Sign in with Microsoft
Sign in or create an account.
You have multiple accounts
Choose the account you want to sign in with.
-
Open File Explorer from the taskbar.
-
Select View > Show > Hidden items.
-
Open File Explorer from the taskbar.
-
Select View > Options > Change folder and search options.
-
Select the View tab and, in Advanced settings, select Show hidden files, folders, and drives and OK.
Need more help?
Want more options?
Explore subscription benefits, browse training courses, learn how to secure your device, and more.
Communities help you ask and answer questions, give feedback, and hear from experts with rich knowledge.
Thank you for your feedback!
×
How to Show Hidden Files on Windows 10 and Windows 7
Many important system files and folders in Windows are hidden, but sometimes you may need to access them. This guide shows how to enable the «Show hidden files, folders, and drives» option in Windows 10 and 7.
The Windows operating system hides many system files and folders to avoid deletion, accidental change, moving, etc. Another reason for hiding files and folders is to make Windows clutter-free. In this way, Microsoft attempts to avoid distracting users with «unnecessary» files by hiding them.
In some cases, users might need to access these hidden files or folders, which is straightforward. Remember, though, that hidden files should generally remain hidden.
Leaving them visible could result in accidental deletion, changes, etc., potentially leading to system instability. If you need to unhide hidden files, we recommend returning them to the hidden state when you are finished.
Video Showing How to View Hidden Files
Table of Contents:
- Introduction
- View Hidden Files in Windows 10
- View Hidden Files in Windows 7
- Video Showing How to View Hidden Files
View Hidden Files in Windows 10
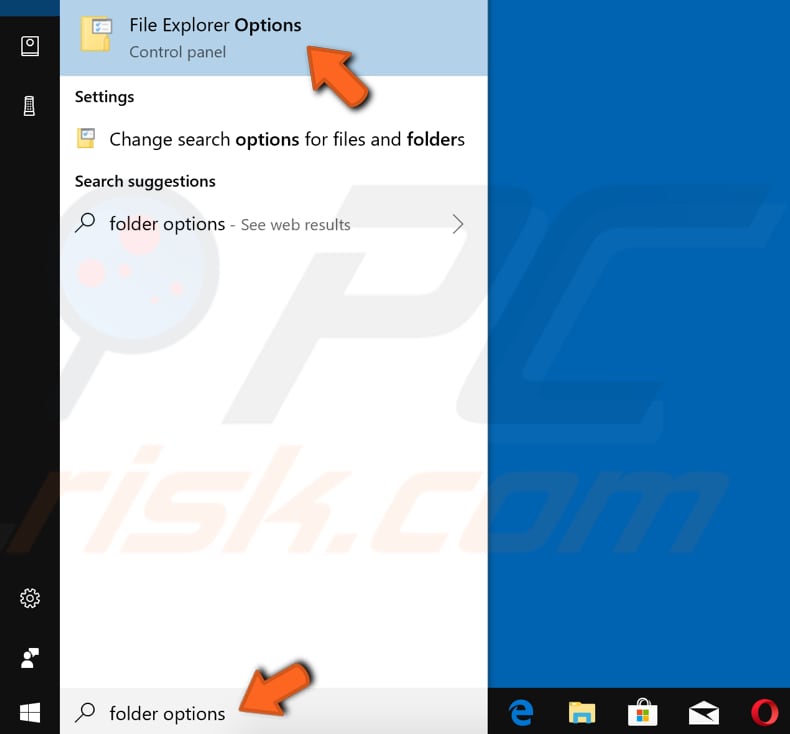
To enable the «Show hidden files» option in Windows 10, type «folder options» or «file explorer options» and click the «File Explorer Options» result.
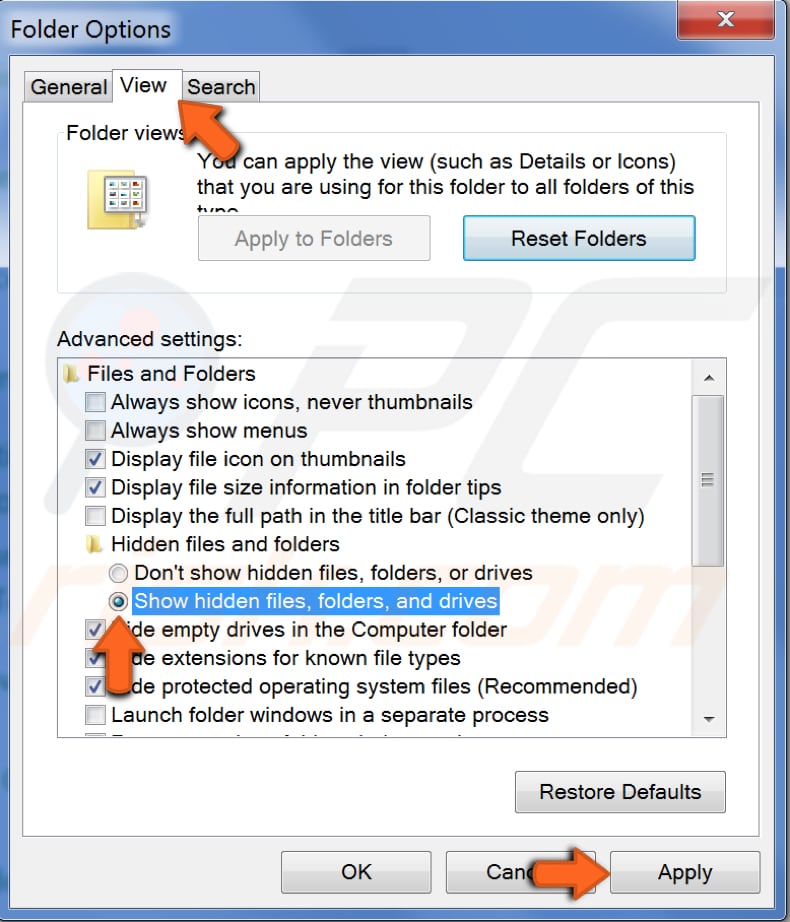
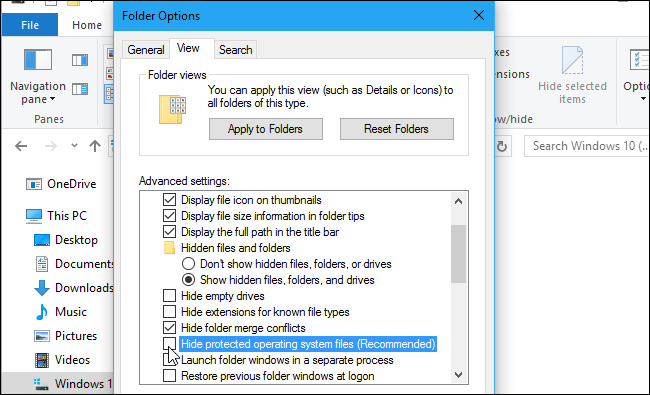
In the File Explorer Options window, find and click the «View» tab. Find the «Show hidden files, folders, and drives» option under Advanced settings. Select it and click «Apply» to save the changes.
Now all hidden files, folders, and drives will be displayed. Once you have finished working with them, we recommend that you re-enable the «Don’t show hidden files, folders, or drives» option.

You can use the Command Prompt and associated commands to view hidden files. Command Prompt is the input field of a text-based user interface screen, a command-line interpreter application available in Windows. This guide describes how to open Command Prompt and the commands used to see hidden files in a particular directory.
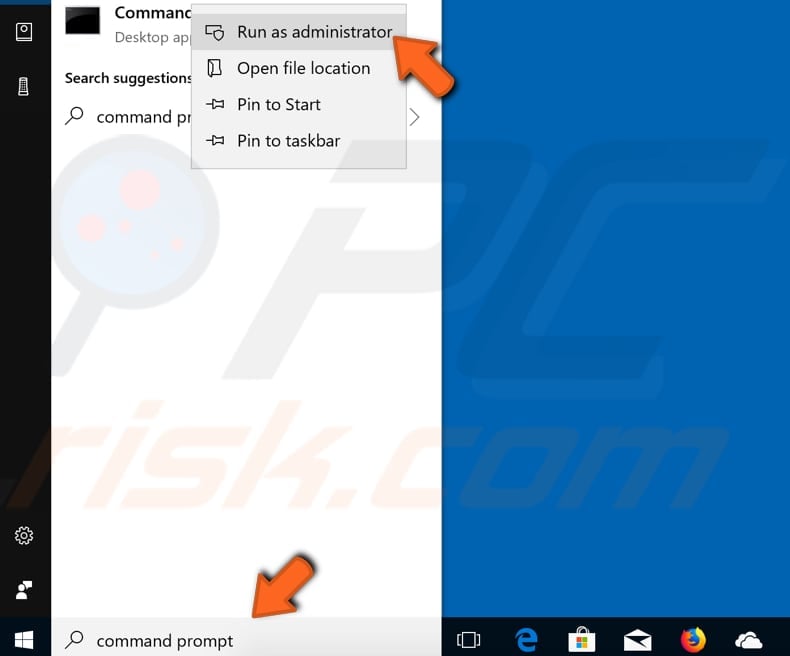
To launch elevated Command Prompt (to run it as administrator), type «command prompt» in Search and right-click the «Command Prompt» result, then select the «Run as administrator» option from the contextual menu.
If you want to see all hidden files and hidden directories in the current directory (the one you have open/currently working with), type the «dir /ah» command and press Enter on your keyboard.

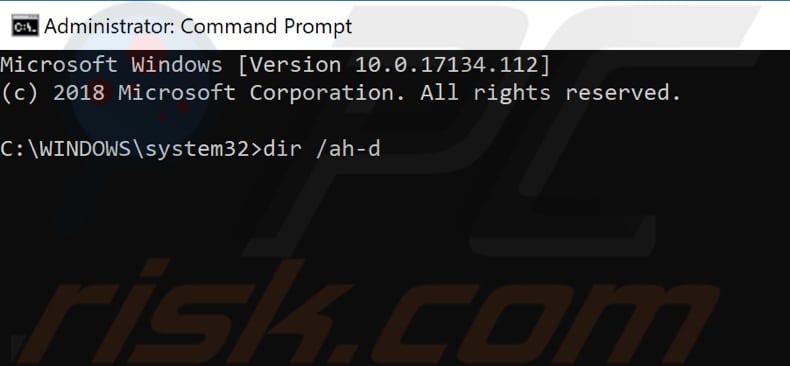
If you want to see all hidden files in the current directory but do not need the hidden subdirectories to be displayed, type the «dir /ah-d» command and press Enter on your keyboard.
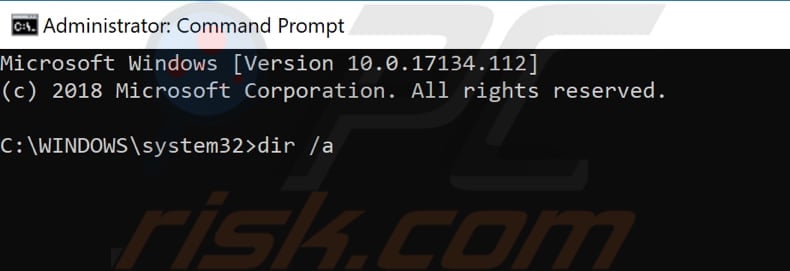
If you want all files and directories, including hidden files and hidden directories of the current directory, to be displayed, then type the «dir /a» command and press Enter on your keyboard.
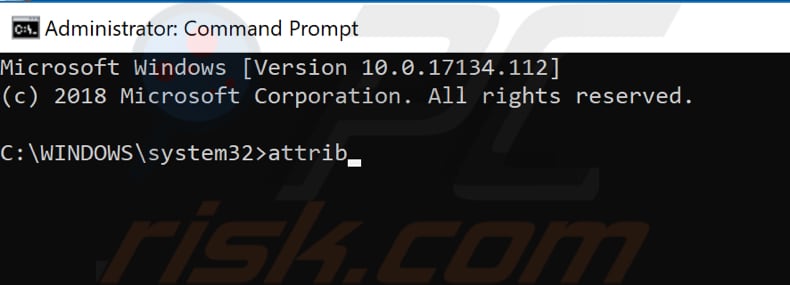
If you type and execute the «attrib» command, you will see all files stored in the current directory with their attributes to the left of the directory path and the filename. Files that have «H» letter next to them will be the hidden files.
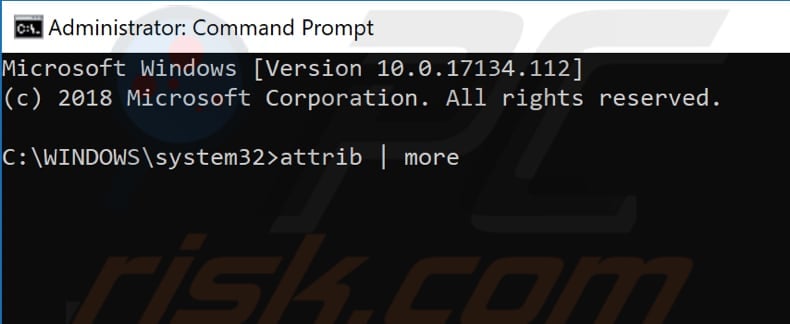
The «attrib | more» command enables you to see more files (if there are too many, and you cannot see all at once).
Now you should know how to enable and disable the «Show hidden files, folders, and drives» option in Windows 10.
[Back to Table of Contents]
View Hidden Files in Windows 7
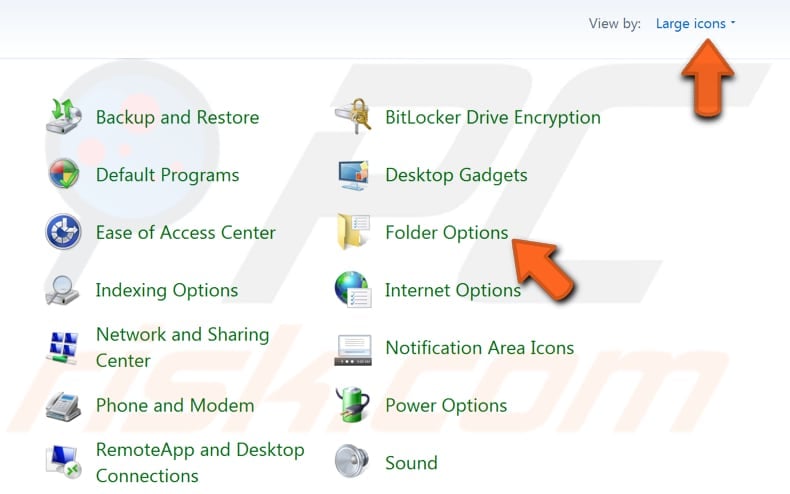
To view hidden files and folders or drives in Windows 7, go to Control Panel — click the «Start» menu and then click the «Control Panel» option.

In Control Panel, find the «Folder Options» and click it. If the Control Panel menu window is displayed differently than shown here, set it to view by «Large icons» in the top-right corner.
In the Folder Options window, find and click the «View» tab, then find the «Show hidden files, folders, and drives» option under Advanced settings. Select it and click «Apply» to save the changes. Now all hidden files, folders, and drives will be displayed.
Once you have finished working with them, we recommend that you re-enable the «Don’t show hidden files, folders, or drives» option.
You can also use Command Prompt commands. The same steps apply to both Windows 10 and Windows 7.
We hope that this guide was helpful and you know more about hidden files and folders, why are they hidden, and how to view them. If you have any questions related to this topic, do not hesitate to leave a comment in the section below.
[Back to Top]
Статья обновлена: 13 июля 2022
ID: 3580
В некоторых случаях вам могут понадобиться файлы и папки, которые по соображениям безопасности могут быть скрыты от просмотра. Проверьте, включен ли на вашем компьютере режим отображения скрытых файлов и папок.
Windows 11
Windows 10
Windows 8, 8.1
Windows 7
Windows Vista
Windows XP
Спасибо за ваш отзыв, вы помогаете нам становиться лучше!
Спасибо за ваш отзыв, вы помогаете нам становиться лучше!
In this post, we will see how to show Hidden Files, Folders & Drives along with Protected operating system files in Windows 11/10/8/7, via File Explorer Options in the Control Panel or by using the Command Prompt and PowerShell.
On most days, you would not want to be bothered by the hidden Windows files on your computer. After all, the last thing that an average Windows user needs is some more data to deal with. On some rare instances though, or if you know what you’re getting yourself into, you may need access to these hidden files to make changes to Windows apps or system settings. These hidden files aren’t readily viewable when you open their parent folder(s) in the File Explorer. Ee will walk you through the steps needed to be taken to show hidden files and folders using the Explorer Options, Windows Command Prompt and the PowerShell, two of the strongest methods for the purpose.
Show Hidden Files & Folders in Windows 11/10 via Explorer Options
You will have to open the Control Panel and then select the File Explorer Options in Windows 11/10. File Explorer Options is referred to as Folder Options in Windows 8.1/7.
To show Hidden Files, Folders & Drives on your Windows 11/10 computer:
- Open File Explorer Options
- Click on the View tab
- Locate Hidden Files & Folders
- Select the Show Hidden Files, Folders and Drives option
- Click on Apply and Exit.
You can also open File Explorer Options in Windows 11 as follows:
1] Launch File Explorer on Windows 11.
2] Click on the three horizontal dots and select Option. This will open the Folder Options window.

3] In the Folder Options window, click on the View tab and select the radio button that says Show hidden files, folders, and drives.

4] Click Apply and then OK.
Alternative method via Explorer Menu bar
In Windows 11, you can open Explorer > View > Show > Select Hidden items.
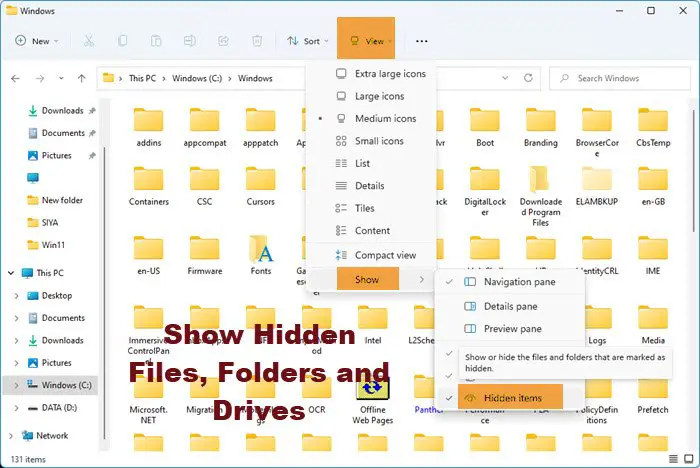
In Windows 10, open Explorer, select the View tab and toggle the Hidden items checkbox to short or hide files and folders.
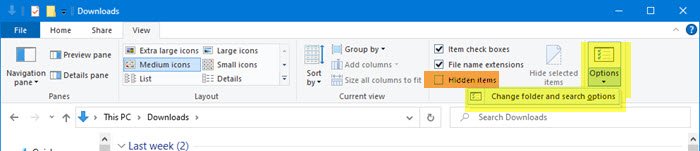
For your information, you can also access the Change folder and search options box from here.
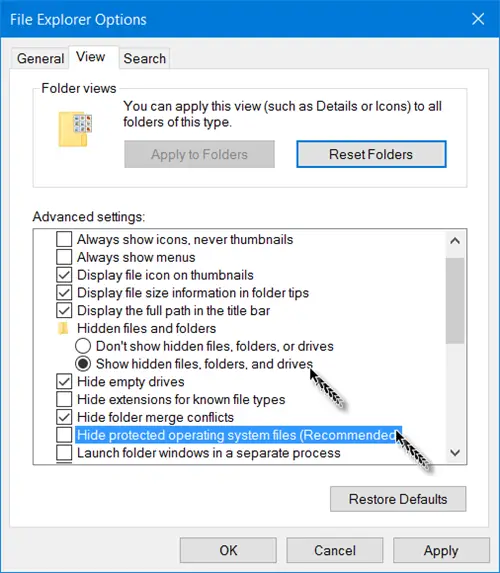
Unhide Protected operating system files
If you wish to unhide and show the Protected operating system files, you need to also uncheck the Hide protected operating system files (Recommended) setting in File Explorer Options, and click Apply.
Show hidden files using Command prompt
The process here is pretty simple. Here are the steps you have to follow:
Open the start command and search for Command Prompt. Select to run it as administrator.
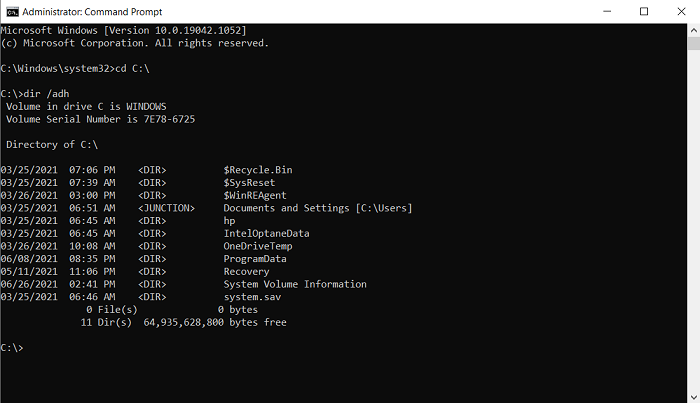
Make a note of the folder in which you want to look for hidden files. For the purposes of this article, we will be using the C:/ drive. Access your drive by using the change directory command cd. Our first command line will look something like
cd C:\
Now, type out the following command line which will show you all the hidden files in the location that you’ve chose
dir /adh
This will show to you all the hidden files, in this case, in the C:/ drive. There are some other keywords that you can use with the dir command if there is some specific information you are looking for. They’re all to be used in a similar manner:
- /a – this will show you only the hidden folders.
- /a:d – this will show you all the directories.
- /a:h – this will show only the hidden files.
- /adh – (The one we’ve used) Gives you all the above information combined.
Let’s now talk about PowerShell and how this process can be replicated there.
Show hidden files using PowerShell
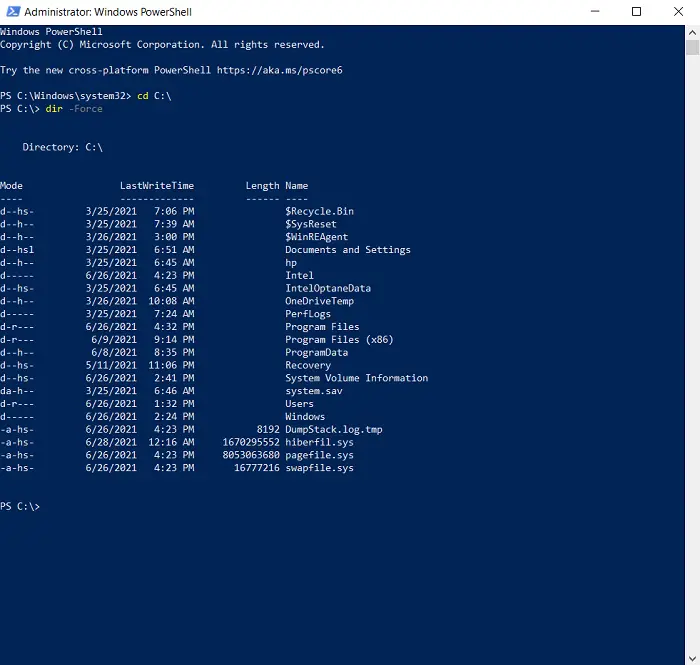
- Open the Start Menu and search for PowerShell, run it as administrator. (You can do the same via the Power User Menu too.)
- The process here is quite similar. Access the location of your choice with the change directory keyword cd. It is used the same way as it was in the Command Prompt.
- Once you’re into the location, type the following command line which will display to you all the hidden files inside it.
dir -Force
- You can browse through the hidden files in a folder inside the drive’s root folder by adding that folder’s name to the cd command. Eg., cd C:\Program Files.
- Once you’re inside this particular folder, type/copy the following command and press enter:
Get-ChildItem -Filter *.* -Recurse -Force -ErrorAction SilentlyContinue | where { $_.Attributes -match “Hidden”}
There is a strong chance that the above command line may return a very high number of hidden files and folders, making it impossible for you to actually read through them.
In that case, you can copy the resultant output and have it saved in a text document by modifying the command line. Simply add a >log.txt to the end of the above Get-ChildItem command and all the data will be saved to a text file named log.txt.
TIP: There is another way! You can use attrib.exe to change File Attributes, and/or show the hidden files.
This post will show you how to make a File or Folder Hidden or Read Only.
If you wish to, you can also list all the hidden files & folders on your Windows computer.
BONUS TIP:
- If you find that the Show Hidden Files, Folders and Drives option is missing, then this registry tweak is sure to help you.
- Alternatively, you could use our freeware FixWin to fix this problem. You will find the fix under its Explorer section.
Learn how to show hidden files in Windows 10….
I could have sworn that I saved these files in this folder! No Kidding! I only accessed the data files the other day!
How many times have you found yourself lamenting these exact words? Too many? Well, here’s something you might not know – those files that seem to have disappeared are hidden somewhere lying pretty as you struggle and cry.
But the good news is that if you use Windows 10, then it’s quite likely that you will recover them. And thanks to the tricks we’ll share below, you will be able to recover those files with ease.
These tricks will also help you find files the next time you feel that you are spending too much time looking for a specific document on your computer.
1. Use Filters
One of the best and the easiest ways for you to access files that are hidden in your computer is by using filters. While typing into the search query or the obvious ‘friendly’ advice – you could just ask Cortana work occasionally, they are frustrating.
No one wants to deal with or has the time to deal with all the random (and even mind-blowing) answers Cortana will give you; ranging from the ones in the local files to the web and every other conceivable location with information about what you are looking.
Thanks to search filters in Windows 10, you could narrow down your results significantly. In case you are wondering, the filters we are talking about are the icons right at the top of your search panel.
Besides the icons, you could also click on the down arrow button that’s at the top-right corner of the search panel. The button gives you access to all the filters on your computer. The best bit about these filters is that you won’t need to look at your nails or scroll down your Instagram feed as you wait for the results.
As long as you know exactly what you are searching for, you’ll only need to type in the filter name into the search box.
So, enter the filter name, this could be Music, Apps, Photos, Folders, Documents, Web, Settings, or Video, and after the filter name (file location) put in a full colon before you enter your search terms.
2. Quick Calculations
If you are unable to locate your calculator app, for whatever reason, you could still locate the file or find an alternative using the quick calculations options.
How does it work? Instead of searching for the calculator app, all you need to do is to input the equation into your search box (on your taskbar). Doing this gives you the right answer to your query, and on to of this, you will get an online calculator thanks to Bing.
3. Using the Settings App
While Windows 10 still has the Control Panel, it now has a new and improved feature that will make your search for the hidden files a lot easier – Settings app. Even though this setting brings about a confusing setup, it offers a lot of help in times of need.
If you are searching for a hidden file in the Setting App, you need to first click on the search box located on the taskbar – this application’s folder has a black-and-white icon. The Control Panel is the one with the colored icon.
Though these two features confuse new users, it’s important to note that the Settings app will show results from your Control Panel, on top of the results from this Settings app. Running a search for the hidden or missing file should be an effortless process thanks to the Settings app.
4. Saving Searches
What better way to ensure fast accessibility to your files than to save the files? Saving your ‘lost and found’ files might not be the first thing that crosses your mind when you search for a hidden file, but it could be what saves you time in the future.
This trick is particularly handy if you find that you are always looking for the same file all the time, day after day or week after week. To save the file, first, enter your search terms into Windows’ explorer (search box) and then click on your Search tab – it is on the ribbon running along the top of the window.
From here, you could tweak your search parameters according to file size, date, or file type, etc. Once you have the parameters set, click on the Save Search option. To ensure that you remember the file’s location, make sure that you give the search query a specific name.
When you do this, you will find your saved searches in your Searches folder, just the way the bookmarked pages are in the Bookmark Manager. Note that this option allowing you to save your searches only works when you are running your searches on the web.
5. Searching File Explorer
File Explorer is an excellent tool for locating hidden files. The File Explorer allows you to run searches from the top-right corner. It will also make it possible for you to run searches for the directory selected on the left panel/ left side of the File Explorer window.
While the results from this search may take longer than anticipated, especially when you are running a large directory, you will get results. To refine your searches from the file explorer, ensure that the File Explorer’s menu bar is expanded.
To expand, toggle your menu bar by clicking on the ^ located on the upper-right section of this window. Next, click on the View tab and then enable the Hidden Items option. For more options in the File Explorer, click on Options, then select View.
6. Control Panel
Go to your computer’s control panel then choose either the small or the large icons from the window’s view menu (if neither of the view options is selected).

Now select the File Explorer Options (also called the Folder options) and then select to open your View tab.
In the View tab, click on Show Hidden Files, Drives, and Folders. Now uncheck the option named Hide protected Operating System Files. On the prompt that pops up, confirm your actions by selecting Yes. And then click on OK.
7. Using the Registry
The other way of accessing hidden files is by using your Windows 10 Registry.
To get started, hold down on the Windows and R keys (simultaneously) to open the Run command/ Dialog box. In the dialog box, type in Regedit and then press enter. From the window that opens, navigate to:
HKEY_CURRENT_USER > Software > Microsoft > Windows > CurrentVersion > Explorer > Advanced.
Now that you are in the Advanced section, set your value for the Hidden option to 1 (this shows hidden folders, files, and drives); and 2 for the window NOT to show the hidden folders, files or drives.
Next set your value for the ShowSuperHidden files to 1 – doing this reveals the option of showing all protected files in your operating system. You could disable this option by setting the value to 2. 2 = Don’t show the protected operating system files.
How to Access Your AppData without having to show your Hidden Files
While the steps above work great in finding hidden files and folder in your Windows 10 operating system, they might not be the best options when you are only looking for files in your AppData folder under your user account.
In such cases, you could access the file by following these steps:
Open the Run command by pressing the Windows + R keys simultaneously.
In the window that appears, type in %appdata% then click OK. These actions will open File Explorer Window. This new window will take you to a new folder, the Roaming Folder. The Roaming folder is the one for your user account’s AppData Folder in which most of the application-specific files are stored.
Using the address bar of the File Explorer, you could also access the Local folder in your AppData.
Dealing with Protected Operating System Files
Besides the use of the ‘regular’ hidden files/ folders for Windows, Microsoft will also protect your important files by adding an extra layer of protection. Knowing that the improper modification of the files could prevent your Windows system from loading, these files will be hidden behind another curtain, in an extra layer of the hidden files for extra security.
The only way of accessing such files is by unchecking the Hide protected Operating Systems Files option. You should, however, make this move with extra care – these are files you don’t want to lose.
It’s important to note that Microsoft Windows is one of the few operating systems that gives its users access to just about every area of its operating system. However, Microsoft knows better – it knows that there are files you cannot afford to lose.
Therefore, it’s put in place systems to prevent any inadvertent removal or modification of the critical system files. These files are hidden from the File Explorer’s view, which is why you will have to look for them deep in your PC.
What this means is that if you are an average Windows user, you will not be able to open the files/ folders even though they are lying in there, somewhere.
The only time you might access these files, albeit accidentally, is if you run specific troubleshooting efforts which need temporary access to the hidden files. Windows works on and prefers keeping these files hidden.
Therefore, by disabling the Hidden options for protected files, you choose to risk exposure and even possible loss or damage of your system’s critical files. The loss or modification of these data files often results in the irreversible damage of the Windows operating system.
An example of these hidden files is the AppData file which is in your Users folder in Local Disk C – you will only see the folder under This PC > C: > Users > [Your User Account], but you cannot find it in your File Explorer window.
Tips for File Management in Windows 10
- Take advantage of the Custom Quick Access View – you could add or remove folders to this section. You could also Pin files/ folders to the Quick Access application
- Turning the ribbon On and Off – you could customize this option in the File Explorer window.
- Showing and Hiding File Extensions – You could turn the file extensions On or Off with ease by clicking on your View tab located at the top of your display in the View ribbon. Here, one of the extensions that you find is the File Name Extension. Now click on that box next to the file, and this will enable the check mark, revealing the extensions. Unchecking it will hide the extensions.
- Launch the File Explorer using the This PC option, instead of the Quick Access window. To do this, go to File Explorer and click on Options under the View menu. Go to Open File Explorer under the Folder Options, and then select the pull-down menu from the settings – this allows the change from Quick Access to This PC.