In Windows 10, you can share your printer with many PCs on your network. To share a printer from the PC that the printer is connected to (the primary PC) with secondary PCs that the printer is not connected to, you must set up sharing settings for the printer, connect the printer to the primary PC (either wirelessly or by using a USB cable), and then turn on the printer. Also make sure the primary PC is turned on, connected to the printer, and connected to the network.
Note: When sharing a printer, make sure that sharing settings are set up on the primary and secondary PCs. Also, make sure you know the name of the primary PC. For more info, see the Set up Sharing settings and Find your PC name sections at the end of this topic.
Share the printer on the primary PC
There are two ways to share your printer: using Settings or Control Panel.
Share your printer using Settings
-
Select the Start button, then select Settings > Devices > Printers & scanners.
-
Choose the printer you want to share, then select Manage.
-
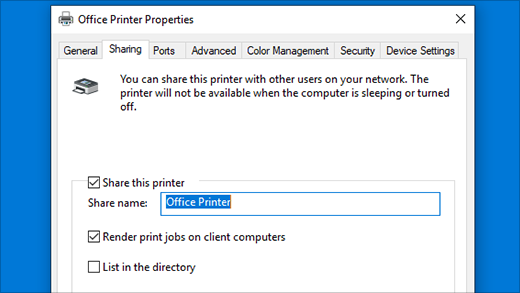
Select Printer Properties, then choose the Sharing tab.
-
On the Sharing tab, select Share this printer.
-
If you want, edit the share name of the printer. You’ll use this name to connect to the printer from a secondary PC.
Share your printer using Control Panel
-
In the search box on the taskbar, type control panel and then select Control Panel.
-
Under Hardware and Sound, select View devices and printers.
-
Select and hold (or right-click) the printer you want to share, select Printer properties, and then choose the Sharing tab.
-
On the Sharing tab, select Share this printer.
-
If you want, edit the share name of the printer. You’ll use this name to connect to the printer from a secondary PC.
-
Select the Start button, then select Settings > Devices > Printers & scanners.
-
Choose the printer you want to share, then select Manage.
-
Select Printer Properties, then choose the Sharing tab.
-
On the Sharing tab, select Share this printer.
-
If you want, edit the Share name of the printer. You’ll use this name to connect to the printer from a secondary PC.

-
In the search box on the taskbar, type control panel and then select Control Panel.
-
Under Hardware and Sound, select View devices and printers.
-
Select and hold (or right-click) the printer you want to share, select Printer properties, and then choose the Sharing tab.
-
On the Sharing tab, select Share this printer.
-
If you want, edit the share name of the printer. You’ll use this name to connect to the printer from a secondary PC.
Connect the shared printer to another PC
There are two ways to connect a shared printer to another PC: using Settings or Control Panel.
-
Select the Start button, then select Settings > Devices > Printers & scanners.
-
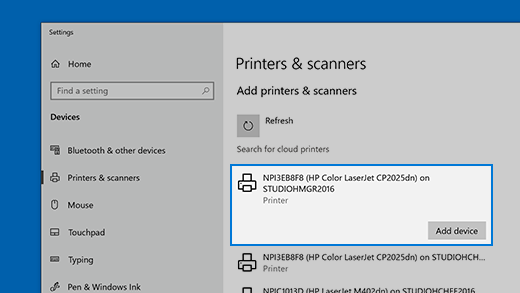
Under Add printers & scanners, select Add a printer or scanner.
-
Choose the printer you want, and then select Add Device.
-
If you don’t see the printer you want, select The printer that I want isn’t listed.
-
In the Add printer dialog box, select Select a shared printer by name, and then enter the computer or device name of the primary PC and the share name of the printer using one of these formats:
-
\\computername\printername
-
http://computername/printername/.printer
-
-
When prompted to install the printer driver, select Next to complete the installation.
For more info about the computer or device name, see the Find your PC name section in this topic. By default, you need the user name and password of the primary PC to access the printer.
-
In the search box on the taskbar, type control panel and then select Control Panel.
-
Under Hardware and Sound, select View devices and printers, and then select Add a printer.
-
Select the printer you want, select Next. When prompted, install the printer driver.
-
If you don’t see the printer you want, select The printer that I want isn’t listed.
-
In the Add a device dialog box, select Select a shared printer by name, and then enter the computer or device name of the primary PC and the share name of the printer using one of these formats:
-
\\computername\printername
-
http://computername/printername/.printer
-
-
When prompted to install the printer driver, select Next to complete the installation.
For more info about the computer or device name, see the Find your PC name section in this topic. By default, you need the user name and password of the primary PC to access the printer.
Set up Sharing settings
The settings you use to share devices is often turned on by default. If not, follow the steps in this section to turn settings on using settings or Control Panel.
-
Select the Start button, then select Settings > Network & Internet > Wi-Fi.
-
Under Related settings, select Change advanced sharing options.
-
In the Advanced sharing settings dialog box, expand the Private section. Next, under Network discovery, select Turn on network discovery.
-
Under File and printer sharing, select Turn on file and printer sharing.
-
In the search box on the taskbar, type control panel and then select Control Panel.
-
Select Network and Internet > Network and Sharing Center > Change advanced sharing settings.
-
In the Advanced sharing settings dialog box, expand the Private section. Next, under Network discovery, select Turn on network discovery.
-
Under File and printer sharing, select Turn on file and printer sharing.
Find your PC name
You’ll need the name of your primary PC, also called the computer name or device name, to connect the secondary PC to the printer.
-
In the search box on the taskbar, type computer name.
-
Select View your PC name.
-
Under Device name, you’ll see the PC (computer) name.
-
In the search box on the taskbar, type control panel and then select Control Panel.
-
Select System and Security > System > See the name of this computer.
-
Under Computer name, you’ll see the PC (computer) name.
Need more help?
Want more options?
Explore subscription benefits, browse training courses, learn how to secure your device, and more.
Communities help you ask and answer questions, give feedback, and hear from experts with rich knowledge.
Find solutions to common problems or get help from a support agent.
With Windows 10, you can print to a shared printer from any device on your network.
In Windows 10, you can take a printer, plug it into one computer, and then print it to another computer. It’s all made possible because of network printer sharing. We covered this before in our article on sharing printers in Windows 7, but some of the steps and screens have changed slightly in Windows 10. Read on for more details.
Sharing Printers over the Network in Windows 10
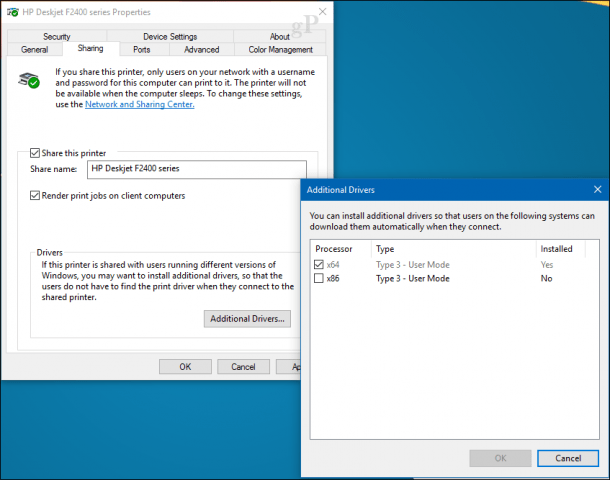
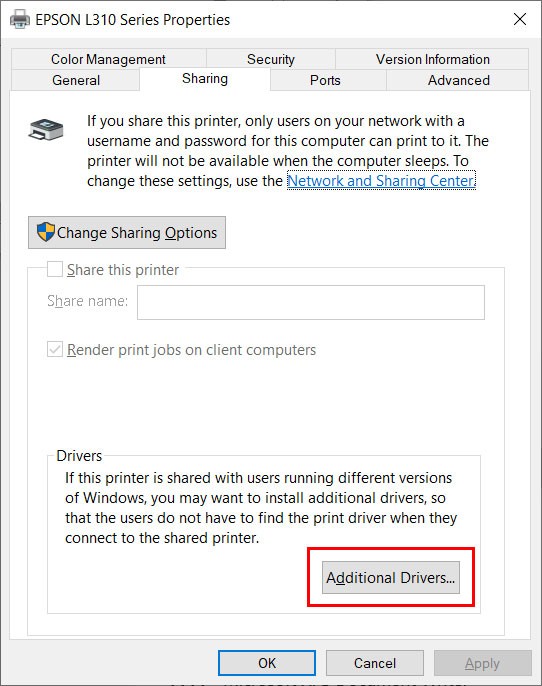
Before you can share a printer, it must first be set up, connected, and powered on. Click Start > Settings > Devices, then open the Devices and Printers link. Right-click your printer, then click Printer properties.
Click Start > Settings > Devices, then open the Devices and Printers link. Right-click your printer, then click Printer properties.

Select the Sharing tab, then check the box to share your printer.
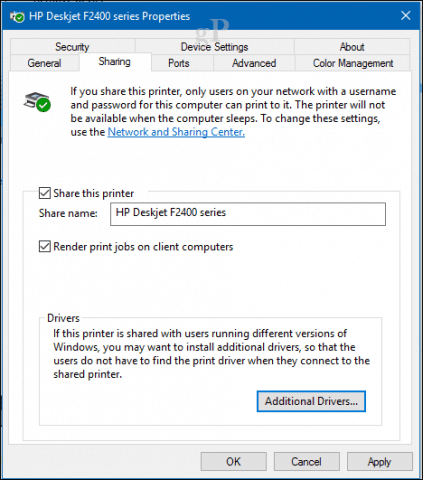
Users should consider that if you are sharing a printer with multiple devices running a mixture of Windows client architectures – 32 or 64 bit-you should enable the “Render print jobs on client computers” option. This will ensure other users can easily install the printer when connecting over the network.
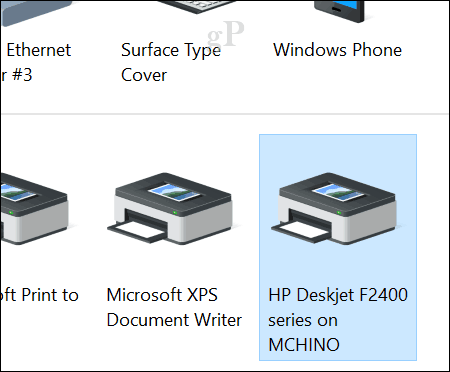
Connect to a Windows 10 Shared Printer
After setting up your shared printer, you can connect to it multiple ways. The first method is from within Devices and Printer. Click the Add Printer button, then click the link, The printer that I want isn’t listed. Choose the Select a shared printer by name radio box, browse to the printer on your network, and click open.

You will be prompted to install the driver. Click Next to complete the installation of the printer.

That’s it! The printer will now show up in Devices and printers as a local device.
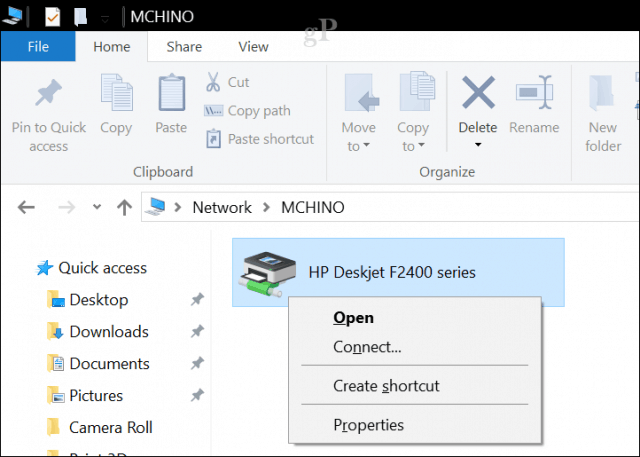
Another way you can connect to a shared network printer is from within File Explorer. Open the Network folder, browse the shared printer’s computer, right-click it, then click Connect.
Conclusion
And there you have it. Sharing printers over a Windows 10 network is a great way to hook up multiple devices to the same printer. This lets you print files and documents without emailing them between devices. This is just one of the ways you can easily share files, storage, and printers in Windows 10.
Have a question about printer shares on the network? Ask in the comments below or visit our Windows 10 forum.
![]()
The use of printers together is commonly used in offices and at home. The main requirement for printers to be used together is to connect between the printer and the user’s computer in a wired LAN or WIFI network.
By sharing a printer, one printer will be able to be used by many computers/laptops. But, how? The following article explains in full how to share the printer thoroughly!!!
Types of printers according to the connector model:
- Printer USB
Generally, printers that we meet have a USB connection to connect with computers, such as Epson L series inkjet printers, Canon pixma series and others. - Printers with LAN connectors (RJ45)
Printers with this feature are usually present in medium-high end class printers. To connect to this type of printer network can already be directly connected to the network through the RJ45 port. Examples of this model such as hp Lasejet P4515 printer, HP Color LaserJet MFP E77822 and others. - Printer with Wifi connection
For this model, can connect to the network wirelessly. Printer models that have features like this such as Epson L3150 WiFi All in One Printer.
Actually, there are still some other connection models, such as LPT ports, Bluetooth, and others. But this model we rarely use.

1. Installation of printer drivers on the server
- Install all the cables according to the printer installation instructions in the manual. Don’t turn on the printer.
- Use the driver of the printer’s built-in CD or download it from its official website. Install the driver on the computer that serves as a server.
- Turn on the printer if the installation process asks to turn on or the driver installation process has been completed.
Note:
If the server is using windows x86 and a client is using windows x64, add the x64 driver to the server. And vice versa. If you don’t add, clients who use a different version of Windows with the server won’t be able to use the printer.
Populer Post
Other Interesting Articles
2. Sharing printers on servers
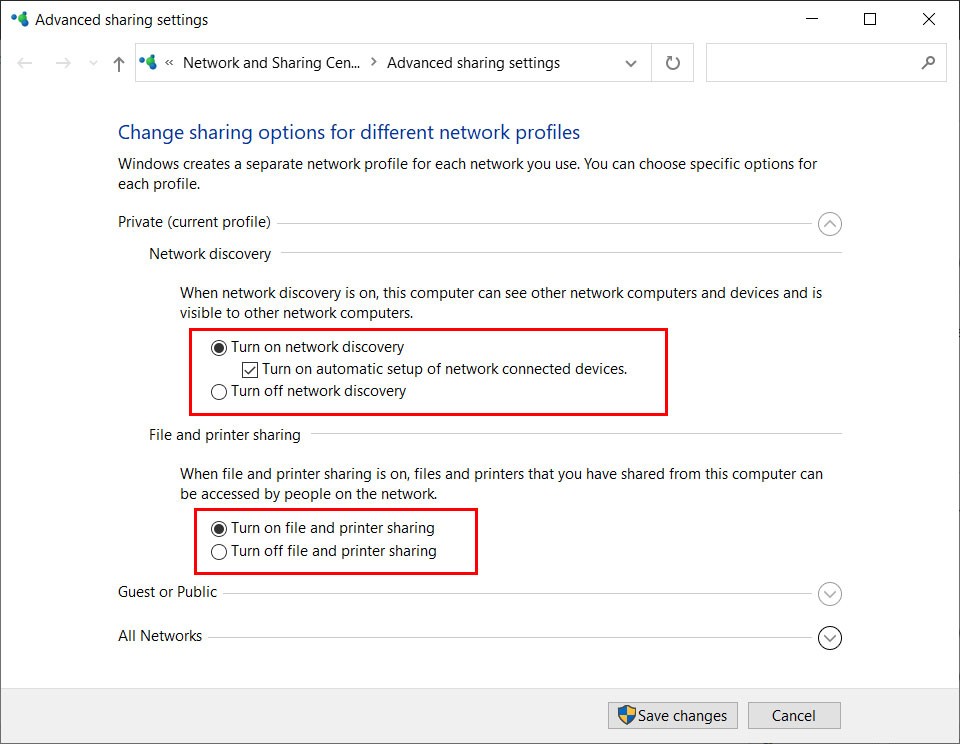
- Open Control PanelNetwork and InternetNetwork and Sharing CenterAdvanced sharing settings.
- Enable Network Discovery and File and Printer Sharing
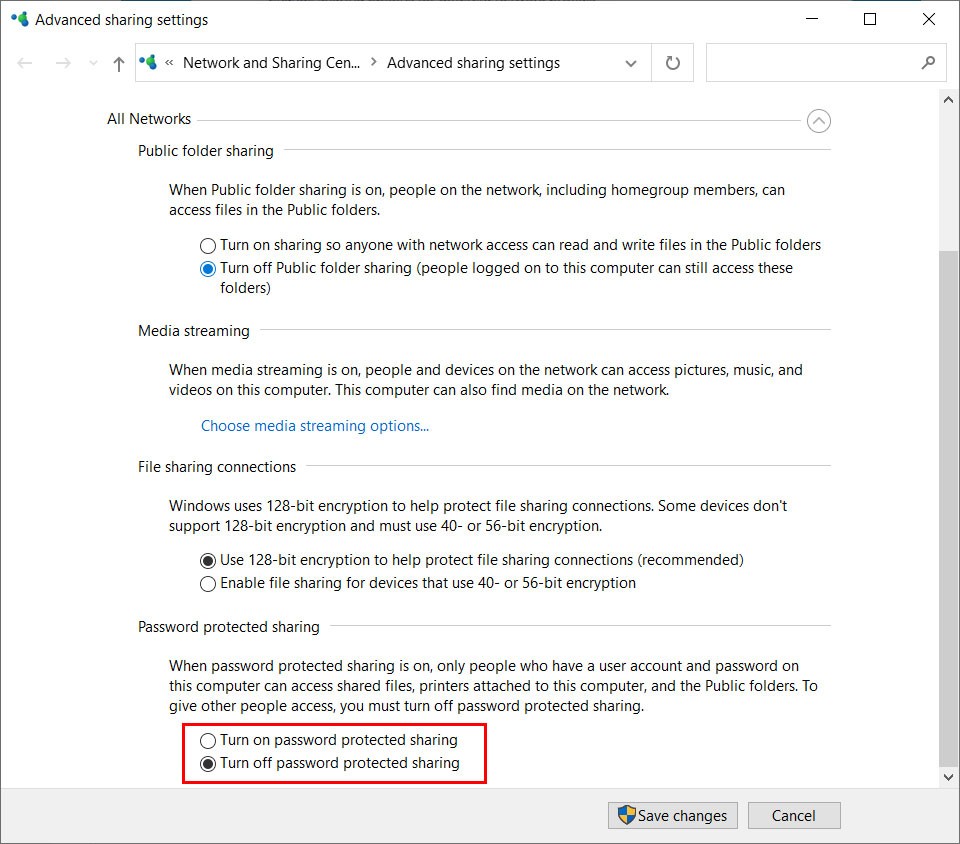
- Turn off Password Protected Sharing on All Networks
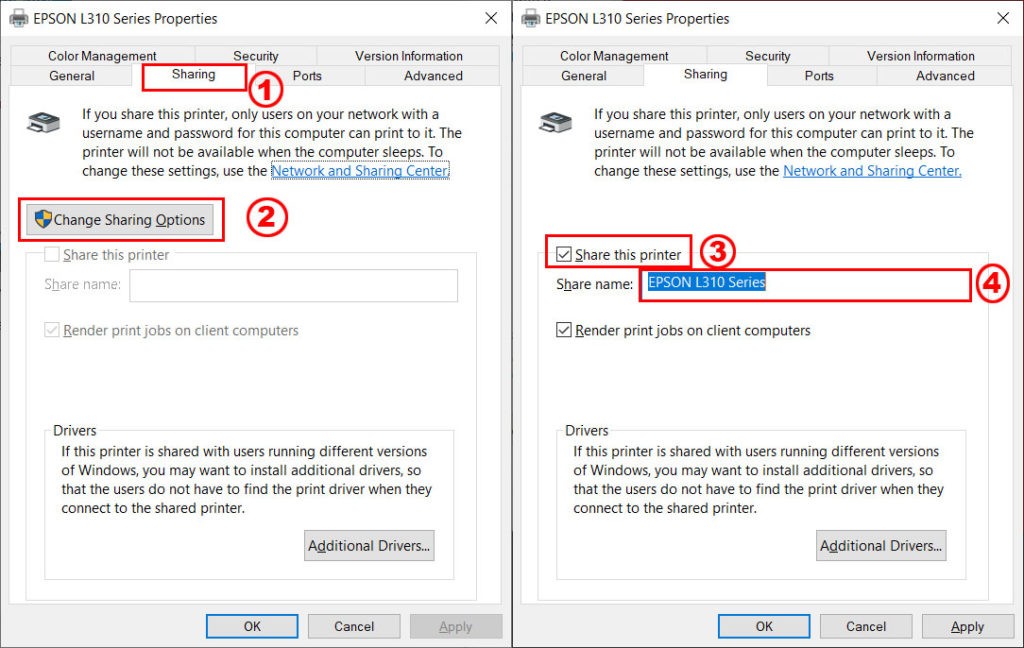
- Open the Control PanelHardware and SoundDevices and Printers, select the printer to disharing, then right-click to select Printer properties
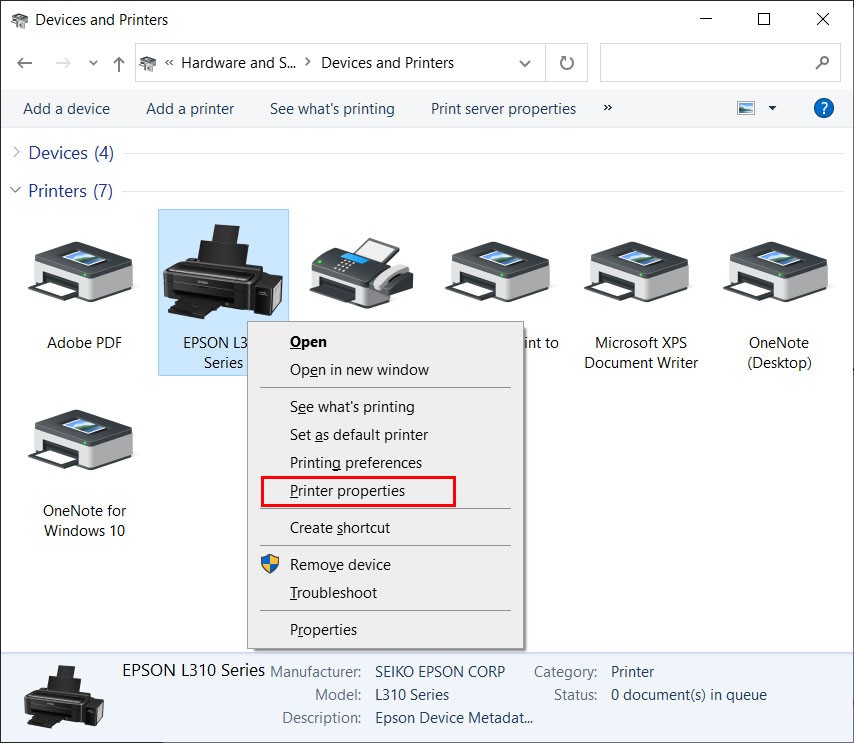
- Open the Sharing tab (1), when the sharing option is off click Change Sharing Option (2).
- Click Share this printer (3) and change the share name (4) of the printer or leave it to default.
3. Connect Client with server printer
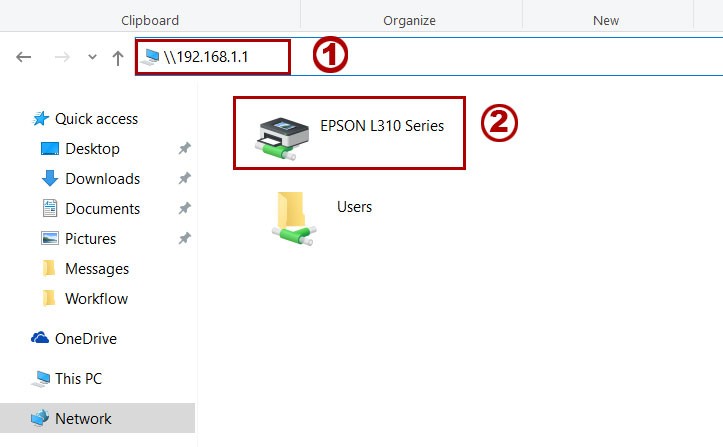
- Open Explorer, type the ip address or name of the server computer (1). For example: “192.168.1.1” or “server-pc”.
- All files and printers will appear. Then double click the printer (2). Wait and follow all the process until it’s over.
- Sharing printer is complete and ready to use.
- The disadvantage of sharing this model is that the server computer must be on in order for the printer sharing to run. If the server computer is off, printer sharing cannot be used.

- Connect the printer with a local LAN network.
- Setting the ip printer manually, if in the network there is no router (DHCP Server). Ip printers and computers must be in one subnet, for example: 192.168.1. xxx
- Click the windows start icon and type add printer. Then select Add a printer or scanner.
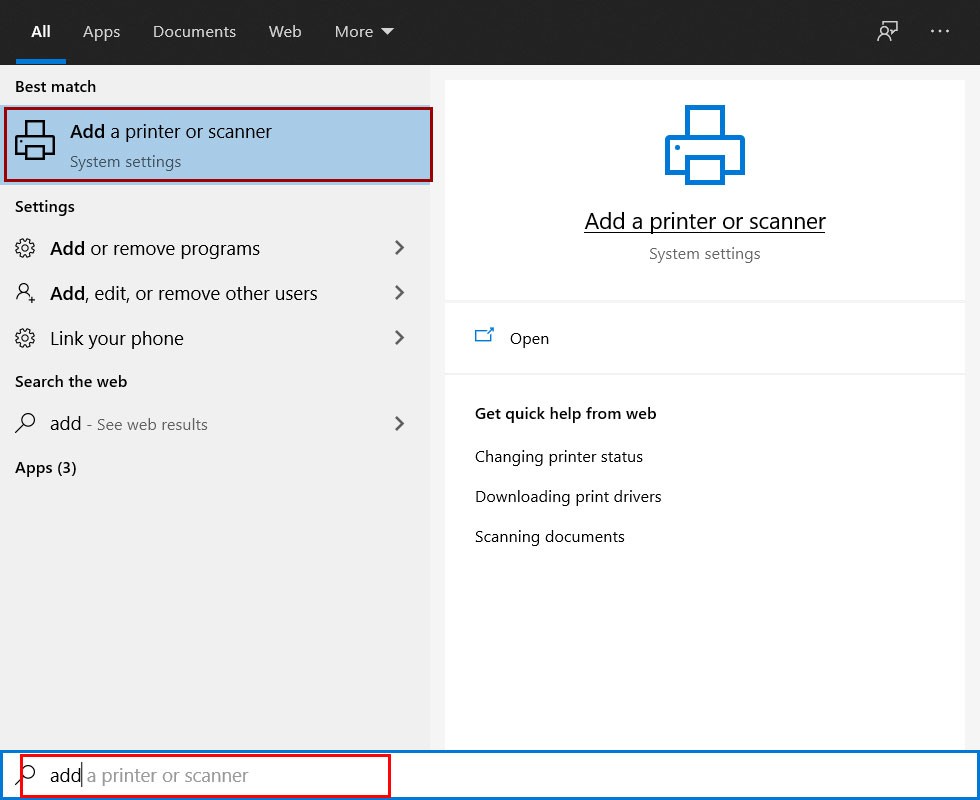
- Click Add a printer or scannner
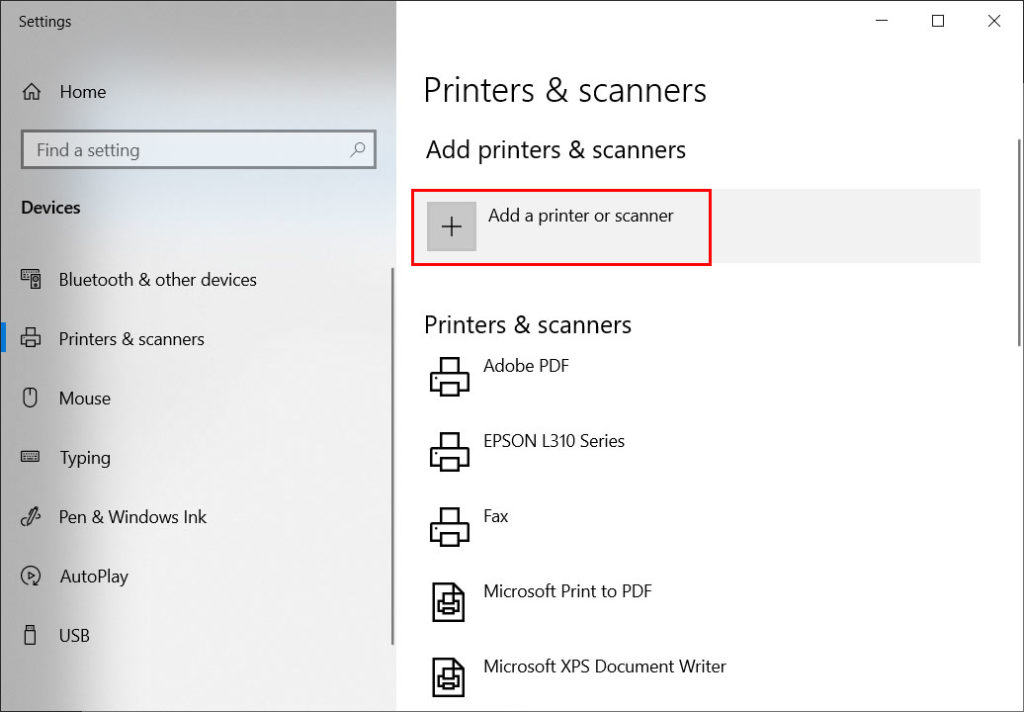
- Then select the printer from the list and click Next, follow all the processes until they are complete.
- The printer is ready to use.

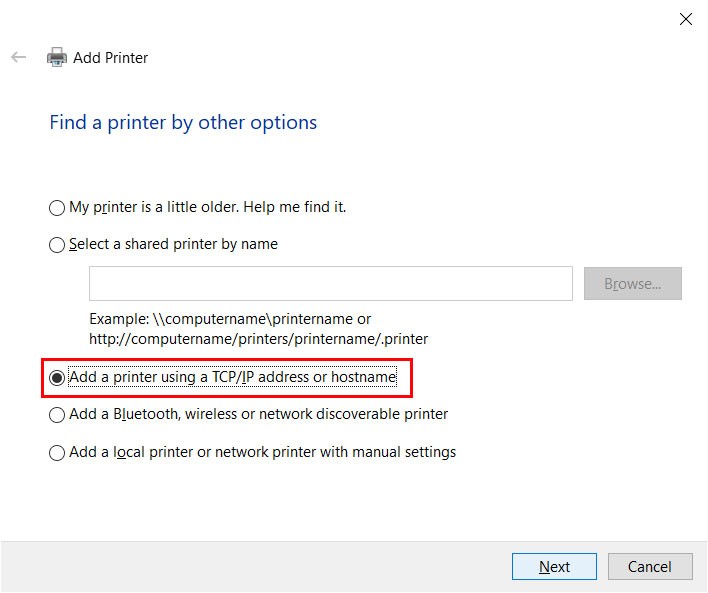
- If the printer does not appear on the list, click The printer that Iwant isn’t listed.
- It will then appear like the image below and plih Add a printer using TCP/IP
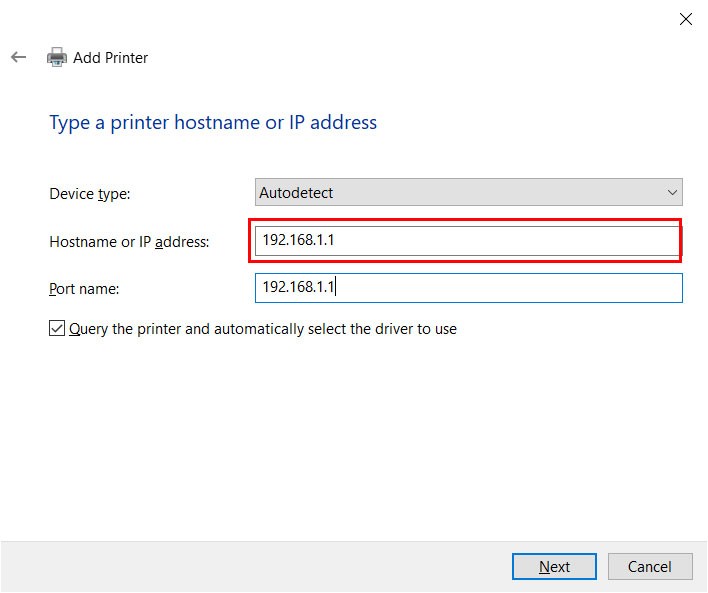
- Fill in the printer’s IP address or printer name.
- Then click Next and follow the process until it’s done.
If there are still obstacles or problems in sharing the printer, please just send a message in the comments field.
May it be useful

If you want to know how to share usb printer over network on Windows 11, read this post. In Windows 11, you can share a printer connected to your computer with other devices on the same network.
Knowing how to share a printer via network in Windows 11 is very convenient for home or business users who only have one printer for printing documents.
In this post, we will guide you through the necessary steps to know how to share printer on the network in Windows 11.
How to share a printer in windows 11
Note: remember to connect the printer to the main computer and leave it on during the sharing process.
To share USB printer on the network with Windows 11, follow the steps below:
- Open Settings.
- Select Bluetooth and Devices.
- Click Printers and Scanners.

4. Click on the printer that will be shared on the network.

5. Click Printer Properties.

- Click the Sharing tab.
- Click the Change Sharing Options button.

8. Check the Share this printer option.

9. Click OK.
After following the steps above, Windows 11 will make the printer available on the network to print documents from other devices.
Now, go to the other computer to add the shared printer on the network.
How to Add Printer on Windows 11 Computer
To add printer in Windows 11, follow the steps below:
- Open Settings.
- Click Bluetooth & Devices.
- Select Printers and Scanners.
4. Click the Add device button.

- Choose the printer you want to add.
- Select Add Device.
Note: If you get a message that “The printer I want is not listed”, click Add manually as highlighted in the section below.

7. Check Select a shared printer by name option.
Tip: use one of the address templates in the image by entering your main computer name and printer name.

After following the steps above, the system will install printer in Windows 11.
Summary
Learn how to share a printer with other PCs on the Windows 11 network.
So, follow the steps above and tell us in the comments if you were able to share printer via USB in Windows 11.
This post shows students and new users steps to share a printer in Windows 11. In Windows 11, you can add a new printer and share it with others on the same network, whether at home or in the office.
There are two methods one can use to share a printer. If you have a network printer and are connected to your network via a router or switch, then all PCs should be able to connect to the printer and add it individually directly.
However, if the printer is not a network printer, but is attached or installed directly to one PC in the home, then you can share it on the PC it’s connected to with other PCs in the home or office. For others to add and print to the printer, ensure the printer is connected to the primary PC wirelessly or by using a USB cable and then turn on the printer.
Also, ensure the primary PC is turned on, connected to the printer, and connected to the network.
Once all the requirements are checked above, use the steps below to share the printer so others can print to it.
To get started with sharing printers on Windows 11, follow the steps below.
How to share a printer in Windows 11
Again, one can share a printer connected to a PC with other users in a home network or office. You’ll need to know the name of the primary PC ( the PC the printer is connected to).
It should be installed and connected to the primary PC to share a printer. If you haven’t installed the printer, use the post below to learn how to add a printer on Windows 11.
How to add a printer on Windows 11
Once the printer is installed and ready, use the steps below to share it with others.
Windows 11 has a centralized location for the majority of its settings. Everything can be done, from system configurations to creating new users and updating Windows from its System Settings pane.
To get to System Settings, you can use the Windows key + I shortcut or click on Start ==> Settings, as shown in the image below:

Alternatively, you can use the search box on the taskbar and search for Settings. Then select to open it.
Windows Settings pane should look similar to the image below. In Windows Settings, click Bluetooth & devices, then select Printers & scanners on the right pane of your screen shown in the image below.

Next, click on the tile of the printer you want to share. If you have multiple printers installed on your PC, they should all be listed on this page.

Once the printer detail pane opens, select the Printer Properties tile as highlighted below.

Click the Change Sharing option under the Sharing tab on the pop-up windows, as highlighted below.

Finally, check the box next to Share this printer to share the printer. In the Share name box, type in a shared name that other PCs will see when connecting to the printer. The name can be descriptive to identify the particular printer.

If you want, edit the share name of the printer. You’ll use this name to connect to the printer from a secondary PC.
The printer should be shared and ready for other PCs to connect and add it.
How to connect to a shared printer on Windows 11
Now that the printer is shared above, if you want to print to it from another PC in the same network, use the steps below.
Read this post below to learn how to add a printer on Windows 11
How to add a printer on Windows 11
When adding a shared printer on another PC,
- If you don’t see the printer you want, select The printer that I want isn't listed
- In the Add printer dialog box, select Select a shared printer by name, and then enter the computer or device name of the primary PC and the share name of the printer using one of these formats:
- \\computername\printername
- http://computername/printername/.printer
- When prompted to install the printer driver, select Next to complete the installation.

By default, you need the username and password of the primary PC to access the printer.
Once all is connected and added, you can print to the printer from the secondary PCs on your network.
That should do it!
Conclusion:
This post showed you how to share a printer on Windows 11 and connect to a shared printer. Please use the comment form below if you find any errors above or have something to add.