The latest Windows versions include a built-in SSH server and client that are based on OpenSSH. This means now you can remotely connect to Windows 10/11 or Windows Server 2022/2019 computer using any SSH client, similar to Linux distros. In this article, we’ll show you how to configure OpenSSH on Windows 10 and Windows 11, and connect to it using Putty or any other SSH client.
OpenSSH is an open-source, cross-platform version of Secure Shell (SSH) that is used by Linux users for a long time. This project is currently ported to Windows and can be used as an SSH server on almost any version of Windows.
How to Install SSH Server on Windows 10 or 11
Starting with Windows 10 build 1809, OpenSSH Server is included in all Windows operating system images.
You can enable the OpenSSH server in Windows 10 or 11 through the graphical Settings panel:
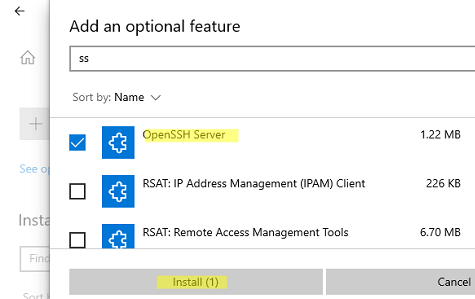
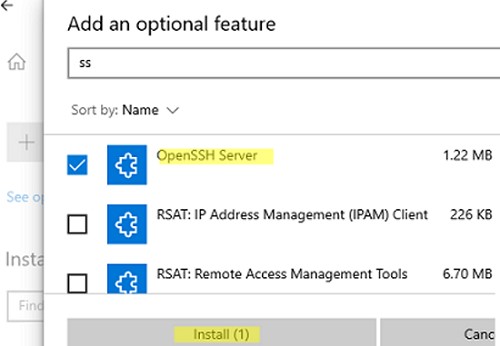
- Go to Settings > Apps > Apps and features > Optional features (or run the command ms-settings:appsfeatures);

- Click Add a feature, select OpenSSH Server (OpenSSH-based secure shell (SSH) server, for secure key management and access from remote machines), and click Install.

- Wait for the OpenSSH server installation to complete.


You can also install the sshd server using PowerShell:
Add-WindowsCapability -Online -Name OpenSSH.Server*

Or using DISM:
dism /Online /Add-Capability /CapabilityName:OpenSSH.Server~~~~0.0.1.0
If you want to make sure the OpenSSH server is installed, run the following PS command:
Get-WindowsCapability -Online | ? Name -like 'OpenSSH.Server*'
Name : OpenSSH.Server~~~~0.0.1.0
State : Installed

OpenSSH Server on Windows delivered as a Feature on Demand (FoD). This means that Windows does not store the binaries for OpenSSH installation locally. During installation of optional features, Windows downloads feature files from Microsoft Update servers. If your computer is located on an offline environment (not connected to the Internet), you can install OpenSSH Server from an offline FoD ISO image:
- You can download the FoD ISO image for your version of Windows from the Volume Licensing Service Centre (VLSC) or from My Visual Studio.
- Mount the FoD ISO media to a virtual DVD drive in Windows;
- Install the OpenSSH.Server with the command:
Add-WindowsCapability -online -name OpenSSH.Server~~~~0.0.1.0 -source -Source "E:\" -LimitAccess
Use the following PowerShell command to uninstall the SSH server:
Remove-WindowsCapability -Online -Name OpenSSH.Server~~~~0.0.1.0
Note. On earlier versions of Windows (prior to Windows 10 1809), you can manually install the Win32-OpenSSH port for Windows from the GitHub repository.
The OpenSSH binary files are located in the C:\Windows\System32\OpenSSH\ folder.

This path is also added to the Path environment variable in Windows:
$Env:Path

How to Enable and Configure SSH Server on Windows
Check the status of ssh-agent and sshd services using the PowerShell Get-Service command:
Get-Service -Name *ssh*

By default, both services are stopped and not added to the automatic startup. Run the following commands to start OpenSSH services and configure autostart for them:
Start-Service sshd

Set-Service -Name sshd -StartupType 'Automatic'

Start-Service ssh-agent

Set-Service -Name ssh-agent -StartupType 'Automatic'

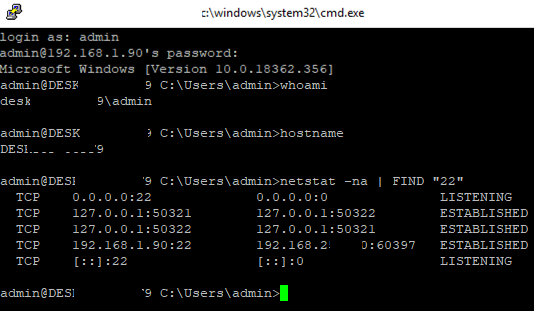
Check if sshd service is running and listening on port TCP/22:
netstat -nao | find /i '":22"'

A rule allowing remote connections to the SSH server is added to the Windows Defender firewall when OpenSSH Server is installed (with the description Inbound rule for OpenSSH SSH Server (sshd)). Use the PowerShell command to check that the rule for the OpenSSH server is enabled:
Get-NetFirewallRule -Name *OpenSSH-Server* |select Name, DisplayName, Description, Enabled

If the rule is disabled, you must enable it:
Get-NetFirewallRule -Name *OpenSSH-Server*|Enable-NetFirewallRule
You can configure a number of settings for the OpenSSH server in Windows by using the %programdata%\ssh\sshd_config configuration file.

Note. Read our guide on how to use Amazon SES as SMTP Relay.
For example, you can disable SSH password authentication and leave only key-based auth by enabling the following directives in the sshd_config file:
PubkeyAuthentication yes

PasswordAuthentication no
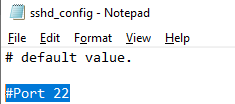
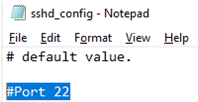
Here you can also specify a new TCP port (instead of the default TCP 22 port) on which the SSHD will accept connections. For example:
Port 2222
Using the directives AllowGroups, AllowUsers, DenyGroups, DenyUsers, you can specify users and groups who are allowed or denied to connect to Windows via SSH:
- DenyUsers theitbros\jbrown@192.168.1.15 — denies connections to username jbrown from 192.168.1.15 host;
- DenyUsers theitbros\* — prevent all users from theitbros domain to connect host via SSH;
- AllowGroups theitbros\ssh_allow — only allow users from theitbros\ssh_allow to connect host.
The allow and deny rules of sshd are processed in the following order: DenyUsers, AllowUsers, DenyGroups, and AllowGroups.
For example, to allow an SSH connection under the mylocaluser1 account from host 192.168.31.100, add the following directive
AllowUsers mylocaluser1@192.168.31.100
After making changes to the sshd_config file, you need to restart the sshd service:
Get-Service sshd| Restart-Service –force

Connect to Windows via SSH
Now you can connect to Windows computer using any SSH client. To connect from Linux, use the command:
ssh -p 22 admin@192.168.1.90
- admin is a local Windows user that you want to connect as. This account must be a member of the built-in Administrators group.
- 192.168.1.90 is an IP address or FQDN of the remote Windows host.

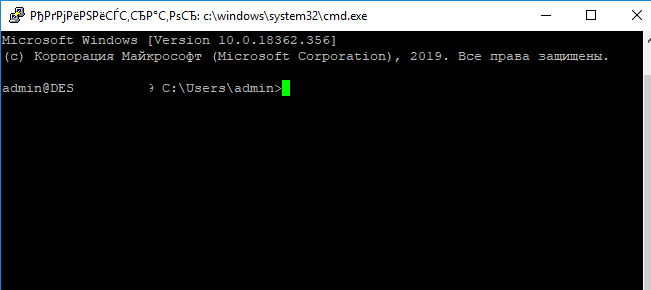
After that, a Windows command prompt window will open in the SSH session.
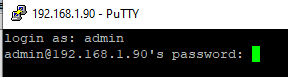
You can use the popular Putty client to connect to a Windows computer via SSH:
- Download and run putty.exe;
- Enter the hostname or IP address of the remote Windows host you want to connect over SSH;
- Select the Connection type: SSH and make sure port 22 is specified;

- Click Open;
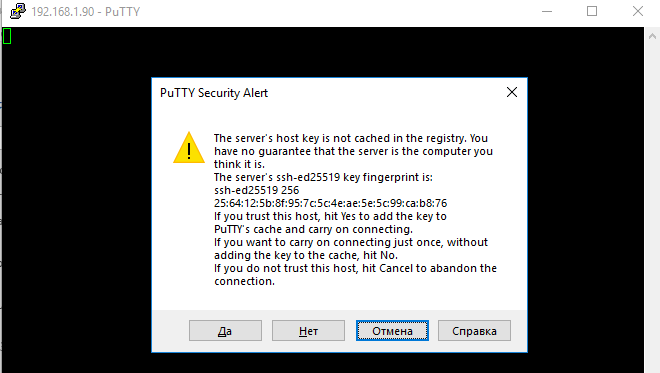
- The first time you connect to a Windows host via SSH, a Security Alert will appear asking you to confirm that you want to add the ssh-ed25519 key fingerprint of the remote machine to your local cache. If you trust this host, click the Accept button. This will add that server to the list of known SSH hosts;
 Note. OpenSSH server fingerprint stored in a file C:\ProgramData\ssh\ssh_host_ecdsa_key.pub. You can view the current ECDSA key fingerprint on a Windows host with the command:
ssh-keygen -lf C:\ProgramData\ssh\ssh_host_ed25519_key.pub

- A Putty window will appear. Here you need to specify the Windows username and password that you want to use to connect;

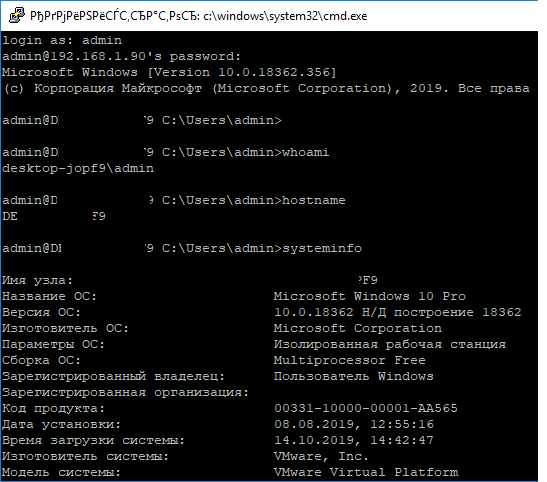
- Once you have logged in, the command prompt of the remote Windows host will be opened;
- You can now interactively run commands on the remote host.


 Note. OpenSSH server fingerprint stored in a file C:\ProgramData\ssh\ssh_host_ecdsa_key.pub. You can view the current ECDSA key fingerprint on a Windows host with the command:


You can also use the built-in Windows SSH client to connect to another Windows host. Install the ssh.exe client on Windows using the command:
Add-WindowsCapability -Online -Name OpenSSH.Client*
Now you can connect to a remote SSH host directly from the Windows command prompt. Use the following command:
ssh root@192.168.13.202
The first time you connect, you will also need to add the fingerprint of the SSH server’s ECDSA key to the list of known hosts. To do this, type “yes” > “enter”.

Enter the user’s password. The command line C:\Windows\system32\conhost.exe should appear: 
You can now use the OpenSSH.Client tools (scp.exe, sftp.exe) to copy a file between hosts using the SSH protocol. The following command will copy the local test1.log file to a remote Windows SSH host:
scp.exe D:\PS\test1.log root@192.168.13.202:c:\temp
![]()
If you prefer to use Windows Terminal, you can add the required SSH host profiles to it for quick connection:
- Run Windows Terminal and go to its Settings;
- Click the Add a new profile button in the Profiles section;

- Specify that you want to create a duplicate of Windows PowerShell profile;

- Specify a profile name (“SSH Windows 10 DEVPC” in this example);
- In the Command line parameter, specify the connection string to your SSH host. For example: %SystemRoot%\System32\WindowsPowerShell\v1.0\powershell.exe ssh root@192.168.13.202

- Save the profile;
- Now in the Windows Terminal menu you will have a separate option for a quick SSH connection to a Windows host.


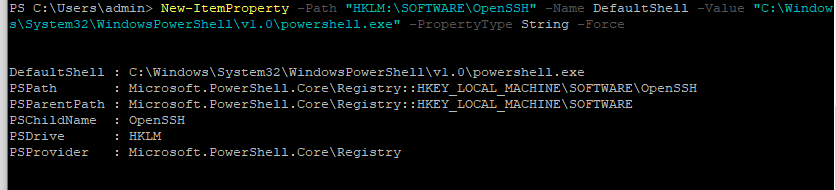
Hint. You can change the default SSH shell on Windows from cmd.exe to PowerShell CLI. To do this, run the following on the host running the OpenSSH server:
New-ItemProperty -Path "HKLM:\SOFTWARE\OpenSSH" -Name DefaultShell -Value "C:\Windows\System32\WindowsPowerShell\v1.0\powershell.exe" -PropertyType String -Force
From here, when connecting to Windows via SSH, you will immediately see PowerShell prompt instead of cmd.exe.

If you want to use key-based ssh authentication instead of password authentication, you need to generate a key using ssh-keygen on your client. In such a case, the contents of the id_rsa.pub file must be copied to the c:\users\admin\.ssh\authorized_keys file in Windows 10.
After that, you can connect from your Linux client to Windows 10 without a password. Use the command:
ssh -l admin@192.168.1.90
In previous versions of OpenSSH on Windows, all of the sshd service logs were written to the text file C:\ProgramData\ssh\logs\sshd.log by default.
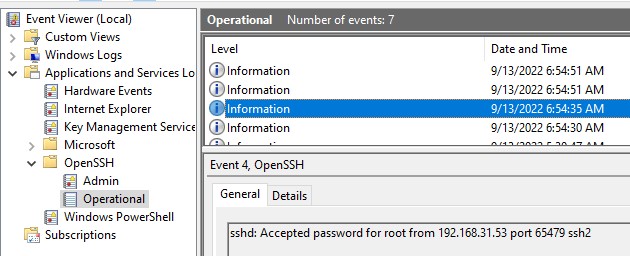
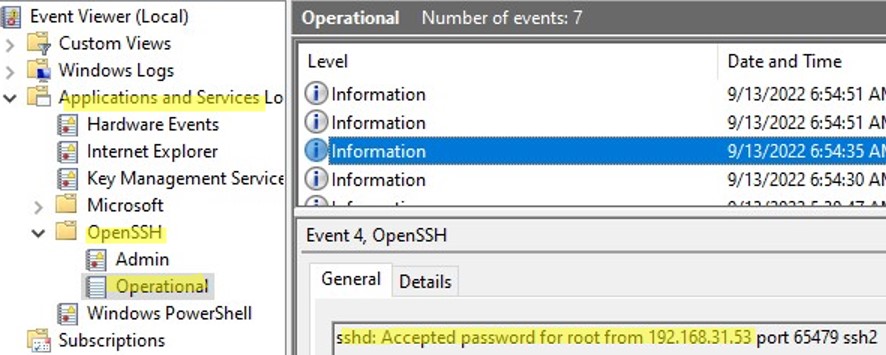
On Windows 11, SSH logs can be viewed using the Event Viewer console (eventvwr.msc). All SSH events are available in a separate section Application and Services Logs > OpenSSH > Operational.
For example, the screenshot shows an example of an event with a successful connection to the computer via SSH. You can see the ssh client’s IP address (hostname) and the username used to connect.
Sshd: Accepted password for jbrown from 192.168.14.14. port 49833 ssh2


Cyril Kardashevsky
I enjoy technology and developing websites. Since 2012 I’m running a few of my own websites, and share useful content on gadgets, PC administration and website promotion.
В современных версиях Windows уже есть встроенный SSH сервер на базе пакета OpenSSH. В этой статье мы покажем, как установить и настроить OpenSSH сервер в Windows 10/11 и Windows Server 2022/2019 и подключиться к нему удаленно по защищенному SSH протоколу (как к Linux).
Содержание:
- Установка сервера OpenSSH в Windows
- Настройка SSH сервера в Windows
- Sshd_config: Конфигурационный файл сервера OpenSSH
- Подключение по SSH к Windows компьютеру
- Логи SSH подключений в Windows
Установка сервера OpenSSH в Windows
Пакет OpenSSH Server включен в современные версии Windows 10 (начиная с 1803), Windows 11 и Windows Server 2022/2019 в виде Feature on Demand (FoD). Для установки сервера OpenSSH достаточно выполнить PowerShell команду:
Get-WindowsCapability -Online | Where-Object Name -like ‘OpenSSH.Server*’ | Add-WindowsCapability –Online
Или при помощи команды DISM:
dism /Online /Add-Capability /CapabilityName:OpenSSH.Server~~~~0.0.1.0
Если ваш компьютер подключен к интернету, пакет OpenSSH.Server будет скачан и установлен в Windows.
Также вы можете установить сервер OpenSSH в Windows через современную панель Параметры (Settings -> Apps and features -> Optional features -> Add a feature, Приложения -> Управление дополнительными компонентами -> Добавить компонент. Найдите в списке OpenSSH Server и нажмите кнопку Install).
На изолированных от интернета компьютерах вы можете установить компонент с ISO образа Features On Demand (доступен в личном кабинете на сайте Microsoft: MSDN или my.visualstudio.com). Скачайте диск, извлеките его содержимое в папку c:\FOD (достаточно распаковать извлечь файл
OpenSSH-Server-Package~31bf3856ad364e35~amd64~~.cab
), выполните установку из локального репозитория:
Add-WindowsCapability -Name OpenSSH.Server~~~~0.0.1.0 -Online -Source c:\FOD
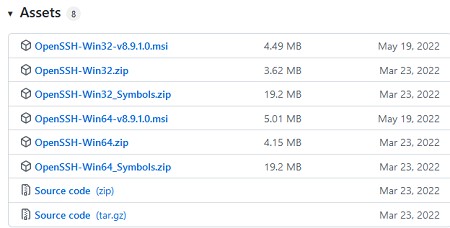
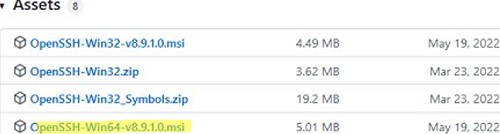
Также доступен MSI установщик OpenSSH для Windows в официальном репозитории Microsoft на GitHub (https://github.com/PowerShell/Win32-OpenSSH/releases/). Например, для Windows 10 x64 нужно скачать и установить пакет OpenSSH-Win64-v8.9.1.0.msi. Следующая PowerShell команда скачает MSI файл и установит клиент и сервер OpenSSH:
Invoke-WebRequest https://github.com/PowerShell/Win32-OpenSSH/releases/download/v8.9.1.0p1-Beta/OpenSSH-Win64-v8.9.1.0.msi -OutFile $HOME\Downloads\OpenSSH-Win64-v8.9.1.0.msi -UseBasicParsing
msiexec /i c:\users\root\downloads\OpenSSH-Win64-v8.9.1.0.msi
Также вы можете вручную установить OpenSSH сервер в предыдущих версиях Windows (Windows 8.1, Windows Server 2016/2012R2). Пример установки Win32-OpenSSH есть в статье “Настройка SFTP сервера (SSH FTP) в Windows”.
Чтобы проверить, что OpenSSH сервер установлен, выполните:
Get-WindowsCapability -Online | ? Name -like 'OpenSSH.Ser*'
State : Installed

Настройка SSH сервера в Windows
После установки сервера OpenSSH в Windows добавляются две службы:
- ssh-agent (OpenSSH Authentication Agent) – можно использовать для управления закрытыми ключами если вы настроили SSH аутентификацию по ключам;
- sshd (OpenSSH SSH Server) – собственно сам SSH сервер.
Вам нужно изменить тип запуска службы sshd на автоматический и запустить службу с помощью PowerShell:
Set-Service -Name sshd -StartupType 'Automatic'
Start-Service sshd

С помощью nestat убедитесь, что теперь в системе запущен SSH сервер и ждет подключений на порту TCP:22 :
netstat -na| find ":22"

Проверьте, что включено правило брандмауэра (Windows Defender Firewall), разрешающее входящие подключения к Windows по порту TCP/22.
Get-NetFirewallRule -Name *OpenSSH-Server* |select Name, DisplayName, Description, Enabled
Name DisplayName Description Enabled
---- ----------- ----------- -------
OpenSSH-Server-In-TCP OpenSSH SSH Server (sshd) Inbound rule for OpenSSH SSH Server (sshd) True

Если правило отключено (состоянии Enabled=False) или отсутствует, вы можете создать новое входящее правило командой New-NetFirewallRule:
New-NetFirewallRule -Name sshd -DisplayName 'OpenSSH Server (sshd)' -Enabled True -Direction Inbound -Protocol TCP -Action Allow -LocalPort 22
Рассмотрим, где храниться основные компоненты OpenSSH:
- Исполняемые файлы OpenSSH Server находятся в каталоге
C:\Windows\System32\OpenSSH\
(sshd.exe, ssh.exe, ssh-keygen.exe, sftp.exe и т.д.) - Конфигурационный файл sshd_config (создается после первого запуска службы):
C:\ProgramData\ssh - Файлы authorized_keys и ssh ключи можно хранить в профиле пользователей:
%USERPROFILE%\.ssh\
Sshd_config: Конфигурационный файл сервера OpenSSH
Настройки сервере OpenSSH хранятся в конфигурационном файле %programdata%\ssh\sshd_config. Это обычный текстовый файл с набором директив. Для редактирования можно использовать любой текстовый редактор (я предпочитаю notepad++). Можно открыть с помощью обычного блокнота:
start-process notepad C:\Programdata\ssh\sshd_config
Например, чтобы запретить SSH подключение для определенного доменного пользователя (и всех пользователей указанного домена), добавьте в конце файле директивы:
DenyUsers winitpro\[email protected]
DenyUsers corp\*
Чтобы разрешить подключение только для определенной доменной группы:
AllowGroups winitpro\sshadmins
Либо можете разрешить доступ для локальной группы:
AllowGroups sshadmins
По умолчанию могут к openssh могут подключаться все пользователи Windows. Директивы обрабатываются в следующем порядке: DenyUsers, AllowUsers, DenyGroups,AllowGroups.
Можно запретить вход под учетными записями с правами администратора, в этом случае для выполнения привилегированных действий в SSH сессии нужно делать runas.
DenyGroups Administrators
Следующие директивы разрешают SSH доступ по ключам (SSH аутентификации в Windows с помощью ключей описана в отдельной статье) и по паролю:
PubkeyAuthentication yes
PasswordAuthentication yes
Вы можете изменить стандартный SSH порт TCP/22, на котором принимает подключения OpenSSH в конфигурационном файле sshd_config в директиве Port.
После любых изменений в конфигурационном файле sshd_config нужно перезапускать службу sshd:
restart-service sshd
Подключение по SSH к Windows компьютеру
Теперь вы можете попробовать подключиться к своей Windows 10 через SSH клиент (в этом примере я использую putty).
Вы можете использовать встроенный SSH клиентом Windows для подключения к удаленному хосту. Для этого нужно в командной строке выполнить команду:
ssh [email protected]
В этом примере
alexbel
– имя пользователя на удаленном Windows компьютере, и 192.168.31.102 – IP адрес или DNS имя компьютера.
Обратите внимание что можно использовать следующие форматы имен пользователей Windows при подключении через SSH:
-
alex@server1
– локальный пользователь Windows -
[email protected]@server1
–пользователь Active Directory (в виде UPN) или аккаунт Microsoft/ Azure(Microsoft 365) -
winitpro\alex@server1
– NetBIOS формат имени
В домене Active Directory можно использовать Kerberos аутентификацию в SSH. Для этого в sshd_config нужно включить параметр:
GSSAPIAuthentication yes
После этого можно прозрачно подключать к SSH сервер с Windows компьютера в домене из сессии доменного подключается. В этом случае пароль пользователя не указывается и выполняется SSO аутентификация через Kerberos:
ssh -K server1
При первом подключении появится стандартный запрос на добавление узла в список известных SSH хостов.
Нажимаем Да, и в открывшееся окне авторизуемся под пользователем Windows.
При успешном подключении запускается командная оболочка cmd.exe со строкой-приглашением.
admin@win10tst C:\Users\admin>
В командной строке вы можете выполнять различные команды, запускать скрипты и программы.
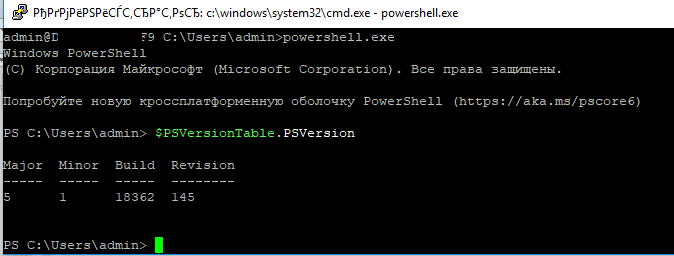
Я предпочитаю работать в командной строке PowerShell. Чтобы запустить интерпретатор PowerShell, выполните:
powershell.exe
Чтобы изменить командную оболочку (Shell) по умолчанию в OpenSSH с cmd.exe на PowerShell, внесите изменение в реестр такой командой:
New-ItemProperty -Path "HKLM:\SOFTWARE\OpenSSH" -Name DefaultShell -Value "C:\Windows\System32\WindowsPowerShell\v1.0\powershell.exe" -PropertyType String –Force
Осталось перезапустить SSH подключение и убедиться, что при подключении используется командный интерпретатор PowerShell (об этом свидетельствует приглашение
PS C:\Users\admin>
).
В SSH сессии запустилась командная строка PowerShell, в которой работают привычные функции: авто дополнение, раскраска модулем PSReadLine, история команд и т.д. Если текущий пользователь входит в группу локальных администраторов, то все команды в его сессии выполняются с повышенными правами даже при включенном UAC.
Логи SSH подключений в Windows
В Windows логи подключений к SSH серверу по-умолчанию пишутся не в текстовые файлы, а в отдельный журнал событий через Event Tracing for Windows (ETW). Откройте консоль Event Viewer (
eventvwr.msc
>) и перейдите в раздел Application and services logs -> OpenSSH -> Operational.
При успешном подключении с помощью к SSH серверу с помощью пароля в журнале появится событие:
EventID: 4
sshd: Accepted password for root from 192.168.31.53 port 65479 ssh2
Если была выполнена аутентификация с помощью SSH ключа, событие будет выглядеть так:
sshd: Accepted publickey for locadm from 192.168.31.53 port 55772 ssh2: ED25519 SHA256:FEHDEC/J72Fb2zC2oJNb45678967kghH43h3bBl31ldPs
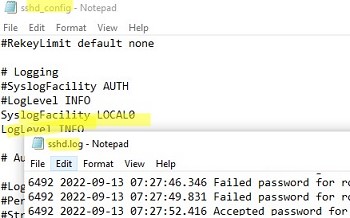
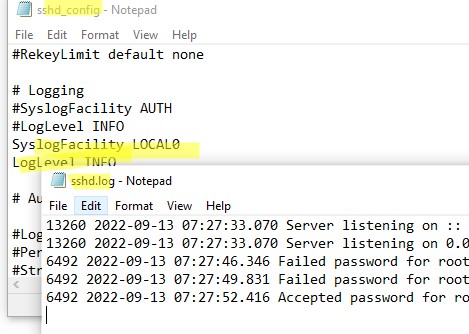
Если вы хотите, чтобы логи писались в локальный текстовый файл, нужно в файле sshd_config включить параметры:
SyslogFacility LOCAL0
LogLevel INFO
Перезапустите службу sshd и провеьте, что теперь логи SSH сервера пишутся в файл C:\ProgramData\ssh\logs\sshd.log
Setting up an SSH server on Windows can be a valuable tool for users who want to access their Windows machine remotely or securely transfer files over a network. SSH (Secure Shell) is a network protocol that allows for secure communication between computers. It provides encryption and authentication, making it a popular choice for remote administration, file transfers, and accessing remote systems.
Video Tutorial:
In this blog post, we will explore the different methods to set up an SSH server on Windows. We will discuss each method in detail and provide step-by-step instructions to help you establish a secure and reliable SSH connection. Whether you are a system administrator, developer, or simply a user who wants to enhance the security and accessibility of their Windows machine, this guide is for you.
Why You Need to Setup an SSH Server on Windows
There are several reasons why setting up an SSH server on your Windows machine can be beneficial:
1. Remote Access: An SSH server allows you to access your Windows machine from anywhere in the world. This means you can manage your files, run commands, and troubleshoot issues remotely without physically being in front of your computer.
2. Secure File Transfers: SSH provides a secure channel for transferring files between computers. Whether you are transferring sensitive documents between your own machines or sharing files with remote colleagues, SSH ensures that your data remains encrypted and protected from unauthorized access.
3. Remote Administration: As a system administrator, an SSH server on Windows enables you to manage multiple machines from a centralized location. You can execute commands, configure settings, and perform administrative tasks on remote servers or workstations.
4. Tunneling: SSH supports tunneling, which allows you to securely route network traffic through an encrypted SSH connection. This can be useful for accessing resources on a remote network, bypassing firewall restrictions, or establishing secure connections to services running on other machines.
Now let’s dive into the methods of setting up an SSH server on Windows.
Method 1: Setting up an SSH Server using OpenSSH
OpenSSH is a widely used open-source implementation of the SSH protocol. It is included in many Linux distributions and can also be installed on Windows. Follow the steps below to set up an SSH server using OpenSSH on Windows:
1. Download OpenSSH for Windows: Visit the official OpenSSH website (https://www.openssh.com/windows.html) and download the latest stable release of OpenSSH for Windows.
2. Install OpenSSH: Run the installer and follow the on-screen instructions to install OpenSSH on your Windows machine. Make sure to select the «Server» component during the installation process.
3. Configure the SSH Server: Once the installation is complete, open an Administrator Command Prompt and run the following command to start the SSH server:
«`
> net start sshd
«`
4. Configure Firewall: If you have a firewall enabled on your Windows machine, you need to allow inbound connections to the SSH server. Use the following command to open the necessary port:
«`
> netsh advfirewall firewall add rule name=«OpenSSH» dir=in action=allow protocol=TCP localport=22
«`
5. Test the SSH Server: Open an SSH client on another machine and connect to your Windows SSH server using the IP address or hostname of your Windows machine. You should be prompted to enter the username and password of an account with administrative privileges on the Windows machine. Once authenticated, you will have remote access to your Windows machine via SSH.
Pros:
1. Provides a secure and encrypted channel for remote access and file transfers.
2. Open-source and widely used, making it compatible with various SSH clients and servers.
3. Can be easily installed on Windows machines and offers a straightforward configuration process.
Cons:
1. Requires administrative privileges on the Windows machine for installation and configuration.
2. Limited graphical user interface (GUI) options compared to SSH solutions designed specifically for Windows.
Method 2: Setting up an SSH Server using Bitvise SSH Server
Bitvise SSH Server is a powerful and flexible SSH server solution for Windows. It offers advanced features and customization options, making it suitable for both individual users and enterprise environments. Follow the steps below to set up an SSH server using Bitvise SSH Server on Windows:
1. Download Bitvise SSH Server: Visit the official Bitvise SSH Server website (https://www.bitvise.com/ssh-server) and download the latest version of Bitvise SSH Server for Windows.
2. Install Bitvise SSH Server: Run the installer and follow the on-screen instructions to install Bitvise SSH Server on your Windows machine. Make sure to select the «SSH server» component during the installation process.
3. Configure SSH Server Settings: After installation, open the Bitvise SSH Server Control Panel. Configure the server settings, such as the port number, authentication methods, and user accounts. Customize the server options according to your requirements.
4. Start the SSH Server: Once the configuration is complete, click on the «Start SSH Server» button in the Control Panel. This will start the Bitvise SSH Server and allow incoming SSH connections.
5. Test the SSH Server: Open an SSH client on another machine and connect to your Windows SSH server using the IP address or hostname of your Windows machine. Enter the username and password of a valid user account configured in Bitvise SSH Server. Once authenticated, you will have remote access to your Windows machine via SSH.
Pros:
1. Offers advanced features and flexibility for customization and configuration.
2. Provides a user-friendly control panel for managing server settings and user accounts.
3. Supports Windows-specific features such as remote desktop forwarding and single sign-on integration.
Cons:
1. Bitvise SSH Server is not open-source and requires a paid license for commercial use.
2. More complex installation and configuration process compared to other SSH server solutions.
Method 3: Setting up an SSH Server using Cygwin
Cygwin is a large collection of GNU and Open Source tools that provide functionality similar to a Linux distribution on Windows. It includes an SSH server (sshd) that can be used to establish SSH connections to Windows machines. Follow the steps below to set up an SSH server using Cygwin on Windows:
1. Download and Install Cygwin: Visit the official Cygwin website (https://www.cygwin.com/) and download the Cygwin installer. Run the installer and select the desired packages, including the «OpenSSH» package, during the installation process.
2. Launch Cygwin: After the installation is complete, launch the Cygwin Terminal.
3. Configure SSH Server: In the Cygwin Terminal, run the following commands to configure the SSH server:
«`
$ ssh-host-config
«`
«`
$ cygrunsrv -S sshd
«`
4. Configure Firewall: If you have a firewall enabled on your Windows machine, you need to allow inbound connections to the SSH server. Use the following command to open the necessary port:
«`
$ netsh advfirewall firewall add rule name=«Cygwin SSH» dir=in action=allow protocol=TCP localport=22
«`
5. Test the SSH Server: Open an SSH client on another machine and connect to your Windows SSH server using the IP address or hostname of your Windows machine. You should be prompted to enter the username and password of a valid user account on the Windows machine. Once authenticated, you will have remote access to your Windows machine via SSH.
Pros:
1. Cygwin provides a comprehensive collection of tools and utilities for Windows users.
2. The SSH server in Cygwin is compatible with many SSH clients and offers Linux-like functionality.
3. Cygwin is free and open-source, making it a cost-effective solution for setting up an SSH server on Windows.
Cons:
1. Requires knowledge of Linux-like command-line interfaces and tools for configuration and usage.
2. Cygwin may have compatibility issues with some Windows applications and services.
Method 4: Setting up an SSH Server using PowerShell
PowerShell, a command-line shell and scripting language developed by Microsoft, offers built-in support for SSH server functionality. Follow the steps below to set up an SSH server using PowerShell on Windows:
1. Install OpenSSH Server: Open an Administrator PowerShell console and run the following command to install the OpenSSH Server feature:
«`
> Add-WindowsCapability -Online -Name OpenSSH.Server~~~~0.0.1.0
«`
2. Start the SSH Server: Run the following command to start the SSH server:
«`
> Start-Service sshd
«`
3. Configure Firewall: If you have a firewall enabled on your Windows machine, you need to allow inbound connections to the SSH server. Use the following command to open the necessary port:
«`
> New-NetFirewallRule -Name sshd -DisplayName ‘OpenSSH Server (sshd)’ -Enabled True -Direction Inbound -Protocol TCP -Action Allow -LocalPort 22
«`
4. Test the SSH Server: Open an SSH client on another machine and connect to your Windows SSH server using the IP address or hostname of your Windows machine. Enter the username and password of a valid user account on the Windows machine. Once authenticated, you will have remote access to your Windows machine via SSH.
Pros:
1. Built-in support in PowerShell, making it easily accessible and available on Windows machines.
2. Simplifies the installation and configuration process, providing an integrated solution for SSH server functionality.
3. PowerShell allows for advanced automation and scripting capabilities for managing SSH connections.
Cons:
1. Limited customization options compared to dedicated SSH server solutions.
2. PowerShell may require additional configuration steps to enable SSH server functionality.
What to Do If You Can’t Setup an SSH Server
If you encounter issues while setting up an SSH server on your Windows machine, here are some possible fixes:
1. Check Firewall Settings: Ensure that your Windows firewall is not blocking incoming SSH connections. Add a rule to allow inbound connections to the SSH server’s port (usually port 22).
2. Verify User Account Credentials: Make sure you are using the correct username and password when connecting to the SSH server. Double-check the account settings and consider creating a new user account specifically for SSH access.
3. Check Port Forwarding: If you are behind a router or firewall, ensure that port forwarding is properly configured to forward incoming SSH connections to the correct Windows machine.
4. Update SSH Server Software: If you are using a third-party SSH server solution, make sure you are using the latest version. Check for any available updates or patches that may resolve compatibility issues or bugs.
5. Restart SSH Server Service: If the SSH server is running but not responding, try restarting the SSH server service. This can be done using the appropriate commands in the command prompt or PowerShell.
Bonus Tips
Here are three bonus tips to enhance your SSH server setup on Windows:
1. Enable Public Key Authentication: Public key authentication offers a more secure and convenient way to authenticate SSH connections. Generate an SSH key pair and configure your SSH server to accept public key authentication.
2. Restrict SSH User Access: Consider restricting SSH access to specific user accounts or IP addresses. This can help improve security and prevent unauthorized access to your Windows machine.
3. Enable Two-Factor Authentication: For an added layer of security, enable two-factor authentication for SSH connections. This requires users to provide an additional verification code, such as through a smartphone app or a hardware token, in addition to the username and password.
5 FAQs
Q1: Can I set up an SSH server on Windows Home Edition?
A1: Yes, you can set up an SSH server on Windows Home Edition using the OpenSSH server method described in this guide.
Q2: How can I change the default SSH server port?
A2: To change the default SSH server port, you need to modify the configuration file of the SSH server you are using. Refer to the documentation or support resources of the specific SSH server solution for instructions on how to change the port.
Q3: Can I access my Windows SSH server from a Mac or Linux machine?
A3: Yes, you can access your Windows SSH server from Mac or Linux machines using SSH clients such as Terminal (Mac) or the OpenSSH client (Linux). The connection process is similar to connecting from another Windows machine.
Q4: Can I transfer files between my Windows SSH server and another SSH server?
A4: Yes, you can transfer files between your Windows SSH server and another SSH server using the SCP (Secure Copy) or SFTP (SSH File Transfer Protocol) commands. These commands allow for secure file transfers over SSH connections.
Q5: Are SSH connections encrypted?
A5: Yes, SSH connections are encrypted, providing secure communication between the client and the server. This encryption ensures that data transmitted over the SSH connection cannot be intercepted or read by unauthorized parties.
Final Thoughts
Setting up an SSH server on Windows can greatly enhance the security and accessibility of your Windows machine. Whether you need remote access, secure file transfers, or remote administration capabilities, SSH provides a reliable and secure solution.
In this blog post, we discussed four different methods for setting up an SSH server on Windows: OpenSSH, Bitvise SSH Server, Cygwin, and PowerShell. Each method has its own advantages and considerations, allowing you to choose the one that best fits your needs and technical proficiency.
Remember to consider your specific requirements, security concerns, and familiarity with command-line interfaces when selecting and configuring an SSH server solution. By following the detailed steps and bonus tips provided in this guide, you will be able to establish a secure and effective SSH connection to your Windows machine.

![]()
bdbch
Posted on
• Updated on
![]()
![]()
![]()
![]()
![]()
Welcome to my first official guide on Dev.to. Today I want to explain how you can setup SSH and Git on your Windows 10 computer.
Note: This is not about 100% securing your keys but about how to generate keys for use with GitHub.
Thanks to garethdd for his constructive feedback.
What is SSH?
SSH stands for Secure Shell and is an awesome way to authenticate yourself on remote servers (for example the Github server) without typing in a password everytime.
SSH works via two keys, the Private Key and the Public Key. While the private key should always stay private and safe, the public key can be shared around the internet without any problems.
The private key allows you to get access to servers that have your public key registered, so your access can only be stolen if the attacker somehow gets your Secret Key so keep it safe!
SSH should be preinstalled on new Windows 10 machines.
What is Git?
Git is a free version management tool that helps you to versionize your code and potentially save it on a remote server (for example Github, Gitlab or Bitbucket).
You can install Git from here:
https://git-scm.com/download/win
You can also install Git via chocolatey:
choco install git -Y
Enter fullscreen mode
Exit fullscreen mode
Create a SSH Key
The first step is to generate a new SSH key. Use cmd or Powershell and run the following command:
ssh-keygen -t rsa -b 4096 -C "your_email@example.com"
Enter fullscreen mode
Exit fullscreen mode
You can but don’t need to give it a passphrase since you should never share your secret key around but using one will secure your keys. Keep in mind that everybody can have as many private keys as they want.
This generates a new private SSH key with rsa encryption and 4096 bits. It also generates a public key from the secret key which you can share around.
There will be a new folder and files in your Windows user folder.
In general you can create as many keys as you want. The id_rsa key is the default key generated by ssh and will be automatically be used by your ssh-agent if you don’t tell it to use another key.
What is an ssh-agent?
An ssh-agent is the agent process used to actually authenticate yourself with ssh. There are a few out there (PuTTY with Pageant for example) but for this example we’ll use the ssh-agent provided by the native and default Windows 10 ssh-agent.
If you want to you can use PuTTY and Pageant to make your keys even more secure. Read this post on Digital Ocean for more information.
If you want to change the key used by your ssh-agent, you must first start the service. The service will be disabled on Windows 10 by default. Search for Services and open the Services settings and look for the «OpenSSH Authentication Agent» and Activate it:

Now you will be able to access the ssh-agent from your console via ssh-agent.
For this example we’re going to try to load another key called example into our agent and use it instead of the id_rsa key. To do this you can run the following command:
ssh-add example
Enter fullscreen mode
Exit fullscreen mode
Now you will have both keys available for this session.
Register your SSH Key on Github
The next step is to register your generated SSH key on Github. For that, run the following command:
type C:\Users\your_user_name\.ssh\id_rsa.pub
Enter fullscreen mode
Exit fullscreen mode
and copy the output string into your clipboard. Now go to your Github keys settings and add a new SSH key with your public key and save it.
Congratulations! You now are able to get and push code to Github without any password!
Note: There should also be a C:\Users\your_user_name\.ssh\id_rsa file. This is your private key, don’t share this around!
Setup Github in your Shell
Now it’s time to setup Git on your machine. After installing it from the link above, open a new cmd or Powershell window. Now we need to set your public Git name and Git email address. This will always be public when pushing code.
Luckily Github gives you a privatized email address for use. Go to https://github.com/settings/emails and you will find a @users.noreply.github.com email address for your account. Copy this email address.
Next register your name and email in Git:
git config --global user.name "Your Name"
git config --global user.email your_email@users.noreply.github.com
Enter fullscreen mode
Exit fullscreen mode
Congratulations! Now all your Commits will be registered as being commited from your Github user.
Signing your GitHub commits (Optional Step)
To sign your commits you first must install the GPG command line tools. After you installed the GPG toolkit, you can run the following command to generate a new gpg key:
gpg --full-generate-key
Enter fullscreen mode
Exit fullscreen mode
This will ask you what kind of key you want. Go for RSA and RSA.

Now you need to enter a bit length. The recommendation is 4096 bits.
After that you can specify a expiration length or if the key should never expire. Pick as you want. Expiring keys are more secure in general because you have to renew them every now and then.
Now enter your personal informations to verifying your identity with your gpg key.
When you’re done you will be asked for a passphrase. Give it a secure passphrase and you will be done with your gpg-key generation.
After that you will be able to find your key in your users .gnupg folder as specified in the success message.
If you want to list your gpg keys, simply run
// short version
gpg --list-secret-keys

// long version
gpg --list-secret-keys --keyid-format LONG
Enter fullscreen mode
Exit fullscreen mode
Your GPG key you can share with Github is the key coming after sec rsa4096/ so for example in
/Users/hubot/.gnupg/secring.gpg
------------------------------------
sec   4096R/3AA5C34371567BD2 2016-03-10 [expires: 2017-03-10]
uid                          Hubot
ssb   4096R/42B317FD4BA89E7A 2016-03-10
Enter fullscreen mode
Exit fullscreen mode
the gpg key would be 3AA5C34371567BD2
To get your public key block, simply run
gpg --armor --export YOUR_GPG_KEY
Enter fullscreen mode
Exit fullscreen mode
which will output your public GPG Key Block. Copy it and paste it to your GitHub Account here.
From now on your commits will be signed when commited.
Use Git
Now you’re ready to actually use Git. From now you can clone repositories via git clone or push new code to Github. Here is a quick reference:
# Clone a repository to the current directory
git clone [REPOSITORY_CLONE_URL]

# Create a new commit with a message
git commit -m "Your commit message"

# Add files to the commit
git add .
git add ./filename.ext

# Push your commits to Github
git push origin master
git push origin [YOUR_BRANCH_NAME]

# Reset your repo to the last version
git reset --hard

# Create a new branch
git checkout -b [YOUR_BRANCH_NAME]

# Switch branches
git checkout [YOUR_BRANCH_NAME]
git checkout master

# Reset a single file
git checkout ./filename.ext
Enter fullscreen mode
Exit fullscreen mode
Conclusion
Thanks for reading this post. I hope it helped you with the setup. If you need help or have questions let me know!
SSH-server based on the OpenSSH package is part of the operating system in all modern versions of Windows. In this article, we’ll show you how to install and configure the OpenSSH server on Windows 10/11 and Windows Server 2022/2019 and connect to it remotely via a secure SSH connection (just like in Linux 🙂).
Contents:
- How to Install OpenSSH Server on Windows?
- Configuring SSH Server on Windows
- Sshd_config: OpenSSH Server Configuration File
- How to Connect to a Remote Windows Computer via SSH?
- Checking SSH Connection Logs in Windows
How to Install OpenSSH Server on Windows?
The OpenSSH Server package is a part of all modern versions of Windows 10 (starting with 1803), Windows 11, and Windows Server 2022/2019 as a Feature on Demand (FoD). To install the OpenSSH server, open the elevated PowerShell prompt and run the command:
Get-WindowsCapability -Online | Where-Object Name -like ‘OpenSSH.Server*’ | Add-WindowsCapability –Online
Or using DISM:
dism /Online /Add-Capability /CapabilityName:OpenSSH.Server~~~~0.0.1.0
If your computer is directly connected to the Internet, the OpenSSH.Server package will be downloaded and installed on Windows.
You can also install OpenSSH on Windows 10/11 through the modern Settings panel (Settings -> Apps and features -> Optional features -> Add a feature). Find Open SSH Server in the list and click Install.
On computers in disconnected (offline) environments, you can install the OpenSSH Server from the Feature on Demand ISO image (available in your account on the Microsoft websites: MSDN or my.visualstudio.com). Download the ISO and extract its contents to the E:\FOD folder (you can only extract the file OpenSSH-Server-Package~31bf3856ad364e35~amd64~~.cab) and install the Windows feature from the local repository:
Add-WindowsCapability -Name OpenSSH.Server~~~~0.0.1.0 -Online -Source E:\FOD
An MSI installer for OpenSSH for Windows is also available in the official Microsoft repository on GitHub (https://github.com/PowerShell/Win32-OpenSSH/releases/). For example, for Windows 10 x64, you need to download and install the OpenSSH-Win64-v8.9.1.0.msi package. The following PowerShell command will download the MSI file and install the OpenSSH client and server on your computer:
Invoke-WebRequest https://github.com/PowerShell/Win32-OpenSSH/releases/download/v8.9.1.0p1-Beta/OpenSSH-Win64-v8.9.1.0.msi -OutFile $HOME\Downloads\OpenSSH-Win64-v8.9.1.0.msi -UseBasicParsing
 msiexec /i $HOME\Downloads\OpenSSH-Win64-v8.9.1.0.msi
You can install an OpenSSH server in previous Windows versions as well (Windows 8.1, Windows Server 2016/2012R2/2012). Check the example on how to install and configure Win32-OpenSSH in the article “How to Configure SFTP Server (SSH FTP) on Windows?”.
To make sure the OpenSSH server has been installed, run the command:
Get-WindowsCapability -Online | ? Name -like 'OpenSSH.Ser*'
State : Installed

Configuring SSH Server on Windows
After installing the OpenSSH server on Windows, two services are added:
- ssh-agent (OpenSSH Authentication Agent) – can be used to manage private keys if you have configured SSH key authentication;
- sshd (OpenSSH SSH Server).
You need to change the startup type of the sshd service to automatic and start the service using PowerShell:
Set-Service -Name sshd -StartupType 'Automatic'
 Start-Service sshd

Use the netstat command to make sure that the SSH server is running and waiting for the connections on TCP port 22:
netstat -na| find ":22"

Make sure that Windows Defender Firewall allows inbound connections to Windows through TCP port 22:
Get-NetFirewallRule -Name *OpenSSH-Server* |select Name, DisplayName, Description, Enabled
Name DisplayName Description Enabled
---- ----------- ----------- -------
OpenSSH-Server-In-TCP OpenSSH SSH Server (sshd) Inbound rule for OpenSSH SSH Server (sshd) True

If the rule is disabled (Enabled=False) or missing, you can create a new inbound rule using the New-NetFirewallRule cmdlet:
New-NetFirewallRule -Name sshd -DisplayName 'OpenSSH Server (sshd)' -Enabled True -Direction Inbound -Protocol TCP -Action Allow -LocalPort 22
By default, key OpenSSH components are located in these folders:
- OpenSSH Server executables:
C:\Windows\System32\OpenSSH\(sshd.exe, ssh.exe, ssh-keygen.exe, sftp.exe, etc.) - The sshd_config file (created after the first service start of the service):
C:\ProgramData\ssh - The authorized_keys file and keys can be stored in the user profile folder:
%USERPROFILE%\.ssh\
Sshd_config: OpenSSH Server Configuration File
You can change your OpenSSH server settings in the config file: %programdata%\ssh\sshd_config. This is a plain text file with a set of directives. You can use any text editor for editing:
start-process notepad C:\Programdata\ssh\sshd_config
For example, to deny SSH connection for a specific domain user account (or all users in the specified domain), add these directives to the end of the file:
DenyUsers woshub\[email protected]
DenyUsers corp\*
To allow SSH connection to the specific domain security group only:
AllowGroups woshub\sshadmins
You can allow access to a local user group:
AllowGroups sshadmins
By default, all Windows users can connect to OpenSSH. Directives in the sshd_config files are processed in the following order: DenyUsers, AllowUsers, DenyGroups, AllowGroups.
You can deny SSH login for the accounts with administrator privileges. In this case, if you need to perform any privileged actions in your SSH session, you will have to use runas.
DenyGroups Administrators
The following directives allow you to access Windows using SSH private keys or a password.
PubkeyAuthentication yes
PasswordAuthentication yes
You can change the default TCP/22 port on which OpenSSH Server connections are accepted in the sshd_config configuration file using the Port directive.
After making any changes to the sshd_config file, you need to restart the sshd service
restart-service sshd
How to Connect to a Remote Windows Computer via SSH?
Now you can try to connect to your Windows 10 computer using the SSH client (I’m using putty in this example).
You can use the built-in Windows SSH client to connect to a remote host. To do this, open the command prompt and run the following command:
ssh [email protected]
In this example, max is the username on the remote Windows computer, and 192.168.13.12 is the IP address or DNS name of the computer.
Note that you can use the following username formats when connecting to Windows via SSH:
max@server1– local Windows user[email protected]@server1– Active Directory user or Microsoft/Azure account (use the UserPrincipalName format)woshub\max@server1– NetBIOS name format
In an Active Directory domain, you can use Kerberos authentication in SSH. To do this, you need to enable the following directive in sshd_config:
GSSAPIAuthentication yes
You can now transparently connect to an SSH server from a domain-joined Windows machine with a domain user session. In this case, the user’s password will not be requested, and SSO authentication via Kerberos will be performed:
ssh -K server1
The first time you connect, you will be prompted to add the host to the list of known SSH hosts (C:\Users\your_user\.ssh\known_hosts).
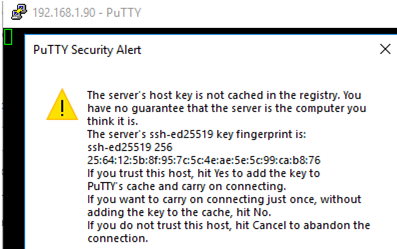
Click Yes, and login under your Windows user account.
If the SSH connection is successful, you will see the cmd.exe shell prompt.
admin@win10pc C:\Users\admin>

You can run different commands, scripts, and apps in the SSH command prompt.
I prefer working in the PowerShell console. To start it, run:
powershell.exe

In order to change the default cmd.exe shell in OpenSSH to PowerShell, make changes to the registry using the following PowerShell command:
New-ItemProperty -Path "HKLM:\SOFTWARE\OpenSSH" -Name DefaultShell -Value "C:\Windows\System32\WindowsPowerShell\v1.0\powershell.exe" -PropertyType String –Force

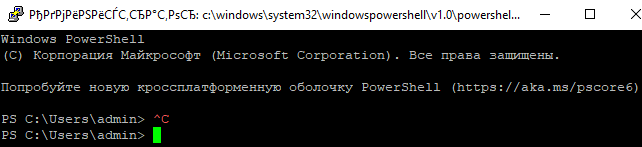
Restart your SSH connection and make sure that PowerShell is now used as a default SSH shell (this is indicated by the prompt PS C:\Users\admin>).

The PowerShell prompt has been started in my SSH session, where the usual functions work: tab autocomplete, PSReadLine syntax highlighting, command history, etc. If the current user is a member of the local administrators’ group, all session commands are executed elevated even if UAC is enabled.
OpenSSH server on Windows can be used in various SSH tunneling scenarios.
Checking SSH Connection Logs in Windows
By default in Windows SSH server connection logs are written not to text files, but to a separate event log via Event Tracing for Windows (ETW). Open the Event Viewer console (eventvwr.msc ) and navigate to Application and services logs -> OpenSSH -> Operational.
If you successfully connect to the SSH server using a password, an event will appear in the log:
EventID: 4
sshd: Accepted password for root from 192.168.1.53 port 65749 ssh2
If SSH key authentication was performed, you will see the following event:
sshd: Accepted publickey for locadm from 192.168.1.53 port 61426
ssh2: ED25519 SHA256:FEHDEC/G42FS23209C2KMb4335923pigN31s3qMK322lGibD
If you want the SSH connection logs to be written to a local text file, you need to enable the following parameters in the sshd_config file:
SyslogFacility LOCAL0
LogLevel INFO
Restart the sshd service and make sure that the SSH server logs are now written to a plain text file C:\ProgramData\ssh\logs\sshd.log