In Windows 11, you decide when and how to get the latest updates to keep your device running smoothly and securely. When you update, you’ll get the latest fixes and security improvements, helping your device run efficiently and stay protected. In most cases, restarting your device completes the update. Make sure your device is plugged in when you know updates will be installed.
If other questions come up when you update Windows 11, here are some other areas that might interest you:
-
How to reset your Microsoft account password
-
Activate Windows
When you only want info about updating Windows 11, you’ll find answers to many of your questions here:
When Windows 11, version 22H2 is ready for your device, it will be available to download and install from the Windows Update page in Settings. Choose a time that works best for you to install it. You’ll then need to restart your device and complete the installation. After that, your device will be running Windows 11, version 22H2.
To manually check for the latest recommended updates on your Windows 11 device, select Start > Settings > Windows Update > Check for updates.
Check for updates
Some updates may not be available on all devices at the same time—we’re making sure updates are ready and compatible.
To stay up to date, select Start > Settings > Windows Update > Check for updates.
Check for updates
If a feature update is available for your device, it will appear separately on the Windows Update page. To install it, select Download and install now.
Here are a few things you can try if you’re having trouble installing updates:
-
Make sure that your device is connected to the internet. Downloading updates requires an internet connection.
-
If you’re connected the internet, try to install the updates manually. Select Start > Settings > Windows Update , and then view available updates.
Check for updates
-
Run the Windows Update Troubleshooter. Select Start > Settings > System > Troubleshoot > Other troubleshooters. Under Most frequent, select Windows Update.
-
If the Troubleshooter doesn’t fix the problem, see Troubleshoot problems updating Windows or Fix Windows Update errors.
The time required to download updates primarily depends on internet connection speed, network settings, and update size. Make sure your device is plugged in and connected to the internet to download updates faster.
You can’t stop updates entirely—because they help keep your device safe and secure, updates will eventually need to be installed and downloaded, regardless of your update settings. Here’s how to temporarily pause updates from being downloaded and installed. Note that after the pause limit is reached, you’ll need to install the latest updates before you can pause updates again.
In Windows 11, select Start > Settings > Windows Update . Next to Pause updates, select the pause length you prefer.
To finish installing an update, your device will need to restart. Windows will try to restart your device when you’re not using it. If it can’t, you’ll be asked to schedule the restart for a more convenient time. Or, you can schedule anytime by following these steps:
-
Select Start > Settings > Windows Update .
-
Select Schedule the restart and choose a time that’s convenient for you.
You can set active hours to make sure automatic restarts for updates only happen when you’re not using your device. Get updates when you’re away from your PC with active hours in Windows.
Try deleting files you don’t need, uninstalling apps you don’t use, or moving files to another drive like an external USB drive or OneDrive. For more tips on freeing up disk space, see Free up drive space in Windows.
We recommend keeping devices like laptops and tablets plugged in when you’re not using them. This way, if updates are installed outside active hours, your device will have enough power to complete the installation. Windows updates don’t consume more battery than other typical system processes.
An update history is available so you can see which updates were installed, and when. You can also use this list to remove specific updates, although we don’t recommend this unless it’s necessary.
Select Start > Settings > Windows Update > Update history .
We don’t recommend that you remove any installed updates. However, if you must remove an update, you can do so in update history.
-
Select Start > Settings > Windows Update > Update history > Uninstall updates .
-
Select the update you want to remove, then select Uninstall.
Feature updates are typically released twice per year and include new functionality and capabilities as well as potential fixes and security updates. Quality updates are more frequent and mainly include small fixes and security updates. Windows is designed to deliver both kinds of updates to devices through Windows Update.
To double check that your device is up to date, open Start > Settings > Windows Update and see your update status and available updates.
Check for updates
Reserved storage will be turned on for new devices with Windows 11 preinstalled, or devices on which a clean install of Windows 11 was performed.
In Windows 10, you decide when and how to get the latest updates to keep your device running smoothly and securely. When you update, you’ll get the latest fixes and security improvements, helping your device run efficiently and stay protected. In most cases, restarting your device completes the update. Make sure your device is plugged in when you know updates will be installed.
If other questions come up when you update Windows 10, here are some other areas that might interest you:
-
How to reset your Microsoft account password
-
Activate Windows
-
Get started with Windows 10
When you only want info about updating Windows 10, you’ll find answers to many of your questions here:
When the Windows 10 2022 Update is ready for your device, it will be available to download and install from the Windows Update page in Settings. Choose a time that works best for you to download the update. You’ll then need to restart your device and complete the installation. After that, your device will be running Windows 10, version 22H2.
To manually check for the latest recommended updates, select Start > Settings > Update & Security > Windows Update , and then select Check for updates.
Check for updates
To get help updating to the latest version of Windows 10, go to the Microsoft software download page and download the Update Assistant.
Some updates may not be available on all devices at the same time—we’re making sure updates are ready and compatible.
To stay up to date, select Start > Settings > Update & Security > Windows Update , and then select Check for updates.
Check for updates
If a feature update is available for your device, it will appear separately on the Windows Update page. To install it, select Download and install now.
Here are a few things you can try if you’re having trouble installing updates:
-
Make sure that your device is connected to the internet. Downloading updates requires an internet connection.
-
If you’re connected the internet, try to install the updates manually. Select Start > Settings > Update & Security > Windows Update , and then select Check for updates.
Check for updates
-
Run the Windows Update Troubleshooter. Select Start > Settings > Update & Security > Troubleshoot . Under Get up and running, select Windows Update.
-
If the Troubleshooter doesn’t fix the problem, see Troubleshoot problems updating Windows or Fix Windows Update errors.
The time required to download updates primarily depends on internet connection speed, network settings, and update size. Make sure your device is plugged in and connected to the internet to download updates faster.
You can’t stop updates entirely—because they help keep your device safe and secure, updates will eventually need to be installed and downloaded, regardless of your update settings. Here’s how to temporarily pause updates from being downloaded and installed. Note that after the pause limit is reached, you’ll need to install the latest updates before you can pause updates again.
In the Windows 10 November 2019 Update (version 1909) or later, or in Windows version 1809 for Pro or Enterprise, select Start > Settings > Update & Security > Windows Update . Then choose one of the following options:
-
Select Pause updates for 7 days.
-
Select Advanced options. Then, in the Pause updates section, select the drop-down menu and specify a date for updates to resume.
To finish installing an update, your device will need to restart. Windows will try to restart your device when you’re not using it. If it can’t, you’ll be asked to schedule the restart for a more convenient time. Or, you can schedule anytime by following these steps:
-
Select Start > Settings > Update & Security > Windows Update .
-
Select Schedule the restart and choose a time that’s convenient for you.
You can set active hours to make sure automatic restarts for updates only happen when you’re not using your device. Get updates when you’re away from your PC with active hours in Windows.
Try deleting files you don’t need, uninstalling apps you don’t use, or moving files to another drive like an external USB drive or OneDrive. For more tips on freeing up disk space, see Free up drive space in Windows.
We recommend keeping devices like laptops and tablets plugged in when you’re not using them. This way, if updates are installed outside active hours, your device will have enough power to complete the installation. Windows updates don’t consume more battery than other typical system processes.
An update history is available so you can see which updates were installed, and when. You can also use this list to remove specific updates, although we don’t recommend this unless it’s necessary.
Select Start > Settings > Update & Security > Windows Update > View update history .
We don’t recommend that you remove any installed updates. However, if you must remove an update, you can do so in update history.
-
Select Start > Settings > Update & Security > Windows Update > View update history > Uninstall updates.
-
Select the update you want to remove, then select Uninstall.
Feature updates are typically released twice per year and include new functionality and capabilities as well as potential fixes and security updates. Quality updates are more frequent and mainly include small fixes and security updates. Windows is designed to deliver both kinds of updates to devices through Windows Update.
To double check that your device is up to date, open Settings > Update & Security > Windows Update and see your update status and available updates.
Check for updates
Reserved storage is not automatically turned on by Windows in any update scenarios. It is only turned on for new devices with the Windows 10 May 2019 Update (version 1903) or later preinstalled, or devices on which a clean install was performed.
The best way to keep Windows 8.1 up to date is to turn on automatic updates. With automatic updates, you don’t have to search for updates online or worry about missing critical fixes or device drivers for your PC. Instead, Windows Update automatically installs important updates as they become available.
To turn on automatic updates:
-
Open Windows Update by swiping in from the right edge of the screen (or, if you’re using a mouse, pointing to the lower-right corner of the screen and moving the mouse pointer up), select Settings > Change PC settings > Update and recovery > Windows Update. If you want to check for updates manually, select Check now.
-
Select Choose how updates get installed, and then, under Important updates, select Install updates automatically (recommended).
-
Under Recommended updates, select Give me recommended updates the same way I receive important updates.
-
Under Microsoft Update, select Give me updates for other Microsoft products when I update Windows, and then select Apply.
Click the questions below to see answers about how Windows Update keeps your device up to date.
Note: If your PC is connected to a network where updates are managed by Group Policy, you might not be able to change settings related to Windows Update. For more info, contact your organization’s technical support.
Open Windows Update by swiping in from the right edge of the screen (or, if you’re using a mouse, pointing to the lower-right corner of the screen and moving the mouse pointer up), select Settings > Change PC settings > Update and recovery > Windows Update. To check for updates manually, select Check now.
An update history is available so you can see which updates were installed, and when. You can also use this list to remove specific updates, although we don’t recommend this unless it’s necessary.
To see your PC’s update history, open Windows Update by swiping in from the right edge of the screen (or, if you’re using a mouse, pointing to the lower-right corner of the screen and moving the mouse pointer up), select Settings > Change PC settings > Update and recovery >Windows Update > View your update history.
We don’t recommend that you remove any installed updates. However, if you must remove an update, you can do so in update history.
-
Open Windows Update by swiping in from the right edge of the screen (or, if you’re using a mouse, pointing to the lower-right corner of the screen and moving the mouse pointer up), select Settings > Change PC settings > Update and recovery > Windows Update > View your update history.
-
Select the update you want to remove, then select Uninstall.
Here are a few things to try if you’re having problems installing updates:
-
Make sure that your PC is connected to the internet. Some updates can’t be installed if you’re using a metered internet connection.
-
If you’re connected the internet and updates aren’t installed automatically, wait a few minutes and then try to install the updates manually.
-
See the Fix Windows Update errors guided walkthrough to try to fix the problem.
Support for Windows 7 ended on January 14, 2020
We recommend you move to a Windows 11 PC to continue to receive security updates from Microsoft.
Learn more
Click the questions below to see answers about how Windows Update keeps your device up to date.
To see your PC’s update history, select the Start button, then select Control Panel > Programs. Under Programs and Features, select View installed updates.
We don’t recommend that you remove any installed updates. However, if you must remove an update, you can do so in update history.
-
Select the Start button, then select Control Panel > Programs. Under Programs and Features, select View installed updates.
-
Select the update you want to remove, then select Uninstall.
Here are some things you can try if you’re having problems installing updates:
-
Make sure that your PC is connected to the internet. Some updates can’t be installed if you’re using a metered internet connection.
-
If you’re connected the internet and updates aren’t installed automatically, wait a few minutes and then try to install the updates manually.
-
See the Fix Windows Update errors guided walkthrough to try to fix the problem.
Note: If your PC is connected to a network where updates are managed by Group Policy, you might be unable to change settings related to Windows Update. For more info, contact your organization’s support person.
Recommended articles
Install Office updates
Activate Windows
How to use the PC Health Check app
Get started with Tips in Windows
How to reset your Microsoft account password
Fix Bluetooth problems in Windows
Normally, Windows Update does not require any administration. Microsoft is making it much like a set it and forget it tool. However, some applications require specific hotfixes and updates installed on your computer before they can run. For example, some applications require a specific version of .NET Framework, Visual C++ redistributable or Java, etc. Some apps require hotfixes instead of add-ons.
In this article, we will discuss how to view a list of all the Windows updates installed on your computer, whether they are feature updates, hotfixes or quality updates. There are several ways of doing this. We will discuss some ways of viewing and saving the list of installed updates in Windows 10. Each method has its own advantages. You can use whichever is suitable for your specific requirement. If you are a network administrator, you should pay attention to the command-line and PowerShell methods as these can be used to extract data from remote computers as well.
Also check how to run Windows Update using PowerShell and the command prompt.
Table of contents
- Using Windows Update History
- Using Command-line options — DISM/SystemInfo
- DISM
- SystemInfo
- Using PowerShell
- Using WinUpdatesList
So let’s start with the visual option first.
Using Windows Update History
- Go to Windows Settings (Windows key + i)
- Go to Update & Security
- Select Windows Update from the left-hand menu and click on View update history link on the right-hand side.

View update history in Windows 10

This will show you all the updates installed on your Windows 10 computer. The updates are categorized into the following categories:
- Quality updates
- Driver updates
- Definition updates
- Other updates
The only caveat in using this method is you can’t search for a specific update. You will have to go through the list of updates manually.
Using Command-line options – DISM/SystemInfo
There are two commands which can be used to extract Windows updates information from the system. Let’s discuss them one by one.
DISM
Run the following command to get all information about each hotfix installed on your computer.
wmic qfe list full
You can also format the output as a table so that it is easy to read and comprehend.
wmic qfe list full /format:table
If full information is not required, you can use the following command to get the summary:
wmic qfe list brief
And if you want to find a specific hotfix, run the following command:
wmic qfe list brief | find “KB4495667”
To save the complete output in a file, run the following command:
wmic qfe list full /format:table > C:\Users\Usman\Desktop\WindowsUpdatesReport.html

SystemInfo
If you only want a list of KnowledgeBase updates numbers, then you can use the systeminfo command.
- Open Command Prompt
- Run the following command
systeminfo | find “KB”
systeminfo hotfixes installed

Using PowerShell
Getting the same information which we got from command-line is easier in PowerShell.
- Open PowerShell with administrative privileges
- Run the following command:
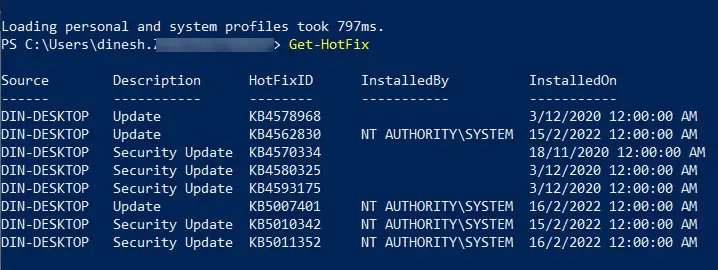
Get-Hotfix - This will list down all the hotfixes installed on the computer and also show the installation date of each hotfix.

PowerShell get hotfix

Using WinUpdatesList

WinUpdatesList is a third-party software which can be used for the same purpose. Since it is a portable tool, it can be run from a network location. The biggest advantage of using WinUpdatesList is that it will list down every update possible from Windows Updates, hotfixes, Windows Defender definition updates, .NET Framework updates, driver updates, etc. You can also save the update as CSV file. It will give you a lot of information about each update like its name, installation date, installed by (if you are on a domain network), update type, link to the hotfix page online, uninstall command (if available), last modified, etc.
Download WinUpdatesList
I hope these methods will be informative for you and it will become easier for you to view and save the list of all the installed updates and hotfixes in Windows 10 and even earlier versions of Windows including Windows Server. Which method do you prefer for your specific need and why? Your comments below will be highly appreciated.
On Windows 10, you can use “update history” to see a list of updates installed on the device when you want to check if a new update was installed successfully or failed to apply. The Windows 10 update history can also come in handy when you know more about a recently installed quality update. Or one of them is causing issues, and you need to uninstall it.
In this guide, you will learn the steps to view the update history of Windows 10 using the Settings app, Command Prompt, and PowerShell.
- Check Windows 10 update history from Settings
- Check Windows 10 update history from Command Prompt
- Check Windows 10 update history from PowerShell
Check Windows 10 update history from Settings
To view the Windows 10 update history, use these steps:
-
Open Settings on Windows 10.
-
Click on Update & Security.
-
Click on Windows Update.
-
Click the “View update history” button.

-
Check the recent history of updates installed on your computer, including quality updates, drivers, definition updates (Microsoft Defender Antivirus), and optional updates.


Once you complete the steps, you’ll better understand the successfully installed updates and those that failed to install.
If an update fails to install, you will notice an error code message, which you can use to research online to determine the reason and the steps to fix the problem.
If you click the link for each update, it will open on the Microsoft support website, which will offer more insights about the changes, improvements, and known issues (if any) about that particular update.
Microsoft hasn’t completely moved all the update settings to this app, which means that if an update is causing problems, you’ll need to click the “Uninstall updates” link to open Control Panel to remove it.
Check Windows 10 update history from Command Prompt
To view the history list of Windows 10 updates using Command Prompt:
-
Open Start.
-
Search for Command Prompt and click the top result to open the app.
-
Type the following command to view the update history and press Enter:
wmic qfe list
If you want to find a specific update, you can use the KB number, typing the following command and pressing Enter:
wmic qfe | find "5020872"
-
Check the “Windows Update history” of your computer.


After you complete the steps, you will get a list with links to the Microsoft support website to know the contents of the updates. You’ll also see the installation date, description, hotfixid (KB number), and more.
Additionally, if you want to uninstall a specific Windows 10 update using Command Prompt, you can use its KB number and run this command: wusa /uninstall /kb:5015807 /quiet. Remember to change “5015807” with the KB number for the update you want to uninstall.
Check Windows 10 update history from PowerShell
Alternatively, you can use the Microsoft PSWindowsUpdate module to manage updates through PowerShell.
To see the history list of updates installed on the computer, use these steps:
-
Open Start.
-
Search for PowerShell, right-click the top result, and select the Run as administrator option.
-
Type the following command to install the PowerShell module to update Windows 10 and press Enter:
Install-Module PSWindowsUpdate

-
Type A to accept and install the module and press Enter.
-
Type the following command to view a list of the 20 most recent updates and press Enter:
Get-WUHistory | Select-Object -First 20


Once you complete the steps, the device may need to restart to complete the process. You can always change 20 for the number of updates you want to see in the command.
The PSWindowsUpdate module also allows you to install updates and uninstall patches causing problems after a Patch Tuesday rollout.
Though the purpose of Windows updates is to enhance the system performance, speed and security, sometimes that can create an issue too. It is very important to identify which updates were installed recently if you face issues with Windows OS or applications on your computer.
When you manage the server administration, you must take extra care while installing Windows updates. Some updates may cause problems with the installed applications or client-server setup. This guide explains where and how to view the installed updates/patches on your Windows 10/11 PC and Windows 2012 R2 (and the latest servers).
Checking the installed Windows update is not a tough task, but you may miss or confuse the place you must check since each interface on every Windows Operating System is different.
It can be checked in the control panel. That will show the details of updates with its KB number and date of installation.
1. To go to the ‘Windows Update’ settings, type ‘Update’ in the search. This will take you to the settings app on Windows 10 or 11. Click on ‘Windows Update settings’ as below.

2) On the next screen, click Advanced options to see the history of installed updates.

3) Click on ‘View your update history.’
 Here it will show the installed updates on your Windows 10 desktop or laptop computer.

Few Drawbacks in this Method
- Unfortunately, this will not show all the updates on your computer. It shows the recent success or failure updates only.
- You can’t directly uninstall a specific update from this settings app; you have to click on ‘Uninstall updates, ’ which will take you to classic control panel settings.
Best Way to Check Installed Updates/Patches on Windows 10/11/2012 R2/2016/2019
Go to the classic (we call it ‘normal’) control panel and click on ‘Programs and Features’.

Here you can view the installed updates on the server or client Operating System with the installation date. It is easy to select individual installed updates and uninstall them (if you think that particular update is causing the issue on your computer or server).
View Windows Update Patches History in Command Prompt and PowerShell
We can use a few commands to check the Windows patch history in Windows client and Server Operating Systems. It is an ideal way to use when you connect a remote computer/server or in a Windows server core installation.
Open command prompt or Powershell and enter the below command to see the installed patches and hotfixes with the installation date in table format.
wmic qfe list full /format:table

If your computer has plenty of updates and you need to find the specific update, use the KB number in the below command.
wmic qfe | find “5007401”
Here is a similar PowerShell command:
Get-Hotfix
You can find more about each update and its implication by searching on Google or Microsoft websites for the particular KB number.
How to Remove a Windows Update from CLI?
It is possible to uninstall a particular Windows update/patch from the command prompt or PowerShell if you have administrative access.
Use one of the commands to find the installed updates and correct KB numbers, then execute the below command.
wusa /uninstall /kb:5010342
/quiet
/norestart
Those are additional keys you can use to uninstall without notifying the user and not restarting the computer or server.

We hope this guide will be useful for finding out the installed Windows updates on Windows 10/11, 2012 R2 and any server Operating Systems.
It is important to make sure that your computer is receiving timely updates and is up to date with all the security and software updates released by Microsoft. You will find below the steps to check or view installed updates in Windows 10.

The main purpose of Windows Updates is to fix security bugs and enhance the performance of your computer.
However, it is not uncommon to find computers developing problems and suffering from performance issues following a Windows update. This can happen due to some of the device drivers becoming incompatible with the update and other reasons.
In such cases, it becomes necessary to view installed updates on your computer and uninstall a particular update, in case the problem on your computer can be traced back to this update.
Checking for installed Updates in Windows 10 is a fairly simple task, it can be done using Settings App or by using Control Panel.
Check Installed Updates Using Settings App
Follow the steps below to View Installed updates in Windows 10 using the Settings App.
1. Click on Windows 10 Start button and then click on the Settings icon.
![]()
2. On the Settings screen, click on Update & Security icon.

3. On the Update & Security screen, click on Windows Update in the left pane and then click on View Installed update history link in the right pane.

4. On the next screen, you will see the list of Updates installed on your computer.
While it is easy to View Installed Updates in Windows 10 using the Settings App, this method does not show all the Windows Updates installed on your computer, it only shows the most recent updates.
Also, you won’t be able to uninstall a particular update from the Settings screen (in case required). You will have to click on Uninstall Updates link which takes you to the classic control panel screen.
View Installed Updates in Windows 10 Using Control
Follow the steps below to view installed updates in Windows 10 using the Control Panel
1. Open Control Panel on your computer by clicking on Start > Windows System > Control Panel.

2. On the Control Panel screen, make sure that you are in Category View and then click on Programs.

3. On the Programs screen, click on View Installed Updates option located under Programs and Features.

4. On the next screen, you will be able to see the complete history of Updates installed on your computer.
5. In case you want to Uninstall any update, right click on the Update and click on Uninstall.

Choose How Updates Are Installed in Windows 10
Windows Home users can only choose from the following 2 options as far as updates are concerned.
- Automatic (Recommended)
- Notify to schedule restart.
Microsoft recommends that you go with the Automatic Update option. If you select Automatic Update, Windows 10 will regularly check for updates, download and install the updates on your computer, automatically.
In case you select the second option (Notify to schedule restart), you will be able to select a scheduled time to restart your computer, in order to finish installing updates on your computer.
In case of Enterprise Users, Microsoft allows users to select when they want to download and install the Updates.
- How to Turn Off Automatic Updates in Windows 10
- How to Fix Stuck Windows 10 Update