Sign in with Microsoft
Sign in or create an account.
You have multiple accounts
Choose the account you want to sign in with.
-
Open File Explorer from the taskbar.
-
Select View > Show > Hidden items.
-
Open File Explorer from the taskbar.
-
Select View > Options > Change folder and search options.
-
Select the View tab and, in Advanced settings, select Show hidden files, folders, and drives and OK.
Need more help?
Want more options?
Explore subscription benefits, browse training courses, learn how to secure your device, and more.
Communities help you ask and answer questions, give feedback, and hear from experts with rich knowledge.
Thank you for your feedback!
×
Here’s how to display hidden files and folders.
Windows 10
-
In the search box on the taskbar, type folder, and then select Show hidden files and folders from the search results.
-
Under Advanced settings, select Show hidden files, folders, and drives, and then select OK.
Windows 8.1
-
Swipe in from the right edge of the screen, then select Search (or if you’re using a mouse, point to the upper-right corner of the screen, move the mouse pointer down, and then select Search).
-
Type folder in the search box, then select Folder Options from the search results.
-
Select the View tab.
-
Under Advanced settings, select Show hidden files, folders, and drives, and then select OK.
Windows 7
-
Select the Start button, then select Control Panel > Appearance and Personalization.
-
Select Folder Options, then select the View tab.
-
Under Advanced settings, select Show hidden files, folders, and drives, and then select OK.
Need more help?
Want more options?
Explore subscription benefits, browse training courses, learn how to secure your device, and more.
Communities help you ask and answer questions, give feedback, and hear from experts with rich knowledge.
Find solutions to common problems or get help from a support agent.
Статья обновлена: 13 июля 2022
ID: 3580
В некоторых случаях вам могут понадобиться файлы и папки, которые по соображениям безопасности могут быть скрыты от просмотра. Проверьте, включен ли на вашем компьютере режим отображения скрытых файлов и папок.
Windows 11
Windows 10
Windows 8, 8.1
Windows 7
Windows Vista
Windows XP
Спасибо за ваш отзыв, вы помогаете нам становиться лучше!
Спасибо за ваш отзыв, вы помогаете нам становиться лучше!
In this post, we will see how to show Hidden Files, Folders & Drives along with Protected operating system files in Windows 11/10/8/7, via File Explorer Options in the Control Panel or by using the Command Prompt and PowerShell.
On most days, you would not want to be bothered by the hidden Windows files on your computer. After all, the last thing that an average Windows user needs is some more data to deal with. On some rare instances though, or if you know what you’re getting yourself into, you may need access to these hidden files to make changes to Windows apps or system settings. These hidden files aren’t readily viewable when you open their parent folder(s) in the File Explorer. Ee will walk you through the steps needed to be taken to show hidden files and folders using the Explorer Options, Windows Command Prompt and the PowerShell, two of the strongest methods for the purpose.
Show Hidden Files & Folders in Windows 11/10 via Explorer Options
You will have to open the Control Panel and then select the File Explorer Options in Windows 11/10. File Explorer Options is referred to as Folder Options in Windows 8.1/7.
To show Hidden Files, Folders & Drives on your Windows 11/10 computer:
- Open File Explorer Options
- Click on the View tab
- Locate Hidden Files & Folders
- Select the Show Hidden Files, Folders and Drives option
- Click on Apply and Exit.
You can also open File Explorer Options in Windows 11 as follows:
1] Launch File Explorer on Windows 11.
2] Click on the three horizontal dots and select Option. This will open the Folder Options window.

3] In the Folder Options window, click on the View tab and select the radio button that says Show hidden files, folders, and drives.

4] Click Apply and then OK.
Alternative method via Explorer Menu bar
In Windows 11, you can open Explorer > View > Show > Select Hidden items.
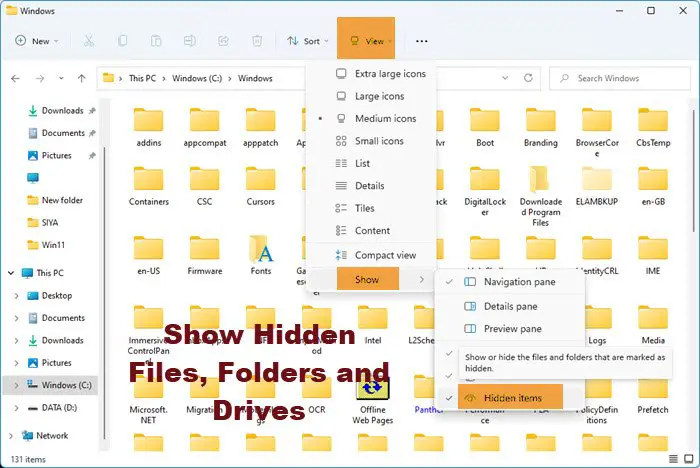
In Windows 10, open Explorer, select the View tab and toggle the Hidden items checkbox to short or hide files and folders.
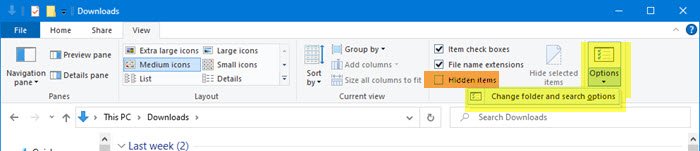
For your information, you can also access the Change folder and search options box from here.
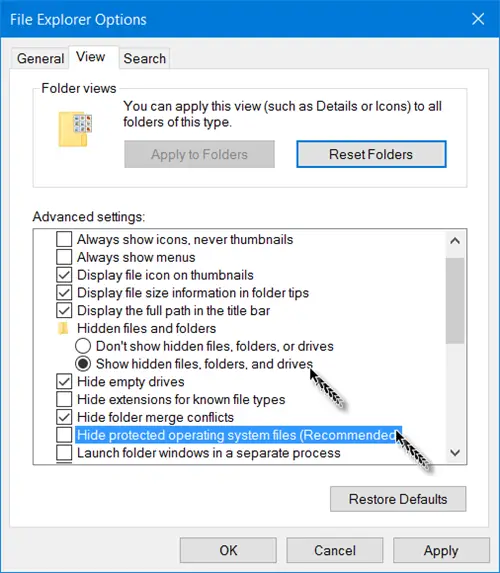
Unhide Protected operating system files
If you wish to unhide and show the Protected operating system files, you need to also uncheck the Hide protected operating system files (Recommended) setting in File Explorer Options, and click Apply.
Show hidden files using Command prompt
The process here is pretty simple. Here are the steps you have to follow:
Open the start command and search for Command Prompt. Select to run it as administrator.
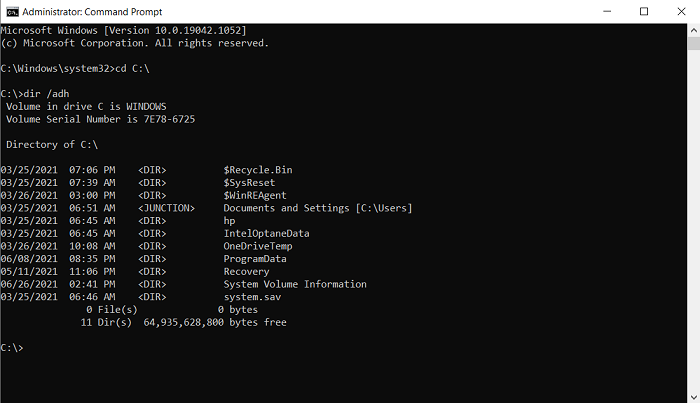
Make a note of the folder in which you want to look for hidden files. For the purposes of this article, we will be using the C:/ drive. Access your drive by using the change directory command cd. Our first command line will look something like
cd C:\
Now, type out the following command line which will show you all the hidden files in the location that you’ve chose
dir /adh
This will show to you all the hidden files, in this case, in the C:/ drive. There are some other keywords that you can use with the dir command if there is some specific information you are looking for. They’re all to be used in a similar manner:
- /a – this will show you only the hidden folders.
- /a:d – this will show you all the directories.
- /a:h – this will show only the hidden files.
- /adh – (The one we’ve used) Gives you all the above information combined.
Let’s now talk about PowerShell and how this process can be replicated there.
Show hidden files using PowerShell
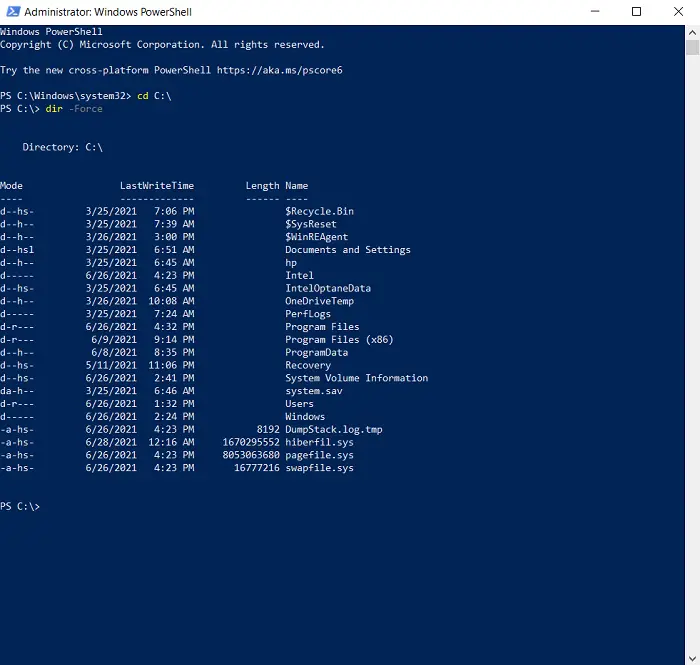
- Open the Start Menu and search for PowerShell, run it as administrator. (You can do the same via the Power User Menu too.)
- The process here is quite similar. Access the location of your choice with the change directory keyword cd. It is used the same way as it was in the Command Prompt.
- Once you’re into the location, type the following command line which will display to you all the hidden files inside it.
dir -Force
- You can browse through the hidden files in a folder inside the drive’s root folder by adding that folder’s name to the cd command. Eg., cd C:\Program Files.
- Once you’re inside this particular folder, type/copy the following command and press enter:
Get-ChildItem -Filter *.* -Recurse -Force -ErrorAction SilentlyContinue | where { $_.Attributes -match “Hidden”}
There is a strong chance that the above command line may return a very high number of hidden files and folders, making it impossible for you to actually read through them.
In that case, you can copy the resultant output and have it saved in a text document by modifying the command line. Simply add a >log.txt to the end of the above Get-ChildItem command and all the data will be saved to a text file named log.txt.
TIP: There is another way! You can use attrib.exe to change File Attributes, and/or show the hidden files.
This post will show you how to make a File or Folder Hidden or Read Only.
If you wish to, you can also list all the hidden files & folders on your Windows computer.
BONUS TIP:
- If you find that the Show Hidden Files, Folders and Drives option is missing, then this registry tweak is sure to help you.
- Alternatively, you could use our freeware FixWin to fix this problem. You will find the fix under its Explorer section.


- You can show hidden files on your Windows 10 computer that are initially invisible when you look for them, which means they were marked as «hidden» by default.
- To view these hidden files on Windows 10, you’ll need to tell your computer to show «Hidden Items.»
- It’s also easy to mark your own files and folders as hidden, which will make them harder for others to find.
- Visit Business Insider’s homepage for more stories.
There are a few reasons you might need to view a hidden file on Windows 10.
Maybe a folder is bigger than the files in it, and you want to see why. Or you’re pretty sure a virus has infected your computer, and you think you know where it might be. Or maybe you’ve been using hidden folders as a way to keep your private files away from prying eyes.
Whatever the case, viewing these hidden files and folders is a simple process.
How to show hidden files or folders on a Windows 10 computer
1. Press the Windows icon at the bottom-left of your screen. and search for the This PC application. Click it to open it.
Ross James/Business Insider
2. You’ll be greeted with a listing of all your computer’s drives. Open the one that has the files you’re looking for. In most cases, «C:» will be the one you need.
3. Once you’re on the next page, at the top of the window there should be a toolbar with a button that says «View.» Click on that.
4. Find the checkbox called «Hidden Items.» Click it so that a checkbox appears.
Ross James/Business Insider
5. As long as Hidden Items remains checked, you’ll be able to view any hidden file or folder.
You can tell that a file or folder was marked as hidden by its icon, which will be slightly transparent.
You can also mark a file or folder as hidden, which is a good way to keep your files private. Here’s how:
How to make a hidden file or folder on a Windows 10 computer
1. Find the file or folder you want to hide.
2. Right-click it, and select «Properties.»
3. In the menu that appears, check the box that’s labeled «Hidden.»
Ross James/Business Insider
4. Click «OK» at the bottom of the window.
5. Your file or folder is now hidden.
You can uncheck a hidden file or folder at any time to make it visible.
Usually system files and folders are hidden for a reason, and it’s best to know that reason before you edit files that are hidden by default.
Related coverage from How To Do Everything: Tech:
-
How to add a printer to a Windows 10 computer, whether it’s wired or wireless
-
How to change your Windows password to protect your computer, or reset the password if you’ve forgotten it
-
How to set up dual monitors on your Windows 10 computer and double the screen size of your workspace
-
How to change the screen brightness on any Windows 10 computer in 2 ways
Ross James is a freelance writer for Business Insider.
Read more
Read less
Insider Inc. receives a commission when you buy through our links.