Pre-requisites: Windows OS, Docker
Before understanding the concept of Docker, let’s first discuss the concept of Hypervisors. So in an IT Company, or any cooperate, there is a development team, a testing team, and an operation team for developing the application, testing it, and deploying it. Now suppose the developers are working on a different OS, for example, let’s say macOS, and they used some dependencies or libraries as per the language they are using, so they just won’t hand the software to the testing team, but also the libraries, but now, the application didn’t run o the tester’s machine, but it worked on the developer’s machine, maybe because the tester’s machine has different OS features than the developer’s one, so now, devs have to send the OS, but that is not practically possible, as one can’t just copy the C drive and hand it over, that’s where the concept of Hypervisors comes into the picture, think of this as a virtual machine or Wim-ware, so you have the physical hardware, you host an OS on it, and the OS can now host another OS also called Guest OS, and this guest OS can be packed and send to the testing team.
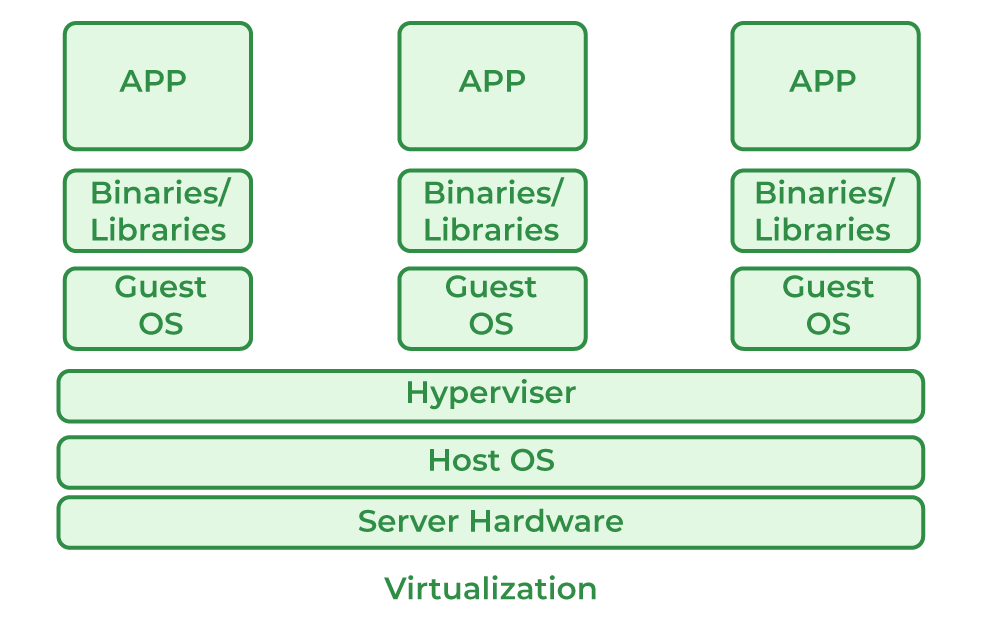
But the problem here is, for every application, one needs a different OS, this will result in a waste of resources as multiple OSs will be running. So for this problem, we have the concept of Containers, the difference between Hypervisors and containers is that we don’t need multiple OS for every application, multiple applications can share the same OS kernel, great isn’t it? So instead of installing HYPERVISOR, we will be installing Docker.

What is Docker?
Docker is an open-source platform where we run our applications in the form of containers. Docker containers are very light in weight and contain all the dependencies and configurations so we can run them across different computing environments. Developers can package all the dependencies of the application in the form of images it can be portable easily or shared easily with other developers without worrying about the underlying OS.
Requirements
- Windows 11 64-bit: Home or Pro version 21H2 or higher, or Enterprise or Education version 21H2.
- Windows 10 64-bit: Home or Pro version 21H2 or higher, or Enterprise or Education version 21H2.
- 4GB RAM or Higher.
- Hyper V feature must be enabled in Windows.
Specifications
- RAM: The minimal amount of Memory needed to run containers smoothly is 4GB, however, if a program has more complicated functions, it will need more than 6 GB RAM.
- Storage: For running the containers and installation of docker the minimum space required is 25GB. If you want to store the container images and data then we need at least more than 35 GB to 40 GB.
- Network: To download, push and pull the images we need active internet then only we can maintain the container images with the help of docker.
- CPU: At least a 64-bit processor is required for docker.
Docker can be run on a laptop with 4 GB of Memory, a 64-bit processor, and 25 GB of storage. It might change based on our use cases.
Step-By-Step Docker Installation On Windows
Follow the below steps to install and configure Docker on Windows:
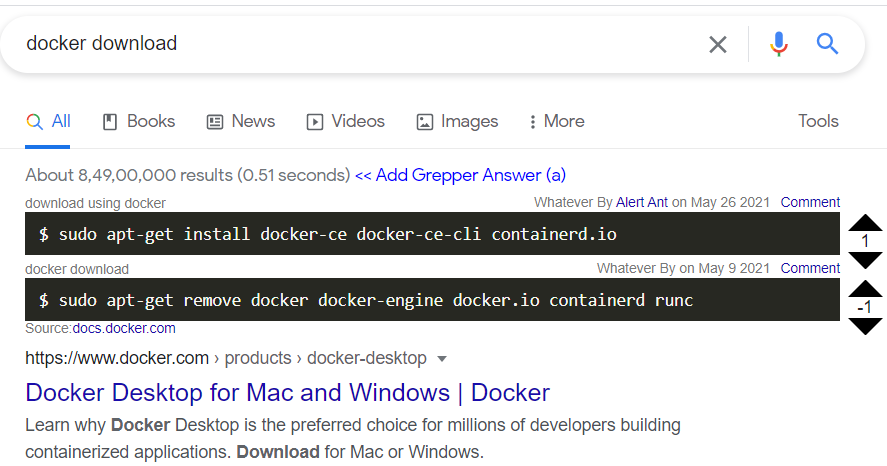
Step 1: For installation of Docker, go to your favorite browser(chrome will be used here, but it can be done by using any browser). In the search bar, type Docker download. And click on the first link that appears.
Step 2: After clicking the link, choose your OS, be it Windows, MAC, or Linux for installation.
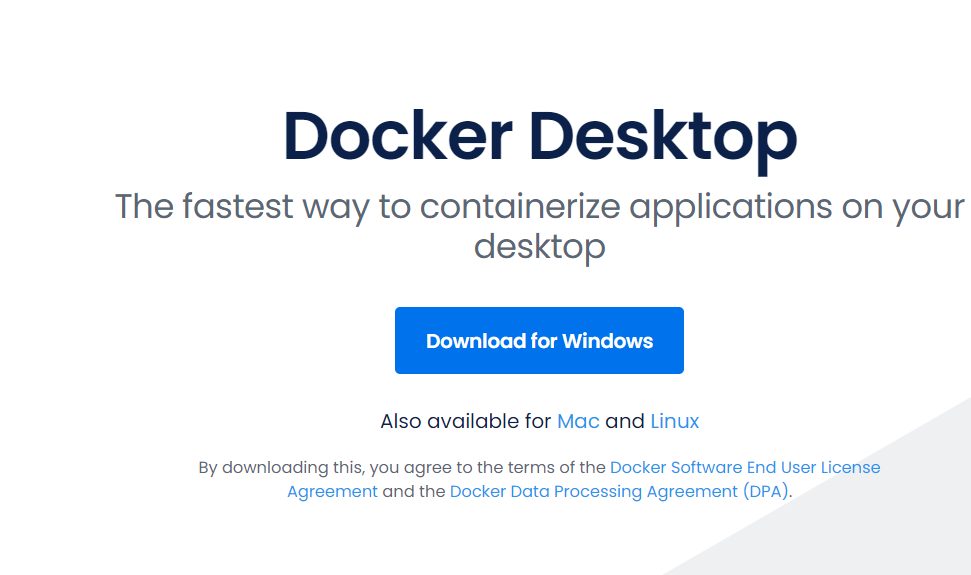
Step 3: The download will start, and based on your internet speed, it will take some time to do so. To know more about docker desktop installation visit Docker Desktop.
Start Docker Desktop Tool
Step 1: After installation, it will look something like this in Windows:
- Open the Docker Desktop.
- Accept the Docker Subscription Service Agreement window. and click On continue. Docker Desktop will start after we accept the terms and conditions.
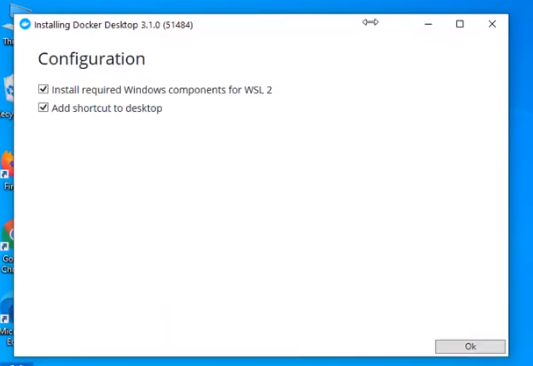
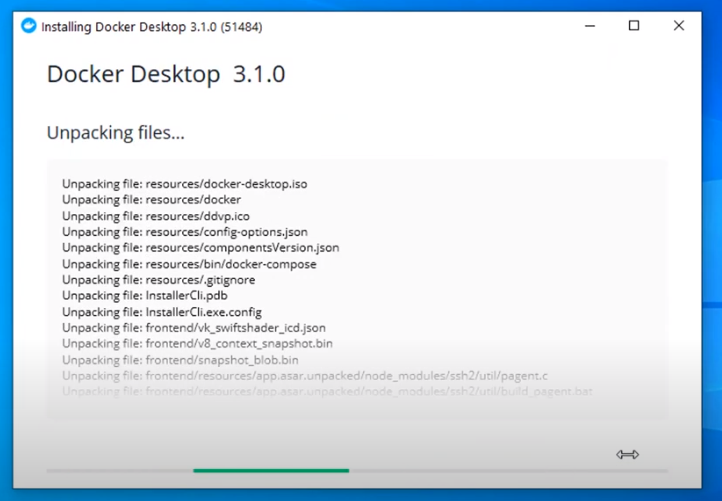
Step 2: After clicking Ok the installation will start.
Step 3: After installation, it will show something like the below:
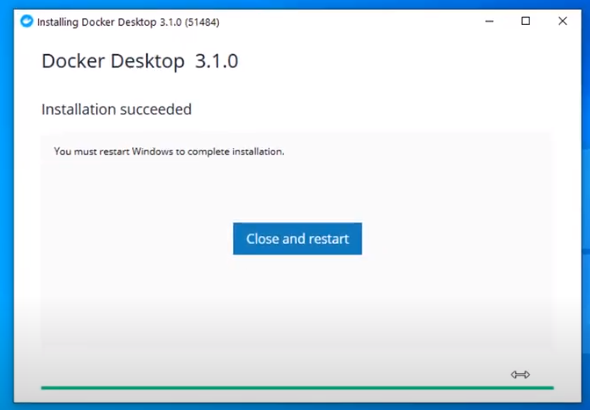
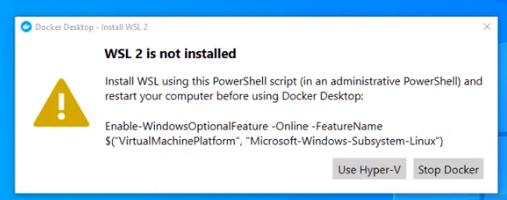
Step 3: After installation, we need to restart our PC and install WSL 2, which stands for Windows Setup for LINUX. It is a compatibility layer for running Linux binary executables natively on Windows 10. Please follow the next few instructions carefully. After restarting, the following dialog box will appear, then click on the Stop Docker button there.
Step 4: After clicking, we need to enable the Hyper-V, for that we will restart the PC and go to BIOS setup, Settings>Update and Security>Recovery>Advanced Setup>Device Configuration. After that, if the option Enable Turbo Boost on DC. is unmarked, mark it, after it, save, and exit.

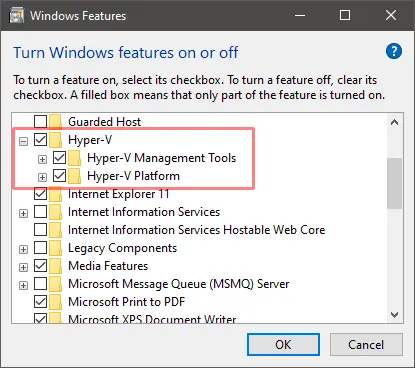
Step 5: Afterward, in the last step, go to Control Panel> Turn Windows Features on and off. Then for activating Hyper-V, mark the Hyper-V and Windows Hypervisor Platform.
At this point, you have successfully installed and configured Docker on your Windows machine.
How To Install From The Command Line?
To install the Docker desktop, follow the procedures listed below.
Step 1: Run the following command in the Command prompt.
start /w "" "Docker Desktop Installer.exe" install
Step 2: Add user account into docker user groups.
net localgroup docker-users <users>/add
Verification
Verify the docker installation and versions,
1. Run the following command in the command prompt to check the docker version.
docker --version
2. After that we will receive a Beta invitation email When you start docker for the first time.
How To Install Docker On Windows 10?
You must perform the following steps in order to install Docker on Windows 10:
Step 1: In this step, we must assure that our Windows can support Docker the minimum requirement is Docker requires 64-bit Windows 10 Pro.
Step 2: You can download the docker by using this link “https://www.docker.com/products/docker-desktop”.
Step 3: Once the installation is finished go to the start menu and open Docker Desktop. Enable Hyper-V and Windows Subsystem for Linux features after enabling Docker Desktop will automatically restart. After restarting you can open the Docker Desktop and start using it.
Step 4: To test whether the Docker Desktop is installed or not open the command prompt or PowerShell window and run try to pull the sample image for example Nginx if the image is pulled then the Docker installation in Windows was completed successfully completed.
How To Install Docker On Windows 11?
First, make sure that your Windows matches Docker’s requirement Docker requires 64-bit Windows 11 Pro, and the rest all the steps are the same as Windows 10.
How To Update The Docker In Windows?
By following the steps mentioned below we can update our Docker:
Step 1: Open the Docker Desktop from the start menu.
Step 2: Click on the settings and click on the “resource” tab there we can find an option called “Check for Updates.”Docker Desktop will check for any available updates.
Step 3: If any update is available Docker will show us like “Download and Install” Directly click on it Docker Desktop will automatically download it after completion of installation you can the Docker version by using the following command in the command prompt or PowerShell window.
docker version
Advantages of Docker In Windows
- Docker for Windows allows developers to their applications easily on any Windows.
- Docker can be installed very easily on Windows.
- Docker containers can be moved in between Windows and Linux without changing the Source code.
- The application is isolated from the underlying OS which makes it more secure.
Uninstall Docker Desktop Tool
To uninstall the Docker Desktop follow the steps mentioned below.
- Find “Add or Remove Programs” in the start menu and choose it.
- Click Docker Desktop when you see Docker in the list of installed programs.
- When you click on uninstall in Docker Desktop, be sure to follow the steps that appear.
- After the uninstallation is complete, restart the computer.
How To Install And Enable WSL 2 On Windows
Before installing docker by using WSL 2 make sure your Windows is supported for that and then install and enable WSL2 on your laptop.
Step 1:Enter the following command as an administrator to enable the Windows Subsystem for Linux feature.
dism.exe /online /enable-feature /featurename
:Microsoft-Windows-Subsystem-Linux /all /norestart
Step 2: In this step, you need to enable the virtual machine platform feature to enable it to run the following command in Powershell as an administrator
dism.exe /online /enable-feature /featurename
:VirtualMachinePlatform /all /norestart
Step 3: After running the above command you need to restart your computer by this the virtual machine platform feature will be enabled.
Step 4: Know download and install WSL 2 Linux kernel updated package from the official website of Microsoft
Step 5: Make WSL 2 the standard version. Run the following command when logged in as an administrator in Windows PowerShell.Install a Linux distribution by using the Microsoft Store. You can pick from a variety of Linux distributions, including Kali Linux, Debian, and Ubuntu.
wsl --set-default-version 2
After completing the above steps we can use execute Linux commands on your windows using WSL 2.
How To Install Docker With WSL 2 Backend On Windows?
Utilizing dynamic memory allocation will help the WSL 2 backend consume resources more efficiently. which enables us to launch Docker very quickly and improve Docker’s speed. To make this happen please follow the steps mentioned below.
Step 1: Install and enable WSL 2 on Windows by following the steps outlined in the previous answers. And install Docker Desktop as mentioned above for Windows.
Step 2: Once the Docker Desktop installation is completed open the setting in Docker Desktop click on the resources tab and click on WSL 2 integration. Click “Apply & Restart” to apply the changes.
Step 3: Open a terminal in your WSL 2 distribution and use the following command to confirm that Docker is operational after Docker Desktop has restarted.
docker pull ubuntu
If the image is successfully retrieved, WSL 2 has likely been deployed as a backend for Docker. The WSL 2 backend now allows you to use Docker to construct and manage containers on your Windows computer.
Note: The Docker CLI interacts with the Docker daemon running in the Windows Docker Desktop application when you issue Docker commands in your WSL 2 terminal.
Conclusion
In this article, we covered a step-by-step procedure to install docker in Windows 11 and Windows 10. We also covered how to install docker in Windows 10 and 11 with the help of the Command line. Refer to Install in Mac and Ubuntu to know more about installation in different OSs.
Since the emergence of DevOps, there had been a lot of buzz around it as DevOps is a combination of tools, framework, and automation. DevOps aimed to align the Dev and Ops team with shared goals. DevOps practices are applied to other teams as well. For more information about the DevOps training and certification, refer DevOps tools courses
DevOps is a mindset, not a toolset. But nothing could workout in an IT team without proper tools. DevOps teams use tools to accelerate and automate the process, thereby ensuring continuous integration, continuous delivery and automation.
The need for DevOps can be understood by the following example. A developer builds an application and sends it to the tester. But, the environments of development and testing systems are different; thus, the code does not work. There are two solutions to this: Docker and Virtual Machines, but Docker is far better in terms of performance, scaling, and efficiency.
DevOps teams could also get benefit from emerging technologies like AI/ML. The AI/ML teams can create patterns for DevOps teams so that the DevOps team can leverage the opportunity to find coding problems that cause bugs so that the DevOps teams can dig deeper into it.
CI/CD is an essential part of DevOps, it maximizes the development phase thereby reducing the time and effort in integrating, testing and deploying the components. The CI/CD practice shifts the focus of the team on to development thereby increasing the organization productivity, efficiency, testing and collaboration.
What is DevSecOps?
In some of the DevOps models, security teams get aligned with development and operations and throughout the application lifecycle to ensure that the development meets all the compliance requirements from the beginning of the application itself. When there is a focus on security in the DevOps team, then it is referred to as DevSecOps.
DevSecOps can be applied to any environment such as cloud native, on premises, hybrid etc.
Docker — An Overview
Docker is a platform that enables creating, deploying, and running applications with the help of containers. A container is a unit of software that packages the code and all its dependencies together such that the application becomes runnable irrespective of the environment.
Container isolates their application and its dependencies into a self-contained unit that can run anywhere. Container removes the need for physical hardware allowing for more efficient use of computing resources. They provide operating-system-level virtualization. Moreover, developers can collaborate faster without worrying about which software dependency they need to install.
A container is a runnable instance of an image. An image is a read-only template with instructions for creating a Docker container. To get more knowledge on docker refer to Kubernetes and docker certification.
Docker is an open source software platform to create, deploy and manage virtualized application containers on a common operating system. Docker packages, provisions and runs containers. Docker packages the application with its all necessary configuration files, dependencies .Each container shares the common underlying Operating system. Software Developers can create containers without docker, but docker makes it more easier to build, safer and simpler to build and deploy containers.
Docker components
- Docker Engine: It handles the underlying tasks and applications involved in building container-based applications
- Docker Hub: It is SAAS tool that enables users to publish and share their applications through a common library.
- Docker CLI: It is a command line interface tool which is used to run docker commands
- Docker File: It is a simple text file which containers instructions for how to build a container
- Docker Daemon: It is a service which runs in the operating system.
- Docker Registry: It enables you to track image versions in repositories, using tagging for identification
- Docker Containers: It is live, runnable instances of docker images.
- Docker Image: Docker image is bundle of application source code along with all its dependencies, tools and libraries.
Why to Use Docker?
Docker enables
- Improved and seamless portability
- Light weight applications
- Automated container creation
- Container Reuse
- Container Versioning
- Shared Container Libraries
Docker Architecture
It consists of a Docker Engine which is a client-server application with three major components:
- A server is a type of long-running program called a daemon process (the docker command).
- A REST API specifies interfaces that programs can use to talk to the daemon and instruct it on what to do.
- A command-line interface (CLI) client is used to run docker commands.The docker commands are used to start,stop and configure docker
.png&w=3840&q=75)
How to Install Docker on Windows?
- Double-click Docker Desktop Installer.exe to run the installer.
- If you haven’t already downloaded the installer (Docker Desktop Installer.exe), you can get it from Docker Hub.
- Once the application is installed, follow the instructions from the installation wizard and proceed with the installation
- Confirm the installation process, Close the wizard once the installation is successful.
Install from Command Line
1. After downloading Docker Desktop Installer.exe, run the following command in a terminal to install Docker Desktop
«Docker Desktop Installer.exe» install
2. If you’re using PowerShell you should run it as
Start-Process ‘.\win\build\Docker Desktop Installer.exe’ -Wait install
3. If using the Windows Command Prompt
start /w «» «Docker Desktop Installer.exe» install
4. Docker desktop doesn’t start automatically after installation. Search for Docker Desktop in windows and select
.png&w=3840&q=75)
Before starting the application, Docker offers an onboarding tutorial. The tutorial explains how to build a Docker image and run a container.
- In order to proceed with the installation, Click the check box to accept the user terms and conditions
- Next, follow the instruction below to install the Docker engine on your system.
- Go to Docker CLI and run the Docker version to verify the version of Docker installation on the system.
Here is a list of elements you should have in order to create and run Docker containers:
- Docker Engine: It runs on the host machine to build and run containers
- Docker Daemon: It manages Docker containers
- Docker Client: It runs commands. The command is translated using REST API and delivered to the Docker Daemon
- Docker Compose: It runs two containers in a single service.
How to Start Docker Daemon on Windows?
To start docker in daemon mode, navigate to docker file location where the docker desktop app is installed and run the dockerd.exe
Sometimes there might be an issue with docker like docker daemon not starting, in order to resolve the issue, one can try the following resolution.
Resolution 1: Restart the docker service, Go to start→search→services.msc. From the services, screen click on Docker Desktop services→restart.
Resolution 2: Using DockerCli.exe, one can switch daemon configuration. One can use the below command to point the docker CLI to either linux or windows.
From powershell,
PS C:\Program Files\Docker\Docker> ./DockerCli.exe -SwitchDaemon
Resolution 3: Restart the docker services using GUI. From the docker GUI, Settings -> Reset – Restart Docker Desktop.
What is Docker wsl2?
By enabling the wsl2 engine for docker, it enables user to leverage Linux workspaces and users to avoid maintaining both Linux and window build scripts. This enables the docker windows container on Linux.
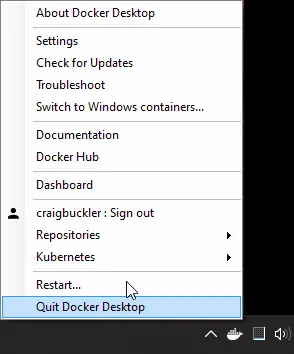
How to Switch Between Windows and Linux Containers?
From the Windows desktop menu, you can select which daemon the docker CLI talks to. One can select ‘Switch to window containers’ to use window containers and select ‘Switch to Linux containers’ to use Linux containers.
To uninstall Docker Desktop from your Windows machine
- Navigate to the Windows Start menu, select Settings > Apps > Apps & features.
- Select Docker Desktop from the Apps & features list
- Select and Click Uninstall
- Confirm once the tool gets uninstalled.
Conclusion
Installing the docker on windows can be done by following the above-mentioned steps. One can use docker CLI windows to start, stop and configure the containers. Above are mentioned steps to install docker on windows. For more information refer to docker classes.
For many developers, Docker is the platform for creating and deploying applications in self-sufficient containers. It is an OS-level virtualization platform that helps users build and manage applications without worrying about dependencies and underlying OS.
In this guide, we will see how to install Docker desktop on Windows 10 or Windows 11. We’ll also mention the benefits of Docker on Windows and how you can uninstall it from the Windows environment.
Let’s start with the benefits of Docker on Windows.
Table Of Content
- What are the Benefits of Working with Docker on Windows?
- Install Docker on Windows 10 & 11
- Prerequisites
- Install Docker Desktop on Windows 11
- Start Docker Desktop Tool
- How To Install Docker on Windows 10?
- How to Install Docker From the Command Prompt
- Uninstall the Docker Desktop Tool
- Conclusion
What are the Benefits of Working with Docker on Windows?
Docker on Windows brings a range of benefits to the development process and application deployment, including:
- The simple user interface allows you to view and monitor all Docker containers from one location.
- Docker takes care of allocating the required resources and memory space for the containers.
- Supports HTTP proxy settings
- Docker allows developers to create containerized applications that can run in a Windows environment. This makes it easy to build and test applications on Windows and then deploy them to other platforms without compatibility issues.
- Docker images can be easily moved between development, testing, and production environments, which makes it easier to maintain consistency and reduce the risk of errors or bugs caused by differences between environments
Like all environments, you need the following elements to run Docker containers in a Windows environment:
- Docker Engine: This runs on the host machine to build and run containers.
- Docker Client: This receives the commands from the users, translates them into REST API, and delivers them to the Docker Daemon.
- Docker Daemon: This manages Docker containers
- Docker Compose: This runs multiple container applications.
Now that you know what you need, we’ll explain the installation process of Docker on the Windows operating system.
Before we discuss the installation process, we should go into the details of prerequisites and related information so that you have a solid foundation on installing Docker on Windows 10 & 11, especially if using it with a dedicated server.
Prerequisites
- Windows 10 64-bit or Windows 11 64-bit (version 2004 or higher for Pro edition; version 1909 or higher for Enterprise and Education editions)
- The target machine should have a 64-bit processor with support for Second Level Address Translation (SLAT).
Minimum 4 GB RAM. - BIOS settings and hardware virtualization support must be enabled.
- Support for Windows Hyper-V enabled.
- Support for Older Windows versions
Install Docker Desktop on Windows 11
Let’s start with the process of installing Docker Desktop on Windows 11. The process involves several steps that are detailed below.
- Visit the Docker Desktop For Windows download page and download the Docker Desktop installation file.
Note: The target machine should have a 64-bit processor and 4GB system RAM to run Docker successfully on Windows 10.
- Run the installer and remember to enable the Hyper-V Windows feature on the Configuration page.
- Complete the installation process and restart the computer once the process finishes.
Start Docker Desktop Tool
After completing the installation, you’ll need to start the Docker tool manually. For this, locate or search for “Docker Desktop” in the desktop search bar.
Before you can get started with Docker, you’ll need to go through the onboarding tutorial. This will help you learn how to build a Docker image and run a container.
Once you’ve completed the tutorial, you’ll be up and running with Docker Desktop on Windows. To verify if everything is working correctly, go to the Docker CLI and run the “docker version” command. This will tell you the Docker version installed on your system.
At this point, Docker has been installed on your Windows 11 machine and is ready for running containers and Docker images.
How To Install Docker on Windows 10?
The process of installing Docker on Windows 10 is similar to installing Docker on Windows 11. Let’s see the major steps of the process.
Start by downloading the installer from the official Docker for Windows page.
Once the download finishes, locate the downloaded file and run it.
On the setup page, you must choose the options, such as the Hyper-V and WSL 2 features. Then, click “OK” and follow the instructions of the wizard. Close the wizard when it finishes.
When using Docker, it’s important to know that the administrator account and Docker user accounts are often the same. If you don’t have a Docker user group, you will need to create one and add your user account to it.
Initially, run the admin panel as computer management.
You can add new users to the Docker group by going to the Local Users and Groups and, from there, find Docker user groups.
After you’ve completed all these steps, restart your computer to update and start Docker Desktop on Windows 10.
Once the system comes back online, start Docker Desktop.
It will prompt you to review and accept the Subscription Services Agreement for Docker Desktop. Once you accept and agree to the terms and conditions, the Docker Desktop window will appear, and you’re ready to work!
Remember to go through the Quick Start guide included with Docker Desktop for a better experience.
Resolving the WSL Kernel Version Error
Some Windows 10 systems can show the following error about Docker Desktop requiring a newer version of the WSL kernel.
To resolve this error, launch the Command Prompt and run the following command:
wsl --update
How to Install Docker From the Command Prompt
If you wish, you can install Docker Desktop from the Command Prompt. This is a simple process where you enter a simple command to initiate the installation process. But first, you need to download the Docker Desktop installer from the official site.
Here are the commands you’ll need to run:
If you’re in a terminal window, run the following command:
"Docker Desktop Installer.exe" install
If you’re in the PowerShell, run the following command:
Start-Process '.\win\build\Docker Desktop Installer.exe' -Wait install
Finally, if you’re at the Command Prompt, run the following command:
start /w "" "Docker Desktop Installer.exe" install
When the process finishes, don’t forget to add your user account to the Docker user group, especially if your admin account and user account are not the same. To do that, run this command:
net localgroup docker-users <users>/add
How do I Know if Docker is Installed on my Windows 10/ Windows 11 Machine?
After the installation finishes, it is always a good idea to verify if everything is working as intended. For this, you can try the following ideas:
- If you’re using a Windows terminal, you can use the following command line to launch Docker:
docker-run
- From Powershell, you can verify the Docker version and installation by entering the following command:
docker --version
- You can also check the latest version of the Docker desktop from the Docker option.
- Alternatively, you can check for a web server by running the Docker desktop.
Uninstall the Docker Desktop Tool
There are times when you might want to remove Docker from the Windows machine. Like the installation process, the uninstallation process is straightforward.
1. Go to the Windows Start menu.
2. Choose Settings > Apps > Apps & features.
3. Docker Desktop should be present in the Apps & features list.
4. Click Uninstall.
Conclusion
Docker on Windows is a quick and easy way to run applications in containers on Windows operating systems. Developers can build, package, and deploy applications more efficiently and consistently across different environments using containers. This improved productivity and reduced complexity help organizations save time and money.
Docker on Windows is the perfect way to utilize the features of both Windows and Linux-based containers. However, it is important to note that Docker on Windows does have some limitations and requirements, such as minimum hardware specifications and the use of Windows 10 Professional or Enterprise editions with the Hyper-V feature enabled.
1,600 words, 8-minute read
Docker can be installed on Linux, mac OS, or Windows.
Requirements and installation instructions can be found on the Docker Docs help pages.
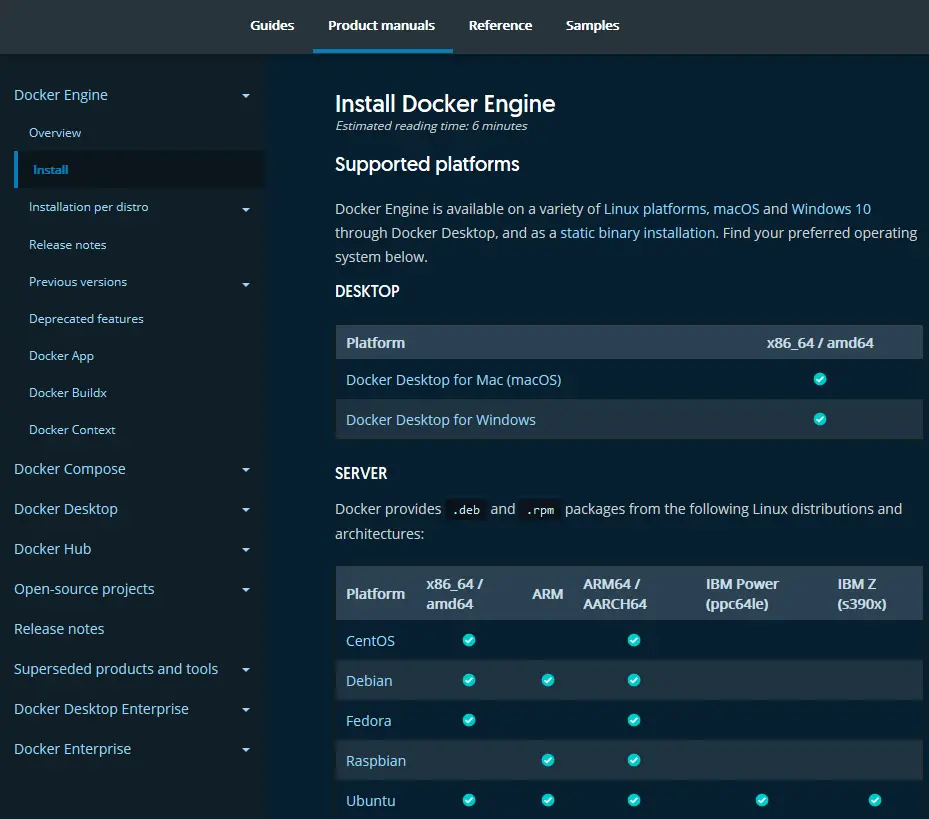
Install Docker on Linux #
Docker Desktop for Linux can be downloaded from Docker Hub. The installer includes the Docker server, CLI, Docker Compose, Docker Swarm, and Kubernetes.
Alternatively, the Docker command-line tool is available in official Linux repositories although these are often older editions. The latest edition is supported on recent 64-bit editions of popular Linux distros:
- Ubuntu (and derivatives such as Mint)
- CentOS
- Debian
- Fedora
Static binaries are available for other distros, although Googling “install Docker on [your OS]” may provide easier instructions, e.g. “install Docker on a Raspberry Pi”.
Follow the Docker documentation for your distro. For example, Docker for Ubuntu is installed with the following commands:
sudo apt-get remove docker docker-engine docker.io containerd runc
sudo apt-get update
sudo apt-get install ca-certificates curl gnupg lsb-release

sudo mkdir -p /etc/apt/keyrings
curl -fsSL https://download.docker.com/linux/ubuntu/gpg | sudo gpg --dearmor -o /etc/apt/keyrings/docker.gpg

echo "deb [arch=$(dpkg --print-architecture) signed-by=/etc/apt/keyrings/docker.gpg] https://download.docker.com/linux/ubuntu $(lsb_release -cs) stable" | sudo tee /etc/apt/sources.list.d/docker.list > /dev/null

sudo apt-get update
sudo apt-get install docker-ce docker-ce-cli containerd.io docker-compose-plugin
To run Docker commands as a non-root user (without sudo), create and add yourself to a docker group:
sudo groupadd docker
sudo usermod -aG docker $USER
Then reboot to apply all changes.
Install Docker on macOS #
Docker Desktop for macOS Sierra 10.13 and above can be downloaded from Docker Hub. The package includes the Docker server, CLI, Docker Compose, Docker Swarm, and Kubernetes.
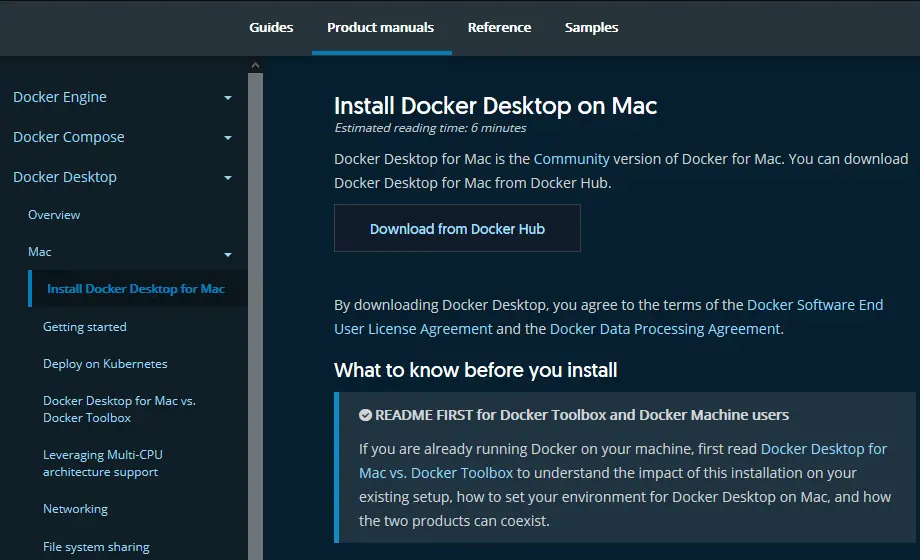
Two editions are available: stable and edge with experimental features. The stable version is best for most developers.
Double-click Docker.dmg to open the installer, then drag the Docker icon to the Applications folder. Double-click Docker.app in that folder to launch Docker.
After completion, the whale icon in the status bar indicates Docker is running and commands can be entered in the terminal.
![]()
Install Docker on Windows #
Docker Desktop for Windows requires either WSL2 or Hyper-V.
Windows Subsystem for Linux (WSL) 2 #
WSL allows you to run full Linux environments directly on Windows 10 or Windows 11.
IMPORTANT!
You can not install the Linux edition of Docker within a WSL-powered Linux distro. You must install Docker Desktop for Windows which allows Docker commands to be run in all Windows and Linux terminals.
WSL2 is the recommended default option for Docker on Windows. It is faster than Hyper-V and available in all editions of Windows 11 and Windows 10 from the May 2020 update (version 2004, OS build 19041).
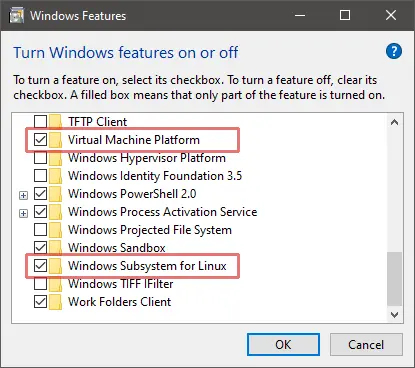
To install WSL2:
-
Enable hardware virtualization support in your BIOS.
This will be active on most devices, but check by rebooting and accessing your PC’s BIOS panels – typically by hitting DEL, F2, or F10 as your system starts. Look for Virtualization Technology, VTx or similar options. Ensure they are enabled, save, and reboot.
WARNING! Be careful when changing BIOS settings – one wrong move could trash your PC.
-
Enable the Virtual Machine Platform and Windows Subsystem for Linux options in the Turn Windows features on or off panel:

This can be accessed by hitting the Start button and typing the panel name or from Programs and Features in the classic Control Panel.
-
Reboot, then enter the following command in a Windows Powershell or
cmdprompt to set WSL2 as the default:wsl --set-default-version 2 -
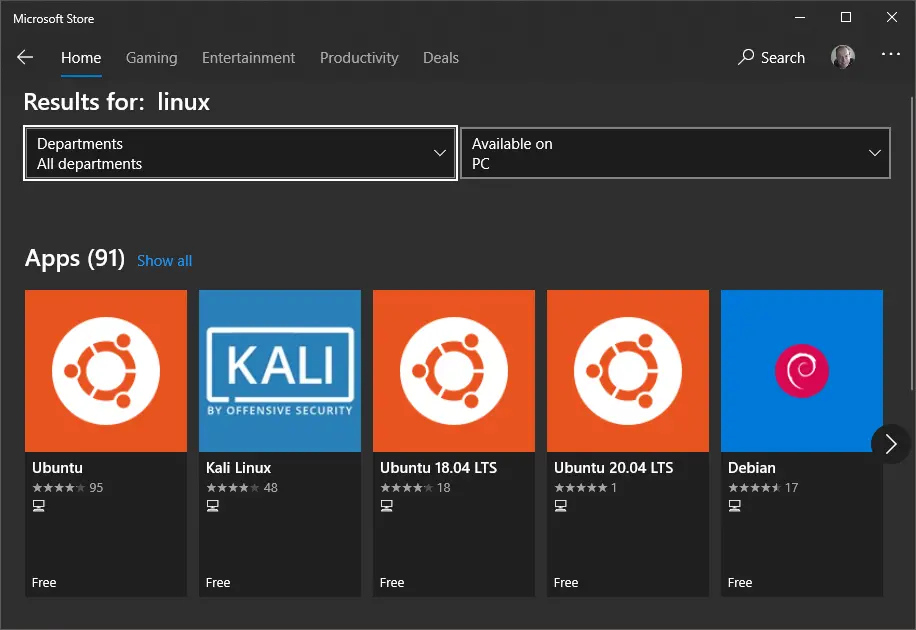
Download and install your preferred distro by searching for “Linux” in the Microsoft Store app. Ubuntu is a good choice.

-
To complete the installation, launch your distro by clicking its Store’s Launch button or choosing its icon from the Start menu.
You may be prompted to install a kernel update – follow the instructions and launch the distro again.
-
Enter a Linux username and password. These are separate from your Windows credentials although choosing the same ones can be practical.
-
Ensure your distro is up-to-date. For example, on an Ubuntu bash prompt enter:
sudo apt update && sudo apt upgrade
You can now install Docker Desktop (see below). For the best performance and stability, store development files in your Linux file system and run Docker from your Linux terminal.
More information about installing and using WSL2:
- Windows Subsystem for Linux 2: The Complete Guide, and
- optionally, Windows Terminal: The Complete Guide.
Hyper-V #
The Microsoft Hyper-V hypervisor is provided free with Windows 10 and 11 Professional and Enterprise. (Windows Home users must use WSL2.)
To install Hyper-V:
-
Enable hardware virtualization support in your BIOS.
This will be active on most devices, but check by rebooting and accessing your PC’s BIOS panels – typically by hitting DEL, F2, or F10 as your system starts. Look for Virtualization Technology, VTx or similar options. Ensure they are enabled, save, and reboot.
WARNING! Be careful when changing BIOS settings – one wrong move could trash your PC.
-
Enable the Hyper-V option in the Turn Windows features on or off panel then reboot.
This can be accessed by hitting the Start button and typing the panel name or from Programs and Features in the classic Control Panel.
You can now install Docker Desktop.
Install Docker Desktop for Windows #
Docker Desktop for Windows 10 and 11 can be downloaded from Docker Hub. The installer includes the Docker server, CLI, Docker Compose, Docker Swarm, and Kubernetes.
Two editions are available: stable and edge with experimental features. The stable version is best for most developers.
Double-click Docker Desktop Installer.exe to start the installation process. After completion and launch, the whale icon in the notification area of the task bar indicates Docker is running and ready to accept commands in the Windows Powershell/cmd terminal (and Linux if using WSL2).
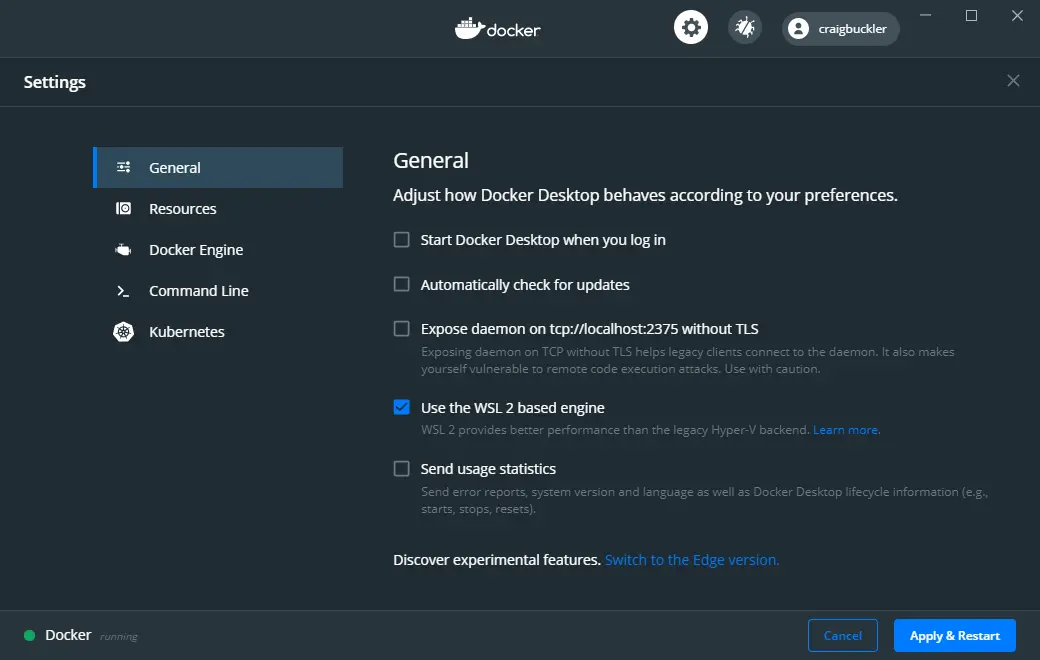
Docker Engine Settings #
Docker uses WSL2 as the default engine when available. You will be prompted to confirm this choice during installation and after WSL2 is installed.
Alternatively, WSL2 can be enabled by checking Use the WSL 2 based engine in the General tab of Settings accessed from the Docker task bar icon. Unchecking the option reverts to Hyper-V.
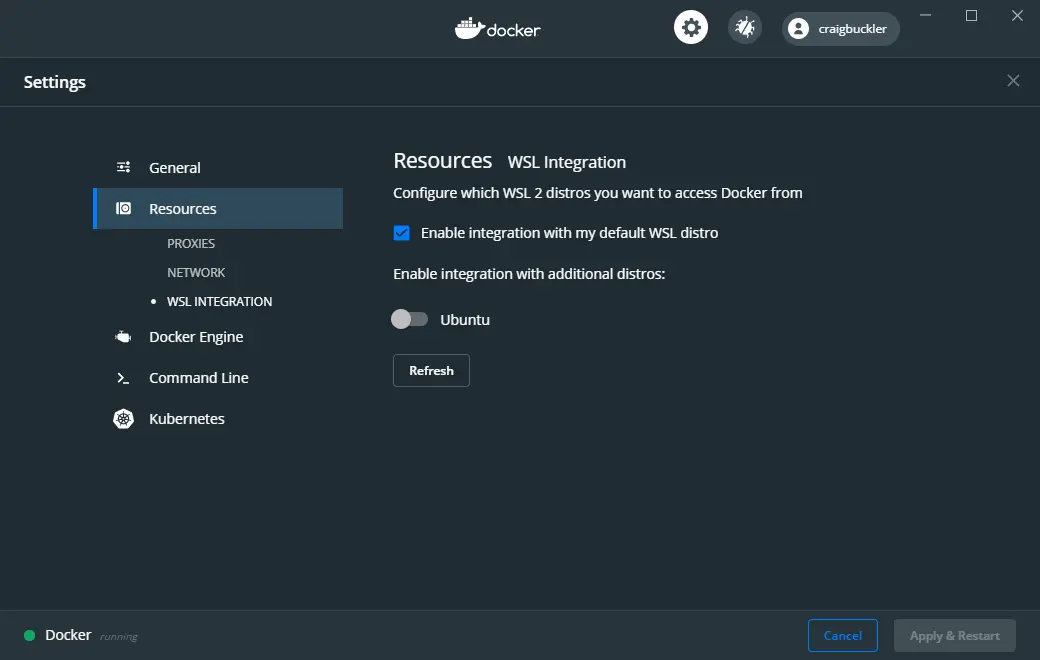
When using WSL2, at least one Linux distro must be enabled – the default is chosen. You can also permit Docker commands in other distros by accessing the WSL integration panel in the Resources section of the Docker Settings:
When using Hyper-V, Docker must be granted access to the Windows file system. Select the drives it is permitted to use by accessing the File Sharing panel in the Resources section of the Docker Settings:
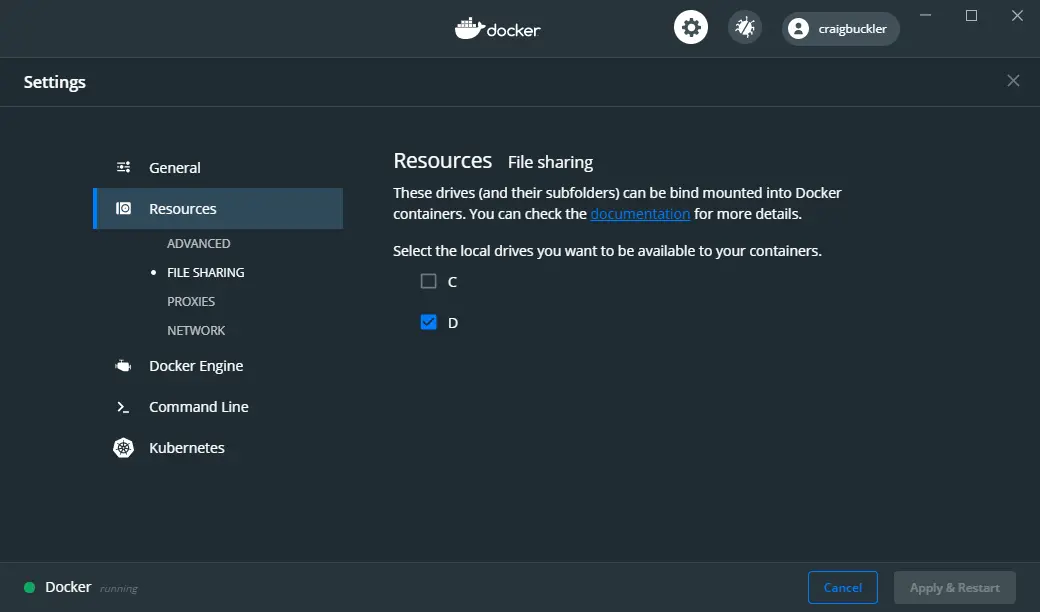
(This option was named Shared Drives in previous editions of Docker Desktop.)
Test your Docker installation #
Check Docker has successfully installed by entering the following command in your terminal:
docker versionA response similar to the following is displayed:
Client: Docker Engine - Community
 Version:           19.03.12
 API version:       1.40
 Go version:        go1.13.10
 Git commit:        abcdef0
 Built:             Mon Jun 22 15:45:36 2020
 OS/Arch:           linux/amd64
 Experimental:      false

Server: Docker Engine - Community
 Engine:
  Version:          19.03.12
  API version:      1.40 (minimum version 1.12)
  ...etc...
Ensure Docker Compose is working by entering:
docker-compose versionTo receive something like:
docker-compose version 1.27.2, build 8d51620a
docker-py version: 4.3.1
CPython version: 3.7.7
OpenSSL version: OpenSSL 1.1.1c  10 Sep 2019
Optionally, try entering:
docker run hello-worldto verify Docker can pull an image from Docker Hub and start containers as expected…
Unable to find image 'hello-world:latest' locally
latest: Pulling from library/hello-world
1b930d010525: Pull complete
Digest: sha256:f9dfddf63636d84ef479d645ab5885156ae030f611a56f3a7ac
Status: Downloaded newer image for hello-world:latest

Hello from Docker!
This message shows your installation appears to be working correctly.
Key points #
What you’ve learned in this chapter:
- How to install and configure Docker on your Linux, macOS, or Windows system.
- How to install Docker Compose.
- How to test the Docker installation.
The following chapters demonstrate how to use Docker during development…
…but to continue reading, you need to buy the book.
Do you want an easy-to-follow course which demonstrates how to use Docker and create practical web development environments on your Windows, macOS, or Linux PC?
Buy the «Docker for Web Developers» book & video course…
-
full course
$99 $50 £43 / €49
buy all
-
ebooks only
$30 $15 £13 / €15
buy books
-
videos only
$80 $40 £34 / €40
buy videos
plus your country’s sales tax where applicable
 Данная публикация является разбором особенностей контейнерной виртуализации Docker под системой Windows.
Она не претендует на роль исчерпывающей и по мере необходимости будет обновляться и дополняться.
За практическим руководством с нуля советую обратиться к этой публикации.
Содержание
- Предварительные настройки
- Выбор между Docker Toolbox on Windows или Docker for Windows
- Windows контейнеры и Linux контейнеры
- Особенности монтирования папок
- Монтирование с хост-машины или volume
- Особенности разметки диска GPT и MBR
- Docker Toobox to Windows
- Docker Swarm
- Проблемы с кодировкой
- Полезные ссылки
- Заключение
Предварительные настройки
Контейнерная виртуализация или виртуализация на уровне операционной системы Docker нативно работает только на дистрибутивах Linux и FreeBSD (экспериментально).
На Windows вам понадобится гостевая Linux система либо специальная минималистичная виртуальная машина с ядром Linux от разработчиков Docker, которая и ставится из коробки.
Само собой разумеется, что вы включили виртуализацию у себя в BIOS/UEFI
Пункт настройки может называться по-разному: VT-x, VT-d, Intel VT, AMD-V, Virtualization Technology.
Еще одним минимальным системным требованием будет разрядность системы x64 и версия не ниже Windows 7 Pro.
Выбор между Docker Toolbox on Windows или Docker for Windows
Появление Docker Toolbox on Windows и Docker Toolbox on Mac было большим событием.
Сборка включается в себя сам docker, утилиту docker-compose, утилиту для работы с виртуальной машиной docker-machine и клиент Kitematic.
Используется виртуальная машина (по умолчанию на VirtualBox) с минималистичным Linux окружением.
Позже для новых операционных систем выпустили Docker for Windows и Docker for Mac, которая на текущий момент является актуальной версией и продолжает развиваться.
Выбор между версиями не сложный:
— Если у вас Windows 10 x64 Pro, Enterprise или Education то включаем службу Hyper-V и ставим Docker for Windows.
Заметьте, что после включения службы Hyper-V пропадет возможность запускать и создавать x64 виртуальные машины на VirtualBox.
— Если же у вас другая версия Windows(7 Pro, 8, 8.1, 10 Home) то ставим VirtualBox и Docker Toolbox on Windows.
Несмотря на то, что Docker Toolbox разработчиками признан устаревшим работа с ним слабо отличается от Docker for Windows.
Вместе с установкой Docker Toolbox будет создана виртуальная машина.
В самом VirtualBox можно будет добавить оперативной памяти и ядер процессора на ваше усмотрение.
Windows контейнеры и Linux контейнеры
Docker for Windows предоставляет возможность переключать контейнеризацию между Linux и Windows версией.
В режиме Windows контейнеризации вы можете запускать только Windows приложения.
Замечу, что на май 2018 года в официальном Docker Hub существует всего 13 образов для Windows.
После включения Windows контейнеризации не забудьте добавить внешнюю сеть.
В конфигурационном файле docker-compose.yml это выглядит так:
networks:
  default:
    external:
      name: nat
Особенности монтирования папок
На примонтированных volume-ах не кидаются события файловой системы, поэтому inotify-tools не работает.
Спасибо пользователю eee
Если вы разрабатываете свой проект и пользуетесь docker-compose вне домашней папки то вам нужно будет проделать некоторые манипуляции.
Используя Docker for Windows для монтирования нового диска у вашего локального пользователя обязательно должен стоять пароль, который будет использоваться для доступа к shared папки.
Особенность заключается в том, что монтируемые внутрь контейнера диск будет монтироваться как от удаленной машины //10.0.75.1/DISK_DRIVE по протоколу SMB.
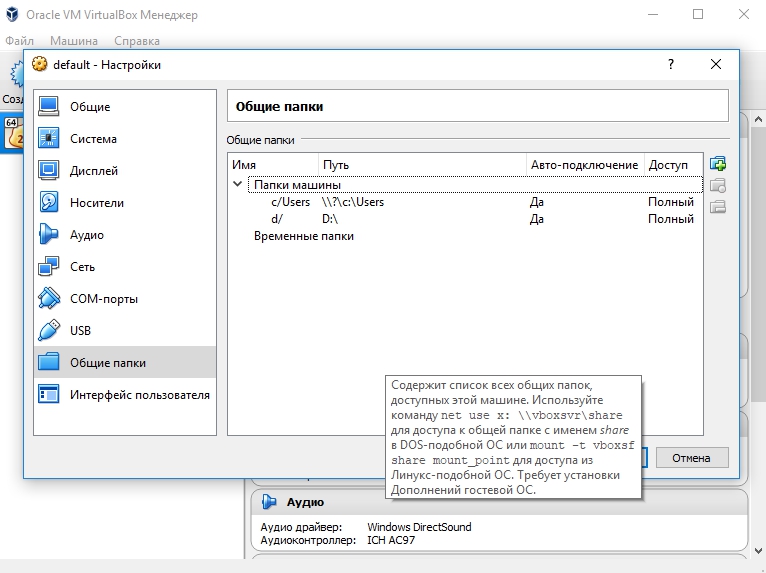
Для Docker Toolbox диски монтируются в самом VirtualBox на вкладке «Общие папки»
Пример для диска «D»:
Права доступа к монтируемым файлам и папкам
Как бы вам не хотелось, но для всех примонтированных из хост-машины файлов и папок будут стоять права 755 (rwx r-x r-x) и поменять их вы не сможете.
Остро встает вопрос при монтировании внутрь файла закрытого SSH ключа, права на который должны быть только у владельца(например 600).
В данном случае либо генерируют ключ при создании образа, либо прокидывают сокет ssh-agent с хост-машины.
Монтирование с хост-машины или volume
Монтирование внутрь контейнера происходит с использованием сети и протокола SMB, следовательно, внутри контейнера диск «D:\» будет примонтирован из источника //10.0.75.1/D
Использование volume внутри контейнера отображается как монтирование локального диска /dev/sda1, что влияет на скорость работы.
Простым тестом копирование файла на обычном HDD скорость работы получилась следующая:
Такая разница в скорости скорее всего связана с тем, что в volume данные сбрасываются на диск постепенно, задействуя кеш в ОЗУ.
Особенности разметки диска GPT и MBR
Данный пункт не является истинной так как опровергающей или подтверждающей информации в интернете найти не смог.
Если на хост-машине таблица разделов MBR, то контейнер с MySQL/MariaDB может упасть с ошибкой:
InnoDB: File ./ib_logfile101: ‘aio write’ returned OS error 122. Cannot continue operation
По умолчанию в базе данных включеён параметр innodb_use_native_aio, отвечающий за асинхронный ввод/вывод и его надо будет выключить.
Данная проблема также встречается на некоторых версиях MacOS.
Docker Toobox to Windows
Главное правило: начинать работу с запуска ярлыка на рабочем столе «Docker Quickstart Terminal», это решает 80% проблем.
— Бывает возникают проблемы с отсутствия переменных окружения, решается командой:
eval $(docker-machine env default)
— Если все же возникают проблемы из разряда «docker: error during connect», необходимо выполнить:
docker-machine env --shell cmd default
@FOR /f "tokens=*" %i IN ('docker-machine env --shell cmd default') DO @%i
Название Docker Machine по умолчанию default.
Docker Swarm
Ни в Docker for Mac, ни в Docker for Windows — нет возможности использовать запущенные демоны в качестве клиентов кластера (swarm members).
Спасибо пользователю stychos
Проблемы с кодировкой
Используя Docker Toolbox(на Docker for Windows не удалось воспроизвести) нашлась проблема с тем, что русские комментарии в docker-compose.yml файле приводили к ошибке:
Traceback (most recent call last):
  File "docker-compose", line 6, in <module>
  File "compose\cli\main.py", line 71, in main
  File "compose\cli\main.py", line 124, in perform_command
  File "compose\cli\command.py", line 41, in project_from_options
  File "compose\cli\command.py", line 109, in get_project
  File "compose\config\config.py", line 283, in find
  File "compose\config\config.py", line 283, in <listcomp>
  File "compose\config\config.py", line 183, in from_filename
  File "compose\config\config.py", line 1434, in load_yaml
  File "site-packages\yaml\__init__.py", line 94, in safe_load
  File "site-packages\yaml\__init__.py", line 70, in load
  File "site-packages\yaml\loader.py", line 24, in __init__
  File "site-packages\yaml\reader.py", line 85, in __init__
  File "site-packages\yaml\reader.py", line 124, in determine_encoding
  File "site-packages\yaml\reader.py", line 178, in update_raw
  File "c:\projects\compose\venv\lib\encodings\cp1251.py", line 23, in decode
UnicodeDecodeError: 'charmap' codec can't decode byte 0x98 in position 1702: character maps to <undefined>
[4176] Failed to execute script docker-compose
Полезные ссылки
Docker Toolbox on Windows
Docker for Windows
Практическое руководство по Docker
Заключение
Особенности работы с Docker контейнеризацией на системе Windows не отличается от работы на Linux за исключение разобранных выше.
В статье я умышленно не упомянул заметно низкую скорость работы контейнеров и overhead используя систему Windows как само собой разумеющееся.
Буду рад услышать ваши отзывы. Не стесняйтесь предлагать улучшения или указывать на мои ошибки.
Только зарегистрированные пользователи могут участвовать в опросе. Войдите, пожалуйста.
Какой версией Docker вы пользуетесь?
32.47%
Docker Toolbox on Windows
88
67.53%
Docker for Windows
183
Проголосовал 271 пользователь.
Воздержался 191 пользователь.