Sign in with Microsoft
Sign in or create an account.
You have multiple accounts
Choose the account you want to sign in with.
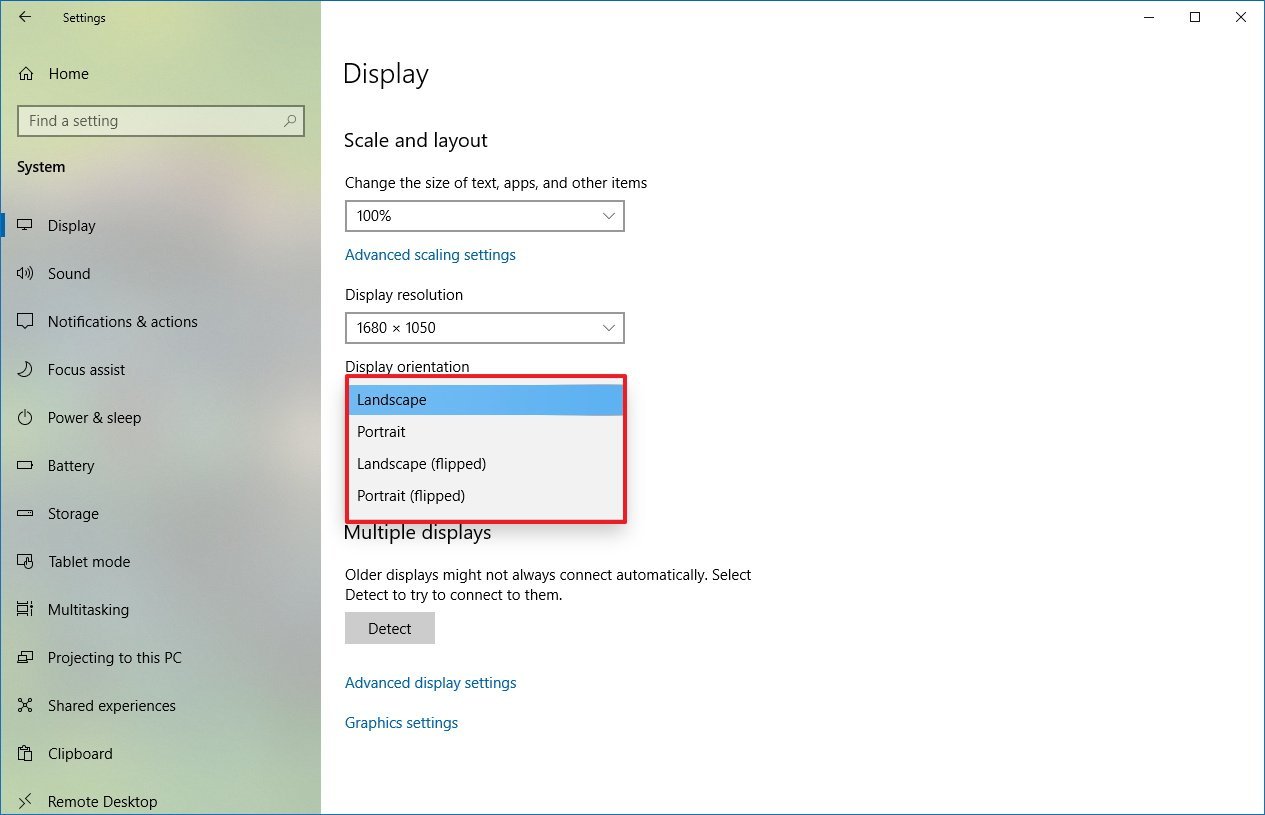
Select the Start button, then type settings. Select Settings > System > Display, and choose a screen orientation from the drop-down list next to Display orientation.
Change screen orientation
Select Start > Settings > System > Display, and choose a screen orientation from the drop-down list labelled Orientation.
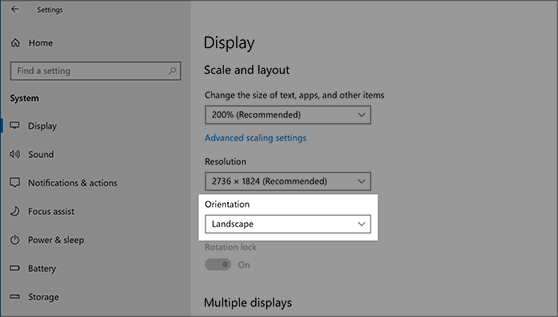
Change screen orientation
Need more help?
Want more options?
Explore subscription benefits, browse training courses, learn how to secure your device, and more.
Communities help you ask and answer questions, give feedback, and hear from experts with rich knowledge.
Thank you for your feedback!
×
Knowing how to rotate the screen in Windows 10 or Windows 11 is a handy skill as whether it happened when you plugged in or detached an external monitor or maybe just hit the wrong key, finding your laptop’s screen is stuck in portrait mode is a hassle.
You can’t even read the text without tilting your head or turning your display on its side. Fortunately, there is a quick and easy way to rotate the screen in Windows 10 or 11.
How to rotate your screen in Windows 10 or 11
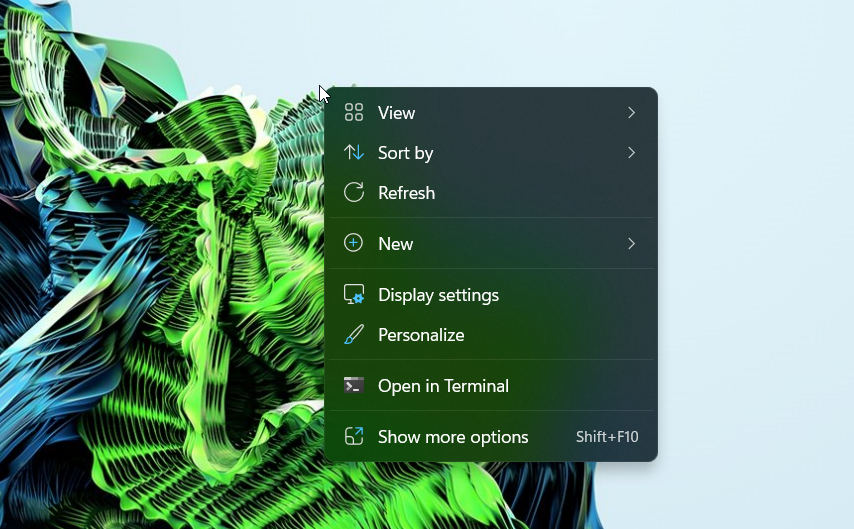
1. Right click on the desktop and select Display settings.
2. Choose a screen to fix if you have multiple monitors attached. (Skip this step if you have only one.)
3. Select Landscape from the Display orientation menu.
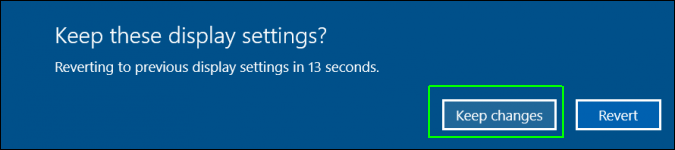
5. Click Keep Changes when prompted.
Get our in-depth reviews, helpful tips, great deals, and the biggest news stories delivered to your inbox.
(Image credit: Windows Central)
On Windows 10, the ability to rotate the screen can come in handy in many scenarios. For instance, if you’re a programmer using an external monitor, turning the screen to portrait mode can improve efficiency when viewing code. If you’re using a tablet, switching the orientation of the screen can be a better way to read a book or document. You can even flip the screen upside down to play a prank to a friend, or to return to landscape mode after accidentally invoking the rotate shortcut.
Whatever the reason it might be, Windows 10 includes multiple ways to rotate the screen in landscape, portrait, or flipped mode using the Settings app and keyboard shortcuts, or through the vendor graphics control panel software.
In this Windows 10 guide, we’ll walk you through the different methods to rotate the screen on your desktop, laptop, or tablet.
- How to rotate screen using Settings
- How to rotate screen using keyboard shortcut
- How to rotate screen using graphics control panel
- How to rotate screen disabling rotation lock on Windows 10
How to rotate screen using Settings
To rotate the screen with the Settings app, use these steps:
- Open Settings.
- Click on System.
- Click on Display.
- Under the «Rearrange your displays» section, select the screen that you want to rotate (if applicable).
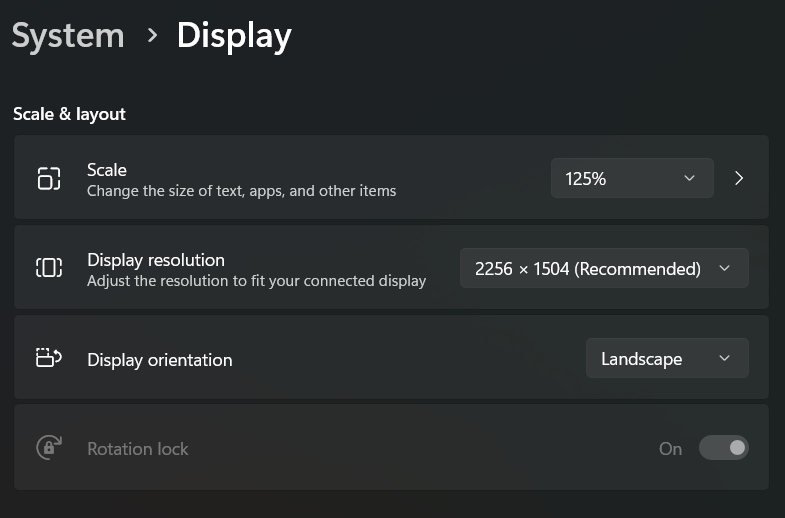
- Under the «Scale and layout» section, use the Display orientation drop-down menu to select one of the orientation:
- Landscape.
- Portrait.
- Landscape (flipped).
- Portrait (flipped).
- Rotate the monitor as needed to the orientation you selected.
- Click the Keep changes button.
Once you complete the steps, the display will change to your preferred orientation.
If the rotation option is grayed out, or the keyboard shortcuts aren’t working, you may need to update the video drivers. In the case that you need assistance, you can use refer to these instructions.
How to rotate screen using keyboard shortcut
Alternatively, if your tablet, laptop, or desktop supports it, you can also use keyboard shortcuts to rotate the screen on Windows 10:
Important: This option may only work with some graphics cards. If it’s not working for you, then use the Settings app option.
- Ctrl + Alt + Up arrow – rotates to landscape mode.
- Ctrl + Alt + Down arrow – rotates the screen upside down.
- Ctrl + Alt + Right arrow – rotates the screen 90 degrees (right).
- Ctrl + Alt + Left arrow – rotates the screen 90 degrees (left).
To return to the normal orientation, use the Ctrl + Alt + Up arrow keyboard shortcut.
How to rotate screen using graphics control panel
Whether you use a graphics card from Intel, NVIDIA, or AMD, each vendor offers a control panel software to control various aspects of the video settings, including an option to rotate the screen.
To rotate the screen using the NVIDIA Control Panel, use these steps:
- Open Control Panel.
- Click on Hardware and Sound.
- Click on NVIDIA Control Panel.
- Under the «Display» section, click on Rotate display.
- Select the display (if applicable).
- Choose the orientation (or use the controls on the right).
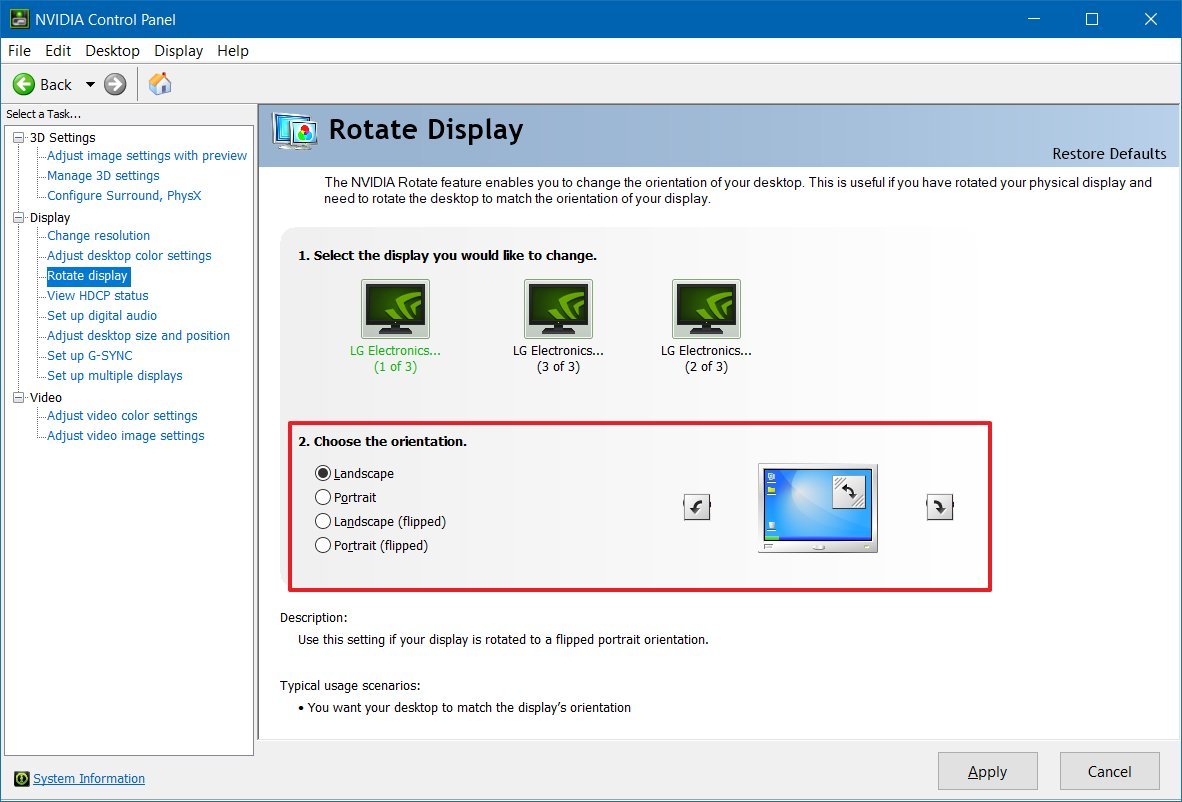
- Click the Apply button.
- Rotate the monitor as needed to the orientation you selected.
Once you complete the steps, the screen will switch to the orientation you specified.
We’re focusing these instructions for the control panel from NVIDIA, but you can find similar options in the control panel provided by Intel and AMD.
How to rotate screen disabling rotation lock on Windows 10
If you’re using a tablet or 2-in-1 device, and rotating the device doesn’t rotate the screen, you may need to change the system settings.
To disable rotation lock on Windows 10, use these steps:
- Open Settings.
- Click on System.
- Click on Display.
- Under the «Scale and layout» section, turn off the Rotation lock option.Quick tip: This option is only available on supported devices.
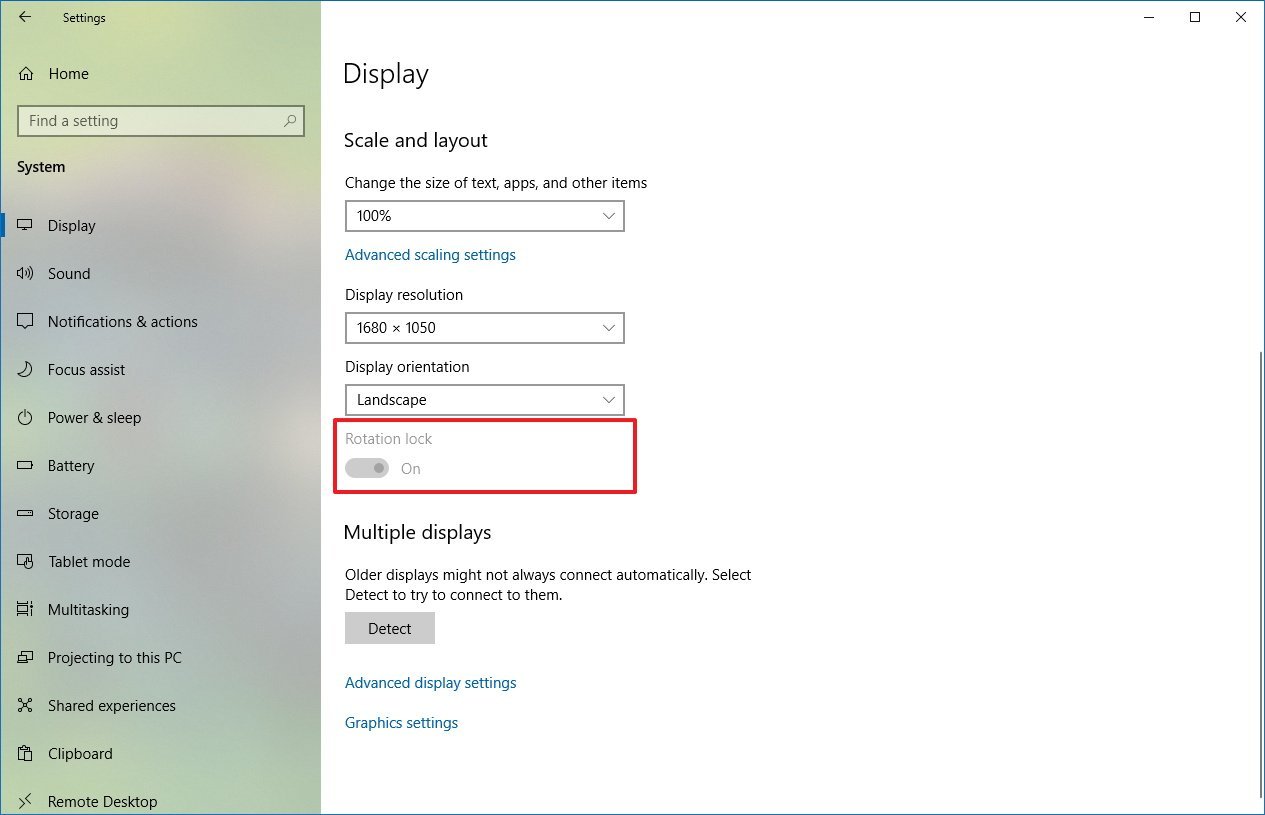
- Rotate the device to change the orientation of the screen.
Alternatively, you can also enable or disable the feature from the Quick action settings on Action center (Windows key + A keyboard shortcut), and clicking the Rotation lock button.
In the case that the option is grayed out, then it’s likely that you have a keyboard attached to the device.
All the latest news, reviews, and guides for Windows and Xbox diehards.
Mauro Huculak is technical writer for WindowsCentral.com. His primary focus is to write comprehensive how-tos to help users get the most out of Windows 10 and its many related technologies. He has an IT background with professional certifications from Microsoft, Cisco, and CompTIA, and he’s a recognized member of the Microsoft MVP community.
You may want to rotate a screen in Windows 10 for many reasons. But there are several ways to do it, and each may suit your specific desktop better. Whether you’re looking for a more permanent or temporary solution will affect which method you should use.
Luckily for you, we will go through every way you can rotate your screen in Windows 10 in this article. Read on to learn more.
This Article Covers:
Why Should You Rotate Display Windows 10?
Sometimes, it makes sense to flip your monitor sideways to view your work or other digital material vertically, whether at work or at home.
You may be a visual artist working on art, and you want to have a better concept of what the subject will appear like from a portrait angle. You may even want to change the orientation for a better screenshot in Windows.
Or perhaps you frequently design spreadsheets that make more sense to display on a vertical screen. Many streamers have a second monitor set up vertically to play their games on the main screen and monitor their chat on the other. Check out some of the best monitors for these types of setups.
Of course, you may also be looking for how to return your monitor to normal after accidentally changing the screen orientation.
How To Rotate Screen on Monitor Using Keyboard Shortcuts
If you want to avoid going to the settings every time you wish to change the screen orientation, you can use the rotate screen shortcut on Windows to change the display orientation. These shortcuts won’t work for everyone as they depend on several factors, such as your Windows version and graphics card drivers. But, if they do work, it’s the easiest way to alter your screen orientation in Windows, so make sure you try this method out first.
Here are the keyboard shortcuts for rotating the screen:
- Rotate to landscape mode (default orientation): Alt + Ctrl + Up
- Rotate the screen upside down: Alt + Ctrl + Down
- Rotate the screen right 90 degrees: Alt + Ctrl + Right
- Rotate the screen left 90 degrees: Alt + Ctrl + Left
If you’re looking for how to fix an upside-down screen, use Alt + Ctrl + Up to return to the default landscape orientation.
How To Rotate a Screen in Windows 10/11
There are multiple ways to learn how to rotate a screen in Windows 10 and 11, as both operating systems essentially share the same back-end code. Whether your PC screen rotated by mistake or you’re looking to change orientation for productive reasons, knowing how to fix a computer screen gone sideways mishap can be extremely handy.
Here is how to rotate the screen on Windows:

- Open “Settings” on Windows. You can do this by pressing the “Start” button and searching for “Settings.” You can also do this by right-clicking on an empty space on your desktop and then clicking “Display settings.”

- In the window that opens, click “System” and then “Display” in the section on the right side of the screen.

- At the top of the screen, you will see numbered boxes representing the monitors connected to your computer. We have an ultrawide monitor towards the right labeled 1 for this setup. The left one is a widescreen labeled as 2. Here, we wish to change the orientation of the second monitor, which is highlighted in blue. You can skip this step if you wish to flip the screen on a laptop with no external displays.

- With the screen selected, to flip the screen on Windows, scroll down to find the “Display orientation” option. Click on it and select the option. You can select between Landscape, Portrait, Landscape (flipped), and Portrait (flipped).
- Once selected, you will see a confirmation window. To confirm, click on “Keep changes.”
If the orientation option is gray and the keyboard shortcuts aren’t working, you may need to update the drivers for your graphics card. This should only happen if you’re using a fresh install of Windows.
Related Reading: How To Get iMessage on Windows
How To Rotate a Desktop Screen With the Graphics Card Control Panel
Most computers either have a dedicated graphics card or an integrated one.
The graphics card is used for the computer’s display, and most of them have control panels that allow you to control various aspects of the settings for the display. These settings will allow you to change the color settings, resolution, and refresh rate. Here you can also find an option that allows a PC to rotate the screen.
Most major graphics card manufacturers like AMD, NVIDIA, and Intel offer control software which you can usually download on the manufacturer’s website. The PC in this example has an NVIDIA GPU, which is why we use the NVIDIA Control Panel.
Here is how to rotate the screen on desktop computers using the control panel:

- On your desktop screen, right-click on an empty space. Here, click on “NVIDIA Control Panel.”

- Here, click on the “Display” section to expand it. There, click on the “Rotate display” option.
- This will open a new section on the right side of the window. You will see two options here. The first allows you to select the monitor you want to rotate. If your PC has an upside-down screen, then make sure to select it. Ignore this step for laptops or computers with a single monitor, as the primary monitor would already be selected.

- Select the rotation type for your screen in the “Choose the orientation” section. These are Landscape, Portrait, Landscape (flipped), and Portrait (flipped).
- After choosing your desired orientation, click the “Apply” button towards the bottom right side of the screen.
- This will prompt a confirmation screen. There, click “Yes” to save the changes.
The steps to follow for Intel and AMD control panels should be the same, with minor visual changes and the placement of the settings.
Rotate Screen in Windows 7, 8, and 11
The above steps for using the graphics card settings should work on all versions of Windows after Windows 7, as the software interface is essentially the same. This means you can use this method to rotate screens on Windows 10,8,7,11.
Frequently Asked Questions
How Do I Rotate the Screen 90 Degrees in Windows 10?
Open “Display settings” on Windows. Here, select the monitor you wish to turn sideways. Scroll down and click on the “Display orientation” option. Choose the “Portrait” option. On the confirmation screen, click the “Keep changes” option. You can also change the display orientation using keyboard shortcuts on Windows. To rotate the screen right 90 degrees, use Alt + Ctrl + Right. To rotate the screen left 90 degrees, use Alt + Ctrl + Left.
Why Is My Computer Screen Not Rotating?
Ensure “Hot Keys” are turned on on your computer if your screen doesn’t rotate when you hit the keyboard. Right-click anywhere on the empty desktop and choose “Graphics Options.” Make sure Enable is ticked under “Hot Keys.” After that, pick the desired choice under Rotation.
Wrapping Up
So the simplest way to rotate a screen in Windows 10 is to use the keyboard shortcut Alt + Ctrl + (Direction Key). But if that doesn’t work, you can always use the control panel on your PC or the display settings from your graphics card driver.
Related:
- How To Open a HEIC File in Windows
- How To Fix the 100% Disk Usage Error in Windows
- How To Make Chrome Your Default Browser
- How To Find Microsoft Office Product Keys
- How To Share Screen on ZOOM
- Windows 7 Factory Reset: 4 Easy Ways to Reset
Rotating your PC or laptop screen on Windows might not seem relevant until you actually need it. Luckily, changing your display orientation to suit your specific use case is pretty straightforward. Let’s learn how to rotate your screen in Windows.
Tip: make your Windows interface look unique with these apps.
Content
- 1. Windows Settings
- 2. Keyboard Shortcuts
- 3. GPU Settings
- 4. Disable Rotation Lock on Tablets and Laptops
- Frequently Asked Questions
Why Would You Want to Rotate Your Screen on Windows?
If you never rotated your screen on Windows, doing so for the first time might feel a little daunting. As it turns out, there are a few prevailing scenarios where screen rotation proves not only useful but downright necessary. These include:
- Having a multi-monitor setup with one screen in vertical orientation – can boost productivity for programmers or people who are working with a lot of text.
- Setting a single monitor to vertical orientation – useful for activities such as photo editing or graphic design.
- Working with 2-in-1 Windows laptops or Windows tablets – for situations when apps require portrait mode to work properly.
- Dealing with a random upside-down screen – rotating your screen will bring things back to normal.
It’s not necessary to have multiple monitors or touchscreen devices to use screen rotation on Windows. If your monitor supports the pivot function, you can rotate it by 90 degrees and use your screen vertically. Below, you’ll learn how to enable the feature.
1. Windows Settings
One of the easiest ways to activate screen rotation for your display is to go through Settings in Windows.
- Right-click anywhere on the desktop and select «Display settings» from the context menu.

- On the right, scroll until you get to the «Scale & layout» section. Select «Portrait» from the drop-down menu next to «Display orientation.» Alternatively, you can opt for «Portrait (Flipped)» or «Landscape (Flipped).»

- A dialog box will pop up asking you to confirm the change or revert to the earlier settings. Click «Keep changes» to retain your new screen orientation. Note that if you don’t select any option before the timer runs out, your screen will automatically revert to the previous orientation.
Good to know: streamline your workflow in Audacity with these keyboard shortcuts.
2. Keyboard Shortcuts
With the help of an app called Intel Graphics Command Center, you can take advantage of keyboard shortcuts to easily change your display orientation. Intel systems might already have the app preinstalled as part of driver packages. If not, you can always download and install it. These shortcuts or hotkeys will work on both Intel and non-Intel systems. You need to enable the hotkeys in the application once to keep using the shortcuts for a quick screen rotation.
Note: some of the app’s other features will be unavailable for non-Intel systems.
- Install «Intel Graphics Command Center» from the Microsoft Store and launch it.

- In the «System» tab on the left, turn on «Enable System HotKeys.»

- The application requires you to turn on «Automatically save my restartable apps and restart them when I sign back in» via «Accounts -> Sign-in options.» It’ll automatically launch a pop-up to take you directly to the required settings page.

- Close the settings page and the Intel Graphics Command Center window. To rotate your screen, you can now employ one of the various key combinations. For instance, to rotate the screen to the right by 90 degrees, press Ctrl + Alt + →. If you wish to rotate it left by 90 degrees, try Ctrl + Alt + ←.
3. GPU Settings
Another method you can use to rotate your screen uses your graphics card’s dedicated software. Those with a computer running Intel graphics can use the Intel Graphics Command Center as shown in the previous method. Those with an NVIDIA or AMD graphics card have access to the NVIDIA Control Panel and AMD Radeon Settings, respectively. For the purposes of this tutorial, we are using the NVIDIA option.
- Launch the NVIDIA Control Panel.
- Navigate to «Rotate display» under the «Display» section on the left.
- Select your preferred display orientation on the left.

- Click «Apply» to save your changes.
4. Disable Rotation Lock on Tablets and Laptops
On Windows tablets and 2-in-1 laptops, rotating the device should automatically rotate your screen. If this feature isn’t working, you may need to check whether «Rotation lock» is enabled in Settings.
Right-click on the desktop and select «Display settings.» Next to «Display orientation» under «Scale & layout,» you’ll see «Rotation lock» if you’re on a tablet or 2-in-1 device.
Disable «Rotation lock» if it’s enabled to rotate your device, and your screen will rotate accordingly.
Tip: seeing an error code 43 in Windows? It’s a sign that your GPU might be malfunctioning. Here’s how to fix it.
Frequently Asked Questions
Why is my computer screen upside down?
Installing Windows updates or making changes to the registry can sometimes result in an upside-down screen. You can try enabling «Rotation lock» in Display Settings on your tablet or 2-in-1 to ensure your screen doesn’t rotate automatically. On other devices, use one of the methods above to revert your screen back to the normal landscape mode.
Why is my screen not rotating?
On Windows tablets or 2-in-1 devices, ensure that «Rotation lock» is disabled in «Display Settings.» On desktops and other laptops, if you’re trying to use keyboard shortcuts, first install Intel Graphics Command Center from Microsoft Store, then enable hotkeys in the application.
How do I change the location of my taskbar?
In Windows 11, you have the option to change the taskbar position to the left side of the screen. Right-click the taskbar, select «Taskbar settings,» navigate to «Taskbar behaviors,» and select «Left» from the drop-down next to «Taskbar alignment.»
Windows 10 gives you more options to align your taskbar around the screen. You can right-click the taskbar, select «Taskbar settings,» and choose «Left,» «Right,» «Top,» or «Bottom» from the drop-down next to «Taskbar location on screen.» If you want more from your taskbar, check out these tips to customize the Windows 11 taskbar.
Image credit: Unsplash. All screenshots by Tanveer Singh.

After a 7-year corporate stint, Tanveer found his love for writing and tech too much to resist. An MBA in Marketing and the owner of a PC building business, he writes on PC hardware, technology, video games, and Windows. When not scouring the web for ideas, he can be found building PCs, watching anime, or playing Smash Karts on his RTX 3080 (sigh).
Subscribe to our newsletter!
Our latest tutorials delivered straight to your inbox