- To resize an image on Windows, you can easily use the built-in Photos app or Microsoft Paint.
- In the Photos app, there’s a «Resize» option hidden in the side menu, which you can use to change the size and quality of an image.
- In Microsoft Paint, you can click «Resize» and then enter the percentage or pixel size you want.
- You’ll get the best results by scaling an image down — if you want to increase an image’s size, you’re better off using a program like Photoshop.
- Visit Business Insider’s Tech Reference library for more stories.
It’s not unusual to resize an image. In fact, if you often work with images downloaded from the internet, you’ll probably find yourself resizing them a lot.
Luckily, the ability to resize images is built into nearly every photo application around. This includes two of the most popular, which are installed on every Windows 10 PC from the start: Photos, and Microsoft Paint.
Note, however, that there’s a difference between resizing an image to be smaller, and resizing it to be larger. Nearly every program, Photos and Paint included, can scale an image down without issue. However, if you use these programs to make an image larger, you might find that the image loses a lot of quality.
If you need to scale an image up (greater than 100% of the original size) without getting it pixelated and blurry, then you’ll need to use a program like Adobe Photoshop that includes a smart resizing feature.
But if you need to scale an image down, or you’re fine with losing image quality, here’s how to use Windows’ built-in image resizing tools.
Check out the products mentioned in this article:
Adobe Photoshop (From $99.00 at Best Buy)
Windows 10 (From $139.99 at Best Buy)
Acer Chromebook 15 (From $179.99 at Walmart)
How to resize an image on Windows using the Photos app
The Photos app should be the default photo viewer for nearly every image type in Windows.
1. Double-click the image file you want to resize to open it in Photos.
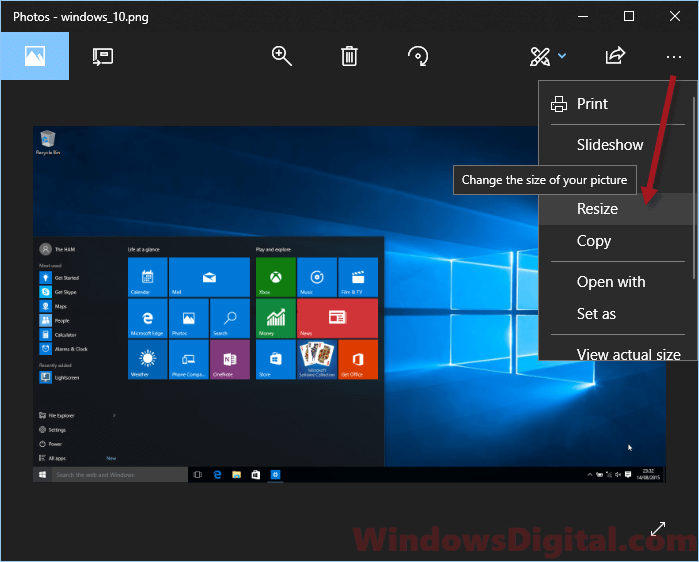
2. Once it’s opened, click the three dots in the top-right corner, then click «Resize.»
William Antonelli/Business Insider
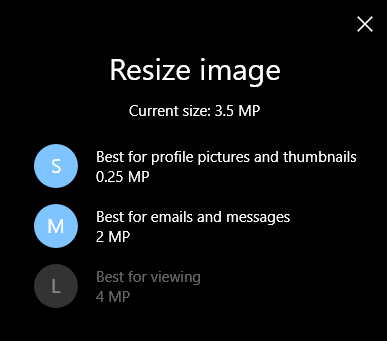
3. A small pop-up will appear, offering you three preset sizes for the picture. Pick one of them, or click «Define custom dimensions» at the bottom.
William Antonelli/Business Insider
4. If you picked custom dimensions, a menu will appear that lets you set exactly how big you want the image to be. You can also choose how high quality the resized image will be — higher quality pictures look better, but have a bigger file size.
If «Maintain aspect ratio» is checked, then you only need to change either the height or width, and the other dimension will change automatically to match it.
Set your new dimensions, and then click «Save resized copy.»
William Antonelli/Business Insider
How to resize an image on Windows using Microsoft Paint
1. Start Paint, which you can usually find in the Start menu. If it’s not there, you can type «Paint» in the Start button search box and click it when it appears in the search results.
2. Open the photo you want to resize by clicking «File,» then «Open,» and selecting the image from your computer’s files.
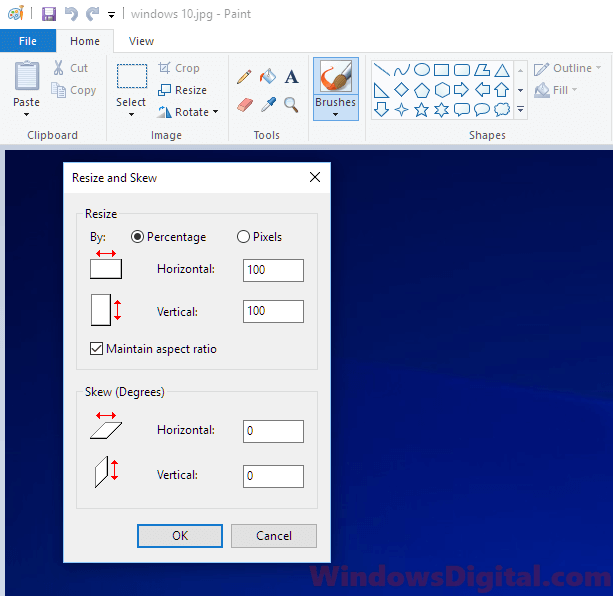
3. In the top menu bar’s «Home» tab, click «Resize.» The «Resize and Skew» window should appear.
4. Enter the size you want to resize the image to. You can set the size by percentage (i.e. «30 percent larger»), or click «Pixels» and enter the exact dimensions you want. As long as you keep «Maintain aspect ratio» checked, you only need to specify the horizontal or vertical dimension, and the other dimension will be set automatically.
Dave Johnson/Business Inisder
5. Click «OK» to make the change.
6. Save the new version of your image by clicking «File» and then «Save As.»

Related coverage from Tech Reference:
-
7 easy ways to speed up your Windows 10 computer, from disabling unneeded effects to upgrading your hardware
-
How to take a screenshot on Windows 10 computers in several different ways
-
How to change the size of your desktop icons on a Windows 10 computer
-
How to create a guest account on your Windows 10 computer in 6 steps
-
5 ways to save battery on any Windows laptop and keep your computer running longer
Dave Johnson
Freelance Writer
Dave Johnson is a technology journalist who writes about consumer tech and how the industry is transforming the speculative world of science fiction into modern-day real life. Dave grew up in New Jersey before entering the Air Force to operate satellites, teach space operations, and do space launch planning. He then spent eight years as a content lead on the Windows team at Microsoft. As a photographer, Dave has photographed wolves in their natural environment; he’s also a scuba instructor and co-host of several podcasts. Dave is the author of more than two dozen books and has contributed to many sites and publications including CNET, Forbes, PC World, How To Geek, and Insider.
Read more
Read less
This tutorial will show you step by step how to resize an image in Windows 11 in two different ways without using any extra software.
The two programs you can use to make an image smaller are already pre-installed with Windows 11.
How to resize an image in Windows 11 using the Photos app
1. Open File Explorer.
![]()
2. Go to the image you want to edit.
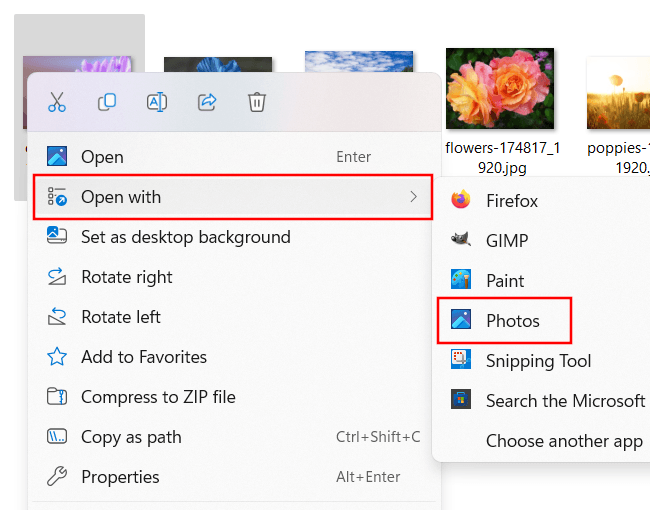
3. Right-click on the image > Open with > Photos.
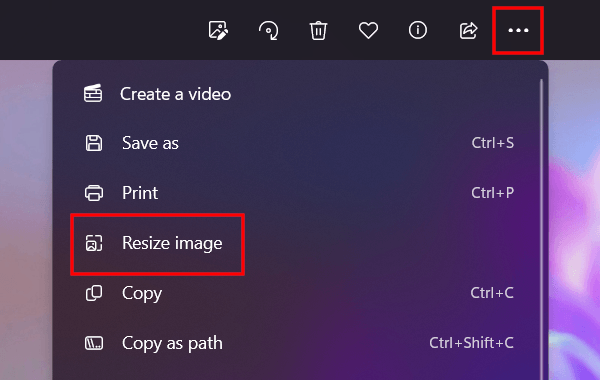
4. Click on the three-dots icon located in the top menu.
5. Click on Resize image.
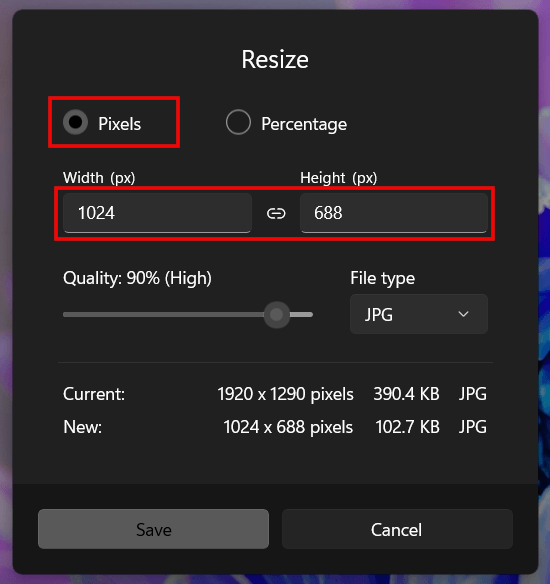
A “Resize” window will appear.
6. Select the Pixels option.
7. Enter the desired width OR height. The aspect ratio (proportional relationship between width and height) of your image will be correct. For example, if you enter a width, the height will automatically be resized to match the aspect ratio of the image.
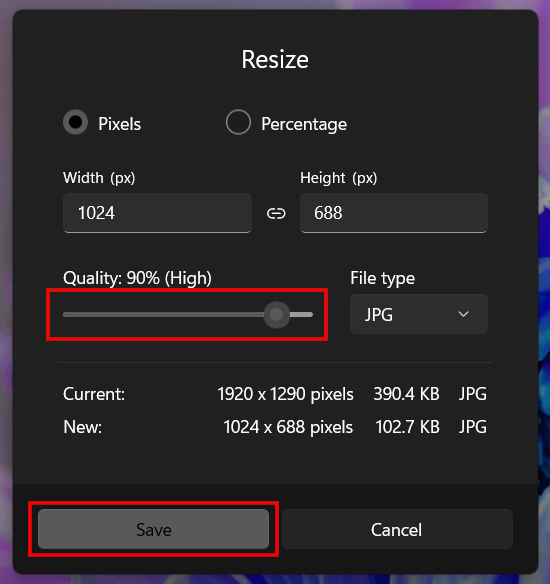
8. You can select a quality by using the slider below “Quality”.
9. Click on Save.
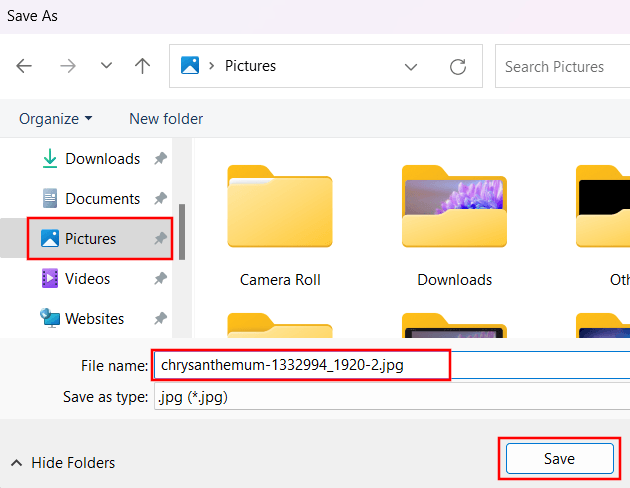
A “Save as” window will appear.
10. Select a location on your computer where you want to save the edited image.
11. Edit the file name of the image in the File name field.
12. Click on Save.
That’s it!
How to resize an image in Windows 11 using Paint
Paint (also known as Microsoft Paint or MS Paint) is a simple raster graphics editor that has been included with all versions of Microsoft Windows.
1. Open File Explorer.
![]()
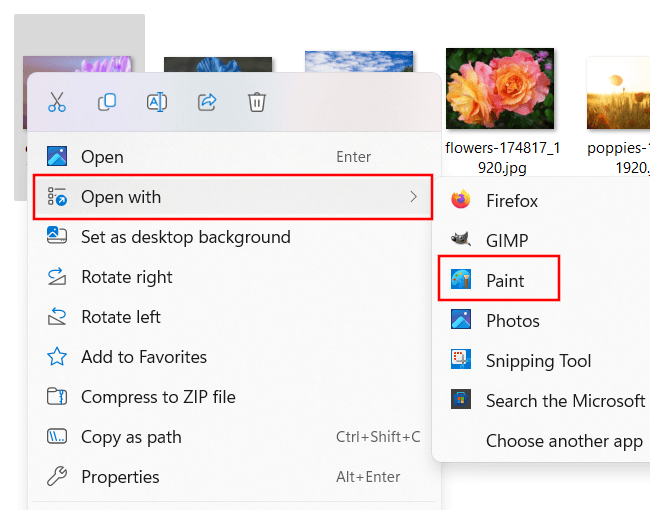
2. Go to the image you want to edit.
3. Right-click on the image > Open with > Paint.
4. Click on the ![]() (resize and skew) icon located in the Image toolbar section.
(resize and skew) icon located in the Image toolbar section.
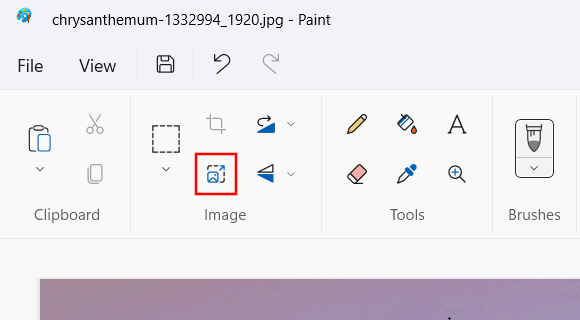
A “Resize and Skew” window will appear.
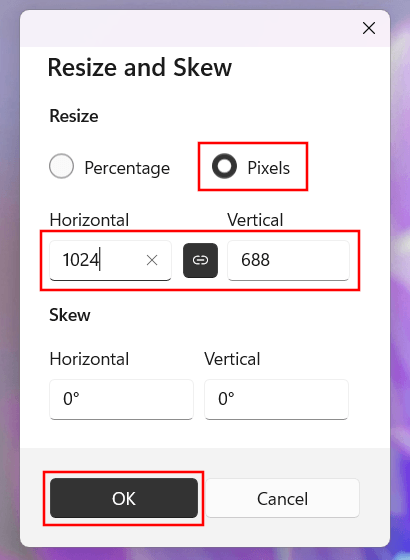
5. Select the Pixels option.
6. Enter the desired width OR height. The aspect ratio (proportional relationship between width and height) of your image will be correct. For example, if you enter a width, the height will automatically be resized to match the aspect ratio of the image.
7. Click on OK.
8. Click on File located in the top left corner.
9. Move your mouse cursor (pointer) to Save as.
10. Click on the format of your image (e.g., PNG, JPEG (JPG), GIF). In this example, the format is .jpg (JPEG).

A “Save as” window will appear.
11. Select a location on your computer where you want to save the edited image.
12. Edit the file name of the image in the File name field.
13. Click on Save.
That’s it!
Windows
Related:
How to resize an image using Paint 3D on Windows 10
How to resize multiple photos at once in Windows 10 and 11
How to crop an image in Windows 11 (easy way)
How to crop an image online using Canva (step by step)
How to replace a color in an image using GIMP (step by step)
Resizing images and photos is a common task when editing pictures. Whether you want to downsize or enlarge an image, it is typically necessary to use third-party software. However, Windows 10 and 11 users can resize their images and photos directly from Microsoft’s Photos app while viewing them, without the need for additional software.
However, the Photos app provides a limited range of fixed resizing options, expressed in megapixels (MP) rather than resolution. This app only permits reducing the dimensions of images or photos, and enlarging them beyond their original size is not possible. Therefore, if you require custom resizing for your images or photos, the Photos app may not be the ideal solution.
Also see: How to Resize Multiple Images At Once in Windows 11
How to resize images and photos in Windows 11/10 using the default Photos App
Follow these simple steps to quickly resize an image or photo in Windows 10 and 11 using the Photos app while viewing the image:
- Right-click on the image or photo that you want to resize and select Open with.
- Select the Photos app from the list of programs to open the image.
- Click on the triple-dotted icon located on the top right corner of the Photos app.
- Select Resize.

The Photos app offers three fixed sizes to choose from:
- Small 0.25 MP, which is the standard size for thumbnails and best for profile pictures.
- Medium 2 MP, which is the most casual looking size and best for emails and messages.
- Large 4 MP, which is the largest size available and is usually the best option for high-quality viewing.
Please note that you can only downsize an image or photo, and you cannot resize an image to a size larger than its original size. Although the Photos app does not offer customization for resizing images, it is still a convenient tool for those who want to resize images to standard sizes without installing additional third-party software.
Resizing photos and images using Paint
Another method to resize images and photos in Windows 10 and 11 is by using Microsoft Paint. This is the most widely used method for resizing photos in Windows without relying on third-party software.
Follow these steps to resize an image or photo in Windows 10 and 11 using Paint:
- Go to the start menu or Cortana.
- Search for Paint and open it.
- In Paint, click on File, then Open to select your desired image or photo.
- Under the Home tab, click on Resize.
- You can then enter a custom size for your image or photo by Percentage or Pixels.
- Click OK to resize the image.
Please note that resizing your images and photos using Microsoft Paint can significantly reduce the quality of the resized image. If the resize difference is significant, the image or photo may become blurry. Nevertheless, it remains the quickest and most straightforward method to resize images and photos in Windows 10 and 11 without relying on third-party software.
Additional tips
When resizing images and photos in Windows 10 and 11, it’s essential to maintain the aspect ratio of the original image to prevent distortion. The aspect ratio is the relationship between the width and height of the image, and it can be maintained by selecting the “Lock aspect ratio” or “Constrain proportions” option in the resizing tool.
For more customization options when resizing images and photos, consider using third-party software such as Adobe Photoshop or GIMP. These programs offer advanced features and tools for resizing images and photos, as well as other editing tasks.
If you frequently resize images and photos to specific sizes, consider creating presets for those sizes in your preferred image editing software. This can save you time and effort when resizing images and photos in the future.
When resizing images and photos for online use, it’s important to consider the file size and format. Large file sizes can slow down page loading times, while certain file formats such as PNG can be more suitable for images with transparent backgrounds.
If you need to resize multiple images and photos at once, consider using batch processing tools in your preferred image editing software. These tools can save you a significant amount of time and effort, especially if you have a large number of images to resize.
Windows 10 and 11 also offer other built-in image editing tools such as cropping, rotating, and applying filters. These tools can be accessed directly from the Photos app, making it a convenient all-in-one tool for basic image editing tasks.
Resizing images and screenshots are a part of my daily work. I love it if I can reduce even a millisecond of time in resizing those images. Recently, I bumped into the newly released Microsoft PowerToys. It lets you quickly resize an image just with a right-click and no loss in quality. Let’s see how to use it.
How To Quickly Resize Images In Windows 10
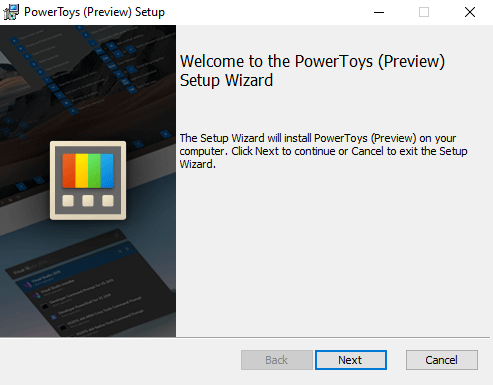
Step 1: To get started, first, we need to install the Microsoft PowerToys. It contains various useful tools, one of such is Image Resizer, which we’ll use this article.
For the unknow, Microsoft PowerToys is an add-on utility for Windows 10 power users, which means they aren’t a native part of Windows 10 and you have to additionally install it from GitHub.
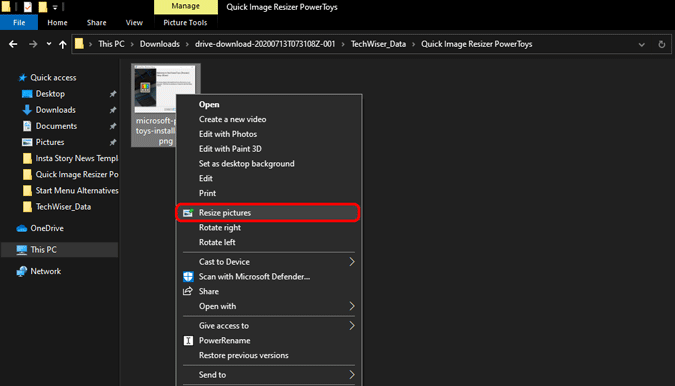
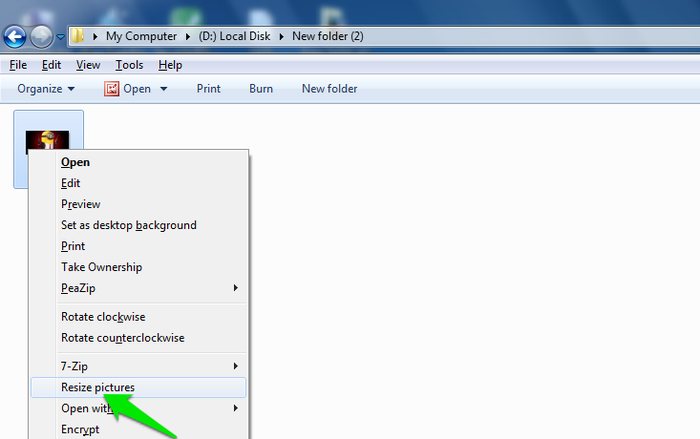
Step 2: Once you have Windows PowerToys installed, right-click on any of the image and you would have a new option called “Resize pictures”. Click on it and you will get the Image Resizer pop-up.
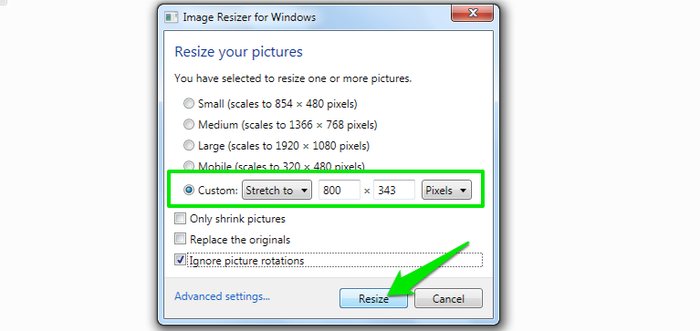
Step 3: From the pop-up, you can select the pre-defined resize values or even enter a custom value. Moreover, it also provides you the option to enter a custom value in Inch, Centimetre, or even Percentage. Leave everything else as default.
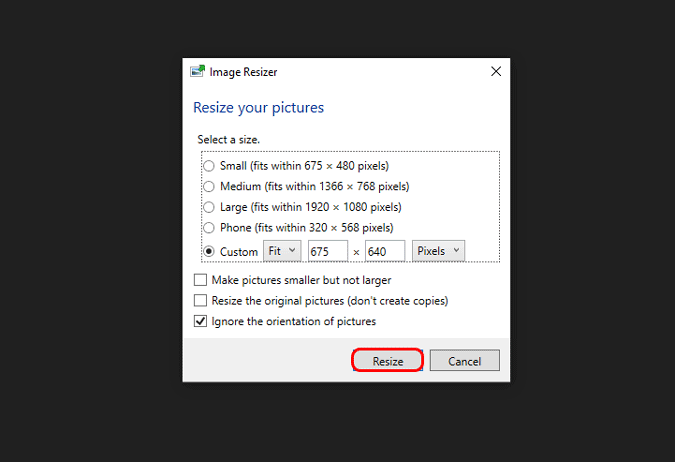
In case you enter a custom value, just enter either the width or height. Image Resizer can automatically populate the other dimension. For instance, we upload pictures to TechWiser with a 675-pixel width. Hence, I just enter the width and leave the height to be automatically populated.
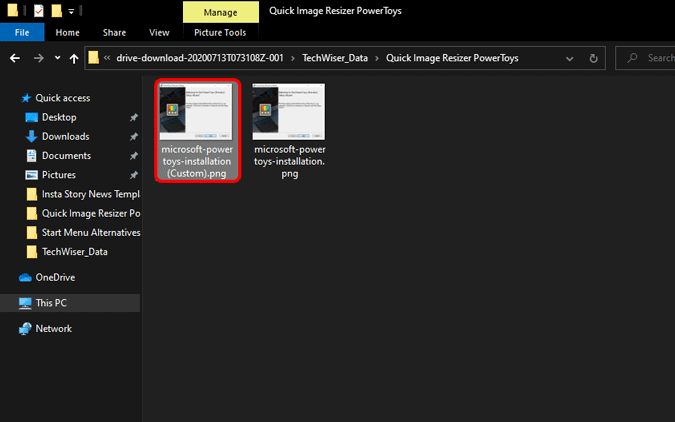
Step 4: Image Resizer doesn’t overwrite the original file. It creates a duplicate file with the same name proceeded by the resize setting name. The resizing is absolutely lossless (in case you are reducing the dimensions).
Read: How to Remove Metadata on Windows, Mac, and Linux
Additional Features /rather put ‘batch resize images’ in h2
Image Resizer also lets you batch resize images. I use it mostly to resize all of the images in a folder at once. To do that, just select all the images, right-click and click on “Resize pictures”. The process ahead is identical to the above-mentioned steps.
In case you frequently resize images like me, Image Resizer also provides you the option to edit pre-defined templates. To do that, head over to the icon tray at the bottom right corner. On the icon tray, right-click on the PowerToys icon and click on “Settings”.
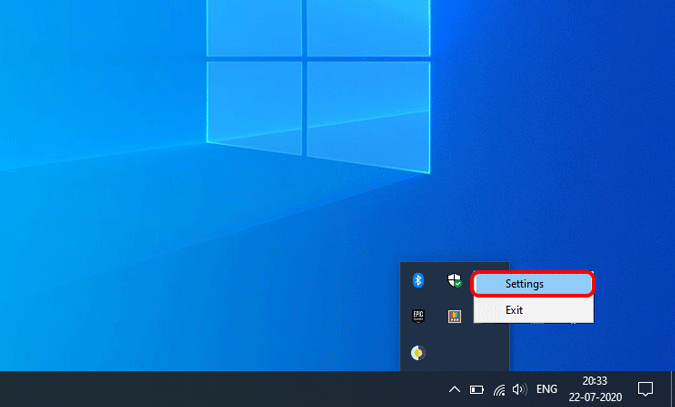
In the PowerMenu settings, navigate to the Image Resizer tab. Here, you will see the 4 default Image resize options – Small, Medium, Large, Phone. You can change the values as per your requirement, remove, or even add dimensions.
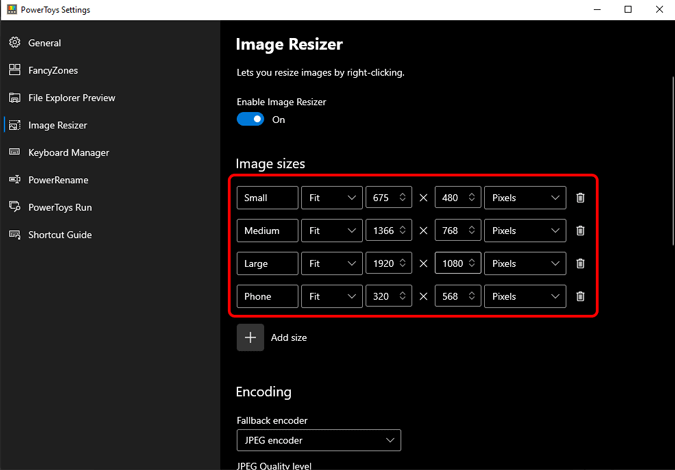
Further, if you scroll down, it provides the encoding options. In case, Image Resizer doesn’t support the file format you are resizing, it converts it into JPEG. This is known as “Fallback encoder”. Next, up you have PNG interlacing and TIFF compression options. In case these words sound new to you, leave them as default.
Other Alternatives
Microsoft’s Image Resizer is based on Brice Lambson’s open-source tool “ImageResizer“. The tool has been shut down now and all development is redirected to Microsoft PowerToys. Similarly, there are other apps like Resize Image. It also lets you batch resize images, however, the approach is slightly different. You have to right-click on images and select “Share”>”Resize Image”.
You can also try the popular command-line tool ImageMagick. It can quickly batch resize images, compress, and convert images.
Also Read: 3 Ways to Get Picture in Picture on Windows 10
Pratik
Pratik works as an In-house writer and video host at TechWiser. Former Programmer, Current writer. Loves tech in any form, quite optimistic about AI, data science and IoT. Talks extremely less but you betcha can geek out over anything on Twitter.
The original size of an image is not always accepted when you try to print or upload the picture. This is especially important when you need to upload a picture to the web, as different websites have different requirements of image size. Fortunately, resizing an image is a fundamental task, and there are dozens of apps for Windows that can easily resize images in Windows.
There are many image resizer tools available for Windows that will let you resize images in Windows as well as help you do another basic editing. For example, you can resize image visual size and also compress it to get a smaller file size. Furthermore, you can also change image type, remove meta data and crop the image, which will lead to changing image size as well.
Check out: Top 10 Best Free Photo Editing Software to Edit Photos Like a Pro
Contents
- How to Resize Images in Windows?
- Resize Images with GIMP
- Quality
- X and Y Resolution
- Resizing the Image
- Other Tools to Resize Images in Windows
- 1. Image Resizer
- 2. RIOT
- 3. Light Image Resizer
- The Pro Review From TechReviewPro
- Don’t Miss:
How to Resize Images in Windows?
In today’s article, we will show you how you can resize a picture using different free tools. Most Windows versions also come with an image resizing tool, but it is not so reliable and doesn’t offer much control. That is why we will be using third-party image resizer tools on Windows for this purpose as they are more reliable and offer better results.
Tip: Resizing a small image to a bigger image can lead to a considerable drop in the picture quality. So be careful when you resize a small image to a larger only resize to the point it offers good quality.
Resize Images with GIMP
GIMP (GNU Image Manipulation Program) is the most robust free photo editing tool, which can also be compared to the paid Adobe Photoshop photo editing tool. Resizing an image is a very basic function for a strong tool like GIMP, but still, we will use GIMP to illustrate how to resize images. It will help both advanced and novice users to resize image according to their need. If you are looking for a lighter and simpler tool for this purpose, skip this and check out the tools mentioned below.
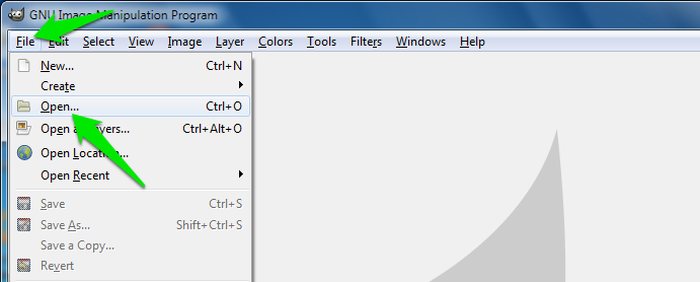
To resize a picture with GIMP, you first need to add the picture inside the GIMP interface. You can directly drag-and-drop the picture inside the GIMP interface, or use the “Open” option in the “File” menu to select the photo from the directory.
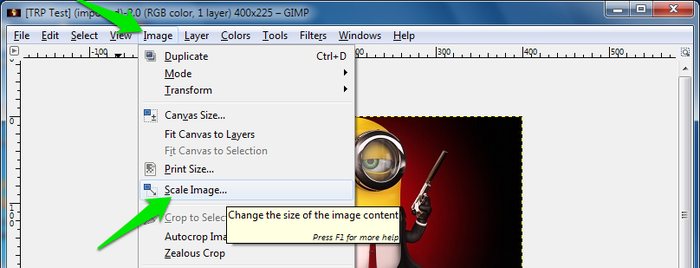
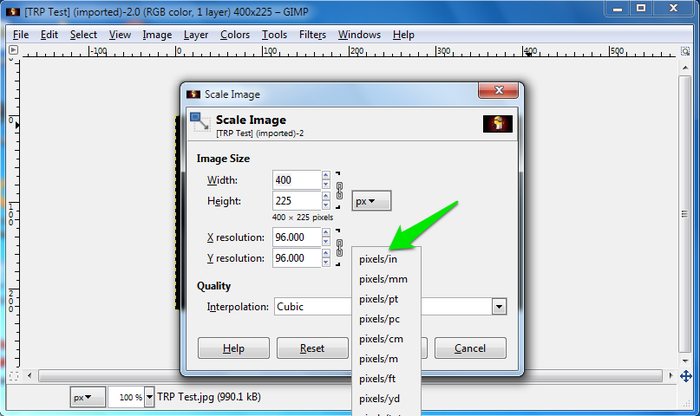
Once the picture is added, click on “Image” menu on top and select “Scale Image.” Here you will find the Width and Height option to adjust image size, but there are many other options as well.
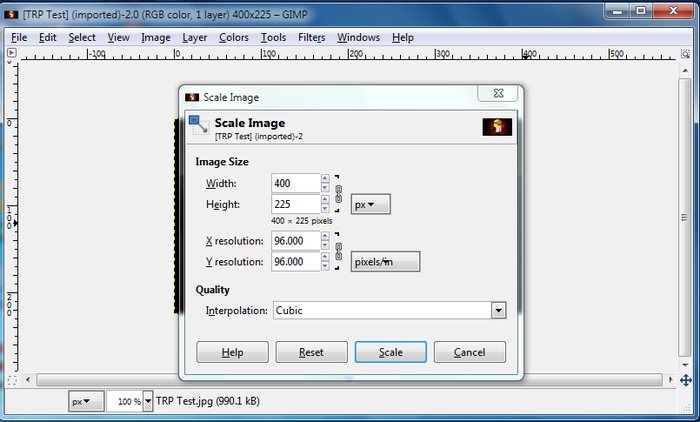
You can adjust how you want to scale the image, by default it is in “Pixels,” which is the standard. You can also use other scaling options like inches, feet, picas, and yards, etc., but novice user should stick with “Pixels” unless required.
Quality
You will see a drop-down menu below the “Quality” heading with multiple options to select, including “None,” “Linear,” “Cubic” and “Sinc.” These are algorithms that will be used for resizing your image; you have to choose the right algorithm according to your picture’s requirement.

None: Use this when you have a perfect image without any sampling.
Linear: It should be used when you have very small text in your picture.
Cubic: It is the standard way of scaling an image and best for most photos unless the photo is very small.
Sinc: It is quite similar to Cubic, but it uses “ringing” pattern instead of “blurring.” It works best for detailed graphics images.
As an average user, you should always use “Cubic” algorithm, and only change it if your image requires.
X and Y Resolution
You should not worry this, as it is used for printing purpose mostly. If you need to convert the picture to paper, then option can be used to spread “pixels” over “inches” or other measurement options. If you have no such intention, leave this option.
Resizing the Image
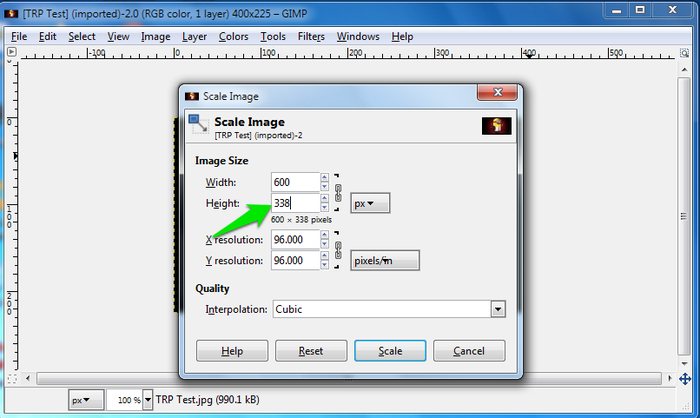
Now that you know what all these options mean, it should be easier to make your choice. For most users, the default options are perfect, and they should just provide “Width” and “Height” to resize the image. However, in rare situations, you can take advantage of other options as well.
To resize the image, provide the required Width or Height and the other factor will be adjusted according to your selection. For example, if you will enter 600 Width, 338 Height will be automatically selected, and vice versa.
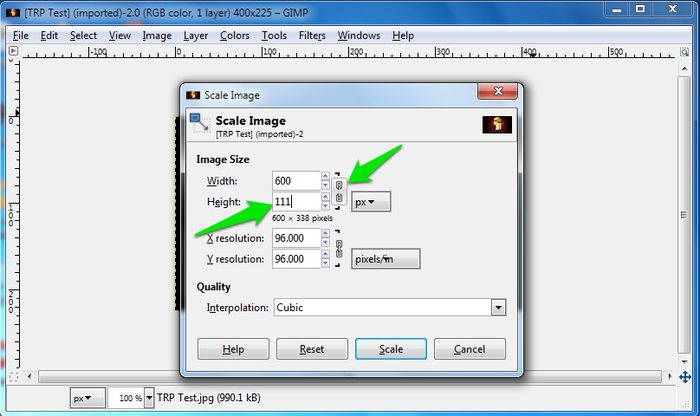
You can also provide custom Height and Width if it is required. To do so, click on the “Chain” icon on the right, and provide your desired Width and Height. This time the numbers will not be automatically adjusted.
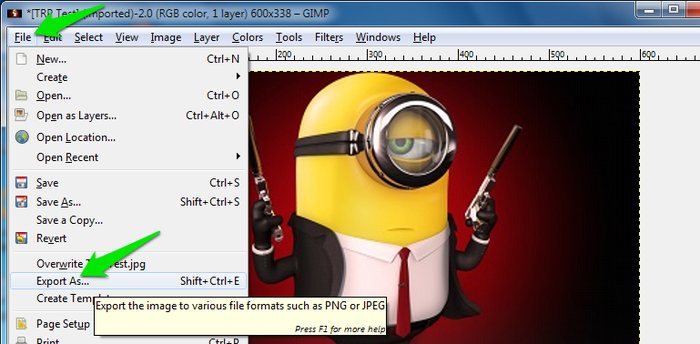
When you are done, just click on “Scale” below and your image will be resized. To save the image, you can click on “File” and then select “Export As” from the menu to save the image.
Also Read: 6 Best Photo Organizing Tools and Alternatives for Picasa
Other Tools to Resize Images in Windows
Above was the full process of how you can effectively resize an image using a robust photo manipulation tool. If you were looking for a simpler tool that will just give you enough options to resize an image, then you can check out our list below. The below-mentioned image resizer tools are free to use and very simple as well, perfect for novice users.
1. Image Resizer
This is the easiest image resizing app in our list that is only 900kb in size and works directly from the Windows explorer. Once you install the program, you will not see any .exe file to launch the application. Instead, it will be added to the context menu (right-click menu). All you have to do is right click on the picture or pictures you want to resize and select “Resize Pictures” from the context menu.
A tiny interface will open up where you will see some already configured sizes and an option to provide custom Width and Height. Just use these options to specify image size and click on “Resize” to resize the image(s). The images resized will be saved in the same directory where the originals images are.
Also See: 6 Best Free Online Photo Collage Maker to Make Photo Collages Online
2. RIOT
RIOT is a very light image manipulation tool with tons of features. Its main purpose is to compress images and decrease their storage size. However, it also comes with the ability to resize images. You can click on “Edit” menu and select “Resample” from it to open resizing options. There are not many options to configure, just provide Width and Height and save the compressed image.
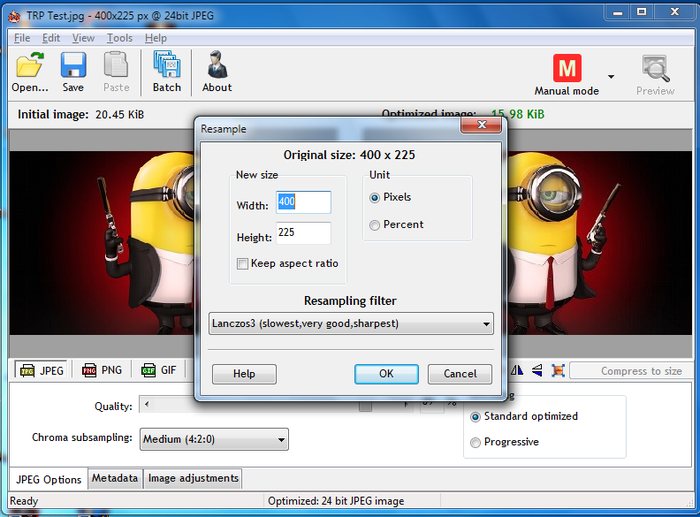
It also has a batch mode, which you can use to resize and compress photos in batch. Other than that, it can also change image type, adjust effects, remove meta data and invert pictures.
3. Light Image Resizer
This is a free image resizer tool only for private use. If you want to use it at the commercial level, you will have to buy a license. The tool is only made of resizing images and comes with many advanced options. It offers a step-by-step guide to each process and also has separate tutorials to guide novice users.
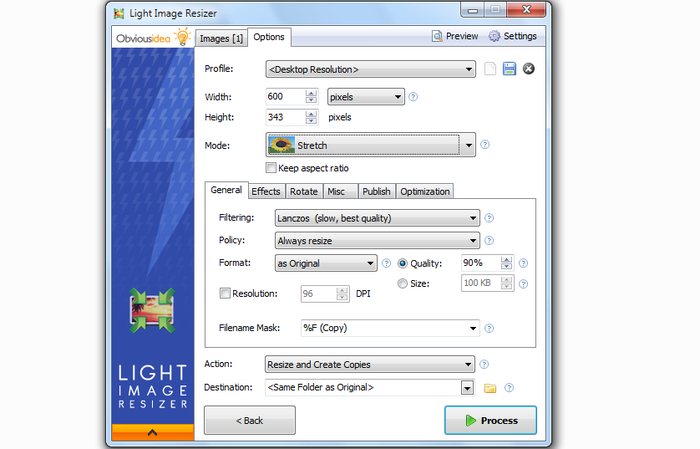
You can process more than one images, and you can resize images using different algorithms like GIMP. The tool is great, but its “Paid” version can be a little annoying.
Also Read: 31+ Best Free Graphic Design Software Tools to Create Stunning Graphic Visuals
The Pro Review From TechReviewPro
Resizing an image is a really simple task, and in most cases, you just need to provide Height and Width, and the software will resize it. However, in some cases, you may have different needs, which is why we have covered both simple and advanced ways to resize images in Windows. If you frequently resize images, then Image Resizer is a great tool. Otherwise, you can also try out GIMP and take advantage of the advanced features it has to offer.
Which image resizer tools or software do you use to resize images in Windows? Do let us all know in the comments below.
Don’t Miss:
- 5 Best Facial Recognition Search Engines to Search Person’s Faces Online
- 7 Best YouTube to MP3 Converts to Convert YouTube Videos to MP3
- 13 Best Android Camera Apps to Improve Android Camera’s Picture Quality
- 8 Best Reverse Image Search Tools to Do Reverse Image Search
- How to Capture Windows Screen? – Top 10 Best Screen Recording Software for Windows