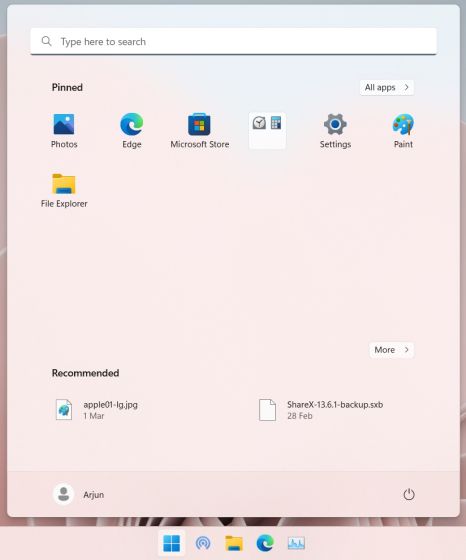
If you do not want to show recently opened files and apps, you can hide the Recommended list or section in Start Menu on Windows 11. You can disable the Recommended section in Start Menu using Windows Settings.

The Start Menu of Windows 11 has a Recommended section, which displays recently opened files and apps. It is more like a list that appears when you right-click on an app on the Taskbar. The same appears in the Start Menu that you can use to find all the recently opened files and apps within moments.
At times, you might not like to show others your recently opened files due to any reason. You could use this tutorial to disable the Recommended app list in the Start Menu in such situations.
To show or hide Recommended list in Start Menu on Windows 11, follow these steps:
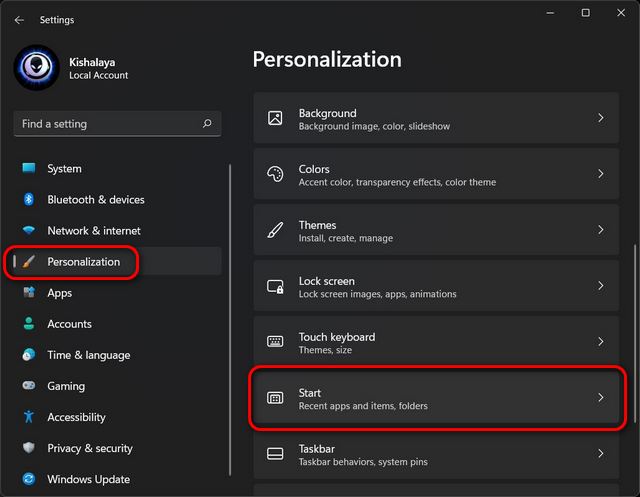
- Press Win+I to open the Windows Settings.
- Go to the Personalization setting.
- Click on the Start option.
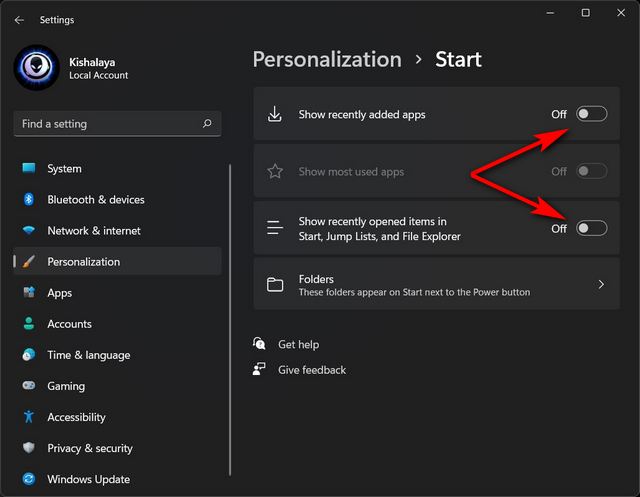
- Toggle the Show recently added apps button.
- Toggle the Show recently opened items in Start, Jump Lists, and File Explorer button.
To know more about these aforementioned steps in detail, continue reading.
At first, you need to open Windows Settings. Although there are several ways to do that, you can press the Win+I keyboard shortcut. Next, switch to the Personalization tab and click on the Start option visible on the right side.
Here you can find two options – Show recently added apps and Show recently opened items in Start, Jump Lists, and File Explorer.
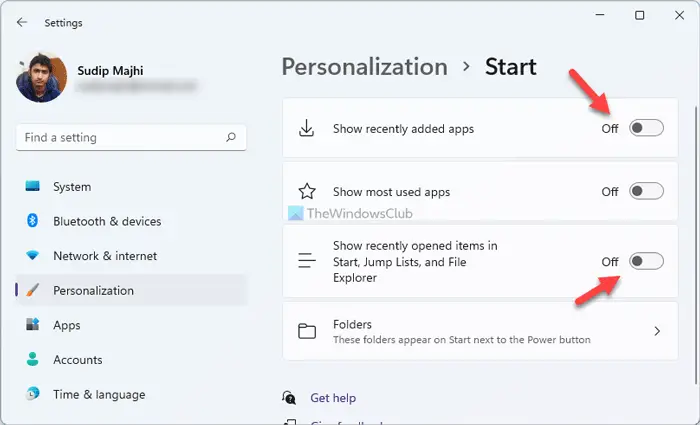
You need to toggle both buttons one after one.
Once done, you can find a message saying To show your recent files and new apps, turn them on in Start settings.
For your information, you can turn on or off the Show recently added apps setting using the Local Group Policy Editor and Registry Editor as well. However, to turn off the other setting, you must open the Windows Settings panel.
To disable the Show recently added apps setting using Group Policy, you need to open the Local Group Policy Editor first. For that, press Win+R, type gpedit.msc, and press the Enter button.
Next, navigate to this path:
Computer Configuration > Administrative Templates > Start Menu and Taskbar
Double-click on the Remove “Recently added” list from Start Menu setting and select the Enabled option.
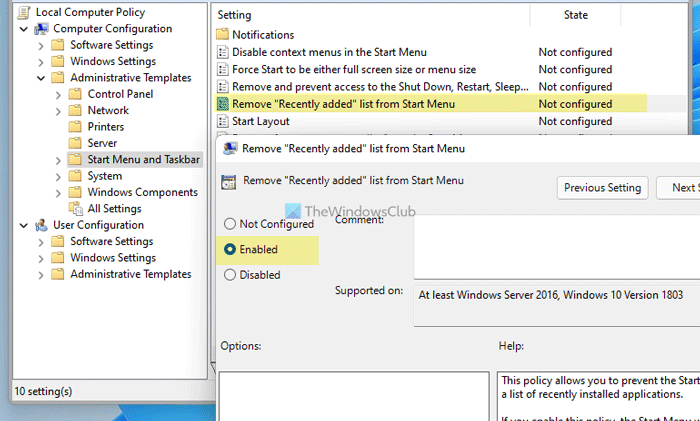
Click the OK button to save the change.
To disable the Show recently added apps setting using Registry, open the Registry Editor on your computer. For that, press Win+R, type regedit, press the Enter button and click on the Yes option.
Next, navigate to this path:
HKEY_LOCAL_MACHINE\SOFTWARE\Policies\Microsoft\Windows
Right-click on Windows and select New > Key. Name it as Explorer. Next, right-click on Explorer and select New > DWORD (32-bit) Value.
Name it as HideRecentlyAddedApps. Double-click on it and set the Value data as 1.
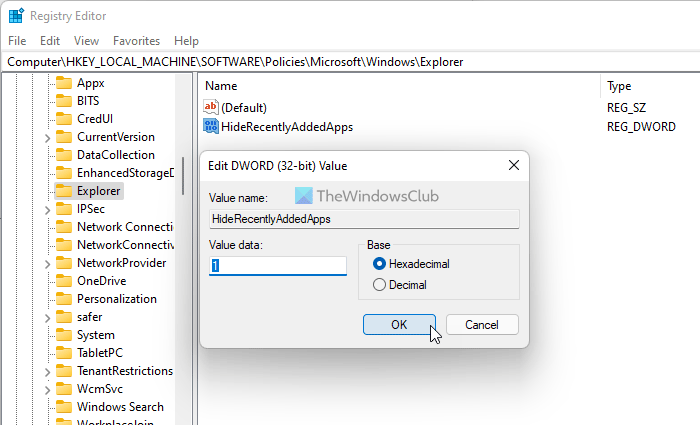
Click the OK button to save the change and restart your computer to get the change.
As mentioned earlier, you must disable the Show recently opened items in Start, Jump Lists, and File Explorer setting from Windows Settings to completely disable the Recommended section in Start Menu on Windows 11.
How do I hide items from the Start menu?
There are several sections included in the Start Menu on Windows 11. You need to toggle various options to hide different items from the Start Menu. For instance, you can use this tutorial to hide the Recommended section. You can right-click on a particular app or file and choose Unpin from Start or a similar option to get the job done.
How do I get rid of the new Windows Start menu?
It is possible to get rid of the new Windows 11 Start Menu using Registry Editor. You need to change the value of Start_ShowClassicMode REG_DWORD value. To learn more about getting back the classic Start Menu in Windows 11, you need to read this article.
That’s all! Hope this guide helped.
Read: How to disable Taskbar Jump Lists in Windows 10?
-
Home
-
News
- How to Remove Recommended on Windows 11? Here Are 5 Ways!
How to Remove Recommended on Windows 11? Here Are 5 Ways!
By Daisy | Follow |
Last Updated
Some users report that when they try to remove Recommended section from the Start menu on Windows 11, it is not working. How to remove Recommended Windows 11? How to turn off Recommended Windows 11? This post from MiniTool introduces how to do that.
The Recommended section is a feature on Windows 11 that can display recently used or opened files, apps, and folders. However, some users report that anyone who opens the Start menu can see their latest used items. Now, we will introduce how to remove Recommended on Windows 11.
Tips:
If you want to provide better protection for your files and folders or get a better privacy experience, you can back up your files/folders to other places such as external drives, NAS, etc. To do that, you can try the free backup software – MiniTool ShadowMaker. This tool also supports encrypting your backup image.
MiniTool ShadowMaker TrialClick to Download100%Clean & Safe
Method 1: Via Settings
How to make Windows 11 remove Recommended? The first method for you is via Settings.
1. Press the Windows + I keys together to open the Settings application.
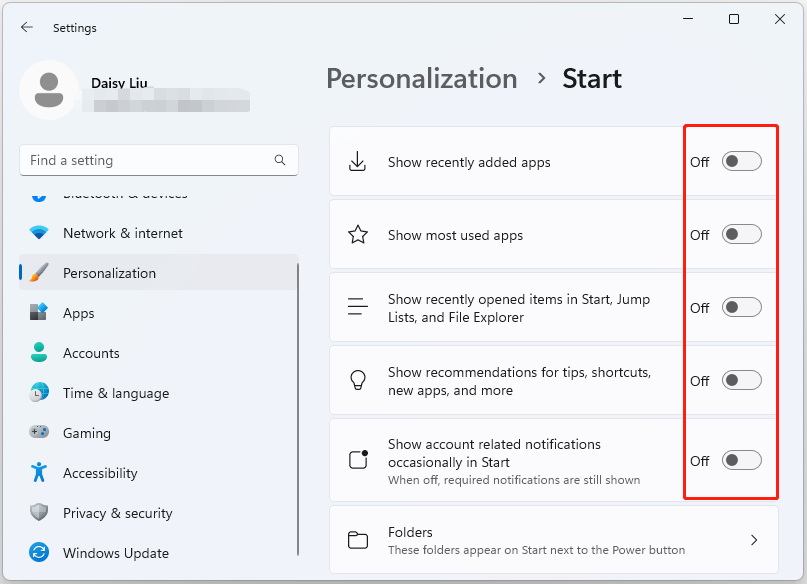
2. Go to Personalization > Start.
3. Turn off the following items:
- Show recently added apps
- Show most used apps
- Show recently opened items in Start, Jump Lists, and File Explorer
- Show recommendations for tips, shortcuts, new apps, and more
- Show account related notifications occasionally in Start
How to remove Recommended from Windows 11? You can also remove it via the Start menu.
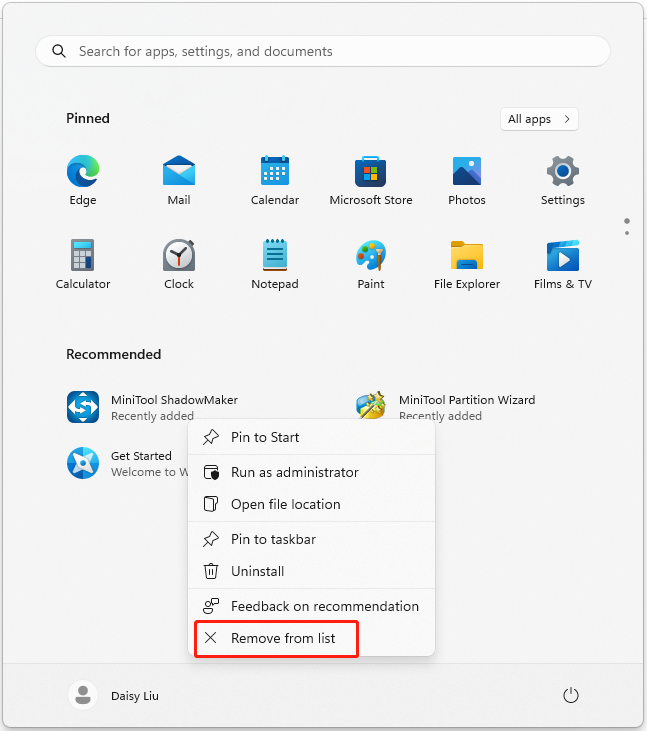
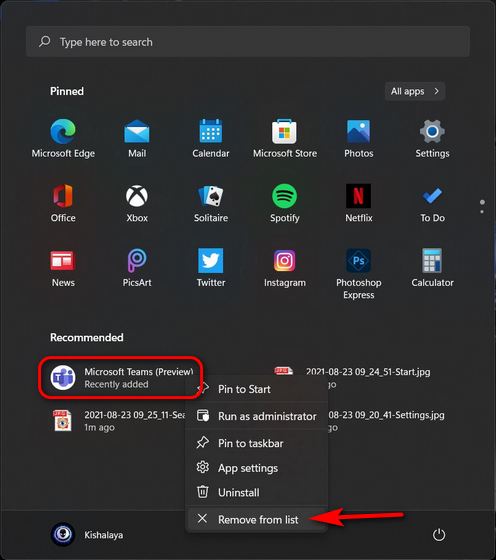
Open Start. Under the Recommended section, right-click the item to select the Remove from list option. After you complete the steps, the item will no longer be available in the list. However, the file will still be available from the location.
Tips:
If you have many items, you will notice a More button in the top-right corner. You can also right-click items to remove them one by one.
Method 3: Via Windows PowerShell
How to remove Recommended Windows 11? Try to use Windows PowerShell to do that. This method is only working in Windows 11 Education/SE versions. It is not possible to disable it in Windows 11 Home/Pro editions.
1. Type Windows PowerShell in the Search box and choose Run as administrator.
2. Execute the following command and press the Enter key.
New-ItemProperty -Path “HKLM:\SOFTWARE\Policies\Microsoft\Windows\Explorer” -Name “HideRecommendedSection” -PropertyType DWord -Value 1 -Force
Method 4: Via Group Policy
Note: This method is only working in Windows 11 Education/SE versions. It is not avalible in Windows 11 Home/Pro editions.
1. Press the Windows + R keys to open the Run dialog box. Type gpedit.msc and press OK to open the Group Policy Editor window.
2. Go to the following location:
Computer Configuration > Administrative Templates > Start Menu and Taskbar
3. Double-click the Remove Recommended section from Start Menu setting.
4. Select the Enabled option in that window. Click Apply > OK.
Method 5: Via Registry Editor
Note:
This method is only working in Windows 11 Education/SE versions. You can’t turn off it in Windows 11 Home/Pro editions.
1. Press the Windows + R keys to open the Run dialog box. Type regedit.msc and press OK to open Registry Editor.
2. Go to the following path:
HKEY_LOCAL_MACHINE\SOFTWARE\Policies\Microsoft\Windows\Explorer
3. Find the HideRecommendedSection value and double-click it to set its value to 1.
Final Words
How to remove Recommended from Windows 11? How to make Windows 11 remove Recommended from the Start menu? You can find answers in the above content. I hope that this post can be useful to you.
About The Author

Position: Columnist
Having been an editor at MiniTool since graduating college as an English major, Daisy specializes in writing about data backups, disk cloning, and file syncing as well as general computer knowledge and issues. In her free time, Daisy enjoys running and going with friends to the amusement park.
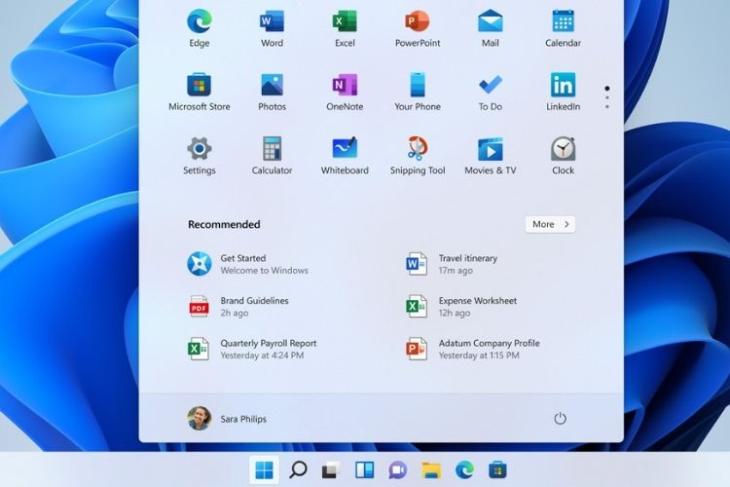
The new centered Start Menu in Windows 11 is divided into two sections. The top half displays the shortcuts for pinned apps, whereas the bottom half includes the “Recommended” section. The latter shows recent files and offers recommendations for various apps installed on your PC. However, if you find the Recommended section annoying and unnecessary, you now have the option to completely remove it. In this tutorial, we will explain how to remove the Recommended section in the Windows 11 Start Menu.
Remove Recommended Section from Windows 11 Start Menu (Updated April 2022)
We have mentioned an easy method to remove the Recommended section from the Windows 11 Start menu in this tutorial. Along with that, we have also included steps to reduce the space assigned to Recommended items, and how to prevent recently added apps from showing up in the Recommended section. You can expand the table below and move to a tutorial of your preference.
Table of Contents
Method 1: Remove Recommended Section on Windows 11 with Explorer Patcher
With the latest release of Explorer Patcher, you can now entirely remove the Recommended section from the Windows 11 Start menu. And the best part is that it’s completely free to use. Earlier, we had used Explorer Patcher to set Windows 11 Taskbar icons to ‘Never Combine’ and this time too, the tiny open-source utility has come to the rescue. Here is how to do it.
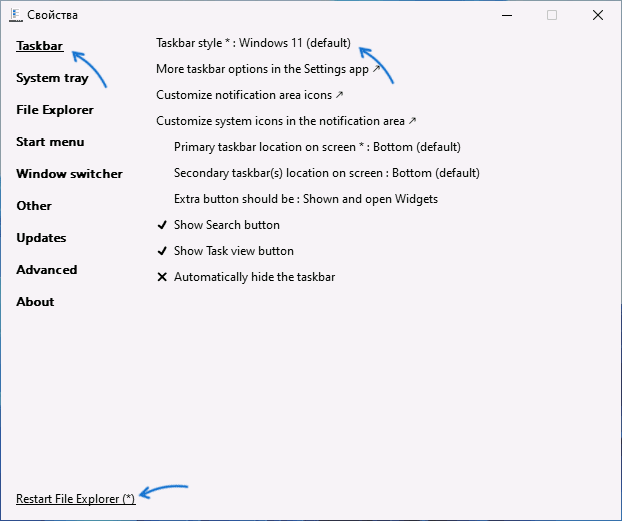
1. Go ahead and download the latest stable build of Explorer Patcher using the GitHub link right here. Then, run the program to see the Windows 11 Taskbar instantly change to a Windows 10-style Taskbar. Now, right-click on the Taskbar and open “Properties“. It will open Explorer Patcher’s properties.

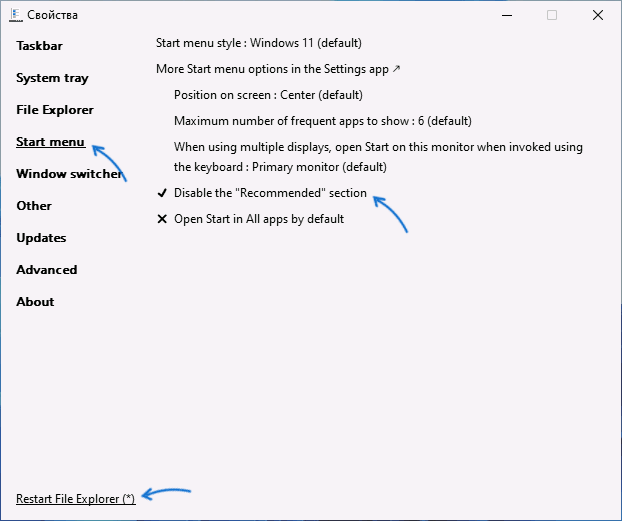
3. Then, move to the “Start menu” section from the left sidebar and turn on the “Disable the Recommended section” toggle. Finally, click on “Restart File Explorer” at the bottom-left corner.
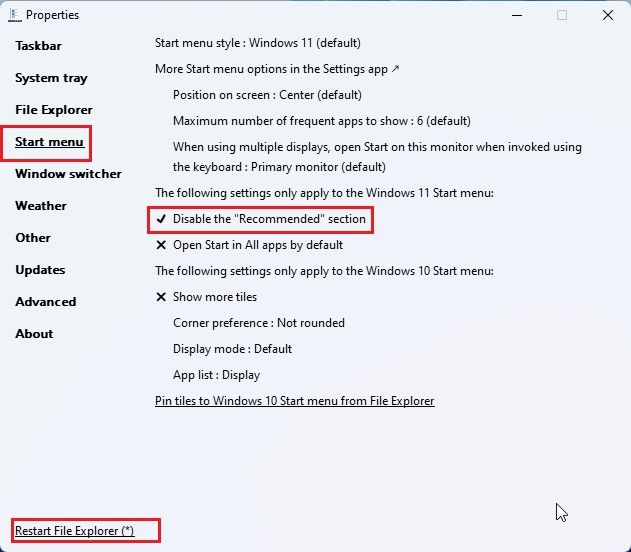
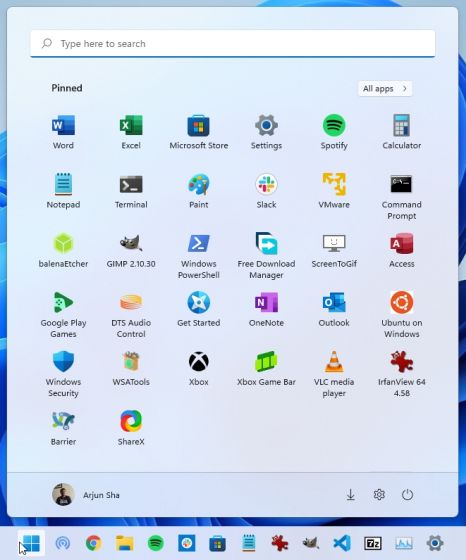
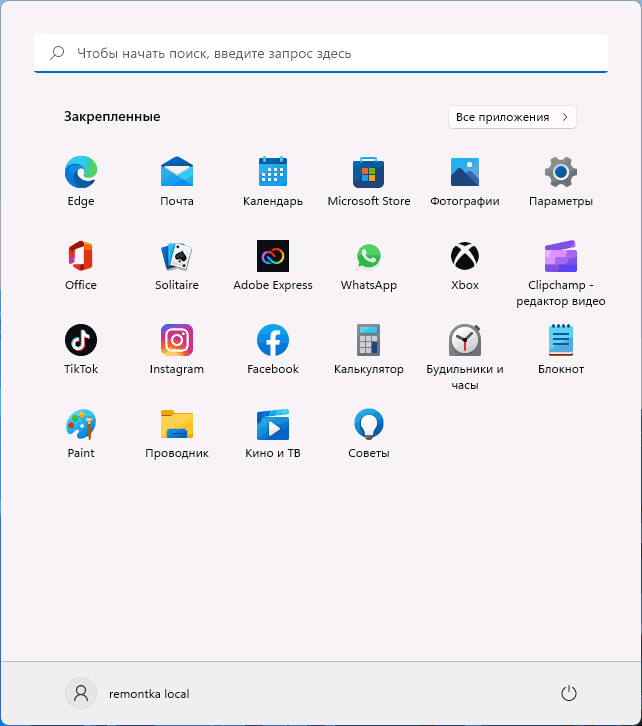
4. Now, open the Start menu on Windows 11, and you will find that the Recommended section has been removed. You can add more apps to the Start menu and fill the entire section with your favorite pinned apps. That’s awesome, right?
Method 2: Reduce Recommended Section Area and Add More Pins
If you are on the Windows 11 Dev build (22509 or later; Dec 1, 2021), you can choose a Start menu layout where the Recommended section is shrunk to just one row, and more space is available for pinned apps. It is one of the best Windows 11 hidden features, and I always switch the layout when setting up Windows 11.
This way, you will not have to use a third-party app to get more space on the Start menu. The feature is currently available to Insiders in the Dev channel, but it will soon be available on the Stable channel. Then, everyone can follow these steps below and reduce the Recommended section area on their Windows 11 PC.
1. First, press the “Windows + I” shortcut to open the Settings. Now, move to “Personalization” from the left sidebar and click on “Start” in the right pane.

2. Here, choose the “More pins” layout.

3. Now, open the Windows 11 Start menu, and you will find that more rows are available for pinned apps. The Recommended section area is reduced to just one row.
Method 3: Remove Recommended ‘Items’ Through Windows Settings
You can remove the Recommended section from the Start Menu using the Settings menu. Here’s how you can do that in two clicks:
- Open “Settings” using the Windows 11 keyboard shortcut Win + I. Then, click on “Personalization” on the left sidebar, and select “Start” on the right pane.
- Now, turn off the toggle next to “Show recently opened items in Start, Jump Lists, and File Explorer“. You can also disable the “Show recently added apps” option to get an even cleaner Start Menu experience in Windows 11.
Note: Disabling “recently opened items” will also get rid of your favorite websites on the Taskbar jump-lists for your browser, which could be inconvenient for some users.
Another way to remove the Recommended items is by individually removing each one from the Start Menu. Here’s how you do that:
- Open the Start Menu either by clicking on the Start Button or hitting the Windows key on your keyboard.
- Now, right-click on the unwanted item and select “Remove from list“. If it is an app that you are trying to remove, you can also click the “Uninstall” button. But this will remove the app from your device for good, and you can no longer access it.
So yeah, you can see that removing the ‘Recommended’ section from the Start Menu in Windows 11 is easy. Apart from this, you can choose to further customize the Start Menu experience in Windows 11 using our linked guide. Now that you know how it works, check out some of our other guides to learn how to remove other annoyances after upgrading from Windows 10 to Windows 11. You can remove ads from your Windows PC and should disable mouse acceleration on your PC if you are a gamer. Meanwhile, if you dislike the new centered Windows 11 Start Menu, learn how to get the old Windows 10-style Start Menu in Windows 11. If you have any other complaints about Microsoft’s new desktop OS, let us know in the comments section, and we will help you out.
 Внизу меню Пуск в Windows 11 отображается раздел «Рекомендуем», где появляются значки недавно добавленных и часто используемых приложений, а также ссылки на последние открытые документы.
Если вы хотите убрать содержимое раздела «Рекомендуем», сделать это сравнительно легко и далее в инструкции будет показано, как именно. К сожалению, если использовать средства системы, сам раздел, даже пустой, продолжит показываться. Но при необходимости можно использовать сторонние утилиты, что также будет продемонстрировано в статье.
Очистка содержимого раздела «Рекомендуем» в Windows 11
Для того, чтобы убрать отдельные или все программы и документы из раздела «Рекомендуем» в меню Пуск Windows 11, используйте следующие шаги:
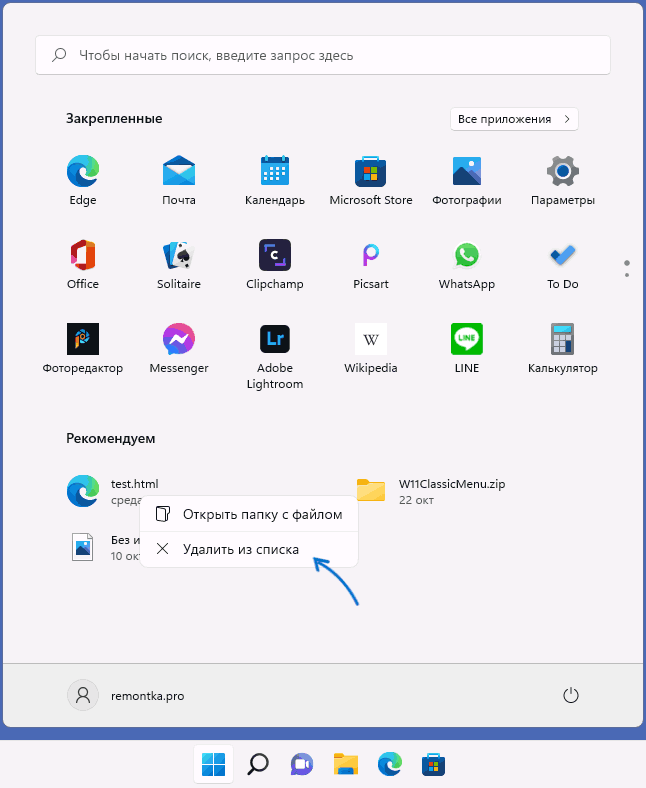
- Если вам требуется удалить только отдельные элементы в разделе «Рекомендуем», просто нажмите по таким элементам правой кнопкой мыши и выберите пункт «Удалить из списка» в контекстном меню.

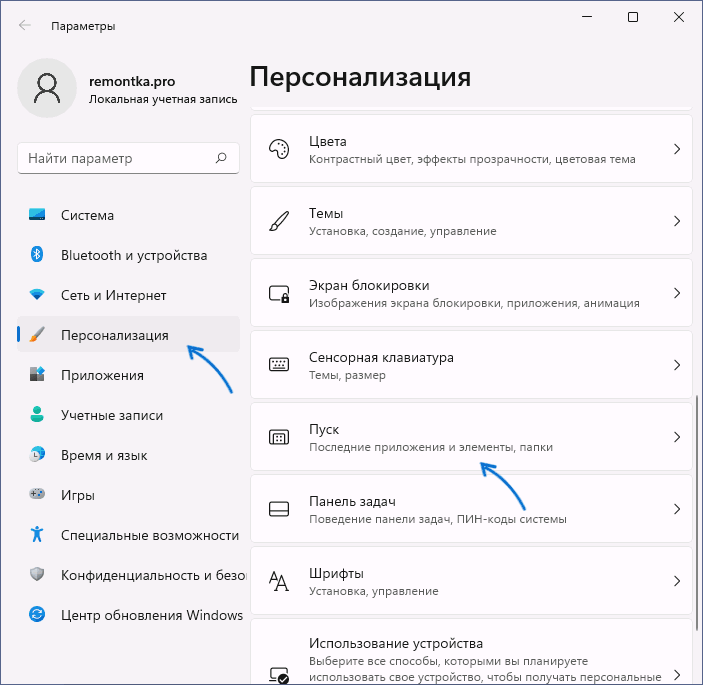
- При необходимости сделать так, чтобы в списке «Рекомендуем» всегда был пустым, зайдите в Параметры — Персонализация и откройте раздел «Пуск».

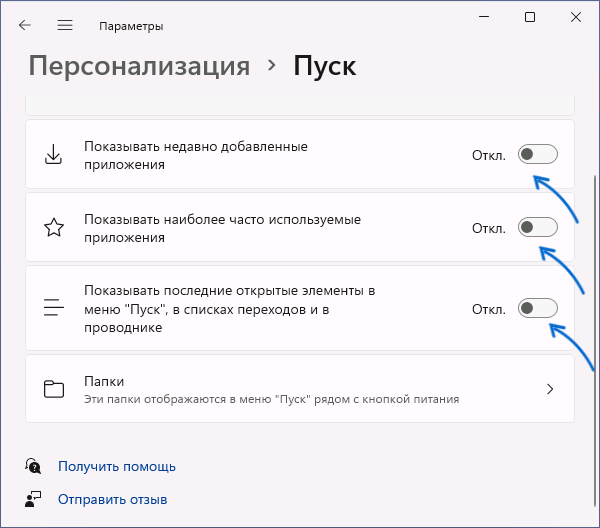
- Отключите пункты «Показывать недавно добавленные приложения», «Показывать наиболее частые приложения», «Показывать последние открытые элементы в меню Пуск, в списках переходов и в проводнике».

- Сразу после этого раздел «Рекомендуем» станет пустым и что-то новое в нём не появится.


Однако, сам раздел продолжит отображаться и всё так же будет занимать почти половину меню «Пуск» Windows 11.
Как было отмечено выше, пока нет способов полностью убрать этот раздел стандартными средствами. Но можно использовать сторонние твикеры, о чем поговорим далее, или альтернативные реализации меню «Пуск» для Windows 11, таких как Start11 или Open Shell.
Как полностью убрать раздел Рекомендуем в меню Пуск Windows 11 с помощью ExplorerPatcher
Средства системы позволяют убрать содержимое, но не раздел «Рекомендуем» в меню Пуск как таковой. Если же требуется полностью избавиться от раздела, можно использовать стороннее приложение ExplorerPatcher:
- Скачайте последнюю версию ExplorerPatcher с официальной страницы https://github.com/valinet/ExplorerPatcher/releases/latest и запустите приложение.
- Внешний вид панели задач изменится, но вы можете вернуть обычный: нажмите правой кнопкой мыши по пустому месту панели задач и выберите пункт «Свойства», в разделе «Taskbar» в пункте «Taskbar Style» выберите «Windows 11» и нажмите «Restart File Explorer» для перезапуска проводника.

- Перейдите в раздел «Start Menu» и включите опцию «Disable the Recommended section», перезапустите проводник.
В результате раздел «Рекомендуем» полностью исчезнет из меню Пуск Windows 11, как показано на изображении ниже.
При желании вы можете сделать так, чтобы меню Пуск всегда открывалось в разделе «Все приложения», где рассматриваемый раздел отсутствует.
Видео инструкция
Windows 10 comes with a lot of changes, some of which are not always welcome. One such change is the addition of the “Recommended” section to the Start Menu. This can be very annoying, especially if you don’t want certain programs or files to show up on your Start Menu.
In this blog post, we will show you how to remove the “Recommended” section from your Start Menu in Windows 11!
To fix various Windows 10/11 problems, we recommend Outbyte PC Repair:
This software will repair common computer errors, protect you from file loss, malware damage, hardware failure, and optimise your computer for peak performance. In three simple steps, you can resolve PC issues and remove virus damage:
- Download Outbyte PC Repair Software
- Click Start Scan to detect Windows 10/11 issues that may be causing PC issues.
- Click Repair All to fix issues with your computer’s security and performance.
This month, Outbyte has been downloaded by 23,167 readers.
If you don’t want to remove the Recommended section from your Start Menu entirely, you can remove individual recommended items. To do this:
- Open the Start Menu and locate the item you want to remove in the “Recommended” section.

- Right-click on it and select “Remove from list.”

- The item will be removed from the recommended section.


If you want to remove the entire “Recommended” section from your Start Menu, you can do so using the Settings menu.
Here are the steps for that:
- Click on the Start button and click the Settings icon.

- Switch to the Personalization tab on the left and select Start settings from the right.

- Under the Layout section, enable the More pins option.

- Along with that, toggle the buttons to disable the Show recently added apps and Show recently opened items in Start, Jump Lists, and File Explorer options, respectively.


Remove Recommended Section Using Explorer Patcher
Some users may not be able to remove the Recommended section using the above method. If you are one of them, then you can try using Explorer Patcher.
Explorer Patcher is a free tool that allows you to change your Windows 11 taskbar to Windows 10 style, patch your system registry and remove the Recommended section from Start Menu in Windows 11.
To do this:
- Download the latest stable version of Explorer Patcher from this link.
- Run the installer, and you will notice that your Windows 11 taskbar is immediately turned to Windows 10 style.
- Right-click on the taskbar and select Properties from the menu

- Under the Properties, switch to the Start menu tab on the left and select Disable the “Recommended” section option on the right.

- Finally, click the Restart File Explorer option at the bottom.


Rounding Up
As you can see, it is quite easy to remove the Recommended section from your Start Menu in Windows 11. You can either do this manually by removing individual items from the recommended list or use tools like Explorer Patcher to get rid of the Recommended section altogether. Whichever method you choose, we hope this guide helped you out!
Can I re-enable the Recommended section after removing it?
Yes, you can re-enable the Recommended section by reverting the changes you made in Settings or Explorer Patcher.
Does Explorer Patcher have any other features?
Yes, Explorer Patcher also allows you to change the Windows taskbar back to Windows 10 style and patch your system registry. You can learn more about its features here.
Is there any other way to remove the Recommended section from Start Menu in Windows 11?
Yes, you can also remove the Recommended section by using third-party tools such as Advanced System Optimizer. These tools are usually more comprehensive and allow you to customize your system further. However, they are not free and require a paid subscription.
Does removing the Recommended section affect my system performance?
No, removing the Recommended section from Start Menu does not affect your system performance in any way. It simply removes certain programs or files from being displayed on your Start Menu.
Is it safe to use Explorer Patcher?
Yes, Explorer Patcher is a safe and reliable tool that can be used to remove the Recommended section from your Start Menu in Windows 11. It does not contain any malicious code or malware. However, as with any other third-party tool, we recommend you scan it with a reliable antivirus program before use.

Peter is an Electrical Engineer whose primary interest is tinkering with his computer. He is passionate about Windows 10 Platform and enjoys writing tips and tutorials about it.