This article describes how to add or remove accounts on your PC. Having different accounts on a shared PC lets multiple people use the same device, all while giving everyone their own sign-in info, plus access to their own files, browser favorites, and desktop settings.
In addition, if you use the same PC for personal projects and work or school, you may want to add different accounts to your PC.
Note: If you have a new device, you may see an account named «defaultuser0″—this account is inactive and it won’t hurt your device or give anyone else access. If you want to remove it, you can restart your device and then sign in again.
Add people to a home PC
The best way to add someone to your PC is to have them sign in with a Microsoft account. Learn more about Microsoft accounts in Sign in with a Microsoft account.
-
Select Start > Settings > Accounts > Family & other users.
-
Under Other users > Add other user, select Add account.
-
Enter that person’s Microsoft account information and follow the prompts.
If you need to remove that person’s sign-in information from your PC:
-
Select Start > Settings > Accounts > Family & other users.
-
Under Other users, select the flyout for the account you want to remove.
-
Next to Account and data, select Remove. Note that this will not delete the person’s Microsoft account, it will just remove their sign-in info from your PC.
Add people to a work or school PC
The best approach is for everyone who shares a PC at work or school to have their own Microsoft account. Learn more about Microsoft accounts in Sign in with a Microsoft account.
To add someone with an existing Microsoft account:
-
Select Start > Settings > Accounts > Other users (in some Windows editions, it may be labeled as Other people or Family & other users).
-
Under Work or school users > Add a work or school account, select Add account.
-
Enter that person’s user account, select the account type, and then select Add.
If you need to remove that person’s sign-in information from your PC:
-
Select Start > Settings > Accounts > Other users.
-
Select the person’s name or email address, then select Remove.
-
Read the disclosure and select Delete account and data. Note that this will not delete the person’s Microsoft account, but it will remove their sign-in info and account data from your PC.
Add work or school accounts to your PC
If you’re using the same PC for both personal and school or business work, you may want to add various accounts to your PC to make it easier for you to get to the files, apps, and information associated with each account. When you access work or school, you’ll be connected to your organization’s domain and have access to its resources.
To add another account to your PC:
-
Select Start > Settings > Accounts > Access work or school .
-
Next to Add a work or school account, select Connect.
-
Enter that person’s account info, select the account type, and then select Add.
If you need to remove an account from your PC:
-
Select Start > Settings > Accounts > Access work or school .
-
Select the account you wish to remove, then select Disconnect.
-
Select Yes to confirm your actions. Note that this will not delete the account entirely, it will just remove access from your PC
Note: If an account is either the only account on the PC or the primary account on the PC, it can’t be removed.
Add accounts used by apps
To make signing in to your accounts easier and faster, you may want to add accounts for different apps.
To add an account used by apps to your PC:
-
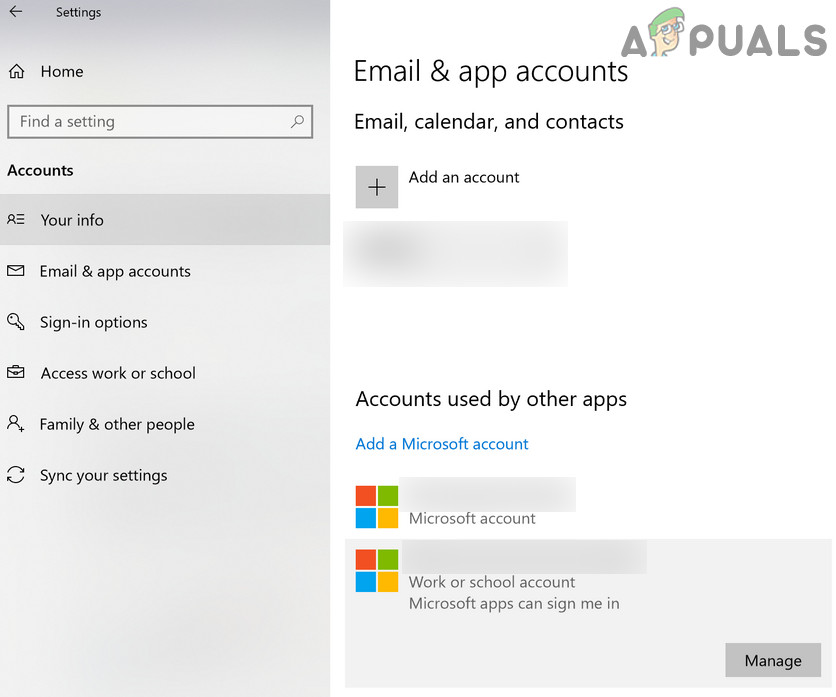
Select Start > Settings > Accounts > Email & accounts .
-
To add an account used by email. calendar, or contacts, select Add an account under Accounts used by email, calendar, and contacts. For other apps, select Add a Microsoft account or Add a work or school account.
-
Follow the prompts to add the account.
To remove an account used by apps from your PC:
-
Select Start > Settings > Accounts > Email & accounts .
-
Select the account you wish to remove, then select Remove.
-
Select Yes to confirm your actions.
Add people to a family group
If you’ve added your family’s Microsoft accounts to your PC, you can set them up as a Microsoft family. It’s a free service that helps families stay connected and keep kids safer on Windows 11 and Xbox One devices, along with Android devices running Microsoft Launcher.
Add people to a home PC
The best way to add someone to your PC is to have them sign in with a Microsoft account. Learn more about Microsoft accounts in Sign in with a Microsoft account.
On Windows 10 Home and Windows 10 Professional editions:
-
Select Start > Settings > Accounts > Family & other users.
-
Under Other users, select Add someone else to this PC.
-
Enter that person’s Microsoft account information and follow the prompts.
If you need to remove that person’s sign-in information from your PC:
-
Select Start > Settings > Accounts > Family & other users.
-
Select the person’s name or email address, then select Remove. Note that this will not delete the person’s Microsoft account, it will just remove their sign-in info from your PC.
Add people to a work or school PC
The best approach is for everyone who shares a PC at work or school to have their own Microsoft account. Learn more about Microsoft accounts in Sign in with a Microsoft account.
To add someone with an existing Microsoft account:
-
Select Start > Settings > Accounts > Other users (in some Windows editions, it may be labeled as Other people or Family & other users).
-
Under Work or school users, select Add a work or school user.
-
Enter that person’s user account, select the account type, and then select Add.
If you need to remove that person’s sign-in information from your PC:
-
Select Start > Settings > Accounts > Other users.
-
Select the person’s name or email address, then select Remove.
-
Read the disclosure and select Delete account and data. Note that this will not delete the person’s Microsoft account, but it will remove their sign-in info and account data from your PC.
Add work or school accounts to your PC
If you’re using the same PC for both personal and school or business work, you may want to add various accounts to your PC to make it easier for you to get to the files, apps, and information associated with each account. When you access work or school, you’ll be connected to your organization’s domain and have access to its resources.
To add another account to your PC:
-
Select Start > Settings > Accounts > Access work or school .
-
Select Connect, then follow the prompts to add the accounts.
If you need to remove an account from your PC:
-
Select Start > Settings > Accounts > Access work or school .
-
Select the account you wish to remove, then select Disconnect.
-
Select Yes to confirm your actions. Note that this will not delete the account entirely, it will just remove access from your PC
Note: If an account is either the only account on the PC or the primary account on the PC, it can’t be removed.
Add accounts used by apps
To make signing in to your accounts easier and faster, you may want to add accounts for different apps.
To add an account used by apps to your PC:
-
Select Start > Settings > Accounts > Email & accounts .
-
To add an account used by email. calendar, or contacts, select Add an account under Accounts used by email, calendar, and contacts. For other apps, select Add a Microsoft account or Add a work or school account.
-
Follow the prompts to add the account.
To remove an account used by apps from your PC:
-
Select Start > Settings > Accounts > Email & accounts .
-
Select the account you wish to remove, then select Remove.
-
Select Yes to confirm your actions.
Add people to a family group
If you’ve added your family’s Microsoft accounts to your PC, you can set them up as a Microsoft family. It’s a free service that helps families stay connected and keep kids safer on Windows 10 and Xbox One devices, along with Android devices running Microsoft Launcher.
Need more help?
Want more options?
Explore subscription benefits, browse training courses, learn how to secure your device, and more.
Communities help you ask and answer questions, give feedback, and hear from experts with rich knowledge.
Find solutions to common problems or get help from a support agent.
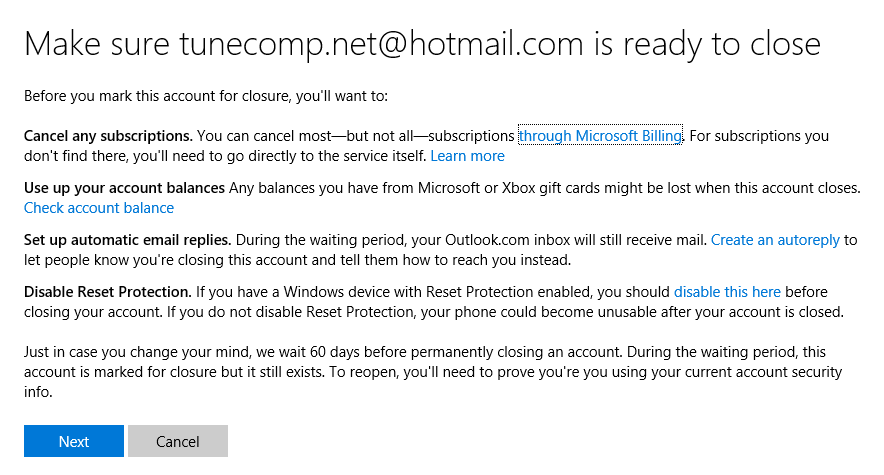
When you close a Microsoft account, for whatever reason, Microsoft wants to make sure of two things:
-
That it’s really you, not someone else trying to close your account.
-
That you’re not leaving anything important behind that you’re going to need later.
Note: If you forgot your account info and had to reset your security info, you must wait 60 days before closing your account.
If you’re sure you want to close your Microsoft account, follow these steps:
-
Learn more about the things you should check first.
-
Go through the process for how to close your account.
-
Find out what happens after you close your account.
Continue
Tip: If you’re a small business owner looking for more information on how to get Microsoft 365 set up, visit Small business help & learning.
Need more help?
Want more options?
Explore subscription benefits, browse training courses, learn how to secure your device, and more.
Communities help you ask and answer questions, give feedback, and hear from experts with rich knowledge.
When you create a user account on a Windows 10 computer, you can either create a local user account (which requires a combination of a username and password to log in) or a Microsoft account (which is tethered to the email address you use to create it and which requires the email address you created the account with and the password to log in). Having a Microsoft account on a Windows 10 computer not only guarantees security (you can’t have a Microsoft account on Windows 10 without a password) but also allows for seamless integration with Microsoft products and services.
However, some users would much rather have a local user account on their computer than a user account that is not only tethered to their Microsoft account but also requires their Microsoft account to log in. Fortunately, there is no requirement for you to have a Microsoft account on Windows 10 to be able to use it – you can still use Windows 10 in all of its glory if you have a local user account. That being the case, it is entirely possible to remove a Microsoft account from Windows 10.
Note: This article also targets cases where you don’t have access to the user accounts (also the case where the user account is a work/school account not in your reach).
Solution 1: Disconnect from Work or School Access Tab in the System’s Settings
Many users tend to remove the work or school account (they have no access to) from the Email & Accounts tab but that option requires them to sign-in to the account that has to be removed (which is not possible). In this context, disconnecting the problematic account in the work or school access tab may solve the problem (as it will not require sign-in). But this may not work if the problematic account is the only or primary account on the PC.
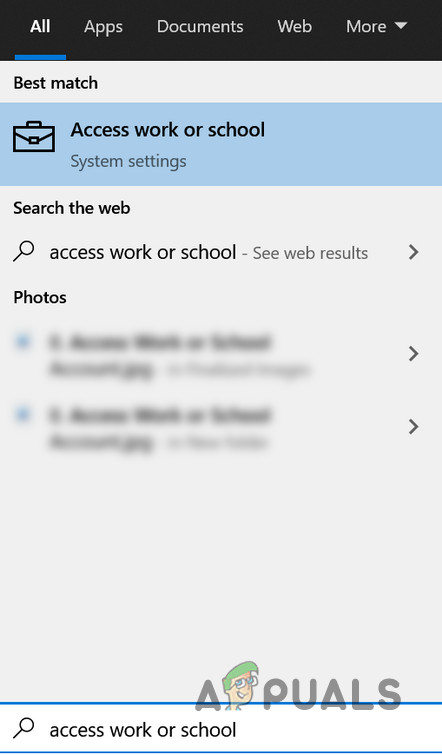
- Hit the Windows key and in the Windows Search, type “Access Work or School” and select it.

Open Access Work or School Settings - Now, in the right pane, expand the problematic account and click on the Disconnect button.

Disconnect Work or School Account - Then confirm to disconnect the account and check if the issue is resolved (you may have to restart your PC).

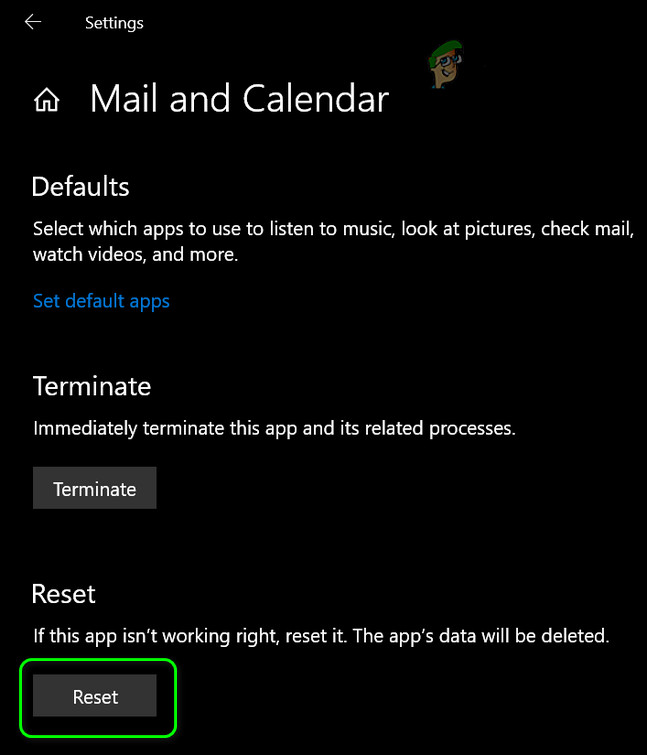
Solution 2: Reset the Mail App to Defaults
If you could not disconnect the problematic account from the Work or School tab, then resetting the Mail app to its defaults will clear out all the email accounts from the PC and thus solve the problem. But keep in mind that all the app data will be lost.
- Hit the Windows key and type Mail. Then right-click on the Mail app and choose App Settings.
- Then scroll down and click on the Reset button.

Reset the Mail App to Defaults - Now confirm to Reset the Mail app and then reboot your PC.
- Upon reboot, check if the problematic account is removed from the PC.
- If not, then check if disconnecting the problematic account from the Work or School tab in Settings (solution 1) resolves the issue.
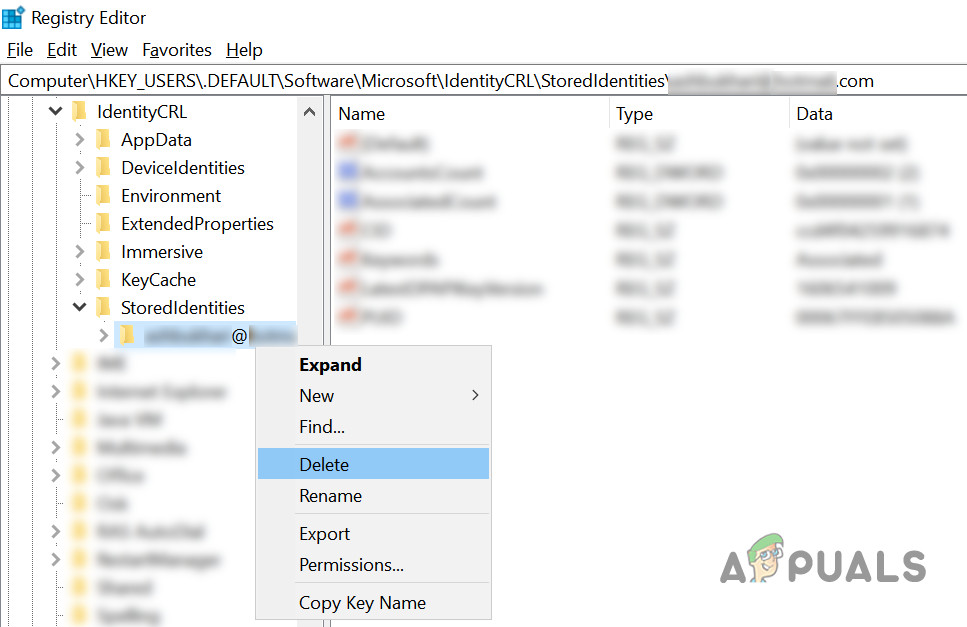
Solution 3: Remove the Problematic Account from the System’s Registry
You may fail to remove the problematic account if the system’s registry entry relevant to that account is corrupt. In this case, deleting the registry entry relevant to the problematic account may solve the problem.
Warning: Proceed further at your own risk as registry editing requires a certain level of proficiency and if done wrong, you may cause everlasting damage to your PC/data.
- Create a backup of your system’s registry.
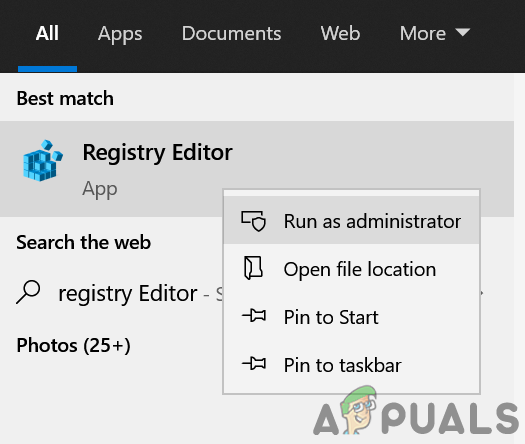
- Hit the Windows key and in the Windows Search bar, type Registry Editor. Then, in the search results shown, right-click on the result of Registry Editor and choose Run as Administrator.

Open Registry Editor as Administrator - Now navigate to the following (you may copy the path and paste it into the address bar of the Registry Editor):
HKEY_USERS\.DEFAULT\Software\Microsoft\IdentityCRL\StoredIdentities
- Then, in the left pane, expand the key of StoredIdentities and right-click on the key related to the problematic account.
- Now, in the context menu, select Delete and then confirm to delete the key.

Delete the Problematic Account from the System’s Registry - Then reboot your PC and check if the account issue is resolved.
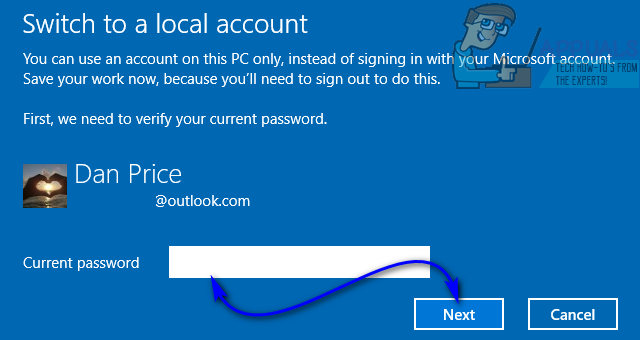
Solution 4: Convert your Existing Microsoft Account into a Local User Account
An existing Microsoft account on a Windows 10 computer can simply be converted into a local user account. This is the ideal course of action for Windows 10 users with just one Microsoft account on their computers or users who want to remove their Microsoft account from within the Microsoft account itself. To use this method to remove a Microsoft account from Windows 10, you need to:
- Open the Start Menu.
- Click on Settings.

- Click on Accounts.

- Locate and click on Sign in with a local account instead in the right pane of the window.

- Type in your password, click on Next and follow the rest of the onscreen instructions to convert the Microsoft account into a local user account.

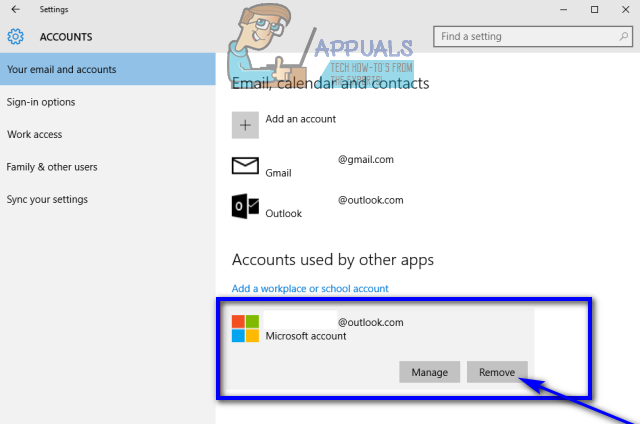
- Repeat steps 1–3.
- In the right pane of the window, scroll down to the Other accounts you use section and locate and click on the Microsoft account you want to remove from your computer to select it.
- Click on Remove.

- Follow the onscreen instructions and prompts to remove the Microsoft account from your computer.


Solution 5: Log in to another Administrator account and remove the Microsoft account
You can also remove a Microsoft account from Windows 10 if you simply log in to an account on your computer that is not the Microsoft account you want to remove (any user account – Microsoft account or local user account, doesn’t really matter – will do, as long as it is an Administrator account and not a Standard User account). If you would like to use this method, simply log in to an Administrator account on your computer that is not the Microsoft account you want to remove, and then:
- Open the Start Menu.
- Click on Settings.
- Click on Accounts.
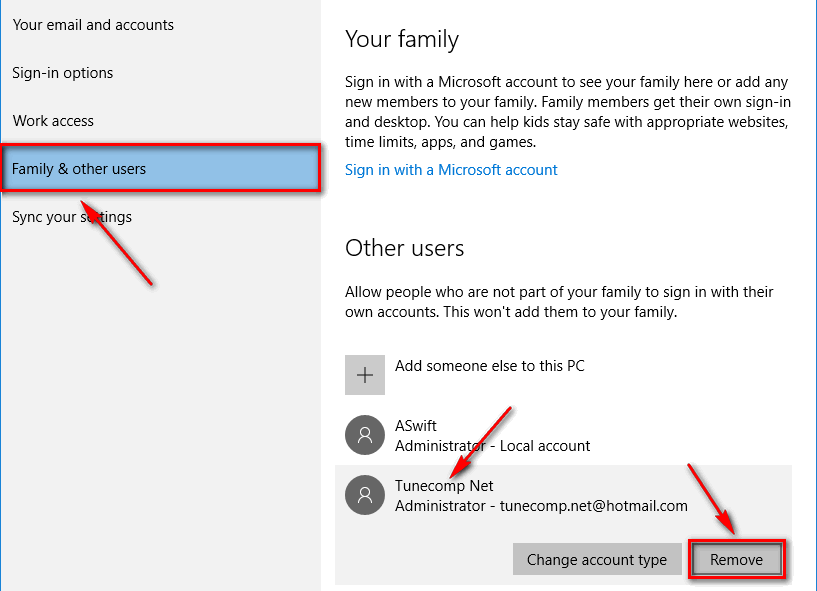
- In the left pane of the window, click on Family & other users.
- In the right pane of the window, locate and click on the Microsoft account you want to remove from your computer to select it.
- Click on Remove.

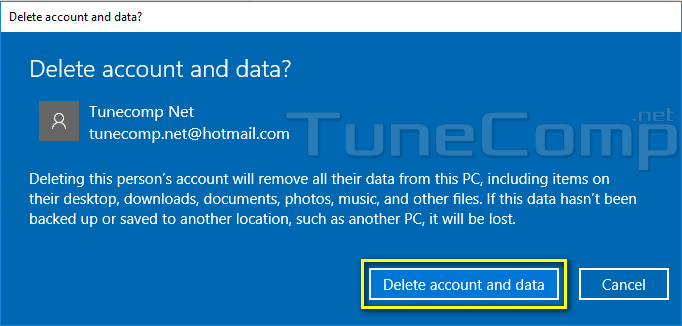
- Follow the onscreen instructions, and on the “Delete account and data?” screen, click on Delete account and data to confirm the removal of the Microsoft account from your computer.

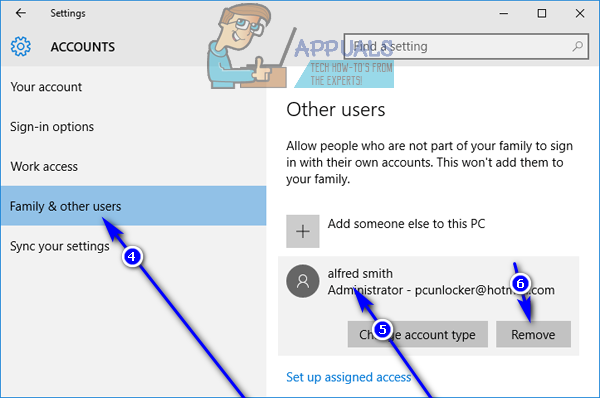
As soon as you do so, the target Microsoft account will be successfully and completely removed from your computer. Be warned, however – the Microsoft account will take all of its secrets to the grave, meaning that any data stored on the account at the time of removal will be gone forever once the Microsoft account has been removed.

Kevin Arrows
Kevin Arrows is a highly experienced and knowledgeable technology specialist with over a decade of industry experience. He holds a Microsoft Certified Technology Specialist (MCTS) certification and has a deep passion for staying up-to-date on the latest tech developments. Kevin has written extensively on a wide range of tech-related topics, showcasing his expertise and knowledge in areas such as software development, cybersecurity, and cloud computing. His contributions to the tech field have been widely recognized and respected by his peers, and he is highly regarded for his ability to explain complex technical concepts in a clear and concise manner.
For various reasons you may want to remove Microsoft account after you used it on your PC. We offer a guide on how to do it correctly. The issue is you won’t be able to delete the Microsoft account until it is the only user on the current computer.
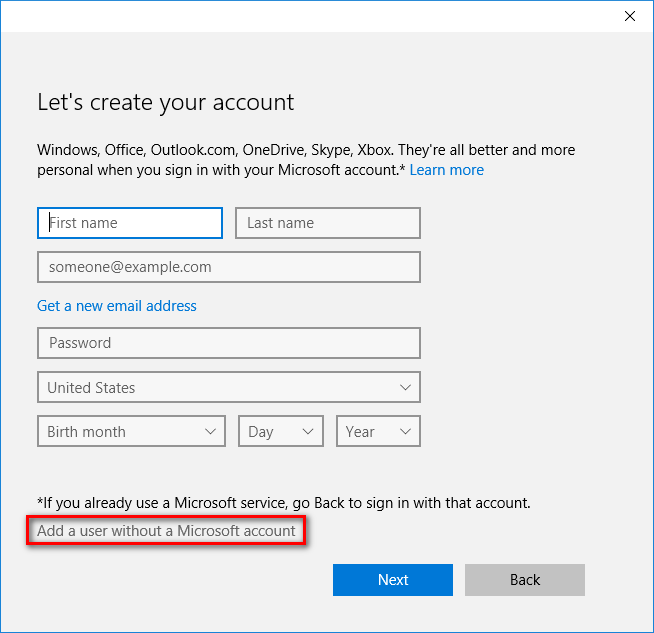
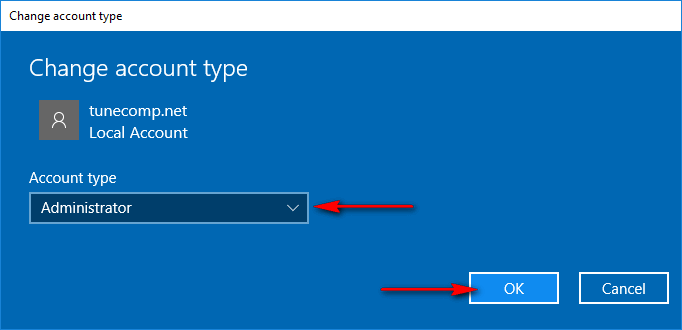
1. Create a new local user (read our detailed guide):
Change the type to Administrator:
2. Sign out of your Microsoft account. And then sign in to the local user:

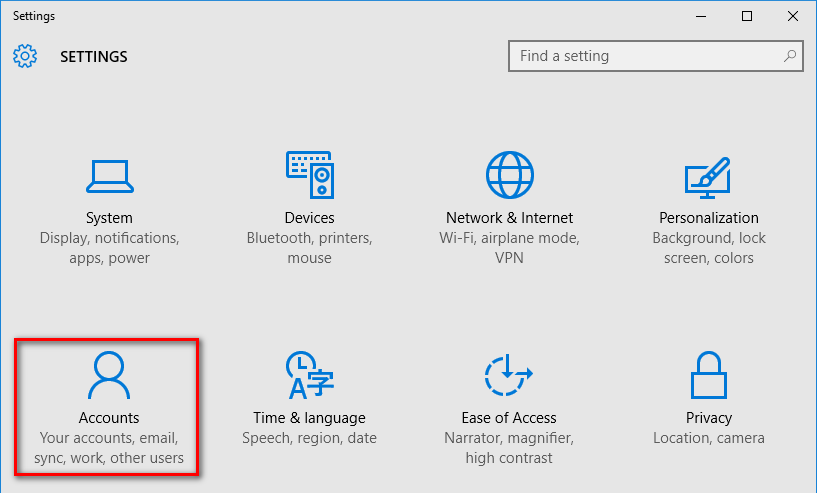
3. After you’re logged in as a local admin, go to Settings:

then select Accounts:
Go to Family & other users tab.
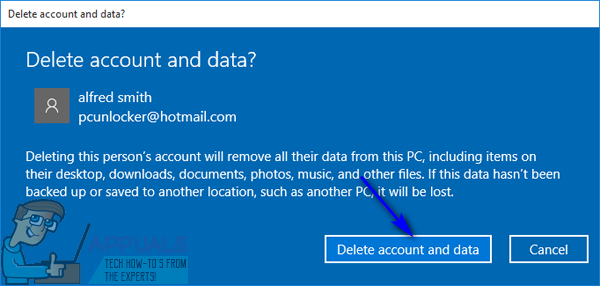
Click on the user you wish to delete and press Remove:
Click Delete account and data:
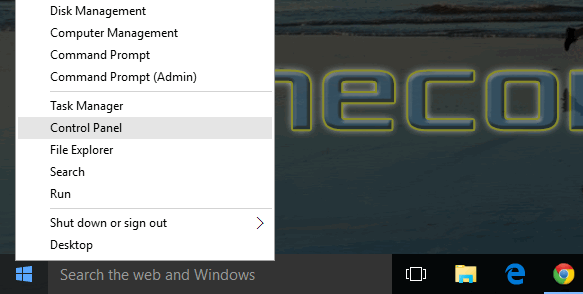
How to Do the Same in Control Panel
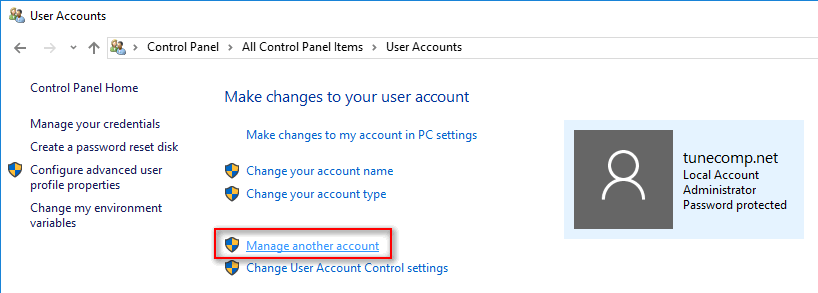
Go to the Control Panel:
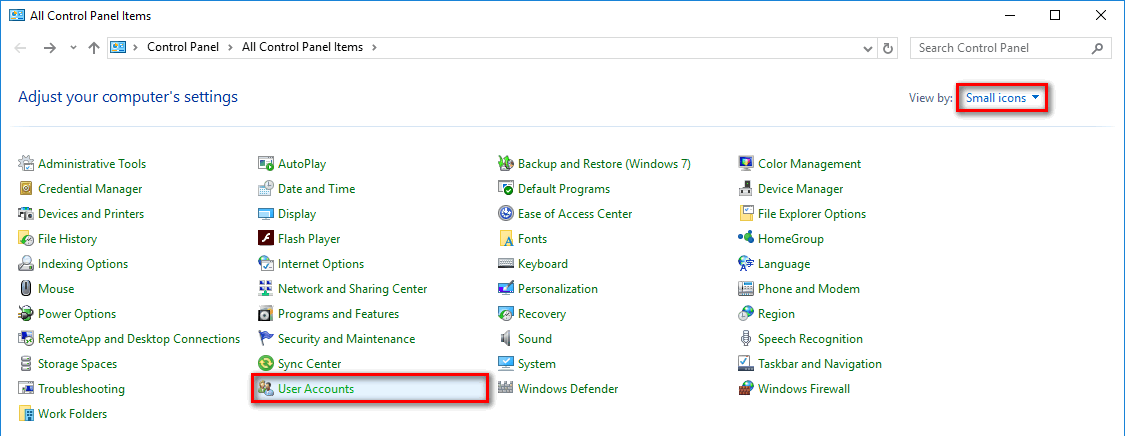
Switch to Small icons view and click on User Accounts:
Click Manage another account:
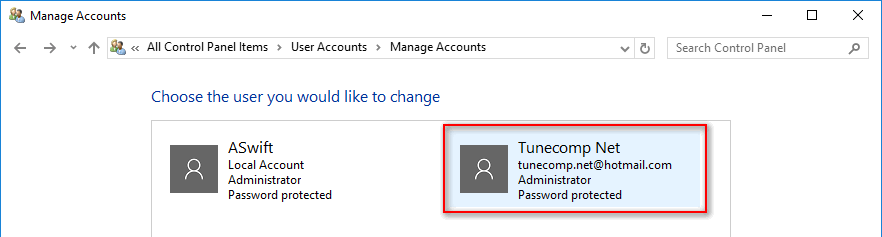
Select the user you want to remove:
Click on Delete the account:

Press Delete Files button:
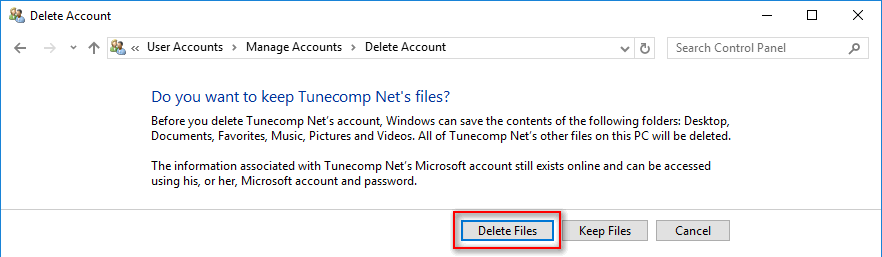
Click on Delete Account:

How to completely delete your information from Microsoft servers
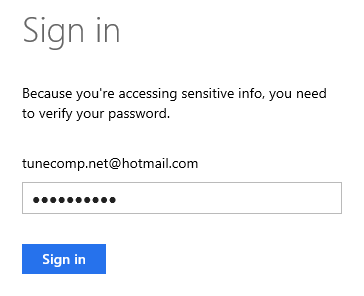
Go to website: https://account.live.com/closeaccount.aspx
Authorize using your email and password:
 (After that you are to confirm your identity via SMS or email. We won’t show that image, cause it is clear.)
Here click Next:
Set all the check boxes, select I no longer want any Microsoft account and click on Mark to closure:

Click Done on the next page. It will be deleted in 60 days.
Please, tell us in the comments whether or not this guide helped you solve your problem. Thank and have a nice day!
Удалить учетную запись Microsoft может потребоваться в самых разных ситуациях, начиная от банального избавления от «мусора», если на вашем компьютере есть несколько учеток, и заканчивая желанием продать ПК или ноутбук. В последнем случае оставлять на нем свою учетную запись точно не стоит.
К счастью, для этого есть немало простых способов, которые не потребуют от вас особых знаний. Рассказываем, как удалить запись Майкрософт всего несколькими кликами мышью.
Содержание
- Как заменить учетную запись Microsoft на локальную
- Удаляем учетную запись с компьютера
- Как удалить добавленную на компьютер учетную запись Microsoft
- Как полностью удалить свою учетную запись Microsoft
Как заменить учетную запись Microsoft на локальную
- Читайте нас там, где вам удобно: 🔹 Телеграм 🔹 Дзен 🔹 Вконтакте
Этот способ отлично подойдет тем, кто хочет продать ноутбук или компьютер, по той простой причине, что свежая локальная учетка не будет синхронизироваться с вашей основной учетной записью.
- Откройте Пуск -> Параметры или нажмите сочетание клавиш Win + I и откройте пункт меню «Учетные записи».
- В разделе «Ваши данные» нажмите «Войти вместо этого с локальной учетной записью».
После этого останется прочитать предупреждение о том, что локальная запись — это неудобно, а переход на нее означает, что ваши персональные данные не будут отображаться на всех ваших учетках. Если вы не откажетесь от своей цели, потребуется ввести ПИН-код текущей учетки или пароль от нее. Ну а дальше система предложит создать локальный профиль и переключит ПК на работу с ним.
Удаляем учетную запись с компьютера
Этот способ оптимален в том случае, если за компьютером работало несколько пользователей с разными учетками, и вам потребовалось отлучить одного из них от «благ цивилизации».
- Нажмите сочетание клавиш Win + I и откройте пункт меню «Учетные записи».
- Перейдите в раздел «Семья и другие пользователи».
- Кликните левой кнопкой мыши по ставшей ненужной учетной записи и нажмите «Удалить».
- Прочитайте предупреждение о том, какие данные будут удалены с ПК вместе с учеткой, и подтвердите удаление.
Как удалить добавленную на компьютер учетную запись Microsoft
Удалить добавленную на ПК учетную запись Microsoft одного из пользователей не получится, но вы можете заблокировать ее на этом компьютере. Алгоритм действий здесь точно такой же, как и в случае удаления локальной учетки одного из друзей или членов семьи. Только вместо кнопки «Удалить» вам будет доступна клавиша «Блокировать». Ее и потребуется нажать, после чего останется следовать появившимся инструкциям.
Как полностью удалить свою учетную запись Microsoft
Если вы по какой-то причине решили полностью отказаться от учетной записи Microsoft, удаление ее с компьютера не избавит вас от самой учетки. Алгоритм действий здесь немного иной.
- Нажмите сочетание клавиш Win + I и откройте пункт меню Учетные записи -> Ваши данные.
- Найдите там пункт «Управление учетной записью Майкрософт», нажав на который вы перейдете на свою учетку на сайте компании.
- Нажмите на значок вашего профиля в верхней правой части экрана и выберите пункт «Мой профиль».
- На открывшейся странице нажмите «Закрыть учетную запись».
Теперь нужно подтвердить свою личность, введя код, отправленный на привязанную к аккаунту почту. Прочитайте предупреждения о последствиях удаления учетки, выберите причину ее закрытия и нажмите кнопку «Пометить для закрытия». Но учтите, что учетную запись можно будет восстановить в течение 60 дней с момента ее удаления.
Читайте также
- Как сбросить ноутбук до заводских настроек
- Как удалить Windows 11: несколько простых способов