If you’re having problems with Windows 11 on your PC or you want a fresh copy of Windows 11 without the clutter of old files or apps, you can reinstall Windows 11 to try and fix your issues and return your PC to a cleaner state.
Check your disk space
If your PC isn’t performing as expected or if you’re having issues with Windows 11, it may be because of low disk space. Before you reinstall Windows 11, try freeing up disk space to see if that helps. For more info, see Free up drive space in Windows.
Before you begin
If you have personal data and files that you want to save, back them up to an external hard drive, USB thumb drive, SD card, or cloud location (such as OneDrive) before you begin to reinstall Windows 11.
Windows 11 must be activated after it’s reinstalled. Usually this happens automatically after you go online. For more info, see «Activating after reinstalling Windows» in Activate Windows.
In Windows 11, you must link your Microsoft account to the Windows 11 digital license on your PC before you can reactivate Windows. For more info, see «Associate your Windows license with your Microsoft account» in Reactivating Windows after a hardware change.
If you reinstall Windows 11 after you make a significant hardware change to your PC (such as replacing the motherboard), it may no longer be activated. You can use the Activation troubleshooter to reactivate Windows. For more info, see Using the Activation troubleshooter.
When you reinstall Windows 11, you’ll need to select the edition of Windows that matches your digital license. For example, if you’re running Windows 11 Home, you’ll need to install Windows 11 Home again.
To see which edition of Windows you’re running, go to Start > Settings > System > About . Your edition is listed under Windows specifications.
Types of reinstalls for Windows 11
The following chart provides info about the different options that you can choose for each type of reinstall including what happens to your apps, files, personal data, and how much disk space is required for the reinstall. Use this chart to help you decide which option to use to reinstall Windows 11.
We recommend that you first try to «Reset Windows 11,» then, if needed, «Reinstall Windows 11 using installation media,» and then, if needed, try a «Clean install of Windows 11 using installation media.»
Notes:
-
Reinstalling Windows 11 using installation media while choosing to ‘Keep nothing’ (a clean install) will automatically enable reserved storage if the partition you reinstall Windows to is 20GB or larger. Reserved storage sets aside disk space to be used by updates, apps, temporary files, and system caches, thus improving the day-to-day function of your PC by ensuring that critical OS functions always have access to disk space.
-
For devices with reserved storage, a reset or reinstall will first use the reserved storage space before using other disk space. For more info, see How reserved storage works in Windows.
|
Reinstall type |
Reinstall options you can choose |
What happens to your apps |
What happens to your personal |
What happens to data stored in other folders or drives |
Disk space required |
|
Reset Windows 11 |
Keep my files |
Apps that didn’t come with your PC are removed. |
Preserved |
Preserved |
Medium |
|
Reset Windows 11 |
Remove everything |
Apps that didn’t come with your PC are removed. |
Deleted |
Deleted |
Low |
|
Reinstall Windows 11 using installation media |
Keep Everything (Default) |
All apps and settings are preserved. |
Preserved |
Preserved |
High |
|
Reinstall Windows 11 using installation media |
Keep Personal Data |
All apps are removed. |
Preserved |
Preserved |
Medium |
|
Reinstall Windows 11 using installation media |
Keep Nothing |
All apps are removed. |
Deleted |
Deleted |
Low |
|
Clean install of Windows 11 using installation media |
N/A (This reinstall option deletes and recreates all disk partitions.) |
Deleted |
Deleted |
Deleted |
Very low |
Reset Windows 11
This option will take your device back to a state similar to when you turned it on for the first time, removing programs you have installed and removing personal files, depending on which option you select. Windows will handle everything automatically, and you won’t need to use an external storage device. Resetting your device is less impactful than the clean install option, though it will require sufficient disk space.
You can reset your PC from Settings or the Windows Recovery Environment (WinRE), which can be accessed through the sign-in screen. For the steps to reset Windows 11, see Reset or reinstall Windows.
If your PC doesn’t have sufficient space available to reset Windows 11, you’ll receive a notification. In this scenario, either free up additional space or use the steps in the next section to reinstall Windows 11.
Reinstall Windows 11 using installation media
This option will use a tool to create installation media which you can use to completely wipe the disk and install a fresh copy of Windows 11. This option requires you to use an external storage device such as a USB drive, and will give you an option to choose what to keep during installation.
Before you begin, make sure you have the following:
-
An internet connection
-
An external storage device such as a USB drive, SD card, or external hard drive with at least 8GB of available space.
Create the installation media
First, create the installation media that you’ll use to reinstall Windows 11.
-
Make sure you’ve backed up any files on your device that you wish to save onto an external storage device such as a USB drive, SD card, or external hard drive, or upload your files to OneDrive.
Note: If you use an external storage device to back up files, make sure it’s a different one than the one you’ll be using to download Windows 10 installation media.
-
Download the Windows 11 installation media to a separate external storage device that has at least 8GB of available space. Everything on this drive will be deleted to complete the download, so make sure it’s empty before you proceed. Here’s how:
-
On a working PC, go to the Microsoft software download website and select Download tool now.
-
When the download is complete, open the tool from your desktop, and then select Yes when asked if you’d like to allow the app to make changes to your device.
-
When the Windows 11 Setup guide appears, accept the license terms and agreements.
-
Select Create installation media (USB flash drive, DVD, or ISO file) for another PC, and then select Next.
-
Choose a language, edition, and architecture (64-bit or 32-bit), and then select Next.
-
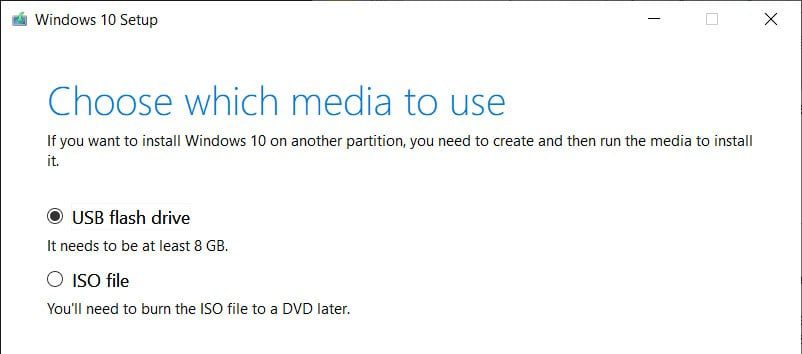
Select USB flash drive, and then select Next.
-
Follow the steps to create installation media, and then select Finish.
-
Use the installation media to reinstall Windows 11
Connect the installation media you created to your PC and reinstall Windows 11.
-
Open File Explorer and select the drive with the installation media.
-
From the root directory of the drive, double-click setup.exe, and then select Yes when asked if you’d like to allow the app to make changes to your device.
-
Select Change to determine what to keep: Select one of the following options, and then select Next:
-
Keep personal files and apps – This will preserve your personal data, apps, and settings.
-
Keep personal files only – This will preserve your personal data and settings, but all your apps will be removed.
-
Keep nothing – This will remove all personal data, settings, and apps.
Warning: You cannot undo a reinstallation of Windows 10. Be sure to back up your files first if you choose the Keep nothing option.
-
-
To finish, select Install to start reinstalling Windows 11 on your PC.
Your PC will restart several times during the reinstallation.
Clean install of Windows 11 using installation media
Warning:
-
A clean installation is an advanced option to help you start fresh on your device. We recommend following the below steps only if you’re confident in making these changes. For more help, contact support.
-
This will remove all your personal files, apps and drivers you installed, apps and customizations from your PC manufacturer, and changes you made in Settings.
This option will use a tool to create installation media which you can use to completely wipe the disk and install a fresh copy of Windows 11. This option requires you to use an external storage device such as a USB drive, and may take a few extra steps, though it will delete everything for the cleanest installation. This type of clean install deletes and recreates system partitions. It will delete all personal files on your device and the partition on your hard drive currently being used for your recovery drive.
Before you begin, make sure you have the following:
-
An internet connection
-
An external storage device such as a USB drive, SD card, or external hard drive with at least 8GB of available space
Create the installation media
First, create the installation media that you’ll use to perform a clean install of Windows 11.
-
Make sure you’ve backed up any files on your device that you wish to save onto an external storage device such as a USB drive, SD card, or external hard drive, or upload your files to OneDrive.
Note: If you use an external storage device to back up files, make sure it’s a different one than the one you’ll be using to download Windows 11 installation media.
-
Download the Windows 11 installation media to a separate 8GB-sized external storage device. Everything on this drive will be deleted to complete the download, so make sure it’s empty before you proceed. Here’s how:
-
On a working PC, go to the Microsoft software download website and select Download tool now.
-
When the download is complete, open the tool from your desktop, and then select Yes when asked if you’d like to allow the tool to make changes to your device.
-
When the Windows 11 Setup guide appears, accept the license terms and agreements.
-
Select Create installation media (USB flash drive, DVD, or ISO file) from another PC, and then select Next.
-
Choose a language, edition, and architecture (64-bit or 32-bit).
-
Follow the steps to create installation media, and then select Finish.
-
Use the installation media to perform a clean install
Connect the installation media you created to your PC and perform a clean install of Windows 11.
-
Next to Advanced startup, select Restart now.
-
Select Use a device, and then choose the device corresponding to the external storage device you’re using.
Note: If the Use a device option isn’t available, visit your device manufacturer’s website for details on how to boot from a USB flash drive.
-
When the first Windows screen appears, choose the options that best suit your needs, and then select Next.
-
Select Install now, and then check the I accept box. Select Next, and then select Custom: Install Windows only (advanced). Your device will now display a list of drives and partitions. If multiple disks are displayed, you’ll only need to delete all partitions from the disk where you want to install Windows.
-
Highlight each drive/partition in the list and select Delete. When the Windows Setup notification appears, select OK.
-
Complete step 5 for every drive in the list except the one that says Unallocated Space. When you’re finished, only Drive 0 Unallocated Space should remain.
-
Select Next.
-
The Windows setup screen will now display Installing Windows. When the installation is complete, your device will restart. When this happens, it may try to restart from the external storage device. If the initial Windows setup screen requests you choose you language/keyboard layout, remove the external storage drive from your device and select OK. This will restart your device.
-
Once the installation is complete and your device has restarted, select the preferences and settings you’d like for your device.
If you’re having problems with Windows 10 on your PC or you want a fresh copy of Windows 10 without the clutter of old files or apps, you can reinstall Windows 10 to try and fix your issues and return your PC to a cleaner state.
Check your disk space
If your PC isn’t performing as expected or if you’re having issues with Windows 10, it may be because of low disk space. Before you reinstall Windows 10, try freeing up disk space to see if that helps. For more info, see Free up drive space in Windows.
Before you begin
If you have personal data and files that you want to save, back them up to an external hard drive, USB thumb drive, SD card, or cloud location (such as OneDrive) before you begin to reinstall Windows 10.
Windows 10 must be activated after it’s reinstalled. Usually this happens automatically after you go online. For more info, see «Activating after reinstalling Windows 10» in Activate Windows.
Note: If Windows 10 was activated on your device after upgrading from Windows 7 or Windows 8.1, you have a digital license for Windows 10 that can automatically activate Windows 10 after you reinstall it. For more info, see «Activating after reinstalling Windows 10» in Activate Windows.
In Windows 10 (version 1607 or later), you must link your Microsoft account to the Windows 10 digital license on your PC before you can reactivate Windows. For more info, see «Associate your Windows 10 license with your Microsoft account» in Reactivating Windows after a hardware change.
If you reinstall Windows 10 after you make a significant hardware change to your PC (such as replacing the motherboard), it may no longer be activated. If you were running Windows 10 (Version 1607) before the hardware change, you can use the Activation troubleshooter to reactivate Windows. For more info, see Using the Activation troubleshooter.
Note: If you weren’t running Windows 10 before making the hardware change, or if the troubleshooter can’t re-activate Windows, contact support.
When you reinstall Windows 10, you’ll need to select the edition of Windows that matches your digital license. For example, if you’re running Windows 10 Home, you’ll need to install Windows 10 Home again.
Types of reinstalls for Windows 10
The following chart provides info about the different options that you can choose for each type of reinstall including what happens to your apps, files, personal data, and how much disk space is required for the reinstall. Use this chart to help you decide which option to use to reinstall Windows 10.
We recommend that you first try to «Reset Windows 10,» then, if needed, «Reinstall Windows 10 using installation media,» and then, if needed, try a «Clean install of Windows 10 using installation media.»
Notes:
-
Starting with the Windows 10 May 2019 Update (version 1903), reinstalling Windows 10 using installation media while choosing to ‘Keep nothing’ (a clean install) will automatically enable reserved storage if the partition you reinstall Windows to is 20GB or larger. Reserved storage sets aside disk space to be used by updates, apps, temporary files, and system caches, thus improving the day-to-day function of your PC by ensuring that critical OS functions always have access to disk space.
-
For devices with reserved storage, a reset or reinstall will first use the reserved storage space before using other disk space. For more info, see How reserved storage works in Windows 10.
|
Reinstall type |
Reinstall options you can choose |
What happens to your apps |
What happens to your personal |
What happens to data stored in other folders or drives |
Disk space required |
|
Reset Windows 10 |
Keep my files |
Apps that didn’t come with your PC are removed. |
Preserved |
Preserved |
Medium |
|
Reset Windows 10 |
Remove everything |
Apps that didn’t come with your PC are removed. |
Deleted |
Deleted |
Low |
|
Reinstall Windows 10 using installation media |
Keep Everything (Default) |
All apps and settings are preserved. |
Preserved |
Preserved |
High |
|
Reinstall Windows 10 using installation media |
Keep Personal Data |
All apps are removed. |
Preserved |
Preserved |
Medium |
|
Reinstall Windows 10 using installation media |
Keep Nothing |
All apps are removed. |
Deleted |
Deleted |
Low |
|
Clean install of Windows 10 using installation media |
N/A (This reinstall option deletes and recreates all disk partitions.) |
Deleted |
Deleted |
Deleted |
Very low |
Reset Windows 10
This option will take your device back to a state similar to when you turned it on for the first time, removing programs you have installed and removing personal files, depending on which option you select. Windows will handle everything automatically, and you won’t need to use an external storage device. Resetting your device is less impactful than the clean install option, though it will require sufficient disk space.
You can reset your PC from Settings or the Windows Recovery Environment (WinRE), which can be accessed through the sign-in screen. For the steps to reset Windows 10, see Reset or reinstall Windows.
If your PC doesn’t have sufficient space available to reset Windows 10, you’ll receive a notification. In this scenario, either free up additional space or use the steps in the next section to reinstall Windows 10.
Reinstall Windows 10 using installation media
This option will use a tool to create installation media which you can use to completely wipe the disk and install a fresh copy of Windows 10. This option requires you to use an external storage device such as a USB drive, and will give you an option to choose what to keep during installation.
Before you begin, make sure you have the following:
-
An internet connection
-
An external storage device such as a USB drive, SD card, or external hard drive with at least 8GB of available space.
Create the installation media
First, create the installation media that you’ll use to reinstall Windows 10.
-
Make sure you’ve backed up any files on your device that you wish to save onto an external storage device such as a USB drive, SD card, or external hard drive, or upload your files to OneDrive.
Note: If you use an external storage device to back up files, make sure it’s a different one than the one you’ll be using to download Windows 10 installation media.
-
Download the Windows 10 installation media to a separate external storage device that has at least 8GB of available space. Everything on this drive will be deleted to complete the download, so make sure it’s empty before you proceed. Here’s how:
-
On a working PC, go to the Microsoft software download website and select Download tool now.
-
When the download is complete, open the tool from your desktop, and then select Yes when asked if you’d like to allow the app to make changes to your device.
-
When the Windows 10 Setup guide appears, accept the license terms and agreements.
-
Select Create installation media (USB flash drive, DVD, or ISO file) for another PC, and then select Next.
-
Choose a language, edition, and architecture (64-bit or 32-bit), and then select Next.
-
Select USB flash drive, and then select Next.
-
Follow the steps to create installation media, and then select Finish.
-
Use the installation media to reinstall Windows 10
Connect the installation media you created to your PC and reinstall Windows 10.
-
Open File Explorer and select the drive with the installation media.
-
From the root directory of the drive, double-click setup.exe, and then select Yes when asked if you’d like to allow the app to make changes to your device.
-
Select Change to determine what to keep: Select one of the following options, and then select Next:
-
Keep personal files and apps – This will preserve your personal data, apps, and settings.
-
Keep personal files only – This will preserve your personal data and settings, but all your apps will be removed.
-
Keep nothing – This will remove all personal data, settings, and apps.
Warning: You cannot undo a reinstallation of Windows 10. Be sure to back up your files first if you choose the Keep nothing option.
-
-
To finish, select Install to start reinstalling Windows 10 on your PC.
Your PC will restart several times during the reinstallation.
Clean install of Windows 10 using installation media
Warning:
-
A clean installation is an advanced option to help you start fresh on your device. We recommend following the below steps only if you’re confident in making these changes. For more help, contact support.
-
This will remove all your personal files, apps and drivers you installed, apps and customizations from your PC manufacturer, and changes you made in Settings.
This option will use a tool to create installation media which you can use to completely wipe the disk and install a fresh copy of Windows 10. This option requires you to use an external storage device such as a USB drive, and may take a few extra steps, though it will delete everything for the cleanest installation. This type of clean install deletes and recreates system partitions. It will delete all personal files on your device and the partition on your hard drive currently being used for your recovery drive.
Before you begin, make sure you have the following:
-
An internet connection
-
An external storage device such as a USB drive, SD card, or external hard drive with at least 8GB of available space
Create the installation media
First, create the installation media that you’ll use to perform a clean install of Windows 10.
-
Make sure you’ve backed up any files on your device that you wish to save onto an external storage device such as a USB drive, SD card, or external hard drive, or upload your files to OneDrive.
Note: If you use an external storage device to back up files, make sure it’s a different one than the one you’ll be using to download Windows 10 installation media.
-
Download the Windows 10 installation media to a separate 8GB-sized external storage device. Everything on this drive will be deleted to complete the download, so make sure it’s empty before you proceed. Here’s how:
-
On a working PC, go to the Microsoft software download website and select Download tool now.
-
When the download is complete, open the tool from your desktop, and then select Yes when asked if you’d like to allow the tool to make changes to your device.
-
When the Windows 10 Setup guide appears, accept the license terms and agreements.
-
Select Create installation media (USB flash drive, DVD, or ISO file) from another PC, and then select Next.
-
Choose a language, edition, and architecture (64-bit or 32-bit).
-
Follow the steps to create installation media, and then select Finish.
-
Use the installation media to perform a clean install
Connect the installation media you created to your PC and perform a clean install of Windows 10.
-
Under Advanced startup, select Restart now.
-
Select Use a device, and then choose the device corresponding to the external storage device you’re using.
Note: If the Use a device option isn’t available, visit your device manufacturer’s website for details on how to boot from a USB flash drive.
-
When the first Windows screen appears, choose the options that best suit your needs, and then select Next.
-
Select Install now, and then check the I accept box. Select Next, and then select Custom: Install Windows only (advanced). Your device will now display a list of drives and partitions. If multiple disks are displayed, you’ll only need to delete all partitions from the disk where you want to install Windows.
-
Highlight each drive/partition in the list and select Delete. When the Windows Setup notification appears, select OK.
-
Complete step 5 for every drive in the list except the one that says Unallocated Space. When you’re finished, only Drive 0 Unallocated Space should remain.
-
Select Next.
-
The Windows setup screen will now display Installing Windows. When the installation is complete, your device will restart. When this happens, it may try to restart from the external storage device. If the initial Windows setup screen requests you choose you language/keyboard layout, remove the external storage drive from your device and select OK. This will restart your device.
-
Once the installation is complete and your device has restarted, select the preferences and settings you’d like for your device.
Need more help?
Want more options?
Explore subscription benefits, browse training courses, learn how to secure your device, and more.
Communities help you ask and answer questions, give feedback, and hear from experts with rich knowledge.
Find solutions to common problems or get help from a support agent.
If you’re having problems with Windows 11 on your PC or you want a fresh copy of Windows 11 without the clutter of old files or apps, you can reinstall Windows 11 to try and fix your issues and return your PC to a cleaner state.
Check your disk space
If your PC isn’t performing as expected or if you’re having issues with Windows 11, it may be because of low disk space. Before you reinstall Windows 11, try freeing up disk space to see if that helps. For more info, see Free up drive space in Windows.
Before you begin
If you have personal data and files that you want to save, back them up to an external hard drive, USB thumb drive, SD card, or cloud location (such as OneDrive) before you begin to reinstall Windows 11.
Windows 11 must be activated after it’s reinstalled. Usually this happens automatically after you go online. For more info, see «Activating after reinstalling Windows» in Activate Windows.
In Windows 11, you must link your Microsoft account to the Windows 11 digital license on your PC before you can reactivate Windows. For more info, see «Associate your Windows license with your Microsoft account» in Reactivating Windows after a hardware change.
If you reinstall Windows 11 after you make a significant hardware change to your PC (such as replacing the motherboard), it may no longer be activated. You can use the Activation troubleshooter to reactivate Windows. For more info, see Using the Activation troubleshooter.
When you reinstall Windows 11, you’ll need to select the edition of Windows that matches your digital license. For example, if you’re running Windows 11 Home, you’ll need to install Windows 11 Home again.
To see which edition of Windows you’re running, go to Start > Settings > System > About . Your edition is listed under Windows specifications.
Types of reinstalls for Windows 11
The following chart provides info about the different options that you can choose for each type of reinstall including what happens to your apps, files, personal data, and how much disk space is required for the reinstall. Use this chart to help you decide which option to use to reinstall Windows 11.
We recommend that you first try to «Reset Windows 11,» then, if needed, «Reinstall Windows 11 using installation media,» and then, if needed, try a «Clean install of Windows 11 using installation media.»
Notes:
-
Reinstalling Windows 11 using installation media while choosing to ‘Keep nothing’ (a clean install) will automatically enable reserved storage if the partition you reinstall Windows to is 20GB or larger. Reserved storage sets aside disk space to be used by updates, apps, temporary files, and system caches, thus improving the day-to-day function of your PC by ensuring that critical OS functions always have access to disk space.
-
For devices with reserved storage, a reset or reinstall will first use the reserved storage space before using other disk space. For more info, see How reserved storage works in Windows.
|
Reinstall type |
Reinstall options you can choose |
What happens to your apps |
What happens to your personal |
What happens to data stored in other folders or drives |
Disk space required |
|
Reset Windows 11 |
Keep my files |
Apps that didn’t come with your PC are removed. |
Preserved |
Preserved |
Medium |
|
Reset Windows 11 |
Remove everything |
Apps that didn’t come with your PC are removed. |
Deleted |
Deleted |
Low |
|
Reinstall Windows 11 using installation media |
Keep Everything (Default) |
All apps and settings are preserved. |
Preserved |
Preserved |
High |
|
Reinstall Windows 11 using installation media |
Keep Personal Data |
All apps are removed. |
Preserved |
Preserved |
Medium |
|
Reinstall Windows 11 using installation media |
Keep Nothing |
All apps are removed. |
Deleted |
Deleted |
Low |
|
Clean install of Windows 11 using installation media |
N/A (This reinstall option deletes and recreates all disk partitions.) |
Deleted |
Deleted |
Deleted |
Very low |
Reset Windows 11
This option will take your device back to a state similar to when you turned it on for the first time, removing programs you have installed and removing personal files, depending on which option you select. Windows will handle everything automatically, and you won’t need to use an external storage device. Resetting your device is less impactful than the clean install option, though it will require sufficient disk space.
You can reset your PC from Settings or the Windows Recovery Environment (WinRE), which can be accessed through the sign-in screen. For the steps to reset Windows 11, see Reset or reinstall Windows.
If your PC doesn’t have sufficient space available to reset Windows 11, you’ll receive a notification. In this scenario, either free up additional space or use the steps in the next section to reinstall Windows 11.
Reinstall Windows 11 using installation media
This option will use a tool to create installation media which you can use to completely wipe the disk and install a fresh copy of Windows 11. This option requires you to use an external storage device such as a USB drive, and will give you an option to choose what to keep during installation.
Before you begin, make sure you have the following:
-
An internet connection
-
An external storage device such as a USB drive, SD card, or external hard drive with at least 8GB of available space.
Create the installation media
First, create the installation media that you’ll use to reinstall Windows 11.
-
Make sure you’ve backed up any files on your device that you wish to save onto an external storage device such as a USB drive, SD card, or external hard drive, or upload your files to OneDrive.
Note: If you use an external storage device to back up files, make sure it’s a different one than the one you’ll be using to download Windows 10 installation media.
-
Download the Windows 11 installation media to a separate external storage device that has at least 8GB of available space. Everything on this drive will be deleted to complete the download, so make sure it’s empty before you proceed. Here’s how:
-
On a working PC, go to the Microsoft software download website and select Download tool now.
-
When the download is complete, open the tool from your desktop, and then select Yes when asked if you’d like to allow the app to make changes to your device.
-
When the Windows 11 Setup guide appears, accept the license terms and agreements.
-
Select Create installation media (USB flash drive, DVD, or ISO file) for another PC, and then select Next.
-
Choose a language, edition, and architecture (64-bit or 32-bit), and then select Next.
-
Select USB flash drive, and then select Next.
-
Follow the steps to create installation media, and then select Finish.
-
Use the installation media to reinstall Windows 11
Connect the installation media you created to your PC and reinstall Windows 11.
-
Open File Explorer and select the drive with the installation media.
-
From the root directory of the drive, double-click setup.exe, and then select Yes when asked if you’d like to allow the app to make changes to your device.
-
Select Change to determine what to keep: Select one of the following options, and then select Next:
-
Keep personal files and apps – This will preserve your personal data, apps, and settings.
-
Keep personal files only – This will preserve your personal data and settings, but all your apps will be removed.
-
Keep nothing – This will remove all personal data, settings, and apps.
Warning: You cannot undo a reinstallation of Windows 10. Be sure to back up your files first if you choose the Keep nothing option.
-
-
To finish, select Install to start reinstalling Windows 11 on your PC.
Your PC will restart several times during the reinstallation.
Clean install of Windows 11 using installation media
Warning:
-
A clean installation is an advanced option to help you start fresh on your device. We recommend following the below steps only if you’re confident in making these changes. For more help, contact support.
-
This will remove all your personal files, apps and drivers you installed, apps and customizations from your PC manufacturer, and changes you made in Settings.
This option will use a tool to create installation media which you can use to completely wipe the disk and install a fresh copy of Windows 11. This option requires you to use an external storage device such as a USB drive, and may take a few extra steps, though it will delete everything for the cleanest installation. This type of clean install deletes and recreates system partitions. It will delete all personal files on your device and the partition on your hard drive currently being used for your recovery drive.
Before you begin, make sure you have the following:
-
An internet connection
-
An external storage device such as a USB drive, SD card, or external hard drive with at least 8GB of available space
Create the installation media
First, create the installation media that you’ll use to perform a clean install of Windows 11.
-
Make sure you’ve backed up any files on your device that you wish to save onto an external storage device such as a USB drive, SD card, or external hard drive, or upload your files to OneDrive.
Note: If you use an external storage device to back up files, make sure it’s a different one than the one you’ll be using to download Windows 11 installation media.
-
Download the Windows 11 installation media to a separate 8GB-sized external storage device. Everything on this drive will be deleted to complete the download, so make sure it’s empty before you proceed. Here’s how:
-
On a working PC, go to the Microsoft software download website and select Download tool now.
-
When the download is complete, open the tool from your desktop, and then select Yes when asked if you’d like to allow the tool to make changes to your device.
-
When the Windows 11 Setup guide appears, accept the license terms and agreements.
-
Select Create installation media (USB flash drive, DVD, or ISO file) from another PC, and then select Next.
-
Choose a language, edition, and architecture (64-bit or 32-bit).
-
Follow the steps to create installation media, and then select Finish.
-
Use the installation media to perform a clean install
Connect the installation media you created to your PC and perform a clean install of Windows 11.
-
Next to Advanced startup, select Restart now.
-
Select Use a device, and then choose the device corresponding to the external storage device you’re using.
Note: If the Use a device option isn’t available, visit your device manufacturer’s website for details on how to boot from a USB flash drive.
-
When the first Windows screen appears, choose the options that best suit your needs, and then select Next.
-
Select Install now, and then check the I accept box. Select Next, and then select Custom: Install Windows only (advanced). Your device will now display a list of drives and partitions. If multiple disks are displayed, you’ll only need to delete all partitions from the disk where you want to install Windows.
-
Highlight each drive/partition in the list and select Delete. When the Windows Setup notification appears, select OK.
-
Complete step 5 for every drive in the list except the one that says Unallocated Space. When you’re finished, only Drive 0 Unallocated Space should remain.
-
Select Next.
-
The Windows setup screen will now display Installing Windows. When the installation is complete, your device will restart. When this happens, it may try to restart from the external storage device. If the initial Windows setup screen requests you choose you language/keyboard layout, remove the external storage drive from your device and select OK. This will restart your device.
-
Once the installation is complete and your device has restarted, select the preferences and settings you’d like for your device.
If you’re having problems with Windows 10 on your PC or you want a fresh copy of Windows 10 without the clutter of old files or apps, you can reinstall Windows 10 to try and fix your issues and return your PC to a cleaner state.
Check your disk space
If your PC isn’t performing as expected or if you’re having issues with Windows 10, it may be because of low disk space. Before you reinstall Windows 10, try freeing up disk space to see if that helps. For more info, see Free up drive space in Windows.
Before you begin
If you have personal data and files that you want to save, back them up to an external hard drive, USB thumb drive, SD card, or cloud location (such as OneDrive) before you begin to reinstall Windows 10.
Windows 10 must be activated after it’s reinstalled. Usually this happens automatically after you go online. For more info, see «Activating after reinstalling Windows 10» in Activate Windows.
Note: If Windows 10 was activated on your device after upgrading from Windows 7 or Windows 8.1, you have a digital license for Windows 10 that can automatically activate Windows 10 after you reinstall it. For more info, see «Activating after reinstalling Windows 10» in Activate Windows.
In Windows 10 (version 1607 or later), you must link your Microsoft account to the Windows 10 digital license on your PC before you can reactivate Windows. For more info, see «Associate your Windows 10 license with your Microsoft account» in Reactivating Windows after a hardware change.
If you reinstall Windows 10 after you make a significant hardware change to your PC (such as replacing the motherboard), it may no longer be activated. If you were running Windows 10 (Version 1607) before the hardware change, you can use the Activation troubleshooter to reactivate Windows. For more info, see Using the Activation troubleshooter.
Note: If you weren’t running Windows 10 before making the hardware change, or if the troubleshooter can’t re-activate Windows, contact support.
When you reinstall Windows 10, you’ll need to select the edition of Windows that matches your digital license. For example, if you’re running Windows 10 Home, you’ll need to install Windows 10 Home again.
Types of reinstalls for Windows 10
The following chart provides info about the different options that you can choose for each type of reinstall including what happens to your apps, files, personal data, and how much disk space is required for the reinstall. Use this chart to help you decide which option to use to reinstall Windows 10.
We recommend that you first try to «Reset Windows 10,» then, if needed, «Reinstall Windows 10 using installation media,» and then, if needed, try a «Clean install of Windows 10 using installation media.»
Notes:
-
Starting with the Windows 10 May 2019 Update (version 1903), reinstalling Windows 10 using installation media while choosing to ‘Keep nothing’ (a clean install) will automatically enable reserved storage if the partition you reinstall Windows to is 20GB or larger. Reserved storage sets aside disk space to be used by updates, apps, temporary files, and system caches, thus improving the day-to-day function of your PC by ensuring that critical OS functions always have access to disk space.
-
For devices with reserved storage, a reset or reinstall will first use the reserved storage space before using other disk space. For more info, see How reserved storage works in Windows 10.
|
Reinstall type |
Reinstall options you can choose |
What happens to your apps |
What happens to your personal |
What happens to data stored in other folders or drives |
Disk space required |
|
Reset Windows 10 |
Keep my files |
Apps that didn’t come with your PC are removed. |
Preserved |
Preserved |
Medium |
|
Reset Windows 10 |
Remove everything |
Apps that didn’t come with your PC are removed. |
Deleted |
Deleted |
Low |
|
Reinstall Windows 10 using installation media |
Keep Everything (Default) |
All apps and settings are preserved. |
Preserved |
Preserved |
High |
|
Reinstall Windows 10 using installation media |
Keep Personal Data |
All apps are removed. |
Preserved |
Preserved |
Medium |
|
Reinstall Windows 10 using installation media |
Keep Nothing |
All apps are removed. |
Deleted |
Deleted |
Low |
|
Clean install of Windows 10 using installation media |
N/A (This reinstall option deletes and recreates all disk partitions.) |
Deleted |
Deleted |
Deleted |
Very low |
Reset Windows 10
This option will take your device back to a state similar to when you turned it on for the first time, removing programs you have installed and removing personal files, depending on which option you select. Windows will handle everything automatically, and you won’t need to use an external storage device. Resetting your device is less impactful than the clean install option, though it will require sufficient disk space.
You can reset your PC from Settings or the Windows Recovery Environment (WinRE), which can be accessed through the sign-in screen. For the steps to reset Windows 10, see Reset or reinstall Windows.
If your PC doesn’t have sufficient space available to reset Windows 10, you’ll receive a notification. In this scenario, either free up additional space or use the steps in the next section to reinstall Windows 10.
Reinstall Windows 10 using installation media
This option will use a tool to create installation media which you can use to completely wipe the disk and install a fresh copy of Windows 10. This option requires you to use an external storage device such as a USB drive, and will give you an option to choose what to keep during installation.
Before you begin, make sure you have the following:
-
An internet connection
-
An external storage device such as a USB drive, SD card, or external hard drive with at least 8GB of available space.
Create the installation media
First, create the installation media that you’ll use to reinstall Windows 10.
-
Make sure you’ve backed up any files on your device that you wish to save onto an external storage device such as a USB drive, SD card, or external hard drive, or upload your files to OneDrive.
Note: If you use an external storage device to back up files, make sure it’s a different one than the one you’ll be using to download Windows 10 installation media.
-
Download the Windows 10 installation media to a separate external storage device that has at least 8GB of available space. Everything on this drive will be deleted to complete the download, so make sure it’s empty before you proceed. Here’s how:
-
On a working PC, go to the Microsoft software download website and select Download tool now.
-
When the download is complete, open the tool from your desktop, and then select Yes when asked if you’d like to allow the app to make changes to your device.
-
When the Windows 10 Setup guide appears, accept the license terms and agreements.
-
Select Create installation media (USB flash drive, DVD, or ISO file) for another PC, and then select Next.
-
Choose a language, edition, and architecture (64-bit or 32-bit), and then select Next.
-
Select USB flash drive, and then select Next.
-
Follow the steps to create installation media, and then select Finish.
-
Use the installation media to reinstall Windows 10
Connect the installation media you created to your PC and reinstall Windows 10.
-
Open File Explorer and select the drive with the installation media.
-
From the root directory of the drive, double-click setup.exe, and then select Yes when asked if you’d like to allow the app to make changes to your device.
-
Select Change to determine what to keep: Select one of the following options, and then select Next:
-
Keep personal files and apps – This will preserve your personal data, apps, and settings.
-
Keep personal files only – This will preserve your personal data and settings, but all your apps will be removed.
-
Keep nothing – This will remove all personal data, settings, and apps.
Warning: You cannot undo a reinstallation of Windows 10. Be sure to back up your files first if you choose the Keep nothing option.
-
-
To finish, select Install to start reinstalling Windows 10 on your PC.
Your PC will restart several times during the reinstallation.
Clean install of Windows 10 using installation media
Warning:
-
A clean installation is an advanced option to help you start fresh on your device. We recommend following the below steps only if you’re confident in making these changes. For more help, contact support.
-
This will remove all your personal files, apps and drivers you installed, apps and customizations from your PC manufacturer, and changes you made in Settings.
This option will use a tool to create installation media which you can use to completely wipe the disk and install a fresh copy of Windows 10. This option requires you to use an external storage device such as a USB drive, and may take a few extra steps, though it will delete everything for the cleanest installation. This type of clean install deletes and recreates system partitions. It will delete all personal files on your device and the partition on your hard drive currently being used for your recovery drive.
Before you begin, make sure you have the following:
-
An internet connection
-
An external storage device such as a USB drive, SD card, or external hard drive with at least 8GB of available space
Create the installation media
First, create the installation media that you’ll use to perform a clean install of Windows 10.
-
Make sure you’ve backed up any files on your device that you wish to save onto an external storage device such as a USB drive, SD card, or external hard drive, or upload your files to OneDrive.
Note: If you use an external storage device to back up files, make sure it’s a different one than the one you’ll be using to download Windows 10 installation media.
-
Download the Windows 10 installation media to a separate 8GB-sized external storage device. Everything on this drive will be deleted to complete the download, so make sure it’s empty before you proceed. Here’s how:
-
On a working PC, go to the Microsoft software download website and select Download tool now.
-
When the download is complete, open the tool from your desktop, and then select Yes when asked if you’d like to allow the tool to make changes to your device.
-
When the Windows 10 Setup guide appears, accept the license terms and agreements.
-
Select Create installation media (USB flash drive, DVD, or ISO file) from another PC, and then select Next.
-
Choose a language, edition, and architecture (64-bit or 32-bit).
-
Follow the steps to create installation media, and then select Finish.
-
Use the installation media to perform a clean install
Connect the installation media you created to your PC and perform a clean install of Windows 10.
-
Under Advanced startup, select Restart now.
-
Select Use a device, and then choose the device corresponding to the external storage device you’re using.
Note: If the Use a device option isn’t available, visit your device manufacturer’s website for details on how to boot from a USB flash drive.
-
When the first Windows screen appears, choose the options that best suit your needs, and then select Next.
-
Select Install now, and then check the I accept box. Select Next, and then select Custom: Install Windows only (advanced). Your device will now display a list of drives and partitions. If multiple disks are displayed, you’ll only need to delete all partitions from the disk where you want to install Windows.
-
Highlight each drive/partition in the list and select Delete. When the Windows Setup notification appears, select OK.
-
Complete step 5 for every drive in the list except the one that says Unallocated Space. When you’re finished, only Drive 0 Unallocated Space should remain.
-
Select Next.
-
The Windows setup screen will now display Installing Windows. When the installation is complete, your device will restart. When this happens, it may try to restart from the external storage device. If the initial Windows setup screen requests you choose you language/keyboard layout, remove the external storage drive from your device and select OK. This will restart your device.
-
Once the installation is complete and your device has restarted, select the preferences and settings you’d like for your device.
Need more help?
Want more options?
Explore subscription benefits, browse training courses, learn how to secure your device, and more.
Communities help you ask and answer questions, give feedback, and hear from experts with rich knowledge.
Find solutions to common problems or get help from a support agent.
Easily refresh your computer by reinstalling Windows
This wikiHow teaches you how to reinstall Windows 10 from the Settings menu, from a recovery drive, or by using installation media.
-

1
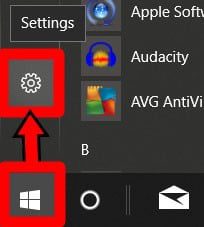
Click the Start
menu. It’s usually at the bottom-left corner of the screen.
- If you’re using a laptop, make sure you plug it into a power source before starting the installation.
- If you’re unable to access the Windows desktop and you created a recovery drive, see this method.
- If you can’t access the Windows desktop and haven’t created a recovery drive, see this method.
-
2
Click Settings
. It’s at the bottom-left corner of the Start menu.
Advertisement
-
3
Click Update & security. It’s the icon of two curved arrows.
-
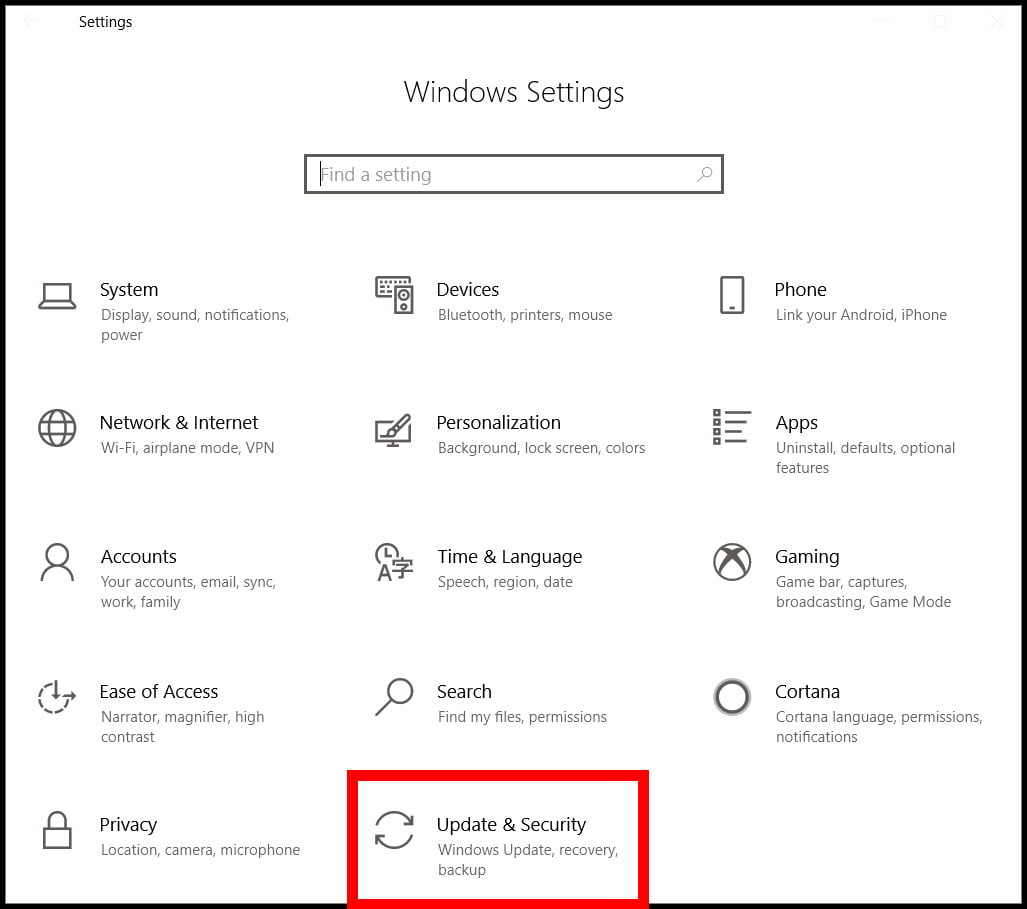
4
Click Recovery. It’s in the left panel.
-
5
Click Get started under “Reset this PC.” It’s near the top of the right panel. A pop-up will appear.[1]
-
6
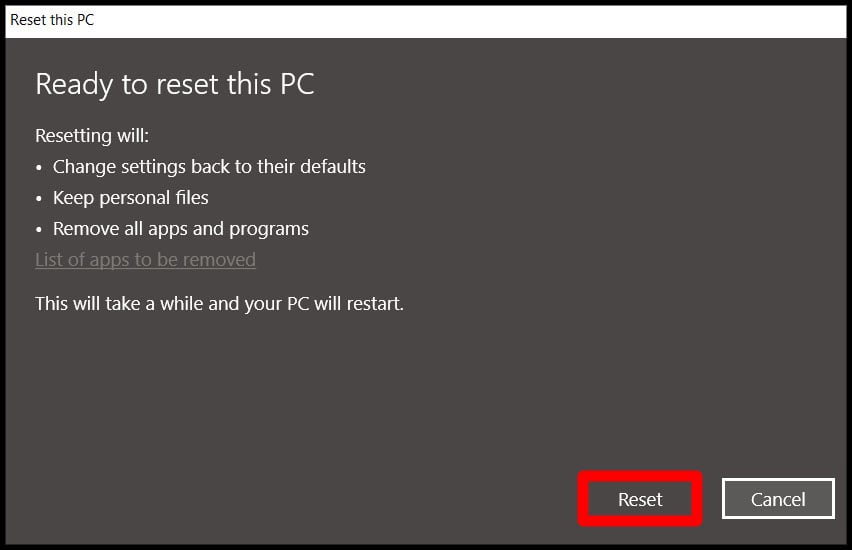
Choose what to do with your files.
- Click Keep my files to avoid losing personal data. Though any apps you’ve installed since you got your computer will be removed, your personal files (such as images and documents) will remain intact.
- Click Remove everything to erase all data on the computer, including your personal files, before reinstalling Windows.
-
7
Follow the on-screen instructions and click Reset when prompted. The options vary depending on your setup, but you’ll always be notified of which types of files will be removed and which will remain. Once you click Reset, the PC will reboot and begin to reinstall Windows.
- If you chose to remove everything, you’ll be asked if you want to clean the hard drive in addition to deleting your files (a good idea if you’re giving the computer to someone else), select Remove files and clean the drive if so.[2]
- If you chose to remove everything, you’ll be asked if you want to clean the hard drive in addition to deleting your files (a good idea if you’re giving the computer to someone else), select Remove files and clean the drive if so.[2]


Advertisement
-
1
Connect your USB recovery drive to the PC. If you created a recovery drive when the PC was working properly, you can use it to reinstall Windows.
- Use this method if you were unable to reinstall Windows 10 from the desktop or if your computer will not boot into Windows.
- If you don’t have a recovery drive, you can use a Windows 10 installation disc or drive.
- If you’re using a laptop, make sure you plug it into a power source before starting the installation.
-
2
Turn on the computer. If the computer was already on, reboot it now that the USB drive is attached. The PC will then boot from the recovery drive to the “Choose an option” screen.[3]
- If you don’t see the “Choose an option” screen, you may need to edit the PC’s BIOS settings so that the PC knows to boot from the USB drive. See Set Your Computer to Boot from USB Flash Drive#Boot from the Flash Drive to learn how.
-
3
Click Troubleshoot. A list of options will appear.
-
4
Click Recover from a drive. This will wipe all data off the PC and install a fresh version of Windows 10.
-
5
Follow the on-screen instructions to complete the installation. Once Windows is reinstalled, you’ll be prompted to set the computer up as if it were new.


Advertisement
-
1
Go to the Microsoft software download site on a working computer. If you’re unable to boot your computer and don’t have a recovery drive, you can download installation media from Microsoft and create your own installation disc or flash drive.[4]
- You’ll need either a blank USB flash drive with at least 8 GB of storage OR a blank DVD (Dual Layer preferred) and DVD burner drive.
- If you’re using a laptop, make sure you plug it into a power source before starting the installation.
-
2
Click Download tool now. It’s the blue button near the center of the page. A file manager window will appear.
-
3
Click Save to download the tool. It may take several minutes for the download to complete.
-
4
Double-click the downloaded tool. It’s called “MediaCreationTool1809.exe” (the number at the end may vary). It should be in the Downloads folder.
- You may have to click Yes or Allow to run the tool.
-
5
Review the agreement and click Accept. After a few seconds, you’ll be asked what you want to do.
-
6
Select Create installation media and click Next. Windows 10 will now download to the computer.
-
7
Click Accept when prompted. This downloads additional updates for the installation media.
-
8
Follow the on-screen instructions to create installation media. You’ll be prompted to select the type of media you’re creating (USB flash drive or DVD), and then walked through the media creation process. Once the media is created, remove the drive or DVD from the working computer.
-
9
Connect the installation media to the PC on which you want to reinstall Windows. Connect the USB flash drive or insert the DVD, depending on the type of media you created.
-
10
Turn on the computer. If the computer was already on, reboot it now that the USB drive is attached (or DVD is inserted). The PC will boot from the inserted media and start the install process.
-
11
-
12
Click Install now. You’ll be prompted to enter the Windows product key, which you’ll usually find on a sticker that’s attached to your PC.
- If you upgraded to Windows 10 from an earlier version for free or purchased Windows from the Microsoft Store, click Skip. Windows will activate itself automatically once installed.[5]
- If you upgraded to Windows 10 from an earlier version for free or purchased Windows from the Microsoft Store, click Skip. Windows will activate itself automatically once installed.[5]
-
13
Accept the terms and click Next. The remaining steps will walk you through the installation process.
-
14
Follow the on-screen instructions to reinstall Windows. You’ll be asked if you want to format the hard drive in addition to reinstalling—this is up to you, but it’s typically only necessary if you’re going to be giving the computer to someone else. Once Windows is reinstalled, you’ll be prompted to set the computer up as if it were new.


Advertisement
Add New Question
-
Question
Does installing Windows in one partition erase data from the other partition (i.e., the whole hard drive), or only on that partition where it is being installed?

It depends on the settings that you choose. In the most cases, only the partition where it is being installed will be erased.
-
Question
UEFI boot: how does that actually work?
The UEFI is a more modern form of BIOS that uses the TPM to validate the master boot record before it boots. Basically, it protects your computer against bootkits by ensuring that only the authentic boot is loaded.
-
Question
How to reinstall the USB port?
Markpenguin8232
Community Answer
You cannot simply «reinstall» a USB port, unless you are talking about hardware,which I assume you are not. What I’m going to assume yo meant is «how to erase the USB after flashing the ISO to it». In which case, hit Windows+R, type «diskmgmt.msc», press Enter, select the disk which says «Removable» under it, and press the Del key on every partition on the disk that isn’t allocated. The USB should only have unallocated space, now right-click on the unallocated space, and click «New Simple Volume». Keep clicking «Next» until you see «Finish». You may want to change the settings, in which case stop at a menu and change the settings. Changing the volume label is on the last screen.


Ask a Question
200 characters left
Include your email address to get a message when this question is answered.
Submit
Advertisement
Thanks for submitting a tip for review!
References
About This Article
Article SummaryX
To reinstall Windows 10 from your settings, click the Start menu, which is usually located at the bottom-left corner of the screen. From there, click the Setting button or the gear icon, which should be at the bottom-left corner of the Start menu. Select “Update and Security,” which has an icon that looks like 2 curved arrows. When you’re ready to update, click “Recovery,” then “Get Started” under “Reset this PC.” Follow the on-screen prompts, then click “Reset.” If you’re using a laptop, remember to plug it in before you get started! Keep reading to learn how to reinstall Windows from a recovery drive.
Did this summary help you?
Thanks to all authors for creating a page that has been read 134,332 times.
Is this article up to date?
Переустановка Windows 10 может решить множество проблем с операционной системой. Более того, это самый простой способ исправить всевозможные глюки, если вы не хотите разбираться в их природе. Помогает она и в борьбе с самыми разными вирусами, избавиться от которых другими способами просто не получается. В общем, часто возможность переустановить Виндовс 10 становится единственным ответом на все проблемы, и сегодня мы расскажем, как это сделать, в том числе, без флешки и диска.
Содержание
- Как переустановить Виндовс 10 без потери данных
- Как установить чистую Windows 10
- Как переустановить Виндовс 10 без флешки
- Как переустановить Виндовс 10 через интернет
- Что за папка Windows.old?
- Выводы
Как переустановить Виндовс 10 без потери данных
Мы уже не раз говорили, что любая версия Windows должна работать на отдельном разделе, а еще лучше отдельном твердотельном накопителе малой емкости. Таким образом, вы без проблем сможете отформатировать системный раздел, после чего установить на него чистую операционную систему и при этом не потеряете ни дистрибутивы программ, ни фильмы, ни личные видео и фотографии.
Проблема в том, что многие пользователи продолжают хранить документы, фотографии и скачанные файлы в папке Users на системном разделе. И в этом случае переустановка Windows с нуля лишит вас всей этой информации. Для того, чтобы такого не произошло, лучше всего сразу переназначить все папки для скачанных файлов, документов, фото и видео с системного раздела на основной накопитель. Ну а если вы не озаботились этим ранее, перед переустановкой операционной системы перенесите их на другой накопитель. В этом случае вы сможете отформатировать системный раздел, и не потеряете ничего важного.

Есть и другой еще более простой способ решения проблемы. Вы можете установить Windows поверх предыдущей версии операционной системы. Таким образом, вы получите свежую платформу, а старые файлы останутся на системном разделе, и вы сможете в любой момент получить к ним доступ. Проблема тут в том, что если цель переустановки — желание избавиться от вирусов, то своей цели вы не достигнете.
При любой переустановке Windows лучше всего создать загрузочную флешку с образом операционной системы. Как это сделать, мы уже писали, например, здесь. Поэтому не будем останавливаться на этом пункте.
После того, как вы создали загрузочную флешку, установите ее в USB-разъем компьютера и перезагрузите его. При загрузке ПК войдите в BIOS / UEFI и установите в качестве предпочтительной загрузку с флешки. Сохраните изменения и выйдите из BIOS / UEFI.
Теперь при загрузке компьютера мы попадем в меню установки Windows. Выберите пункт «Обновление: установка Windows с сохранением файлов, параметров и приложений», укажите нужный раздел для установки ОС и следуйте подсказкам мастера установки.
В результате у вас появится новая операционная систем, а все программы, файлы, документы, фотографии и видео, хранящиеся на системном разделе, останутся в неприкосновенности.
Как установить чистую Windows 10
Этот способ отличается от рассмотренного нами ранее полным форматированием системного раздела и удалением хранящихся на нем файлов. И именно его мы рекомендуем использовать для переустановки операционной системы. Таким образом, вы одновременно очистите ПК от мусора, избавитесь от любых возможных вирусов в операционной системе и получите чистую Windows без каких-либо сделанных ранее настроек. Минус здесь один — вам нужно заранее позаботиться о переносе всех нужных файлов из папки Users на отдельный накопитель или в другой раздел.
Для чистой установки ОС загрузитесь с созданной ранее флешки с дистрибутивом Windows и выберите пункт «Выборочная: только установка Windows (для опытных пользователей)». После этого система попросит вас выбрать раздел, в который будет установлена операционная система. Выберите его и нажмите кнопку «Форматировать» для очистки тома от всех хранящихся там данных, включая и старую копию ОС.
На этом этапе нужно быть особенно внимательным. Ведь если вы ошибетесь с разделом и отформатируете другой диск, то можете потерять все важные данные на основном накопителе. Поэтому смотрите не только на название раздела, но и на его объем. Конечно, если ваш системный накопитель меньше основного.
Дальше нам остается следовать подсказкам мастера установки, который попросит выбрать язык операционной системы и раскладку клавиатуры.
Как переустановить Виндовс 10 без флешки
В общем-то, для переустановки Windows 10 вовсе не обязательно создавать загрузочную флешку. Она всего лишь упрощает процесс установки и делает его более удобным. Более того, многие ноутбуки поставляются с предустановленной операционной системой, а на их накопителе имеется скрытый раздел с файлами предустановленной лицензионной Windows, всеми необходимыми драйверами и фирменными программами производителя лэптопа. А некоторые производители включают в комплект поставки своих устройство диск для его восстановления до заводского состояния.
Поэтому ответ на вопрос о том, как переустановить Виндовс 10 на ноутбуке, обычно очень прост: для этого можно использовать фирменную утилиту или сочетание клавиш при запуске ОС. Какой конкретно способ сработает, зависит от производителя, ну а инструкцию по переустановке Windows в каждом конкретном случае можно найти на его официальном сайте.
В большинстве случаев для этого требуется войти в меню «Пуск» ноутбука и найти там предустановленную программу со словом Recovery в названии. Если же операционная система по какой-то причине не запускается, внимательно прочитайте текст при включении лэптопа. Часто там можно увидеть надписи в стиле «Press F2 for Recovery». Нажав эту кнопку, вы попадете в меню восстановления системы, одним из пунктов которого будет «Переустановка».
Если же вы хотите переустановить Windows на обычном ПК, а загрузочной флешки под рукой нет, скачайте с официального сайта Microsoft фирменную утилиту Media Creation Tool. Правда, сразу предупреждаем — если вы живете в России, для загрузки утилиты потребуется VPN. После ее загрузки VPN можно отключить: необходимые файлы Windows 10 для создания образа или записи установочного USB-накопителя скачаются и без него.
Теперь остается распаковать образ на жесткий диск, запустить файл Setup.exe и следовать советам мастера установки Windows 10. Главное распаковывайте его не в тот же раздел, где установлена старая копия операционной системы.
Как переустановить Виндовс 10 через интернет
Собственно, это самый простой способ переустановки Windows, который не потребует от вас ровным счетом никаких манипуляций с образами, установочными файлами, загрузочными дисками и другими непонятными и пугающими словами.
- Откройте меню Пуск -> Параметры.
- Найдите в открывшемся окне пункт Обновление и безопасность.
- Кликните на пункт «Восстановление» в левой части окна. Выберите пункт «Вернуть компьютер в исходное состояние» и нажмите кнопку «Начать».
После этого вам будет предложено два варианта восстановления до исходных настроек:
- с удалением установленных приложений и параметров, но сохранением ваших личных файлов;
- полное удаление личных файлов, приложений и параметров.
На следующем этапе установки можно выбрать установку ОС с помощью локального образа или облачную переустановку, при которой система сама скачает нужный дистрибутив и запустит переустановку системы.
Что за папка Windows.old?
При переустановке операционной системы без форматирования системного накопителя многие пользователи обнаруживают на нем странную папку Windows.old, которая может весить десятки гигабайт. В ней хранятся файлы ранее установленной операционной системы. Причем удалить ее с помощью стандартного проводника у вас не получится.
Для того, чтобы избавиться от этой папки:
- откройте меню Пуск -> Параметры
- Перейдите в раздел Система -> Память и найдите там пункт «Настроить контроль памяти или запустить его».
- пролистайте открывшееся окно до раздела «Освободить пространство сейчас» и нажмите кнопку «Очистить сейчас».
- система определит неиспользуемые файлы и предложит вам их список. В нем будет пункт «Предыдущие установки Windows». Поставьте галку напротив этого пункта и нажмите «Удалить файлы».
После этого папка Windows.old и все следы предыдущей установки операционной системы исчезнут.
Выводы
Мы разобрали, как переустановить Виндовс 10 с флешки, диска, скрытого раздела и даже просто через интернет. Как вы видите, ни один из способов установки системы не вызывает никаких сложностей, и весь вопрос лишь в том, какой из них удобнее именно вам.
Правда, мы бы рекомендовали использовать чистую установку операционной системы с загрузочной флешки и форматированием системного раздела. Именно он гарантирует полное отсутствие «мусора» от старой системы и эффективнее всего борется как со сбоями в ее работе, так и со всевозможными вирусами.
Если же вы решили установить систему без форматирования и удаления старой ОС, не забудьте почистить оставшиеся от нее хвосты. Как это сделать, подробно разобрано в главе об удалении папки Windows.old.
Читайте также
- Черный экран на ноутбуке: что делать
- Компьютер включается и сразу выключается: что делать?
- Завис ноутбук: причины и способы решения проблемы
If your computer has been infected by a virus or it’s getting slow, you might want to reinstall Windows. As long as the hardware is intact, you can do a clean install or simply reinstall the OS by using this guide. Here’s how to reinstall Windows 10 on a PC.
How to Reinstall Windows from PC Settings
Windows 10 allows you to reinstall a new version
of your operating system over your current version. Doing this will allow you
to keep your files or delete them for a fresh reinstall. Follow one of the
three steps below to begin the process:
- Click the Start button. This is the button in the bottom left corner of your screen with the Windows logo.
- Then click Settings. This is the gear icon just above the power button.
- Next, select Update & Security.
- Click Recovery in the left menu panel. The right panel will show you options for recovery.
- Under Reset this PC, click Get Started.
- Choose to keep your files or remove everything.
Note: Even if you choose to keep your files, only your personal files will be saved. All the apps and settings that you had on your PC will be removed.
- Finally, select Reset. Your computer will restart with a fresh install of your operating system (OS).
If your PC is not working, you will need to create a recovery drive. To do this, you need a USB flash drive with at least eight gigabytes (8GB) of storage.
How to Create a Windows 10 Recovery USB Drive
If you can’t reinstall your operating system
(OS) using the reset settings, you might need to use a recovery drive. Here’s
how to create a Windows 10 recovery USB drive.
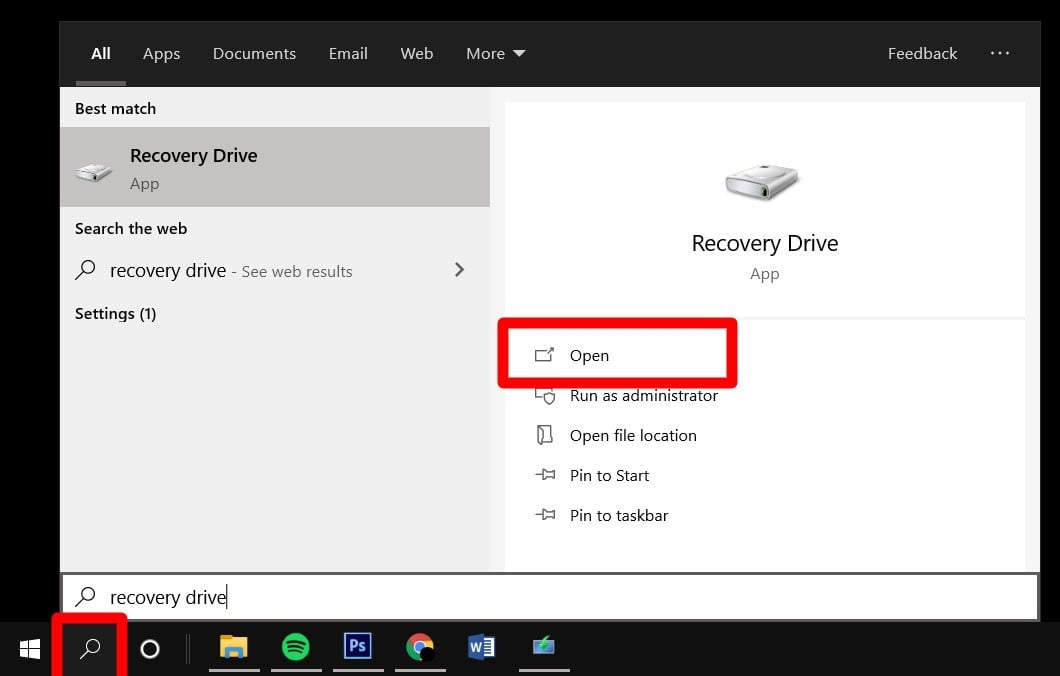
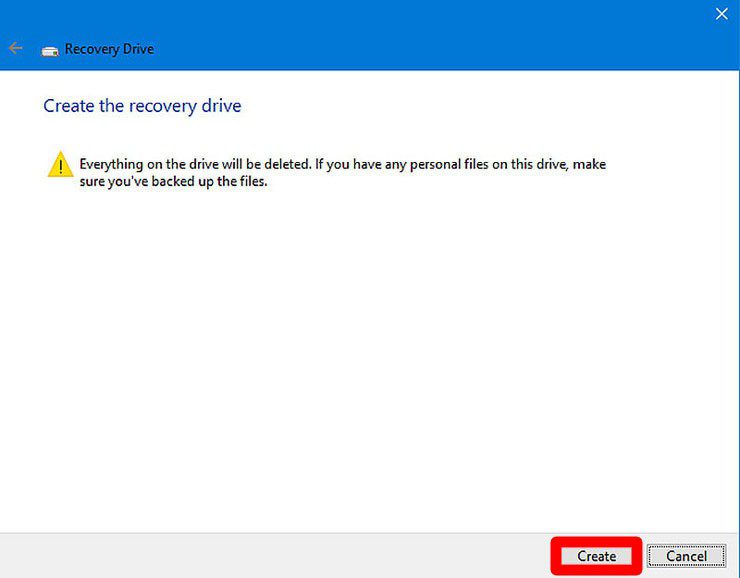
Warning: When you create a Recovery drive, you will lose all of your data on your USB hard drive. Don’t forget to back up your data first.
- Click on the Search button and type “recovery drive” in the search box. The search button is the magnifying glass on the bottom left corner of your screen.
- Open the recovery drive app and select your drive.
- Then click Create.
It will take several minutes for your recovery drive to be created.
How to Reinstall Windows From USB Recovery Drive
Now that you have a recovery drive, here’s how
to reinstall Windows using your USB drive.
Note: When you recover from a USB drive, you
will lose all your files on your computer. A clean install will take place,
giving you a fresh version of your operating system.
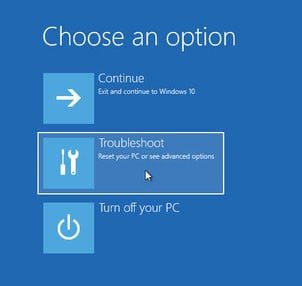
- Plug your USB recovery drive into the PC you want to reinstall Windows on.
- Reboot your PC. If it’s already switched on, you will need to reboot it again. When it starts, you will see a Choose an Option display.
- Select Troubleshoot.
- Then choose Recover from a Drive.
- Next, cick “Just remove my files.” If you plan on selling your computer, click Full clean the drive. This option will take longer, so make sure your computer is plugged in.
- Finally, set up Windows.
How to Reinstall Windows 10 on a Non-Working PC
If your PC won’t
respond, you can try reinstalling Windows with Microsoft’s media creation tool.
Here’s how.
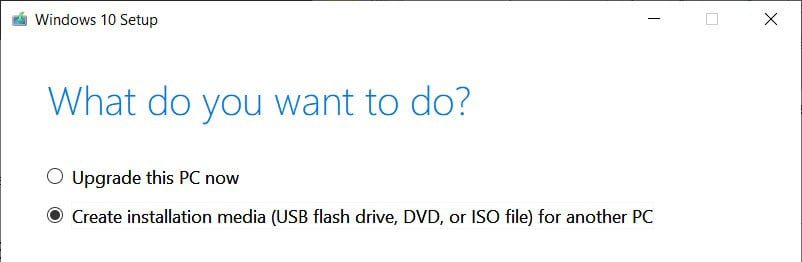
- Download Microsoft’s media creation tool from a working computer.
- Open the downloaded tool. You can find the file in the Downloads folder.
- Select the “create installation media” option.
- Use the recommended options for this PC. This is where you can change the language, operating system version, and architecture of your recovery drive.
- Then select USB flash drive.
- Select your USB drive from the list. Wait for the media creation tool to download. This might take a few minutes.
- Plug the USB drive into the non-working computer.
- Reboot the computer. It will start from the inserted USB drive, and the install process will begin.
- Select your information and preferences and then click Next.
- Click Install now.
- Enter the Windows product key when prompted. You will find it on a sticker attached to your PC or laptop.
- In the terms page, click Next. You will then be taken to the rest of the steps for installing the OS. Follow the instructions until the process is complete. When the clean install is finished, you will be able to set up your PC or laptop as if it were new.

If you are having problems with your computer after upgrading, check out our article on how to downgrade Windows 10.