If you can’t locate a lost file from your backup, then you can use Windows File Recovery, which is a command line app available from the Microsoft Store. Use this app to try to recover lost files that have been deleted from your local storage device (including internal drives, external drives, and USB devices) and can’t be restored from the Recycle Bin. Recovery on cloud storage and network file shares is not supported.
Note This app requires Windows 10 build 19041 or later (See which version of Windows 10 you have).
Important: If you want to increase your chances of recovering a file, minimize or avoid using your computer. In the Windows file system, the space used by a deleted file is marked as free space, which means the file data can still exist and be recovered. But any use of your computer can create files, which may over-write this free space at any time.
Windows File Recovery — Winter 2020 release
-
If necessary, download and launch the app from Microsoft Store.
-
Press the Windows key, enter Windows File Recovery in the search box, and then select Windows File Recovery.
-
When you are prompted to allow the app to make changes to your device, select Yes.
-
In the Command Prompt window, enter the command in the following format:
winfr source-drive: destination-drive: [/mode] [/switches]
-
There are 2 basic modes you can use to recover files: Regular and Extensive.
Regular mode examples
Recover your Documents folder from your C: drive to the recovery folder on an E: drive. Don’t forget the backslash (\) at the end of the folder.
Winfr C: E: /regular /n \Users\<username>\Documents\
Recover PDF and Word files from your C: drive to the recovery folder on an E: drive.
Winfr C: E: /regular /n *.pdf /n *.docx
Extensive mode examples
Recover any file with the string «invoice» in the filename by using wildcard characters.
Winfr E: C: /extensive /n *invoice*
Recover jpeg and png photos from your Pictures folder to the recovery folder on an E: drive.
Winfr C: E: /extensive /n \Users\<username>\Pictures\*.JPEG /n\Users\<username>\Pictures\*.PNG
The source and destination drives must be different. When recovering from the operating system drive (often C: ), use the /n <filter> switches to specify the user files or folder.
Microsoft automatically creates a recovery folder for you called, Recovery_<date and time> on the destination drive. -
When you are prompted for confirmation to continue, enter Y to start the recovery operation. Depending on the size of your source drive, this may take a while. To stop the recovery process, press Ctrl + C.
The following information can help you decide which file system you have and which mode to use.
File systems
|
File system |
Examples |
|---|---|
|
FAT and exFAT |
SD cards, flash or USB drives (< 4GB) |
|
NTFS |
Computers (HDD, SSD), external hard drives, flash or USB drives (> 4GB) |
There are several file systems supported by Windows that vary depending on the storage device or operating system. Recovering files from non-NTFS file systems is only supported by extensive mode. To see which file system you have, right click a drive in File Explorer and select Properties.
Deciding which mode to use
Use the following table to help you decide which mode to use. If you are not sure, start with Regular mode.
|
File system |
Circumstances |
Recommended mode |
|---|---|---|
|
NTFS |
Deleted recently |
Regular |
|
NTFS |
Deleted a while ago |
Extensive |
|
NTFS |
After formatting a disk |
Extensive |
|
NTFS |
A corrupted disk |
Extensive |
|
FAT and exFAT |
Any |
Extensive |
General syntax
The following table summarizes what each advanced switch is used for.
|
Parameter / switch |
Description |
Supported mode(s) |
|---|---|---|
|
Source-drive: |
Specifies the storage device where the files were lost. Must be different from the destination-drive. |
All |
|
Destination-drive: |
Specifies the storage device and folder on which to put the recovered files. Must be different from the source-drive. |
All |
|
/regular |
Regular mode, the standard recovery option for non-corrupted NTFS drives |
Regular |
|
/extensive |
Extensive mode, a thorough recovery option suitable for all file systems |
Extensive |
|
/n<filter> |
Scans for a specific file by using a file name, file path, file type, or wildcards. For example:
|
All |
|
/? |
Summary of syntax and switches for general users. |
All |
|
/! |
Summary of syntax and switches for advanced users. |
All |
Advanced syntax
The following table summarizes what each advanced switch is used for.
|
Switch |
Description |
Supported modes |
|---|---|---|
|
/ntfs |
NTFS mode, a fast recovery option for healthy NTFS drives using the master file table |
NTFS |
|
/segment |
Segment mode, recovery option for NTFS drives using file record segments |
Segment |
|
/signature |
Signature mode, recovery option for all file system types using file headers |
Signature |
|
/y:<type(s)> |
Recover specific extension groups, comma separated |
Signature |
|
/# |
Signature mode extension groups and supported file types. |
Signature |
|
/p:<folder> |
Saves a log file of the recovery operation in a different location than the default location on the recovery drive (for example, D:\logfile). |
All |
|
/a |
Overrides user prompts, which is useful in a script file. |
All |
|
/u |
Recovers undeleted files, for example, from the Recycle Bin. |
NTFS |
|
/k |
Recovers system files. |
NTFS |
|
/o:<a|n|b> |
Specifies whether to always (a), never (n), orkeep both always(b) when choosing whether to overwrite a file. The default action is to prompt to overwrite. |
NTFS |
|
/g |
Recovers files without primary data streams. |
NTFS |
|
/e |
To keep your results manageable and focus on user files, some file types are filtered by default, but this switch removes that filter. For a complete list of these file types, see the information after this table. |
NTFS |
|
/e:<extension> |
Specifies which file types are filtered. For a complete list of these file types, see the information after this table. |
NTFS |
|
/s:<sectors> |
Specifies the number of sectors on the source device. To find sector information, use fsutil. |
Segment |
|
/b:<bytes> |
Specifies the cluster size (allocation unit) on the source device. |
Segment |
File extension filter list
The following file types are filtered from results by default. Use the /e switch to disable this filter or the /e:<extension> filter to specify file types not to filter.
_, adm, admx, appx, appx, ascx, asm, aspx, aux, ax, bin, browser, c, cab, cat cdf-ms, catalogItem, cdxm, cmake, cmd, coffee, config, cp, cpp, cs, cshtm, css, cur, dat, dll, et, evtx, exe, fon, gpd, h, hbakedcurve, htm, htm, ico, id, ildl, ilpdb, iltoc, iltocpdb, in, inf, inf_loc, ini, js, json, lib, lnk, log, man, manifest, map, metadata, mf, mof, msc, msi, mui, mui, mum, mun, nls, npmignore, nupkg, nuspec, obj, p7s, p7x, pak, pckdep, pdb, pf, pkgdef, plist, pnf, pp, pri, props, ps1, ps1xm, psd1, psm1, py, resjson, resw, resx, rl, rs, sha512, snippet, sq, sys, t4, targets, th, tlb, tmSnippet, toc, ts, tt, ttf, vb, vbhtm, vbs, vsdir, vsix, vsixlangpack, vsixmanifest, vstdir, vstemplate, vstman, winmd, xam, xbf, xm, xrm-ms, xs, xsd, ym
Can you give some tips to help me use the correct syntax?
-
Always use drive letters in the source and destination path, don’t forget the colon (:) after the drive letter, and make sure there is a space between the source and destination.
-
When you specify just a folder name, such as /n \Myfolder\, add a backslash (\) at the end of it.
-
If a file or folder name has spaces, surround it with quotes. For example:
winfr C: E: /regular /n «\Users\<username>\Documents\Quarterly Statement.docx»
What does <username> mean in the command examples?
In the File Explorer address bar, enter C:\users to see a list of potential users on your computer. There may be several users on your computer, including you, the administrator, and the default account. When you see <username> in a file path, it is a placeholder for the current username on your computer.
Why am I getting this message: «Source and Destination cannot refer to the same physical partition?»
The source and destination drive or partition path should not be the same. If you only have one drive, use a USB or external hard drive as your destination path. Don’t create a partition after losing data, because this reduces the chance of a successful recovery.
Why does the recovery operation take so long?
Depending on the size of the disk, it may take some time to recover the file, especially if you are using Extensive mode.
Why are additional files recovered from my operating system drive?
Behind the scenes, Windows is constantly creating and deleting files. By default, Windows File Recovery filters out these files, but some slip through. To prevent this, use the /n <filter> as per examples in this article.
What is the $Recycle.Bin folder?
For NTFS and segment modes, you may also see lost files recovered from the Recycle Bin (files either in the recycle bin or that were permanently deleted) with the name $files.xxx and stored in a folder called $RECYCLE.BIN.
What happens if the destination drive is full?
If you see the following message: »Destination disk is full, please free up space before resuming: (R)esume, (S)kip file, or (A)bort,» free up drive space on the destination drive, and then choose one of the options.
I was not able to recover the file, now what?
If you used Regular mode, try again in extensive mode if the file type is supported. It’s possible that the free space was overwritten, especially on a solid-state drive (SSD). If you need help, contact your administrator.
Windows File Recovery — Summer 2020 release
-
If necessary, download and launch the app from Microsoft Store.
-
Press the Windows key, enter Windows File Recovery in the search box, and then select Windows File Recovery.
-
When you are prompted to allow the app to make changes to your device, select Yes.
-
In the Command Prompt window, enter the command in the following format:
winfr source-drive: destination-drive: [/switches]
The source and destination drives must be different. When recovering from the operating system drive (often C: ), use the /n <filter> and /y:<type<(s)> switches to specify the user files or folder.
Microsoft automatically creates a recovery folder for you called Recovery_<date and time> on the destination drive.
There are three modes you can use to recover files: Default, Segment, and Signature.
Default mode examples
Recover a specific file from your C: drive to the recovery folder on an E: drive.
winfr C: E: /n \Users\<username>\Documents\QuarterlyStatement.docx
Recover jpeg and png photos from your Pictures folder to the recovery folder on an E: drive.winfr C: E: /n \Users\<username>\Pictures\*.JPEG /n \Users\<username>\Pictures\*.PNG
Recover your Documents folder from your C: drive to the recovery folder on an E: drive.winfr C: E: /n \Users\<username>\Documents\
Don’t forget the backslash (\) at the end of the folder.
Segment mode examples (/r)
Recover PDF and Word files from your C: drive to the recovery folder on an E: drive.
winfr C: E: /r /n *.pdf /n *.docx
Recover any file with the string «invoice» in the filename by using wildcard characters.winfr C: E: /r /n *invoice*
Signature mode examples (/x)
When using signature mode, it’s helpful to first see the supported extension groups and corresponding file types.
Recover JPEG (jpg, jpeg, jpe, jif, jfif, jfi) and PNG photos from your C: drive to the recovery folder on an E: drive.winfr C: E: /x /y:JPEG,PNG
Recover ZIP files (zip, docx, xlsx, ptpx, and so on) from your C: drive to the recovery folder on an E: drive.winfr C: E:\RecoveryTest /x /y:ZIP
-
When you are prompted for confirmation to continue, enter Y to start the recovery operation.
Depending on the size of your source drive, this may take a while.
To stop the recovery process, press Ctrl+C.
The following information can help you decide which file system you have and which mode to use.
File systems
There are several file systems supported by Windows that vary depending on the storage device or operating system. Recovering files from non-NTFS file systems is only supported in signature mode. To see which file system you have, right click a drive in File Explorer and select Properties.
|
File system |
Examples |
|
FAT and exFAT |
SD cards, flash or USB drives (< 4GB) |
|
ReFS |
Windows Server and Windows Pro for Workstations |
|
NTFS |
Computers (HDD, SSD), external hard drives, flash or USB drives (> 4GB) |
Deciding which mode to use
Use the following table to help you decide which mode to use. If you’re not sure, start with the default mode.
|
File system |
Circumstances |
Recommended mode |
|
NTFS |
Deleted recently |
Default |
|
NTFS |
Deleted a while ago |
Segment, followed by Signature |
|
NTFS |
After formatting a disk |
Segment, followed by Signature |
|
NTFS |
A corrupted disk |
Segment, followed by Signature |
|
FAT, exFAT |
Recovery file type is supported (see following table) |
Signature |
Signature mode extension groups and file types
The following table summarizes the extension groups and the supported file types for each group when you use the /y:<type(s)> switch
|
Extension group |
File type |
|
ASF |
wma, wmv, asf |
|
JPEG |
jpg, jpeg, jpe, jif, jfif, jfi |
|
MP3 |
mp3 |
|
MPEG |
mpeg, mp4, mpg, m4a, m4v, m4b, m4r, mov, 3gp, qt |
|
|
|
|
PNG |
png |
|
ZIP |
zip, docx, xlsx, pptx, odt, ods, odp, odg, odi, odf, odc, odm, ott, otg, otp, ots, otc, oti, otf, oth |
General syntax
The following table summarizes what each basic command line parameter and switch is used for.
|
Parameter or switch |
Description |
Supported modes |
|
Source-drive: |
Specifies the storage device where the files were lost. Must be different from the destination-drive. |
All |
|
Destination-drive: |
Specifies the storage device and folder on which to put the recovered files. Must be different from the source-drive. |
All |
|
/r |
Uses segment mode, which examines File Record Segments (FRS). |
Segment |
|
/n <filter> |
Scans for a specific file by using a file name, file path, or wildcards. For example:
|
Default |
|
/x |
Uses signature mode, which examines file types and works on all file systems. |
Signature |
|
/y:<type(s)> |
Scans for files with specific file types. Separate multiple entries by using commas. For a list of extension groups and corresponding file types, see the table, «Signature mode extension groups and file types» in the section, «About modes and file systems». |
Signature |
|
/# |
Shows signature mode extension groups and corresponding file types in each group. |
All |
|
/? |
Shows a quick summary of syntax and switches for general users. |
All |
|
/! |
Shows a quick summary of syntax and switches for advanced users. |
All |
Advanced syntax
The following table summarizes what each advanced switch is used for.
|
Switch |
Description |
Supported modes |
|
/p:<folder> |
Saves a log file of the recovery operation in a different location than the default location on the recovery drive (for example, D:\logfile). |
All |
|
/a |
Overrides user prompts, which is useful in a script file. |
All |
|
/u |
Recovers undeleted files, for example, from the Recycle Bin. |
Default |
|
/k |
Recovers system files. |
Default |
|
/o:<a|n|b> |
Specifies whether to always (a), never (n), orkeep both always(b) when choosing whether to overwrite a file. The default action is to prompt to overwrite. |
Default |
|
/g |
Recovers files without primary data streams. |
Default |
|
/e |
To keep your results manageable and focus on user files, some file types are filtered by default, but this switch removes that filter. For a complete list of these file types, see the information after this table. |
Default |
|
/e:<extension> |
Specifies which file types are filtered. For a complete list of these file types, see the information after this table. |
Default |
|
/s:<sectors> |
Specifies the number of sectors on the source device. To find sector information, use fsutil. |
Segment |
|
/b:<bytes> |
Specifies the cluster size (allocation unit) on the source device. |
Segment |
|
/f:>sector> |
First sector to scan on the source device. |
Segment |
Can you give some tips to help me use correct syntax?
Here are some suggestions:
-
Always use drive letters in the source and destination path, don’t forget the colon (:) after the drive letter, and make sure there is a space between the source and destination.
-
If a switch has a colon, such as /y:, don’t add a space between the colon and the rest of the value.
-
When you specify just a folder name, such as /n \Myfolder\, add a backslash (\) at the end of it.
-
If a file or folder name has spaces, surround it with quotes. For example:
winfr C: E: /n «\Users\<username>\Documents\Quarterly Statement.docx»
-
To stop the recovery process, press Ctrl+C.
What does <username> mean in the command examples?
In the File Explorer address bar, enter C:\users to see a list of potential users on your computer. There may be several users on your computer, including you, the administrator, and the default account. When you see <username> in a file path, it is a placeholder for the current username on your computer.
Why am I getting this message: «Source and Destination cannot refer to the same physical partition?»
The source and destination drive or partition path should not be the same. If you only have one drive, use a USB or external hard drive as your destination path. Don’t create a partition after losing data, because this reduces the chance of a successful recovery.
Why does the recovery operation take so long?
Depending on the size of the disk, it may take some time to recover the file, especially if you are using signature mode.
Why are additional files recovered from my operating system drive?
Behind the scenes, Windows is constantly creating and deleting files. By default, Windows File Recovery filters out these files, but some slip through. To prevent this, use the /n <filter> switch in default and segment modes and the /y:<type(s)> switch in signature mode.
What is the $Recycle.Bin folder?
For default and segment modes, you may also see lost files recovered from the Recycle Bin (files either in the recycle bin or that were permanently deleted) with the name $files.xxx and stored in a folder called $RECYCLE.BIN.
What happens if the destination drive is full?
If you see the following message: «Destination disk is full, please free up space before resuming: (R)esume, (S)kip file, or (A)bort», Free up drive space on the destination drive, and then choose one of the options.
I was not able to recover the file, now what?
If you used default or segment mode, try again in signature mode if the file type is supported. It’s possible that the free space was over-written, especially on a solid state drive (SSD). If you need help, contact your administrator.
Need more help?
Want more options?
Explore subscription benefits, browse training courses, learn how to secure your device, and more.
Communities help you ask and answer questions, give feedback, and hear from experts with rich knowledge.
Если вы не можете найти потерянный файл из резервной копии, можно использовать Windows File Recovery, которое является приложением командной строки, доступным в Microsoft Store. Используйте это приложение, чтобы попытаться восстановить потерянные файлы, которые были удалены с локального запоминающего устройства (включая внутренние диски, внешние диски и USB-устройства) и которые не могут быть восстановлены из корзины. Восстановление в облачном хранилище и сетевых общих папках не поддерживается.
ПримечаниеДля этого приложения требуется Windows 10 сборка 19041 или более поздняя (см. версию Windows 10).
Важно: Если вы хотите увеличить вероятность восстановления файла, сведите к минимуму или избежать использования компьютера. В файловой системе Windows пространство, используемое удаленным файлом, помечается как свободное место, что означает, что файловые данные по-прежнему могут существовать и быть восстановлены. Но любое использование компьютера может создавать файлы, которые могут переписать это свободное пространство в любое время.
Windows File Recovery — выпуск зимы 2020 г.
-
При необходимости скачайте и запустите приложение из Microsoft Store.
-
Нажмите клавишу Windows, введите Windows File Recovery в поле поиска и выберите Windows File Recovery.
-
Когда вам будет предложено разрешить приложению вносить изменения в устройство, нажмите кнопку Да.
-
В окне командной строки введите команду в следующем формате:
winfr source-drive: destination-drive: [/mode] [/switches]
-
Существует два основных режима, которые можно использовать для восстановления файлов: Обычный и Расширенный.
Примеры регулярного режима
Восстановите папку Documents с диска C: в папку восстановления на диске E: . Не забудьте обратную косую черту (\) в конце папки.
Winfr C: E: /regular /n \Users\<username>\Documents\
Восстановление ФАЙЛОВ PDF и Word с диска C: в папку восстановления на диске E:.
Winfr C: E: /regular /n *.pdf /n *.docx
Примеры расширенного режима
Восстановите любой файл со строкой «счет» в имени файла, используя подстановочные знаки.
Winfr E: C: /extensive /n *invoice*
Восстановите фотографии jpeg и png из папки «Изображения» в папку восстановления на диске E: .
Winfr C: E: /extensive /n \Users\<username>\Pictures\*.JPEG /n\Users\<username>\Pictures\*.PNG
Исходный и целевой диски должны отличаться. При восстановлении с диска операционной системы (часто C: ) используйте параметры /n <filter> , чтобы указать пользовательские файлы или папку.
Корпорация Майкрософт автоматически создает папку восстановления для вызываемого вами Recovery_<date and time> на целевом диске. -
При появлении запроса на подтверждение продолжения введите Y, чтобы начать операцию восстановления. В зависимости от размера исходного диска это может занять некоторое время. Чтобы остановить процесс восстановления, нажмите клавиши CTRL + C.
Следующие сведения помогут вам решить, какую файловую систему у вас есть и какой режим использовать.
Файловые системы
|
«Файловая система» |
Примеры |
|---|---|
|
FAT и exFAT |
SD-карты, флэш-накопители или USB-накопители (< 4 ГБ) |
|
NTFS |
Компьютеры (HDD, SSD), внешние жесткие диски, флэш-накопители или USB-накопители (> 4 ГБ) |
Windows поддерживает несколько файловых систем, которые зависят от запоминающего устройства или операционной системы. Восстановление файлов из файловых систем, отличных от NTFS, поддерживается только в расширенном режиме. Чтобы узнать, какая файловая система у вас есть, щелкните правой кнопкой мыши диск в проводник и выберите Свойства.
Выбор режима для использования
Используйте следующую таблицу, чтобы решить, какой режим следует использовать. Если вы не уверены, начните с обычного режима.
|
«Файловая система» |
Обстоятельствах |
Рекомендуемый режим |
|---|---|---|
|
NTFS |
Недавно удалено |
Обычный |
|
NTFS |
Удалено некоторое время назад |
Обширные |
|
NTFS |
После форматирования диска |
Обширные |
|
NTFS |
Поврежденный диск |
Обширные |
|
FAT и exFAT |
Любой |
Обширные |
Общий синтаксис
В следующей таблице приведены сведения о том, для чего используется каждый расширенный коммутатор.
|
Параметр или переключатель |
Описание |
Поддерживаемые режимы |
|---|---|---|
|
Исходный диск: |
Указывает запоминающее устройство, на котором были потеряны файлы. Должен отличаться от целевого диска. |
Все |
|
Целевой диск: |
Указывает запоминающее устройство и папку, в которую будут помещены восстановленные файлы. Должен отличаться от исходного диска. |
Все |
|
/Регулярные |
Обычный режим— стандартный вариант восстановления для не поврежденных дисков NTFS. |
Обычный |
|
/Обширные |
Расширенный режим— вариант тщательного восстановления, подходящий для всех файловой системы. |
Обширные |
|
/n<фильтр> |
Сканирует определенный файл с помощью имени файла, пути к файлу, типа файла или подстановочных знаков. Например:
|
Все |
|
/? |
Сводка синтаксиса и параметров для общих пользователей. |
Все |
|
/! |
Сводка синтаксиса и параметров для опытных пользователей. |
Все |
Расширенный синтаксис
В следующей таблице приведены сведения о том, для чего используется каждый расширенный коммутатор.
|
Перейти |
Описание |
Поддерживаемые режимы |
|---|---|---|
|
/Ntfs |
Режим NTFS— быстрый вариант восстановления для работоспособных дисков NTFS с помощью таблицы файлов master |
NTFS |
|
/Сегмента |
Режим сегментов, параметр восстановления для дисков NTFS с использованием сегментов записей файлов |
Сегмента |
|
/Подпись |
Режим сигнатуры, параметр восстановления для всех типов файловой системы с использованием заголовков файлов |
Подпись |
|
/y:<type(s)> |
Восстановление определенных групп расширений, разделенных запятыми |
Подпись |
|
/# |
Группы расширений режима подписи и поддерживаемые типы файлов. |
Подпись |
|
папка /p:<> |
Сохраняет файл журнала операции восстановления в расположении, отличном от расположения по умолчанию на диске восстановления (например, D:\logfile). |
Все |
|
/a |
Переопределяет запросы пользователей, что полезно в файле скрипта. |
Все |
|
/U |
Восстанавливает незавершенные файлы, например из корзины. |
NTFS |
|
/K |
Восстанавливает системные файлы. |
NTFS |
|
/o:<a|n|b> |
Указывает, следует ли всегда (a), никогда (n) или хозяйничать всегда(b) при выборе варианта перезаписи файла. Действие по умолчанию — запрос на перезапись. |
NTFS |
|
/Г |
Восстанавливает файлы без основных потоков данных. |
NTFS |
|
/E |
Чтобы обеспечить управляемость результатов и сосредоточиться на пользовательских файлах, некоторые типы файлов фильтруются по умолчанию, но этот параметр удаляет этот фильтр. Полный список файлов этих типов см. в этой таблице. |
NTFS |
|
расширение /e:<> |
Указывает, какие типы файлов фильтруются. Полный список файлов этих типов см. в этой таблице. |
NTFS |
|
/s:<секторов> |
Указывает количество секторов на исходном устройстве. Чтобы найти сведения о секторе, используйте fsutil. |
Сегмента |
|
/b:<байтов> |
Указывает размер кластера (единицу выделения) на исходном устройстве. |
Сегмента |
Список фильтров расширений файлов
Следующие типы файлов фильтруются по результатам по умолчанию. Используйте параметр /e, чтобы отключить этот фильтр, или расширение /e:<> фильтр, чтобы указать типы файлов, которые не следует фильтровать.
_, admx, admx, appx, appx, ascx, asm, aspx, aux, ax, bin, browser, c, cab, cat cdf-ms, catalogItem, cdxm, cmake, cmd, coffee, config, cp, cpp, cs, cshtm, css, cur, dat, dll, et, evtx, exe, fon, gpd, h, hbakedcurve, htm, htm, ico, id, ildl, ilpdb, iltoc, iltocpdb, in, inf, inf_loc, ini, js, json, lib, lnk, log, man, manifest, map, metadata, mf, mof, msc, msi, mui, mum, mun, nls, npmignore, nupkg, nuspec, obj, p7s, p7x, pak, pckdep, pdb, pf, pkgdef, plist, pnf, pp, pri, props, ps1, ps1xm, psd1, psm1, py, resjson, resw, resx, rl, rs, sha512, snippet, sq, sys, t4, targets, th, tlb, tmSnippet, toc, ts, tt, ttf, vb, vbhtm, vbs, vsdir, vsix, vsixlangpack, vsixmanifest, vstdir, vstemplate, vstman, winmd, xam, xbf, xm, xrm-ms, xs, xsd, ym
Можете ли вы дать несколько советов, которые помогут мне использовать правильный синтаксис?
-
Всегда используйте буквы диска в исходном и целевом пути, не забывайте двоеточие (:) после буквы диска и убедитесь, что между источником и назначением есть пробел.
-
При указании только имени папки, например /n \Myfolder\, добавьте обратную косую черту (\) в ее конце.
-
Если имя файла или папки содержит пробелы, заключите его кавычками. Например:
winfr C: E: /regular /n «\Users\<username>\Documents\Quarterly Statement.docx»
Что означает <имя пользователя> в примерах команд?
В адресной строке проводник введите C:\users, чтобы просмотреть список потенциальных пользователей на компьютере. На вашем компьютере может быть несколько пользователей, включая вас, администратора и учетную запись по умолчанию. Если в пути к файлу отображается <имя пользователя>, это заполнитель для текущего имени пользователя на компьютере.
Почему я получаю следующее сообщение: «Источник и назначение не могут ссылаться на одну и ту же физическую секцию?»
Исходный и целевой диск или путь к секции не должны совпадать. Если у вас есть только один диск, используйте USB-диск или внешний жесткий диск в качестве пути назначения. Не создавайте секцию после потери данных, так как это снижает вероятность успешного восстановления.
Почему операция восстановления занимает так много времени?
В зависимости от размера диска восстановление файла может занять некоторое время, особенно если вы используете расширенный режим.
Почему с диска операционной системы восстанавливаются дополнительные файлы?
В фоновом режиме Windows постоянно создает и удаляет файлы. По умолчанию Windows File Recovery фильтрует эти файлы, но некоторые из них проскальзывают. Чтобы избежать этого, используйте> фильтра /n <, как показано в примерах в этой статье.
Что такое папка $Recycle.Bin?
В режимах NTFS и сегментирования также могут отображаться потерянные файлы, восстановленные из корзины (файлы в корзине или которые были удалены без возможности восстановления) с именем $files.xxx и сохраненные в папке с именем $RECYCLE. БЕН.
Что произойдет, если целевой диск заполнен?
Если появится следующее сообщение: «Целевой диск заполнен, освободите место перед возобновлением: (R)esume, (S)kip-файл или (A)борт», освободите место на целевом диске, а затем выберите один из вариантов.
Мне не удалось восстановить файл, что теперь?
Если вы использовали обычный режим, повторите попытку в расширенном режиме, если поддерживается тип файла. Вполне возможно, что свободное пространство было перезаписано, особенно на твердотельных накопителях (SSD). Если вам нужна помощь, обратитесь к администратору.
Windows File Recovery — выпуск летом 2020 г.
-
При необходимости скачайте и запустите приложение из Microsoft Store.
-
Нажмите клавишу Windows, введите Windows File Recovery в поле поиска и выберите Windows File Recovery.
-
Когда вам будет предложено разрешить приложению вносить изменения в устройство, нажмите кнопку Да.
-
В окне командной строки введите команду в следующем формате:
winfr source-drive: destination-drive: [/switches]
Исходный и целевой диски должны отличаться. При восстановлении с диска операционной системы (часто C: ) используйте параметр /n <фильтра> и параметр /y:<< >, чтобы указать пользовательские файлы или папку.
Корпорация Майкрософт автоматически создает папку восстановления для Recovery_<> даты и времени на целевом диске.
Для восстановления файлов можно использовать три режима: по умолчанию, сегмент и подпись.
Примеры
режима по умолчанию
Восстановите определенный файл с диска C: в папку восстановления на диске E: .winfr C: E: /n \Users\<username>\Documents\QuarterlyStatement.docx
Восстановите фотографии jpeg и png из папки «Изображения» в папку восстановления на диске E: .winfr C: E: /n \Users\<username>\Pictures\*.JPEG /n \Users\<username>\Pictures\*.PNG
Восстановите папку Documents с диска C: в папку восстановления на диске E: .winfr C: E: /n \Users\<username>\Documents\
Не забудьте обратную косую черту (\) в конце папки.
Примеры режима сегментирования (/r)
Восстановление ФАЙЛОВ PDF и Word с диска C: в папку восстановления на диске E:.
winfr C: E: /r /n *.pdf /n *.docx
Восстановите любой файл со строкой «счет» в имени файла, используя подстановочные знаки.winfr C: E: /r /n *invoice*
Примеры режима подписи (/x)
При использовании режима подписи полезно сначала просмотреть поддерживаемые группы расширений и соответствующие типы файлов.
Восстановите фотографии JPEG (jpg, jpeg, jpe, jif, jfif, jfi) и PNG с диска C: в папку восстановления на диске E:.winfr C: E: /x /y:JPEG,PNG
Восстановление ZIP-файлов (ZIP, docx, xlsx, ptpx и т. д.) с диска C: в папку восстановления на диске E:.winfr C: E:\RecoveryTest /x /y:ZIP
-
При появлении запроса на подтверждение продолжения введите Y , чтобы начать операцию восстановления.
В зависимости от размера исходного диска это может занять некоторое время.
Чтобы остановить процесс восстановления, нажмите клавиши CTRL+C.
Следующие сведения помогут вам решить, какую файловую систему у вас есть и какой режим использовать.
Файловые системы
Windows поддерживает несколько файловых систем, которые зависят от запоминающего устройства или операционной системы. Восстановление файлов из файловых систем, отличных от NTFS, поддерживается только в режиме подписи. Чтобы узнать, какая файловая система у вас есть, щелкните правой кнопкой мыши диск в проводник и выберите Свойства.
|
«Файловая система» |
Примеры |
|
FAT и exFAT |
SD-карты, флэш-накопители или USB-накопители (< 4 ГБ) |
|
Refs |
Windows Server и Windows Pro для рабочих станций |
|
NTFS |
Компьютеры (HDD, SSD), внешние жесткие диски, флэш-накопители или USB-накопители (> 4 ГБ) |
Выбор режима для использования
Используйте следующую таблицу, чтобы решить, какой режим следует использовать. Если вы не уверены, начните с режима по умолчанию.
|
«Файловая система» |
Обстоятельствах |
Рекомендуемый режим |
|
NTFS |
Недавно удалено |
По умолчанию |
|
NTFS |
Удалено некоторое время назад |
Сегмент, за которым следует подпись |
|
NTFS |
После форматирования диска |
Сегмент, за которым следует подпись |
|
NTFS |
Поврежденный диск |
Сегмент, за которым следует подпись |
|
FAT, exFAT |
Поддерживается тип файла восстановления (см. следующую таблицу). |
Подпись |
Группы расширений и типы файлов режима подписи
В следующей таблице перечислены группы расширений и поддерживаемые типы файлов для каждой группы при использовании параметра /y:<type(s)>
|
Группа расширений |
Тип файла |
|
ASF |
wma, wmv, asf |
|
JPEG |
jpg, jpeg, jpe, jif, jfif, jfi |
|
MP3 |
.mp3 |
|
MPEG |
mpeg, mp4, mpg, m4a, m4v, m4b, m4r, mov, 3gp, qt |
|
|
|
|
PNG |
png |
|
МОЛНИЯ |
zip, docx, xlsx, pptx, odt, ods, odp, odg, odi, odf, odc, odm, ott, otg, otp, ots, otc, oti, otf, oth |
Общий синтаксис
В следующей таблице приведены сведения о том, для чего используется каждый базовый параметр командной строки и переключатель.
|
Параметр или переключатель |
Описание |
Поддерживаемые режимы |
|
Исходный диск: |
Указывает запоминающее устройство, на котором были потеряны файлы. Должен отличаться от целевого диска. |
Все |
|
Целевой диск: |
Указывает запоминающее устройство и папку, в которую будут помещены восстановленные файлы. Должен отличаться от исходного диска. |
Все |
|
/R |
Использует режим сегментов, который проверяет сегменты записи файла (FRS). |
Сегмента |
|
/n <фильтр> |
Сканирует конкретный файл с помощью имени файла, пути к файлу или подстановочных знаков. Например:
|
По умолчанию |
|
/X |
Использует режим подписи, который проверяет типы файлов и работает во всех файловых системах. |
Подпись |
|
/y:<type(s)> |
Проверяет наличие файлов с определенными типами файлов. Разделите несколько записей с помощью запятых. Список групп расширений и соответствующих типов файлов см. в таблице «Группы расширений и типы файлов в режиме подписи» раздела «О режимах и файловых системах». |
Подпись |
|
/# |
Показывает группы расширений режима подписи и соответствующие типы файлов в каждой группе. |
Все |
|
/? |
Краткое описание синтаксиса и параметров для пользователей. |
Все |
|
/! |
Краткое описание синтаксиса и параметров для опытных пользователей. |
Все |
Расширенный синтаксис
В следующей таблице приведены сведения о том, для чего используется каждый расширенный коммутатор.
|
Перейти |
Описание |
Поддерживаемые режимы |
|
папка /p:<> |
Сохраняет файл журнала операции восстановления в расположении, отличном от расположения по умолчанию на диске восстановления (например, D:\logfile). |
Все |
|
/a |
Переопределяет запросы пользователей, что полезно в файле скрипта. |
Все |
|
/U |
Восстанавливает незавершенные файлы, например из корзины. |
По умолчанию |
|
/K |
Восстанавливает системные файлы. |
По умолчанию |
|
/o:<a|n|b> |
Указывает, следует ли всегда (a), никогда (n) или хозяйничать всегда(b) при выборе варианта перезаписи файла. Действие по умолчанию — запрос на перезапись. |
По умолчанию |
|
/Г |
Восстанавливает файлы без основных потоков данных. |
По умолчанию |
|
/E |
Чтобы обеспечить управляемость результатов и сосредоточиться на пользовательских файлах, некоторые типы файлов фильтруются по умолчанию, но этот параметр удаляет этот фильтр. Полный список файлов этих типов см. в этой таблице. |
По умолчанию |
|
расширение /e:<> |
Указывает, какие типы файлов фильтруются. Полный список файлов этих типов см. в этой таблице. |
По умолчанию |
|
/s:<секторов> |
Указывает количество секторов на исходном устройстве. Чтобы найти сведения о секторе, используйте fsutil. |
Сегмента |
|
/b:<байтов> |
Указывает размер кластера (единицу выделения) на исходном устройстве. |
Сегмента |
|
/f:>сектор> |
Первый сектор для сканирования на исходном устройстве. |
Сегмента |
Можете ли вы дать несколько советов, которые помогут мне использовать правильный синтаксис?
Ниже приведены некоторые рекомендации.
-
Всегда используйте буквы диска в исходном и целевом пути, не забывайте двоеточие (:) после буквы диска и убедитесь, что между источником и назначением есть пробел.
-
Если переключатель имеет двоеточие, например /y:, не добавляйте пробел между двоеточием и остальной частью значения.
-
При указании только имени папки, например /n \Myfolder\, добавьте обратную косую черту (\) в ее конце.
-
Если имя файла или папки содержит пробелы, заключите его кавычками. Например:
winfr C: E: /n «\Users\<username>\Documents\Quarterly Statement.docx»
-
Чтобы остановить процесс восстановления, нажмите клавиши CTRL+C.
Что означает <имя пользователя> в примерах команд?
В адресной строке проводник введите C:\users, чтобы просмотреть список потенциальных пользователей на компьютере. На вашем компьютере может быть несколько пользователей, включая вас, администратора и учетную запись по умолчанию. Если в пути к файлу отображается <имя пользователя>, это заполнитель для текущего имени пользователя на компьютере.
Почему я получаю следующее сообщение: «Источник и назначение не могут ссылаться на одну и ту же физическую секцию?»
Исходный и целевой диск или путь к секции не должны совпадать. Если у вас есть только один диск, используйте USB-диск или внешний жесткий диск в качестве пути назначения. Не создавайте секцию после потери данных, так как это снижает вероятность успешного восстановления.
Почему операция восстановления занимает так много времени?
В зависимости от размера диска восстановление файла может занять некоторое время, особенно если используется режим подписи.
Почему с диска операционной системы восстанавливаются дополнительные файлы?
В фоновом режиме Windows постоянно создает и удаляет файлы. По умолчанию Windows File Recovery фильтрует эти файлы, но некоторые из них проскальзывают. Чтобы избежать этого, используйте параметр /n <фильтра> в режимах по умолчанию и сегментации, а параметр /y:<type(s)> в режиме подписи.
Что такое папка $Recycle.Bin?
В режиме по умолчанию и режиме сегментирования вы также можете увидеть потерянные файлы, восстановленные из корзины (файлы в корзине или которые были удалены без возможности восстановления) с именем $files.xxx и сохраненные в папке с именем $RECYCLE. БЕН.
Что произойдет, если целевой диск заполнен?
Если отображается следующее сообщение: «Целевой диск заполнен, освободите место перед возобновлением: (R)esume, (S)kip-файл или (A)bort», освободите место на целевом диске, а затем выберите один из вариантов.
Мне не удалось восстановить файл, что теперь?
Если вы использовали режим по умолчанию или сегмент, повторите попытку в режиме подписи, если поддерживается тип файла. Возможно, что свободное пространство было переопределино, особенно на твердотельном диске (SSD). Если вам нужна помощь, обратитесь к администратору.
Нужна дополнительная помощь?
Нужны дополнительные параметры?
Изучите преимущества подписки, просмотрите учебные курсы, узнайте, как защитить свое устройство и т. д.
В сообществах можно задавать вопросы и отвечать на них, отправлять отзывы и консультироваться с экспертами разных профилей.
Looking to recover deleted files in Windows 10? You can use numerous methods to get data back, including EaseUS file recovery software. Windows also has its own built-in file recovery tools. We’ll show you the best approaches to make recovery modes in different data loss situations.
|
Methods |
Scenarios a file was deleted |
| 📌Windows 10 Data Recovery Software | Recover permanently deleted files not in the Recycle Bin. |
|
🔂Undo Delete |
The file or folder was deleted recently, and you haven’t restarted your computer. |
|
📛Restore from Recycle Bin |
You remove the files using simple Delete methods, and the Recycle Bin hasn’t been emptied. |
| Find deleted files with CMD | The files are hidden intentionally or unintentionally. |
|
🧿Windows File Recovery Tool |
Undelete files with a free command line utility. |
| 📁Retrieve Using File Backup | The important file is deleted permanently. But there are backup files created before. |
| 📝Restore from Previous Versions | Permanently deleted folders, do not want to use third-party software to recover files. |
Restore Permanently Deleted Files in Windows 10 with Data Recovery Software
It is, unfortunately, all too easy to accidentally delete files in Windows 10. Microsoft has included a safety net in the form of the Recycle Bin, but this does not always help – sometimes, you can accidentally delete data permanently. Holding the Shift key while deleting a file bypasses the Recycle Bin, or trying to delete files when the Bin is full, and data will simply be wiped out.
The most reliable method to get back permanently deleted files is using EaseUS Data Recovery Wizard, a dedicated data recovery software that is compatible with different Windows versions. It has a high success rate and remains easy to use. This file recovery software enables you to recover deleted files without backup.
Follow the steps below to recover deleted files or retrieve permanently lost files and data in Windows 10.
- Step 1. Download EaseUS Data Recovery Wizard by clicking on the download button. To guarantee a high data recovery chance, install the software on another disk instead of the original storage location where you lost files.
- Step 2. Launch EaseUS Data Recovery Wizard and choose the hard disk to perform a quick or deep scan for permanently deleted files.
- Step 3. Filter the recovery folder to find the files you want to undelete from the list of results.
- Step 4. Preview the files and click the «Recover» button to start the recovery process.

⚠️ It is essential to remember that time is of the essence when it comes to data recovery. The sooner you can start the process of locating and recovering data, the greater your chances of successful data recovery. Leave things for too long, and it is possible that recovery will be impossible due to new data being overwritten or a problem arising on the drive you are trying to recover data from.
Video Tutorial on Restoring Deleted Files in Windows 10 in 5 Ways
- 0:00 Method 1. Recover Files from a Recycle Bin
- 0:48 Method 2. Recover lost data Using CMD
- 3:14 Method 3. Restore files with Data Recovery Software
- 5:53 Method 4. Restore files using File History backup
- 7:27 Method 5. Recover deleted Files from Previous Versions
Share this ultimate data recovery program with your friends on Twitter, Facebook, or Instagram! You can also read on to find out more solutions for deleted file recovery on Windows 10.
Recover Deleted Files in Windows 10 Using Undo Delete
Many users know a quick way to recover recently deleted files: Ctrl+Z deleted files recovery. Or, You can right-click the folder where it was located and click «Undo Delete».
Here are the steps to undelete files with the Undo Delete feature:
Step 1. Right-click the folder where the file was lost.
Step 2. Click «Undo Delete» to restore the file to its original location.
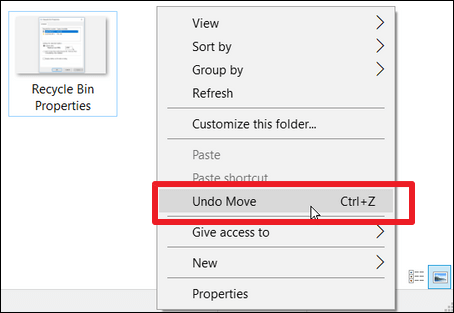
Step 3. Or, press «Ctrl+Z» directly to restore the lost files.
⚠️ Keep in mind that ctrl+z or Undo Delete will only work if the file or folder was deleted recently. This method is not useful if you restart your computer after file loss.
Restore Deleted Files in Windows 10 from the Recycle Bin
How do I restore deleted folders on my desktop? If you delete a file by hitting the «Delete» button on your keyboard or simply dragging it to the Recycle Bin, then the steps to undelete files in Windows 10 are easy. Recycle Bin can be very helpful to recover deleted files in Windows 10 for free.
- Step 1. Find the Recycle Bin icon on the desktop. Open it and then locate the deleted files you are interested in.
- Step 2. Browse through the content of the Recycle Bin to locate the files you need. You can also perform a search for a specific file or use the column headings to identify files based on size, date of modification, and more.
- Step 3. Select the file you would like to get back and then right-click them.
- Step 4. Click «Restore» to recover deleted files.
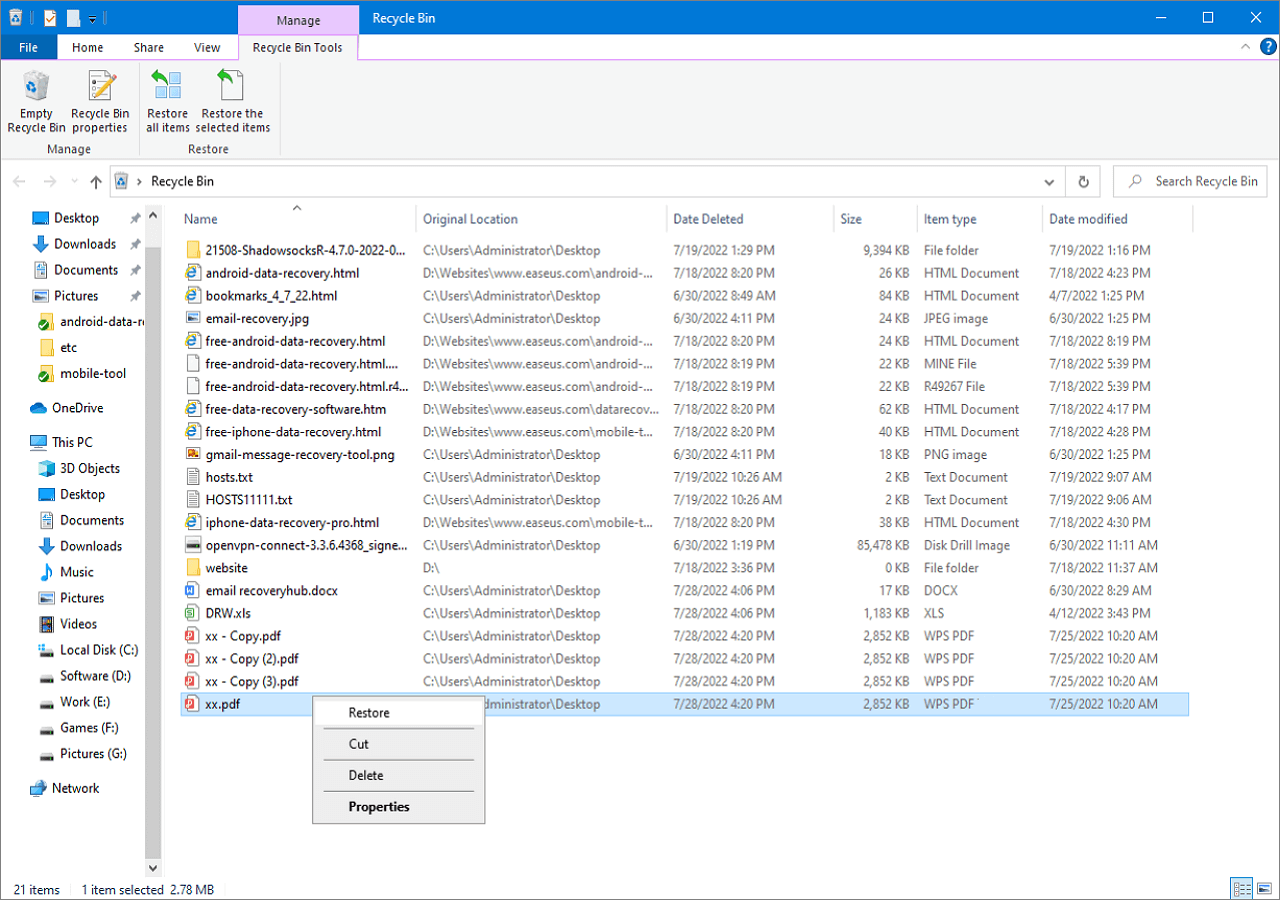
⚠️ There are, however, limitations to this method. It will only work if you haven’t emptied the Recycle Bin and if you have not bypassed the Bin by holding the Shift key while deleting data. If you can’t find what you are looking for in the Recycle Bin, it is possible that your files have been permanently deleted; you can try the following methods for Recycle Bin recovery.
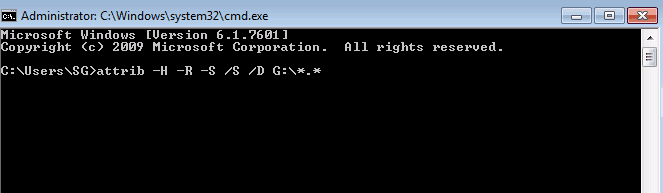
Recover Permanently Deleted Files from Windows 10 Using CMD
The Windows Command Prompt can be a powerful disk and file management tool. You can use CMD to recover hidden files with the attrib command lines. But these commands can’t restore deleted files.
Step 1. Type cmd in the Search box. Right-click on Command Prompt and select Run as administrator.
Step 2. Type ATTRIB -H -R -S /S /D X:*.* and hit Enter in the command prompt window. Replace «X» with the letter of your hard drive.
Want to help others? Share this tutorial on your social media and start a conversation about recovering deleted files in Windows 10.
Undelete Files in Windows 10 Using Windows File Recovery
As long as you have at least Windows 10 May 2020 Update (Windows 10 2004) installed, you have access to Windows File Recovery – although you will need to install it from the Microsoft Store. This is Microsoft’s own free data recovery tool, but it is very different from programs like EaseUS Data Recovery Wizard because it is a command-line tool. This means that rather than using a familiar system of icons and menus, it is text-based and, therefore, not something that everyone will be comfortable with.
Because of the potential for things to go wrong, the Windows File Recovery tool is only really recommended for slightly more experienced computer users.
Before you get started with Windows File Recovery, there are two things you need to prepare: there are a couple of conditions you should know:
- You need a secondary drive to recover data – this can be a regular hard drive or an external USB drive.
- You need to know the exact location where your deleted files were originally stored.
How to use Windows File Recovery to restore deleted files in Windows 10
Step 1. Open the «Microsoft Store» app and search for Window File Recovery. Now, download and install the app by clicking the «Get» button.
Step 2. Press the Windows key and click the Search box. Enter Windows File Recovery in the Search box and select it.
Solution source: https://www.microsoft.com/en-us/p/windows-file-recovery/9n26s50ln705?activetab=pivot:overviewtab from Microsoft’s official website
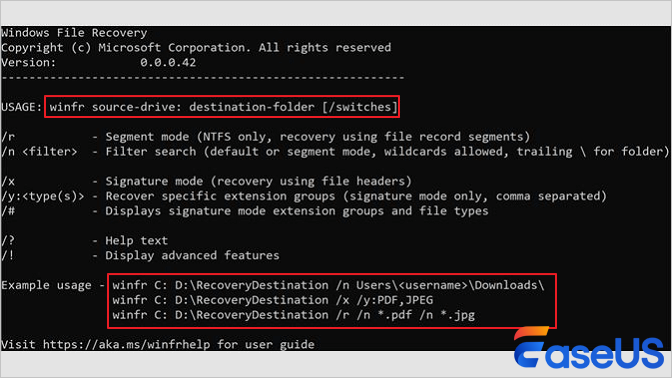
Step 3. Use the syntax indicated below to start the process of recovering deleted files with a deep scan. The basic command line is:
winfr source-drive: destination-drive: [/switches].
For example:
winfr C: D: /n \Users\Documents\test.docx
This particular command will recover a deleted Word document named test that had been stored on the C: drive, saving it to the D: drive.
Step 4. You can then follow the on-screen instructions to finish restoring deleted files.
⚠️ This data recovery method will not be suitable for everyone because different commands are needed for every scenario. It’s also worth noting that it will not be able to help you in every instance. For example, it cannot recover lost files following a virus attack or lost partition. In these cases, looking to EaseUS Data Recovery Wizard is better, as outlined above.
Recover Permanently Deleted Files Windows 10 from File Backup
This solution only works when you set up a backup or open the File History function before the data loss happens. If there is no backup available, you still need data loss recovery software to recover permanently deleted files on Windows 10.
Go to check your recent backups and follow the steps to get deleted files back from a Windows backup:
Step 1. Open «Settings» from the Start menu and head to «Update & Security». Click the «Backup» section to the left.
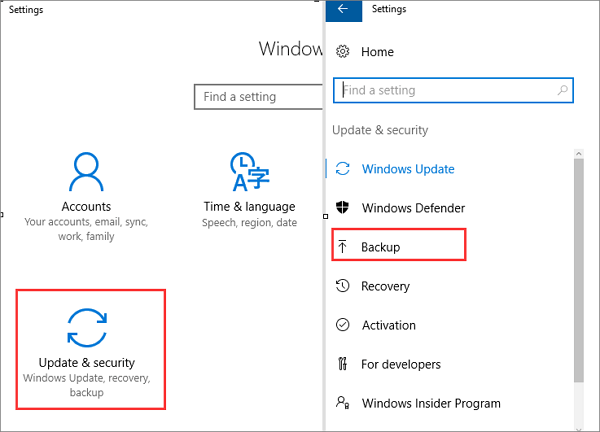
Step 2. Select «Backup and Restore (Windows 7)». Click «Restore my files» > «Browse for files» or «Browse for folders» to select the previously created backup.

Step 3. Choose where to save your files. In the case of a naming conflict, Windows will warn you. Choose «Copy and Replace», «Don’t copy» or «Copy, but keep both files» according to your needs and then wait for the restoring process to complete.
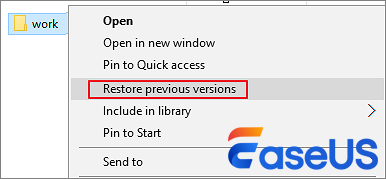
Recover Deleted Files in Windows 10 from Previous Versions
You can also recover permanently deleted files in Windows 10 files by using the «Restore previous versions» function – but you must already have enabled this feature in order for it to work. To ensure that this is an option that is available to you, you need to set up a File History feature to back up files automatically.
Assuming you have already configured this feature of Windows, you can use the following steps to restore permanently deleted files:
Step 1. Look for and right-click on the folder that contains the permanently deleted files.
Step 2. Click «Restore previous versions».
Step 3. Select the files you are interested in, and click «Restore» to restore previous versions.
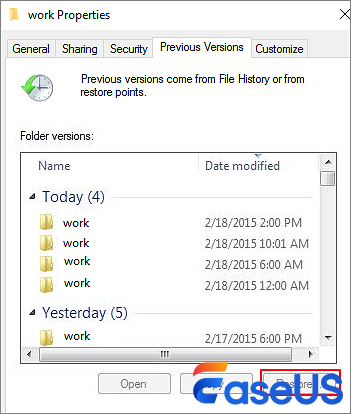
If Windows warns you that it already contains a file or folder with the same name, select «Replace the file in the destination» to overwrite it, or select a new file name.
⚠️ Both previous versions and file history backup require you to backup files before you lose data. Otherwise, there is no backup available to restore from, and you’ll lose your files completely.
Did this article help you recover deleted files on Windows 10? Help others discover it by sharing it on your social media.
How to Prevent Accidentally Deleted Files on Windows 10
Rather than losing data and then recovering it, effectively avoiding the accidental deletion of files is certainly the best option. Here are some tips you can use to protect your data.
| ❌Avoid human error | Be careful when accessing or editing files, and do not delete them by mistake. Alternatively, do not permanently delete data all at once, making recovery more difficult. |
| ✅Backup important data regularly | Back up your data regularly in any effective way. You can use backup tools that come with Windows, or you can choose trusted third-party file backup software. |
| 😀Stop using the device and recover deleted data quickly | When you delete data from an HDD, SD card, or external drive, be sure to stop using your device promptly and use professional data recovery software to recover deleted files. |
Recover Deleted Files Windows 10 FAQs
Read further information on how to restore permanently deleted files in Windows 10.
1. Can I recover permanently deleted files from my computer?
In most cases, yes. However, a few factors will affect your chances of success, such as the type of file that was deleted and how long ago it was deleted. If you have recently deleted a file and emptied it from your computer’s Recycle Bin, you may still be able to recover it using a deleted file recovery program.
2. How to recover deleted files from Windows for free?
One option to restore deleted files for free is using a free deleted file recovery software — EaseUS Data Recovery Wizard Free, which will scan your hard drive and attempt to recover any deleted files. With this tool, you can recover deleted files up to 2GB of data for free.
Step 1. Download and run EaseUS Data Recovery Wizard Free.
Step 2. Scan a disk for deleted files.
Step 3. Preview and store files to an external storage device.
3. How can I recover deleted files in Windows 10 without software?
A few ways are available to recover deleted files without using any third-party software. One way is to check the Recycle Bin to see if the file you accidentally deleted is still there. If it is, simply right-click on the deleted file and select Restore.
If the file is not in the Recycle Bin, you can restore it from a previous version. To do this:
Step 1. Open File Explorer and navigate to the deleted file’s folder.
Step 2. Right-click on the folder and select Properties.
Step 3. Under the Previous Versions tab, select the most recent version of the folder that contains the deleted file and click Restore.
4. How to restore permanently deleted files from Recycle Bin?
You can use a third-party data recovery tool to recover permanently deleted a file from your Recycle Bin.
Step 1. Install and launch EaseUS Recycle Bin recovery software.
Step 2. Click the Recycle Bin option under the Locations section and click Scan.
Step 3. Select the file you need, preview it, and restore it.
5. How can I recover permanently deleted files in Windows 10 without backup?
If you accidentally deleted a file and do not have a backup, you will need to use dedicated Windows 10 data recovery software to recover it. Many different file recovery programs are available, and EaseUS Data Recovery Wizard is popular, which allows for data recovery after file corruption.
Once you have chosen and installed a file recovery program, simply run it and follow the prompts in order to attempt to recover your permanently deleted files.
How to recover deleted files Windows 10?
«I lost some important work files due to a virus attack on my computer. Is there any way that can bring back my files? They were really important. Thank you.»
Where does a deleted file go? How to recover deleted files Windows 10? These are some of the questions that immediately pop up in one’s mind when one accidentally ends up deleting a file. In dire times like these, when you have just deleted an important file and are looking for ways to recover deleted files windows 10, you need a guiding light to show you the way. That’s exactly what we aim to be through this comprehensive article. We have curated a list of the most effective and highly rated fixes to recover your data in a flash. Along with tools present in Windows to recover your data we have also included a third-party app, the Tenorshare 4DDiG data recovery app, which is the best in the business when it comes to data recovery. So come along with us on this read and get your data back in no time.

- Part 1: Can You Recover Deleted Files on Windows 10/11?
-
Part 2: How to Recover Deleted Files Windows 10/11?
- Solution 1: Undelete Files Windows 10 Using Undo Delete/ CTRL+Z
- Solution 2: Recover Deleted Files Windows 10/11 from Recycle Bin
- Solution 3: Recover Deleted Files Windows 10/11 with Tenorshare 4DDiGHOT
- Solution 4: Recover Deleted Files on Windows 10 Using CMD
- Solution 5: File Recovery Windows 10 from File History Backup
- Solution 6: Recover Windows 10 Deleted Files with System Restore
- Solution 7: Restore Deleted Files via System Image Recovery
- Solution 8: Retrieve Deleted Files through Windows File Recovery
- Part 3: How to Prevent Data Loss on Windows 10/11?
-
FAQs about Deleted File Windows 10
- 1. Where Do Deleted Files Go Windows 10?
- 2. How do I recover permanently deleted files?
- 3. Can I recover permanently deleted documents from my computer?
How to Recover Permanently Deleted Files Windows 10/11 with or without Software?
Part 1: Can You Recover Deleted Files on Windows 10/11?
The answer to that question is a resounding YES! Contrary to popular belief, permanently deleted files are not swiped off completely from the hard drive. These files are stored on the hard drive for some time. During this time it’s possible to retrieve these files. Recovery of these files may require extensive fixes or the use of third-party apps like the Tenorshare 4DDiG Data Recovery app. We have curated a comprehensive list of all these fixes and more in this article, so keep reading.
Solution 1: Undelete Files Windows 10 Using Undo Delete/ CTRL+Z
Let’s start off with some basic ways to undelete files windows 10. If you delete an important file and immediately realize your mistake, you can quickly get it back by using the key combination of ‘CTRL + Z’. It will undo the deletion and get your files back. However, this method only works if you do it immediately after you have deleted the file and not closed the window.
Solution 2: Recover Deleted Files Windows 10/11 from Recycle Bin
Another great way to recover deleted files windows 10 free is to use the Recycle Bin. The Recycle Bin is a great tool to get your deleted files back. To use it:
Step 1: Open the Recycle Bin and search for the deleted file that you are looking for.
Step 2: Once you find it, right-click on it and select ‘Restore’.
Tips: Recycle bin is great, however, it can only store files that you have temporarily deleted. Files that have been permanently deleted using Shift + Del or been cleared from the Recycle Bin can only be recovered with professional data recovery tools like Tenorshare 4DDiG.
Solution 3: Recover Deleted Files Windows 10/11 with Tenorshare 4DDiG
Inbuilt recovery tools can only help you to a certain extent. If you want to recover deleted files windows 10 after emptying recycle bin or if you want to recover permanently deleted files windows 10, you’ll have to make use of third-party recovery apps to do that. Lucky for you because we have the best third-party recovery app to do that work. It goes by the name of Tenorshare 4DDiG data recovery software and it’s worth every penny. With the fastest scan times in the industry and its amazing ability to recover a wide variety of files, it is everything you’ll need for your file recovery windows 10 needs. Let’s have a look at the features which makes 4DDiG data recovery special.
- Recover files deleted by accident, formatting, partition loss, corruption, virus assault, and other causes.
- Recover deleted files not In Recycle Bin.
- Recover data from internal and external storage devices, Encrypted devices, crashed computers, recycle bin, etc with ease.
- Support recovery of up to 1000+ file types including photos, videos, audio, documents, etc.
- Support Windows 11/10/8/8.1/7
- No viruses, malware, adware, or pop-ups.
You can quickly recover your lost files with 4DDiG in 3 simple steps, here’s how,
- Select a Location
- Scan the Selected Drive
- Preview and Recover Deleted File from Windows 10
Bring up the 4DDiG app and from the home interface, select the drive from which your file was deleted and click on ‘Scan’. Next up, select the type of files you want to recover and click on OK.
The app will now start scanning for your lost files. With the 4DDiG app, you have the option of previewing the files as they are being found.
Once all files have been recovered, select the files you want to save and click on ‘Recover’. Choose an appropriate storage location and save the files.
Solution 4: Recover Deleted Files on Windows 10 Using CMD
When it comes to issues related to storage, there is no better utility than the command prompt. You just have to run certain commands to see where your files are getting lost. Here’s how you can use it to recover deleted files on windows 10.
Step 1: Open the Command Prompt window by typing in CMD in the Windows Search box.
Step 2: Once the command prompt is up, type in the following, ‘chkdsk C : /f’.
Here, ‘C’ represents the drive you are trying to scan. Press enter and let the CHKDSK scanning complete.
Step 3: Once the CHKDSK scan is done, do the ATTRIB scan by entering the following command, ‘ATTRIB -H -R -S /S /D C:*.*’
Let the scan complete.
As great as this method is, it can only uncover hidden files. So if this method doesn’t work for you, move on to the next one.
Solution 5: File Recovery Windows 10 from File History Backup
Another great answer to the question of how to restore deleted files windows 10 is by using the File History Backup. Here’s how,
Step 1: Open ‘Control Panel’ on your computer and navigate to System and Security > File History > Restore personal files.
Step 2: In this window, select the drive/ folder from which your files are deleted. Find the file you want to recover from the list and click on ‘Restore’.
This method only works on Windows 8 and above and if you have turned on the File History feature. You can turn it on by going to Settings > Update and Security > Backup > Back up using File History.
Solution 6: Recover Windows 10 Deleted Files with System Restore
System Restore works by taking your system back to a point where your file was not deleted, thus recovering your deleted file. To do this,
Step 1:Type in, ‘Create a System Restore Point’ in your Windows Search Bar and click on the ‘System Restore’ result.
Step 2: Select a System Restore Point’ from the list and click on ‘Next’.
Step 3: Confirm the restore point and let the process begin.
System Restore only works if you have made restore point backups before. So remember to create restore points in the future to recover deleted files easily.
Solution 7: Restore Deleted Files via System Image Recovery
System Image Recovery is a handy little tool that works if you have created an image backup of the Windows OS. It restores the whole operating software and is usually used as a last resort to restore your data.
Step 1: Go to ‘Settings’ from the Start menu and head over to ‘Update and Security’. In this window, select the ‘Recovery’ option from the left-hand side. Save your work and click on ‘Restart’ under Advanced startup.
Step 2: As the computer restarts, go to Troubleshoot > Advanced Options > See more recovery options> System Image Recovery. Here select the system image backup file you want to restore and click ‘Next’. Go through the other settings as needed and click on ‘Finish’.
This method can’t be used to restore individual files and folders and restores the system as a whole.
Solution 8: Retrieve Deleted Files through Windows File Recovery
Using the Windows File Recovery tool is a good option to restore permanently deleted files windows 10 and windows 11. To do it, open the Windows Terminal by pressing the ‘Win + X’ and selecting ‘Windows Terminal’. Next, type the following command:
‘winfr C: E: /regular /n \Users\username\Documents\’
Here ‘C’ and ‘E’ represent your first and last drives. The only problem with this tool is that its recovery prowess pales in comparison to third-party recovery apps.
Part 3: How to Prevent Data Loss on Windows 10/11?
It’s no secret that preventing data loss is far easier than trying to windows 10 recover deleted files. Here are some ways in which you can do that,
- Think before deleting anything- Delete only if you are completely sure you are not going to need the file in the future.
- Maintain local backups on your computer.
- Enable OneDrive Backup options.
- Scan your PC regularly for viruses and malware.
- Keep your computer updated with the latest drivers and software.
FAQs about Deleted Files Windows 10
1. Where Do Deleted Files Go Windows 10?
Files that are not deleted permanently get moved to the recycle bin. Permanently files are overwritten with new data but can be restored by recovery apps like the 4DDiG Data Recovery.
2. How do I recover permanently deleted files?
There are several ways to free recover deleted files windows 10. These include,
- Using the professional data recovery tool for Windows 10
- Using Command Prompt to recover files
- File Recovery Windows 10 from File History Backup
- Recovering Windows 10 Deleted Files with System Restore
- Using the System Image Recovery
- Retrieving Deleted Files through Windows File Recovery
3. Can I recover permanently deleted documents from my computer?
Yes. You can use tools like Command Prompt, File History Backup, System Restore, etc. You can also use third-party apps like the 4DDiG Data Recovery.
Summary
From fixes to FAQs, we have covered everything you need to know on how to recover deleted files in windows 10. So bring up those Windows tools and start the Tenorshare 4DDiG data recovery app and get your lost and deleted files back in no time.
Tenorshare 4DDiG Data Recovery
4DDiG is your second to none choice to recover all lost data on Windows/Mac computer from various loss scenarios like deletion, formatting, RAW, etc. with a higher success rate.
Free Download
Free Download
BUY NOW
BUY NOW
![]()
Download Article
![]()
Download Article
Did you accidentally delete an irreplaceable file from your Windows 10 PC? It happens to the best of us! Fortunately, there are many safeguards in place that make it easy to recover your files before they are gone forever. This wikiHow article will show you how to undelete files using free tools built into Windows and two other easy data recovery tools.
-

1
Open the Recycle Bin on your PC. Before you panic or try another method, double-check your Recycle Bin to make sure the file isn’t still in there. You’ll usually see the Recycle Bin icon on your desktop, but if you don’t, you can also fine it by pressing the Windows key, typing recycle, and clicking Recycle Bin.
-
2
Browse or search for a file. If your Recycle Bin has a lot of files, it may be helpful to use the search bar at the top-right corner. You can also simply scroll through the files to look for the one you need.
Advertisement
-
3
Right-click a file and choose Restore. This will return the deleted file to the folder from which you deleted it.
- To restore multiple files at once, hold down the Control key as you click each file, then right-click anywhere in the highlighted area and choose Restore.
- You can also restore all deleted files from the Recycle Bin at once by clicking Restore all items at the top of the window.


Advertisement
-
1
Know when to use this method. If you aren’t able to restore a file from the Recycle Bin or find it in your backup, this method can help you regain access to lost files.[1]
- You have to restore the missing files to a drive that is not the same drive the file was deleted from—this means that if you only have one hard drive, you’ll need to connect a USB flash or other external drive to your PC to restore the lost files. If you don’t have another drive to use, you won’t be able to use this method.
- It’s not possible to restore files to or from a cloud storage or networked drive with this method.
-
2
Install Windows File Recovery by Microsoft. This utility might already be installed on some systems, but not all.
- Open the Microsoft Store app from the Windows Start menu.
- Search for Windows File Recovery.
- If you see the option to do so, click Get and follow the on-screen instructions to install.
- If the app is already installed, you’ll see Open instead.
-
3
Open Windows File Recovery. It’s easy—just type windows file recovery into the Windows Search field (press Windows key + S if you don’t see it), and then click Windows File Recovery in the search results. This will open a command prompt window.
- If prompted, give the app permission to make changes to your computer.
-
4
Determine the mode you want to use. There are two different modes for restoring files:
- Regular mode: Use this mode if the file you deleted was from a drive formatted with NTFS and the drive is not corrupted.
-
Extensive mode: Use this mode if the file you deleted was on a drive formatted as FAT or exFAT, which is common for flash cards and other removable media, or the drive is corrupted. This mode will take a little longer.
- If you’re not sure which mode to use, start with Regular mode, and then try Extensive if that doesn’t work.
-
5
Use the winfr command to restore your files. The command will look like this winfr source-drive: destination-drive: /mode /switches file-or-folder. The /n switch lets you specify files and folders to recover. Here are some examples you can use in both regular and extensive modes:
- If you want to recover all files ending with .JPEG from your pictures directory on the C drive to a recovery folder on your F drive, you’d use winfr C: F: /regular /n *\Users\yourusername\Pictures\*.JPEG.
- You can also use /n multiple times to recover files that meet multiple criteria. For example, to recover both JPEG and PNG files from your Pictures folder, you could use winfr C: F: /regular /n \Users\yourusername\Pictures\*.JPEG /n \Users\yourusername\Pictures\*.PNG.
- To recover all files ending with .docx from any location on the original drive, you could use winfr C: F: /regular /n *.docx.
- To recover your entire Documents folder from the C: drive to the F: drive, you’d use winfr C: F: /regular \Users\yourusername\Documents\.
- Note the trailing backslash \ at the end of the folder name—this is necessary when recovering an entire folder.
-
6
Press Y to confirm. Windows File Recovery will now attempt to recover the file(s). If the recovery is successful, the files will be saved to the destination drive in a new folder called «Recovery_(date and time).»
- If you’re unable to recover the files in regular mode, run the same command again replacing /regular with /extensive.
- Some file types are hidden from results by default, including .log, .vbs, .c, .cab, .py, and .lnk. If you are unable to find the type of file you’re looking for, run the recovery again, this time adding the /e switch to disable extended filtering.


Advertisement
-
1
Open the File History tool. If you want to recover a file or folder you’ve accidentally overwritten or replaced with a newer version in your Documents, Music, Pictures, Videos, or Desktop folder, this method will help you get your original file(s) back. To open the tool, press the Windows key on your keyboard, type restore your files, and then click Restore your files with File History.[2]
- This method requires that you’ve enabled File History in your settings. File History works with a network or external drive, so if you don’t have one of those, you don’t have File History enabled.[3]
- If the file you want to recover no longer exists at all, you can restore its containing folder to a previous version that existed before you deleted the file.
- This method requires that you’ve enabled File History in your settings. File History works with a network or external drive, so if you don’t have one of those, you don’t have File History enabled.[3]
-
2
Locate the file or folder you need in the File History tool. All of the files that have earlier versions saved will be visible here. Once you find the file, you’ll be able to browse the dates of previously saved versions.
-
3
Use the arrows to select the version to restore. Be sure to choose a version of the file or folder that existed before you made the change.
-
4
Select a version and click Restore. A confirmation message will appear.
- If you’d rather restore the file or folder to a different location, right-click Restore, choose Restore to, and then click another location.
-
5
Click Restore to confirm. This saves the original version of the file or folder to its original location.


Advertisement
-
1
Install Recuva. Recuva is a free app that will undelete files you accidentally removed from your computer.[4]
You can get the tool from https://www.ccleaner.com/recuva.- The free version of the tool should be enough for recovering most deleted files.
-
2
Open Recuva once installed. You’ll find it in your Windows menu. If prompted, allow the app to make changes to your PC.
- The first time you open Recuva, you may see a warning message about the app being blocked. Click the warning message, select the first option in the list, select the Actions menu, and then click Allow on device to continue.
-
3
Click Next on the wizard. Now you’ll be able to use this quick-scan feature to recover deleted files.
-
4
Select a file type and click Next. If you’re not sure the type of file you’re looking for, choose All Files.
-
5
Select the location the file was deleted from. For example, if you deleted the file from Recycle Bin, choose In the Recycle Bin.
- To enter a specific folder, choose In a specific location, click Browse…, and then select the folder.
-
6
Click Next. Recuva will now attempt to find deleted files.
- You’ll see that there’s a Deep Scan option here. Try the regular scan first. If you are unable to recover your file normally, you can close and re-open Recuva and check the box next to «Enable Deep Scan.» This option will take a long time, and it might not be necessary.
-
7
Click Start. Recuva will now search for shadow copies of deleted files from the selected location. Once the scan is complete, a list of files will appear.
-
8
Select the file(s) you want to recover and click Recover…. This restores the selected file(s) and/or folder(s) to the original location.


Advertisement
-
1
Open the Control Panel. If you back up your PC to another drive, including a networked drive, or another version of Windows that was installed on your PC, you can restore files at any time from earlier backups. To get started, press the Windows key and type control panel, then click Control Panel in the search results.[5]
-
2
Open the Backup and Restore tool. If you don’t see it, click System and Security first.
-
3
Choose which files to restore. If you want to restore one of your own files, select Restore my files. To restore files for another user (or all users), choose Restore all users’ files.
- If you want to restore files from a different backup than the one selected by default, click Select another backup to restore files from, and then locate the backup.
-
4
Select Browse for files or Browse for folders. Choose the option that applies to you based on whether you want to restore individual files or entire folders.
-
5
Search for the file or folder you want to restore. You can type any part of the file or folder name to locate the file or folder, and then click Search.
- You can use wildcards, such as *.jpg, to find all files that match a certain string of text.
-
6
Select the file(s) or folder(s) and click Next.
-
7
Choose where you want to restore the files. To bring them back to their original location, leave the default option selected. Otherwise, you can select In the following location and click Browse to select another folder.
-
8
Click Restore. The selected file(s) and/or folder(s) will be recovered to the chosen directory.


Advertisement
-
1
Install Stellar Data Recovery on your Windows PC. This file recovery app does have a fee, but you can do a free scan before paying to see if the app is capable of restoring the files you need. Search the web for «Stellar Data Recovery» and install the free downloadable version.
-
2
Open Stellar Data Recovery. You’ll find it in your Windows menu after installing.
-
3
Choose what you want to recover and click Next. You can select as many of the different file types as you’d like.
-
4
Select the location from which you deleted the file. You can choose one of the common locations at the top, such as Desktop or Documents, or select Choose Location to select a folder manually.
- If the file was saved to an external drive that’s connected to your computer right now, select that drive.
- If the file was saved to a partition that is no longer accessible, select Can’t Find Drive.
-
5
Click Scan to search for deleted files. Once the scan is complete, you’ll see a list of files and/or folders you can restore.
- If nothing is found, click the link next to «Deep Scan» to try a more in-depth scan.
-
6
Select the file(s) and/or folder(s) and click Recover. If you’re willing to pay for Stellar, you will be asked to do so now. Once you make your payment, you’ll receive a product key via email that you can enter into the provided field. Once validated, you’ll be able to recover the selected file(s), as well as any you need to recover in the future.


Advertisement
Add New Question
-
Question
How can I recover a file that was accidentally overwritten?

Stan Kats is the COO and Chief Technologist for The STG IT Consulting Group in West Hollywood, California. Stan provides comprehensive technology & cybersecurity solutions to businesses through managed IT services, and for individuals through his consumer service business, Stan’s Tech Garage. Stan has over 7 years of cybersecurity experience, holding senior positions in information security at General Motors, AIG, and Aramark over his career. Stan received a BA in International Relations from The University of Southern California.
Cybersecurity Expert
Expert Answer
If you hadn’t turned on file versions in your operating system, and you overwrote a file with the exact same name, then unfortunately it will have been lost irrevocably. Check to see if you made backup copies.

Ask a Question
200 characters left
Include your email address to get a message when this question is answered.
Submit
Advertisement
References
About This Article
Article SummaryX
1. Check the Recycle Bin first.
2. Use Windows File Recovery if you have another drive, including a flash drive.
3. Restore from File History if you make backups.
4. Use the free Recuva tool to find deleted files.
5. Restore from an older backup using Backup and Restore.
6. Try Stellar Data Recovery’s free option to see if files are recoverable.
Did this summary help you?
Thanks to all authors for creating a page that has been read 40,423 times.