How to make a screen recording
Clipchamp for personal accounts Clipchamp for work accounts More…Less
In Clipchamp, you can either record your screen or you can record both your screen and webcam together to produce training videos, react videos, presentations, gaming streams, and much more.
When you record screen and camera together, the recordings are captured simultaneously but they can be adjusted in the editing timeline separately. This means each video can be resized and placed however you like.
For the ideal outcome, recordings will align if you place them on top of each other on the timeline. The webcam recording can then be altered using freehand editing to place it over the screen recording to give a picture-in-picture appearance.
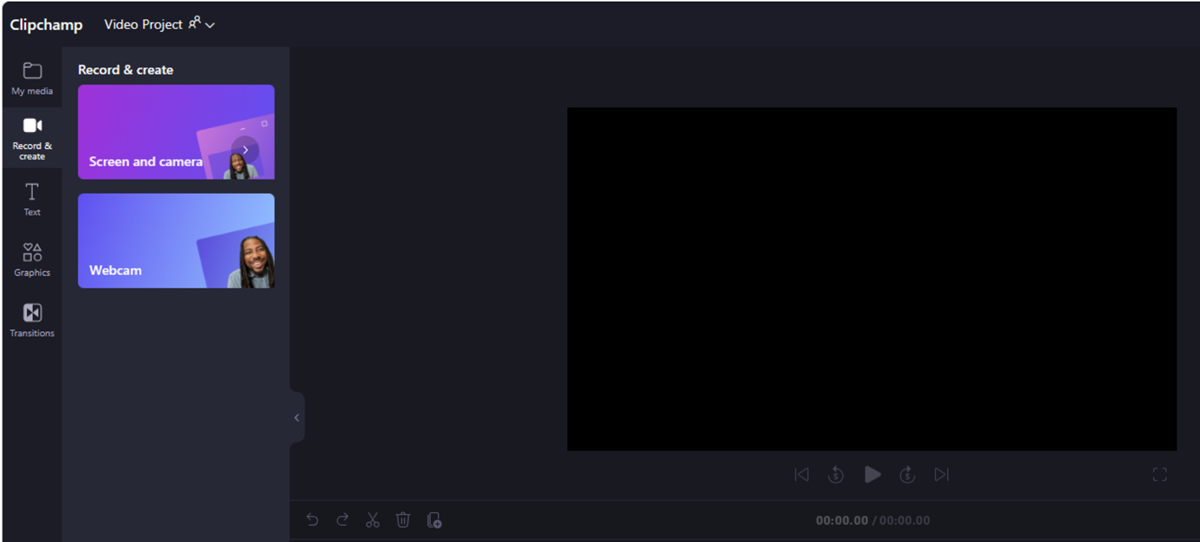
In Clipchamp’s video editor for personal accounts, to take a recording, go to the Record & create tab on the left toolbar.
Next, select either the screen or screen & camera option. Audio will also get recorded through your computer’s microphone, for example, if you want to talk while showing your screen (unless you turn audio recording off).
Note: The screenshots in this article show the screen recorder option. The same steps apply to screen & camera after choosing this option in the initial step.
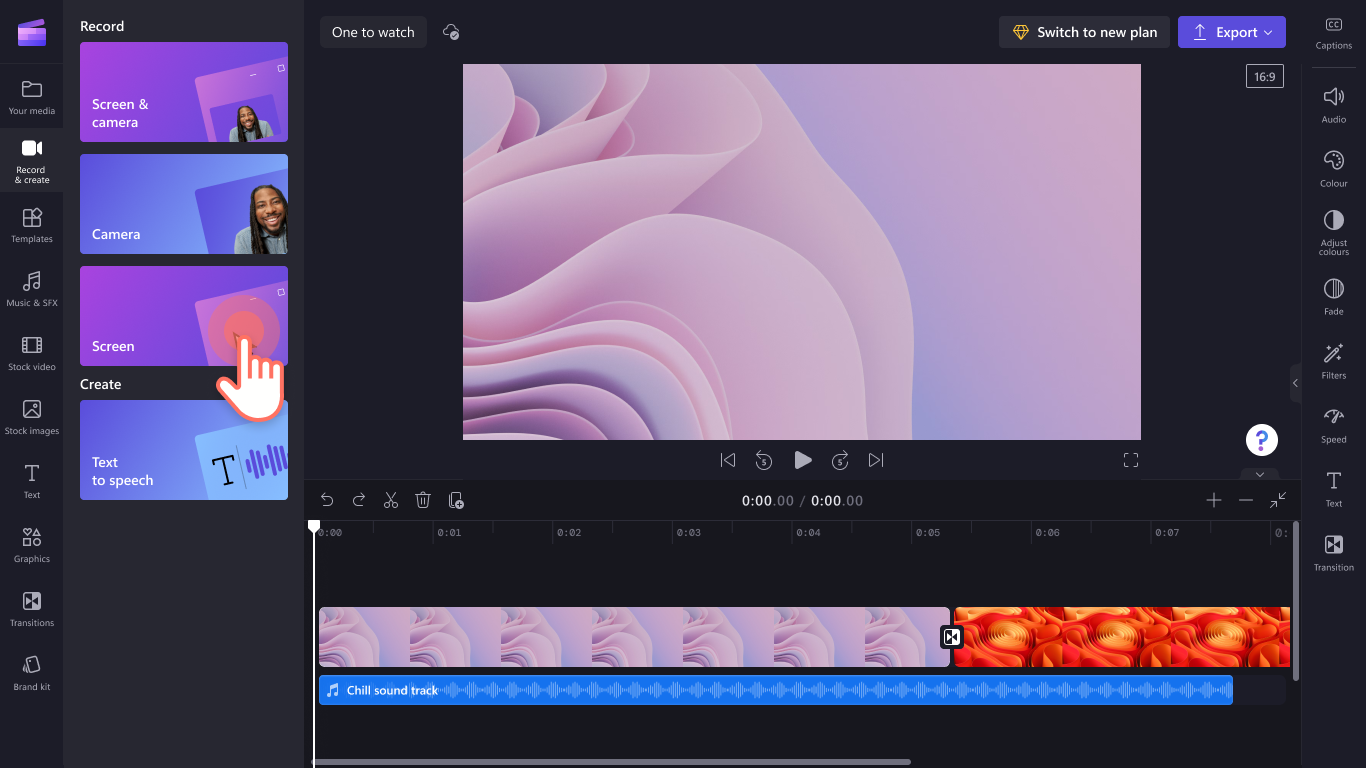
To begin, open the «Record & create» tab
In this menu, you’ll see the options Screen & camera, Camera, Screen, and Text-to-speech. Select the Screen option.
Allow camera & mic access, start the screen recording
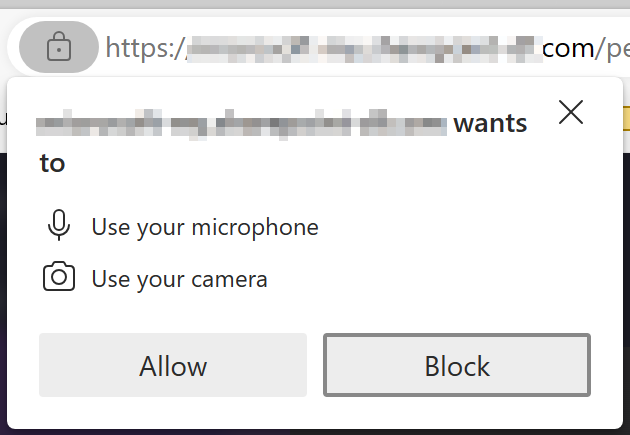
A popup will appear at the top of your screen.
Allow Clipchamp access to use your camera & microphone. If you gave permission to access one or both devices before, the message on the popup can look different to our example screenshot.
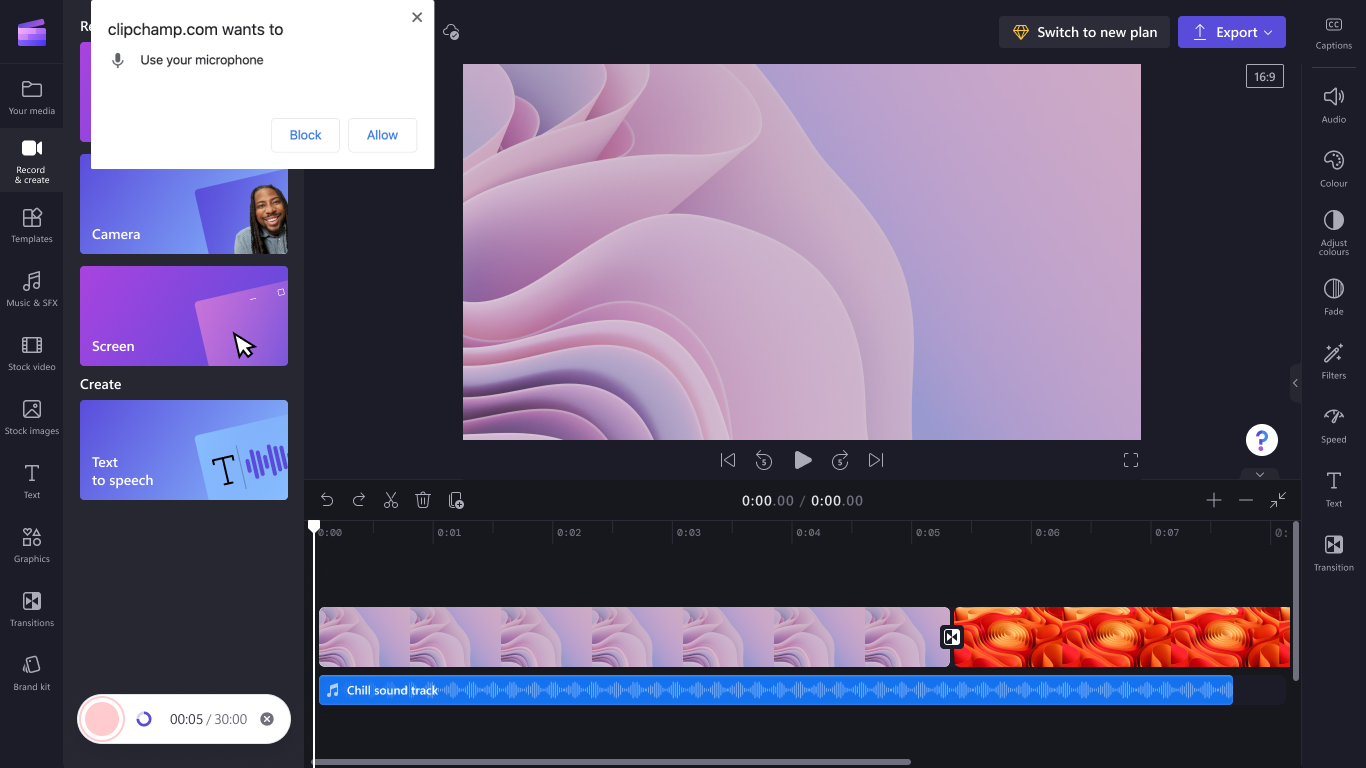
Next, start recording your screen by selecting the big red button at the bottom left.
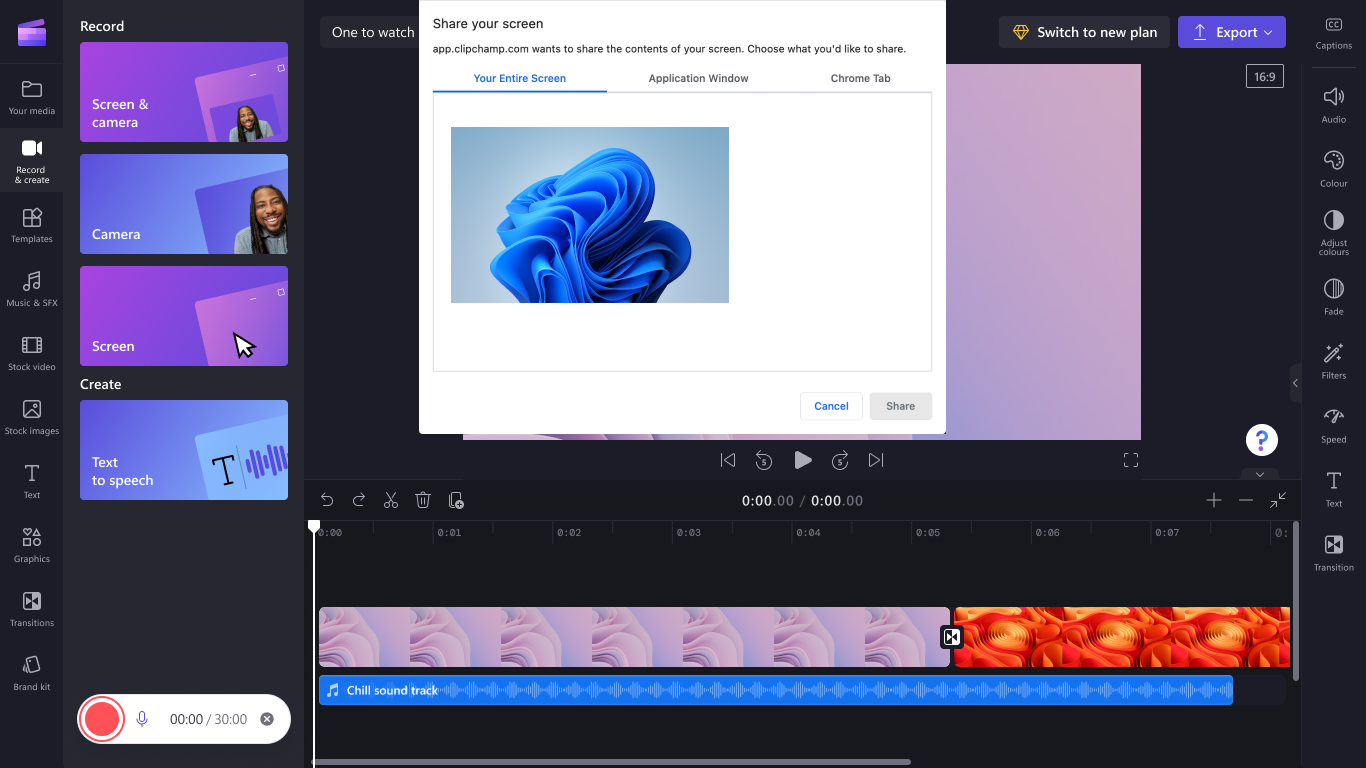
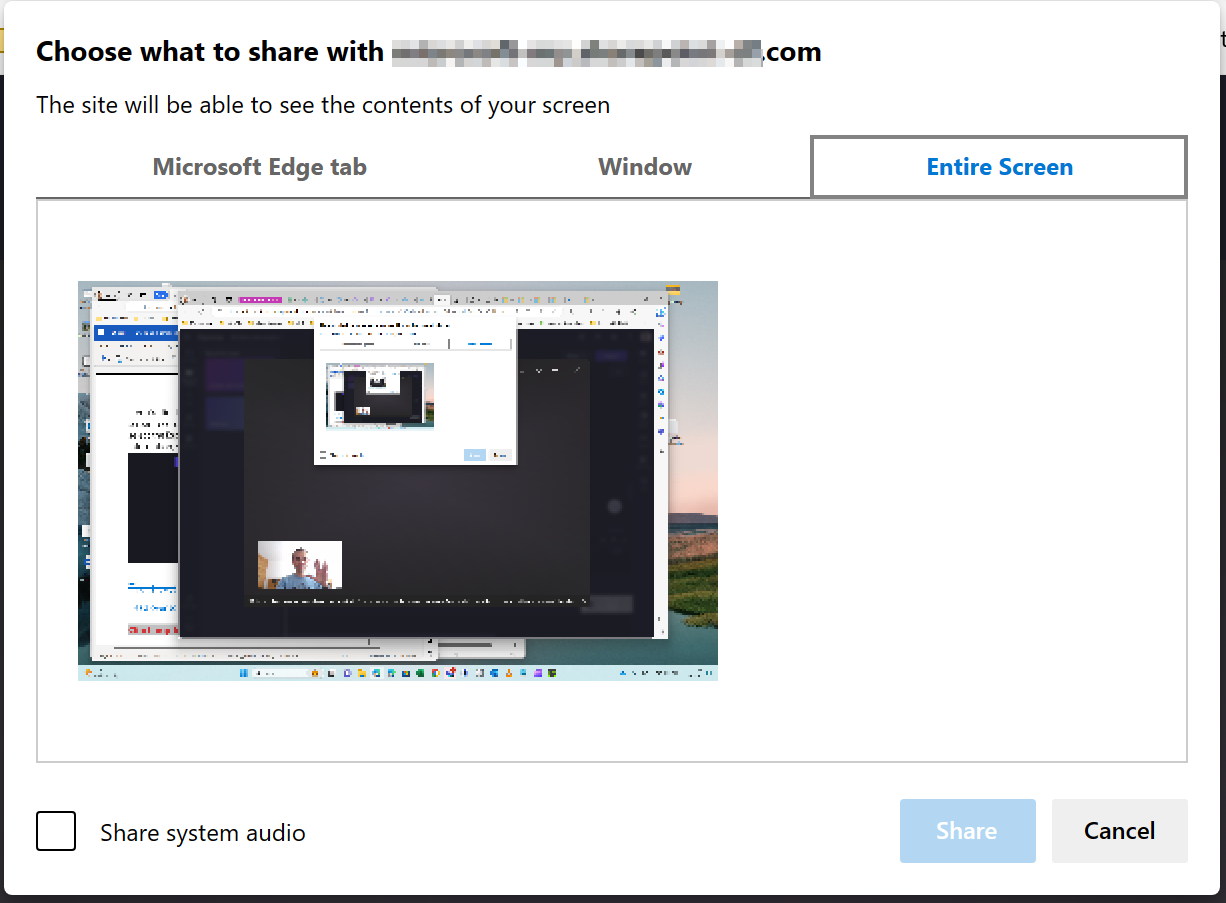
Another popup window will appear with screen recording options. Either record your entire screen, an application window, or a browser tab. We opted to screen record a Chrome tab for this tutorial. Select the tab of your choice, then select Share.
Important: In the Clipchamp Windows app, you will be able to select browser tabs from Microsoft Edge due to the way the Windows app works. To record a Chrome tab, open Clipchamp in Chrome and start a screen recording there.
You will be brought to the Chrome tab you have selected to screen record. Your screen is now actively recording. Your audio will automatically start recording when you select Share. Your built-in microphone will pick up on your voice, computer or mouse clicking, and any noise around you. To stop recording your screen, select Stop sharing.
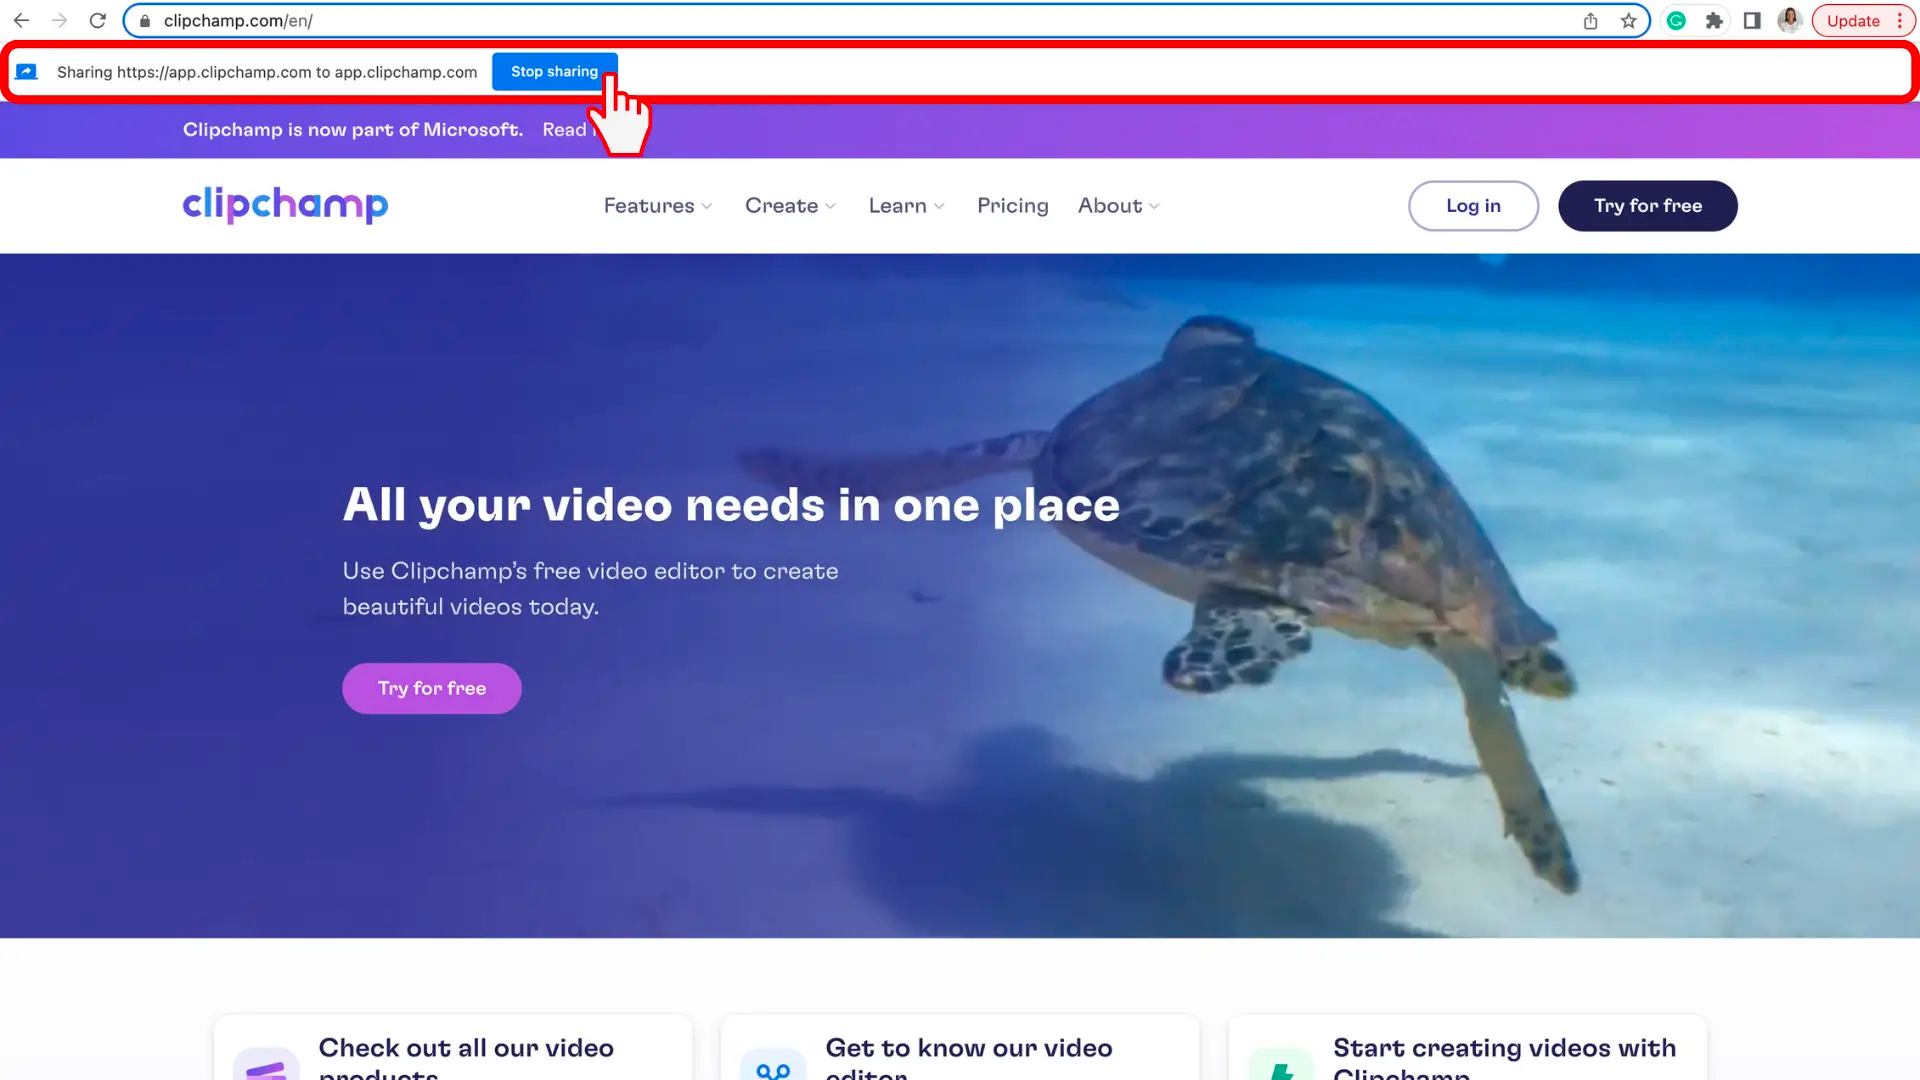
TIP: If you want to record for longer than the maximum time (shown to the right of the elapsed time), try taking several shorter recordings and combining them in the editor later.
Download the raw recording, add it to the editing timeline
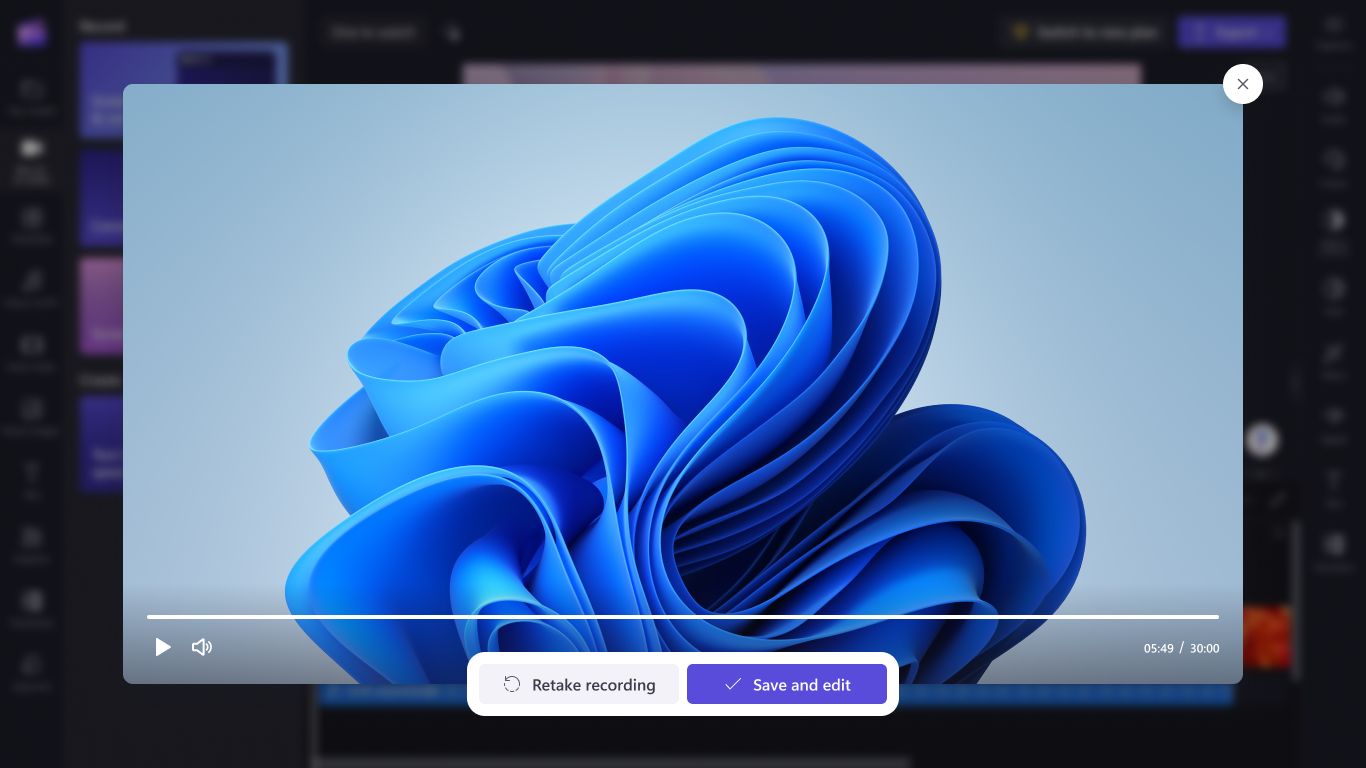
After you’ve selected Stop sharing, return to the editor. You can now preview your screen recording with audio. If you’re unhappy with the screen-recorded video, select Retake recording. If you want to use your video, select Save and edit.
A copy of the recording (in WebM format) will download to your computer, depending on the default settings in place, you can either select a folder to save it in or it will get stored in the Downloads folder automatically.
The clip will also get loaded into the editing project and will automatically be added to the timeline. To add more than one copy to the timeline, select the Your media tab to find the screen recording file. Note that the audio track of the recording is part of the video.
Edit your screen recording audio
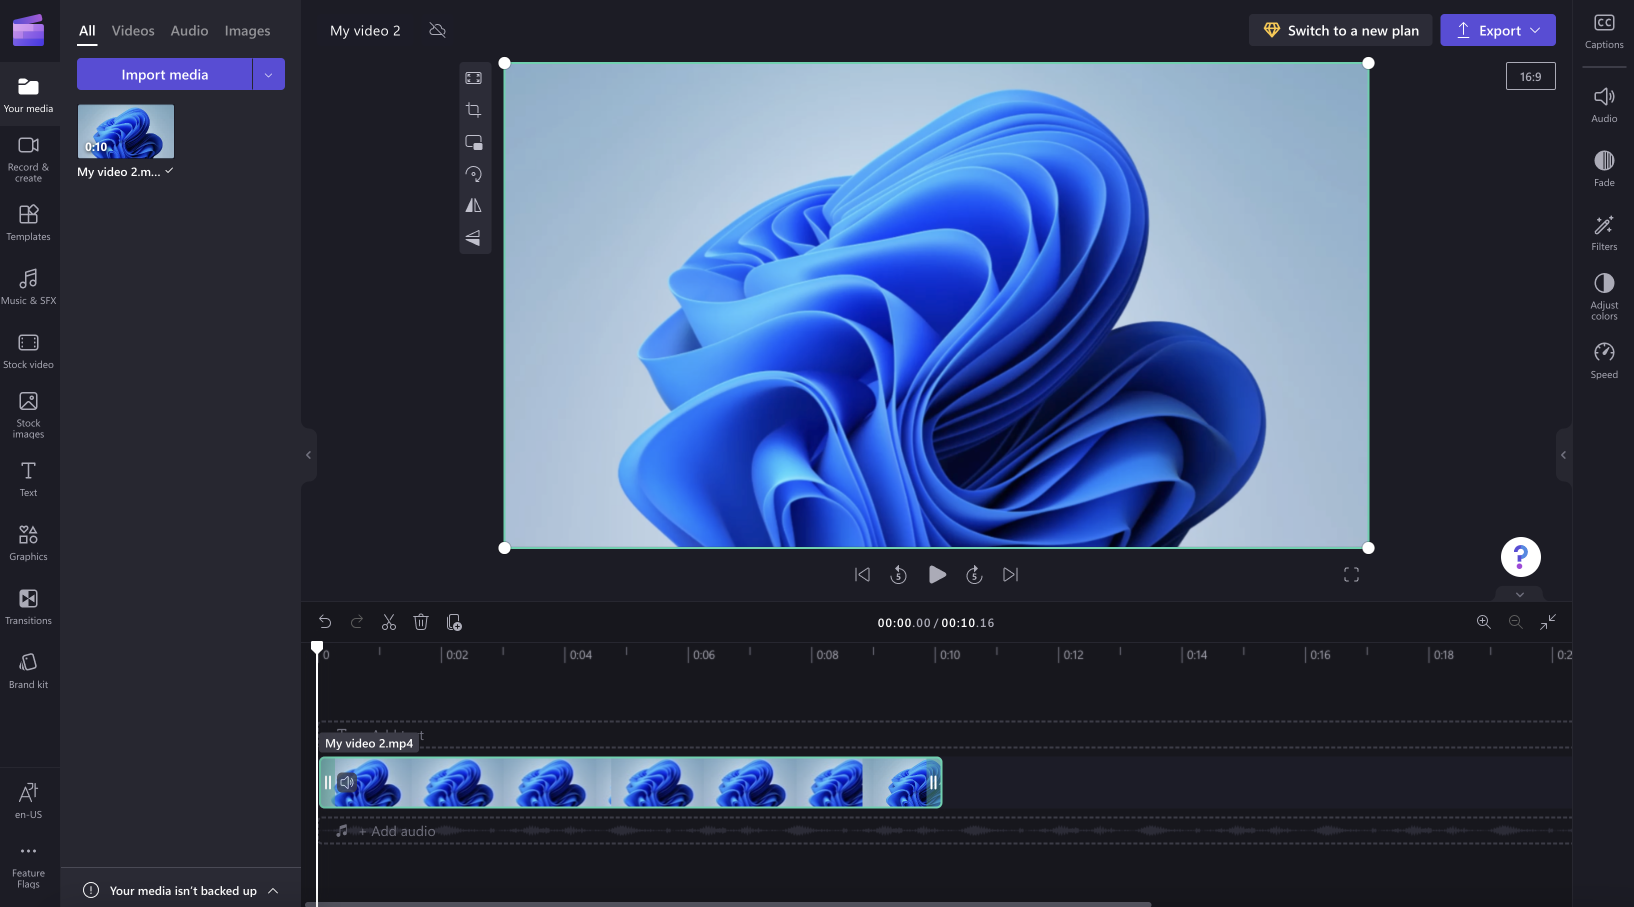
You can mute your screen recording audio by clicking on the microphone icon on the clip on the timeline. You can also detach the audio track to edit it separately.

In addition, you can edit the video further, for instance by trimming unwanted parts off the start or end or splitting it to cut out segments.
If the recording doesn’t fit the dimensions of your project (e.g. you see black bars on either side of it) you can crop it to fit the project’s aspect ratio.
For more information on Clipchamp’s editing tools, see the How to edit a video article.
Export the video
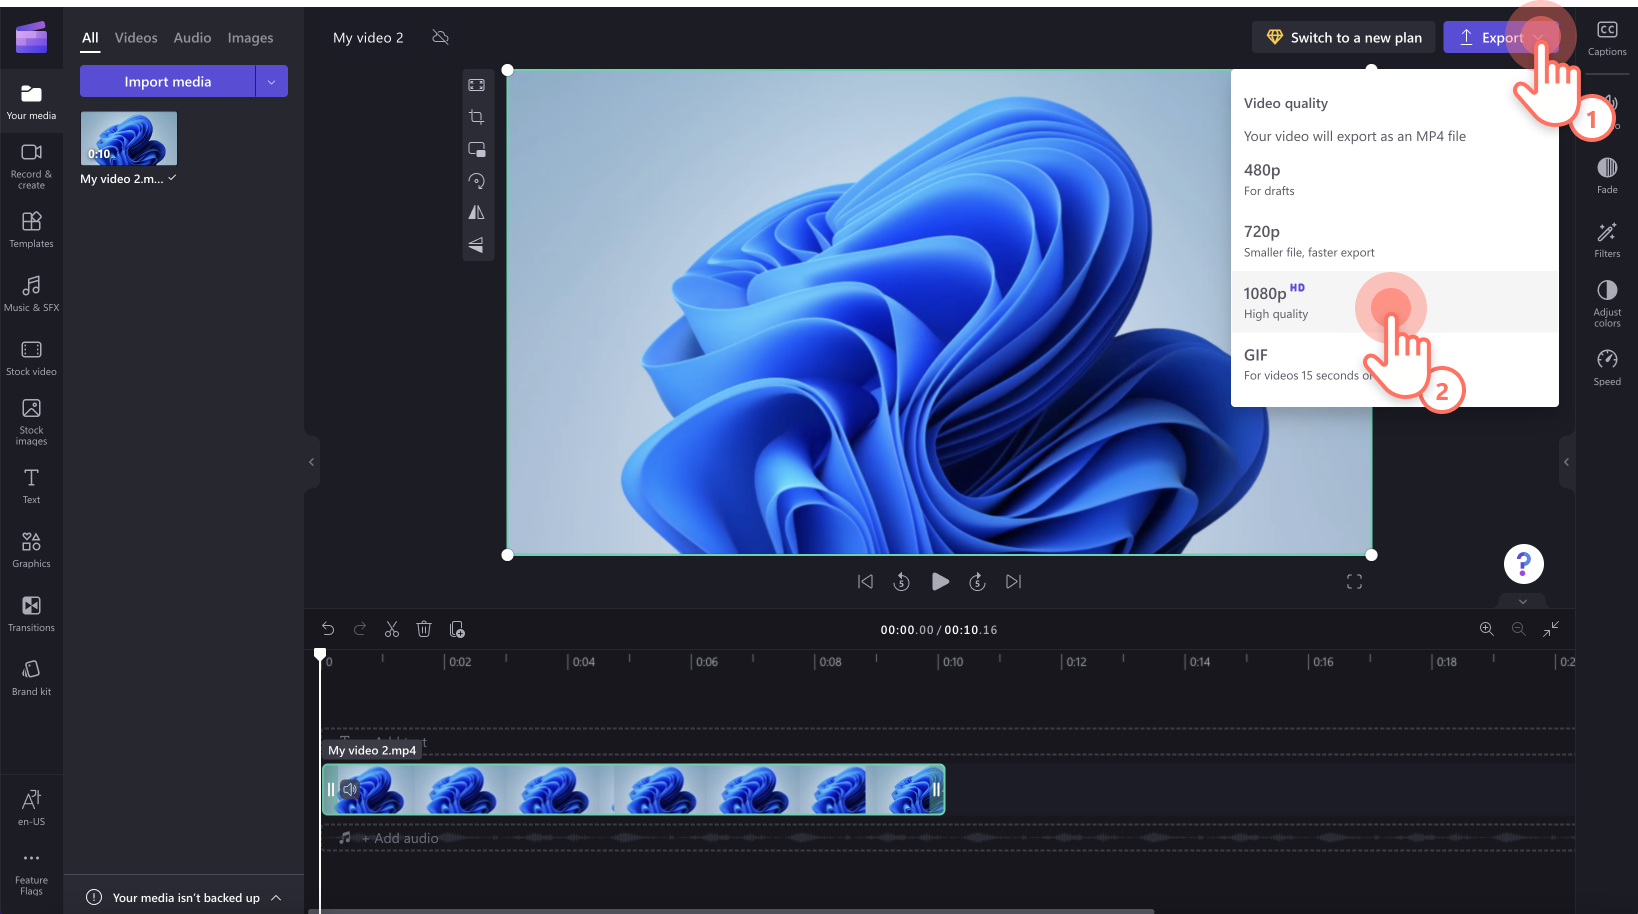
If you’re finished editing and would like to save the screen recording including edits as an MP4 video to your computer, select the Export button in the top right and follow the prompts.
In Clipchamp’s video editor for work accounts, to take a screen recording, go to the Record & create tab in the left toolbar of the editor. Next, select the Screen and camera option.
Audio will also be recorded through your computer’s microphone. For example, you could talk while showing your screen (unless you turn audio recording off).
To begin, open the «Record & create» tab
Select Record & create on the toolbar, then select Screen and camera.
Allow camera & microphone access, start the recording
Important: When you use Clipchamp in Edge, you can select browser tabs from Microsoft Edge to record. To record a Chrome tab, open Clipchamp in Chrome and start a screen recording there.
When you start a recording for the first time, you’ll see a popup next to the browser address bar asking for permission to access your camera and microphone.
Allow access, otherwise the screen and camera recording won’t work.
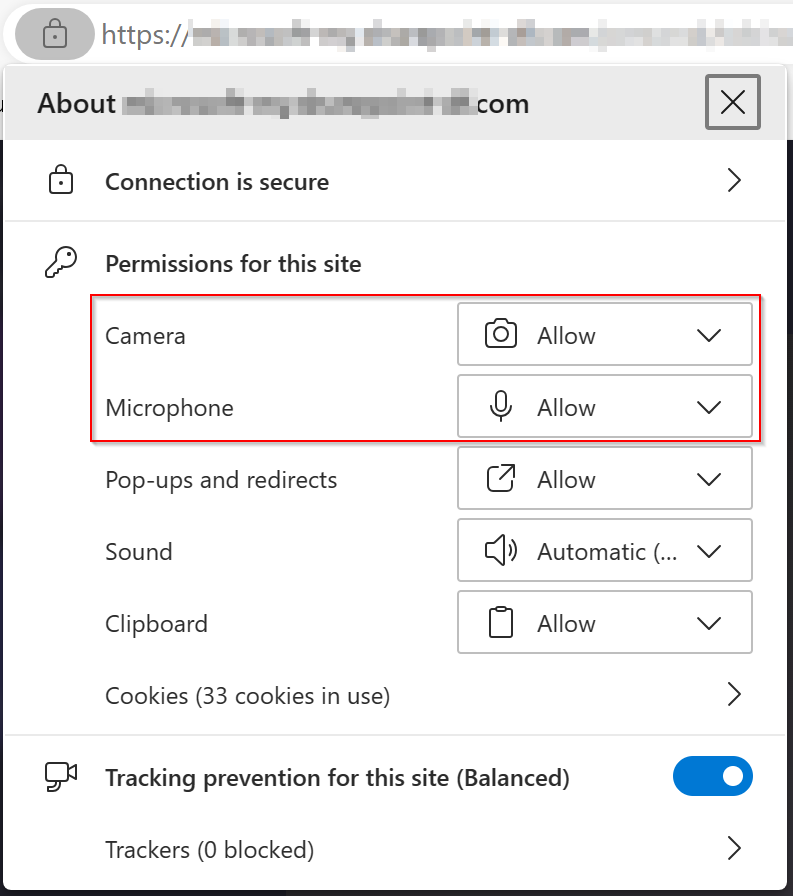
To check the permissions you’ve given Clipchamp, select the Lock icon and make sure you’ve allowed Clipchamp access to use your webcam and microphone.
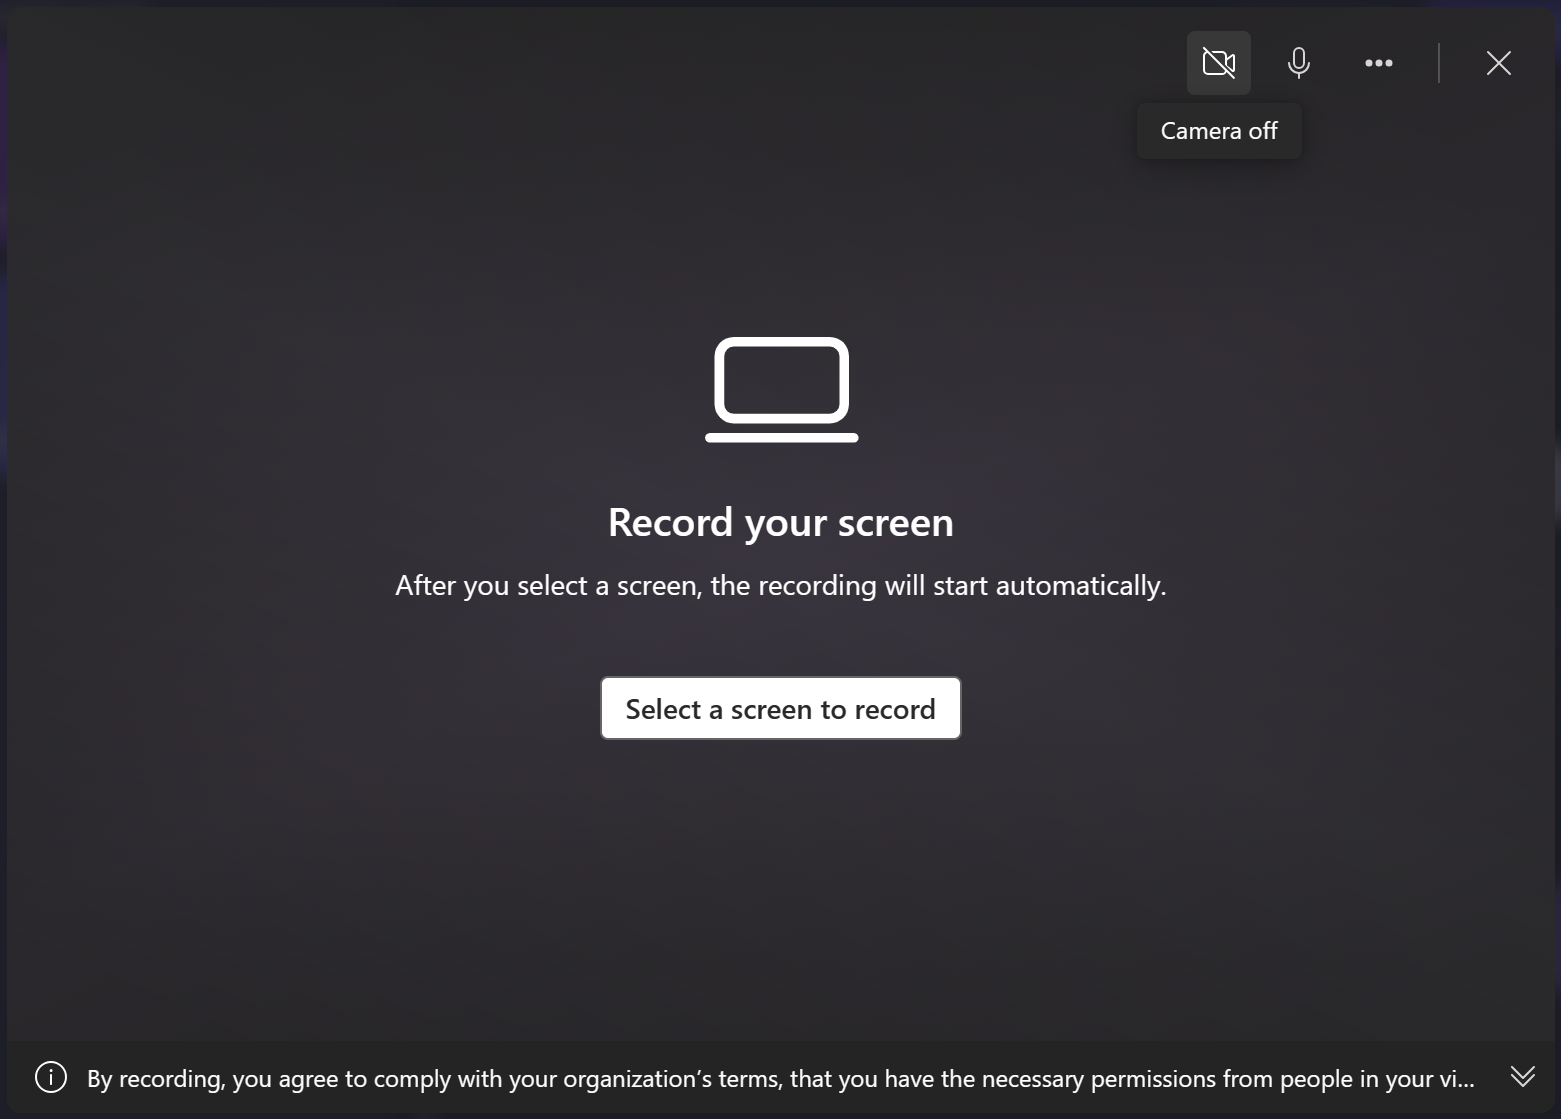
In the popup window, toggle your webcam on or off to either include or exclude the camera from the recording session, then click Select a screen to record.
Select a screen, window or browser tab, also decide if you’d like to include the system audio, then select Share.
You will be brought to the screen, window or browser tab you selected to record. After a countdown of beeps, your screen starts actively recording. The computer’s microphone will pick up on your voice, computer sounds or mouse clicking, and any noise around you.
To stop recording your screen, select Stop sharing in the horizontal toolbar that appeared when the recording started.
TIP: If you want to record for longer than the maximum time, try taking several shorter recordings and combining them in the editor later.
Save your screen recording
After you’ve selected Stop sharing, return to the editor. You can now preview your screen recording with audio. If you’re unhappy with the screen-recorded video, select Retake recording. If you want to use your video, select Save and edit.
Note: If you recorded both screen and camera, there will be 2 files available, one for the screen recording and one for the webcam recording. If you only recorded your screen, there will be one file.
A copy of the recording (in WebM format) will download to your computer, depending on the default settings in place, you can either select a folder to save it in or it will get stored in the Downloads folder automatically.
The clip(s) will also get loaded into the editing project and will automatically be added to the timeline. The audio track of the recording is part of the video.
If there is a screen recording and a camera recording, the 2 files are added to the timeline as a group. You can ungroup them by right clicking on the media on the timeline, then selecting ungroup.
Edit the recording and audio
You can mute your screen recording audio by clicking on the microphone icon on the clip on the timeline. You can also detach the audio track to edit it separately.
In addition, you can edit the video further, for instance by trimming unwanted parts off the start or end or splitting it to cut out segments.
If the recording doesn’t fit the dimensions of your project (e.g. you see black bars on either side of it) you can crop it to fit the project’s aspect ratio. You can also add text and titles.
For more information on Clipchamp’s editing tools, see the How to edit a video article.
Adjust the layout
If your recording includes a webcam clip that appears as a separate item on the timeline, you can edit the layout of the video by freely moving your webcam recording around the screen. To do so, drag and drop the camera clip around the preview window in the editor.
You can also use the editing features on the media’s property panel. These include fit, crop, picture-in-picture, rotate, flip horizontal, and flip vertical.
Export your video
If you’re finished editing and would like to save the edited project to your computer as an MP4 video, select the Export button in the top right and follow the prompts.
Need more help?
Want more options?
Explore subscription benefits, browse training courses, learn how to secure your device, and more.
Communities help you ask and answer questions, give feedback, and hear from experts with rich knowledge.
Screen recording is a nifty feature that’s useful for a number of things, especially when it comes to creating tutorials. If a screenshot is worth a thousand words, then screen recording goes several steps further.
Not just that, we will also show you how you can turn your screen recordings into professional videos using InVideo’s online editor.
In this article, we’ll show you
1. How to screen record on Windows 10?
2. How to record video on any Windows 10 or other PCs?
3. Bonus: How to turn your screen recordings into professional videos in minutes?
1. How to screen record on Windows 10?
On Windows 10, you can record your screen using the built-in tool — Game Bar. It was designed essentially to capture PC and Xbox gaming sessions, but it can also be used to record other apps and activities.
First, enable Game Mode on your system:
Step 1: Click on the start menu and then select settings

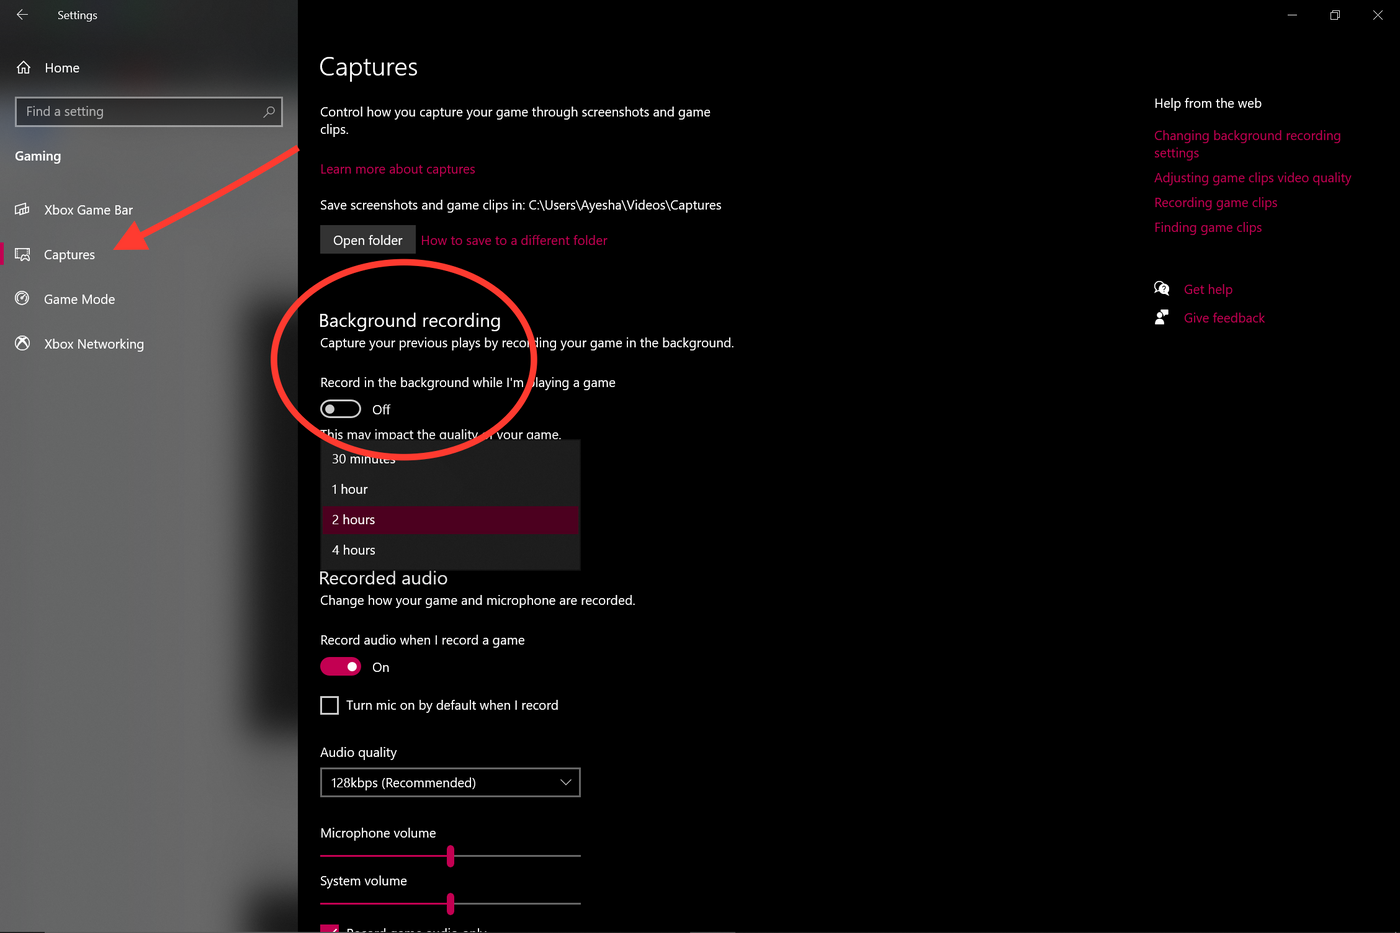
Step 2: From the Settings window, Click on Gaming.

Step 3: Go to Game Mode and enable Game Mode

Note: To check the maximum duration of how long a screen recording can be, head over to Game Bar’s settings. Click on the Start menu and hit Settings. Click on Gaming. Under Captures will be the option for Background Recording. Select from the maximum recording time drop-down from 30 minutes to 4 hours.
Now you’re all set to record your screen. Windows 10 Game Bar can only support screen recording of one application at a time. This means, you can’t switch to recording another window or ALT + TAB your way after you’ve started recording. Also note that you cannot record your Desktop or File Explorer or Maps.
With that, let’s get down to the steps you can use to record your screen using the Game Bar.
Step 1: Open the app you want to record. Close other windows and make sure there’s no unwanted audio that will sneak its way into your recording.
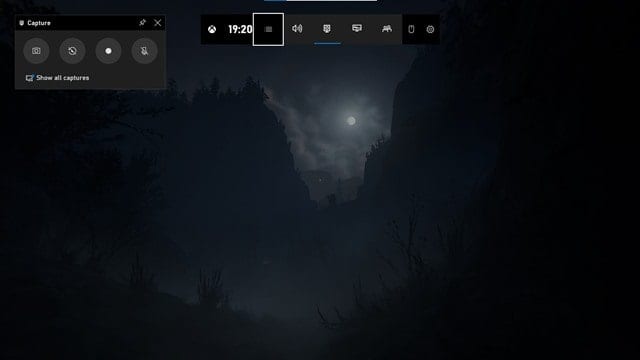
Step 2: Press the Windows + G on your keyboard. This should open up the Game Bar.

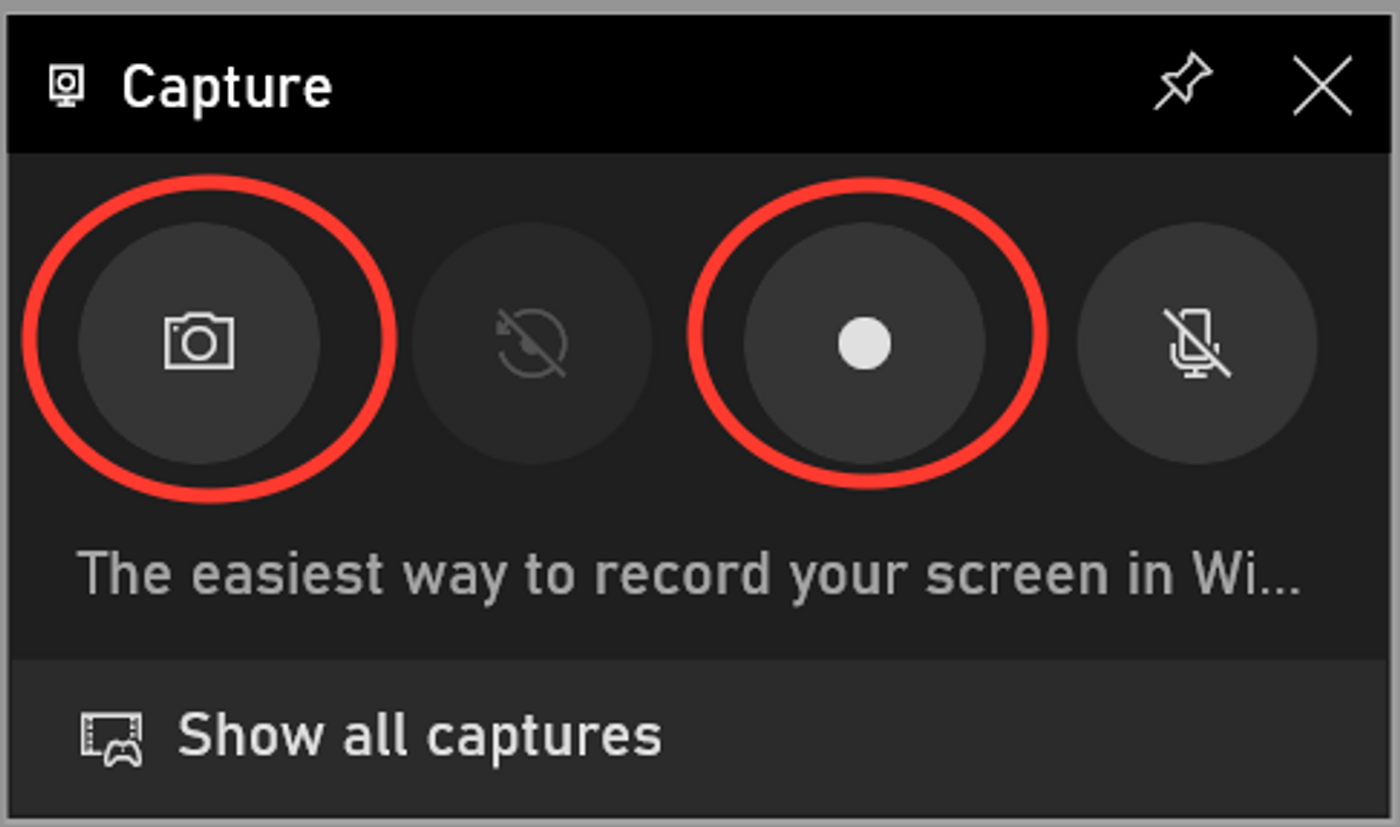
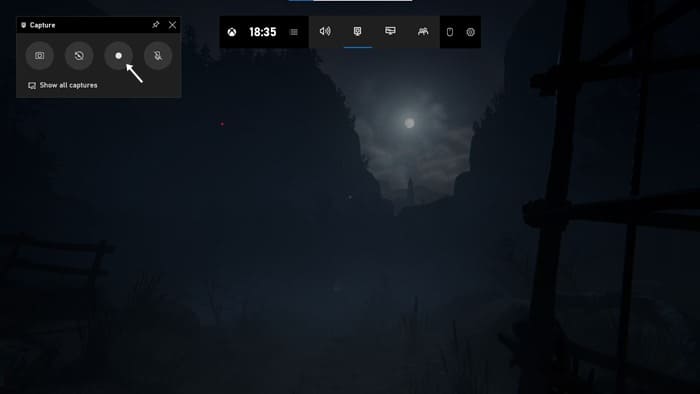
Step 3: In the ‘Capture’ window, click on the Camera icon to take a screenshot. To start recording your screen, click on the circle with the dot (or press Windows + Alt + R).
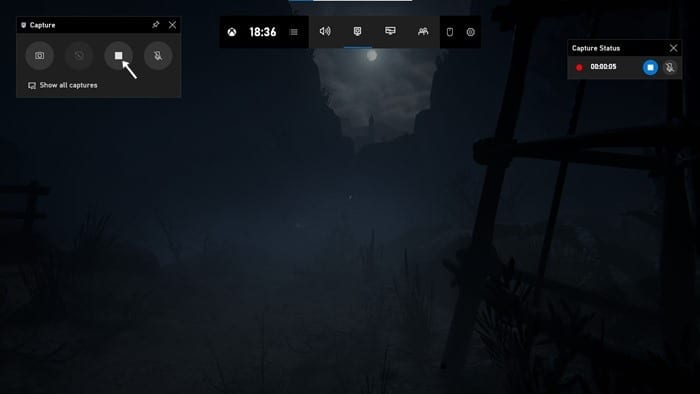
Step 4: Once you start recording, a capture status with a timer, recording controls and a microphone will appear. The mic is to switch on and off external sounds to record commentary. Internal sounds will be recorded by default.
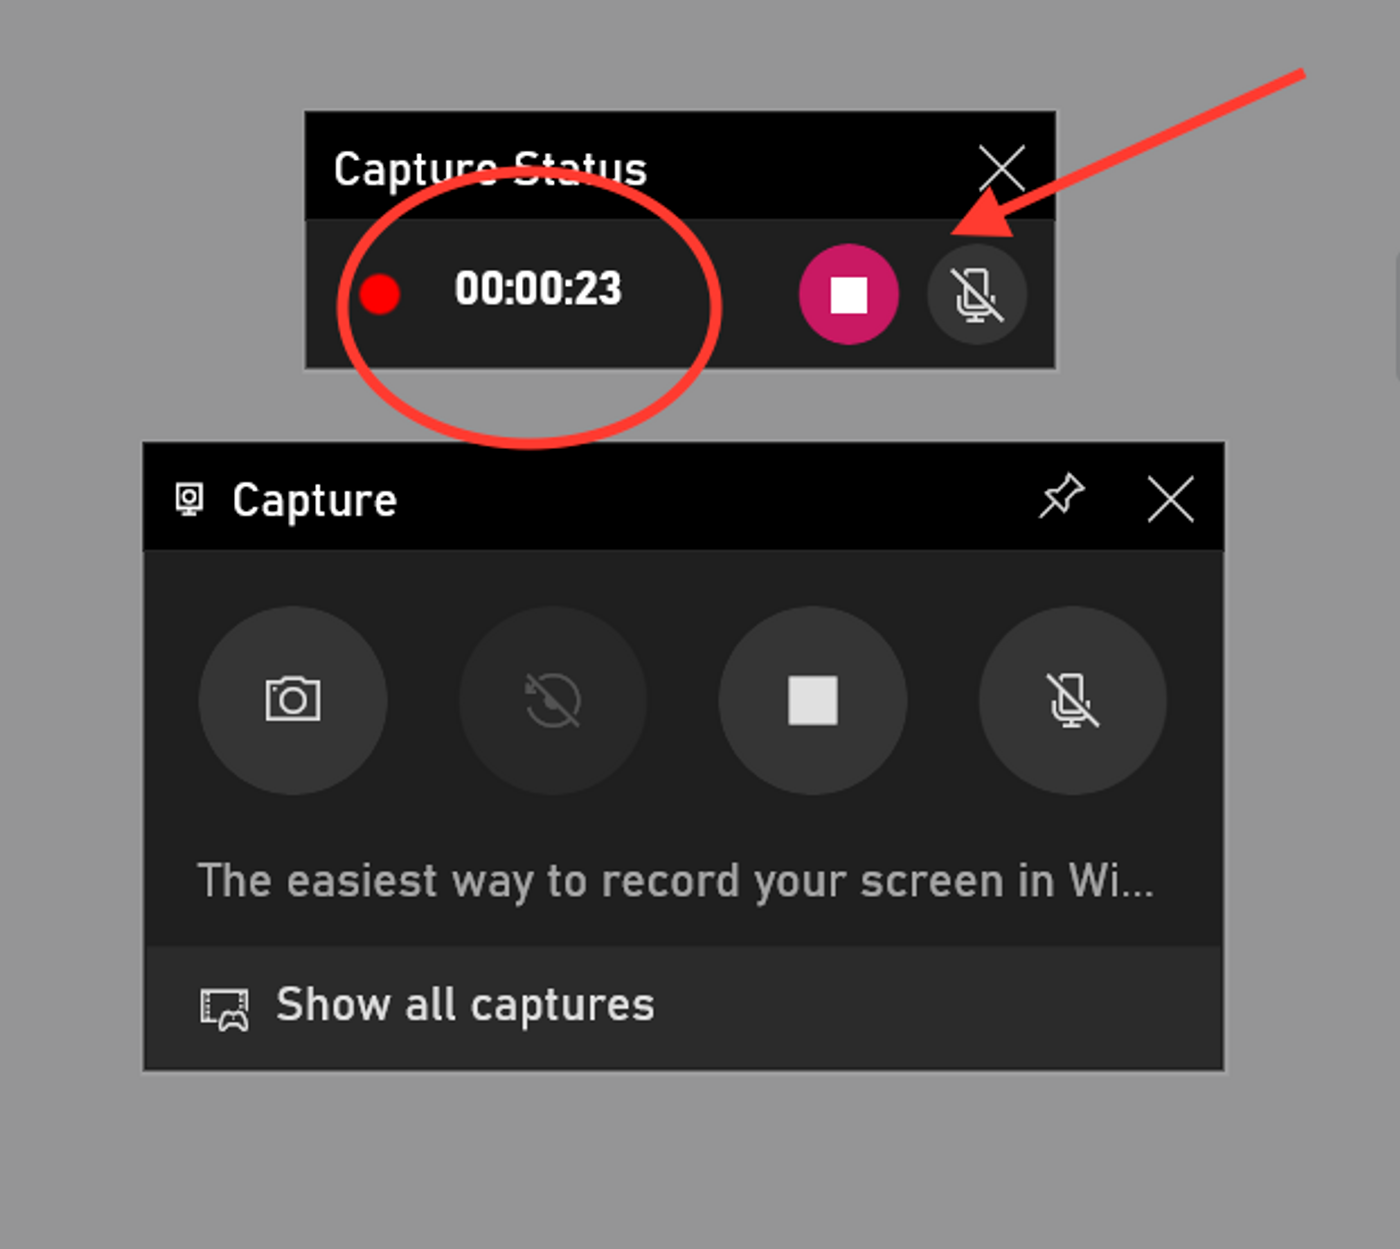
Step 5: Click on the stop button or press Windows + Alt + R again to stop recording.
Step 6: A pop up will appear on the right side saying ‘Game clip recorded’. Click on the pop-up to see that your screen recording is saved in the ‘Captures’ folder in File Explorer.

2. How to record video on Windows 10 or any PC?
Now that we’ve covered screen recording on Windows 10, let’s see how you can record videos on Windows 10 or any other PC.
Just follow these simple steps:
Step1: Hit that start menu and launch the ‘Camera’ app which is also available under the list of All Apps.
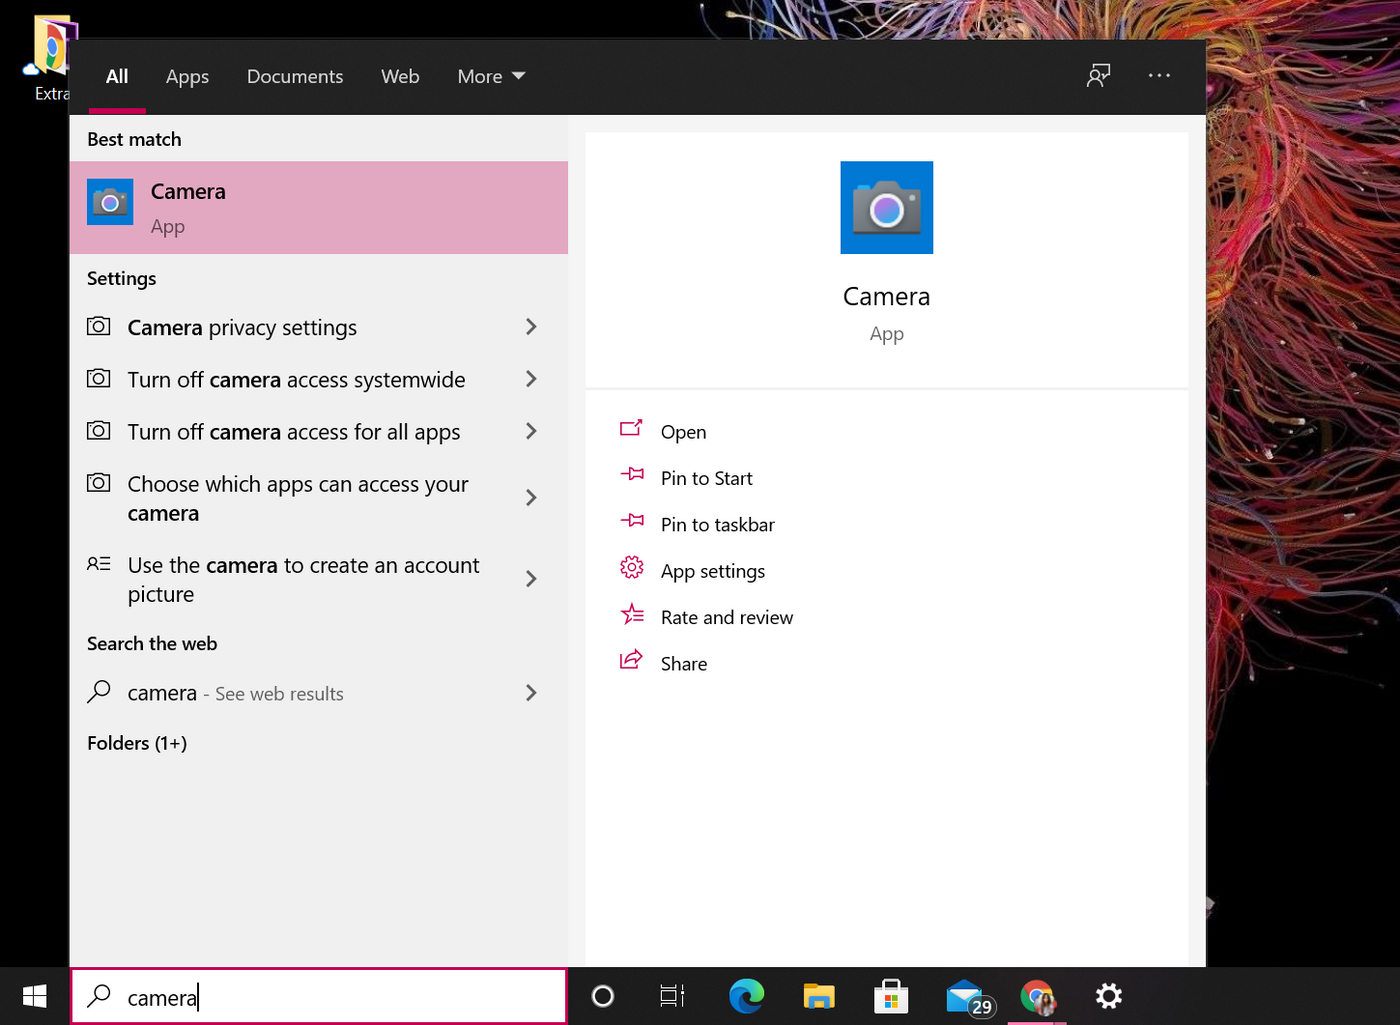
Step 2: Once the camera is opened, there are options on the right to choose from, photo or video mode. The app will allow you to record a maximum of three hours.

Step 3: Once you have finished recording your video, they are saved by default to the Camera Roll folder.

If you’re using a PC to record videos without an in-built camera, you will need to connect a webcam to your PC. Here’s a super easy tutorial to help you screen record and take a video at the same time.
And for better quality and more freedom in terms of video recording duration, a third-party app will be required. Head on over here to see InVideo’s curation of the best webcam recording softwares available right now.
3. BONUS: How to turn your screen recordings into professional videos in minutes?
You’ve got your recording and the screen capture. Now, If you want to make an impact and go the extra mile, you’d want to turn your screen-recordings into fully-edited videos with music and text. That’s where an online video editor like InVideo can come in handy. You can easily create professional-quality videos in minutes even if you’ve never edited a video before.
Here’s how you can use InVideo to make all the difference:
Step 1: Sign-up for an InVideo account if you haven’t already. Click on “Blank Canvas”, select a dimension, then click “Make a Video” to get started.

Step 2: You’ll now be taken to the InVideo editor. Click on the “Upload Media” button or drag and drop your files to the centre to the editor

Step 3: Once uploaded, drag your video to the center in the workspace to begin making your changes. A pop up will ask you if you want to trim your video. Make any changes you want to or use the full version. And now your visuals are all set.
Step 4: Once done, it’s time to pick from InVideo’s in-built collection of music across moods, genres, sfx and more from the music icon located on the left of the screen. Alternatively, if you’d like to add your own music to this project, simply click on the Upload music option on the right of the search bar to upload files from your system.

Step 5: Drag and adjust the timeline — to sync the music to your text and visual elements.

Step 6: Once you’re done tinkering, click on the Download & Share button, select your video’s quality, then hit “Export”.

Step 7: If you’d like to add text to your video, simply click on the text tab from the row of options on the left hand side. Select a from a collection of fonts and typographies.

Step 8: And you’re done! Download the video or share it directly on your social media platforms.

Wrapping up —
There you have it, you’ve learned how to screen record on Windows 10 and you’ve also figured out how to record videos on Windows 10 and other PCs, and you also know how to turn your screen recordings into professional videos using InVideo’s online editor. If you want to further deep-dive into what are the best webcam recording softwares of 2022, check out this post where we cover exactly that.
And if you have any other questions or want to continue the conversation, hop on over to the IV community where you’ll be able to collaborate and learn from 25K other creators and marketers just like you.
FAQs
1. How do I record my screen on Windows 10 for free?
You can record your screen on Windows 10 for free using the in-built tool Game Bar. You can screen record up to 4 hours and a single application at a time. You cannot screen record your desktop or file explorer.
2. Where do screen recordings go in Windows 10?
Your screen recordings are all stored by default in the Captures folder. Head to Gaming from settings. Click on Captures from the options available on the left. All your screenshots and screen recordings are stored here.
3. How long can windows screen record?
With Game Bar, you can record your screen for up to 4 hours at a time.
4. How do I record video and audio on my laptop?
If you’re using a Windows 10 laptop, your machine features the in-built universal app, ‘Camera’ which allows you to record audio and video on a PC. The in-built camera will automatically record all audio while recording.
Want to know how to record video on PC for offline viewing? The easiest way is to find some free video recording software to capture the video content. Here, on this page, you will learn some best free Windows 10 video recorder, and also detailed tutorials to record video Windows 10 without hassle. Now, let’s dig into it!
| Tools | Effectiveness | Difficulty |
|---|---|---|
| 🏅EaseUS RecExperts | High — Support capturing from various sources in high quality, without watermark. | ⭐ |
| Xbox Game Bar | Low — Only record in full screen with a microphone | ⭐ |
| IceCream Screen Recorder | Medium — Provide powerful recording tools, but complicated to operate. | ⭐⭐⭐⭐ |
| Movavi | High — Offer different recording modes but performs poorly in recording videos from Netflix, etc. | ⭐⭐⭐ |
| Flashback Express | Medium — Record videos in good quality and allows adding webcam overlay. | ⭐⭐⭐⭐ |
| Camtasia | High — Let record and edit video in a single application. | ⭐⭐⭐ |
| EaseUS Online Recorder | High — Easy to use and no need to sign up. | ⭐ |
#1. Record Video on Windows 10 Using a Professional Video Recorder
- 👀Editor’s viewpoint:
- EaseUS RecExperts is appropriate for capturing almost any video content on your Windows 10 PC, including online courses, movies, video conferences, etc. Also, it performs perfectly in capturing protected videos without black screen!
EaseUS RecExperts is a full-featured but lightweight Windows 10 video recorder. It records what’s happening on full screen or a part of the screen in 720P, 1080P, and 4K/8K. Not like other tools, it records videos on Windows 10 without a time limit.
Most importantly, it allows you to screen-record protected videos from some popular sites like Netflix, Hulu, Disney, etc., and there won’t be any black screen issues! Last but least, there will be no watermark on your video recordings! Download it right now!
Follow the detailed guide below to capture videos on your Windows 10 computer:
Step 1. Run EaseUS RecExperts on your device and you will see two recording modes. You can choose «Full Screen»to record the whole screen or choose «Region» to select the recording area manually before recording.

Step 2. After that, you can choose to record the webcam, system sound, microphone or record none of them as you like. You can also set auto split, auto recording with various functions on the interface.
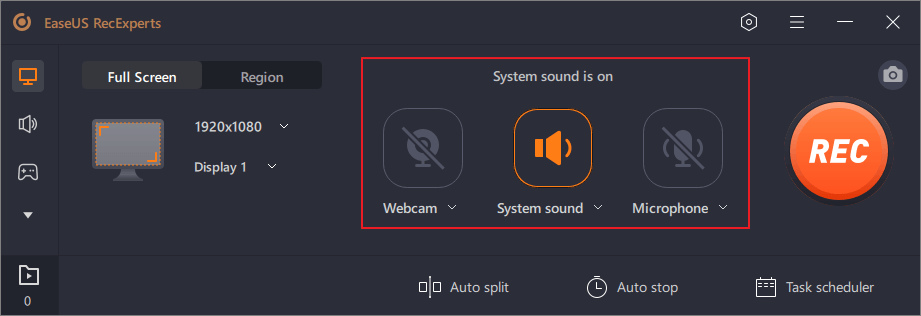
Step 3. Then, you can click the red «REC» button to start recording. Here will be a menu bar on your screen. To pause the recording, click on the white double vertical bar; to end the recording, click on the red square sign.
![]()
Step 4. After recording, you will be led to the list interface. Here you can view or edit your recordings. To start a new recording, just click on the «REC» button on the top of the interface.

You can also watch a simple video tutorial here:
- 00:00 — 00:16 Intro
- 00:17 — 01:44 Preparation
- 01:45 — 02:38 Begin recording
#2. Capture Videos on Laptop Windows 10 with Game Bar
- 👀Editor’s viewpoint:
- It is a completely free & built-in Windows video recorder that can help users capture videos easily. However, it only records in full screen, and the output quality is a little low. To conclude, it is suitable for those who have lower requirements about the output video files.
Game bar is a pre-installed tool for Xbox players to capture game screenshots, game videos, etc., for free. Although its name may indicate that this best game recorder is designed to capture gameplay clips, it can record nearly all screen activities, including all kinds of videos. Now let’s check how this free Windows 10 video capture software works.
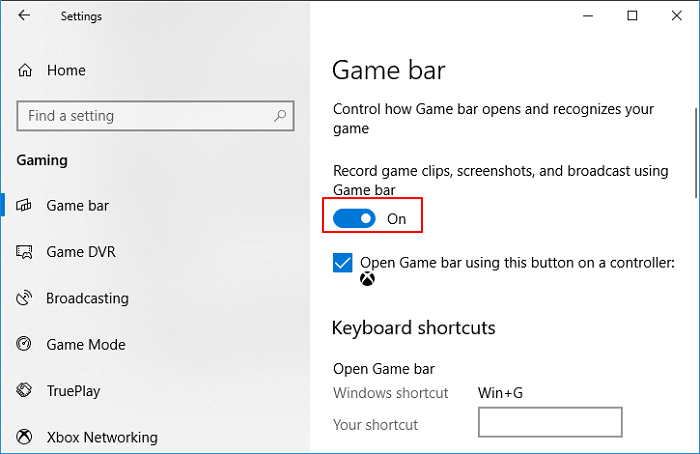
Step 1. Go to «Settings» > «Gaming» > «Game bar» to turn it. When you need to use it, press «Windows» + «G» to open the Game Bar. Click «Yes» if you see a prompt asking if the highlighted application on your screen is a game.
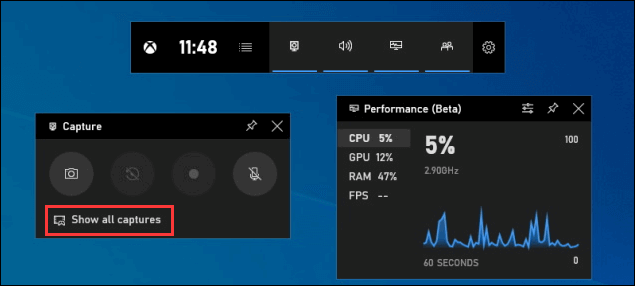
Step 2. Click the Start/Stop Recording button or press the «Windows» + «Alt» + «R» keys to start or stop the recording process. If you need to turn on the microphone, click the «Microphone On» button.

Step 3. When the recording is finished, on the «Show all captures» in the «Capture» widget. Then you will see a list of video clips you recorded, and you can click the video to play it.
✏️Although Xbox Game Bar was designed to record games and videos at first, it put a time limit on recordings. Therefore, you’d better try EaseUS RecExperts if you don’t want your recording to be rudely stopped. Download it right now!
#3. Record A Video on Windows 10 using Icecream Screen Recorder
- 👀Editor’s viewpoint:
- This video capture software performs well in recording video content as well as audio on Windows 10. However, it is a little expensive, at $29.95.
Icecream Screen Recorder is an innovative Windows 10 video capture software that allows users to record anything on PC. It helps you customize the window size and video resolution flexibly without much effort. Besides, it can also record a Skype call, game videos, video tutorials, live streams, and more for free.
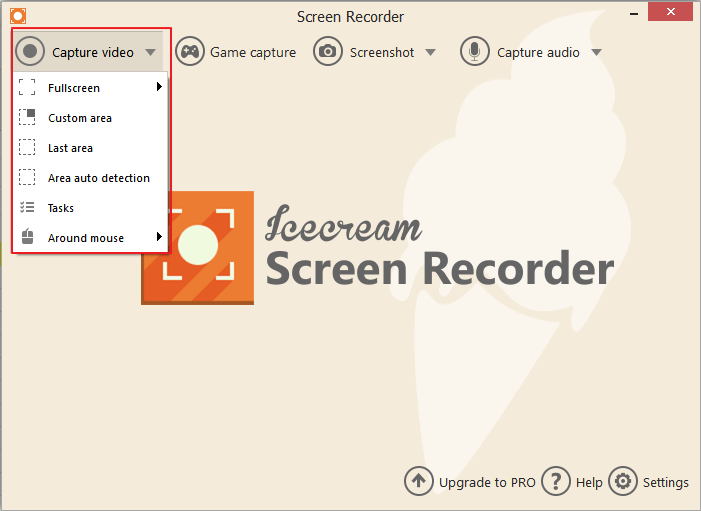
Step 1. Install and run the Icecream Screen Recorder. Click the «Capture video» button and set the window size you want to record on your PC.
Step 2. Drag the center of the recording window to the desired region on your computer. Click «Rec» to start recording screen movements on your computer. You can also reset the recording frame to other sizes, such as full-screen 1920×1080, 1366×768, etc.
Step 3. When you finish the recording, press F8 or click on the «Stop» button to save the video clips.
#4. Record Videos in Windows 10 with Movavi Screen Recorder
- 👀Editor’s viewpoint:
- Movavi Screen Recorder is a good helper for recording videos on Windows in most situations. However, it performs poorly in capturing videos from Hulu, Netflix, or other streaming platforms.
Movavi Screen Recorder is a wonderful Windows 10 video recorder capable of recording videos quickly in one click. Because of its powerful functions, you can use this recording tool to record Webex meeting, webinars, and online classes. Various other events on your screen can also be captured so that you can use these materials to create videos freely.
Since this software supports many audio and video formats, it’s convenient for you to upload videos to many platforms like YouTube and Google Drive and then share them with others easily. How to clip on a PC with this tool? Here is a tutorial for you.
Step 1. Launch the Movavi Screen Recorder, and there will be a «Record region» button on the main interface. Then, choose the window that is playing the video you want to record as the recording area.

Step 2. Click the red «REC» button on the right side to start the recording. Three seconds later, the video you need will be recorded.
Step 3. Click on the «Stop» button when you want to save the recorded video. You can choose the output format, the file name, and the location if necessary. Finally, you can download the video to your computer.
#5. Record Video Windows 10 with Flashback Express
- 👀Editor’s viewpoint:
- This tool is best for those video contenters who want to whip up short videos and post them on YouTube or other sites directly.
Flashback Express is designed to help users of Windows 10 record videos easily. Even if you don’t know how to capture video on a PC, its intuitive interface will guide you to complete the recording task effortlessly. Moreover, this screen recorder for Windows 10 allows users to add webcam footage to the screen recording, and record videos with no watermark. The recorded video can also be easily shared on YouTube.
How to record video in Windows 10 with Flashback Express:
Step 1. Install and run Flashback Express Recorder on your PC. Select the Record mode — Fullscreen, Region, Window.
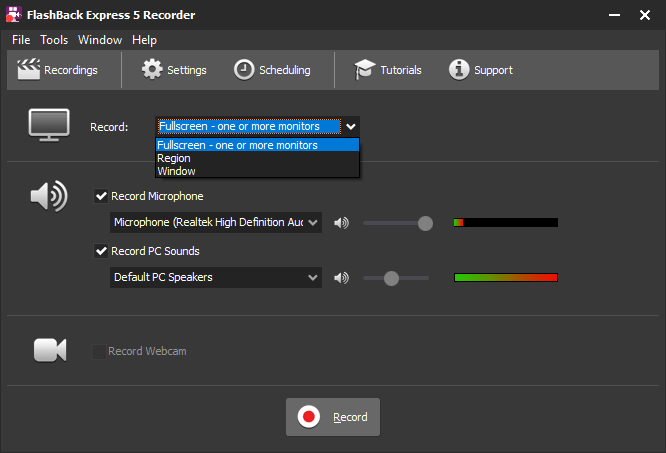
Step 2. Adjust the window size and location, and click «Record» to start.
Step 3. When you finish recording, click the red square button to stop. Click «Save» to save the recorded video. After this, you can play the recorded video on your computer with the Flashback Express Player.
#6. Capture Videos on Windows 10 using Camtasia
- 👀Editor’s viewpoint:
- This tool provides both advanced recording and editing tools. For those who want to find a screen with plentiful editing features, it should the first choice.
TechSmith produces Camtasia for professional users to record onscreen videos and edit videos with annotations, behaviors, animations, cursor effects, etc. With a built-in recorder, you can easily record videos on Windows 10 PC with ease.
Check out how to video record on Windows 10 using Camtasia:
Step 1. Install and run Camtasia. Click «New Recording» to continue.
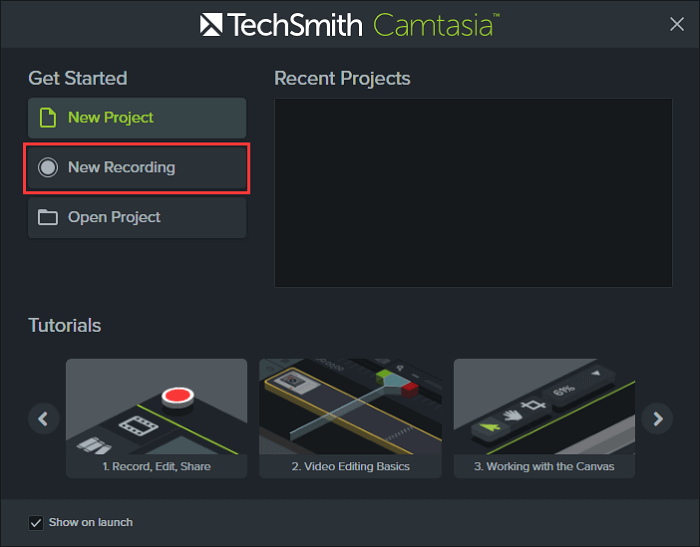
Step 2. Drag the window center to the desired region, and adjust the window size, and dimensions from the pane below. Click the red «rec» button to start recording.

Step 3. When you finish the recording, click the «Stop» button to complete.
After this, Camtasia will load the recorded video, and you can play the video or add more effects to the video there.
#7. Record A Video on Windows 10 with Online Recorder
- 👀Editor’s viewpoint:
- This online video recorder is easy to operate and works well with most browsers. Most importantly, users don’t need to sign up.
This online screen recorder is effortless to use. You can use it to record videos on a PC. As the icons on its main interface indicate, you can only use those three browsers to utilize it: Google Chrome, Firefox, and Opera. You don’t even create an account and log in to that website; all the on-site operations are easy enough for beginners to use.
How to Record Video Windows 10 with online recorder:
Step 1. Click the«Start Recording» button on the main interface.
Step 2. Next, choose the audio source you want to capture at the same time. If needed, you can tick the Webcam option.
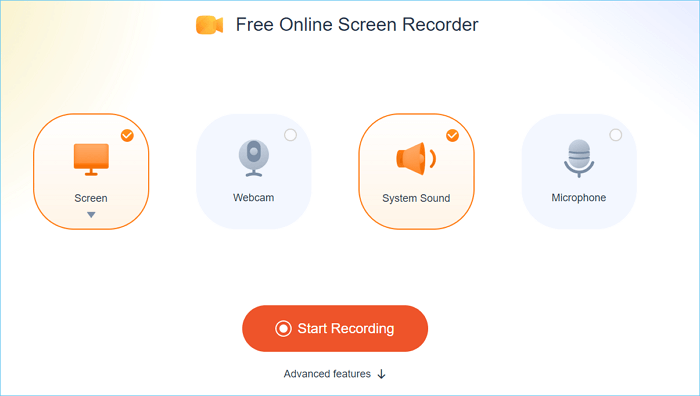
Step 3. Then select the tab or window you want to record, and click Share to start your recording.
FAQs about How to Record Video on Windows 10
Check the frequently asked questions related to this topic below.
1. Does Windows 10 have a video recorder?
Yes, Windows 10 and Windows 11 have a built-in screen recording feature that can record video from your screen. It’s called Xbox Game Bar.
2. How do I record video on my PC?
If you don’t want to use a third-party app, just use the default video recorder on your PC. To start recording, use the combination «Windows + Alt + R» or press the «Start recording» button on the Game Bar.
Conclusion
This page is for people who don’t know how to record video in Windows 10, and it covers 8 Windows 10 video recorder programs. If you want to find the best Windows 10 video capture software, don’t miss EaseUS RecExperts, as it enables you to record whatever is on your screen as a video. If you want to record a webcam, it’s free to record the webcam as a video or use the webcam as a video overlay on the recordings.
While you may be using Windows 10 for a while, this doesn’t mean you’ve discovered all the operating system’s features. Windows 10 is still new to many users, and most of its features remain undiscovered.
On Windows 10, you don’t need to install screen recording software to record your screen. A built-in feature allows you to record your entire Windows 10 screen-free.
Not only that, but you can also use VLC Media Player to record your desktop screen in easy steps. So, if you are looking for ways to record screens in Windows 10 without installing any software, you are reading the right guide.
Below, we have shared the two best ways to record screen in Windows 10/11. Both of the methods were free and require no additional app installation. So, let’s get started.
Record Windows 10 screen via Game Bar
Xbox Game bar is a gaming feature of Windows 10 that provides you an option to record your screen. While the feature is designed to record gameplay videos, it can also record your desktop screen. Here’s how to record the screen via the Xbox Game bar.
1. First, in your Windows 10, click on the Start button and type Xbox. Next, open the Xbox Game Bar app.
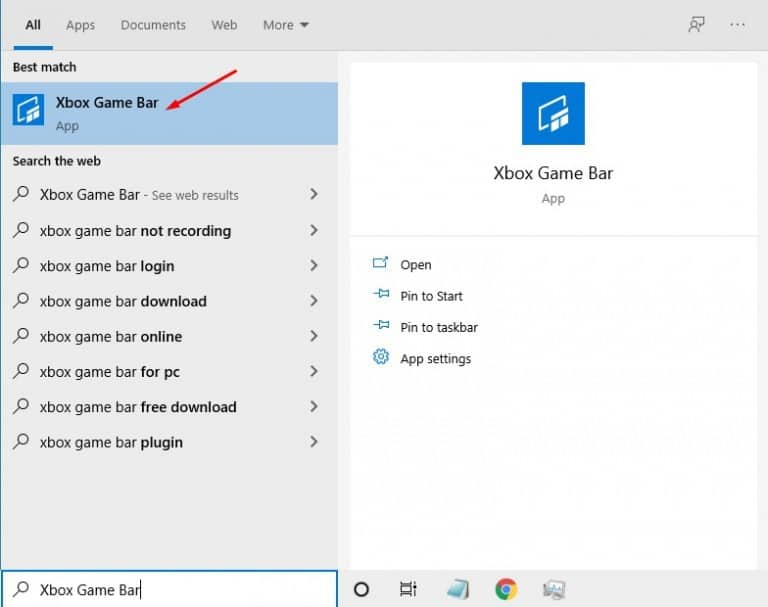
2. Now, you have to press Windows Key + G button on the screen you want to record.
3. Now, you will see many options. You need to click on the Recording button on the Capture widget. This will start the screen recording.
4. To stop the screen recording, click on the Stop button on the same widget.
By default, all your recordings get saved to the folder
“C/Users/Videos/Captures“.
That’s it! You can easily record the screen with the Xbox Game bar on Windows 10. You can also capture screenshots with the same tool.
Using VLC Media Player
With the VLC Media player, you can record the screen easily. You can use this method in Windows 7, 8, 10, and even Windows 11. Here’s how to record your Windows 10 screen using VLC Media Player.
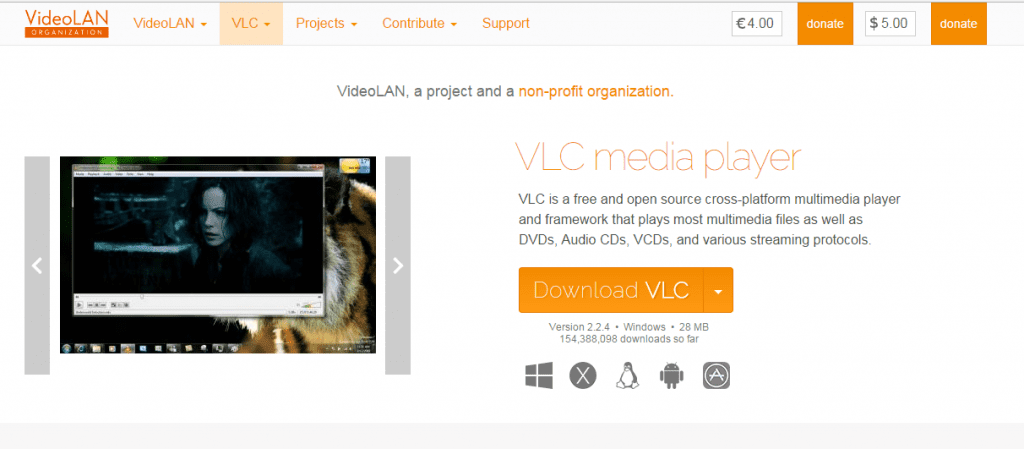
1. First, download and install VLC Media Player on your Windows computer if you don’t have one.
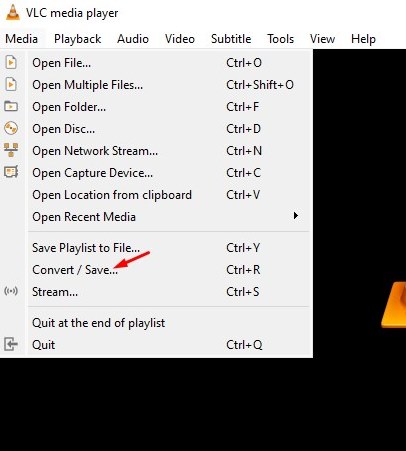
2. Next, click on the Media tab and select the Convert / Save option.
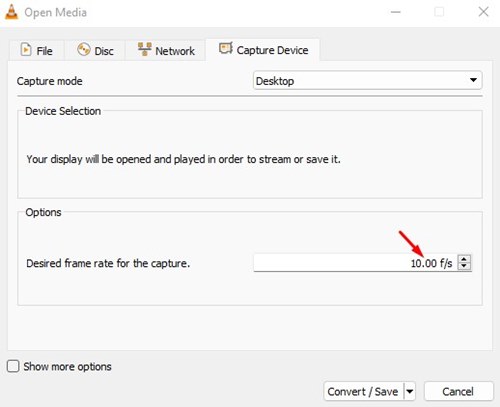
3. Now switch to the Capture Device and select Desktop on the Capture mode.

4. On the Desired frame rate for the capture, set your desired frame rate. 10f/s is recommended.
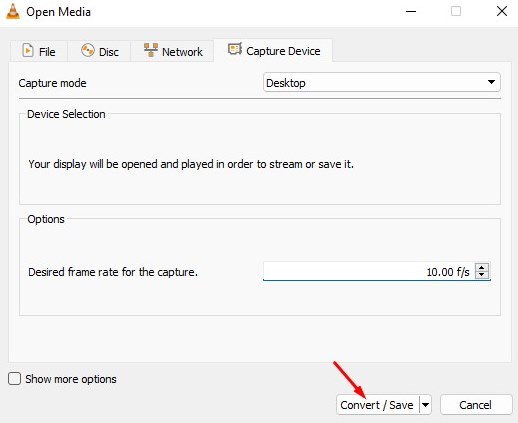
5. Once done, click on the Convert / Save button at the bottom of the Window.
6. On the Convert Window, click the browse button, select the filename, and set the location.
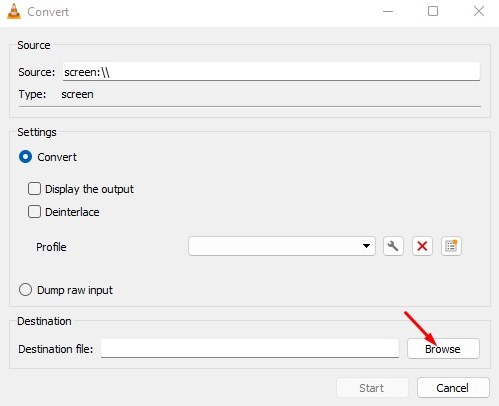
7. Once done, click on the Start button.

That’s it! You are done. Now the screen recording will start. You can now control the screen recording from the VLC’s interface.
That’s it! You are done. This VLC media player method works with every Windows version. You don’t need any additional software to record your desktop screen.
So, this is all about Windows 10 screen recording. We have shared the two best methods to record Windows 10 screen. If you don’t want to go through all hassle and want a straightforward way to record Windows 10 screen, you need to check our article Best Screen Recording Software.
How to Video Record Your Screen on Windows 10 — Integrated Tools and Third Party Apps
August 28, 2023
2 min to read
Windows
This article offers instructions on how to video record your screen on Windows 10 using a variety of tools, both integrated and third-party, free and paid.
Using Windows Integrated Tools
Windows 10 comes equipped with the Game Bar, an integrated tool designed for screen recording. To utilize this tool, follow these steps:
- Prepare the activity you wish to record.
- Start the recording process.
- Stop the recording once completed.
- If necessary, you can adjust the Game Bar settings to enhance your user experience.
Using Third-Party Tools, Free and Paid
There are also numerous third-party applications designed for screen recording on Windows 10.
Free Options
- Free Cam – Excellent for creating WMV screen captures.
- DVDVideoSoft’s Free Screen Video Recorder – Ideal for recording Skype video calls.
- ShareX – Suitable for sharing screen recordings online.
- CamStudio – Great for creating AVI video files.
- Ezvid – Best for creating quick video clips and sharing them on YouTube.
- TinyTake – Offers a native cloud-based gallery for storing and sharing videos.
- OBS (Open Broadcaster Software) – Optimal for capturing gameplays.
- Debut Video Capture – Ideal for creating demonstrations and streaming video games.
- Loom – Perfect for video messaging.
Paid Options
- iSpring Suite – A solution for screencasts, software tutorials, and complete video courses.
- Camtasia – Provides quiz and interactivity options.
- Filmora Scrn – Suitable for streaming and game recording.
- Movavi Screen Recorder – Ideal for capturing video calls, webinars, and online events.
- My Screen Recorder Pro – Good for distributing videos to a website.
- FlashBack – Offers simple screen recording with basic editing features.
- ScreenPal (formerly Screencast-O-Matic) – Reliable tool with a built-in stock library and secure video hosting.
Notable Mentions:
- Zappy – A screen recorder designed for remote teams.
- Apowersoft’s Free Online Screen Recorder – A tool that does not require installation.
Additionally, Clipchamp offers an online screen recording service with added special effects, while TechSmith’s Snagit is recommended for quick desktop screen recordings.
Remember to check the necessary permissions and terms and conditions before you start screen recording, especially if it involves third-party intellectual property. With a range of tools at your disposal, it’s simple to record video of screen Windows 10.
Give us some love and rate our post!