There are many reasons why you probably need to record internal audio on a Windows 10 computer more or less in your daily life. Sometimes, you may need to record a lecture, a conversation, an interview, etc.
However, most of you have no idea to capture the system audio on Windows 10. Given that, this post comes in handy. Just keep reading to learn how to record internal audio on Windows 10 hassle-free! Before diving into the details of each method, check the comparison table of them first.
| Methods | Effectiveness | Difficulty |
|---|---|---|
| EaseUS RecExperts | High — One-click to record audio; allow adjust recording parameters; support noise reduction feature; | Super Easy |
| Voice Recorder | Medium — Only support capturing microphone sound; | Easy |
| Audacity | High — Record audio with customized settings but limited output formats; | Medium |
| Stereo Mix | High — Only record system sound; cannot adjust recording quality; | Difficult |
| Audio Cable | Medium — Need to prepare some cables and adapters; | Difficult |
How to Record System Audio on Windows 10 with EaseUS RecExperts
EaseUS RecExperts is one of the most popular and useful Windows audio recorders. It allows you to record computer audio, your voice, or both at the same time with a few simple clicks. Besides, it can help you easily adjust the volume and select the audio recording source.
With its aid, you can record streaming audio from almost any site effortlessly, like Pandora, and export in crystal quality. Besides, it lets you adjust the bitrate, sampling rate, and even output format according to your needs. Most importantly, there are some editing tools available to enrich your recorded audio file.
If those functions are helpful for you, don’t hesitate to download this safe and versatile software. Try this simple audio recorder to record audio on Windows 10 PC effortlessly.
Here’s how to record internal audio on Windows 10 using RecExperts:
Step 1. Launch EaseUS RecExperts on your computer, and click «Audio» (looks like a speaker) on the left side of the main interface.
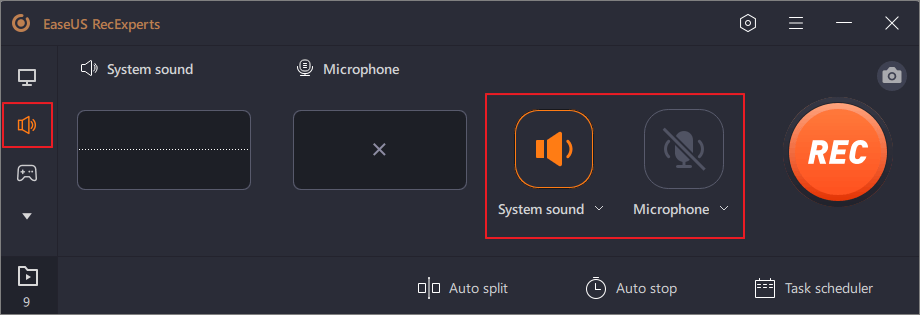
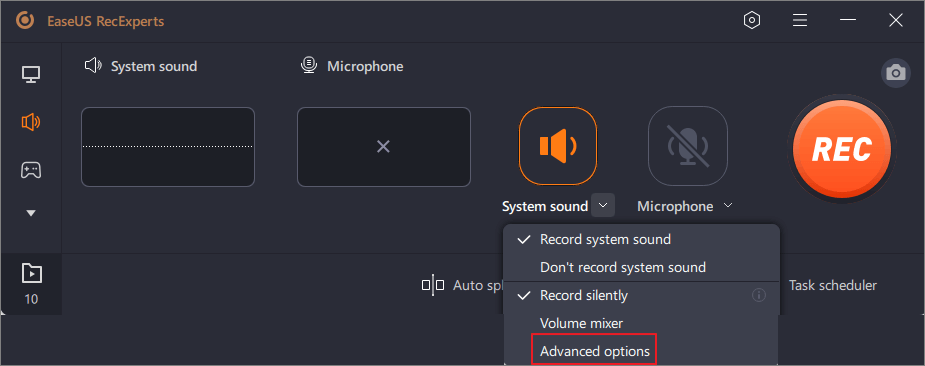
Step 2. To record the internal audio, you need to select the «System sound» option on the next window. You can adjust the volume by clicking on «System sound» > «Advanced options».
Step 3. Next, click on the red «REC» button to begin your recording. While recording, you can pause or stop the recording by clicking on the according buttons.
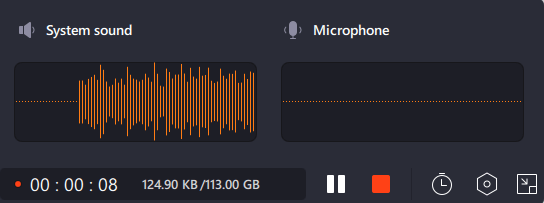
Step 4. Once done, you can find the recordings in the pop-up recording list window.

If you prefer to watch a video tutorial to solve your problem, you can check the following one:
- 01:07 — 01:31 Change settings
- 01:32 — 03:52 Record audio
- 03:53 — Edit the recording
How to Record Computer Audio on Windows 10 with Voice Recorder
Voice Recorder is a free voice recording app included on Windows 10. If you can’t find it, you may download it manually from the Microsoft app store. With this app, you can quickly and conveniently record lectures, conversations, interviews, etc.
The best thing about it is that it comes inbuilt on your Windows computer. Therefore, there’s no need to download and install it, which could save a lot of time for you. This guide will show you how to record computer audio on Windows 10 easily. Just follow the steps below.
Step 1. Search for Video Recorder on your computer, and click on the top result to open it.
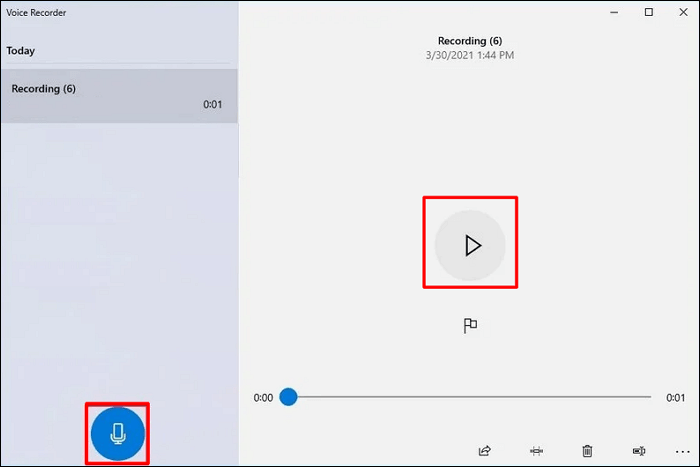
Step 2. Click on the «Record» button. To help yourself jump to the important part of the audio file later, click on the «Flag» button to add a marker during the recording. This operation will not interrupt the audio recording process.
Step 3. Click on the «Pause» button to stop recording temporarily, or click on the «Stop» button to end the voice recording.
Step 4. After recording, the audio file will be saved automatically as .m4a format in the «Sound recordings» folder below «Documents».
How to Capture Internal Audio on Windows 10 with Audacity
Audacity is a free, easy-to-use, and multi-track audio editor and recorder were developed by a group of volunteers. It can record live audio through a microphone or a mixer or digitize recordings from other media. After recording, you can easily edit your audio file by cutting, copying, pasting, and deleting.
Most importantly, you can export your recordings in many different file formats, including multiple files at once. This is helpful for you if you need to post your recordings on different platforms in different formats. Follow those steps to record sound in Windows 10 now.
How Can Audacity Record Computer Audio Windows 10:
Step 1. Make sure your microphone is connected to your computer.
Step 2. Check Audacity settings. Click «Edit» > «Preferences» in turn to set the audio quality and channels.
Step 3. Start to record your audio. Choose the red record button and speak into the microphone. When speaking, you can adjust the recording level in the Windows volume control.
Step 4. Once done, click the yellow stop button to stop the recording. If you need, you can click «Edit» to trim, delete, split your audio file.
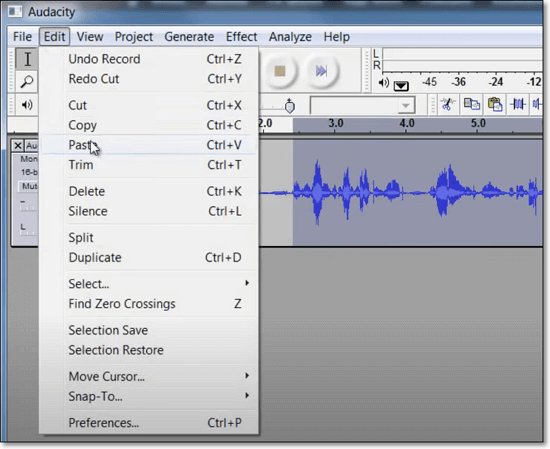
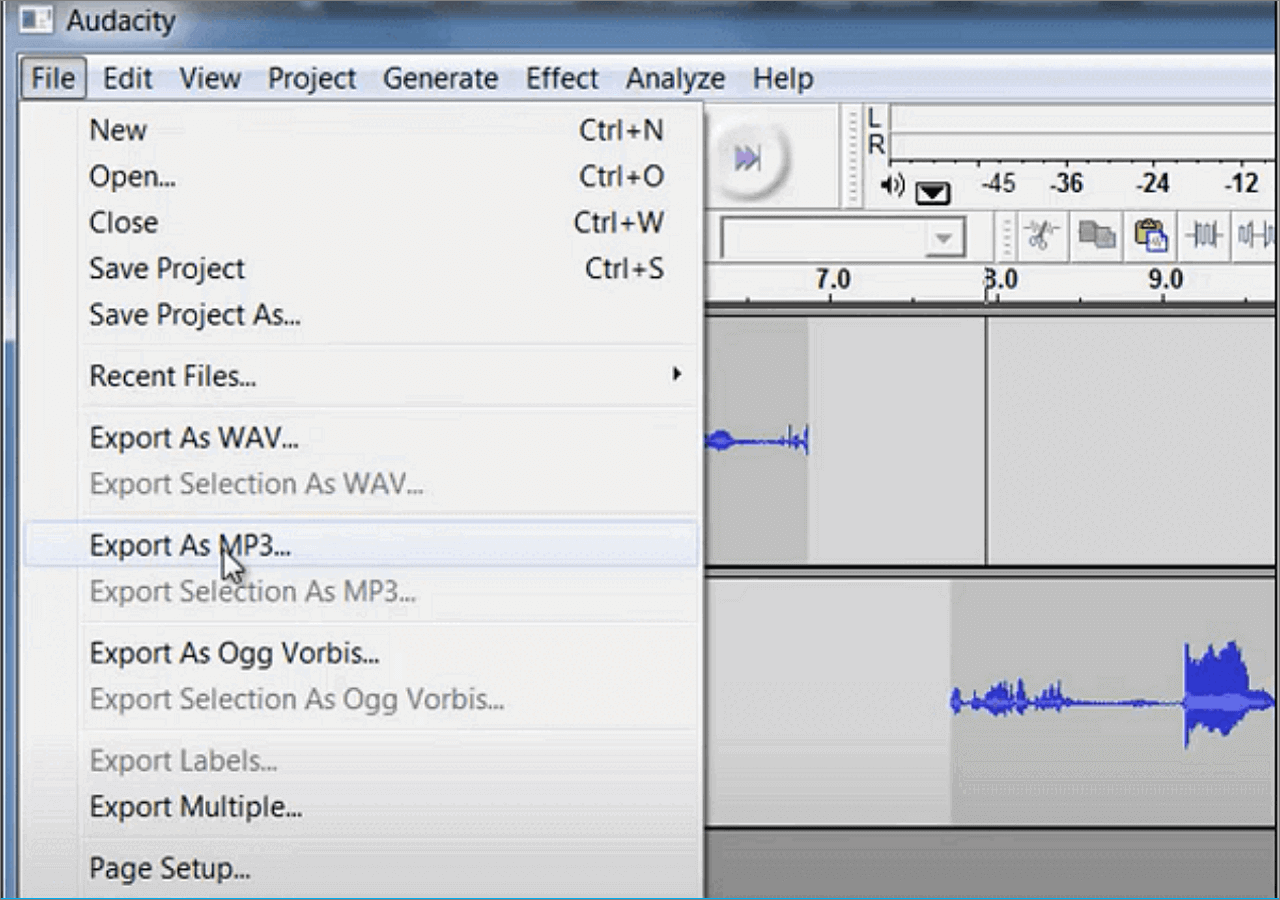
Step 5. When everything goes well, click «File» and choose «Export as…» to save your recorded audio file.
How to Record Computer Audio Windows 10 with Stereo Mix
Stereo Mix is a special recording option on a Windows computer, and it focuses on any application to record the same sound that your computer is outputting from its speakers or headphones on Windows. After enabling it, you can start recording the system sound from Windows 10 with Setero Mix.
Some people find it hard to use because they need to change the computer settings for this tool. However, once you change the settings, the recording will be as easy as you expect. Don’t miss this tool.
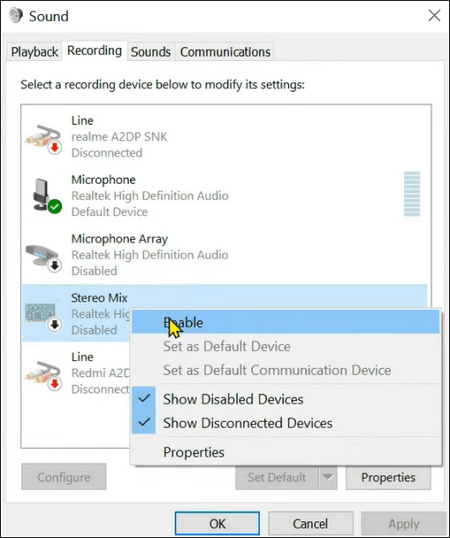
Step 1. Enable Stereo Mix. Click Windows icon > Settings > System > Sound > Sound Control Panel. In the Sound window, click on «Recording» to find the Stereo Mix, and next right-click on it and select the «Enable» option.
Step 2. Open start and type «Video Recorder» in the search bar, press «Enter» on the keyboard, and open the software. Click the «Record» button to begin recording audio.
Step 3. You can click the Flag button to add a marker to the recording. When you are done, click the «Stop» button, and a new window will appear that shows you the recordings available.
Step 4. Click on the recorded audio file and choose the «Play» button to preview your audio file. Here you can also export, trim, delete the audio files on your computer.
How to Record Internal Audio on Windows 10 Using an Audio Cable
Apart from that internal audio recorders software, there is also a simple way to help you capture the internal sound from your computer. All you need is a 3.5 mm mail and a USB audio adapter.
As a basic screen recording feature on Windows computers, Audio Cable can only offer you an ordinary performance. If you need more, you may choose other options in this post.
Step 1. Plug one end into the microphone jack on your PC, and the other end into the headphone jack of the audio adapter.
Step 2. Move to the Sound Control Panel, set the USB audio device as default.
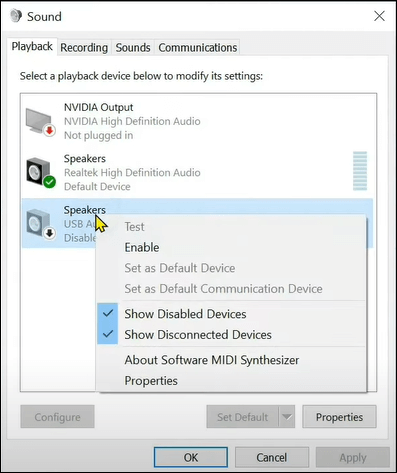
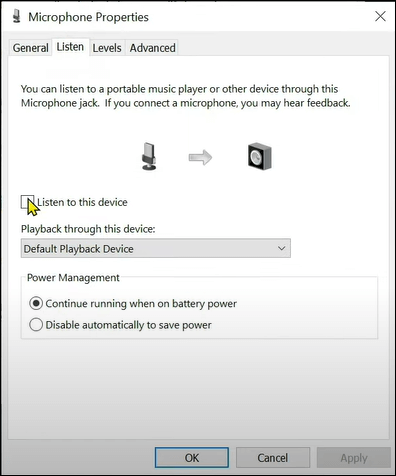
Step 3. In the recording tab, set the microphone as the default communication device. Right-click on «Microphone» and click «Properties» to enable «Listen to this device», and click «Apply»,
Step 4. At last, you can use any audio recording software to capture the computer sound on Windows 10.
Conclusion
In this article, we offer four quick and easy ways on how to record audio on Windows 10. Among the four audio recorders we mentioned above, you can choose the best one according to your needs.
If you need to capture the system and your voice simultaneously, EaseUS RecExperts is your best choice. This recording software not only helps you record audio but captures screen, webcam, and gameplay effortlessly.
FAQs About Recording Audio Windows 10
Here we collect some questions that most people frequently ask, and you can take a look.
1. Does Windows 10 have an audio recorder?
Yes, Windows 10 has a sound recorder called Voice Recorder App. If you need a quick way to record audio on your computer, this app can help you. You can use it to record interviews, conversations, lectures, and anything that can make a sound.
2. How can I record sound from my computer?
Audacity can help you record sound from your computer. You can choose to record the internal voice, microphone, or your voice and microphone at the same time. Moreover, you can use it to record your screen and favorite games.
3. How do I record only internal audio?
- Download and install EaseUS RecExperts, launch this program on your computer, and click «Audio» on the main interface.
- Click the Sound icon on the lower left to select the «System sound» as the recording source.
- Click «REC» to begin your recording.
![]()
Download Article
Easy-to-follow steps for recording audio on a Windows computer
![]()
Download Article
- Using Windows Voice Recorder
- Using Audacity
- Q&A
|
|
Do you want to record audio on your Windows computer? You can use a free app like Audacity to record the audio coming from your computer, such as audio coming from your favorite music and video apps. If you want to record something through your computer’s microphone, you can use the Voice Recorder app that comes with all versions of Windows. If you want to do more advanced multi-track recording (such as for your band/music project), see How to Record a Song with Audacity. This wikiHow article teaches you how to record both internal and external sound on your Windows computer.
Things You Should Know
- Record internal audio using Audacity. Launch the app, Choose «Windows WASAPI from the audio host drop-down menu and «Speakers (loopback)» from the audio input drop-down menu.
- Disable software playthrough, then click the red circle to start recording. Play the audio you want to record. Click «Stop» «overview» to end the recording.
- To record external audio, open Windows Voice Recorder and click on the blue-and-white microphone to start recording. Hit the blue-and-white square to stop.
-

1
Test your microphone. This method covers making a simple one-track recording using your Microphone and Windows Voice Recorder. If you want to do more advanced multi-track recording (such as for your band/music project), see How to Record a Song Audacity. Since most laptops have an onboard microphone, you shouldn’t need to connect an external one to record simple voice audio. Desktop PC users will need an external microphone. Here’s how to test whether your microphone is ready to record:
-
2
Click the Start
menu. It’s usually at the bottom-left corner of the screen.
Advertisement
-
3
Type voice recorder. This will search your computer for the Voice Recorder app, which is a free app that’s included with Windows 10.
-
4
Click Voice Recorder in the search results. It’s the microphone-shaped app icon at the top of the results. This opens the Voice Recorder app.
-
5
Click blue-and-white microphone to start recording. It’s at the bottom-left corner of the app. Voice Recorder will begin capturing audio from your microphone.
- If you’re recording your voice, speak directly into the microphone to record yourself.
-
6
Click the blue-and-white square to stop recording. It’s at the center of the window. This saves the recording and returns you to the main Voice Recorder screen.
- Recordings are automatically saved to the Sound Recordings folder inside Documents.
-
7
Click the recording date to listen to the recording. Your recordings appear in the left panel with the most recent recording at the top.
- To change the name of your file, right-click its name in the left panel and select Rename.
- To share your recording with others, right-click the file and select Share. This allows you to select an app to share with.


Advertisement
-
1
Download and install Audacity. Audacity is a free program that record and edit audio on your PC, including the music coming from your favorite movie and video players.[1]
To download Audacity, go to https://www.audacityteam.org/download/ in your computer’s web browser, and then do the following:- Click Audacity for Windows.
- Click the Audacity 2.3.2 installer link to download the file.
- Double-click the installer file.
- Follow the on-screen instructions to install Audacity.
-
2
Open Audacity. If Audacity doesn’t open automatically, open Start
, type audacity, and click Audacity in the search results.
-
3
Click the audio host drop-down menu. It’s near the upper-left side of Audacity and usually has MME selected by default. A drop-down menu will appear.
-
4
Select Windows WASAPI. This option sets Audacity to record sound from other apps, such as those that play music or videos.
-
5
Click the audio input drop-down menu. It’s to the right of the microphone icon that’s right of the «Windows WASAPI» box.
-
6
Click Speakers (loopback). Selecting it ensures that Audacity will capture your computer’s internal (on-screen) audio without recording external audio (e.g., your typing).
- If the audio you’re listening to is currently coming through headphones, you’ll click Headphones (loopback) here instead.
-
7
Disable Software Playthrough. To ensure that your audio is captured without distortions and feedback, follow these steps:[2]
- Click the Transport menu.
- Click Transport Options.
- Remove the check mark from «Software Playthrough» if its present. If there is no check mark, there’s no need to make any changes.
-
8
Click the red circle to start recording. It’s near the top-left corner of Audacity. Audacity will begin recording the audio coming from apps on your computer.
-
9
Play the audio you want to record. It’s best to do this after beginning your recording—you can always trim down the beginning of the recording to account for dead space as needed.
-
10
Click
button to stop recording. This «Stop» icon is near the top-left corner of Audacity.
-
11
Switch the «audio host» menu back to MME. This is the menu near the top-left corner of the app that currently says «Windows WASAPI.» This will change back the audio output and input options so that you can play your recorded audio.
-
12
Click
to listen to your recorded audio. It’s the green «Play» button at the top of the Audacity window. This will play the recorded audio through your computer’s speakers (or headphones).
-
13
Save your recorded audio. To save your file:
- Click the File menu in the top-left corner of the window.
- Select Export.
- Click Export as MP3 (or your desired format) in the menu.
- Select a save location.
- Enter a file name in the «File name» text box.
- Click Save.
- Click OK when prompted.


Advertisement
Add New Question
-
Question
Can I record music coming from the computer without downloading anything?

No. You usually need a program that will enable you to do that. It’s very simple. Install Audacity free audio program. Once the interface is open, there are several choices for the procedures you wish to use. Once set, you play your chosen music on your PC and start recording. The help files are really good and easy to follow.
-
Question
Will this work for me? I have cassette tapes that I need to convert to text.
No. This is about how to record sound (including speech) as an audio file. It is not about «speech recognition» to convert audio speech to text.
-
Question
Can I record music from my computer without a microphone?
Yes, you can record internally using the first method in this article. you can play music from YouTube or your music player and record it with Audacity without catching any residual background noise.
See more answers
Ask a Question
200 characters left
Include your email address to get a message when this question is answered.
Submit
Advertisement
Thanks for submitting a tip for review!
About This Article
Thanks to all authors for creating a page that has been read 628,984 times.
Is this article up to date?
Whether you’re recording a podcast, an interview, a message to a friend, or notes to yourself, audio recording is very easy to do on Windows. There are various third-party apps you can use, but Windows 11 also comes with an app called Voice Recorder preinstalled.
You can use that to record yourself easily — no download required. You can also use the app for some basic features, including trimming and exporting the tracks.
Here’s how to use Voice Recorder to record whatever audio you need to.
:format(webp)/cdn.vox-cdn.com/uploads/chorus_asset/file/24058636/htss2.png)
How to audio record on Windows 10
- Open Voice Recorder. It should come up if you type the name into the search box. If for some reason it’s not showing up, you can download it from the Microsoft Store for free.
- Press the microphone button to start recording. It will become a Stop button.
- Press the pause button to pause recording; press it again to resume.
- Press the Stop button to stop recording.
- The recording will automatically show up on the left side of the screen. Right-click it to rename or share the file.
How to audio record on Windows 11
:format(webp)/cdn.vox-cdn.com/uploads/chorus_asset/file/24058649/htss1.png)
The Sound Recorder app on Windows 11 is a bit more sophisticated. It brings a bunch of new features, including the ability to switch microphones from the homescreen and change playback speed.
- Open Sound Recorder. It should come up if you type the name into the search box. If for some reason it’s not showing up, you can download it from the Microsoft Store for free.
- Press the big red button or press Control + R to start recording. It will become a Pause button.
- Press the Pause button to pause recording; press it again to resume.
- Press the Stop button (the big black square) to stop recording.
- The recording will automatically show up on the left side of the screen. Right-click it to rename or share the file.
Capture voice recordings, music, and more right from your PC
What to Know
- Start > open Windows Voice Recorder > select the Record icon.
- Or, use Audacity. Configure the audio inputs to record sound from the computer and select the Record icon.
- When you’re done, go to File > Save > Save as WAV to save the finished audio.
This article explains how to record audio on Windows 10. The instructions apply to all Windows 10 laptops and PCs.
How to Record Computer Audio With Windows Voice Recorder
Windows Voice Recorder is a simple but effective program that comes pre-installed with Windows and can be used to record audio directly from your computer’s microphone. It also has a rudimentary editor you can use to trim unwanted bits from the start and end of the recording.
-
If you don’t have a microphone built into your computer, connect one before you start Windows Voice Recorder.
-
You need to make sure the microphone is set as the default recording device. Select the Start menu, then select Settings, represented as a gear-shaped icon.
-
In the Windows Settings search box, type Sound and press Enter. In the search results, select Sound Settings.
-
In the Input section, use the input device drop-down menu to choose your microphone, then close the Settings window.
-
Open Windows Voice Recorder from the Start menu. It should already be installed, but if it’s not, you can find it in the Microsoft Store.
-
Select the Record icon on the left side of the screen to begin recording.
In some versions of Voice Recorder, the Record icon may shift to the middle of the window when you first open it or if you haven’t previously made any voice recordings. Once you have created recordings, the Record icon appears on the left side of the screen.
-
While you’re recording, you can select the Pause icon to temporarily hold recording, then select Pause a second time to continue, recording to the same file.
-
When you’re done, select the Stop icon.
-
After your recording is done, you can select the recording file, then select the Play icon to hear it played back.
-
If you want to trim the start and end of the audio, select the Trim icon at the bottom of the window.
-
Drag the start and end bars until you’ve edited the audio. Select the Play icon to hear your revised start and end points. When you’re satisfied, select the Save icon and choose if you want to save the current file or create a new copy.
-
To find the MP3 file on your computer’s hard drive, right-click the file and choose Open File Location. You can also select the Share icon to send the file to someone via email or social media.
Record on Windows 10 Using Audacity
There are many third-party audio recording programs for Windows, but Audacity is a powerful one that’s free and open source. It’s used by many creative professionals, including podcasters, to make voice recordings and other kinds of audio.
Before you download and use Audacity, be sure to review its privacy policy to ensure you’re comfortable with its terms.
You can easily use Audacity to make, edit, and publish audio files recorded by microphone, in much the same way as you can record audio in Windows Voice Recorder. We demonstrate how to use the program to record internal audio from another program on your PC.
If you’re capturing audio being played by another program, be aware of the possibility of copyright infringement regarding recording and reusing that audio. If the audio is copyrighted, and you record and reuse it, you could be breaking the law, which has serious consequences.
-
If you don’t already have Audacity installed on your computer, install Audacity, then open it.
-
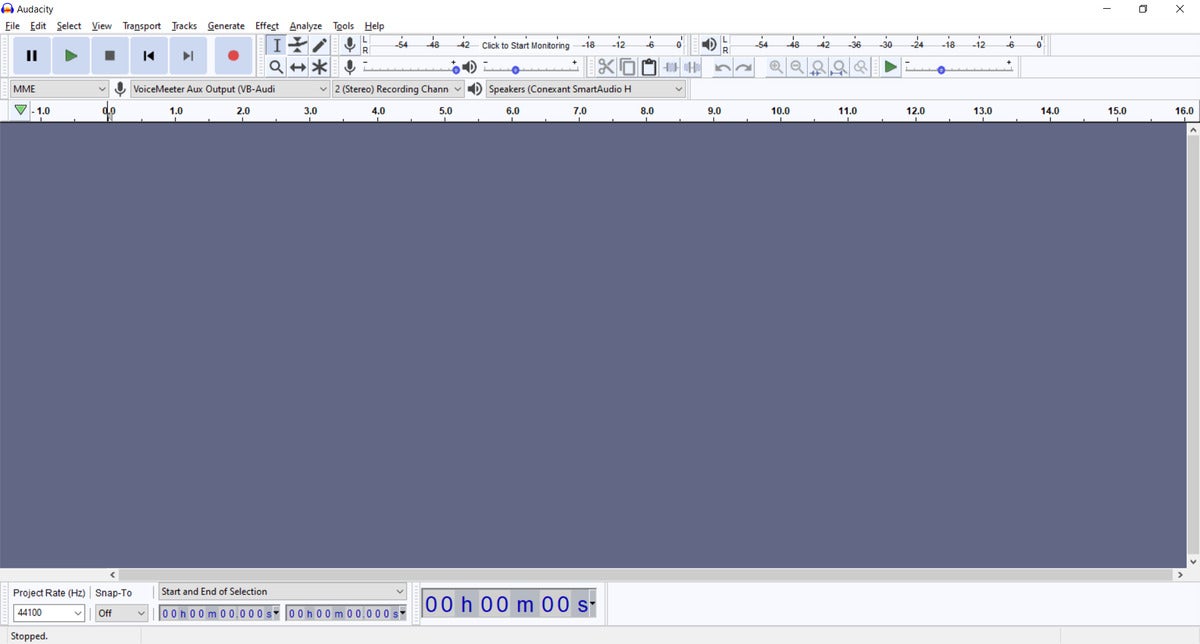
First, configure the audio inputs so Audacity can record sound from the computer. Select the Audio host drop-down menu at the top left of the window and choose Windows WASAPI. It allows Audacity to «hear» audio from other apps.
-
Select the Audio input drop-down menu to the right of the Audio host menu, then select the speakers or headphones you’re currently using to hear audio on the computer, with «loopback» in parenthesis. This ensures the audio being captured is the only audio you can hear coming from the computer.
-
When you’re ready, select the Record icon in the Audacity toolbar.
-
When you’re done, select the Stop icon.
-
To play back the audio you just recorded to hear and edit it, restore the two menus to the settings they had at the start. The Audio host menu should be set to MME.
-
Select the Play icon to hear the audio you just recorded.
-
When you’re done, you can save the finished audio. Select File > Save > Save as WAV.
FAQ
-
How do I screen record on Windows 10 with audio?
-
How do I record streaming audio on Windows 10?
-
How do I record calls on my computer using Audacity?
There are a few ways to record calls using Audacity. The easiest is to use a VoIP recorder and insert the file into Audacity.
-
How do I record Discord audio on Windows 10?
The easiest way to record audio from Discord is to use the Craig chatbot. You might need to change your microphone settings by going to Settings > App Settings > Voice & Video.
Thanks for letting us know!
Get the Latest Tech News Delivered Every Day
Subscribe
Audio recording is simple in Windows 10. All you need is a microphone and software to capture the input.
You don’t have to spend money on a sound recording program, however. Good paid programs exist, of course, but you can do well with free offerings. That’s especially so if you plan to do very little in the way of editing.
Not all sound recording programs have the same level of features, so we’ve highlighted two that suit both basic and more advanced needs. You’re covered if straightforward is what you want, and also if you require greater control over inputs and edits. And both picks cost absolutely nothing to use.
Editor’s note: This article was updated to include a video of the process.
Voice Recorder
Recording in Voice Recorder is dead simple.
This dead-easy-to-use sound recording program comes included with Windows 10, so you can jump into it straightaway. To begin, tap the Windows key (or click on the Start button), type voice or recorder to bring up Voice Recorder as a search result, and hit enter.
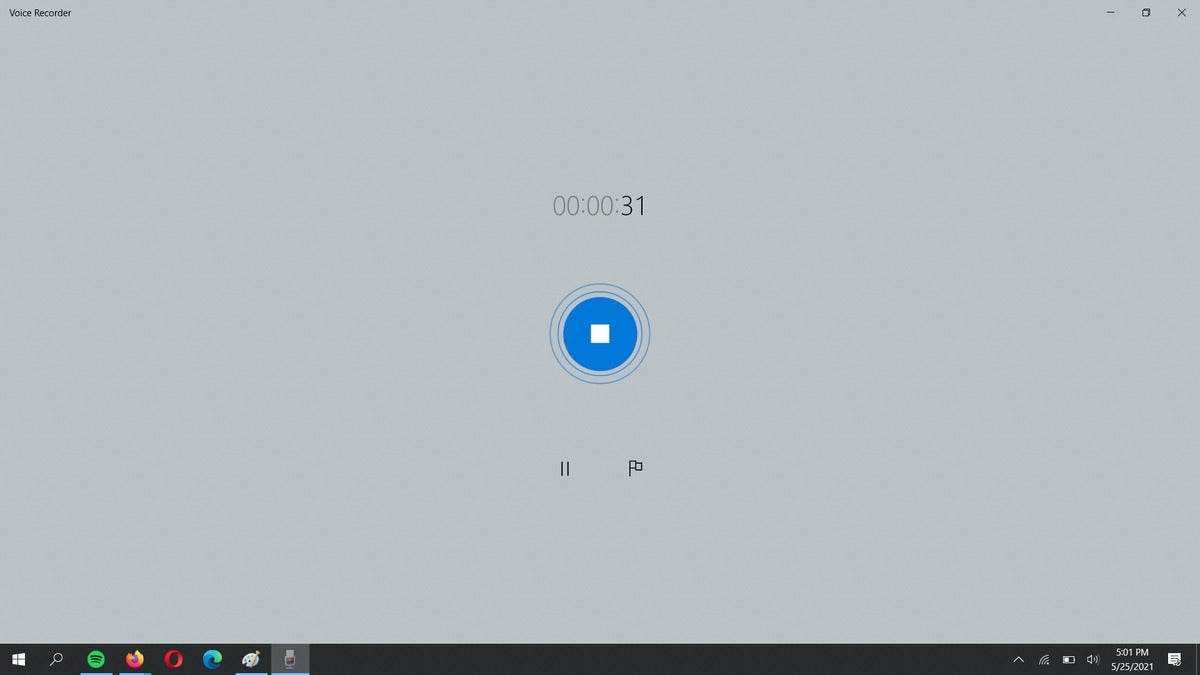
Starting a recording is as simple as clicking on the large blue microphone icon in the left-hand part of the window. The screen will change to show buttons for stopping, pausing, and marking specific moments within the recording, as well as a counter that shows how long you’ve been recording. When you’re done, click on the blue stop button in the middle of the screen.
In the main window, you’ll see a list of recorded clips. You can also select files for playback, trimming, and renaming. If you’re having trouble recording through your microphone, or through the correct microphone, go into Win10’s Sound settings (Windows key, then type sound settings.) Under Input, verify that the microphone in use is set as the active device.
Files recorded in Voice Recorder are immediately accessible as .m4a files, which most modern devices can play through their default apps.
Audacity
Audacity might lack a sleek, modern look, but it has plenty of features to make up for its plain user interface.
Audacity may not look like much, but this well-known free audio recording program’s sophistication lies in its feature set.
To record, simply open Audacity after installation and hit the red recording button. Audacity makes the most important basic controls obvious and available in this main window: You can start, stop, and pause recordings as needed, easily change which microphone you’re using as an input device, and switch up the output device for listening to playback. Basic editing tools are available here on this screen too.
Audacity’s real benefit is its ability to accommodate more complicated recording setups, like multiple tracks and/or multiple input devices, as well as more intricate edits and adjustments. (Example: Increasing input levels because the mic’s output isn’t strong enough.) Learning the ins and outs of Audacity can take some time, but that time invested will make it easier to get the most out of your recordings.
You can also export your clips in a wide variety of common file types, which is beneficial to even basic users. Be aware that unlike Voice Recorder, Audacity doesn’t immediately save recordings as playable audio files. Instead, it saves whatever you’ve recorded as a project file, and you must export via File > Export to an audio format like .mp3 or .wav for other devices or programs to be able to play back the file.
For more detailed information on how to dive into Audacity’s wealth of features, check out our Audacity primer.
Recording tips
For higher-quality recordings, keep these tips in mind:
- Record in a spot free of background noise and echo. As odd as it sounds, the inside of a closet full of clothes works remarkably well.
- Stay closer to your mic—moving too far away from it can cause the recording to sound hollow.
- Hardware does play a role in sound quality, so if you have some spare cash, upgrading to one of our best USB microphone picks from a laptop, webcam, or headset mic will let your voice shine.