Are you finding yourself constantly frustrated while multitasking on your Windows 10 computer? Do you often need to keep an important window from getting lost behind other windows, but you don’t know how? If so, then you’re in the right place! In this article, you will learn exactly how to pin a window on top in Windows 10. With just a few simple steps, you can make sure that your window will stay on top of other windows and never get lost again. Let’s get started!
To Pin a Window on Top Windows 10, follow these steps:
- Right-click on the window title bar.
- Choose the “Always on Top” option from the context menu.
- The window will stay pinned on top of other windows.
This feature is available in all Windows versions after Windows 7.

Pinning a Window on Top of Windows 10
Pinning a window on top of Windows 10 is a great way to keep a particular window open and accessible as you work with other windows. It’s especially useful when you’re working with multiple programs and need to keep an eye on one program while working in another. Here’s how to get started.
Step 1: Locate the Target Window
The first step is to locate the window you want to pin to the top of your Windows 10 desktop. You can find the window by using the taskbar or by using the Task Manager. The Task Manager is a powerful tool that allows you to view and manage running programs and processes. To open the Task Manager, press the Windows key + X and select Task Manager.
Once the Task Manager is open, you can select the window you want to pin to the top of your desktop. To do this, click the “Processes” tab and locate the window you want to pin. Once you’ve located the window, right-click it and select “Pin to top” from the menu.
Step 2: Pin the Window to the Top
Now that you’ve located the window you want to pin to the top of your Windows 10 desktop, you can pin it. To do this, right-click the window and select “Pin to top” from the menu. This will make the window stay on top of other windows, even when you switch to another window.
Step 3: Keep the Window on Top
Once you’ve pinned the window to the top of your desktop, you can keep it there by selecting the “Always on top” option in the window’s menu. This will keep the window on top of other windows even when you switch to another window.
Step 4: Unpin the Window
If you want to unpin the window from the top of your desktop, you can do so by right-clicking the window and selecting “Unpin from top” from the menu. This will remove the window from the top of your desktop and allow you to switch to another window.
Step 5: Pin the Window Again
If you want to pin the window back to the top of your desktop, you can do so by right-clicking the window and selecting “Pin to top” from the menu. This will make the window stay on top of other windows, even when you switch to another window.
Related FAQ
1. What is Pin on Top?
Pin on Top is a Windows 10 feature that allows you to keep a window in the foreground of your computer screen. It will stay in the same position, regardless of what other windows or programs you may have open. This feature is especially useful when you need to keep a certain window visible, such as a chat window or a document that you are working on.
2. How do I Pin a Window on Top of Windows 10?
To pin a window on top of Windows 10, you will need to right-click on the title bar of the window that you would like to pin. From the menu that appears, select the option “Pin on Top.” The window will now remain in the foreground, regardless of what other windows or programs you may have open.
3. What are the Benefits of Pinning a Window on Top?
The primary benefit of pinning a window on top is that it allows you to keep a certain window visible, regardless of what other windows or programs you may have open. This can be especially useful for keeping track of certain documents or conversations that you need to have visible at all times. It can also help to keep your workflow organized, as you can keep the window you need on top, while still having access to other windows or programs.
4. Is There a Limit to How Many Windows I Can Pin on Top?
No, there is no limit to how many windows you can pin on top. You can pin as many windows as you like and they will all remain in the foreground. However, it is important to note that if you have too many windows pinned on top, your computer may start to run slowly and become unresponsive.
5. Can I Unpin a Window Once I Have Pinned It on Top?
Yes, you can unpin a window once you have pinned it on top. To do this, simply right-click on the title bar of the window that you would like to unpin and select the option “Unpin from Top.” This will remove the window from the foreground, allowing you to open and view other windows or programs.
6. Is Pinning a Window on Top Available on All Versions of Windows?
Yes, pinning a window on top is available on all versions of Windows 10. This feature was first introduced in Windows 8 and has been included in all subsequent versions of Windows 10. It is a useful feature that can help to keep your workflow organized and keep certain windows visible at all times.
How To Pin A Window On Top In Windows 10 (2023)
There you have it! Now you know how to pin a window on top of Windows 10. It’s an incredibly simple process that will save you time and effort. So don’t wait any longer, start pinning your most-used windows to the top of your desktop today!
Содержание
- Вариант 1: Закрепление любого окна
- Способ 1: PinWin
- Способ 2: DeskPins
- Способ 3: AutoHotKey
- Вариант 2: Закрепление отдельных программ
- Закрепление «Диспетчера задач»
- Закрепление проигрывателя Windows Media Player
- Закрепление плеера браузера
Вариант 1: Закрепление любого окна
Чтобы закрепить окно Windows поверх остальных, потребуется воспользоваться сторонними утилитами, поскольку штатных средств для этого не предусмотрено. Разберем несколько бесплатных вариантов, которые позволят сделать так, чтобы любое окно системы и софта располагалось всегда поверх. Алгоритм зависит от выбранного средства: у некоторых утилит реализована функция горячих клавиш, у других – через меню в области уведомлений.
Способ 1: PinWin
PinWin – бесплатное приложение, с помощью которого можно закрепить любое окно поверх других, даже если оно неактивно. Работает через область уведомлений, где после инсталляции появится его иконка:
Скачать PinWin с официального сайта
- Скачайте установочный файл и запустите его, чтобы инсталлировать приложение на компьютер, следуя инструкциям пошагового мастера.
- В трее появится значок, стилизованный под канцелярскую кнопку, нажмите на него. Отобразится меню, где доступен список всех окон, которые запущены. Выберите из перечня нужное или воспользуйтесь пунктом «Select Window From Screen».
- То окно, которое нужно закрепить, будет подсвечиваться красным цветом. Щелкните левой кнопкой мыши, чтобы указать, что именно отобразится поверх остальных окон.

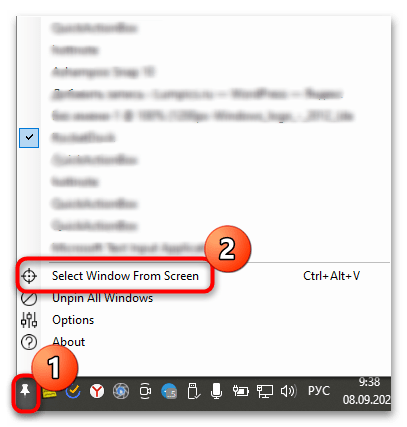
В утилите реализована горячая клавиша при выборе окна с рабочего стола: достаточно одновременно зажать «Ctrl + Alt + V».
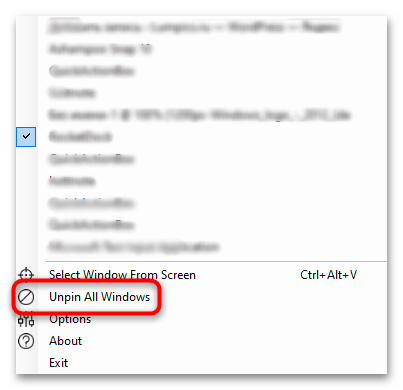
Несмотря на то, что интерфейс на английском языке, он интуитивно прост. При необходимости можно открепить сразу все окна, выбрав пункт «Unpin All Windows».
Способ 2: DeskPins
Еще одно решение, упрощающее работу с окнами в Windows 10, – это DeskPin. С помощью него можно без особых усилий закрепить любое окно поверх остальных:
Скачать DeskPins с официального сайта
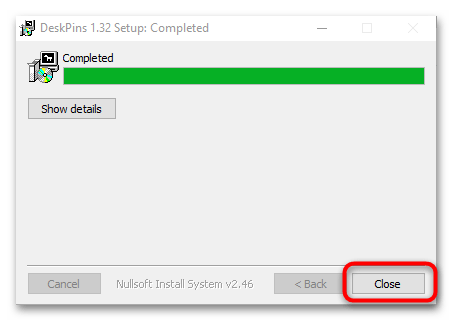
- Загрузите и установите DeskPins. После инсталляции нажмите на «Close» в окне пошагового мастера.
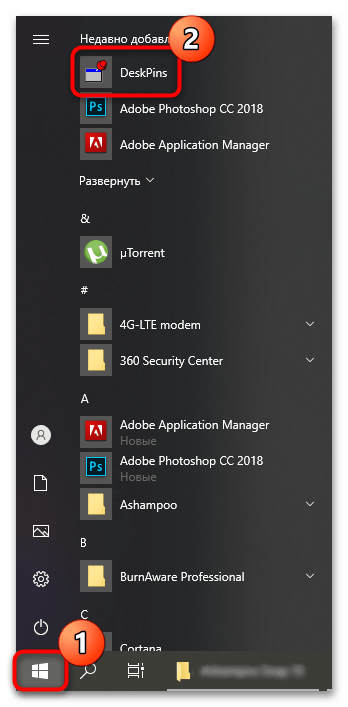
- Чтобы иконка приложения появилась на панели уведомлений, запустите его, отыскав в списке установленного софта.
- Щелкните ЛКМ по значку на трее, и тогда курсор мыши преобразуется в значок канцелярской кнопки. Кликните по тому окну, которое надо закрепить. Вверху появится картинка в виде кнопки, указывающая, что окно располагается поверх остальных.

Чтобы открепить окно, наведите курсор на красный значок канцелярской кнопки. Появится иконка в виде крестика, после чего щелкните по нему ЛКМ.
Способ 3: AutoHotKey
AutoHotKey – удобная программа, с помощью которой пользователь может самостоятельно создавать различные скрипты для своих горячих клавиш. При этом они применяются не только в определенных приложениях, но и в операционной системе в общем. Создать скрипт, отвечающий за функцию «Всегда сверху» у активного окна, достаточно просто:
Скачать AutoHotKey с официального сайта

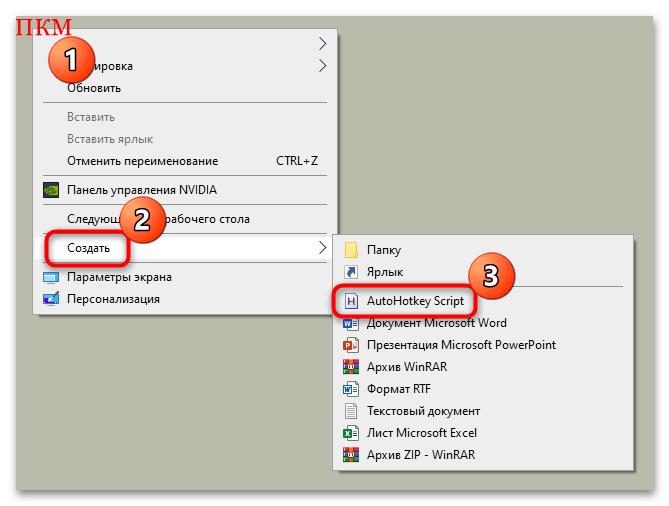
- После скачивания установочного файла запустите его. Его функции автоматически интегрируются в контекстное меню Windows 10. Щелкните правой кнопкой мыши по свободной области рабочего стола и в списке наведите курсор на пункт «Создать». В развернувшемся дополнительном меню нажмите на пункт «AutoHotkey Script».
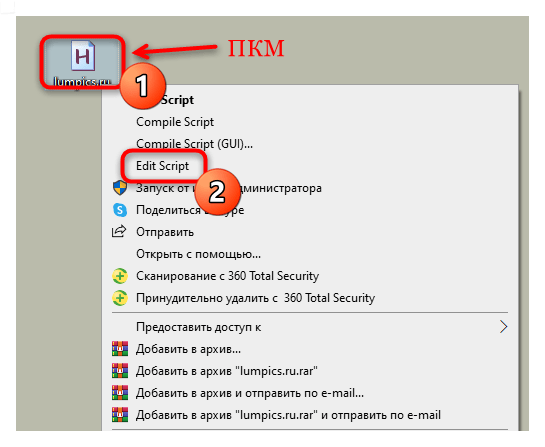
- Задайте имя скрипту, затем кликните по нему правой кнопкой мыши и выберите функцию «Edit Script».
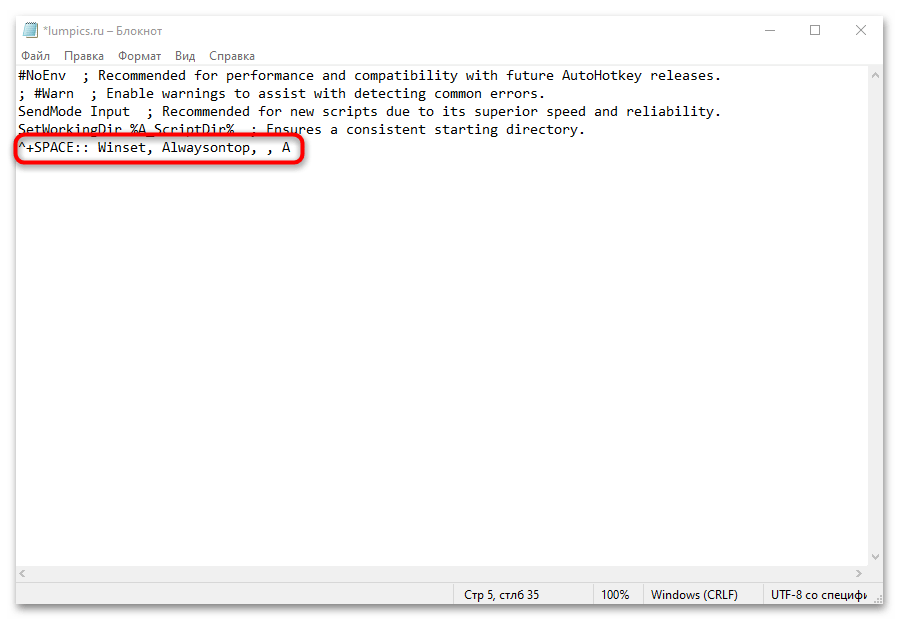
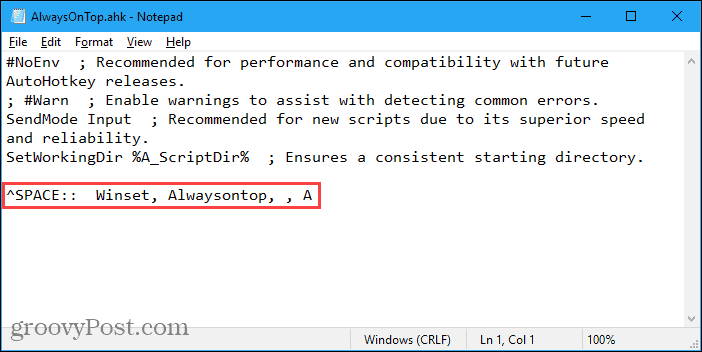
- По умолчанию запустится встроенный редактор «Блокнот». Не удаляйте уже введенные символы, а ниже пропишите команду
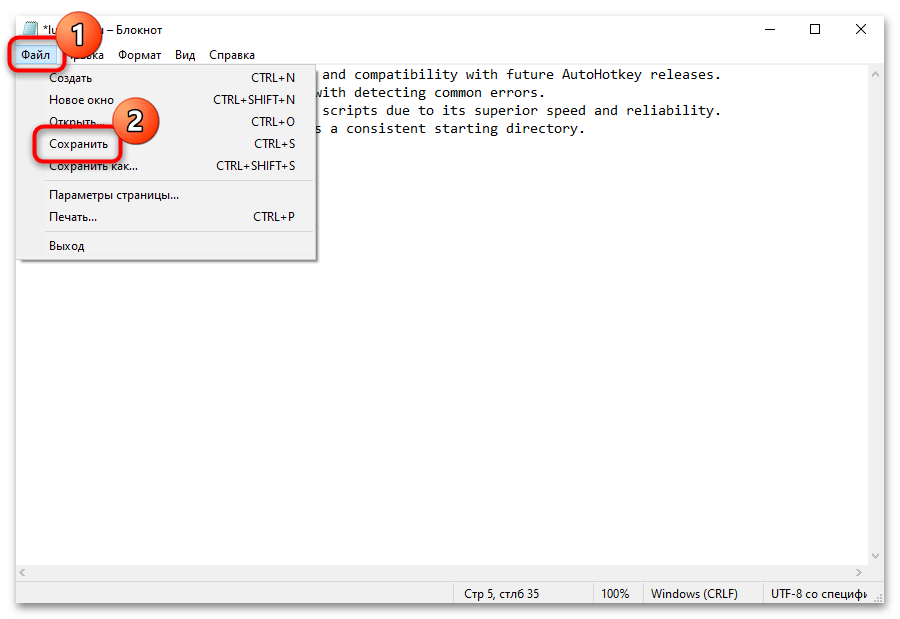
^+SPACE:: Winset, Alwaysontop, , A. - Нажмите на вкладку «Файл» и выберите пункт сохранения.
Затем потребуется запустить файл скрипта двойным нажатием ЛКМ. Теперь, когда открыто окно, которое нужно закрепить, достаточно использовать комбинацию клавиш «Ctrl + Shift + Space».
Вместо «Space» можно задать любую клавишу, вписав ее в файле скрипта, открытом в «Блокноте».
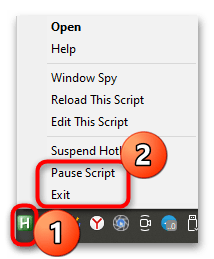
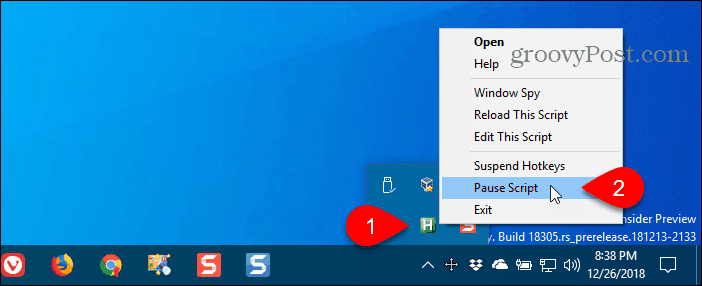
Чтобы остановить работу скрипта, достаточно в трее щелкнуть по его иконке правой кнопкой мыши и выбрать пункт «Exit». Также можно поставить его на паузу, воспользовавшись параметром «Pause Script».
Вариант 2: Закрепление отдельных программ
Встроенных в Windows средств закрепления окон, как вы уже понимаете, нет — лишь только пара системных приложений умеет выносить себя на первый план. Кроме того, если говорить о функциях самой программы, браузеры сейчас позволяют выносить окно плеера отдельно, и оно по умолчанию закрепляется поверх всех окон.
Закрепление «Диспетчера задач»
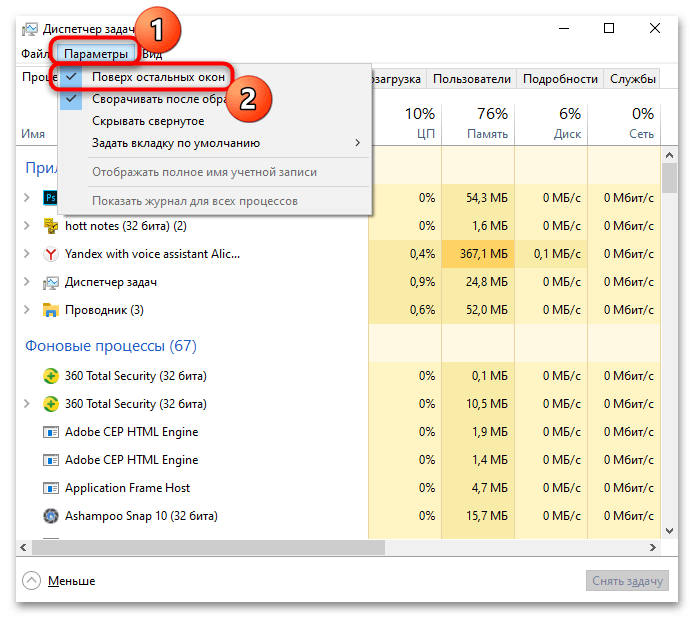
Штатное средство «Диспетчер задач» позволяет отслеживать работу активных процессов и производительность системы в целом, поэтому иногда важно, чтобы окно приложения было на виду. Разработчики предусмотрели такую возможность: для этого достаточно в запущенном «Диспетчере задач» кликнуть по вкладке «Параметры», затем отметить пункт «Поверх остальных окон».
Читайте также: Методы запуска «Диспетчера задач» в Windows 10
После этого «Диспетчер задач» будет всегда находиться сверху. Его размер можно уменьшить, если навести курсор на границу интерфейса, чтобы он преобразился в стрелку с двумя концами. Удерживая левую кнопку мыши, перетащите границу окна, пока оно не примет нужный размер.
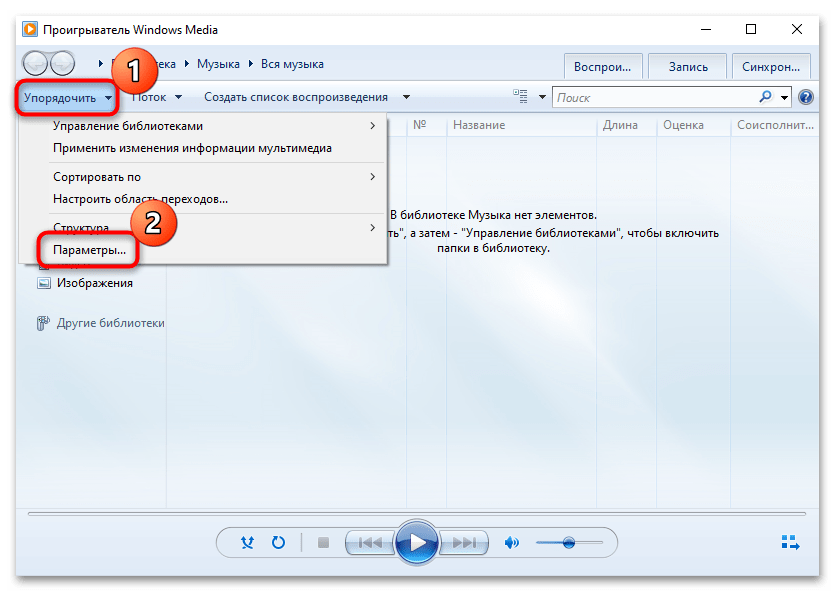
Закрепление проигрывателя Windows Media Player
Встроенный мультимедийный проигрыватель Windows Media Player также предусматривает функцию «Окно в окне», то есть при которой он будет закреплен на экране:
- В запущенном приложении нажмите на кнопку «Упорядочить» и из меню выберите пункт «Параметры».
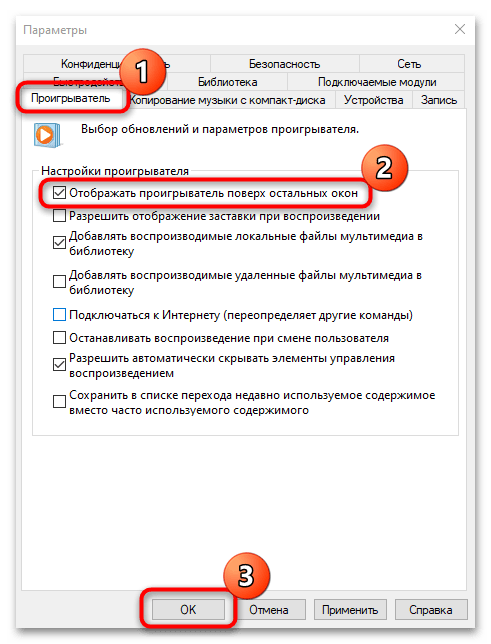
- В новом системном окне перейдите на вкладку «Проигрыватель» и поставьте галочку около опции «Отображать проигрыватель поверх остальных окон». Кликните по «ОК», чтобы применить изменения.
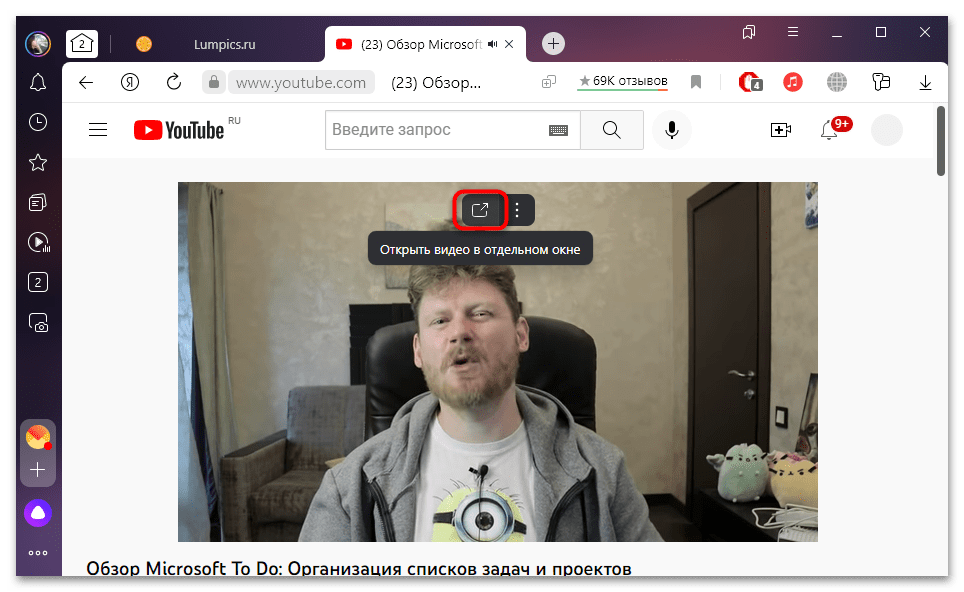
Закрепление плеера браузера
Некоторые браузеры имеют встроенную функцию «Окно в окне», что удобно при просмотре видеоконтента с сайтов или специальных сервисов. Во время воспроизведения через встроенный проигрыватель на ресурсе в этом случае нужно нажать на специальную иконку, запускающую плеер в отдельном окне, которое по умолчанию поверх остальных. Это доступно в таких обозревателях, как Яндекс.Браузер, Opera, встроенном Microsoft Edge.
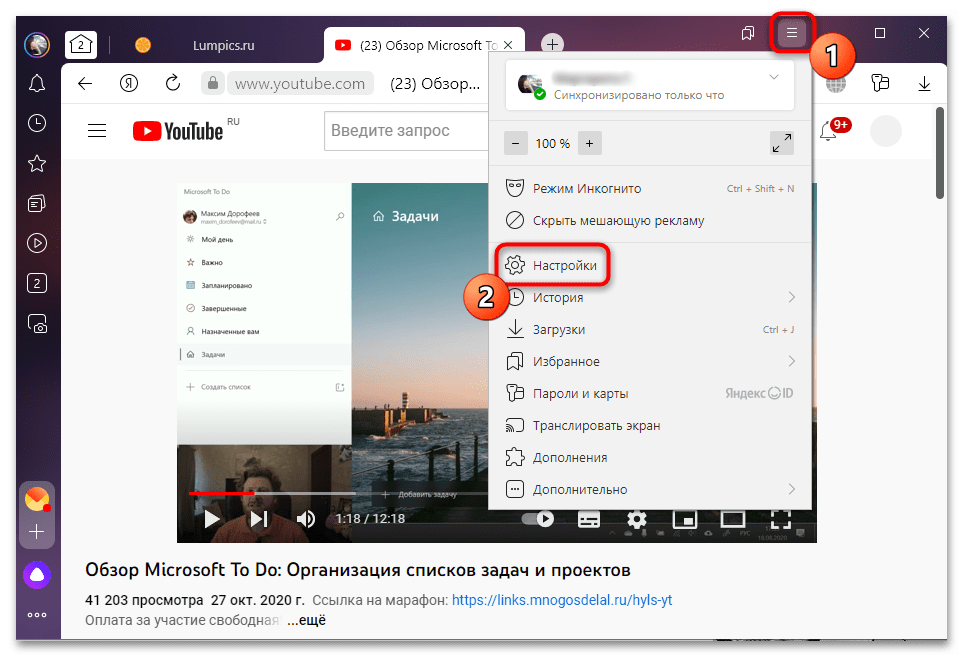
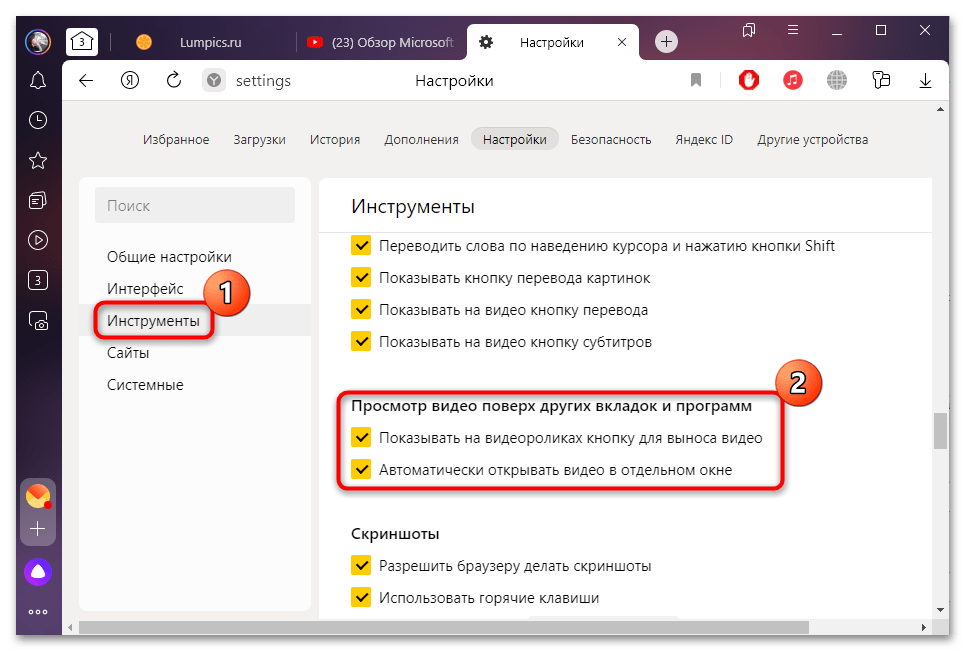
Если в «Яндекс.Браузере» нет значка для выноса видео в отдельном окне поверх остальных, то эту функцию потребуется активировать вручную:
- Откройте раздел «Настройки», нажав на три вертикальные полоски на верхней панели.
- На вкладке «Инструменты» найдите блок «Просмотр видео поверх других вкладок и программ». Отметьте опцию «Показывать на видеороликах кнопку для выноса видео».

When working with multiple windows in Windows 10, you might want to keep a window always on top for easy reference. Learn three different ways of accomplishing this.
When you are working in Windows with limited screen space, it’s useful to have certain windows stay on top of others. Some programs in Windows automatically incorporate this “always on top” feature, but most programs don’t, and Windows doesn’t include this feature either.
Today we’ll cover three ways to easily add the “always on top” feature to every single program in Windows.
1. Use a Keyboard Shortcut with an Always on Top AutoHotkey Script
AutoHotkey is a free program that allows you to create scripts to perform multiple actions with a single keyboard shortcut. It runs in the background and sits in the system tray.
We’re going to use AutoHotkey to create a script that will keep a selected window on top of all others when you press Ctrl + Spacebar when that window is active. We’ll show you the script and explain how it works. But we’ll also provide a downloadable AutoHotkey script file you can use.
Download and install AutoHotkey and then run it.
Download the AlwaysOnTop.ahk script file, extract the .zip file, and put the script in a folder on your hard drive that won’t be moved or deleted.
The script contains some comments and then the following command:
^SPACE:: Winset, Alwaysontop, , A
This command sets the currently active window to always be on top when you press Ctrl + Spacebar. If you’d rather use a different key combination, you can change the first part of the command, “^SPACE“. The “^” character represents the Ctrl key. You’ll find the symbols to use for other hotkeys in the Hotkey Modifier Symbols section on this AutoHotkey help page.
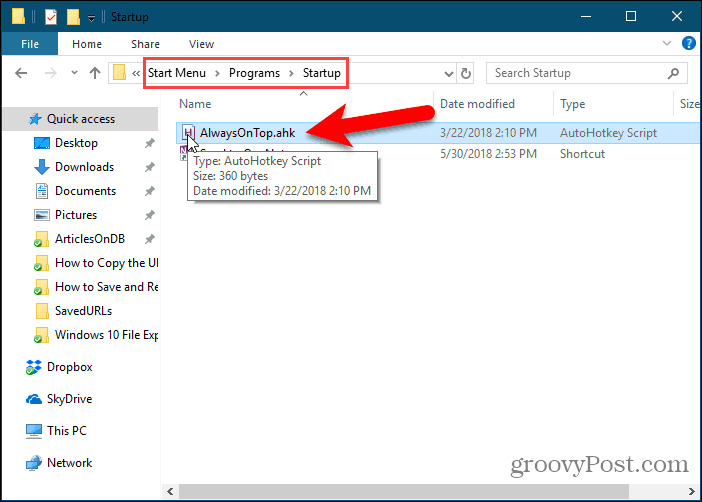
You can put the script in the Windows startup folder (%AppData%MicrosoftWindowsStart MenuProgramsStartup), so it starts automatically when Windows starts.
The AutoHotkey script stays in the system tray.
To make the active window always on top, press Ctrl + Spacebar (or the keyboard shortcut you assigned). Press the keyboard shortcut again to disable “always on top” for the active window.
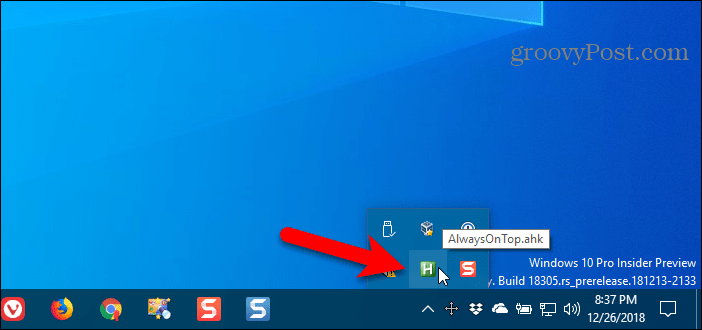
For script options, right-click on the AutoHotkey icon in the system tray.
2. Use Your Mouse with DeskPins
DeskPins provides pins you can grab and use to keep any window on top of all other windows. The program sits in the system tray and uses minimal resources.
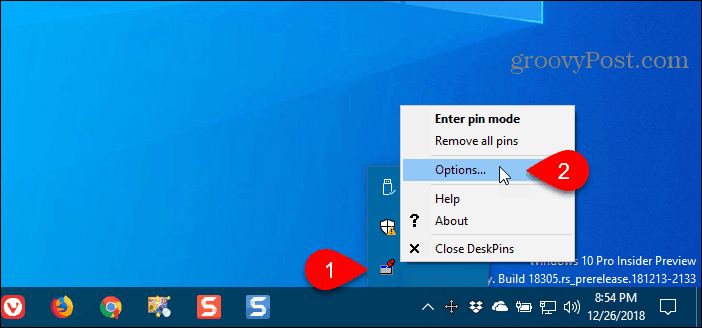
Download and install DeskPins. Run the program, right-click the icon in the system tray, and select Options to change the Pins, Autopin, and Hotkeys settings.
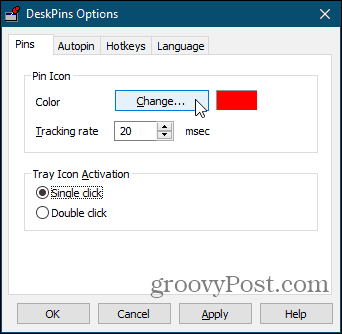
On the Pins tab, you can change the color of the pins. The Tracking rate controls how often each pin checks the pinned window’s position and state. Lower values make the pins more responsive. You can enter any number from 10 to 1000 msec (milliseconds).
If you have an older computer, you may want to increase the Tracking rate number to avoid slowing down your computer.
You can also choose Single click or Double click under Tray Icon Activation to indicate how you get pins from the DeskPins system tray icon. The default is Single click.
You can have DeskPins automatically pin certain types of windows using rules on the Autopin tab.
Check the Enable box and then click Add to add a new rule. Use the checkboxes next to the rules to enable and disable individual rules.
Click Help to access the DeskPins help file for more information about automatically pinning windows.

DeskPins provides default shortcuts for entering pin mode and toggling the active window pin. You can change these shortcuts on the Hotkeys tab.

To pin a window on top, click (or double-click, depending on the setting) the DeskPins icon in the system tray.
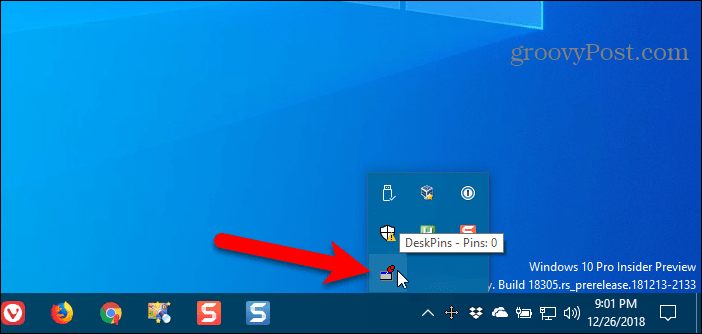
Then, click the title bar on the window you want to keep always on top.
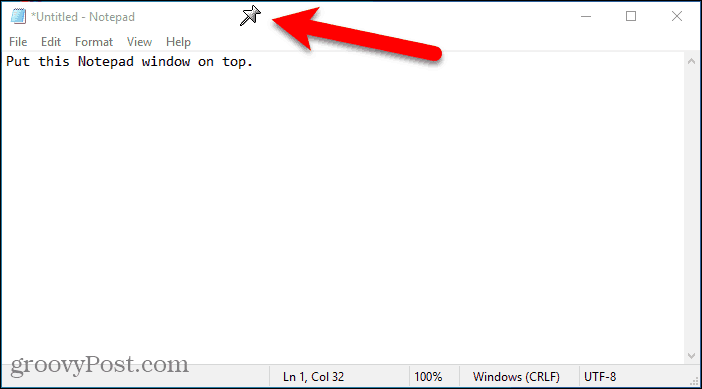
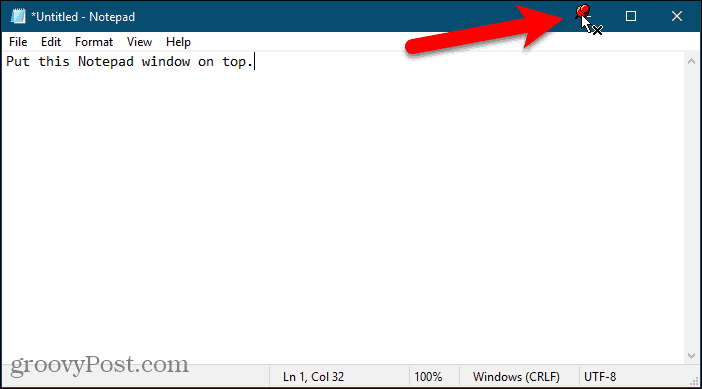
A pin displays on the title bar of the chosen window in the color you specified, or in the default color red.
Click the pin again to disable always on top for the window.
3. Use a System Tray Menu with TurboTop
TurboTop also sits in your system tray like DeskPins. But it operates differently.
Download and install TurboTop. Then, run the program.
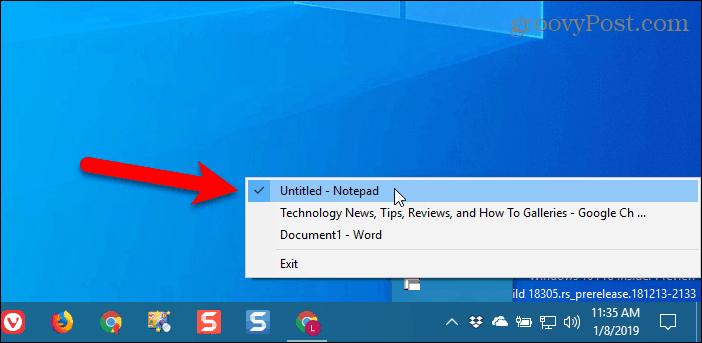
To keep a window always on top, click the TurboTop icon in the system tray. A list of all open windows displays. Select the title of the window you want.
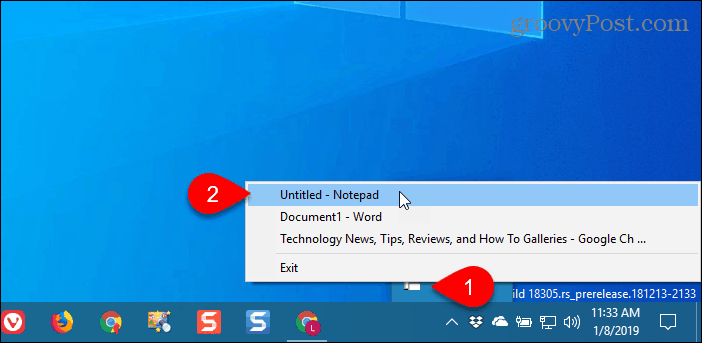
Any windows you choose to be always on top are indicated with a checkmark on the TurboTop menu.
To stop keeping a window always on top, click the TurboTop icon in the system tray and select that window again, so there’s no checkmark next to the window name on the menu.
Bring the Always-on-Top Feature to All Windows
Whether you like using keyboard shortcuts or prefer using the mouse, there’s an easy solution for keeping windows always on top. If you’ve found other options for keeping windows always on top, let us know in the comments.
![]()

To pin a window on top, click (or double-click, depending on the setting) the DeskPins icon in the system tray.
Then, click the title bar on the window you want to keep always on top.
How do I keep a window always on top?
All you need to do is select the window and then hit ‘Ctrl + Space’ from your keyboard, and the window will stay there as it is on top of all other windows. Click here to download Always On Top.
How do I lock a window in Windows 10?
4 ways to lock your Windows 10 PC
- Windows-L. Hit the Windows key and the L key on your keyboard. Keyboard shortcut for the lock!
- Ctrl-Alt-Del. Press Ctrl-Alt-Delete.
- Start button. Tap or click the Start button in the bottom-left corner.
- Auto lock via screen saver. You can set your PC to lock automatically when the screen saver pops up.
Is there a way to pin a window on top?
Click the icon in your taskbar and look for your mouse to turn int a small pin. Instead of using a keyboard shortcut, you’ll need to pin your program by clicking on the top portion of a desktop window. A small red pin icon will appear in the pinned window at the top of the page.
How do you make an app always on top?
Select the Player tab and enable the “Keep Now Playing on top of other windows” checkbox. Firefox: Install the Always on Top add-on. Once you have, press Alt and click View > Always on Top. You can also just press Ctrl+Alt+T to make the current Firefox window always-on-top.
How do I make Windows 10 full screen?
Use a keyboard shortcut to switch between full screen and normal display modes. When screen space is at a premium and you only need SecureCRT on your screen, press ALT+ENTER (Windows) or COMMAND+ENTER (Mac). The application will expand to full screen, hiding the menu bar, tool bar, and title bar.
How do I lock apps on Windows 10?
Lock Apps on Windows 10 with My Lockbox
- You can use the My Lockbox software to lock apps on Windows 10.
- When you first open My Lockbox, the software will ask you to set up a password that will be used to lock the apps on your PC.
- Then, you can choose the folder to protect and click “Ok”.
What does lock do on Windows 10?
Locking and Unlocking Your Windows 10 Computer. You unlock your computer by logging in again (with your NetID and password). Locking Your Computer. Press and hold the Windows logo key on your keyboard (this key should appear next to the Alt key), and then press the L key.
How do I remotely lock my computer Windows 10?
How to lock a Windows 10 device remotely
- Open your Microsoft account online.
- Click on Devices.
- In the “Overview” tab, click the Show details (or Manage) button for the device you want to lock.
- Click the Find my device tab.
- Click the Lock button on the top-right side.
- Click the Next button.
Where are Windows 10 lock screen pictures?
How to Find Windows 10’s Spotlight Lock Screen Pictures
- Click Options.
- Click the View tab.
- Select “Show hidden files, folders and drives” and click Apply.
- Go to This PC > Local Disk (C:) > Users > [YOUR USERNAME] > AppData > Local > Packages > Microsoft.Windows.ContentDeliveryManager_cw5n1h2txyewy > LocalState > Assets.
How do I pin a window to my screen?
To pin a window to the side of the screen, you simply drag it by its title bar until the mouse cursor hits the left or right boundary of the screen. Before you let go of the mouse button, you will see a ghost of how the window will be placed. Let go of the mouse button and the window will drop there.
How do I make my apps full screen on Windows 10?
Click on Start Button on your Taskbar and open any of the Universal App. Press the middle maximize button and the app will expand to fill up the screen. Now press Win+Shift+Enter keys and the app will go full-screen as follows.
How do I turn off Internet Explorer always on top?
If you’d like to disable it, here’s how.
- Right click the Start icon and select Control Panel.
- Click Programs.
- Choose Programs & Features.
- In the left sidebar, select Turn Windows features on or off.
- Uncheck the box next to Internet Explorer 11.
- Select Yes from the pop-up dialogue.
- Press OK.
How do I keep notepad on top?
Open Notepad, click on the “DeskPins” icon on the Taskbar and then click anywhere within the Notepad window to keep it on top. Go to Dropbox.com and download the Always On Top ZIP file. Run the executable file inside the Always On Top ZIP file. Open Notepad and press “Ctrl-Space” to keep the Notepad window on top.
How do I make Netflix always on top?
Method
- Go to the Chrome Webstore.
- Install this add-on: Open-as-Popup.
- Navigate to the Netflix site.
- Pick the movie of choice and start watching.
- Find the Open-as-Popup icon in the toolbar and click it.
- With the new Popup window selected, Use the Always On-Top hotkey Ctrl+Space to set the that window as “Always On-Top”.
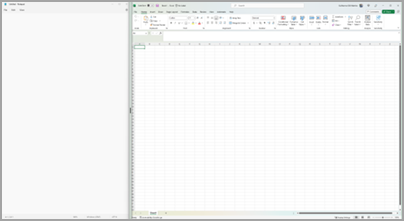
How do you make Excel always on top?
Instead, think of the selection as the first cell outside of your fixed column and row.
- Open your Excel spreadsheet.
- Click cell B2.
- Click the View tab on the ribbon.
- Double-click the Freeze Panes button.
- Click the option Freeze Panes.
- Scroll down your worksheet to make sure the first row stays at the top.
How do I maximize my screen on Windows 10?
Full Screen issues on Windows 10?
- Go to the Options / Menu / Settings inside the game (not all games have this). Select Full-Screen On (or Off).
- Check the Resolution and DPI settings on the computer. In Windows 10 that screen will look allot like this:
- Game won’t open in fullscreen. You may have success when you reduced color mode.
- Game is flashing.
How do I fix full screen on Windows 10?
To do that, follow these steps:
- Right click on your Desktop and choose Display settings from the menu.
- In Display settings window click Identify.
- Now in Display settings set the monitor with the same number you got in Step 2 as the main monitor.
- Save the changes and try running games in fullscreen.
How do I make my command prompt full screen Windows 10?
To try the full screen mode of the command prompt in Windows 10, do the following:
- Open a new Command prompt window by launching the appropriate shortcut from the Start menu or by typing cmd into the Start menu search box and pressing Enter.
- When command prompt starts, press Alt + Enter keys together on the keyboard.
How do I hide a window in Windows 10?
Hide or Display All Desktop Items in Windows 10. The first way to quickly hide everything is a built-in feature of Windows 10. Just right-click an empty area of the desktop and select View and then uncheck Show desktop icons from the context menu.
How do I hide apps on Windows 10?
Hide App list from Windows 10 Start Menu
- Step 1: Go to ‘Start’, and open ‘Settings’.
- Step 2: Now select ‘Personalization’. Then from the left menu choose ‘Start’.
- Step 3: Find the setting that says “Show app list in Start menu” and turn it off to hide the app list from the Start menu.
Can you password protect a folder in Windows 10?
Unfortunately, Windows Vista, Windows 7, Windows 8, and Windows 10 do not provide any features for password protecting files or folders. You need to use a third-party software program to accomplish this. Select the file or folder you want to encrypt. Right-click the file or folder and select Properties.
How do I change the login screen on Windows 10?
To change the current login screen background image, open the Settings app. Go to the Personalization group of settings and click ‘Lock Screen’. Select an image for the lock screen and then scroll down to the very bottom. Here you will see an option ‘Show lock screen background picture on the sign-in screen’.
What is the lock screen on Windows 10?
You can do a lot of cool things in Windows 10, but the first item that greets you when you fire up the OS is the lock screen. Clicking or tapping on it brings you to the sign-in screen where you log in to Windows.
How do I fix the lock screen on Windows 10?
Now expand “Desktop background settings -> Slide show” and set “On battery” option to “Available” from the drop down box. Apply changes and it may also fix the issue. If the option “Press Ctrl+Alt+Delete to unlock” is enabled on your Windows 10 computer, the slide show feature of Lock Screen will not work.
How do I make Skype always on top?
Press “Ctrl-Space” to keep Skype on top. The Skype window will always appear in front of all other windows on the screen and on top of the Windows task bar. Press “Ctrl-Space” again when you want to undo this, so that the window behaves like a normal window again..
How do I minimize a window in Internet Explorer?
How to Minimize & Maximize an Internet Explorer Browser
- Open your Internet Explorer web browser.
- Click on the small box that is displayed with a horizontal line or a symbol that looks like a dash, located on the upper, right corner of the Internet Explorer window. The window should minimize as soon as you click.
To make your app window “Always on Top,” click on the “Window” option in the menu and select “Keep Afloat.” Do note that Afloat doesn’t work on all applications (for example, Firefox). It only works for applications with support for SIMBL, so don’t be surprised when you don’t see the “Keep Afloat” function.
Photo in the article by “Flickr” https://www.flickr.com/photos/dok1/4609436395/
Download PC Repair Tool to quickly find & fix Windows errors automatically
Do you like the Always On Top feature provided by some apps and want this feature in other apps too? Well, you can make any window stay at the top of other windows. This post discusses a number of tools that let you do so. Keeping a window on top comes with a lot of benefits, you can continue doing your work, while also keeping an eye on other windows as well.
Here are a few free tools that can help you keep a window Always on Top on your Windows 11/10 PC:
- Microsoft PowerToys
- Window TopMost Control
- PinWin
- PinWin – Pin On Top
- TurboTop
- OnTopReplica
- DeskPins
- AOT Extension for Chrome & Firefox
- WindowTop
- OnTopper
- TopMostFriend
- PinMe.
1] Microsoft PowerToys
You can pin a window and make the program or app stay Always On Top using Microsoft PowerToys.
Once you have installed PowerToys, you need to use the Win+Ctrl+T hotkey!
2] Window TopMost Control
TopMost Control can make any program window stick over other program windows. To make a window always on Top you have four options:
- Select a window and double click to the TopMost Control icon in the system tray
- Select a window and use Ctrl+Alt+Space Keyboard shortcuts
- Use Windows List in system tray menu
- Use CMD.
Get it here.
3] PinWin
PinWin is a very simple and intuitive app that allows you to make any 3rd party window, remain “always-on-top”. It will appear on top of other windows at all times. Available here.
4] PinWin – Pin On Top
PinWin – Pin On Top is another minimal Windows system tray application that allows you to pin any windows to the top of the screen with one click. Available here.
5] TurboTop

TurboTop is again a small utility that runs from the system tray. It lets you choose the window that you want to keep on top and that all. The window would stick to the top while you do your work. There are no hotkeys or customizations possible with this tool. TurboTop is very simple to use and just does what it says. Click here to download TurboTop.
6] OnTopReplica
OnTopReplica is a great tool that creates a real-time clone of a specified window using DWM Thumbnails and the Windows Forms Aero library. You can create a clone by selecting a Window or by specifying an area from your screen. You can easily resize the window as per your requirement and tweak a few other settings as well. You can set the clone opacity and even lock its position on the screen. To facilitate the task, you can even choose hotkeys to clone the screen and also for showing/hiding the cloned window. Click here to download OnTopReplica.
7] DeskPins
DeskPins is another lightweight tool that can force any running programs to stay on top of others. It is available here.
8] AOT Extension for Firefox
AOT a.k.a. Always on Top extension for lets you keep any webpage on top of all other windows. The extension comes in handy when you are manually doing some data entry on a webpage and minimizing and then maximizing windows is a pain. It is available for Mozilla Firefox which can be downloaded from here.
9] WindowTop

You might want also to check out WindowTop. It is a free utility for Windows that lets you pin an open window on top of others. You can control opacity, click-through windows, enable Dark Mode & Shrink the open applications.
10] OnTopper
OnTopper is another free tool available on SourceForge that lets you pin a program window topmost.
Related: How to enable Always on Top for Windows Terminal.
11] TopMostFriend
This free utility lets you quickly force any program to be always on top. It should work on any version of Windows that supports .NET Framework 4.0 and is available for download from Github.
12] PinMe
PinMe lets you pin a window Always On Top, change transparency level, capture windows, and offer basic statistics on your PC. It is available here.
Did we miss any?
How do I pin a window always on top in Windows?
You can pin a window and make the program or app stay Always On Top using Microsoft PowerToys.
Once you have installed PowerToys, you need to use the Win+Ctrl+T hotkey!
How do I pin a Chrome window to the top in Windows?
You can use a browser extension or a free tool to do this as mentioned in this post. If you want to pin a Chrome tab, then right-click the tab and select Pin.

Lavish loves to follow up on the latest happenings in technology. He loves to try out new Windows-based software and gadgets and is currently learning JAVA. He loves to develop new software for Windows. Creating a System Restore Point first before installing a new software is always recommended, he feels.
Windows 10 provides you several ways to pin a website to the Start menu in Windows 10. It is a useful function which saves your time. If you are in Tablet mode, you can open your favorite web site with just one tap or click!
For some reason, Microsoft has locked down the ability to pin a website to the Start Menu by right clicking a URL file from your Favorites folder. But a number of third party browsers and the default browser, Microsoft Edge, have the appropriate function to pin your favorite web pages as Start menu tiles. Also, if you want to use the built-in ability to pin web sites to the Start menu, i.e. without using any browser, you can unblock the hidden context menu entry for *.URL files. Let’s see all these ways one by one.
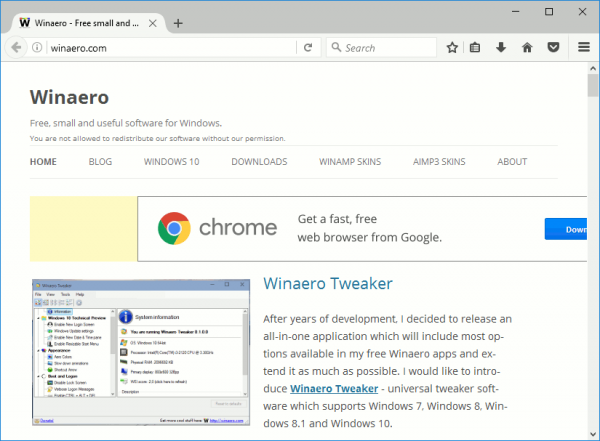
Pin a Website to the Start Menu in Windows 10 with Edge Or Chrome
Microsoft Edge
The Edge browser comes with the built-in ability to pin an opened website to the Start menu in Windows 10. It is accessible directly from its menu. Here is what you should do.
- Open the Edge browser. Its icon is pinned to the taskbar out of the box.
- Navigate to the website you want to pin to the Start menu.
- In Edge, click the three dots «…» menu button to open the browser’s menu.
- There, click the item Pin this page to Start as shown below:

- A confirmation box will appear. There, click «Yes» to pin the page to the Start menu. It will appear in the Start menu immediately.
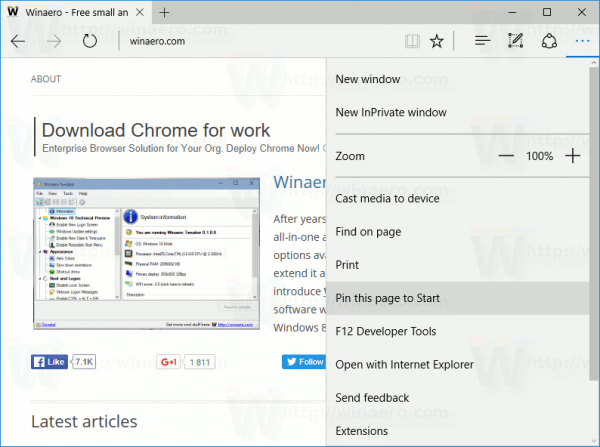
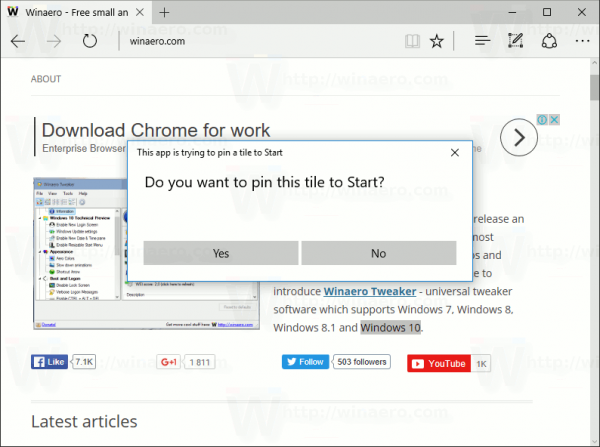
See the following screenshot: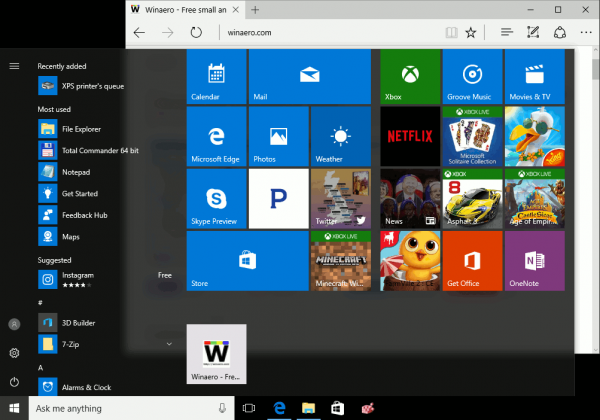
A tile pinned this way will always open in Microsoft Edge. This is because Edge creates a special «modern» shortcut which only Edge can handle and ignores the default browser which might be set in Settings by the user.
Google Chrome
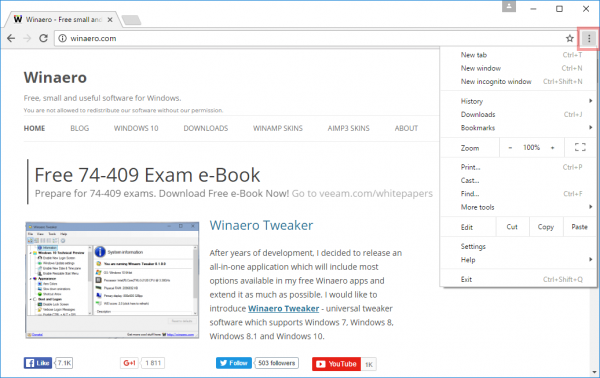
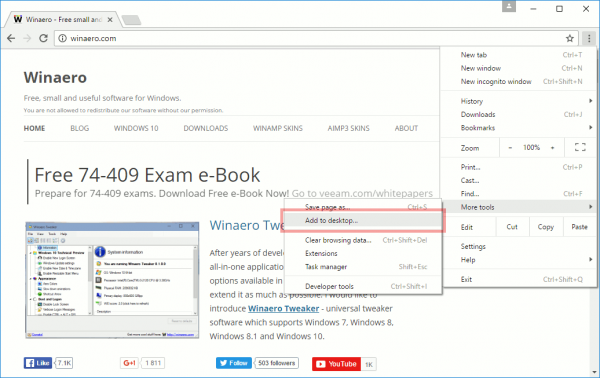
Similar to Microsoft Edge, the popular Google Chrome browser allows you to create a shortcut to the opened page. However, the shortcut will be created on the Desktop instead of the Start menu, but you can pin it to the Start menu from the context menu without additional hacks or tweaks. Do the following.
- Launch Chrome and navigate to the page of your choice.
- Click the vertical three dots menu button to open Chrome’s menu:

- Under «More tools», look for the command «Add to Desktop»:
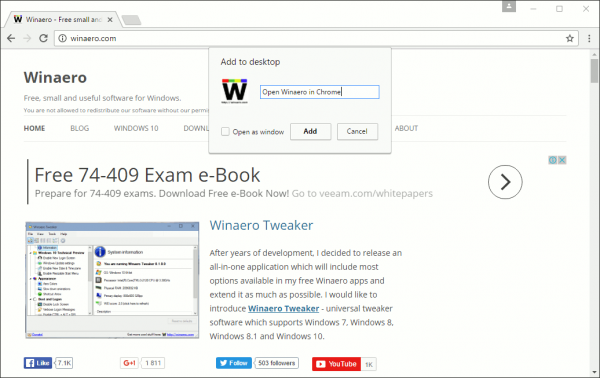
- Google Chrome will ask you for the shortcut name. You can change it if you wish.
- A new URL shortcut will be created on your Desktop:

- Now, just right click it and pin to the Start menu using the context menu item «Pin to Start»:

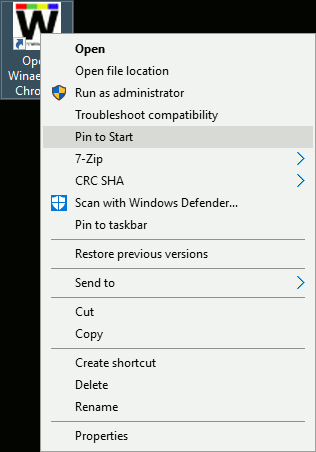
The site will be pinned to the Start menu: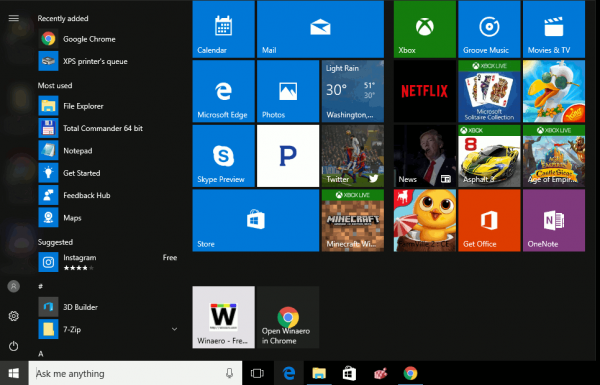
When you click this tile, the pinned web site will be opened in Google Chrome. If you open the shortcut’s properties, you will see that it is set to launch Chrome’s executable file:
Firefox or any other browser
Actually, you can use the trick done by Google Chrome to pin a web site which will be opened in your browser of choice.
For example, to pin a web site which will always open in Mozilla Firefox, you can do the following:
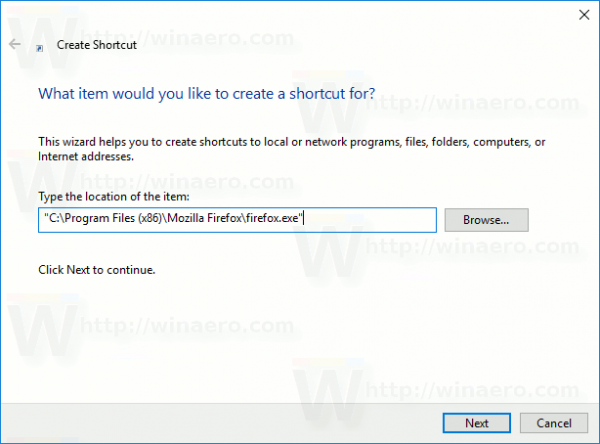
- Right click the Desktop and select New — Shortcut.

- In the shortcut target box, type or copy-paste the full path to Firefox’s EXE file. In my case it is
"C:Program Files (x86)Mozilla Firefoxfirefox.exe"

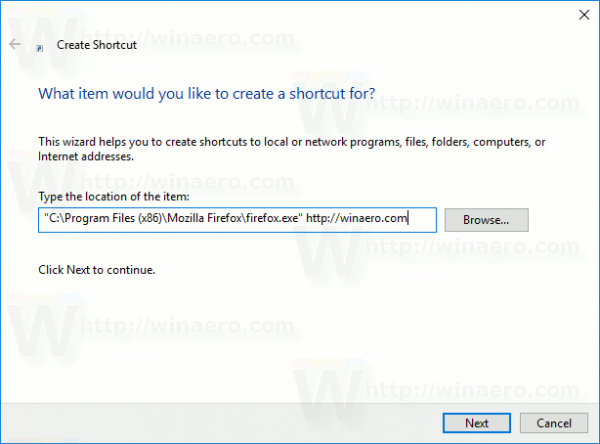
- After the «firefox.exe» portion, add a space and type or paste the destination URL of the web site you want to open with the shortcut, so you will get something like this:
"C:Program Files (x86)Mozilla Firefoxfirefox.exe" https://winaero.com
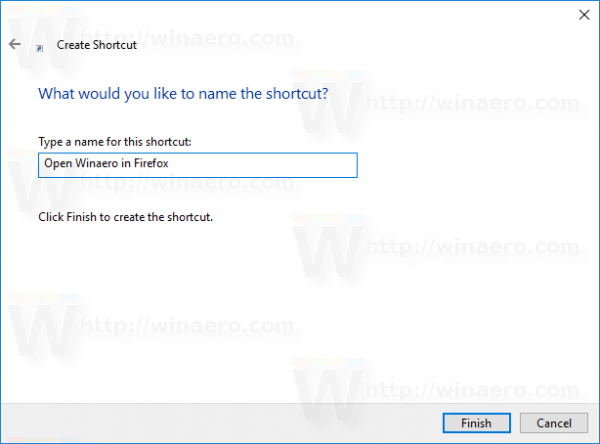
- Name the shortcut as you wish.
- Now, right click the shortcut you created and select «Pin to Start» from the context menu:

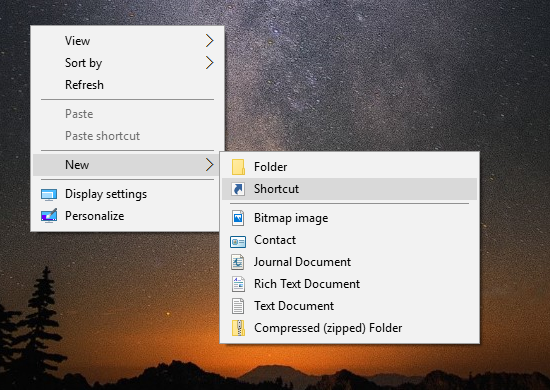
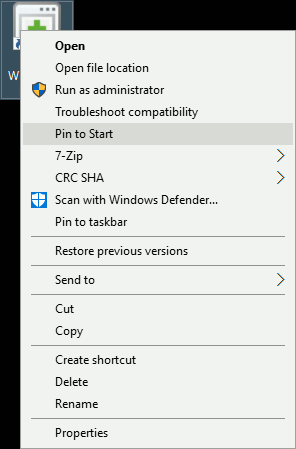
Voila, you just pinned a web site which will be opened in Firefox: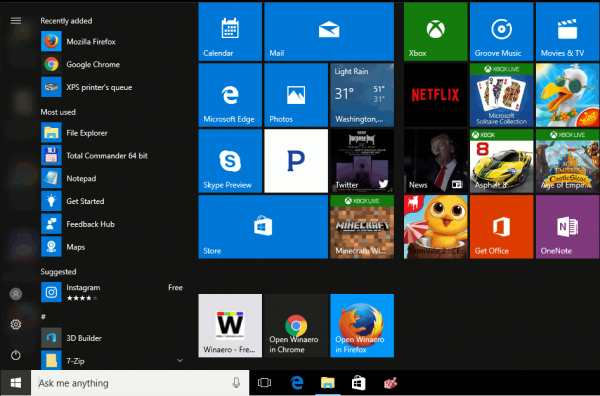
Now, let’s see how to pin URL files to the Start menu in Windows 10.
Pin URL files to the Start menu in Windows 10
This is possible and the great news is URL files are handled by the default browser installed. Once you pin a URL file, you can switch your default browser and it won’t be necessary to change your tiles in the Start menu.
The quickest way to create a URL file for an opened page is to drag the address bar icon to the Desktop. This works in Firefox, Chrome and Internet Explorer. I have not tested it with other browsers, but the same should be possible in other Chromium-based browsers like Opera.
Let’s create a new URL file.
- Open the target web site in Firefox, Chrome or Internet Explorer. I will use Firefox.

- Click the icon on the left from the web site address and drag and drop it to the Desktop.
 Tip: to drag to the Desktop, drag it first to the Show Desktop (Aero Peek) button at the end of the Taskbar. Or press Win+D after you have started dragging and drop it on the Desktop.
 Tip: to drag to the Desktop, drag it first to the Show Desktop (Aero Peek) button at the end of the Taskbar. Or press Win+D after you have started dragging and drop it on the Desktop.
You just created a new URL file:
You can check out its properties. While you created it using Firefox, the target web site will be opened in the default browser every time you click it.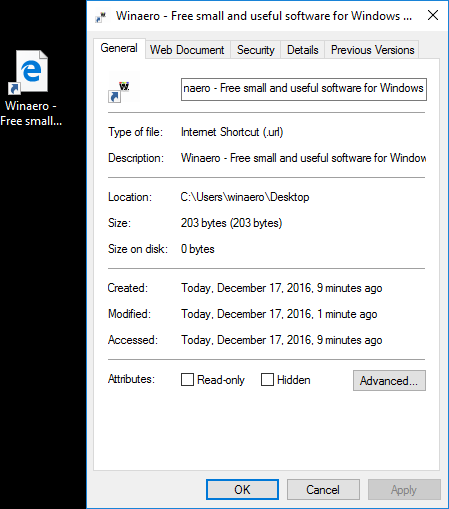
Now, in the context menu of the URL file there is no «Pin to Start» command.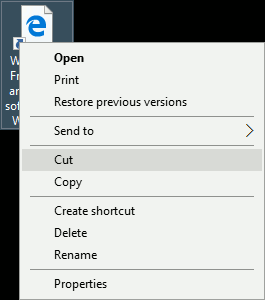
Let’s enable it!
You need to enable the Pin to Start command for all file types. I covered this in detail in the following article:
How to pin any file to Start Menu in Windows 10
In short, you need to apply the following tweak:
Windows Registry Editor Version 5.00

[HKEY_CURRENT_USERSoftwareClasses*]

[HKEY_CURRENT_USERSoftwareClasses*shellex]

[HKEY_CURRENT_USERSoftwareClasses*shellexContextMenuHandlers]

[HKEY_CURRENT_USERSoftwareClasses*shellexContextMenuHandlersPintoStartScreen]
@="{470C0EBD-5D73-4d58-9CED-E91E22E23282}"

[HKEY_CURRENT_USERSoftwareClassesAllFileSystemObjects]

[HKEY_CURRENT_USERSoftwareClassesAllFileSystemObjectsshellex]

[HKEY_CURRENT_USERSoftwareClassesAllFileSystemObjectsshellexContextMenuHandlers]

[HKEY_CURRENT_USERSoftwareClassesAllFileSystemObjectsshellexContextMenuHandlersPintoStartScreen]
@="{470C0EBD-5D73-4d58-9CED-E91E22E23282}"
You can download ready-to-use «Pin To Start» registry tweak.
The Pin to Start command will become available for all files in Windows 10: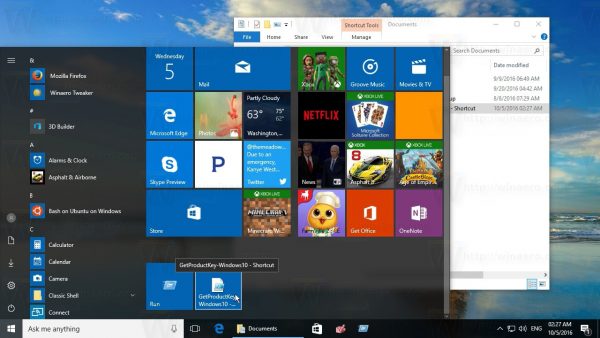
Now, right click the URL file you have and select Pin to Start. The command will be visible there: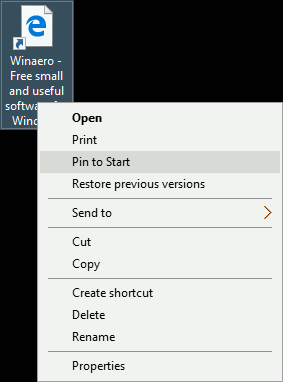
When click the command, the URL file will be pinned to the Start menu in Windows 10:
When you click the pinned URL file in the Start menu, it will open in your default browser!
Also, if you install a new browser app, you will be prompted to choose the app to open your pinned URL file: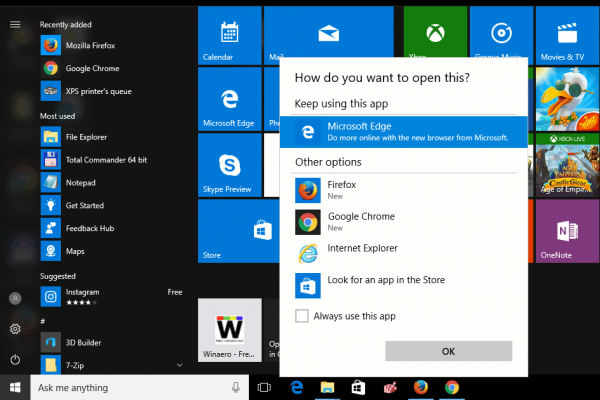
The last trick is the best one as it provides you a way to change the default browser and open pinned web sites to the Start menu in any browser you want.
That’s it.
Support us
Winaero greatly relies on your support. You can help the site keep bringing you interesting and useful content and software by using these options:
If you like this article, please share it using the buttons below. It won’t take a lot from you, but it will help us grow. Thanks for your support!
3 Ways to Keep a Window Always on Top on Windows 10
To pin a window on top, click or doubleclick, depending on the setting the DeskPins icon in the system tray . Then, click the title bar on the window you want to keep always on top. A pin displays on the title bar of the chosen window in the color you specified, or in the default color red.
How do I Pin a Window on my Desktop?
In order to pin a window, rightclick on the icon in your tray again and enter Pin Mode. Your cursor will change to a pin – click on the title bar of the window you want to always keep on top, and a pin will appear on that bar. Itll be the color you set in the options menu earlier.
How do I Keep a Window on Top in Windows 10?
Just press CTRL + SPACE on whatever window you want to stay on top.
How do I Keep a Window Always on Top?
Windows Media Player: Click Organize > Options. Select the Player tab and enable the “Keep Now Playing on top of other windows” checkbox. Firefox: Install the Always on Top addon. Once you have, press Alt and click View > Always on Top.
How To Keep a Window Always On Top in Windows 10
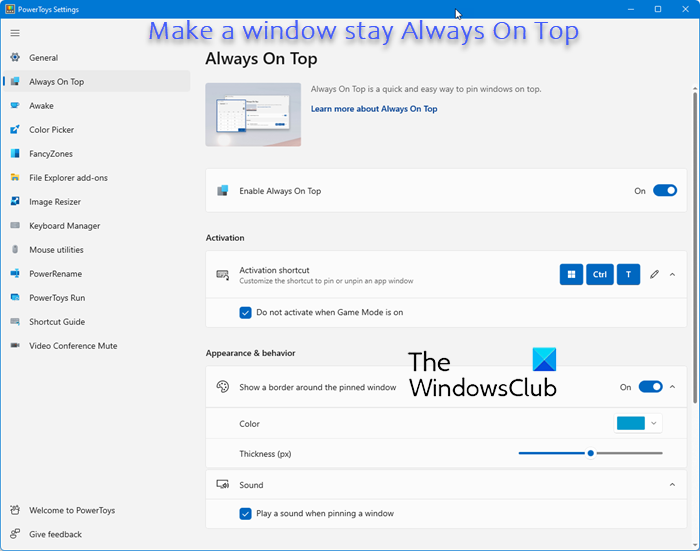
Windows не идеальна даже в одиннадцатой номерной версии — в системе порой не хватает удобных функций, которые разработчикам было бы не очень-то сложно реализовать. Одна из таких — закрепление нужного окна поверх других, чтобы оно при любых обстоятельствах оставалась на переднем плане, то есть не перекрывалось ничем другим. Стандартными средствами системы сделать это нельзя, но Microsoft предусмотрела лайфхак — такая возможность доступна благодаря утилите PowerToys.
💡 PowerToys — это официальная бесплатная программа, выпускающаяся Microsoft для продвинутых пользователей и распространяющаяся через GitHub. Она содержит много действительно интересных и полезных возможностей, которых почему-то нет в самой Windows. Эта статья выходит в рамках цикла материалов про PowerToys, в котором читатели знакомятся с занятными функциями утилиты, пригождающимися в ежедневном использовании.
Как всё выглядит и работает
На практике всё выглядит довольно просто — необходимо кликнуть мышкой на нужное окно, сделав его активным, и просто нажать выбранную комбинацию клавиш. После этого оно выделится цветом и закрепится поверх других. Чтобы снять закрепление, необходимо проделать то же самое.
Что можно настроить
Утилита PowerToys предназначена для продвинутых пользователей, поэтому разработчики не поскупились на детальные настройки функции, можно отрегулировать буквально каждый элемент.
- Сочетание клавиш для активации — по умолчанию используется сочетание Win + Ctrl + T (программа указывает последнюю клавишу для русской раскладки), однако его можно поменять на любое другое, начинающееся на кнопку Win, Ctrl, Alt или Shift. Также, при желании, можно выключить активацию закрепления окна при игровом режиме (чтобы случайно не сбить игру).
- Выделение закреплённого окна — по умолчанию окно визуально выделяется рамкой, но это можно отключить. Если же вас устраивает выделение, его можно настроить, выбрав нужный цвет и указав толщину выделяющей рамки.
- Звук при закреплении — его можно только отключить, выбирать свою мелодию нельзя.
- Исключения — можно добавить приложения, которые не будут подчиняться программе и закрепляться. Они добавляются вводом их исполняющего файла — к примеру, notepad.exe (для «Блокнота»).
Как настроить опцию
- Скачайте PowerToys со страницы релизов на GitHub (самый верхний файл с разрешением .exe) и установите его.
- Запустите PowerToys от имени администратора (нажав правую кнопку мыши и выбрав соответствующую опцию).
- Слева вверху нажмите на кнопку «≡» и выберите пункт «Поверх других окон». Включите её и настройте при необходимости.
- На главном экране утилиты (в меню «Общее») внизу активируйте переключатель «Запускать при старте», чтобы программа PowerToys открывалась в свёрнутом виде при включении компьютера и все её возможности работали.
- Теперь не боюсь за Windows: точки восстановления создаются каждый день. Вот как это настроить
- 7 функций, которые сделают Windows 12 лучшей системой. Если Microsoft пойдёт на это
- Эта бесплатная утилита от Microsoft в разы ускоряет работу. Она существует ещё с Windows 95
- Эта утилита показывает, где используется выбранный файл в Windows и что мешает удалить его
- Мод Windows 10 для игр: тестирую Atlas OS, из которого вырезали лишнее ради производительности
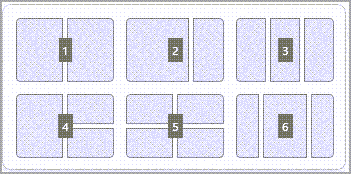
Функция привязки — это отличный способ повысить производительность за счет совместного использования нескольких окон приложений на одном экране. Доступны различные макеты с различными размерами на выбор, поэтому вы можете получить максимум от любимых приложений при работе с определенными задачами.

Вот несколько способов воспользоваться преимуществами Snap. Выберите любой из заголовков, и он откроется для отображения дополнительного содержимого:
Функция привязки в Windows имеет несколько предопределенных макетов, которые можно выбрать для привязки всех открытых окон.
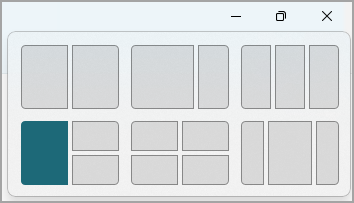
Чтобы открыть макеты привязки, выполните приведенные далее действия.
-
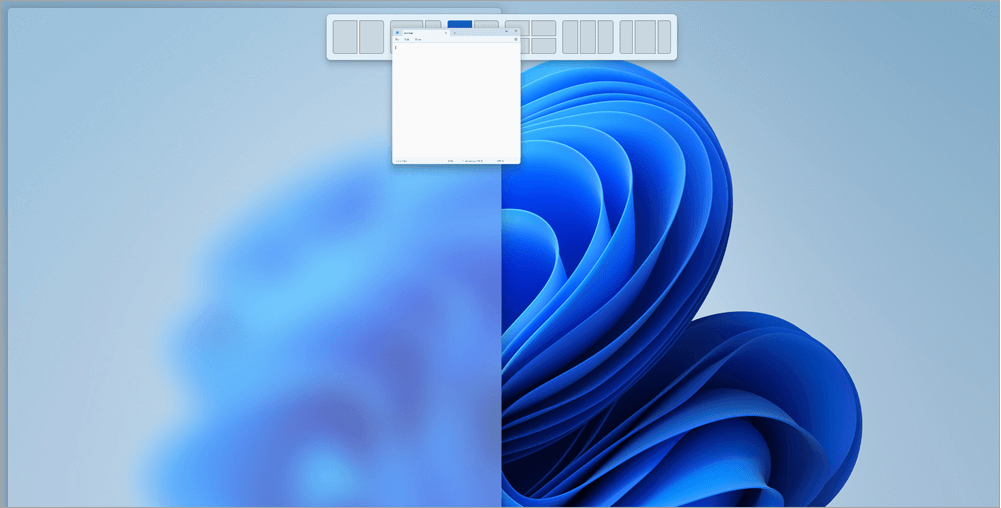
С помощью клавиатуры: В окне, который вы хотите привязать, нажмите клавишу с логотипом Windows + Z , чтобы запустить окно макета.
-
С помощью мыши: В окне, который вы хотите привязать, наведите указатель мыши на кнопку Свернуть или Развернуть , чтобы запустить окно макета.
Примечание: В зависимости от размера дисплея могут отображаться различные предопределенные макеты для размера дисплея.
Инструмент Snap Assist будет автоматически отображаться после прикрепления первого окна. При snap Assist будут отображаться все остальные открытые окна в виде эскизов, чтобы вы могли выбрать, какие окна вы хотите добавить в выбранный макет.
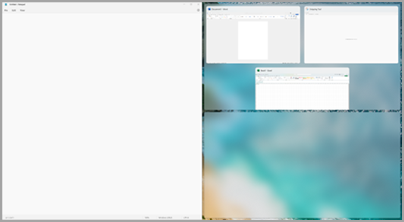
Snap Assist позволяет изменить размер полей макета путем выбора и перетаскивания разделительных линий. Измените размер окна с одной стороны, и соседнее окно изменит размер, чтобы поместиться рядом, чтобы у вас не было впустую места на экране.
Примечание: Snap Assist доступна только для двух окон приложений одновременно на Windows 11 SE. Подробнее
После выбора макета и прикрепления каждого пространства с выбранными окнами он автоматически становится группой привязки. Эта функция может быть полезна при работе над определенной задачей с помощью нескольких приложений. Если вы прерваны и откроете новое приложение, вы можете легко вернуться к группе Snap, наведите указатель мыши на одно из открытых приложений группы, чтобы снова найти группу Snap.
Есть несколько способов использования мыши для привязки в Windows:
Наведите указатель мыши на кнопку «Свернуть» или «Развернуть» приложения
-
Наведите указатель мыши на кнопку Свернуть или Развернуть в приложении, которое вы хотите привязать. Поле Макет привязки отобразится автоматически.
-
Выберите макет привязки, который вы хотите использовать, в поле Макет.

-
Используйте Snap Assist, чтобы заполнить макет другими приложениями, которые вы хотите привязать вместе.
Перетащите приложение в обе стороны экрана
-
Выберите и перетащите окно или приложение, которое вы хотите привязать к боковой части или краю экрана. Поле Макет привязки отобразится автоматически.
-
Перетащите приложение в нужный макет.
-
Используйте Snap Assist, чтобы заполнить макет другими окнами или приложениями, которые вы хотите привязать вместе.
Вы также можете перетащить приложение в правую или среднюю левую часть экрана, чтобы сразу создать параллельную привязку.

Перетащите приложение в верхнюю середину экрана
-
Выберите и перетащите окно или приложение, которое вы хотите привязать к верхней середине экрана. Поле Макет привязки отобразится автоматически.
-
Перетащите приложение в нужный макет.
-
Используйте Snap Assist, чтобы заполнить макет другими приложениями, которые вы хотите привязать вместе.
Есть два способа использования клавиатуры для привязки в Windows:
Открытие макета привязки с помощью клавиатуры
-
Нажмите клавишу с логотипом Windows + Z, чтобы отобразить поле макета.
-
Введите номер макета, который вы хотите использовать, а затем введите номер, в котором нужно разместить окно в этом макете.
Вы также можете использовать мышь для выбора предпочтительного макета. -
Используйте Snap Assist, чтобы заполнить макет другими окнами или приложениями, которые вы хотите привязать к одному экрану.
Используйте стрелки клавиатуры, чтобы открыть макет привязки
-
Нажмите и удерживайте клавишу с логотипом Windows + СТРЕЛКА, чтобы привязать приложение, в которое вы находитесь. Вы можете продолжать изменять позиции прикрепления с помощью стрелок клавиатуры.
-
Используйте стрелку влево , чтобы разместить приложение в левой части экрана
-
Используйте стрелку вправо , чтобы разместить приложение в правой части экрана
-
Используйте стрелку вверх , чтобы расположить приложение в верхней части экрана.
-
-
Когда вы найдете нужное расположение привязки, отпустите клавишу с логотипом Windows, чтобы разместить привязку.
-
Используйте Snap Assist, чтобы заполнить макет другими окнами или приложениями, которые вы хотите привязать к одному экрану.
Статьи по теме
Дополнительные возможности с многозадачностью в Windows
Как использовать несколько мониторов в Windows
Изменение разрешения экрана в Windows
Snap упрощает аккуратное упорядочивание открытых окон на рабочем столе, чтобы вы могли быстро получить доступ к важным для вас вещам, когда они вам нужны. Вы можете использовать Snap, чтобы упорядочить все открытые окна с помощью мыши, клавиатуры или функции Snap Assist.
Вот несколько способов воспользоваться преимуществами Snap. Выберите любой из заголовков, и он откроется для отображения дополнительного содержимого:
Используйте мышь для прикрепления в Windows:
-
Выберите и перетащите окно или приложение, которое вы хотите привязать к боковой части или краю экрана. Поле Макет привязки отобразится автоматически.
-
Перетащите приложение в нужный макет.
-
Используйте Snap Assist, чтобы заполнить макет другими окнами или приложениями, которые вы хотите привязать вместе.
Вы также можете перетащить приложение в правую или среднюю левую часть экрана, чтобы сразу создать параллельную привязку.
Использование клавиатуры для прикрепления в Windows:
-
Нажмите и удерживайте клавишу с логотипом Windows + СТРЕЛКА, чтобы привязать приложение, в которое вы находитесь. Вы можете изменить положение привязки с помощью стрелок клавиатуры.
-
Используйте стрелку влево , чтобы разместить приложение в левой части экрана
-
Используйте стрелку вправо , чтобы разместить приложение в правой части экрана
-
Используйте стрелку вверх , чтобы расположить приложение в верхней части экрана.
-
-
Когда вы найдете нужное расположение привязки, отпустите клавишу с логотипом Windows, чтобы разместить привязку.
-
Используйте Snap Assist, чтобы заполнить макет другими окнами или приложениями, которые вы хотите привязать к одному экрану.
Инструмент Snap Assist будет автоматически отображаться после прикрепления первого окна. При snap Assist будут отображаться все остальные открытые окна в виде эскизов, чтобы вы могли выбрать, какие окна вы хотите добавить в выбранный макет.
Snap Assist позволяет изменить размер полей макета путем выбора и перетаскивания разделительных линий. Измените размер окна с одной стороны, и соседнее окно изменит размер, чтобы поместиться рядом, чтобы у вас не было впустую места на экране.
Совет: Если вы владелец малого бизнеса и хотите получить дополнительные сведения о настройке Microsoft 365, посетите раздел Справка и обучение для малого бизнеса.
Статьи по теме
Дополнительные возможности с многозадачностью в Windows
Как использовать несколько мониторов в Windows
Изменение разрешения экрана в Windows
Нужна дополнительная помощь?
Нужны дополнительные параметры?
Изучите преимущества подписки, просмотрите учебные курсы, узнайте, как защитить свое устройство и т. д.
В сообществах можно задавать вопросы и отвечать на них, отправлять отзывы и консультироваться с экспертами разных профилей.