Disk Management in Windows helps you perform advanced storage tasks like initializing a new drive and extending or shrinking volumes. Here’s some info on things you can do using Disk Management:
Initialize a new drive
Extend a basic volume
Shrink a basic volume
Change a drive letter
Troubleshoot Disk Management
To open Disk Management, right-click (or long-press) the Start button and select Disk Management.
If you need help freeing up space on your PC, see Disk cleanup in Windows or Free up drive space in Windows.
В этой статье мы расскажем о простых и доступных способах перейти в Управление дисками в Windows 10. Это может понадобиться, если возникнут какие-то проблемы с подключёнными дисками (HDD или SSD) или потребуется получить доступ к системным средствам работы с носителями информации. По традиции начнём с самых удобных и запоминающихся способов.
С помощью кнопки Пуск
- Нажмите правой кнопкой мыши на кнопку Пуск (на панели задач) с логотипом Windows.
- Откроется контекстное меню кнопки «Пуск».
- Найдите в списке утилиту «Управление дисками» и нажмите на неё.

С помощью кнопки или строки поиска на панели задач Windows 10
В Windows 10 на панели задач можно увидеть кнопку поиска в виде лупы или строки с текстом «Введите здесь текст для поиска».
- Нажмите на кнопку поиска.
- Начните набирать текст
Управление компьютеромилиdiskmgmt.msc. - Windows установит лучшее соответствие и первым вариантом предложит запустить приложение «Управление компьютером» или diskmgmt.msc (в зависимости от того, что вы вводили в поисковой строке).

- Если в поиске вы искали приложение «Управление компьютером», то в дереве консоли откройте раскрывающийся список «Запоминающие устройства» и выберите «Управление дисками».

С помощью списка приложений в меню Пуск
- Нажмите на кнопку Пуск с логотипом Windows.
- В списке всех приложений найдите папку «Средства администрирования Windows».
- Нажмите на папку, чтобы раскрыть список стандартных утилит Windows.
- Найдите в списке приложение «Управление компьютером» и нажмите на него.

- В дереве консоли откройте раскрывающийся список «Запоминающие устройства» и выберите «Управление дисками».
С помощью адресной строки в проводнике
Еще один вариант открытия утилиты «Управление дисками» из любой папки.
- Откройте приложение «Проводник» (Explorer) или просто щелкните по ярлыку «Мой компьютер» на рабочем столе.
- В адресной строке введите текст
diskmgmt.mscи нажмите кнопку Enter или кнопку со стрелкой.

С помощью приложения «Выполнить»
- Запустите приложение «Выполнить» (нажмите на клавиатуре кнопку с логотипом Windows + R ).
- Введите текст
diskmgmt.msc - Нажмите кнопку «ОК».

С помощью классической Панели управления
Как открыть классическую Панель управления в Windows 10? Все способы.
Если не знаете, как воспользоваться данным способом и возникает трудность с поиском классической Панели управления
- Откройте классическую Панель управления.
- Найдите вкладку «Администрирование» и нажмите на неё.

- Откроется новое окно со списком всех системных утилит.
- Найдите в списке приложение «Управление компьютером» и запустите его.

- В дереве консоли откройте раскрывающийся список «Запоминающие устройства» и выберите «Управление дисками».
А какой вариант открытия утилиты «Управление дисками» используете вы?
Напишите в комментариях о своих способах 😉
Disk Management is a powerful tool that can be used to manage your computer’s storage and files. It can be used to create, delete, and view folders, files, and volumes. Disk Management is available as a Windows 10 or 11 app. Here are five ways to open Disk Management on Windows 10 or 11:
- Open the Start Menu and type “diskmgmt.” This will open the Disk Management window.
- Right-click on the disk you want to manage and select “Open With.” This will open the Disk Management window with the disk listed as the active drive.
- Click on the “New” button in the Disk Management window and enter a name for your new disk. The name should be something unique so you can easily find it later.
- Click on the “Create” button in the Disk Management window and enter a size for your new disk (in MB). The size should be at least 1GB but no more than 5GB.
- Click on the “Delete” button in the Disk Management window and enter a path for your new disk (in C:). The path should start with \???. If you don’t have an existing directory named \???\ then you’ll need to create one by typing “mkdir C:?” into a command prompt and pressing Enter.
Disk Management is a utility found in Windows 10 and 11. It is used to initialize hard drives, create, resize, or delete partitions, change drive letters, and more. Find out five ways to open it here.
To access Disk Management through the Computer Management tool, click the Start button, type “Computer management” into the search bar, and hit Enter or click “Open.”
Click “Storage” in the Computer Management window if it isn’t expanded, then click on “Disk Management.”
RELATED: 10+ Useful System Tools Hidden in Windows
Search Disk Management
If you want to bypass the Computer Management window, you can just search for Disk Management directly. There are some differences between the user interfaces of Windows 10 and Windows 11 — in this case, it doesn’t change the steps, so don’t worry about it too much.
Click the Start button, type “disk management” into the search bar, and then hit Enter or click “Open.”
If you want to use the Power User Menu to access Disk Manager you can hit Windows+x or right-click the Start button, and then click “Disk Management.”
RELATED: How to Access Windows 10’s Hidden Power User Menu
Disk Management can be launched from the run window as well. Hit Windows+R, type “diskmgmt.msc” into the box, and then click “Ok.”
RELATED: Run a Command as Administrator from the Run Box in Windows 7, 8, or 10
Command Prompt or PowerShell
RELATED: 10 Ways to Open the Command Prompt in Windows 10
Type diskmgmt.msc in Command Prompt or PowerShell, and then hit Enter.
Disk Management should open immediately.
Disk Management is a useful tool for managing partitions, and it is worth familiarizing yourself with it. Be careful not to accidentally delete any partitions though.
 Многие инструкции, имеющие отношение к работе с дисками и разделами на них, среди прочего предлагают использовать «Управление дисками» Windows, однако не все пользователи знают, как запустить указанную системную утилиту.
В этой пошаговой инструкции несколько способов открыть управление дисками Windows 11 и Windows 10, большинство из предложенных методов подойдут и для предыдущих версий системы.
Управление дисками в контекстном меню кнопки Пуск (Win+X)
Если вы хотите запустить «Управление дисками» максимально быстро, достаточно выполнить следующие шаги:
- Нажмите правой кнопкой мыши по кнопке «Пуск» или используйте сочетание клавиш Win+X
- Выберите пункт «Управление дисками» в открывшемся контекстном меню.

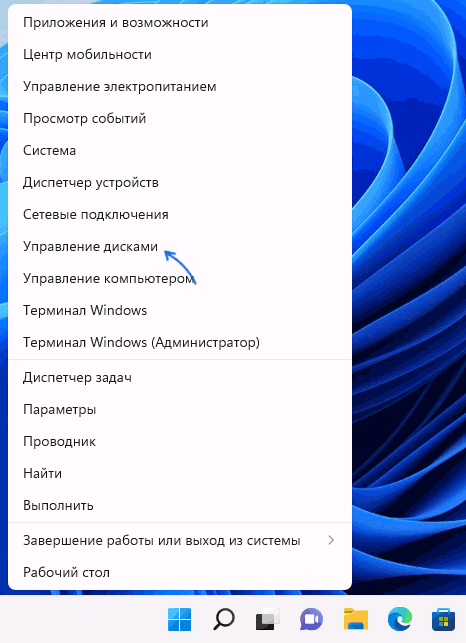
Это — самый быстрый способ открыть рассматриваемую системную утилиту, которого, в большинстве случаев, оказывается достаточно.
При необходимости или в случае, если предложенный вариант по какой-то причине не подходит, вы можете использовать одну из следующих возможностей для запуска: окно Win+R («Выполнить»), поиск Windows, или «Управление компьютером», но, как правило, уже первого способа оказывается достаточно, чтобы попасть в это окно:

Запуск управления дисками в окне «Выполнить»
Один из наиболее часто используемых способов открыть Управление дисками — использовать диалоговое окно «Выполнить». Шаги будут следующими:
- Нажмите правой кнопкой мыши по кнопке «Пуск» и выберите пункт «Выполнить» в контекстном меню, или нажмите сочетание клавиш Win+R на клавиатуре.
- Введите diskmgmt.msc в окно «Выполнить».

- Нажмите кнопку Ок или клавишу Enter на клавиатуре.
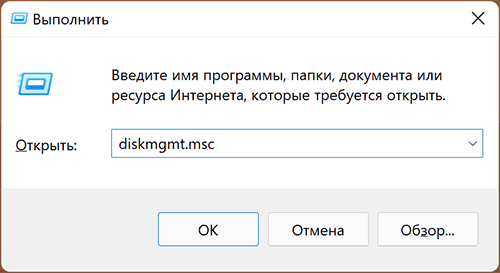
В результате будет открыто окно «Управление дисками».
Поиск Windows 11 и Windows 10
Если вы не знаете, как запустить тот или иной инструмент в Windows 11 или 10, всегда помните о поиске в панели задач: большинство системных утилит можно быстро найти и запустить с его помощью, и я всегда стараюсь об этом напоминать.
К сожалению, это не вполне применимо в случае «Управление дисками», поскольку для этого запроса результаты поиска не те, что требуется. Тем не менее, запуск через поиск возможен:
- Нажмите по кнопке поиска на панели задач Windows 11 и введите «диск» в поле поиска. В случае Windows 10 ввод можно начать сразу в поле поиска на панели задач.
- Откройте пункт «Создание и форматирование разделов жесткого диска».

- Откроется именно то, что требуется — «Управление дисками».

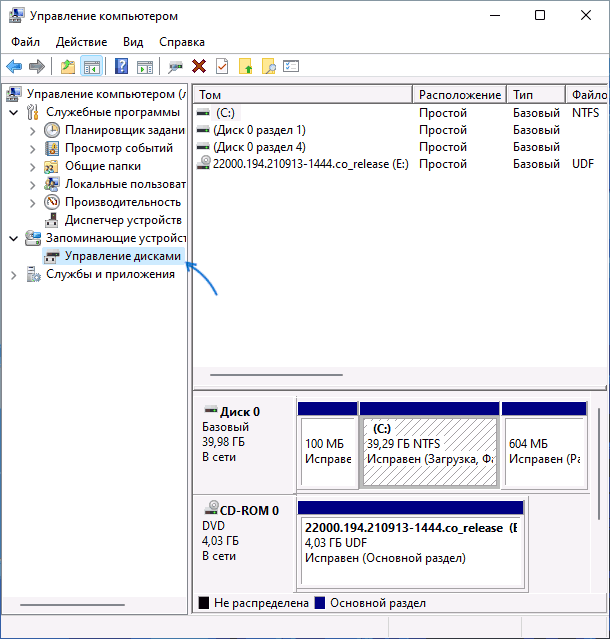
Управление дисками в окне «Управление компьютером»
Ещё одна возможность — использовать окно «Управление компьютером», которое содержит набор системных инструментов, включая необходимый:
- Откройте «Управление компьютером» через поиск Windows, либо через диалоговое окно «Выполнить», используя compmgmt.msc в качестве команды.
- В открывшемся окне выберите пункт «Управление дисками» в разделе «Запоминающие устройства».

Это все основные способы запуска. Конечно, их можно модифицировать: например, вводить diskmgmt.msc в командной строке, а не окне «Выполнить» или найти и запустить этот файл из папки C:\Windows\System32, но это будут лишь модификации уже приведённых выше методов.
409
409 people found this article helpful
Use the Disk Management utility to make changes to drives in Windows
What to Know
- Control Panel > System and Security > Windows Tools > Computer Management > Disk Management
- Alternatively, open Command Prompt and execute diskmgmt.msc.
- Make a shortcut: Right-click desktop, New > Shortcut. Type diskmgmt.msc, select Next. Change name, Finish.
You’ll need to open the Disk Management tool to partition a hard drive, format a hard drive, change a drive letter, or perform other disk-related tasks. You won’t find a shortcut to Disk Management in the Windows Start menu or Apps screen because it’s not a program in the same sense that most other software is.
How to Open Disk Management in Windows
The most common and operating-system-independent way to open Disk Management is through the Computer Management utility, described below.
-
Open Control Panel. In most versions of Windows, Control Panel is most readily available from its shortcut on the Start menu or Apps screen.
-
Select System and Security. If you’re viewing the Large icons or Small icons view of the Control Panel, you won’t see this link. If you’re on one of those views, select Windows Tools or Administrative Tools and skip to Step 4.
System and Security is only found in Windows 11, 10, 8, and 7. In Vista, the equivalent link is System and Maintenance, and in XP, it’s called Performance and Maintenance. See What Version of Windows Do I Have? if you’re not sure.
-
Select Windows Tools (Windows 11) or Administrative Tools. It’s located near the bottom of the window, so you might need to scroll down to see it.
This window is called System and Maintenance or Performance and Maintenance in Vista and XP, respectively.
-
In the window that’s now open, double-tap or double-click Computer Management.
-
Choose Disk Management on the left side of the window. It’s located under Storage.
If you don’t see it listed, you might need to select the plus or arrow icon to the left of the Storage icon.
Disk Management may take several seconds or more to load but will eventually appear on the right side of the Computer Management window.
You can now partition a hard drive, format a hard drive, change a drive’s letter, or do whatever else you need to do in Windows’ disk manager tool. Most free disk partitioning software tools can also accomplish these hard drive tasks.
Other Ways to Open Disk Management
You can also type a simple command in any version of Windows to open Disk Management. This method might be much faster for you if you’re used to running commands in the Run dialog box or Command Prompt.
Just execute diskmgmt.msc from either of those command line interfaces. See How to Open Disk Management From the Command Prompt for more detailed instructions.
To immediately launch the tool, you can also make your own shortcut to Disk Management right on your desktop.
Here’s how:
-
Right-click or tap and hold any empty space on the desktop.
-
Go to New > Shortcut.
-
Type diskmgmt.msc and then press Next.
-
Customize the name if you want, and then select Finish.
If you’re running Windows 10 or Windows 8, and you have a keyboard or a mouse, Disk Management is one of many quick-access options on the super-useful Power User Menu. Just right-click the Start button or try the Win+X combination on your keyboard.
If Explorer won’t even run, meaning that you can’t use the desktop to make a shortcut, access the Start button, or open Command Prompt, Task Manager might be your only option.
To open Disk Management with Task Manager, first open Task Manager (Ctrl+Shift+Esc is one easy method) and then go to Run new task at the top (Windows 11) or File > Run new task (select More details first if you don’t see the File menu). What you’ll see looks exactly like the Run dialog box; enter the diskmgmt.msc command there to open the program.
FAQ
-
How do you open Disk Management as an administrator?
Make sure you’re logged in as an administrator before you open Disk Management. Go to Start > Settings > Accounts. If you’re not logged in as an admin, switch to that account or select Change account type to designate a new administrator account.
-
How do you assign a drive letter to an external hard drive using Disk Management?
Open Disk Management as an administrator and select the drive you want to change. Right-click and select Change Drive Letter and Paths > Change, then pick a new drive letter and choose OK > Yes. Keep in mind that you can’t change the drive letter of the partition that contains the Windows operating system, which is usually the C drive.
Thanks for letting us know!
Get the Latest Tech News Delivered Every Day
Subscribe