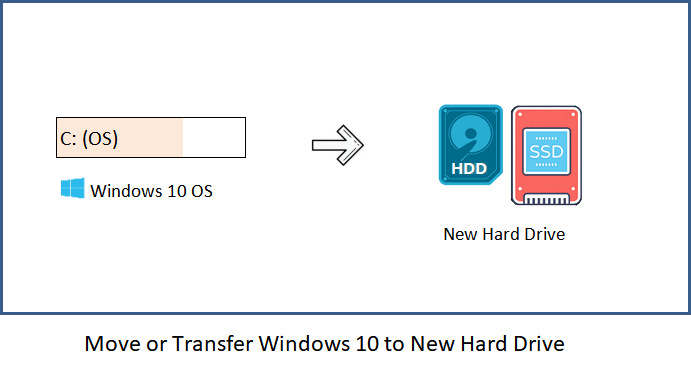
Migrating Windows to another drive is a challenging task for most Windows users. Fortunately, it can be easy and fast for all levels of Windows users to transfer Windows 10 to a new hard drive, whether it’s an HDD or SSD, with the help of professional Windows 10 migration solutions, as shown below.
This page covers a complete guide to follow and quickly move Windows 10 to another drive or a new HDD/SSD.
You can always trust the reliable OS migration feature in EaseUS manager software for an efficient solution, as shown below. Learn how to do this on your own.
Also, work to Move everything from C to D drive, move program files x86 to another drive, and move OS with installed apps to a new disk.
Preparations: Make Everything Ready for Moving Windows
Before transferring Windows 11/10 OS, here are some preparation jobs you should have done in advance.
1. Prepare a New Hard Drive — HDD/SSD
Before Windows 10 migration, you need to connect or install a new hard drive so to make sure that your computer can detect it correctly with the following tips:
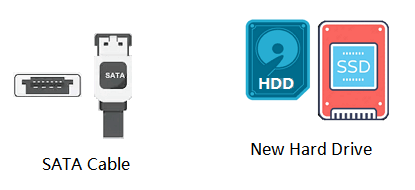
Step 1. Prepare a new HDD/SSD and a SATA cable.
Note that space on the new hard drive/SSD must be more significant than the system C drive used space on the source disk.
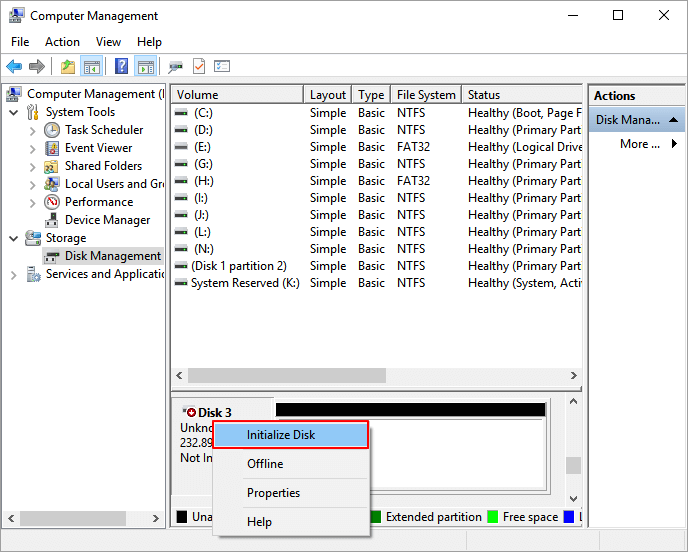
Step 2. Connect the new SSD/HDD to PC and initialize the disk.
Connect SSD/HDD to your PC via SATA and power cables > Locate and right-click the new disk in Disk Management > Select «Initialize Disk» > Set the disk as GPT or MBR (the same as the source OS disk).
- Notice:
- If the destination disk has partitions and data, you should back up your disk/partition and data to another device first, then delete all partitions and continue.
2. Download A Reliable Windows 10 Migration Tool
To migrate Windows to another new disk, you’ll need a reliable OS migration tool for help. Here we collect two tools for you to try:
| EaseUS OS Migration Tool — Solution 1 | Windows System Image Tool — Solution 2 |
|---|---|
|
|
EaseUS Suggestion: To safely migrate or move your Windows 10 OS to another hard drive, EaseUS partition manager software — Partition Master in Solution 1 is the best option for you. This method also works to migrate Windows 11 or older Windows 8/7 systems to a new disk drive.
Solution 1. How to Move Windows 10 to a New Hard Drive Via OS Migration Tool
Duration: 25 minutes — 1 hour or so.
Support: OS migration on Windows 11/10/8/7/XP/Vista and Windows servers, significant to small or small to big HDD/SSD.
To move Windows 10 to another new hard drive or SSD, follow through the subsequent two phases. You’ll successfully transfer everything from the C drive to another disk without losing data. Also, Windows and program reinstallations are not needed.
#Phase 1. Move Windows to a New Hard Drive (HDD/SSD)
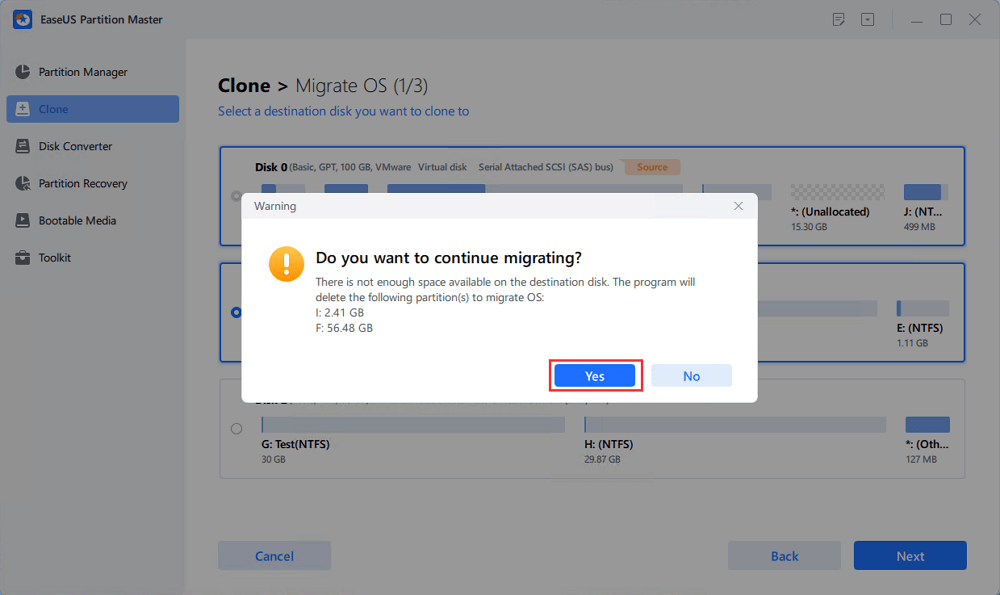
Note: The operation of migrating OS to SSD or HDD will delete and remove existing partitions and data on your target disk when there is not enough unallocated space on the target disk. If you saved important data there, back up them to an external hard drive in advance.
Step 1. Select «Clone» from the left menu. Select the «Migrate OS» and click «Next» to continue..
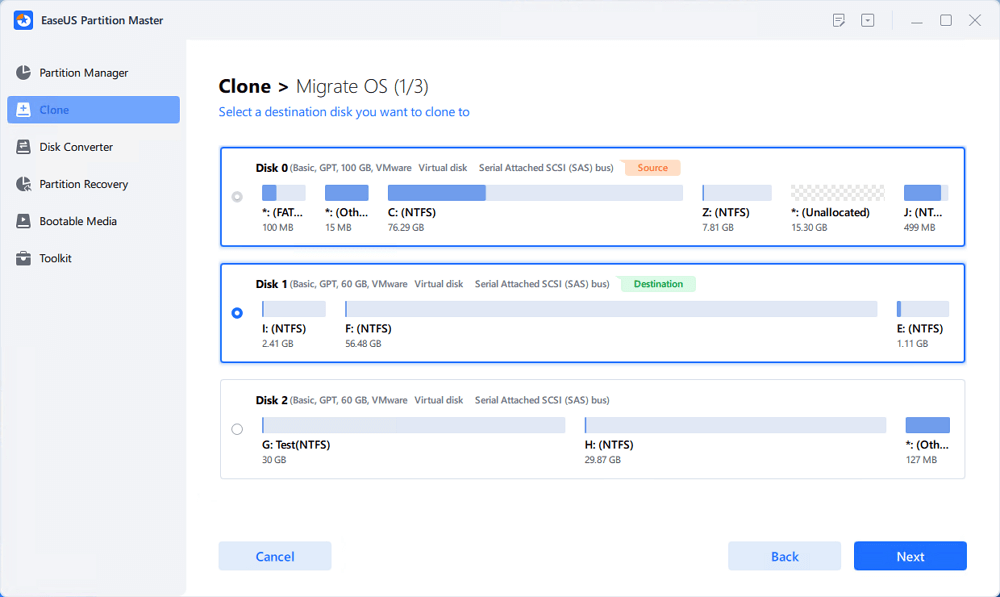
Step 2. Select the target disk you want to move Windows to. Click «Next».
Step 3. Click «Yes» after checking the warning message. The data and partitions on the target disk will be deleted. Make sure that you’ve backed up important data in advance. If not, do it now.
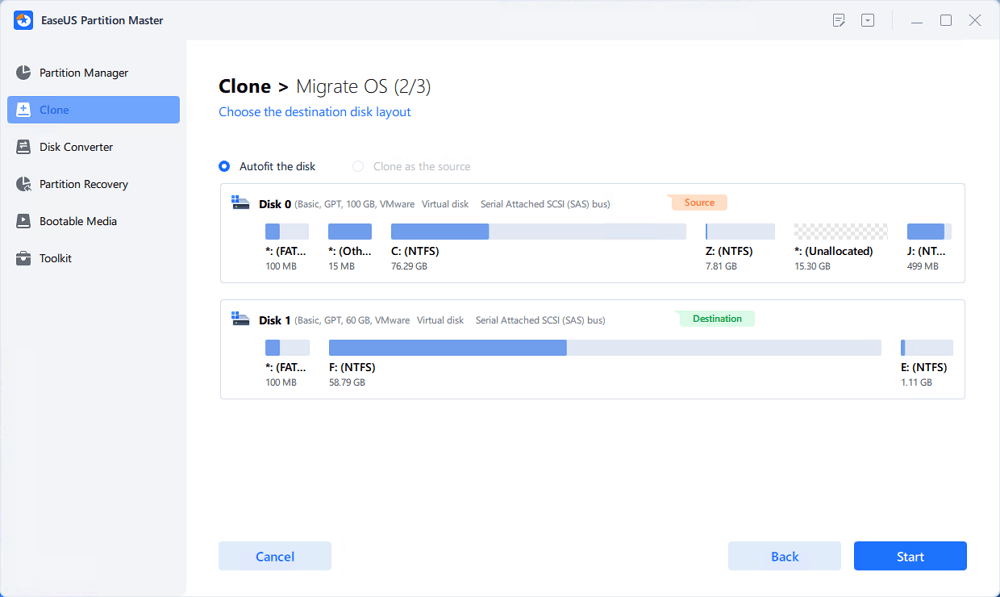
Step 4. Preview the layout of your target disk. Then click «Start» to start migrating OS to a new disk.
Video Tutorial to Migrate Windows to Another New Hard Drive:
When the OS migration process finishes, you can move to the next phase to set Windows 10 boot from the new disk.
#Phase 2. Set Up Windows 10 to Boot from New Hard Drive
After the OS migration, you must set up the computer to boot Windows 10 from the new hard drive. If you forget, your computer will continue booting up from the old system disk.
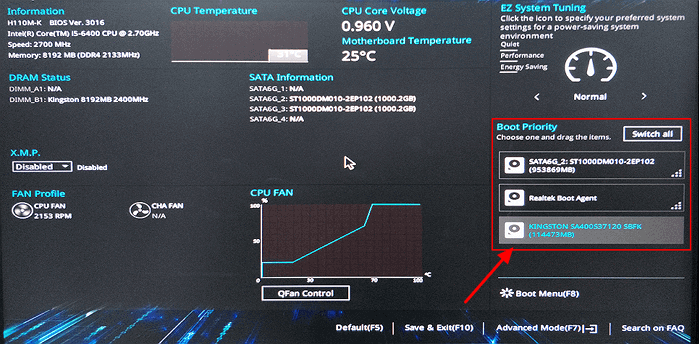
Here are the steps to set the OS to boot from the new disk by changing its boot priority from BIOS:
Step 1. Restart PC and press F2/F12/Del to enter BIOS.
Step 2. Go to the Boot section, and set the PC to boot from the new hard drive.
Step 3. Save changes, exit BIOS, and restart the PC.
After this, you can successfully log in to your account and use Windows 10 on the new hard drive or SSD. Note that the above steps also work to migrate Windows 11 to a new SSD.
📖Read Also:
1. Will the Windows 10 license be transferred to a new hard drive?
Yes, when you transfer Windows 10 to another drive on the same computer, the license is still on the motherboard, and you can directly boot the PC. And if the computer warns your Windows is not activated, just reactivate the Windows license. Your Windows OS will boot up and work as normal on the new disk.
2. What to do with the old OS drive?
1️⃣ Reset the disk drive as fresh as new for data storage. You can delete OS drive and data volumes, and repartition the disk.
2️⃣ Erase the disk for selling. You can wipe the entire disk and clean up all data completely.
EaseUS Partition Master, with its Wipe Disk and Partition Hard Drive features, can help.
Feel free to share this solution online and help more of your friends upgrade their OS disk without reinstalling the Windows:
Solution 2. Transfer Windows to Another Drive With Windows System Image Tool
Duration: 30 minutes — 1 and a half an hour or so.
Support: OS migration on Windows 10, small disk to big SSD/HDD only.
Limites: New disk must be more significant than the original system disk space.
Some experienced Windows users may feel like running the Windows system image tool for the Windows 10 migration operation. Although free, it’s still not a handy solution for most average Windows users.
If you insist on doing so, follow the step-by-step operations in the below 3 phases:
#Phase 1. Create Windows 10 System Image to An External Hard Drive
Step 1. Connect an empty external hard drive to your PC.
Step 2. Type Control Panel in the Search box and select to open it. Click «Backup and Restore (Windows 7)».
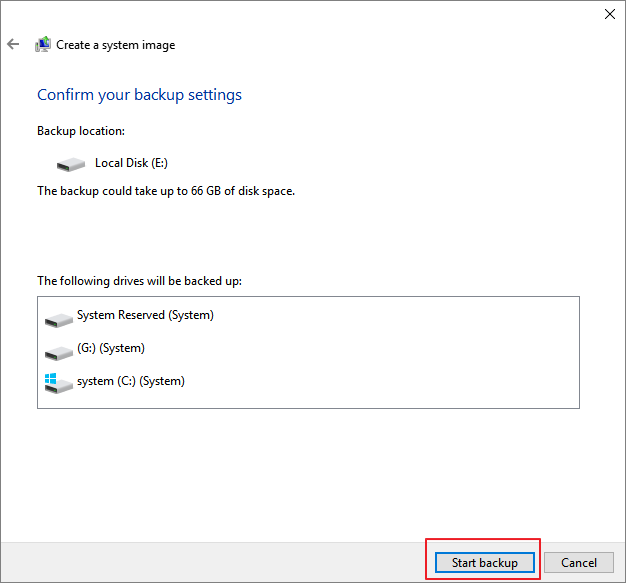
Step 3. Click «Create a system image», select the external USB drive as the destination to save Windows 10 system image, and click «Next» to continue.
Step 4. The System and System Reserved partitions will be selected by default. Click «Next» to continue.
Step 5. Click «Start backup» to create your system image on the USB drive.
#Phase 2. Create Windows Media Creation Tool
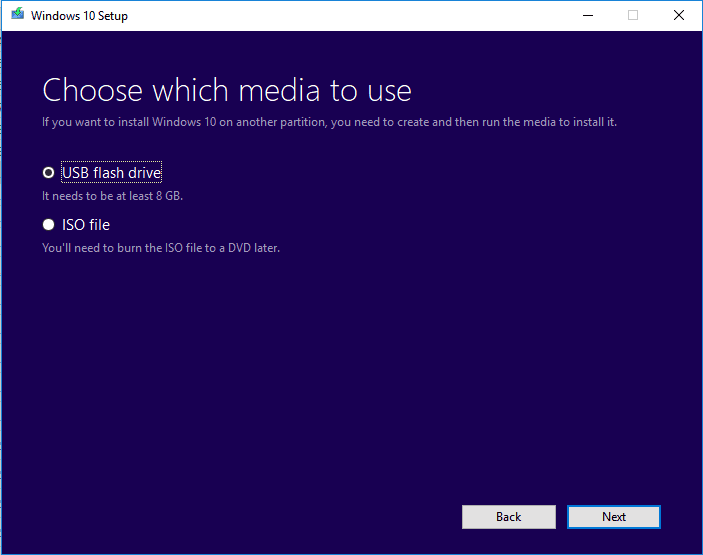
Step 1. Connect an empty USB flash drive (min 8GB) to the PC.
Step 2. Download Windows 10 installation media and run it as an administrator.
Step 3. On the «What do you want to do?» interface, select «Create installation media for another PC», and select «Next».
Step 4. Choose the language, edition, and architecture (64-bit or 32-bit) for Windows 10.
Step 5. Select USB flash drive to use:
Do the two solutions remove your issue? If you have solved your problem, share the article to help more people.
#Phase 3. Restore and Move Windows 10 System Image to Another New Disk
Step 1. Connect both Windows 10 installation media and Windows image backup disk to your PC and reboot it.
Step 2. Press F1/F2/Del to enter BIOS and set the installation media as the boot drive.
Step 3. Reboot the PC from Windows Installation Media, and click «Repair your computer» on the Install Now window.
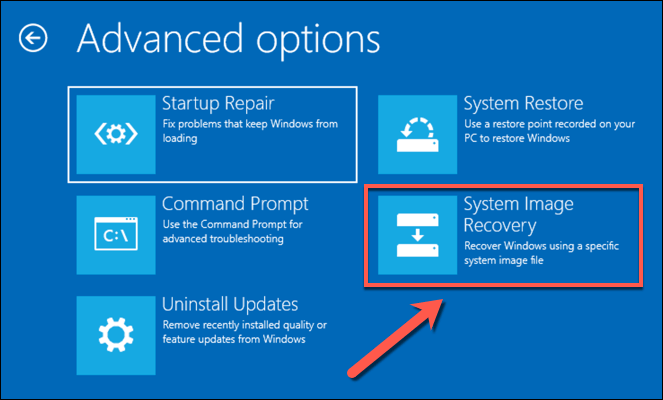
Step 4. Enter the Advanced options, click «Troubleshoot» and then select «System Image Recovery».
Step 5. Check «Select a system image» to bring up your Windows 10 system image disk and select it. Click «Next» to continue.
Step 6. Click «Exclude disks…» to exclude the original system disk, leaving only the new HDD/SSD. Click «OK» to confirm.
Step 7. Click «Next» to start the restoration process and wait for the restoration process to complete.

Once you finish restoring Windows 10 image to the new disk, Windows 10 will restart and boot up.
If Windows 10 doesn’t boot up, revert to Phase 2 in Solution 1 to set the new disk as a boot drive. You will be able to run Windows 10 on the new disk without any issues anymore.
Conclusion
This page covers a full guide to help you migrate, move, or transfer Windows 10 OS to a new hard drive or SSD without losing any data or boot issue. You can get everything done in three parts:
- Part 1. Prepare a new hard drive/SSD — initialize the disk and download a reliable OS migration tool.
- Part 2. Migrate Windows 10 to a new hard drive/SSD via the OS migration tool.
- Part 3. Move Windows 10 via System Image Tool.
As for Windows beginners, we would like to suggest you run reliable EaseUS Partition Master for moving Windows 10 to a new HDD/SSD with ease.
If you have more questions about migrating Windows 10 or transferring Windows OS to another drive — HDD/SSD, check the Further Readings below, and you’ll find satisfying answers.
Further Readings — FAQs about Windows 10 OS Migration to a New Drive
Here, we collect some related questions that are frequently asked in the Windows forum. If you have the same questions, check and find answers here.
1. How do I move Windows 10 to a new SSD?
As the full guide provided on this page, to move Windows 10 to a new SSD, follow the guide steps below:
- 1. Connect the new SSD to the PC via SATA cable and initialize it (in the same partition style as your OS disk).
- 2. Download, install, and run EaseUS Partition Master on your PC.
- 3. Select Migrate OS to HDD/SSD, and select the new SSD as your target disk to move Windows 10.
- 4. Confirm and execute the operation.
- 5. Insert new SSD to the computer, restart it and set the computer to boot from the new SSD in BIOS.
2. How do I transfer Windows 10 to a USB flash drive?
Transferring Windows 10 to a USB drive and taking your OS anywhere now is possible. Here are the steps for you to follow:
- 1. Prepare an empty USB flash drive or external USB drive (external hard drive) with a bigger space than your system drives.
- 2. Download and run reliable system migration software. Here we recommend you try EaseUS Todo Backup.
- 3. Run EaseUS Todo Backup and select System Clone > Create a Windows portable USB.
Wait for the process to finish. After this, you can take the USB to any computer and boot your Windows 10 OS on the new computer. For more detailed steps, refer to Transfer Windows 10 to a USB flash drive for help.
3. How do I fresh install Windows OS, like Windows 10, to SSD?
There are two ways that you can install OS like Windows 10 to SSD. As recommended on this page, one is to migrate or transfer Windows 10 to SSD using the Migrate OS feature in EaseUS Partition Master.
The other way is to fresh install Windows 10 on SSD with the following steps:
- 1. Download the media creation tool from Microsoft.
- 2. Run the downloaded tool, choose «Create installations media for another PC,» and click «Next».
- 3. Select «Language, Edition, and Architecture for Windows 10» and click «Next».
- 4. Choose the USB Flash drive.
- 5. Insert the USB drive into the PC and click «Next».
- After the drive is selected, the tool will start downloading Windows 10, and will take a few minutes to finish downloading.
- 6. Connect the USB drive with Windows 7/8 and run it in Explorer; click Setup.
- 7. When you reach the Ready to Install dialog, click «Change» to keep and choose Nothing. Click «Next»
Follow the on-screen tutorial to complete the Windows 10 installation process. For a detailed guide, refer to this page: Transfer/Install Windows OS to SSD. It has all the exact steps that you need.
4. How to move installed programs to another drive, Windows 7?
To move installed programs and apps to another drive in Windows 7, you have two options to try:
- 1. Transfer programs and program data to another drive via PC Transfer software.
- 2. Manually copy and move installed program files like .exe to another drive.
For more detailed steps, you can follow Transfer Installed Programs to New Hard Drive for help.
If you’ve just upgraded your PC and want to migrate Windows 10 to a new hard drive, you’ll have to consider your options. This is a job that beginners might struggle with, but it doesn’t have to be—you just need to figure out how you’re going to move your files from A to B and ensure Windows will boot from your new drive.
There are a few ways you can do this. You could create a new system image to migrate from one drive of equal size to another. Alternatively, you could consider cloning your hard drive to copy your installation, especially if your drives are different sizes. Here’s what you’ll need to do to begin the process.
Before You Move Windows 10 to a New Hard Drive
Before you consider a transfer of Windows 10 to a new hard drive, you should consider backing up your essential files, independently of any new system image you create.
While this process shouldn’t have an impact on your original drive and files, you may cause data loss if you accidentally overwrite your initial drive in the process. To be sure that your data is safe, you should always perform an independent backup of your files using portable media (such as a USB drive) or online cloud storage.
Once you’ve backed up your essential files, you’ll have two options to consider. The process to move Windows 10 to a new hard drive depends on if you’re moving to a drive of equivalent or larger size or if the drive is smaller, as the process will vary.
It doesn’t matter if you’re moving from a traditional drive to a hybrid or solid state drive, as only the size of the drive itself matters. If you’re moving to a drive of equivalent or larger size, you’re free to create a system image to clone your drive using Windows’ own built-in system imaging tools.
However, if you’re moving to a drive that’s smaller than the original, you won’t be able to use this method, as Windows will show an error during the re-imaging process. Instead, you’ll need to transfer Windows 10 to a new hard drive using third-party tools that will allow you to copy the files successfully to the smaller drive.
Create a New System Image to Migrate Windows to Drives of Equivalent or Larger Size
If you want to migrate Windows 10 to an equivalently-sized or larger hard drive than the original, the best method is to use Windows’ own system imaging tool. This will allow you to copy your original drive exactly to your new drive.
It’s important to stress that this method only works if you’re using a drive of equivalent or larger size. If it’s smaller, you’ll need to follow the steps below to use a third-party tool instead.
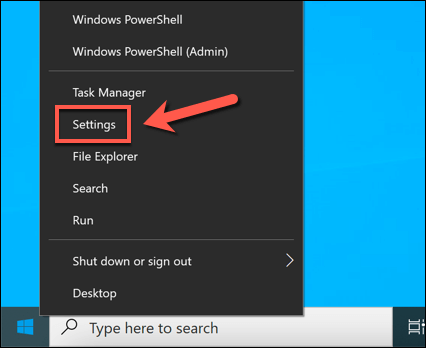
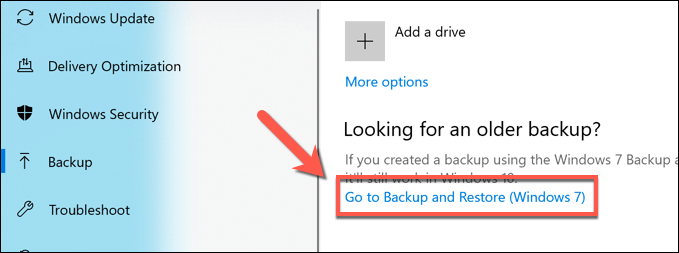
- To begin, you’ll need to create a new system image for your Windows installation. To do this, right-click the Start menu and select the Settings option.
- In the Settings menu, select Update & Security > Backup. In the Backup menu, select the Go to Backup and Restore (Windows 7) option, listed under the Looking for an older backup? category.
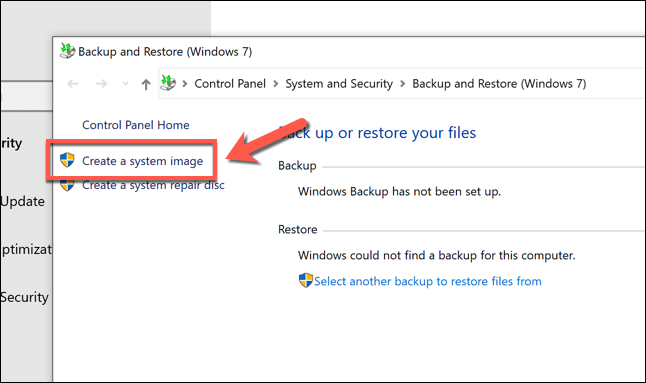
- In the older Control Panel window, select the Create a system image option, visible in the left-hand menu. Make sure to connect an external drive (such as an external USB hard drive) at this point, unless you plan on using a network location to store your system image (such as a network attached storage device).
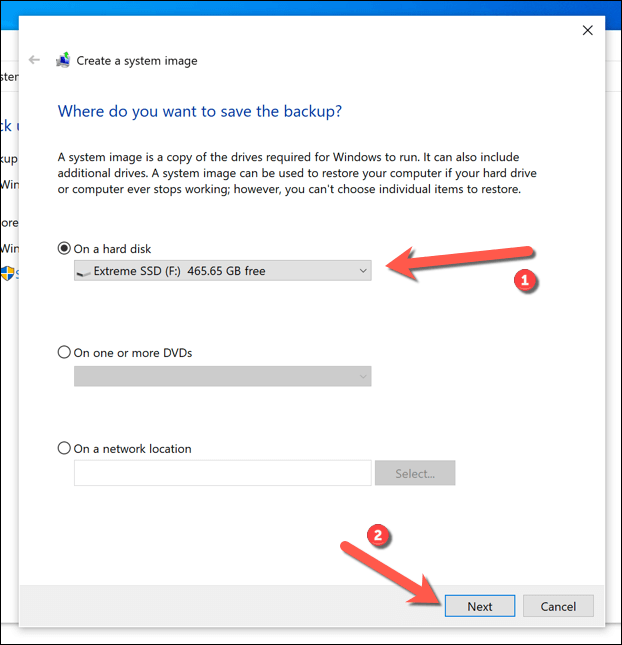
- A new Create a system image menu will open and automatically begin scanning for a suitable external drive or network location to store the system image. If you’re using a portable hard drive, select this from the On a hard disk drop-down menu. If you’re using a network storage location, choose the On a network location option, then select a suitable location on your network to store the file. Select Next to continue.
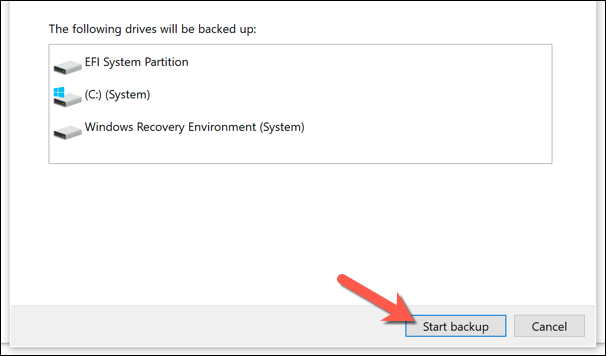
- Windows will confirm the partitions on your drive that will be copied to the new system image. Select Start backup to begin.
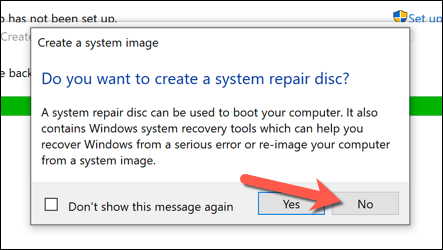
- Allow the system image creation process to finish. Once completed, Windows will ask you if you want to create a new system repair disk. It may be a good idea to do this, especially if you manage to corrupt your MBR or GPT boot files in the process. However, you can select either Yes or No to proceed.
After creating the new system image, you’re ready to use it on your new drive. At this stage, connect your new hard drive to your PC and remove the existing hard drive. You could also leave your existing hard drive in place and format it, allowing you to repurpose it as a secondary storage drive.
Use a System Image to Move Windows to a New Hard Drive
With a new system image of your existing drive ready, you can use the image to create a complete copy of your Windows installation on a new hard drive. As we’ve mentioned previously, you can only do this if the new drive is the same size or larger than the previous system drive.
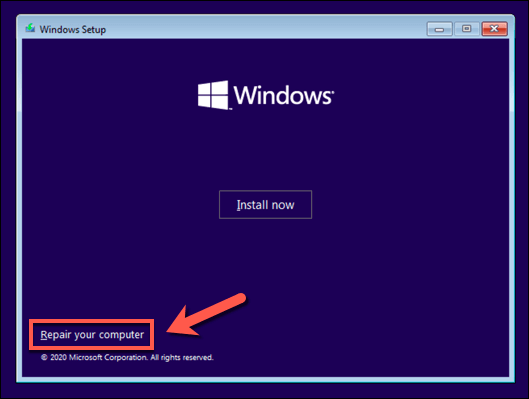
- To begin, insert your Windows installation media using a portable USB memory stick or DVD. Once inserted, boot your PC and ensure that your BIOS or UEFI settings prioritize that drive over any other drives. Once the Windows installation menu appears, select Next, then select Repair your computer in the bottom left corner.
- In the Advanced Options menu, select Troubleshoot > System Image Recovery.
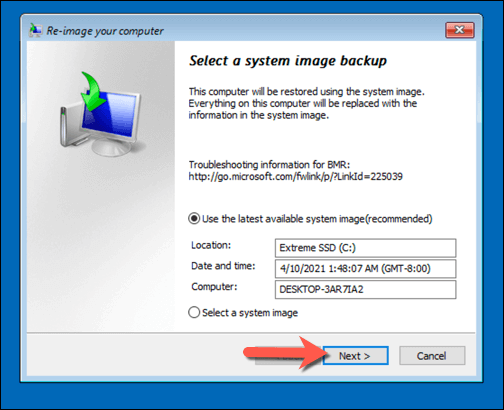
- Windows should automatically detect the system image on your external hard drive in the Re-image your computer menu. If it doesn’t, select the Select a system image option to locate it manually. Otherwise, leave the Use the latest available system image (recommended) option selected, then select Next to continue.
- Using the new system image, your new hard drive will be formatted with the same partitions as the previous drive. If you want to exclude any partitions first, select Exclude disks and uncheck them. Otherwise, select Next to continue.
- Select Finish > Yes to begin the disk imaging process, which will take some time to complete. Once this process is finished, select Restart Now to boot into your PC. You can remove the Windows installation drive or disk at this point, and you may also need to change your BIOS/UEFI settings to ensure that the new drive is selected as the first boot disk.
If you’ve copied your files to a new drive of the same size, you won’t need to do anything else at this stage—Windows will boot as normal, and you can resume using your PC. If you’ve cloned your drive to a larger sized drive, however, you may need to take additional steps to utilize the additional space.
Resize the System Partition After Using a System Image
A system image clones your drive entirely, recreating all available partitions on the previous drive to the exact sizes as the original partitions. If you’ve used a system image to move Windows to a larger hard drive, you’ll need to resize the system partition (C:) to utilize all of the available space on the new drive.
- To do this, boot into Windows on your new drive and sign in. Right-click the Start menu and select the Disk Management option.
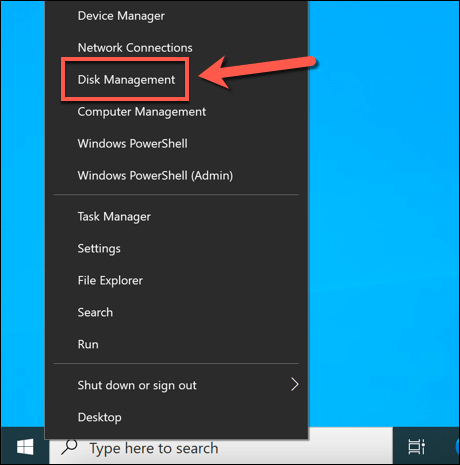
- In the Disk Management menu, right-click your system partition (C:) and select Extend Volume.

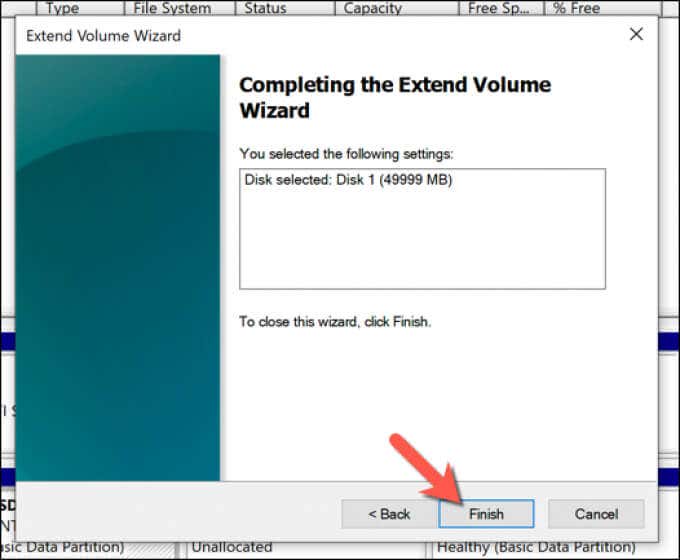
- In the Extend Volume Wizard menu, select Next, then ensure that the amount of additional space (equivalent to the figure in the Maximum available space in MB box) is selected in the Select the amount of space in MB box. Select Next to continue.
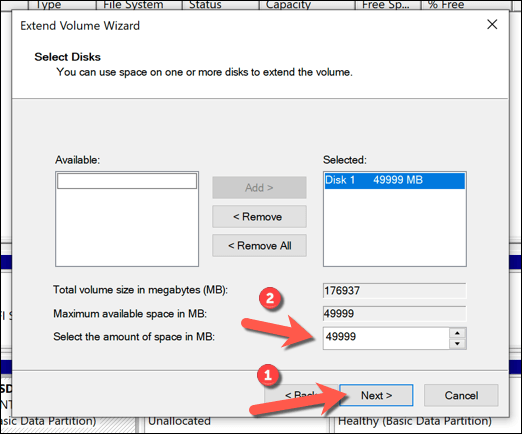
- Confirm that the details are correct, then select Finish to complete the process.
After a few moments, your system partition will be expanded to include the additional space on your drive, ensuring that all available drive space is usable.
Transfer Windows 10 to a Different Sized Hard Drive Using Third-Party Software
Using a new system image to clone your hard drive is still the best way to migrate Windows 10 to a new hard drive. Unfortunately, as this process doesn’t work if you’re moving from a larger to smaller drive, you’ll need to use third-party software to copy Windows instead.
Various tools exist for this method, but one good (and free) option is to use Macrium Reflect Free. The free version of Macrium Reflect allows you to clone your Windows installation from a larger to a smaller drive, resizing the partition table in the process. You can also use this to clone Windows to a larger driver if you’d prefer.
Before you follow these steps, make sure that both your existing hard drive and new hard drive are connected to your PC and are detectable in Windows.
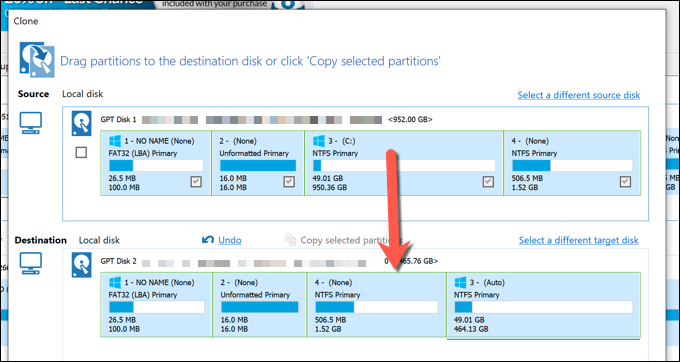
- To begin, download and install the Home Use version of Macrium Reflect Free from the Macrium Reflect website. Once installed, run the software and make sure that the checkbox next to the disk containing your system partition (C:) is selected. Once selected, select the Clone this disk option below it.
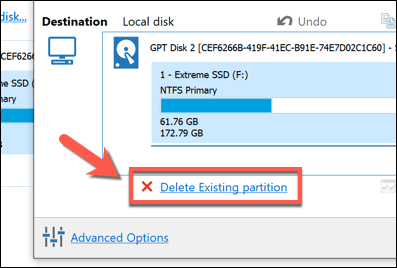
- In the Clone menu, select your new (smaller) drive by selecting the Select a disk to clone to option in the Destination section.
- With the new disk selected, you’ll need to delete any existing partitions on the drive by first selecting them in the Destination category, then selecting the Delete Existing partition option to remove them.
- With any existing partitions on your new drive removed, drag and drop each of the partitions on your drive (excluding the system C: partition) from the Source category to the Destination category. Leaving your system partition (C:) last, drag and drop that partition onto the Destination category.
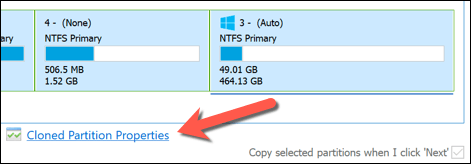
- Macrium Reflect will automatically resize your system partition to use up the remaining space on your new drive if your new drive is smaller than the original. If you’d like to change the size of your C: partition (or you’re using a larger drive, so wish to resize it to use up the additional space), select it in the Destination category first, then select the Cloned Partition Properties option.
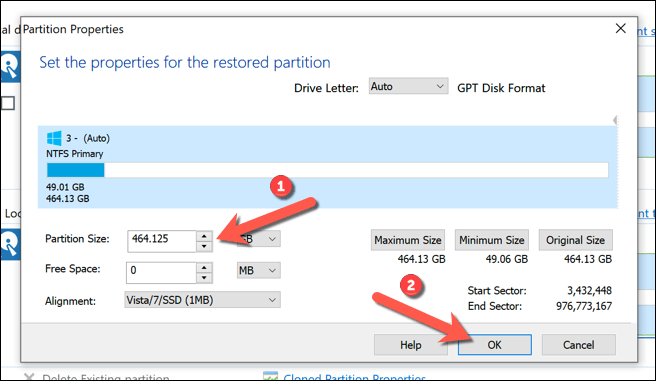
- In the Partition Properties menu, resize your partition using the Partition Size box. If you’re using a larger drive, make sure that the Free Space box reaches 0 MB to ensure you’re utilizing all available space. Select OK to confirm the change.
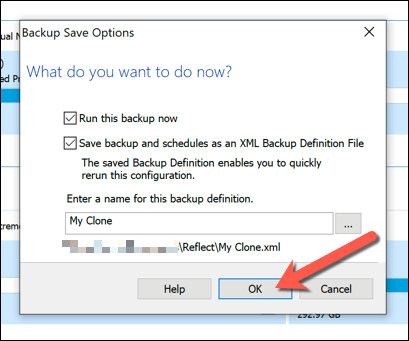
- Select Finish to confirm your cloning options.
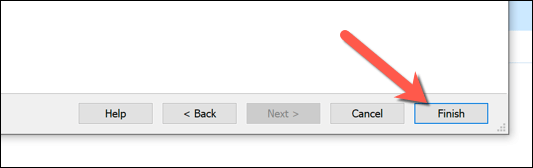
- Leave the options intact in the Backup Save Options menu that appears next, then select OK to confirm.
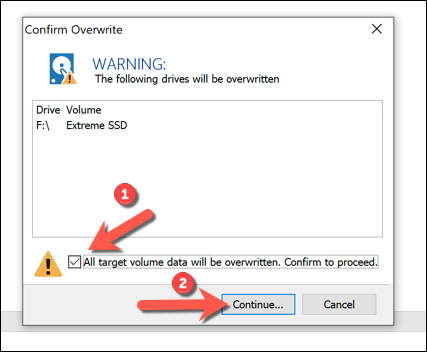
- Macrium will need permission to delete existing partitions and begin the cloning process. Select the available checkbox in the Confirm Overwrite menu, then select Continue to proceed. Allow some time for the cloning process to finish.
Once completed, your existing hard drive containing your Windows installation and all other files will be cloned to your new drive. You can shut down your PC and remove your previous hard drive at this stage, or use Disk Management to format and repurpose it instead.
Final Steps
Whether you’re using a Windows 10 system image to move to a new drive of the same size, or using third-party software like Macrium Reflect to clone it instead, you’ll be ready to boot up and use your new drive without any further steps. You may need to resize your system partition if the drive is bigger than the original, however.
If you do run into problems, you may want to consider reinstalling Windows 10 and starting afresh without cloning your drive entirely. You can do this without losing your personal files, but you may need to install your software again and transfer your Windows 10 license in the process.
If your PC comes with a relatively low-storage HDD or SSD, you might want to upgrade it. But the main question is whether it’s possible to move the genuine Windows to your new drive.
Well, the short answer is yes! In fact, there are two possible ways to do it. This way, you do not need to install Windows entirely on your new storage device. Also, this can come in handy if you’re trying to back up the drive to recover the system in case of a future failure.
In this article, we will guide you through both methods on how to move Windows to another drive, whether it be on an HDD, SSD, optical disk, or even your flash drive!
Table of Contents
Before You Begin
Before jumping into the main content, there are a few things you need to consider. You might want to get some additional devices, like a UPS (to prevent data loss from a power failure), a secondary device (flash drive or SD card for backing up data), and, most importantly, the right destination drive.
Get the Right Drive

If you haven’t already bought a drive, we recommend getting one larger or with equivalent disk space than the former. While it’s possible to migrate Windows from a larger to a smaller drive, you will require a third-party cloning tool to do this correctly. In such a case, you may skip the first method as you’ll likely encounter a re-imaging process error.
Likewise, we also recommend getting an SSD over a traditional HDD or other storage disks. These days, you can find NVMe, SATA, or M.2 SSDs, all of which are faster, more durable, and quieter than traditional drives.
Backup Important Files
Moving Windows to another drive may take approximately 20 minutes to 1 hour, depending on your system. Thus, there’s a potential risk of data loss due to power failure or other reasons.
As a precaution, we highly recommend backing up your important data using any preferred method. Well, you could use a secondary storage device (flash drive or SD card) or even online backup tools like OneDrive, Google Drive, and iCloud.
Defrag Your HDD
Defragging means rearranging the unordered or unorganized files on your hard drive. Basically, this is a Windows optimization technique that helps improve the speed and performance of your HDD.
Well, this process will store all the HDD’s data in a contiguous block, which can speed up the cloning process. Indeed, defragging your drive will organize all the unordered files, and hence the migration of Windows to another device becomes much more efficient.
However, we do not recommend defragging an SSD if you’re already using one. This is because it has no significant advantage and even has a chance of reducing its lifespan.
Perform Disk Cleanup
Since cloning produces the exact copy of your source drive, all the temporary and junk files will also migrate to the new storage device. To prevent this, we recommend performing a disk cleanup, and here’s a quick guide on how you can do just that:
- Press the Windows/Start key and search for Disk Cleanup.

- Launch the utility and wait until the disk space is calculated.
- Under Files to delete, you’ll get a long list of items you might want to remove.
- Select all and hit the Ok button.

- Finally, press Delete all and wait until your HDD or SSD space is freed.


Now that you have backed up vital files, defragged your HDD, and performed a disk cleanup, it’s time to start moving Windows to your destination drive. Before that, kindly install your new HDD or SSD in the right slot and plug in the data and power connectors.
Once that’s done, you can now proceed with one of the two methods below. As mentioned earlier, you may skip the first one if you’re trying to clone a hard drive from a larger source to a smaller destination drive.
Restoring System Image
If you’re planning to transfer Windows to an equivalent-sized drive or on a larger one, the best method is to create a system image. Then, you can use this at your destination HDD, SSD, or an alternative disk to move the OS.
An advantage of this is that you won’t require any third-party cloning tool. However, you need to first create a bootable USB flash drive or DVD using the Windows Media Creation tool. Please follow the below instructions on how you can do it the right way:
- First, press Windows + R and run the
controlcommand to launch Control Panel. - Under System and Security, select Backup and Restore (Windows 7).

- Next, choose to Create a system image.

- Once a new window pops up, choose the On a hard disk option, select your drive from the drop-down, and hit Next.

- You’ll get a list of all your partitions that will be backed up. Press the Start Backup button to continue.
- Now, wait until you’re asked whether to create a system repair disk. For now, you can select No. However, we recommend pressing Yes if you’re facing severe Windows issues and wish to fix this.
- Once this process is completed, shut down Windows, and remove your current drive.
- Then, insert the bootable USB or DVD and turn on your PC.

- Now, you should automatically enter the Windows Setup screen, where you can press Next to continue.

If it doesn’t, you might need to change the boot priority. For this, we have prepared a separate guide to help you change the boot drive in Windows. - Next, click the Repair your computer link at the screen’s bottom-left corner.

- Once you enter the Advanced Startup screen, go to Troubleshoot > Advanced Options > System Image Recovery.

- After the Re-image your computer dialogue box shows up, select Use the latest available system image, and click on Next.

- Now, you can press Exclude disks button and remove any partition you wish. But if you want to clone the exact copy, you can directly press Next.
- Then, tap the Yes button to confirm your action.


Now, your PC should boot normally, and the transfer of Windows to the new drive should be successful. However, if an unallocated partition remains, you might want to extend your drive’s volume to take complete advantage:
- In the instant search section on your Windows taskbar, search for
Create and format hard disk partitions. Select this to launch the Disk Management utility.
- Right-click your drive and select the Extend Volume option.

- In the Extend Volume Wizard, press Next.

- Now, ensure the amount of space is correctly configured and tap Next.
- Finally, click the Finish button, which should merge the partitions.


Cloning Your Storage Device
The other easy way to move Windows to another drive is by cloning your bootable drive. However, the process requires a third-party cloning tool. Some popular ones include Clonezilla, AOMEI Partition Manager, Macrium Reflect, etc.
For demonstration purposes, we have included the steps for Macrium Reflect. You may choose any other software, as the process should be somewhat similar:
- Firstly, navigate to the manufacturer’s website and download the installation file.
- After setup, launch the utility. Some software, including Macrium Reflect, requires admin privilege. So, you may have to press the Yes button to get past the user-control prompt.
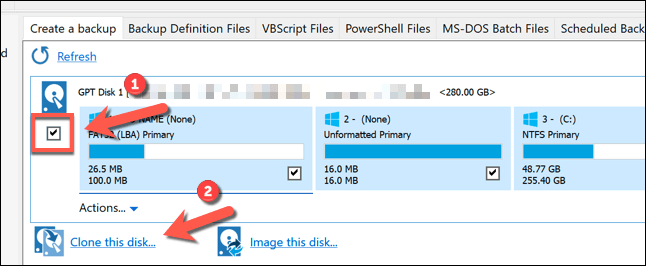
- Now, navigate to the Local disks section on the right pane.
- Here, check the disk you’re trying to clone and select Clone this disk option.

- Once the clone window pops up, check the source drive from the Source section again.
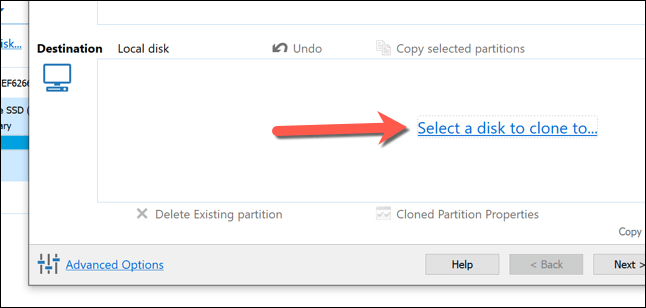
- Then, move to the Destination section and press the Select a disk to clone to option.

- Here, choose your destination drive and tap Next to move forward. While you’re at it, you may also choose to delete any additional partition.
- Lastly, hit the Finish button and wait for the cloning process to finish.

- Once the clone is completed, press the Ok button and restart your computer.
- Now, get into BIOS and change the boot priority. You should find this option under the Boot options.
- Save the setting using the dedicated key and start Windows. You should be able to boot without any issues.
- Now, you can extend your drive to remove the unallocated partition (after cloning a smaller to a larger hard drive).


Question
«I recently decided to upgrade my computer by purchasing an SSD to replace my old HDD. Although I was uncertain about how to transfer my existing Windows 10 operating system from the HDD to the SSD without reinstalling the system from scratch. Could I really boot from the new drive successfully after migration?»
This guide will explain how to move Windows to another drive — a process known as ‘disk cloning.’ This process allows you to upgrade your hard drive or transfer Windows to a new computer. It covers the preparation needed before you begin, the process of cloning the drive, and the post-move procedures you must take to ensure your system is running correctly.
We’ll also provide tips on how to manage the storage of your Windows installation, with advice on how to move Windows to another drive without losing data. With this guide, you’ll be able to perform a safe and successful transfer of your Windows installation, whether from an old hard drive to a new one or from one computer to another.
So if you have bought a new hard drive or are planning to move your Windows to a new computer, read on to learn how to do it.

- Part 1: Can You Move Windows from One Drive to Another?
- Part 2: How to Move Windows to Another Drive without Losing Data?HOT
- Part 3: How to Transfer Windows to Another Drive via Windows System Image Tool?
-
FAQs:
- 1. How Do I Move Windows from C Drive to D Drive?
- 2. How Do I Move Windows 10 to A New SSD?
- 3. Can I Move Just Windows to A New SSD?
Part 1: Can You Move Windows from One Drive to Another?
You can move Windows from one drive to another using a disk cloning utility. The process involves:
- Creating an image of your existing Windows installation.
- Saving it to the new drive.
- Restoring the exact image to the new drive.
This will copy all the files and settings from the original drive to the new one, allowing you to use the same Windows installation on the new one.
It’s important to note that this process will only work if the new drive is of the same type (e.g., HDD or SSD) and is at least as large as the original drive. If the new drive is smaller than the original, you will need to manually delete some files to ensure the image will fit onto the new drive. Additionally, if you are moving from an HDD to an SSD, you should perform a clean installation of Windows to take advantage of the increased speed of the SSD. Keep reading to learn how to move Windows 10 to another hard drive.
Part 2: How to Move Windows to Another Drive without Losing Data?
4DDiG Partition Manager is a robust and reliable partitioning software solution that lets users quickly and easily manage their hard disk partitions. It offers a wide range of features, making it an ideal choice for users who need a solution for «how to move Windows from one drive to another.»
Key Features:
- Partition Management: 4DDiG Partition Manager allows users to create, delete, resize, move, format, split, merge, and copy partitions.
- Backup and Restore: It also provides a simple and effective backup and restores function.
- Disk Cloning: This feature allows users to clone their hard disk partitions to another disk easily.
- Hard Disk Diagnostics: 4DDiG Partition Manager includes a powerful hard disk diagnostic tool to detect and repair any potential issues with hard disk partitions. It can also detect and repair bad sectors and recover lost data.
- Bootable Media: It can create bootable media, such as USB sticks or CDs, to ensure that the partitioning process can be carried out even if the computer fails to boot from the hard disk.
Here’s how to copy Windows to another drive:
Buy Now
- Install 4DDiG Partition Manager on your computer and connect the new drive. Then launch the application and click «Start» to proceed.
- Select the new drive as the target disk and click «Start» to continue. The source disk will be selected by default.
- A pop-up window will inform you that the partitions and files on the target disk will be overwritten during system migration. To proceed, click «Sure» and «Start» to begin.
- The system migration will begin under 4DDiG Partition Manager and will take some time to complete depending on the size of the drives. You can view the migration speed, elapsed time, and other data related to the migration.
- Now you have successfully migrated your OS to the target drive.
Note: Remember to back up your data on the target disk before system migration.
Part 3: How to Transfer Windows to Another Drive via Windows System Image Tool?
Not sure how to transfer Windows to another drive? Follow the given steps:
1. Create a system image of your current Windows installation:
- Open the «Control Panel.»
- Go to the Control Panel
- Select the «System» menu and go for the «Backup and Restore» option.
- Click «Create a system image.»
- Select the drive where you want to save the system image and click «Next.»
- Select the drives to create a system image for.
- Click «Start backup.»
2. Transfer the system image to the new drive:
- Connect the newly-bought drive to the PC.
- Open the «Control Panel.»
- Tap the «System» option and go for «Backup and Restore.»
- Click «Restore my files» and then «Select another backup to restore files from.»
- Tap on the system image created from there and tap on the «Next» button.
- Select each drive that you want to create an image of and click «Next.»
- Click «Start Restore.»
3. Boot from the new drive:
- Reboot the PC and go to the boot menu.
- Click on the new drive as your boot device.
- Follow the instructions given on your PC screen to complete the setup.
Disadvantages of this method:
- This method requires a backup of your current Windows installation.
- Setting up the new drive requires time and effort.
- There is always a risk of data loss or corruption during the transfer process.
FAQs:
1. How Do I Move Windows from C Drive to D Drive?
Step 1: Backup your data: The most crucial step before moving your Windows operating system is to back up your data. This includes files, documents, pictures, music, etc.
Step 2: Create a system image: The next step is to create a system image of your current Windows installation. This will allow you to restore your system if anything goes wrong during the transition.
Step 3: Install a new hard drive: If you don’t already have a new hard drive installed on your computer, you’ll need to install one. Make sure it is large enough to fit the amount of data you’re transferring.
Step 4: Use a disk cloning tool: You’ll need to use a disk cloning tool to transfer your Windows installation from the C drive to the D drive. There are several open-source tools available that can be useful.
Step 5: Boot from the new drive: Once the cloning process is complete, you’ll need to boot your computer from the new drive. This can be done in your computer’s BIOS settings.
Step 6: Adjust boot order: Make sure the boot order has been adjusted so that your new drive is the primary boot drive.
Step 7: Update drivers: Finally, you’ll need to update your drivers to ensure they are compatible with the new drive. This can be done either manually or using an automated driver update tool.
2. How Do I Move Windows 10 to A New SSD?
- Create a System Backup: Use Windows Backup to create a system image backup of your current Windows 10 installation. This will save your settings, applications, and files to an external hard drive.
- Install the New SSD: Physically install the new SSD into your computer and make sure it is properly connected.
- Restore the System Backup: Use the system image backup you created to restore your Windows 10 installation to the new SSD
- Install New Drivers: Install all necessary drivers for the new hardware.
- Optimize the SSD: Finally, use a tool such as the Intel SSD Toolbox to optimize your new SSD for the best performance.
3. Can I Move Just Windows to A New SSD?
Yes, you can, but you will need to create a backup image of your current Windows installation and then use cloning software to transfer the image to the new drive. You will then need to reinstall all your applications and settings, but the process should be fairly straightforward.
Conclusion
In summary, this guide has provided a comprehensive overview of how to move Windows to another drive. We’ve covered the preparation needed before you begin, the process of cloning the drive, and post-move procedures to make sure your system is running correctly.
We’ve also provided advice on how to manage the storage of your Windows installation, with tips on how to move windows to another drive, Windows 10, without losing data. If you want to transfer Windows to a new drive, we recommend using 4DDiG Partition Manager. With this tool, you can easily and safely migrate your system to a new drive without any data loss.
4DDiG Partition Manager
4DDiG Partition Manager is a simple and secure professional system migration tool that can migrate Windows OS to SSD in one click without reinstalling your system, effectively clone your entire hard drive to backup your data and more. It supports securely moving installed applications, system updates, drivers, custom settings from one PC to another.
Free Download
BUY NOW
Free Download
BUY NOW
If you want to move Windows to another drive, continue reading below. Over time, computer hardware (like everything else) wears out. This of course also happens with hard drives, which over time their performance decreases and need to be replaced.
The hard disk is probably the most important device on the computer because it is used to store your work (documents, photos, videos, confidential data, etc.). Therefore, it is advisable to replace it after 3-5 years to avoid possible data loss and to extend the life and performance of the computer.
If you want to replace your Windows hard disk drive (HDD) with another HDD or SSD (Solid State Drive – which is at least 14 times faster than an average hard disk), you can do so in one of the following ways:
- Way 1: Backup your files to an external disk, and then proceed to a clean installation of Windows. After installation, install the necessary programs, restore your files and personalize your computer as before.
- Way 2: Move Windows and all your data (Files, Programs and Settings) to another HDD, without any hassle to reinstall your programs and restore your files and settings.
Of the above methods, as you can understand, the second one is the easiest, because it allows you to move Windows to another drive without the stress of reinstalling the operating system, programs and settings or to restore your files back!
In this tutorial you will find detailed instructions on how to transfer Windows along with your programs, files and settings to another drive.
How to Migrate Windows to Another Hard Drive (Windows 11/10/8.1).
To move (migrate) Windows to another drive, you can either use the built-in Windows Backup and Restore tool to create a System Image and then to restore that image to the new drive (Method-1), or to use a third-part disk cloning utility to copy your Windows disk to a new one (Method-2). Both methods are described below. *
* Important:
Before you start the process of moving Windows to another drive, apply the following steps:
1. Backup your personal files and data to another external storage device (e.g. USB Drive) in order to have a copy of your files if something goes wrong.
2. Perform a disk cleanup to delete the useless files and free up storage space.
- Method 1. Create & Restore System Image.
- Method 2. Clone Disk with a Third-Party tool.
Method 1. How to Transfer Windows to Another Drive using a System Image.
The built-in Windows system image tool is the first and recommended method for transferring Windows, files, applications, and settings to another drive equal to or larger than the current drive. For example, if the current drive is 256GB, to use the System Image on Windows, the new drive must be larger than 256GB or equal in size. *
* Note: If the contents of your current disk (used space), can fit on a disk smaller in size than the current disk, follow the instructions on Method-2 to clone the drive by using a disk-cloning utility.
Requirements:
-
- A New Drive with Equal or Largest size (in Gigabytes) to the current Drive.
The process of moving Windows to another hard drive using Windows built-in system image tool require that the new drive must be larger in size or equal to the current drive. - A Secondary drive/disk (internal or external), to store the System Image. If you don’t own a secondary drive, follow the instructions on Method-2 below.
- A USB Windows installation media.
In order to restore Windows to a new drive you have to start your PC from a USB installation media. If you don’t own a Windows Installation media, follow these instructions to create one.
- A New Drive with Equal or Largest size (in Gigabytes) to the current Drive.
Step 1. Create a System Image.
To create a full backup of your Windows disk, (aka «System Image» backup):
1. Get a portable USB hard drive with enough free space and plug it into the PC. When done, ensure that it appears in Windows Explorer.
2. Click the Start menu, then type Control panel and select Open.

3. Select Backup and Restore (Windows 7)

4. Click Create a system image

5. A dialog box will appear scanning your PC for backup devices. Click on the drop down below On a hard disk and select the USB hard drive you plugged in, then click Next.

6. A window will appear with the size of the data that will be migrated to the USB hard drive. Select Start Backup to proceed.

7. A progress bar will appear indicating the duration of the process. Be patient until Windows saves the system image to the external disk. (This process will take some time depending on the size of the data and the speed of the hardware).
8. When the system image completes, you will be prompted to create a system repair disk. Click No to proceed and close all windows.

Step 2. Replace Hard Drive.
Once you have saved the system image and have the Windows USB installation media, proceed to restore Windows to the new disk as follows:
1. Shutdown your PC.
2. Remove the current Windows hard disk and disconnect (unplug) any other secondary disks (if any), to avoid mistakes.
3. Install the new hard disk.
4. Plug the external USB drive with the System Image.
Step 3. Restore System Image.
1. Turn on your PC and boot from the USB Windows Installation Media. (The common keys to access the boot order options are the Del, F9, F12)
2. At the Windows Setup screen choose Next and then click Repair your computer.

3. Select Troubleshoot, then click System Image Recovery.

4. When the System Recovery tool detects the image you created, leave the «Use the latest available system image» option selected and click the Next button.

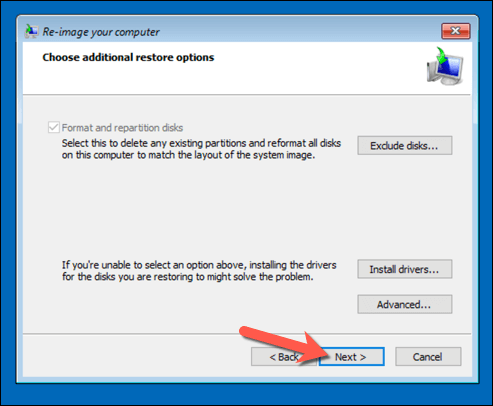
5. Ensure that Format and repartition disk* checkbox is checked and click Next.
* Attention: This will delete any existing partitions and data on the new hard drive and reformat it to match the layout of the system image.

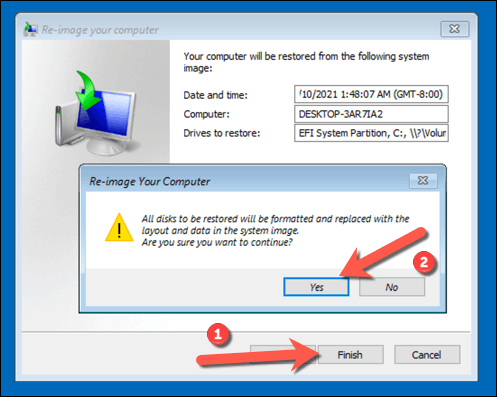
6. Finally click Finish and then select Yes to confirm that you want to proceed with system image restoration. The process will take some minutes to complete depending on the volume of data on the system image.
7. Once the restoration is complete, the PC will automatically restart in 60 seconds. At this point, remove the USB Installation media and let the system to boot from the new drive. (In some cases you may need to go to BIOS/UEFI to set the computer to boot from the new hard disk).
Quick Tip: If the new hard is the same size as the previous hard drive, all the disk space will be allocated. However, if the new hard drive is larger than the previous hard drive, there will be unallocated space. In this case, you must expand the volume to take advantage of all available space on the new hard disk.
Method 2. How to Move Windows to Another Drive by Cloning Hard Disk.
The second method to copy your Windows drive to another, is by cloning your main disk to a new one, by using a third-party Disk Cloning Software/Utility. For this task, you can use one of the following reliable and FREE Disk Cloning Tools: *
- AOMEI Backupper Standard
- EaseUs ToDo BackUp Home
- MiniTool Partition Wizard Free 12.6.
* Note: For the purposes of this tutorial we demonstrate on how to clone a HDD to another (HDD or SSD), with EaseUs ToDo BackUp.
Requirements:
-
- A New Disk/Drive with Smaller,* Equal or Largest size (in Gigabytes) to the current Drive.
* Note: If you want to use a smaller disk to move the current Windows disk, you must ensure that the data (used space), on the current disk will fit on the new disk.
How to Clone your Hard Drive with EaseUs ToDo BackUp:
1. Download EaseUs ToDo BackUp Home. (Click the Free Trial button and click Download.)

2. When the download completes, go ahead and install the program.
3. Shutdown your PC.
4. Connect the new disk and disconnect (unplug) any other secondary disks (if any), to avoid mistakes. *
* Note: If you own a laptop, get a USB hard drive enclosure and insert the new drive and then plug it to your PC.
5. Turn on your PC and boot to Windows.
6. Launch EaseUs ToDo BackUp Home, and select Later at License screen.
7. From the Menu ![]() select Clone
select Clone

2. Check the Source disk (with the Operating System), and click Next.

3. Now check the Target disk which in this case is the new hard drive. Click Next to proceed.

4a. Select Proceed.

4b. Now you will get a warning that all the data on the target drive will be erased. Click Continue to start cloning the drive.

5. The cloning process will start and you will be able to see the progress on the screen. (Be patient until the process to complete).

6. When the cloning process in completed, click Finish and close Easeus ToDo Backup.

7. Shut down the PC.
8. Remove the current hard drive from the computer and replace it with the cloned drive.
9. Finally power on your PC and let it to boot to Windows. If everything has gone well, the computer will boot into the Windows desktop just like it did with the old drive. *
* Note: If you PC can’t boot to Windows enter BIOS setup and change the boot priority to the new drive.
That’s it! Which method worked for you?
Let me know if this guide has helped you by leaving your comment about your experience. Please like and share this guide to help others.