Your Windows PC comes with a one-stop backup solution, Windows Backup, that will help you to back up many of the things that are most important to you. From your files, themes, and some settings to many of your installed apps and Wi-Fi information — Windows Backup will help protect what matters and make it easier than ever to move to a brand-new PC.
This guide will help you to use Windows Backup to back up key things on your Windows PC.
Step 1: Sign in with a Microsoft account
This is the account associated with Windows, Microsoft 365, OneDrive, Xbox, and more. Your backed-up information will be stored with your Microsoft account, so getting back to your things on a new PC is as easy as signing in.
To sign in to your Microsoft account, select Start > Settings > Accounts > Your info . Select Sign in with a Microsoft account instead. You’ll see this only if you’re using a local account. If you see Sign in with a local account instead, you’re already using your Microsoft account.
Important: You must use a personal Microsoft account with Windows Backup. Work or school Microsoft accounts won’t work.
Open account settings
Create a new Microsoft account
Check if you have a Microsoft account
Step 2: Back up your folders
Windows Backup is an easy, single stop for all of your backup needs. Your free Microsoft account comes with 5 GB of OneDrive cloud storage (and more storage is available if you need it), and backing up your folders syncs the folders you specify to your OneDrive account, making them instantly accessible on all computers that you use with this Microsoft account. And since they are synced to OneDrive, once you sign in to OneDrive on a new PC, those files will be available to you once again.
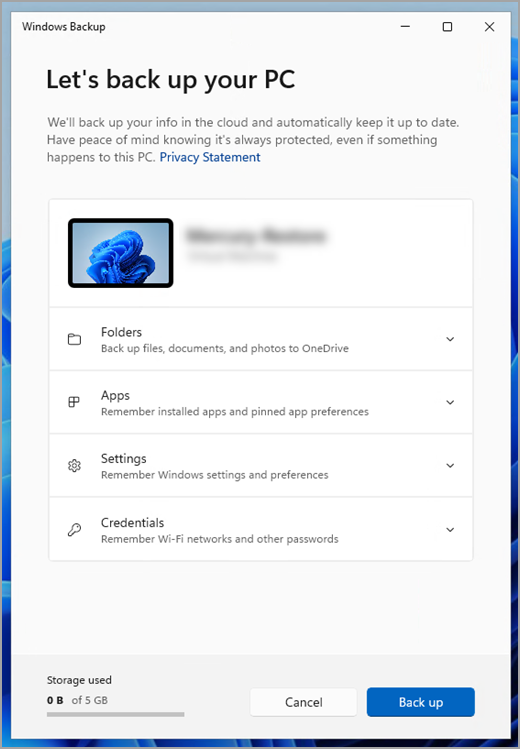
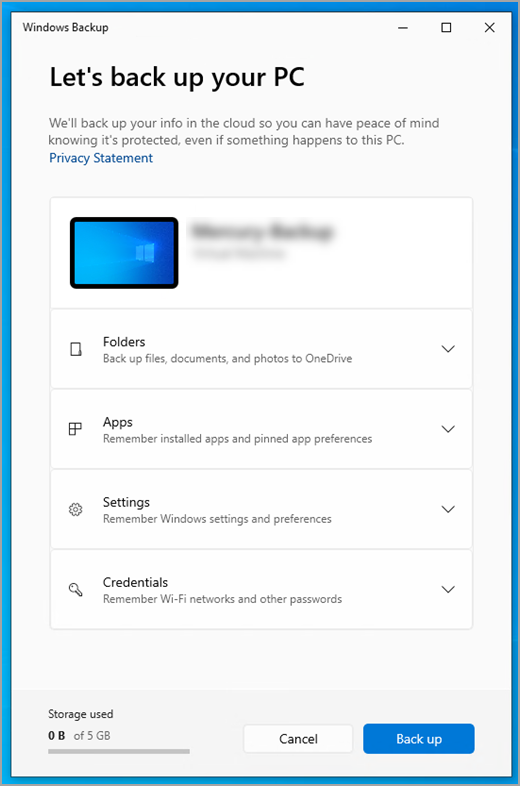
First, launch Windows Backup: select Start , type windows backup, and select Windows Backup from the results. (Or you can select Start > All apps > Windows Backup.)
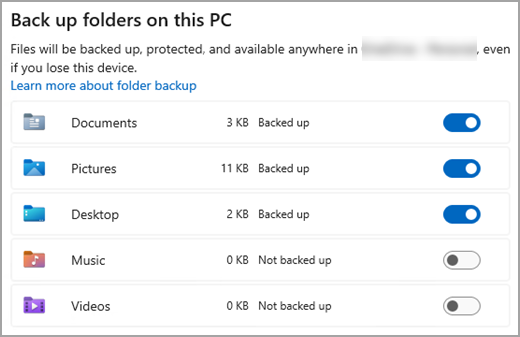
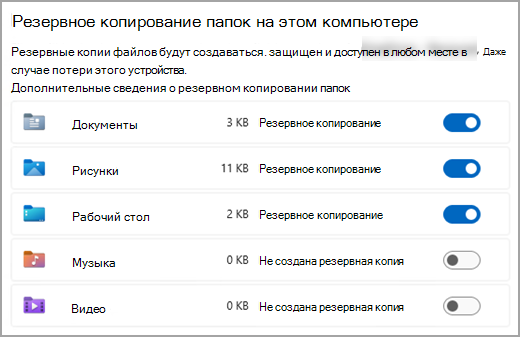
Then select Folders to drop it down, and select which of your user folders you want to back up to OneDrive:
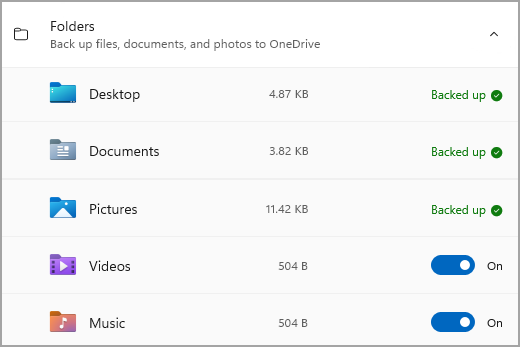
You can back up your Desktop, Documents, Pictures, Videos, and Music folders. Simply toggle the switch for each folder On or Off.
Note: If you have backed up these folders in the past, they will show as Backed Up. If you wish to no longer back up these folders, see What do I do if I want to stop backing something up?, below.
Step 3: Back up your settings
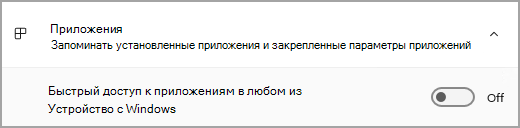
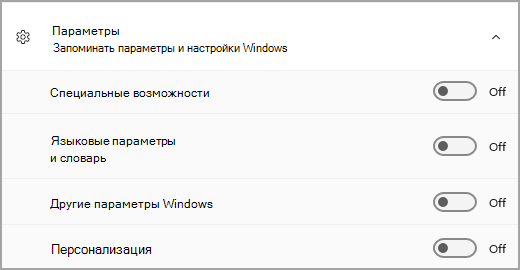
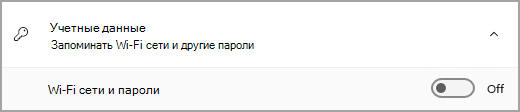
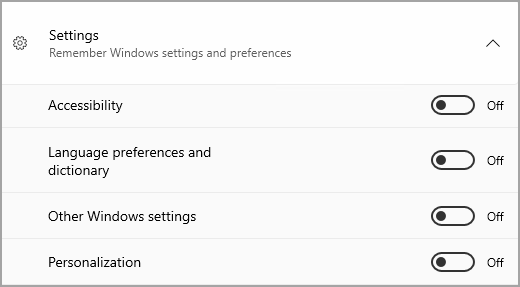
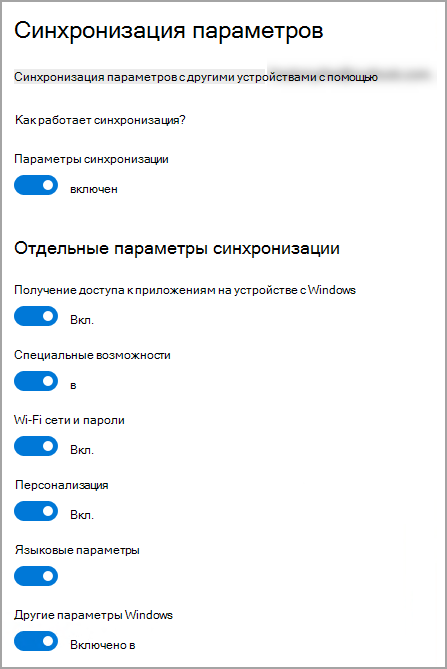
Windows Backup can help back up other Windows settings for you, such as your installed apps, your Wi-Fi network and password information, and other settings such as language preference or your wallpaper settings.
You’ll see the state of all of these settings in Windows Backup:
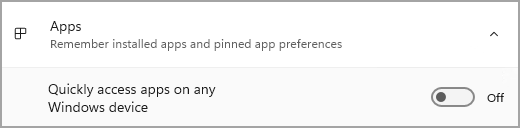
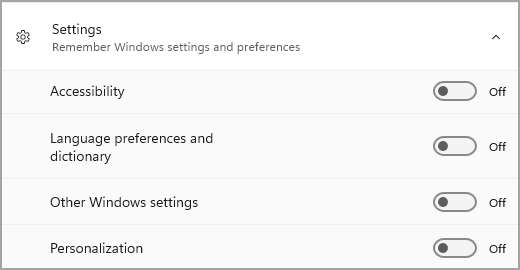
Again, you can simply toggle these settings On or Off.
Note: If these settings have been backed up in the past (and some are by default), they will show as Backed up and the toggle switch will be unavailable. If you want to stop backing these up, see What do I do if I want to stop backing something up?, below.
Once you have everything set up the way you want it, select Back up.
Note: If you receive an error from OneDrive when you try to back up, it’s possible that you aren’t signed in to OneDrive or there may be another issue with OneDrive that needs to be resolved in order for Windows Backup to work. For more, see Fix OneDrive sync problems.
Open Windows backup settings
Step 4: Time to relax!
You’re all set! Your folders and settings are being backed up and you can access your files on all of the computers that you log into with this Microsoft account. It really couldn’t be easier.
If you want to check and make sure everything is still backed up (hey, we all want that sense of security from time to time!), you can just open the Windows Backup app and it will show you the current state of your backup, or you can check on things at the top of the Windows backup page in Settings, at Start > Settings > Accounts > Windows backup.

Open Windows backup settings
How do I restore this backup?
We have your back! When you get a new PC or if you have to reinstall Windows, when you are setting it up, just log in with the same Microsoft account that you used to make the backup here. We’ll see that you have backups and ask you if you would like to restore one.

If you have more than one computer backed up, you can select More options and select the backup you wish to restore from. When you get to your desktop everything will be right there waiting for you!
Note: Files can be restored anytime simply by signing in to OneDrive with the same Microsoft account you used to make the original backup.
What about my Microsoft Edge preferences?
To easily browse the web from any of your devices and keep your favorites organized, sign in to Microsoft Edge and turn on sync.
Sign in to sync Microsoft Edge across devices
What do I do if I want to stop backing something up?
You may notice that if you have been backing something up in Windows Backup, that item is marked as Backed up and you no longer have access to the switch to turn it On or Off.
If for some reason you no longer want to back up some of your folders, apps, or settings, the place to control that is in Start > Settings > Accounts > Windows backup.
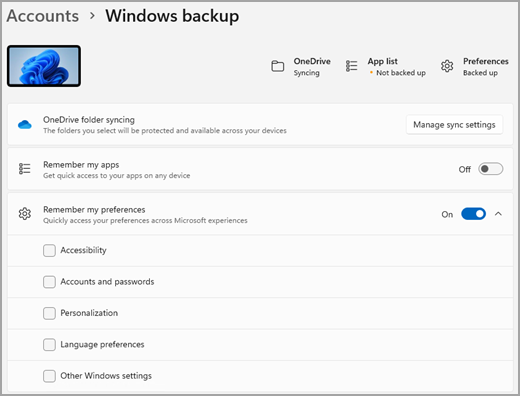
From here, you can deactivate file backup by selecting Manage sync settings next to OneDrive folder syncing and then turning off the folders you no longer wish to back up.
For apps and settings, you can set the switch for Remember my apps to On or Off, or drop down Remember my preferences and ensure the checkboxes for any of the items you wish to back up are checked.
Note:
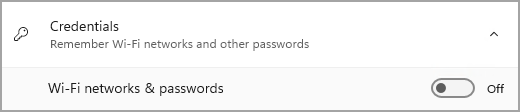
Accounts and passwords is the box to check in Settings for Wi-Fi networks & passwords in Windows Backup.
Your Windows PC comes with a one-stop backup solution, Windows Backup, that will help you to back up many of the things that are most important to you. From your files, themes, and some settings to many of your installed apps and Wi-Fi information — Windows Backup will help protect what matters and make it easier than ever to move to a brand-new PC.
This guide will help you back up key things on your Windows PC.

Step 1: Sign in with a Microsoft account
This is the account associated with Windows, Microsoft 365, OneDrive, Xbox, and more. Your backed-up information will be stored with your Microsoft account, so getting back to your things on a new PC is as easy as signing in.
To sign in to your Microsoft account, select Start > Settings > Accounts > Your info . Select Sign in with a Microsoft account instead. You’ll see this only if you’re using a local account. If you see Sign in with a local account instead, you’re already using your Microsoft account.
Important: You must use a personal Microsoft account with Windows Backup. Work or school Microsoft accounts won’t work.
Open account settings
Create a new Microsoft account
Check if you have a Microsoft account
Step 2: Back up your folders
Windows Backup is an easy, single stop for all of your backup needs. Your free Microsoft account comes with 5 GB of OneDrive cloud storage (and more storage is available if you need it), and backing up your folders syncs the folders you specify to your OneDrive account, making them instantly accessible on all computers that you use with this Microsoft account. And since they are synced to OneDrive, once you sign in to OneDrive on a new PC, those files will be available to you once again.
First, launch Windows Backup: select Start , then Windows Backup.
Then select Folders to drop it down, and select which of your user folders you want to back up to OneDrive:
You can back up your Desktop, Documents, Pictures, Videos, and Music folders. Simply toggle the switch for each folder On or Off.
Note: If you have backed up these folders in the past, they will show as Backed Up. If you wish to no longer back up these folders, see What do I do if I want to stop backing something up?, below.
Step 3: Back up your settings
Windows Backup can help back up other Windows settings for you, such as your installed apps, your Wi-Fi network and password information, and other settings such as language preference or your wallpaper settings.
You’ll see the state of all of these settings in Windows Backup:

Again, just toggle these settings On or Off.
Note: If these settings have been backed up in the past (and some are by default), they will show as Backed up and the toggle switch will be unavailable. If you want to stop backing these up, see What do I do if I want to stop backing something up?, below.
Once you have everything set up the way you want it, go back to Windows Backup and select Back up.
Note: If you receive an error from OneDrive when you try to back up, it’s possible that you aren’t signed in to OneDrive or there may be another issue with OneDrive that needs to be resolved in order for Windows Backup to work. For more, see Fix OneDrive sync problems.
Open Windows sync settings
Step 4: Time to relax!
You’re all set! Your folders and settings are being backed up and you can access your files on all of the computers that you log into with this Microsoft account. It really couldn’t be easier.
If you want to check and make sure everything is still backed up (hey, we all want that sense of security from time to time!), you can just open the Windows Backup app and it will show you the current state of your backup, or you can check on the state of your OneDrive folder sync at the top of the main Settings page; just open Start > Settings and look for the icon.

Open Windows settings
How do I restore this backup?
We have your back! When you get a new Windows 11 PC, when you are setting it up, just log in with the same Microsoft account that you used to make the backup here. We’ll see that you have backups and ask you if you would like to restore one.
If you have more than one computer backed up, you can select More options and select the backup you wish to restore from. When you get to your desktop everything will be right there waiting for you!
Note: Files can be restored anytime simply by signing in to OneDrive with the same Microsoft account you used to make the original backup.
If you have to reinstall Windows on your Windows 10 PC, you’ll still have your folders synced to OneDrive and your settings synced to your Microsoft account, so as long as you log in with the same account you used to make the backup, everything will restore and you’ll still have your files and settings with you.
What about my Microsoft Edge preferences?
To easily browse the web from any of your devices and keep your favorites organized, sign in to Microsoft Edge and turn on sync.
Sign in to sync Microsoft Edge across devices
What do I do if I want to stop backing something up?
You may notice that if you have been backing something up in Windows Backup, that item is marked as Backed up and you no longer have access to the switch to turn it On or Off.
If you want to stop backing up some of your folders, you’ll need to turn those off in OneDrive. To do that, right-click (or long-press) the OneDrive icon in your system tray, then select Settings > Sync and backup > Manage backup, and turn off the folders you no longer wish to back up.
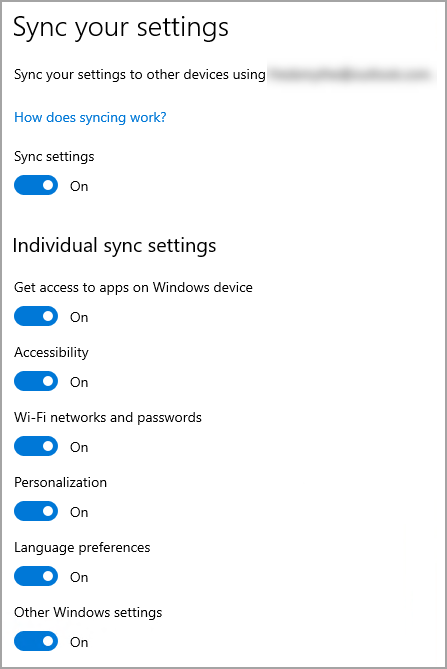
For apps and settings, the place to control that is in Windows Settings. Go to Start > Settings > Accounts > Sync your settings , set Sync Settings to On, and then turn off items you wish to stop backing up.
На вашем компьютере с Windows есть единое решение для резервного копирования программа архивации данных, которое поможет вам создать резервную копию многих наиболее важных для вас вещей. От файлов, тем и некоторых параметров до многих установленных приложений и Wi-Fi сведения — программа архивации данных поможет защитить все, что важно, и облегчит переход на новый компьютер.
Это руководство поможет вам использовать программа архивации данных для резервного копирования ключевых вещей на компьютере с Windows.

Шаг 1. Вход с помощью учетной записи Майкрософт
Это учетная запись, связанная с Windows, Microsoft 365, OneDrive, Xbox и т. д. Данные, для которых создана резервная копия, будут храниться в вашей учетной записи Майкрософт, поэтому получить доступ к вашим элементам на новом компьютере так же просто, как войти в систему.
Чтобы войти в свою учетную запись Майкрософт, выберите Пуск > Параметры > Учетные записи > Ваши данные . Выберите Войти вместо этого с учетной записью Майкрософт. Этот параметр отображается, только если вы используете локальную учетную запись. Если вы видите параметр Войти вместо этого с локальной учетной записью, вы уже используете свою учетную запись Майкрософт.
Важно: Вы должны использовать личную учетную запись Майкрософт с программа архивации данных. Рабочие или учебные учетные записи Майкрософт не будут работать.
Открыть параметры учетной записи
Создать новую учетную запись Майкрософт
Проверьте, есть ли у вас учетная запись Майкрософт
Шаг 2. Резервное копирование папок
программа архивации данных — это простой и единый останов для всех ваших потребностей в резервном копировании. Ваша бесплатная учетная запись Майкрософт поставляется с 5 ГБ облачного хранилища OneDrive (при необходимости доступно дополнительное хранилище), а резервное копирование папок синхронизирует указанные папки с вашей учетной записью OneDrive, что делает их мгновенным доступом на всех компьютерах, которые вы используете с этой учетной записью Майкрософт. Так как они синхронизируются с OneDrive, после входа в OneDrive на новом компьютере эти файлы снова станут доступны.
Сначала запустите программа архивации данных: выберите Пуск , введите windows backup и выберите программа архивации данных в результатах. (Вы также можете выбрать Запустить > Все приложения > программа архивации данных.)
Затем выберите Папки , чтобы открыть его, и выберите, какие из папок пользователей вы хотите создать резервную копию в OneDrive:
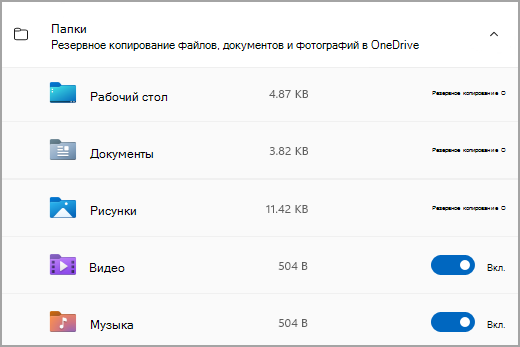
Вы можете создать резервную копию папок «Рабочий стол», «Документы«, «Изображения«, «Видео» и «Музыка«. Просто переключите переключатель для каждой папки Вкл . или Выкл.
Примечание: Если вы создали резервную копию этих папок в прошлом, они будут отображаться как Резервные копии. Если вы больше не хотите создавать резервную копию этих папок, см. статью Что делать, если я хочу прекратить резервное копирование? ниже.
Шаг 3. Резервное копирование параметров
программа архивации данных могут помочь вам создать резервную копию других параметров Windows, таких как установленные приложения, сведения о Wi-Fi сети и пароле, а также другие параметры, например языковые предпочтения или параметры обои.
Вы увидите состояние всех этих параметров в программа архивации данных:
Опять же, можно просто переключить эти параметры в положение Вкл. или Выкл.
Примечание: Если резервное копирование этих параметров было выполнено в прошлом (а некоторые из них по умолчанию), они будут отображаться как Резервные копии, а переключатель будет недоступен. Если вы хотите прекратить резервное копирование этих данных, см. статью Что делать, если я хочу прекратить резервное копирование? ниже.
Когда все будет настроено так, как вы хотите, выберите Создать резервную копию.
Примечание: Если при попытке создать резервную копию из OneDrive появляется сообщение об ошибке, возможно, вы не вошли в OneDrive или возникла другая проблема с OneDrive, которую необходимо устранить, чтобы программа архивации данных работали. Дополнительные сведения см. в статье Устранение проблем приложение синхронизации OneDrive.
Открыть параметры архивации данных Windows
Шаг 4. Пора расслабиться!
Все готово! Для папок и параметров создается резервная копия, и вы можете получить доступ к файлам на всех компьютерах, на которых вы входите с помощью этой учетной записи Майкрософт. Это действительно не может быть легче.
Если вы хотите проверка и убедиться, что все еще резервная копия (эй, мы все хотим это чувство безопасности время от времени!), вы можете просто открыть приложение программа архивации данных, и оно покажет текущее состояние резервной копии, или вы можете проверка о вещах в верхней части страницы резервного копирования Windows в параметрах. в разделе Пуск > Параметры > Учетные записи > резервное копирование Windows.

Открыть параметры архивации данных Windows
Разделы справки восстановить эту резервную копию?
У нас есть твоя спина! При получении нового компьютера или при необходимости переустановки Windows при его настройке просто войдите в систему с той же учетной записью Майкрософт, которая использовалась для создания резервной копии. Мы увидим, что у вас есть резервные копии, и спросим, хотите ли вы восстановить их.

Если у вас есть несколько компьютеров, для которых создана резервная копия, можно выбрать Дополнительные параметры и выбрать резервную копию, из которой необходимо выполнить восстановление. Когда вы вернетесь к вашему рабочему столу, все будет прямо там ждет вас!
Примечание: Файлы можно восстановить в любое время, просто войдя в OneDrive с той же учетной записью Майкрософт, которая использовалась для создания исходной резервной копии.
Как насчет моих настроек Microsoft Edge?
Чтобы легко просматривать веб-страницы с любого своего устройства и упорядочить избранное, войдите в Microsoft Edge и включите синхронизацию.
Вход для синхронизации данных Microsoft Edge на разных устройствах
Что делать, если я хочу прекратить резервное копирование?
Вы можете заметить, что если вы создали резервную копию в программа архивации данных, этот элемент помечается как Резервное копирование и у вас больше нет доступа к переключателю для включения или выключения.
Если по какой-либо причине вы больше не хотите создавать резервную копию некоторых папок, приложений или параметров, место для управления находится в разделе Параметры запуска > > Учетные записи > резервное копирование Windows.

Здесь вы можете отключить резервное копирование файлов, выбрав Управление параметрами синхронизации рядом с элементом Синхронизация папок OneDrive, а затем выключив папки, которые вы больше не хотите создавать резервные копии.
Для приложений и параметров можно установить для параметра Запомнить мои приложениязначение Вкл . или Выкл., или раскрывающийся список Запомнить мои настройки и установить флажки для любого из элементов, для которых вы хотите создать резервную копию.
Примечание:
Учетные записи и пароли — это поле для проверка в разделе Параметры сетей Wi-Fi & пароли в программа архивации данных.
На вашем компьютере с Windows есть единое решение для резервного копирования программа архивации данных, которое поможет вам создать резервную копию многих наиболее важных для вас вещей. От файлов, тем и некоторых параметров до многих установленных приложений и Wi-Fi сведения — программа архивации данных поможет защитить все, что важно, и облегчит переход на новый компьютер.
Это руководство поможет вам создать резервную копию ключевых элементов на компьютере с Windows.
Шаг 1. Вход с помощью учетной записи Майкрософт
Это учетная запись, связанная с Windows, Microsoft 365, OneDrive, Xbox и т. д. Данные, для которых создана резервная копия, будут храниться в вашей учетной записи Майкрософт, поэтому получить доступ к вашим элементам на новом компьютере так же просто, как войти в систему.
Чтобы войти в свою учетную запись Майкрософт, выберите Пуск > Параметры > Учетные записи > Ваши данные . Выберите Войти вместо этого с учетной записью Майкрософт. Этот параметр отображается, только если вы используете локальную учетную запись. Если вы видите параметр Войти вместо этого с локальной учетной записью, вы уже используете свою учетную запись Майкрософт.
Важно: Вы должны использовать личную учетную запись Майкрософт с программа архивации данных. Рабочие или учебные учетные записи Майкрософт не будут работать.
Открыть параметры учетной записи
Создать новую учетную запись Майкрософт
Проверьте, есть ли у вас учетная запись Майкрософт
Шаг 2. Резервное копирование папок
программа архивации данных — это простой и единый останов для всех ваших потребностей в резервном копировании. Ваша бесплатная учетная запись Майкрософт поставляется с 5 ГБ облачного хранилища OneDrive (при необходимости доступно дополнительное хранилище), а резервное копирование папок синхронизирует указанные папки с вашей учетной записью OneDrive, что делает их мгновенным доступом на всех компьютерах, которые вы используете с этой учетной записью Майкрософт. Так как они синхронизируются с OneDrive, после входа в OneDrive на новом компьютере эти файлы снова станут доступны.
Сначала запустите программа архивации данных: нажмите кнопку Пуск , а затем программа архивации данных.
Затем выберите Папки , чтобы открыть его, и выберите, какие из папок пользователей вы хотите создать резервную копию в OneDrive:
Вы можете создать резервную копию папок «Рабочий стол», «Документы«, «Изображения«, «Видео» и «Музыка«. Просто переключите переключатель для каждой папки Вкл . или Выкл.
Примечание: Если вы создали резервную копию этих папок в прошлом, они будут отображаться как Резервные копии. Если вы больше не хотите создавать резервную копию этих папок, см. статью Что делать, если я хочу прекратить резервное копирование? ниже.
Шаг 3. Резервное копирование параметров
программа архивации данных могут помочь вам создать резервную копию других параметров Windows, таких как установленные приложения, сведения о Wi-Fi сети и пароле, а также другие параметры, например языковые предпочтения или параметры обои.
Вы увидите состояние всех этих параметров в программа архивации данных:
Опять же, просто переключите эти параметры Вкл . или Выкл.
Примечание: Если резервное копирование этих параметров было выполнено в прошлом (а некоторые из них по умолчанию), они будут отображаться как Резервные копии, а переключатель будет недоступен. Если вы хотите прекратить резервное копирование этих данных, см. статью Что делать, если я хочу прекратить резервное копирование? ниже.
Когда все будет настроено так, как вы хотите, вернитесь к программа архивации данных и выберите Создать резервную копию.
Примечание: Если при попытке создать резервную копию из OneDrive появляется сообщение об ошибке, возможно, вы не вошли в OneDrive или возникла другая проблема с OneDrive, которую необходимо устранить, чтобы программа архивации данных работали. Дополнительные сведения см. в статье Устранение проблем приложение синхронизации OneDrive.
Открытие параметров синхронизации Windows
Шаг 4. Пора расслабиться!
Все готово! Для папок и параметров создается резервная копия, и вы можете получить доступ к файлам на всех компьютерах, на которых вы входите с помощью этой учетной записи Майкрософт. Это действительно не может быть легче.
Если вы хотите проверка и убедиться, что все резервные копии по-прежнему сохраняются (эй, мы все хотим это чувство безопасности время от времени!), вы можете просто открыть приложение программа архивации данных, и оно покажет текущее состояние резервной копии, или вы можете проверка состояние синхронизации папок OneDrive в верхней части страницы параметров main. Просто откройте пуск > Параметры и найдите значок.
Открытие параметров Windows
Разделы справки восстановить эту резервную копию?
У нас есть твоя спина! Когда вы получите новый Windows 11 компьютере, при его настройке просто войдите в систему с той же учетной записью Майкрософт, которая использовалась для создания резервной копии. Мы увидим, что у вас есть резервные копии, и спросим, хотите ли вы восстановить их.
Если у вас есть несколько компьютеров, для которых создана резервная копия, можно выбрать Дополнительные параметры и выбрать резервную копию, из которой необходимо выполнить восстановление. Когда вы вернетесь к вашему рабочему столу, все будет прямо там ждет вас!
Примечание: Файлы можно восстановить в любое время, просто войдя в OneDrive с той же учетной записью Майкрософт, которая использовалась для создания исходной резервной копии.
Если вам потребуется переустановить Windows на компьютере с Windows 10, папки будут синхронизированы с OneDrive, а параметры будут синхронизированы с учетной записью Майкрософт. Если вы войдете в систему с помощью той же учетной записи, которую вы использовали для создания резервной копии, все будет восстановлено, и у вас по-прежнему будут ваши файлы и параметры.
Как насчет моих настроек Microsoft Edge?
Чтобы легко просматривать веб-страницы с любого своего устройства и упорядочить избранное, войдите в Microsoft Edge и включите синхронизацию.
Вход для синхронизации данных Microsoft Edge на разных устройствах
Что делать, если я хочу прекратить резервное копирование?
Вы можете заметить, что если вы создали резервную копию в программа архивации данных, этот элемент помечается как Резервное копирование и у вас больше нет доступа к переключателю для включения или выключения.
Если вы хотите прекратить резервное копирование некоторых папок, необходимо отключить их в OneDrive. Для этого щелкните правой кнопкой мыши (или долго нажмите) значок OneDrive в области уведомлений, а затем выберите Параметры > Синхронизация и резервное копирование > Управление резервным копированием и отключите папки, которые вы больше не хотите создавать резервные копии.
Для приложений и параметров — место для управления, которое находится в параметрах Windows. Перейдите в раздел Пуск > Параметры > Учетные записи > Синхронизация параметров , установите для параметра Параметры синхронизации значение Вкл., а затем отключите элементы, которые вы хотите прекратить резервное копирование.
Нужна дополнительная помощь?
Нужны дополнительные параметры?
Изучите преимущества подписки, просмотрите учебные курсы, узнайте, как защитить свое устройство и т. д.
В сообществах можно задавать вопросы и отвечать на них, отправлять отзывы и консультироваться с экспертами разных профилей.
(Image credit: Future)
As part of your recovery plan, a full backup should be at the top of your list since it is the best strategy against hardware failure, apps, upgrade problems, and malware attacks that can corrupt your files and damage your Windows 10 installation. If you are not proactively creating full backups, you will be putting at risk documents, priceless pictures, and configurations you have spent long hours setting up.
If you use Windows 10, you have many different methods to create a backup. For example, you can use third-party solutions to create a backup of the entire system, copy files to an external drive manually, or upload them to a cloud storage service like OneDrive. However, if you do not want to use manual methods or third-party tools, you can always create a full backup using the legacy built-in System Image Backup tool.
A system image is another way to say «full backup,» as it contains a copy of everything on the computer, including the installation, settings, apps, and files. Usually, you will find this tool better suited to restore the entire system from critical hardware or software problems, such as hard drive failure or when trying to roll back to a previous version of Windows 10.
This guide will walk you through creating a full backup with all your custom settings, apps, files, and installation using the system image tool.
How to create a backup with system image tool on Windows 10
The system image tool allows you to create a full backup to an external drive or network-shared folder. However, it is best to use removable storage, which you can disconnect and store in a different physical location.
Quick note: The System Image Backup tool for Windows 10 is no longer a maintained feature, but you can still use it for the foreseeable future. The instructions outlined in this guide are meant to create a temporary full backup while the feature is still available. You can also read this guide with alternative ways to back up your computer.
To create a full backup of Windows 10 with the system image tool, use these steps:
- Open Settings.
- Click on Update & Security.
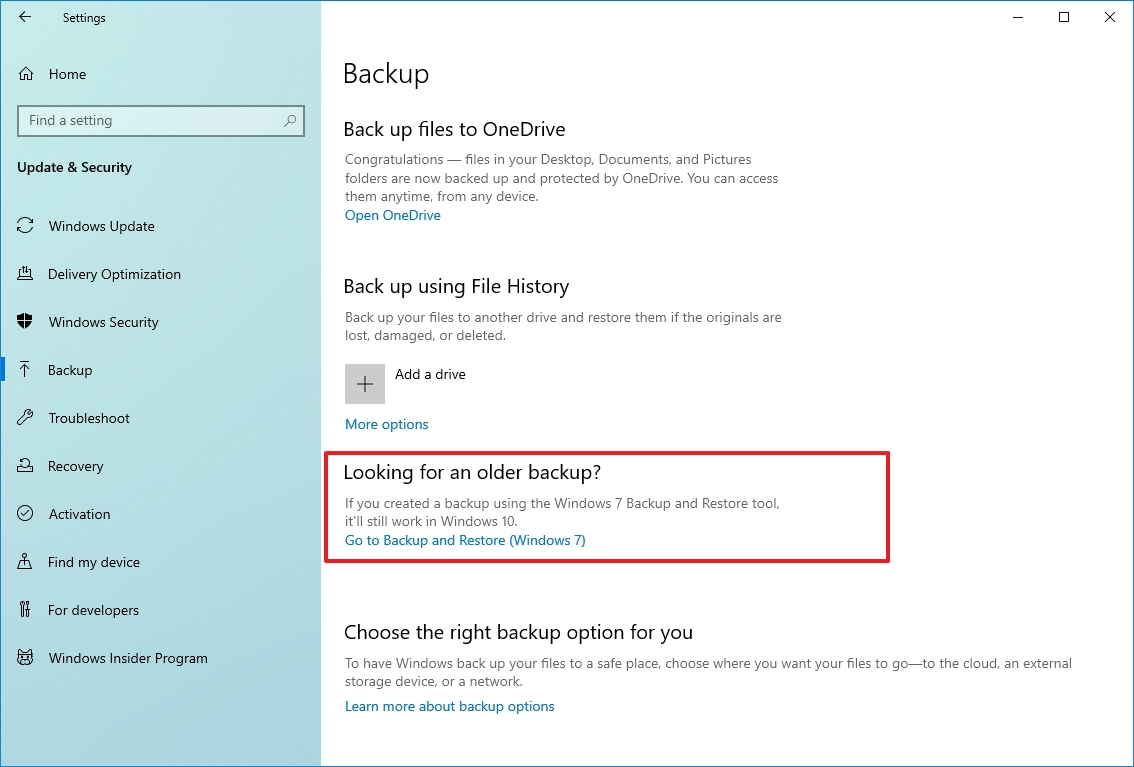
- Click on Backup.
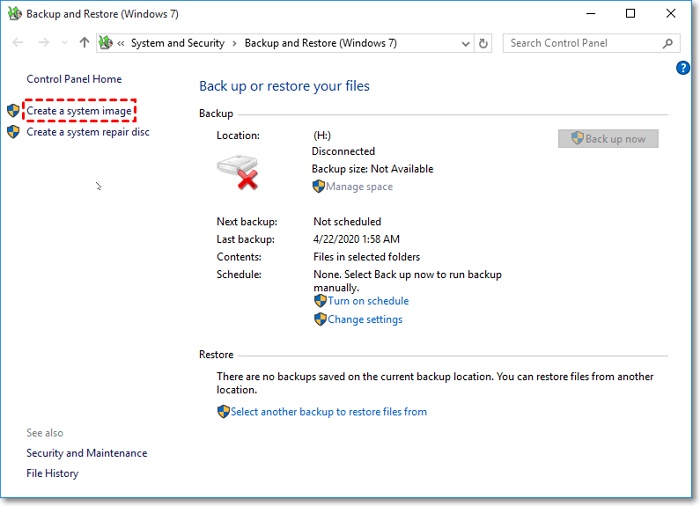
- Under the «Looking for an older backup?» section, click the «Go to Backup and Restore (Windows 7)» option.
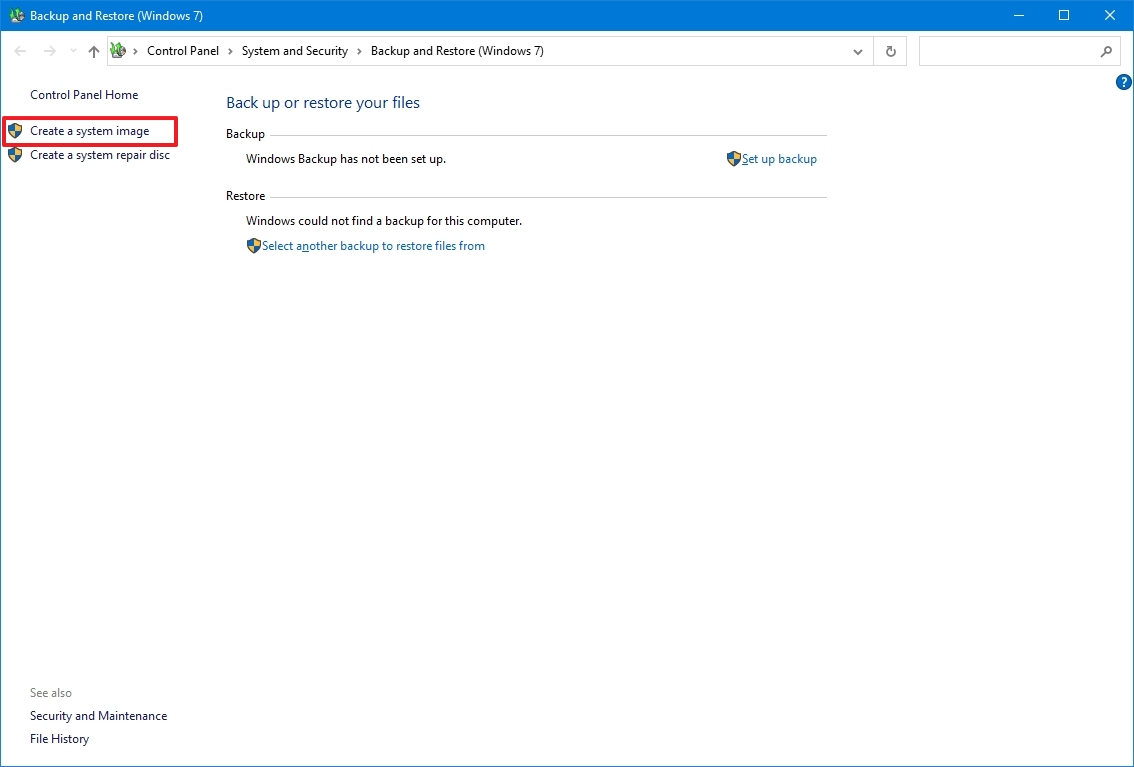
- Click the «Create a system image» option from the left pane.
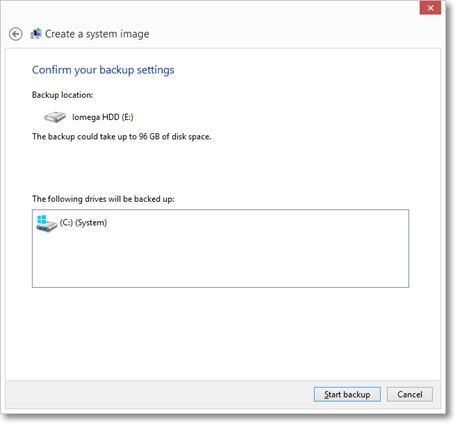
- Select the «On a hard disk» option.
- Use the «On a hard disk» drop-down menu and select the location to export the Windows 10 full backup.
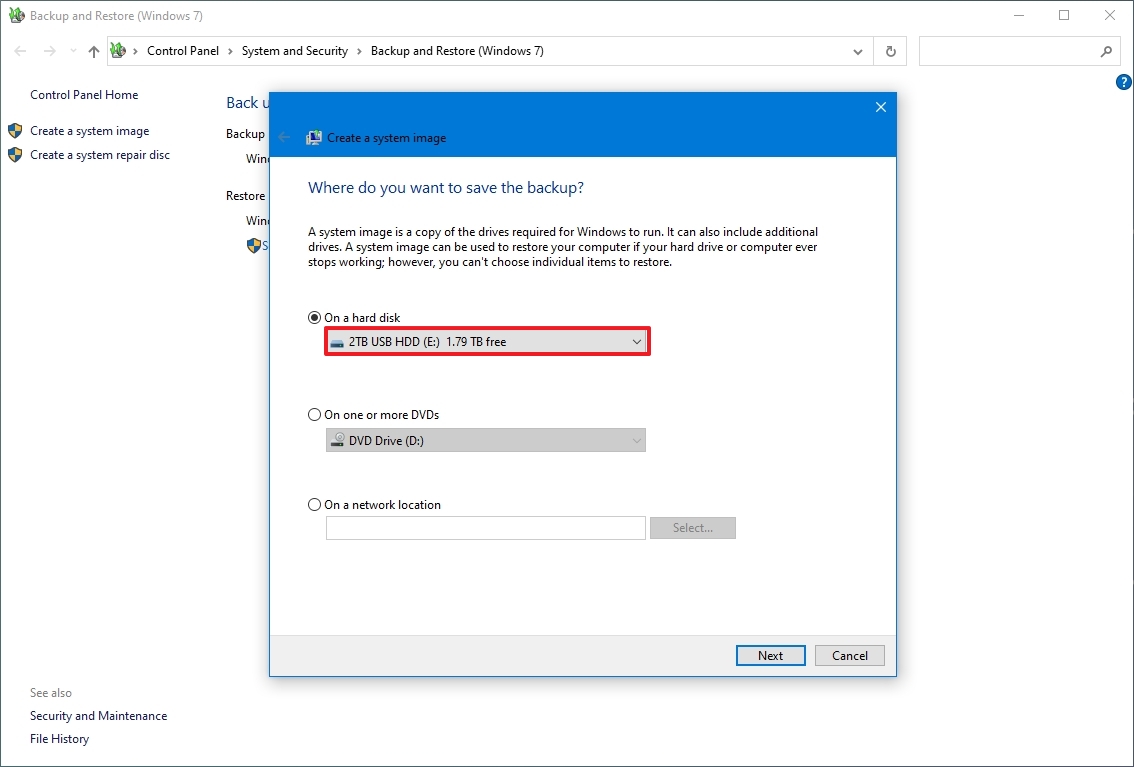
- Click the Next button.
- (Optional) Select any additional hard drives to include them in the backup.
- Click the Next button.
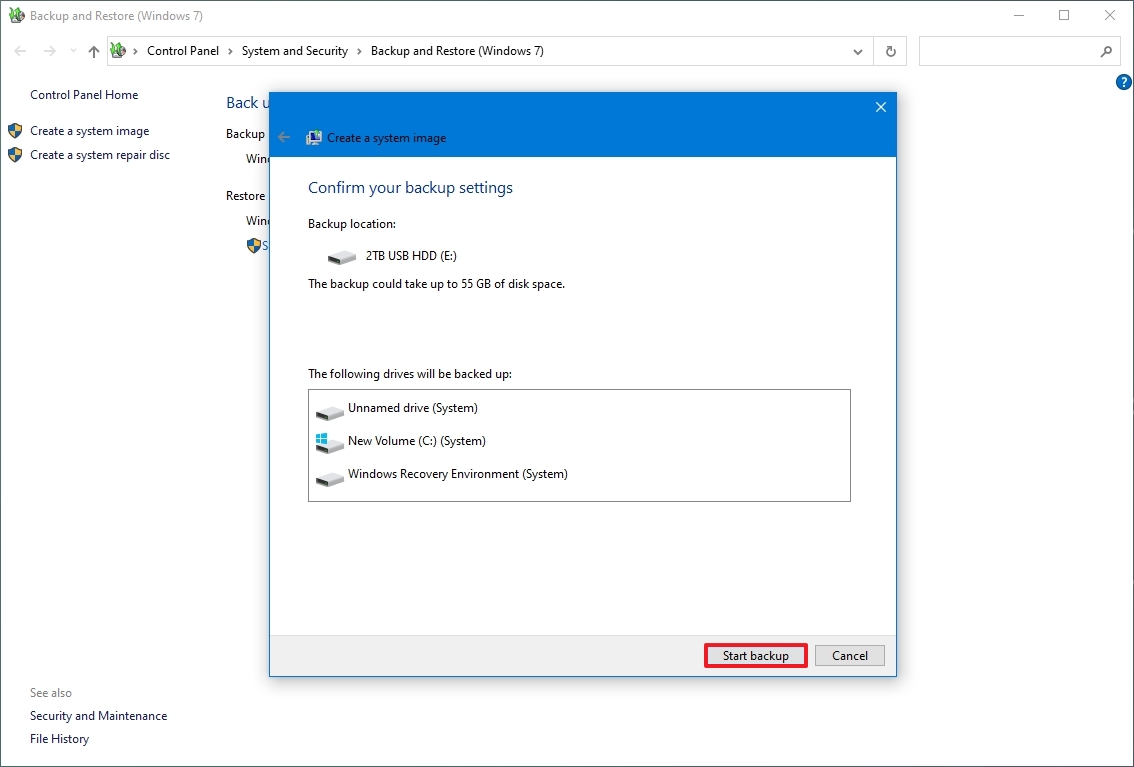
- Click the Start backup button.
- Click the No button.
- Quick note: You’ll also receive a prompt to create a system repair disc, but because most devices no longer include an optical drive, you can skip it. If you must restore the machine, you can use a USB installation media to access the recovery environment.
- Click the Close button.
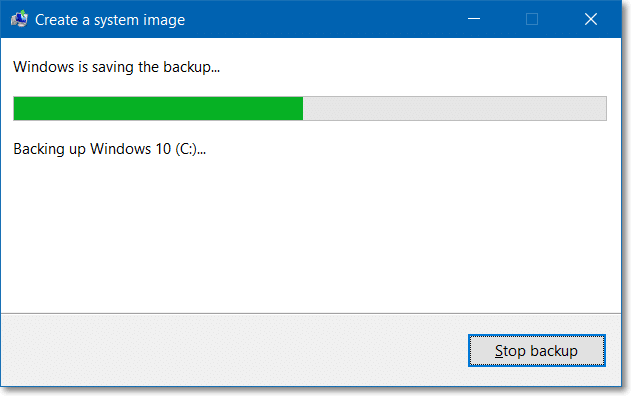
Once you complete the steps, the tool will create an image of the entire system that includes everything on the primary hard drive and other drives you may have selected.
While the backup is in progress, you can continue working on the device since it uses the «Shadow Copy» feature to backup files even if files are open and apps are running.
After the process, you can disconnect and store the external drive safely. You may consider keeping the backup in a different physical location if you have valuable data.
How to restore a backup with system image tool on Windows 10
If you need to replace the hard drive or hardware failure occurs, you can use one of the backups to recover the device and files.
To restore a backup on Windows 10, use these steps:
- Connect the drive with the full backup to the device.
- Connect the Windows 10 USB bootable drive to the computer.
- Start the computer.
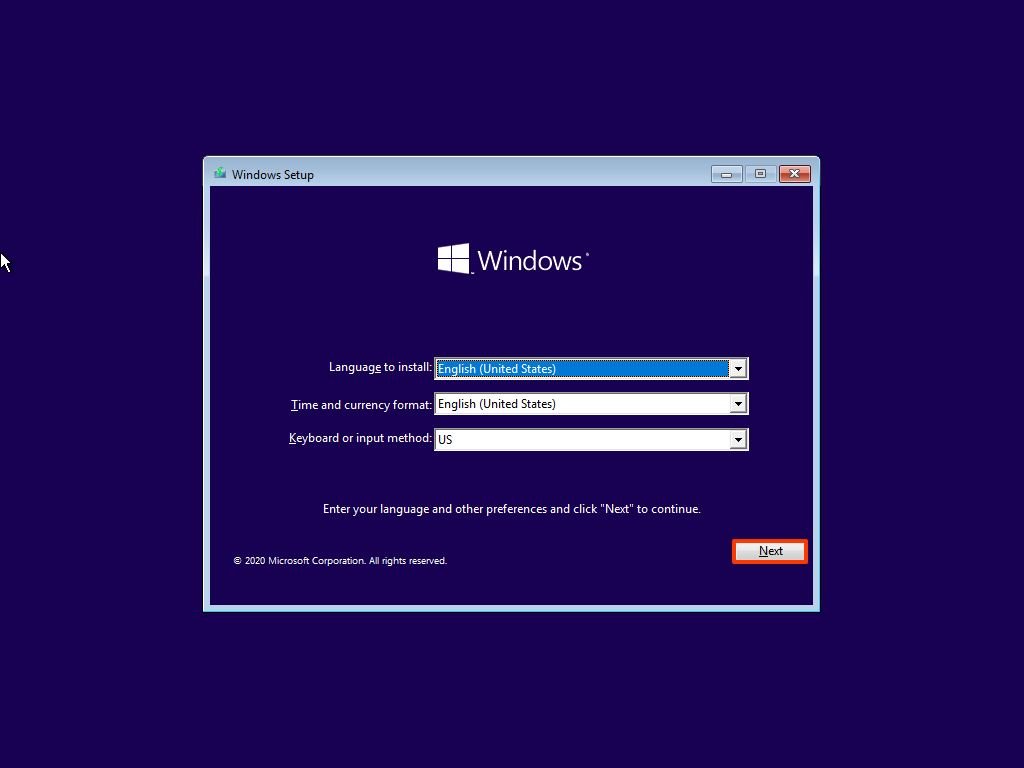
- On the USB bootable drive startup prompt, press any key to continue.
- Quick tip: If the device does not start in the Windows Setup wizard, you will need to access the Basic Input/Output System (BIOS) or Unified Extensible Firmware Interface (UEFI) to change the boot order settings. You can use this guide to access the BIOS/UEFI, but the steps are usually different per manufacturer and device model. It is recommended to check your manufacturer support website for more specific details.
- On the «Windows Setup» page, click the Next button.
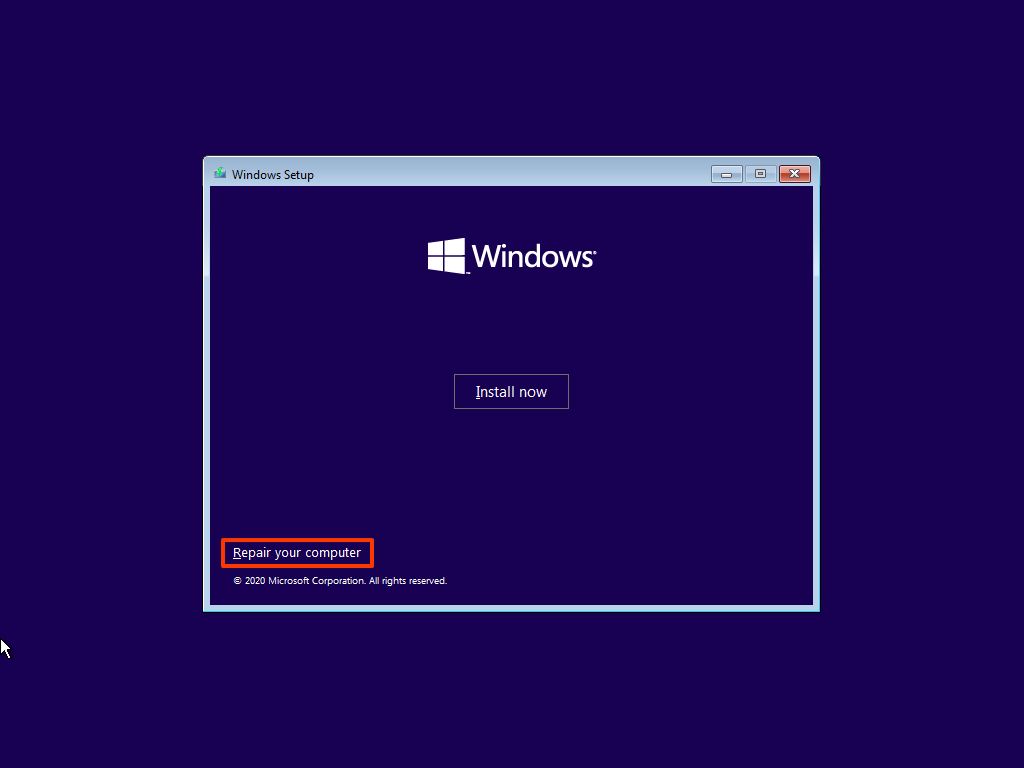
- Click the «Repair your computer» option from the bottom-left corner of the screen.
- Click the Troubleshoot option.
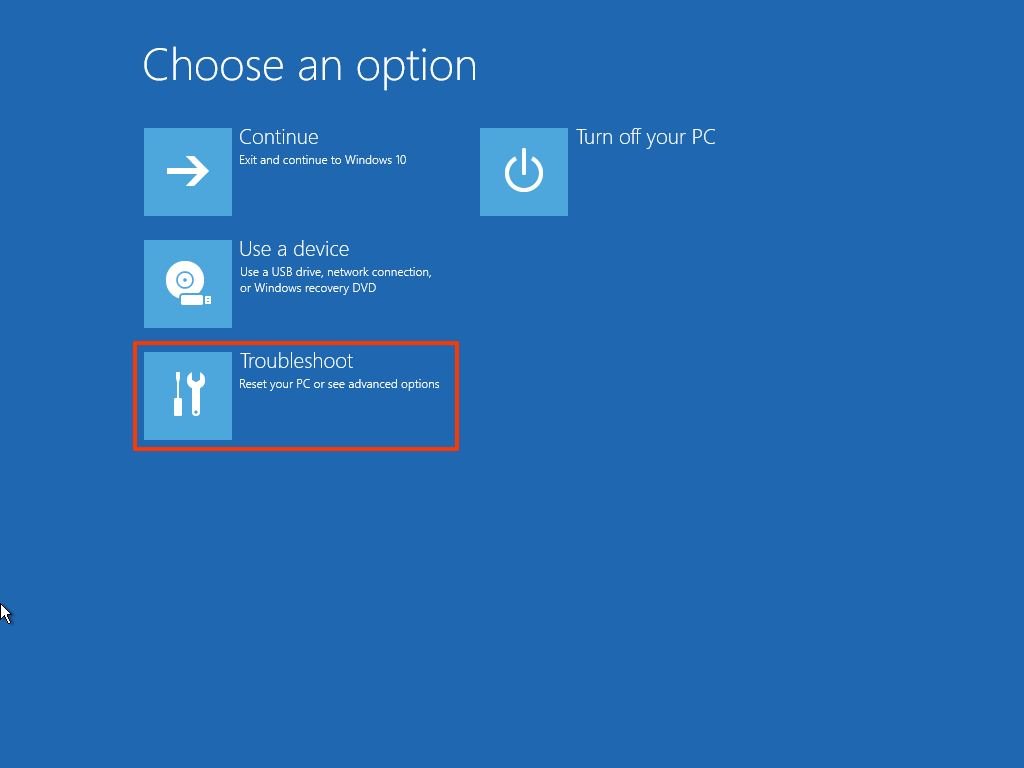
- Click the «System Image Recovery» option.
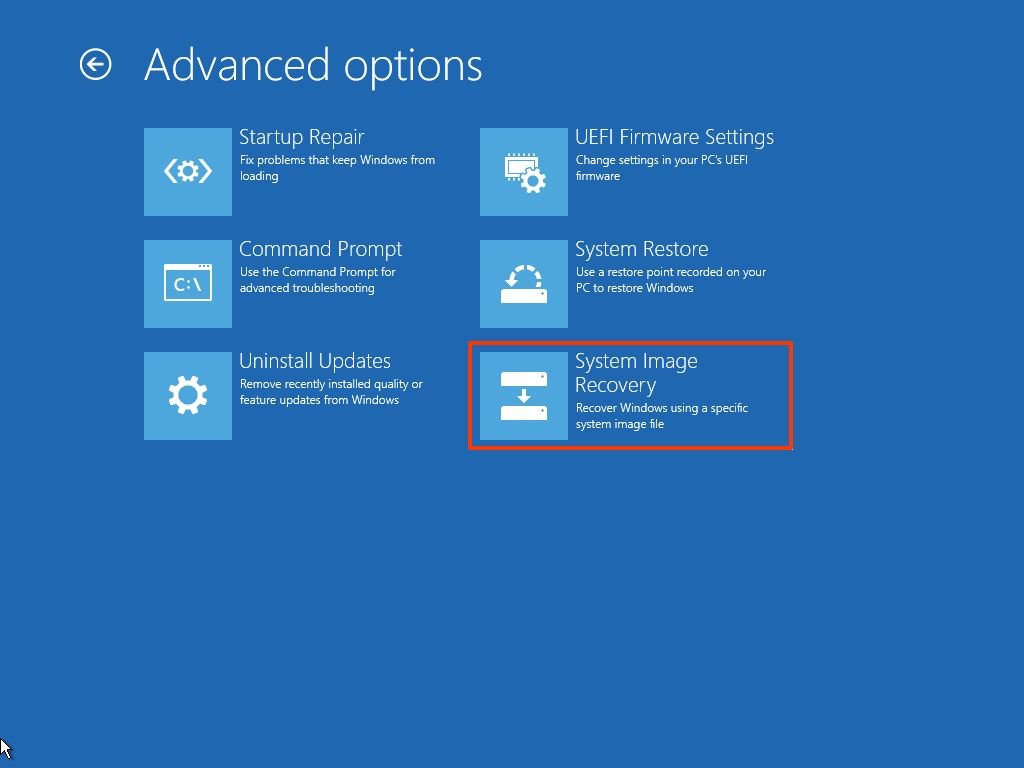
- Select the Windows 10 option as the target operating system.
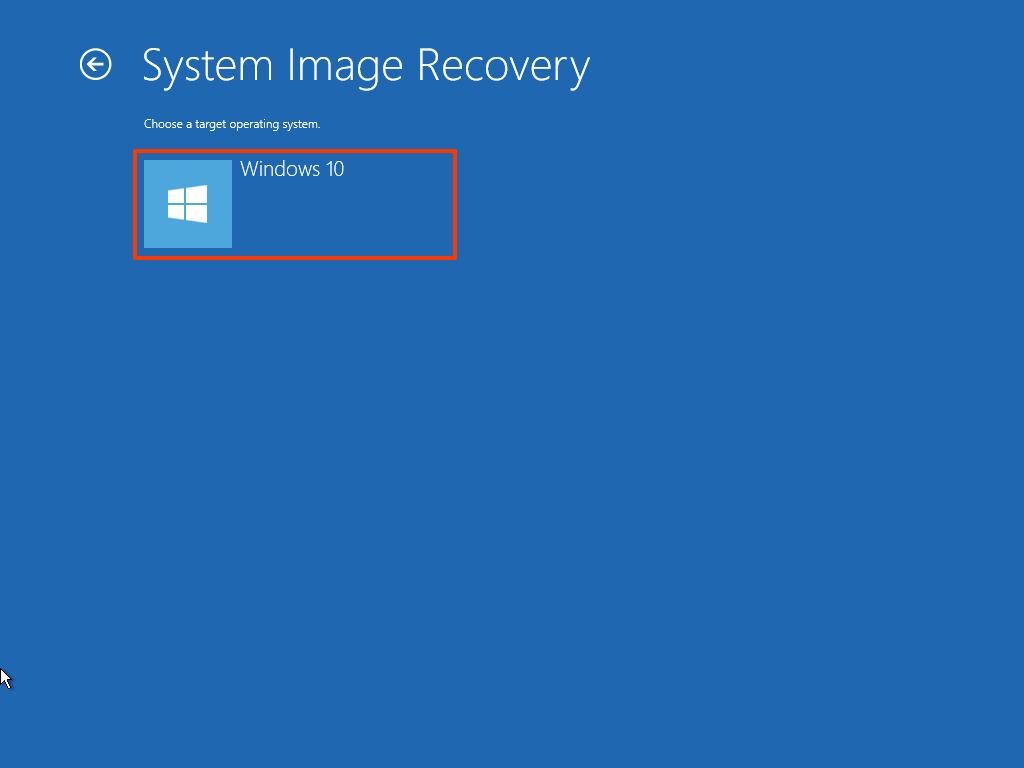
- On the «Re-image your computer» page, select the «Use the latest available system image» option.
- Quick tip: You can use the «Select a system image» option if you have multiple backups and you are trying to restore an older version of the system and files.
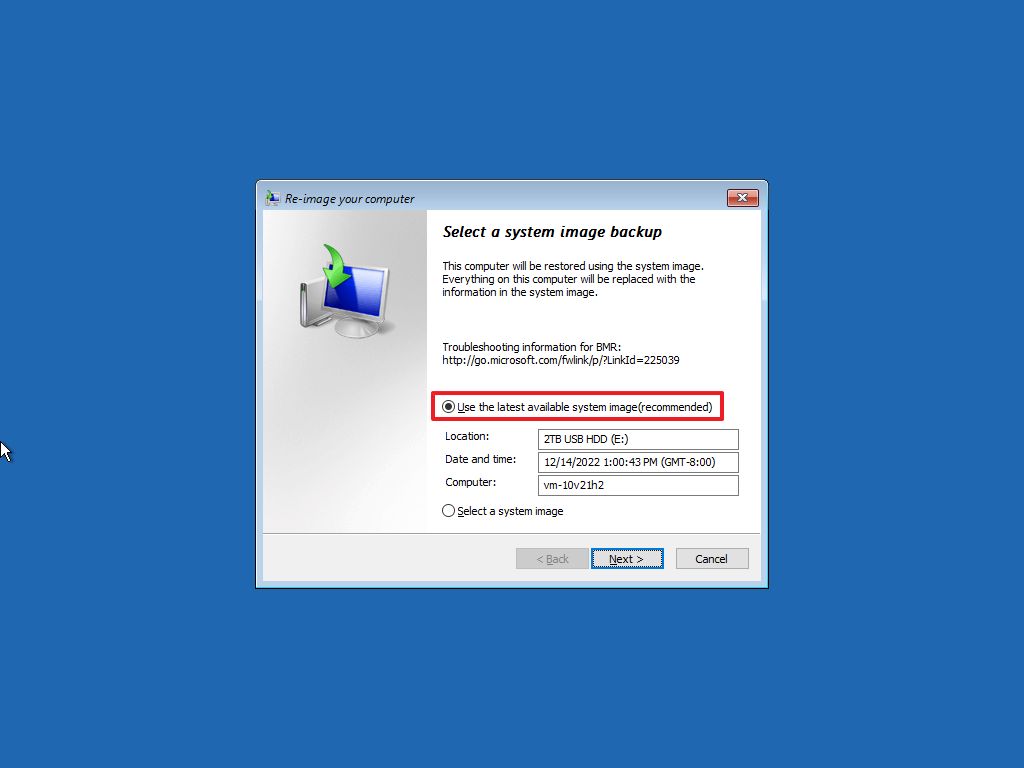
- Click the Next button.
- (Optional) Carefully select the «Format and repartition disks» option before restoring the backup (if you are restoring the backup on a new drive).
- Quick tip: If you choose this option, use the Exclude disks option to prevent formatting secondary drives that may contain data.
- (Optional) Check the «Only restore system drivers» option (if the backup contains a copy of multiple drives and you only want to restore the operating system).
- Click the Next button.
- Click the Finish button.
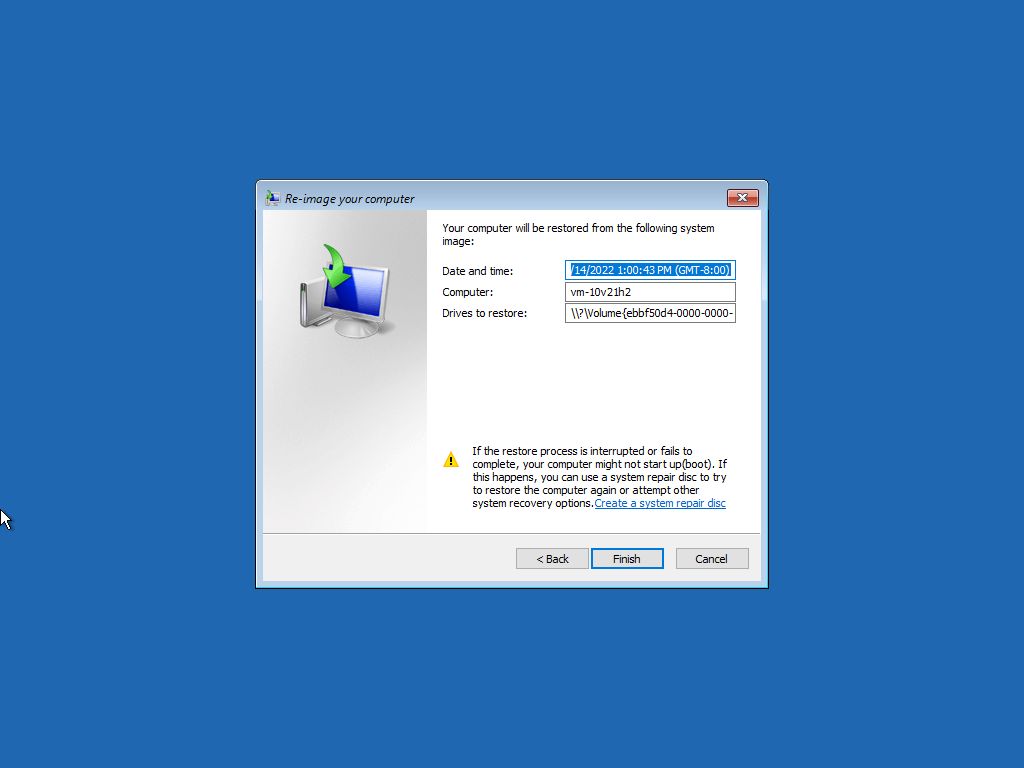
- Click the Yes button.
After you complete the steps, the recovery process will start on the computer. The time to finish the restoration will depend on the amount of data and hardware configuration.
If you are about to restore a device, do not interrupt the process, as it can cause the backup to fail, making it unbootable. It is always recommended to have the laptop connected to a power source and a desktop computer to an uninterruptible power supply (UPS) to avoid problems.
Once the backup has been restored, open Settings > Update & Security > Windows Update, and click the Check for Updates button to quickly install any missing security updates.
Although there are many other backup solutions, you still have many reasons to choose the System Image Backup tool. For example, when you do not have another solution and need a recovery plan, when you are about to upgrade to a new version or make system changes. Or when you are about to replace the main hard drive or need a quick way to transfer the installation and files without reinstallation.
It’s also a good idea to periodically create a backup of your computer in case the unexpected happens, and you need to recover from system or hardware failure, malware, ransomware, or hacker attacks.
One thing to keep in mind with this tool is that it is meant to recover the entire system, not individual files and settings. If you want to keep updated copies of your files, you should be using other solutions, such as OneDrive or File History. Also, you need to be proactive about creating backups because you can only recover the system with the files and settings until the last backup. Anything after the full backup won’t be available during recovery.
More resources
For more helpful articles, coverage, and answers to common questions about Windows 10, visit the following resources:
- Windows 11 on Windows Central — All you need to know
- Windows 10 on Windows Central — All you need to know

Cutting-edge operating system
A refreshed design in Windows 11 enables you to do what you want effortlessly and safely, with biometric logins for encrypted authentication and advanced antivirus defenses.
All the latest news, reviews, and guides for Windows and Xbox diehards.
Mauro Huculak is technical writer for WindowsCentral.com. His primary focus is to write comprehensive how-tos to help users get the most out of Windows 10 and its many related technologies. He has an IT background with professional certifications from Microsoft, Cisco, and CompTIA, and he’s a recognized member of the Microsoft MVP community.
We are fairly certain that there must have been a few times that you would’ve lost a couple of your important files on Windows 10. It could be either because of a system error or other reasons. Documents, valuable images, and setups that you have spent a significant amount of time setting up might be lost if you do not take the proactive step of generating complete backups regularly.
If you are using Windows 10, you have access to various ways to generate backups. For instance, you may utilize third-party solutions to back up the whole system, transfer data manually to an external drive, or upload them to a cloud storage service such as OneDrive. Another option is to use a combination of these three methods.
On the other hand, if you do not like to utilize manual techniques or third-party applications, you may always generate a complete backup using the traditional built-in System Backup utility if you do not choose to use either of these options. However, we have a better tool in store that will guide you on How to Do a System Backup on Windows 10.

What Is System Backup on Windows 10?
Your Windows installation and other important software will be safe with a system backup. If you have the storage capacity, creating a system backup can assist you in getting back up and running if anything catastrophic happens to your device.
If your laptop’s system software or hardware fails, you may still access your data thanks to this backup. You may back up your Windows 10 installation by making a system image, including all your important files. Complete system images allow you to roll back to a prior version of your information.
Why Do You Back up a System on Windows 10?
Here are some of the best reasons to have a system backup in Windows 10:
- You do not have to pay anything to use Windows Backup, and there are no fees associated with using it for its backup functions.
- It is a trustworthy and genuine source that may be used for storing and restoring data.
- It provides a backup solution that may be tailored to your needs. You can selectively include or omit certain files from the backup.
- Your data backups will be updated automatically to reflect the change.
- This service provides a safe offline data restoration and backup solution.
- When backing up data, this backup program backs up the whole operating system, including all of its files and apps and the data itself.
- Restoring lost data is a simple and speedy process. It is possible to restore data on local disks or a remote shared folder, both of which are available as alternatives.
How to Do a System Backup on Windows 10?
Creating a backup of the complete operating system is far more difficult than just backing up a folder containing your vacation photos. Let us show you which method below will be most useful to you.
Method 1. How to Do a System Backup on Windows 10 with Windows Backup Software
Method 2. How to Make a System Backup on Windows 10 with Restore Points?
Method 3. How to Create a System Backup on Windows 10 with System Image?
Windows 10, to its credit, has various tools that may be used to create backups of the operating system.
The one shown here is perhaps the one that is recognized the most:
Method 1. How to Do a System Backup on Windows 10 with Windows Backup Software
The best method to do a system backup is to ensure you have backup software that will help you along the way. EaseUS Todo Backup Home has many more functions than are necessary for individual usage. Backups of your system, disks/partitions, and files may be carried either manually or automatically by the application according to a predetermined schedule.
You can create complete, incremental, and differential backups of your data. Start downloading the free Windows backup software and create a complete backup if you want more control over your backups. You may get the program from Microsoft.
Main Features of EaseUS Todo Backup
- Content for flexible backups, including support for folders beyond those offered by File History.
- Provide each user with a FREE cloud storage space of 250 GB from EaseUS.
- Now more options are available for backup destinations, including local, cloud, and NAS drives.
- Additional options for data backup, such as incremental backups and backups triggered by specified circumstances, etc.
Here are the steps you should follow:
Step 1. Launch EaseUS Todo Backup on your computer, and click Create Backup on the home screen and then hit the big question mark to select backup contents.

Step 2. To back up your Windows operating system, click «OS» to begin the backup task.

Step 3. Your Windows operating system information and all system related files and partitions will be automatically selected so you don’t need to do any manual selection at this step. Next, you’ll need to choose a location to save the system image backup by clicking the illustrated area.

Step 4. The backup location can be another local drive on your computer, an external hard drive, network, cloud or NAS. Generally, we recommend you use an external physical drive or cloud to preserve the system backup files.

Step 5. Customiztion settings like enabling an automatic backup schedule in daily, weekly, monthly, or upon an event, and making a differential and incremental backup are available in the Options button if you’re interested. Click «Backup Now«, and the Windows system backup process will begin. The completed backup task will display on the left side in a card style.

Method 2. How to Make a System Backup on Windows 10 with Restore Points?
Restore points are the quickest and easiest way to remedy errors caused by faulty updates or changes to the registry and are also the easiest way to back up the essential system files on Windows 10. Follow the steps below on how to create a backup using restore points:
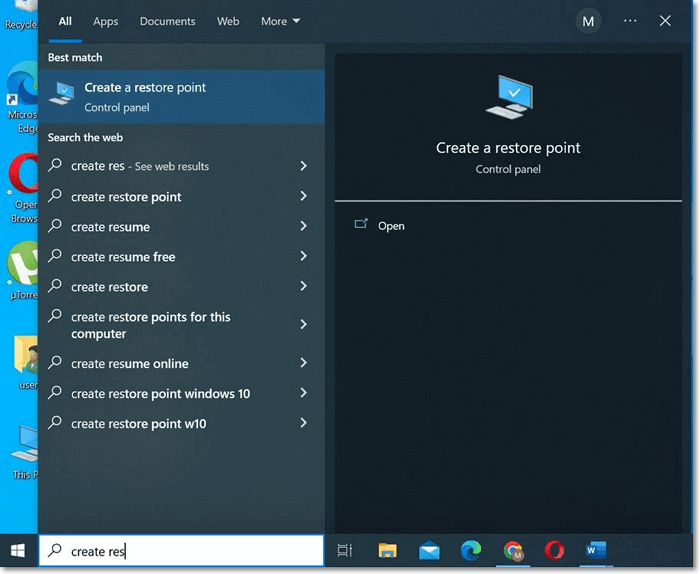
Step 1: Enter «Create a restore point» into the search box located on the taskbar, and then pick the appropriate option from the resulting list.
Step 2: Choose to configure from the System Protection section of System Properties.
Step 3: Click on the button to activate the system protection.
Step 4: Reopen the tab labeled system protection again, and then pick create.
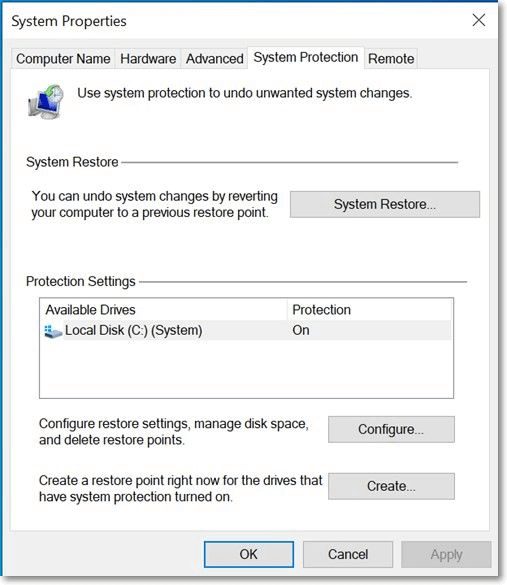
Step 5: After you have typed a description for the restore point, pick the Create > OK button.
Method 3. How to Create a System Backup on Windows 10 with System Image?
System Restore is a tool included in Windows 10 that may be used to fix broken installations by rolling back certain system files and Windows Registry settings to a previous point in time. It achieves this by accessing backups of the system files and registry taken before any issues appeared.
Each disk has a «System Volume Information» folder where restore points are kept at their root level. Creating a restore point does not alter your system, but restoring to that point would. We’ll cover Windows 11 and Windows 10, as the procedures are the same across the two.
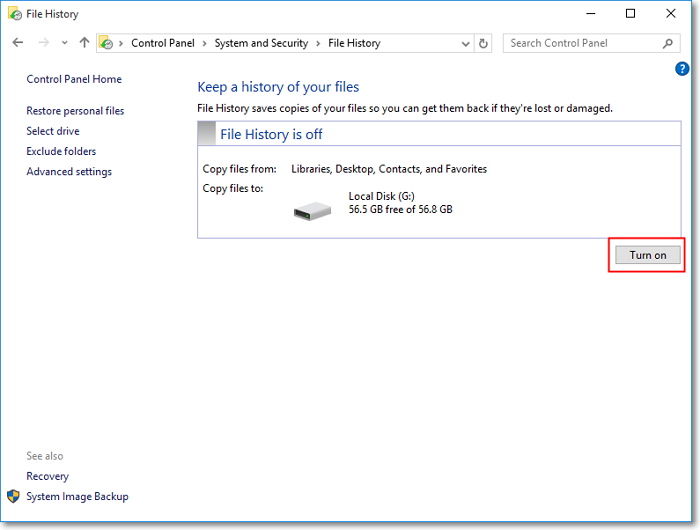
Step 1: In Windows, you may create a system image by going to the «file history» section of the settings menu and selecting «system image backup.»
Step 2: Move the mouse to the «generate a system image» option on the left side of the window and click it.
- Note:
- Meanwhile, please wait while it looks for all potential backup drives.
Step 3: Your backup drive option should now be available. If it still doesn’t appear, make sure it’s plugged in and formatted properly.
Step 4: After you’ve made sure you’re backing up the proper drives, you can click «next» and start the backup process.
- Note:
- A backup image will be created on the external hard disk, and Windows will begin the process immediately. This might take a while, depending on how much information is being sent.
Step 5: When it is done copying your data, you may choose to create a system repair disk. This is optional, but it will provide you with a means of recovery if you lose access to Windows and no longer have the installation disk.
- Tip
- After verifying the external disk has your backup, you may now dismiss this window. Then it would help if you took it down and put it away safely.
Final Verdict
Data backups serve a similar purpose as medical insurance. If you don’t need one, you won’t know how much you rely on one. When it happens, it’ll be too late.
You may forget about having any security in regard to your data. It’s always preferable to err on caution, whether with your data or your health.
To answer the issue of how to do system backups on Windows 10, we suggest you try out the EaseUS Todo Backup, which will make backing up and restoring an easy job for you!
System Backup on Windows 10 FAQs
1. How Long Does It Take to do a System Backup on Windows 10?
What you back up is a major factor. Transferring a small file shouldn’t take more than a few seconds, but transferring a huge file (over 1 GB) might take up to five minutes. The backup process might take several hours if you copy everything on your hard disk.
2. How Does Backup Work in Windows 10?
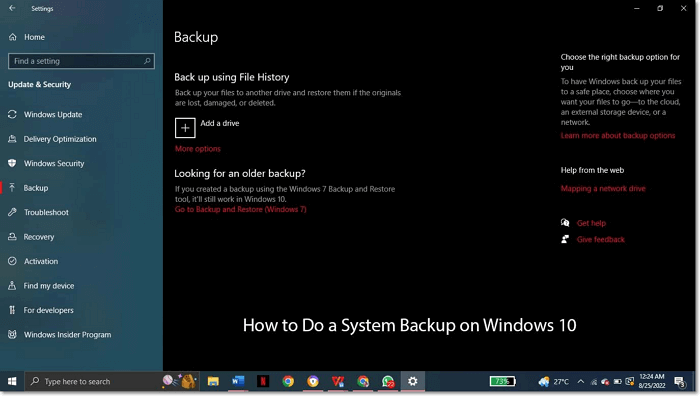
For Windows 10’s backup options, choose the option by selecting the Start menu, then Settings, and then Update & Security. Go to the menu, File History Backup, and Add a drive. Windows will show you a list of available backup devices if you have attached a functional one. It’s time to decide on a storage area for your data copies.
3. Is Windows 10 Backup Good Enough?
More precisely, Microsoft’s built-in Windows backup service has a long track record of falling short. Windows 10’s backup, like Windows 7 and 8, is barely «acceptable,» meaning it’s better than nothing. The good news is that even that is an upgrade from earlier versions of Windows.

There are many ways to backup Windows, and some of those ways are better at certain things than they are at others. For many users – including yours truly – the best kind of backup is an image backup. Such a backup includes a copy of the Windows boot/system drive, including its various partitions. This captures the OS, your settings, your applications and your data files all at once. An image backup is saved inside a single file called an image, and may be of type .IMG, .WIM (Windows Image format), VHD(X) for Hyper-V virtual machines, or .ESD (a compressed Windows image file format optimized for Internet download), among others.
What’s in a Boot/System Image?
Like the answer to any good question, a listing of image file contents or constituents starts with “It depends.” The image backup only needs to capture the contents of what is called the C: or boot/system drive by default in Windows 10 and 11.
But for maximum utility and restore flexibility, an image backup will ideally include all of the partitions on the drive being backed up. A map of a typical modern C: drive appears in Figure 1, shot from within the Disk Management tool (diskmgmt.msc).

These three partitions appear in the same order on most newer Windows 10 and all Windows 11 installations. The EFI partition is where the boot loader and other device and OS installation capability resides. It’s what a PC reads first when it’s booting up and getting ready to run an operating system (most likely, Windows from this layout). The C: Volume partition is where Windows runs, and where all the OS, application, and related settings, preferences, and so forth reside. The Recovery Partition offers an alternate set of boot and OS files that can be used to start up and repair a damaged system/boot (C:) drive, restore a backup, and much, much more.
Older Windows 10 installation used to put the Recovery File between the EFI and the C: partitions. But recent changes to the Windows installer allow it to adjust the size of the C: partition. It can make that partition a little smaller to accommodate a larger Recovery partition from one Windows version or upgrade to the next. That way, the disk layout stays unaltered, instead of getting littered with additional new Recovery partitions as sometimes used to happen on Windows 10. Figure 2 shows what this can look like from my 2017 vintage Windows 10 production PC:

What Is a “Whole-Drive” Image Good For?
Imaging the entire boot/system drive means the whole contents of that drive can be wiped out, and restored from a backup. A whole drive image can also be turned into a virtual disk, or even a virtual machine. The Recovery Partition (3rd from left on Figure 1, 1st from left on Figure 2) provides an alternate boot environment for Windows based on Microsoft’s Windows Pre-installation Environment (WinPE) runtime used for the Windows installer and for other purposes.
The Windows Recovery Environment (WinRE, as you might expect) is a specialized runtime environment that boots a slimmed-down version of Windows. It supports command-line access via Command Prompt, and can incorporate a variety of Windows applications and repair tools – such as boot repair utilities, disk or driver scanners, partition managers, data recovery tools, anti-virus programs, update and install/uninstall utilities, and a whole lot more – to run against a damaged or inoperable Windows installation.
The most basic and important use for a whole-drive image is to replace a balky, damaged or non-working Windows installation (and its supporting boot/system disk infrastructure) in one simple, relatively speedy operation. But there’s a lot more one can do with such images, including:
- Performing repair and recovery operations on a broken or questionable Windows installation. This usually involves booting to alternate media, and running rescue and repair from there. Thus most good image backup utilities include some kind of “rescue media” or “bootable recovery” capability. You’ll boot your PC to the alternate media, and then perform rescue or restore operations on the primary but wonky version of Windows you want to fix (or replace). The same approach also works to support a so-called “clean install” of Windows which involves wiping the existing boot/system disk, repartitioning and reformatting, and then creating an entirely new (“clean”) Windows boot\system drive partition structure and contents.
- Mount an image as a virtual drive or even as a virtual machine (VM). Many good image backup utilities will let you mount an image backup in the form of one or more virtual drives (one for each disk partition in the image). This lets you open and navigate the contents of the backup as if it were another Windows drive, or run the image as just another Windows VM to explore, work on, or retrieve some or all of its contents.
- “Bare metal restore” means you can take an image backup and restore it onto a PC that has no OS currently installed. This is a way to take a formerly running installation from a PC that’s no longer usable or available, and get it running on a different PC. This can be a lifesaver when a downed or damaged PC can be used, but its image backup can still be installed and run on another machine.
Image Backup and Image Restore
Creating an image backup essentially means making a snapshot of each partition on the boot/system drive, then recording that snapshot in some heavily compressed (and possibly even encrypted) format on a storage device of some kind. Modern image backup tools are fast and efficient and can work with speedy external media.
Choosing the Right Backup Target
For maximum portability, it’s most sensible to use an external storage device for backups. Then, even if your PC becomes completely unusable, you can simply detach the external backup device and restore your chosen image to another PC. In fact, I strongly recommend using an NVMe SSD enclosure that is USB4 or Thunderbolt 4 capable of housing a PCIe x3 (or better) SSD of at least 512GB capacity as your backup device (see our list of best SSD enclosures).
Why do this? Because such a device is at least 100X faster than a flash drive, 40X faster than a hard disk, and between 20 and 30X faster than older SSDs (e.g. M.2 flash drives). I routinely create backups of my test Windows PCs in under 4 minutes on such devices; restoring such backups takes a little longer (5-6 minutes; uncompressed backup size 6-10 GB). Backing up even my storage-laden production PC, from which I make a daily 60-plus GB backup image that includes two data drives as well as my system/boot drive, takes less than 20 minutes to back up (5 minutes longer to restore, give or take).
Most capable image backup utilities (see next section) include file-by-file restore capabilities. Use these to restore accidentally deleted or damaged files. An image restore is something you’ll do when a drive has been damaged, corrupted, or when OS or application changes make it easier and less time-consuming to start afresh from your latest image backup rather than trying to fix what’s wrong. As a case in point, I tried a Windows filesystem experiment with changing ownership on certain protected OS files last month. After spending 15-20 minutes trying unsuccessfully to bind my self-inflicted wounds, I simply restored that morning’s backup and left that mess behind me.
To perform an image restore on the boot/system drive, you must boot to alternate media. From there, you’ll run a utility that finds your chosen backup image, then copies onto the target storage device of your choosing. Again: this completely wipes out the existing contents, and creates a new set of partitions on the target drive using the snapshots in the image backup for each partition that needs to be restored. Hopefully the reason for alternate media is clear: you can’t replace an OS and supporting infrastructure on a drive while using the OS and its services from that same drive. It just doesn’t work!
Choosing a Suitable Image Backup Solution
There are dozens of software packages that can perform Windows image backups on either Windows 10 or 11 currently available. Neither I – nor Microsoft, for that matter – recommends the old tool that persists in the Control Panel under the name “Backup and Restore (Windows 7)” as shown in Figure 3.
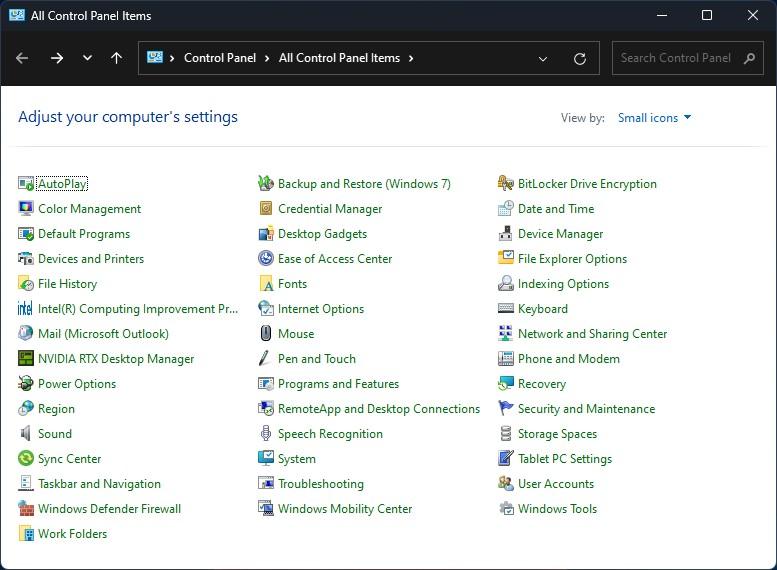
On the Microsoft.Answers pages, an October 22 post reads as follows: “Windows 7 Backup is only included in Windows 10 and 11 to transfer files over from Windows 7. It is way too old to work reliably for regular backup.” It’s much smarter and less risky to use a more modern backup/restore tool for Windows 10 or 11 instead. And indeed, when I tried to back up a Windows 10 system using this tool just now, it failed to create a successful backup, as shown in Figure 4 (it didn’t run to completion, or completed with skipped files, on a couple of Windows 11 laptops, either). It ran for upwards of 2.5 hours (157 minutes) before throwing this error message, too. For best results, please don’t use this tool. Try one of those mentioned in the next section instead.
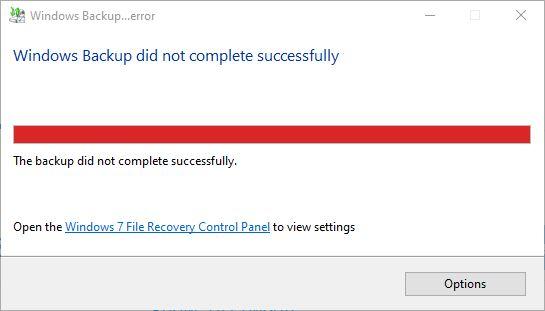
Table of Potential Candidates
The table below shows a list of leading Windows backup tools that regularly show up in “best of” lists across a wide range of sources. I’ll use that table to compare and contrast their capabilities and limitations across some important features already discussed. For a truly exhaustive list of such tools see the June 2023 Lifewire story “32 Best Free Backup Software Tools.”
Swipe to scroll horizontally
| · | EasUS Todo Backup |
| Free version available | Yes |
| Mount backup image as drive or VM | Yes (drive) VM (No) |
| Build rescue media | Yes |
| File&folder backup | Yes |
| Image backup | Yes |
| Free version link | https://www.easeus.com/backup-software/tb-free.html |
| · | AOMEI Backupper Standard |
| Free version available | Yes |
| Mount backup image as drive or VM | No |
| Build rescue media | Yes |
| File&folder backup | Yes |
| Image backup | Yes |
| Free version link | https://www.aomeitech.com/llyy/download/aomei-backupper.html |
| · | DriveImage XML |
| Free version available | Yes |
| Mount backup image as drive or VM | No |
| Build rescue media | No, but works with Standard WindowsPE |
| File&folder backup | Yes |
| Image backup | Yes |
| Free version link | https://www.runtime.org/driveimage-xml.htm |
| · | MiniTool ShadowMaker |
| Free version available | Yes |
| Mount backup image as drive or VM | Drive (Yes) VM (No) |
| Build rescue media | Yes |
| File&folder backup | Yes |
| Image backup | Yes |
| Free version link | https://www.minitool.com/backup/system-backup.html |
| · | Redo Rescue |
| Free version available | Yes |
| Mount backup image as drive or VM | No |
| Build rescue media | Yes |
| File&folder backup | Yes |
| Image backup | Yes |
| Free version link | http://redorescue.com/ |
| · | Macrium Reflect Free (Free version goes off-market on January 1, 2024) |
| Free version available | Yes |
| Mount backup image as drive or VM | Yes |
| Build rescue media | Yes |
| File&folder backup | Yes |
| Image backup | Yes |
| Free version link | https://www.macrium.com/reflectfree |
As a long-time user of Macrium Reflect, it is the package I use to back up my production systems daily, and both test and family member PCs weekly. I routinely see data rates upwards of 2 GBps when backing up to or restoring from USB 3.2 or Thunderbolt 4 NVMe SSD enclosures, and the source of the timing information earlier in this story. I have tried all of the aforementioned packages, and will be settling on one of the others (probably AOMEI Backupper or MiniTool ShadowMaker) after Reflect ceases support for its free version on the last day of 2023. In the past three years, Macrium Reflect restores have allowed me to recover from the following potential catastrophes with minimal disruption and loss of time and productivity:
- A botched experiment in taking ownership of files in the C:\Windows\System32 file hierarchy
- Failure of an older data drive (a 1TB Seagate 2.5” HDD purchased in 2011)
- Boot configuration data (BCD) damage or loss that rendered 3 systems unbootable
- Recovery of up to half-a-dozen Windows Insider Windows 10 and 11 preview installs that experienced driver difficulties during or immediately after installation
Access to a known good working image backup with proven tools, skills and knowledge to restore systems to working condition is a key capability that lets me stay comfortable as a Windows Insider MVP. I download, install, and experiment with Insider Previews across all channels (Canary, Dev, Beta and Release Preview) whenever they’re released. I’ve not yet encountered a situation from which I couldn’t recover, though I have had to resort to restoring a previous release image, then skipping one or more interim releases, to keep some of those test systems running.
One Last But Vital Backup/Restore Trick
If you restore any image backup to a PC, you will lose access to any new files or changed settings, preferences, registry tweaks, app or application installs, and so forth, that occurred after the backup was made. But image backup offers a possible band-aid to address this. If you’re going to restore an image backup to a still functioning system, you can capture an image backup of the current image before restoring your last backed up one.
Most image backup packages will let you mount an image as a virtual drive. That means when you restore the old image, you can mount the new one to copy (or document) changes that occurred after the old image was captured. That should prevent loss of data files (for me that means documents, spreadsheets, and so forth) at a minimum. As long as you can grab a file, create a registry snapshot (.reg file), or otherwise capture settings and preferences, you can get them from the soon-to-be abandoned installation back into the known good working image that will carry you forward. Don’t forget!
Join the experts who read Tom’s Hardware for the inside track on enthusiast PC tech news — and have for over 25 years. We’ll send breaking news and in-depth reviews of CPUs, GPUs, AI, maker hardware and more straight to your inbox.
Ed Tittel is a long-time IT writer, researcher and consultant, and occasional contributor to Tom’s Hardware. A Windows Insider MVP since 2018, he likes to cover OS-related driver, troubleshooting, and security topics.