If your PC is running slowly, the following suggestions might help speed things up. The tips are listed in order, so start with the first one, see if that helps, and then continue to the next one if it doesn’t.
One of the best ways to get the most out of your PC is to make sure you have the latest version of Windows 11 installed. When you check for updates, your PC will also search for the latest device drivers, which can also help improve your PC’s performance.
To check for updates
-
Do one of the following:
-
If the status says «You’re up to date,» continue and check for optional updates.
-
If the status says «Updates are available,» once they are downloaded, select Install now.
-
-
Select the updates you want to install, then select Install.
-
Restart your PC and see if it seems to run better.
Sometimes an optional update, like a new non-critical driver, will be available that may help.
To check for optional updates
-
Select the Start button, then select Settings > Windows Update > Advanced options > Optional updates.
-
If additional updates are available, select them and then select Download & install.
-
Restart your PC and see if it seems to run better.
For more info about updates, including how you can have them installed automatically, see the Windows Update FAQ.
For Windows Update troubleshooting info, see Update Windows and Troubleshoot problems updating Windows.
If your PC still runs slowly, continue to the next tip.
Having many apps, programs, web browsers, and so on open at once can slow down your PC. Having a lot of browser tabs open at once can also slow it down quite a bit. If this is happening, close any apps, browser tabs, etc., that you don’t need and see if that helps speed up your PC. If it doesn’t seem to help, restart your PC and then open just the apps, programs and browser windows you need.
To restart your PC
-
Select the Start button, then select Power > Restart .
-
After your PC restarts, open just the apps you need, then close them when you’re done.
Sometimes apps that were made for an earlier version of Windows will still run on Windows 11, but they might slow down your PC. If this happens after you open a certain program, check the software company’s website for an updated version, or run the Program Compatibility Troubleshooter.
To run the Program Compatibility Troubleshooter
-
Select Search , type troubleshoot in the search box, then select Troubleshoot settings > Other troubleshooters .
-
Under Other, select the Run button next to Program Compatibility Troubleshooter .
-
Select the program that you’re having problems with, then select Next and continue through the troubleshooter.
PC still running slowly? Continue to the next tip.
ReadyBoost lets you use a removable drive, like a USB flash drive, to improve your PC’s performance without opening your PC and adding more memory (RAM). To use ReadyBoost, you’ll need a USB flash drive or a memory card that has at least 500 MB free and a high data transfer rate.
To use ReadyBoost
-
Insert the USB flash drive into a USB port on your PC.
-
Select File Explorer from the taskbar.
-
Press and hold (or right-click) the USB flash drive (or SD card if you used one instead), then select Properties.
-
Select the ReadyBoost tab, then select Use this device.
Windows determines if the device can use ReadyBoost. If it can’t, it’ll let you know. -
After Windows determines how much free space to use to optimize memory, select OK to reserve this space so ReadyBoost can use it.
When you look at the contents of the USB flash drive in File Explorer, you’ll see a file named ReadyBoost.sfcache on the flash drive. This file shows how much space is reserved for ReadyBoost.
Note: ReadyBoost can’t be used if Windows is installed on a solid state drive (SSD). An SSD is already fast, and ReadyBoost won’t be able to improve its performance.
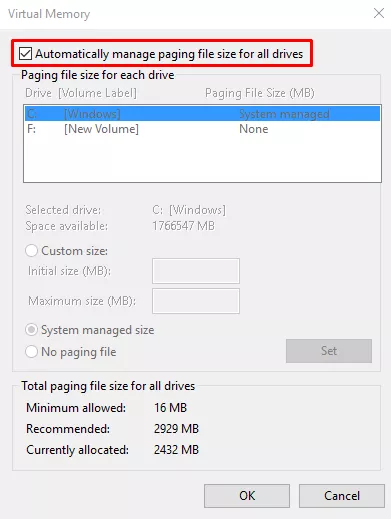
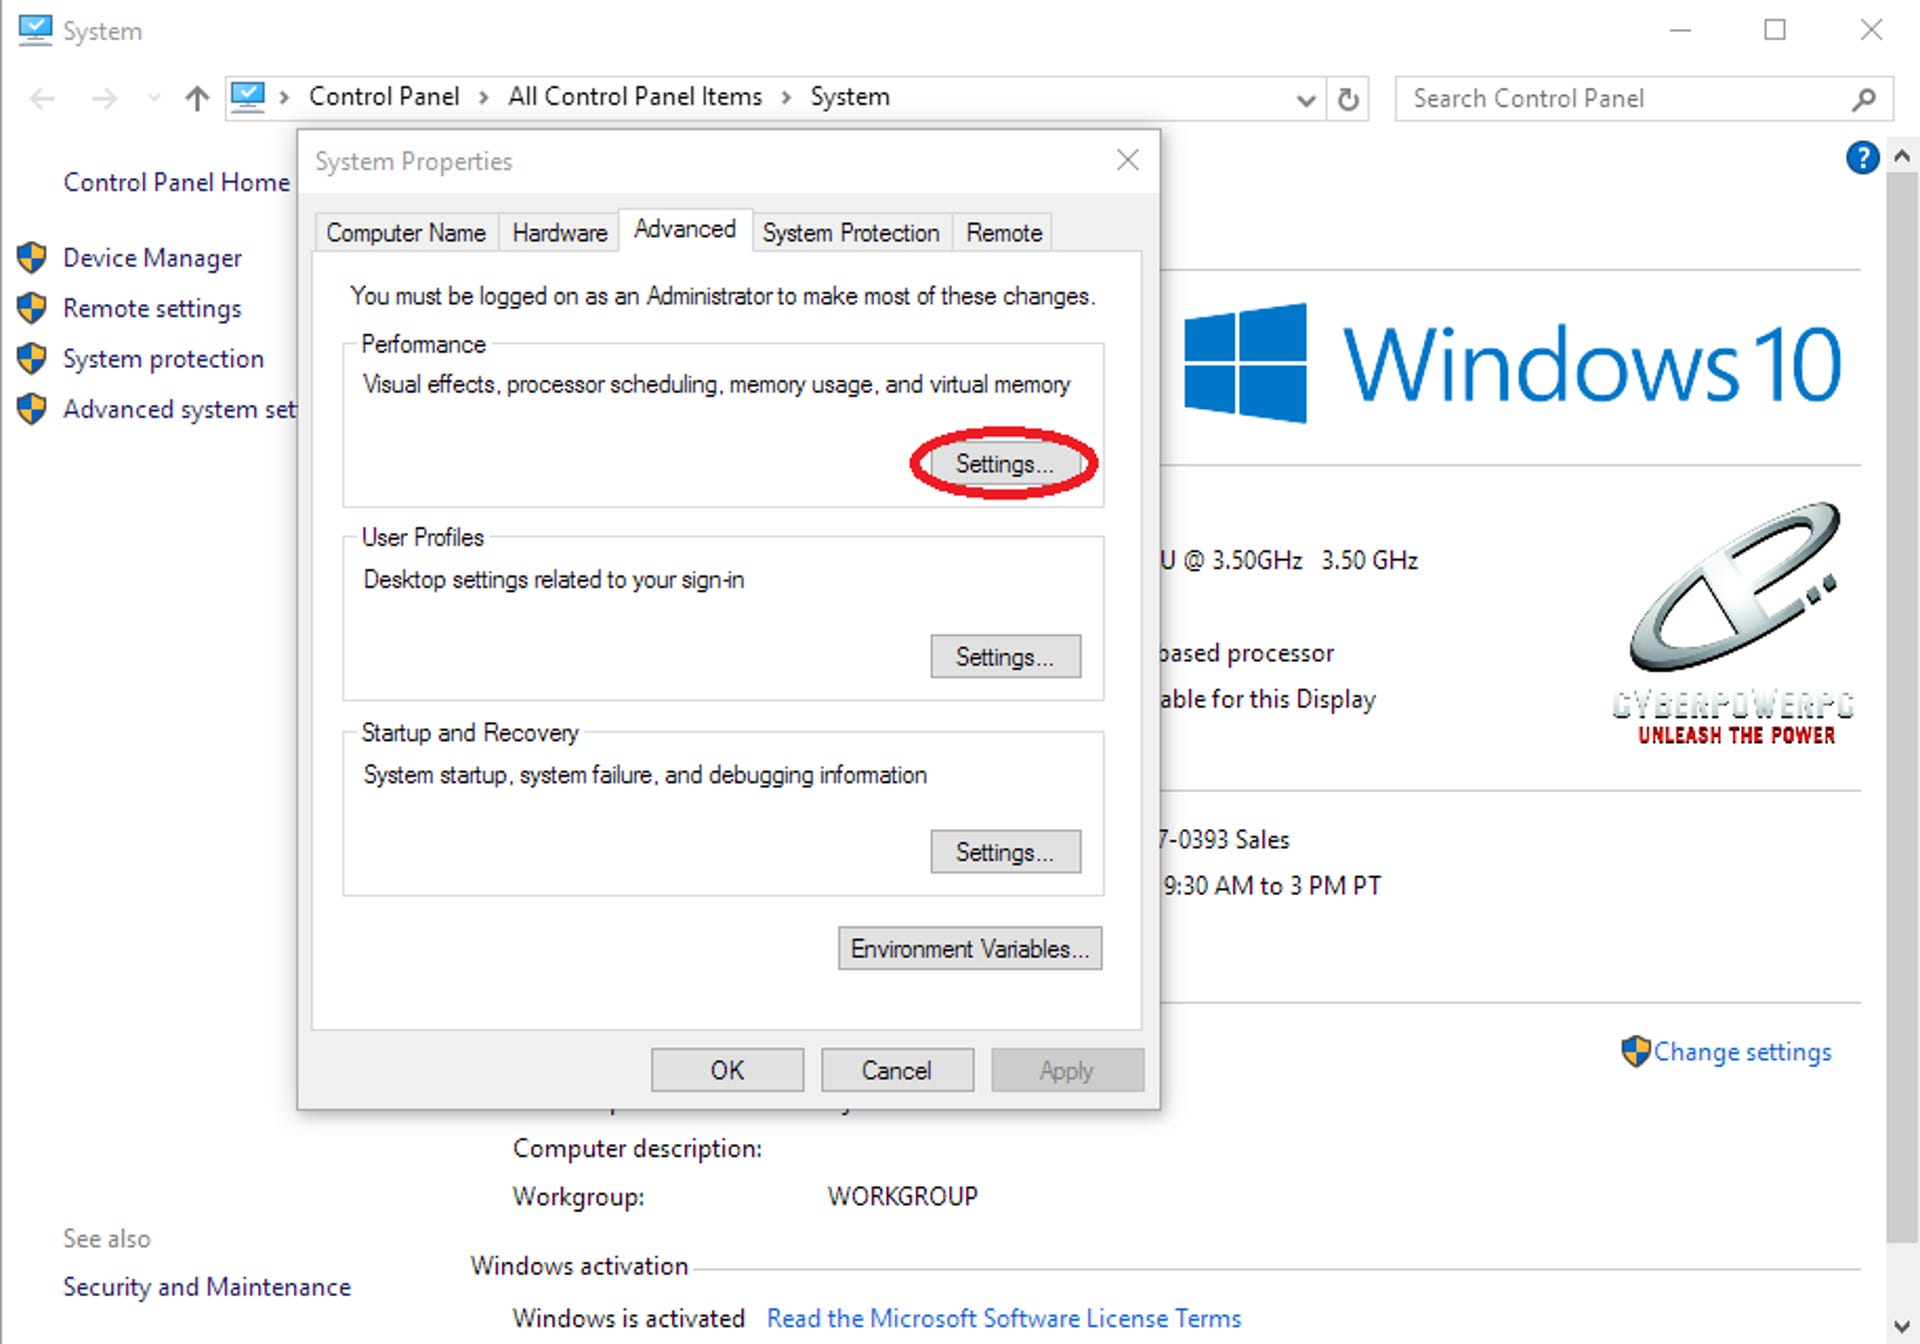
The paging file is an area on your hard disk that Windows uses like memory. There’s a setting in Windows 11 that manages the page file size automatically, which can help improve your PC’s performance.
To make sure automatic page file management is turned on
-
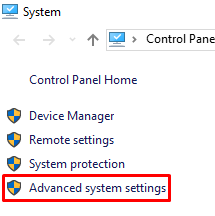
Select Search on the taskbar, type advanced system in the search box, and then select View advanced system settings, which has Control panel listed underneath it.
-
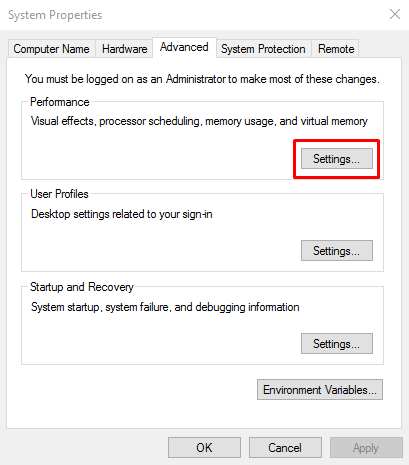
In System Properties, select the Advanced tab, then select Settings in the Performance area.
-
In Performance Options, select the Advanced tab, then select Change in the Virtual memory area.
-
Make sure the Automatically manage paging file size for all drives check box is selected. If it is, continue to the next tip. If it’s not, select it and then restart your PC by selecting Start > Power > Restart .
Use your PC and see if it’s running better. If it’s not, try the next tip.
You may improve performance if you free some disk space on your PC.
To check for low disk space
-
Your drives will be listed in the Storage area. Note the amount of free space and total size for each drive.
Note: If your PC is not low on space, try the next tip.
You can use Storage Sense to delete unnecessary or temporary files from your device, which can also free up space.
If you turn on Storage Sense, Windows will automatically free up space by getting rid of unnecessary files—including files in your recycle bin—when you’re low on disk space or at intervals you specify. The instructions below show you how to delete temporary files and how to turn on and configure Storage Sense.
If you can’t find Storage Sense on your device using the following steps, see the «Free up space with Disk cleanup» section below instead.
Note: You may not want to delete temporary files to improve performance. While these files may not be used at the moment, they help your apps load and run faster.
To delete temporary files with Storage Sense
-
Select Temporary files in the storage breakdown. Note: If you don’t see Temporary files listed, select Show more categories.
-
Windows will take a few moments to determine what files and apps are taking up the most space on your PC.
-
Select the items you want to delete, and then select Remove files.
To see what’s in your Recycle Bin before you empty it, open it from your desktop. If you don’t see the Recycle Bin icon on your desktop, in the search bar on the taskbar, type recycle bin, then select Recycle Bin from the list of results.
Note: Windows moves files you delete to the Recycle Bin in case you change your mind and need them again in the future. You might be able to free up a significant amount of space by deleting Recycle Bin files to permanently remove files you’ve previously deleted.
To turn on and configure Storage Sense
-
In the Storage management area, turn on Storage Sense.
-
Select the for Storage Sense to configure it.
-
Under Cleanup of temporary files, ensure Keep Windows running smoothly by automatically cleaning up temporary system and app files is checked.
-
Under Configure cleanup schedules, choose how often you want Storage Sense to run.
-
For the files you want Storage Sense to delete (your choices are files in your Recycle Bin and in your Downloads folder), select the preferred time intervals, or select Never if you want Storage Sense to leave those types of files alone.
-
Scroll down and select Run Storage Sense now.
-
Windows will take a few moments to clean up your files, and then you’ll see a message indicating how much disk space has been freed up.
If your system doesn’t have Storage Sense, you can use the Disk Cleanup tool to delete temporary files and system files from your device.
To run Disk Cleanup
-
Select Search , type disk cleanup, then select Disk Cleanup from the list of results.
-
Select the checkbox next to the type of files you want to delete. (To view a description of each type of file, select the name.) By default, Downloaded Program Files, Temporary Internet Files, and Thumbnails are selected. Be sure to clear those check boxes if you don’t want to delete those files.
-
To free up even more space, select Clean up system files. Disk Cleanup will take a few moments to calculate the amount of space that a can be freed up.
Note: If it’s been fewer than 10 days since you upgraded to Windows 11, your previous version of Windows will be listed as a system file you can delete. If you need to free up drive space, you can delete it, but keep in mind that you’ll be deleting your Windows.old folder, which contains files that give you the option to go back to your previous version of Windows. If you delete your previous version of Windows, this can’t be undone. (You won’t be able to go back to your previous version of Windows.)
-
Select the types of files you want to delete, select OK, then select Delete files in the confirmation window to start the cleanup.
If your PC still runs slowly, try uninstalling apps you don’t use anymore.
To uninstall apps you don’t use anymore
-
Search for a specific app or sort them to see which ones are using the most space.
-
When you find an app to remove, select the More icon next to it and, if possible, select Uninstall.
-
Restart your PC and see if performance has improved.
If your PC still runs slowly, try moving files to another drive.
If you have photos, music, or other files that you want to keep but don’t use often, consider saving them to removable media, like a USB drive. You’ll still be able to use them when the drive is connected, but they won’t take up space on your PC.
To move files to another drive
-
Connect the removable media to your PC.
-
Select File Explorer from the taskbar and find the files you want to move.
-
Select the files, then on the taskbar, select Cut .
-
Select your removable media from the location list, then select Paste .
-
When the move is complete, restart your PC and see if performance has improved.
Get more info about freeing drive space in Windows.
If your PC still runs slowly, try the next tip.
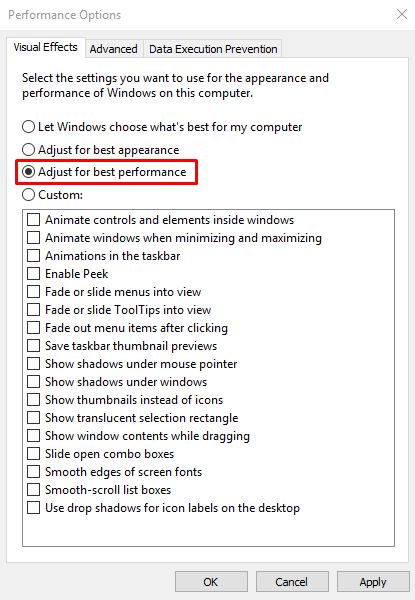
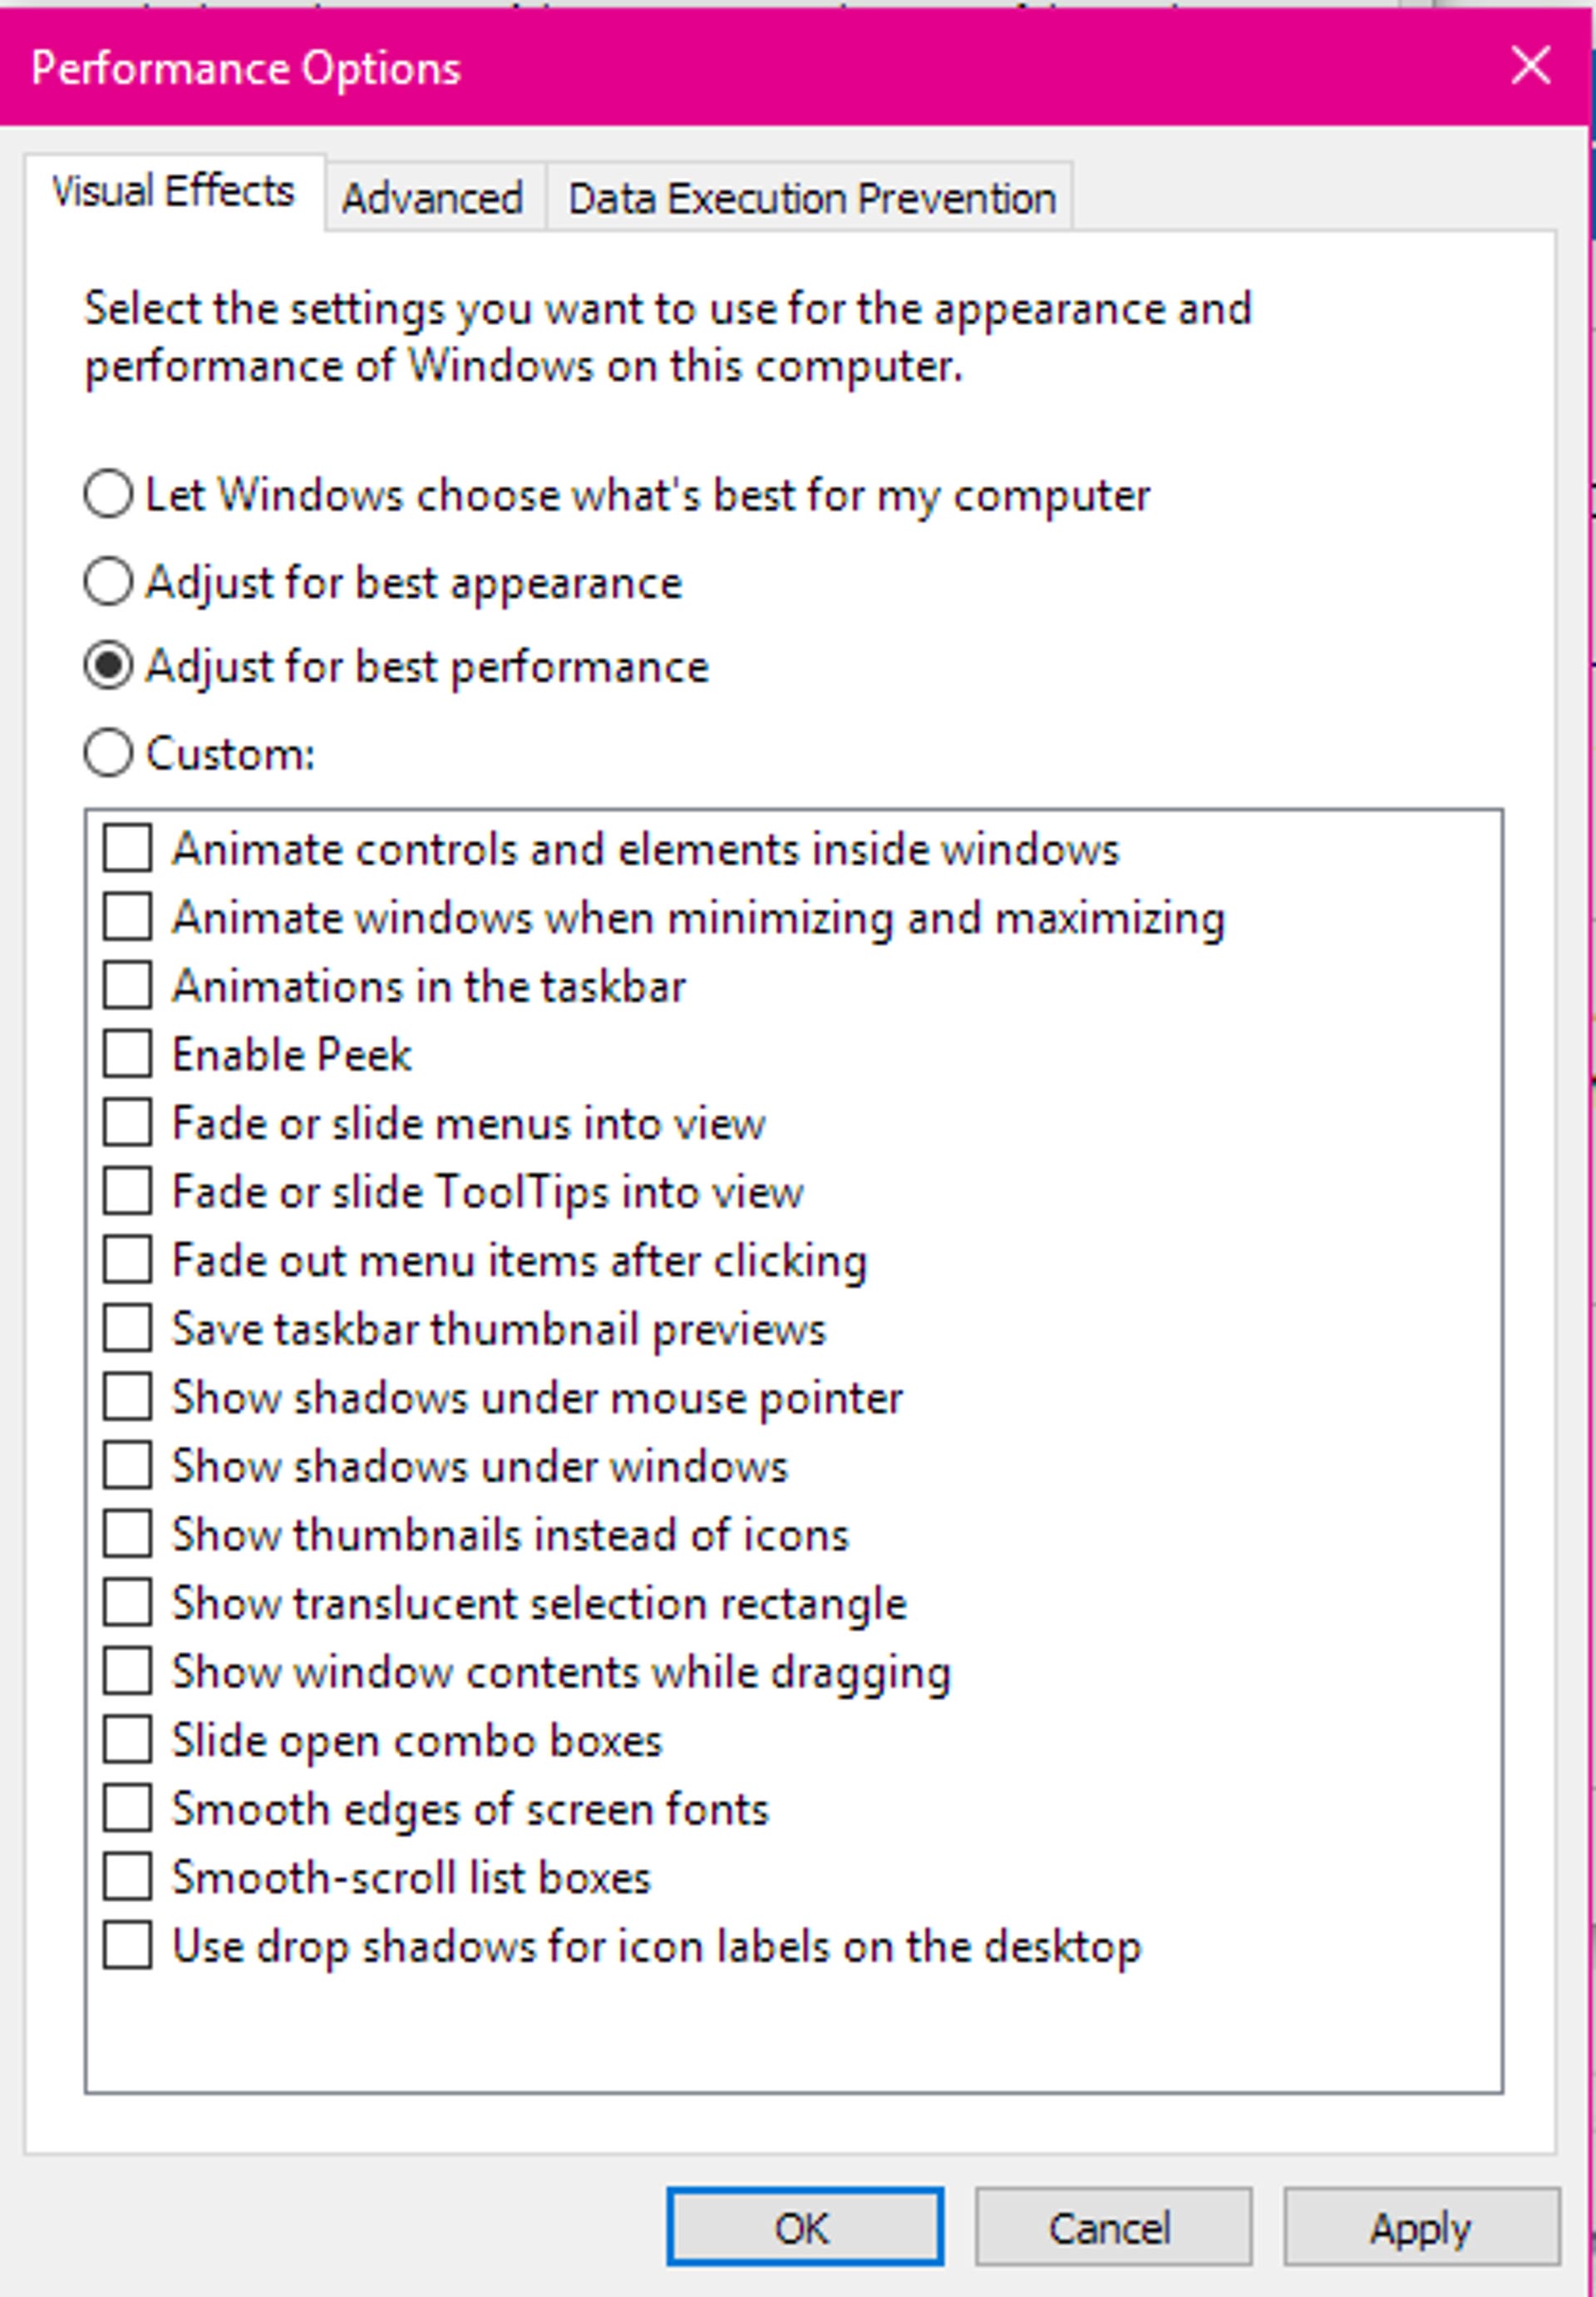
Windows 11 includes many visual effects, such as animations and shadow effects. These look great, but they can also use additional system resources and can slow down your PC. This is especially true if you have a PC with a smaller amount of memory (RAM).
To adjust the visual effects in Windows
-
Select Search , type performance, then select Adjust the appearance and performance of Windows in the list of results.
-
On the Visual Effects tab, select Adjust for best performance > Apply.
-
Restart your PC and see if that speeds up your PC.
If your PC still runs slowly, continue to the next tip.
Your PC settings let you choose where files will be saved by default. You can save files on your PC or to OneDrive by default and sync files between the two locations. This lets you get to your files from any device that can connect to the internet, and it helps make sure your files are backed up in case your PC is ever damaged or lost. However, files must sync between your PC and OneDrive, and syncing can slow down your PC. You can pause OneDrive syncing temporarily and see if it helps improve your PC performance.
To pause syncing to OneDrive
-
On the taskbar, look for OneDrive near the notification area.
-
Select OneDrive > Help & Settings > Pause syncing, and then choose how long you want to pause syncing your files.
-
Restart your PC and see if your performance issues have improved with syncing paused.
-
To resume syncing your files, select OneDrive > Help & Settings > Resume syncing.
You can also visit Fix OneDrive sync problems to check for any sync issues.
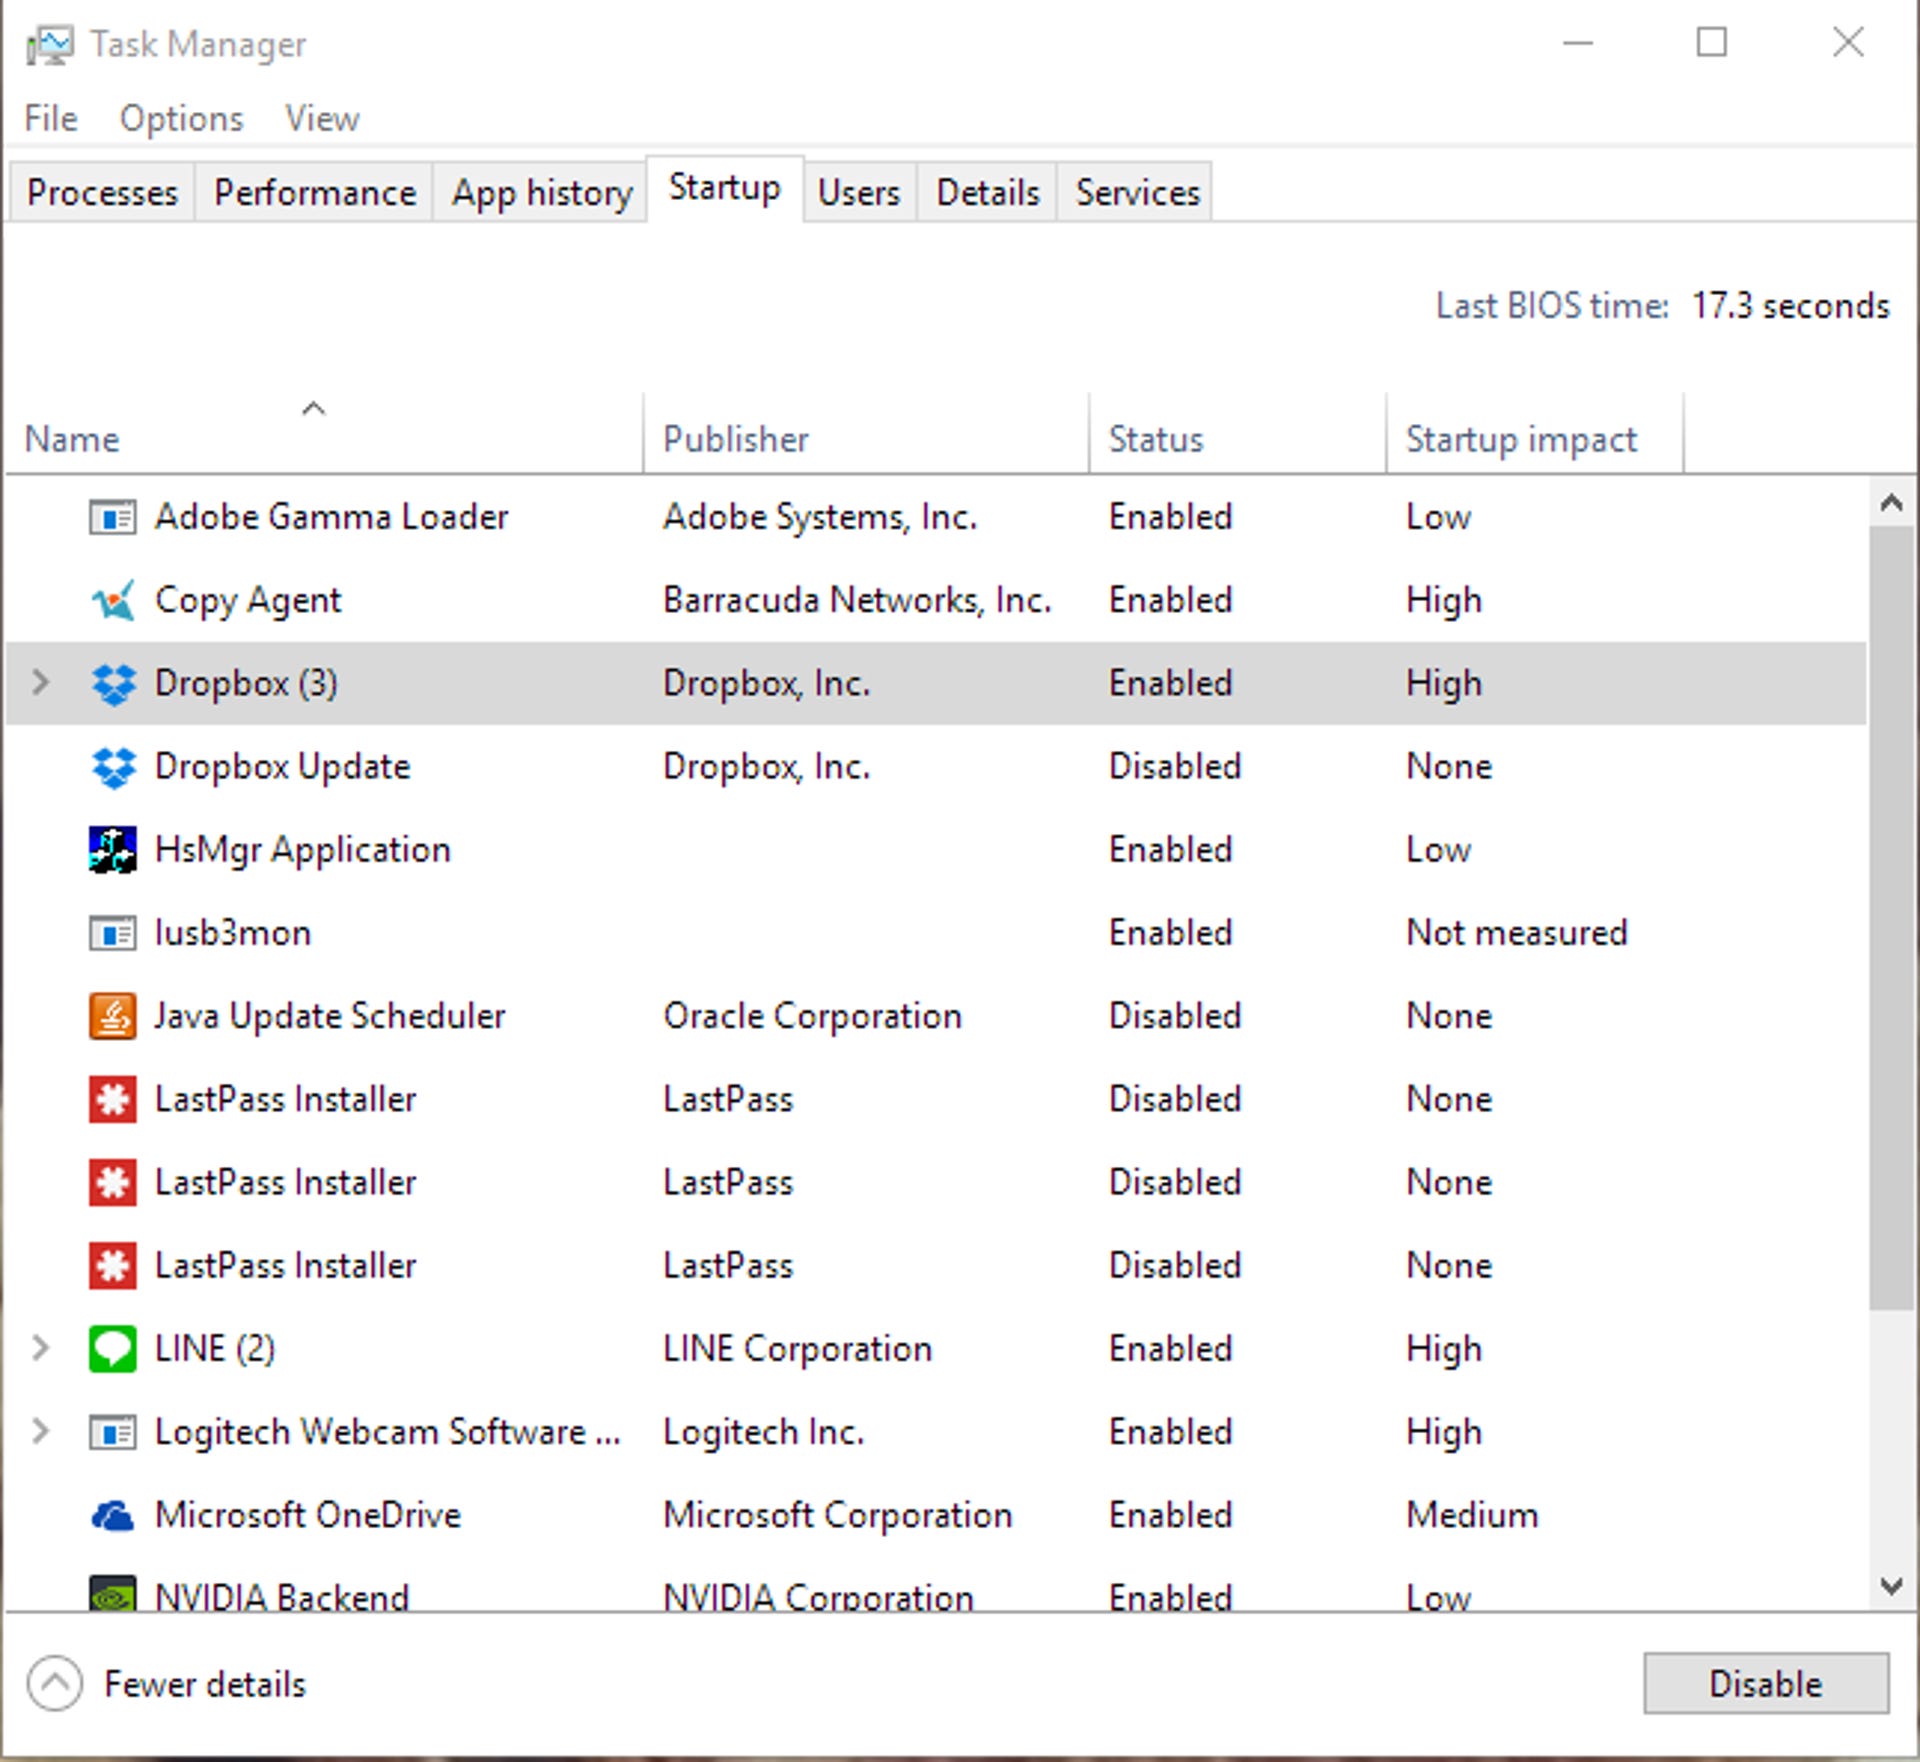
When you turn on your PC, some programs start automatically and run in the background. You can disable these programs so they don’t run when your PC starts.
Many programs are designed to start automatically when Windows does. You don’t realize they’re running, but they’ll open quickly when you go to use them. This is helpful for programs you use a lot, but not for programs you don’t use often because it increases the time it takes Windows to start.
Find the programs that start automatically
Sometimes you can determine which programs start automatically by looking at the program icons in the notification area on the far right of the taskbar. Check there first to see if there are any programs running that you don’t want to start automatically. To try to find out the name of the program, point to the icon with your mouse pointer. Make sure you select Show hidden icons , so you don’t miss any programs.
Even after you check the notification area, you might still miss some programs that run automatically at startup. Here’s how you can find all the programs that start automatically, and stop the ones that you don’t want to start automatically when Windows starts.
To stop a program from starting automatically
-
In the Startup Apps area, find the program you want to stop from starting automatically and set it to Off.
Note: If you turn off a program and it continues to start automatically when Windows starts, you should scan for viruses and malware. See the next section for more info.
A virus, malware, or malicious software could cause your PC to run slowly. Other symptoms include unexpected pop-up messages, programs that unexpectedly start automatically, or the sound of your hard disk constantly working.
The best way to handle viruses and malicious software is to try to prevent them by running antimalware and antivirus software and keeping it up to date. However, even if you take precautions, your PC can still become infected.
You can scan your PC for viruses or other malicious software by using Windows Security (formerly Windows Defender Security Center), which is included in Windows 11. For more info, see How to protect your Windows PC.
Notes:
-
If you’re using other antivirus or anti-malware software, see the documentation for that program to learn how to scan for viruses. Also, make sure multiple antivirus programs aren’t running at the same time. If they are, choose the one you want to run, and then disable or uninstall any others.
-
If you have another antivirus program installed and turned on, Windows Security will be turned off by default.
To scan for viruses using Windows Security
-
Select Virus & threat protection, then select Protection updates under Virus & threat protection updates.
-
On the Protection updates screen, select Check for updates to make sure you have the most recent updates.
-
Select Virus & threat protection, then select Quick scan.
Wait for Windows Security to finish scanning for viruses and malware.
-
Do one of the following, depending on the results of the scan:
-
Run the recommended advanced scan. This scan takes longer but searches more extensively for threats on your PC.
-
If Windows Security finds a virus or malware and can’t remove or quarantine it, contact Microsoft Support for help.
-
If no viruses are found, restart your PC and try to reproduce the performance problem you were having with your PC.
-
Note: If Windows Security doesn’t open, can’t update the definition file, or can’t finish scanning for viruses, try running Microsoft Defender Antivirus (offline scan), which is explained below.
To scan for malware and viruses with Microsoft Defender Antivirus (offline scan)
-
Save any documents or anything else you might have open on your PC.
-
Select Virus & threat protection, and then under Current threats, select Scan options > Microsoft Defender Antivirus (offline scan) > Scan now.
Your PC will restart, and Microsoft Defender Antivirus (offline scan) will run and scan for viruses and malware. The scan might take 15 minutes or so, and your PC will restart again after that.
-
Try to reproduce the performance issue.
If your PC still runs slowly, continue to the next tip.
Restoring your PC undoes recent changes that might be causing problems. If you think a recently installed app, driver, or update for Windows could be causing problems, you might get things running normally again by restoring your PC to an earlier point, called a restore point.
Notes:
-
Restoring from a restore point won’t affect your personal files, but it will remove apps, drivers, and updates that were installed after the restore point was created.
-
System restore works for changes made in the last 7 to 14 days.
To restore your PC from a restore point
-
Select Search on the taskbar, type advanced system, then select View advanced system settings from the list of results.
-
On the System Protection tab, select System Restore.
-
Select Recommended restore to go with the most recent restore point Windows has made automatically, or Choose a different restore point to select one yourself, then select Next.
-
If you chose to select a different restore point, select one, then select Next. Either way, select Finish to begin restoring.
-
Once the restore is completed, restart your PC and see if performance has improved.
If you don’t see any restore points, it might be because system protection isn’t turned on.
To turn on system protection
-
In the search box on the taskbar, type create a restore point, then select Create a restore point from the list of results.
-
On the System Protection tab, select Configure.
-
Select Turn on system protection > OK.
If your PC is running slowly, the following suggestions might help speed things up. The tips are listed in order, so start with the first one, see if that helps, and then continue to the next one if it doesn’t.
One of the best ways to get the most out of your PC is to make sure you have the latest version of Windows 10 installed. When you check for updates, your PC will also search for the latest device drivers, which can also help improve your PC’s performance.
To check for updates
-
Select the Start button, then select Settings > Update & Security > Windows Update > Check for updates.
Check for Windows updates
-
Do one of the following:
-
If the status says «You’re up to date,» go to the next tip.
-
If the status says «Updates are available,» select Install now.
-
-
Select the updates you want to install, then select Install.
-
Restart your PC and see if it seems to run better.
For more info about updates, including how you can have them installed automatically, see the Windows Update FAQ.
For Windows Update troubleshooting info, see Update Windows 10 and Troubleshoot problems updating Windows 10.
If your PC still runs slowly, continue to the next tip.
Having many apps, programs, web browsers, and so on open at once can slow down your PC. Having a lot of browser tabs open at once can also slow it down quite a bit. If this is happening, close any apps, browser tabs, etc., that you don’t need and see if that helps speed up your PC. If it doesn’t seem to help, restart your PC and then open just the apps, programs and browser windows you need.
To restart your PC
-
Select the Start button, then select Power > Restart.
-
After your PC restarts, open just the apps you need, then close them when you’re done.
Sometimes apps that were made for an earlier version of Windows will still run on Windows 10, but they might slow down your PC. If this happens after you open a certain program, check the software company’s website for an updated version, or run the Program Compatibility Troubleshooter.
To run the Program Compatibility Troubleshooter
-
In the search box on the taskbar, type troubleshoot, then select Troubleshoot settings, which has System settings listed underneath it.
-
In the list of troubleshooters, select Program Compatibility Troubleshooter > Run the troubleshooter.
-
Select the program that you’re having problems with, then select Next and continue through the troubleshooter.
PC still running slowly? Continue to the next tip.
ReadyBoost lets you use a removable drive, like a USB flash drive, to improve your PC’s performance without opening your PC and adding more memory (RAM). To use ReadyBoost, you’ll need a USB flash drive or a memory card that has at least 500 MB free and a high data transfer rate.
To use ReadyBoost
-
Insert the USB flash drive into a USB port on your PC.
-
Select File Explorer from the taskbar.
-
Press and hold (or right-click) the USB flash drive (or SD card if you used one instead), then select Properties.
-
Select the ReadyBoost tab, then select Use this device.
Windows determines if the device can use ReadyBoost. If it can’t, it’ll let you know. -
After Windows determines how much free space to use to optimize memory, select OK to reserve this space so ReadyBoost can use it.
When you look at the contents of the USB flash drive in File Explorer, you’ll see a file named ReadyBoost.sfcache on the flash drive. This file shows how much space is reserved for ReadyBoost.
Note: ReadyBoost can’t be used if Windows is installed on a solid state drive (SSD). An SSD is already fast, and ReadyBoost won’t be able to improve its performance.
The paging file is an area on your hard disk that Windows uses like memory. There’s a setting in Windows 10 that manages the page file size automatically, which can help improve your PC’s performance.
To make sure automatic page file management is turned on
-
In the search box on the taskbar, type advanced system, and then select View advanced system settings, which has Control panel listed underneath it.
-
In System Properties, select the Advanced tab, then select Settings in the Performance area.
-
In Performance Options, select the Advanced tab, then select Change in the Virtual memory area.
-
Make sure the Automatically manage paging file size for all drives check box is selected. If it is, continue to the next tip. If it’s not, select it and then restart your PC by selecting the Start button > Power > Restart.
Use your PC and see if it’s running better. If it’s not, try the next tip.
You may improve performance if you free some disk space on your PC.
To check for low disk space
-
Your drives will be listed in the Storage area. Note the amount of free space and total size for each drive.
Note: If your PC is not low on space, try the next tip.
You can use Storage Sense to delete unnecessary or temporary files from your device, which can also free up space.
If you turn on Storage Sense, Windows will automatically free up space by getting rid of unnecessary files—including files in your recycle bin—when you’re low on disk space or at intervals you specify. The instructions below show you how to delete temporary files and how to turn on and configure Storage Sense.
If you can’t find Storage Sense on your device using the following steps, see the «Free up space with Disk cleanup» section below instead.
Note: You may not want to delete temporary files to improve performance. While these files may not be used at the moment, they help your apps load and run faster.
To delete temporary files with Storage Sense
-
Select Temporary files in the storage breakdown. Note: If you don’t see Temporary files listed, select Show more categories.
-
Windows will take a few moments to determine what files and apps are taking up the most space on your PC.
-
Select the items you want to delete, and then select Remove files.
To see what’s in your Recycle Bin before you empty it, open it from your desktop. If you don’t see the Recycle Bin icon on your desktop, in the search bar on the taskbar, type recycle bin, then select Recycle Bin from the list of results.
Note: Windows moves files you delete to the Recycle Bin in case you change your mind and need them again in the future. You might be able to free up a significant amount of space by deleting Recycle Bin files to permanently remove files you’ve previously deleted.
To turn on and configure Storage Sense
-
In the Storage area, turn on Storage Sense.
-
Select Configure Storage Sense or run it now.
-
In the Storage Sense area, choose how often you want Storage Sense to run.
-
In the Temporary Files area, select Delete temporary files that my apps aren’t using.
-
Select which files you want Storage Sense to delete (your choices are files in your Recycle Bin and in your Downloads folder), then select the corresponding time intervals.
-
Scroll down and select Clean now.
-
Windows will take a few moment to clean up your files, and then you’ll see a message indicating how much disk space has been freed up.
If your system doesn’t have Storage Sense, you can use the Disk Cleanup tool to delete temporary files and system files from your device.
To run Disk Cleanup
-
In the search box on the taskbar, type disk cleanup, then select Disk Cleanup from the list of results.
-
Select the checkbox next to the type of files you want to delete. (To view a description of each type of file, select the name.) By default, Downloaded Program Files, Temporary Internet Files, and Thumbnails are selected. Be sure to clear those check boxes if you don’t want to delete those files.
-
To free up even more space, select Clean up system files.Disk Cleanup will take a few moments to calculate the amount of space that a can be freed up.
Note: If it’s been fewer than 10 days since you upgraded to Windows 10, your previous version of Windows will be listed as a system file you can delete. If you need to free up drive space, you can delete it, but keep in mind that you’ll be deleting your Windows.old folder, which contains files that give you the option to go back to your previous version of Windows. If you delete your previous version of Windows, this can’t be undone. (You won’t be able to go back to your previous version of Windows.)
-
Select the types of files you want to delete, select OK, then select Delete files in the confirmation window to start the cleanup.
If your PC still runs slowly, try uninstalling apps you don’t use anymore.
To uninstall apps you don’t use anymore
-
Search for a specific app or sort them to see which ones are using the most space.
-
When you find an app to remove, choose it from the list and select Uninstall.
-
Restart your PC and see if performance has improved.
If your PC still runs slowly, try moving files to another drive.
If you have photos, music, or other files that you want to keep but don’t use often, consider saving them to removable media, like a USB drive. You’ll still be able to use them when the drive is connected, but they won’t take up space on your PC.
To move files to another drive
-
Connect the removable media to your PC.
-
Select File Explorer from the taskbar and find the files you want to move.
-
Select the files, go to Home, then select Move to >Choose location.
-
Select your removable media from the location list, then select Move.
-
Restart your PC and see if performance has improved.
Get more info about freeing drive space in Windows 10.
If your PC still runs slowly, try the next tip.
Windows 10 includes many visual effects, such as animations and shadow effects. These look great, but they can also use additional system resources and can slow down your PC. This is especially true if you have a PC with a smaller amount of memory (RAM).
To adjust the visual effects in Windows
-
In the search box on the taskbar, type performance, then select Adjust the appearance and performance of Windows in the list of results.
-
On the Visual Effects tab, select Adjust for best performance > Apply.
-
Restart your PC and see if that speeds up your PC.
If your PC still runs slowly, continue to the next tip.
Your PC settings let you choose where files will be saved by default. You can save files on your PC or to OneDrive by default and sync files between the two locations. This lets you get to your files from any device that can connect to the internet, and it helps make sure your files are backed up in case your PC is ever damaged or lost. However, files must sync between your PC and OneDrive, and syncing can slow down your PC. You can pause OneDrive syncing temporarily and see if it helps improve your PC performance.
To pause syncing to OneDrive
-
On the taskbar, look for OneDrive near the notification area.
-
Select OneDrive > More > Pause syncing, and then choose how long you want to pause syncing your files.
-
Restart your PC and see if your performance issues have improved with syncing paused.
-
To resume syncing your files, select OneDrive > More >Resume syncing.
You can also visit Fix OneDrive sync problems to check for any sync issues.
Notes:
-
If you have Window 10 version 1709 or higher, you can use OneDrive Files On-Demand to choose which files you want to sync and always keep on your PC. This can help improve PC performance if you reduce the number of files that are synced to your PC. To see which version of Windows 10 your device is currently running, select the Start button, then select Settings > System > About.
Open About settings -
For more info on OneDrive Files On-Demand, see Learn about OneDrive Files On-Demand.
When you turn on your PC, some programs start automatically and run in the background. You can disable these programs so they don’t run when your PC starts.
Many programs are designed to start automatically when Windows does. You don’t realize they’re running, but they’ll open quickly when you go to use them. This is helpful for programs you use a lot, but not for programs you don’t use often because it increases the time it takes Windows to start.
Find the programs that start automatically
Sometimes you can determine which programs start automatically by looking at the program icons in the notification area on the far right of the taskbar. Check there first to see if there are any programs running that you don’t want to start automatically. To try to find out the name of the program, point to the icon with your mouse pointer. Make sure you select Show hidden icons , so you don’t miss any programs.
Notification area with mouse pointing to show hidden icons
Even after you check the notification area, you might still miss some programs that run automatically at startup. Here’s how you can find all the programs that start automatically, and stop the ones that you don’t want to start automatically when Windows starts.
To stop a program from starting automatically
-
In the Startup Apps area, find the program you want to stop from starting automatically and set it to Off.
Notes:
-
If you turn off a program and it continues to start automatically when Windows starts, you should scan for viruses and malware. See the next section for more info.
-
To use the procedure above to stop a program from starting automatically, you need to have Windows 10 (Version 1803 or higher) installed. To see which version of Windows 10 your device is currently running, select the Start button, then select Settings > System > About.
Open About settings -
If you have Windows 10 (Version 1709 or earlier) installed, press Ctrl + Alt + Delete, select Task Manager, select Startup, select the program you want to stop from starting automatically, then select Disable.
A virus, malware, or malicious software could cause your PC to run slowly. Other symptoms include unexpected pop-up messages, programs that unexpectedly start automatically, or the sound of your hard disk constantly working.
The best way to handle viruses and malicious software is to try to prevent them by running antimalware and antivirus software and keeping it up to date. However, even if you take precautions, your PC can still become infected.
You can scan your PC for viruses or other malicious software by using Windows Security (formerly Windows Defender Security Center), which is included in Windows 10. For more info, see How to protect your Windows 10 PC.
Notes:
-
If you’re using other antivirus or anti-malware software, see the documentation for that program to learn how to scan for viruses. Also, make sure multiple antivirus programs aren’t running at the same time. If they are, choose the one you want to run, and then disable or uninstall any others.
-
If you have another antivirus program installed and turned on, Windows Security will be turned off by default.
To scan for viruses using Windows Security (Windows 10 Version 1809 or later)
-
Select Virus & threat protection, then select Check for updates under Virus & threat protection updates.
-
On the Protection updates screen, select Check for updates to make sure you have the most recent updates.
-
Select Virus & threat protection, then select Quick scan.
Wait for Windows Security to finish scanning for viruses and malware.
-
Do one of the following, depending on the results of the scan:
-
Run the recommended advanced scan. This scan takes longer but searches more extensively for threats on your PC.
-
If Windows Security finds a virus or malware and can’t remove or quarantine it, contact Microsoft Support for help.
-
If no viruses are found, restart your PC and try to reproduce the performance problem you were having with your PC.
-
Notes:
-
If Windows Security doesn’t open, can’t update the definition file, or can’t finish scanning for viruses, try running Windows Defender Offline, which is explained below in To scan for malware and viruses with Windows Defender Offline (Windows 10 Version 1809 or later).
-
To see which version of Windows 10 your device is currently running, select the Start button, then select Settings > System > About.
Open About settings
To scan for viruses using Windows Defender Security Center (Windows 10 Version 1803)
-
Select Virus & threat protection, then select Virus & threat protection updates > Check for updates to make sure you have the latest definition file.
-
Select the Virus & threat protection tab, then select Scan now.
Wait for Windows Defender Security Center to finish scanning for viruses and malware.
-
Do one of the following, depending on the results of the scan:
-
Run the recommended advanced scan. This scan takes longer but searches more extensively for threats on your PC.
-
If Windows Defender Security Center finds a virus or malware and can’t remove or quarantine it, contact Microsoft Support for help.
-
If no viruses are found, restart your PC and try to reproduce the performance problem you were having with your PC.
-
Notes:
-
If Windows Defender Security Center doesn’t open, can’t update the definition file, or can’t finish scanning for viruses, try running Windows Defender in Offline Mode, which is explained below in To scan for malware and viruses with Windows Defender Offline (Windows 10 Version 1803).
-
To see which version of Windows 10 your device is currently running, select the Start button, then select Settings > System > About.
Open About settings
To scan for malware and viruses with Windows Defender Offline (Windows 10 Version 1809 or later)
-
Save any documents or anything else you might have open on your PC.
-
Select Virus & threat protection, and then under Current threats, select Scan options > Windows Defender Offline scan > Scan now.
Your PC will restart, and Windows Defender Offline will run and scan for viruses and malware. The scan might take 15 minutes or so, and your PC will restart again after that.
-
Try to reproduce the performance issue.
If your PC still runs slowly, continue to the next tip.
To scan for malware and viruses with Windows Defender Offline (Windows 10 Version 1803)
-
Save any documents or anything else you might have open on your PC.
-
Select Virus & threat protection, then select Run a new advanced scan > Windows Defender Offline scan > Scan now.
Your PC will restart, and Windows Defender Offline will run and scan for viruses and malware. The scan might take 15 minutes or so, and your PC will restart again after that.
-
Try to reproduce the performance issue.
If your PC still runs slowly, continue to the next tip.
Restoring your PC undoes recent changes that might be causing problems. If you think a recently installed app, driver, or update for Windows could be causing problems, you might get things running normally again by restoring your PC to an earlier point, called a restore point.
Notes:
-
Restoring from a restore point won’t affect your personal files, but it will remove apps, drivers, and updates that were installed after the restore point was created.
-
System restore works for changes made in the last 7 to 14 days.
To restore your PC from a restore point
-
In the search box on the taskbar, type restore point, then select Create a restore point from the list of results.
-
On the System Protection tab, select System Restore.
-
Select Next, then choose the restore point related to the app, driver, or update that might be causing the problem. Then select Next > Finish.
-
Restart your PC and see if performance has improved.
If you don’t see any restore points, it might be because system protection isn’t turned on.
To turn on system protection
-
In the search box on the taskbar, type restore point, then select Create a restore point from the list of results.
-
On the System Protection tab, select Configure.
-
Select Turn on system protection > OK.
Need more help?
Want more options?
Explore subscription benefits, browse training courses, learn how to secure your device, and more.
Communities help you ask and answer questions, give feedback, and hear from experts with rich knowledge.
Find solutions to common problems or get help from a support agent.
Windows 10 and 11 tips
If you want to optimize Windows 10, take a few minutes to try out these tips to speed up your PC and make it less prone to performance and system issues.
Contributing Editor,
Computerworld |
Thinkstock 
Want Windows 10 to run faster? We’ve got help. In just a few minutes you can try out these tips; your machine will be zippier and less prone to performance and system issues.
1. Change your power settings
If you’re using Windows 10’s “Power saver” plan, you’re slowing down your PC. That plan reduces your PC’s performance in order to save energy. (Even desktop PCs typically have a “Power saver” plan.) Changing your power plan from “Power saver” to “High performance” or “Balanced” will give you an instant performance boost.
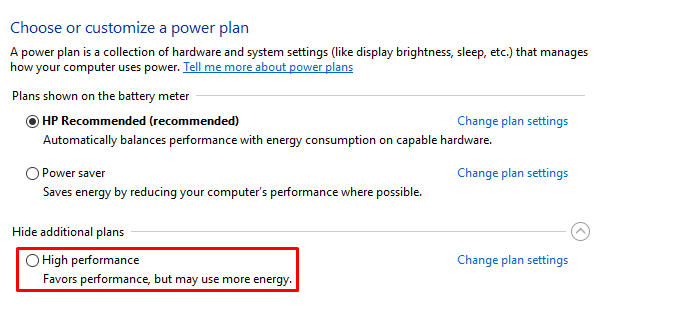
To do it, launch the Control Panel app, then select Hardware and Sound > Power Options. You’ll typically see two options: “Balanced (recommended)” and “Power saver.» (Depending on your make and model, you might see other plans here as well, including some branded by the manufacturer.) To see the “High performance” setting, click the down arrow by “Show additional plans.”
Change your power settings in Control Panel to give your PC a performance boost. (Click image to enlarge it.)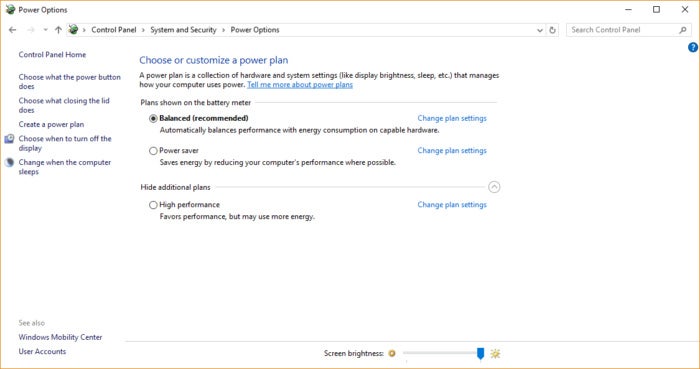 IDG
IDG
To change your power setting, simply choose the one you want, then exit Control Panel. “High performance” gives you the most oomph, but uses the most power; “Balanced” finds a happy medium between power use and better performance; and “Power saver” does everything it can to give you as much battery life as possible. Desktop users have no reason to choose “Power saver,” and even laptop users should consider the “Balanced” option when unplugged — and “High performance” when connected to a power source.
2. Disable programs that run on startup
One reason your Windows 10 PC may feel sluggish is that you’ve got too many programs running in the background — programs that you rarely or never use. Stop them from running, and your PC will run more smoothly.
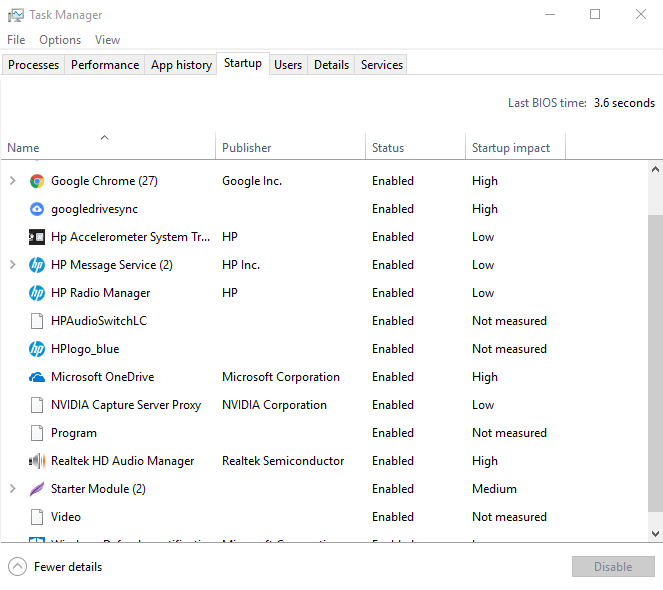
Start by launching the Task Manager: Press Ctrl-Shift-Esc, right-click the lower-right corner of your screen and select Task Manager, or type task manager into the Windows 10 search box and press Enter. If the Task Manager launches as a compact app with no tabs, click “More details” at the bottom of your screen. The Task Manager will then appear in all of its full-tabbed glory. There’s plenty you can do with it, but we’re going to focus only on killing unnecessary programs that run at startup.
Click the Startup tab. You’ll see a list of the programs and services that launch when you start Windows. Included on the list is each program’s name as well as its publisher, whether it’s enabled to run on startup, and its “Startup impact,” which is how much it slows down Windows 10 when the system starts up.
To stop a program or service from launching at startup, right-click it and select “Disable.” This doesn’t disable the program entirely; it only prevents it from launching at startup — you can always run the application after launch. Also, if you later decide you want it to launch at startup, you can just return to this area of the Task Manager, right-click the application and select “Enable.”
You can use the Task Manager to help get information about programs that launch at startup and disable any you don’t need. (Click image to enlarge it.)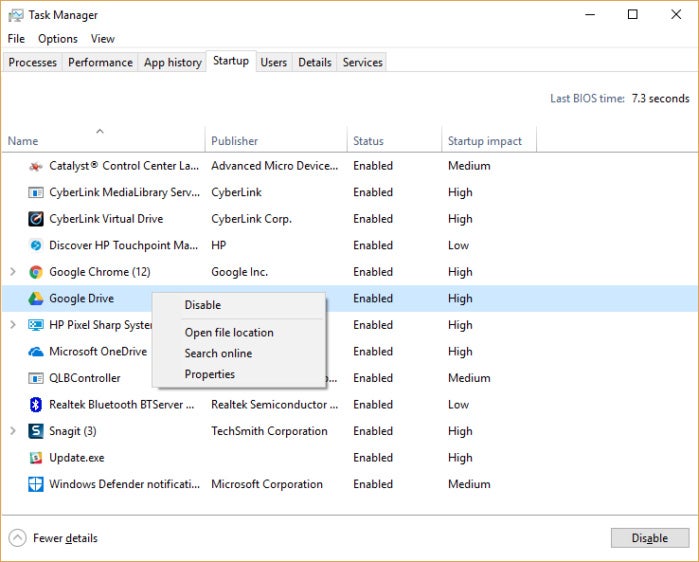 IDG
IDG
Many of the programs and services that run on startup may be familiar to you, like OneDrive or Evernote Clipper. But you may not recognize many of them. (Anyone who immediately knows what “bzbui.exe” is, please raise your hand. No fair Googling it first.)
The Task Manager helps you get information about unfamiliar programs. Right-click an item and select “Properties” for more information about it, including its location on your hard disk, whether it has a digital signature, and other information such as the version number, the file size and the last time it was modified.
You can also right-click the item and select “Open file location.” That opens File Explorer and takes it to the folder where the file is located, which may give you another clue about the program’s purpose.
Finally, and most helpfully, you can select “Search online” after you right-click. Bing will then launch with links to sites with information about the program or service.
If you’re really nervous about one of the listed applications, you can go to a site run by Reason Software called Should I Block It? and search for the file name. You’ll usually find very solid information about the program or service.
Now that you’ve selected all the programs that you want to disable at startup, the next time you restart your computer, the system will be a lot less concerned with unnecessary programs.
3. Go to a Previous Restore Point
As you use Windows 10, it automatically creates restore points that are essentially snapshots of your system at specific moments in time, including installed software, drivers and updates. Restore points are a kind of safety net so if something goes wrong, you can always restore your PC to a previous state.
They can also be used to speed up your PC if you notice — for no reason you can fathom — it’s started to slow down. Recently installed problematic drivers, software, or updates could be to blame, so going back to a previous restore point could speed things up again because the system will be returned to the state it was in before the problems started. Keep in mind, though, that you’ll only be able to restore your system to the state it was in during the last seven to 10 days. (Restore points don’t affect your files, so you won’t lose any files by going to a restore point.)
To go to a previous restore point:
- Save any open files and close all your programs.
- In the search box type advanced system and then click View advanced system settings. You’ll be sent to the Advanced tab of System Properties in the Control Panel.
- Click the System Protection tab.
- In the System Restore area, click System Restore. From the screen that appears, click Next.
- You’ll see the most recent restore point. Click Next if you want to go that restore point. To see others, click Show more restore points. Highlight the one you want to use and click Next.
- Click Finish from the screen that appears.
- Your system will restore to the restore point you chose and shut down. Restart your PC.
Going to a restore point can help speed up your PC if you’ve recently installed drivers, software, or updates that have slowed down your system. Microsoft
Note: there’s a chance System Restore isn’t turned on, meaning you won’t be able to use this tip. If that’s the case, you should turn it on to solve any future problems. To do so:
- In the search box, type create a restore point, then click Create a restore point.
- On the System Protection tab and select Configure.
- Select Turn on system protection. Leave the other settings on the page as they are.
- Click OK. From now on your PC will automatically create restore points.
4. Use ReadyBoost to speed up disk caching
Windows 10 regularly stores cached data on your hard disk, and then when it needs the data, fetches it from there. The time it takes to fetch cached data depends on the speed of your hard disk. If you have a traditional hard disk instead of an SSD, there’s a trick that can help speed up your cache: use Windows’ ReadyBoost feature. It tells Windows to cache data to a USB flash drive, which is faster than a hard disk. Fetching data from that speedier cache should speed up Windows.
First, plug a USB flash drive into one of your PC’s USB ports. The flash drive needs to support at least USB 2.0, and preferably USB 3 or faster. The faster your flash drive, the more of a speed boost you should see. Also, look for a flash drive that is at least double the size of your PC’s RAM for maximum performance.
After you plug in in the drive, open File Explorer and click “This PC.” Look for the flash drive. It may have an odd name, like UDISK 28X, or something even less-obvious. Right-click it, choose Properties and click the ReadyBoost tab.
Turn on ReadyBoost from this screen to speed up your PC.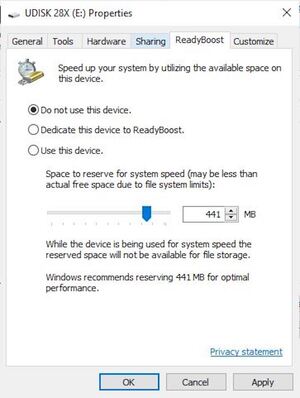 Microsoft
You’ll come to a screen that asks whether you want to use the flash drive as a cache and recommends a cache size. Leave the cache size as is or change it if you like. Then select “Dedicate this device to ReadyBoost” and click Apply and then click OK.
(Note that if you see the message, “This device cannot be used for ReadyBoost” when you click the ReadyBoost tab it means your flash drive doesn’t meet ReadyBoost’s minimum performance standards, so you’ll have to insert a new one.)
As you use your computer, ReadyBoost will start filling the cache with files, so you may notice an increase in disk activity. Depending on how much you use your PC, it can take a few days for your cache to fill and offer maximum improved performance. If you don’t see an increase in performance, try a flash disk with more capacity.
Note: If you have an SSD, you won’t get any extra speed from ReadyBoost, and it might even hurt performance. So don’t use this on a system with an SSD.
5. Shut off Windows tips and tricks
As you use your Windows 10 PC, Windows keeps an eye on what you’re doing and offers tips about things you might want to do with the operating system. In my experience, I’ve rarely if ever found these “tips” helpful. I also don’t like the privacy implications of Windows constantly taking a virtual look over my shoulder.
Windows watching what you’re doing and offering advice can also make your PC run more sluggishly. So if you want to speed things up, tell Windows to stop giving you advice. To do so, click the Start button, select the Settings icon and then go to System > Notifications & actions. Scroll down to the Notifications section and uncheck the box marked “Get tips, tricks, and suggestions as you use Windows.”
Turning off Windows’ suggestions for you should help things run more smoothly (and give you back a measure of privacy). (Click image to enlarge it.)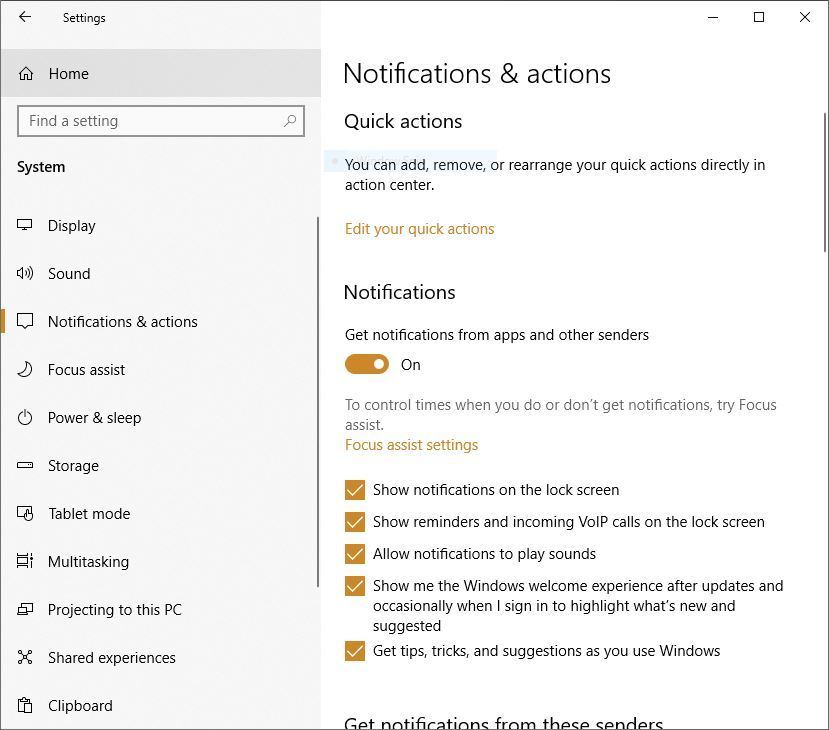 IDG
IDG
That’ll do the trick.
6. Stop OneDrive from syncing
Microsoft’s cloud-based OneDrive file storage, built into Windows 10, keeps files synced and up to date on all of your PCs. It’s also a useful backup tool so that if your PC or its hard disk dies, you still have all your files intact, waiting for you to restore them.
Here’s how to turn off OneDrive syncing temporarily, to see if that boosts system performance. (Click image to enlarge it.)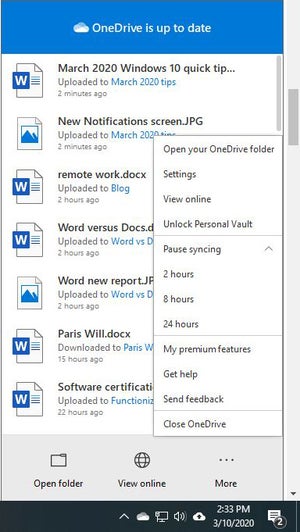 IDG
IDG
It does this by constantly syncing files between your PC and cloud storage — something that can also slow down your PC. That’s why one way to speed up your PC is to stop the syncing. Before you turn it off permanently, though, you’ll want to check whether it is actually slowing down your PC.
To do so, right-click the OneDrive icon (it looks like a cloud) in the notification area on the right side of the taskbar, then click the More button at the bottom of the screen. From the popup screen that appears, click “Pause syncing” and select either 2 hours, 8 hours or 24 hours, depending upon how long you want it paused. During that time, gauge whether you’re seeing a noticeable speed boost.
If so, and you decide you do indeed want to turn off syncing, right-click the OneDrive icon, and from the popup, select Settings > Account. Click “Unlink this PC,” and then from the screen that appears, click “Unlink account.” When you do that, you’ll still be able to save your files to your local OneDrive folder, but it won’t sync with the cloud.
If you find that OneDrive slows down your PC but prefer to keep using it, you can try to troubleshoot OneDrive problems. For info on how to do that, check out Microsoft’s “Fix OneDrive sync problems” page.
7. Use OneDrive Files on-Demand
Some users may not want to stop OneDrive from syncing; doing so defeats its purpose of making sure you have the latest files on whatever device you use. And it would also mean you won’t be able to use OneDrive as a way to safely back up files.
But there’s a way to get the best of both worlds: You can keep syncing to an absolute minimum and only do it when absolutely necessary. You’ll speed up performance, and still get the best of what OneDrive has to offer.
To do this, you use Windows’ OneDrive Files on-Demand feature. With it, you can choose to keep only certain files on your PC, but still have access to all your other OneDrive files in the cloud. When you want to use one of those online files, you open it directly from the cloud. With fewer files on your PC sync, you should see a performance boost.
Right-click the OneDrive icon on the right side of the Taskbar and select Settings, then click the Settings tab on the dialog box that appears. Check the box next to Files On-Demand. Now click the OneDrive icon and select Open Folder. OneDrive appears in a File Explorer window. Right-click a folder whose files you want stored only in the cloud, but not on your PC, then select “Free up space.” Files from that folder will be removed from your disk, but still kept in OneDrive in the cloud.
For every folder whose files you want kept on your PC, right-click the folder and select “Always Keep on this Device.” You can change the options on any folder at any time by right-clicking it and choosing what you want done.
Use this dialog box to turn on OneDrive Files on-Demand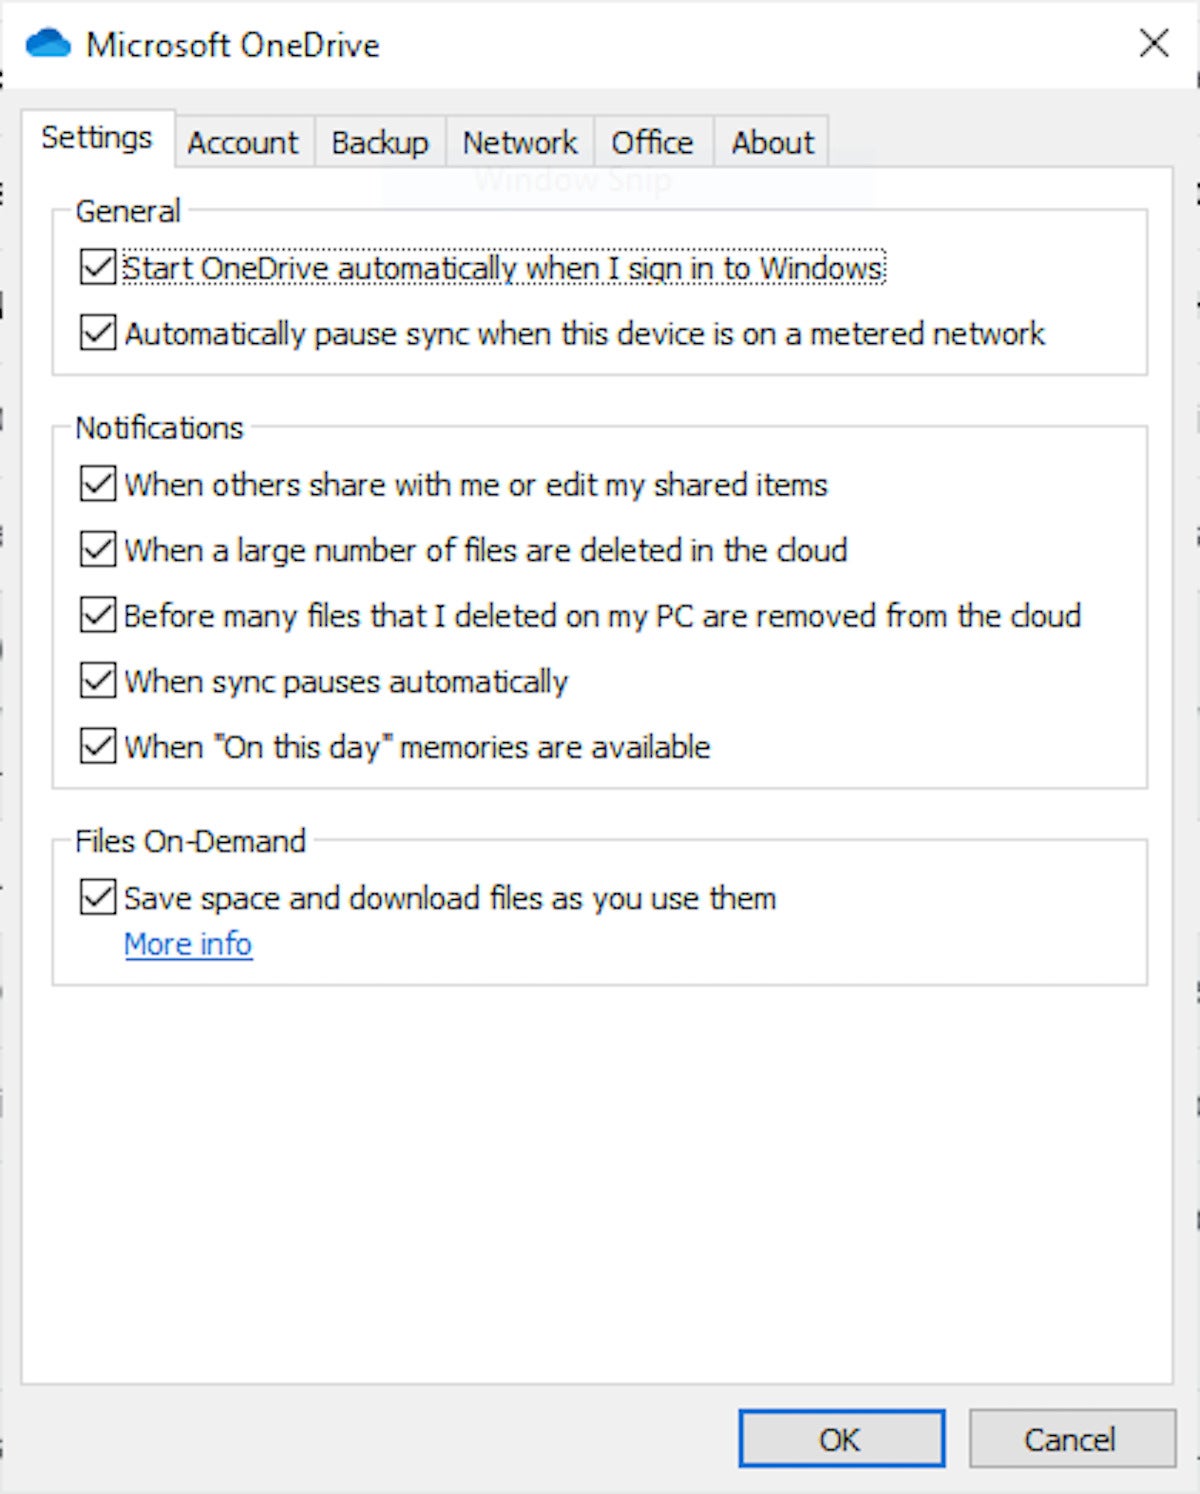 Microsoft
If you change your mind and want all your files stored locally and kept in sync via OneDrive, go back to the OneDrive settings dialog box and uncheck the box next to Files on-Demand.
Note that OneDrive Files on-Demand is available only on Windows Version 1709 and higher.
8. Turn off search indexing
Windows 10 indexes your hard disk in the background, allowing you — in theory — to search your PC more quickly than if no indexing were being done. But slower PCs that use indexing can see a performance hit, and you can give them a speed boost by turning off indexing. Even if you have an SSD disk, turning off indexing can improve your speed, because the constant writing to disk that indexing does can eventually slow down SSDs.
To get the maximum benefit in Windows 10, you need to turn indexing off completely. To do so, type services.msc in the Windows 10 search box and press Enter. The Services app appears. Scroll down to either Indexing Service or Windows Search in the list of services. Double-click it, and from the screen that appears, click Stop. Then reboot your machine. Your searches may be slightly slower, although you may not notice the difference. But you should get an overall performance boost.
Here’s how to turn off Windows 10 indexing. (Click image to enlarge it.)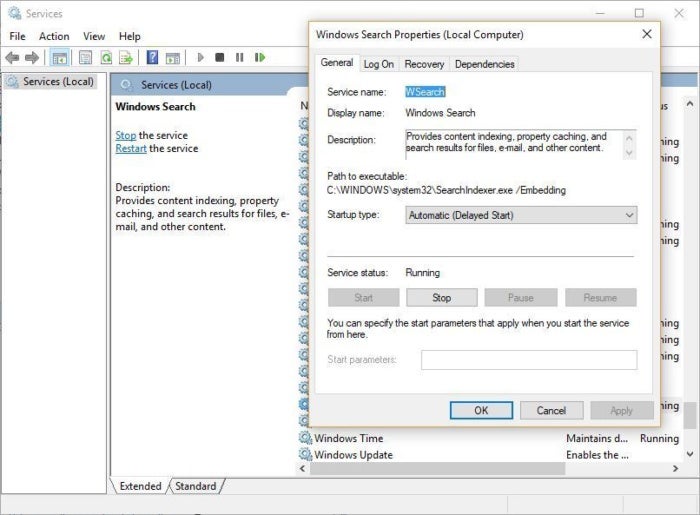 IDG
IDG
If you’d like, you can turn off indexing only for files in certain locations. To do this, type index in the Windows 10 search box and click the Indexing Options result that appears. The Indexing Options page of the Control Panel appears. Click the Modify button, and you’ll see a list of locations that are being indexed, such as Microsoft Outlook, your personal files, and so on. Uncheck the box next to any location, and it will no longer be indexed.
9. Clean out your hard disk
If you’ve got a bloated hard disk filled with files you don’t need, you could be slowing down your PC. Cleaning it out can give you a speed boost. Windows 10 has a surprisingly useful built-in tool for doing this called Storage Sense. Go to Settings > System > Storage and at the top of the screen, move the toggle from Off to On. When you do this, Windows constantly monitors your PC and deletes old junk files you no longer need — temporary files, files in the Downloads folder that haven’t been changed in a month, and old Recycle Bin files.
You can customize how Storage Sense works and also use it to free up even more space than it normally would. Underneath Storage Sense, click “Configure Storage Sense or run it now.” From the screen that appears, you can change how often Storage Sense deletes files (every day, every week, every month or when your storage space gets low).
You can also tell Storage Sense to delete files in your Download folder, depending on how long they’ve been there, and set how long to wait to delete files in the Recycle Bin automatically. You can also have Storage Sense move files from your PC to the cloud in Microsoft’s OneDrive cloud storage if they’re not opened for a certain amount of time (every day, or every 14 days, 30 days or 60 days).
Here’s how to customize the way Storage Sense works, and to tell it to delete old versions of Windows. (Click image to enlarge it.)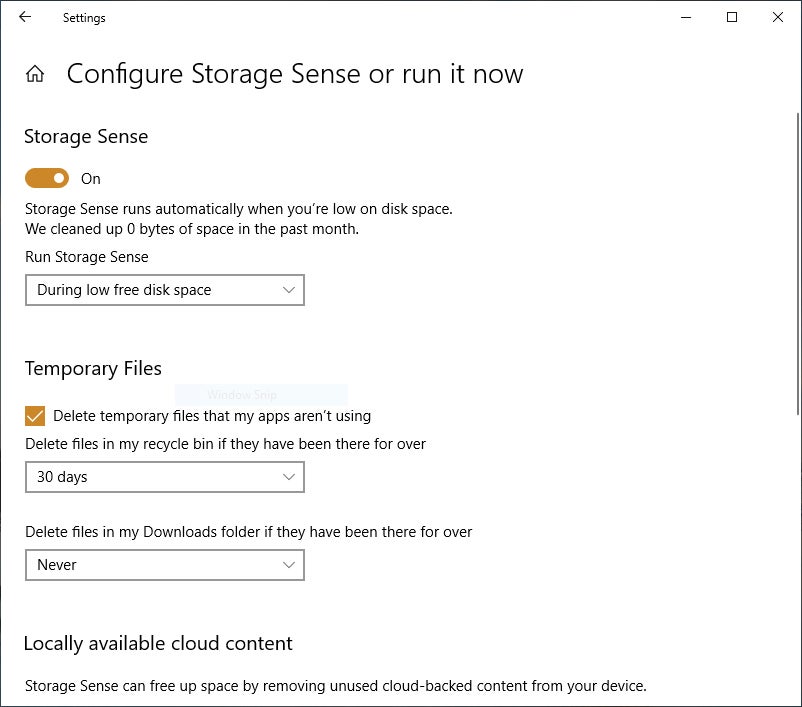 IDG
IDG
You can also delete old versions of Windows that might be hogging space. At the bottom of the screen, check the box next to “Delete previous versions of Windows.” Storage Sense will then delete old versions of Windows ten days after you’ve installed an upgrade. Note that if you do this, you won’t be able to revert to the older version of Windows.
10. Clean out your Registry
Under the Windows hood, the Registry tracks and controls just about everything about the way Windows works and looks. That includes information about where your programs are stored, which DLLs they use and share, what file types should be opened by which program, and just about everything else.
But the Registry is a very messy thing. When you uninstall a program, for example, that program’s settings don’t always get cleaned up in the Registry. So over time, it can get filled with countless outdated settings of all types. And that can lead to system slowdowns.
Don’t even think of trying to clean any of this out yourself. It’s impossible. To do it, you need a Registry Cleaner. There are plenty available, some free and some paid. But there’s really no need to outright buy one, because the free Auslogics Registry Cleaner does a solid job.
Before using Auslogics or any other Registry Cleaner, you should back up your Registry so you can restore it if anything goes wrong. (Auslogics Registry Cleaner does this for you as well, but it can’t hurt to have it backed up twice.) To do your own Registry backup, type regedit.ext in the search box, then press Enter. That runs the Registry editor. From the File menu, select Export. From the screen that appears, make sure to choose the “All” option in the Export range section at the bottom of the screen. Then choose a file location and file name and click Save. To restore the Registry, open the Registry editor, select Import from the File menu, then open the file you saved.
Now download, install and run Auslogics Registry Cleaner. On the left-hand side of the screen you can select the kinds of Registry issues you want to clean up — for example, File Associations, Internet or Fonts. I generally select them all.
Auslogics Registry Cleaner scans for and fixes problems in your Windows Registry. (Click image to enlarge it.)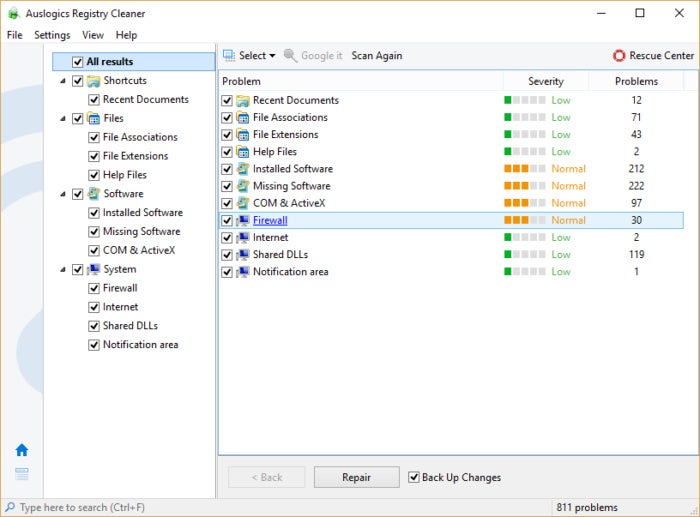 IDG
IDG
Next, tell it to scan the Registry for problems. To do that, click “Scan Now,” and from the drop-down menu that appears, select Scan. That lets you first examine the Registry problems it finds. If you instead choose “Scan and Repair,” it makes the fixes without you checking them.
It now scans your Registry for errors, then shows you what it found. It ranks the errors according to their severity to help you decide which to fix. Click Repair when you’ve made your decision, and make sure that “Back Up Changes” is checked, so you can restore the Registry easily if something goes wrong.
Redmond has stopped increasing the version number of their operating system; we can only see themed Windows 10 Updates. In April 2017, Microsoft announced that Windows 10 would be receiving two major updates per year.
Despite all the rapid development, Windows machines slow down over time as they get bloated with programs and files. So, if you own a desktop or laptop is running Windows 10, chances are high you might regularly use the web to find guides on how to make Windows 10 faster and improve its performance.
In the past, we have told you about the tips and tricks for improving performance on Android and iOS devices. So, I thought I should include whatever I know and create a post on how can we speed up Windows 10 and improve its performance to get the most out of the operating system.
It is possible that you might’ve come across some or many of these Windows 10 performance tricks across the web. But I think it would be great to refresh your memories.
Also Read: 12 Easy Ways To Maximize Battery Life On Windows 10
How to speed up Windows 10 using 18 ways?
1. Prevent programs from loading at startup
It’s a common sight for most Windows users to have tons of apps and features loaded when their machines start. These are mostly the ones installed by the manufacturers, and others which automatically launch at startup.
Watching these programs load is one of the most visible instances where you feel slowness of your machine. On Windows 10 (and Windows 8/8.1), you can disable programs from loading at startup using the task manager.
And if you’re cherishing the old Windows 7 or Windows XP, the interface to disable startup programs can be accessed via the ‘msconfig’ utility. To do so, use the Windows + R keyboard shortcut. Type msconfig and hit Enter.
This way you can speed up Windows startup by avoiding programs you don’t want to popup automatically.
2. Use fewer apps at a time, reduce RAM usage to speed up computer
Running multiple apps at the same time increases your productivity. But doing the same puts an extra burden on the shoulders of your PC. Well, in most cases, the CPU isn’t affected much, but the RAM is the resource that gets exploited.
You can head over to the Task Manager app and monitor memory usage under the Performance tab > Memory. If the usage stats show that the programs are harassing the RAM chip, you can kill the culprits from the Processes tab to speed up your Windows 10 machine. But make sure you don’t end up killing an important Windows processes. You have to see that there is a difference between the ‘Available’ memory and the memory ‘In Use’.
Your system memory filling up to the brim causes things to slow down on your computer. Adding more RAM is one option, but it requires you to shell out your hard-earned money. A less efficient measure to boost Windows 10 performance would be increasing the size of the Windows Page File.
How to change Windows Page File size? (Read our detailed article on Windows Page File here)
- Go to This PC > Properties.
- Click Advanced System Settings.

- Under Performance, click Settings. Go to Advanced tab.

- Under virtual memory, click Change.

- Untick Automatically manage paging file size for all drives check box. Select a drive and enable the Custom Size option. Choose the Initial size and Maximum size of the page file. Click Ok to save the changes.


There is one thing, if you have excess RAM, like some 16GB, you really don’t need to increase page file size. However, disabling the page file isn’t an option you should consider. Your PC might run into problems.
3. See if your Windows isn’t corrupt
While the word “corrupt” is mostly used for a special category of humans, the data on operating systems like Windows can also get corrupt. Probably, some process or an app messed up things.
The corrupt data can make your Windows 10 PC work like a sloth (no offense to the animal, please). And in the worst scenarios, your system might crash.
One of the easiest ways to fix corrupted files on Windows 10 is to run the system file checker utility. You might have used the same while trying to repair corrupt pen drives and hard drives that went rogue. Fixing corrupted files will surely speed up Windows 10 machine of yours.
How to run System File Checker in Windows 10?
You can start an elevated command prompt window and execute the following command.
sfc /scannow
The process might take some time depending on the size of your hard drive. Alternatively, you can run the tool by visiting This PC > Windows drive (right-click) > Properties > Tools. Click Check.
4. Scan your PC for malware to speed up Windows 10
Well, this might be the most naive thing you would read in the post intended towards speeding up Windows 10 PCs. Malware community has existed for decades, and their fear compelled Microsoft to include an anti-virus tool in their operating system; it’s called Windows Defender.
Your slow Windows 10 system might be due to some fishy app hiding inside the machine, disguised as some system update program or anything else.
You should regularly scan your PC for malware, either by using Windows Defender or some third-party antivirus software, to make your Windows faster.
5. Shutting down and restarting Windows isn’t an option, it’s a necessity
During college, I had some friends who probably didn’t know the ‘Shut Down’ and ‘Restart’ options existed on Windows. Their poor PCs had to stay up for weeks without getting any chance to restart even once.
Do keep in mind, your PC can survive a few days without rebooting or shutting down. But, that doesn’t mean one always should keep it running.
Restarting or shutting down your PC at regular intervals clears the system memory that gets consumed over time, and it also kills all the errant processes to speed up your Windows 10 PC.
6. Prefer to hibernate your PC, or maybe sleep
When you hibernate your PC, less time is required when you turn it back on. That’s because the current state of the system is saved on the hard drive and gets loaded when you power on the system.
Give your PC some sleep
Putting their computer on sleep mode is mostly a routine for Mac users because these devices can live for almost a month in that way. But now, Windows users also find it comfortable keep their PC in sleep mode for long hours.
In Sleep Mode, only the RAM on the device remains active. But sleep mode drains the battery, although in small amounts. So, you might not want to prefer it every time for your Windows PC, but sleep mode makes it quicker for you to start working on the system.
Don’t forget to check out our post on the difference between Shutdown, Sleep, Fast Startup, Hybrid Sleep, Hibernate.
7. Make Windows ugly as possible
Do away with animations and special effects
Our modern PCs are all about software that should look great, filled with animations and effects that soothe users’ eyes. But these visual improvements consume system resources. The machines which don’t possess efficient hardware could suffer the consequences sometimes.
There are also some people who don’t use their computers diligently; they install random apps and do things that cause problems. Sometimes, the normal operation of the machine suffers.
How to disable/enable animations in Windows 10?
You can tune Windows for best performance by disabling the animations. Go to This PC (right-click) > Properties > Advanced System Settings > Settings (Under Performance).
In the Performance Options window, select the radio button that says “Adjust for best performance“. Alternatively, you can select Custom and choose the options you want to disable.
Disable transparency to make Windows 10 faster
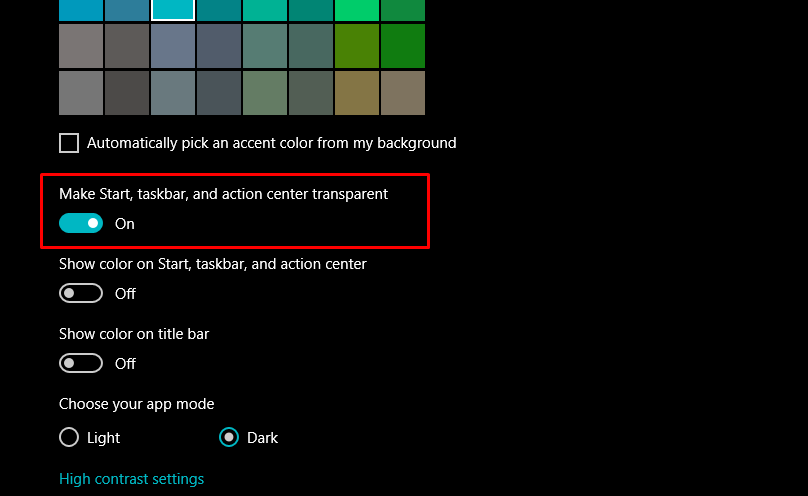
Having the taskbar, start menu, and action center transparent can be good for your eyes, but the feature consumes some of the resources on your PC. You can disable transparency by visiting Settings > Personalization > Colors. Turn off the toggle button that says ” Make Start, taskbar, and action center transparent.
8. Always keep Windows updated
There is an abundance of updates in the Windows ecosystem that are regularly pushed to the users, sometimes forcefully. But regularly updating your computer can improve Windows 10’s performance in addition to protecting the machine from unwanted threats and newly discovered vulnerabilities.
Starting with Windows 8, Microsoft provides universal drivers for a vast collection of third-party hardware. Updates for such devices are delivered through Windows Update. But in the case of unsupported third-party apps and hardware, you might have to update them manually.
If you’re running recent versions of Windows 10, updates install way faster than before. That’s because Microsoft has optimized the Windows Update process in such a way that most of the installation happens in the background while the user is busy with their work.
9. Open apps lightning fast
This is one of the ways you can make Windows 10 faster during daily usage. You can create custom keyboard shortcuts to open apps by pressing a single key. In this post, we have detailed the process to create custom keyboard shortcuts in Windows.
10. Choose what your PC should prefer
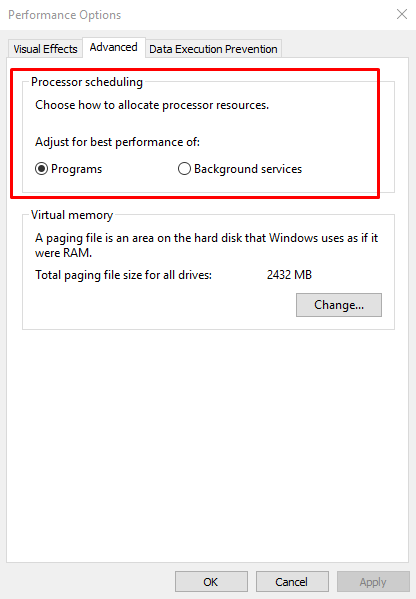
In the same Performance Options window I mentioned above (point 7), switch to the Advanced tab. There, you can determine whether your PC should give preference to the programs you use or the services that run in the background. This adjustment could give a considerable performance boost according to your needs.
11. Turn off cloud sync to make Windows faster
Windows 10 offers integrated support for Microsoft’s cloud storage service OneDrive. You can copy all the files and folders to OneDrive which you want to upload to the cloud. Many users have a soft corner for Google Drive; there are chances they might not be using One Drive.
But even if you’re a die-hard fan of the OneDrive, turning on the sync and forgetting about it wouldn’t be a wise move. It would consume your resources and slow down Windows 10. In fact, it’s not only OneDrive, and you should do this for other services too.
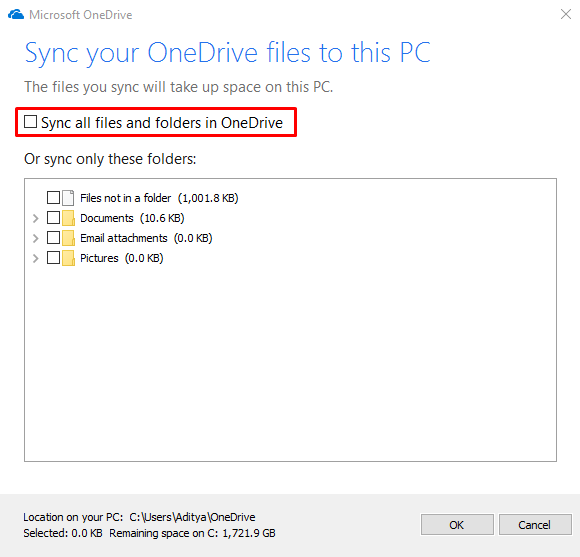
To disable OneDrive sync and make your Windows faster, go to This PC > OneDrive (right-click) > Choose OneDrive folders to sync. On the next screen, untick the checkbox Sync all files and folders in OneDrive and click Ok.
12. Use fast startup to speed up your computer’s load time
One way to accelerate Windows 10 startup process is by turning on the hibernation feature that’s disabled by default. Fast Startup (enabled by default) is another feature which reduces the booting time of Windows 10. It’s a combination of shutdown and hibernation.
You can check whether Fast Startup is enabled for your computer by visiting Power Options > Choose what the power button does. Click “Change settings that are currently unavailable” to unlock the shutdown configuration. There, you’ll see the option to enable/disable fast startup. Check out our post on the difference between Fast Startup, Hybrid Sleep, Hibernate Shutdown and Sleep.
13. Use ReadyBoost to speed up Windows 10
ReadyBoost is a Windows feature that can supplement your RAM when your hard drive is slow. You might see visible differences in system performance if you’re running low-end hardware.
The trick can make your Windows laptop or desktop faster. But keep in mind, ReadyBoost doesn’t work in the case of SSDs as they’re usually faster than USB drives. You can read our detailed post on “How To Speed Up Windows Using ReadyBoost And USB Drive?” to get a better idea.
14. Turn off live tiles
Live Tiles debuted with Windows 8. The live tiles in the Start Menu or Start Screen provide updated information related to an app, either sourced from the web or locally. But they also consume resources and battery, not up to the level that it would slow things down. But turning the live tiles off would be beneficial if you never bothered to see what a live tile is offering.
How to turn off live tiles in Windows 10 to speed up your computer?
If you’re running Windows 10 Pro, you can use the Group Policy Editor. In the editor, open User Configuration > Administrative Templates > Start Menu and Taskbar > Notifications > Turn off tile notifications.
Otherwise, you’ll have to disable the live tiles manually for each app. Open Start > Right-click a live tile > More > Turn live tile off.
Also Read: What Windows Do I Have? 4 Ways To Know Your Windows Version And OS Build?
15. Use High-Performance Mode to improve PCs performance
The ‘High Performance’ mode in Power options helps you make the best out of your PC. The CPU can utilize its full potential, while the high-performance mode prevents various components like hard drives, WiFi cards, etc. from going into power saving states.
Connect a charger while doing resource-heavy tasks
Did you ever realize why power users prefer desktops? One of the reasons is the constant power supply which improves performance. In the case of laptops, you can keep the charger connected while you play games, or use a large software.
16. Use the built-in troubleshooter
With the release of the Creators Update, Microsoft has started providing a dedicated section for various Windows troubleshooting utilities. You can visit Settings > Update & Recovery > Troubleshooter.
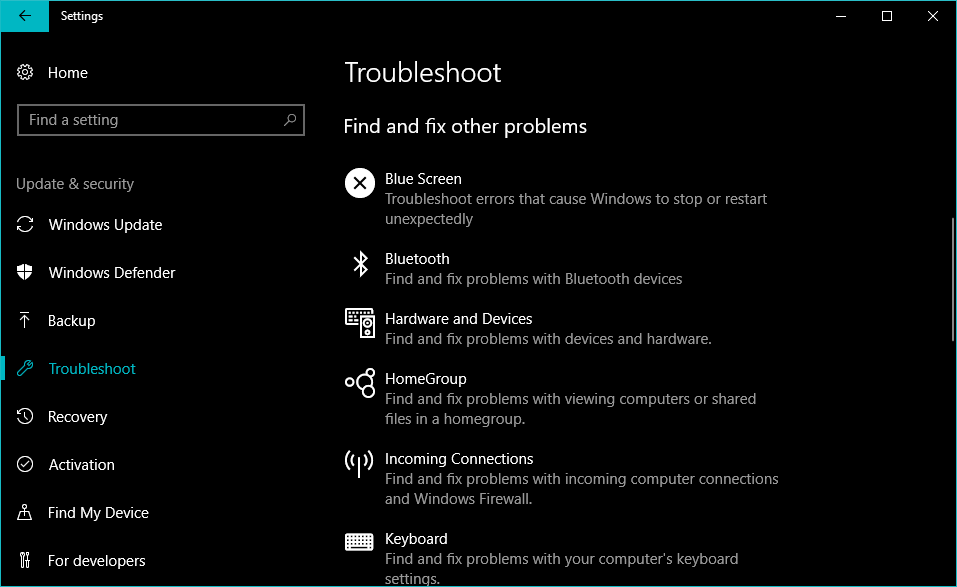
There, you’ll find options to fix errors related to Bluetooth, BSOD, audio, Windows Update, keyboard, and other hardware on the system. Fixing various problems can make your Windows 10 PC run faster and without errors.
17. Improve app performance in Windows 10
If you’re running the April Update, Windows 10 now includes a new Settings page that lets you change advanced graphics settings for individual apps, both UWP and classic. This could be handy if you’re facing performance problems with a particular app and you’re blaming your innocent PC.
Go to Settings > System > Display. Scroll down and click Graphics Settings. One the next screen, select the classic or UWP app you want to configure and click Add.
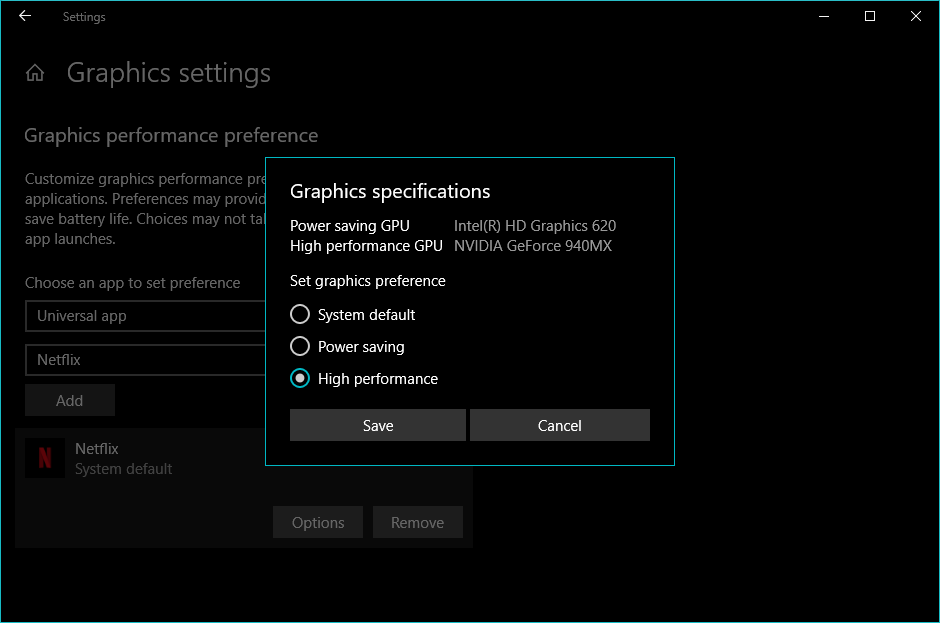
Now, click the app’s name and click Options. Here, you can choose between different graphics specifications like System default, Power Saving, and High Performance. The high-performance setting allows the app to take advantage of the discrete GPU on your system.
18. Free up space in Windows 10
Deleting unwanted data is a great way to speed up Windows 10. In general, Windows already included the disk cleanup utility that lets you clear your hard drive. All you need to do is type Disk Cleanup in the Windows Search bar and fire up the utility. It’ll take some time to analyze your hard drive after which you can choose what to delete.
If you want to free up space in Windows 10, the April 2018 Update comes with a new junk removal tool called Free Up Space. It can be found in the Settings app and works almost the same way. I used it to remove almost 46GB of data from my hard drive.
Talking about clearing up your hard drive, if you use OneDrive you can try the feature called Files On-Demand.
19. Reset your PC
Apparently, the last and the least option to end all of the Windows-related problems is to Reset your Windows 10 PC. You can do so by visiting the Recovery section in Settings or by the utility provided by your device manufacturer which you can access by pressing some key when the PC boots. Reinstalling Windows 10 would revert all the wrong-doings and changes you and various apps have made to the system.
So, these were some of the methods that can help you speed up your Windows 10 PC. If you have something to add, don’t forget to drop your thoughts in the comments.
Also Read: How To Limit Windows Update Download Speed Using This Hidden Setting

Aditya likes to cover topics related to Microsoft, Windows 10, Apple Watch, and interesting gadgets. But when he is not working, you can find him binge-watching random videos on YouTube (after he has wasted an hour on Netflix trying to find a good show).
Reach out at [email protected]
Watch this: 10 quick ways to speed up Windows 10
If your formerly shiny, new Windows 10 PC has begun to lose some of its luster, there are ways to put a little pep back in its step. Here are some quick, easy ways to improve its performance without swapping out any hardware.
1. Go opaque
Windows 10’s new Start menu is sexy and see-through, but that transparency will cost you some (slight) resources. To reclaim those resources, you can disable transparency in the Start menu, taskbar, and action center: Open the Settings menu and go to Personalization > Colors and toggle off Make Start, taskbar, and action center transparent.

Enlarge Image

2. No special effects
Making the Start menu, taskbar, and action center transparent is one thing, but Windows 10 still has a lot of other snazzy, built-in special effects. To really go bare-bones on the special effects, right-click the Start button and click System.

Enlarge Image
Click Advanced system settings to open the System Properties menu. On the Advanced tab under Performance, click Settings…

Enlarge Image
This will open the Performance Options menu. In the Visual Effects tab, either choose Adjust for best performance to turn off all unnecessary animations and special effects, or choose Custom: and deselect the visual effects you think can live without. When you’re finished, click OK to apply your changes.
3. Disable Startup programs
If your PC is taking a long time to boot up — and you’ve enabled Fast Startup and everything — you may have too many programs starting up when you turn your computer on. To fix this, right-click on the Start button and click Task Manager. Click the Startup tab (click More details if you don’t see the Startup tab) and peruse the list of programs that start up with your computer. If you see a program that doesn’t need to be there, right-click it and click Disable. You can also arrange the list of programs by Startup impact, if you’d like to see the programs that are taking up the most resources (and time).

Enlarge Image
4. Find (and fix) the problem
Windows 10 has a built-in performance troubleshooter that can help you find and fix any problems that might be affecting your PC’s speed. To open the troubleshooter, right-click on the Start button and click Control Panel. Under Security and Maintenance at the top, click Troubleshoot common computer problems. Next, under System and Security, click Run maintenance tasks.
5. Reduce the Boot Menu Time-out
When your computer starts up, the boot menu is displayed for a certain amount of time before the operating system loads. This gives you time to do things like start Windows in Safe Mode. You can shave a few seconds off your startup time by changing the boot menu time-out, which is set to 30 seconds by default.
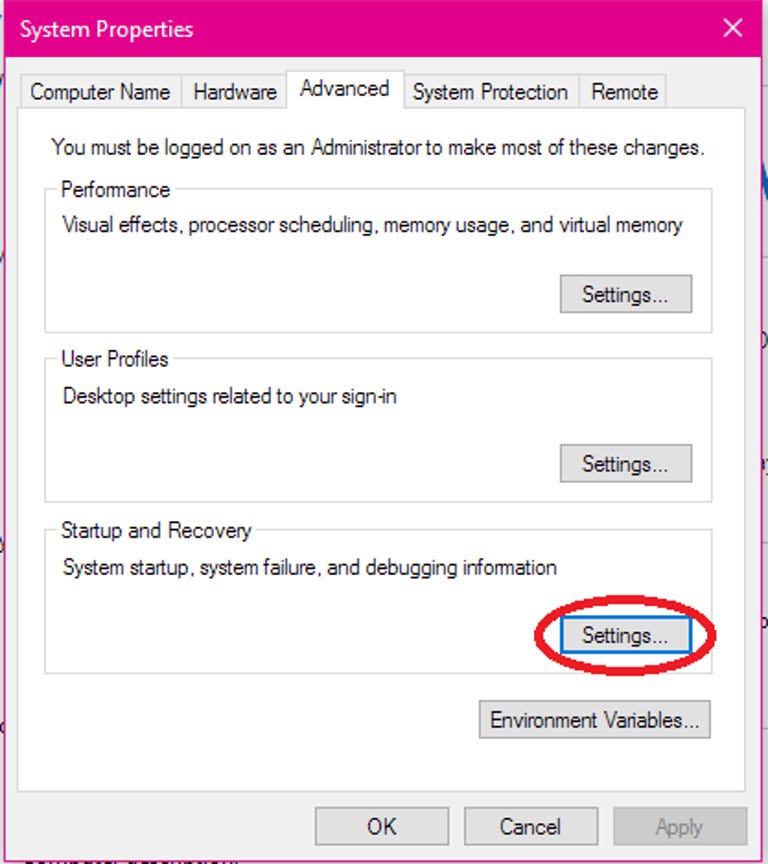
Enlarge Image
To do this, right-click on the Start button and click Control Panel. Go to System > Advanced system settings, and, under Startup and Recovery, click Settings.
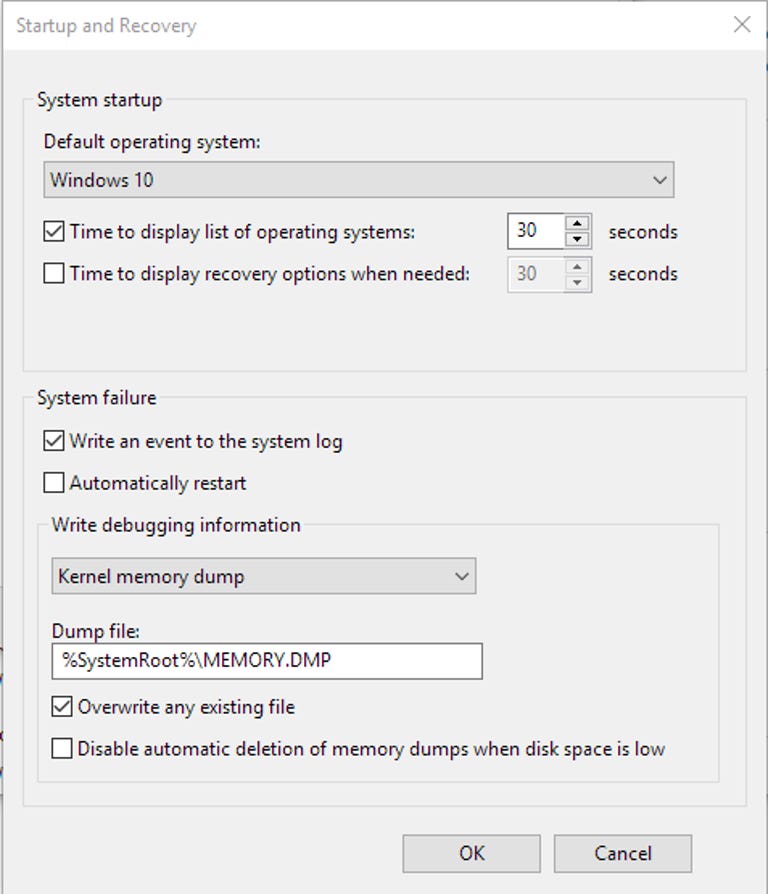
Enlarge Image

Next to Time to display list of operating systems:, change the value from 30 seconds to 10 seconds and click OK.
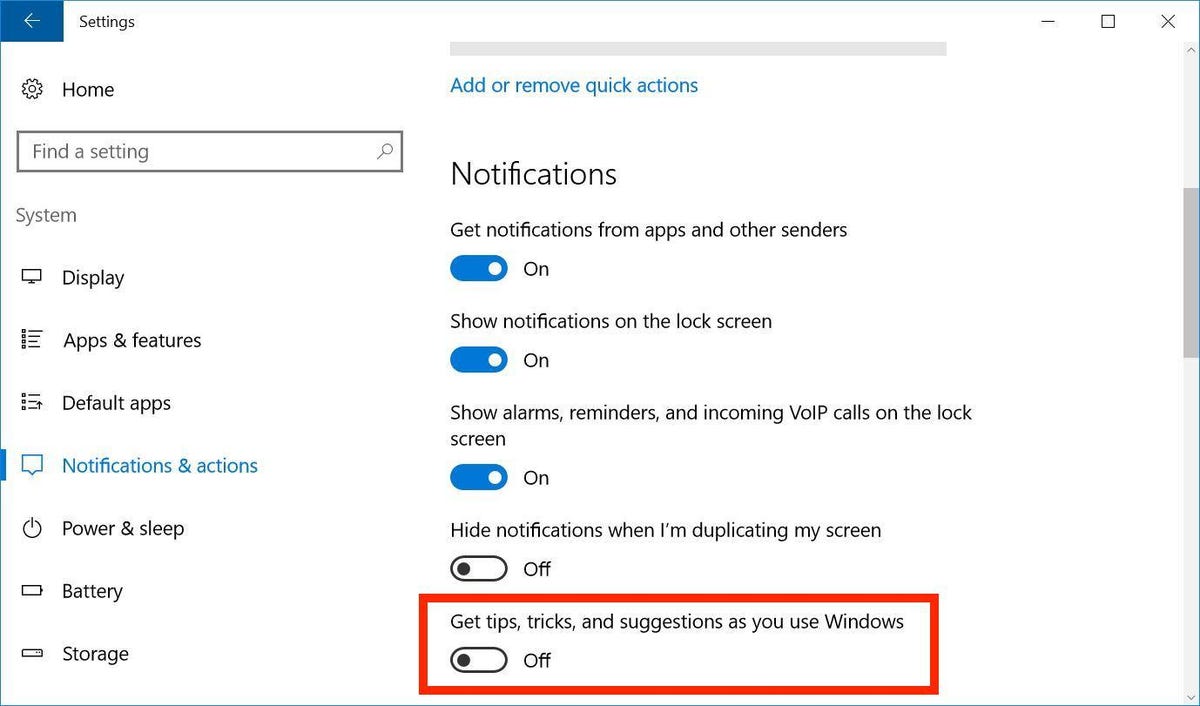
6. No tipping
In an effort to be helpful, Windows 10 will sometimes give you tips on how to get the most out of the OS. It scans your computer in order to do this, a process that can have a slight impact on performance. To turn off these tips, go to Start > Settings > System > Notifications & actions and toggle off Get tips, tricks and suggestions as you use Windows.
7. Run Disk Cleanup
This one’s a win-win. It’ll improve performance and free up space on your hard drive. Disk Cleanup has been around forever, but this trusted Windows utility can still help clean out the temporary files, installers and other junk littering your hard drive. To run it, just search for Disk Cleanup, run it and click the button labeled Clean up system files.
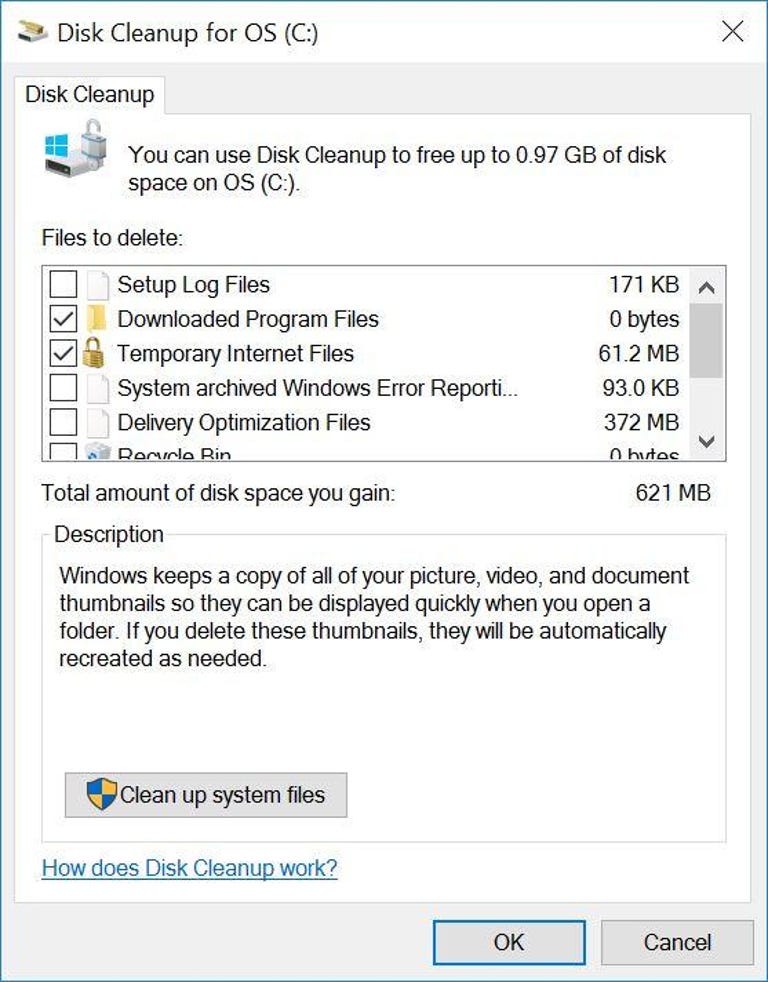
8. Eradicate bloatware
If your PC came with preinstalled apps you don’t want or need, get rid of them. Same goes for any apps you installed that you later found to be of little or no use. Right-click the Start menu, choose Control Panel and under the Programs header, click Uninstall a program. Peruse the list from time to time and select the programs you no longer need and click Uninstall at the top of the list.
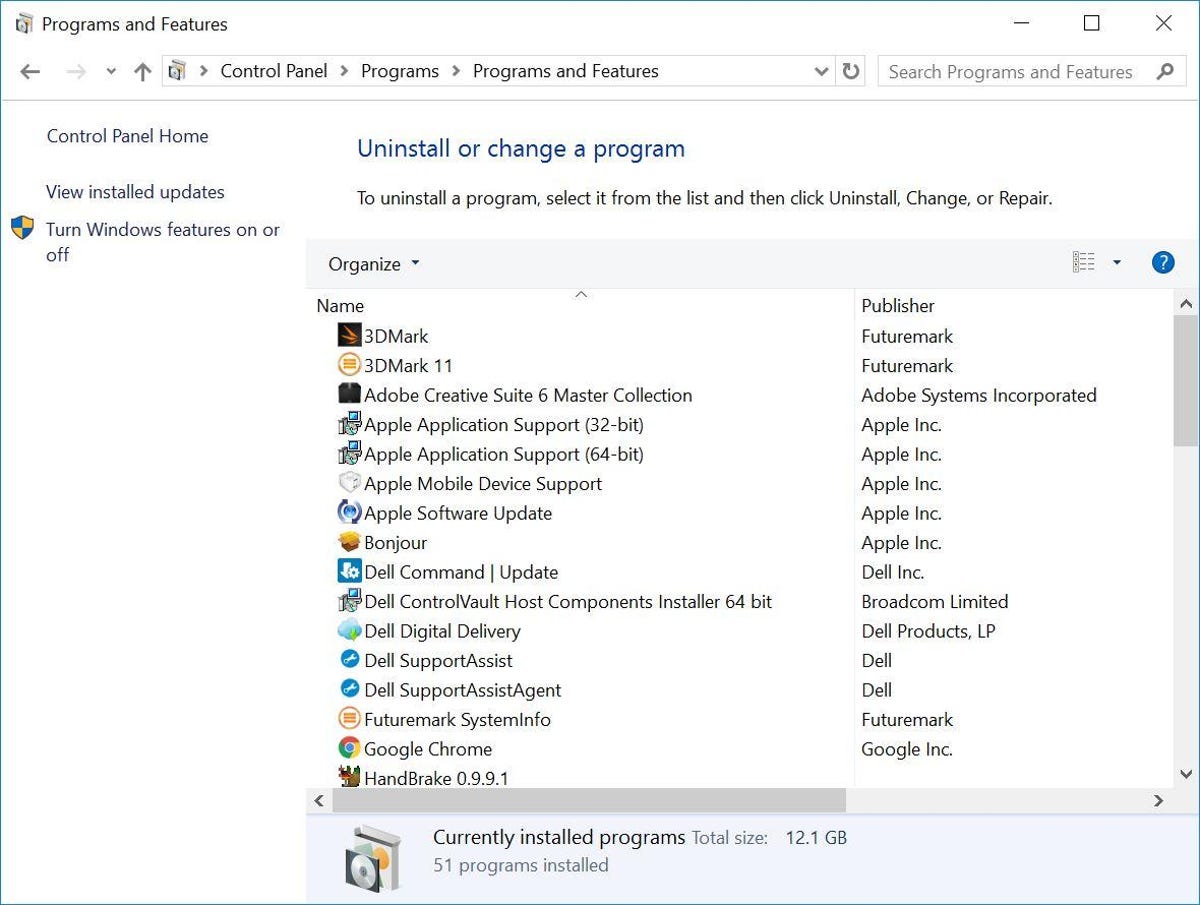
9. Power plan
Make sure you aren’t using a Power saver plan if you don’t need to. Even desktops will sometimes feature a power-saver option, which doesn’t do you any good unless you are trying to conserve battery life. Open the Control Panel and go to Hardware and Sound > Power Options to see which power plan you are currently using. For better performance, make sure you are using a High Performance or Balanced plan (or a plan from the PC manufacturer that says it’s balanced).
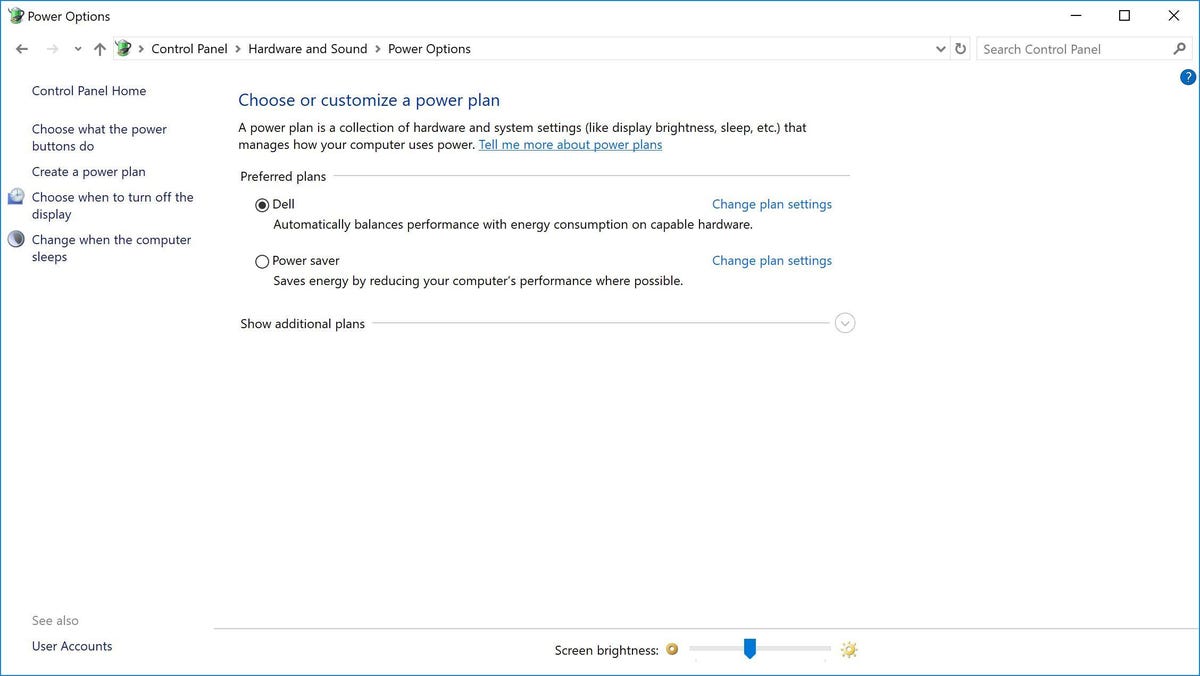
10. Restart your PC
Is speeding up your computer as simple as…restarting it? Maybe. Restarting your PC clears out its memory and stops any processes that might be taking up resources. Also, shutting down your computer is not the same as restarting it — shutdown is affected by Windows 10’s Fast Startup, which saves a snapshot of your PC and its processes in a hiberfile for faster boot-up. Restart is not affected by Fast Startup, so if you have Fast Startup enabled, restarting your PC is the only way to fully clear the memory and shutdown processes.
Editors’ note: This story was originally published on April 12, 2016, and has since been updated with more tips.
Windows 10 is a widely used Operating system worldwide. Since its launch, Microsoft has been adding more and more features that consume more RAM. Over the period, Windows 10 starts lagging, and we always wonder how to make windows 10 faster? In this guide, you can make your windows faster than ever. Be assured that all the mentioned tips are working fine, which will speed up windows 10 performance.
-
1)
Why your PC hangs/slow up over time? -
2)
How to make Windows 10 faster and improve its performance? Comprehensive 21 best settings-
3)
1. Close Background Running Processes to make windows 10 faster -
4)
2. Uninstall unnecessary Software to make windows 10 faster -
5)
3. Stop startup programs – How to Reduce Windows 10 boot time -
6)
4. Remove pre-installed apps to make Windows 10 faster-
7)
Remove pre-installed Apps –
-
7)
-

5. Close resource-intensive programs through the “Resource monitor tool.” -
9)
6. Use the Windows Experience Index to identify the items slowing your PC -
10)
7. Increase the Virtual Memory of your PC -
11)
8. Defragment Hard Disk to speed up windows 10, and hard disk read/write speed to make windows 10 faster -
12)
9. Dissipate the Heat properly -
13)
10. Optimise Visual Preferences -
14)
11. Optimise boot options from System Configuration to make windows 10 faster than ever -
15)
12. Change the Power Options -
16)
13. Delete unnecessary temporary files -
17)
14. Clear the disk space using the “Disk Cleanup Tool.” -
18)
15. Tweak Registry to speed up windows 10 -
19)
16. Disable Windows Update -
20)
17. Turn off the Windows suggestions feature to make windows 10 faster -
21)
18. Use Windows ReadyBoost to speed up windows 10 performance using USB -
22)
19. Improve Apps performance through Graphics settings -
23)
20. Upgrade the Hardware -
24)
21. Extend C Drive space if it’s full
-
3)
-
25)
Infographics- All the points covered on How to make windows 10 faster

Why your PC hangs/slow up over time?
Before we start the speed-up tips, let it be clear that there are some reasons for the slow performance of your PC. This applies to all PCs, but we talk more about Windows 10 here.
- Hardware limitation: The biggest reason any computer becomes slow is hardware that cannot handle so many resources. Ensure that your hardware configurations are the latest and use the programs/software supporting your equipment.
- Extensive Use: Doing too much multitasking over the capability of the computer makes it slow, and it starts responding slowly.
- Services running in the Background: There are chances that you install some software that runs in the background even if you close it. Many services running in the background make windows slower to operate.
- Poor Heat dissipation: One of the reasons for the low performance of Windows 10 is lousy heat dissipation. More temperature adds an extra burden to the CPU, making it run at a lower clock speed.
- C drive space is Low: With less space left in the C-drive can limit the functionality of the windows 10 operating system, which makes windows run slow.
Apart from the above, many reasons affect the PC’s performance.
How to make Windows 10 faster and improve its performance? Comprehensive 21 best settings
Once you identify the problem, it is easier to speed up windows 10. Here are the tips that explain “the windows 10 speed up Process,” which helps you speed up Windows 10 boot and overall performance.
Pro Tip – Most of these methods also work on the other Windows versions like Windows 7,8 & 11.
1. Close Background Running Processes to make windows 10 faster

Unwanted programs/processes make the windows run slow. You can close these unnecessary processes from the windows task manager.
- Right-click on the taskbar and select task manager to open the task manager.
- If you can’t see the other tabs in the task manager, select the “more details” option.
- Now Choose the Services tab and close the unwanted services you don’t need.
Just remember that, don’t close the service that you don’t know about. This might stop your PC from responding, and you need to restart it forcefully, which could lose all your unsaved data.
2. Uninstall unnecessary Software to make windows 10 faster

We install lots of software. But some of this software is for just one-time use. Over a period, we stop using some apps because we find a better alternative to that app. But we forgot to uninstall the older app. These scenarios create lots of junk in C drive space. Also, it does more burden on RAM if their services still run in the background.
Just identify such Apps and uninstall them through the control panel.
Can’t find the control panel? We have also covered that; follow this guide to know the easiest ways to open a control panel in windows 10.
Click on the first result, choose the software to uninstall, and click the uninstall button.
3. Stop startup programs – How to Reduce Windows 10 boot time

People always complain that their windows take more time to start. This is because many programs start their process as windows start. You can identify programs and close them so that Windows 10 boot takes less time.
You can close startup programs through a task manager—Right-click on the taskbar and select task manager to open it.
Now, choose the start-up tab and select the program you don’t want to start at boot. Right-click on it and select disable.
We have made a comprehensive guide on reducing Windows boot time that you can read here – How To Make Windows 10 Boot Faster.
4. Remove pre-installed apps to make Windows 10 faster

Many pre-installed apps come with Windows 10. Most of these apps are unnecessary, and an average user doesn’t use them.
But the problem with such apps is that they can’t be uninstalled through the control panel. The un-install button for these apps is disabled, and you go helplessly. But from now, you remove such apps by just copy-paste. So let’s do it.
Press Windows + X button to open an admin menu and select the “Run Windows PowerShell (Admin)“option.
Now type the following commands to remove the respective Pre-installed App. You can skip any of these commands to keep that program/app.
Remove pre-installed Apps –
Uninstall 3D Builder:
Get-AppxPackage *3dbuilder* | Remove-AppxPackage
Uninstall Alarms and Clock:
Get-AppxPackage *windowsalarms* | Remove-AppxPackage
Uninstall Calendar and Mail:
Get-AppxPackage *windowscommunicationsapps* | Remove-AppxPackage
Uninstall Camera:
Get-AppxPackage *windowscamera* | Remove-AppxPackage
Uninstall Get Office:
Get-AppxPackage *officehub* | Remove-AppxPackage
Uninstall Get Skype:
Get-AppxPackage *skypeapp* | Remove-AppxPackage
Uninstall Get Started:
Get-AppxPackage *getstarted* | Remove-AppxPackage
Uninstall Groove Music:
Get-AppxPackage *zunemusic* | Remove-AppxPackage
Uninstall Maps:
Get-AppxPackage *windowsmaps* | Remove-AppxPackage
Uninstall Microsoft Solitaire Collection:
Get-AppxPackage *solitairecollection* | Remove-AppxPackage
Uninstall Money:
Get-AppxPackage *bingfinance* | Remove-AppxPackage
Uninstall Movies & TV:
Get-AppxPackage *zunevideo* | Remove-AppxPackage
Uninstall News:
Get-AppxPackage *bingnews* | Remove-AppxPackage
Uninstall OneNote:
Get-AppxPackage *onenote* | Remove-AppxPackage
Uninstall People:
Get-AppxPackage *people* | Remove-AppxPackage
Uninstall Phone Companion:
Get-AppxPackage *windowsphone* | Remove-AppxPackage
Uninstall Sports:
Get-AppxPackage *bingsports* | Remove-AppxPackage
Uninstall Weather:
Get-AppxPackage *bingweather* | Remove-AppxPackage
Uninstall Xbox:
Get-AppxPackage *xboxapp* | Remove-AppxPackage
Now restart the PC once and feel the speed. You can restart the computer later after applying all the tips mentioned in this guide on how to make windows 10 faster.
5. Close resource-intensive programs through the “Resource monitor tool.”

Some programs consume lots of resources that increase the burden on RAM. You can close such items to make windows faster.
Resource-hungry programs can be found using the resource monitor tool.
- Open the windows menu, search “resource monitor,” and open the tool.
- Now open the CPU tab and sort the list from higher to lower by clicking on the “Average CPU” option.
- Now select which item consumes more resources and that you want to close. Right-click on it and select “end process.”
Make sure to restart the computer after you stop unwanted resources. You can restart the PC later after reading this windows 10 speed-up guide completely, which contains more speeding-up tips in the next part.
6. Use the Windows Experience Index to identify the items slowing your PC
Windows experience index is a tool by Microsoft that asses your computer and gives the rating to the PC. Ratings are decided as per the performance of various aspects of the PC, including Hardware.
You have to periodically keep an eye on this rating to identify the culprit of the slow performance of the windows. Inferior rank to the computer means you have to work on a suggested item or replace the hardware. This tool also gives possible suggestions, which helps to make windows faster in less time.
However, Microsoft has discontinued Windows performance Index Tool in Windows 10. But you can use third-party apps that do the same job to help speed windows 10.
You can use software like Chrispc win experience index and Winaero WEI Tool.
In the Chrispc software, you need to click on the Re-run assessment button to start the rating. Wait for some time to complete, and the tool will show you the possible errors on the screen.
7. Increase the Virtual Memory of your PC

So far, in the guide on how to make windows 10 faster, we have seen many tips to speed up Windows 10 that actually work. But this tip is way more efficient, which significantly shows you the difference in speed.
Windows uses a pool between RAM and Hard drive to create a loop. When one program takes more RAM space, windows shift the less space taking applications in the hard disk space; this hard disk space is automatically created by windows and called a Paging file. Also, this process is called “Swap.”
However, the paging file size is automatically decided, but you change it manually to increase the virtual memory.
- Press the Win + R key to launch the Run tool to increase its size.
- Now type the following path and hit enter.
%windir%\system32\systempropertiesperformance.exe
- The performance Option windows now show on the screen.
- Select the Advanced tab and under the Virtual memory option, click on the Change button.
- Uncheck the “Automatically manage paging file size for all drives.”
- Check the Custom size option and enter the desired size in MB.
- Click on the Set button and then Ok to save changes. Click OK to close the window.
Restart the PC for changes to take effect. You can restart the PC later after applying all the tips mentioned here.
8. Defragment Hard Disk to speed up windows 10, and hard disk read/write speed to make windows 10 faster

A heavily fragmented disk makes read-write speed slow, which slows down the Windows speed. A simple de-fragmentation of the drive can speed up Windows 10 significantly.
Defragmenting a disk is an easy task, but beware, it takes a lot of time for a heavily fragmented hard drive.
Open the Windows menu, type defragment, and launch the Windows Defragment and optimize drives tool.
- First, click on the Analyze button to analyze the fragmentation level. Then click on Optimize to start the defragmentation process.
- You can read the How to defragment windows guide to know the detailed procedure.
- Wait for the process to complete and then restart the computer.
9. Dissipate the Heat properly
![How to make Windows 10 faster than ever [21 best settings] 3](https://ws-na.amazon-adsystem.com/widgets/q?_encoding=UTF8&ASIN=B08JS9PJD7&Format=_SL160_&ID=AsinImage&MarketPlace=US&ServiceVersion=20070822&WS=1&tag=geeks00f-20&language=en_US "How to make Windows 10 faster than ever [21 best settings] 10")
Improper ventilation and bad head dissipation may lead to an increase in the temperature of the CPU. More temperature of PC means the reduced performance of the CPU. Some of the majors taken to minimize heat generation and effective dissipation are –
- Avoid heat generation by not running more heavy software at a time (if possible, of course). Also, avoid Multitasking with substantial RAM consumer programs.
- Avoid using your laptop that blocks the ventilators and cooling fan outlet.
- If you use your laptop for heavy tasks like video editing, rendering, etc., you can use Cooling pads that you can purchase for mere bucks from an online store. Here are some cheap cooling pads available on the Amazon store. https://amzn.to/2KAlDmJ.
- New gaming desktop PCs come with liquid cooling technologies that give better performance and speed as liquid cooling is more efficient than natural cooling. You can purchase such a computer if you are game savvy and a heavy tasker.
10. Optimise Visual Preferences

Windows 10 comes with more attractive visuals and animations that feel good while operating. But on the other hand, these visual effects take more RAM and affect windows performance.
You can disable such visual effects that you don’t like or compromise them for Windows 10 speed up.
- To disable selective visual effects, you can open the windows menu, search “advanced system settings,” and open the first result from the search.
- Now, from the advanced tab, click on the Settings button under the performance option.
- The new window with all the animation effects shows on the screen. You can disable all animation effects by clicking “Adjust for best performance.” However, you can enable some options if you want.
11. Optimise boot options from System Configuration to make windows 10 faster than ever

optimizing some settings from the system configuration can make windows ten faster.
- To open system configuration, press the Win + R button and type “msconfig.” Hit enter to launch it.
- Under the Boot tab, check “No GUI Boot” to speed up Windows 10 boot.
- Click the Advanced options button and then check the “Number of processes.” Also, select the higher number from the drop-down list. Click OK to save changes.
- Now click on Apply button and click the OK button. A pop-up window appears that says to restart the computer for changes to take effect. Now, save all your files from the computer and click on the Restart button.
You can restart the PC later as you may want to continue reading this guide on how to make windows ten faster.
12. Change the Power Options

Windows provides the feature to adjust the Power option as per your preference.
Changing the power option to “High performance” significantly speeds up Windows 10 computer.
- To open the power options, open the Main menu and Windows Mobility Center. And select the first result.
- Under the power plans, select the “High Performance” option and save the settings.
- Your PC can now run faster than ever.
Please note that choosing a Higher performance mode in the power plan may consume more battery on the laptop.
13. Delete unnecessary temporary files

Over the use, windows create temporary files that consume more resources and hard disk space—deleting such temp files to make windows 10 faster.
- Type Win+R to launch the Run tool and then time this path-
- Hit enter and select all files to delete them.
- Now, again go to the run tool and type –
temp
- Hit enter and tap continue to allow admin rights.
- Then select all files from opened windows and delete them,
- Again, in the Run tool, type –
prefetch
- Hit enter and tap continue to allow admin rights. Select all files there and delete them.
As these temporary files are generated automatically over time, you can follow the above steps periodically to clean them up.
14. Clear the disk space using the “Disk Cleanup Tool.”

Sometimes full hard disk slowdowns the performance of the windows, as it can’t use space to run the programs.
You can clean the unnecessary files stored on the hard drive, especially from the C drive. This Cleanup can be done from any Windows cleaner software available for free. You can download any of this software, but I recommend using CC Cleaner software.
You can also clean system files from the C drive using the Windows cleanup tool.
- Open My Computer and right-click on the C drive to open the windows cleanup tool.
- Select Properties and click on “Disk Cleanup.”
- The tool now calculates the unnecessary files and shows you in the new window. Just click Ok to start the cleaning process.
- On the same windows, click on “Clean up system files” to clean system files.
15. Tweak Registry to speed up windows 10

You can edit some registry settings to make them assist in speeding up windows 10.
- To open Registry Editor, press Win + R and type “Regedit.” Hit enter to open the tool.
- Go to –
Computer\HKEY_CURRENT_USER\Control Panel\Mouse
- Now select “MouseHoverTime” option.
- Double click on the option and change the value to 10. Click OK to save the changes.
- Click on “Desktop” and select the “MenuShowDelay” option from the left side menu.
- Double click on the option and change the value to 10. Click OK to save the changes.
These settings reduce the delay when we click on the menu button and over on some objects. This helps in speeding up windows 10 performance.
16. Disable Windows Update
Starting from Windows 10, Microsoft disabled the option to stop windows update. Because of this, windows update keeps running in the background and consumes the resources. Also, it consumes the internet in the background without knowing you.
However, you can disable windows updates by performing some tasks and making windows 10 faster. To know the detailed steps, you can read the guide on How to disable Windows 10 update.
The latest windows update 1903 (May 2019 update) brings a pause Updates Feature. Using this feature, you can pause the updates for 7 days once the Pause Updates button clicks. Pressing the same button multiple times would increase the number of days by 7. So, if you want to pause updates for 28 days, you have to press the Pause Updates buttons 4 times.
17. Turn off the Windows suggestions feature to make windows 10 faster

Windows scans your PC and shows you the tips/ideas to improve the user experience. However, this tool consumes the RAM as it continuously scans your actions and finds possible advice. But, if you have been a windows 10 User for a long time, you might not need such suggestions. You can disable it to speed up windows 10 performance to some extent.
To disable this feature, go to Settings –> System –> Notifications & actions, then under Notifications options, turn off “Get tips, tricks, and suggestions as you use windows.”
18. Use Windows ReadyBoost to speed up windows 10 performance using USB
ReadyBoost is a feature that uses the USB drive as an additional RAM to speed up Windows performance. You can use this utility and see a significant change in performance. Read the detailed article about ReadyBoost from the Microsoft ReadyBoost page.
19. Improve Apps performance through Graphics settings
Improving the performance of the individual app makes it load faster. If some of your programs take a long time to load and hang while operating, you can use this setting to increase their performance.
- Go to Settings –> System –> Display –> Graphics settings. Here, select the classic app and click on choose app. Then head over to the Programs directory in C drive and choose the program you want to speed up.
- Once the program has shown under the list, click on it and open the options menu. Select the “High performance” option here, and click Save.
This way, you can speed up the particular app, which speeds up the windows.
20. Upgrade the Hardware
![How to make Windows 10 faster than ever [21 best settings] 4](https://ws-na.amazon-adsystem.com/widgets/q?_encoding=UTF8&ASIN=B07M7Q21N7&Format=_SL250_&ID=AsinImage&MarketPlace=US&ServiceVersion=20070822&WS=1&tag=geeks044b-20 "How to make Windows 10 faster than ever [21 best settings] 18")
An old PC becomes outdated in some departments. Hardware is not compatible or can’t handle the newly made software that comes with new features and requires more resources.
You can upgrade some parts of the hardware within your budget. Some of these are RAM, Processor, and add more features. It is somewhat ambiguous in the case of the laptop, but desktop PCs can be easily upgraded.
SSD is also an option to make windows faster. Solid State Drives (SSD) is a new technology that is way faster than the traditional HDD. You can upgrade to SSD to experience faster performance.
21. Extend C Drive space if it’s full
If the C drive becomes full or has less space remaining, you may see lags on your PC. Read-write speed becomes slow when C drive space is less. In this case, you have to increase the C drive space to experience faster performance. But, there is no straightforward way to increase C drive space without formatting it. But you can do it with little extra effort. Read the guide Extend C drive without formatting to do the same.
Infographics- All the points covered on How to make windows 10 faster

Summary –
How to make windows 10 faster is the only question that comes to your mind when you get frustrated with your slow-running PC. However, speeding up windows is not so hard; it’s an easy process that I have explained to you. By following all these 21 settings, you can speed up the performance and make windows 10 faster in [year]. I hope you will be able to speed up windows 10 with these settings and enjoy using your faster PC.