Можно использовать установочный носитель (USB-накопитель или DVD-диск), чтобы установить новую копию Windows, выполнить чистую установку или переустановить Windows.
Чтобы создать установочный носитель, перейдите на веб-сайт скачивания ПО, где вы найдете пошаговые инструкции. На этом веб-сайте вы можете выбрать версию Windows и создать собственный установочный носитель с помощью USB-устройства флэш-памяти или DVD-диска. Чтобы перейти непосредственно к одной из версий, выберите одну из следующих ссылок:
-
Windows 7
-
Windows 8.1
-
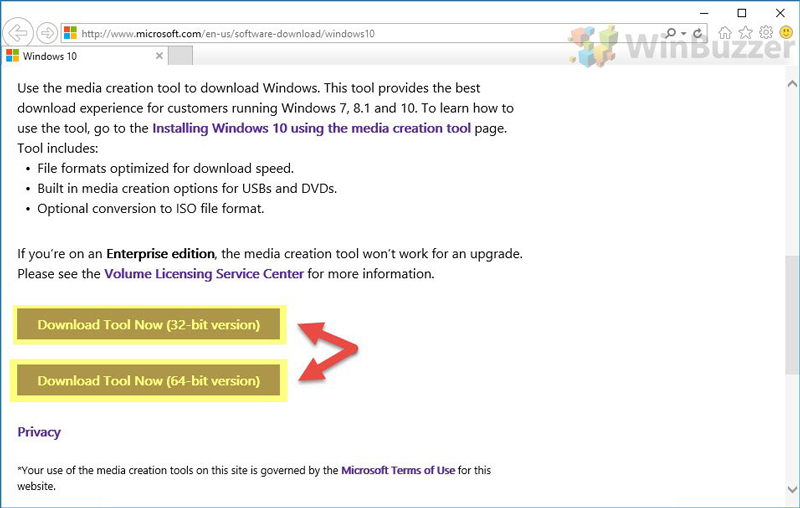
Windows 10 (Затем выберите Скачать средство сейчас.)
-
Windows 11 (затем выберите Скачать средство сейчас.)
Важно: Создайте резервную копию файлов перед установкой и переустановкой Windows на компьютере. Узнайте, как это сделать.
Чтобы создать установочный носитель, необходимо следующее:
-
Компьютер с надежным подключением к Интернету. Время скачивания зависит от скорости подключения к Интернету.
-
USB-устройство флэш-памяти, внешний жесткий диск или DVD-диск. Пустое USB-устройство флэш-памяти или внешний жесткий диск объемом не менее 8 ГБ либо пустой DVD-диск (и устройство для записи на DVD-диски). Рекомендуем использовать чистый носитель, поскольку все его содержимое будет удалено. Если при записи DVD-диска из ISO-файла отображается сообщение о том, что файл образа диска слишком большой, необходимо использовать DVD-носитель с двумя слоями (DL).
-
Ключ продукта. 25-значный ключ продукта (не требуется для цифровых лицензий). Если вам требуется помощь, см. раздел Как найти ключ продукта Windows.
После создания установочного носителя вы можете сбросить или переустановить Windows. Дополнительные сведения см. в статье Параметры восстановления в Windows.
Нужна дополнительная помощь?
Нужны дополнительные параметры?
Изучите преимущества подписки, просмотрите учебные курсы, узнайте, как защитить свое устройство и т. д.
В сообществах можно задавать вопросы и отвечать на них, отправлять отзывы и консультироваться с экспертами разных профилей.
Найдите решения распространенных проблем или получите помощь от агента поддержки.
Bootable disk is required when we need to do a fresh Windows installation. Bootable disk is a disk which contains special files to boot up or startup the computer to start a utility or program. In this case to install a Windows 10 operating system we require a bootable disk to start the installation process of Windows 10.
A bootable disk is not required when we upgrade from older operating system like Windows 7 to Windows 10. But if we downloaded an ISO file to install it on a different PC or for a clean install we must have to create a bootable disk.
Lets learn how we can create a bootable Windows 10 disk.
Microsoft has provided official tools to create a bootable disk without using any third party software. We here explain the 3 main methods.
1. Using Windows Media Creation Tool by Microsoft
This is the easiest and most reliable method. The utility automatically downloads Windows 10 and copy the files from a USB disk by making it a bootable disk. This method can also be used to download ISO files only. Follow the steps below.
- Download the Windows Media Creation Tool: Click here to download media creation tool.
- Double-click on the downloaded file.
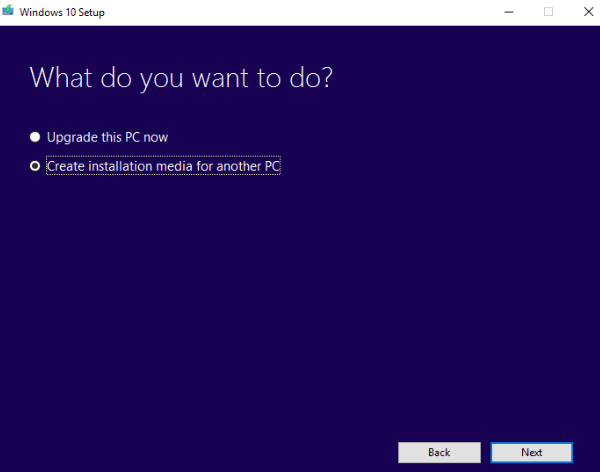
- Select “create installation media for another PC“.
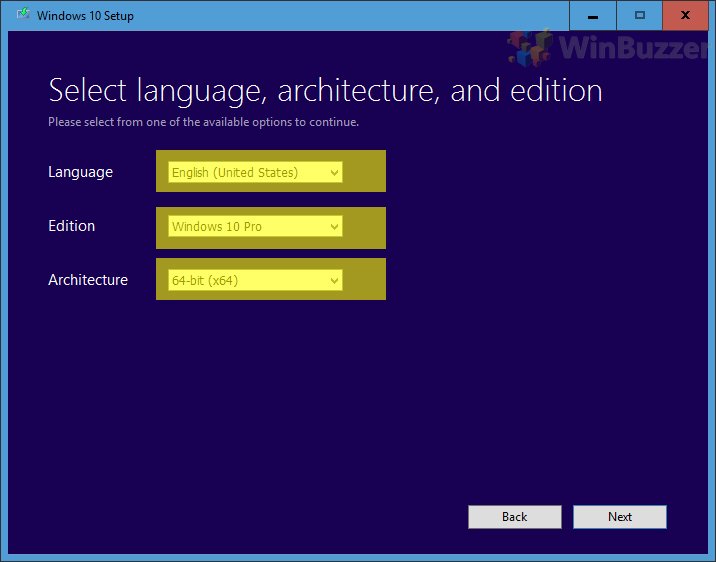
- Select Language / Edition and Architecture as per your requirement.
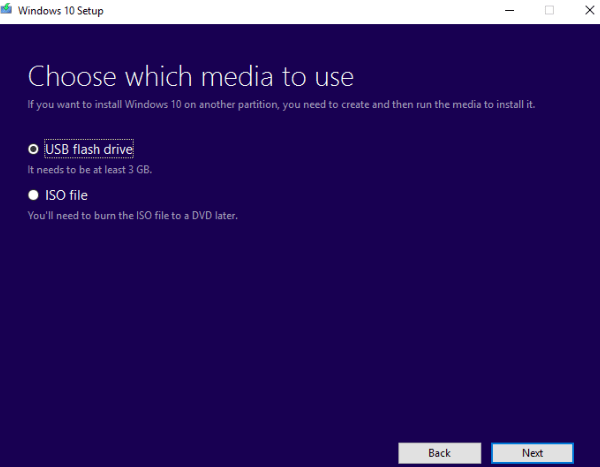
To learn more about it, go to https://www.microsoft.com/en-in/software-download/windows10 - Select USB flash drive for USB or ISO file for DVD.
- Your disk will be ready after the completion of the process. It requires atleast 8 GB of pen drive. Make sure there will not be any important data in the disk as it will format the disk during the creation of the bootable disk.

- Select “USB Flash Drive” option and click on Next.

You can download Windows 10 ISO files for free directly from Microsoft using this media creation tool. An activation key will be required during the installation process.
2. Using Windows USB / DVD Download Tool
This is an old and still working method to create a bootable media for Windows Installation. The name can confuse you but it is also working perfectly for Windows 10 as well. However, this method requires an ISO image of Windows 10. So first you have to download the Windows 10 iso file.
- This process requires an empty USB stick (Min: 8GB). Quickly format the USB drive first.
- Download Windows USB / DVD Download Tool & Install it on your computer.
- After finishing of its installation, Run it.
- It requires an ISO image file for Windows. Select the ISO image and start the process. you can download the ISO file of windows 10 using the media creation tool as mentioned in method 1.
- Start Windows USB / DVD Download Tool to create a bootable disk
- Select the Windows 10 ISO file by clicking on the browse button.
- Then click on Next.

- After that, it will ask you to select the USB drive.
- It will prompt you to format the USB drive. Please allow it to format the USB flash drive and start making the Windows 10 USB. Follow the remaining on-screen instructions too.
- After completion of the process, your Windows 10 bootable USB / DVD installer USB will be ready to use.


3. Create Bootable Windows 10 disk with the help of third party software.
However, you will not be required to go with this method (third party tool) because the above given two methods will work for sure. Under any circumstances, you’ll only go with the option if the above two have not worked for you.
Making a boot-able flash drive becomes pretty easy with a third party software, named Rufus. Here are the essential guidelines when using Rufus to make a bootable Windows 10 flash drive. Let’s learn the same.
- Download Rufus.
- Open Rufus.exe
- When the software launches on the screen, plug in your USB flash drive.
- Find the option Create a bootable USB drive.
- From the menu that follows, select an ISO image.
- Now click on next button to this menu and click on the Windows 10 ISO you want to install on your computer.
- Now click on the start button at the bottom, and it will begin to create a bootable USB flash drive.
- Once completed, your USB will become bootable and you will be ready to install / reinstall Windows 10 on any computer using this Windows 10 USB flash drive.
4. Create Bootable Windows 10 USB through Command Prompt
This method is useful for advanced users. Sometimes users only have access to command prompts only and are unable to start Windows. If you have an ISO file, you can create a bootable pen drive using this method. Follow the given guidelines carefully as this method is a little complicated:
- Plug in your USB drive to your computer.
- Open “Command Prompt” (Admin).
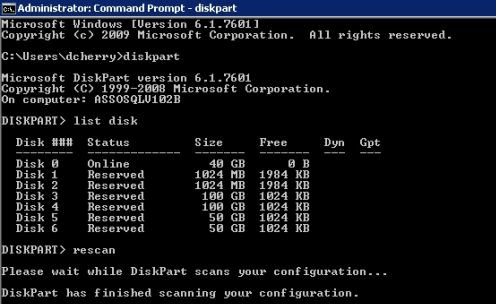
- In the Command prompt, type in the following command: diskpart and press the enter key from your keyboard.

- Now type list disk and press enter key. This will display a list of available connected disks.
- From this list, you need to select your USB drive. To do this, type select disk # and press Enter (Replace # with your disk number from the list). You will get a message saying “Disk 1 is now the selected disk’
- The next step is to clean the USB drive. To do this, type clean and press enter.
- Now create a bootable partition, simply type Create partition primary and press Enter.
- You need to select the partition you just created. Type select partition 1 and then type active and hit Enter.
- Now format the USB drive by typing “format fs=ntfs quick”. After this, press Enter.
- Assign drive letter. To assign a letter to your USB drive, just type assign. You may skip this step.
- Now get exit from disk part command by typing EXIT command. Go back to the command prompt on the main screen.
- Now minimize it for a while.
Copy the Windows 10 files to USB flash drive
Copy all the files of Windows 10 and paste them in the USB drive manually. Files can be copied from a Windows 10 disk or by extraction from an ISO file.
- Open the Windows 10 Disk / saved Windows 10 folder. If you do not have this, then download the Windows 10 ISO file from the Microsoft website and extract the ISO file to a folder, then open the extracted folder.
- Select all the files of Windows 10 and copy them.
- Now open the USB flash drive and paste all the copied files there.
Now make the USB flash drive bootable
Let’s suppose that the F: drive would be your USB drive and the E: drive is your DVD drive. Make sure the Windows 10 bootable DVD is inserted into the DVD drive from where the data is copied to the USB bootable drive.
Change the Windows active directory to the F: drive (DVD Drive). The default active directory is “C:\Windows\System32” in CMD. That Windows 10 DVD should be inserted into the DVD drive.
- Open the command prompt (admin) once again.
- Type E: and then press enter. The active directory will be changed immediately.
- Now type in the CD boot command and press enter.
- To create the bootsector in the F: drive (USB Pen Drive), type bootsect/nt60 F: into the command line.
- That’s it!! Your flash drive is now a Windows 10 bootable USB drive
And that is all there is to know about the manual creation of a bootable Windows 10 USB flash drive. all the methods are equally useful. If you’re an expert you can use the manual method without taking help from software, but beginners are advised to seek software help to avoid any complications. The best and easy method is using the Windows Media Creation Tool .
Are you still using the Windows 7? Microsoft has ended the windows 7 support.
Upgrade to Windows 10 as early as possible.
Why we need to create a bootable Windows 10 USB drive?
Since the availability of USB drives, the use of CD and DVD has prominently declined. The major reasons behind this are the ease of use, portability, larger capacity and faster copying of data files by the USB drives in comparison to the older methods. All you need is a flash drive with a capacity of more than 4GB, although 6 to 12 GB of available space is ideal for storing additional files as well. Create a bootable USB drive and keep it in a safe place that you can use this disk to easily fix the installation issues.
How to download windows 10 bootable USB or ISO image for clean windows installation.
Given above method 1 can be used to easily download the ISO image file. We didn’t found any other direct link to download ISO image for offline purpose. So downloading it using the media creation tool is the only method to get it directly from the Microsoft.
You can also upgrade to Windows 10 for Free using windows 7 license key.
Please share your experience with the creation of bootable windows 10 disk using the below comment box.

Contents
- 1 How to Create a Windows 10 USB via the Media Creation Tool (UEFI or Legacy)
- 2 How to Put Windows 10 on a USB Drive via ISO with Rufus (Legacy or UEFI)
- 3 How to Create a Windows 10 Bootable USB fro ISO via the Windows 7 USB/DVD Download Tool (Legacy)
No matter how technically-minded you are, it’s always smart to have a Windows 10 boot stick to hand. It takes just a few minutes to create a bootable Windows 10 USB, but it can save countless hours if your OS breaks down and you don’t have a spare PC to hand.
These days, a Windows 10 USB is the preferred method to perform a clean install of Microsoft’s operating system. With disk drives more or less dead, it’s often the only real choice on a completely new PC. Flash drives also don’t get scratched, are faster to write to, and take up less space.
Those wondering exactly how to make a bootable USB for Windows will be pleased to hear there are three generally accepted methods. One involves Microsoft’s Media Creation Tool, which greatly simplifies the experience, while third-party tool Rufus is best used to create a bootable USB from an iso. We’ll also be covering the creation of a boot stick from Windows 7, for the few of you still left on the outdated OS.
First, though, it’s worth noting that Windows machines generally have two BIOS types: Legacy or UEFI. You can read a full explanation on superuser here, but the general gist is that UEFI is supported on most modern PCs. If you’re unsure, take a look at your System Information app. Windows will list the type under ‘BIOS mode’.
How to Create a Windows 10 USB via the Media Creation Tool (UEFI or Legacy)
This is the Microsoft-recommended route to put Windows 10 on a USB drive, and for good reason. The Media Creation Tool cuts out some of the licensing annoyances in the setup process.
- Download the Windows 10 Media Creation Tool
The Windows 10 Media Creation Tool can be grabbed from Microsoft’s official site, and you shouldn’t obtain it from anywhere else. Once there, decide if you want your Windows 10 boot stick to install a 32 or 64-bit version of the OS (64-bit is a safe bet for most people). Click the relevant “Download tool now” button and open the file.

- Use the Windows 10 bootable USB tool to create media for another PC
When the Media Creation Tool boots, it’ll ask you to choose whether to create installation media this PC or another one. Click “Create installation media for another PC” and click “Next”.

- Choose a system architecture for your Windows 10 USB
When you install Windows 10 to a USB, Microsoft asks you to choose the system’s architecture, language, and edition. Check your license key to see if you want a Windows 10 Home or Windows 10 Pro download, and select 64-bit or 32-bit. Again, you can find your architecture in your System Information app, but you can always choose both if you have the space on the USB drive. Once you’re done, click “Next”.

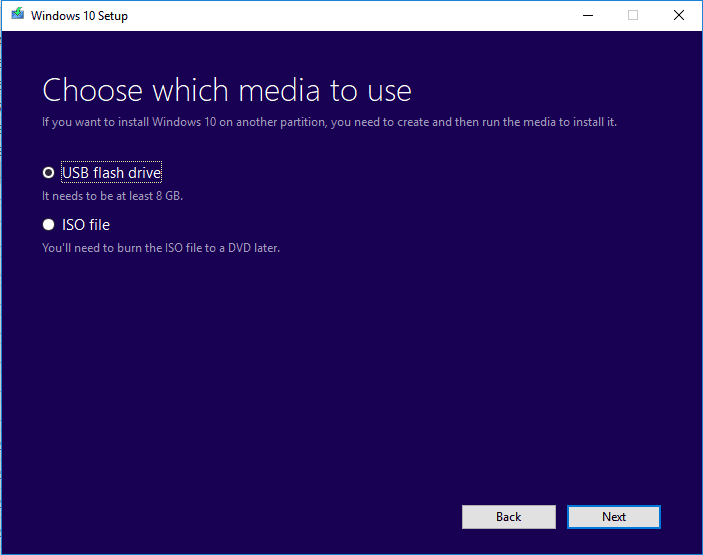
- Agree to install Windows 10 to a USB flash drive
On the “Choose which media to use” screen, click “USB flash drive”. Click “Next”.
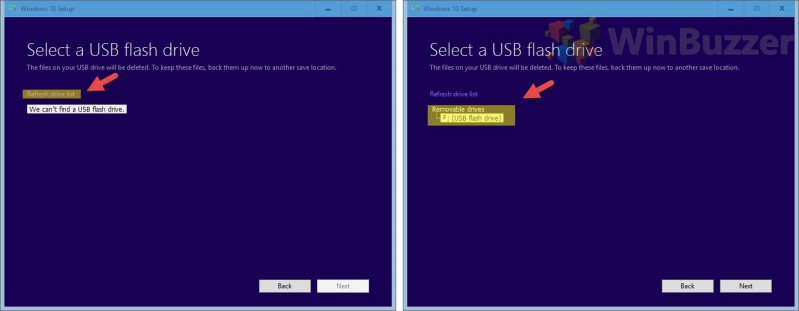
- Select your USB boot stick
Plug in your USB boot stick and click “Refresh drive list”. Select the USB drive and click “Next”.

- Wait for the ISO to download and automatically create a bootable USB
The download may take some time, depending on your internet connection, the speed of your hard drive, and the speed of your USB stick.
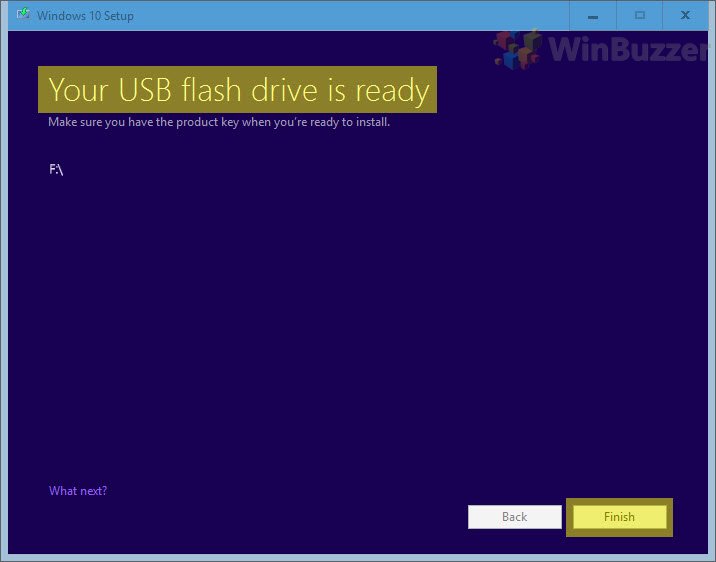
- Finish the Windows 10 USB creation
When everything has been written to the drive, the Media Creation Tool will display the message “Your USB flash drive is ready”. Click “Finish”.


How to Put Windows 10 on a USB Drive via ISO with Rufus (Legacy or UEFI)
The in-built Windows 10 download tool is good enough, but there are some instances where you might want to use third-party tool Rufus. For example, if you followed our how to download Windows 10 ISO files guide and have a disc image lying around already. It can also be better if you don’t have enough space on your C:/ drive for the Media Installation Tool to function.
- Download a Windows 10 ISO file
There are several ways you can obtain an ISO:
? Via the Media Creation Tool
? Directly from the Microsoft servers
? From an unofficial source (not recommended)
? By converting an official Windows Update ESD file into ISO format
? By slipstreaming all available updates into a Windows 10 ISO file - Grab the Rufus Windows 10 download
Download Rufus from the official website, either in regular or portable version. We choose Rufus because it’s free and tends to be faster than other alternatives like UNetbootin, Universal USB Installer, Windows 7 USB download tool, or WintoUSB.
- Plug in the USB Flash Drive and run Rufus
It should boot straight to the Rufus bootable usb screen without any extra fuss.
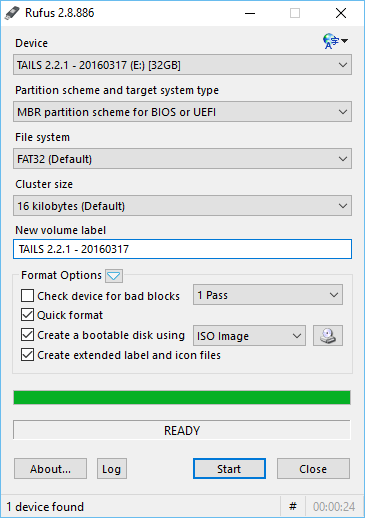
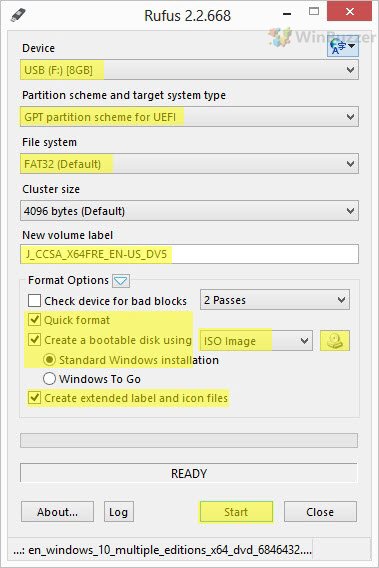
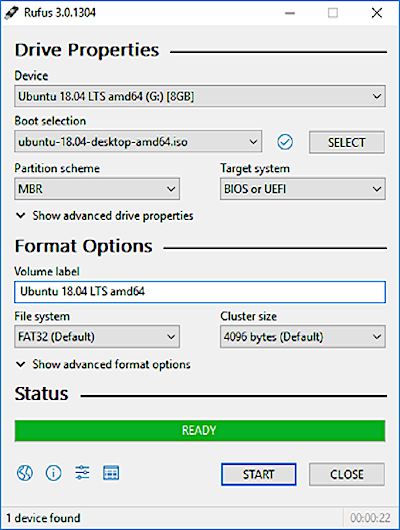
- Create a Windows 10 UEFI boot USB with Rufus
To create a UEFI boot USB, select the following options, and click Start:
? Device: Your USB drive
? Partition scheme and target system type: GPT partition scheme for UEFI
? File system: Fat32 (Default)
? Cluster size: 4096 bytes (Default)
? New volume label: Windows 10 UEFI
? Format Options:
✔ Quick format
✔ Create a bootable disk using: ISO image (here you need to select your 64-bit Windows 10 ISO file from your computer)
✔ Standard Windows installation
✔ Create extended label and icon filesOnce you’re done, click “Start”.

Accept the warning by clicking “OK”.
- Create a Windows 10 Legacy Boot USB with Rufus
The settings for a Rufus bootable USB that’s compatible with Legacy BIOS versions are quite different. Select the following:
? Device: Your USB drive
? Partition Scheme and target system type: MBR partition scheme for BIOS or UEFI-CSM
? File system: NTFS
? Cluster size: 4096 bytes (Default)
? New volume label: Windows 10 Legacy Boot USB
? Format Options:
✔ Quick format
✔ Create a bootable disk using: ISO image (here you need to select your 64-bit Windows 10 ISO file)
✔ Standard Windows installation
✔ Create extended label and icon filesWhen you’re done, click “Start”.
Accept the warning by clicking “OK”.


How to Create a Windows 10 Bootable USB fro ISO via the Windows 7 USB/DVD Download Tool (Legacy)
If you want a legacy BIOS but want to stick to Microsoft’s official tool, the old Windows 7 USB/DVD tool is also a good choice.
- Download a Windows 10 ISO file
? Via the Media Creation Tool
? Directly from the Microsoft servers
? From an unofficial source (not recommended)
? By converting an official Windows Update ESD file into ISO format
? By slipstreaming all available updates into a Windows 10 ISO file - Download and Install the Windows 7 USB/DVD Download Tool
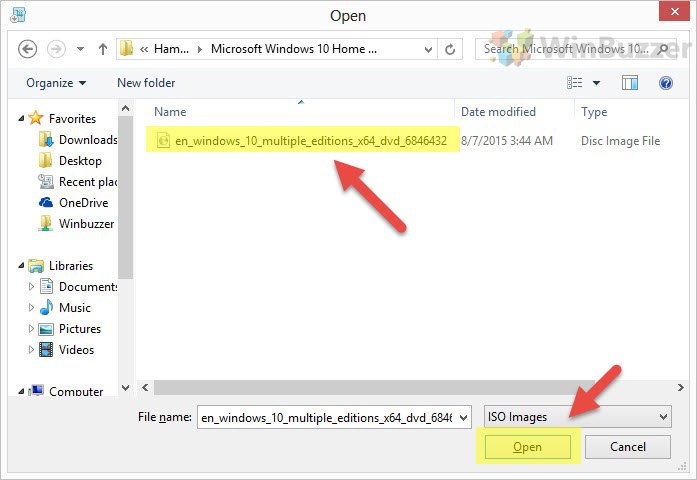
- Click “Browse”
- Select your Windows 10 ISO file and press “Open”

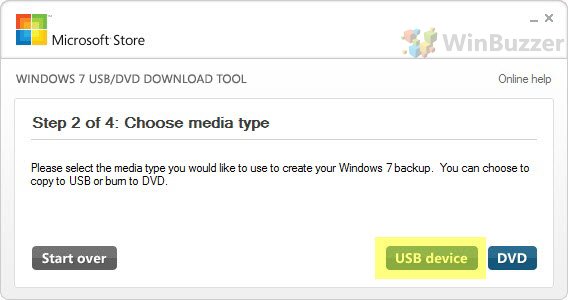
- Click “Next”
- Choose “USB device”
- Select the Windows 10 USB you want to make into a boot stick
If it doesn’t display immediately, ensure it’s plugged in correctly and press the refresh icon. Then click “Begin copying”.
- Erase the USB drive

- Confirm the drive erase by clicking “Yes”

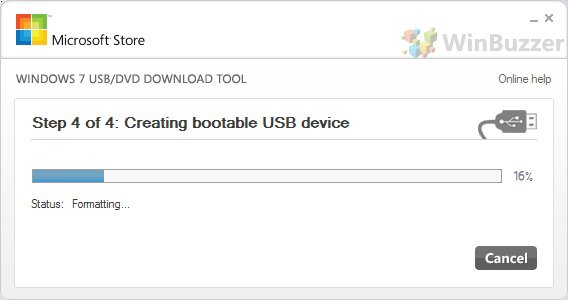
- Wait for the Windows 7 USB/DVD Download Tool to create a Windows 10 boot stick
Depending on your hard drive/USB speeds, this could take some time.
- Close the USB/DVD Download tool
When you see the “Bootable USB device created successfully” message, it’s safe to close.


Updated by
Cici on Sep 19, 2023
| Workable Solutions | Step-by-step Troubleshooting |
|---|---|
| Manual Way | Step 1: Format your USB drive. Step 2: Go to Microsoft’s website and download the Media Creation Tool…Full steps |
| Use EaseUS Partition Master | Step 1. To create a bootable disk of EaseUS Partition Master, you should prepare a storage media…Full steps |
Introduction
Creating a bootable USB drive for windows is simple and can be done with a few clicks. This guide will walk you through creating bootable USB windows 10 using Rufus’s free program. To make a bootable USB drive for Windows 10, you will need a USB drive with at least 8GB of storage space and a copy of the Windows 10 ISO. Users can download Windows 10 ISO from Microsoft’s website.
Once you have downloaded the ISO, please open it and extract the contents to your USB drive. Make sure that the USB drive is formatted as NTFS. After extracting the contents, rename the USB drive to «Windows 10». After renaming the drive, please insert it into the USB port on your computer. When you turn on your PC and press F12, select «Boot from USB.» The system will boot from the USB drive.
What is a bootable USB?
A bootable USB is a USB drive that can be used to start or «boot» a computer. A bootable USB can be used to install a new operating system (OS) on a computer or fix problems with the existing OS. An installation ISO file of the desired OS and a USB drive are needed to create a bootable USB. Creating a bootable USB requires a USB drive and the installation ISO file for your desired OS.
Further Reading: Boot Windows from SD Card
Why would you need a bootable USB for Windows 10?
Windows 10 is a great operating system, but what if something goes wrong and you need to reinstall it? That’s where a bootable USB for Windows 10 comes in handy. A bootable USB is a USB drive that has been formatted to be used as a boot disk. You can install Windows 10 from USB on your computer, even if it doesn’t have an operating system installed.
Windows 10 is the latest version of the Windows operating system. It offers many new features, including the ability to create a bootable USB. This article will show you how to create a bootable USB for Windows 10. What you will need Before you begin, ensure that your computer has an empty USB drive. You also need to have a blank, formatted USB drive.
You May Also Like:
Two methods of creating bootable USB for Windows 10:
Creating a bootable USB for Windows 10 is essential when upgrading or installing the operating system. There are two common methods for using Microsoft’s Media Creation Tool or DiskPart. The Media Creation Tool is the easier option, but it can only be used to create a bootable USB on a computer running the same Windows 10 you want to install. If you want to create a bootable USB on a different version of Windows 10, or if your computer doesn’t have Windows 10 installed, you’ll need to use DiskPart.
1. Manual Steps of Creating Bootable USB for Windows 10 Using the Media Creation Tool
In this article, we are going to show you the step-by-step manual instructions on how to create a bootable USB for Windows 10 using the Media Creation Tool:
Step 1: Format your USB drive.
Step 2: Go to Microsoft’s website and download the Media Creation Tool. Once downloaded, open it up and click on «Create installation media for another PC».
Step 3: Create bootable media using the Media Creation Tool.
Step 4: Select which language, edition, and architecture you want Windows 10 to be installed in.
Step 5: Ensure that the «ISO file» option is selected and then click on «Next».
Step 6: The Media Creation Tool will start downloading the necessary files.
Step 7: Once it is done, choose where you want to save the ISO file and click on «Create».
We will show you how to create a bootable USB using the ISO file. First, insert a blank USB into your computer. Once you have done that, open up your Command Prompt. Press the «Windows + X» on the keyboard and select «Command Prompt (Admin)». In the Command Prompt, enter the disk part and then type list disk.
Once you have done that, you will see a list of your hard drives. Choose the disk with the ISO file on it and then select «select disk X». You will now be asked to type in the number of cylinders for your USB drive. Type in 15 and then press enter.
2. Use Third-party Bootable USB Creation Tool
A bootable USB is a must-have tool for any computer technician. It can be used to install an operating system, troubleshoot problems, or as a rescue disc. The most common way to create a bootable USB is to use the built-in tools of your operating system. But what if you need to create a bootable USB on a different computer? Or what if your computer doesn’t have an operating system installed? You can use a third-party tool to create your USB in these cases.
What is EaseUS Partition Master and its WinPE Creator
Since its establishment in 2004, EaseUS has been a leader in providing innovative data security and storage management software. EaseUS Partition Master is one of the company’s most popular products. A disk partitioning tool allows users to manage their hard disk partitions and check hard disk health easily. In addition to its Windows-based version, the company also offers a WinPE Creator version that can be used to create a bootable USB or CD/DVD drive with the Partition Master software installed. It allows users to manage their partitions even if they cannot start their computer.
Step 1. To create a bootable disk of EaseUS Partition Master, you should prepare a storage media, like a USB drive, flash drive or a CD/DVD disc. Then, correctly connect the drive to your computer.
Step 2. Launch EaseUS Partition Master, and find the «Bootable Media» feature on the left. Click on it.
Step 3. You can choose the USB or CD/DVD when the drive is available. However, if you do not have a storage device at hand, you can also save the ISO file to a local drive, and later burn it to a storage media. Once made the option, click the «Create» button to begin.
- Check the Warning message and click «Yes».
Step 4. When the process finishes, you’ll see a pop up window, asking if you want to restart computer from the bootable USB.
- Reboot Now: it means you want to restart the current PC and enter EaseUS Bootable Media to manage your disk partitions without OS.
- Done: it means you don’t want to restart the current PC but to use the bootable USB on a new PC.
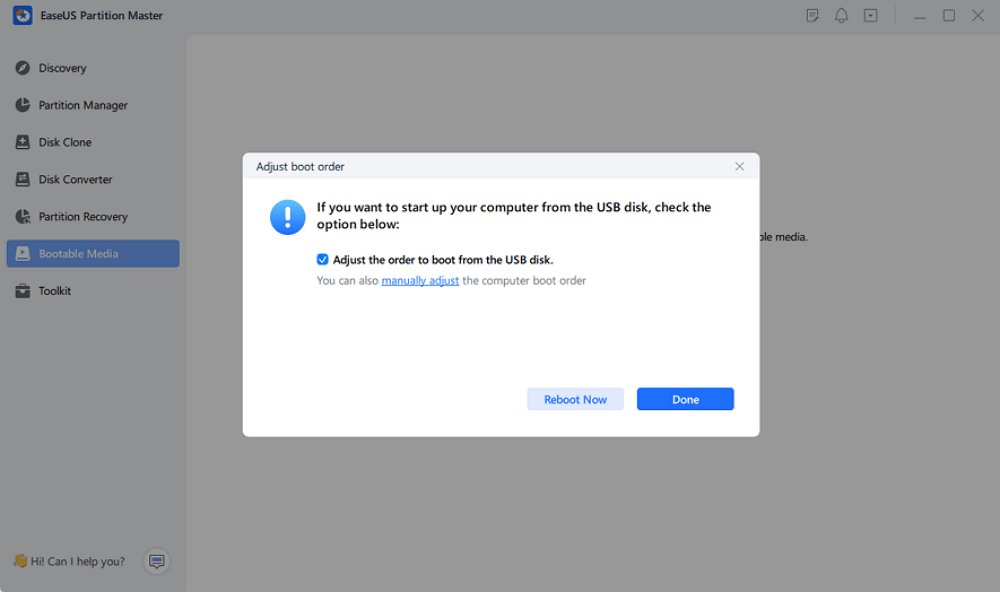
Note: To use the bootable disk on a new PC, you need to resart the target computer and press F2/F8/Del key to enter BIOS, and set the USB bootable disk as the first boot disk.
Wait patitiently and your computer will automatically boot up from the USB bootable media and enter EaseUS WinPE desktop.

Final thoughts
Creating a bootable USB Windows 10 is an easy process that can be completed with a few simple steps. By following the above instructions, you can create a USB stick that can be used to install Windows 10 on any computer. This process is ideal for people who want to install Windows 10 on multiple computers or for people who want to try out the new operating system before committing to a complete installation.
Note: Before you begin, ensure you have enough space on your USB for 8GB and have backed up your data.
Isn’t it amazing that our USB flash drives can hold a live operating system? This has been really helpful and convenient to many of us who would need to install or reinstall their operating system on their laptops and computers. It just has gotten way easier for us, without having to install it using the traditional CD drives or DVD drives.
Windows 10 has been the common go-to operating system as it has stood the test of time. You might notice that most laptops or computers comes with the default operating system which is Windows. If you have a look at your office’s computers, many businesses as well has the Windows operating system installed on their computers. I myself, from my childhood up to now, am using the Windows operating system and I think it’s just easier to stick with what you are used to.
So, as what I have said earlier, USB flash drives can now hold a live operating system. And that is made possible with the help of a tool that allows us to create a bootable USB flash drive. Win32 Disk Imager is a simple program and an open source application that can write image files to a USB flash drive. Here are the things that I love about the Win32 Disk Imager:
- There is no need for you to install the program. Yes, you read that right. As unusual as it may seem, knowing that we usually install programs so we can start using them, all you need to do is unzip the program and run the file.
- Simple and straight forward. It has a very simple user interface thus allowing us to create a bootable USB flash drive without any confusion. It is pretty straight forward, as you just need to select the Windows 10 image file from your computer and the device which is the USB flash drive that we are going to use, and voila! You have your Windows 10 bootable USB flash drive.
- Win32 Disk Imager is a free program! You don’t even have to shell out money to be able to use this amazing program.
Steps To Create A Windows 10 Bootable Usb Flash Drive With Win32 Disk Imager
Step 1: Download Win32 Disk Imager
- For those who does not have the Win32 Disk Imager yet, you may copy and paste this link on your browser: https://sourceforge.net/projects/win32diskimager/files/latest/download
- Go ahead and click Download
- A pop-up message will appear regarding privacy. Just go ahead and click I ACCEPT
- Then it will start downloading Win32 Disk Imager
- Another pop-up message will appear asking you what you want to do with the file, just go ahead and click on RUN
- Then a pop-up message will appear again saying that the publisher could not be verified, are you sure that you want to run this software? Just go ahead and click RUN
- After a few moments, Win32 Disk Imager will be pulled up
Step 2: Download Windows 10 ISO file
- You can type in your browser: Download Windows 10 ISO disk image, and click on the first result shown which is from Microsoft,
- Click Download the tool now, which will start to download the Media Creation Tool that will help us create a Windows 10 ISO file
- Click on the file and accept the License Terms
- Then it will ask you what you want to do, just select Create Installation Media (USB flash drive, DVD, or ISO file) for another PC. Go ahead and click Next.
- Select the language, architecture and edition. I chose English for the language, Windows 10 for the edition, and 64 bit (x64) for the architecture since I have a 64 bit laptop. Then click Next.
- Then it will tell you to choose which media to use. Go ahead and select ISO file. Then you can go ahead and click Next.
- Then you can go ahead and decide the location to save the ISO file. Then go ahead and click Save.
- After which, the Media Creation Tool will start downloading the Windows 10 ISO file.
- Then click Finish.
P.S.
To speed up the process, it is best to have a high-speed internet connection.
Step 3: Select Image File
Remember why I love Win32 Disk Imager? Because of it being simple and straight forward.
- So yeah, under the Image File, if you click on the blue folder icon.
- Then go ahead and browse for the Windows 10 ISO file that you just have created using the Media Creation Tool
- Select the file
Step 4: Plug your USB flash drive into your laptop or computer
This is pretty much self-explanatory.
Step 5: Select the Device
- Click on the Device drop-down list.
- Select the device
P.S.
Just be sure that you have selected the correct device. It is always best to only have the USB flash drive plugged into your laptop or computer to avoid confusion. If you are not sure whether you have selected the correct device, you can check the name of your device by going to the File Explorer.
Step 6: Double check
- Make sure that you have selected the correct file for the Image File
- Make sure that you have selected the correct device
Step 7: Write
- Once you are done double checking everything, go ahead and click Write.
- A pop-up message will appear, select Yes and this should start writing the Windows 10 ISO file to your USB flash drive.
Step 8: Finish and Eject USB flash drive from your computer or laptop
Congratulations! You have just created a Windows 10 bootable USB flash drive with Win32 Disk Imager. Once you have finished the process, do not forget to remove the USB flash drive safely from your laptop or computer. Now, it is very easy for you to install or re-install Windows 10 on your laptops and computers! Have a damaged installation or getting a new laptop or computer? This should not be a problem at all! You can go ahead and take care of it anywhere, anytime.