1. Overview
Windows Subsystem for Linux (WSL) allows you to install a complete Ubuntu terminal environment in minutes on your Windows machine, allowing you to develop cross-platform applications without leaving windows.
What you will learn:
- How to enable and install WSL on Windows 10 and Windows 11
- How to install and run a simple graphical application that uses WSLg
- How to install and run a much more advanced application that uses WSLg
Note: As of November 2022, WSL is now available as a Windows Store app for both Windows 10 and Windows 11. This means previous tutorials related to installing WSL as a Windows feature are no longer required.
What you will need:
- A Windows 10 or Windows 11 physical or virtual machine with all the updates installed
2. Install WSL
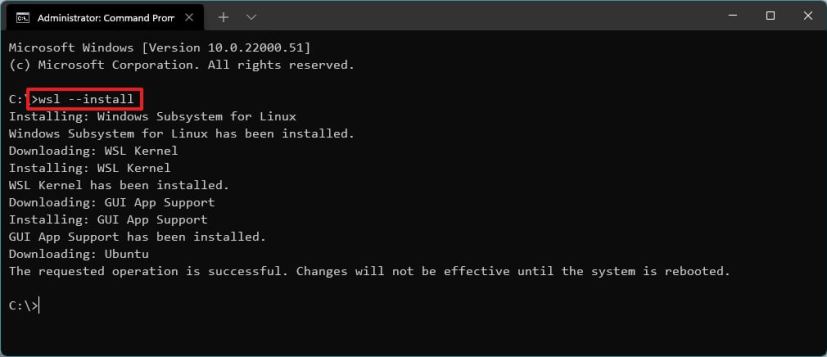
WSL can be installed from the command line. Open a powershell prompt as an Administrator (we recommend using Windows Terminal) and run:
wsl --install
This command will enable the features necessary to run WSL and also install the default Ubuntu distribution of Linux available in the Microsoft Store. It is recommended to reboot your machine after this initial installation to complete the setup.
You can also install WSL from the Microsoft Store.
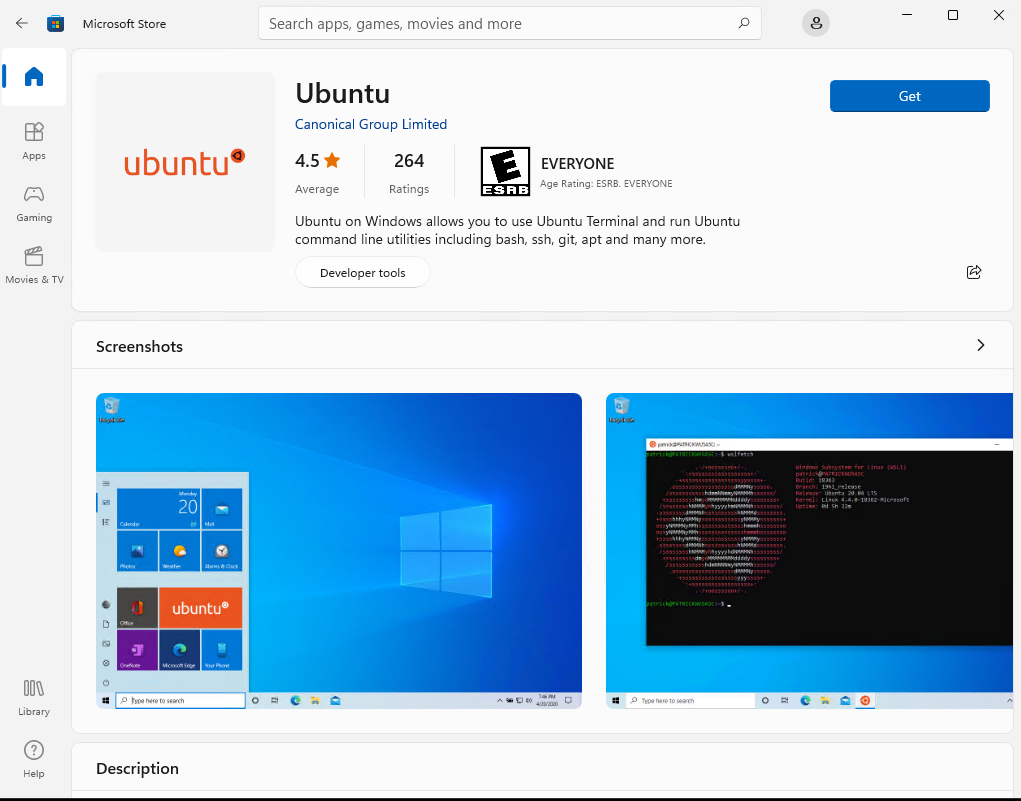
Installation of WSL from the Microsoft Store
Duration: 3:00
The WSL app is availble to install directly from the Microsoft Store like other Windows applications.
To install the WSL application from the Microsoft Store, open it and search for Windows subsystem.
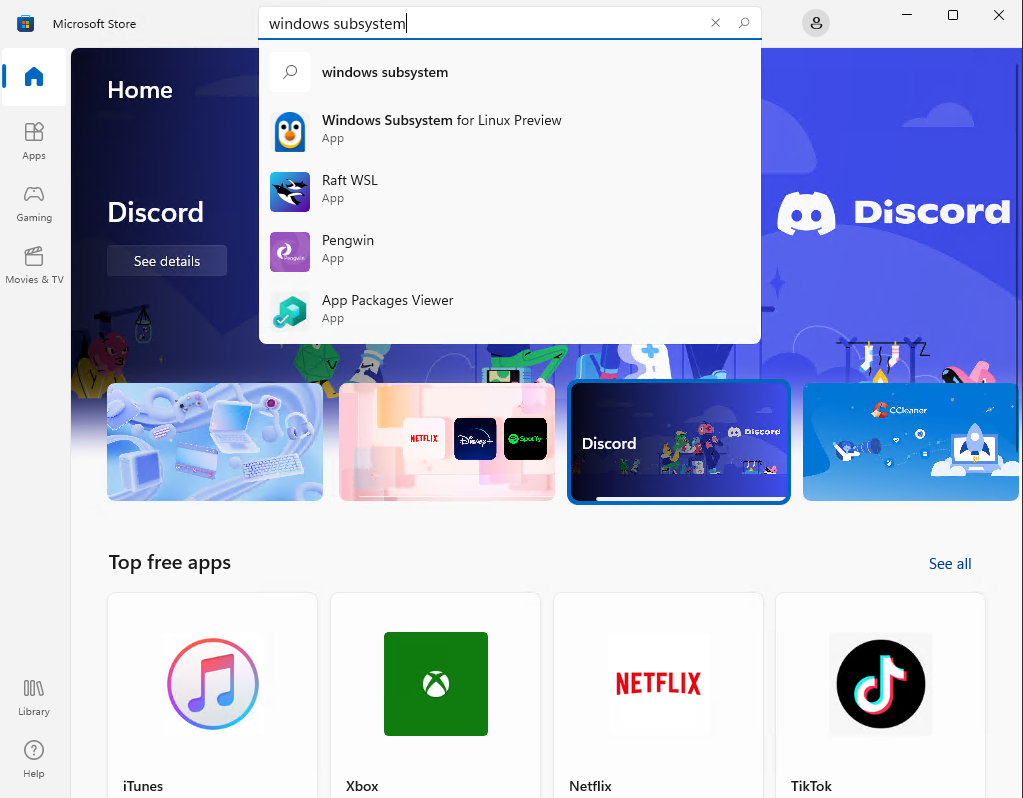
Click on the item Windows Subsystem for Linux to open the corresponding application page.
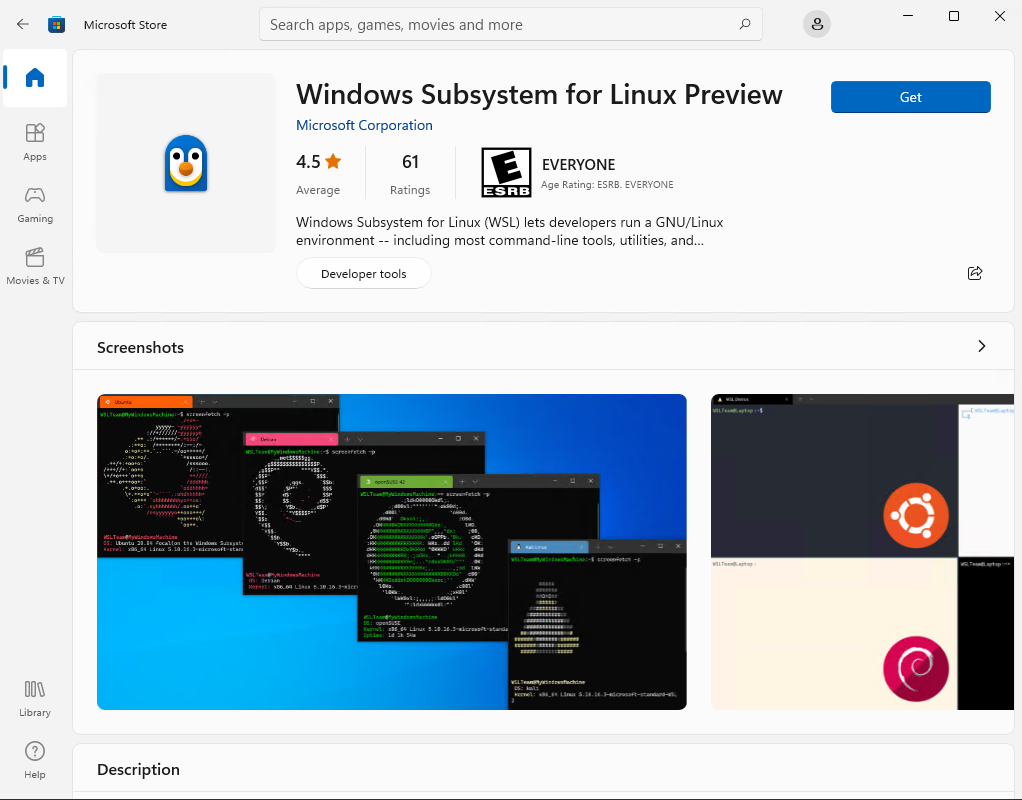
Click on Get to download and install the application.
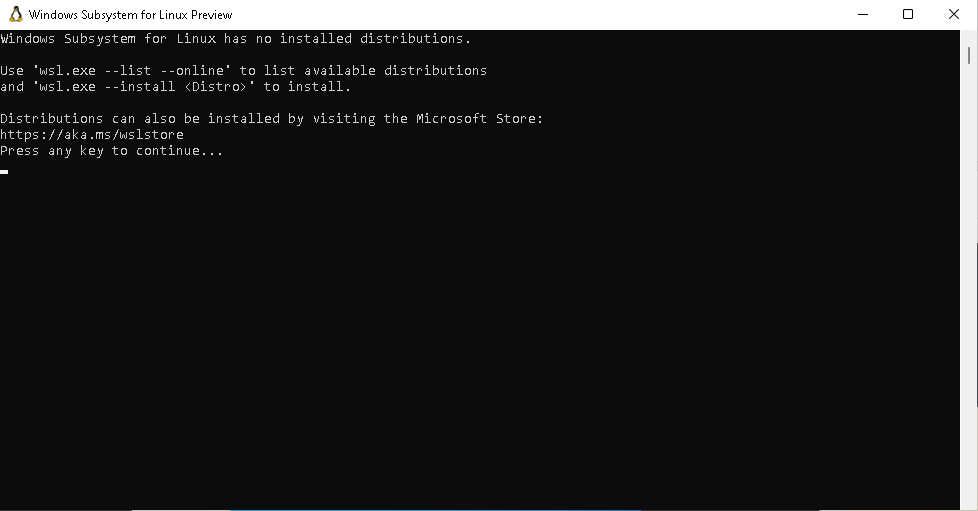
Upon installation, you can click on Open, but it will not do much since there is no Linux distribution installed.
However, if you really want to open the WSL application without installing a distribution, you’ll see a nice and short help message that you must follow in order to make something useful with WSL:
You can now proceed with the installation of Ubuntu.
3. Download Ubuntu
WSL supports a variety of Linux distributions including the latest Ubuntu release, Ubuntu 20.04 LTS and Ubuntu 18.04 LTS. You can find them by opening the Microsoft Store app and searching for Ubuntu.
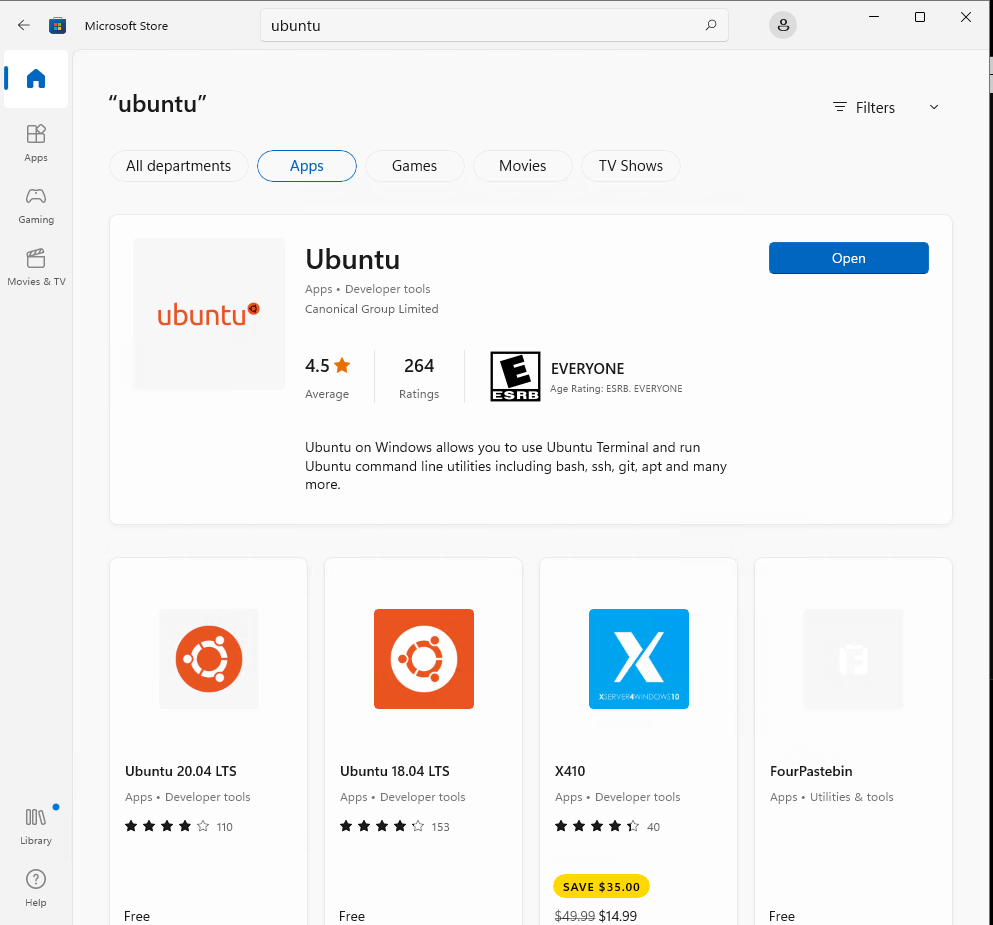
Choose the distribution you prefer and then select Get.
Which version should I choose?
There are three types of Ubuntu releases published to the Microsoft Store:
- Ubuntu with a version number e.g. Ubuntu 20.04.x. This will always be 20.04 and upgrades won’t be proposed.
- Ubuntu without a version number. This is the latest LTS version of Ubuntu after the first point release. At the time of writing, it is Ubuntu 22.04. It will remain Ubuntu 22.04 until the first point release of the next LTS release of Ubuntu, for example 24.04.1 in 2024.
- Ubuntu Preview is a daily build of the latest development version of Ubuntu. You should install it if you want to live on the edge but not for production workload as it doesn’t receive the same amount of QA as stable releases and may break at any time.
Ubuntu will then install on your machine.
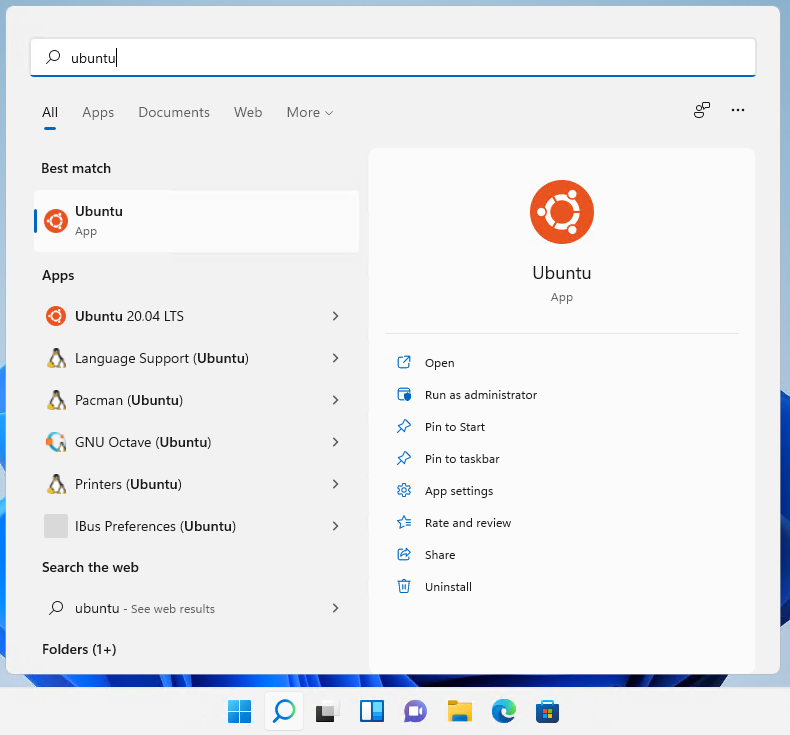
Once installed, you can either launch the application directly from the store or search for Ubuntu in your Windows search bar.
Install Ubuntu from the command line
It is possible to install the same Ubuntu applications available on the Windows Store directly from the command line.
In a Powershell terminal you can run:
wsl --list --online to see all available distros.

You can install a distro using the NAME by running:
wsl --install -d Ubuntu-20.04

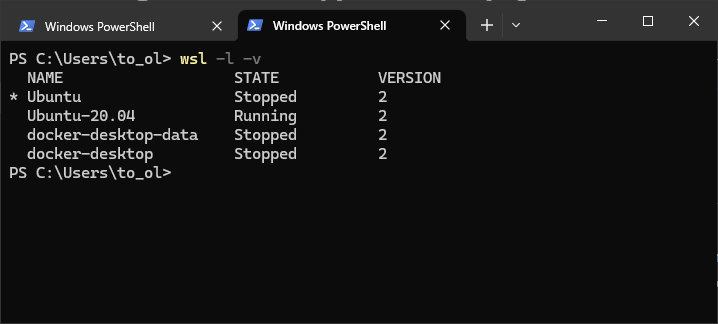
Use wsl -l -v to see all your currently installed distros and which version of WSL they are using:
4. Configure Ubuntu
Congratulations, you now have an Ubuntu terminal running on your Windows machine!
Once it has finished its initial setup, you will need to create a username and password (this does not need to match your Windows user credentials).

Finally, it’s always good practice to install the latest updates with the following commands, entering your password when prompted.
sudo apt update
Then
sudo apt full-upgrade
Press Y when prompted.
(Optional) Enable systemd
In September 2022, Microsoft announced support for systemd in WSL. This long-awaited upgrade to WSL unlocks a huge number of quality of life features for managing processes and services. This includes snapd support, which enables users to take advantage of all of the tools and apps available on snapcraft.io.
To enable systemd you will need make a small modification to /etc/wsl.conf in your Ubuntu distribution.
Run `sudo nano /etc/wsl.conf’ to open the file and insert the following lines:
[boot]
systemd=true
Then restart your distro by running wsl --shutdown in powershell and relaunching.
5. Install and use a GUI package
WSL2 comes with WSLg enabled by default. WSLg allows you to run graphical linux applications.
To check that you have the latest package lists, type:
sudo apt update
Then, start with some basic X11 applications:
sudo apt install x11-apps
To run the xeyes, a “follow the mouse” application, type:
xeyes &
The & at the end of the line will execute the command asynchronously. In other words, the shell will run the command in the background and return to the command prompt immediately.
The first launch of a GUI application takes a few seconds while WSL is initializing the graphics stack. Next executions of GUI applications are much faster.
Leave xeyes opened and run the calculator xcalc with:
xcalc
When you move the cursor over the calculator, xeyes follows the cursor. This shows that several GUI applications can interact together.
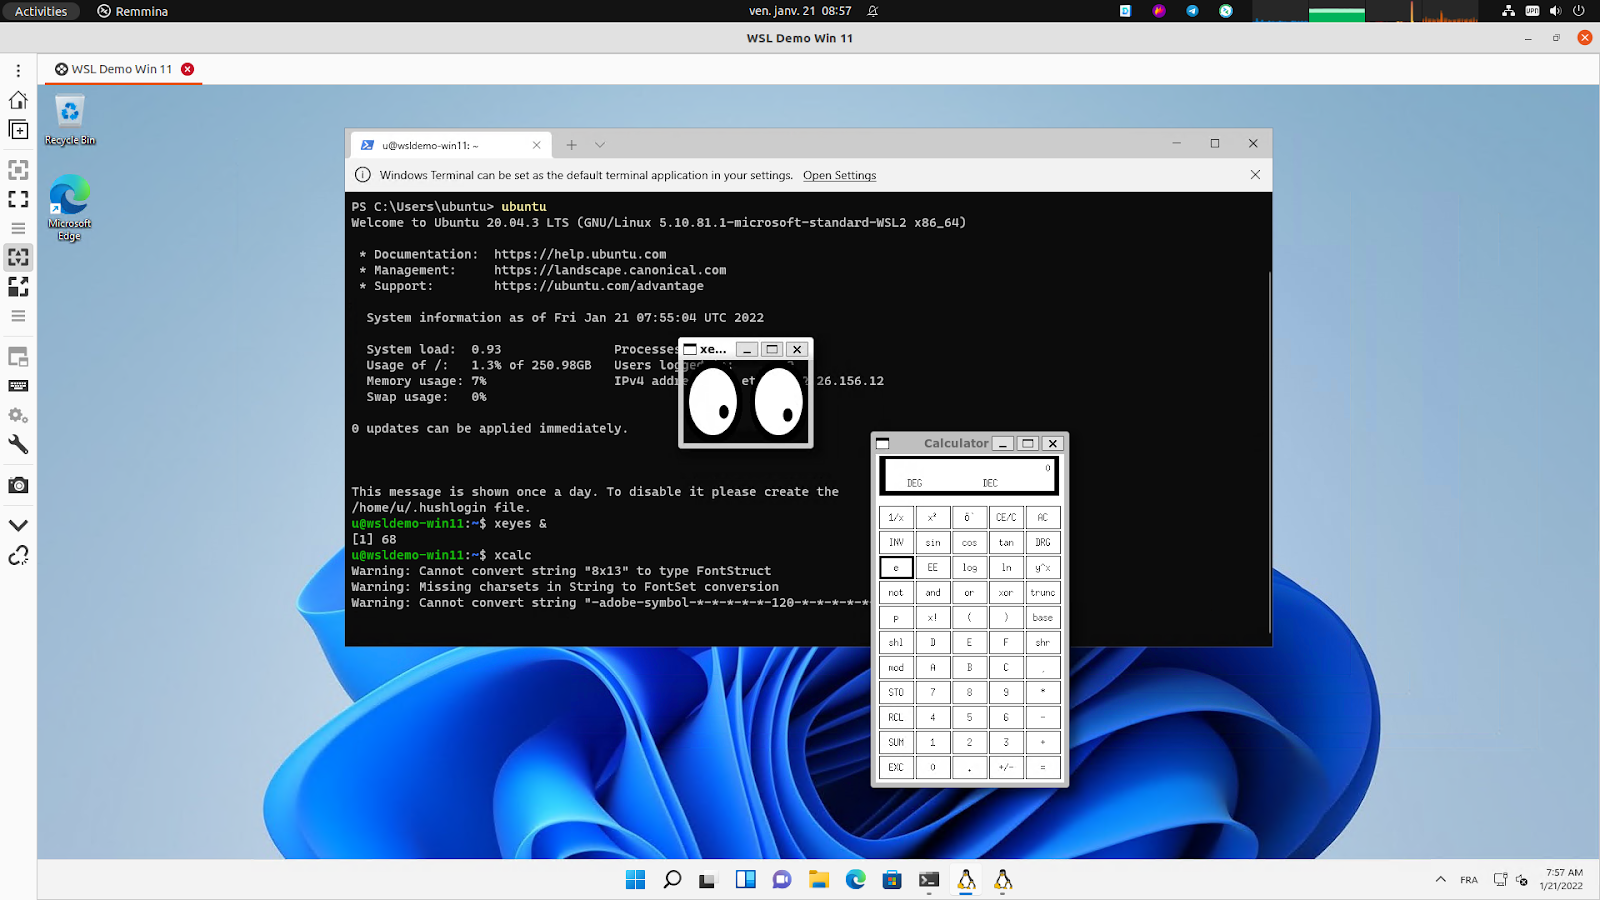
Note that applications running under WSLg display a little penguin at the bottom right corner of their icons in the Windows taskbar. That’s one way you can distinguish applications running on Windows or Ubuntu (besides the window decoration and styling).
![]()
Close xeyes and xcalc by pressing the cross icon on the top right corner of each X application window.
Xcalc and xeyes are very basic X Windows applications but there are plenty of choices in the Linux ecosystem corresponding to your needs and available out of the box on Ubuntu.
In the following example, we will use GNU Octave to perform numerical computation.
We will use it to calculate and draw a beautiful Julia fractal. The goal here is to use Octave to demonstrate how WSLg works, not to go through the theory of fractals.
First thing is to install the software like we did for x11-apps, from the terminal prompt run:
sudo apt install octave
Then start the application:
octave --gui &
Do not forget the ampersand & at the end of the line, so the application is started in the background and we can continue using the same terminal window.
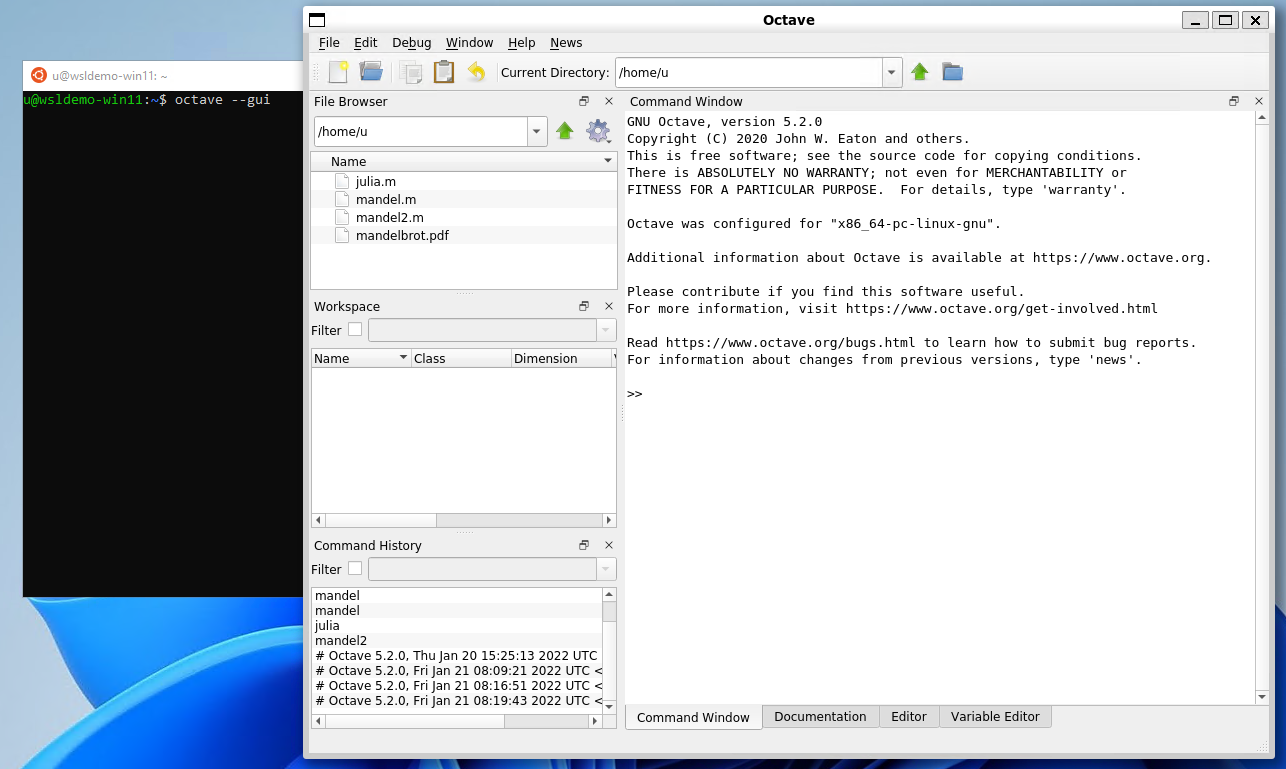
In Octave, click on the New script icon to open a new editor window and copy/paste the following code:
#{

Inspired by the work of Bruno Girin ([Geek Thoughts: Fractals with Octave: Classic Mandelbrot and Julia](http://brunogirin.blogspot.com/2008/12/fractals-with-octave-classic-mandelbrot.html))

Calculate a Julia set

zmin: Minimum value of c

zmax: Maximum value of c

hpx: Number of horizontal pixels

niter: Number of iterations

c: A complex number

#}

function M = julia(zmin, zmax, hpx, niter, c)

%% Number of vertical pixels

vpx=round(hpx*abs(imag(zmax-zmin)/real(zmax-zmin)));

%% Prepare the complex plane

[zRe,zIm]=meshgrid(linspace(real(zmin),real(zmax),hpx),

linspace(imag(zmin),imag(zmax),vpx));

z=zRe+i*zIm;

M=zeros(vpx,hpx);

%% Generate Julia

for s=1:niter

mask=abs(z)<2;

M(mask)=M(mask)+1;

z(mask)=z(mask).^2+c;

end

M(mask)=0;

end
This code is the function that will calculate the Julia set.
Save it to a file named julia.m. Since it is a function definition, the name of the file must match the name of the function.
Open a second editor window with the New Script button and copy and paste the following code:
Jc1=julia(-1.6+1.2i, 1.6-1.2i, 640, 128, -0.75+0.2i);

imagesc(Jc1)

axis off

colormap('default');
This code calls the function defined in julia.m. You can later change the parameters if you want to explore the Julia fractal.
Save it to a file named juliatest.m.
And finally, press the button Save File and Run.

After a few seconds, depending on your hardware and the parameters, a Julia fractal is displayed.

Like Octave, this window is displayed using WSLg completely transparently to the user.
Enjoy!
6. Enjoy Ubuntu on WSL!
That’s it! In this tutorial, we’ve shown you how to install WSL and Ubuntu on Windows 11, set up your profile, install a few packages, and run a graphical application.
We hope you enjoy working with Ubuntu inside WSL. Don’t forget to check out our blog for the latest news on all things Ubuntu.
Further Reading
- Enabling GPU acceleration on Ubuntu on WSL2 with the NVIDIA CUDA Platform
- Setting up WSL for Data Science
- Working with Visual Studio Code on Ubuntu on WSL2
- Microsoft WSL Documentation
- Whitepaper: Ubuntu WSL for Data Scientists
- WSL on Ubuntu Wiki
- Ask Ubuntu
Was this tutorial useful?
Thank you for your feedback.
- To install WSL on Windows 11, open PowerShell or Command Prompt (admin), run the “wsl –install” command, and restart the computer.
- The command will install WSL alongside the Ubuntu distribution.
- Or, to install WSL with a specific distro, run the “wsl –install -d DISTRO-NAME” command.
- Or, to install WSL from Microsoft Store, enable the “Virtual Machine Platform” feature and then download the WSL app from the Store.
On Windows 11, Microsoft simplified the installation process of the Windows Subsystem for Linux 2 (WSL) to only one command to download and install all the required components, which includes the virtual machine platform and Linux GUI apps.
In addition, the command also installs the latest Ubuntu distro by default. If you prefer another distribution of Linux, you can append an option in the command to install any of the supported distros. Alongside the new quick and easy process, you will also find another way to make it easier to update the kernel with only one command.
This guide will teach you the easy steps to install the WSL platform on your computer. In addition, we will outline the steps to update the Linux kernel on Windows 11.
- Install WSL on Windows 11
- Install WSL with specific distro on Windows 11
- Update WSL kernel on Windows 11
- Install WSL from Microsoft Store
To install WSL (Windows Subsystem for Linux) on Windows 11 from Command Prompt, use these steps:
-
Open Start on Windows 11.
-
Search for Command Prompt (or PowerShell), right-click the top result and select the Run as administrator option.
-
Type the following command to install the WSL on Windows 11 and press Enter:
wsl --install

-
Restart your computer to finish the WSL installation on Windows 11.
-
Continue with the Linux distro setup as necessary.
After you complete the steps, the required Linux components will install automatically on Windows 11 and the latest version of the Ubuntu Linux distribution.
Install WSL with specific distro on Windows 11
If you prefer another flavor of Linux, the WSL2 command includes an option to view and select a different distro.
To install WSL with a specific distro on Windows 11, use these steps:
-
Open Start.
-
Search for Command Prompt, right-click the top result, and select the Run as administrator option.
-
Type the following command to view a list of available WSL distros you can install on Windows 11 and press Enter:
wsl --list --online
Quick note: You can install Ubuntu, Debian, Kali Linux, openSUSE, and SUSE Linux Enterprise Server.
-
Type the following command to install the WSL with a specific distro on Windows 11 and press Enter:
wsl --install -d DISTRO-NAME

In the command, remember to replace “DISTRO-NAME” with the name of the distro you want to install, such as Debian.
-
Restart your computer to finish the WSL installation on Windows 11.
-
Continue with the Linux distro setup as necessary.

Once you complete the steps, the Windows Subsystem for Linux 2 components will install along with the distro of Linux you specified.
Update WSL kernel on Windows 11
To update the WSL kernel from Command Prompt, use these steps:
-
Open Start.
-
Search for Command Prompt, right-click the top result, and select the Run as administrator option.
-
Type the following command to update the WSL kernel on Windows 11 and press Enter:
wsl --update


After you complete the steps, if an update is available, it will download and install on your computer.
Install WSL from Microsoft Store
You can also download all the components wrapped into an app from the Microsoft Store. The benefit of using this approach is that feature will run isolated from Windows 11, and updates will be available through the Microsoft Store without waiting for the next version of the operating system to install the newest version.
To install WSL from the Microsoft Store, use these steps:
1. Enable Virtual Machine Platform
-
Open Start.
-
Search for Turn Windows Features on or off and click the top result to open the app.
-
Check the Virtual Machine Platform option.

-
Click the OK button.
-
Click the Restart button.

After completing the steps, you can download the app from the Microsoft Store.
2. Install Windows Subsystem for Linux app
-
Open the Windows Subsystem for Linux store page.
-
Click the Get button.
-
Click the Open button.
-
Click the Get button again.


3. Install Linux distro
-
Open Microsoft Store app.
-
Search for the Linux distro. For example, Debian.
-
Click the Get button.

-
Click the Open button.

Once you complete the steps, WSL will install on Windows 11, including the support for Linux GUI apps and the Linux distribution.
1.2K
показов
1.9K
открытий
Сегодня покажу как поставить WSL (Windows Subsystem for Linux) на Windows 11
В этой статье вы узнаете:
- Что такое WSL и для чего она нужна
- Гайд по установке WSL
- Настройка компилятора
- Что делать, если WSL потребляет избыточное количество оперативной памяти
Что такое WSL и для чего она нужна
WSL (Windows Subsystem for Linux) — это среда выполнения Linux, предоставляемая операционной системой Windows. WSL позволяет запускать исполняемые файлы Linux напрямую в Windows без необходимости установки отдельной виртуальной машины или перезагрузки компьютера.
WSL обеспечивает совместимость с ядром Linux, что позволяет пользователям запускать большинство командной строки и приложений Linux непосредственно в Windows. Оно включает в себя поддержку большинства дистрибутивов Linux, таких как Ubuntu, Debian, Fedora и других, и предлагает доступ к огромному количеству программ и утилит, которые разработаны для Linux.
Теперь перейдём к гайду
Гайд по установке WSL
Открываем PowerShell или Terminal от имени администратора
Вводим следующую команду: wsl —install
Ждём
По завершении установки перезагружаем наш ПК.
Мне нравится Ubuntu, поэтому я не буду её менять, но если ты хочешь поменять дистрибутив, то вот ссылка на инструкцию.
Теперь после установки WSL необходимо создать учетную запись пользователя и пароль для установленного дистрибутива Linux (в моём случаи речь идёт про Ubuntu):
На случай, если что-то пошло не так на этапе создания учётной записи вот мини-туториал как это можно исправить.
Важный нюанс: Windows не выполняет автоматическую установку обновлений или обновление дистрибутивов Linux. Это задача, выполнение которой большинство пользователей Linux предпочитают контролировать самостоятельно. Поэтому обновим нашу подсистему с помощью этой команды: sudo apt update && sudo apt upgrade
Настройка компилятора
Я использую WSL, чтобы компилировать программы на языке С, поэтому покажу команды для установки компилятора.
По очереди:
sudo apt-get update
sudo apt-get install cmake gcc clang gdb build-essential
sudo apt-get install valgrind
Важный момент: Проверим, установился ли у нас компилятор, должен появится номер: gcc —version
Что делать, если WSL потребляет избыточное количество оперативной памяти
Бонусом, я покажу, как снизить потребление оперативной памяти нашей подсистемой:
Есть два пути
Путь первый:
Открываем командную строку от администратора и вставить команду
wsl —shutdown, эта команда завершит процесс VmmemWSL.
Чтобы легко открыть командную строку можно зажать кнопки Win + X > пункт PowerShell (Администратор) > команда start cmd > нажимаем Enter.
Путь второй:
Можно также ограничить ресурсы Vmmem путем создания файла %UserProfile%\.wslconfig, внутри которого прописать:
[wsl2]
memory=2GB # Ограничиваем память для WSL2 VM.processors=5 # Ограничиваем количество процессов для WSL2 VM.
Чтобы создать файл с названием .wslconfig — нужно открыть блокнот Win + R > notepad > вставить содержимое > Сохранить как > в Тип файла указать Все файлы, после указать название и сохранить.
Кстати говоря, в этом файлике можете попробовать поставить значение memory равное 1, может ещё меньше будет))
На этом у меня всё, надеюсь моя статья помогла тебе решить твою проблему))
Благодарю за прочтение!
Table of Contents
- Installing WSL2 on Windows 10/11 (The easy way)
- Installing WSL2 on Windows 10/11 (The hard way)
- Step 1: Enable Windows Subsystem for Linux (WSL)
- Step 2: Enable Windows Virtual Machine Platform
- Step 3: Update the Linux kernel to the latest version
- Step 4: Set WSL2 as the default version
- Step 6: Install your preferred Linux distribution
The process of installing WSL2 can differ slightly depending upon the version of Windows you are using, so choose the easy way below if you’re running the latest updates of Windows 10/11, otherwise, follow these instructions below to install WSL2 manually.
To install WSL2, you must be running the following versions of Windows 10/11
- For x64 systems: Version 1903 or higher, with Build 18362 or higher
- For ARM64 systems: Version 2004 or higher, with Build 19041 or higher.
- Builds lower than 18362 do not support WSL 2. You will need to update your version of windows.
Installing WSL2 on Windows 10/11 (The easy way)
If you’re running Windows 10 version 2004 or higher (Build 19041 and above) or windows 11, installation is as simple as running the below command.
This will take care of all the steps required, i.e.
- Enable Windows Virtualisation Layer and WSL2
- Update the Linux kernel to the latest version
- Install the default Linux distribution, i.e. latest Ubuntu (Currently Ubuntu 20.04)
Then type wsl in your terminal and press enter to login to WSL2.
Installing WSL2 on Windows 10/11 (The hard way)
If you’re running Windows 10 version 1903 or lower (Build 18362 and below), you will need to install WSL2 manually.
Step 1: Enable Windows Subsystem for Linux (WSL)
Open the Windows Terminal or Powershell, and type the following command to enable WSL:
dism.exe /online /enable-feature /featurename:Microsoft-Windows-Subsystem-Linux /all /norestart
Step 2: Enable Windows Virtual Machine Platform
In the Windows Terminal or Powershell, type the following command to enable Windows Virtual Machine Platform:
dism.exe /online /enable-feature /featurename:VirtualMachinePlatform /all /norestart
Step 3: Update the Linux kernel to the latest version
This requires you to download the WSL2 Linux kernel update MSI package, choose the appropriate version from below, and install it. 1. WSL2 Linux kernel update MSI package for x64 systems 2. WSL2 Linux kernel update MSI package for ARM64 systems
Step 4: Set WSL2 as the default version
Installing WSL2 in Step #3 doesn’t change the default version of WSL from 1 to 2. To change the default version of WSL, you must run the following command in terminal or powershell:
wsl --set-default-version 2
Step 6: Install your preferred Linux distribution
You can choose from 10+ distributions available on Microsoft Store. To install, open Microsoft Store, and search for the Linux distribution you want to install then click on the Get button.
Need Help? Open a discussion thread on GitHub.
Related Posts
WSL 2 or Windows Subsystem for Linux 2 is an iterative update to Windows Subsystem for Linux 1. Being so much better than WSL 1, it is obvious that one must upgrade to WSL 2. That is what we will be checking out in this guide.

The following are the requirements that your computer must fulfill for Windows Subsystem for Linux 2 to run properly:
- Windows 10 Build 18917 or newer
- Hyper-V Virtualization
To install Windows Subsystem for Linux 2 on Windows 11/10, follow these steps:
- Enable the Optional feature.
- Install a distro.
- Enable Virtual Machine Platform optional feature.
- Configure the installed distro.
1] Enable the Optional feature
In order to enable the WSL Optional feature, open Windows PowerShell with Administrator privileges.

Execute the following command:
Enable-WindowsOptionalFeature -Online -FeatureName Microsoft-Windows-Subsystem-Linux
If will ask for a confirmation if you want to reboot your computer, hit Y to do it straight away or to reboot it manually, hit N.
2] Install a distro
You can try to download and install a suitable Linux distro for your computer from the Microsoft Store.
3] Enable Virtual Machine Platform optional feature
Open Windows PowerShell as an Administrator and execute the following command:
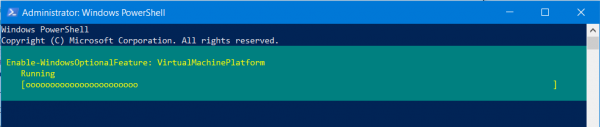
Enable-WindowsOptionalFeature -Online -FeatureName VirtualMachinePlatform
If it asks for a confirmation, to reboot your computer, hit Y to do it straight away or to do it later, hit N.
4] Configure the installed distro
Finally, we have to configure the installed distro to WSL 2.
Open Windows PowerShell and execute this command to list all the available WSL distros on your computer:
wsl -l -v
Set the desired distro to WSL 2. execute the following command:
wsl --set-version DistroName 2
Finally, set the selected distro as default by executing the following command:
wsl --set-default-version 2
You would be experiencing the new seamless and faster experience with Windows Subsystem for Linux.
This new update to the command line utility brings in the new architecture. This will drastically improve the file system performance and the full system call compatibility. This new update is based on virtualization (which is based on Hyper – V) which works on a real Linux kernel.
How do I get WSL 2 on Windows 11/10?
To get WSL or Windows Subsystem for Linux 2 on Windows 11/10 computer, you must have Windows 10 Build 18917 or newer version, and Hyper-V virtualization enabled. Following that, you can follow the aforementioned steps one after one. You need to enable the Optional feature first. Then, you need to install a distribution, allow the Virtual Machine Platform optional feature, and configure the Linux distribution.
How do I get Linux subsystem on Windows 11/10?
To get Linux Subsystem on Windows 11/10, you need to use Windows PowerShell. Enter this command to enable the optional feature: Enable-WindowsOptionalFeature -Online -FeatureName Microsoft-Windows-Subsystem-Linux. Then, download a Linux distribution from the Microsoft Store and turn on the Virtual Machine Platform optional feature using Windows PowerShell by entering this command: Enable-WindowsOptionalFeature -Online -FeatureName VirtualMachinePlatform. Following that, you can configure the installation as you like.
You should be all set now!
TIP: You can install Windows Subsystem for Linux with a single command on Windows 11.