1. Overview
Windows Subsystem for Linux (WSL) allows you to install a complete Ubuntu terminal environment in minutes on your Windows machine, allowing you to develop cross-platform applications without leaving Windows.
In this tutorial, we’ll show you how to get up and running with Ubuntu on WSL. These instructions will work on both Windows 10 or Windows 11.
Whilst WSL is a powerful tool for all users, some features, such as the ability to run graphical Linux applications, are only available on Windows 11. Please check out our Windows 11 tutorial for more information.
2. Install WSL
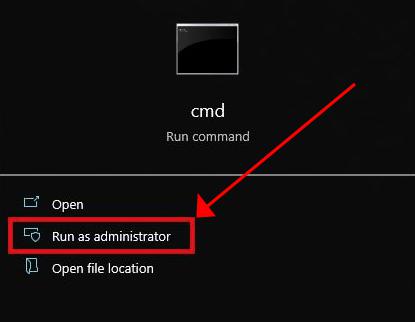
Installing WSL is now easier than ever. Search for Windows PowerShell in your Windows search bar, then select Run as administrator.

At the command prompt type:
wsl --install
And wait for the process to complete.
For WSL to be properly activated, you will now need to restart your computer.
3. Download Ubuntu
WSL supports a variety of Linux distributions, including the latest Ubuntu release, Ubuntu 20.04 LTS and Ubuntu 18.04 LTS. You can find them by opening the Microsoft store app and searching for Ubuntu.
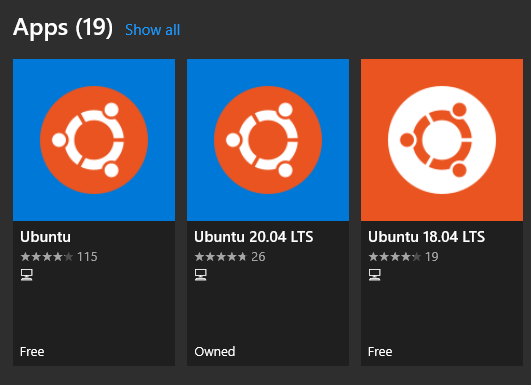
Choose the distribution you prefer and then click on Get as shown in the following screenshot:

Ubuntu will then install on your machine.
The one line install!
There is a single command that will install both WSL and Ubuntu at the same time.
When opening PowerShell for the first time, simply modify the initial instruction to:
wsl --install -d ubuntu
This will install both WSL and Ubuntu! Don’t forget to restart your machine before continuing.
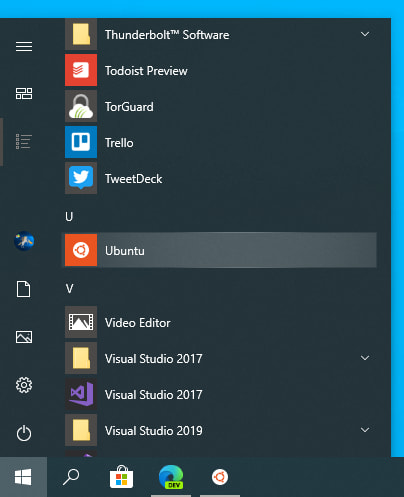
Once installed, you can either launch the application directly from the store or search for Ubuntu in your Windows search bar.
4. Configure Ubuntu
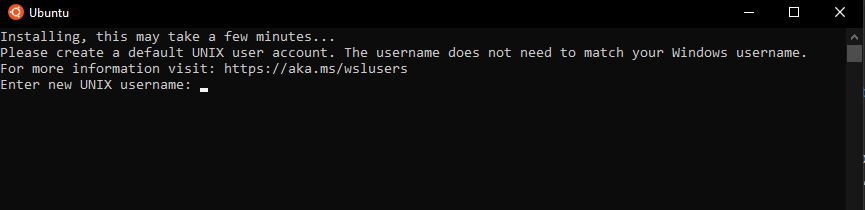
Congratulations, you now have an Ubuntu terminal running on your Windows machine!
If Ubuntu returns an error during this initial installation, then the most common issue is that virtualisation is disabled in your device’s BIOS menu. You will need to turn this on during your device’s boot sequence. The location of this option varies by manufacturer, so you will need to refer to their documentation to find it.
Once Ubuntu has finished its initial setup you will need to create a username and password (this does not need to match your Windows user credentials).
Finally, it’s always good practice to install the latest updates with the following commands, entering your password when prompted.
sudo apt update
Then
sudo apt upgrade
Press Y when prompted.
5. Install your first package
Installing packages on Ubuntu is as easy as using a single command. Below, you will see how to install bpython, a simple python interpreter for trying out ideas, featuring some nice usability features like expected parameters and autocompletion.
To check that you have the latest package lists, type:
sudo apt update
Then install bpython:
sudo apt install bpython
To run the application type:
bpython
And you’re ready to go!

6. Customising your Terminal with Windows Terminal Preview
Since you’re likely to be using your Ubuntu terminal a fair bit, it’s always nice to do some customisation. We recommend installing Windows Terminal Preview to get the most user-friendly setup. You can find it in the Microsoft Store.

Windows Terminal allows you to open multiple Terminal instances as tabs, so you can have PowerShell running alongside Ubuntu. It also includes a number of customisation options. In the below screenshot, we’ve changed the tab name and colour, and configured the terminal appearance to use the Tango Dark theme and the Ubuntu font!
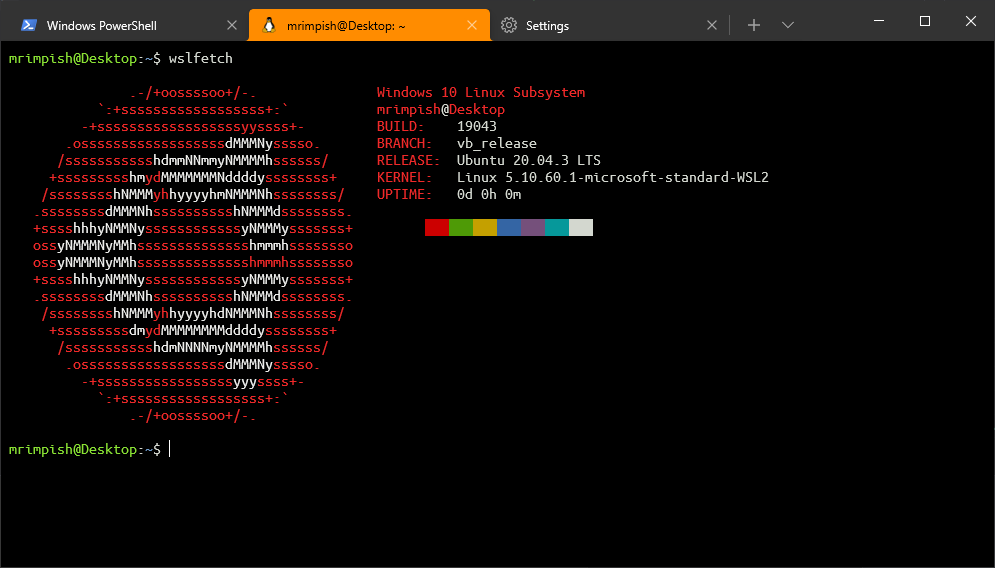
These customisations can be applied universally using the Appearance menu in Settings or to individual profiles which each have their own Appearance menu. Try it yourself to find something you feel comfortable with!

7. Enjoy Ubuntu on WSL!
That’s it! In this tutorial, you’ve seen how to install WSL and Ubuntu, set up your profile, and install your first package. You also got some tips on how to customise your experience.
We hope you enjoy working with Ubuntu inside WSL. Don’t forget to check out our blog for the latest news on all things Ubuntu.
Further Reading
- Install Ubuntu on WSL2 on Windows 11 with GUI Support
- Working with Visual Studio Code on Ubuntu on WSL2
- Enabling GPU acceleration on Ubuntu on WSL2 with the NVIDIA CUDA Platform
- Setting up WSL for Data Science
- WSL on Ubuntu Wiki
- Ask Ubuntu
Was this tutorial useful?
Thank you for your feedback.
Updated: 12/05/2021 by

WSL, the Windows Subsystem for Linux, is a free, optional feature of Windows 10 that allows Linux programs to run on Windows. It provides you with a Windows version of the bash shell and a compatibility layer that permits many Linux programs to run natively on your Windows machine.
System requirements
Before installing WSL, make sure your computer meets the minimum system requirements to run WSL:
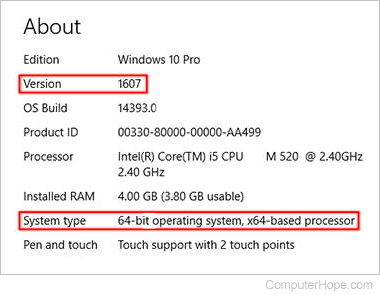
- You must be running Windows 10 version 1607 (the Anniversary update) or above.
- WSL only runs on 64-bit versions of Windows 10. 32-bit versions are not supported.
To check that the computer meet the requirements, follow these steps:
- Open your Settings. You can do this by clicking the gear icon on the Start menu, or by opening the Power User Tasks menu and choosing Settings.
- In the Settings window, choose System.
- On the left side of the System window, choose About.
- On the right side of the window, system information is displayed. Make sure the Version is at least 1607, and the System type is a 64-bit operating system.
If the Version number is less than 1607, you need to perform a Windows Update before installing WSL.
If the System type is not a 64-bit operating system, you cannot run WSL.
Installing WSL
To install WSL, follow these steps.
- Click Start, type cmd, right-click on Command Prompt and choose the option to run as Administrator.
- Once at the command prompt type wsl —install and press Enter.
or
- Open a new PowerShell window as Administrator. To do this, open your Start menu, scroll down to W, and expand the Windows PowerShell folder. Right-click Windows PowerShell, choose More, then Run as administrator.
- At the PowerShell prompt, run the following command:
Enable-WindowsOptionalFeature -Online -FeatureName Microsoft-Windows-Subsystem-Linux
- Some necessary software downloads, and the WSL subsystem will be enabled after you reboot. Linux itself is not installed yet, however (until you choose a Linux distribution, in step 5.)
- When the download is complete, PowerShell ask if you’re ready to reboot the computer. Before rebooting, make sure any documents are saved, and any open applications are closed. Type Y, or if you’re going to reboot later, type N instead.
- After your computer reboots, log in to Windows and open a new Command prompt (or PowerShell). At the prompt, run:
bash
- Bash will inform you that no distribution is installed, and give you a URL for downloading one from the Windows Store:
Windows Subsystem for Linux has no installed distributions.
Distributions can be installed by visiting the Windows Store:
https://aka.ms/wslstore
Press any key to continue...
- In a web browser, navigate to the URL https://aka.ms/wslstore to download a WSL-integrated Linux distribution. As of this writing, choices are Ubuntu, OpenSUSE, SUSE Enterprise Server, Debian, and Kali. If you’re unsure what to pick, we recommend Ubuntu.

- Click the distribution of your choice, then click Get.

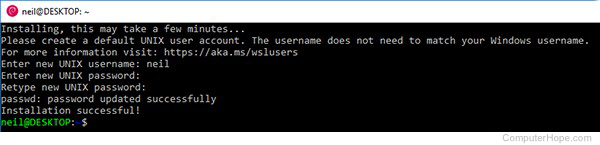
- When the installation is complete, click Launch. You will see this message:
Installing, this may take a few minutes...
It may silently wait for you to press a key after it’s done, so you might want to press Backspace every 15 seconds or so, to check if it’s finished.
Note
You may receive this error:
Installing, this may take a few minutes...
Installation failed!
Error: 0x8000000d
Press any key to continue...
This error is a known bug that occurs in some versions of Windows 10. If you get this error, you can fix it by repeating steps 1 and 2. Then, continue to step 10.
- Ubuntu is now installed, and WSL is enabled. You can open the WSL Ubuntu command prompt by clicking the Launch button in the Windows Store or in the Start menu by choosing Ubuntu. You can also open a command prompt (or PowerShell) and run bash.
Getting started with your Linux subsystem
The first time you run your WSL distribution, you will be asked to create a user account. It can be different than your Windows username but needs to be in lowercase. You will be asked to set a password.
Congratulations! Linux is running. You’re now at the bash prompt, and you can run Linux commands and programs.
Update your Linux software
Now is a great time to perform a software update. Follow the instructions below to update your software with the apt command.
Like Ubuntu, WSL uses the APT (advanced packaging tool) to manage software packages. The apt command lets you search for, download, and install software, all from the command line. It automatically manages your software dependencies for you. That way, if one program depends on a certain version of another program, both will be installed, and kept up-to-date.
Any apt commands that make changes to your system must run as root. If you’re logged in as your regular user (as you usually should be), run a program as root by prefixing it with sudo («superuser do»). It requires you enter your password, and your program is run as root.
sudo apt update
[sudo] password for hope:
Updates download, but nothing is installed or upgraded yet. To upgrade all available packages, run:
sudo apt upgrade
Tip
Sudo will not ask you for your password this time, unless more than five minutes have elapsed since the last sudo command.
The size of the upgrades is calculated, and you will be prompted to continue. Type y and press Enter. The upgrades download and install, which might take a while, depending on the speed of your computer and Internet connection.
When the upgrade is complete, you will be returned to the bash prompt. Your Linux system is now up-to-date.
At any time, you can exit bash using the exit command.
exit
The Windows and WSL file systems
WSL has its own file system. This Linux file system is installed to your Windows file system at the following location:
%LOCALAPPDATA%\Lxss\
For instance, if your Windows username is Owner and Windows is installed on your C: drive, your WSL file system is located at:
C:\Users\Owner\AppData\Local\Lxss\
It’s good to know that this is where it’s located, but you shouldn’t move or make any changes to the files it contains.
When you’re using WSL, you might be wondering how you can access your Windows files. Your C: drive is located at:
/mnt/c/
The name mnt stands for «mount,» which is where your Windows drives are mounted within WSL. For instance, your D: drive would be /mnt/d/, etc.
Creating links to Windows folders
For convenience, it’s a good idea to create symbolic links to your Windows home folder. A symbolic link is similar to a shortcut in Windows: it’s a file that points to another file or directory. When you refer to the symbolic link, the system will dereference the link, and behave as if you had specified the actual «target» file or directory.
Using symbolic links can save you a lot of typing, and remembering of obscure directory names.
To create a symbolic link in Linux, use the ln command. The syntax for creating a symbolic link is ln -s targetname linkname.
For instance, to create a symbolic link in your WSL home folder called winhome that refers to C:\Users\Owner\, follow these steps.
First, change the working directory to your home directory, which is located at /home/username/. You can do this with the cd command:
cd /home/hope/
In bash, «~» (a tilde) is an alias for your home directory, so you can also type:
cd ~
Next, use ln -s to create the symbolic link. For instance, if your Windows home folder is C:\Users\Owner\, the command would be:
ln -s /mnt/c/Users/Owner/ winhome
Now there’s a symbolic link called winhome in your WSL home directory, which acts like a shortcut to your Windows home directory. So, you can change to your Windows home directory using:
cd ~/winhome/
Or, to change to your Windows desktop folder:
cd ~/winhome/Desktop/
More information about Linux commands
Enjoy your new Linux subsystem! Make sure to visit our overview of Linux commands for more information about tools and programs you can use.
Posted:
15 May, 23
Updated:
15 May, 23
by Susith Nonis
15 Min

List of content you will read in this article:
Windows Subsystem for Linux (WSL) is a popular feature in Windows 10/11 that allows users to run Linux commands and applications directly on their Windows machine. With the latest version, WSL2, users can also access the Linux file system natively and enjoy a more performant experience.
Installing WSL/WSL2 on Windows 10/11 is simple, but a few prerequisites and customizations can enhance the experience. In this step-by-step guide, we will walk you through installing WSL/WSL2 on Windows 10/11 and show you how to customize and troubleshoot it to make the most of this powerful feature.
What Exactly Is WSL and How Does It Work?
Windows Subsystem for Linux (WSL) is a feature in Windows 10/11 that allows users to run Linux applications directly on their Windows machines. It is essentially a compatibility layer between the Windows operating system and Linux, enabling users to access the Linux command-line interface and its tools. The technology behind WSL is essentially a virtualization layer that runs a Linux kernel inside a lightweight virtual machine, providing an isolated environment for Linux applications to run on Windows.
WSL translates Linux system calls to their corresponding Windows system calls, allowing Linux binaries to run seamlessly on Windows. The first version of WSL used a translation layer called lxcore.sys, which was a user-mode driver that could map Linux system calls to Windows system calls. The latest version, WSL2, uses a full Linux kernel in a lightweight virtual machine, which provides even better compatibility and performance for Linux applications.
WSL2 is designed to provide a more authentic Linux experience on Windows by supporting features like full system call compatibility, support for Docker, and access to the Linux file system natively. By running a Linux kernel inside a virtual machine, WSL2 provides an isolated and secure environment for running Linux applications on Windows. This allows developers and system administrators to work seamlessly between Windows and Linux environments without switching between the operating systems.
What Are the Uses and Benefits of WSL?
- Running Linux applications on Windows: One of the most obvious uses of WSL is the ability to run Linux applications natively on Windows. This can be especially useful for developers who must test their applications across multiple platforms.
- Developing cross-platform applications: With WSL, developers can easily switch between Windows and Linux environments and develop cross-platform applications without switching between the two operating systems. This can save time and increase productivity.
- Using Linux command-line tools on Windows: WSL provides access to the Linux command-line interface and its tools, which can benefit users who prefer Linux command-line tools over Windows command-line tools.
- Enhancing Windows with Linux tools: WSL allows users to enhance their Windows experience by using Linux tools like grep, sed, and awk, which are unavailable in Windows.
- Accessing the Linux file system from Windows: With WSL2, users can access the Linux file system natively from Windows, allowing them to work seamlessly between the two operating systems.
- Running Docker containers on Windows: WSL2 supports Docker, making it possible to run Docker containers on Windows and benefit from the advantages of both operating systems.
- Learning and experimenting with Linux: WSL provides a convenient way for Windows users to learn and experiment with Linux without installing a separate operating system.
- Faster performance and reduced resource consumption: WSL2 provides faster performance and reduced resource consumption compared to the first version of WSL, making it a more attractive option for users who need to run Linux applications on Windows.
- Easy installation and setup: WSL is easy to install and set up and can be done directly from the Microsoft Store.
- Free and open-source: WSL is a free and open-source technology, making it accessible to everyone and providing opportunities for customization and development.
Prerequisites of Installing WSL/WSL2
- Windows 10/11: WSL/WSL2 is a feature available only on Windows 10 and 11, so it is essential to have a compatible version of Windows installed on your machine.
- System requirements: The system requirements for WSL and WSL2 are relatively low, but it is recommended to have at least 4 GB of RAM and 64-bit Windows 10/11.
- Enable Virtualization: WSL2 requires virtualization to be enabled in your machine’s BIOS/UEFI settings. Make sure to check if virtualization is enabled before installing WSL2.
- Update Windows: It is crucial to keep Windows up to date to ensure the latest security patches and updates are installed. Check for updates and install any available updates before installing WSL/WSL2.
- Disable Developer Mode: If Developer Mode is enabled on your machine, you will need to disable it before installing WSL/WSL2. To do so, go to Settings > Update & Security > For developers and select the option for «Sideload apps.
- Install Windows Terminal: Although not strictly necessary, Windows Terminal is a powerful terminal emulator that can enhance the WSL/WSL2 experience. Installing it beforehand can help you get started with WSL/WSL2 faster.
- Choose a Linux distribution: WSL/WSL2 requires a Linux distribution to be installed before it can be used. Microsoft provides several distributions in the Microsoft Store, including Ubuntu, Debian, and Fedora. Choose the distribution that best suits your needs and install it before proceeding with WSL/WSL2 installation.
- Install a Windows Subsystem for Linux update: Before installing WSL2, ensure you have installed the latest Windows Subsystem for Linux update. You can do this by checking for updates in the Microsoft Store or using the Windows Update feature.
Installing WSL/WSL2
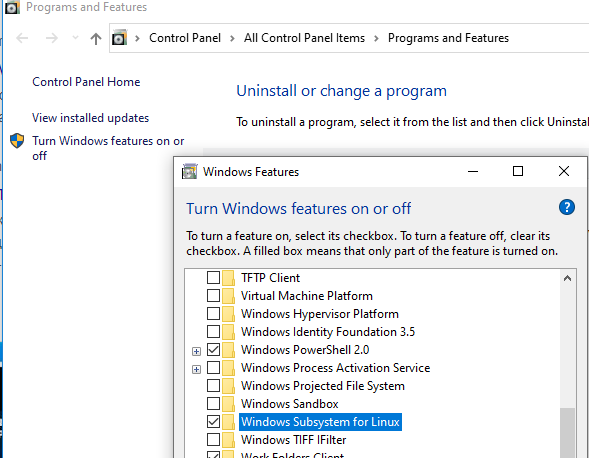
- Enable Windows Subsystem for Linux: Before installing WSL/WSL2, you must enable the Windows Subsystem for Linux feature on your Windows machine. This can be done by going to Control Panel > Programs > Turn Windows features on or off and selecting the checkbox for Windows Subsystem for Linux.
- Install a Linux distribution: Choose the one you want to use and download it from the Microsoft Store. Once downloaded, launch the distribution and follow the setup wizard to install it.
- Install WSL2: To install WSL2, download and install the latest WSL2 kernel update package from the Microsoft website. After downloading the package, double-click it to run the installer and follow the setup wizard to install it.
- Set WSL2 as the default version: Once WSL2 is installed, you must set it as the default version. Open PowerShell or Command Prompt and enter the command: wsl —set-default-version 2
- Launch the Linux distribution: After installation, launch the Linux distribution from the Start menu or by typing its name in the Windows search bar. The first time you launch the distribution, setting up the environment may take a few moments.
- Customize the Linux environment: Once the Linux distribution is up and running, you can customize it by installing additional packages and configuring settings.
- Install additional tools: WSL/WSL2 provides access to a wide range of Linux tools and utilities, but you may need to install additional tools depending on your use case. You can install additional tools using the package manager for your Linux distribution.
- Access files and folders: By default, WSL/WSL2 can access only its file system, but you can access files and folders on your Windows machine using the /mnt directory. For example, to access the C: drive, use the command cd /mnt/c.
- Install and use Windows Terminal: Windows Terminal is a powerful terminal emulator that can enhance the WSL/WSL2 experience. You can download it from the Microsoft Store to manage multiple tabs and windows, customize settings, and more.
Customizing WSL/WSL2
- Changing the default Linux distribution: If you have installed multiple Linux distributions, you can change the default distribution using the command: wsl —set-default <distribution name>.
- Changing the default user: By default, the user for a Linux distribution in WSL/WSL2 is set to the username you use on your Windows machine. You can change the default user by editing the /etc/wsl.conf file and adding the line user=<username>.
- Configuring the Linux environment: You can customize the Linux environment by editing the .bashrc or .zshrc files. These files are in your home directory and can be edited using a text editor.
- Installing additional software: WSL/WSL2 provides access to a wide range of Linux software, but you can install additional software using the package manager for your Linux distribution. For example, to install the git package in Ubuntu, use the command: sudo apt-get install git.
- Configuring network settings: You can configure network settings for WSL/WSL2 by editing the /etc/resolv.conf file. This file contains DNS server settings and can be edited using a text editor.
- Mounting Windows drives: WSL/WSL2 can access only its file system by default. However, you can mount Windows drives using the /mnt directory. For example, to mount the D: drive, use the command: sudo mount -t drvfs D: /mnt/d.
- Changing the default terminal: WSL/WSL2 uses the default Windows terminal. However, you can change the default terminal by setting the WSL_DISTRO_NAME environment variable to the name of the Linux distribution you want to use as the default terminal. For example, to use Ubuntu as the default terminal, use the command: setx WSL_DISTRO_NAME Ubuntu.
- Using GUI applications: WSL/WSL2 does not support GUI applications by default. However, you can install an X server on your Windows machine and use it to run Linux GUI applications. The most popular X server for Windows is Xming.
Tips & Tricks
- Using WSL with Visual Studio Code: If you are a developer, you can use Visual Studio Code with WSL/WSL2 to develop applications in a Linux environment. Visual Studio Code has built-in support for WSL/WSL2 and allows you to develop, build, and test applications in a Linux environment directly from your Windows machine. You can also install the Remote — WSL extension to access WSL/WSL2 directly from Visual Studio Code.
- Running GUI applications in WSL: Although WSL/WSL2 does not support GUI applications by default, you can install a third-party X server on your Windows machine and use it to run Linux GUI applications. One of the popular X servers for Windows is Xming. Once you have installed the X server, you can use the DISPLAY environment variable to run GUI applications in WSL/WSL2.
- Connecting to remote servers using SSH: WSL/WSL2 provides native support for SSH. SSH can connect to remote servers directly from your WSL/WSL2 terminal. To connect to a remote server using SSH, use the ssh command followed by the username and IP address of the remote server. For example, to connect to a remote server with the username user and the IP address 192.168.1.10, use the command: ssh user@192.168.1.10.
- Using Windows applications in WSL: Although WSL/WSL2 is designed to provide a Linux environment on Windows, you can also run Windows applications from within WSL/WSL2. To run a Windows application from within WSL/WSL2, use the cmd.exe command followed by the path to the Windows application. For example, to run Notepad from within WSL/WSL2, use the command: cmd.exe /c «start notepad».
- Sharing files between Windows and Linux: WSL/WSL2 provides a way to share files between Windows and Linux. By default, your Windows drives are mounted in the /mnt directory in WSL/WSL2. This allows you to access your Windows files from within WSL/WSL2. Similarly, you can also access your Linux files from within Windows using the \\wsl$\<distribution> path.
Troubleshooting
While installing WSL/WSL2 on Windows 10/11 is straightforward, some issues may arise during or after installation. Here are some common troubleshooting tips to help you resolve any issues you may encounter:
- Enable Virtualization: WSL/WSL2 requires virtualization support from your computer’s processor. Ensure that virtualization is enabled in your computer’s BIOS settings.
- Upgrade Windows: Ensure that you have the latest version of Windows installed. WSL/WSL2 is only available on Windows 10 version 2004 or later and Windows 11.
- Enable WSL/WSL2 feature: If you cannot install WSL/WSL2, ensure you have enabled Windows’s WSL/WSL2 feature. To do this, open the Control Panel, select «Programs,» then click «Turn Windows features on or off.» Ensure that «Windows Subsystem for Linux» and «Virtual Machine Platform» are enabled.
- Check System Requirements: Ensure that your system meets the requirements for WSL/WSL2. WSL/WSL2 requires a 64-bit version of Windows 10 or 11 and a compatible version of Windows Build.
- Restart the Computer: Restarting your computer can sometimes help resolve installation issues.
- Check the Installation Logs: If the installation fails, check the installation logs to determine the cause of the issue. The installation logs are found at C:\Users\<Username>\AppData\Local\Temp\.
- Uninstall and Reinstall: If everything fails, try uninstalling and reinstalling WSL/WSL2.
- Check for Firewall Settings: Ensure your firewall is not blocking WSL/WSL2. You may need to add exceptions to your firewall settings.
- Check Antivirus Settings: Some antivirus software may interfere with installing WSL/WSL2. Check your antivirus settings to ensure it is not blocking WSL/WSL2.
- Check Network Settings: Ensure that your network settings are configured correctly. WSL/WSL2 requires an internet connection to download and install packages.
By following these troubleshooting tips, you should be able to install and use WSL/WSL2 on Windows 10/11 without any issues.
Summing Up
WSL/WSL2 is an incredibly useful tool that allows you to run Linux applications and commands natively on Windows 10/11. With this guide, you should now understand what WSL/WSL2 is, how to install it, and how to customize it to suit your needs. Whether you’re a developer, a system administrator, or someone who wants to explore Linux on Windows, WSL/WSL2 is a powerful tool that can greatly enhance your workflow. Following the steps outlined in this guide, you should be able to install and use WSL/WSL2 on your Windows 10/11 machine in no time.
- WSL/WSL2 allows you to run Linux applications on Windows 10/11.
- WSL2 is a major improvement over the previous version, with a full Linux kernel.
- You can install multiple Linux distributions using WSL/WSL2.
- WSL/WSL2 can be customized to suit your needs, including running graphical applications and connecting to remote servers using SSH.
- Troubleshooting common issues, such as installation errors and networking problems, is an important part of using WSL/WSL2.
The Windows Subsystem for Linux (WSL) lets developers run a GNU/Linux environment on Windows, without the overhead of a traditional virtual machine or dual boot setup. This incorporates Linux-like functionality on Windows OS without the overhead of running another OS in parallel, therefore, reducing resource consumption. This makes WSL a go-to choice for people wanting to switch between the two Operating Systems or ones who want to get Linux-like functionality in their Windows OS. WSL2 is a new version of the architecture that allows you to use Linux on top of Windows 10 natively and replaces WSL. In this article, you will learn how to install WSL2 on Windows 10.
Setup of Windows Subsystem for Linux:
Here are some steps to install Windows Subsystem for Linux. We are installing WSL on Windows 10.
Step 1: Open the start menu by pressing the [Win] key or clicking the bottom right icon of the desktop.
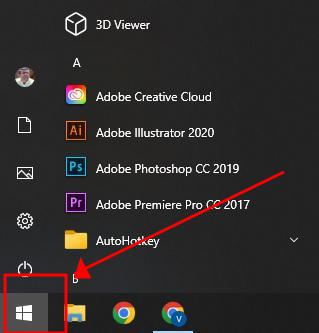
Step 2: Type cmd. A result similar to this would be appearing.
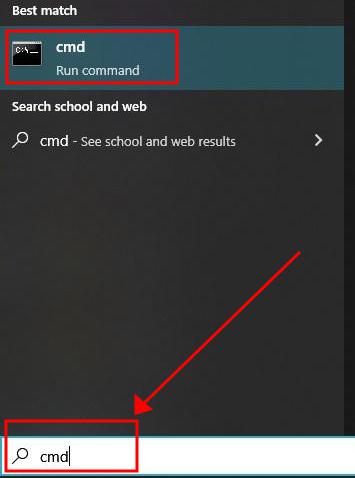
Step 3: Click on the Run as administrator option on the right side of the taskbar
Step 4: A new window would have appeared similar to this

Step 5: Type the following command and press Enter.
wsl –install
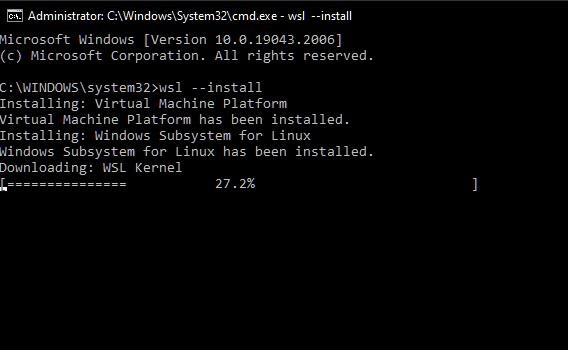
Step 6: The WSL2 installation process has begun. It will install the Linux Kernel during this process. After the process has been completed the user gets acknowledged as follows.
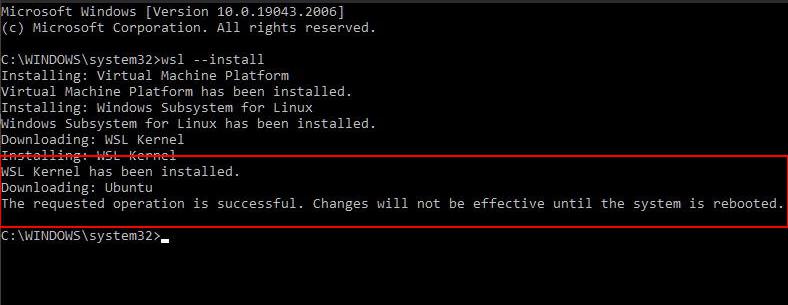
Step 7: Now WSL has been successfully installed onto the Windows 10 Operating System. Now restart your Operating System. Upon restarting you could use WSL2.
Note: By default, the Ubuntu distribution gets installed in WSL2. If you want any specific distribution, you could get so by replacing the command.
wsl --install
wsl --install -d DIST
Where DIST is the name of the distribution you are wanting to install.
Enabling Virtual Machine:
As mentioned earlier, WSL2 is a small virtual machine, so Windows has to accommodate it. If this is already enabled, skip the process and restart your PC to make sure it’s ready for installation. The easiest way to do this is with PowerShell. As an administrator, he opens PowerShell and enters the following command:
dism.exe /online /enable-feature /featurename:VirtualMachinePlatform /all /norestart
Now you can reboot your PC and be able to do anything on WSL.
Installing Linux Packages:
You can also install Linux packages here. Popular apt and apt-get commands are available. For example, let’s install the htop package on this version of Linux and see what happens. First, open the Linux terminal and run the following command to update the APT package repository cache.
Step 1: Type the following command:
$ sudo apt update

Step 2: Now install the htop package using the following command.
$ sudo apt install htop

Step 3: After successfully installing the htop package, we can simply run and execute htop by following command:

Conclusion:
This article contains the following methods that we have discussed above:
- Basics of WSL (Windows Subsystem for Linux).
- Installation process of WSL (Windows Subsystem for Linux) on Windows 10.
- Enabling Virtual Machine
- Steps to update WSL (Windows Subsystem for Linux).
- Installation of htop package of Linux inside WSL.
Last Updated :
21 Dec, 2022
Like Article
Save Article
Windows Subsystem for Linux (WSL) — подсистема ОС Windows 10, позволяющая разработчикам, тестировщикам запускать нативные приложения Linux, писать скрипты, выполнять команды непосредственно из Windows. В обновлённой Windows 10 (2004) появилась 2я версия WSL, в которой используется полноценное ядро Linux с возможностью запуска приложений и контейнеров Docker, реализована высокая скорость загрузки, небольшой объем потребляемых ресурсов, управление в фоновом режиме, обновление ядра. Таким образом вы сможете запускать ELF64 программы, которые могут получать доступ к файловой системе Windows без использования сторонних порто (таких как Cygwin).
Образ ядра Linux (версия ядра 4.19) в Windows 10 представляет собой легкую виртуальную машину, для запуска которой не нужно ставить полноценную роль Hyper-V. Системные вызовы Linux транслируются на лету в вызовы Windows без использования эмулятора (в отличии от WSL1).
Изначально компонент WSL отключен. Чтобы его включить, вам необходимо зайти в Пуск -> Панель управления -> Программы и компоненты -> Включение и отключение компонентов Windows (Control Panel\All Control Panel Items\Programs and Features\Turn Windows features on or off), активировать галочку Подсистема Windows для Linux (Windows Subsystem for Linux), нажать кнопку ОК, и перезагрузить компьютер.
Вы можете включить компоненты WSL в Windows 10 с помощью dism:
dism.exe /online /enable-feature /featurename:VirtualMachinePlatform /all /norestart
dism.exe /online /enable-feature /featurename:Microsoft-Windows-Subsystem-Linux /all /norestart
или PowerShell
Enable-WindowsOptionalFeature -Online -FeatureName Microsoft-Windows-Subsystem-Linux
Enable-WindowsOptionalFeature -Online -FeatureName VirtualMachinePlatform
В Windows Server 2004 Semi-Annual Channel (SAC) для установки компонента WSL используется командлет Install-WindowsFeature:
Install-WindowsFeature -Name Microsoft-Windows-Subsystem-Linux
После этого также необходимо перезагрузить компьютер.
В настройка BIOS/UEFI компьютера должна быть включена поддержка аппаратной виртуализации: Intel VT (Intel Virtualization Technology) или AMD-V.
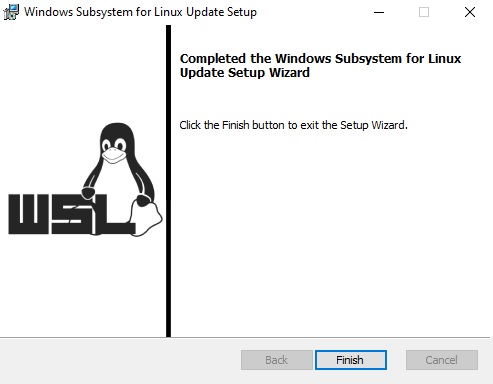
Теперь вам нужно выполнить обновление WSL до версии 2. Для этого требуется зайти на сайт https://docs.microsoft.com/ru-ru/windows/wsl/wsl2-kernel, скачать файл wsl_update_x64.msi, установить его. По завершении увидите картинку
Чтобы сделать WSL2 архитектурой по умолчанию для новых дистрибутивов, в PowerShell выполните команду:
wsl --set-default-version 2
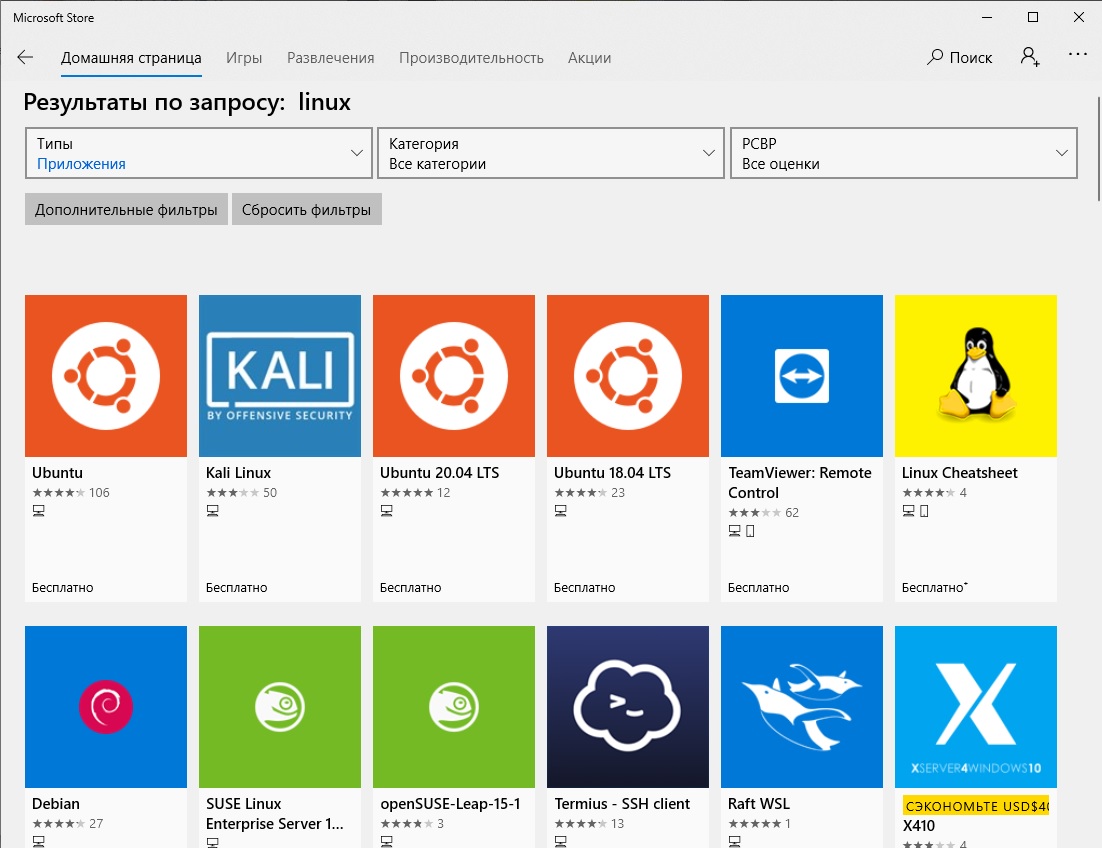
Далее вам необходимо открыть Microsoft Store, в поиске ввести слово “Linux”. В появившемся списке выберите нужный дистрибутив. Доступные Ubuntu, Debian, Kali Linux, Linux Cheatsheet, SUSE Linux Enterprise Server15, openSUSE Leap 15-1, Pengwin Enterprise, Fedora Remix for WSL или другие. В нашем примере мы будем использовать Ubuntu 20.04 LTS, нажмите кнопку Получить.
Если у вас отключен Windows Store или вы хотите установить дистрибутив WSL в Core редакции Windows Server, вы можете скачать дистрибутив Ubuntu с помощью PowerShell командлета Invoke-WebRequest:
Invoke-WebRequest https://aka.ms/wslubuntu2004 -OutFile ubuntu-2004.zip –UseBasicParsing
Распакуйте архив:
Expand-Archive -Path .\ubuntu-2004.zip
Запустите установку образа Linux с помощью файла Ubuntu.exe.
Также вы можете скачать образ в виде appx файла и установить его с помощью командлета Add-AppxPackage.
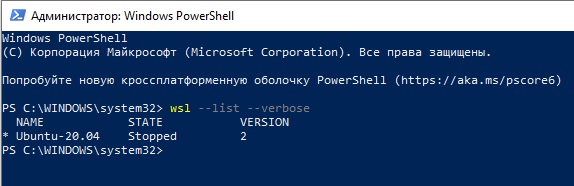
После установки можно проверить используемую версию WSL с помощью команды
wsl --list –-verbose
Если у вашей среды Linux указана версия 1, нужно изменить ее на WSL2 командой:
wsl --set-version Ubuntu-20.04 2
Файл жёсткого диска с образом виртуальной машины ОС Linux Ubuntu 20.04 будет располагаться в профиле пользователя: C:\Users\234\AppData\Local\Packages\CanonicalGroupLimited.Ubuntu20.04onWindows_79rhkp1fndgsc\LocalState.
После установки дистрибутива в стартовом меню появляется ярлык на него. Для запуска Ubuntu зайдите в меню Пуск, нажмите на соответствующем ярлыке и получите в отдельном окне полноценную командную оболочку Bash. Запускать WSL можно и с помощью команды wsl. При первом запуске образа в командной строке Bash вам будет предложено создать пользователя и пароль (которые не должны совпадать с учётной записью Windows). Чтобы выполнять команды с правами root, необходимо использовать дополнительный ключ (префикс) sudo. В WSL есть общие команды для Bash и CMD, и тут нужно не забывать, что система Linux чувствительна к регистру.
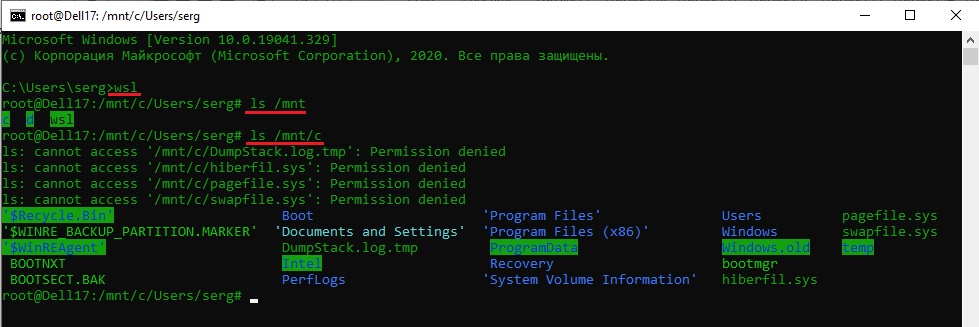
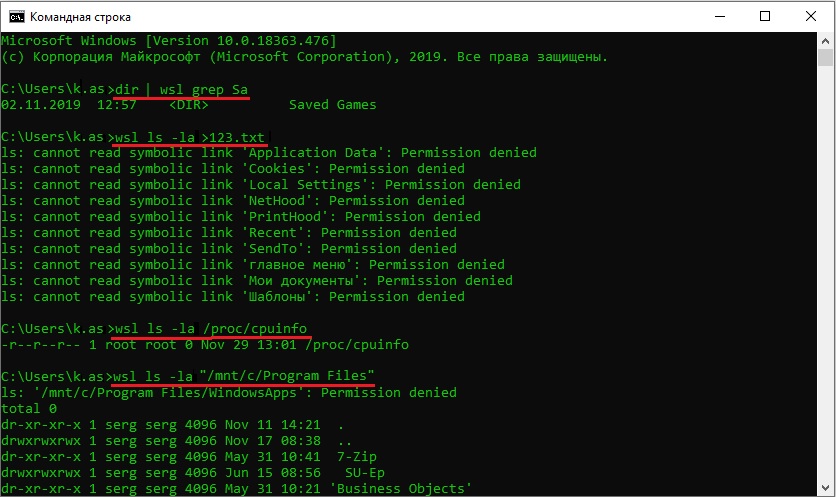
Вы можете выполнить Linux-команды из CMD. Для этого необходимо вначале указать “WSL”. Например, для просмотра списка файлов и папок в каталоге Windows, выполните:
wsl
ls /mnt
ls/mnt/c
dir | wsl grep Sa
wsl ls ‑la > 123.txt
wsl ls ‑la /proc/cpuinfo
wsl ls ‑la “/mnt/c/Program Files”
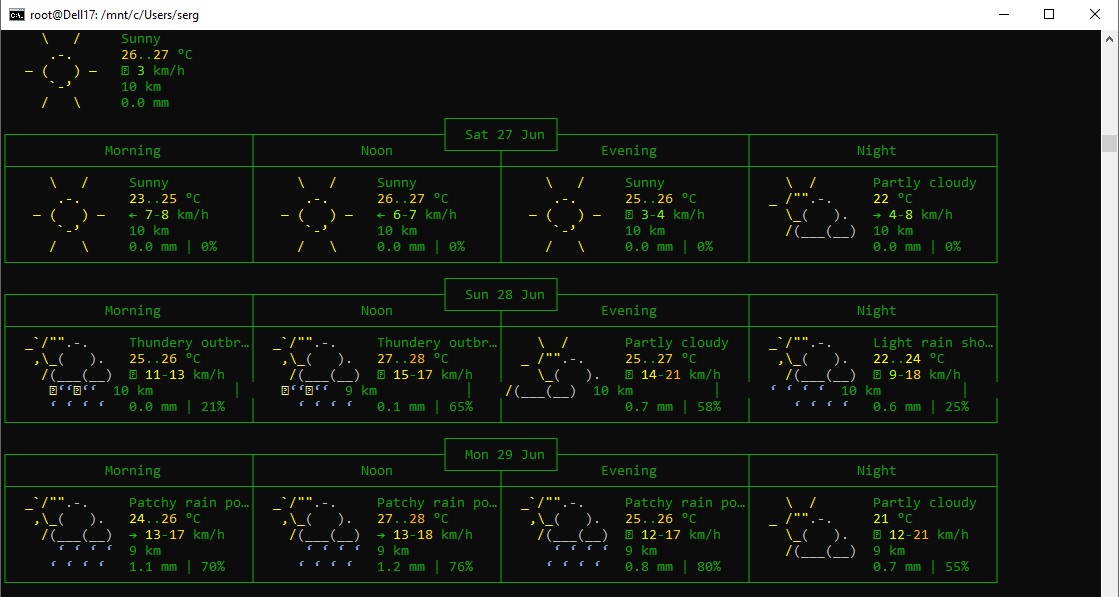
Также вы можете открыть проводник командой explorer.exe, калькулятор – calc.exe, блокнот – notepad.exe, paint – mspaint.exe, календарь – cal, погоду – curl wttr.in
Ещё один пример взаимосвязи 2х систем – вы можете открыть в Windows файл из WSL-дистрибутива по сетевому пути. Для этого в CMD наберите путь к файлу:
notepad \\wsl$\Ubuntu-20.04\home\1122.txt
Из окна консоли вы можете обновить список пакетов в Ubuntu с помощью команд:
sudo apt-get update
sudo apt-get upgrade
После обновления Ubuntu папка …/LocalState будет занимать 1.5 Гб.
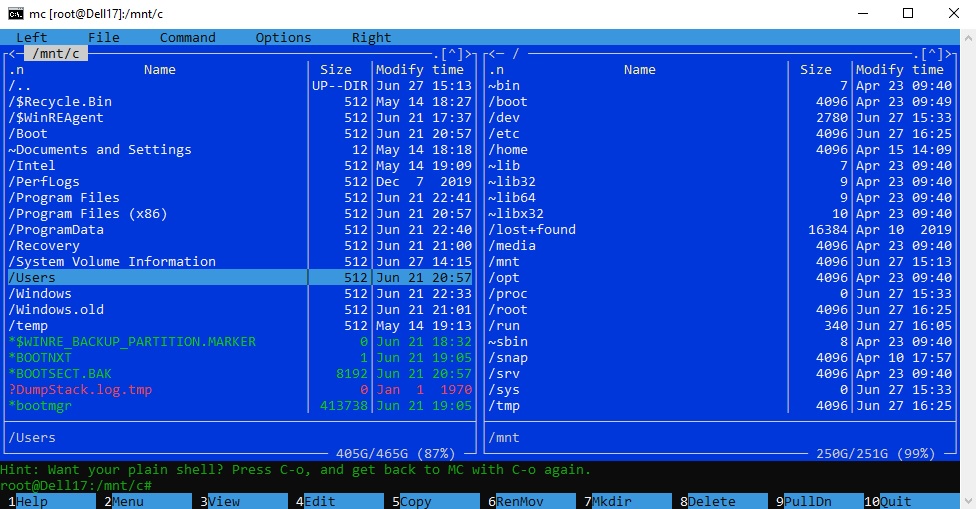
Из командной строки Linux можно не только просмотреть Windows-файлы и каталоги, но и получить к ним доступ. Чтобы удобнее копировать файлы, просматривать директории и их содержимое, установите файловый менеджер Midnight Commander с помощью команды
sudo apt-get install mc
Вы можете запустить Midnight Commander как в командной оболочке Bash, так и внутри CMD. На скриншоте ниже показано, что в двух панелях MC показывается список файлов с обеих ОС.
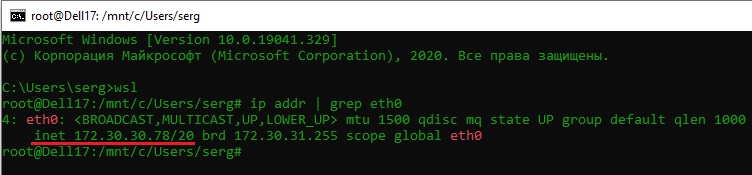
Можно отобрахить сетевые настройки (IP адрес) IP-адрес Linux-системы:
ip addr | grep eth0
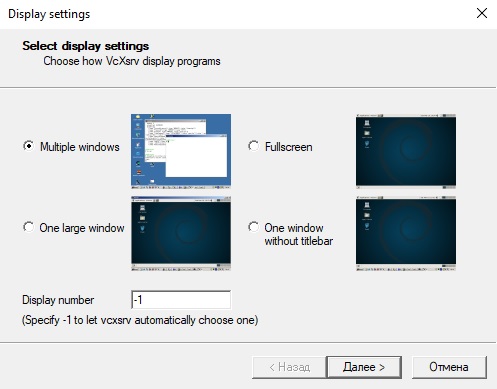
В WSL не предусмотрена работа приложений с графическим интерфейсом. Тем не менее вы можете попробовать их установить и использовать. Чтобы запускать графические приложения в Linux, нужно скачать и установить в Windows программу VcXsrv Windows X Server (https://sourceforge.net/projects/vcxsrv/).
С помощью пакетного менеджера apt-get установим несколько графических программ: например, браузер, текстовый редактор или что-то ещё:
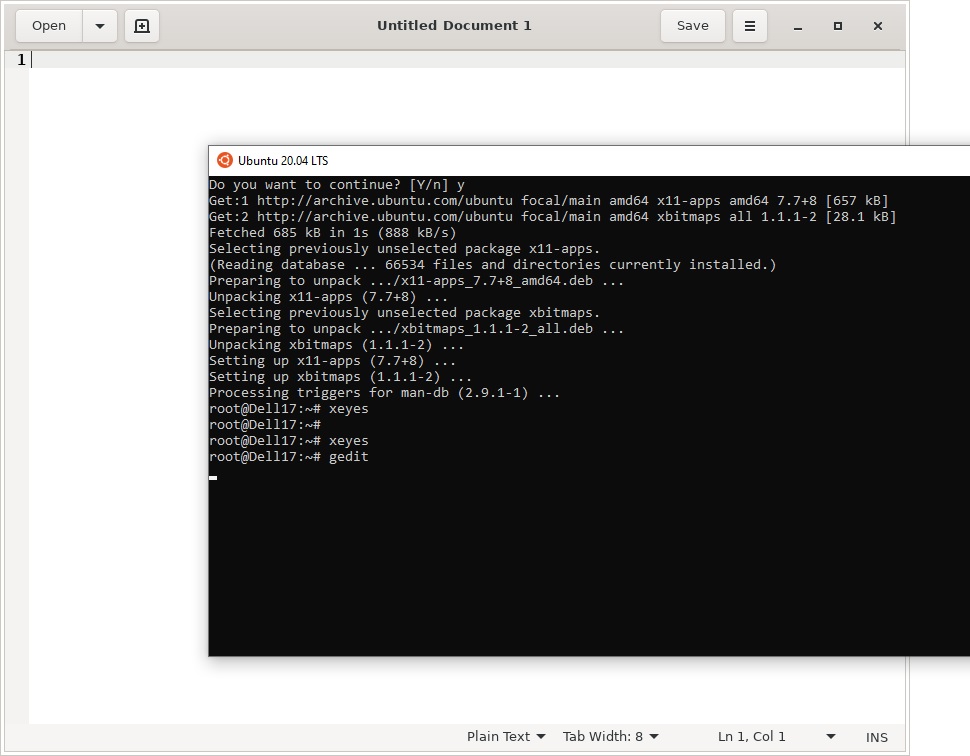
sudo apt-get install gedit
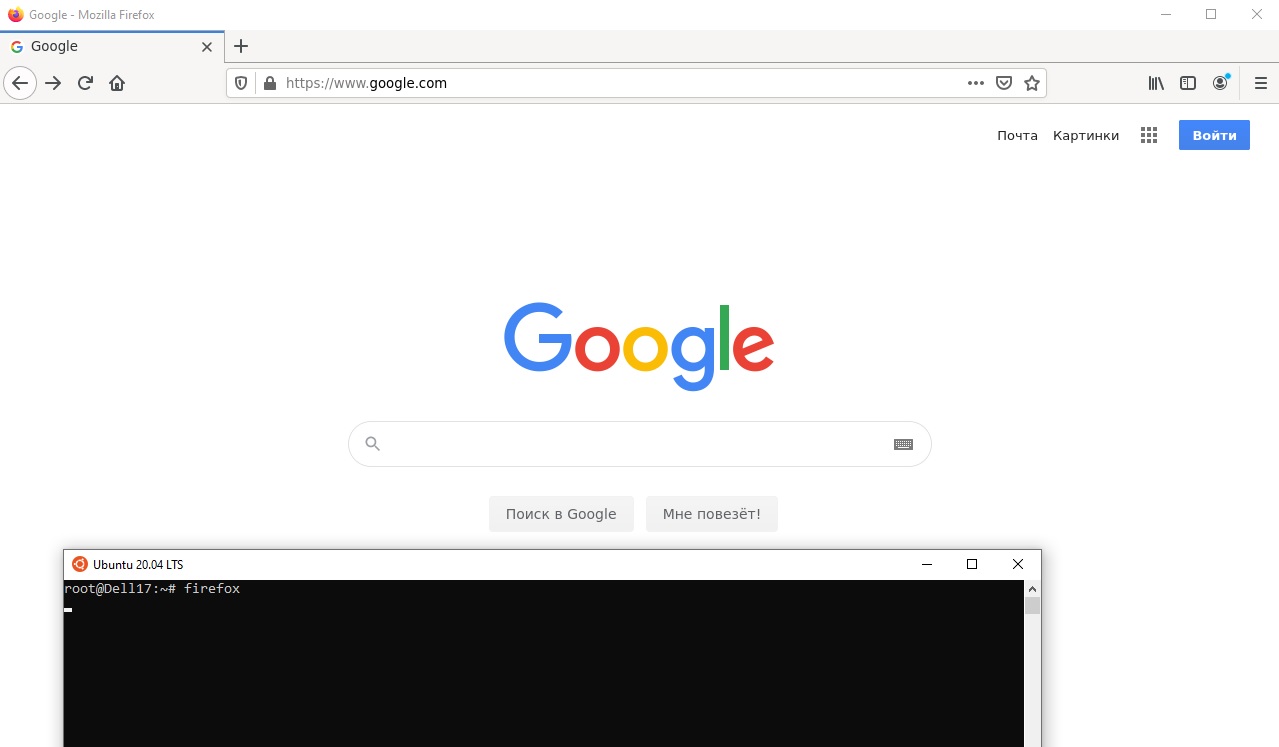
sudo apt-get install firefox
sudo apt-get install x11-app
Затем создайте файл в директории root:
cd /~
vim .bash_login
впишите строку
export DISPLAY=$(cat /etc/resolv.conf | grep nameserver | awk '{print $2}'):0
сохраните запись
Esc -> :wr -> :q
Теперь можете запустить графические программы Linux через WSL командами:
firefox
или
gedit
Вы можете установить в Windows 10 несколько дистрибутивов Linux и запускать одновременно в разных окнах WSL. Вывести весь перечень установленных дистрибутивов можете с помощью команды:
wsl --list –all
чтобы завершить работу всех запущенных дистрибутивов и ядра WSL 2, выполните команду:
wsl --shutdown