Windows 10 offers ample attractive features that encourage users to download Win 10 to their desktop/PC. Like, there is the Cortana application that acts as a personal assistant, and a virtual desktop can be enabled. Also, Windows 10 comes completely free for the users which is another plus point among all the operating systems.
So, here you will learn how to install Windows 10 in a step-by-step process.
Installing Windows 10 From USB Flash Drive
Here, we will first focus on the configuration of the USB drive that is going to be used for the installation process. Following that, the steps for the installation of Windows 10 will be executed.
Configuration of USB Drive:
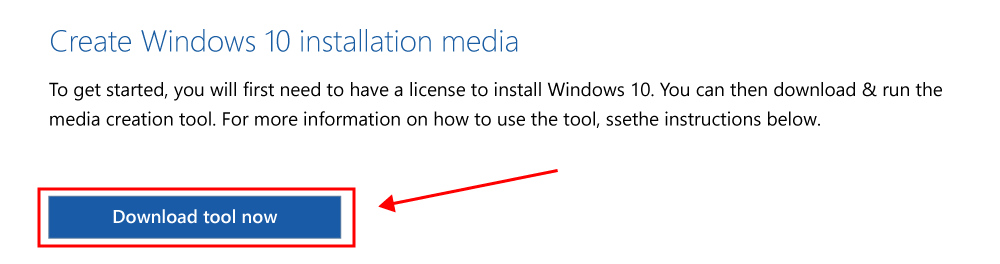
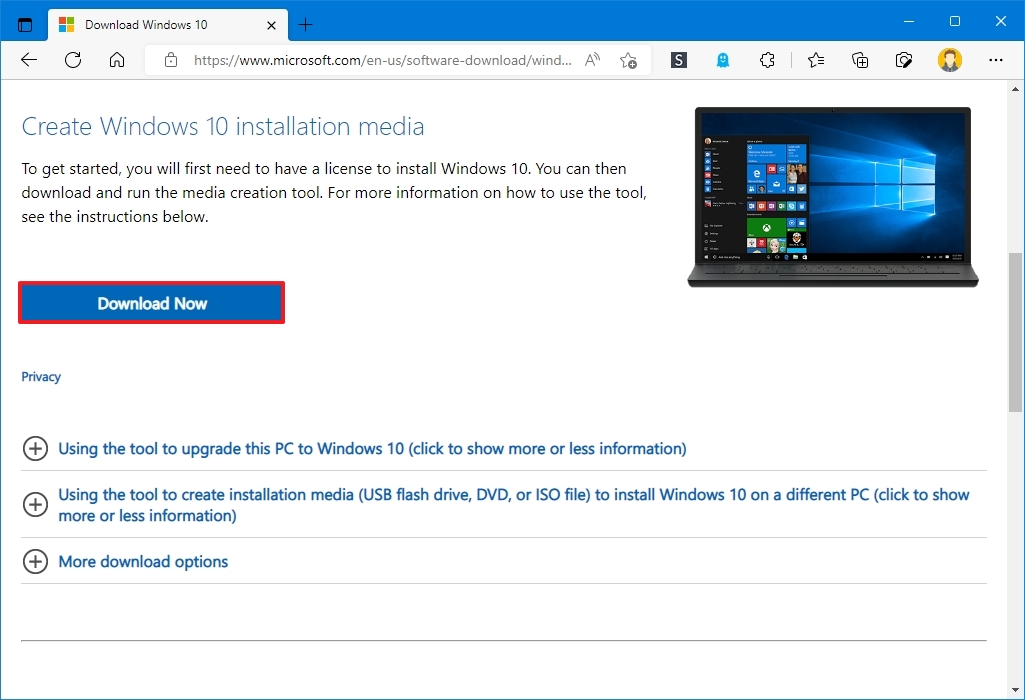
Step 1: Browse to the Official Website of Windows 10 & download the ISO File for configuration purposes. Click on Download Tool Now. Insert the USB Drive into the device which has a minimum of 8 GB of free memory
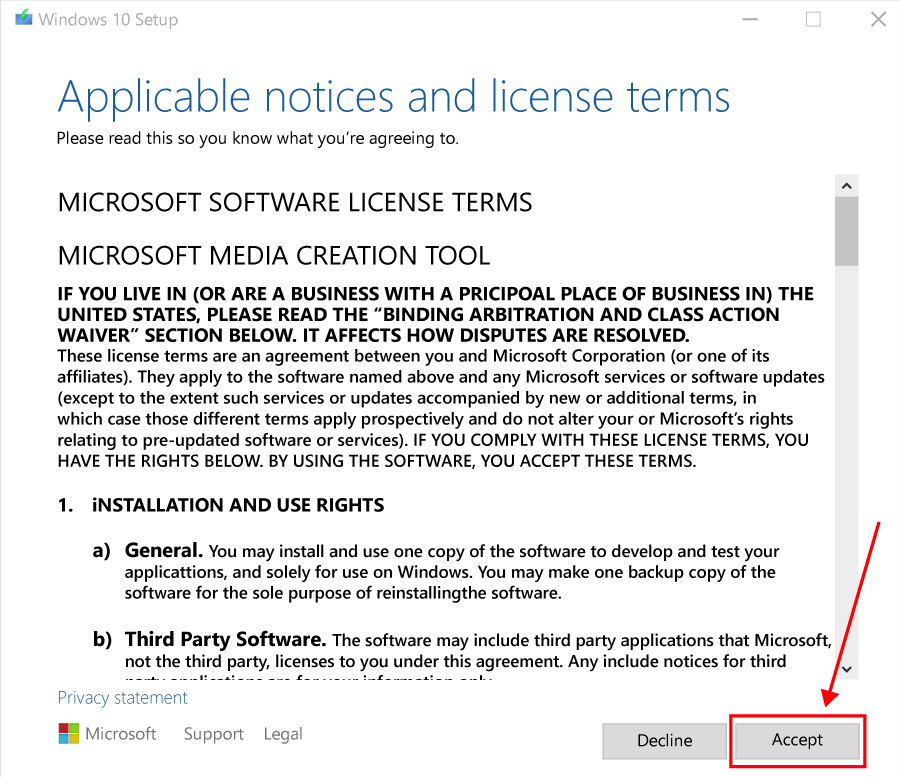
Step 2: Open the installed file & click on the Accept button to move ahead.
Note: It is advisable to read all the items & conditions before moving ahead. If you find anything improper, you can decline the process.
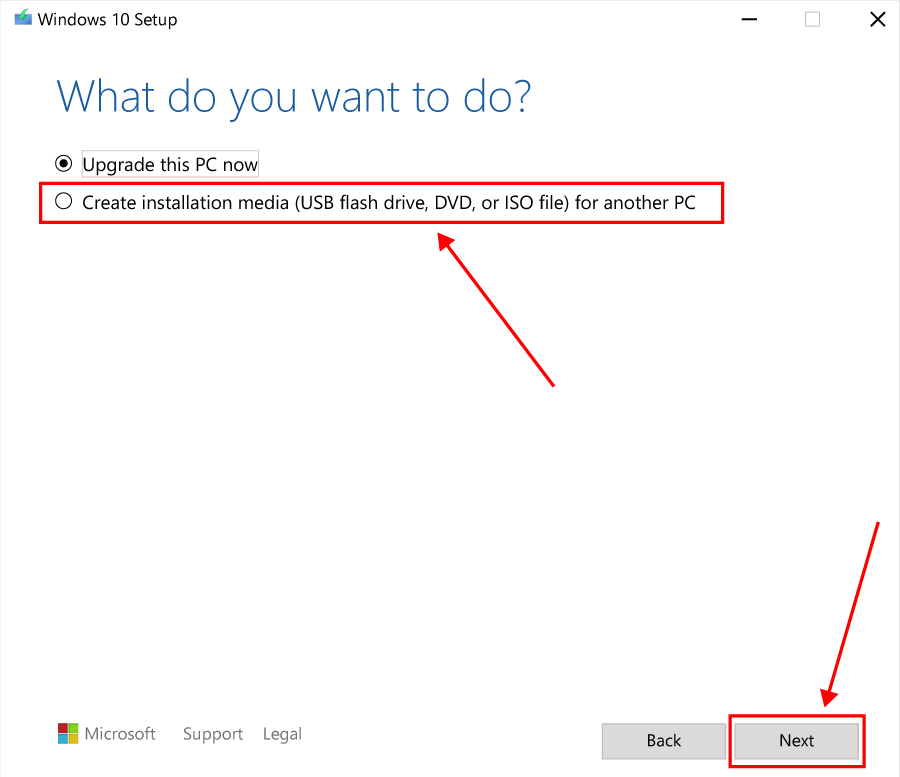
Step 3: Click on the Second Option to create Installation Media. After that, click on Next.
Step 4: Now, in the next window, mark the Checkbox which will get all the device-related information. Click Next to move ahead.
Step 5: Now, click on the USB Drive option & click Next.
Step 6: Now, the USB Drive will be shown, click Next to start processing.
Step 7: After waiting a bit, click on Finish to complete the process.
Hence, we have successfully configured the USB drive for installing Windows 10 on a desktop or laptop.
Installation of Windows 10:
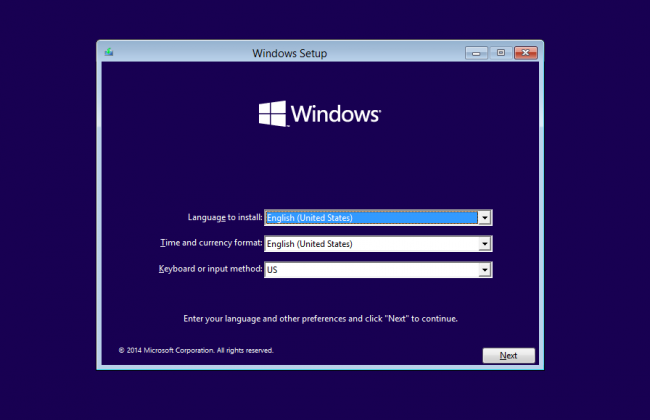
Step 1: To boot Windows 10 with USB, restart the device & enter the boot menu option. On the screen, click on Next by leaving all the options as it is.
Note: The method to enter the boot menu is different for different devices. Sometimes, pressing the F2 key can lead to the boot menu. It is advisable to search for the key on the internet along with the name of the motherboard. Because the key depends upon the type of motherboard installed in the device.

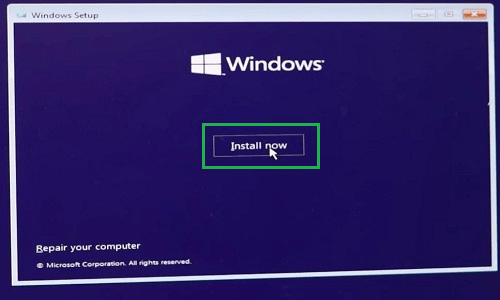
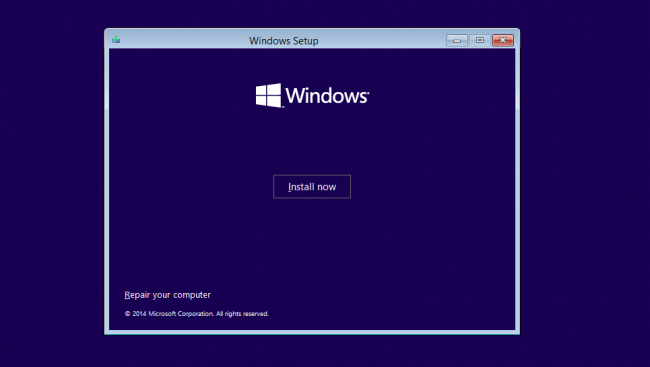
Step 2: Now, click on the Install Now button.
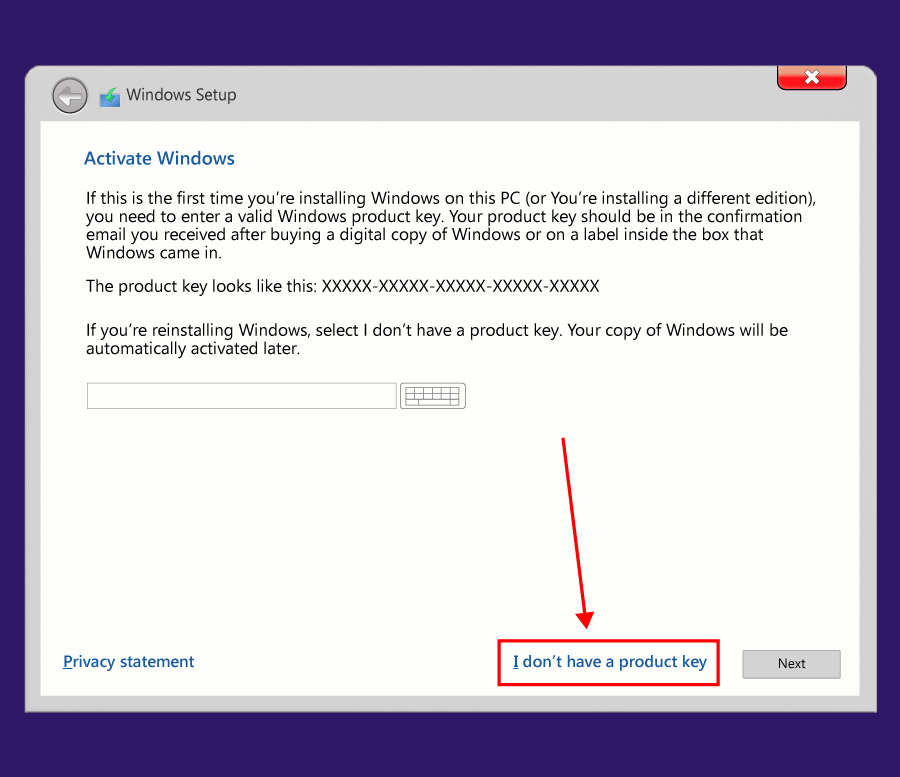
Step 3: In the next window, it will ask for the Product Key. Click on the option below to move ahead without Product Key.
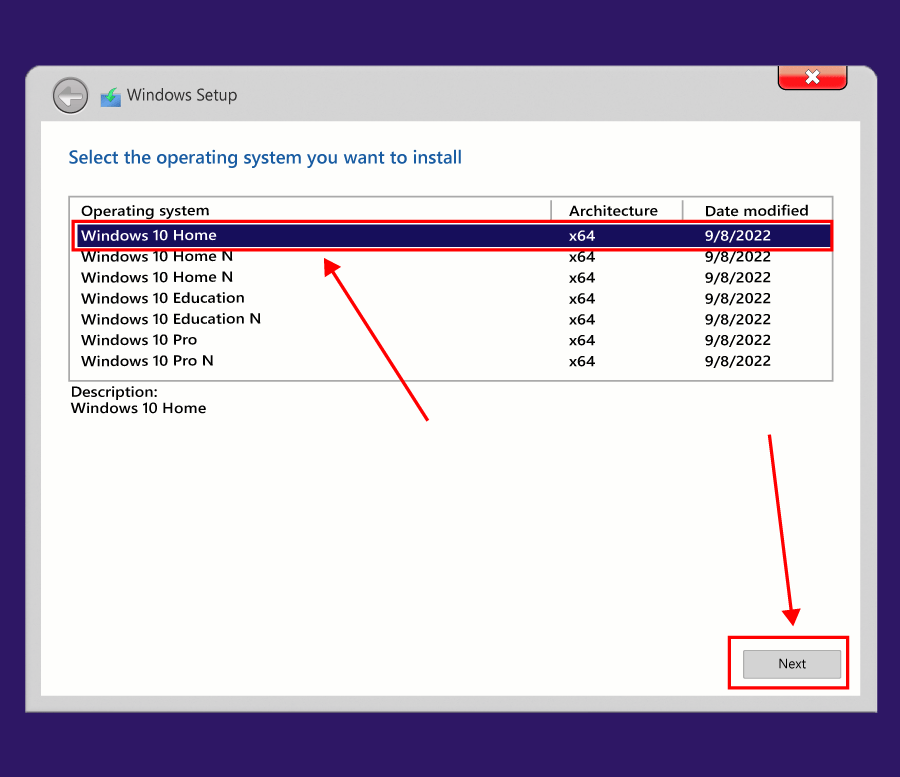
Step 4: On the next page, so many options will be present for Windows 10. Select the Default one & click Next.
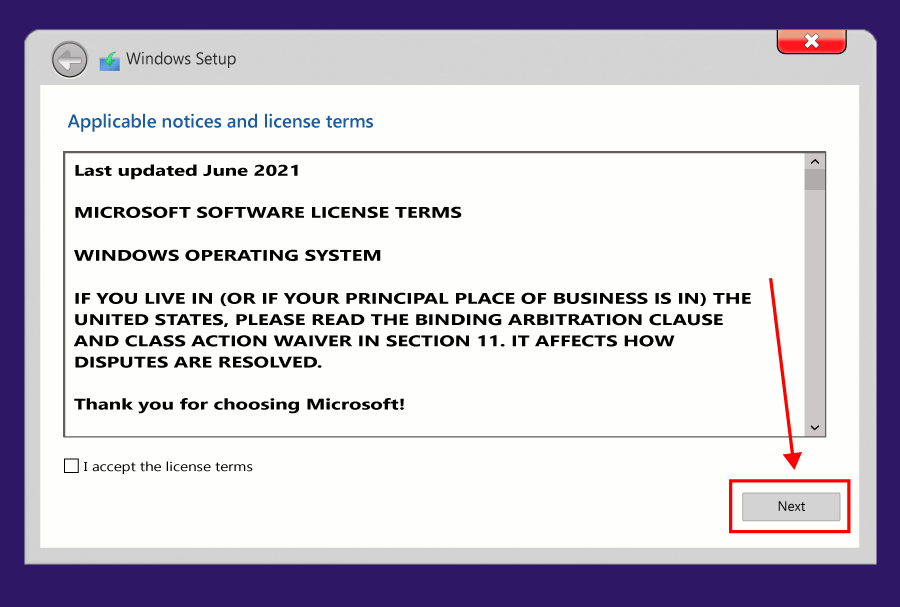
Step 5: Click on the Checkbox as consent for the terms & conditions. And click on the Next button.
Note: It is advisable to read all the items & conditions before moving ahead. If you find anything improper, you can decline the process.
Step 6: Now, click on the Upgrade option to move all the files & supported applications to Windows 10 without occurring any error.
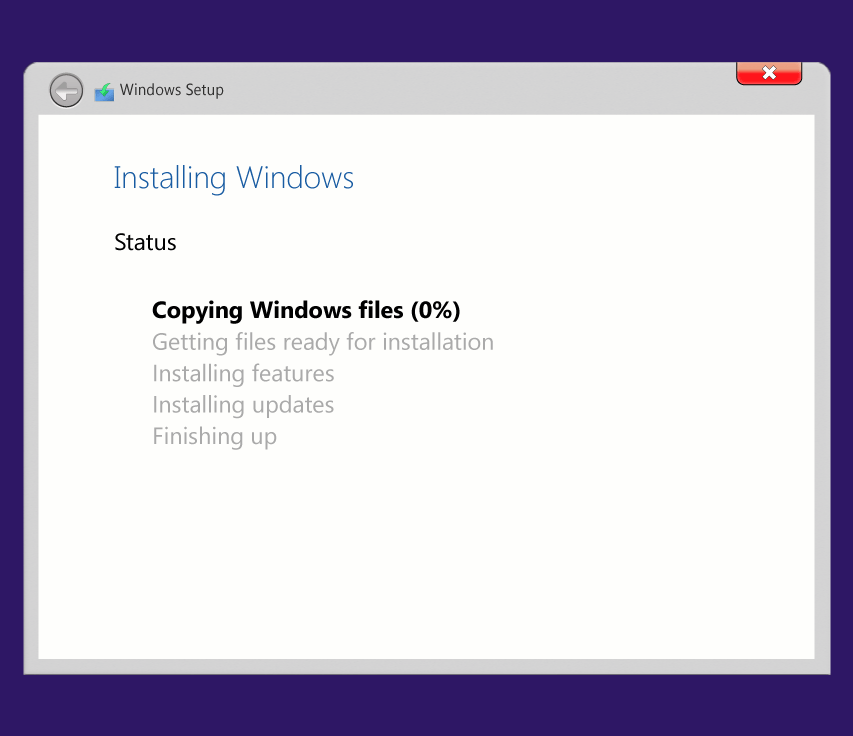
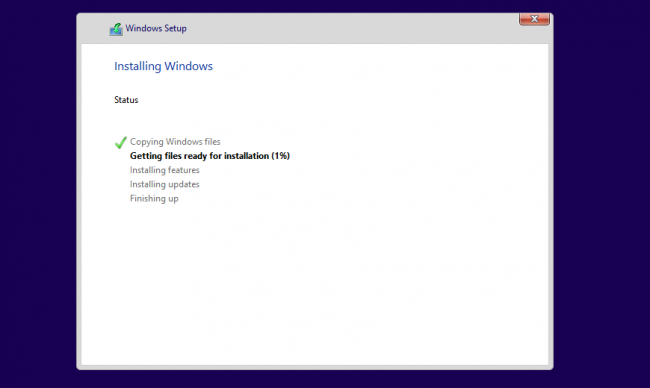
Step 7: Now, the installation process is started. Wait till the installation is completed.
Hence, we have successfully installed Windows 10 operating system using a USB drive on any computer or laptop.
From the above method, it is clear that the installation of the Windows 10 operating system is a cakewalk. Just you need to have a minimum of 8 GB of USB drive for it. You can now install Windows 10 without taking the help of any technician who charges you for doing such a simple task.
Last Updated :
25 Aug, 2023
Like Article
Save Article
(Image credit: Future)
When installing a fresh copy of Windows 10, you typically use a USB flash drive to launch the «Windows Setup» wizard to continue the installation process. However, on a device that has a Unified Extensible Firmware Interface (UEFI) instead of the legacy Basic Input/Output System (BIOS), it is crucial to use the correct media for the firmware type to complete the installation successfully.
On Windows 10, you can use at least two tools to create a bootable USB flash drive. You can use the Microsoft Media Creation Tool to download the files onto a removable drive with support for both firmware types (UEFI and legacy BIOS). Or you can use Rufus, a third-party tool that makes it easy to create a flash drive to install Windows with support for UEFI.
This guide will walk you through creating a Windows 10 USB flash drive with support for UEFI using the Microsoft Media Creation Tool and Rufus.
How to create Windows 10 UEFI boot media with Media Creation Tool
The Media Creation Tool is the best option available for creating a bootable USB media to perform an in-place upgrade or clean installation of Windows 10.
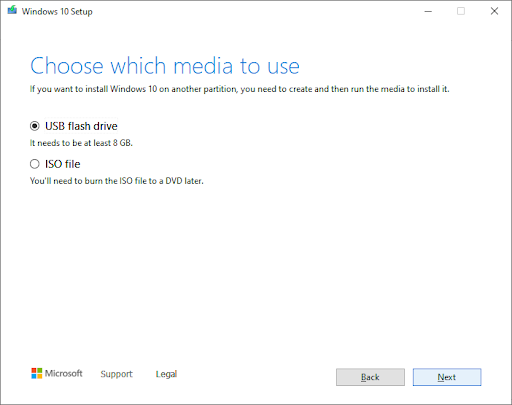
To create a Windows 10 USB media, connect a flash drive of at least 8GB of space, and then use these steps:
- Open the Windows 10 download page.
- Under the «Create Windows 10 installation media» section, click the Download tool now button to save the file.
- Double-click the MediaCreationToolxxxx.exe file to launch the setup.
- Click the Accept button to agree to the licensing terms.
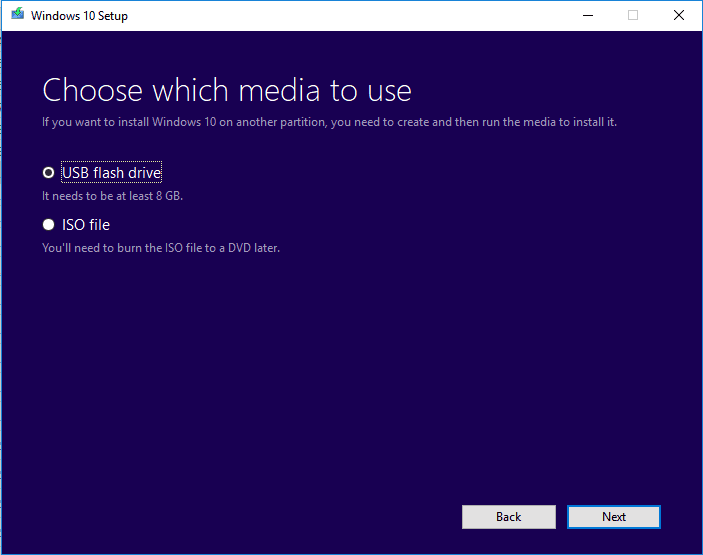
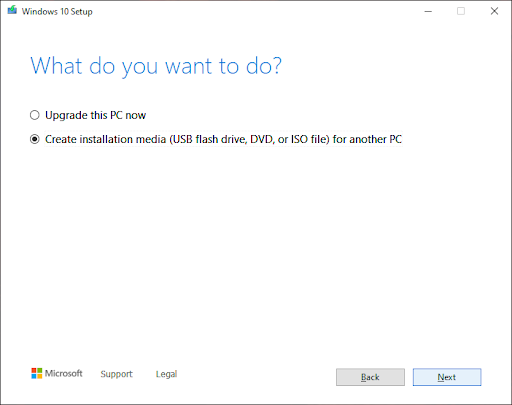
- Select the «Create installation media (USB flash drive, DVD, or ISO file) for another PC» option.

- Click the Next button.
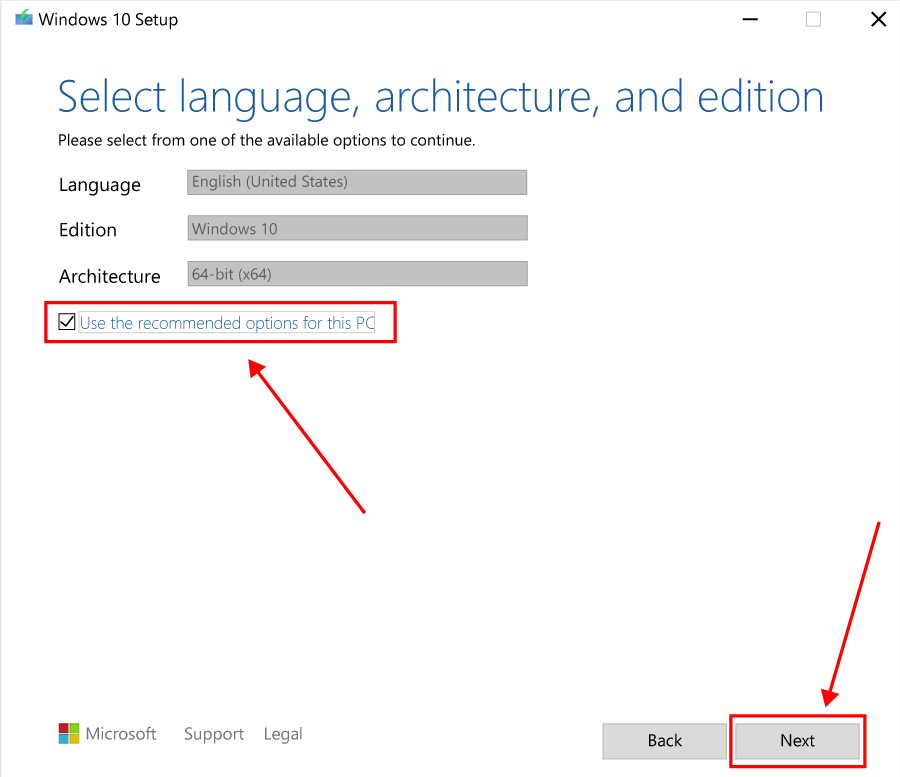
- (Optional) Clear the «Use the recommended options for this PC» option.
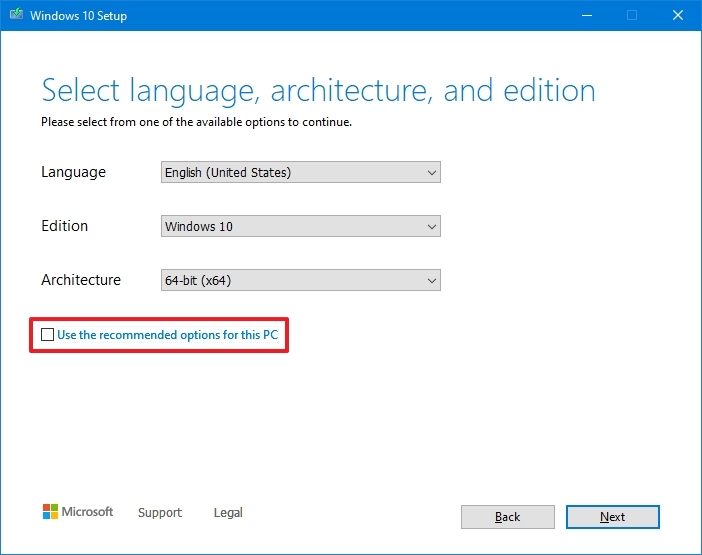
- Select the correct language, architecture, and edition of Windows 10 (if applicable).
- Quick tip: If you plan to install Windows on multiple computers running 32-bit and 64-bit architectures, use the «Architecture» drop-down menu and select the Both option to create a media that will work on both systems.
- Click the Next button.
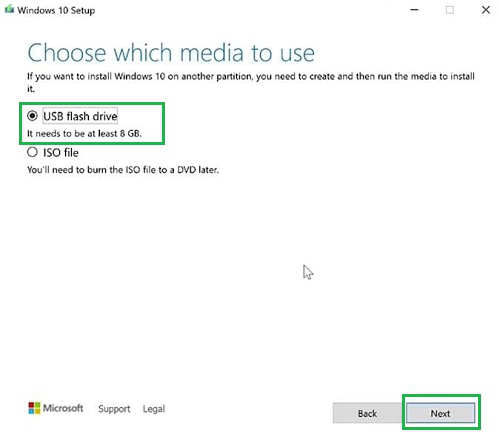
- Select the USB flash drive option.
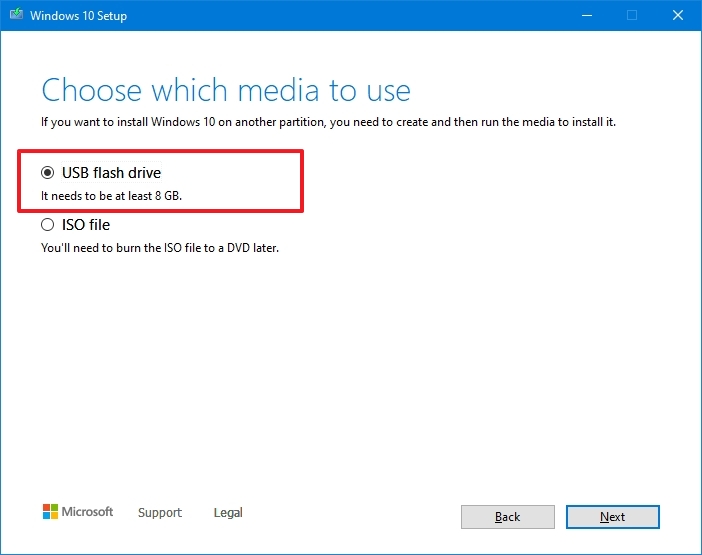
- Click the Next button
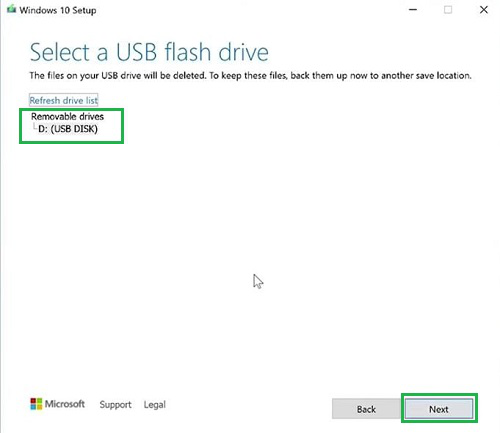
- Select the flash drive from the list. (If you do not see the device, click the «Refresh drive list» option.)

- Click the Next button.
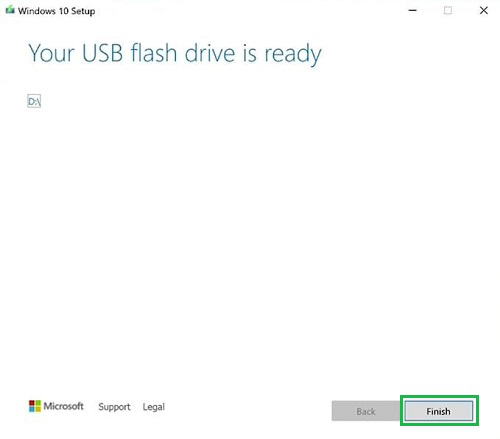
- Click the Finish button.
Once you complete the steps, the Media Creation Tool will download the files and will create a bootable USB flash drive that you can use to install Windows 10 on computers with support for UEFI and BIOS.
How to create Windows 10 UEFI boot media with Rufus
If the Media Creation Tool does not work or you do not want to use it, then you can try Rufus, a popular free third-party tool that allows you to create an installation media with support for UEFI devices. The utility offers two ways to make the installation media, including using an existing ISO file or downloading the image from the Microsoft servers directly from the app.
Create flash drive with existing Windows 10 ISO
To create a USB media with an existing Windows 10 ISO file, connect a flash drive of at least 8GB of space, and use these steps:
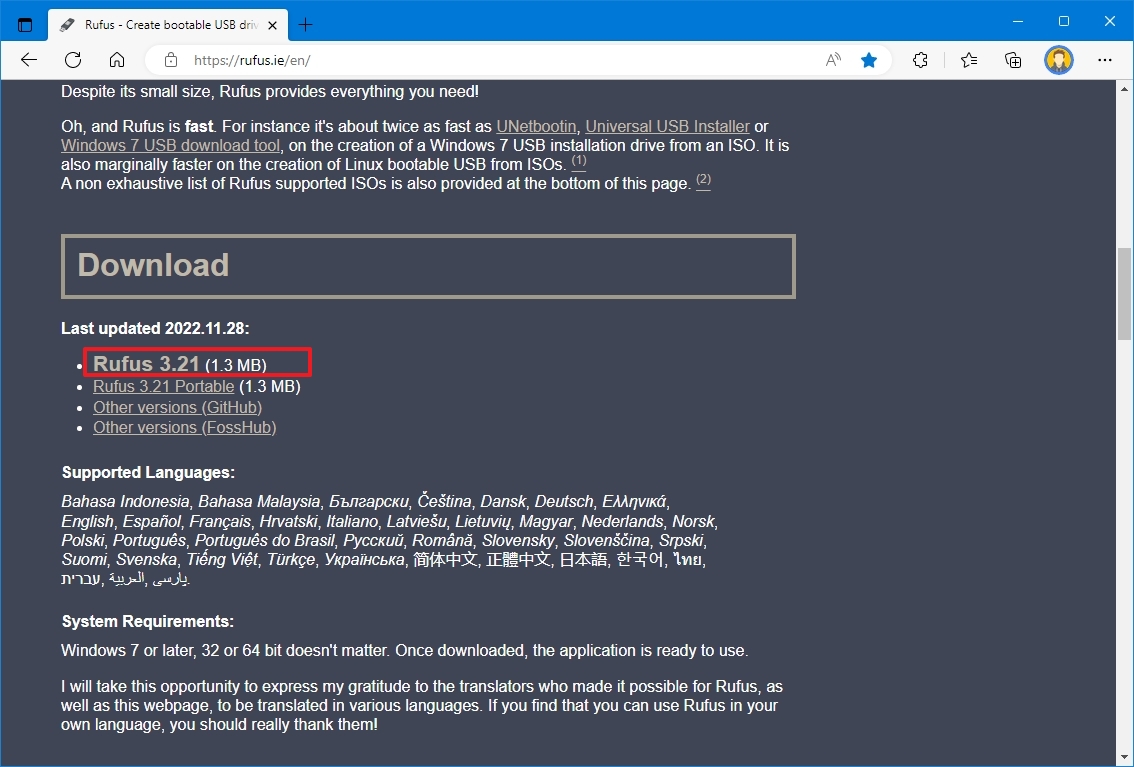
- Open Rufus download page.
- Under the «Download» section, click the latest release (first link) and save the file.
- Double-click the Rufus-x.xx.exe file to launch the tool.
- Under the «Device» section, select the USB flash drive.
- Under the «Boot selection» section, click the Select button on the right.
- Select the Windows 10 ISO file from the folder location.
- Click the Open button.
- Use the «Image option» drop-down menu and select the «Standard Windows installation» option.
- Use the «Partition scheme» drop-down menu and select the GPT option.
- Use the «Target system» drop-down menu and select the UEFI (non CSM) option.
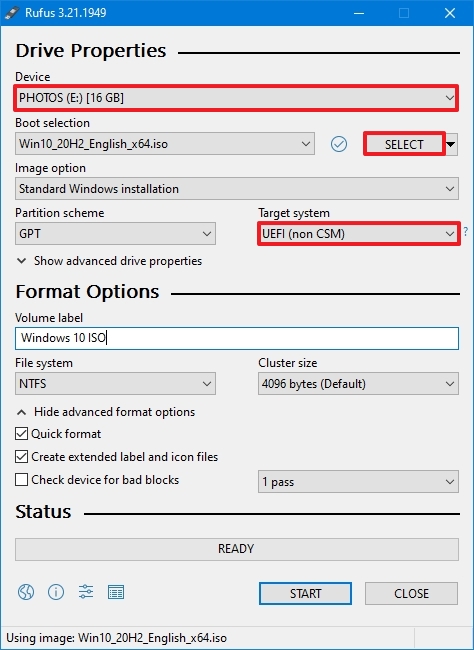
- Under the «Show Advanced drive properties» section, do not change the default settings (unless you know what you are doing).
- Under the «Volume label» field, confirm a name for the drive — for example, «Windows 10 USB.»
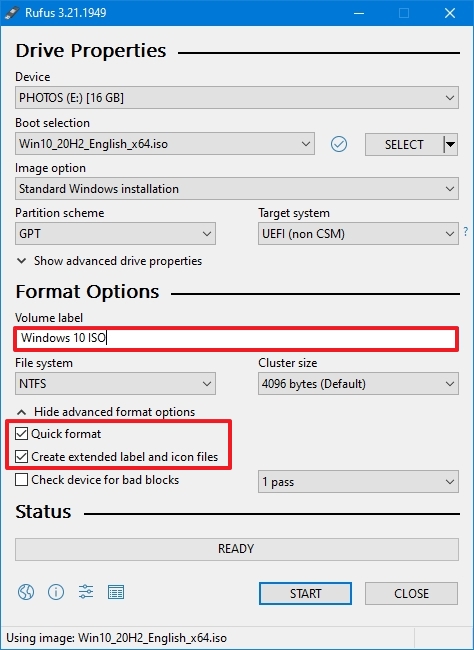
- Do not change the default settings in the «File system» and «Cluster size» options.
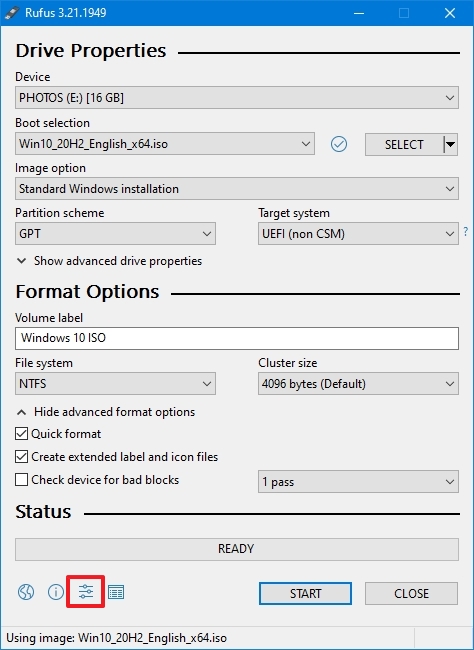
- Click the «Show advanced format options» setting.
- Check the Quick format option.
- Check the «Create extended label and icon files» option.
- Click the Start button.
- Leave the customization installation settings unchecked.
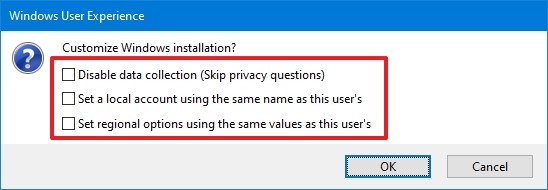
- Click the OK button to confirm.
- Click the Close button.
After you complete the steps, Rufus will create a USB flash drive to install Windows 10 on a device using UEFI.
Create flash drive downloading Windows 10 ISO
The tool also has a feature to download the Windows 10 ISO file, which you can then use to create a USB flash drive to install Windows 10.
To create an install media with UEFI support with Rufus, use these steps:
- Open Rufus download page.
- Under the «Download» section, click the latest release (first link) of the tool to save the file.
- Double-click the Rufus-x.xx.exe file to launch the tool.
- Click the Settings button at the bottom of the page.
- Under the «Settings» section, use the «Check for updates» drop-down menu and select the Daily option.

- Click the Close button.
- Close the Rufus tool.
- Double-click the Rufus-x.xx.exe file to reopen the utility.
- Under the «Device» section, select the USB flash drive from the list.
- Under the «Boot selection» section, click the arrow button next to the «Select» option and choose the Download option.
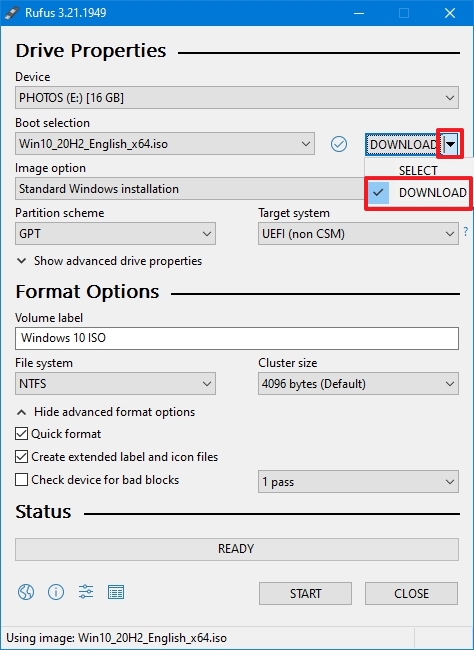
- Click the Download button.
- Use the «Version» drop-down menu and select the Windows 10 option.
- Click the Continue button.
- Select the 22H2 (Build 19045.xxx — xxxx.xx) option to download the Windows 10 November 2021 Update.
- Click the Continue button.
- Use the «Edition» drop-down menu and select the Windows 10 Home/Pro/Edu option.
- Click the Continue button.
- Use the «Language» drop-down menu and select your installation language.
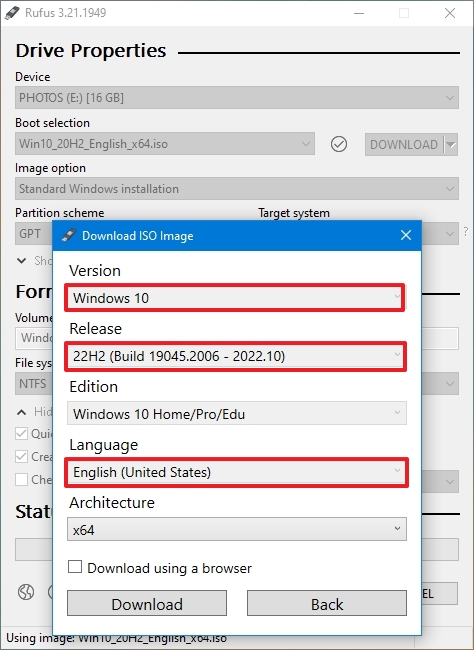
- Quick note: If you are located in the United States, select the «English» option. Otherwise, select the «English International» option or the language that applies to you.
- Click the Continue button.
- Use the «Architecture» drop-down menu and select the 32-bit or 64-bit option (recommended).
- Quick tip: You can check your computer’s architecture on Settings > System > About, and under the Device specifications section, confirm whether the «System type» is 64-bit or 32-bit.
- Click the Download button.
- Select a folder to save the ISO file.
- Click the Save button.
- Use the «Image option» drop-down menu and select the «Standard Windows installation» option.
- Use the «Partition scheme» drop-down menu and select the GPT option.
- Use the «Target system» drop-down menu and select the UEFI (non CSM) option.
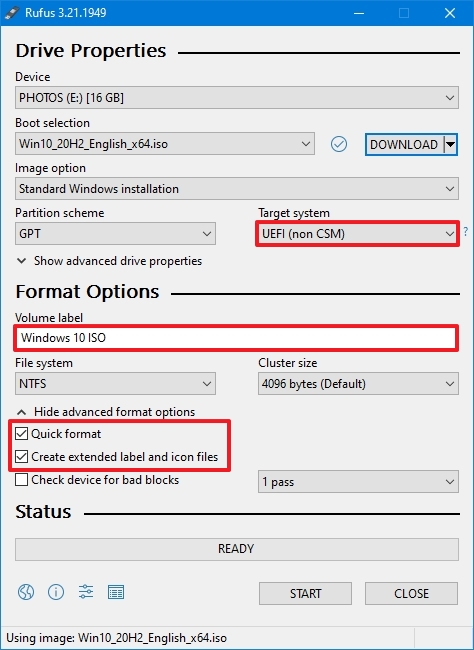
- Under the «Show Advanced drive properties» section, do not change the default settings.
- Under the «Volume label» field, confirm a name for the bootable drive — for example, «Windows 10 USB.»
- Under the «File system» and «Cluster size» sections, do not change the default settings.
- Click the «Show advanced format options» button.
- Check the Quick format option.
- Check the «Create extended label and icon files» option.
- Click the Start button.
- Leave the customization installation settings unchecked.
- Click the OK button.
- Click the Close button.
Once you complete the steps, Rufus will run the automated script to download the Windows 10 ISO file from the Microsoft servers and create a bootable media to install the operating system on a UEFI device without needing the Media Creation Tool.
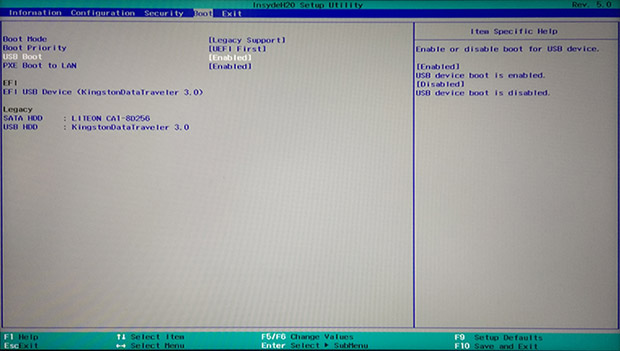
When you have the USB boot media with support for UEFI systems, you can launch the «Windows Setup» wizard to perform a clean installation of Windows 10 or an in-place upgrade. However, since the «UEFI:NTFS bootloader» does not include a digital signature for secure boot, you must temporarily disable secure boot on the motherboard firmware before you can boot into the setup. Typically, you would do this from within the UEFI, which you can access by hitting one of the function keys (F1, F2, F3, F10, or F12), Esc, or the Delete key, as soon as you start the computer.
The firmware settings are different per manufacturer and even by device model. As a result, check your device manufacturer’s support website for more specific instructions. After the installation of Windows 10, you can enable secure boot again.
More resources
For more helpful articles, coverage, and answers to common questions about Windows 10, visit the following resources:
- Windows 11 on Windows Central — All you need to know
- Windows 10 on Windows Central — All you need to know
All the latest news, reviews, and guides for Windows and Xbox diehards.
Mauro Huculak is technical writer for WindowsCentral.com. His primary focus is to write comprehensive how-tos to help users get the most out of Windows 10 and its many related technologies. He has an IT background with professional certifications from Microsoft, Cisco, and CompTIA, and he’s a recognized member of the Microsoft MVP community.

Install Windows 10 – If you looking to install Windows 10 Operating System then this is the right place to find out That How to install Windows 10 using USB-Drive, and here you will also learn that How to Create a Bootable USB-Drive for Windows 10.
Are you a student and want to install Windows 10, but do you know How to Download Windows 10, How to Create a Bootable USB Drive, and How to Install Windows 10 from a Bootable USB-Drive?
Don’t worry, In this article, I have told you completely steps that How you can download and install Windows 10 using a Bootable Drive. And trust me, till the last of this blog you will understand how to install Windows 10.
So let’s get started!
Windows 10 System Requirements

If you want to install WIndows 10 on your Computer then you need to know about your Computer’s System Requirements, whether your Computer can Support Windows 10 or Not. To install Windows 10 your Computer must have these minimum System Requirements.
- 1 Gigahertz Processor or more
- Minimum 1 GB RAM (32-bit)
- Minimum 2 GB RAM (64-bit)
- Minimum Hard Disk space 20 GB
- Screen Resolution 800 x 600
- How to Check RAM Type, Size, and Speed in Windows
- How Much Space Does Windows 10 Really Take-up

Now I will tell you that How you can install Windows 10 from a USB, but first you need these Devices or Programs to Install Windows 10. If you have already these programs or devices then you can easily install Windows 10 on your computer, So install Windows 10 follow my steps one by one.
- Windows 10 ISO file
- Rufus Software
- Minimum of 8 GB Pendrive
- a Computer for install Windows 10
Step 1 – Download Windows 10 ISO

If you want to install Windows 10 then you must need a Windows 10 ISO file, but do you know How to Download Windows 10 ISO file, Don’t worry, In the first step I will tell you that How you can Download Windows 10 ISO file.
- First, open any Browser on your Computer
- Search “Download Windows 10 ISO”
- Then open first WebSite or click here
- Now you can Buy and use Windows 10.
Step 2 – Download Rufus Software

If you want to install Windows 10 then you must need Rufus Software, Rufus is basically Software which is Create a Bootable Drive for installing any Operating System. So follow the steps for downloading Rufus Software.
- First, open any Browser on your Computer
- Search “Download Rufus“
- Then open first WebSIte or Click here
- Then you can Download Rufus and it’s free.
Step 4 – Create a Windows 10 Bootable USB

- First, Install Rufus on your Computer
- Open Rufus Software
- Then you will see a New Window
- In this, your pendrive is automatically selected
- Then click on Select option and Select Windows 10 ISO file
- Now, If you have minimum 1 TB Hard Disk
- Then selct “MBR” otherwise “GPT“
- Finally, click on Ready Button.
Then you will see that your USB Drive will start to make a Bootable USB Drive. You can also use Command Prompt but If you don’t have any knowledge of CMD then you should use Rufus Software.
- Create a Bootable USB drive using CMD for windows 10
- How to Recover Deleted Data from Hard Disk free

Now I will tell you how you can open the Boot Menu on your Computer, In Boot Menu you can select a Bootable Device and use a New Operating System on your Computer.
- First, Insert USB-Drive in your Computer
- Then Restart your Computer
- Then Press Boot Key Multiple Time before Windows Logo.
- And you will see that Boot Menu is Opened.
If you don’t know that which is the Boot Key in your Computer Then click here to know all Computer’s Boot Key.
Step 6 – Setup Windows 10

If you want to install Windows 10 then You have to give some of your information of use Windows 10 like – Country & Language, Date & Time, etc.
- In Boot Menu you will see many Options
- And here is also your USB-Drive Option.
- Select USB-Drive and hit Enter
- Then you will see Windows 10 Installation Setup Window
- Then Select your Language and Country, and Next
- Click on Install Now button
- Then you will see Setup is Starting
Step 7 – Create Disk Partition for Windows 10

- After, Setup Windows 10 you will see a Disk Window
- Now you need to Create a New Partition for Windows 10
- If you have already a Partition of any Oerating System
- Then just format here and Install Windows 10
- otherwise select new partition and install Windows 10.

Then you will see that Windows 10 will start installing on your computer, this process will take 5 to 10 minutes or more according to your computer, after that you can use Windows 10, this is a very easy way to install Windows 10.
- How to Download and Install Windows 11
- How to install windows 7 operating system
- How to Install Windows 8.1 from USB Drive
- How to Download and Install VMware in Windows 10
If you have liked this article (How to Install Windows 10 from USB), then you can share it with friends and family so that they do not ever get such a problem.
If you have any problem with any part of this article, or you want any more information related to the computer, then tell me in the comment box, I will surely reply to you.
Thank You !!
Как установить Windows 11/10 с USB на новый компьютер? Далее три возможных способа с подробными инструкциями.
| Рабочие решения | Пошаговое устранение неполадок |
|---|---|
| 1. самый простой способ | Используйте программу для управления разделами EaseUS, чтобы одним щелчком мыши перенести ОС…Все шаги |
| 2. USB-накопителя | Используйте простой инструмент для создания установочного USB-накопителя Windows 11/10, а затем установите…Все шаги |
| 3. Windows Media Creation tool | Windows Media Creation Tool создаёт установочный USB-накопитель Windows 11/10 для установки ОС… Все шаги |
Как перенести ОС для установки Windows 11/10 на новый ПК в несколько кликов
Самый простой и быстрый способ установить Windows 11/10 на новый ПК — перенести операционную систему на HDD/SSD вместо установки Windows с USB. Но как перенести Windows 11/10 на новый компьютер? EaseUS Partition Master спешит на помощь. Этот универсальный менеджер разделов предлагает комплексные решения для организации жёсткого диска и повышения производительности компьютера.
- Изменение размера/перемещение, объединение, клонирование разделов и проверка файловой системы на ошибки.
- Клонирование диска, преобразование в GPT/MBR, преобразование в динамический/базовый диск и даже безвозвратное удаление данных.
- Перенос ОС на HDD/SSD, увеличение размера раздела и т. п.
Подготовьте:
- Компьютер под управлением Windows 11/10
- Извлеките системный диск из нового ПК и подключите его к компьютеру с Windows 11/10
- Скачайте EaseUS Partition Master
Пошаговое руководство по переносу Windows 11/10 на HDD/SSD
Шаги по переносу ОС на HDD/SSD:
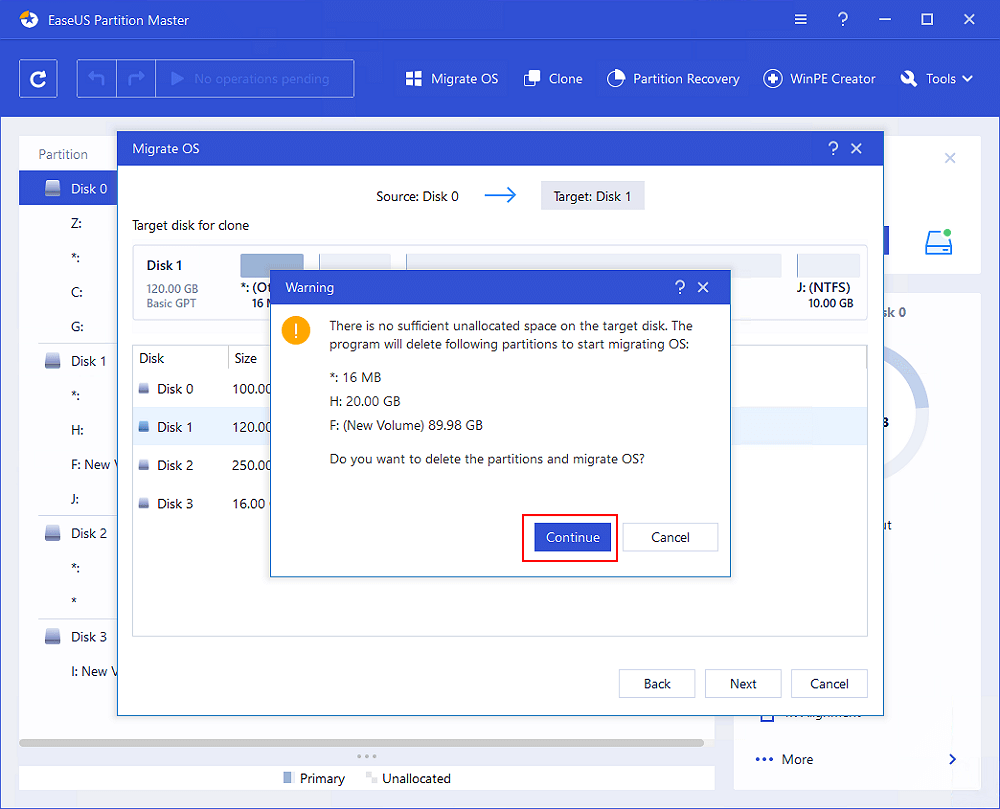
Шаг 1: запустите EaseUS Partition Master, выберите функцию «Перенести ОС» в верхнем меню.

Шаг 2: укажите SSD или HDD-диск, куда будет перенесена текущая ОС, и нажмите «Далее».
Предупреждение: все данные и разделы на указанном диске будут удалены. Убедитесь, что вы сделали резервную копию всей важной информации.
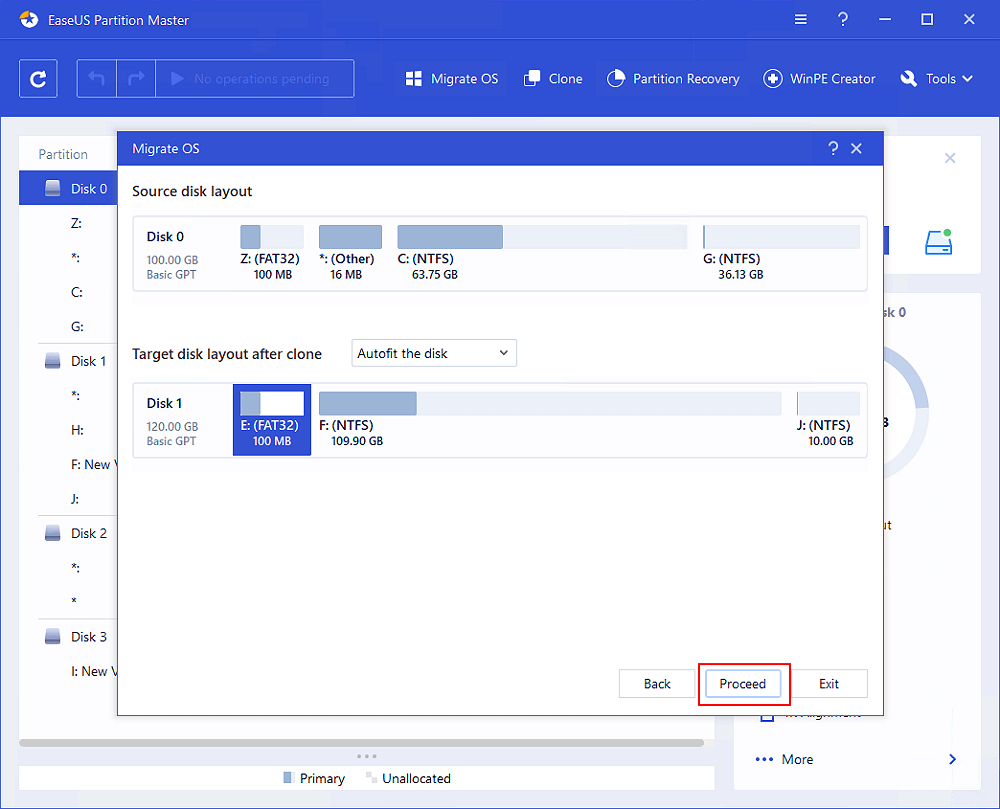
Шаг 3: предварительно просмотрите, как будет размечен указанный диск. Вы также можете изменить текущие установки, чтобы настроить разметку диска по своему усмотрению. Затем нажмите «Продолжить», чтобы начать перенос вашей ОС на новый диск.
Обратите внимание: Операция переноса ОС на SSD или HDD удалит существующие разделы и данные на целевом диске, если на целевом диске будет недостаточно нераспределённого пространства. Если вы сохранили там важные данные, заранее сделайте их резервную копию на внешний жёсткий диск.
После клонирования системы снова подключите диск к новому ПК. Затем запустите его с Windows 11/10. Если ваш компьютер не запускается, вы можете войти в BIOS и установить новый клонированный диск в качестве загрузочного устройства.
- Перезагрузите компьютер. Когда появится экран запуска, постоянно нажимайте F2/F12/DEL, чтобы войти в BIOS.
- Затем с помощью клавиши со стрелкой выберите пункт «Загрузка» (Boot) и выберите клонированный жёсткий диск в качестве первого варианта загрузки.
- Сохраните настройки и перезагрузите компьютер.
Как установить Windows 11/10 с загрузочной флешки
Если вам нужна инструкция как установить Windows 11/10 на новый компьютер только с помощью флешки, не закрывайте эту страницу. Читайте далее и вы узнаете, как установить Windows 11/10 с загрузочного USB-накопителя или с помощью ISO-файла Windows 11/10 с помощью инструмента для создания установочного носителя.
Далее пошаговые руководства, как создать загрузочный установочный USB-накопитель Windows 11/10 и установить ОС на новый ПК.
- 1. Что вам понадобится
- 2. Форматирование USB-накопителя
- 3. Создание установочной USB-флешки Windows 11/10
- 4. Как установить Windows 11/10 с USB
1 — Подготовьте
- UltraISO — инструмент для создания загрузочной флешки Windows 11/10
- USB-накопитель со свободным местом не менее 8 ГБ
- Свободный компьютер, на котором вы будете форматировать флешку
- EaseUS Partition Master — лучший инструмент для форматирования USB
- Ваш новый компьютер, на который вы установите Windows 11/10
Затем выполните три шага по установке Windows 11/10 с USB на новый компьютер
2 — Отформатируйте USB-накопитель и установите основной раздел как активный
Скачайте и установите EaseUS Partition Master на доступном вам компьютере (ваш старый компьютер или ПК ваших друзей).
Шаг 1: запустите EaseUS Partition Master, щелкните правой кнопкой мыши по тому разделу, который хотите отформатировать, и выберите опцию «Форматировать».
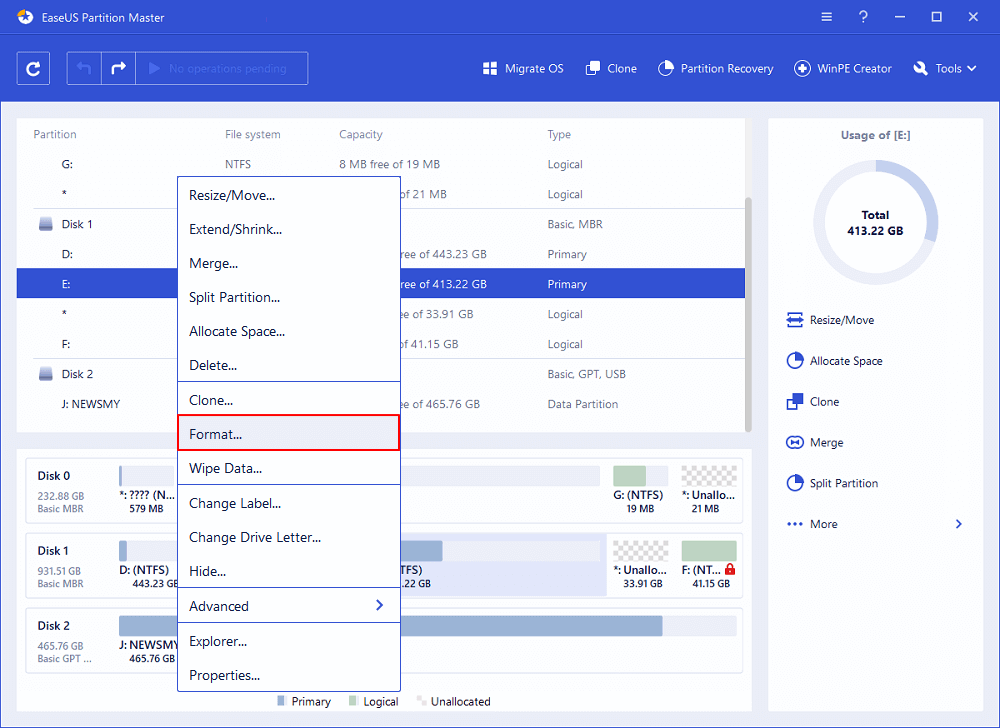
Шаг 2: в новом окне введите метку раздела, выберите файловую систему (fat32 / ntfs / ext3 / ext3 / ext4) и установите размер кластера в соответствии с вашими потребностями, затем нажмите «ОК».
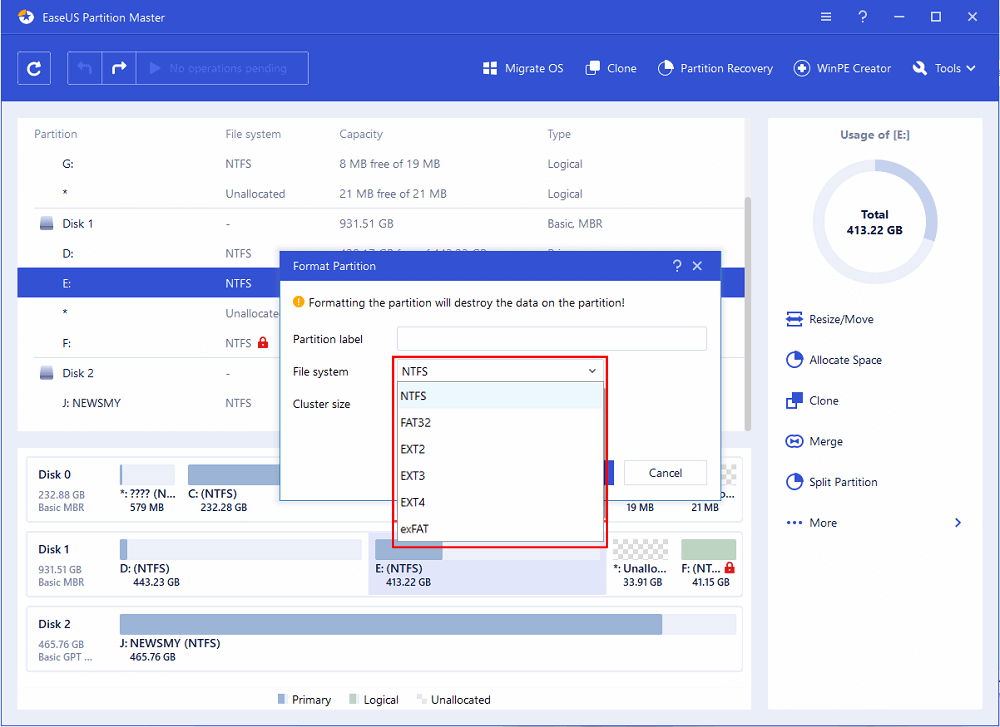
Шаг 3: затем вы увидите окно с предупреждением — нажмите «ОК» для продолжения.
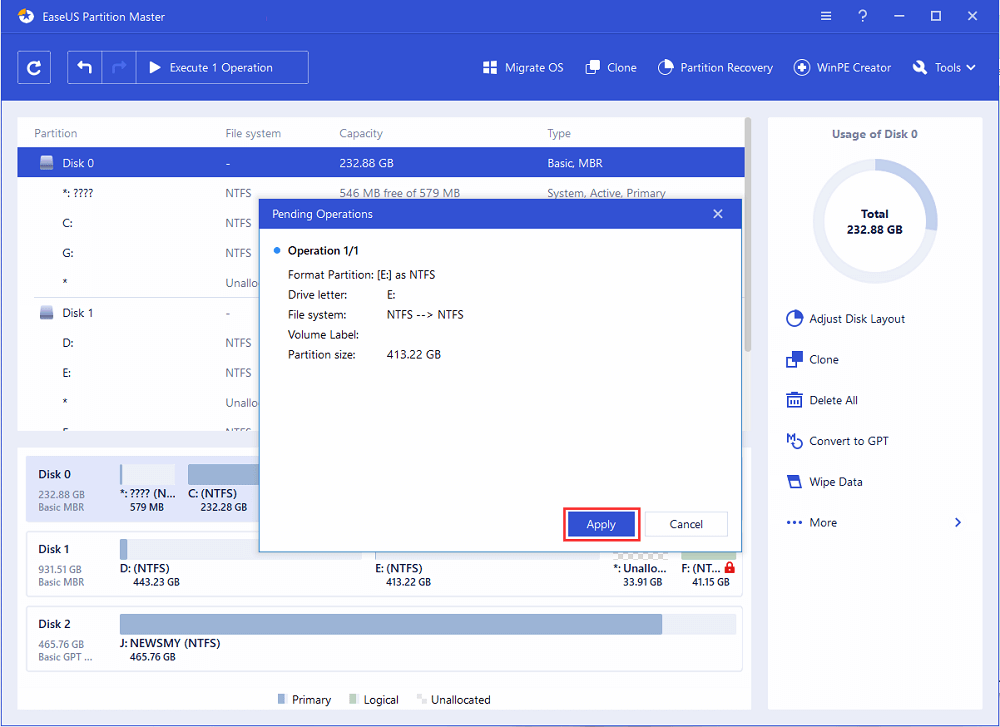
Шаг 4: нажмите кнопку «Выполнить операцию» в верхнем левом углу, чтобы просмотреть добавленную задачу по форматированию. Если все корректно — нажмите «Применить», чтобы начать форматирование раздела.
- Обратите внимание:
- Параметр «Set active» («Установить активным») доступен только в том случае, если стиль раздела флеш-накопителя USB — «Основной». Вам может понадобиться преобразование логического раздела в основной, если на этом шаге не удаётся пометить раздел как активный.
Еще один способ отформатировать флешку для установки Windows 11/10 с USB:
- 1. Подключите флеш-накопитель USB к свободному ПК.
- 2. Откройте «Управление дисками». Щёлкните правой кнопкой мыши по кнопке Пуск и выберите «Управление дисками».
- 3. Отформатируйте раздел. Щёлкните правой кнопкой мыши по разделу USB-накопителя и выберите Форматировать. Выберите файловую систему FAT32, чтобы иметь возможность загружать ПК на основе BIOS или UEFI.
- 4. Установите раздел как активный: щёлкните правой кнопкой мыши по разделу USB-накопителя и выберите Сделать раздел активным.
3 — Создайте установочный USB-накопитель Windows 11/10
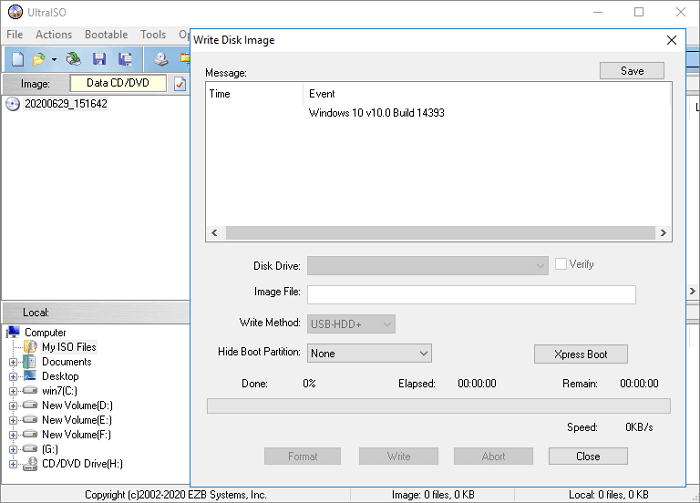
Когда вы планируете установить Windows 11/10, для установки часто требуется компакт-диск или USB-накопитель. Как создать загрузочную флешку Windows 11/10? С помощью UltraISO- утилиты для записи DVD-диска Windows 11/10 или ISO-образа на USB-накопитель. Сделайте это, выполнив следующие действия.
- Подключите пустой отформатированный USB-накопитель к компьютеру.
- Откройте и запустите UltraISO. Выберите «Файл» > «Открыть», чтобы импортировать исходный файл установки ISO операционной системы Windows 11/10.
- Выберите «Самозагрузка» > «Записать образ диска..» в главном меню. Выберите USB-накопитель, с которого вы хотите загрузиться.
- Нажмите кнопку «Записать», после чего флешка будет записана как загрузочная для Windows 11/10.
- После завершения записи вы можете использовать USB в качестве установочного диска для установки операционной системы Windows 11/10.
4 — Как установить Windows 11/10 с USB-накопителя на новый ПК
Теперь, когда вы знаете, что вам нужно, если вы хотите установить Windows 11/10 с USB на новый компьютер, вы можете следовать инструкциям по установке ОС Windows. Подключите загрузочный USB-накопитель к новому ПК, убедитесь, что USB-устройство обнаружено, затем выберите его в качестве основного загрузочного устройства.
- Включите ПК и нажмите клавишу, которая открывает меню выбора загрузочного устройства для компьютера, например, клавиши Esc/F10/F12. Выберите вариант загрузки ПК с USB-накопителя.
- Запустится программа установки Windows. Следуйте инструкциям по установке Windows 11/10. Обратите внимание, что часть настройки ОС будет продолжаться после входа в систему, так что наберитесь терпения. Вам также необходимо проверить наличие обновлений Windows (Параметры > Обновление и безопасность > Центр обновления Windows) после установки, чтобы убедиться, что все обновлено.
- Извлеките флешку из компьютера.
Иногда лучше устанавливать Windows 10 на внешний жёсткий диск. В этом случае вы можете использовать свою собственную настроенную операционную систему Windows 11/10, где бы вы ни находились.
Как установить Windows 11/10 с USB с помощью Windows Media Creation Tool
Если вы хотите узнать, как установить Windows 11/10 с USB-накопителя с помощью Windows Media Creation Tool, потратьте две минуты на прочтение этой части. По оценкам, 90% читателей смогут самостоятельно начать установку Windows 10 с USB после прочтения этой части. Теперь пришло ваше время научиться устанавливать Windows11/10 с USB с помощью Windows Media Creation Tool.
- 1. Скачайте инструмент для создания установочного носителя
- 2. Создайте установочный носитель Windows 11/10
- 3. Установите Windows 11/10 с USB-накопителя
1. Скачайте инструмент для создания установочного носителя
Вначале вам потребуется лицензия для установки Windows 11/10. Затем вы можете загрузить инструмент для создания установочного носителя Windows 11/10 и использовать этот инструмент для установки Windows 11/10 с USB-накопителя или из файла Windows ISO. Скачайте инструмент для создания установочного носителя Windows.
Перед загрузкой убедитесь, что у вас есть:
- Быстрое интернет-соединение
- Достаточно места на компьютере, USB или внешнем диске для скачивания инструмента
- Пустой USB-накопитель ёмкостью не менее 8 ГБ или чистый DVD-диск (и устройство записи DVD) для создания загрузочного диска
- Важно
- Поскольку при создании установочного носителя Windows 11/10 содержимое USB-накопителя или DVD-диска будет удалено, лучше использовать чистый USB-накопитель или чистый DVD-диск.
- Если вы получили сообщение, что файл образа диска слишком велик при записи DVD из файла ISO, вам необходимо использовать двухслойный (DL) DVD-носитель.
2 — Как создать установочный носитель Windows 11/10
Шаг 1. Загрузите и запустите инструмент от имени администратора.
Шаг 2. На странице «Что вы хотите сделать?» выберите параметр «Создать установочный носитель для другого компьютера», а затем нажмите кнопку «Далее».
Шаг 3. Выберите язык, выпуск и архитектуру (64-разрядная) для Windows 11/10.
Шаг 4. Выберите носитель, который вы хотите использовать:
- USB флешка— подключите пустое USB-устройство флеш-памяти ёмкостью не менее 8 ГБ.
- ISO-файл — сохраните ISO-файл на своём компьютере. Его можно использовать для создания загрузочного DVD-диска. После скачивания файла вы можете перейти в папку, в которой сохранён файл, или выбрать «Открыть устройство записи DVD-дисков» и следовать инструкциям для записи файла на DVD-диск.
Чтобы записать ISO-файл Windows 11/10 на DVD
- Найдите папку, в которую вы скачали ISO-файл Windows 11/10.
- Щёлкните правой кнопкой мыши по ISO-файлу и выберите «Свойства». На вкладке «Общее» нажмите кнопку «Изменить…» рядом со строкой «Приложение:» и выберите «Проводник» Windows. Нажмите кнопку «Применить».
- Щёлкните по ISO-файлу правой кнопкой мыши и выберите параметр «Записать образ диска».
Если вы хотите установить Windows 11/10 непосредственно из ISO-файла без использования DVD- или USB-диска, вы можете подключить ISO-файл. Это позволит выполнить обновление существующей операционной системы до Windows 11/10.
Чтобы подключить ISO-файл:
- Перейдите в папку, в которую вы скачали ISO-файл. Затем щёлкните правой кнопкой мыши по ISO-файлу и выберите «Свойства».
- На вкладке «Общее» нажмите кнопку «Изменить…» рядом со строкой «Приложение:» и выберите «Проводник.» Windows для открытия ISO-файлов и нажмите кнопку «Применить».
- Щелкните правой кнопкой мыши по ISO-файлу и выберите «Подключить».
- Будет создан «виртуальный» загрузочный диск. Дважды щёлкните его, чтобы посмотреть файлы на диске. Дважды щёлкните файл setup.exe для запуска программы установки Windows 11/10.
После этого продолжайте выполнять описанные ниже шаги для установки Windows 11/10.
3 — Как установить Windows 11/10 с помощью Media Creation Tool
Шаг 1. Подключите флеш-накопитель USB или вставьте DVD-диск в новый компьютер, на котором вы хотите установить Windows 11/10.
Шаг 2. Перезагрузите компьютер. Если компьютер не загружается автоматически с USB- или DVD-диска, вам может потребоваться открыть меню загрузки или изменить порядок загрузки в параметрах BIOS или UEFI. Для этого необходимо нажать определённую клавишу (например, F2, F12, DELETE или ESC) сразу после включения компьютера.
Совет: Если загрузочная флешка не отображается или не распознается в Windows 11/10, ознакомьтесь с руководством для решения этой проблемы.
Шаг 3. Следуйте инструкциям на экране, чтобы завершить установку Windows 11/10. Введите лицензионный ключ Windows 10, когда во время установки появится всплывающее окно для ключа продукта.
Шаг 4. После завершения установки Windows 11/10 убедитесь, что у вас установлены все необходимые драйверы устройств.
Нажмите кнопку «Пуск», перейдите в раздел «Параметры» > «Центр обновления Windows» и нажмите кнопку «Проверить наличие обновлений».
Установка Windows 11/10 с USB — Заключение
В этой статье представлены три распространённых способа установки Windows 10 на новый компьютер:
- Перенос ОС для установки Windows 11/10 на новый компьютер без усилий.
- Установка Windows 11/10 с загрузочного USB-накопителя.
- Установка Windows 11/10 с USB-накопителя с помощью инструмента для создания установочного носителя Windows 11/10.
Установка Windows 11/10 с USB — сложная работа, вы должны точно следовать инструкциям. Если во время процесса возникнут какие-либо проблемы, вы можете связаться с нашей службой технической поддержки через чат или по электронной почте: support@easeus.com для более быстрой и эффективной помощи.
Часто задаваемые вопросы — Как установить Windows 11/10 с USB (устранение неполадок)
Некоторые пользователи жалуются, что у них часто возникают сомнения по поводу того, надо ли обновлять или устанавливать Windows 11/10 с USB. Давайте разбираться вместе.
Как установить Windows с USB-накопителя?
Шаг 1. Отформатируйте USB-накопитель и установите основной раздел как активный.
Шаг 2. Загрузите и запустите Media Creation Tool на доступном вам работающем ПК, подключённом к Интернету.
Шаг 3. Создайте установочный носитель на пустом USB.
Шаг 4. Установите Windows 11/10 с USB-накопителя на новый компьютер.
Шаг 5. Следуйте инструкциям на экране, чтобы завершить установку Windows 11/10.
Как сделать USB загрузочным?
Чтобы создать загрузочную флешку:
Шаг 1. Загрузите и запустите Media Creation Tool на доступном вам работающем ПК, подключенном к Интернету.
Шаг 2. Создайте установочный носитель на пустом USB.
Могу ли я установить Windows 11/10 на сам USB?
Если вы предпочитаете использовать переносную версию, вы можете создать и использовать USB-накопитель, на котором напрямую работает Windows 10. Вам понадобится флешка с объёмом свободного места не менее 8 Гб, а лучше 32 Гб. Вам также потребуется лицензия для активации Windows 10 на USB-накопителе.
Как установить Windows 11/10 с USB на SSD?
- Выключите вашу систему, удалите старый жёсткий диск и установите SSD — в процессе установки к вашей системе должен быть подключен только SSD.
- Вставьте загрузочный установочный носитель.
- Зайдите в BIOS и, если режим SATA не установлен на AHCI, измените его. Читать далее…
Как разбить жёсткий диск в Windows 11/10 на разделы после установки Windows 11/10 с USB?
Вы можете легко изменять размер, расширять, уменьшать или создавать разделы на жёстком диске с помощью EaseUS Partition Master. Загрузите эту программу и с лёгкостью разделите жёсткий диск в Windows 11/10 .
You have plenty of choices to make when installing a new version of Windows on your device.
If your computer doesn’t have a CD or DVD drive, you may want to learn how to run the installation from a “bootable USB” to set up your operating system quickly.
Most modern computers and laptops have completely abandoned the CD or DVD drive, making installation disks obsolete. While this isn’t an issue in many areas, such as video games and movies, it does oppose a roadblock for some software installations. You may want to learn how to install Windows 10, Windows 8.1, and Windows 7 using a bootable USB.
This article will go in-depth regarding what a bootable USB is and how to use one to create installation media for various Windows Operating Systems to install Windows 10, 8.1, or even 7. If you’ve already got your bootable USB ready — simply jump to the “How to Install Windows using Bootable USB” section and set your new copy of Windows up in a matter of minutes.
Jump To:
- How to create a Windows bootable USB with the Media Creation Tool.
- How to boot from USB? Change your computer’s boot order
- How to install Windows 10 using bootable USB
- How to install Windows 8.1 using bootable USB
- How to install Windows 7 using Bootable USB
Benefits of installing Windows with a bootable USB
There are many instances where you might need to reinstall your operating system or get a new one entirely. For example, you’d need to reinstall Windows if you encountered a serious error, your hard drive became damaged or corrupted, or you’re upgrading/downgrading your system.
When planning to reinstall or install a Windows operating system on your PC, you need to have the necessary installation files beforehand. This will allow you to boot and install the system.
Tip: Try creating an installation media using your device before installing a new system. If it’s not possible, use a different device near you, or ask someone you know to help you out.
Because CD and DVDs are becoming less practical, many computers and laptops no longer come with a drive to read and write physical disks. This makes it impossible for you to create or use an installation media unless it’s on a bootable USB drive. While this may sound impractical initially, USB sticks have a huge advantage over disks.
USBs are incredibly accessible, given the fact that almost every computer has a USB port that you can use to connect external devices. It’s the easiest and most streamlined method of installing an operating system. Nowadays, you can create a bootable USB to install various versions of Windows.
How to create a Windows bootable USB with the Media Creation Tool
Before installing Windows using a USB, you need to create the installation media itself. Your computer will read this once the USB flash drive is connected, allowing it to boot from USB. Below are the steps to create this bootable USB flash drive using the Media Creation Tool issued by Microsoft.
- Download the appropriate installation media from Microsoft:
- Download Windows 10
- Download Windows 8.1 Disc Image (ISO File)
- Download Windows 7 Disc Images (ISO Files)
- Follow the steps to download the Windows version you want. Some versions may require you to provide your Windows product key to verify your eligibility to download disc images.

- Save the Media Creation Tool to your computer. Launch the file and click Accept when prompted to agree to the software license terms when the download is finished.

- Select Create installation media (USB flash drive, DVD, or ISO file) for another PC and click the Next button.
- Follow any on-screen instructions to set your preferred language, Windows edition, and System Architecture. If unsure, check the Use the recommended options for this PC option and proceed.
- Choose the USB flash drive and select your USB from the list. The Windows installation files will start to download to your USB drive.
- Note that the download may take a long time, depending on your internet connection. Ensure not to disrupt the process until the bootable USB drive is created.


Here’s a summary to boot from a USB.
You first need to create the USB itself, which will be read by your computer and used to boot up. You can find the guidelines on creating a bootable USB using the Media Creation Tool issued by Microsoft.
- Open the Microsoft Download Windows page in your web browser and click on the Download tool now button.
- Save the tool to your computer. Launch the media creation tool when the download is finished and click Accept when prompted to agree to the launch.
- Select Create installation media (USB flash drive, DVD, or ISO file) for another PC and click the Next button.
- Set your preferred Language, Windows 10 Edition, and System Architecture.
- If you can’t change the settings, place a checkmark next to the Use the recommended options for this PC option and proceed.
- Choose the USB flash drive, then hit the Next button and select your USB drive from the list. The Windows installation files will start to download to your USB drive.
- The download may take a long time, depending on your internet speed. Ensure not to disrupt the process until the creation tool has been created.
How to boot from USB? Change your computer’s boot order
After creating an installation media, you must know how to boot from USB. This is needed to install Windows from the bootable USB.
The trick is: you need to change your computer’s boot order. Doing so will place the USB flash drive at the top of the boot order priority list, meaning that your computer will read the files on it first. This will prompt your computer to load the installation media instead of the already installed system.
You need to change the boot order in your computer’s BIOS to boot from USB. After completing this step, during the next startup sequence, your system will immediately boot from USB and use the installation media you created, starting the Windows installation process.
How to Install Windows using Bootable USB
With your computer’s boot order successfully changed to load up from a USB device first, you can now crack on with installing Windows using your USB’s installation file.
Note: Make sure you’ve backed up all your files before installing to ensure you don’t lose any valuable data.
How to install Windows 10 using bootable USB
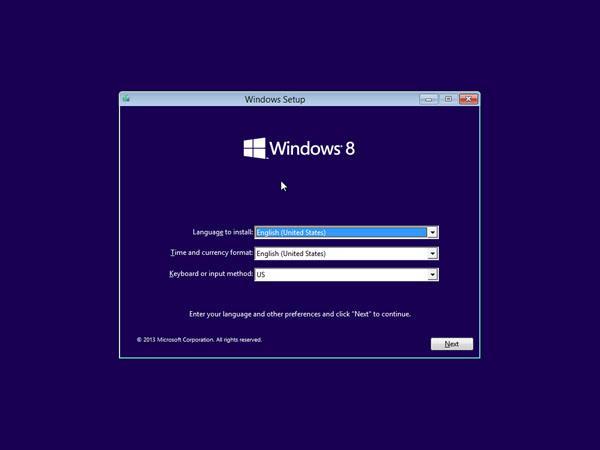
- Plug your USB device into your computer’s USB port, and start up the computer. You may be asked to press a key to boot from the USB.
- Choose your preferred language, timezone, currency, and keyboard settings. Once you’re happy with customizing these settings, click Next. (Note that these settings can be changed in the future after the Windows 10 installation is complete.).

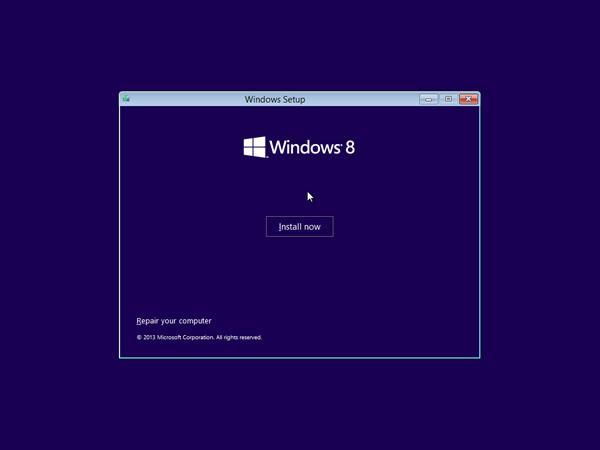
- Click Install Now and select the Windows 10 edition you’ve purchased. Now click Next to start the installation process.
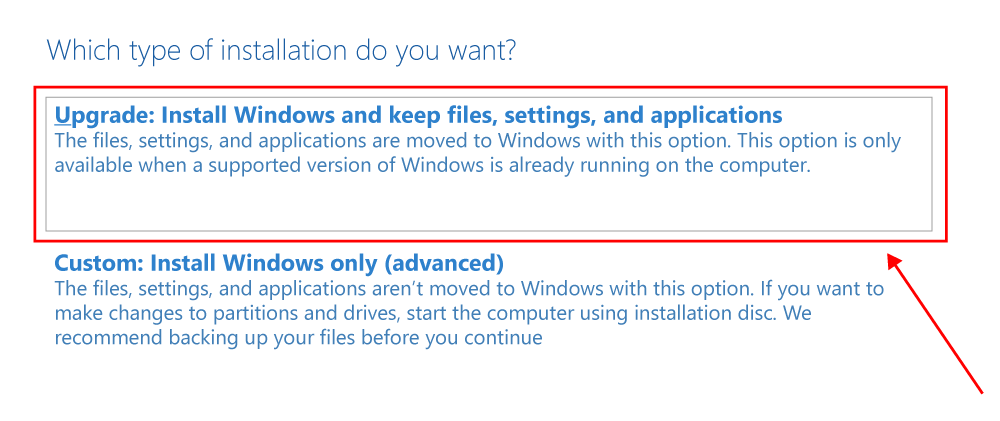
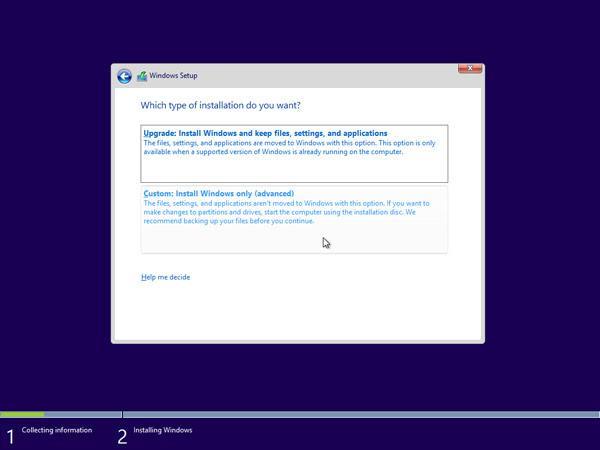
- Choose your installation type. You can either choose Upgrade, which will allow keeping your current files, settings, and apps; or do a fresh clean installation by picking Custom. In this example, we’ll be choosing custom to do a fresh Windows installation.

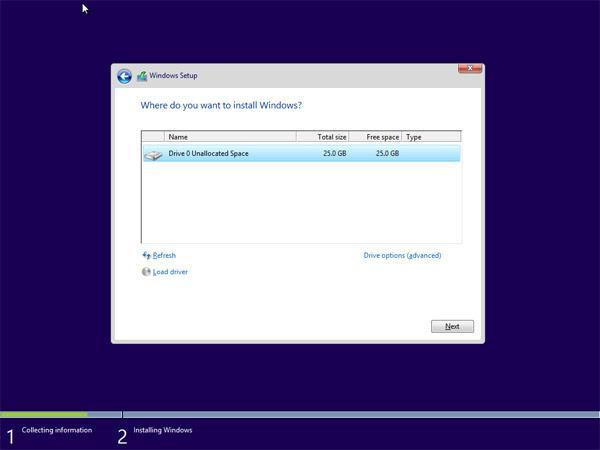
- To install Windows, you need a partition on your hard drive for storing system files; this will become the main C: drive. You can either pick an existing partition and format it or delete everything and create new partitions.
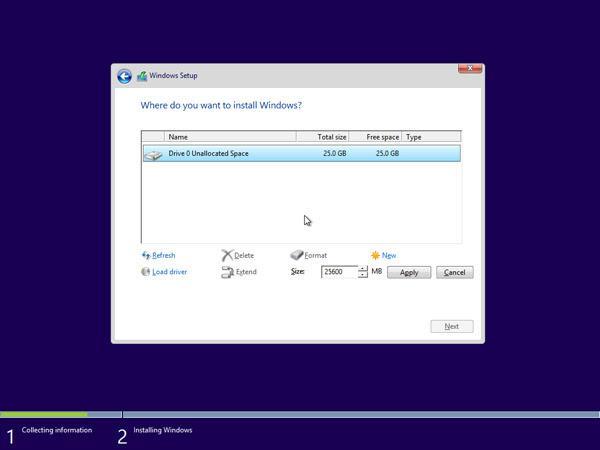
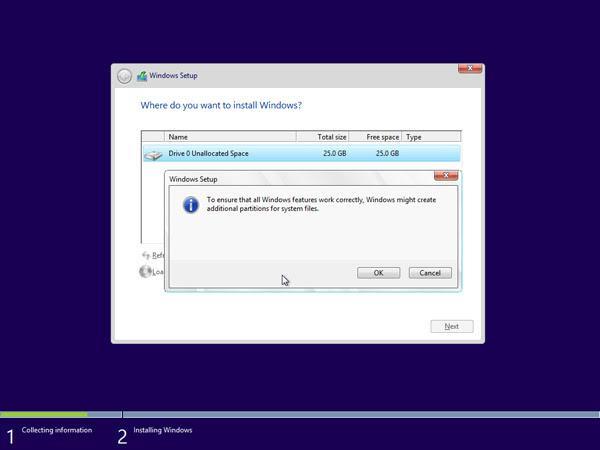
- If you’ve deleted all the existing partitions, your harddrive’s space will be unallocated, and you’ll need to create new partitions. If you just formatted an existing partition, then skip to Step 7 now. To create new partitions:
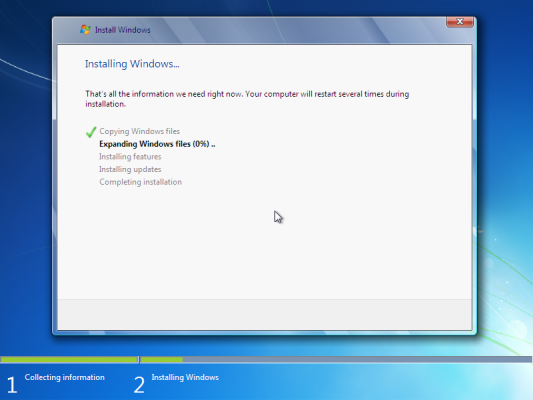
- Now select the partition where you want to install Windows and click Next. The Windows 10 installation will begin. Your computer may reboot a few times during the process. This is normal.

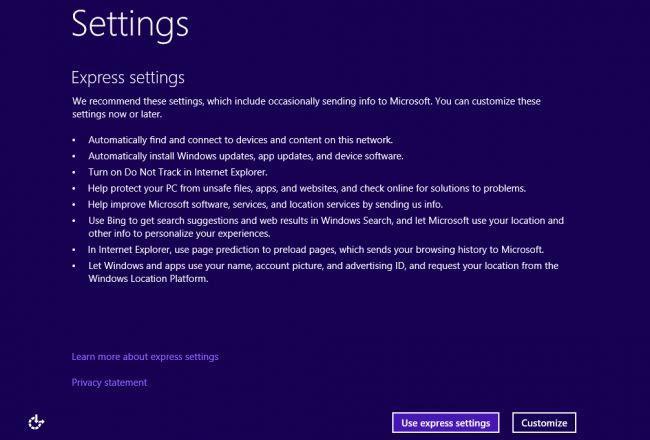
- After the installation is complete, your computer will automatically restart one last time. When it starts up again for the first time, you’ll be able to choose more of your settings or use express settings recommended by Microsoft.

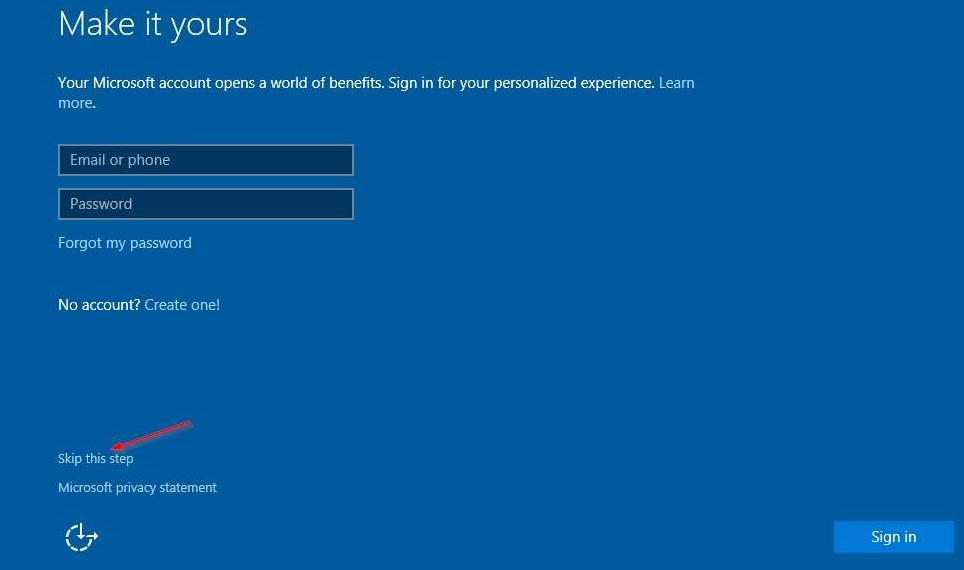
- Finally, sign in to your Microsoft account to use some of the new features with Windows 10, such as password recovery, and to access One Drive. If you don’t want to sign in with your Microsoft account, click Skip this step and follow the instructions to create a local user account instead.


How to install Windows 8.1 using bootable USB
- Plug your USB device into your computer’s USB port, and start up the computer. You may be asked to press a key to boot from the USB.
- Choose your preferred language, timezone, currency, and keyboard settings. Once you’re happy with customizing these settings, click Next. Don’t worry if you’ve made a mistake, you can change any of these in the future.

- Click Install Now and select the Windows 8.1 edition you’ve purchased. Now click Next to start the installation process.
- Enter the product key that came with your Windows purchase to activate it. When done, click Next.
- Note: You might not be prompted to enter a product key until later in the Windows 8.1 installation. This varies from version to version.
- Accept the license terms and then click Next.
- Choose your preferred installation type. You can either choose Upgrade, which will allow keeping your current files, settings, and apps; or choose Custom to do a fresh clean installation of Windows 8.1. In this example, we’ll be choosing custom to do a fresh Windows installation.
- To do a completely fresh installation with new partitions, you have to delete all the existing partitions first. Select each partition one by one and click Delete, then OK.
- Note: If you haven’t yet backed up your hard drive, you may want to stop now, back everything up, and start again. Once you’ve deleted the partitions you won’t be able to recover the data stored on these drives.
- Your computer hard drive’s space will now be unallocated. Following this, you need to create some new partitions. Select Drive options (advanced). Click New and choose the size for your new partition, then click Next.
- Windows will now create a new partition for storing system files. Click OK to accept. Repeat this step if you wish to create additional partitions.
- Select one of the new partitions and click Format. This will allow you to format your new partition. Press OK when prompted, and repeat the process for any other partitions, except the one for storing system files.

- Select the partition where you want to install Windows, and click Next.
- The Windows 8.1 installation will now begin. Your computer may reboot a few times during the process. This is normal. Follow the instructions when instructed to personalize your computer settings.


How to install Windows 7 using Bootable USB
- Plug your USB device into your computer’s USB port, and start up the computer. You may be asked to press a key to boot from the USB.
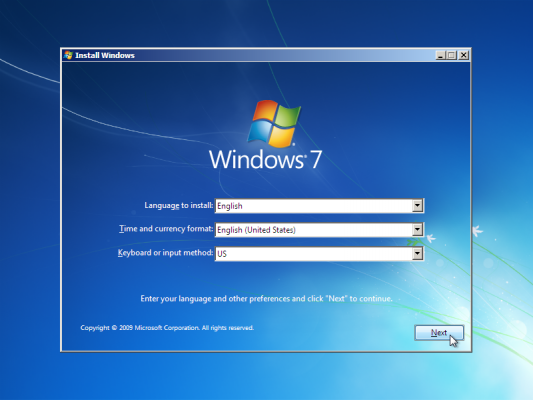
- Choose your preferred language, timezone, currency, and keyboard settings. Once you’re happy with customizing these settings, click Next. Don’t worry if you’ve made a mistake, you can change any of these in the future.

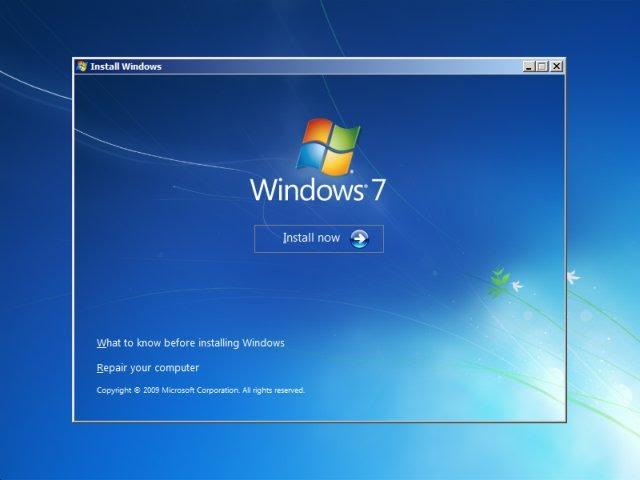
- Click Install Now to start the installation process.

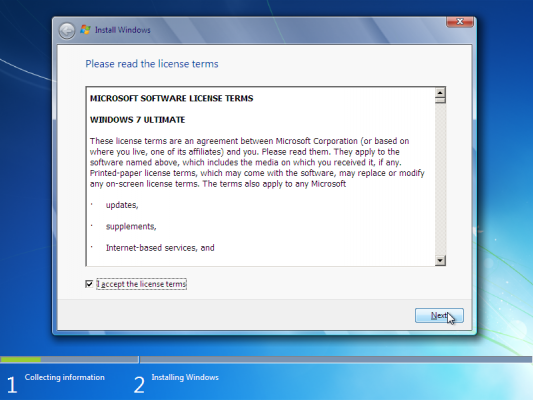
- Accept the license terms and then click Next.
- Choose your preferred installation type. You can either choose Upgrade, which will allow keeping your current files, settings, and apps; or choose Custom to do a fresh clean installation of Windows 7. In this example, we’ll be choosing custom to do a fresh Windows installation.
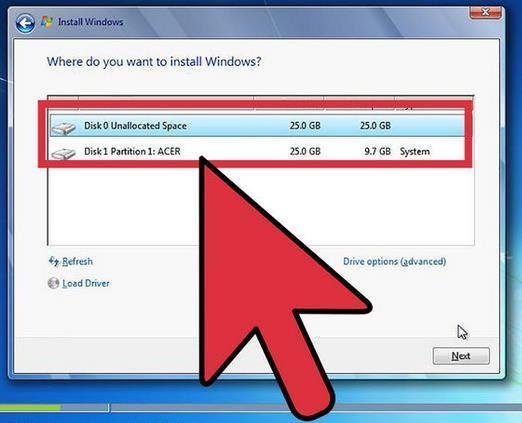
- To do a completely fresh installation with new partitions, you have to delete all the existing partitions first. Select each partition one by one and click Delete, then OK.
- Note: If you haven’t yet backed up your hard drive, you may want to stop now, back everything up, and start again. Once you’ve deleted the partitions you won’t be able to recover the data stored on these drives.

- Your computer hard drive’s space will now be unallocated. Following this, you need to create some new partitions. Select Drive options (advanced). Click New and choose the size for your new partition, then click Next.
- Windows will now create a new partition for storing system files. Click OK to accept. Repeat this step if you wish to create additional partitions.
- Select one of the new partitions and click Format. This will allow you to format your new partition. Press OK when prompted, and repeat the process for any other partitions, except the one for storing system files.
- Select the partition where you want to install Windows, and click Next.
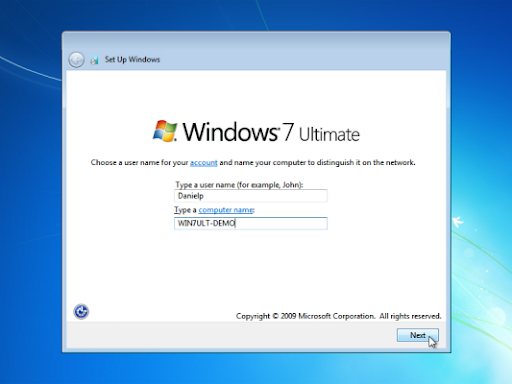
- Once the installation is complete, you’ll receive a prompt to set the user and computer names.
- Note: The built-in Administrator account is disabled on Windows 7, so the username you create will be the only one available on the system at first.
- Enter your username. The computer’s default name will be username-PC, where username is the username you’ve entered, but you can also change this. Once you’re done, click Next.

- Finally, enter the new user’s password, or just leave it blank and then click Next.
- Note: If you choose to create a password for your Windows 7 account, make sure to keep this safe. This will be the only user account on the system. If you lose it, you won’t be able to log in to your Windows system later.

That’s it! You’ve now installed a fresh copy of Windows from a bootable USB on your computer.
You may want to run a Windows update next time you start up your computer and install the latest firmware/drivers available from your manufacturer, otherwise, you’re ready to go with your new Windows machine.
Next Read:
> How to Create a Bootable USB Using Rufus
Frequently Asked Questions
Q: How to boot from a USB flash drive?
To boot your computer from USB, you need to plug the USB stick in your computer and power it on. If the install media doesn’t automatically start, you need to first change the boot order. This can be done from the BIOS settings.
Q: What format should a bootable USB be for Windows 10?
Your USB flash drive should have the FAT32 format to run the Windows 10 installer media.
Q: What size USB drive is required for the Windows Media Creation Tool?
You need a USB drive with a minimum of 4GB of free space. It should also be empty before you run the tool.
Q: How do I use the Rufus USB tool?
You can find all the information you need about the Rufus USB tool in our How to Create a Bootable USB Using Rufus article.
Q: Can I use a USB drive I created to install Windows on someone else’s computer?
No. The Windows ISO file on the USB drive is intended to be used to install Windows on the licensed user’s computers. If you’re a business owner, you may be required to show any digital licenses when auditing.
You May Also Like
» How to Create a Bootable USB Using Rufus
» How to Install Microsoft Office Updates
» How to Install Office on a Windows PC Using My Online Microsoft Account