Have you ever imagined that to use your own Windows 11/10 OS wherever you go? If yes, follow this page and you will uncover two practical ways to help you install Windows 11/10 on an external hard drive:
# 1. Install Windows 10/8/7 on External Hard Drive using EaseUS OS2GO
# 2. Install Windows 10 (Enterprise/Education Edition) on External Hard Drive
By doing so, you can take your Windows to anywhere and boot Windows 11/10 on any computer via the external hard drive.
Is It Possible to Install Windows 11/10 on an External Hard Drive
«I have a Seagate 2TB Expansion Desktop External HDD. Thinking that it will be cool to have an OS on the External. So I want to install the Windows 10 OS on this external HDD. But whenever I tried to install Windows 10 straight onto the external disk, I get an error message saying that windows cannot be installed on a USB drive or IEE 1394.
I was just wondering if it is possible to install Windows on an external hard drive. If so how can I get the Windows 10 OS installed?»

As you might know, although one can install Windows on an external hard drive, you can’t install the same to an external hard drive with default settings. Installing Windows 10 on an external hard drive is not an easy task for average users.
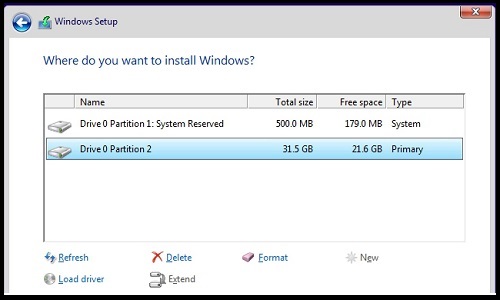
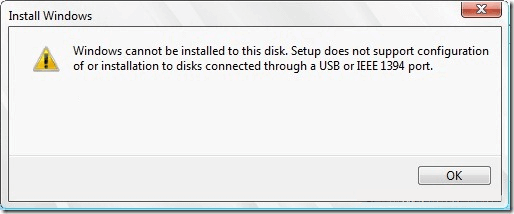
Usually, Windows recognizes and displays the USB hard drive on the installation screen but it doesn’t allow you to install Windows on it. If you attempt to so, you will get «Windows cannot be installed to this disk» error.
Don’t worry! Here you can find two complete solutions to install Windows 10 on an external hard drive and take Windows anywhere as you want.
![]()
It only takes two stages to install Windows 10 on an external hard drive. First, preparations — back up the external hard drive data and delete all the partitions on the external hard drive. Then, install Windows 10 on the external hard drive .
To install Windows 10 on the external hard drive, you have two options here: 1. Using system clone feature with EaseUS Todo Backup; 2. Use Windows To Go. Both two options allow you to execute the operation and make sure is bootable on the external hard drive.
Follow through the guidance here to install Windows 10 on the external hard drive and make it bootable on your own:
Preparations — Back-Up the External Hard Drive in Advance
You can simply copy the data to another disk or just use data backup software to do it. If you prefer a one-click backup solution, you may consider third-party backup software.
EaseUS Todo Backup provides professional and steady service to back up your external hard drive easily. It can also help you install Windows 10 on a hard drive for another computer.
Way 1. Use EaseUS Todo Backup
Applies to: all Windows operating OS, like Windows 11/10/8/7, etc.
Pros: The created Windows USB drive is bootable on any computer.
# 1. Delete All Partitions on the External Hard Drive
Make sure the capacity of your target external hard drive is larger than the total size of your boot and system partition.
You may use Disk Management to delete the external hard drive partition. If you have difficulty in deleting partitions, you can ask free partition manager for help.
Step 1. Launch EaseUS Partition Master, and click «Partition Manager».
Make sure that you’ve backed up the important data before deleting any partition on your disk.
Step 2. Select to delete partition or delete all partitions on hard drive.
- Delete single partition: right-click on a partition that you want to delete and choose «Delete«.
- Delete all partitions: right-click a hard drive that you want to delete all partitions, and select «Delete All«.
Step 3. Click «Yes» to confirm the deletion.
Step 4. Click «Execute xx Task» and then click «Apply» to save the change.
0:00 — 0:26 Delete single volumes; 0:27 — 0:53 Delete all partitions.
After the operation, the external hard drive will turn to an unallocated space without a drive letter on it. By now, the external hard drive is ready to install Windows 10.
# 2. Install Windows 10 On External Hard Drive
Basically, EaseUS OS2GO makes it easier to install the Windows system on an external hard drive than using Windows To Go. Then, refer to this guide to clone system with EaseUS Todo Backup below:
Preparation:
- 1. Check how much disk space is used for the system C drive. Then prepare a qualified USB drive which is larger than the used space.
- 2. Make sure you use an empty USB, because the system clone will overwrite the USB data completely.
- 3. Connect the USB drive to your machine and make sure it can be detected.
Follow the overall process to create a portable Windows USB drive and boot from it:
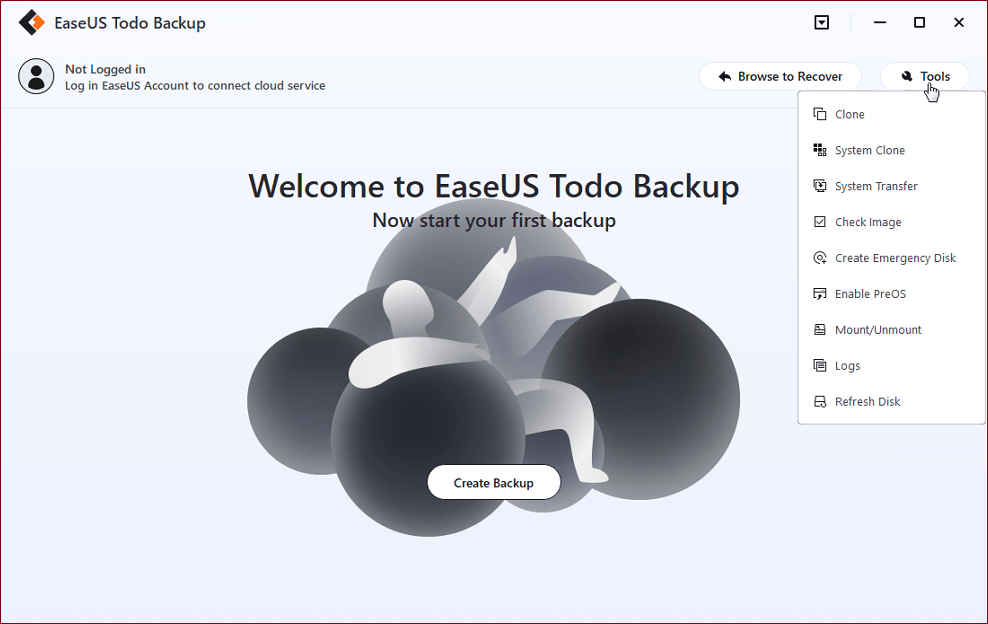
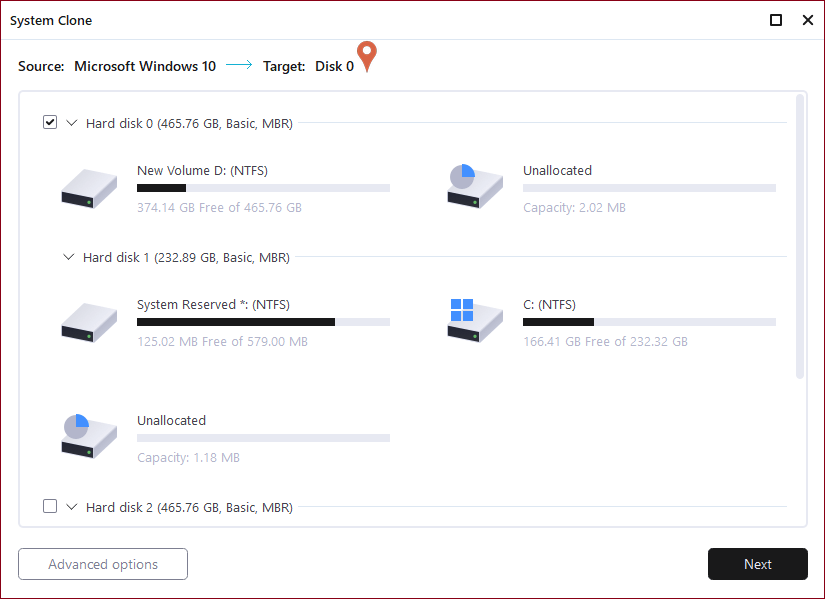
Step 1. On the main page, find and click «Tools«, choose «system clone«.

Step 2. The boot and system partition will be selected automatically, you just need to choose the target disk and click «Next.»
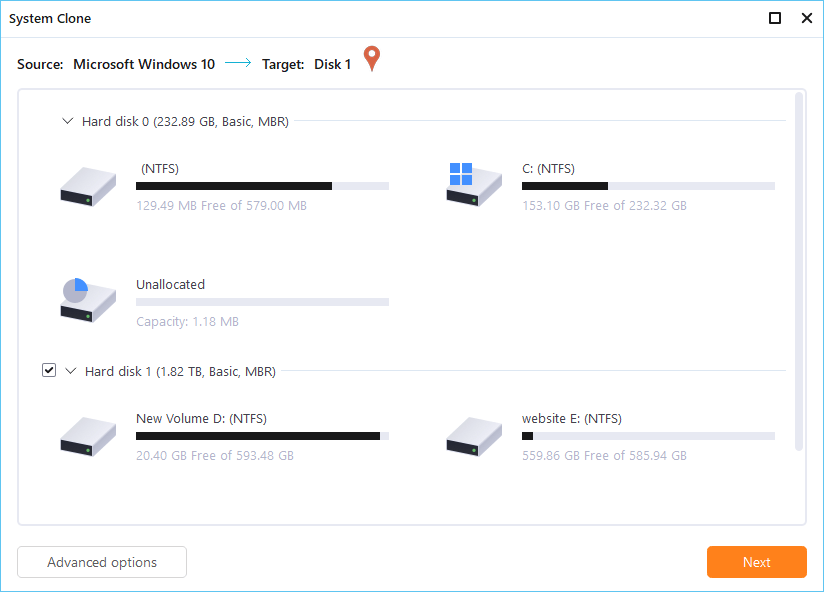
*System clone does not support cloning MBR disk to GPT or vice versa. Make sure that the partition style of the source disk and the target disk are the same.

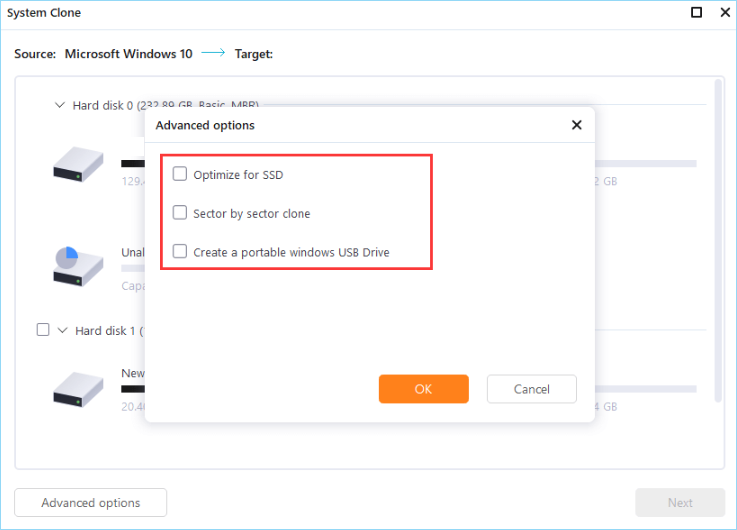
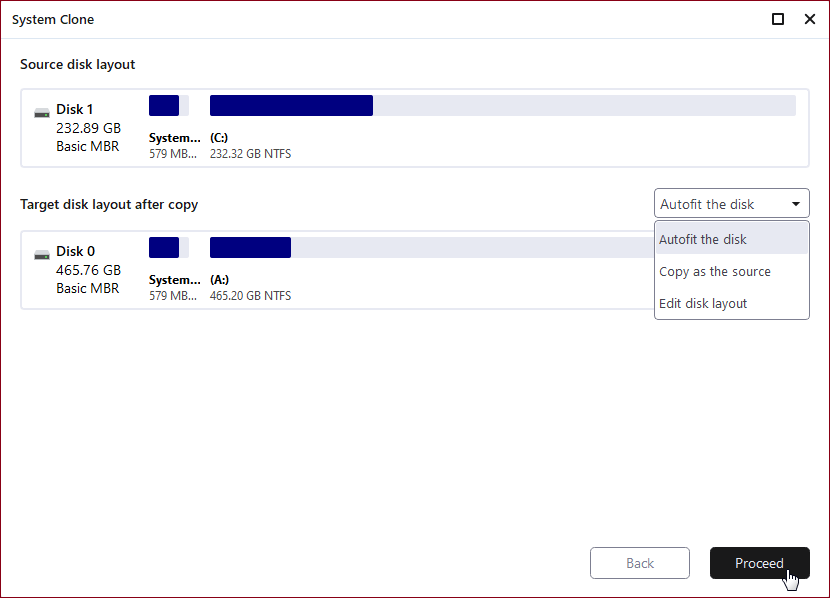
Step 3. Click «Advanced Options«, and choose «Create a portable Windows USB drive«.
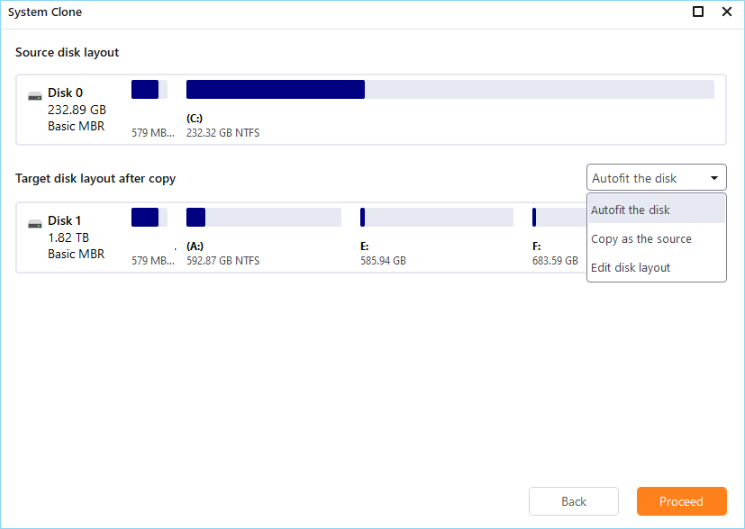
Step 4. Click «Proceed«. EaseUS Todo Backup will start to create portable USB.
Step 5. How to boot from the portable USB drive.
- Connect your portable USB to the computer
- Restart the computer and press «Del/F2/F12/F10» to enter BIOS
- Set the PC to boot from the portable USB by changing the boot order in BIOS under the «Boot» tab
- Save changes and you’ll see your system booting up from the USB drive
After the connection, wait for the computer to configure system settings and you will finally arrive at the desktop screen that’s exactly the same with that of the cloned system.
Put the «username» and «password» of the cloned system.
Done. You should now successfully enter the cloned system.
Way 2. Use Windows To Go
Applies to: Windows 10 Enterprise Edition and Education Edition.
Pros: Makes Windows 10 bootable on the external hard drive. (Only works on the host computer.)
Note that Windows To Go is only available in Windows Enterprise Edition and Education Edition. It means that if your current system is not one of these two editions, you won’t be able to use Windows To Go to execute this task. Also, you need a certified USB drive to use Windows to Go.
Here are the steps:
Step 1. Check if your external hard drive is one of the certified USB drives for use as Windows to Go drives:
- IronKey Workspace W700
- IronKey Workspace W500
- IronKey Workspace W300
- Kingston DataTraveler Workspace for Windows To Go
- Spyrus Portable Workplace
- Spyrus Secure Portable Workplace
- Spyrus Worksafe
- Super Talent Express RC4/RC8 for Windows To Go
- Western Digital My Passport Enterprise
Step 2. Connect your external hard drive to the computer, back up the external hard drive to another device, and format the drive to NTFS.
Step 3. Download Windows 10 Enterprise ISO file.
Step 4. Right-click the Windows icon and click «Search», type Windows to Go, and hit Enter.
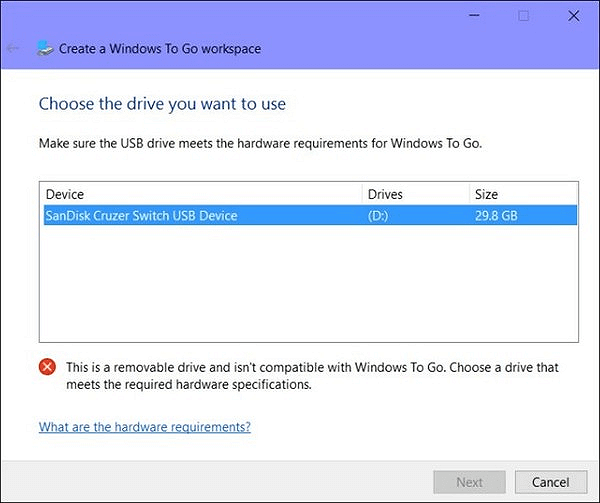
Step 5. Choose your external hard drive and click «Next».

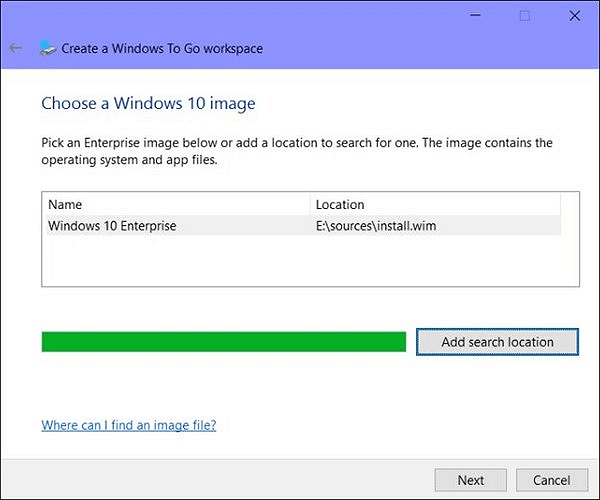
Step 6. Click «Add search location» to browse the Windows 10 ISO image that you downloaded in advance on your computer.
Click «Next» to continue.

Step 7. Enable BitLocker Encryption on the external hard drive. (It’s an optional choice.)
Step 8. Click «Create» and wait for Windows to Go to transfer the Windows 10 image to the USB drive.
wait for the creation process to complete. It will take 20-30 minutes. When a completion page appears, it means that your Windows to Go workspace is ready to use.
You can now prepare a host computer using the Windows To Go startup options and boot from your Windows To Go drive. Both two ways can help you install Windows 10/11 on an external hard drive. Share this article to help more users in need now.
Conclusion
This page includes two ways of helping Windows users to install Windows 10 on an external hard drive, making Windows bootable from the drive.
If you prefer to create a Windows to GO USB drive on any Windows operating system, EaseUS Todo Backup with its system clone feature as recommended in Way 1 is the best choice.
If you only want to create an emergency disk to make your own Windows 10 bootable on an external hard drive and use it on the host computer, Windows to Go feature in Way 2 is worth a try.
Installing Windows to an external hard drive is a bit different from installing it to an internal one. If you follow the conventional steps, you’ll encounter the error “You can’t install Windows on a USB Flash Drive using Setup.”
Microsoft did have a tool called Windows To Go (WTG) for creating portable workspaces, but it had a lot of limitations. For instance, it only supported USB drives certified for Windows To Go, external USB Hubs were not supported, and Windows To Go installations didn’t support feature updates either.
As such, Windows To Go was deprecated in Windows 10 Version 1903. You can still use it to install older Windows versions, but this is generally not a good idea from a long-term perspective.
If you want to install newer Windows versions to external hard drives without any limitations, Rufus is a great free and open-source option.
Table of Contents
Install Windows with Rufus
Rufus is generally used to create bootable USB drives, which in turn are used to install the OS onto internal hard drives. In this case, though, we’re using it for something unconventional, i.e., installing Windows onto an external hard drive.
Aside from selecting the Windows To Go option during the initial phase, the rest of the process is mostly the same. Here are the full steps:
- Download and install a stable Rufus version if you haven’t already.
- Connect the hard drive to your PC.
- Launch Rufus and select the hard drive in the device section.

- Click on the SELECT button and locate the Windows ISO.
- Under Image Option, select Windows To Go.
- Select the Windows version you want to install.

- Enable the Prevent Windows To Go from accessing internal disks option.

- In the case of Windows 11, you can remove the requirements if necessary.
- Accept the confirmation prompt to proceed with the installation. The Windows To Go media creation will take a while. Make sure the process isn’t interrupted, as that could leave the drive in an unusable state.
- After the process is complete, restart your PC and press the BIOS key (Del or Fn keys).
- Depending on the BIOS interface, you can change the boot order or directly select the device to boot from (the USB hard drive in this case). Afterward, press F10 to save the changes and exit.
- Upon restarting, you’ll boot to the hard drive. Configure the keyboard layout, privacy choices, and other settings as you prefer to complete the setup process.


As stated, the Windows To Go feature is mostly deprecated now due to its various limitations. However, if you want to use this anyway on older systems, there are a few things to keep in mind.
First, unlike Rufus, the hard drive needs to be a Certified WTG USB drive. This should be the only USB drive connected to your PC during the installation. Next, the Windows Image (WIM) file that you use should contain a valid Enterprise sysprep generalized image.
WTG Creator Wizard
With that said, the steps to use the Windows To Go creator wizard are listed below. As this wizard is only available on Windows 8 Enterprise clients, you can follow the command-line method listed further below in the case of other systems.
- Press Win + S, type Windows To Go, and press Enter.
- Select the USB drive on the choose drive page.

- In the choose image page, click on Add Search Location.

- Navigate to the image’s location, and press Create. Optionally, you can also use BitLocker to encrypt the drive if you want.
- The creation process can take upwards of half an hour. After it’s complete, reboot your PC and access the BIOS Setup Utility.
- Change the boot order to boot to the USB.
- Upon booting to the USB, configure the privacy and other settings to your preference to complete the setup.


CLI Method
The command-line method uses PowerShell to perform essentially the same steps as above. First, we select the USB drive, clear all data from it, and initialize it as an MBR disk. Next, we create a system partition, format the volume as FAT32, and set up the volume for use by assigning it a drive letter. Here are the initial steps for all of this:
First, ensure that only the intended USB drive is connected to your PC. Press Win + R, type powershell, and press CTRL + Shift + Enter. Then, execute the following commands one by one in Powershell:
$Disk = Get-Disk | Where-Object {$_.Path -match "USBSTOR" -and $_.Size -gt 20Gb -and -not $_.IsBoot }

Clear-Disk –InputObject $Disk[0] -RemoveData

Initialize-Disk –InputObject $Disk[0] -PartitionStyle MBR

$SystemPartition = New-Partition –InputObject $Disk[0] -Size (350MB) -IsActive

Format-Volume -NewFileSystemLabel "UFD-System" -FileSystem FAT32 ` -Partition $SystemPartition

$OSPartition = New-Partition –InputObject $Disk[0] -UseMaximumSize

Format-Volume -NewFileSystemLabel "UFD-Windows" -FileSystem NTFS ` -Partition $OSPartition

Set-Partition -InputObject $SystemPartition -NewDriveLetter "S"

Set-Partition -InputObject $OSPartition -NewDriveLetter "W"

Set-Partition -InputObject $OSPartition -NoDefaultDriveLetter $TRUE
After the initial procedure is complete, use DISM to apply the OS image onto the system partition as such:dism /apply-image /imagefile:n:\imagefolder\deploymentimages\mywtgimage.WIM /index:1 /applydir:W:\
Next, use bcdboot to move the necessary boot files to the system partition as such:W:\Windows\System32\bcdboot W:\Windows /f ALL /s S:
The process is mostly complete, but we’ll need to create a couple of XML files before we’re done. First, create a san_policy.xml file with the following content:
<?xml version='1.0' encoding='utf-8' standalone='yes'?>
<unattend xmlns="urn:schemas-microsoft-com:unattend">
  <settings pass="offlineServicing">
    <component
        xmlns:wcm="http://schemas.microsoft.com/WMIConfig/2002/State"
        xmlns:xsi="http://www.w3.org/2001/XMLSchema-instance"
        language="neutral"
        name="Microsoft-Windows-PartitionManager"
        processorArchitecture="x86"
        publicKeyToken="31bf3856ad364e35"
        versionScope="nonSxS"
        >
      <SanPolicy>4</SanPolicy>
    </component>
    <component
        xmlns:wcm="http://schemas.microsoft.com/WMIConfig/2002/State"
        xmlns:xsi="http://www.w3.org/2001/XMLSchema-instance"
        language="neutral"
        name="Microsoft-Windows-PartitionManager"
        processorArchitecture="amd64"
        publicKeyToken="31bf3856ad364e35"
        versionScope="nonSxS"
        >
      <SanPolicy>4</SanPolicy>
    </component>
  </settings>
</unattend>
Navigate to the root directory of the Windows partition on the WTG drive and save this san_policy.xml file there. Then, execute the following command:Dism.exe /Image:W:\ /Apply-Unattend:W:\san_policy.xml
Next, create an unattend.xml file with the following content:
<?xml version="1.0" encoding="utf-8"?>
<unattend xmlns="urn:schemas-microsoft-com:unattend">
    <settings pass="oobeSystem">
        <component name="Microsoft-Windows-WinRE-RecoveryAgent"
          processorArchitecture="x86"
          publicKeyToken="31bf3856ad364e35" language="neutral"
          versionScope="nonSxS"
          xmlns:wcm="http://schemas.microsoft.com/WMIConfig/2002/State"
          xmlns:xsi="http://www.w3.org/2001/XMLSchema-instance">
            <UninstallWindowsRE>true</UninstallWindowsRE>
        </component>
        <component name="Microsoft-Windows-WinRE-RecoveryAgent"
          processorArchitecture="amd64"
          publicKeyToken="31bf3856ad364e35" language="neutral"
          versionScope="nonSxS"
          xmlns:wcm="http://schemas.microsoft.com/WMIConfig/2002/State"
          xmlns:xsi="http://www.w3.org/2001/XMLSchema-instance">
            <UninstallWindowsRE>true</UninstallWindowsRE>
        </component>
    </settings>
</unattend>
Save and copy this unattend.xml file into the sysprep folder. Its location will generally be W:\Windows\System32\sysprep\.
Do note that there might be a temporary unattend file in the %systemroot%\panther folder. If there is, you should replace the previous version with the one you just created.
Once all of this is done, all that remains is to reboot your PC, boot into the USB, and complete the setup process.
-
Home
-
News
- How to Install Windows 10/11 on External Hard Drive? Run WinToUSB
By Vera | Follow |
Last Updated
Can I install Windows on an external hard drive? If you wonder about this question, you can find a positive answer. In this post, MiniTool will guide you on how to install Windows 10 on external hard drive using WinToUSB. Of course, you can also install Windows 11.
Can You Use an External Hard Drive to Install Windows?
Usually, you choose to install Windows 11/10 via a USB flash drive or CD/DVD to an internal hard drive. You may ask: can I install Windows on an external hard drive? The answer is yes.
But if you directly install Windows to an external drive, an error may appear saying Windows cannot be installed to this disk. Setup does not support configuration of or installation to disks connected through a USB or IEEE 1394 port.
For ordinary users, it may be a tricky business to install OS on external hard drive. If you want to use your own operating system wherever you go, follow the guide below to easily do this thing.
How to Install Windows on External Hard Drive
Microsoft offers a tool called Windows To Go (WTG) that enables you to create a Windows To Go workspace which can be booted from a USB-connected external drive on PCs. But in Windows 10 V1903, Microsoft has abandoned it. If you want to install a relatively new system to your external hard disk, running this tool is not a good idea but you can use a third-party utility like WinToUSB.
WinToUSB enables you to install and run fully functional Windows on an external hard drive, USB flash drive or Thunderbolt drive, create a Windows installation USB drive from a Windows installation ISO, and create a bootable WinPE USB drive from a WinPE ISO.
Now, follow the instructions below to install Windows on external hard drive via this tool.
Step 1: Download WinToUSB via this webpage – https://www.easyuefi.com/wintousb/. Double-click on the .exe file and install this Windows To Go creator on your PC.
Step 2: Prepare an ISO file of Windows 11/10 in advance – you can run Media Creation Tool or visit the official website to directly get ISO. Alternatively, you can download Windows ISO via WinToUSB. Here, we choose the first option.
Related posts:
- How to Download Windows 11 Pro ISO and Install It on Your PC
- Windows 10 ISO Free Download & Troubleshooting Guide
Step 3: Launch WinToUSB and tap on the Windows To Go USB section.
Step 4: Tap on Select installation source > Browse image file to find the ISO image you have downloaded. Then, choose a Windows edition. Note that the free edition doesn’t support Windows Pro/Education.
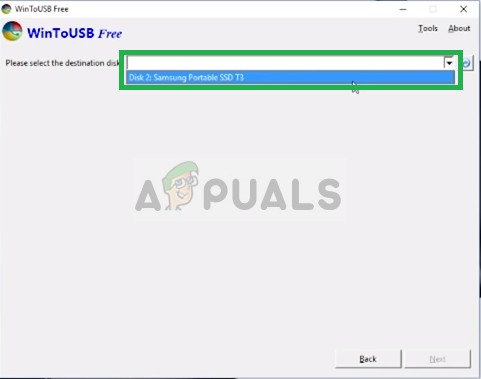
Step 5: Click Select destination drive to choose the connected external hard drive.
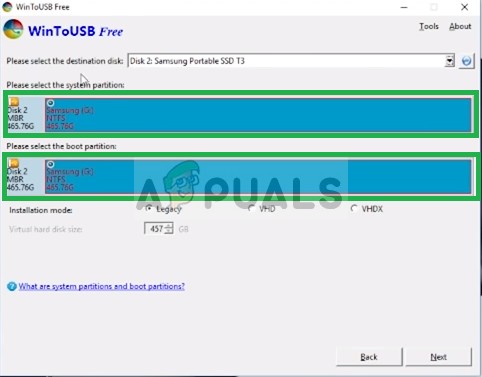
Step 6: Configure other settings like partition scheme, installation mode, etc.
Step 7: Hit Proceed and confirm the operation. Then, WinToUSB starts installing Windows.

After some time, you can install Windows on external hard drive and you get a portable Windows. To know some details about the creation, refer to this official help document – How to create portable Windows 11/10/8/7 from an ISO, WIM, ESD, SWM, VHD(X) or DBI file.
Final Words
How to put Windows 10 on an external hard drive? With the help of WinToUSB, things can become very easy. If you need, follow the given detailed guide to install Windows 10/11 to your external disk to access it wherever.
If you want to install Windows on an internal hard drive via ISO, see the guide – How to Install Windows 11 from USB? Follow Steps Here. This operation can erase some data, especially C drive. So if you have files saved on Desktop, remember to back up important data with the PC backup software – MiniTool ShadowMaker.
MiniTool ShadowMaker TrialClick to Download100%Clean & Safe
About The Author

Position: Columnist
Vera is an editor of the MiniTool Team since 2016 who has more than 7 years’ writing experiences in the field of technical articles. Her articles mainly focus on disk & partition management, PC data recovery, video conversion, as well as PC backup & restore, helping users to solve some errors and issues when using their computers. In her spare times, she likes shopping, playing games and reading some articles.
Windows 10 is a series of personal computer operating systems produced by Microsoft as part of its Windows NT family of operating systems. It is the successor to Windows 8.1 and was released to manufacturing on July 15, 2015, and broadly released for retail sale on July 29, 2015. Windows 10 receives new builds on an ongoing basis, which are available at no additional cost to users.

Windows 10 can be installed through the official Microsoft disk or through their website. The operating system features support to be installed through USB, DVD, or CD. But installing the Windows 10 on an External Hard Drive can be a tricky business therefore in this article, we will teach you the easiest methods to install the operating system on an External Hard Drive.
If you try to use the media creation tool in order to make a bootable External Hard Drive you might end up with an error. Therefore, in this process, we will make sure that all the errors are removed and the bootable Hard Drive is created successfully for which perform the following steps:
- Plugin your External Hard Drive through USB
- Now we will format the Hard Drive to NTFS make sure to back up any data on the Hard Drive
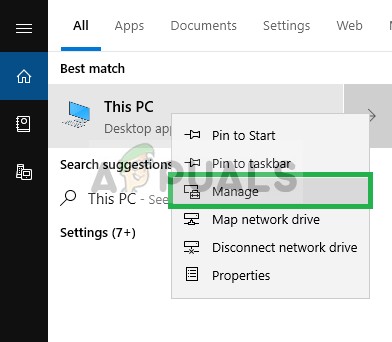
- Type “This PC” in the search bar on the taskbar

Typing “This PC” in the search bar - Right-Click on the “This PC” icon and select “Manage”

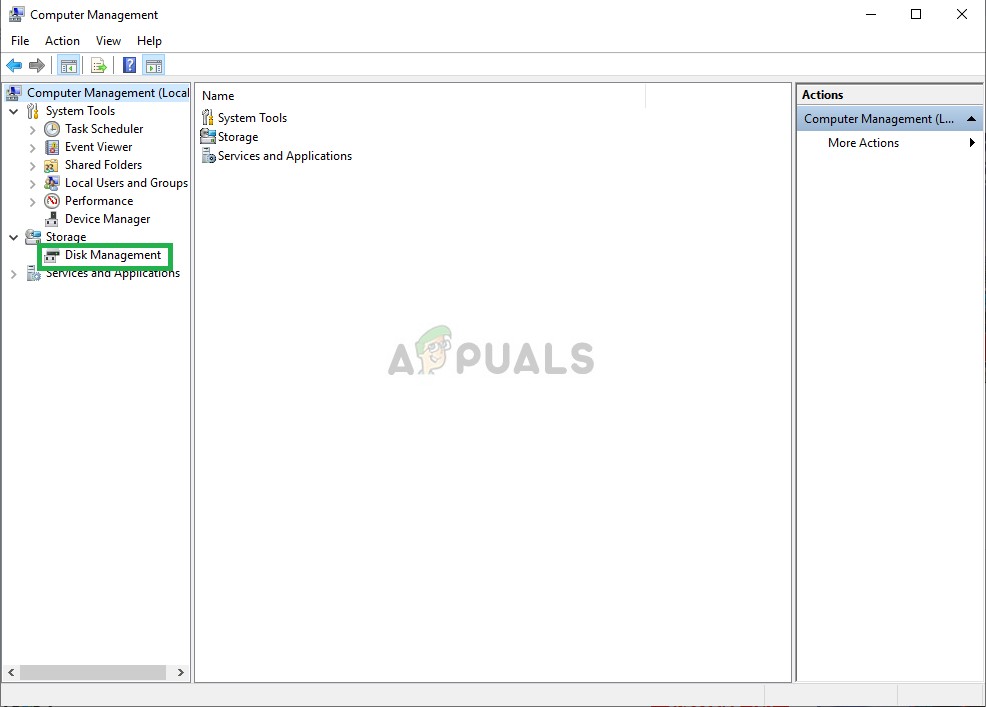
Right Clicking on the icon and selecting Manage - In the Computer Management Window, Double click on the “Disk Management” option under the Storage heading on the left side

Double Clicking on the Disk Management option under the storage heading - It will take a few moments to recognize the Hard Drives attached to the computer
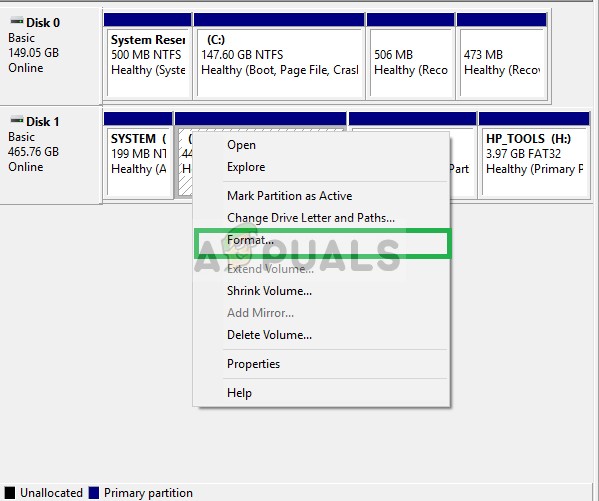
- After it shows all the Hard Drives attached to the computer, right-click on the name of your External Hard Drive and click on “Format”

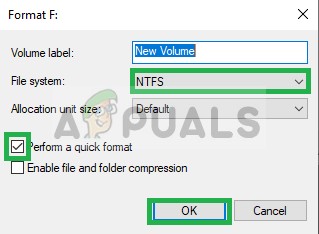
Right-Clicking on the Hard Drive and selecting Format option - Select File Type as “NTFS” and check the “quick format” box before you click OK

Selecting NTFS and checking quick Format Box - A warning will pop up that will tell you that all the files on the Hard Drive will be lost, select OK if you want to continue

Selecting OK in the warning box - It will take just a few seconds and your Hard Drive will be formatted into NTFS
- Now that the Drive is in the NTFS format, download Windows 10 Media Creation Tool from here
- After downloading the Media Creation tool, run it
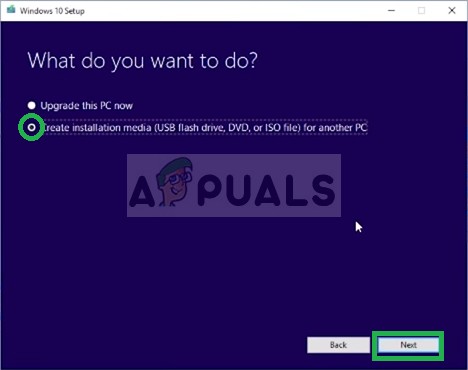
- It will take a few minutes to get things ready, after that, it will ask you whether you want to “upgrade your PC” or “Create Installation Media“, Select the “Create Installation Media” option.

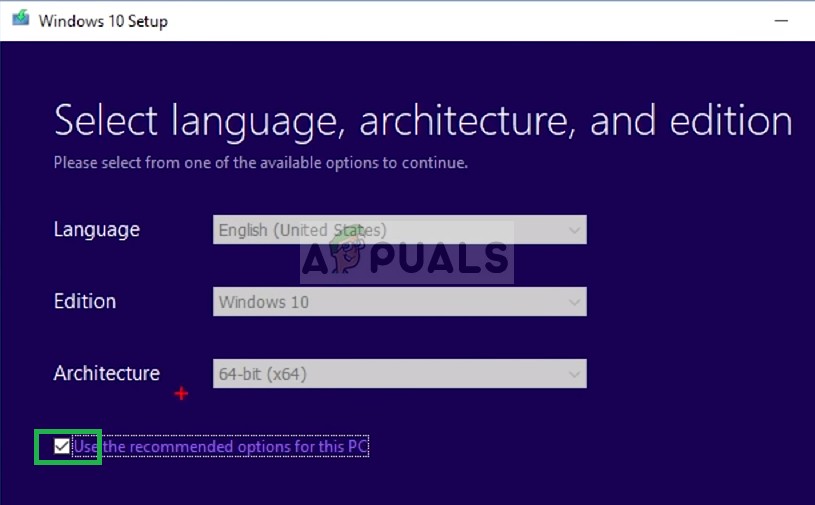
Selecting Create installation Media Option - Now it will prompt you to select Language, Architecture and the Edition of the Windows.

Selecting the Language, Architecture and the edition - Select the “use recommended settings” option or edit it to your preference and click on next
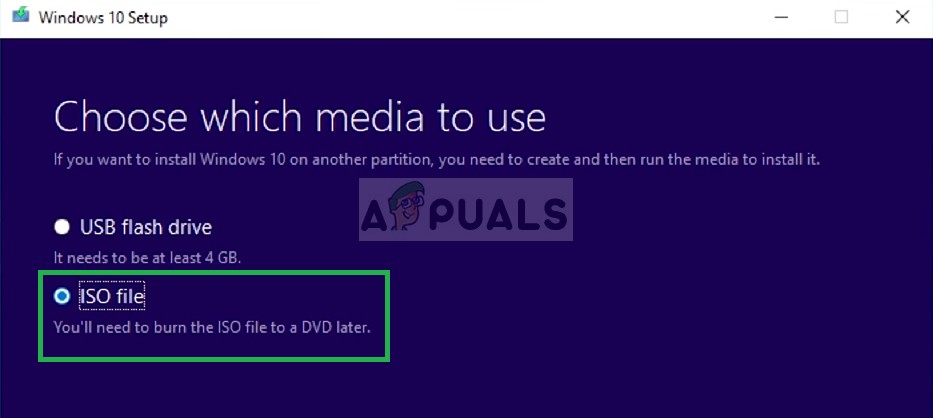
- After that, it will ask you to choose which media you want to use, Select the ISO option and Click next

Selecting ISO - Now select the path in which you want to download the ISO and click on Save
- This will download the Windows 10 ISO to the location that you selected
- Now download “wintousb” from here
- Once downloaded, run the program and install it
- After the program is installed, open it and click on OK in the checking for an updated prompt message

Clicking on “OK” - Click on the “Browse For Folder” option in the top right and select the path where you downloaded the Windows 10 ISO

Clicking on the “Browser for Folder” option - Select the edition of Windows 10 that you want to install and click on “Next“
- Click on the Dropdown and select your External Hard Drive

Selecting the External Hard Drive from the drop down - Select your Hard Drive in both “System Partition” and “Boot Partition” Options, make sure Legacy mode is selected and click on “Next”

Selecting Hard Drive in both the settings - Now wait until the Windows is installed on the Hard Drive
- Once it is installed, restart the computer and press F2, Del or F12 button to get into the bios
- In the bios navigate to the “boot options” and select ‘Boot Mode” as “Legacy Support‘ and “Boot Priority” as “Legacy First“.
- Now save your changes and reboot.
- Windows 10 should now be installed on the “External Hard Drive“


This process will install Windows 10 on the External Hard Drive and windows can now boot remotely on any computer that supports the architecture.

Kevin Arrows
Kevin Arrows is a highly experienced and knowledgeable technology specialist with over a decade of industry experience. He holds a Microsoft Certified Technology Specialist (MCTS) certification and has a deep passion for staying up-to-date on the latest tech developments. Kevin has written extensively on a wide range of tech-related topics, showcasing his expertise and knowledge in areas such as software development, cybersecurity, and cloud computing. His contributions to the tech field have been widely recognized and respected by his peers, and he is highly regarded for his ability to explain complex technical concepts in a clear and concise manner.
Back to top button
Вы когда-нибудь представляли, что будете использовать свою собственную ОС Windows 11/10, куда бы вы ни пошли? Если да, смотрите далее эту страницу, и вы обнаружите два практических способа установки Windows 11/10 на внешний жесткий диск:
# 1. Инсталляция Windows 11/10 на внешний жесткий диск при помощи EaseUS Todo Backup
# 2. Инсталляция Windows 11/10 (Enterprise/Education Edition) на внешний жесткий диск
Таким образом, вы можете перенести свою Windows куда угодно и загрузить Windows 11/10 на любом компьютере через внешний жесткий диск.
Возможно ли установить Windows 11/10 на внешнем жестком диске
«У меня есть внешний жесткий диск Seagate Expansion Desktop емкостью 2 ТБ. Думаю, будет здорово иметь ОС на внешнем жестком диске. Поэтому я хочу установить ОС Windows 10 на этот внешний жесткий диск. Но всякий раз, когда я пытался установить Windows 10 прямо на внешний жесткий диск, внешний диск, я получаю сообщение об ошибке, в котором говорится, что Windows не может быть установлена на USB-накопитель или IEE 1394.
Мне просто интересно, можно ли установить Windows на внешний жесткий диск. Если да, то как я могу установить ОС Windows 10?»
Как вы, возможно, знаете, хотя Windows можно установить на внешний жесткий диск, вы не можете установить ее на внешний жесткий диск с настройками по умолчанию. Установка Windows 10 на внешний жесткий диск — непростая задача для обычных пользователей.
Обычно Windows распознает и отображает жесткий диск USB на экране установки, но не позволяет установить на него Windows. Если вы попытаетесь это сделать, вы получите сообщение об ошибке «Невозможно установить Windows на этот диск».
Не волнуйтесь! Здесь вы можете найти два полных решения для установки Windows 10 на внешний жесткий диск и переноса Windows куда угодно.
Как установить Windows 11/10 на внешнем жестком диске (два способа)
Для установки Windows 10 на внешний жесткий диск требуется всего два этапа. Во-первых, подготовка — сделайте резервную копию данных внешнего жесткого диска и удалите все разделы на внешнем жестком диске. Затем установите Windows 10 на внешний жесткий диск.
Чтобы установить Windows 10 на внешний жесткий диск, у вас есть два варианта: 1. Использование функции клонирования системы с помощью EaseUS Todo Backup; 2. Используйте Windows To Go. Оба варианта позволяют выполнить операцию и убедиться, что внешний жесткий диск является загрузочным.
Следуйте приведенным здесь инструкциям, чтобы установить Windows 10 на внешний жесткий диск и сделать его загрузочным самостоятельно:
Подготовка — сделайте резервную копию внешнего жесткого диска заранее
Вы можете просто скопировать данные на другой диск или просто использовать программу для резервного копирования данных. Если вы предпочитаете решение для резервного копирования в один клик, вы можете рассмотреть стороннее ПО для резервного копирования.
EaseUS Todo Backup предоставляет профессиональные и стабильные услуги для простого резервного копирования вашего внешнего жесткого диска.
Способ 1. Инсталляция Windows 11/10 на внешний жесткий диск при помощи EaseUS Todo Backup
Применимо к: все версии ОС Windows, включая Windows 11/10/8/7 и т. д.
Плюс:Созданный USB-накопитель Windows будет загрузочным на любом компьютере.
# 1. Удаление всех разделов на внешнем жестком диске
Убедитесь, что емкость выбранного внешнего жесткого диска больше, чем общий размер загрузочного и системного разделов.
Вы можете использовать Управление дисками, чтобы удалить раздел внешнего жесткого диска. Если у вас возникли трудности с удалением разделов, вы можете обратиться за помощью к бесплатному менеджеру разделов.
Шаг 1. Нажмите на Этот компьютер (This PC) > Управление (Manage) > Управление дисками (Disk Management).
Шаг 2. Выберите и правый клик на внешний жесткий диск в Управлении дисками, выберите «Удалить том» («Delete Volume»).

Шаг 3. Нажмите «Да» («Yes») чтобы разрешить Windows 10 удалить выбранный раздел на внешнем жестком диске.
После операции внешний жесткий диск превратится в нераспределенное место без буквы диска. В данный момент внешний жесткий диск готов для установки Windows 10.
# 2. Установка Windows 10 на внешний жесткий диск с помощью функции клонирования системы EaseUS
По сути, EaseUS Todo Backup с функцией клонирования системы упрощает установку системы Windows на внешний жесткий диск, чем с помощью Windows To Go. Загрузите и запустите EaseUS программу для клонирования системы — Todo Backup Todo на вашем компьютере. Затем следуйте инструкции, чтобы клонировать систему с помощью EaseUS Todo Backup или посмотрите видео ниже.
Шаг 1. На главном экране, найдите и выберите «Инструменты», клонирование системы и другие утилиты,так же находятся тут.
Шаг 2. EaseUS Todo Backup автоматически выберет системный и загрузочный раздел, выберите диск назначения и нажмите «Далее.»
Шаг 3. Если диск назначения это SSD, то выберите «Оптимизировать для SSD» в расширенных опциях. Выберите «Создать переносной USB диск Windows» если вы хотите создать переносной USB диск с операционной системой на нём.
Шаг 4. Нажмите «Продолжить»для старта клонирования.
Шаг 3. Чтобы загрузить клонированную систему с USB-накопителя на других устройствах Windows, просто подключите накопитель к устройству.
После подключения подождите, пока компьютер настроит параметры системы, и вы, наконец, получите экран рабочего стола, который точно такой же, как у клонированной системы.
Поставьте «имя пользователя» и «пароль» клонированной системы.
Готово. Теперь вы можете успешно войти в клонированную систему.
Способ 2. Использование Windows To Go для инсталляции Windows 10 на внешний жесткий диск
Применимо к: Windows 10 Enterprise Edition и Education Edition.
Плюс: Делает Windows 10 загрузочным на внешнем жестком диске. (Работает только на основном компьютере)
Обратите внимание, что Windows To Go доступна только в Windows Enterprise Edition и Education Edition. Это означает, что если ваша текущая система не относится к одному из этих двух выпусков, вы не сможете использовать Windows To Go для выполнения этой задачи. Кроме того, для использования Windows to Go вам потребуется сертифицированный USB-накопитель.
Вот шаги:
Шаг 1. Убедитесь, что ваш внешний жесткий диск является одним из сертифицированных USB-накопителей для использования в качестве дисков Windows to Go:
- IronKey Workspace W700
- IronKey Workspace W500
- IronKey Workspace W300
- Kingston DataTraveler Workspace for Windows To Go
- Spyrus Portable Workplace
- Spyrus Secure Portable Workplace
- Spyrus Worksafe
- Super Talent Express RC4/RC8 for Windows To Go
- Western Digital My Passport Enterprise
Шаг 2. Подключите ваш внешний жесткий диск к компьютеру, сделайте резервную копию внешнего жесткого диска на другой диск и отформатируйте диск в NTFS.
Шаг 3. Скачайте файл Windows 10 Enterprise ISO.
Шаг 4. Правый клик на иконку Windows, и нажмите «Найти» («Search»), введите Windows to Go, и нажмите Enter.
Шаг 5. Выберите ваш внешний жесткий диск и нажмите «Next».
Шаг 6. Нажмите на «Add search location» для поиска образа вашего Windows 10, который вы скачали на компьютер.
Нажмите «Next» для продолжения.
Шаг 7. Активизируйте BitLocker Encryption на внешнем жестком диске. (Это необязательно)
Шаг 8. Нажмите «Create» и подождите, пока Windows перенесет образ Windows 10 на USB-накопитель.
Дождитесь завершения процесса создания. Это займет 20-30 минут. Когда появляется страница завершения, это означает, что ваше рабочее пространство Windows to Go готово к использованию.
Теперь вы можете подготовить хост-компьютер, используя параметры запуска Windows To Go, и загрузиться с диска Windows To Go.
Заключение
На этой странице представлены два способа помочь пользователям Windows установить Windows 10 на внешний жесткий диск, сделав загрузку Windows с этого диска.
Если вы предпочитаете создать USB-накопитель Windows to GO в любой операционной системе Windows, EaseUS Todo Backup с функцией клонирования системы, как рекомендовано в Способ 1, будет лучшим выбором.
Если вы хотите создать аварийный диск только для того, чтобы ваша собственная Windows 10 загружалась с внешнего жесткого диска и использовалась на главном компьютере, функция Windows to Go, то вам стоит попробовать Способ 2.