Windows Terminal это новый терминал для удобной работы с утилитами командной строки и оболочками cmd.exe, powershell. Терминал поддерживает вкладки, панели, настройку собственных профилей, стилей и конфигураций. Если у вас установлен WSL или Azure Cloud Shell, оболочки для этих сред автоматически добавляются в консоль Windows Terminal.
Консоль Windows Terminal предустановлена в Windows 11 и Windows 10 22 H2. В остальных версиях Windows его нужно устанавливать вручную. Microsoft рекомендует устанавливать Windows Terminal через Microsoft Store, в этом случае вы гарантированно получите последнюю версию терминала, которая будет обновляться автоматически (https://www.microsoft.com/en-us/p/windows-terminal/9n0dx20hk701?activetab=pivot:overviewtab).
Если у вас отключен, отсутствует или поврежден Microsoft Store (например, в Windows 10 LTSC или в Windows Server 2022), вы можете установить Windows Terminal:
- Вручную скачайте последний релиз Windows Terminal с GitHub и установите файл MSIX в Windows;
- Воспользуйтесь менеджером пакетов Chocolatey или WinGet.
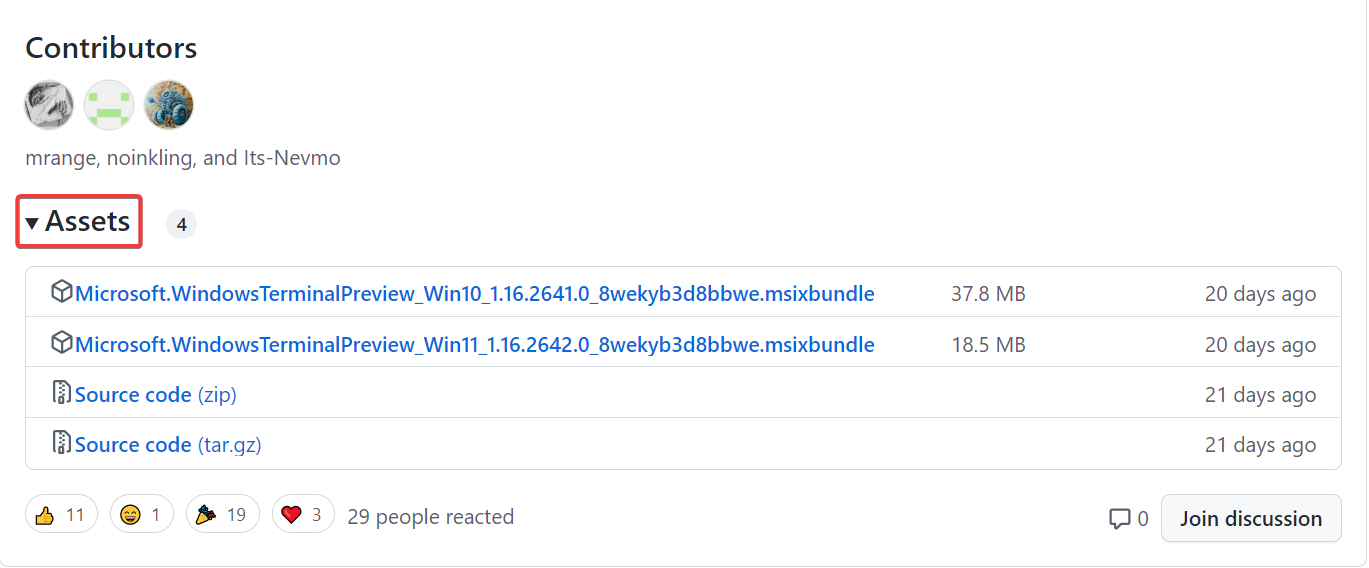
Чтобы вручную установить Windows Terminal, нужно скачать msixbundle пакет с официальной страницы проекта на GitHub https://github.com/microsoft/terminal/releases. Найдите последний релиз терминала для вашей версии Windows в разделе Asset и скачайте файл.
Можно скачать файл с помощью командлета Invoke-WebRequest:
Invoke-WebRequest -Uri https://github.com/microsoft/terminal/releases/download/v1.16.10261.0/Microsoft.WindowsTerminal_Win10_1.16.10261.0_8wekyb3d8bbwe.msixbundle
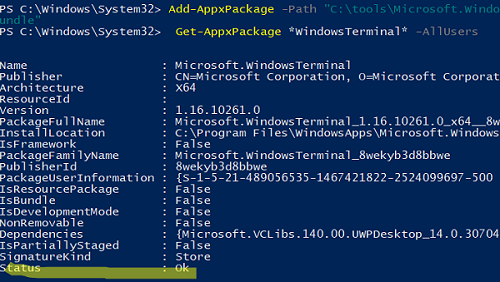
Установите пакет в Windows с помощью командлета Add-AppxPackage:
Add-AppxPackage -Path .\Microsoft.WindowsTerminal_Win10_1.16.10261.0_8wekyb3d8bbwe.msixbundle
Проверьте, что пакет успешно установился:
Get-AppxPackage *WindowsTerminal* -AllUsers
Если вы используете версию PowerShell Core 7.x, нужно предварительно импортировать модуль установки пакетов AppX / MSIX):
Import-Module Appx -UseWindowsPowerShell
При ручной установке Windows Terminal в старых версиях Windows 10 может появиться ошибка:
Add-AppPackage : Deployment failed with HRESULT: 0x80073CF3, Package failed updates, dependency or conflict validation.
Windows cannot install package Microsoft.WindowsTerminal_Win10_1.16.10261.0_8wekyb3d8bbwe.msixbundle because this package depends on a framework that could not be found. Provide the framework "Microsoft.VCLibs.140.00.UWPDesktop" published by "CN=Microsoft Corporation, O=Microsoft Corporation, L=Redmond, S=Washington, C=US", with neutral or x64 processor architecture and minimum version 14.0.30035.0, along with this package to install. The frameworks with name "Microsoft.VCLibs.140.00.UWPDesktop" currently installed are .....
Перед установкой пакета Microsoft.WindowsTerminal нужно скачать и установить фреймворк VCLibs. Скачайте пакет VCLibs с официальной страницы загрузки (https://learn.microsoft.com/en-us/troubleshoot/developer/visualstudio/cpp/libraries/c-runtime-packages-desktop-bridge) и установите его с помощью команды:
Add-AppPackage .\Microsoft.VCLibs.x64.14.00.Desktop.appx
При установке пакета Microsoft.WindowsTerminal в Windows Server 2019 или 2016 появляется ошибка:
Add-AppxPackage : Deployment failed with HRESULT: 0x80073CFD, A Prerequisite for an install could not be satisfied.
Windows cannot install package Microsoft.WindowsTerminal_1.16.10261.0_x64__8wekyb3d8bbwe because this package is not compatible with the device. The package requires OS version 10.0.19041.0 or higher on the Windows.Mobile device family. The device is currently running OS version 10.0.17763.107.

Как вы видите, пакет проверяет ОС при установке. Для установки Windows Terminal нужен билд не ниже Windows 1903 (10.0.18362.0). Таким образом, установить Windows Terminal на Windows Server 2019 не удастся.
Если у вас появляется ошибка 0x80073CFD в Windows 10, попробуйте установить обновления или использовать более раннюю версию Microsoft.WindowsTerminal.
Также вы можете скачать и установить последнюю версию пакета Microsoft.WindowsTerminal с помощью менеджера пакетов WinGet:
winget install --id=Microsoft.WindowsTerminal -e

Или с помощью chocolatey:
Set-ExecutionPolicy Bypass -Scope Process -Force; iex ((New-Object System.Net.WebClient).DownloadString('https://chocolatey.org/install.ps1'))
choco install microsoft-windows-terminal
Можно установить старую версию пакета:
choco install -y microsoft-windows-terminal --version 1.12.10732.0
При установке пакета через choco install на Windows Server 2019 появляется ошибка:
ERROR: This package requires at least Windows 10 version 1903/OS build 18362.x.
The install of microsoft-windows-terminal was NOT successful.
Error while running 'C:\ProgramData\chocolatey\lib\microsoft-windows-terminal\tools\chocolateyInstall.ps1'.

Для запуска Windows Terminal выполните команду:
wt.exe

Welcome to the Windows Terminal, Console and Command-Line repo
This repository contains the source code for:
- Windows Terminal
- Windows Terminal Preview
- The Windows console host (
conhost.exe) - Components shared between the two projects
- ColorTool
- Sample projects
that show how to consume the Windows Console APIs
Related repositories include:
- Windows Terminal Documentation
(Repo: Contribute to the docs) - Console API Documentation
- Cascadia Code Font
Installing and running Windows Terminal
Note
Windows Terminal requires Windows 10 2004 (build 19041) or later
Microsoft Store [Recommended]
Install the Windows Terminal from the Microsoft Store.
This allows you to always be on the latest version when we release new builds
with automatic upgrades.
This is our preferred method.
Other install methods
Via GitHub
For users who are unable to install Windows Terminal from the Microsoft Store,
released builds can be manually downloaded from this repository’s Releases
page.
Download the Microsoft.WindowsTerminal_<versionNumber>.msixbundle file from
the Assets section. To install the app, you can simply double-click on the
.msixbundle file, and the app installer should automatically run. If that
fails for any reason, you can try the following command at a PowerShell prompt:
# NOTE: If you are using PowerShell 7+, please run
# Import-Module Appx -UseWindowsPowerShell
# before using Add-AppxPackage.

Add-AppxPackage Microsoft.WindowsTerminal_<versionNumber>.msixbundle
Note
If you install Terminal manually:
- You may need to install the VC++ v14 Desktop Framework Package.
This should only be necessary on older builds of Windows 10 and only if you get an error about missing framework packages. - Terminal will not auto-update when new builds are released so you will need
to regularly install the latest Terminal release to receive all the latest
fixes and improvements!
Via Windows Package Manager CLI (aka winget)
winget users can download and install
the latest Terminal release by installing the Microsoft.WindowsTerminal
package:
winget install --id Microsoft.WindowsTerminal -e
Note
Due to a dependency issue, Terminal’s current versions cannot be installed via the Windows Package Manager CLI. To install the stable release 1.17 or later, or the Preview release 1.18 or later, please use an alternative installation method.
Via Chocolatey (unofficial)
Chocolatey users can download and install the latest
Terminal release by installing the microsoft-windows-terminal package:
choco install microsoft-windows-terminal
To upgrade Windows Terminal using Chocolatey, run the following:
choco upgrade microsoft-windows-terminal
If you have any issues when installing/upgrading the package please go to the
Windows Terminal package
page and follow the
Chocolatey triage process
Via Scoop (unofficial)
Scoop users can download and install the latest Terminal
release by installing the windows-terminal package:
scoop bucket add extras
scoop install windows-terminal
To update Windows Terminal using Scoop, run the following:
scoop update windows-terminal
If you have any issues when installing/updating the package, please search for
or report the same on the issues
page of Scoop Extras bucket
repository.
Windows Terminal Roadmap
The plan for the Windows Terminal is described here and
will be updated as the project proceeds.
Project Build Status
| Project | Build Status |
|---|---|
| Terminal |  |
| ColorTool | |
Terminal & Console Overview
Please take a few minutes to review the overview below before diving into the
code:
Windows Terminal
Windows Terminal is a new, modern, feature-rich, productive terminal application
for command-line users. It includes many of the features most frequently
requested by the Windows command-line community including support for tabs, rich
text, globalization, configurability, theming & styling, and more.
The Terminal will also need to meet our goals and measures to ensure it remains
fast and efficient, and doesn’t consume vast amounts of memory or power.
The Windows Console Host
The Windows Console host, conhost.exe, is Windows’ original command-line user
experience. It also hosts Windows’ command-line infrastructure and the Windows
Console API server, input engine, rendering engine, user preferences, etc. The
console host code in this repository is the actual source from which the
conhost.exe in Windows itself is built.
Since taking ownership of the Windows command-line in 2014, the team added
several new features to the Console, including background transparency,
line-based selection, support for ANSI / Virtual Terminal
sequences, 24-bit
color,
a Pseudoconsole
(«ConPTY»),
and more.
However, because Windows Console’s primary goal is to maintain backward
compatibility, we have been unable to add many of the features the community
(and the team) have been wanting for the last several years including tabs,
unicode text, and emoji.
These limitations led us to create the new Windows Terminal.
You can read more about the evolution of the command-line in general, and the
Windows command-line specifically in this accompanying series of blog
posts
on the Command-Line team’s blog.
Shared Components
While overhauling Windows Console, we modernized its codebase considerably,
cleanly separating logical entities into modules and classes, introduced some
key extensibility points, replaced several old, home-grown collections and
containers with safer, more efficient STL
containers,
and made the code simpler and safer by using Microsoft’s Windows Implementation
Libraries — WIL.
This overhaul resulted in several of Console’s key components being available
for re-use in any terminal implementation on Windows. These components include a
new DirectWrite-based text layout and rendering engine, a text buffer capable of
storing both UTF-16 and UTF-8, a VT parser/emitter, and more.
Creating the new Windows Terminal
When we started planning the new Windows Terminal application, we explored and
evaluated several approaches and technology stacks. We ultimately decided that
our goals would be best met by continuing our investment in our C++ codebase,
which would allow us to reuse several of the aforementioned modernized
components in both the existing Console and the new Terminal. Further, we
realized that this would allow us to build much of the Terminal’s core itself as
a reusable UI control that others can incorporate into their own applications.
The result of this work is contained within this repo and delivered as the
Windows Terminal application you can download from the Microsoft Store, or
directly from this repo’s
releases.
Resources
For more information about Windows Terminal, you may find some of these
resources useful and interesting:
- Command-Line Blog
- Command-Line Backgrounder Blog
Series - Windows Terminal Launch: Terminal «Sizzle
Video» - Windows Terminal Launch: Build 2019
Session - Run As Radio: Show 645 — Windows Terminal with Richard
Turner - Azure Devops Podcast: Episode 54 — Kayla Cinnamon and Rich Turner on DevOps
on the Windows
Terminal - Microsoft Ignite 2019 Session: The Modern Windows Command Line: Windows
Terminal —
BRK3321
FAQ
I built and ran the new Terminal, but it looks just like the old console
Cause: You’re launching the incorrect solution in Visual Studio.
Solution: Make sure you’re building & deploying the CascadiaPackage project in
Visual Studio.
Note
OpenConsole.exe is just a locally-built conhost.exe, the classic
Windows Console that hosts Windows’ command-line infrastructure. OpenConsole
is used by Windows Terminal to connect to and communicate with command-line
applications (via
ConPty).
Documentation
All project documentation is located at aka.ms/terminal-docs. If you would like
to contribute to the documentation, please submit a pull request on the Windows
Terminal Documentation repo.
Contributing
We are excited to work alongside you, our amazing community, to build and
enhance Windows Terminal!
BEFORE you start work on a feature/fix, please read & follow our
Contributor’s
Guide to
help avoid any wasted or duplicate effort.
Communicating with the Team
The easiest way to communicate with the team is via GitHub issues.
Please file new issues, feature requests and suggestions, but DO search for
similar open/closed preexisting issues before creating a new issue.
If you would like to ask a question that you feel doesn’t warrant an issue
(yet), please reach out to us via Twitter:
- Christopher Nguyen, Product Manager:
@nguyen_dows - Dustin Howett, Engineering Lead: @dhowett
- Mike Griese, Senior Developer: @zadjii@mastodon.social
- Carlos Zamora, Developer: @cazamor_msft
- Pankaj Bhojwani, Developer
- Leonard Hecker, Developer: @LeonardHecker
Developer Guidance
Prerequisites
- You must be running Windows 10 2004 (build >= 10.0.19041.0) or later to run
Windows Terminal - You must enable Developer Mode in the Windows Settings
app
to locally install and run Windows Terminal - You must have PowerShell 7 or later installed
- You must have the Windows 11 (10.0.22621.0)
SDK
installed - You must have at least VS
2022 installed - You must install the following Workloads via the VS Installer. Note: Opening
the solution in VS 2022 will prompt you to install missing components
automatically:- Desktop Development with C++
- Universal Windows Platform Development
- The following Individual Components
- C++ (v143) Universal Windows Platform Tools
- You must install the .NET Framework Targeting Pack to build test projects
Building the Code
This repository uses git
submodules for some of its
dependencies. To make sure submodules are restored or updated, be sure to run
the following prior to building:
git submodule update --init --recursive
OpenConsole.sln may be built from within Visual Studio or from the command-line
using a set of convenience scripts & tools in the /tools directory:
Building in PowerShell
Import-Module .\tools\OpenConsole.psm1
Set-MsBuildDevEnvironment
Invoke-OpenConsoleBuild
Building in Cmd
Running & Debugging
To debug the Windows Terminal in VS, right click on CascadiaPackage (in the
Solution Explorer) and go to properties. In the Debug menu, change «Application
process» and «Background task process» to «Native Only».
You should then be able to build & debug the Terminal project by hitting
F5. Make sure to select either the «x64» or the «x86» platform — the
Terminal doesn’t build for «Any Cpu» (because the Terminal is a C++ application,
not a C# one).
👉 You will not be able to launch the Terminal directly by running the
WindowsTerminal.exe. For more details on why, see
#926,
#4043
Coding Guidance
Please review these brief docs below about our coding practices.
👉 If you find something missing from these docs, feel free to contribute to
any of our documentation files anywhere in the repository (or write some new
ones!)
This is a work in progress as we learn what we’ll need to provide people in
order to be effective contributors to our project.
- Coding Style
- Code Organization
- Exceptions in our legacy codebase
- Helpful smart pointers and macros for interfacing with Windows in WIL
Code of Conduct
This project has adopted the Microsoft Open Source Code of
Conduct. For more information see the Code of Conduct
FAQ or contact opencode@microsoft.com with any
additional questions or comments.
Windows Terminal is Microsoft’s powerful integration of several software, including the Command Prompt, Windows PowerShell, Azure Cloud Shell, and Windows Subsystem for Linux (WSL). Using this latest console, you can easily multitask by switching between panes, running different types of commands side by side, and having a singular view of your entire system.
This tutorial covers different ways to install Windows Terminal on Windows 10 machines. The new Windows Terminal also allows you to experiment with different themes which we cover toward the end.
Also read: 8 Ways to Customize Windows Terminal
Windows Terminal was first launched in May 2019 with a stated aim to run a multi-tabbed console that could run the PowerShell and Command line simultaneously on each side. The new Windows terminal also supports Azure Cloud Shell, SSH, and the Windows Subsystem for Linux (WSL).
The console offers a genuine, multi-tabbed browsing experience. You can use Alt + Click to split a current window into two or more panes. Another shortcut, Shift + Click, opens a new terminal window.

From the top menu selection, you can choose between Windows PowerShell, Command Prompt, and Azure Cloud Shell window panes. While the default is PowerShell, you can change it to Command Prompt from Settings.

Ways to Install Windows Terminal
There are different ways to install Windows Terminal on your Windows 10 system, from the easy to the slightly more complex. Knowing these different strategies is important, as it would help you correctly install the latest versions and achieve more customization with additional themes and third-party software support.
1. From Microsoft Store
Of course, the easiest way to install the integrated Windows Terminal is to download it from Microsoft Store. The download link can be found here.
In case your Store is not working properly, you can troubleshoot with these tips.

Once the software is installed, you can readily launch it from the Store itself.

You can always go back to the Windows search box to open the Windows Terminal app and even choose its default console window. Run it in «Administrator» mode for best results.

2. Through GitHub
The various release builds for Microsoft Windows Terminal can also be manually downloaded. The GitHub Releases link is here. Search for the latest Windows Terminal version under «Assets» as shown here. Click the «msixbundle» link to proceed.

The «msixbundle» package is quickly downloaded and saved on your system.

When you click to install, you will receive a preview of the Windows Terminal. This would proceed smoothly from here.

It takes just a few minutes for the package to be completely installed. You are now ready to deploy Windows Terminal.

Once opened, you will notice a «do you want to close all tabs?» option after you close the terminal window. This would never happen with individual Command Prompt or PowerShell windows.

3. Through Chocolatey
Chocolatey is one of the most versatile tools to install any third-party software. It can be used to make Discord bots, launch Power Toys, and provide a component of lightweight browsers.
Whether or not Chocolatey is installed on your system, you can always find out using a fresh set of instructions in Windows PowerShell. Copy the following into a PowerShell window and click «Enter:»
Set-ExecutionPolicy Bypass -Scope Process -Force; [System.Net.ServicePointManager]::SecurityProtocol = [System.Net.ServicePointManager]::SecurityProtocol -bor 3072; iex ((New-Object System.Net.WebClient).DownloadString('https://chocolatey.org/install.ps1'))

As shown here, Chocolatey was already installed, so it just got upgraded. To install Windows Terminal using Chocolatey, the following command will do:
choco install microsoft-windows-terminal

Click «Y» to any requests for «Yes to all.»

You will be able to view the success screen once the latest Windows Terminal package is launched through Chocolatey.

Windows Terminal Themes
Unlike the monotonous background of Windows Command Prompt and PowerShell, the new integrated Windows Terminal offers many colorful themes.
While GitHub offers many different themes for Windows Terminal, you can find a huge selection of such themes from this online link. Go down to download a JSON file which has a collection of the themes.

Go to the «Settings» menu in the integrated terminal window. Select «Open JSON file.»

Now open the Windows Terminal JSON themes from the downloaded location. This will give you more choice in colorful backgrounds.

You can also manually change the background and foreground (font color) from «Color Schemes» in Settings.

Here we have learned different ways to install the Windows Terminal on Windows 10, along with adding new themes. Installing the new Windows Terminal does not affect your existing Command Prompt or PowerShell software. You can continue to use them while learning to use the integrated terminal.
Moreover, it does not require too much learning, as the basic usage of PowerShell/Command Prompt has been retained. In fact, it’s been made easier. For example, you can freely copy-paste in the new Windows Terminal window for the Command Prompt and don’t have to separately configure it.

Sayak Boral is a technology writer with over eleven years of experience working in different industries including semiconductors, IoT, enterprise IT, telecommunications OSS/BSS, and network security. He has been writing for MakeTechEasier on a wide range of technical topics including Windows, Android, Internet, Hardware Guides, Browsers, Software Tools, and Product Reviews.
Subscribe to our newsletter!
Our latest tutorials delivered straight to your inbox
The source code is available for free for download on GitHub
by Loredana Harsana
Loredana is a passionate writer with a keen interest in PC software and technology. She started off writing about mobile phones back when Samsung Galaxy S II was… read more
Updated on
- Microsoft has launched a dedicated terminal that allows you to open all other command-line tools from within it.
- Windows 11 comes with Windows Terminal pre-installed, but, on Windows 10, you need to manually install it yourself.
- Windows Terminal can be installed directly from the Microsoft Store.
- However, you can also install it without the Store by using the source code available on GitHub.
XINSTALL BY CLICKING THE DOWNLOAD
FILE
Microsoft has developed a new, modern, feature-rich terminal application called Windows Terminal. It’s meant to gather all the command-line tools like Command Prompt and PowerShell in one place.
This is quite a nifty idea, and in the opinion of many Windows 10 users, long overdue. Although it’s initially intended for developers, anyone who wants to enter a few command lines is welcome.
Not only that but regular updates and constant development are promised.
While Windows Terminal is officially out, Microsoft only allows you to install it via Microsoft Store in Windows 10.
What does Windows Terminal do?
One of the main features of this new terminal application is multiple-tab support. Windows 10 users have asked for this forever, and now it’s finally happening.
What this actually means? It means that you will be able to open, for example, Command Prompt, PowerShell, WSL, and Raspberry Pi all at once, each on a separate and connected tab. And all that under a single Windows Terminal window.
Other notable features include a new text rendering engine that will allow the display of a lot more symbols, text characters, glyphs, and even emojis and a new open-source monospaced font.
How we test, review and rate?
We have worked for the past 6 months on building a new review system on how we produce content. Using it, we have subsequently redone most of our articles to provide actual hands-on expertise on the guides we made.
For more details you can read how we test, review, and rate at WindowsReport.
Along with this, many more customization options and profiles with different font styles, colors, transparency, and other things, let you decide how Windows Terminal looks and feels.
What does my PC need to run Windows Terminal?
Before you start, there are some very important prerequisites:
- To run Windows Terminal, you have to be on Windows 1903 (build >= 10.0.18362.0) or above.
- You must have the 1903 SDK (build 10.0.18362.0) installed.
- You need Visual Studio 2017 or above.
- Some Workloads need to be installed from the Visual Studio installer: Desktop Development with C++, Universal Windows Platform Development, C++ (v141) Universal Windows Platform Tools (individual component).
- You need to enable Developer Mode in the Windows Settings.
How can I install Windows Terminal without Microsoft Store?
1. Download the .msixbundle file from the latest release for Microsoft Terminal from GitHub. It is available in the Assets section.
2. Launch a Powershell window to the file location of the downloaded file.
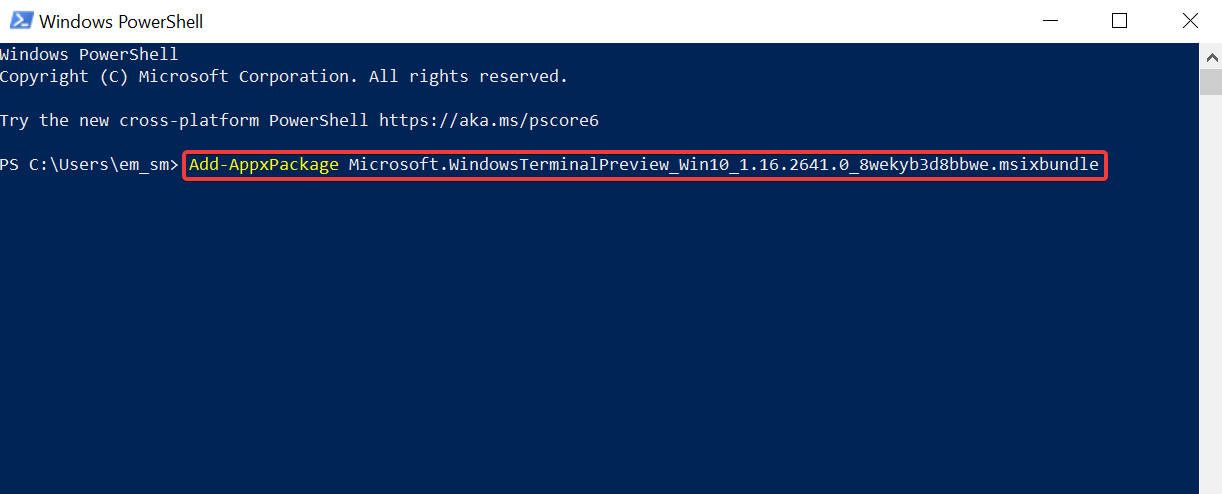
3. Type this command, and replace [name] with the full name of the downloaded file : Add-AppxPackage [name]
In our case, the command looks like this: Add-AppxPackage Microsoft.WindowsTerminalPreview_Win10_1.16.2641.0_8wekyb3d8bbwe.msixbundle
4. Press Enter to run the command.
5. Windows Terminal has been installed and you can now use it on your PC.
If you don’t want to install Windows Terminal from the Microsoft Store, there is a quick workaround for this. You can install it directly from the source code.
Yes, that’s right. Windows Terminal it’s open-source and you can find all the things you need on GitHub’s dedicated page for it.
If something isn’t right or you can’t find certain things, there is a README file as well as some scripts in the /tools directory.
As you can see, it’s pretty simple to take an early look at Microsoft’s new Windows Terminal. Just head over to GitHub and clone, build, test, and run the Terminal in any way you want.
Of course, if you find any bugs or issues with the source code for GitHub’s Windows Terminal, share them with the world so everyone may contribute and get rid of them.
- How to Use Steam Deck’s Keyboard in Desktop Mode
- How to Format an NVMe SSD on Windows 11
- How to Download & Install New Microsoft Office Fonts
- Offline Files on Windows 11: How to Enable or Disable
- How to Crop an Image on Windows 10 [5 Ways]
How can I install Windows Terminal from Microsoft Store on Windows 10?
If you would rather use the Store to install this tool, feel free to do so. This is the fastest way of getting the tool on your PC. This is what you need to do:
- Launch Microsoft Store.
- In the search box, type Windows Terminal.
- Click on the result for the Windows Terminal app.
- Press on the Get button. The app will start downloading and installing in no time.
Learn more about a variety of PowerShell commands you can run on Windows 10 by reading our guide.
Hope that the wait was worth it. Are you excited about the new Windows Terminal or it’s not that important for you? Leave the answer and any other questions you may have in the comments section below.
![]()
In this blog post, we will discuss how to install Windows Terminal application on a Windows 10 machine and will learn about its brief overview, main features, and important configuration files.
What is a Windows Terminal?
“Windows Terminal is a modern terminal application for users of command-line tools and shells like Command Prompt, PowerShell, and Windows Subsystem for Linux (WSL). Its main features include multiple tabs, panes, Unicode and UTF-8 character support, a GPU accelerated text rendering engine, and the ability to create your own themes and customize text, colors, backgrounds, and shortcut key bindings“. [source: Microsoft Docs]
Features of Windows Terminal
Windows Terminal is packed with lots of features, and the user can customize a variety of functionality to improve day to day workflows. Below given are some of the top features. The details of all the available features are well documented and can be found at Microsoft site
Customization
This is one of the best features that any user would like. The user can customize backgrounds, color schemes, add background images, custom fonts as well as define its own key bindings (shortcuts). An individual profile can be also customized as per need.
Dynamic Profile
The Terminal automatically creates multiple profiles for multiple versions of PowerShell or WSL (Windows Subsystem for Linux) installed on the system. Each of these profiles can be customized individually.
Tab Based UI
The Terminal offers a tab-based user interface. The user can work with multiple profiles in a single instance of Terminal by opening multiple sessions of all the available profile options.

Panes
The user can also run multiple command-line shells in a single tab side-by-side and work accordingly.

GPU Rendering
The Terminal uses GPU to render text, providing greater performance than its predecessor command-line interface. The support for Unicode and UTF-8 character is also rendered by the GPU, hence providing support for emojis and new fonts.
Install from Windows Store
The Windows Terminal can be installed directly from the Microsoft Store. Open Microsoft Store app from the Start menu and search for Windows Terminal and select Windows Terminal as shown or you can be opened directly using the link: https://www.microsoft.com/en-us/p/windows-terminal/9n0dx20hk701

The only requirement is the operating system’s minimum version number. If we open the store and search for Windows Terminal and look for the minimum requirement, it says “Windows 10 version 18362.0 or higher“. If you have this version or above you are good to go.

Verify OS Version
Check the version of your operating system by opening the “winver” application. Press Windows + R to open the Run dialog and type winver in it and click OK button.

This will open a dialog displaying the current version on Windows on your machine.

If you have the minimum required version or above you are good to go, else you need to update your Windows.
Install Windows Terminal
If you meet the minimum OS version requirement then click on the install button in the Windows Store App and this will install the application on your machine.

Run Windows Terminal
On Start Menu search for Windows Terminal and open the application.

Once the application is up and running, you will notice a completely new user interface compare to the previous CMD shell or PowerShell applications. The terminal application now has tabs to allow multiple sessions as well as multiple shells in the same session.
The application will open the PowerShell profile by default (can be different on your machine) and all the available OS supported shell will be available in the drop-down combo box.

The Configuration Files
The best feature of Windows Terminal is the ability to customize it. The user can customize, its text color, cursor shape, background color, background image, opacity, icon settings, etc. The user can have multiple customized profiles and can have global settings to apply to all the available profiles as well. All these settings are stored in different JSON files. Let us look into these files and have a brief overview of them.
settings.json
The settings.json file as the name suggests contains settings for the terminal application. A few of the important settings like what should be your default profile, color scheme, key bindings, etc can be found here.
The setting.json file can be opened by clicking the Settings menu item or the file can be found at the Windows App packages location at the following: %userprofile%\appdata\Local\Packages\Microsoft.Windowsterminal_8wekyb3d8bbwe

The sample settings.json is given below, your settings.json might look a bit different depending upon your profiles, plus I have removed all the comments from the file.
{
    "$schema": "https://aka.ms/terminal-profiles-schema",
    "defaultProfile": "{61c54bbd-c2c6-5271-96e7-009a87ff44bf}",
    "copyOnSelect": false,
    "copyFormatting": false,
    "profiles":
    {
        "defaults":
        {
 	    "colorScheme": "Tango Dark"
        },
        "list":
        [
            {
                "guid": "{61c54bbd-c2c6-5271-96e7-009a87ff44bf}",
                "name": "Windows PowerShell",
                "commandline": "powershell.exe",
                "hidden": false
            },
            {
                "guid": "{0caa0dad-35be-5f56-a8ff-afceeeaa6101}",
                "name": "Command Prompt",
                "commandline": "cmd.exe",
                "hidden": false
            },
            {
                "guid": "{b453ae62-4e3d-5e58-b989-0a998ec441b8}",
                "hidden": false,
                "name": "Azure Cloud Shell",
                "source": "Windows.Terminal.Azure"
            }
        ]
    },
    "schemes": [],
    "keybindings":
    [
        { "command": {"action": "copy", "singleLine": false }, "keys": "ctrl+c" },
        { "command": "paste", "keys": "ctrl+v" },
        { "command": "find", "keys": "ctrl+shift+f" },
        { "command": { "action": "splitPane", "split": "auto", "splitMode": "duplicate" }, "keys": "alt+shift+d" }
    ]
}
defaults.json
The defaults.json file contains all the default configuration values for the terminal. This file can be used for reference, as it is an auto-generated file and contains all complete default configuration of the terminal application.
Here in this file, we can see, the profiles, key-bindings, or shortcuts at application-level, tab management, pane-management, visual-adjustment, default color-schemes, etc. To open the default.json file hold the alt key while opening settings.json file as mentioned above.
// THIS IS AN AUTO-GENERATED FILE! Changes to this file will be ignored.
{
    "defaultProfile": "{61c54bbd-c2c6-5271-96e7-009a87ff44bf}",

    // Launch Settings
    "initialCols": 120,
    "initialRows": 30,
    "launchMode": "default",

    // Selection
    "copyOnSelect": false,
    "copyFormatting": true,
    "wordDelimiters": " /\\()\"'-.,:;<>~!@#$%^&*|+=[]{}~?\u2502",

    // Tab UI
    "alwaysShowTabs": true,
    "showTabsInTitlebar": true,
    "showTerminalTitleInTitlebar": true,
    "tabWidthMode": "equal",

    // Miscellaneous
    "confirmCloseAllTabs": true,
    "theme": "system",
    "rowsToScroll": "system",
    "snapToGridOnResize": true,

    "profiles":
    [
        {
            "guid": "{61c54bbd-c2c6-5271-96e7-009a87ff44bf}",
            "name": "Windows PowerShell",
            "commandline": "powershell.exe",
            "icon": "ms-appx:///ProfileIcons/{61c54bbd-c2c6-5271-96e7-009a87ff44bf}.png",
            "colorScheme": "Campbell",
            "antialiasingMode": "grayscale",
            "closeOnExit": "graceful",
            "cursorShape": "bar",
            "fontFace": "Cascadia Mono",
            "fontSize": 12,
            "hidden": false,
            "historySize": 9001,
            "padding": "8, 8, 8, 8",
            "snapOnInput": true,
            "startingDirectory": "%USERPROFILE%",
            "useAcrylic": false
        },
        {
            "guid": "{0caa0dad-35be-5f56-a8ff-afceeeaa6101}",
            "name": "Command Prompt",
            "commandline": "cmd.exe",
            "icon": "ms-appx:///ProfileIcons/{0caa0dad-35be-5f56-a8ff-afceeeaa6101}.png",
            "colorScheme": "Campbell",
            "antialiasingMode": "grayscale",
            "closeOnExit": "graceful",
            "cursorShape": "bar",
            "fontFace": "Cascadia Mono",
            "fontSize": 12,
            "hidden": false,
            "historySize": 9001,
            "padding": "8, 8, 8, 8",
            "snapOnInput": true,
            "startingDirectory": "%USERPROFILE%",
            "useAcrylic": false
        }
    ],
    "schemes":
    [
        // A profile can override the following color scheme values:
        //   - "foreground"
        //   - "background"
        //   - "cursorColor"
        {
            "name": "Campbell",
            "foreground": "#CCCCCC",
            "background": "#0C0C0C",
            "cursorColor": "#FFFFFF",
            "black": "#0C0C0C",
            "red": "#C50F1F",
            "green": "#13A10E",
            "yellow": "#C19C00",
            "blue": "#0037DA",
            "purple": "#881798",
            "cyan": "#3A96DD",
            "white": "#CCCCCC",
            "brightBlack": "#767676",
            "brightRed": "#E74856",
            "brightGreen": "#16C60C",
            "brightYellow": "#F9F1A5",
            "brightBlue": "#3B78FF",
            "brightPurple": "#B4009E",
            "brightCyan": "#61D6D6",
            "brightWhite": "#F2F2F2"
        },
        {
            "name": "Campbell Powershell",
            "foreground": "#CCCCCC",
            "background": "#012456",
            "cursorColor": "#FFFFFF",
            "black": "#0C0C0C",
            "red": "#C50F1F",
            "green": "#13A10E",
            "yellow": "#C19C00",
            "blue": "#0037DA",
            "purple": "#881798",
            "cyan": "#3A96DD",
            "white": "#CCCCCC",
            "brightBlack": "#767676",
            "brightRed": "#E74856",
            "brightGreen": "#16C60C",
            "brightYellow": "#F9F1A5",
            "brightBlue": "#3B78FF",
            "brightPurple": "#B4009E",
            "brightCyan": "#61D6D6",
            "brightWhite": "#F2F2F2"
        },
        {
            "name": "Vintage",
            "foreground": "#C0C0C0",
            "background": "#000000",
            "cursorColor": "#FFFFFF",
            "black": "#000000",
            "red": "#800000",
            "green": "#008000",
            "yellow": "#808000",
            "blue": "#000080",
            "purple": "#800080",
            "cyan": "#008080",
            "white": "#C0C0C0",
            "brightBlack": "#808080",
            "brightRed": "#FF0000",
            "brightGreen": "#00FF00",
            "brightYellow": "#FFFF00",
            "brightBlue": "#0000FF",
            "brightPurple": "#FF00FF",
            "brightCyan": "#00FFFF",
            "brightWhite": "#FFFFFF"
        },
        {
            "name": "One Half Dark",
            "foreground": "#DCDFE4",
            "background": "#282C34",
            "cursorColor": "#FFFFFF",
            "black": "#282C34",
            "red": "#E06C75",
            "green": "#98C379",
            "yellow": "#E5C07B",
            "blue": "#61AFEF",
            "purple": "#C678DD",
            "cyan": "#56B6C2",
            "white": "#DCDFE4",
            "brightBlack": "#5A6374",
            "brightRed": "#E06C75",
            "brightGreen": "#98C379",
            "brightYellow": "#E5C07B",
            "brightBlue": "#61AFEF",
            "brightPurple": "#C678DD",
            "brightCyan": "#56B6C2",
            "brightWhite": "#DCDFE4"
        },
        {
            "name": "One Half Light",
            "foreground": "#383A42",
            "background": "#FAFAFA",
            "cursorColor": "#4F525D",
            "black": "#383A42",
            "red": "#E45649",
            "green": "#50A14F",
            "yellow": "#C18301",
            "blue": "#0184BC",
            "purple": "#A626A4",
            "cyan": "#0997B3",
            "white": "#FAFAFA",
            "brightBlack": "#4F525D",
            "brightRed": "#DF6C75",
            "brightGreen": "#98C379",
            "brightYellow": "#E4C07A",
            "brightBlue": "#61AFEF",
            "brightPurple": "#C577DD",
            "brightCyan": "#56B5C1",
            "brightWhite": "#FFFFFF"
        },
        {
            "name": "Solarized Dark",
            "foreground": "#839496",
            "background": "#002B36",
            "cursorColor": "#FFFFFF",
            "black": "#073642",
            "red": "#DC322F",
            "green": "#859900",
            "yellow": "#B58900",
            "blue": "#268BD2",
            "purple": "#D33682",
            "cyan": "#2AA198",
            "white": "#EEE8D5",
            "brightBlack": "#002B36",
            "brightRed": "#CB4B16",
            "brightGreen": "#586E75",
            "brightYellow": "#657B83",
            "brightBlue": "#839496",
            "brightPurple": "#6C71C4",
            "brightCyan": "#93A1A1",
            "brightWhite": "#FDF6E3"
        },
        {
            "name": "Solarized Light",
            "foreground": "#657B83",
            "background": "#FDF6E3",
            "cursorColor": "#002B36",
            "black": "#073642",
            "red": "#DC322F",
            "green": "#859900",
            "yellow": "#B58900",
            "blue": "#268BD2",
            "purple": "#D33682",
            "cyan": "#2AA198",
            "white": "#EEE8D5",
            "brightBlack": "#002B36",
            "brightRed": "#CB4B16",
            "brightGreen": "#586E75",
            "brightYellow": "#657B83",
            "brightBlue": "#839496",
            "brightPurple": "#6C71C4",
            "brightCyan": "#93A1A1",
            "brightWhite": "#FDF6E3"
        },
        {
            "name": "Tango Dark",
            "foreground": "#D3D7CF",
            "background": "#000000",
            "cursorColor": "#FFFFFF",
            "black": "#000000",
            "red": "#CC0000",
            "green": "#4E9A06",
            "yellow": "#C4A000",
            "blue": "#3465A4",
            "purple": "#75507B",
            "cyan": "#06989A",
            "white": "#D3D7CF",
            "brightBlack": "#555753",
            "brightRed": "#EF2929",
            "brightGreen": "#8AE234",
            "brightYellow": "#FCE94F",
            "brightBlue": "#729FCF",
            "brightPurple": "#AD7FA8",
            "brightCyan": "#34E2E2",
            "brightWhite": "#EEEEEC"
        },
        {
            "name": "Tango Light",
            "foreground": "#555753",
            "background": "#FFFFFF",
            "cursorColor": "#000000",
            "black": "#000000",
            "red": "#CC0000",
            "green": "#4E9A06",
            "yellow": "#C4A000",
            "blue": "#3465A4",
            "purple": "#75507B",
            "cyan": "#06989A",
            "white": "#D3D7CF",
            "brightBlack": "#555753",
            "brightRed": "#EF2929",
            "brightGreen": "#8AE234",
            "brightYellow": "#FCE94F",
            "brightBlue": "#729FCF",
            "brightPurple": "#AD7FA8",
            "brightCyan": "#34E2E2",
            "brightWhite": "#EEEEEC"
        }
    ],
    "keybindings":
    [
        // Application-level Keys
        { "command": "closeWindow", "keys": "alt+f4" },
        { "command": "toggleFullscreen", "keys": "alt+enter" },
        { "command": "toggleFullscreen", "keys": "f11" },
        { "command": "openNewTabDropdown", "keys": "ctrl+shift+space" },
        { "command": "openSettings", "keys": "ctrl+," },
        { "command": "find", "keys": "ctrl+shift+f" },

        // Tab Management
        // "command": "closeTab" is unbound by default.
        //   The closeTab command closes a tab without confirmation, even if it has multiple panes.
        { "command": "newTab", "keys": "ctrl+shift+t" },
        { "command": { "action": "newTab", "index": 0 }, "keys": "ctrl+shift+1" },
        { "command": { "action": "newTab", "index": 1 }, "keys": "ctrl+shift+2" },
        { "command": { "action": "newTab", "index": 2 }, "keys": "ctrl+shift+3" },
        { "command": { "action": "newTab", "index": 3 }, "keys": "ctrl+shift+4" },
        { "command": { "action": "newTab", "index": 4 }, "keys": "ctrl+shift+5" },
        { "command": { "action": "newTab", "index": 5 }, "keys": "ctrl+shift+6" },
        { "command": { "action": "newTab", "index": 6 }, "keys": "ctrl+shift+7" },
        { "command": { "action": "newTab", "index": 7 }, "keys": "ctrl+shift+8" },
        { "command": { "action": "newTab", "index": 8 }, "keys": "ctrl+shift+9" },
        { "command": "duplicateTab", "keys": "ctrl+shift+d" },
        { "command": "nextTab", "keys": "ctrl+tab" },
        { "command": "prevTab", "keys": "ctrl+shift+tab" },
        { "command": { "action": "switchToTab", "index": 0 }, "keys": "ctrl+alt+1" },
        { "command": { "action": "switchToTab", "index": 1 }, "keys": "ctrl+alt+2" },
        { "command": { "action": "switchToTab", "index": 2 }, "keys": "ctrl+alt+3" },
        { "command": { "action": "switchToTab", "index": 3 }, "keys": "ctrl+alt+4" },
        { "command": { "action": "switchToTab", "index": 4 }, "keys": "ctrl+alt+5" },
        { "command": { "action": "switchToTab", "index": 5 }, "keys": "ctrl+alt+6" },
        { "command": { "action": "switchToTab", "index": 6 }, "keys": "ctrl+alt+7" },
        { "command": { "action": "switchToTab", "index": 7 }, "keys": "ctrl+alt+8" },
        { "command": { "action": "switchToTab", "index": 8 }, "keys": "ctrl+alt+9" },

        // Pane Management
        { "command": "closePane", "keys": "ctrl+shift+w" },
        { "command": { "action": "splitPane", "split": "horizontal" }, "keys": "alt+shift+-" },
        { "command": { "action": "splitPane", "split": "vertical" }, "keys": "alt+shift+plus" },
        { "command": { "action": "resizePane", "direction": "down" }, "keys": "alt+shift+down" },
        { "command": { "action": "resizePane", "direction": "left" }, "keys": "alt+shift+left" },
        { "command": { "action": "resizePane", "direction": "right" }, "keys": "alt+shift+right" },
        { "command": { "action": "resizePane", "direction": "up" }, "keys": "alt+shift+up" },
        { "command": { "action": "moveFocus", "direction": "down" }, "keys": "alt+down" },
        { "command": { "action": "moveFocus", "direction": "left" }, "keys": "alt+left" },
        { "command": { "action": "moveFocus", "direction": "right" }, "keys": "alt+right" },
        { "command": { "action": "moveFocus", "direction": "up" }, "keys": "alt+up" },

        // Clipboard Integration
        { "command": { "action": "copy", "singleLine": false }, "keys": "ctrl+shift+c" },
        { "command": { "action": "copy", "singleLine": false }, "keys": "ctrl+insert" },
        { "command": "paste", "keys": "ctrl+shift+v" },
        { "command": "paste", "keys": "shift+insert" },

        // Scrollback
        { "command": "scrollDown", "keys": "ctrl+shift+down" },
        { "command": "scrollDownPage", "keys": "ctrl+shift+pgdn" },
        { "command": "scrollUp", "keys": "ctrl+shift+up" },
        { "command": "scrollUpPage", "keys": "ctrl+shift+pgup" },

        // Visual Adjustments
        { "command": { "action": "adjustFontSize", "delta": 1 }, "keys": "ctrl+=" },
        { " command": { "action": "adjustFontSize", "delta": -1 }, "keys": "ctrl+-" },
        { "command": "resetFontSize", "keys": "ctrl+0" }
    ]
}
This concludes the post, I hope this post on How to install Window Terminal is helpful to you, thanks for visiting, Cheers!!!
[Further Readings: Important Debugging Shortcuts of Visual Studio 2019 | How to publish a Blazor Server Application to IIS | Top 7 Visual Studio 2019 extensions for Web Projects | The difference in Blazor Server and WebAssembly Application | Exploring Blazor WebAssembly App Project Structure | Top 10 Productivity Tips and Tricks in Visual Studio 2019 | CRUD Operations in WPF using EntityFrameworkCore and SQLite | How to implement Dependency Injection in WPF | How to use External Tool in Visual Studio 2019 | Top Features of Visual Studio 2019 Community Edition | Basic CRUD operations in Blazor using SQLite as the database | How to consume REST API in Blazor Application ]