Search code, repositories, users, issues, pull requests…
Provide feedback
Saved searches
Use saved searches to filter your results more quickly
Sign up
Today in this tutorial, you will learn how to install PowerShell 7 on Windows 10/11 and Windows Server.
The PowerShell version built into Windows 10 (and later) is called Windows PowerShell (version 5.1). The latest version is called PowerShell Core or simply PowerShell. Both versions can co-exist on the same computer.
You can check the PowerShell version by running the following command:
$PSVersionTableThere are a couple of different ways to install PowerShell 7. One method is to download the MSI installer. Another way is to install PowerShell using the Winget package manager. In this tutorial, we cover both methods.
Installing PowerShell using the MSI Installer
You can download the latest version of the PowerShell installer from the following URL: https://github.com/PowerShell/PowerShell.
Scroll down to the Get PowerShell section, and download the stable version of the MSI package.

Now, complete the MSI wizard with the default options, and you are done.

After the installation is complete, you will find the shortcut to the PowerShell 7 console in the PowerShell folder in the Start menu.

The old version, Windows PowerShell (v5.1), will run side-by-side with PowerShell 7. Both versions will be available in the Windows Terminal app.

To make PowerShell 7 the default version on Windows Terminal, Go to Settings > Startup, choose PowerShell from the Default profile drop-down menu, and click Save.

Installing PowerShell 7 Using the Winget Package Manager
The fastest and easiest way to install PowerShell 7 is to use the Winget package manager. Winget is available on computers with Windows 10 or above; but not on Windows Server.
To install PowerShell 7, open a Command Prompt (CMD or PowerShell) as an Administrator and execute the following command:
winget install --id Microsoft.Powershell --source wingetThe above command will install the latest version of PowerShell on your computer.
Remarks
The name of the executable for PowerShell 7 is pwsh.exe. The older version uses the powershell.exe process.
One thing about PowerShell 7 is that there is no ISE (Integrated Scripting Environment); It has been discontinued. From now on, you will use Visual Studio Code for scripting and development.
-
Home
-
News
- What Is PowerShell? | PowerShell Download and Install on Windows
By Stella | Follow |
Last Updated
In this post, MiniTool Software will simply introduce what PowerShell is and how to download PowerShell on Windows 10/11. If you want to download and install PowerShell on your Windows computer, this post is helpful. If you want to recover your lost files on Windows, you can try MiniTool Power Data Recovery.
What Is PowerShell?
PowerShell is a task-based command-line shell and scripting language built on .NET. It is also known as Windows PowerShell. It can help system administrators and power-users rapidly automate task that manage operating systems like Windows, macOS, and Linux, and processes.
You can run commands on PowerShell to manage your computer. For example, you can use it to access data stores like the registry and certificate store as you can easily access the file system. PowerShell has a rich expression parser and a fully developed scripting language.
How to Download and Install PowerShell on Windows 10/11?
If PowerShell is not installed on your Windows computer, do you know where to download it? It is very simple. You can just download Windows PowerShell from Microsoft Store.
System Requirements
Your PC should meet the following requirements if you want to download Windows PowerShell on your Windows computer:
- Operating system: Windows 10 version 17763.0 or higher
- Architecture: ARM arm64 X86 X64
- Keyboard: Integrated Keyboard
- Memory: At least 1GB, 2GB is recommended
- Mouse: Integrated Mouse is recommended
Download and Install PowerShell on Windows
Here, we will show you how to download PowerShell on Windows 10. If you are running Windows 11, you can also use these steps to perform a PowerShell download.
Step 1: Click the search icon from the taskbar and search for Microsoft Store.
Step 2: Click Microsoft Store from the search result to open it.
Step 3: Type powershell into the search box on the top of Microsoft Store, then press Enter. You will see PowerShell is available in Microsoft Store as follows. Then, click the Install button to download and install PowerShell on Windows 10. You should wait until the process end.

How to Open PowerShell on Windows?
Way 1: From Start
PowerShell is a downloaded app in your Windows computer. You can click the Start button, find PowerShell from the app list, and click it to open it. You can right-click it and select Run as administrator to run it as administrator.

Way 2: Using Search
You can also click the search icon from the taskbar, search for powershell using the search feature, and select PowerShell to open it. You can also select Run as Administrator from the right panel to run it as administrator.

How to Uninstall PowerShell on Windows?
PowerShell is the app that is installed by yourself. You can use the universal methods to uninstall it from your Windows PC.
For example, you can click the Start button and find the PowerShell app from the apps list. Then, right-click PowerShell and select Uninstall to remove PowerShell from your computer.

The second way you can use is to press Windows + I to open the Settings app, then select Apps > Apps & features, find and click PowerShell from the right app list, click the Uninstall button and click the Uninstall button on the pop-up interface to confirm the operation. This will remove PowerShell from your PC.

Bottom Line
Want to download and install PowerShell on your Windows computer? This post shows you a safe and easy way: you can just download PowerShell from Microsoft Store. Besides, if you want to recover your lost and deleted files, you can try MiniTool Power Data Recovery. This is a professional data recovery software that can work on all versions of Windows.
MiniTool Power Data Recovery TrialClick to Download100%Clean & Safe
Should you have other related issues, you can let us know in the comments.
About The Author

Position: Columnist
Stella has been working in MiniTool Software as an English Editor for more than 7 years. Her articles mainly cover the fields of data recovery including storage media data recovery and phone data recovery, YouTube videos download, partition management, and video conversions.
PowerShell is a really useful tool if you know your way around it. Here’s how to get it, or update it if you already have it.

Windows PowerShell is a command-line tool developed by Microsoft that helps you automate mundane tasks on your system. If you’re an avid Windows user who uses PowerShell on a regular basis, you’ll want to use the most recent version of the tool.
There are several ways to install or update PowerShell on Windows 11. In this article, we take a look at all of them.
1. How to Install or Update PowerShell With the Winget Command
The Windows Package Manager (or Winget) is a command-line program that you can use to install apps on Windows. This eliminates the need to search for the app on the web and go through the tedious installation process.
Using the Winget command is one of the most straightforward ways to install or update PowerShell in Windows 11. Here are the steps you can follow.
- Click the magnifying glass on the taskbar or press Win + S to open the search menu.
- Type Command Prompt in the search box at the top.
- Select Run as administrator to open Command Prompt with administrative privileges.
- Select Yes when the User Account Control (UAC) prompt appears.
- Paste the following command in the console and press Enter to view all the available versions of the PowerShell app.
winget search PowerShell - Note down the ID associated with the PowerShell app you want to get.
- Run the following command to install the PowerShell app.
winget install AppID
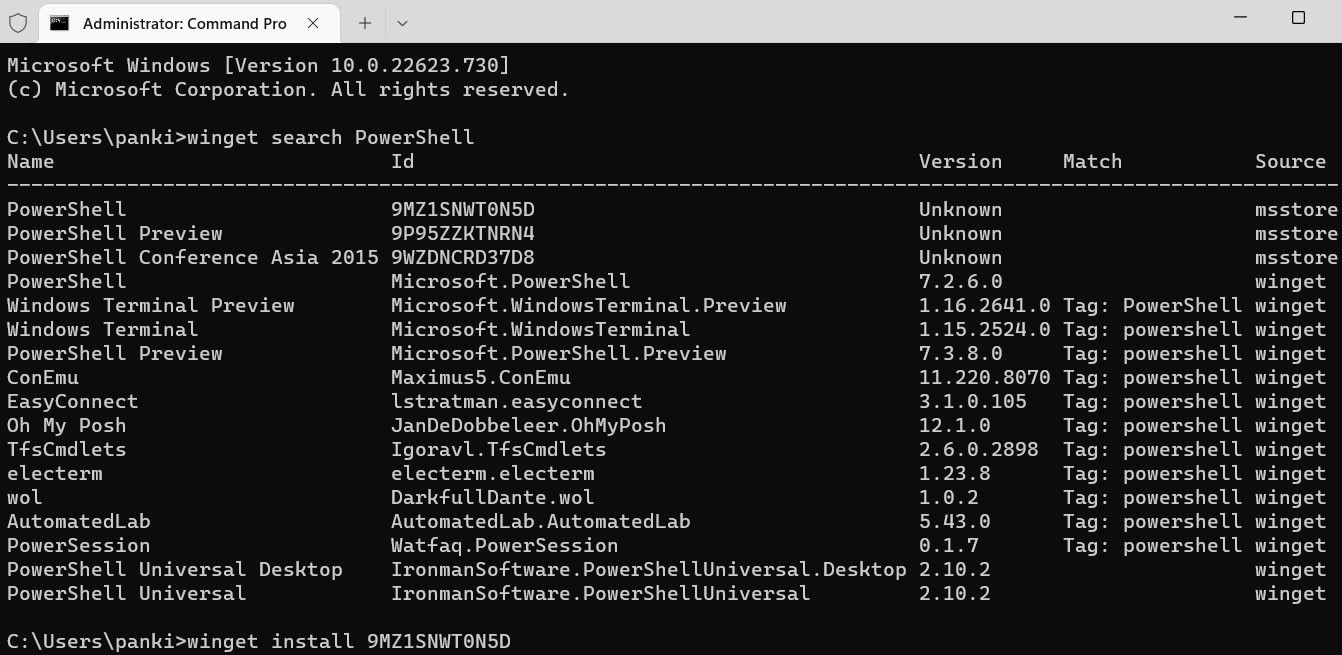
Replace AppID in the above command with the actual app ID noted in the last step.
Wait for Winget to download and install PowerShell on your PC and then exit the terminal window. Following that, the PowerShell app should be available for use.
Conveniently, the Winget command also lets you install multiple apps at once. If you want to learn how, check our guide on how to batch-install multiple software packages in Windows 11.
2. How to Install or Update PowerShell From GitHub
Another way to install or update PowerShell on Windows is to download its installer package from the GitHub website. Here’s how you can go about it.
- Open up your preferred web browser and navigate to GitHub’s PowerShell page.
- Select the latest PowerShell version from the GitHub page.
- Scroll down the Assets section and download the MSI file on your PC.
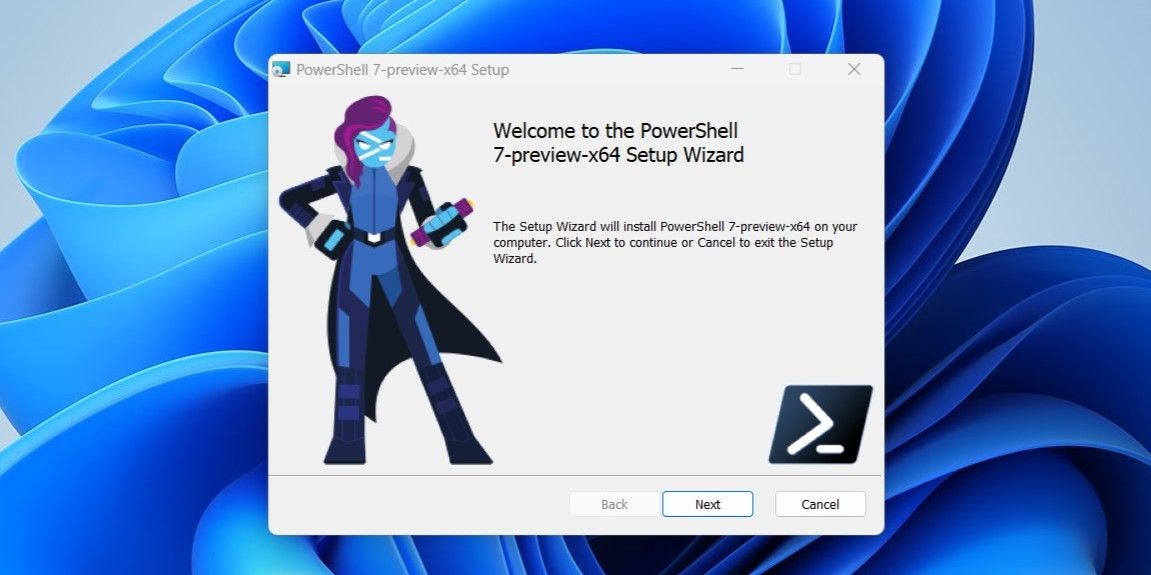
- Open the installer package and click Next.

- Specify the installation folder and click Next.
- Click Next again.
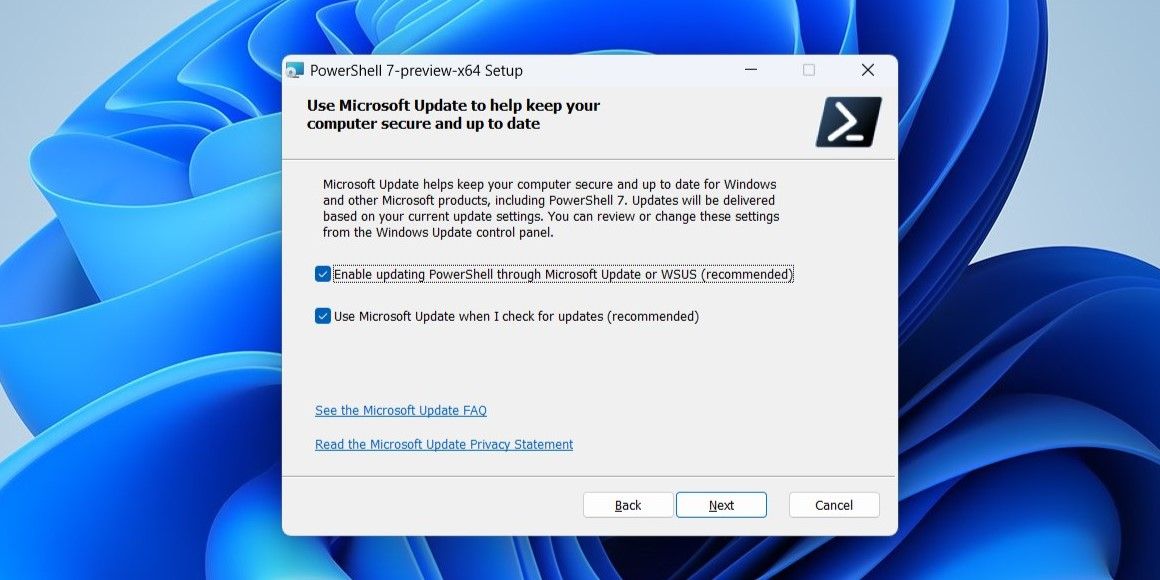
- Check the boxes that read Enable updating PowerShell through Microsoft Update or WSUS and Use Microsoft Update when I check for updates. Then, click Next.

- Click the Install button and follow the on-screen instructions to complete the process.
And that’s about it. Once you complete the above steps, you’ll have the latest version of PowerShell at your disposal.
3. How to Install or Update PowerShell Using the Microsoft Store
The PowerShell app is also available on Microsoft Store. To install or update the PowerShell app using Microsoft Store, use the following steps:
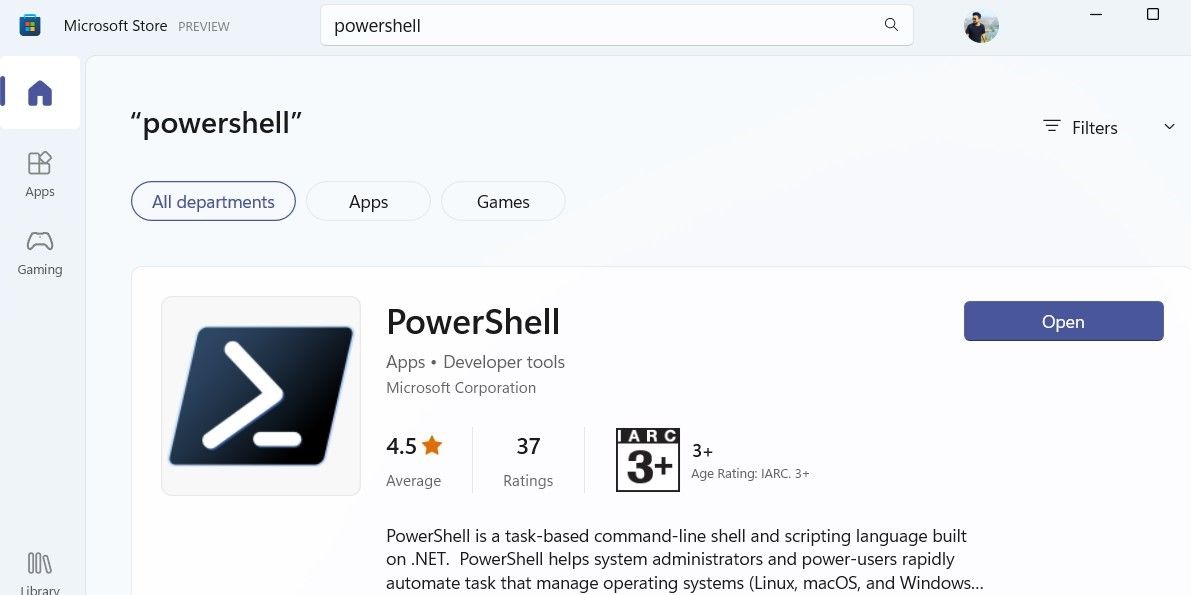
- Open the Microsoft Store app on your PC.
- Use the search bar at the top to locate the PowerShell app on the store.
- Click the Update button to update the PowerShell app. If you don’t have the app, click the Install button to get it.

If you’re having trouble opening the Microsoft Store app on your Windows 11, fix it so that you can update your apps easily.
Automate Your Tasks With PowerShell
Using the most recent version of PowerShell should give you access to the latest features. You can use any of the methods you like to install or update PowerShell on Windows 11.
Now that you’ve got the latest version of PowerShell, why not learn some alternative ways to open it on your Windows PC?
PowerShell 7 is the new cross-platform version of PowerShell and can be installed on a wide range of operating systems, including Windows, Linux, MacOS.
Installation takes just a few seconds. PowerShell 7 has grown up considerably: while it can’t (yet) do everything that is possible in Windows PowerShell, it might be a fast alternative to the automation tasks it can handle, and a good start to get used to it.
Quick Words
PowerShell 7 is built on the cross-platform .NET Core. This ensures that it is available across platforms, but is also the reason why PowerShell 7 currently does not support all PowerShell Modules and may lack certain capabilities.
It currently does not support window elements (and as such does not include Out-GridView either). Also older PowerShell Modules might not yet be compatible. That said, it is impressive how compatible PowerShell 7 still is.
Because of the potential incompatibilities, PowerShell 7 uses its own module paths (take a look at $env:psmodulepath). You may need to install modules again using Install-Module from within PowerShell 7, or manually copy compatible modules.
Installing on Windows
Use the existing Windows PowerShell to download the official installation script from Microsoft, turn it into a function, then use it to download and install PowerShell Core.
PowerShell Core is a portable app and won’t interfere with the existing Windows PowerShell installation. After you installed PowerShell Core, you simply have two PowerShell environments run
powershell.exeto open the cozy Windows PowerShell, and runpwsh.exeto launch the new PowerShell Core.
# download the installation code
$code = Invoke-RestMethod -Uri https://aka.ms/install-powershell.ps1
# turn it into a function
$null = New-Item -Path function:Install-PowerShell -Value $code
# run the function
Install-PowerShell -UseMSI -Preview
Install-PowerShell downloads and installs the appropriate version for you. Above script downloads and installs the latest preview version via MSI Installer. Remove -Preview to get the latest official and stable release.
| Parameter | Description |
|---|---|
| Destination | Path where PowerShell Core should be installed |
| Daily | Install from Daily Build (the super freshest build) |
| Preview | Install the latest preview build (currently PowerShell 7) |
| UseMSI | Use the MSI Installer for installation |
| Quiet | Install without user interaction (MSI) |
| DoNotOverwrite | Do not overwrite an existing destination folder |
| AddToPath | Add the installation path to the environment variable %PATH% so that you can run pwsh from any directory to launch PowerShell |
Test-Drive the Preview
Most of the exciting new features surface in PowerShell 7. This version is not yet released as I write this, so if you want to play with the “new” PowerShell, I strongly recommend that you test-drive the latest preview release by using the parameter -Preview.
Launching PowerShell
Once PowerShell is installed, you can launch it via pwsh, for example from within your PowerShell Console:
If Windows PowerShell can’t find the command, then you may have opted out to add the path to PowerShell to your $env:path environment variable. In this case, you need to specify the full absolute path to pwsh.exe.
Check $env:path
To check whether pwsh.exe was added to the environment variable, run this:
This lists all folders that Windows searches when you specify an executable without full path. There should be an entry like this:
C:\Program Files\PowerShell\7-preview\preview
Installing On Linux
To install PowerShell on Linux, run this line:
wget https://aka.ms/install-powershell.sh; sudo bash install-powershell.sh -preview; rm install-powershell.sh
Contributing
PowerShell is driven by a vibrant community. It is open-source, and you should visit github.com/PowerShell/PowerShell as a starting point.
Look at the source code, contribute yourself by working on the code, or report bugs or submit feature requests and new ideas here.
Before you file any of these, you should take a minute and browse through the existing submissions and make sure you are not producing duplicate effort.