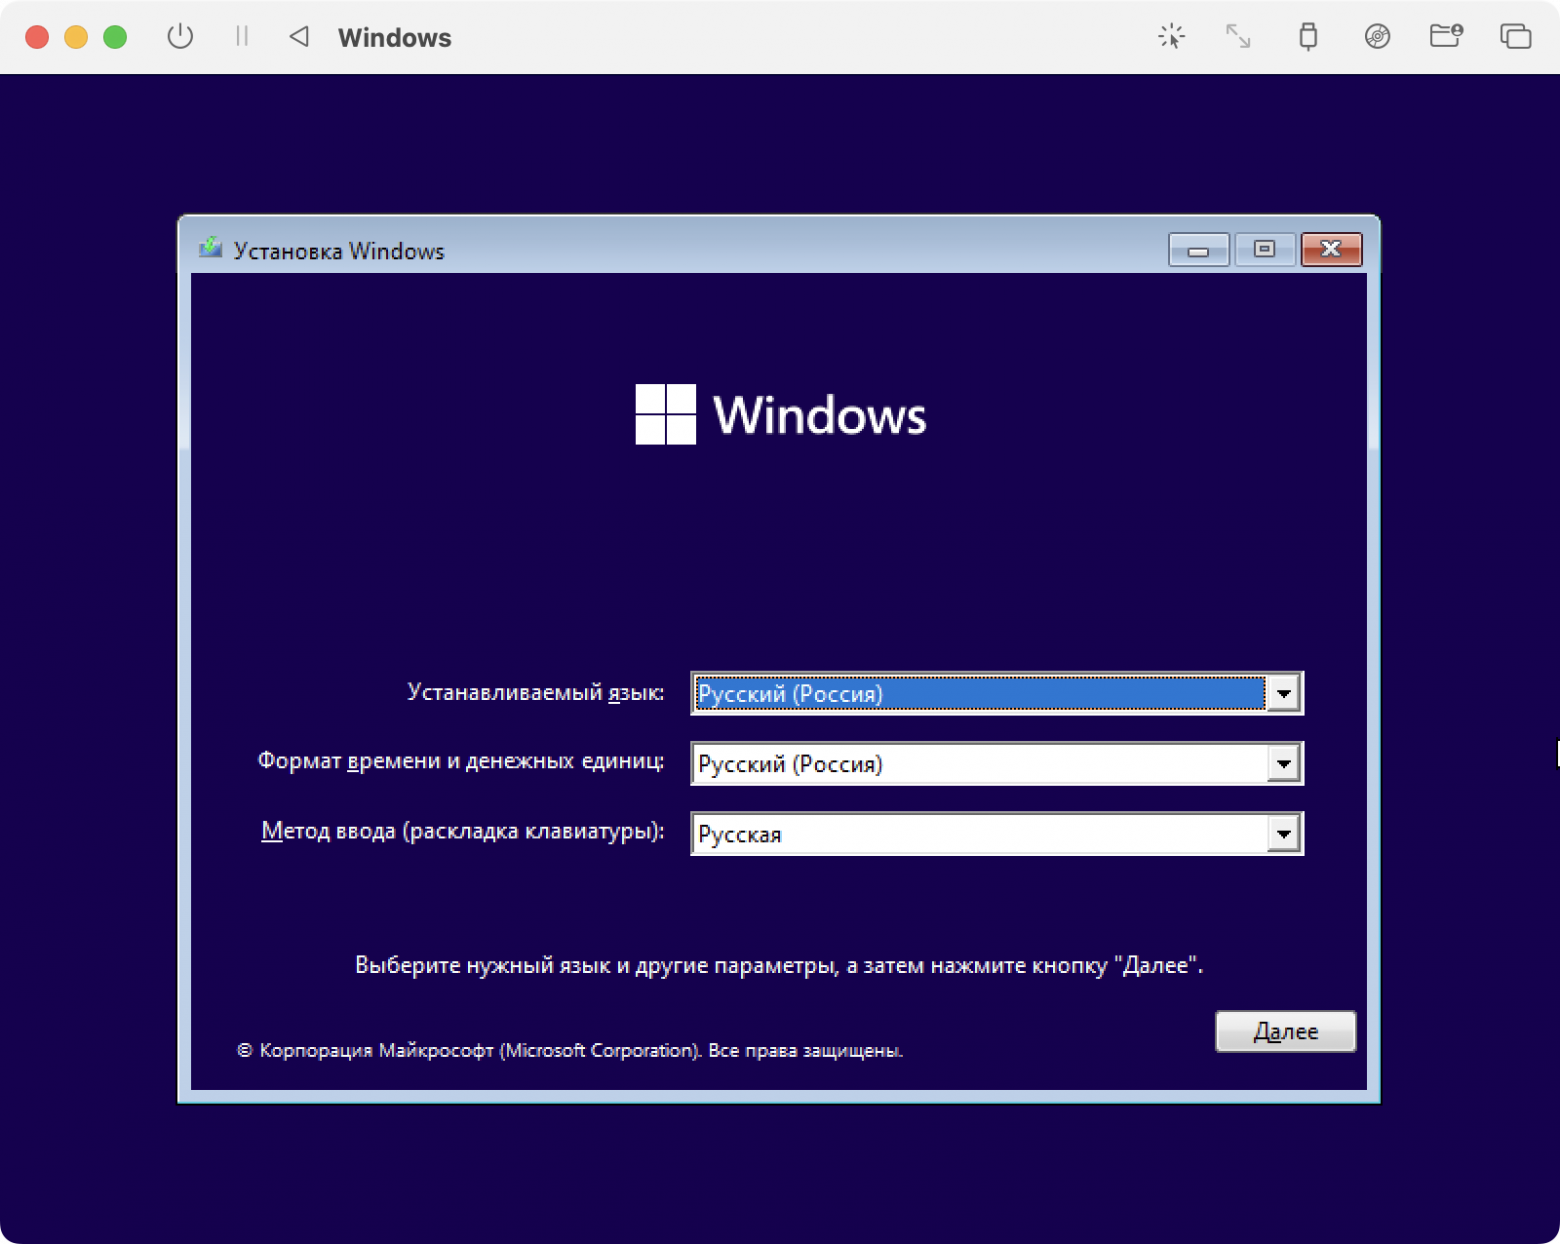
You can enjoy Windows 10 on your Apple Mac with the help of Boot Camp Assistant. Once installed, it allows you to easily switch between macOS and Windows by simply restarting your Mac.
For details and installation steps, follow the instructions at https://support.apple.com/HT201468. If you need more help, please contact Apple support by clicking the link at the bottom of that webpage.
Need more help?
Want more options?
Explore subscription benefits, browse training courses, learn how to secure your device, and more.
Communities help you ask and answer questions, give feedback, and hear from experts with rich knowledge.
Уровень сложности
Простой
Время на прочтение
2 мин
Количество просмотров 54K

В статье описана инструкция по установке Windows внутри MacOS.
На текущий момент автору статьи известно только два рабочих варианта:
-
Parallels Desktop — всё работает из коробки, но платно;
-
UTM — требует минимальных усилий, бесплатно;
В данной статье будет рассмотрен вариант установки через UTM.
Необходимо:
Установить brew
Необходимо в терминале выполнить команду:
/bin/bash -c "$(curl -fsSL https://raw.githubusercontent.com/Homebrew/install/HEAD/install.sh)"
Детальная инструкция по установке есть на официальном сайте.
Установить инструменты разработчика xcode
Необходимо в терминале выполнить команду:
xcode-select --install
Установить UTM
Необходимо в терминале выполнить команду:
brew install utm
Установить qemu
Необходимо в терминале выполнить команду:
brew install qemu
Скачиваем дамп Windows
Выбираем версию Windows:
-
Windows 10
-
Windows 11
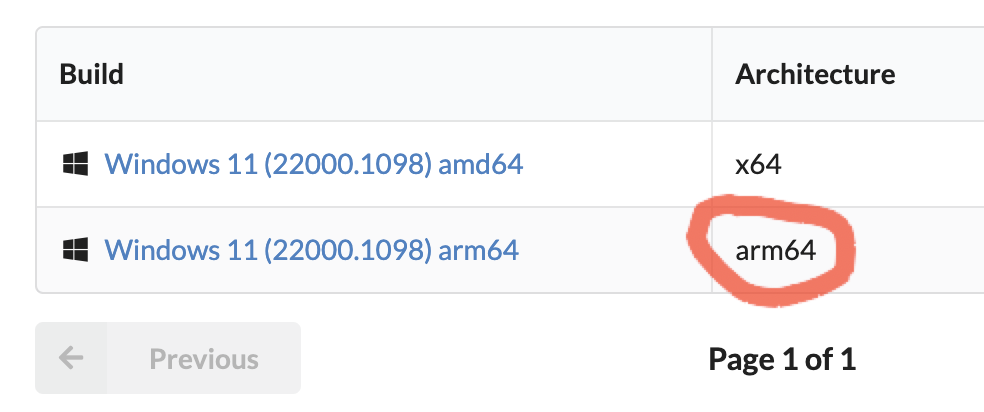
Скачиваем подходящую версию дампа с архитектурой arm64:
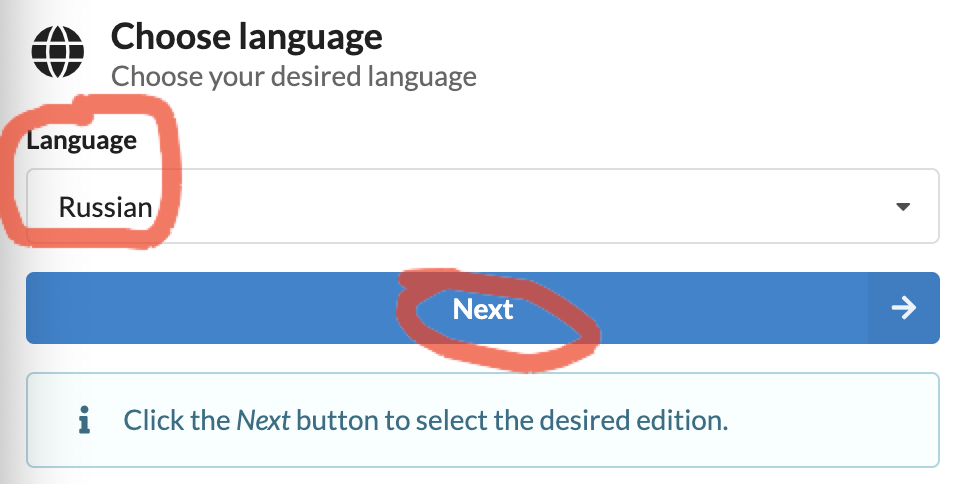
Выбираем язык:
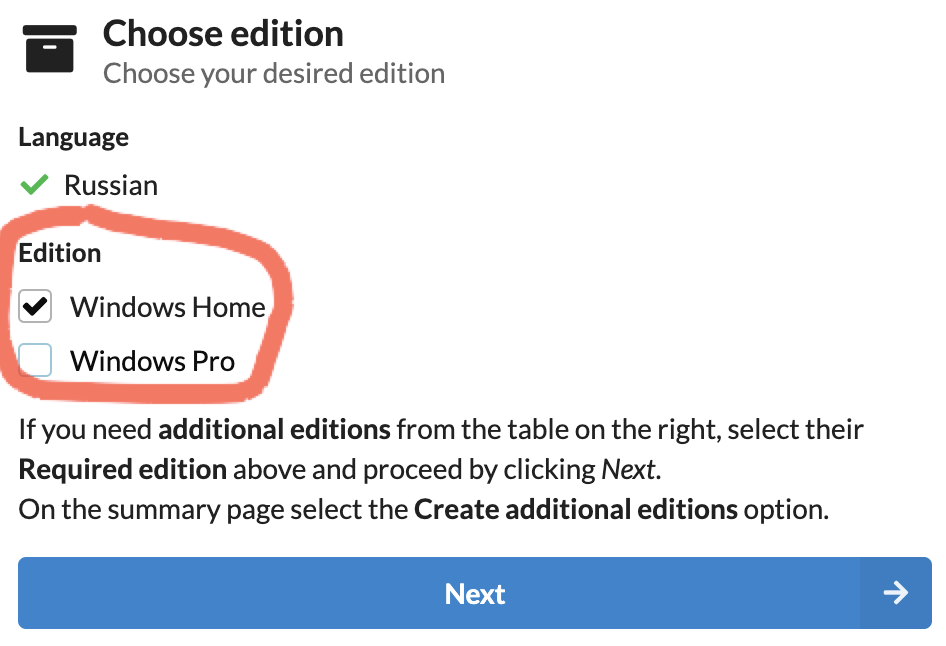
Выбираем выпуск:
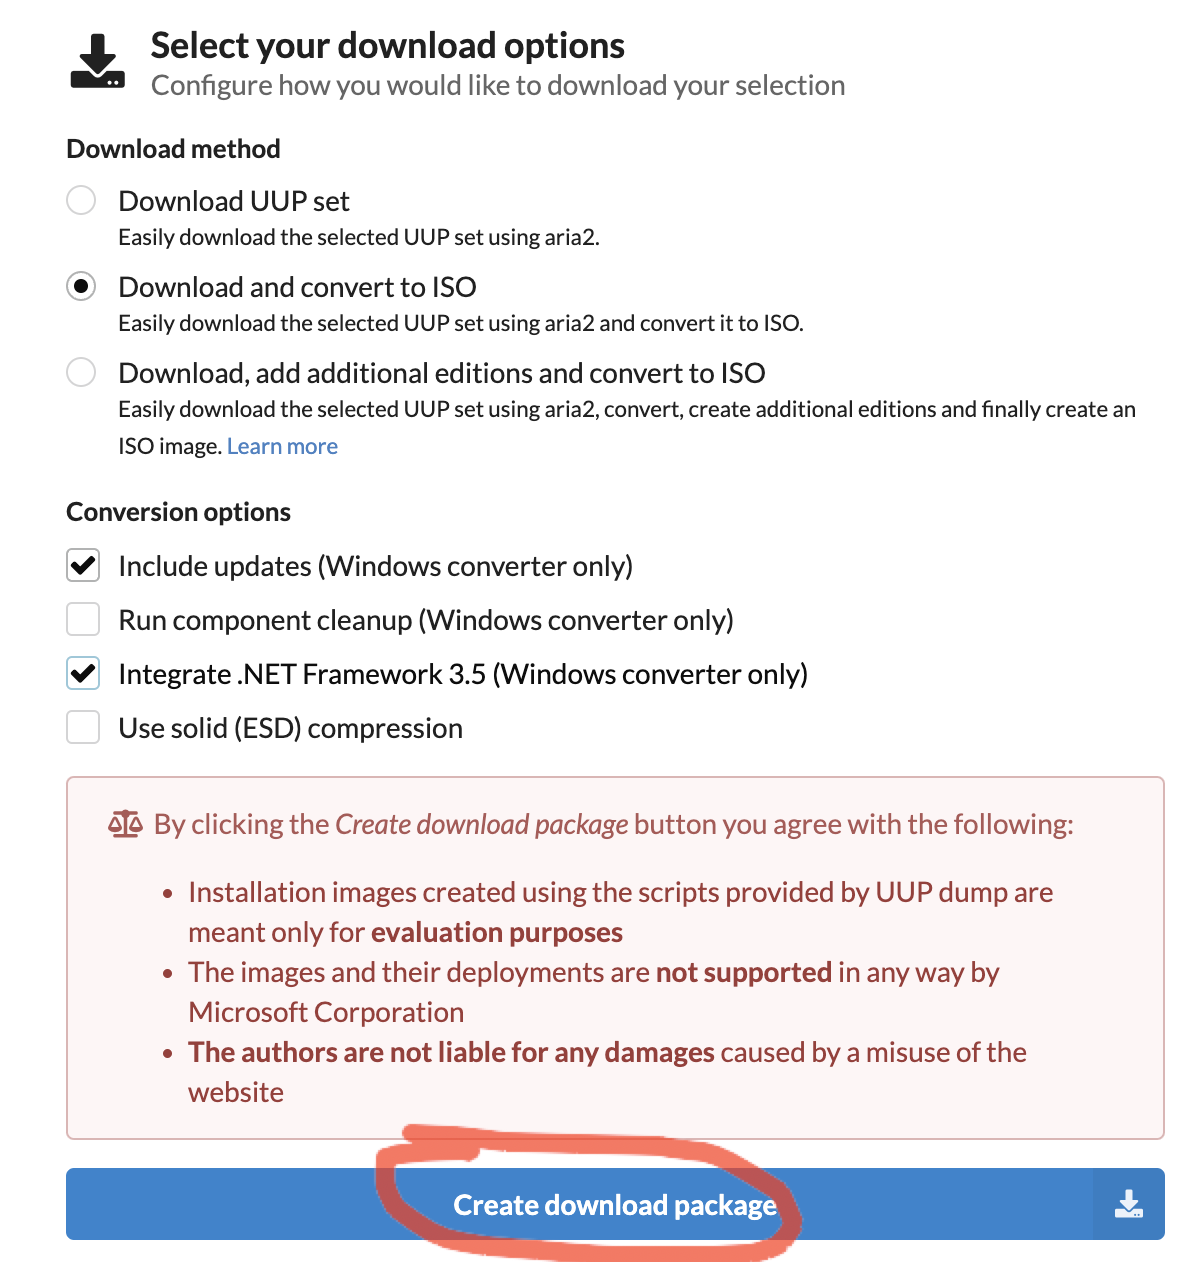
Скачиваем package:
Распаковываем архив, для этого два раза кликаем по нему:

В терминале необходимо перейти в скачанную папку.
И выполнить в ней команды:
brew install aria2
brew tap sidneys/homebrew
brew install cabextract wimlib cdrtools sidneys/homebrew/chntpw
sh uup_download_macos.sh
Ждём окончания загрузки, после этого в папке будет создан новый ISO-файл.
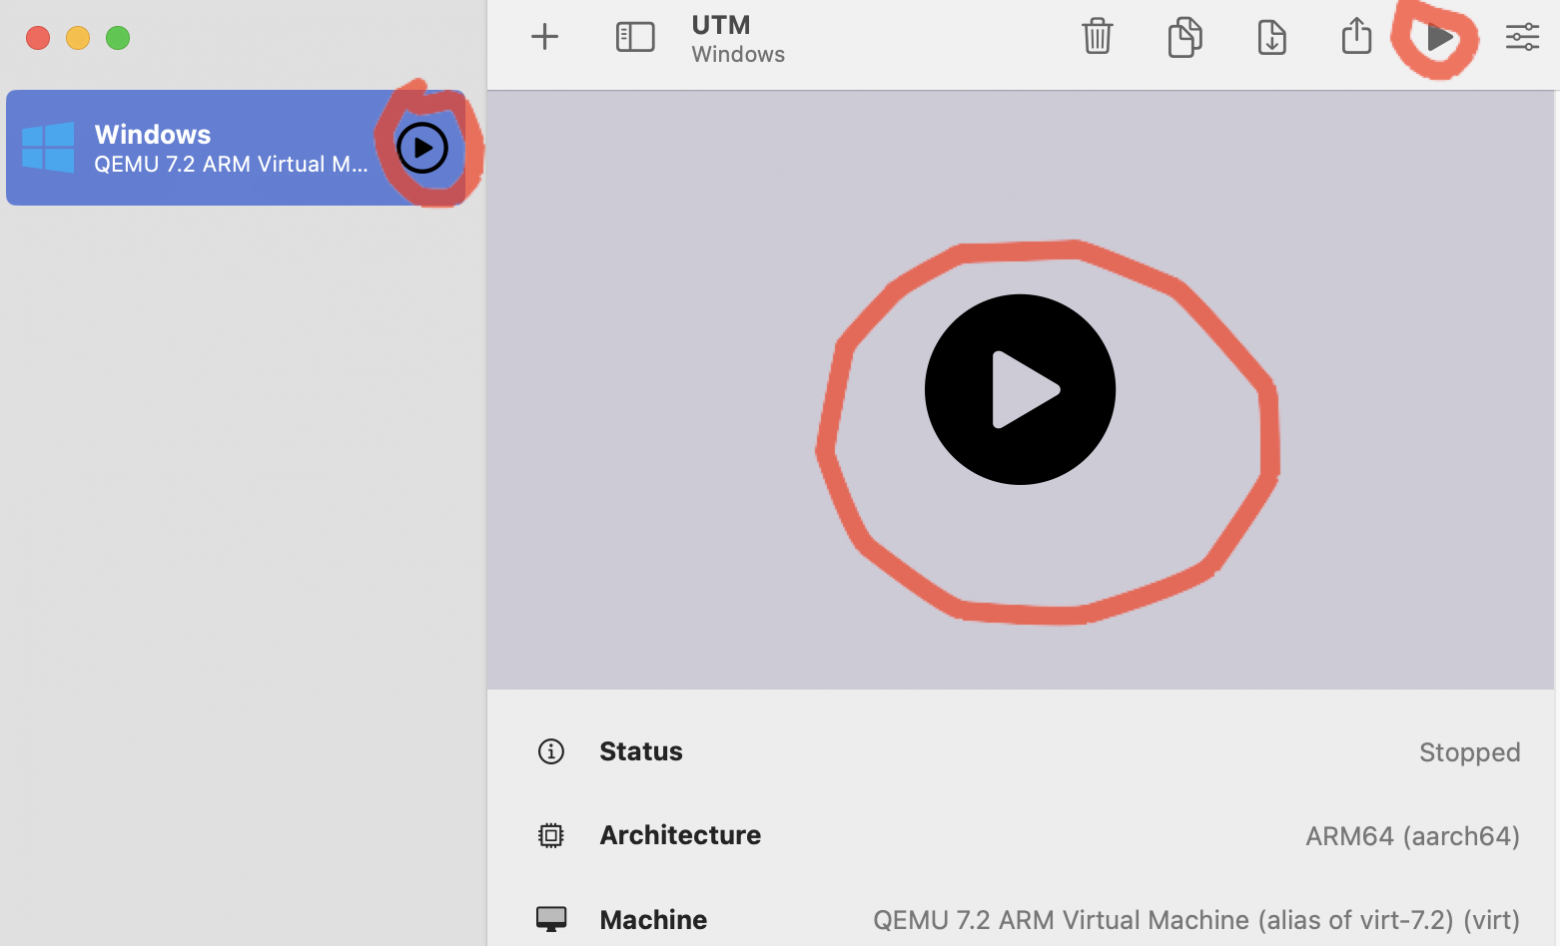
Устанавливаем образ Windows ч.1
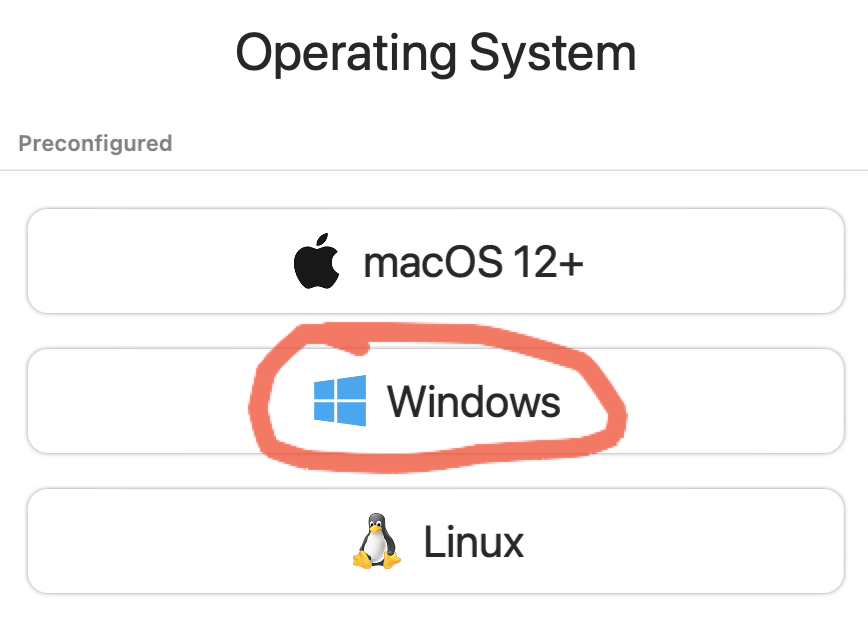
Запускаем ранее установленную программу UTM и выбираем:

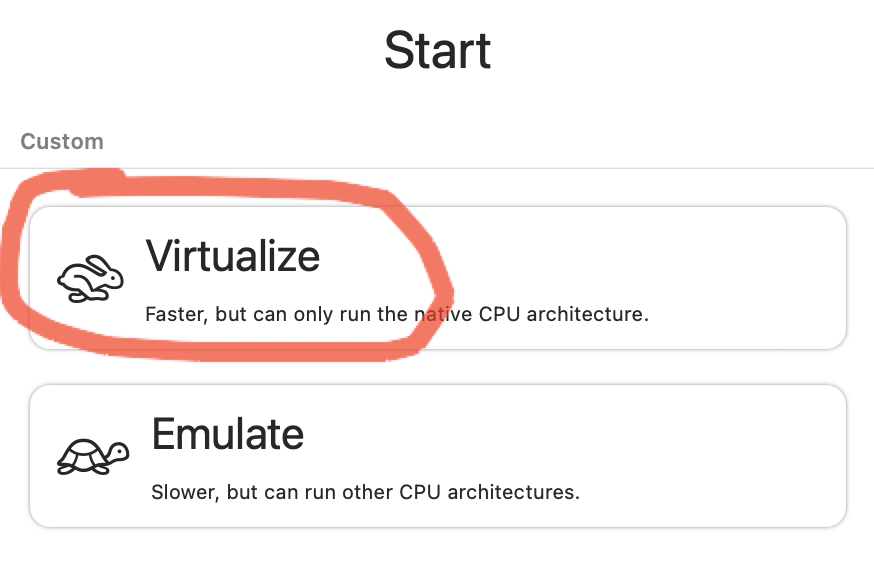

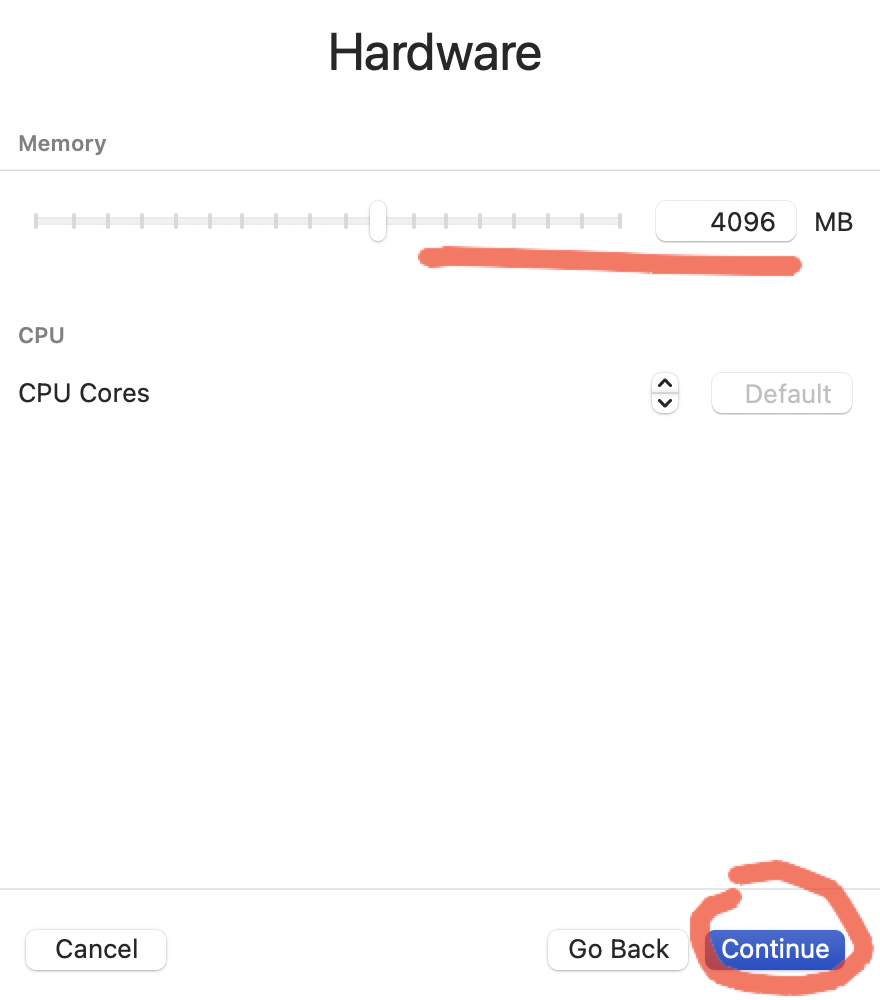
Выбираем количество ресурсов, больше — быстрее будет работать.
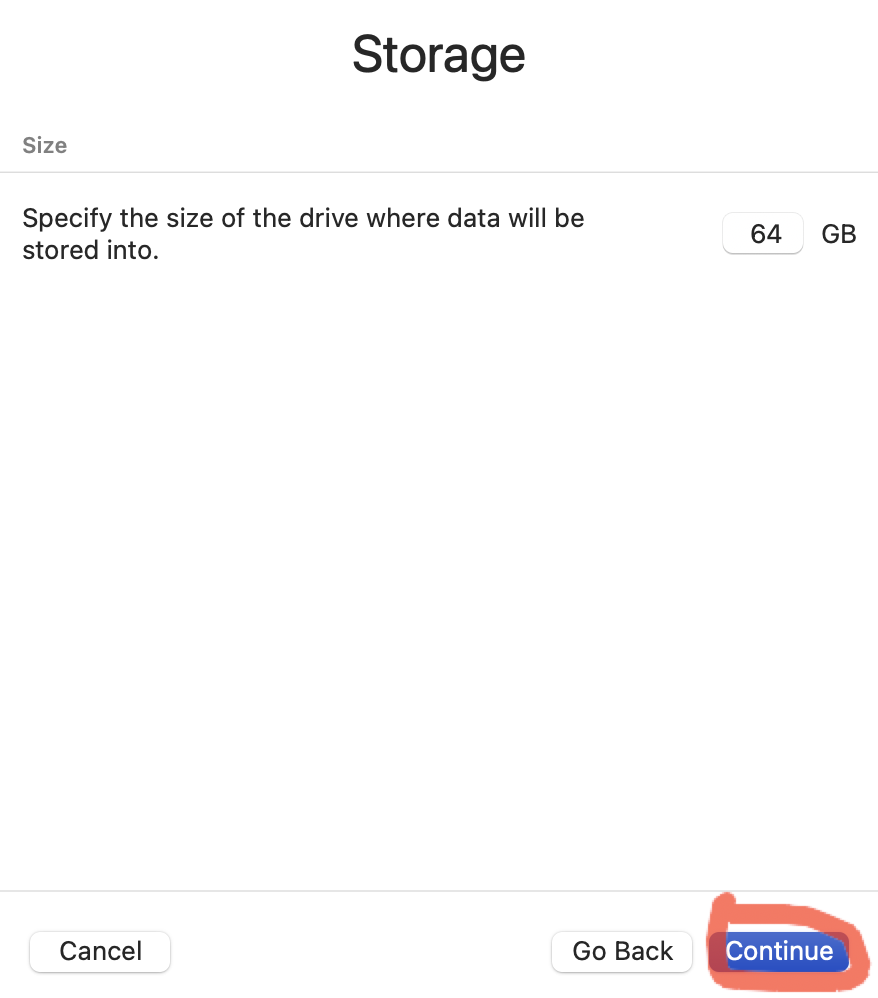
Выбираем размер выделяемого дискового пространства
Выбираем папку, которая будет общей для систем


Запускаем Windows!
Выйдет вот такое окно и нужно успеть нажать какую-нибудь клавишу! Если не успели, то можно перезапустить виртуальную машину.
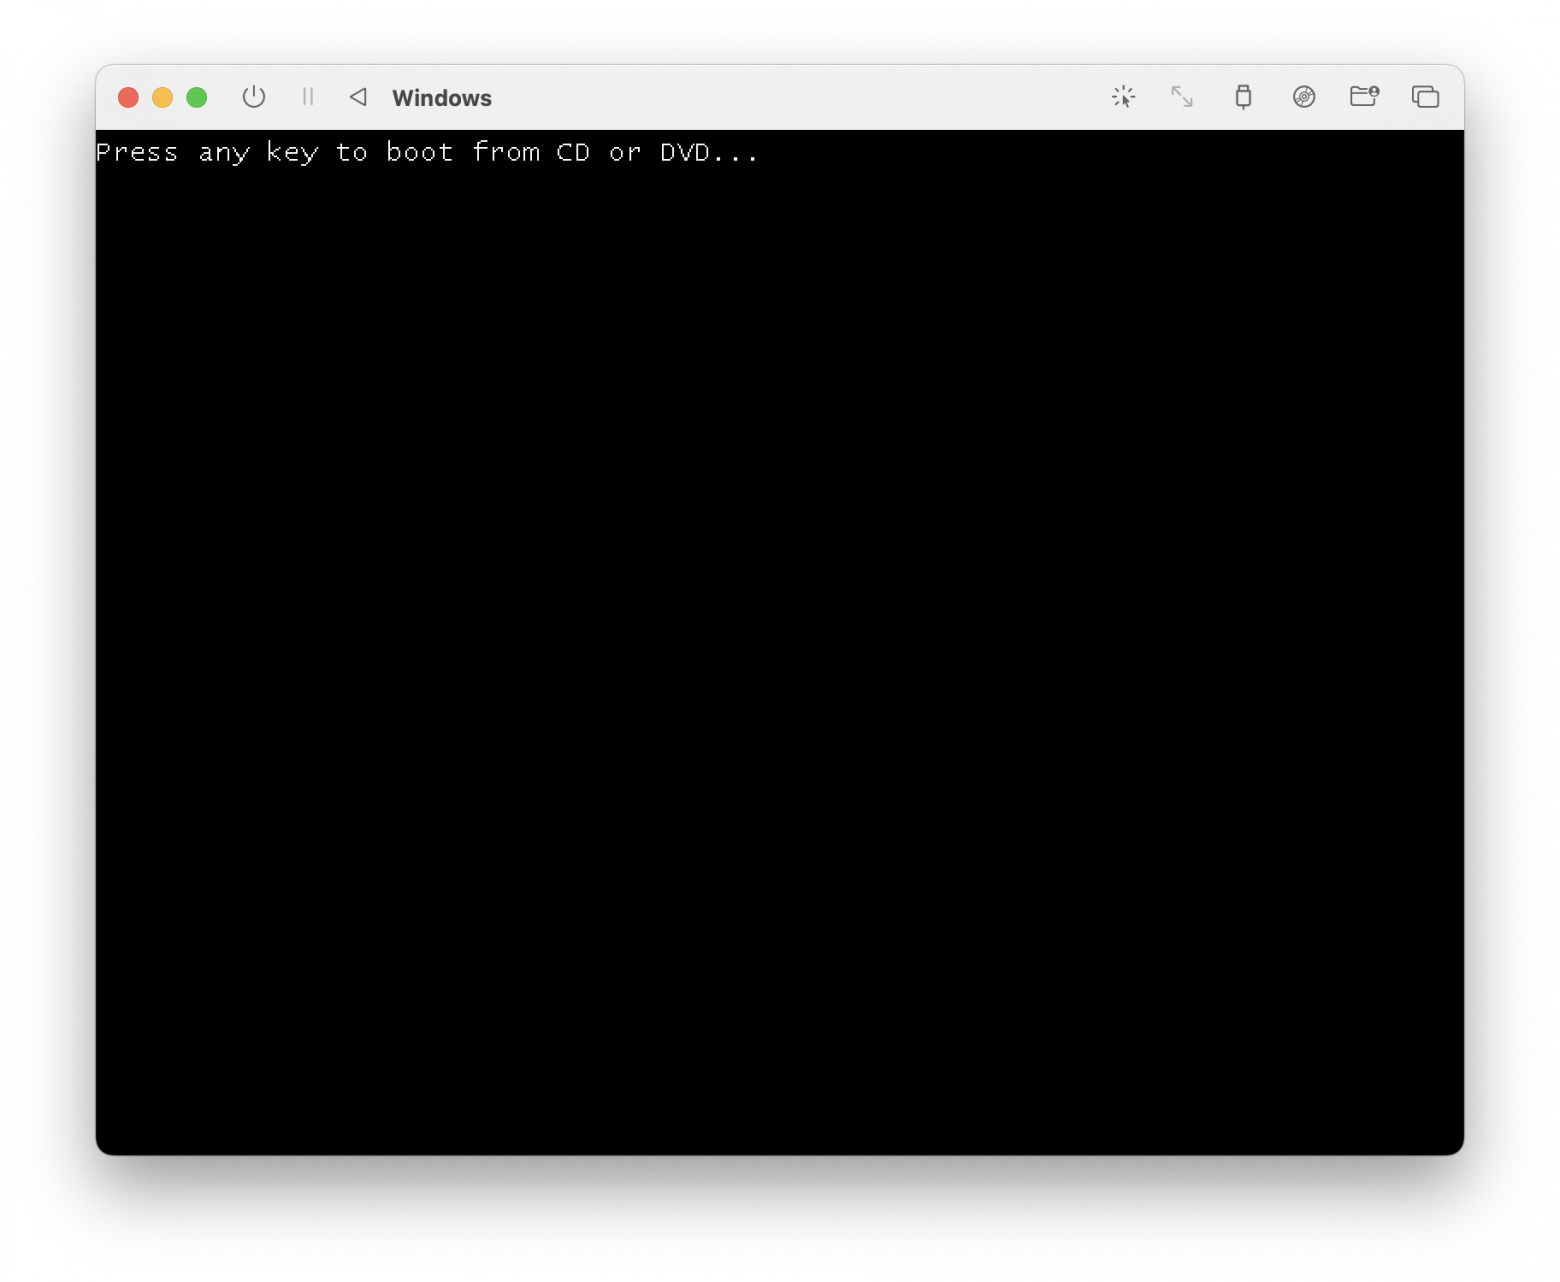
Необходимо набрать команду:
exit

Выбираем Boot Manager
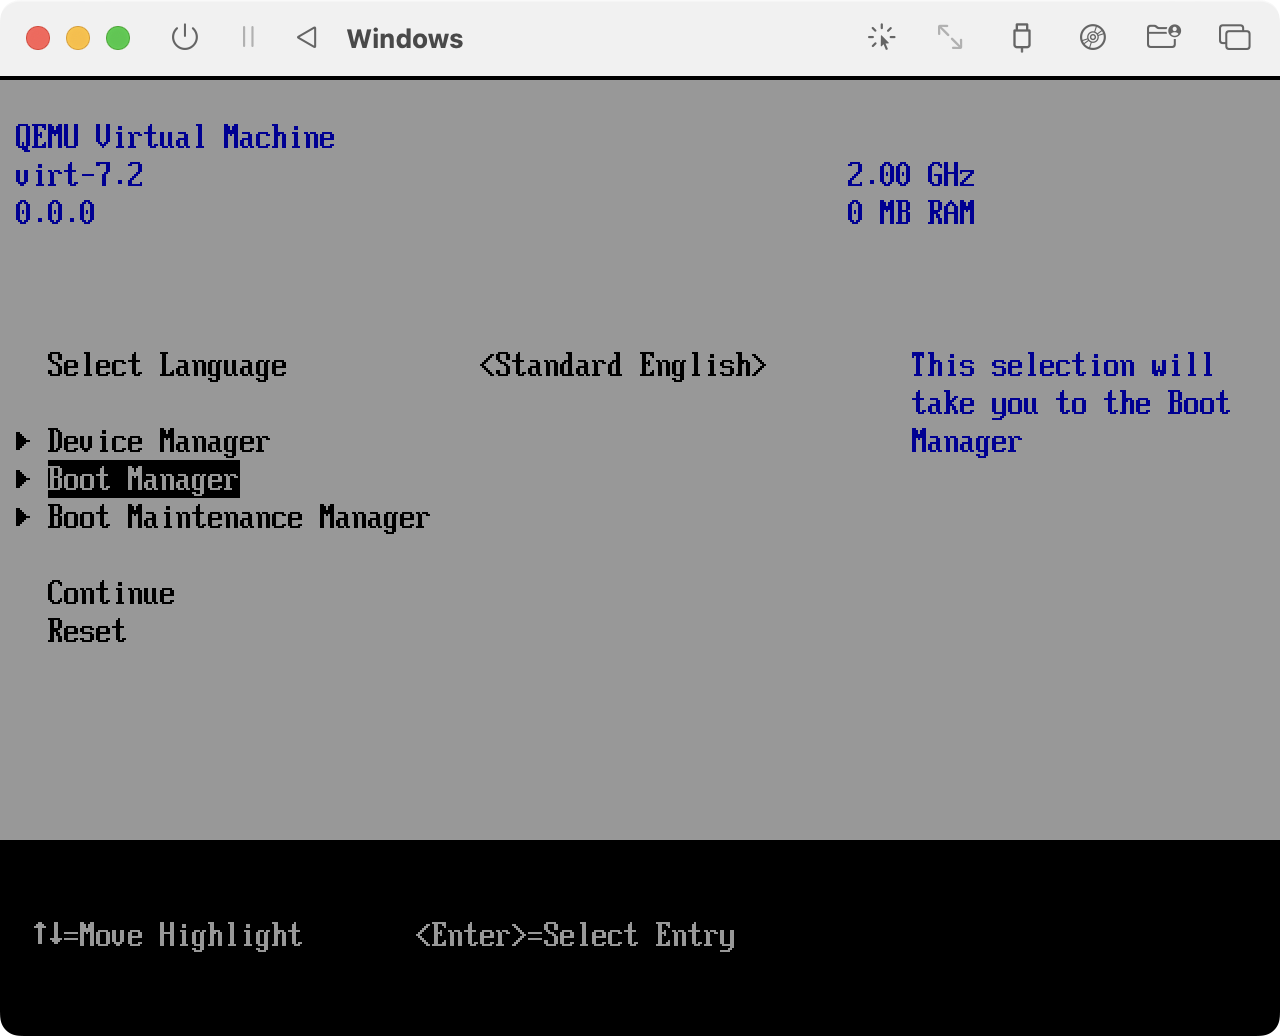
Выбираем первый пункт:


Устанавливаем образ Windows ч.2
Далее следует стандартная процедура установки windows
На выходе мы получаем вот такой результат.
Generally, one computer only runs one operating system. In some cases, users might need two operating systems on one computer, and it is more common when users are using Mac computers.
On Mac computers, the built-in Boot Camp has long been an official way to allow users to partition the hard drive and then install Windows. Even so, many people are still looking for alternative ways to install Windows 10 on Mac without Boot Camp. Because the Boot Camp doesn’t work seamlessly in many cases, it is tedious, error-prone, and it slows down installation productivity.
Thankfully, there are numerous third-party tools that help users install Windows systems without Boot Camp. Here in this article, we will introduce how can Mac users apply a tool called EaseUS OS2Go to install Windows. Moreover, virtual machines such as VMware and VirtualBox are also perfect choices to run Windows on macOS.
Preparations
Before starting to install Windows 10 on your Mac, you should prepare the following things:
- A USB stick with at least 64 GB or larger.
- A copy of a Windows 10 ISO image file or a Windows computer.
- A valid Windows 10 license that can legally and properly activate Windows.
- Download the Boot Camp Drivers.
If you prefer not to use Boot Camp, then the easiest method is to create a portable Windows USB so that you can use it on the Mac computer. There are plenty of third-party tools that can help users to create a portable Windows USB, one of such tools is EaseUS OS2Go. All you need is to prepare a larger enough USB drive, then leave the rest to EaseUS OS2Go.
Procedure 1. Create Windows Portable USB
First, you need to download and install EaseUS OS2Go on your computer. Then follow the detailed guide below to create a Windows portable USB.
Step 1. Install EaseUS OS2Go on your Windows computer, it will display your system drive’s used space. Plug in a USB drive that is larger than the system drive used space. Choose the target USB drive and click Next to continue.

Step 2. EaseUS OS2Go will notify you that the following operation would delete all data on your drive. Make sure that you have backed up all the important data. Click the Continue button to proceed.

Step 3. Adjust disk layout. The default disk layout on the target drive will be exactly the same as the resource drive. You could also edit the layout according to your needs. Tick the option there if you’re using a Solid State Drive as the Windows bootable drive. Next, click Proceed.

Step 4. Then EaseUS OS2Go will start to create the portable USB drive. It usually takes a while depending on your OS and Network condition. When the progress reaches 100%, the USB drive should be bootable now.

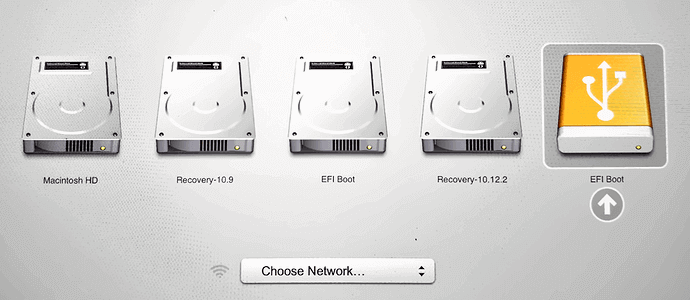
Step 5. Insert the portable Windows USB and start your Mac. Press the Option/Alt key. Choose the yellow EFI Boot icon to boot from the USB drive. Then follow the onscreen instruction to boot your Mac.
Procedure 2. Partition Mac Drives
If you still want to install Windows on your Mac, you can first create a bootable Windows USB with ISO files, then you need to partition the Mac drive and boot the Mac from the USB. Here are the detailed steps of these two procedures. As the Windows OS should be installed on a separated partition, it is an essential step to partition your drive. On Mac computers, you can apply the Disk Utility.
Step 1. Open Disk Utility, select your local drive (SSD or HDD) on the left and click Partition.
Step 2. Click on the small «+», then select the size of the partition, it should be at least 30 GB. You can name it anything as you want, and make sure the format is set to MS-DOS (FAT), then click Apply. Now you can see there are two separated partitions.
Procedure 3. Boot Your Mac from Bootable USB Drive
Now it’s the last step, boot your Mac from the created bootable USB drive.
Step 1. Insert the USB drive into your Mac.
Step 2. Restart the Mac and holding the Option key to enter the installing page.
Step 3. Choose EFI Boot, and the Mac should be boot from USB properly. Follow the Windows setup wizard to install the Windows OS on the created partition. The installing process will take some time, please wait patiently. During the process, the Mac will automatically restart several times.
Step 4. If you have created a portable USB with an activated Windows computer, just wait until the booting process finishes. If you have created the portable USB with Windows ISO files, then you need to activate the Windows system. Enter your Windows product key. If you lost the key, you can click the do it later button.
Step 5. You may find the keyboard or the mouse is not working under the Windows system, that’s because the bootable USB drive only contains basic drivers. You need to download and install Windows support drivers.
Step 6. Download and launch Boot Camp on your Mac, navigate to the USB drive in File Explorer, then go to WindowsSupport > BootCamp. Double-click the setup.exe.
Step 7. Follow the setup wizard, wait until it tells you to reboot the Mac to finish the installation. Now your Mac computer has dual systems.
If you want to switch from Windows system to macOS or vice versa, restart your Mac and holding the Option key to enter the booting page, choose the corresponding drive, you can switch from Windows and macOS.
![]()
Conclusion
It does seem a little bit complicated to install the Windows OS on a Mac computer. However, with EaseUS OS2GO, you have finished the most difficult part — creating a bootable USB. Then you could follow our step-by-step guide to finish the next procedures.
Лучшее решение зависит от того, для чего вы хотите использовать Windows. Вы хотите играть в видеоигры? Нужно использовать конкретное приложение для Windows? Или вы хотите портативную систему Windows, которую вы можете загрузить с любого Mac?
1. Двойная загрузка MacOS и Windows с помощью Boot Camp
Boot Camp — это встроенная утилита в Mac, которую вы можете использовать для установки Windows. Он разделяет ваш жесткий диск на две части, с Windows с одной стороны и macOS с другой.
Мы называем это системой двойной загрузки, потому что вы можете загружаться либо в MacOS, либо в Windows. Но вы не можете использовать обе операционные системы одновременно, а это значит, что вам нужно перезагрузить Mac, когда вы захотите переключиться.
Положительным моментом является то, что вы получаете отличную производительность в обеих операционных системах, потому что она должна работать только по одной за раз. В некоторых случаях Mac под управлением Windows через Boot Camp работает быстрее, чем выделенный компьютер Windows.
Система с двойной загрузкой — лучший вариант, если вы хотите играть в компьютерные игры, редактировать видео, визуализировать графику или выполнять другие ресурсоемкие задачи.
Как установить Windows на свой Mac с помощью Boot Camp
С Mac и подключением к Интернету у вас уже есть все необходимое для установки и запуска Windows с помощью Boot Camp. Хотя, если ваш Mac вышел до 2015 года, вам также необходимо создать установщик USB Boot Camp.
Прежде чем начать, убедитесь, что у вас есть как минимум 64 ГБ свободного места на вашем загрузочном диске. Вам нужно столько места для операционной системы Windows.
Когда вы будете готовы, загрузите последнюю версию Windows в виде образа диска ISO.
Затем откройте Ассистент Boot Camp. Вы найдете его в Утилиты в папке Программы на вашем Mac, но поиск в Spotlight ( Cmd + Space ) быстрее, чтобы открыть его. Следуйте инструкциям на экране для разбиения жесткого диска, загрузки драйверов поддержки Windows и установки системы двойной загрузки.
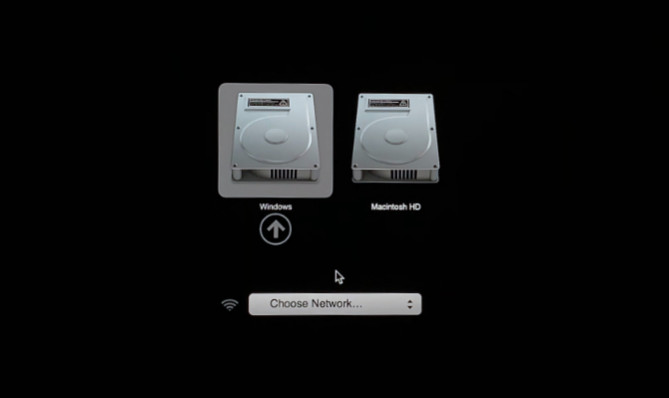
Когда установка Boot Camp завершится, перезагрузите Mac и удерживайте Option, пока он включается. Это должно дать вам выбор для загрузки в MacOS или Windows.
Виртуальная машина работает под управлением Windows внутри macOS. Нет необходимости разбивать жесткий диск на разделы и не нужно перезагружать Mac, когда вы захотите переключить операционные системы.
Использование виртуальной машины означает, что на вашем Mac одновременно работают и Windows, и macOS, поэтому производительность не так хороша, как у системы с двойной загрузкой. Однако дополнительного удобства использования приложений Windows вместе с приложениями macOS обычно достаточно, чтобы компенсировать эту потерю.
У вас есть несколько вариантов виртуальной машины, если вы хотите установить Windows на свой Mac:
- Parallels
- VirtualBox
- VMware Fusion
Parallels и VMware Fusion — это первоклассные сервисы, которые упрощают установку и запуск Windows с помощью множества удобных для Mac функций. VirtualBox сложнее в настройке и имеет меньше функций, но он бесплатный.
Как установить виртуальную машину Windows на ваш Mac
3. Запустите Windows To Go с внешнего диска с помощью WinToUSB
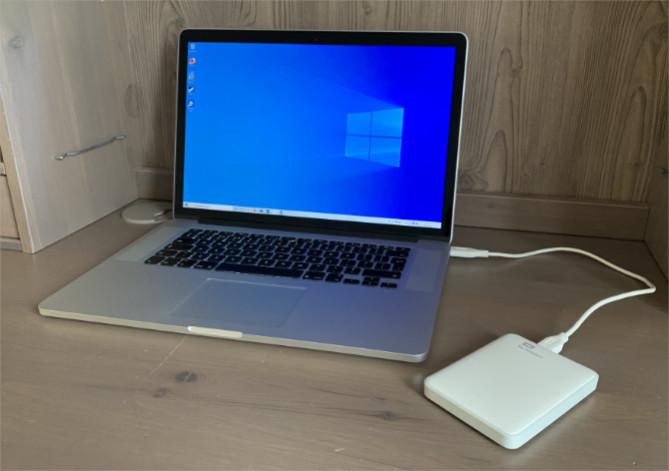
Windows To Go — это функция, позволяющая установить систему Windows на внешний жесткий диск, который затем можно загрузить с любого Mac. Непосредственные преимущества заключаются в том, что он не занимает места на вашем внутреннем жестком диске и обеспечивает огромную мобильность.
Использование Windows To Go похоже на систему с двойной загрузкой, за исключением того, что Windows запускается с совершенно другого диска вместо отдельного раздела. Это означает, что вам все равно нужно перезагружать ваш Mac всякий раз, когда вы хотите переключить операционные системы.
К сожалению, системы Windows To Go ограничены скоростью передачи данных и чтения/записи вашего внешнего диска и портом, к которому они подключены.
В идеале следует использовать диск USB 3.0 со скоростью записи не менее 50 МБ / с. Вы также должны убедиться, что вы подключаете его к порту USB 3.0 на вашем Mac для самого быстрого соединения.

Как установить Windows To Go для Mac на внешний диск
Хотя Microsoft отказалась от официальной функции Windows To Go в 2019 году, вы все равно можете использовать аналогичную настройку благодаря стороннему программному обеспечению. В настоящее время самый простой способ установить Windows To Go на внешний диск — это WinToUSB.
Это бесплатное приложение для Windows, поэтому вам нужно использовать компьютер с Windows или виртуальную машину, чтобы временно установить его на свой Mac. Если у вас нет под рукой Windows-машины, мы предлагаем вам использовать для этого виртуальную машину VirtialBox.
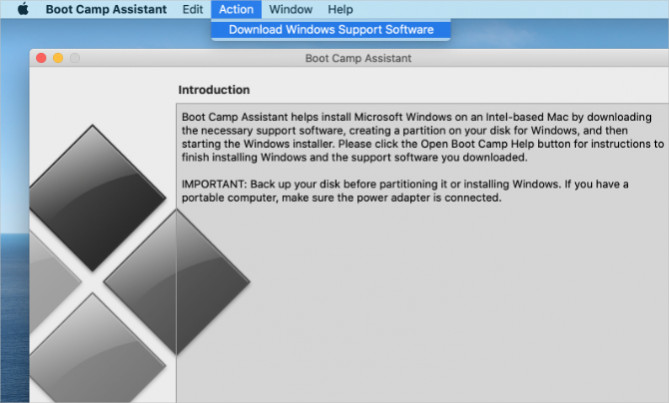
Вам также необходимо загрузить файлы поддержки из Boot Camp, чтобы оборудование Mac работало с Windows. Откройте Boot Camp Assistant в macOS и выберите Действие > Загрузить программное обеспечение поддержки Windows в строке меню.
Когда файлы поддержки завершат загрузку, скопируйте и вставьте их в свою виртуальную машину.
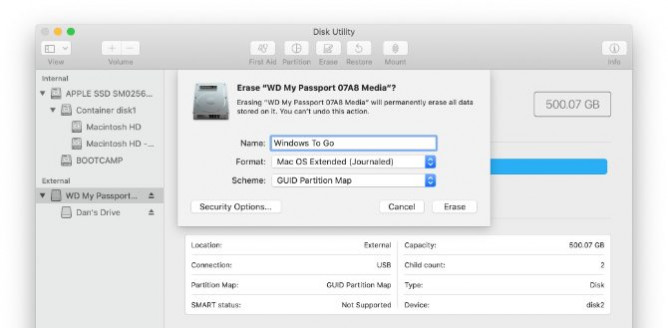
Теперь подключите ваш внешний диск и откройте Дисковую утилиту на вашем Mac. Сотрите и переформатируйте диск как macOS Extended (Journaled) со схемой карты разделов GUID. Как только это будет сделано, извлеките и снова подключите его к вашей виртуальной машине.
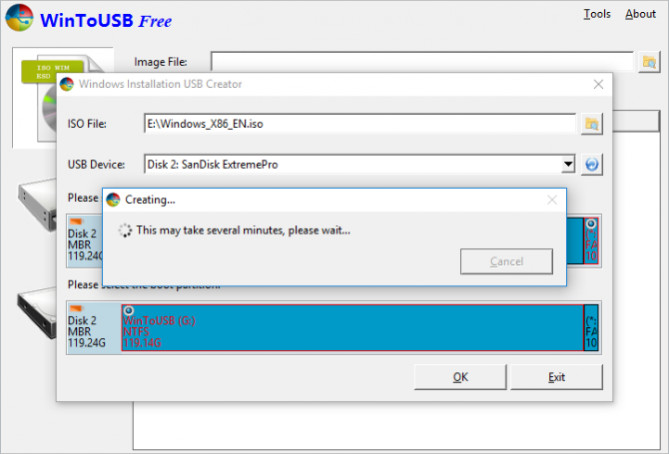
В вашей виртуальной машине загрузите образ диска Windows ISO и установите WinToUSB.
Щелкните правой кнопкой мыши кнопку «Пуск», чтобы открыть Управление дисками, и выберите внешний диск. Здесь щелкните правой кнопкой мыши основной раздел диска и выберите Удалить том, затем снова щелкните правой кнопкой мыши и создайте Новый том. Установите файловую систему на NFTS .
Откройте WinToUSB и выберите внешний диск в качестве места назначения для Windows. Выберите ваш загрузочный и системный разделы и выберите Legacy mode для установки.
После того, как WinToUSB установит Windows на ваш внешний диск, используйте файловый проводник, чтобы скопировать через папку поддержки Windows из Boot Camp Assistant.
Наконец, перезагрузите Mac и удерживайте Option, пока он включается для загрузки Windows To Go с внешнего диска. Откройте папку поддержки Windows и перейдите в Boot Camp > Настройка.
Prior to the launch of the M1 Macs in November 2020 one of the benefits of using a Mac was that you had the choice of either running macOS on its own, or installing Windows for those occasions when you need to run Windows-only apps and games.
It’s still possible to run Windows on a Mac, but right now this will only really work on a Mac with an Intel processor. In theory you can run Windows on a Mac with Apple’s M1 Chip, but this is only the ARM version of Windows, which isn’t readily available, and many Windows programs don’t run on it.
In this article we explain how to install Windows on a Mac. There are a number of ways to do so: you can use Apple’s dual-booting Boot Camp Assistant, you can use third-party virtualisation software or you can run Windows apps via an emulator.
We also discuss the pros and cons of each approach in this article.
There is a new version of Windows coming – Windows 11 – read:
Windows 11 vs macOS and what Apple should copy.
Which Macs can run Windows?
This depends on the version of Windows you’re trying to install, if you want to run Windows 10 any Mac with an Intel processor since late 2012 should support it.
Here’s the list of compatible devices:
- MacBook introduced in 2015 or later
- MacBook Air introduced in 2012 or later
- MacBook Pro introduced in 2012 or later
- Mac mini introduced in 2012 or later
- iMac introduced in 2012 or later
- iMac Pro (all models)
- Mac Pro introduced in 2013 or later
If you have an M1 Mac you can run the ARM version of Windows via
Parallels Desktop 16.5, however, getting a copy of Windows for ARM isn’t simple, and there are compatibility issues with Windows programs not running in that version of Windows. More information here:
New Parallels Desktop brings Windows to M1 Macs. You may also like to read:
Will Windows run on Apple Silicon.
Because it’s such early days for the ARM version of Windows running on M1 Macs we won’t go into detail about how to get it running on a Mac, but we will point you to Parallels who have some
information detailing the process.
As for Windows 11: running Windows 11 on the Mac may not be possible whether you have an Intel or M1 Mac. This is because in order to run Windows 11 the computer needs a security module called TPM – which Macs do not have. We explain everything in
Will Windows 11 run on Mac?
How much space does Windows need?
Your Mac will also need to have at least 64GB of disk space free if you are to install Windows in a Boot Camp partition. However, because Windows requires 128GB (once you install all the accompanying programs) Apple actually
suggests that you create a 128GB partition.
What’s best Boot Camp or virtualisation?
There are two main methods if you need to install Windows on your Mac, and the option you choose will generally depend on the type of software you need to run.
The first, provided by Apple itself with the Boot Camp Assistant that is installed on all Intel Macs, is called ‘dual-booting’, as it gives you the ability to start up (or ‘boot’) your Mac using either Windows or macOS.
The Boot Camp Assistant can split your Mac’s hard drive (or solid state drive) into two sections, called ‘partitions’. It leaves macOS on one partition, then installs Windows on the second partition. You simply choose which operating system you want to run by pressing the Alt/Option key on your keyboard when you boot your Mac.
Installing Windows on a Boot Camp partition with this method effectively turns your Mac into a Windows PC, and devotes all of your Mac’s processor power and memory – and its graphics card if it has one – to running Windows alone.
That’s the best option if you want to play Windows games, or run high-end graphics and design software that needs all the power it can get.
The only disadvantage of Boot Camp is that you lose access to all your normal Mac apps while you’re running Windows, which means you have to shut down Windows and boot back into macOS if you want to use Mac apps such as Apple Mail or Photos.
This is where the other option, known as virtualisation, can come in handy. Instead of splitting your hard drive into separate partitions for macOS and Windows, you use a virtualisation program such as
Parallels Desktop or
VMware Fusion to create a ‘virtual machine’ that runs within macOS itself. For more options see
best virtual machine software for Mac.
The virtual machine (VM) is simply an app that runs on the Mac just like any other Mac app. However, the virtual machine mimics the workings of a PC, allowing you to install Windows on the virtual machine, and then install any Windows apps that you need to run as well.
This is definitely the most convenient option, as it means that you can run your Windows apps on the Mac desktop right alongside all your normal Mac apps, so there’s no need to dual-boot back and forth between the macOS and Windows as you do when running Boot Camp.
But virtualisation has disadvantages too. Running Windows within a virtual machine means that you’re effectively running two operating systems at the same time, so you’re going to need plenty of processor power and memory to get decent performance when running your Windows apps.
Even so, most recent (Intel) Macs can still provide good performance when running Windows in a virtual machine, and it’s only 3D games and high-end graphics apps that need the extra power you can get from dual-booting with Boot Camp.
The new alternative: Windows 365
Microsoft has launched a new service – Windows 365 – that allows business users to access cloud-based PCs running Windows and Windows software from anywhere. It means you get a full-fledged Windows 10 computer in the cloud. But this isn’t limited to Windows machines – it can also run on a Mac, iPad or iPhone. More here:
How Windows 365 is bringing Windows to Mac, iPad and iPhone.
All Windows 10 and Windows 11 devices will be compatible, as you would expect. But the good news is that a Windows 365 session will also be able to be streamed to hardware running macOS, iPadOS, Linux and Android.
Windows 365 is similar to virtualisation and remote access software, but it’s worth noting that one disadvantage of Microsoft’s cloud solution is that the monthly fee is quite high (starting at £20.50/$24 per user, per month, for a 1 CPU, 2GB RAM, 64GB storage Cloud PC –
details of pricing here), and if you want more memory and storage space it costs even more. You’ll also need a good internet connection, since every input must also be transmitted via the web.
How to get Windows for Mac
If you want to run Windows 10 on your Mac you can download it as a ‘disk image’ file – sometimes also called an ‘ISO file’ –
from Microsoft’s website.
You can download ISO files for Windows 7 and Windows 8.1 as well. However, these versions of Windows were originally sold on disk, so if you still have the original disk then it’s probably quicker to create the ISO file using the installer program on the disk. This is actually quite straightforward, and Apple covers this option
on its website too.
Now you have Windows install files you just need to get Boot Camp or your Virtualisation software up and running so you can install it.
If you want to get Windows for free or find a way to run Windows for free on your Mac read:
How to run Windows 10 on a Mac for free.
How to run Windows on a Mac via Boot Camp
One of the best things about running Windows via Boot Camp is that Apple provides Boot Camp Assistant as a free app that helps you to install Windows on your Mac.
You’ll find the Assistant located in the Utilities folder within the main Applications folder on your Mac – but before you run the Assistant there are a few things that you will need to run Windows in Boot Camp.
What you need
- Apple recommends that you have a minimum of 64GB of free storage available on your Mac’s internal hard drive (or solid-state drive) for installing Windows. Actually 128GB is recommended!
- You may also need a memory stick with at least 16GB of storage for the additional ‘driver’ software that Windows needs in order to control components such as your Mac’s monitor and camera, as well as your Mac keyboard and mouse (which, of course, are different from conventional Windows mice and keyboards). Some Macs will be able to download these necessary drivers though.
- You’ll need a fully paid-for copy of Windows, along with the licence number. Recent Mac models and any Mac running Catalina will only work with Windows 10, although older models may also work with Windows 7, or Windows 8.1. You can check which versions of Windows your Mac can run
on Apple’s website.
The installation process will vary, depending on which version of Windows you’re using.
Once you’ve completed those preparations you’ll be ready to run Boot Camp Assistant and install Windows on your Mac. Here’s what to do.
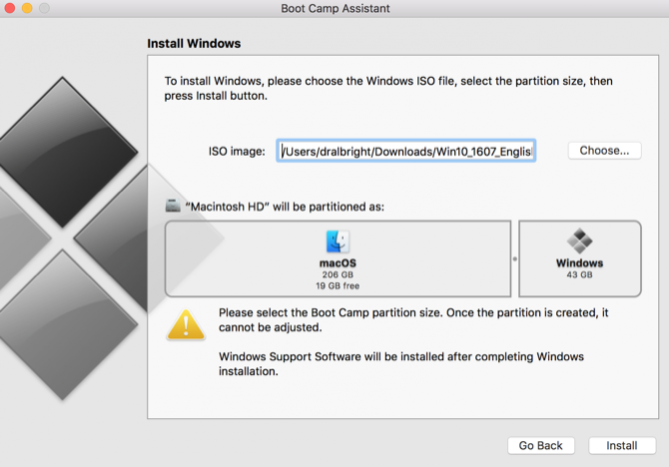
Step 1: Open Boot Camp Assistant.
When you run Boot Camp Assistant for the first time, it will prompt you with a number of options. The first option is to select the ISO image you want to use. Click the Choose button then navigate to the one you have created or downloaded. This will copy your Windows ISO file on to the USB memory stick so that you can install Windows.

Step 2: Download driver software
Next Boot Camp Assistant may tell you that it will download the driver software for Windows on to the USB memory stick as well. However, it will only download the drivers for Windows 8.1 and Windows 10, so if you want to install Windows 7 – which is still used by millions of people around the world, but is no longer supported by Microsoft – then you’ll have to head back to the
compatibility tables on Apple’s website in order to locate the driver software that you need for your Mac, then follow the instructions to copy the drivers on to your USB memory stick.
Step 3: Partition your drive
To allocate room for Windows, Boot Camp will need to split your Mac’s hard drive into two separate sections, known as ‘partitions’. This is shown at the bottom of the pane with the normal macOS on the left and the proposed Windows one on the right.
By default, Boot Camp Assistant offers to create a small Windows partition that is only 40GB in size, but you can use the slider control (the dot between the partitions) to adjust the size of the two partitions as required.

If your Mac has more than one internal hard drive or SSD, it’s possible to devote one of those drives exclusively to Windows.
However, Boot Camp doesn’t play well with external drives connected via USB or Thunderbolt, so it’s best to use your normal internal drive wherever possible. And if you have an external drive connected to your Mac for
Time Machine backups then it’s a good idea to remove it as Boot Camp can get a bit confused if it detects an external drive during installation.
When you’re done, click the Install button at the bottom of the window to start the process.
Step 5: Install Windows
Once you’ve partitioned your Mac drive, Boot Camp will shut down your Mac and launch the Windows installer program from the USB memory stick. You can just follow the prompts to install Windows. As soon as Windows starts up you will also be prompted to install the additional Boot Camp drivers from the memory stick as well.

Step 6: Run Windows
Once that’s done you can simply ‘dual-boot’ between the macOS and Windows by pressing Alt (aka
Option) on your keyboard when you turn the Mac on. You’ll see the two partitions with the macOS and Windows displayed on screen as the Mac starts up, and you can simply select whichever operating system you need.
How to run Windows in a Virtual Machine
Virtualisation programmes such as
Parallels Desktop and
VMware Fusion provide an ingenious and flexible alternative to the dual-boot approach of Boot Camp.
Instead of splitting your Mac’s hard drive into separate partitions, and then installing Windows on to the Boot Camp partition, these programs create a virtual machine – or VM – which is simply an app that runs on the Mac and acts like a PC.
You can then install Windows in the VM, along with whatever Windows apps and software that you need to run. The VM can run alongside other Mac apps, such as Safari or Apple Mail, so there’s no need to switch back and forth between the two operating systems, as you are forced to do with Boot Camp.

You may need to buy a copy of the VM software, as well as providing your own copy of Windows. Parallels starts at £69.99/$79.99, VMware is free for personal use, but will cost from $149 otherwise.
There is also a free virtualisation program, called
VirtualBox, but it’s fairly complex and difficult to use, so we’ll focus first on using Parallels and VMware to install Windows. We do have a separate article discussing how to use VirtualBox though, if you feel ready for the challenge.
We have a separate in-depth guide to
the Best virtual machine software for Mac.
Run Windows on a Mac with Parallels
Parallels Desktop (version 16 at time of writing – read our
Parallels Desktop 16 review) costs £69.99/$79.99 and has a more colourful graphical interface than VMware Fusion, but the two programs take the same basic approach. They provide several options for creating a new VM on your Mac, using an installer disk, or ISO file.

It’s also possible to connect an existing Windows PC to your Mac and create a VM on the Mac that is an exact copy of the PC, complete with Windows and all the Windows apps that you need. And, if you’re already using Boot Camp, you can even create a VM that duplicates your Boot Camp partition – which is a handy option for quickly checking a few files, or running apps that don’t need top performance, without having to shut the Mac down and boot into Windows.
Once you’ve decided how you want to install Windows, both programs allow you to adjust a number of important settings.
Run Windows on a Mac with VMware Fusion
VMware Fusion (now in version 12 – read our
VMware Fusion 12 review) is a little more complicated, as it displays a window with a lot of settings that might seem a bit daunting to first time users. Parallels makes things a bit easier for beginners, by providing a number of predefined options that are suitable for productivity software such as Microsoft Office, or running heavy-duty 3D games, or design software.
VMware has various licensing options. The basic version- Fusion 12 Player – is free for personal use (details
here). The commercial price of Fusion 12 Player is $149, while Fusion 12 Pro is $199, or it is an $79 upgrade from previous versions.
Hardware settings
Both VMware Fusion and Parallels allow you to change the hardware configuration of your VMs if you need to, just as though you were choosing the physical hardware for a real Mac or PC.
If your Mac has a multi-core processor then you can devote multiple cores to your VM in order to improve performance. You can also allocate extra memory and disk space, and even increase the amount of video memory that your VM can use for handling 3D graphics in games and other graphics software.

Other options provided by both Parallels and VMware include the ability to connect external devices, such as a hard drive or even Bluetooth speakers to your Windows VM. You can also determine how your VM interacts with the macOS on your Mac, perhaps sharing specific folders and files that you need for a work project, or sharing your music or photo libraries.
Software settings
A key aspect of how your VM runs on your Mac is the way it appears when it’s running on the Mac desktop.

By default, both Parallels and VMware run their VMs in a window – so you get a kind of ‘Windows window’ that displays the Windows desktop floating in its own window on top of the Mac desktop. However, it’s also possible to expand the Windows desktop so that it fills the entire screen, making your Mac look just like a normal PC (whilst still allowing you to switch into Mac apps by using Command-Tab).
But a better option for many people is the ability to hide the Windows desktop altogether, so that individual Windows apps appear all on their own on the Mac desktop, just like ordinary Mac apps.

The number of different options available here can be a bit intimidating, but the great thing about virtualisation technology is that you can’t really break a VM. You can save different versions of your VM – just like saving different versions of a document in Microsoft Word. That allows you to experiment with different settings to see which options work best for you, and then simply revert back to a previous version of the VM whenever you want.
Can I run macOS on a Windows PC?
What about the opposite scenario? Is it possible to run macOS on a PC?
In a word: no. It is one of those ironies that although Microsoft is famed for its aggressive commercial practices, Apple is responsible for this particular impasse. Although you can run Windows on any X86 computer, Apple makes its own macOS software available only on Mac software.
Overtly the reasoning is laudable: macOS is designed to run on Apple’s own hardware, and the experience wouldn’t be as good on any old computer. This is one reason why you will never run an underpowered Mac.
But it is also fair to say that Apple creates software in order to sell hardware. The excellence of macOS is a killer app when it comes to selling Macs, and it doesn’t want to share. So if you want to experience the best of all worlds, you need to run Windows on your Mac.
That said, you could read
how to create a Hackintosh and try.