-
Главная
-
Инструкции
-
Виртуализация
-
Установка Windows на VMware: пошаговая инструкция
Виртуализация – это технология для создания виртуальных версий физических ресурсов, на которых работают разнообразные изолированные виртуальные машины.

Источник изображения: habr.com
На картинке выше изображена архитектура гипервизоров второго типа (hosted). Гипервизор – это программное обеспечение или аппаратное устройство, которое является ключевой составляющей виртуализации и позволяет создавать и управлять виртуальными машинами на физическом компьютере или сервере. Второй тип гипервизора работает поверх уже установленной операционной системы, которая в данном случае называется хостовой. К нему относятся такие инструменты, как:
- Oracle VirtualBox;
- Parallels Desktop;
- VMware Workstation.
В настоящей статье мы опишем пошаговую инструкцию по установке операционной системы Windows 11 на VMware. Прочитав ее, вы узнаете:
- как установить VMware Workstation на свой компьютер;
- как правильно настроить установленный гипервизор;
- как создать виртуальную машину с операционной системой Windows 11 и многое другое.
Системные требования для VMware Workstation
Системные требования для VMware Workstation могут изменяться в зависимости от версии программы и операционной системы.
Минимальные системные требования выглядят следующим образом:
- Процессор: 64-битный процессор с тактовой частотой выше 1.3 Ghz и поддержкой виртуализации (Intel VT-x или AMD-V);
- Оперативная память: Минимум 2 ГБ RAM, но рекомендуется 4 ГБ или больше;
- Свободное дисковое пространство: Минимум 2,5 ГБ свободного места на жестком диске для установки программы;
- ОС: VMware Workstation поддерживает различные версии Windows и Linux.
Чтобы узнать актуальные системные требования для конкретной версии VMware Workstation, рекомендуем обратиться к официальным ресурсам VMware или к программной документации.
Установка VMware Workstation
На данном этапе будет производиться установка VMware Workstation. Ниже мы опишем ее пошагово.
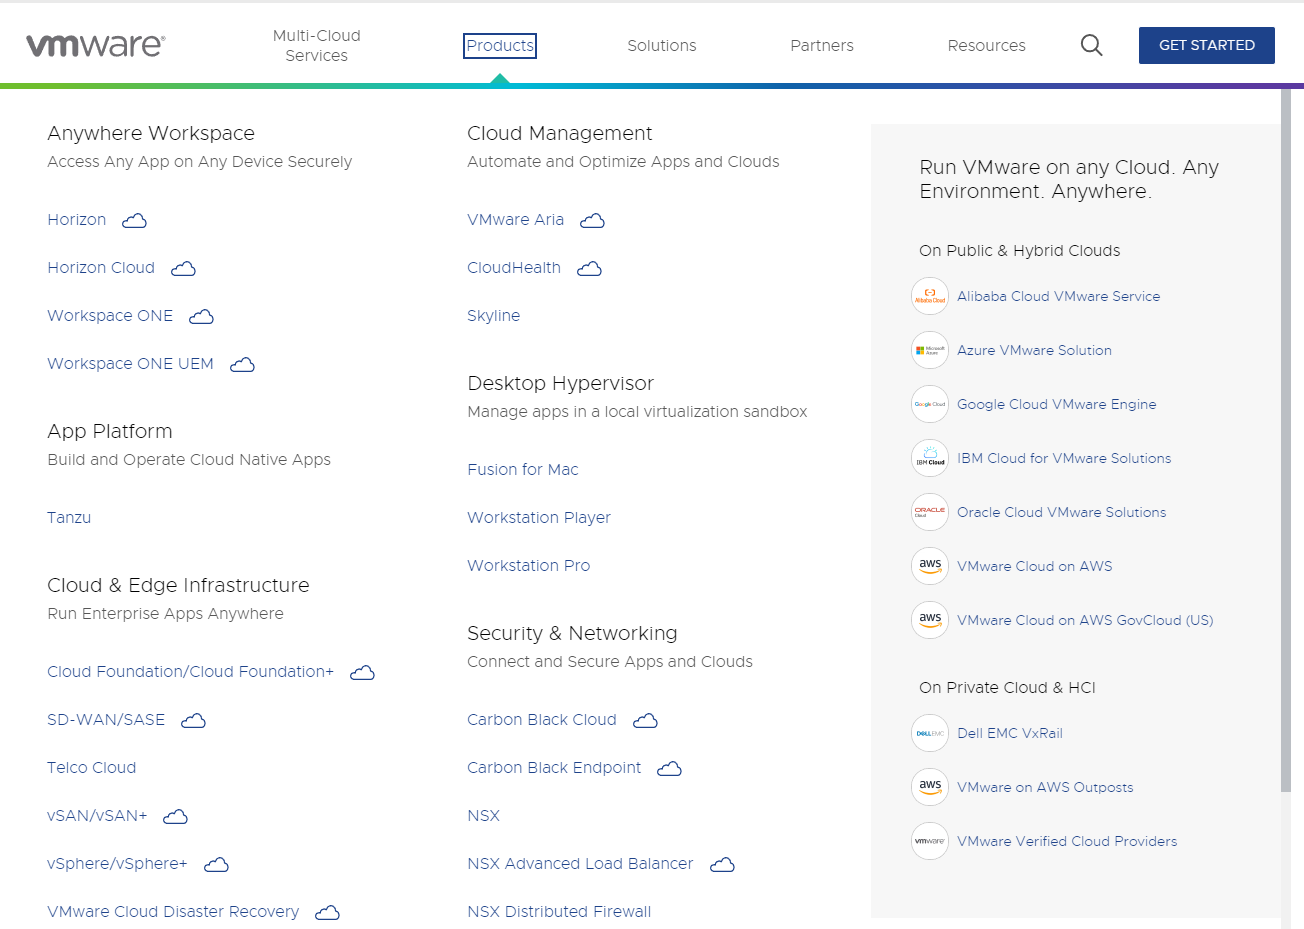
- Для начала зайдем на официальный сайт компании VMware и перейдем на вкладку «Products» в верхнем меню.
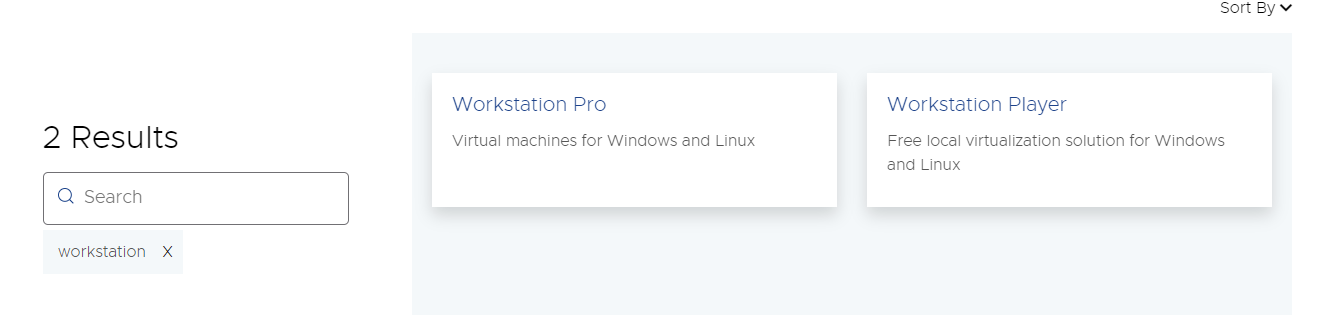
- Воткрывшемся списке продуктов ищем вкладку «Desktop Hypervisor» и выбираем «Workstation Pro».
- Далее, в открывшемся окне скроллим вниз и ищем пункт «Download Trial».
- Последнее, что осталось сделать для начала скачивания файла установщика, — это выбрать необходимую ОС в качестве хостовой. В этой инструкции мы будем выполнять установку VMware Workstation на Windows. Нажимаем кнопку «DOWNLOAD NOW» и ожидаем окончания загрузки файла.
- По окончании загрузки запускаем скачанный файл. Перед нами должно открыться окно установки VMware Workstation Pro, как показано на картинке ниже.
Нажимаем кнопку «Next».
- В следующем окне устанавливаем галочку рядом с пунктом «I accept the terms in the License Agreement» и нажимаем кнопку «Next». Эти действия подразумевают, что вы принимаете условия лицензионного соглашения.
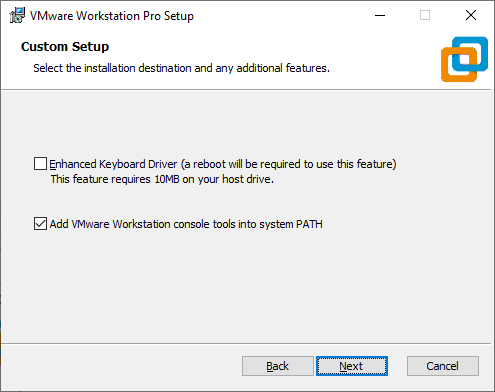
- Далее установщик предлагает указать путь, куда будет установлена VMware Workstation, а также предоставляет на выбор две опции:
-
- Улучшенный драйвер клавиатуры. Эта опция предоставляет дополнительную функциональность для работы с клавиатурой в виртуальных машинах. Когда она включена, VMware Workstation устанавливает драйвер, который улучшает обработку дополнительных клавиш, повышает безопасность и позволяет передавать дополнительные клавишные комбинации между хостовой и гостевой ОС.
- Добавить инструменты консоли VMware Workstation в системный путь. Данная опция предназначена для автоматизации некоторых аспектов работы гипервизора.
Вы можете выбрать их в зависимости от ваших потребностей и предпочтений при установке программы. Мы включим в установку обе предложенные опции.
- В следующем окне мастер установки предложит включить 2 опции:
-
- Проверять наличие обновлений продукта при запуске.
- Присоединиться к программе улучшения опыта клиентов VMware.
Данный шаг мы пропускаем, оставляя поля для галочек пустыми, и нажимаем кнопку «Next».
- На заключительном этапе нам будет предложено создать ярлыки на рабочем столе и в меню «Пуск». Выбор данных опций зависит от ваших предпочтений.
- И наконец, после указания всех параметров и опций установки, нажимаем кнопку «Install».
На этом этап установки VMware Workstation окончен. Теперь мы переходим к его запуску и созданию своей первой виртуальной машины.
Запуск VMware Workstation и создание первой виртуальной машины
На данном этапе мы перейдем к работе в среде VMware Workstation, где выполним его базовую настройку и подготовим виртуальную машину, на которую в дальнейшем будет выполняться установка Windows 11. По ходу инструкции, вам понадобиться оригинальный iso-образ ОС Windows 11. Скачать его вы можете с официального сайта Microsoft (недоступно для пользователей из России), либо других проверенных источников.
- По окончании установки VMware Workstation запустим его. При первом запуске перед нами появится следующее диалоговое окно:
Здесь необходимо указать лицензионный ключ ПО либо запустить пробный период на 30 дней.
- Далее откроется рабочее окно установленного гипервизора. Оно продемонстрировано на картинке ниже.
В первую очередь произведем настройку директории, куда в будущем будут устанавливаться все виртуальные машины. Для этого откроем вкладку «Edit», а затем выберем пункт «Preferences…».
В открывшемся окне на вкладке «Workspace» вы можете изменить путь к директории хранения виртуальных машин.
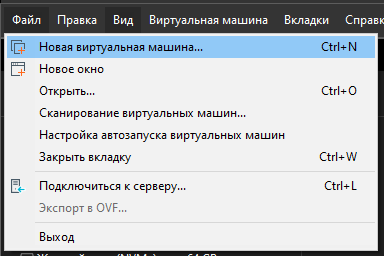
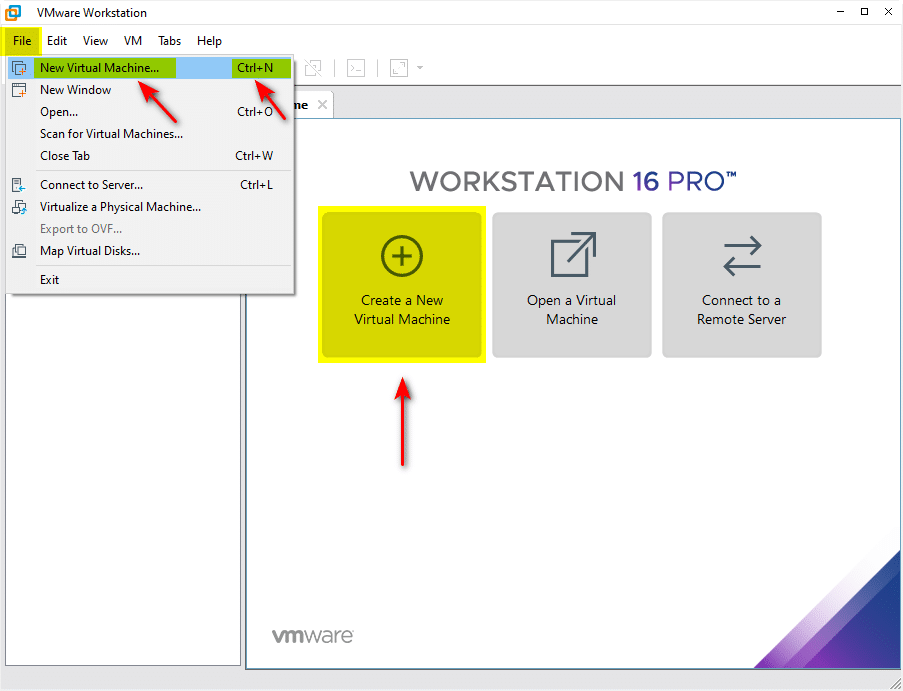
- Теперь мы можем создать свою первую виртуальную машину. Для этого переходим на вкладку «File» и выбираем пункт «New Virtual Machine…».
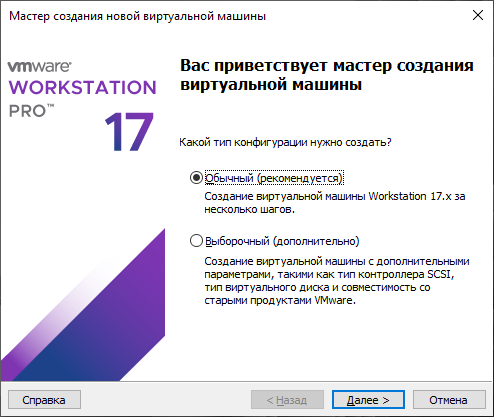
- На следующем шаге перед нами должен открыться мастер создания новой виртуальной машины.
Здесь мы выбираем первый пункт — «Обычная установка». Его отличие от второго («Выборочная установка») заключается в уровне автоматизации процесса установки. «Выборочная установка» включает в себя самостоятельную настройку разного вида оборудований. Однако это можно сделать и после создания виртуальной машины.
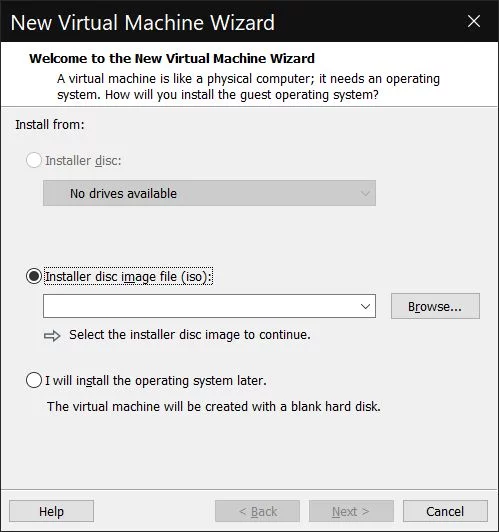
- На следующем этапе мы указываем тип установки гостевой ОС. Система предлагает на выбор 3 варианта:
-
- Установка с физического диска.
- Установка из образа ISO.
- Установка операционной системы позже.
Мы воспользуемся вторым вариантом из предложенных и добавим ISO-образ ОС, скачанный ранее, используя кнопку «Browse…».
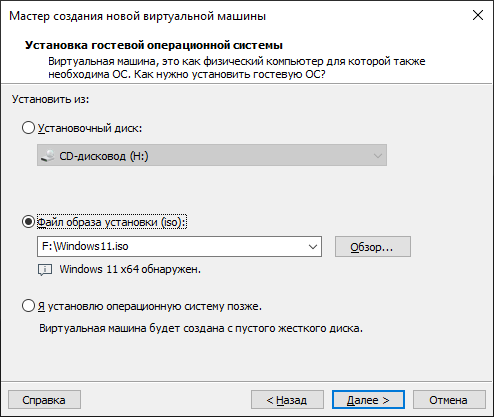
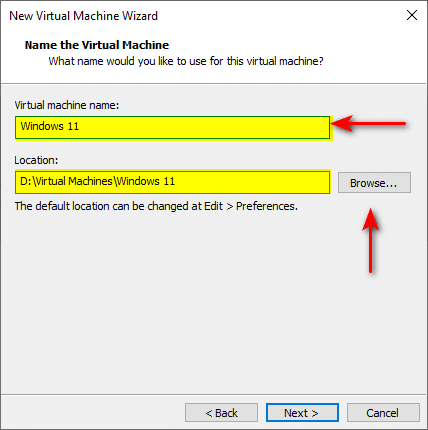
- Далее система предложит нам указать имя виртуальной машины и путь к ее хранению.
Оставляем предложенные настройки и нажимаем кнопку «Next».
- В следующем окне мастер установки предложит настроить шифрование виртуальной машины.
Для корректной работы гостевой ОС требуется модуль TPM (Trusted Platform Module). Все ваши файлы будут зашифрованы с использованием пароля, который необходимо указать в соответствующих строках. На выбор система предлагает 2 типа шифрования:
- Шифрование всех файлов виртуальной машины.
- Шифрование только тех файлов, которые необходимы для поддержки модуля TPM.
Мы выбрали второй тип шифрования. Также мы установили галочку в поле, отвечающем за сохранение пароля в диспетчере учетных данных.
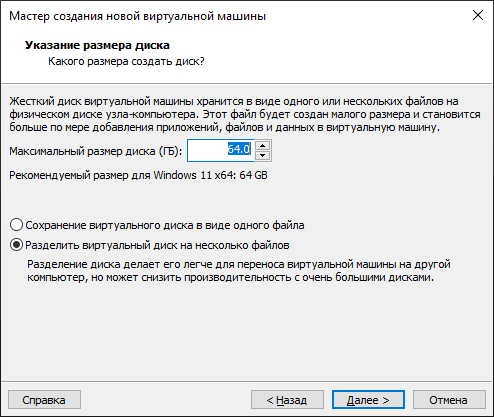
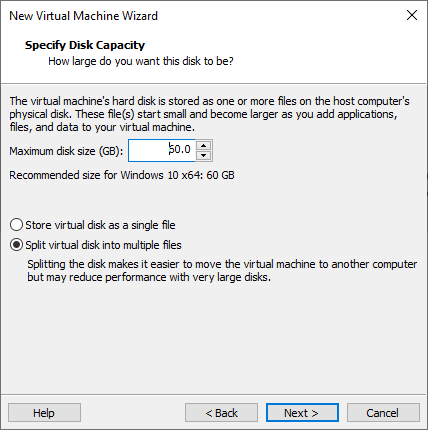
- Далее мастер установки попросит указать требуемое для ОС место на диске и метод хранения файлов.
Оставляем предложенные системой данные и переходим к следующему этапу.
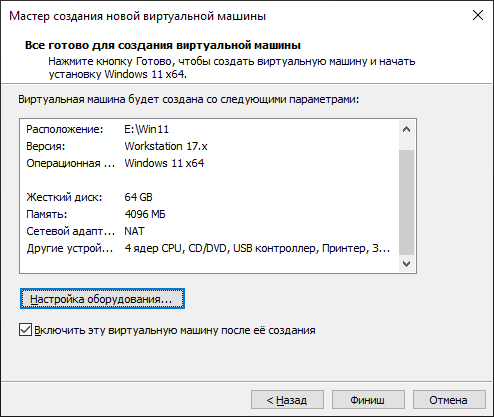
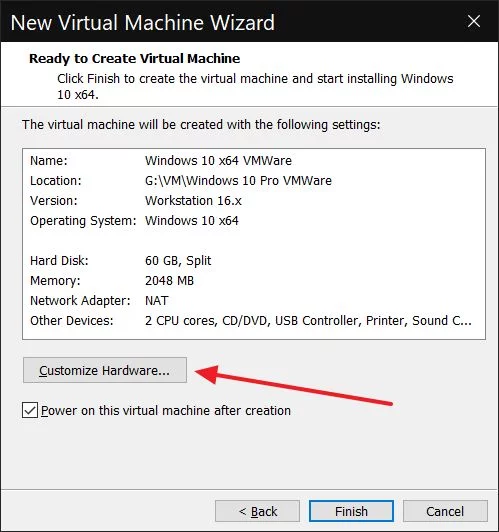
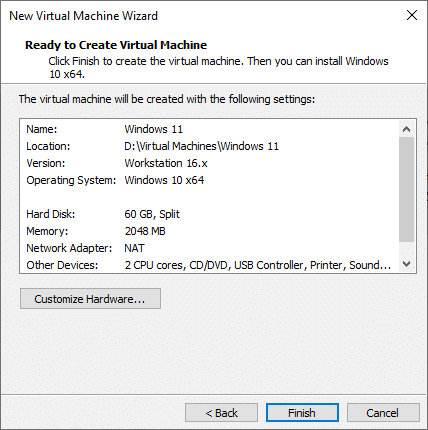
- На данной этапе пользователю будут продемонстрированы предварительные параметры виртуальной машины. Их можно изменить, нажав кнопку «Customize Hardware…», либо оставить без изменений.
Виртуальная машина создана и готова к запуску. В следующем этапе будет описан процесс установки и настройки Windows 11 в VMware.
Установка и настройка Windows 11 в VMware Workstation
Если на этапе создания виртуальной машины все было сделано верно, то вы можете приступать к установке Windows 11.
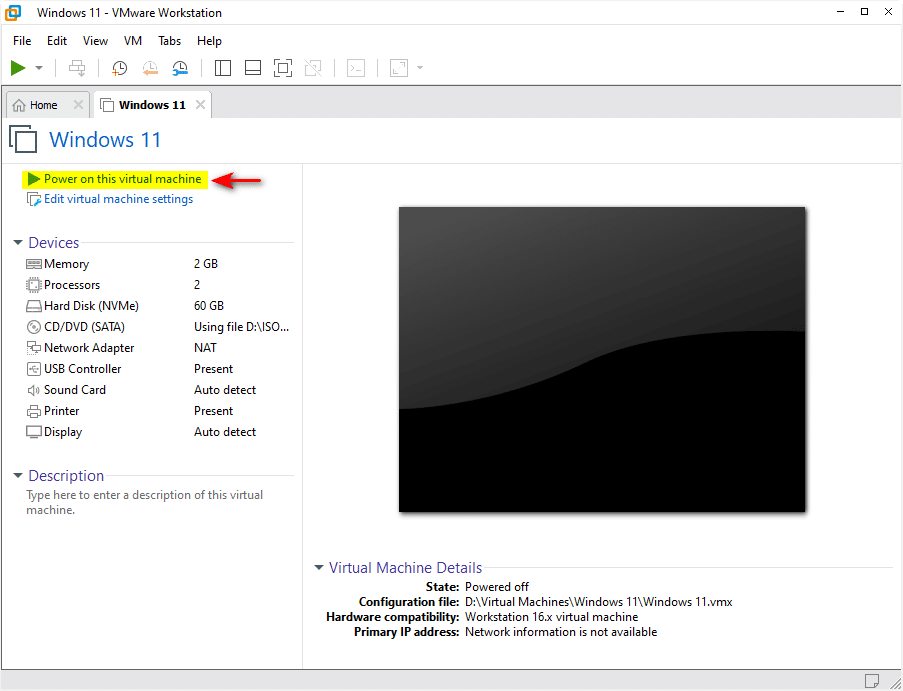
- Чтобы установить Windows 11 в VMware Workstation, достаточно выбрать ранее созданную виртуальную машину из списка доступных и нажать кнопку запуска, как это показано на картинке ниже.
При запуске виртуальной машины, вы можете столкнуться с ошибкой, изображенной на картинке ниже.
Данная ошибка означает, что у вас не выполнено первое требование из главы «Системные требования для VMware Workstation», а именно отсутствует поддержка виртуализации. Чтобы это исправить, необходимо зайти в настройки BIOS и включить параметр SVM Mode.
- После запуска виртуальной машины перед вами появится следующее окно.
Для загрузки с установочного образа, необходимо переключиться в рабочую область окна и быстро нажать любую клавишу на клавиатуре, например «Enter».
- Далее начнется стандартный процесс установки Windows 11, который ничем не отличается от процесса установки на физический компьютер.
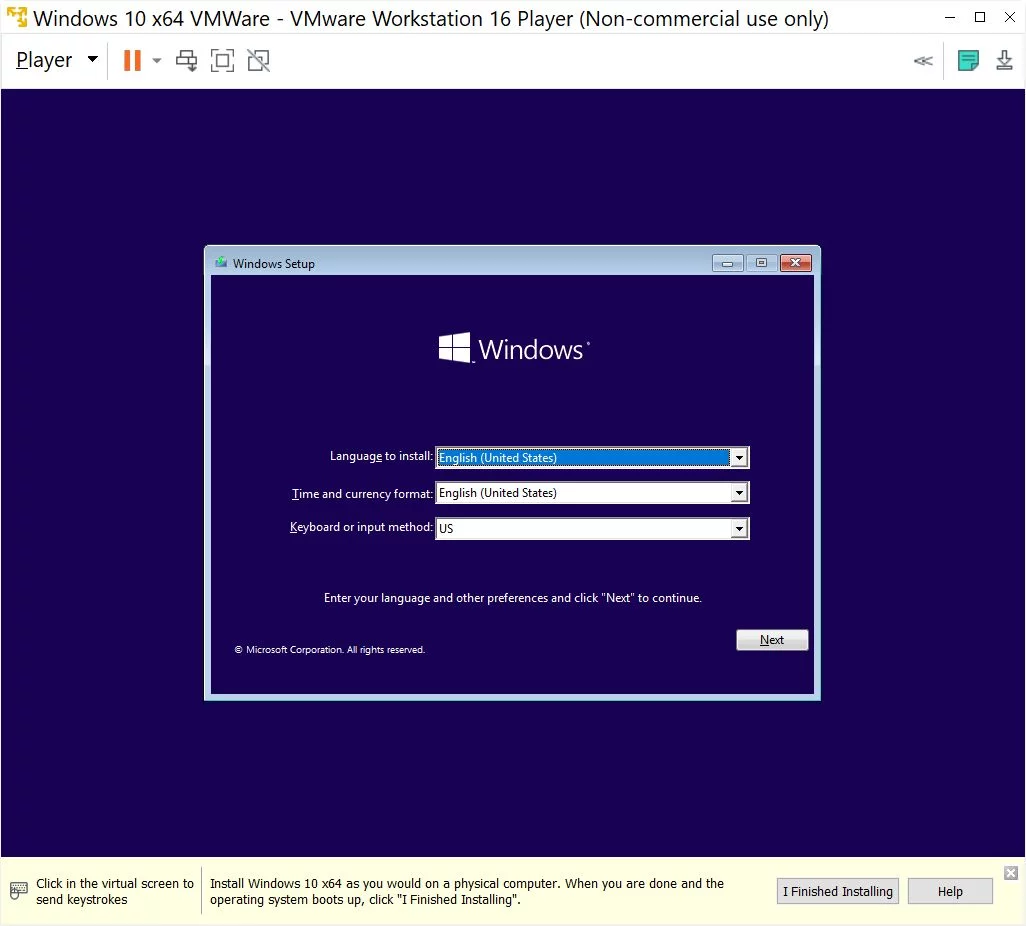
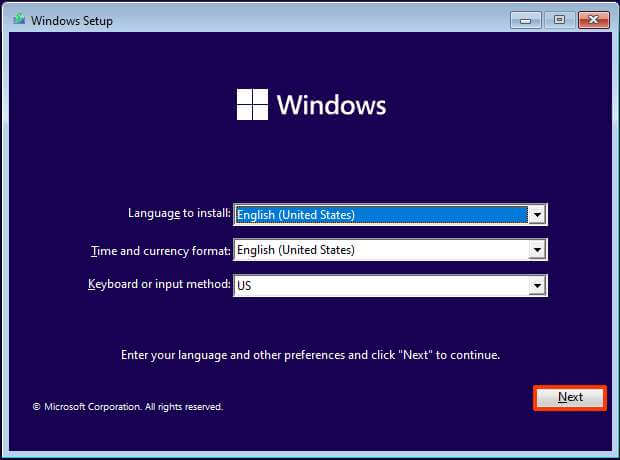
В первую очередь, мы выбираем язык установки, время и валюту, а также язык клавиатуры.
- На следующем этапе необходимо выбрать требуемый тип операционной системы и принять лицензионной соглашение.
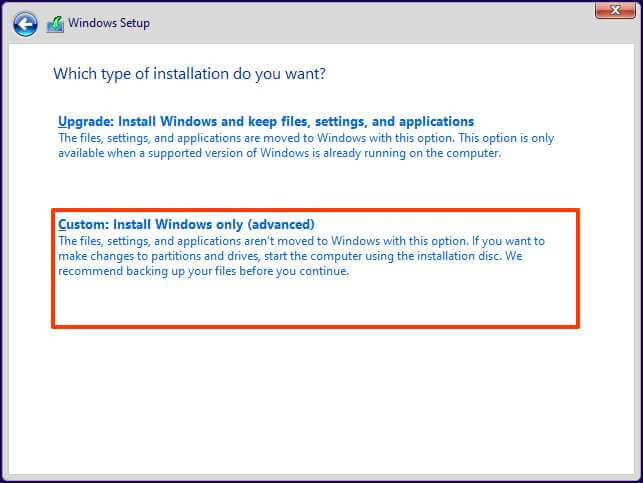
- Далее система предложит выбрать тип установки.
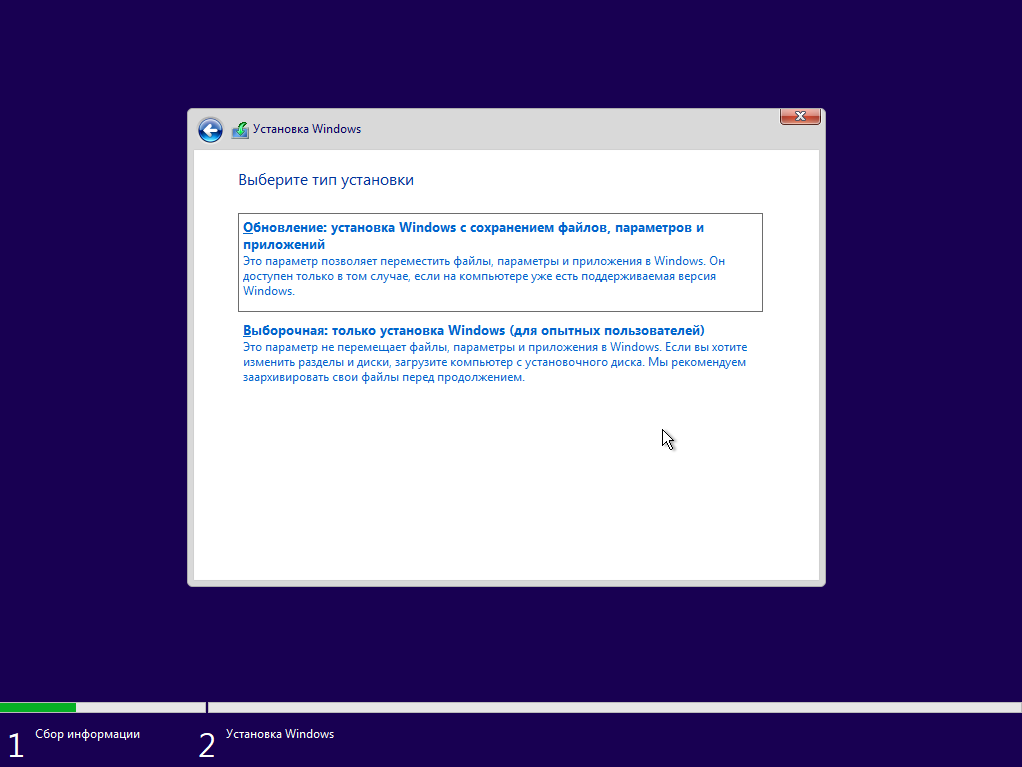
Так как мы устанавливаем систему впервые, а не обновляем ее, нам нужно выбрать второй вариант.
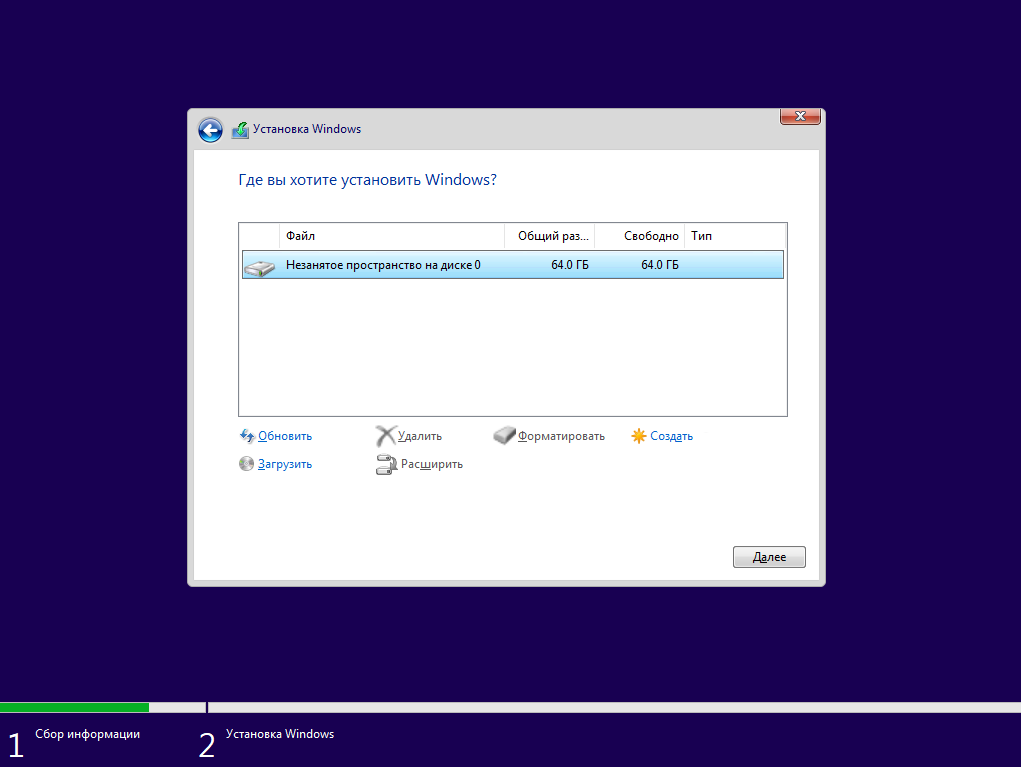
- Предпоследним шагом установки является выбор дискового пространства. Мы выбираем созданный диск на 64 Гб. На нем впоследствии будут созданы необходимые разделы для системы. Нажав кнопку «Далее», запустим процесс установки Windows 11.
- Заключительным шагом является первоначальная настройка установленной ОС. Она включает в себя:
-
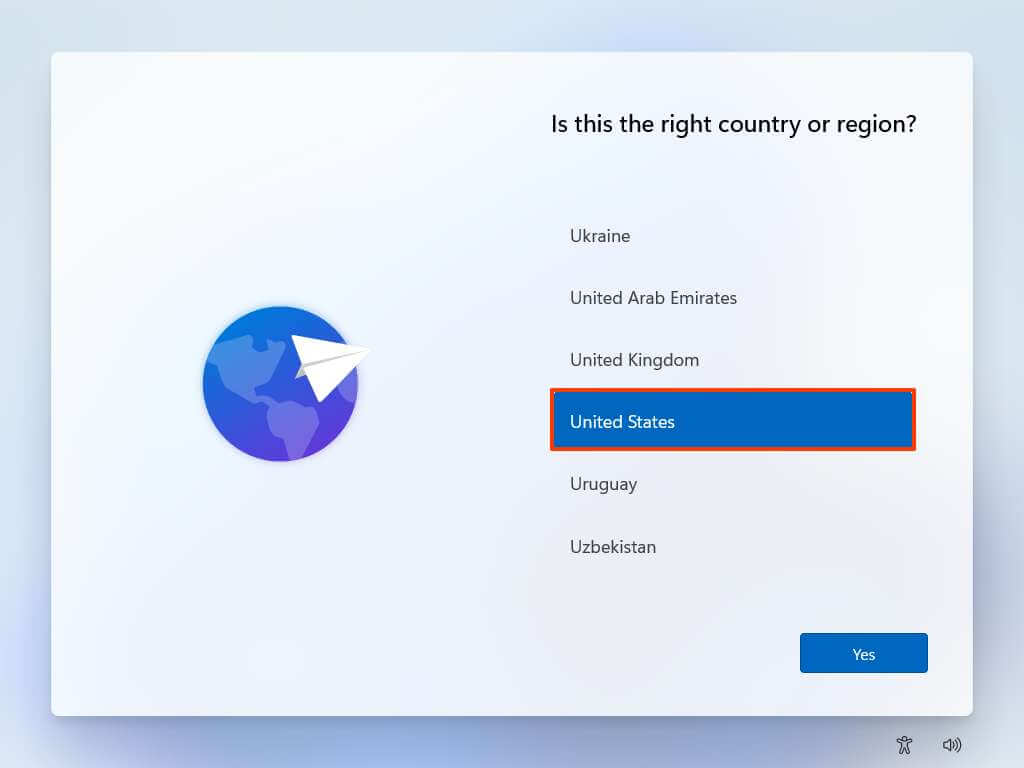
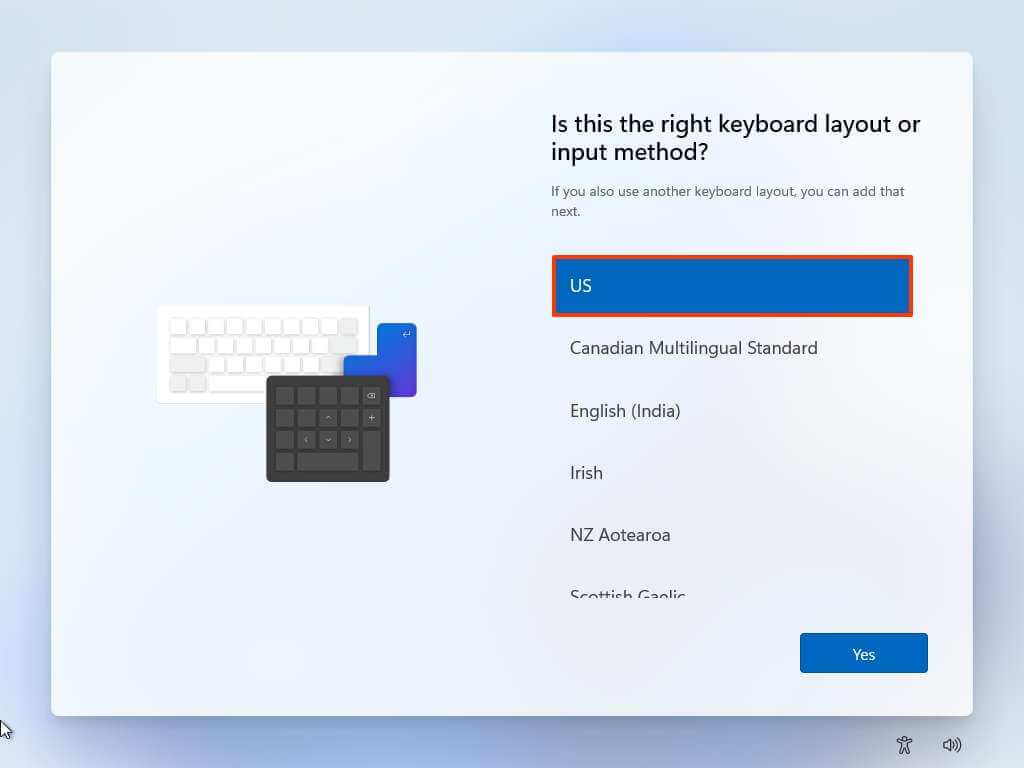
- Выбор региона и языка;
- Настройка раскладки клавиатуры и метода ввода;
- Настройка учетной записи Microsoft;
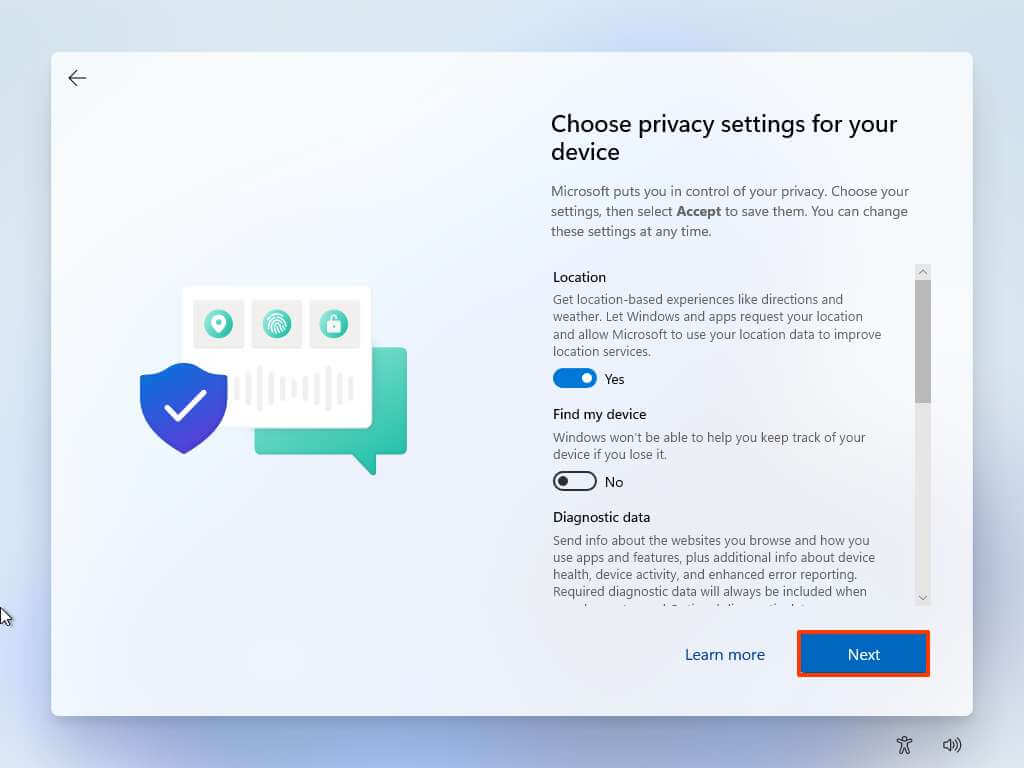
- Выбор параметров конфиденциальности устройства и другие настройки.
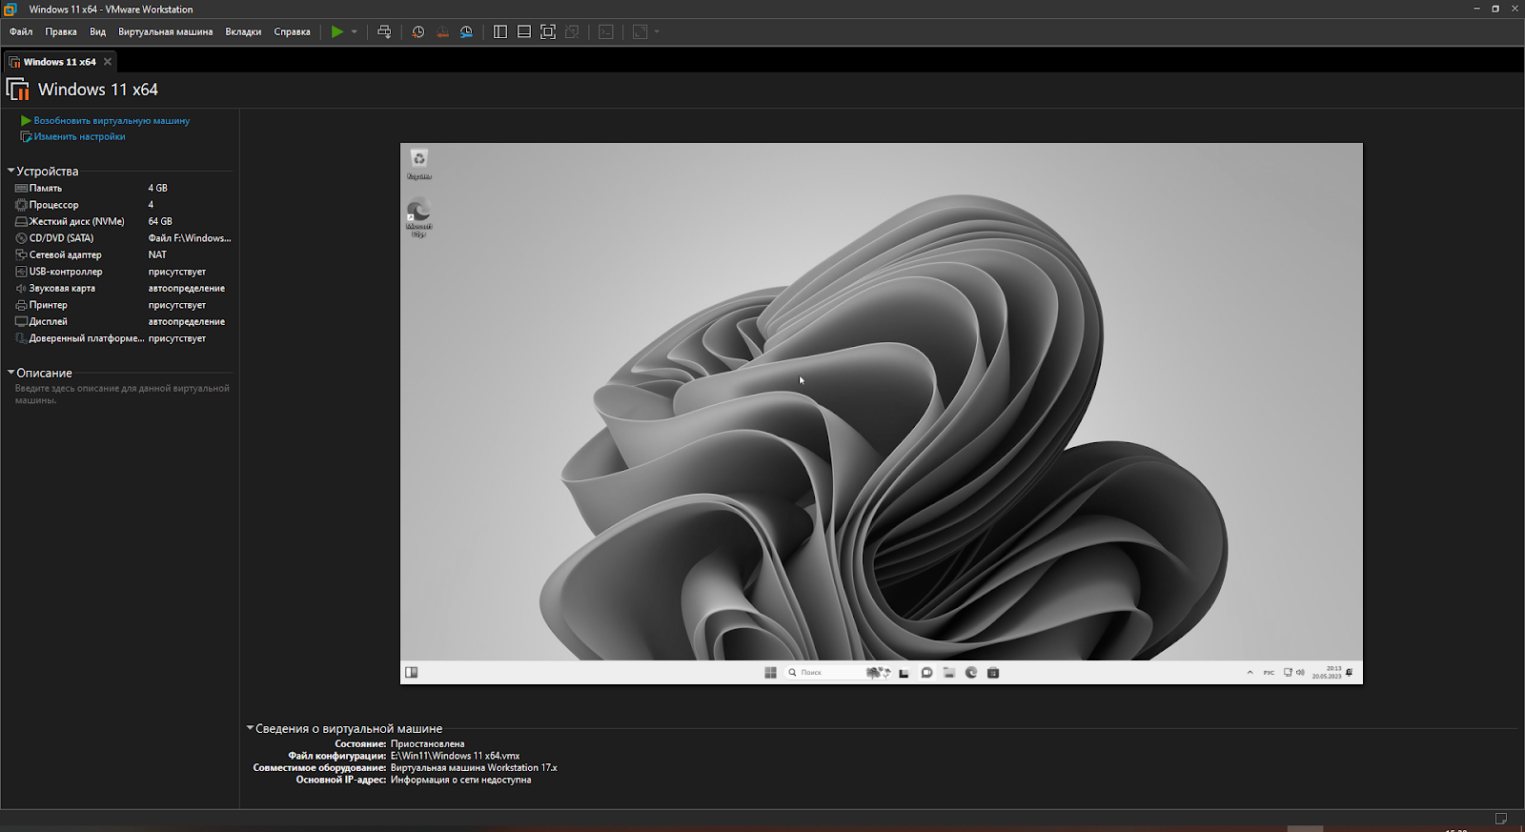
По завершении данного этапа перед вами откроется рабочий стол Windows 11. Это означает, что установка Windows 11 на виртуальную машину закончена.
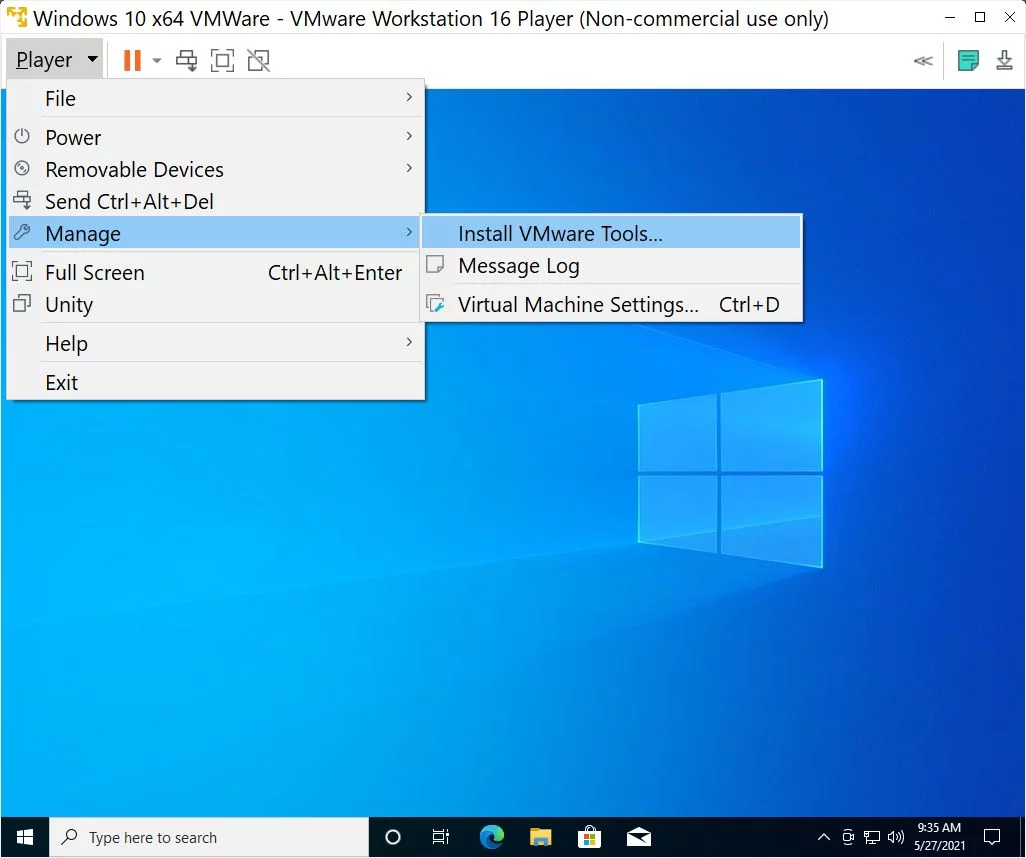
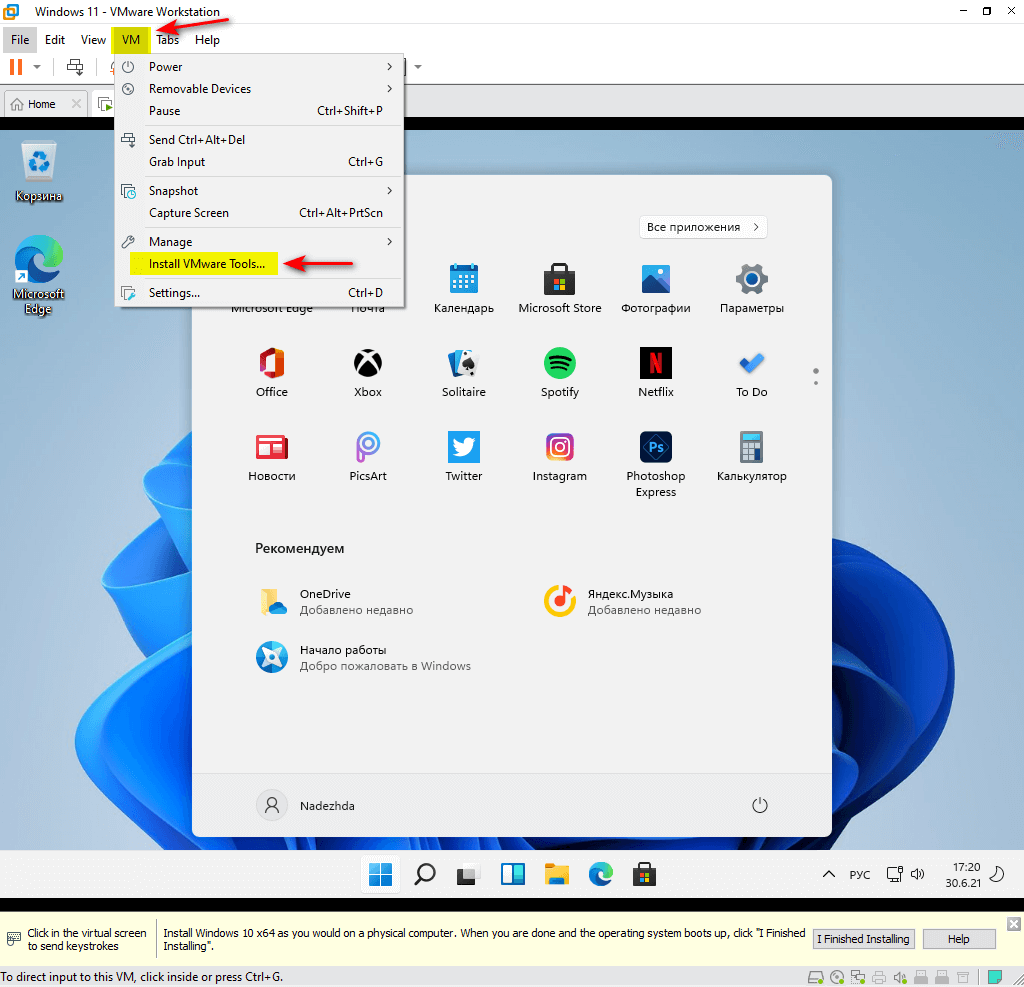
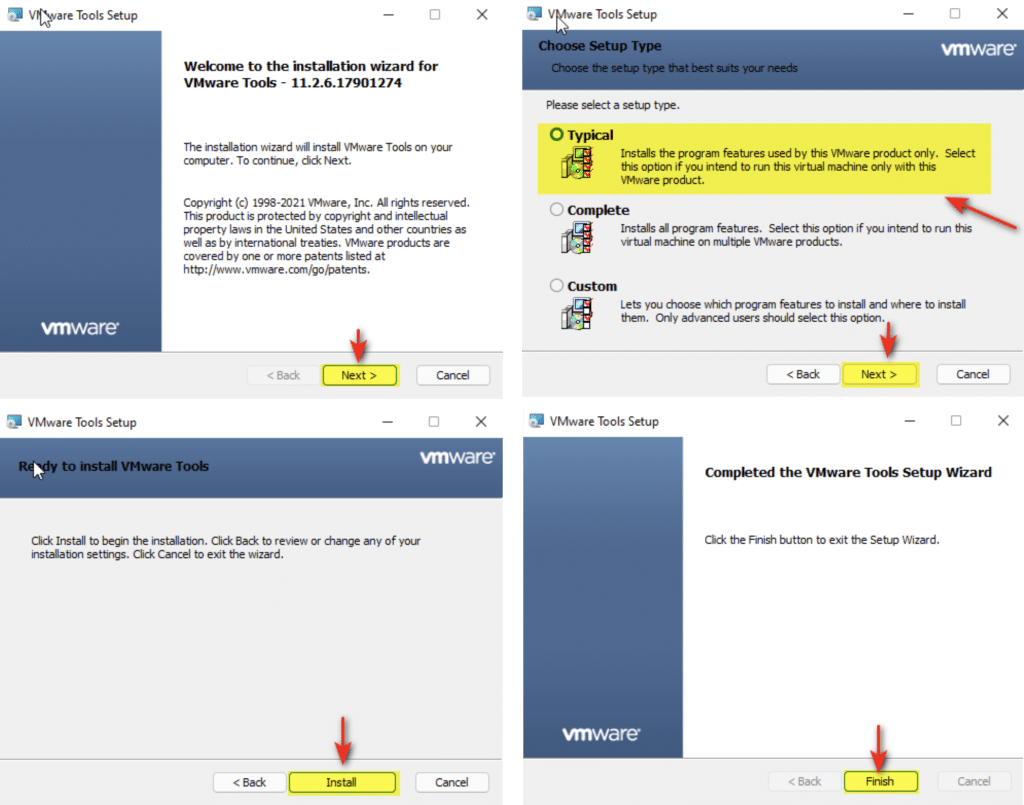
- Помимо выполненной установки ОС, опишем дополнительный шаг для установки VMware Tools. VMware Tools — это пакет программного обеспечения, предоставляемый VMware, который устанавливается внутри виртуальных машин для обеспечения более эффективной работы и интеграции между хостовой системой и виртуальной машиной.
Чтобы установить VMware Tools, кликаем в меню по вкладке «VM» и выбираем пункт «Install VMware Tools…». После этого в гостевой ОС должен появиться DVD-дисковод с установочными файлами, как показано на картинке ниже.
Среди всех файлов выбираем «setup64» и начинаем установку. После ее окончания перезагружаем систему.
Заключение
В настоящей статье мы подробно описали установку Windows 11 на VMware Workstation. Она включает в себя все этапы, от загрузки самого VMware Workstation на хостовую систему до установки Windows 11 на созданную виртуальную машину.
Виртуализация через VMware позволяет максимально гибко использовать ресурсы вашего компьютера, обеспечивая изоляцию и эффективное управление виртуальными машинами.
Введение
Благодаря виртуализации ресурсы, которые раньше были доступны только в физической форме, такие как серверы, устройства хранения данных или настольные системы, переносятся в цифровую форму. Технология отделяет физическое оборудование от программного обеспечения (ПО), работающего на нем. Это дает возможность эффективно использовать аппаратные ресурсы, легко разделяя возможности больших систем на более мелкие части. Затем эти сегменты могут быть распределены между множеством различных приложений и пользователей с разными потребностями с помощью виртуальных машин (ВМ).
В данном материале мы рассмотрели решение от компании VMware, являющейся крупнейшим разработчиком ПО для виртуализации, и рассказали, как установить Windows 11 на виртуальную машину.
Системные требования для работы с VMware Workstation
Согласно документации VMware, устройство пользователя должно соответствовать следующим требованиям (для работы Workstation 17.x):
- 64-разрядный процессор, выпущенный Intel® или AMD после 2011 года с тактовой частотой не ниже 1,3 ГГц;
- Минимальное количество требуемой ОЗУ — 2 ГБ, но производитель рекомендует использовать 4 ГБ.
Установка VMware Workstation
Для установки VMware Workstation вам потребуется сначала перейти на официальный сайт. Нас интересует вкладка Products.
Листаем вниз и выбираем кнопку See all products.
В открывшемся окне поиска вводим Workstation и выбираем нужное.
Мы будем использовать версию Pro. Переходим на соответствующую вкладку и выбираем Download Trial и соответствующую систему. На момент написания инструкции пакет загрузки весит 608 МБ.
После загрузки и запуска нас встречает окно установки, в котором отражаются три опции:

- Change отвечает за установку и выбор дополнительных функций. Мы выберем именно его.
- Repair отвечает за восстановление программы.
- Remove отвечает за удаление программы с устройства.
На следующем этапе инсталлятор предоставляет выбор двух параметров:
- Enhanced keyboard driver или же расширенный драйвер клавиатуры — данный параметр позволяет улучшить отклик клавиш.
- Add VMware Workstation console tools into system path позволяет автоматизировать некоторые аспекты работы VMware Workstation.
Далее следует завершающий этап установки, сообщающий об успехе операции.
Создание и настройка новой виртуальной машины в VMware Workstation
После установки VMware Workstation перед нами открывается следующее окно:
Для создания новой виртуальной машины требуется выбрать Файл → Новая виртуальная машина.
После нажатия нас встретит мастер создания, где можно будет выбрать файл образа, расположение и произвести настройку оборудования.
Для установки выбираем Обычный. Его отличие от выборочного заключается в том, что при выборе второго вам предложат сразу настроить оборудование, однако это можно сделать и после создания в настройках.
Вторым этапом установки является выбор образа системы. Пользователю предоставляется три возможности.
- Загрузить системы с физического диска через дисковод.
- Указать ISO-образ системы на устройстве. Его можно скачать с официального сайта.
- Отложить момент выбора и установить ОС позже.
Мы выбираем второй вариант.
Третий этап заключается в установке названия машины и указания места ее расположения.
На четвертом этапе пользователю дают возможность указать выделяемое под ОС место на диске, а также метод хранения файлов ВМ.
На пятом этапе пользователь видит перед собой всю информацию о работе виртуальной машины, а также может внести дополнительные корректировки в оборудование.
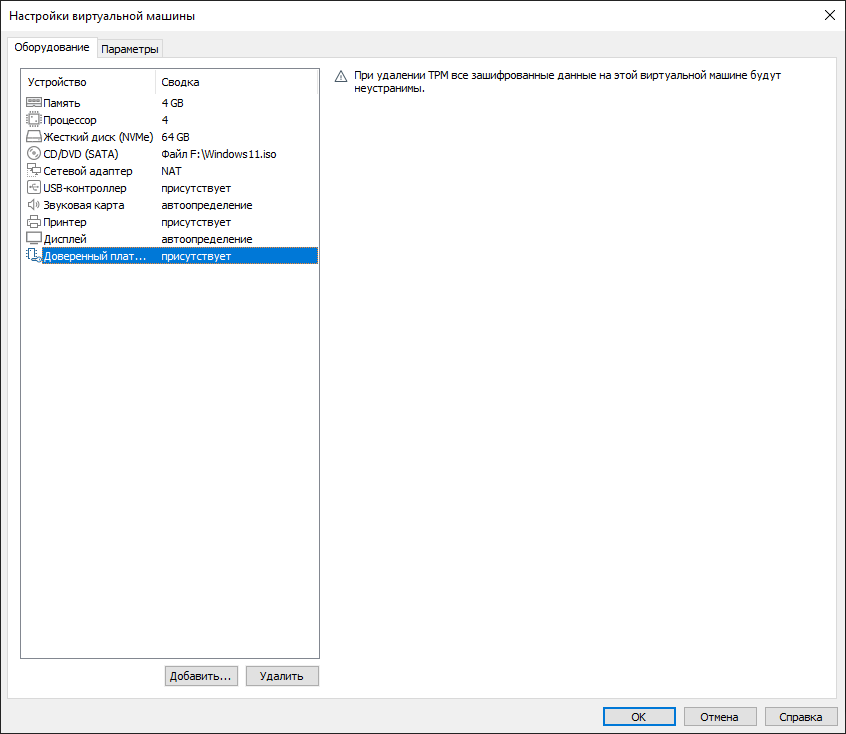
Также при создании виртуальной машины стоит убедиться, что в машину добавился Trusted Platform Module, в случае, если этого не произошло стоит добавить его самостоятельно. Для этого потребуется включить шифрование виртуальной машины. Запустите ВМ и перейдите во вкладку Изменить настройки и включите шифрование. Отметим, что пароль будет запрашиваться при каждом запуске машины.
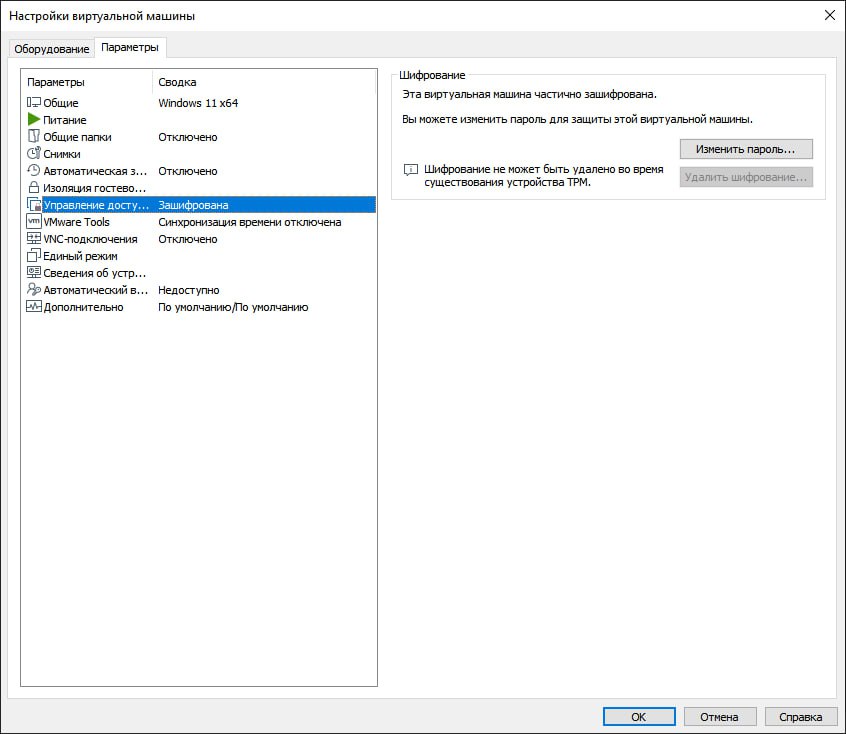
По завершении шифрования идем во вкладку Оборудование, нажимаем Добавить и подключаем Trusted Platform Module.
Установка Windows 11 на виртуальную машину из VMware Workstation Pro
Для установки Windows 11 компьютер пользователя должен соответствовать определенным требованиям:
- иметь в себе чип TPM 2.0 (модуль доверенной платформы),
- иметь режим UEFI с Secure Boot,
- 4 ГБ оперативной памяти,
- 64 ГБ свободного места на носителе.
Если при создании виртуальной машины все было сделано согласно инструкции, перед вами откроется стандартное окно установки Windows. В противном случае система предложит выбрать образ диска. Если возникнет ошибка такого содержания: «Запуск Windows 11 на этом компьютере не возможен. Этот компьютер не соответствует минимальным требованиям к системе для установки этой версии Windows. Дополнительные сведения см. на сайте», необходимо отключить программную проверку совместимости, о том как это сделать вы можете прочитать ниже в нашей инструкции.
После этого потребуется указать ключ продукта или пропустить этот вариант. Однако стоит помнить, что через определенное время на экране появится надпись о необходимости активации ОС.
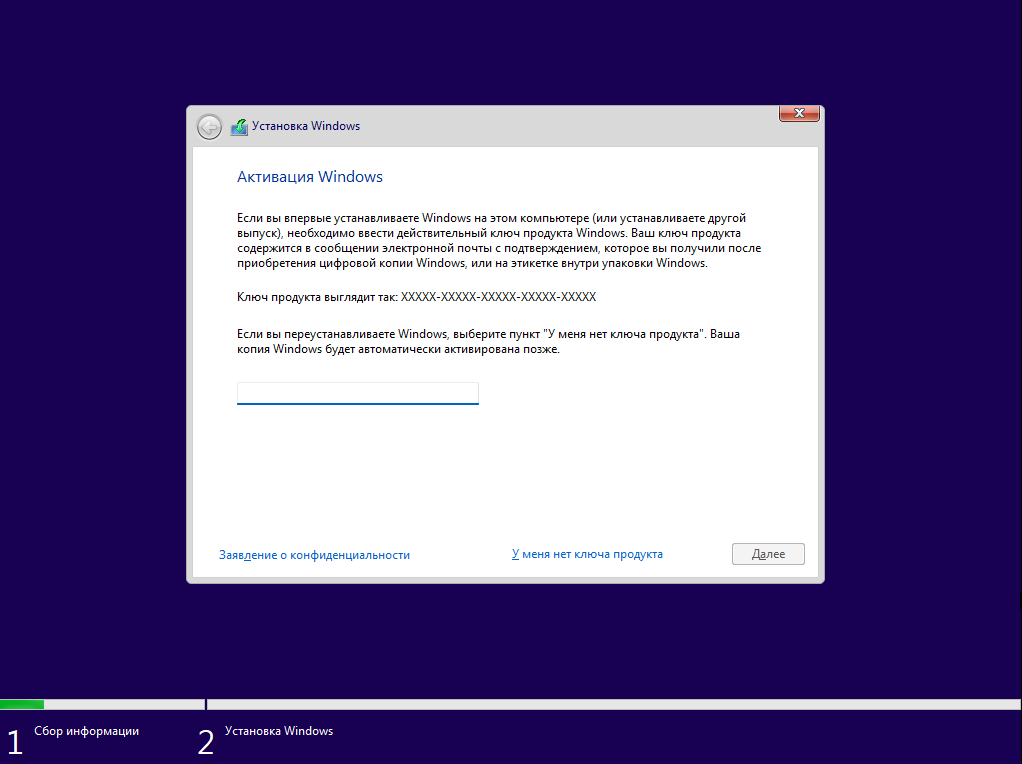
Далее идет выбор версии ОС и пользовательское соглашение Microsoft.
Затем пользователю предоставляется выбор: обновить систему или установить ее самостоятельно.
После этого нужно выбрать дисковое пространство. Пользователь увидит все установленные носители из которых ему следует выбрать необходимый вариант, где будет создано несколько разделов для системы.
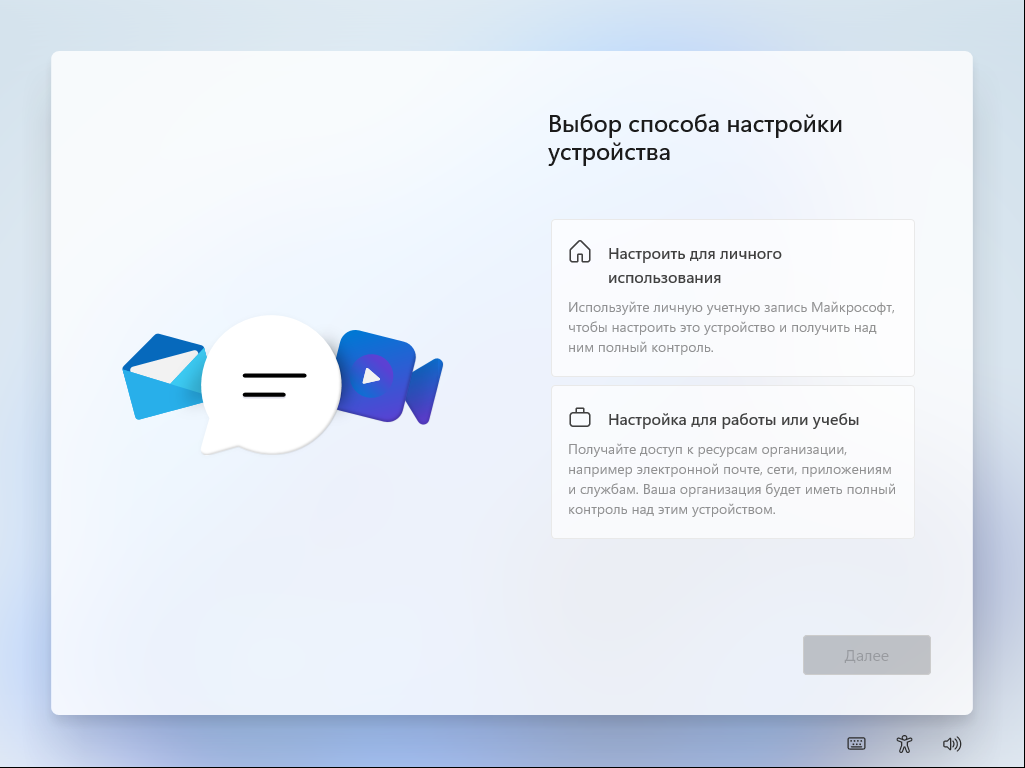
Теперь, после установки системы, последует ее предварительная настройка. Она включает в себя выбор региона, создание пользователя и выбор необходимых функций. Здесь можно выделить то, что теперь процедура входа в учетную запись Microsoft является обязательной. Однако, это несет и свои плюсы — система автоматически создает бэкапы, которые позволяют восстановить настройки при переустановке.
Если пользователь видит ошибку такого содержания: «Запуск Windows 11 на этом компьютере не возможен. Этот компьютер не соответствует минимальным требованиям к системе для установки этой версии Windows. Дополнительные сведения см. на сайте», то подробную информацию об ошибке можно увидеть в файле лога setuperr.log. Для открытия командной строки при установке потребуется нажать Shift + F10, после чего ввести:
notepad x:\windows\panther\setuperr.log
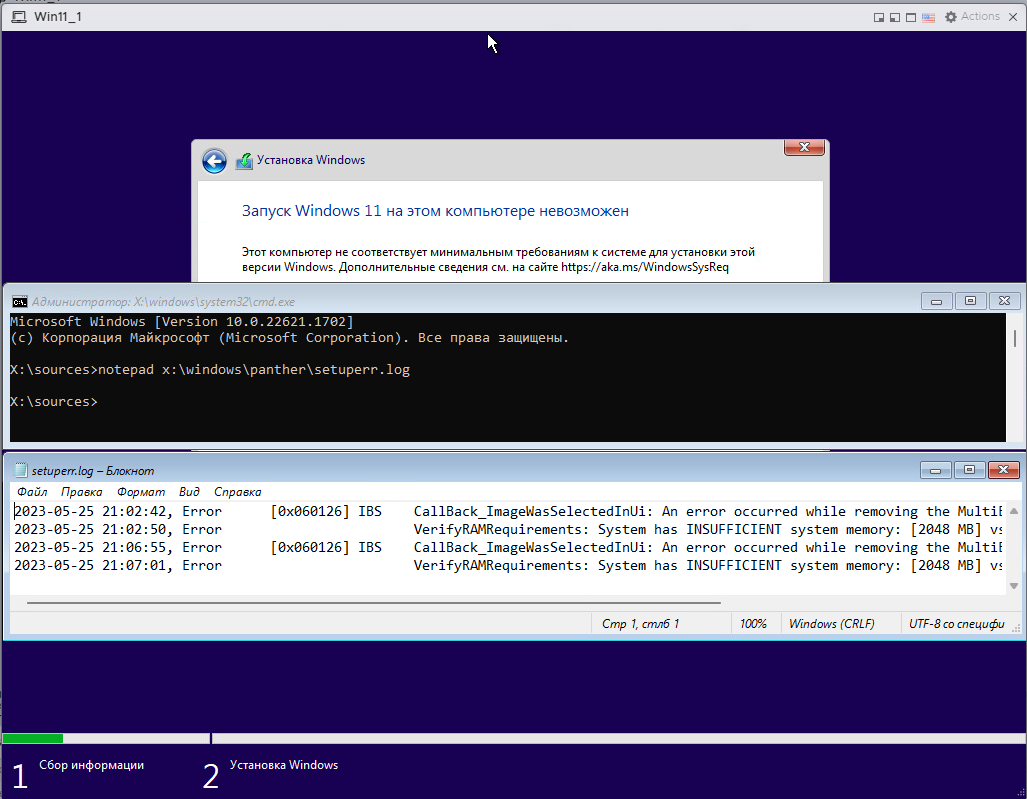
В случае, приведенном на скриншоте выше, можно увидеть, что устройству не хватает оперативной памяти (вместо требуемых практически четырех в наличии есть два).
В файле отображается только одна из локальных ошибок — в случае множественного несоответствия придется смотреть файл снова. Но вы также можете и пропустить эти ошибки, воспользовавшись редактором реестра. Для этого вам нужно будет перейти по пути:
HKEY_LOCAL_MACHINE\SYSTEM\Setup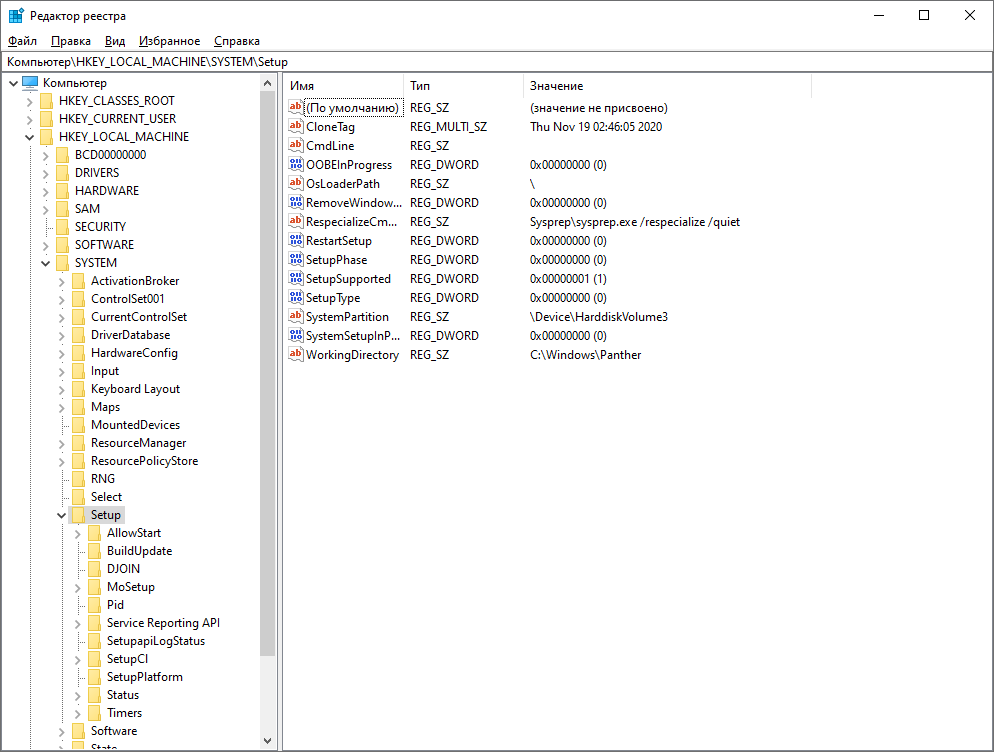
Здесь нужно создать новый раздел с названием LabConfig, где далее создать параметр Dword с названием ошибки со значением 1 (изменить → значение: 1):
- BypassCPUCheck требуется для решения проблемы с несовместимостью процессоров;
- BypassTPMCheck требуется для решения проблемы с работой без наличия чипа TPM 2;
- BypassRAMCheck требуется для решения проблемы с недостаточным количеством RAM. Данный параметр позволяет не проводить проверку на минимальный объем;
- BypassSecureBootCheck требуется для решения проблемы с наличием Legacy BIOS;
- BypassStorageCheck требуется для решения проблемы с нехваткой дискового пространства (отключается проверка).
Если же вы не хотите делать это с помощью графического редактора, то на помощь может прийти командная строка. В ней следует ввести:
reg add HKLM\SYSTEM\Setup\LabConfig /v НАЗВАНИЕ_ПАРАМЕТРА /t REG_DWORD /d 1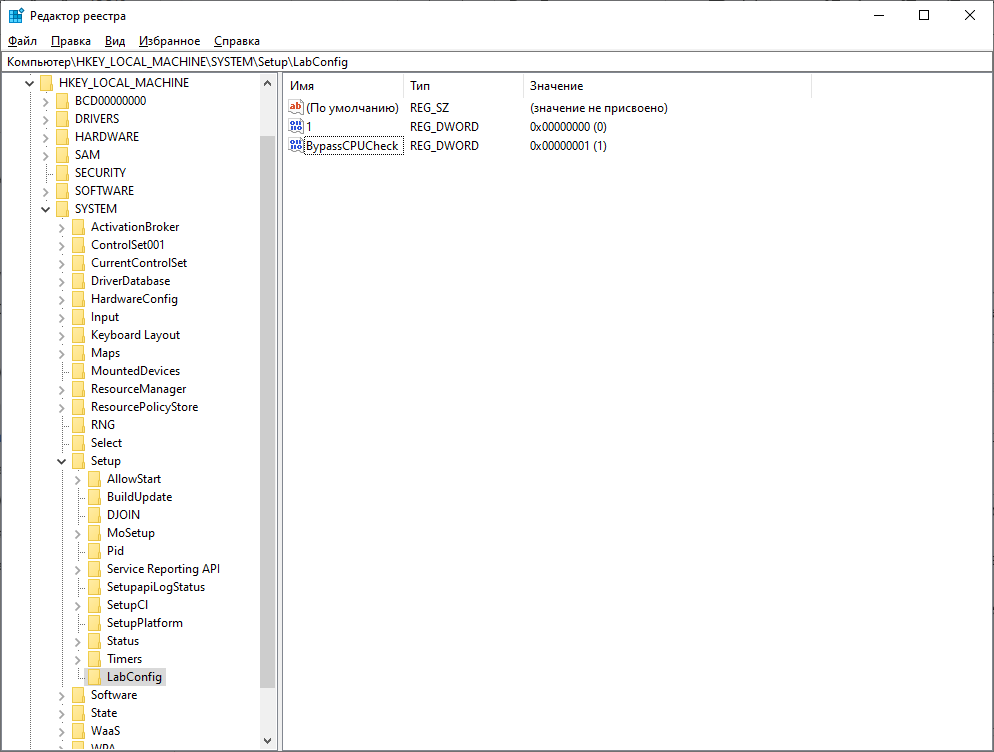
Также для пропуска в автоматическом режиме вы можете модифицировать ISO-образ системы. Для этого потребуется создать файл AutoUnattend.xml и поместить его в корень ISO со следующим содержанием:
<unattend xmlns="urn:schemas-microsoft-com:unattend">
<settings pass="windowsPE">
<component name="Microsoft-Windows-Setup" processorArchitecture="amd64" publicKeyToken="31bf3856ad364e35" language="neutral" versionScope="nonSxS" xmlns:wcm="http://schemas.microsoft.com/WMIConfig/2002/State" xmlns:xsi="http://www.w3.org/2001/XMLSchema-instance">
<RunSynchronous>
<RunSynchronousCommand wcm:action="add">
<Order>1</Order>
<Path>reg add HKLM\System\Setup\LabConfig /v BypassTPMCheck /t reg_dword /d 0x00000001 /f</Path>
</RunSynchronousCommand>
<RunSynchronousCommand wcm:action="add">
<Order>2</Order>
<Path>reg add HKLM\System\Setup\LabConfig /v BypassSecureBootCheck /t reg_dword /d 0x00000001 /f</Path>
</RunSynchronousCommand>
<RunSynchronousCommand wcm:action="add">
<Order>3</Order>
<Path>reg add HKLM\System\Setup\LabConfig /v BypassRAMCheck /t reg_dword /d 0x00000001 /f</Path>
</RunSynchronousCommand>
<RunSynchronousCommand wcm:action="add">
 <Order>5</Order>
<Path>reg add HKLM\System\Setup\LabConfig /v BypassCPUCheck /t reg_dword /d 0x00000001 /f</Path>
</RunSynchronousCommand>
<RunSynchronousCommand wcm:action="add">
<Order>4</Order>
<Path>reg add HKLM\System\Setup\LabConfig /v BypassStorageCheck /t reg_dword /d 0x00000001 /f</Path>
</RunSynchronousCommand>
</RunSynchronous>
<UserData>
<ProductKey>
<Key></Key>
</ProductKey>
</UserData>
</component>
</settings>
</unattend>
Установка Windows 11 на VMware ESXi
Процесс установки WIndows 11 на VMware ESXi версии 8 не сильно отличается от установки на Workstation. Для начала вам надо подключится к панели управление ESXi. Это можно сделать, посмотрев главную страницу ОС (в данном случае в поисковой строке браузера следует ввести 192.168.1.12):
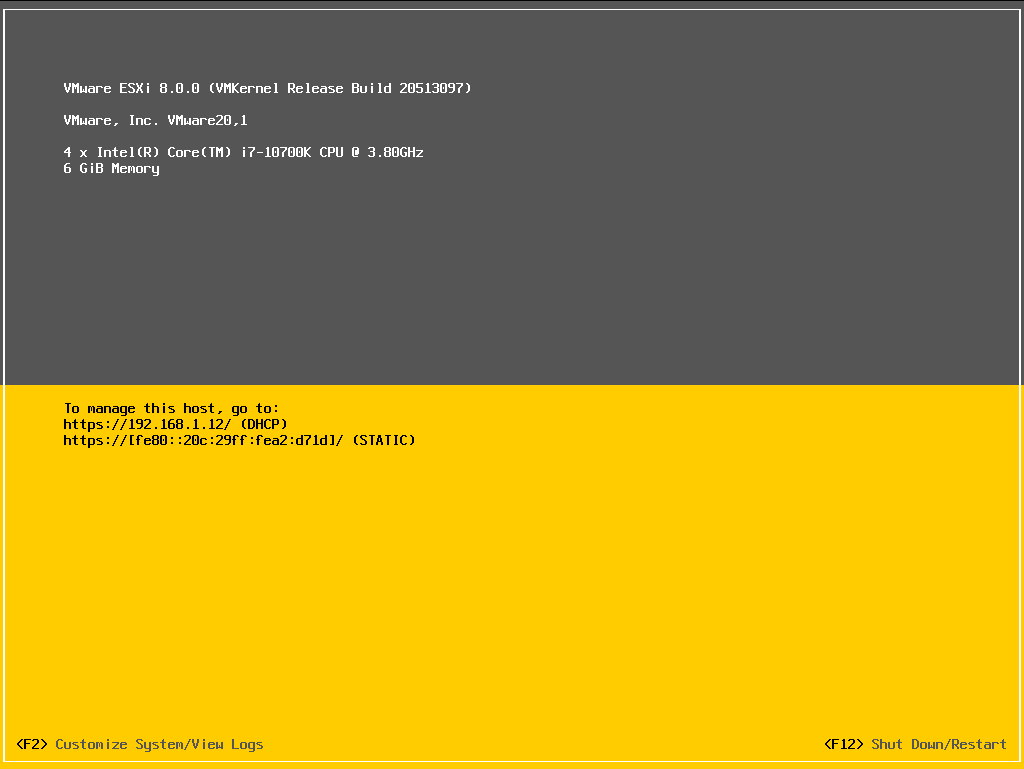
После этого пользователя встретит окно авторизации, куда следует ввести логин root и настроенный пароль. Далее откроется главная страница:
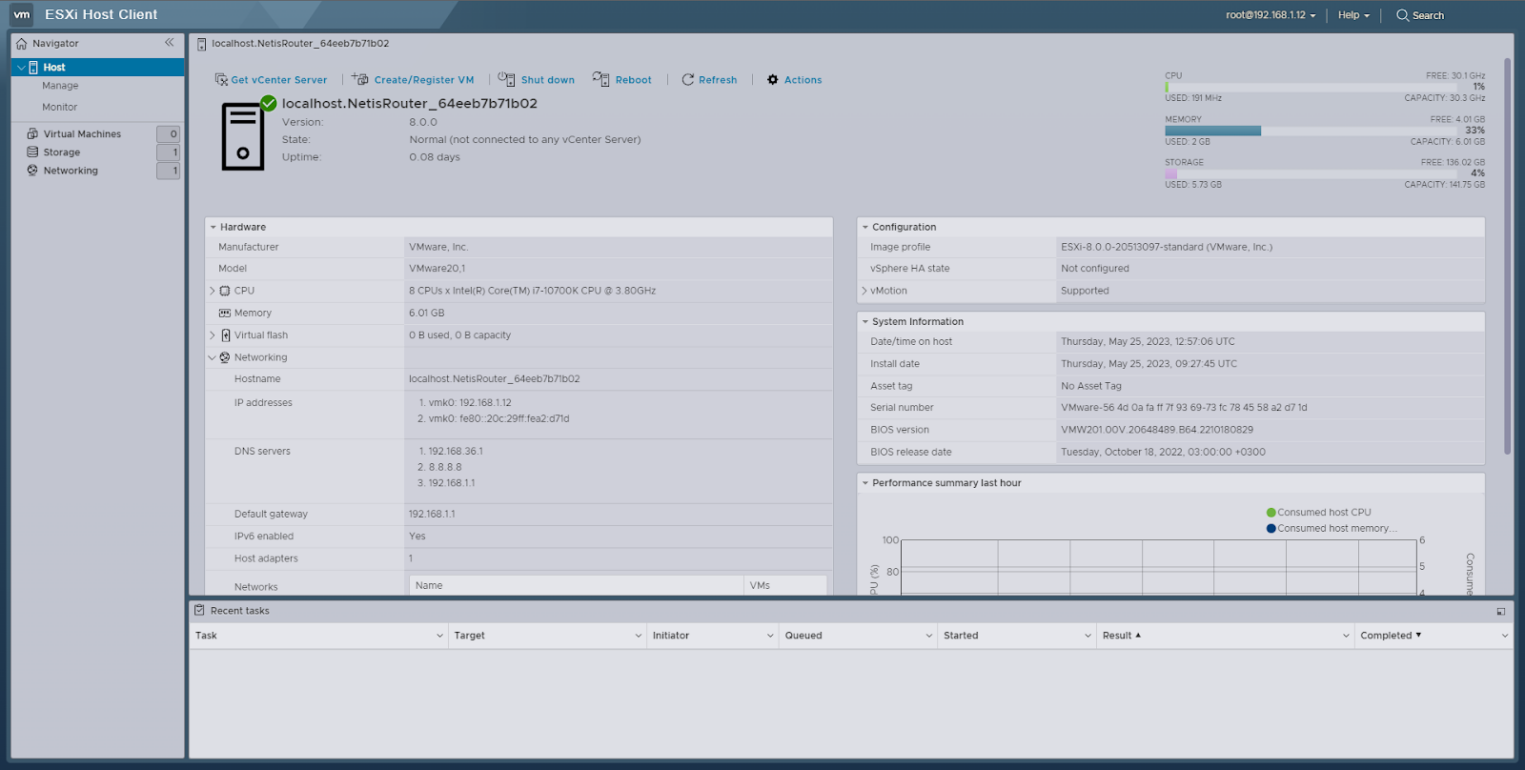
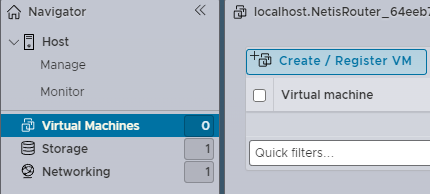
Здесь нас будет интересовать раздел Virtual Machines. Перейдя в него следует выбрать Create / Register VM.
И следующие пункты:
- Select creation type — Create a new virtual machine;
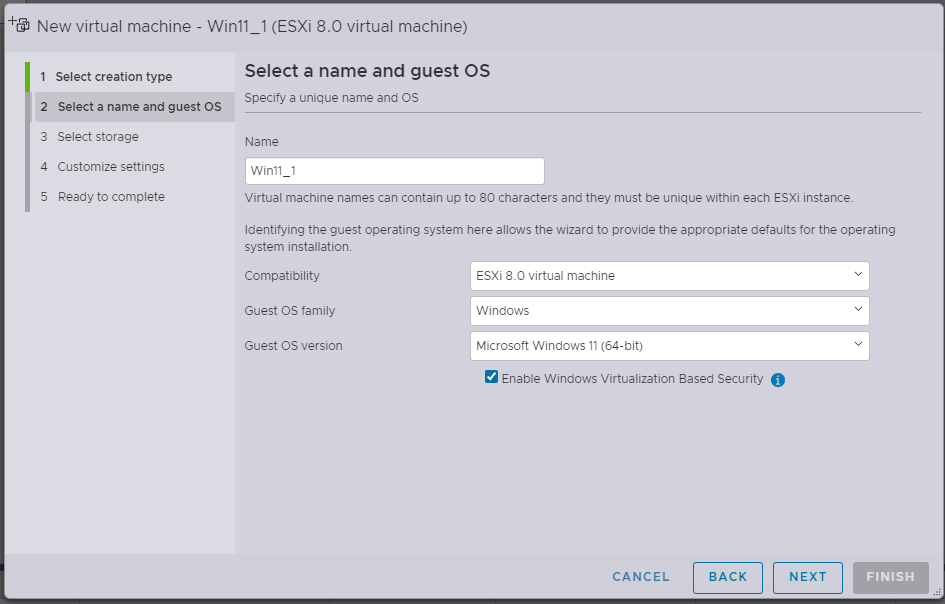
- Select a name and guest OS. В этом разделе следует указать нужное имя ВМ, ее семейство и тип (Windows и Windows 11), также поставить галочку рядом с Enable Windows Virtualization Based Security;
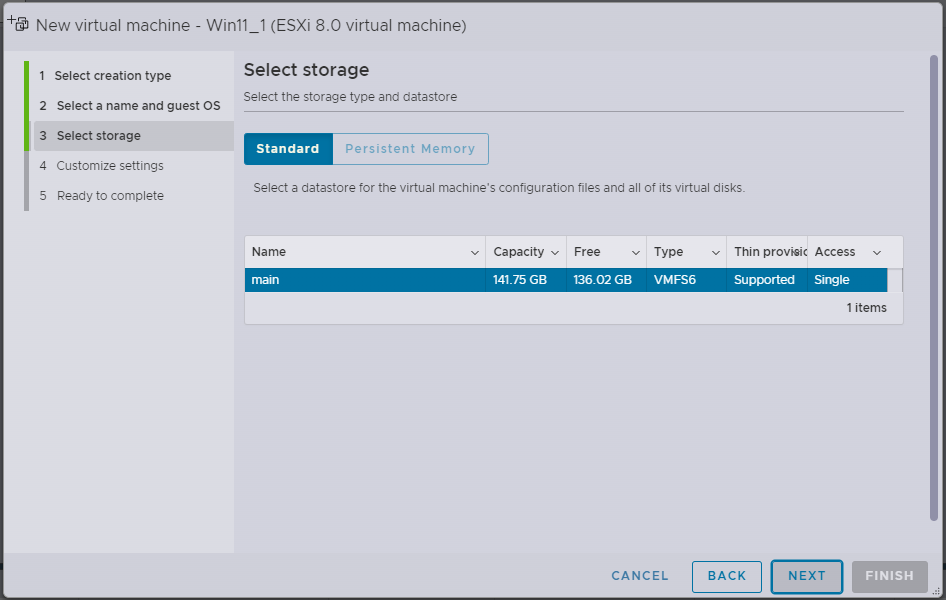
- Select Storage. Здесь следует выбрать хранилище, где будет располагаться ВМ;
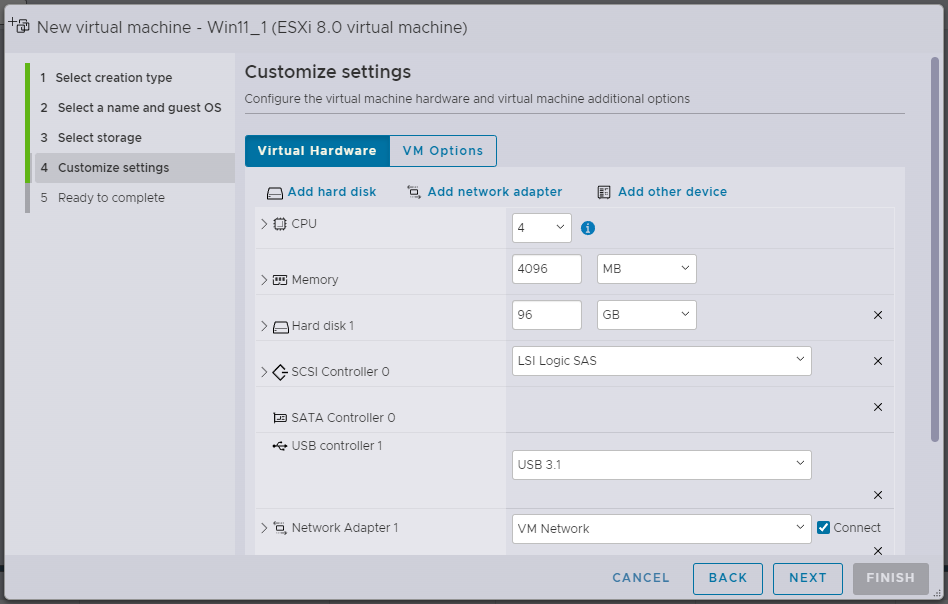
- Customize settings. Здесь можно дополнительно настроить ВМ в соответствии с требованиями ОС.
На данном этапе пользователю предоставляется выбор трех вариантов создания виртуальной машины.
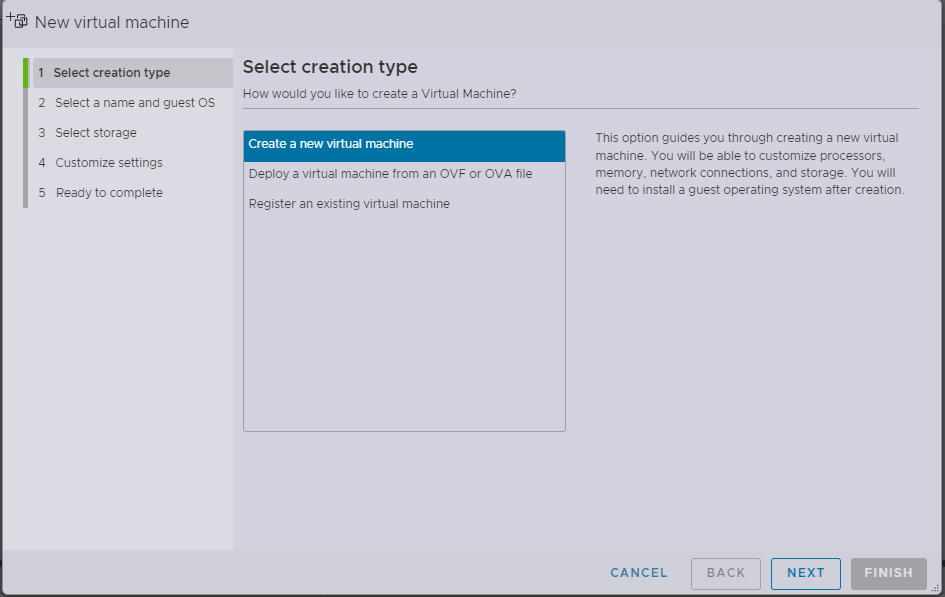
- Create a new virtual machine. Данная опция поможет создать новую ВМ, в процессе чего можно настроить процессоры, память, сетевые подключения и хранилище. После создания нужно будет установить гостевую операционную систему.
- Deploy a virtual machine from OVF or OVA file. Эта опция поможет вам пройти процесс создания виртуальной машины из файлов OVF (Open Virtualization Format) и VMDK (Virtual Machine Disk или же формат образа диска от VMware).
- Register an existing virtual machine. Этот параметр позволит выбрать уже установленную ВМ.
На следующем этапе задается название ВМ, совместимую ОС (это версия ESXi или Workstation) и тип версии устанавливаемой ОС (в нашем случае WIndows и Windows 11).
Далее выбирается хранилище, которое будет использоваться ВМ.
На заключительном этапе указываются количество используемых центральным процессором ядер, объем памяти и прочие параметры.
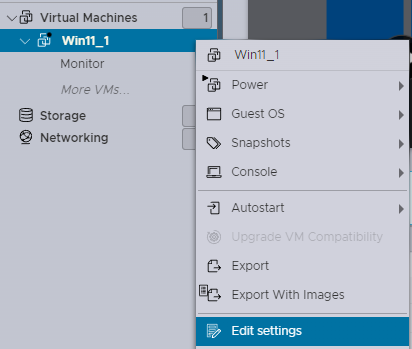
Теперь, когда появилось уведомление об успешном создании ВМ, следует указать ISO-файл Windows 11. Для этого выберите свою ВМ и нажмите Edit settings.
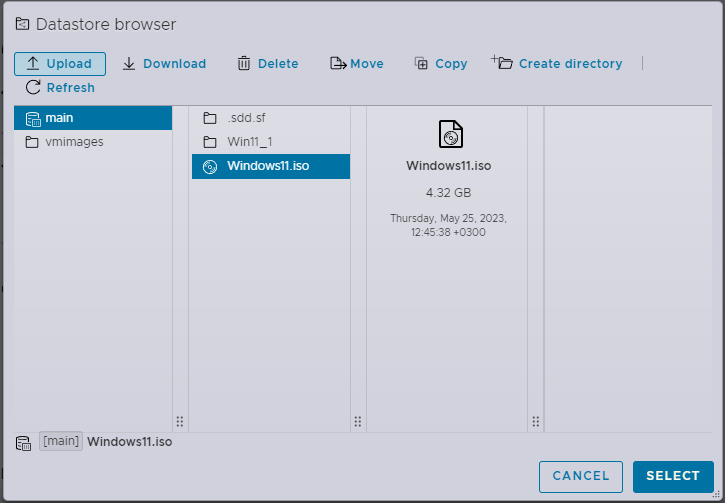
Перейдите в к пункту CD/DVD Drive 1 и выберите Datastore ISO file.
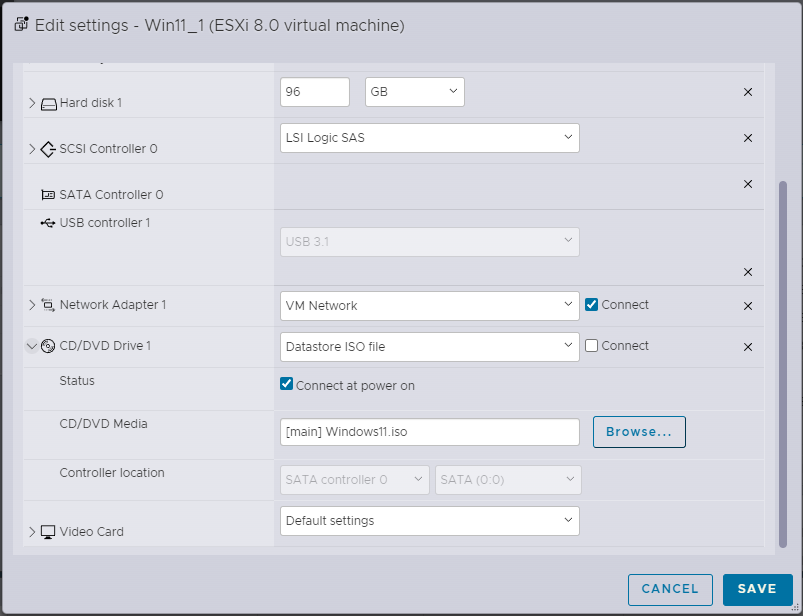
Его потребуется добавить в хранилище, что можно сделать с помощью кнопки Upload.
После этого можно будет запустить ВМ.
В случае первой установки на чистый ESXi 8 возникает ошибка с отсутствием поддержки TPM (VerifyTPMSSupported). Решается это либо добавлением соответствующего значения в реестр каждой ВМ (о чем мы писали раньше), либо же включением поддержки TPM на всех машинах в разделе Security (при использовании vCenter), о чем вы можете прочитать в документации VMware.
Дополнения для гостевой операционной системы VMware Workstation PRO
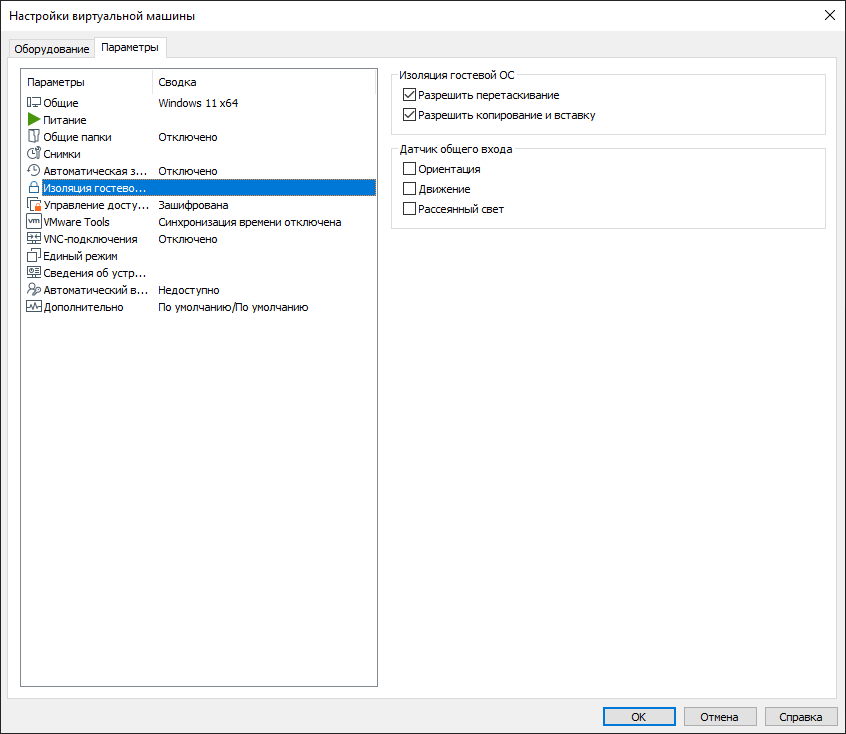
Под данным термином подразумевается функция двунаправленного буфера обмена между ВМ и основной ОС. Чтобы активировать это в Workstation, следует перейти в Изменить настройки.
Затем в разделе Параметры выбрать вкладку Изоляция гостевой ОС. В правой ее части будут два пункта, которые надо включить:
- Разрешить перетаскивание.
- Разрешить копирование и вставку.
Заключение
Установка Windows 11 на VMware является процессом не сложным, но требующим некоторых дополнительных действий. Плюсами данной ОС являются улучшенные алгоритмы работы с накопителями и более эффективное использование оперативной памяти, однако, минусы также присутствуют: необходимость наличия модуля TPM 2.0, обязательная поддержка DirectX 12 видеокартой, а также некоторые изменения, связанные с графической оболочкой самой ОС.
Надеемся, эта инструкция поможет вам справиться с задачей установки ОС на ВМ.
- This guide will cover the basics of setting up a VM that will boot the Windows 10 installer image.
- If you’re interested in installing Windows 10 on a virtual machine this is a quick guide for doing so with VMWare Workstation Player.
- Virtual machines are becoming more common these days and have some advantages over normal bare-metal installations.
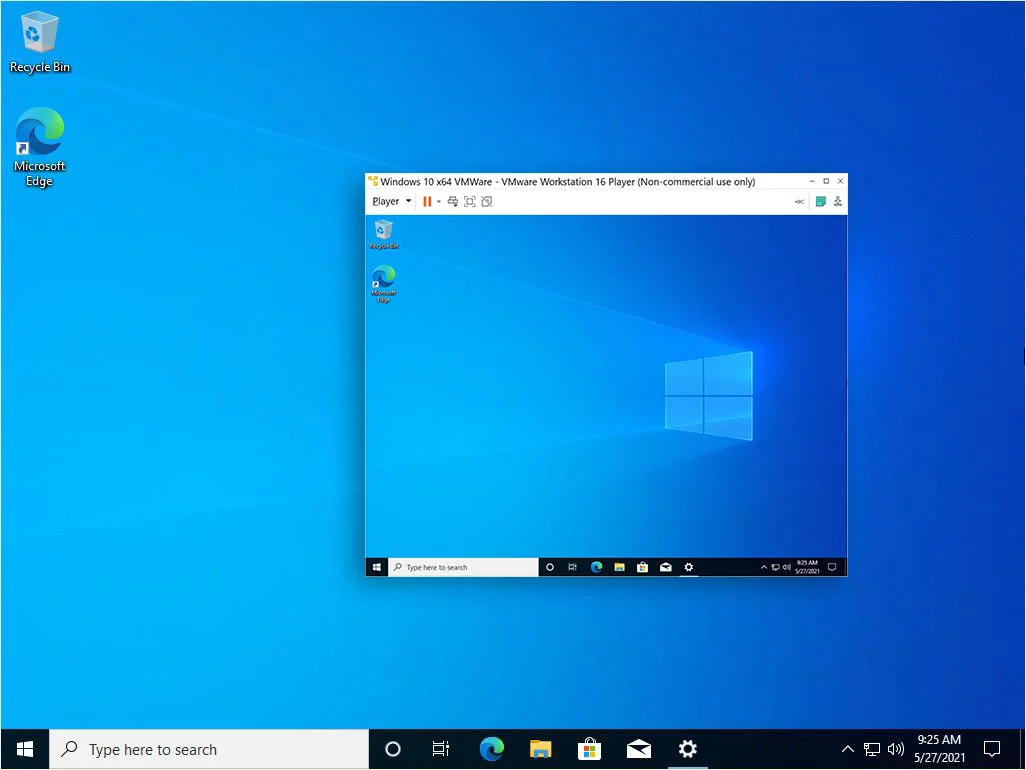
You may have heard about virtual machines, you have an idea about what they are and what they do, but don’t know where to start. If that’s the case here’s a guide that will teach you how to install Windows 10 in VMWare, inside a virtual machine that runs on a PC with Windows 10. We also have a more generic article about VM Pros and Cons.
Yes, it sounds like Inception and it is Inception. You can do VMs inside VMs, but that’s not the point of this article, so let’s get going.
But first, if you don’t know what a virtual machine is read this article.
CONTENTS
- 1 First Question: Why Use a Virtual Machine?
- 2 Which Virtual Machine Software to use?
- 3 Guide for Installing Windows 10 on VMWare Workstation Player
- 4 Optional Step: Install VMWare Tools
First Question: Why Use a Virtual Machine?
I’m not an expert in VMs, not even close, but I’ve used them from time to time. I tried to either see what MacOS looks like or a certain Linux distribution without having to risk messing with dual boot, or I was just trying to learn more about virtual machines.
If you’ve ever asked yourself why use a virtual machine, here are a few simple reasons:
- You want to try out new operating systems.
- You need to run old software on a really old OS.
- You want to develop software for other platforms.
- You want to take advantage of snapshots (backups of the state of the OS at a certain point).
- You want to clone a system and try it on a different computer.
And these are just reasons for home use. In the corporate environment or for hosting providers is basically a must-do. Read this article to learn more.
Which Virtual Machine Software to use?
I only have experience with two programs for creating and running virtual machines: VMware Workstation Player and Oracle VirtualBox. Both are free for personal use if you just want to try them.
For this article, I’ll be using VMWare Workstation Player 16, but I’ll do another article for installing Windows 10 with VirtualBox in the near future so make sure you subscribe to BinaryFork to get notified when that article is live.
If you need more options to choose from I recommend you also check out this article. I’ve personally used VMWare and VirtualBox in the past and found them easy to set up and good enough for my use case. That’s why I’ve recommended them in the first place, but there are plenty of other options out there, both free and paid.
Be aware this is not a tutorial on how to install Windows 10 on a computer (virtual or physical), but a tutorial on how to set up a virtual machine and boot the Windows 10 Installer. Thankfully, we have a step-by-step guide for installing Windows 10.
With the warning above out of the way let’s see how to set up and start the Windows 10 installation in a virtual machine using VMWare Workstation Player as the virtualization environment. It’s a variation of our other guide.
After installing VMWare Workstation Player the first screen you see is this one:
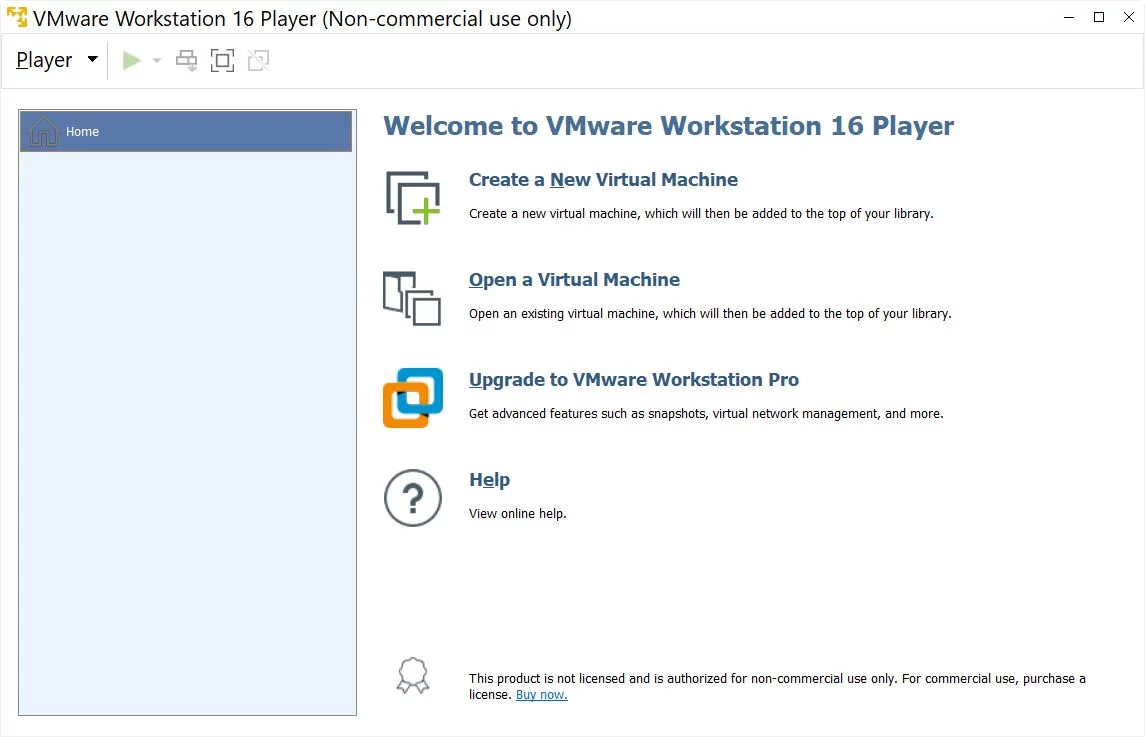
Let’s start clean:
1. Click on Create a New Virtual Machine.
2. In the next window click Browse to select the Windows 10 ISO image you’ve downloaded previously (we have a tutorial on how to do that too).
3. Select a name and a storage location on the local computer for the VM files.

4. Choose a virtual disk size for the VM. I recommend you opt for splitting the VM drive into multiple files. You can expand the size later on if needed, but it’s not super easy. Maybe you can consider choosing a bigger size from the beginning since the actually occupied space will depend on what you install, so you’re not wasting any space by selecting a bigger maximum size.

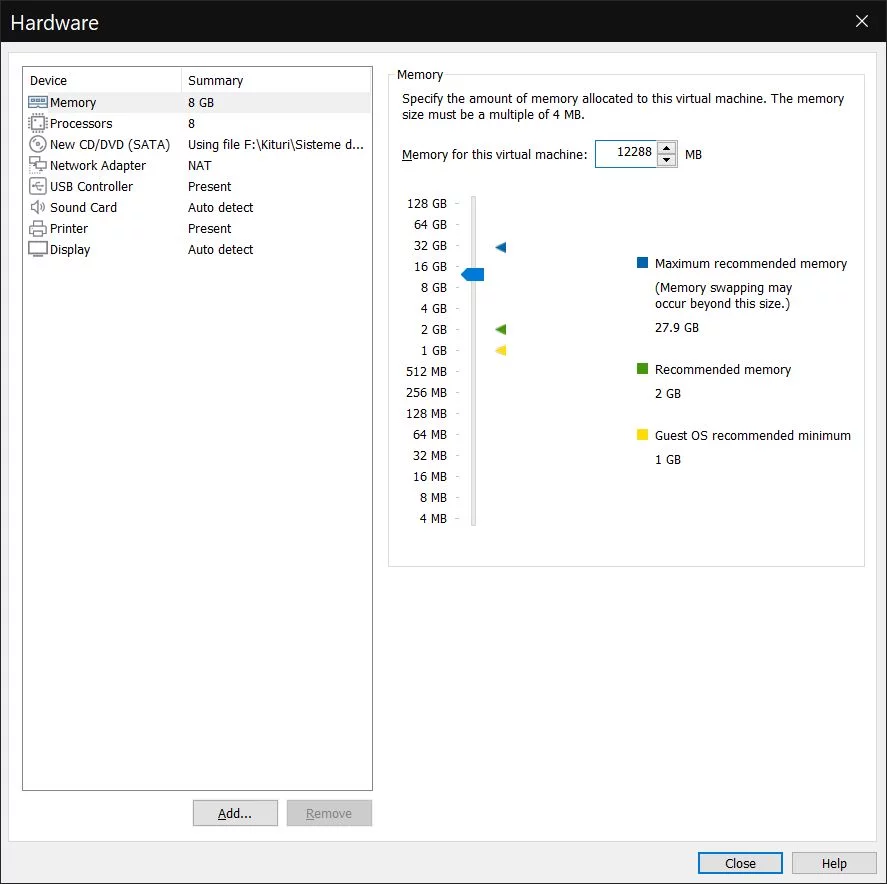
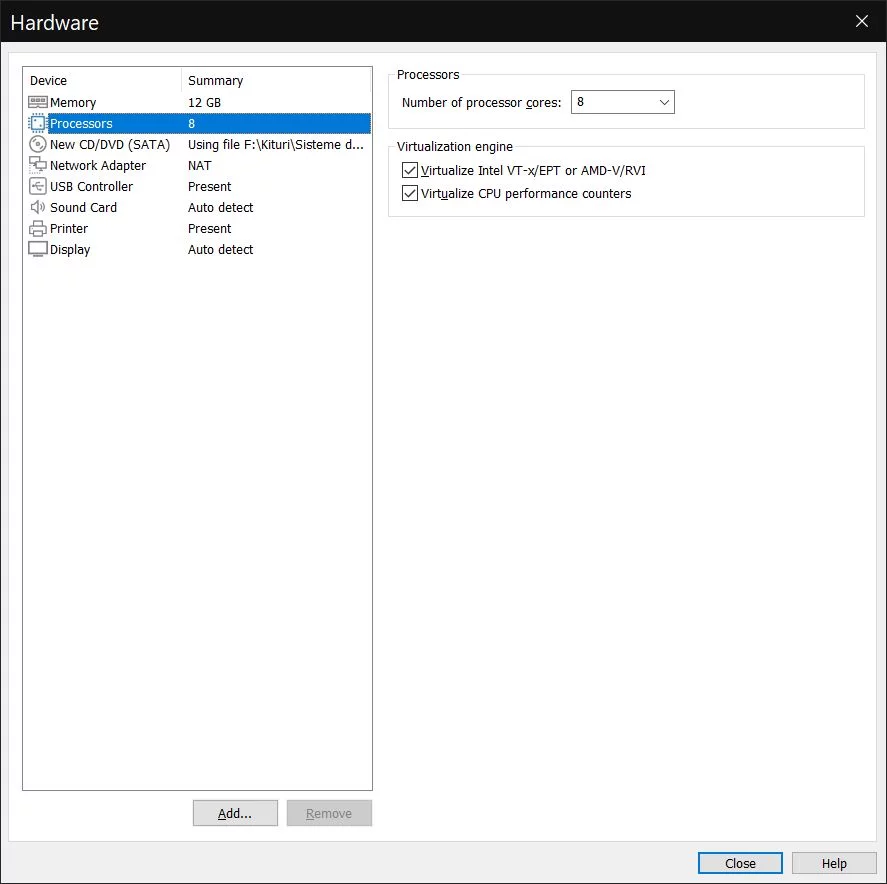
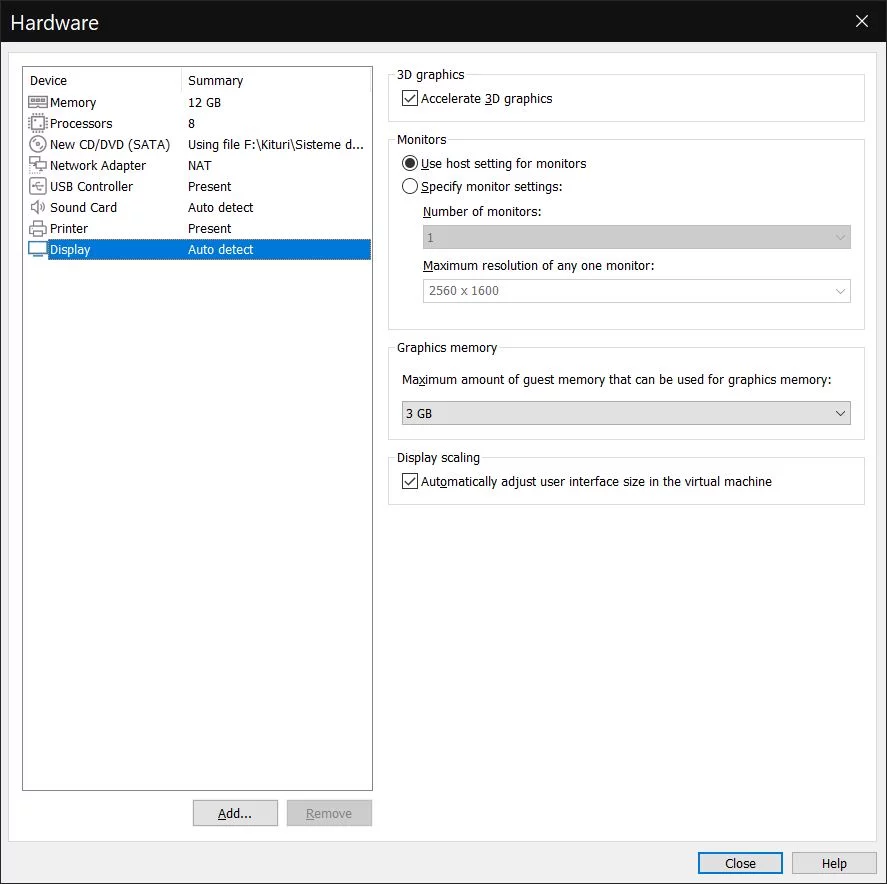
5. At this step you’re getting a summary of your VM settings. Before clicking Finish I suggest you customize the VM hardware first. The default allocated resources are a bit light if you ask me (2 GB RAM and 2 CPU cores).
6. All these Hardware settings can be changed later (after you power down the VM), so don’t sweat too much about them. Here are the most important options, for CPU, RAM, and display/GPU.
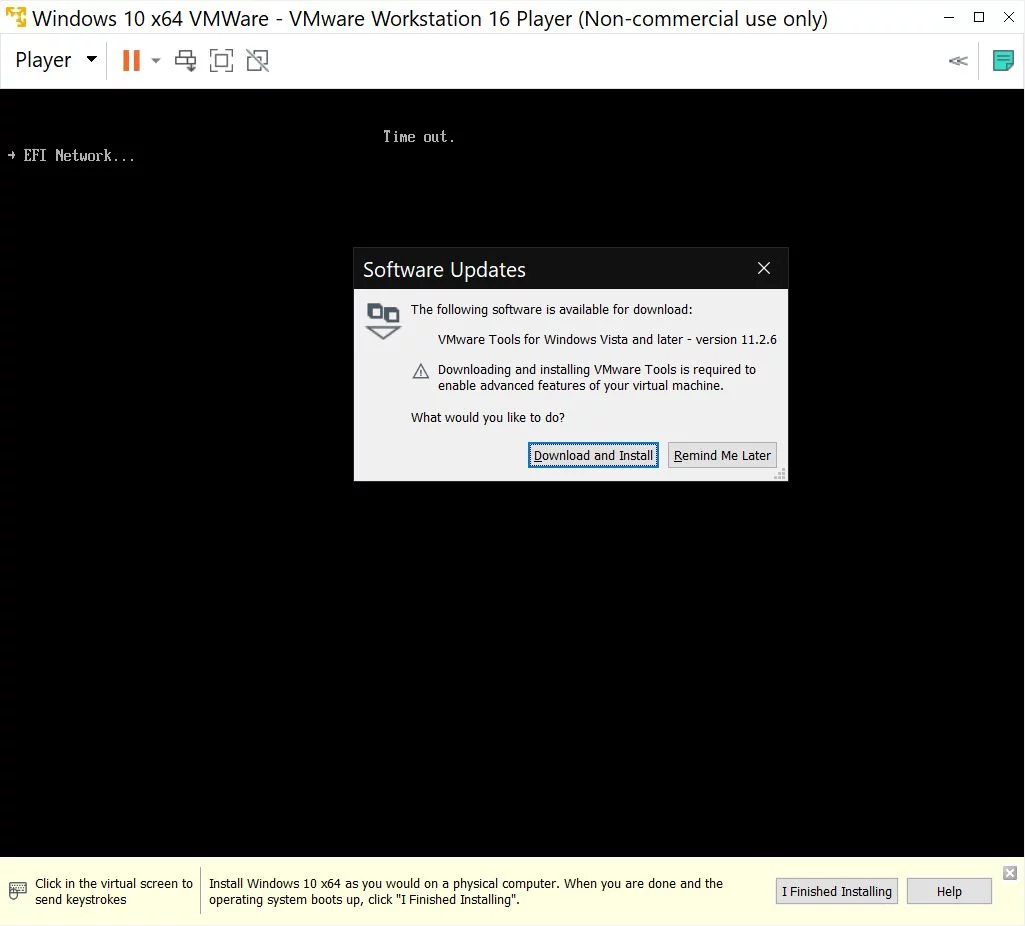
7. Just about now you’ll get a prompt to download VMWare Tools. I suggest you download and install them. This will install them for VMware Workstation Player. There’s also a chapter in this article about how to install them inside the VM.
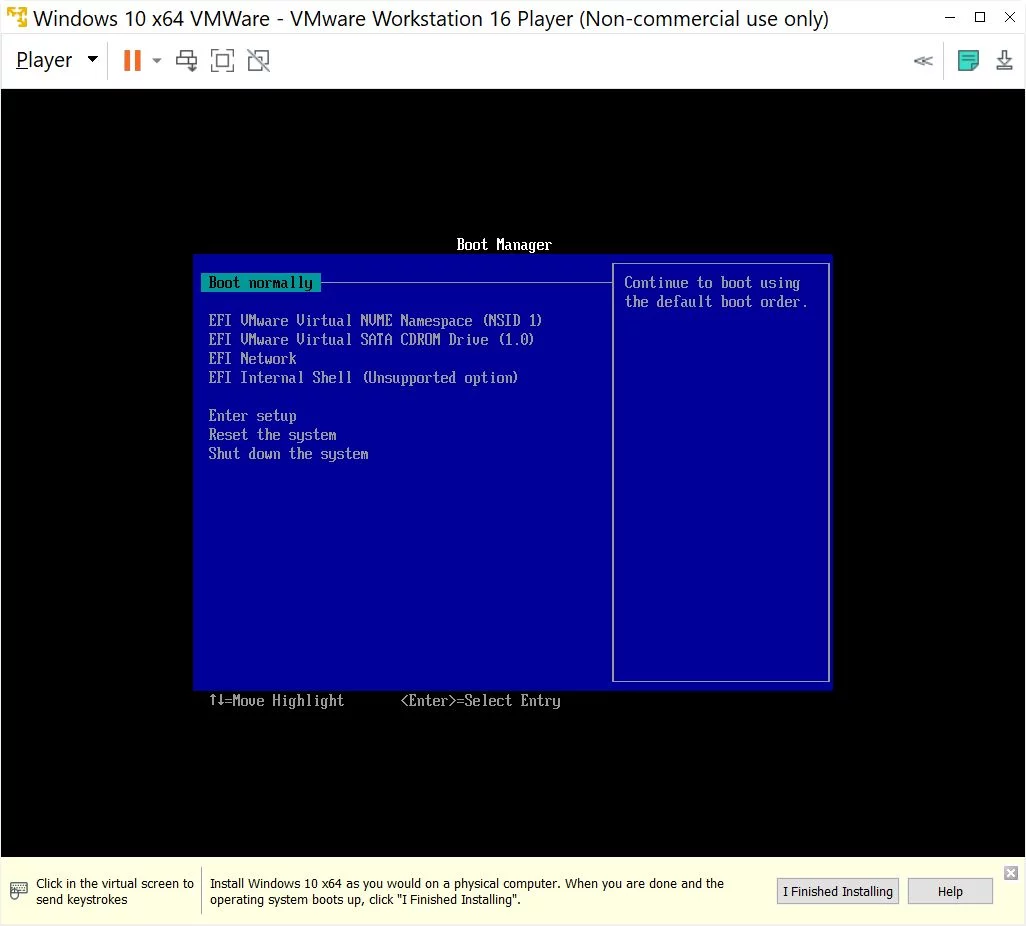
8. The VM will now start and greet you with the Boot Manager. Select the SATA CDROM drive. This is where the Windows 10 ISO selected at the first step will be mounted automatically by VMWare.
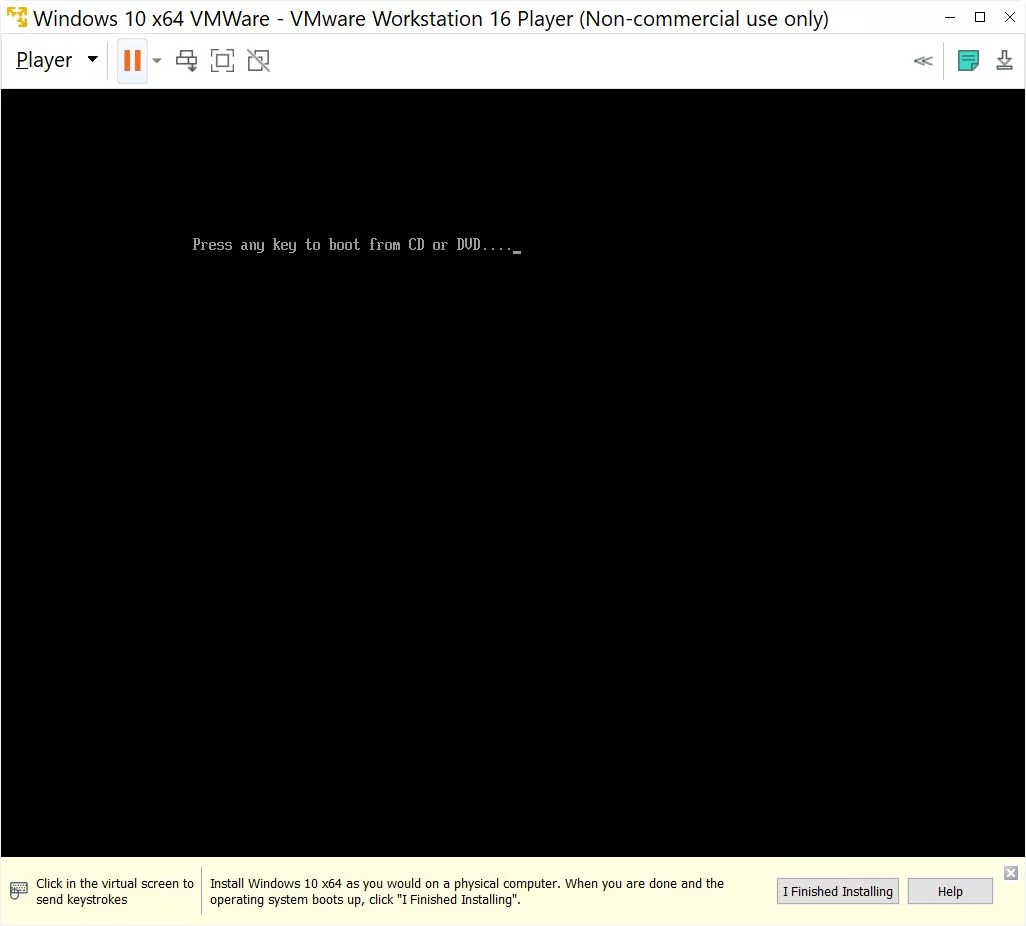
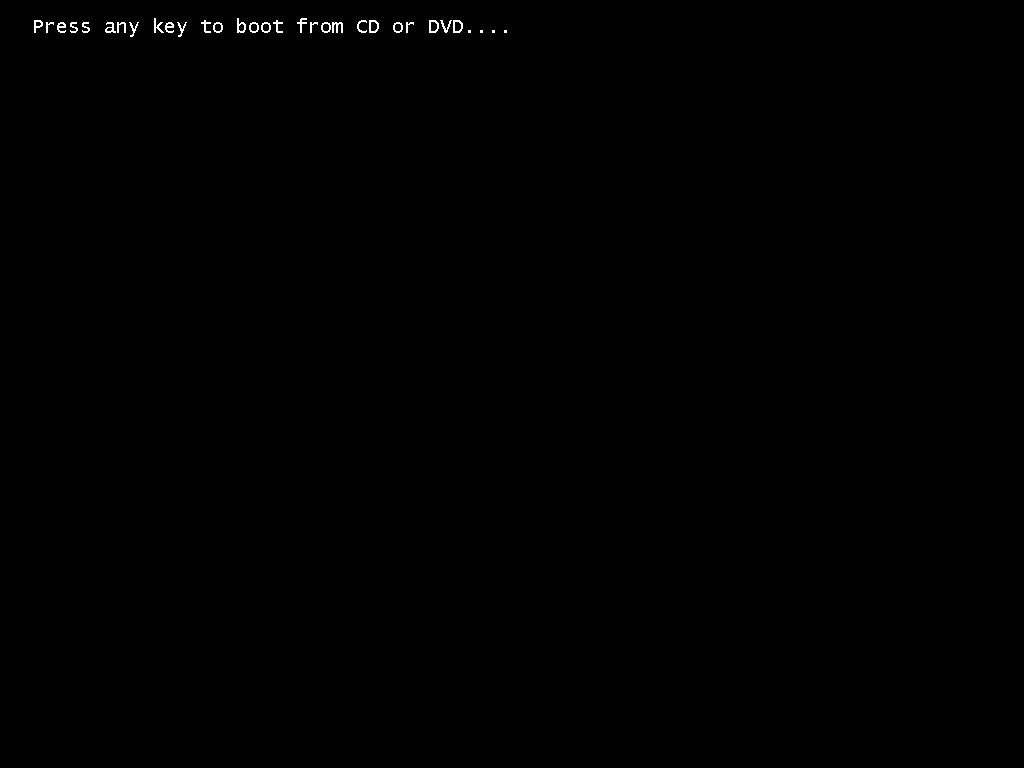
9. The following screen is well known for users like me: Press any key to boot from CD or DVD… What are you waiting for? Press that Any key they keep mentioning.
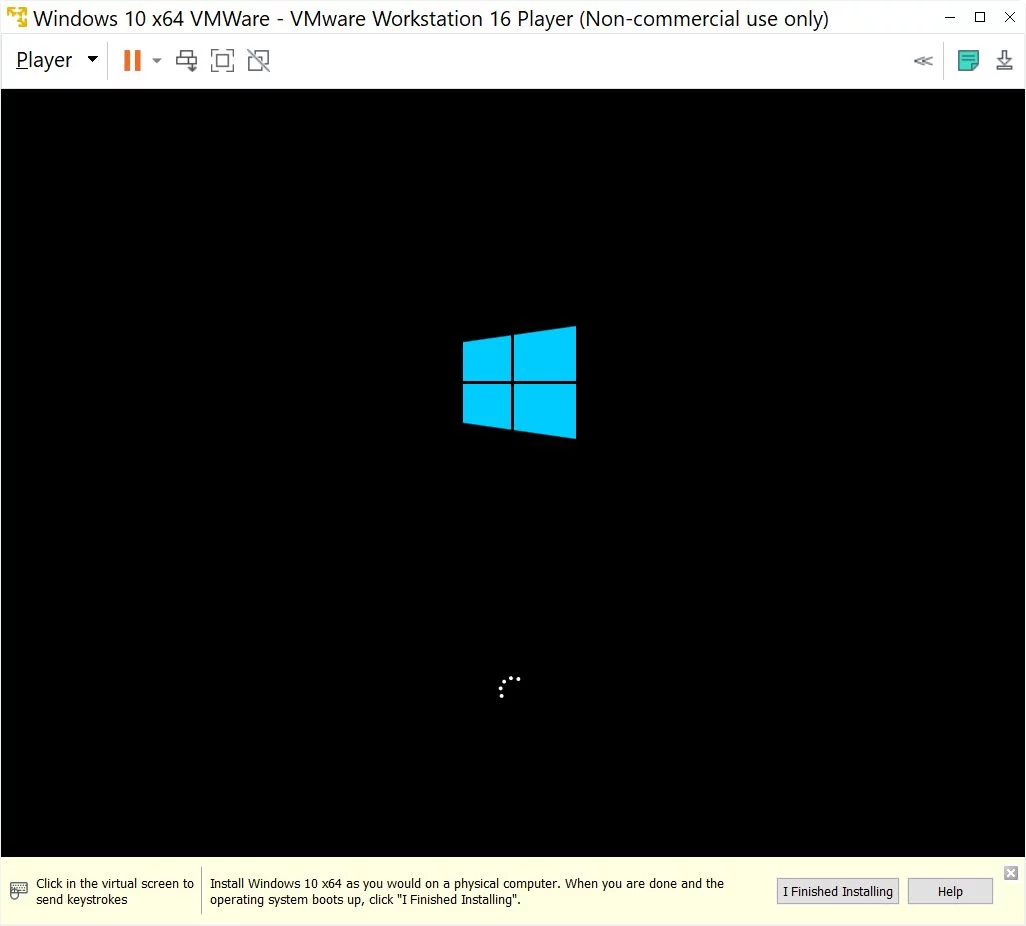
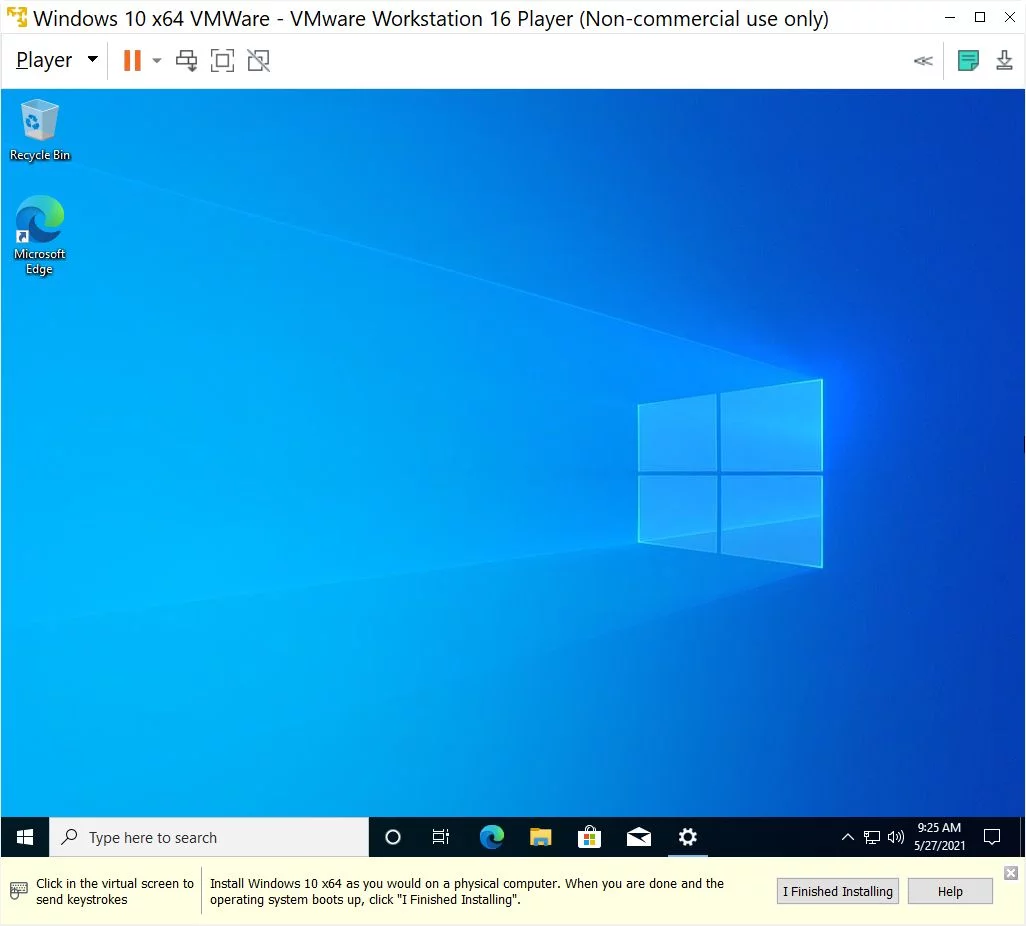
10. The familiar Windows 10 logo will show up and soon you’ll see the first step of the Windows 10 installer.
11. Follow all steps and in a matter of minutes, the VM will boot into Windows for the first time. Don’t forget to click the “I Finished Installing” notification at the bottom of the VMWare Workstation Player.
You’re set up now and can start working with your new VM. Shutting down, restarting, or suspending the VM can be done from the Windows 10 Start menu, the one inside the machine, or from the Player menu inside VMWare (Player – Power). Starting the VM can only be done from VMWare, of course, since the VM doesn’t have a physical On/Off switch.
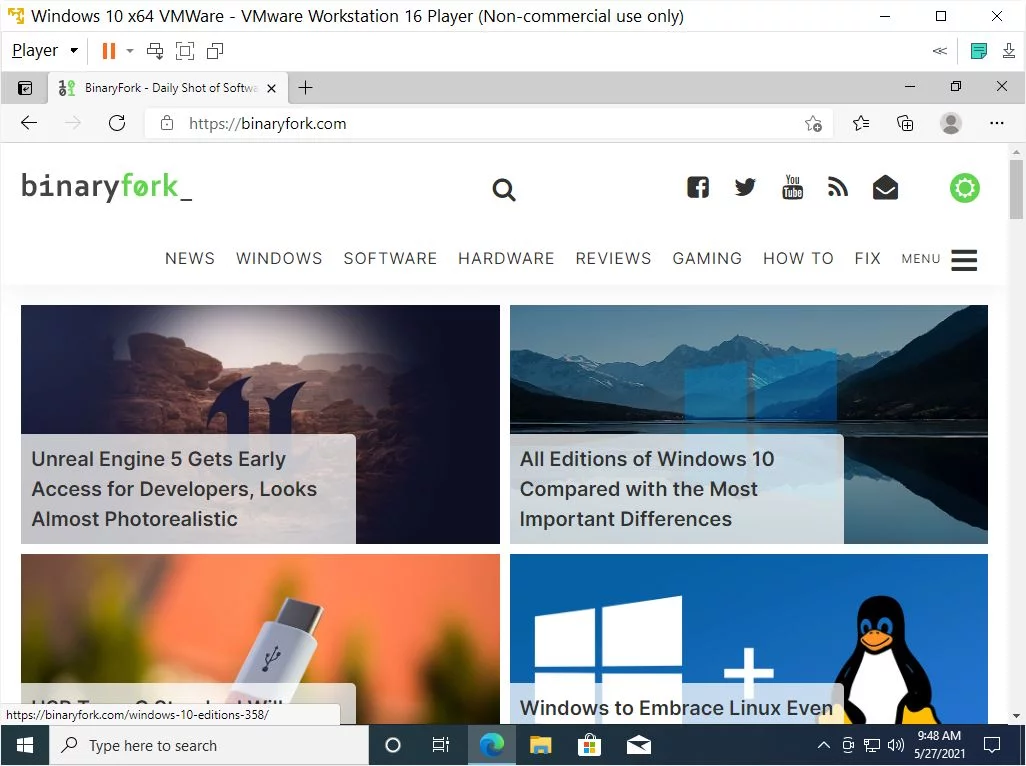
The first thing I did was visit BinaryFork, of course 🙂
Optional Step: Install VMWare Tools
If you want to get more from your virtual machine I suggest you also install VMWare tools, basically software add-ons that will be installed inside the VM, allowing for better management and even a seamless integration with the guest OS. More details can be found on VMWare’s website.
How to install:
- In the VMWare top menu go to Player – Manage – Install VMware Tools.
- The VMWare Tools image will be loaded into the virtual CD ROM drive. Run setup64.exe to begin the installation.
- In the last step select Typical for the setup type if you don’t have custom needs.
- Reboot the VM.
After doing this step you’ll likely feel that the user interface of the VM responds faster and feels snappier. Not quite as fast as the native Windows 10 install, but still pretty good for most tasks you’ll be running inside the VM.
I’m planning a similar tutorial that will cover the basic setup of a Windows 10 VM with Oracle VirtualBox. Also, I’ve talked about an interesting virtualization feature in Windows: the Sandbox environment for testing apps. Let me know if you have any questions or suggestions for making these articles more interesting/useful. Any feedback is appreciated.

I’m passionate about technology, science, and movies. I write about tech since 2003.

VMware can be used as a desktop hypervisor to manage apps in a local virtualization environment. You can download the VMware Workstation or the Workstation Pro online which depends on your requirements for the sandbox environment you plan to set up. In this quick guide, I will be showing you how to Install Windows 10 on VMware Workstation. Here are some exciting articles: How to record the screen of macOS, how to Set Quicktime or VLC as a default player on macOS, and how to prevent VLC player from reverting to the native video size on Mac.
With a VMware Workstation Player, you can easily run multiple operating systems as a virtual machine, and you can download it for free. You can download a free Windows 10 in iso format online and can quickly be installed on VMware. Check this article if you want to know How to install Windows Server 2022 on VMware Workstation, How to upgrade VMware Tools in vSphere , and 3 Ways to Convert VMware VMs to Hyper-V and how to Create or delete snapshots on VMware Workstation
Steps to Install Windows 10 on VMware using the Windows iso file
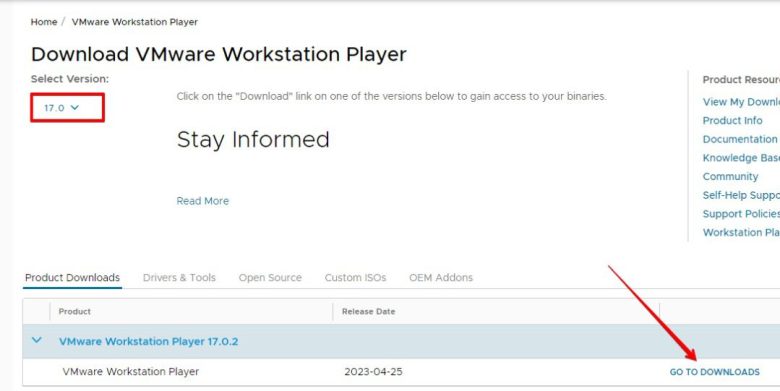
1: Download the latest version of VMware Workstation Player here and install it.
2. Download Windows 10 iso file from here. Name the file Windows 10 and save in a location.
3. Launch the just installed VMware Virtual Machine and select “Create a New Virtual Machine”

4. Browse to the location you saved the Windows 10 iso file and select it. Click Next.

4. Enter a name for the Virtual Machine. You may want to see how to extend a VM Hard Disk on VMware Workstation.

Specify Disk Capacity and Virtual Disk type
5. Next step is creating your virtual disk. The recommended maximum disk size is 60 GB. In this article we will be selecting “Split virtual disk into multiple files” option.
If you don’t select this option, VMware will allocate the space on your hard drive.

6. If you want to further configure more settings then click on Customize Hardware. But if you want to move ahead without another configuration, just click Next. In this guide I will show you the other configurations.

7. In this section you can adjust the Memory or the processors. This is dependent on your system capacity.
But you can also decide to stick with the default values. After setting the configuration you can click next.

6. Begin the installation by clicking on “Power on” and follow the steps. If you have a product key you can insert it, if you don’t have you can skip it. Please see The security database on the server does not have a computer account for this workstation trust relation [Part 1].

That’s all you need to install Windows 10 on VMware.
FAQs on Installing Windows 10 on VMware Workstation Player using Windows iso file.
How to install Windows on VMware with ISO?
1. Select Create a New Virtual Machine in the main window.
2. Browse and locate your Windows 11 ISO file.
3. Select Next.
4. Select Microsoft Windows in the Guest operating system section.
How do I install an ISO file in Windows 10?
After downloading the ISO image, open the File Explorer and right-click on the downloaded file. From the pop-up menu, select the Mount menu. This will open a virtual drive that is visible in File Explorer. You can then go ahead to install the software.
I hope you found this blog post on how to Install Windows 10 on VMware Workstation Player using Windows iso file. Interesting and helpful. In case you have any questions do not hesitate to ask in the comment section.
Table of Contents
In this article, we will discuss How to Install Windows 11 on VMware Workstation. We previously shared How to install Windows 11 on Virtualbox: {Free Download} Windows 11 ISO File.
Installing the Microsoft Windows 11 on VMware Workstation 16 Virtual Machine.
On June 28, the first insider version of the MS Windows 11 operating system – Windows 11 Build 22000.51 (Dev) became available, which received most of Microsoft’s planned new features and improvements.
The first build of Windows 11 Insider Preview is available for testing.
In our detailed tutorial, let’s install Windows 11 on VMware Workstation using the ISO image created from this instruction.
Install Windows 11 on VMware Workstation: What you need?
- Windows 11 ISO image. You can use this guide to create Windows 11 ISO. Or you can simply download the ISO file from our resources (Download Windows 11 ISO file– See step #1) You can also download Windows 11 ISO file directly from the Insider Program by Microsoft. If you decide to use our link, download the Download Internet Download Manager (IDM) to speed up your processor. You can also connect to the Free Download Manager add-on, which increases the download speed several times.
- VMWare Workstation
How to Install Windows 11 on VMware Workstation: Step by Step Guide
- Run VMware Workstation
- Select File > New Virtual Machine from the main menu of the program (you can also press Ctrl+N or select Create a New Virtual Machine)
Step.1 Configuring VMware Workstation
- In the wizard window that opens, you must select what type of configuration you want to use. By default, the Typical option is used. If you select this option, VMWare Workstation will set the default device set for the virtual machine you are creating.
Step.2 Setting up the Configurations Required
- In the Guest Operating System Installation dialog box, you must select where you want to install the operating system. It is necessary to install the radio button in the Installer disk image file(iso) item and specify the path to the iso image of the MS Windows 11 operating system.
Step.3 Specify Windows 11 ISO Operating System Image
- If the operating system distribution is written to disk, you must select Installer disk. If you need to specify later the path to the ISO image (that you created using this guide) of the operating system, you can select I will install the operating system later.
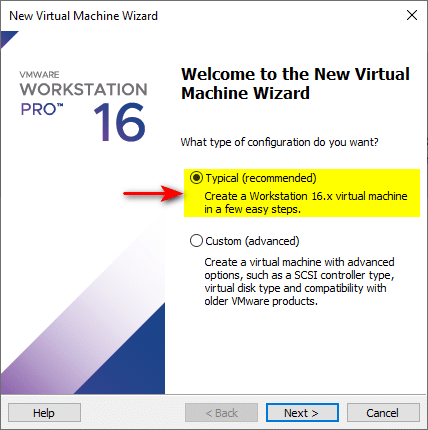
- In the Select a Guest Operating System dialog box, select the operating system version you want to install. In the current version of VMware Workstation, select Windows 10 x64 from the drop-down list and click Next.

Step.4 Specify the Operating System Version
- In the Name the Virtual Machine dialog box, in the Name field, instead of the default name, you can specify your name for the virtual machine, as well as select the path to the directory where all the files will be located.
Step.5 Specify Virtual Machine Name
- In the next dialog box, you must specify the size of the virtual disk. You can leave the size of the virtual disk as the default.
Step.6 Specifying Virtual Hard Disk Size
The options below mean making the virtual disk one large file or splitting into several smaller ones (rational to use when working with the FAT32 file system).
- The virtual machine Configration summary dialog box. If you want to change the Configration (adjust the amount of RAM for the guest system or change the type of networking, etc.), you must click the Customize Hardware button.
Step.7 Virtual Machine Configration Summary
- After clicking the Power on this virtual machine button, the emulator will start, in which the installation of the operating system will begin.
Step.8 Installation of Windows 11 on VMware Workstation
- Be sure to fix the mouse cursor in the virtual environment and when the inscription Press any key to boot from CD or DVD… appears, press any key to start the installation process specified at the Configration stage of the MS Windows 11 operating system.
Step.9 Installation Windows 11 on VMware Workstation
Step.10 Installation Windows 11 on VMware Workstation
- At the first stage of installation, you need to select the language, time format, and keyboard input method and click Next.

Step.11 Choosing the language, time format, and keyboard input method
- In the next window, click install.
Step.12 Installation of Windows 11 on VMware Workstation
- Click the I do not have a product key button in the key window to activate the MS Windows 11 operating system.
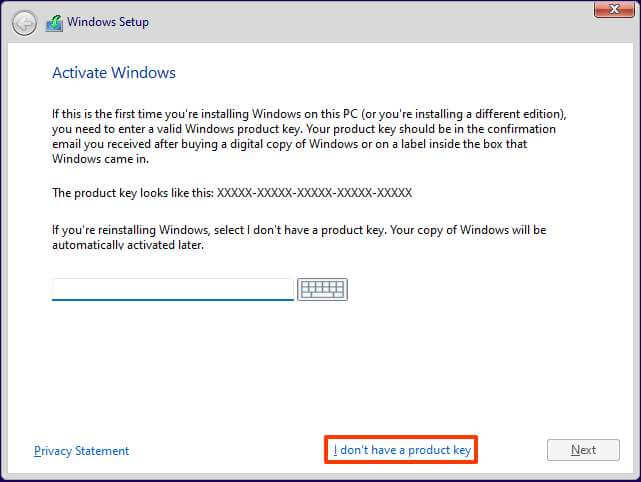
Step.13 Window for entering the key of the operating system MS Windows 11
- In the next step of the installation, you will be prompted to select an operating system revision. As part of the writing of the article, the Pro edition was chosen. If you entered a key in the previous step, this installation step would be absent since the key will automatically determine the revision.
Step.14 Choosing the edition of the operating system MS Windows 11
- The next step is to read the license agreement and accept the license terms. Select the checkbox I accept the terms of the license agreement. and click Next.
Step.15 License Agreement
- At the next critical stage, you will be asked to choose the installation type of the MS Windows 11 operating system. Within the framework of this article, the option of a clean installation of MS Windows 11, select Selective.
Step.16 Choosing the installation type of MS Windows 11 operating system.
- Next, you need to select a partition to install the operating system. This article describes the option of installing on a blank disk. The choice is made by default. Click Next.
Step.17 Choosing a partition for installing the MS Windows 11 operating system
- Upon copying and installing the operating system components, the computer will be restarted several times, and the components and equipment will be conStepured. Next, you need to select a region. Since the region of Russia was already selected at the initial stage of installation, click Yes. You can leave the input method as the default and click Yes.
Step.18 Selecting a region and configuring the language functions of the keyboard
- In the Add Second Layout window, you can click Skip because the English keyboard layout is present by default.
Step.19 Configuring keyboard language functions
- In the next window, you need to come up with a unique computer name and click Next.
Step.20 Creating a computer name
- In the device setup method window, select ConStepure for personal use and click Next
Step.21 Choosing how to configure the device
- You can specify an existing Microsoft account in the next window, either create a new account or create a local account by selecting Sign-in Options Offline Account. In this article, you will use the option to create a local account.

Step.22 Choosing an account use case

Step.23 Creating a local account
- In the next window, select the Limited features option
Step.24 Creating a local account
- Next, select Don’t sign in with a Microsoft account and click Next.
Step.25 Choosing an account use case
- In the next window, you need to create the name of the local account that will be registered with the operating system.
Step.26 Creating a local account name
- If necessary, create a password for the account or leave the field blank and click Next.
Step.27 Creating a password for a local account
- In the next step, repeat the password you entered earlier and click Next.
- Next, you need to select three secret questions and specify the answers to them.

Step.28 Introduction of answers to security questions
- In the Privacy Settings window, you can configure options such as Location (getting information about the location of the computer), Find Your Device (with the option enabled, Microsoft will be able to track the location of a lost device as long as you use a Microsoft account), Diagnostic Data (sending diagnostic data about the device, its health, activity, as well as information about visited sites, application usage, etc.), Handwriting and typing (sending diagnostic data to Microsoft to improve handwriting recognition and typing), Individual capabilities (sending diagnostic data to Microsoft for various recommendations, including operating system optimization), Advertising ID. You can change these settings later. When writing the article, all options were disabled. Click Accept.
Step.29 Setting Privacy Settings
- At the end of the installation, if you used the VMware Workstation virtualization platform, you must install additional components of VMware Tools for the correct operation of the guest system, including optimizing the screen resolution, the ability to copy files from the host system to the guest system and vice versa, etc. In the main menu of VMware Workstation, select VM > Install VMware Tools.
Step.30 Installing Additional Components
- In the VMware Tools Setup Welcome window, click Next, select the Typical installation option, and click Install in the next window. When the installation is complete, click Finish. In the pop-up window with information about the need to restart the system, click Yes. In automatic mode, the operating system will be restarted.
Step.31: Activate Windows 11 for free.
Conclusion: Install Windows 11 on VMware Workstation
I hope this article on How to Install Windows 11 on VMware Workstation was easy and up to the mark. If you face any problems, you can use Virtualbox to install Windows 11; here is a guide that will help- How to install Windows 11 on Virtualbox: {Free Download} Windows 11 ISO File. Or you can share your queries in the comment section below.