![]()
Download Article
Easily install Windows 10 or 11 on Ubuntu Linux with this user-friendly guide
![]()
Download Article
- Create a Windows Partition
- Create a Bootable USB
- Install Windows
- Set Up Dual Boot
- Tips
|
|
|
|
This wikiHow guide teaches you how to install Windows on a PC that’s already running Ubuntu Linux. Before you get started, make sure you’ve already purchased a Windows license and product key. Don’t worry if you don’t have Windows install media, as you can create a bootable USB drive from a downloadable ISO image. Once you’ve installed Windows from Ubuntu, you can install a tool called EasyBCD that allows you to switch between operating systems (dual boot) easily.
Things You Should Know
- You’ll need a USB flash drive with at least 8 GB of space and a partition with 20 — 50GB of space to install Windows.
- Once you download an ISO image of Windows 10 or Windows 11 from Microsoft, you can use UNetbootin to create your install drive.
- Boot from the USB drive to install Windows.
-

1
Open Gparted. You’ll use this tool to create a new partition for Windows. You’ll see a list of all drives and partitions.
- If you haven’t already installed Gparted, you can download it from the Software Center or by running sudo apt-get install gparted from the command line.
-
2
Unmount the partition you want to shrink. Right-click the partition that contains the space you want to allocate to Windows and select Unmount.
- You won’t be able to unmount and shrink the Ubuntu partition while Ubuntu is running. If you want to allocate space from your Ubuntu partition, you’ll need to boot from a Ubuntu flash drive and use the Try Ubuntu feature rather than reinstalling Ubuntu. Then, you can run Gparted from there.
Advertisement
-
3
Right-click the partition you want to edit and select Resize/Move. This allows you to create a new partition from your unmounted one.
-
4
Enter the new partition size (in MB) and click Resize. You should allocate at least 20 GB (20000 MB) for Windows 10 or 64 GB (64000 MB) for Windows 11. If you plan to install apps and use Windows regularly, you’ll probably want to increase that amount.[1]
-
5
Click Apply to save your changes. You’ll see this green checkmark icon in the top toolbar. Once you do this, you’ll see your unallocated space.
-
6
Right-click the unallocated space and select New. This opens the «Create a New Partition» window.
-
7
Enter the details for your new Windows partition and click Add.
- In the «New size» field, enter the size (in MB) of the partition you want to allocate to Windows (e.g., 50000).
- «Primary Partition» should already be selected from the «Create as» menu. If it’s not, select it now.
- Select ntfs from the «File System» menu.
- In the Label field, type «Windows 10» or «Windows 11» as needed.
-
8
Click Apply. It’s the green check mark button at the top of Gparted.
-
9
Unmount the new partition. Now that you’ve created your Windows partition, unmount it by right-clicking it and selecting Unmount.


Advertisement
-
1
Download the Windows 10 or 11 installation media. You’ll need a blank USB drive with at least 8 GB of space to create install media. Any data on the USB drive will be erased during this process.[2]
- Windows 11: Go to https://www.microsoft.com/software-download/windows11. In the «Download Windows 11 Disk Image (ISO) for X64 devices» section, select a Windows 11 version, then click Download Now to save the image.
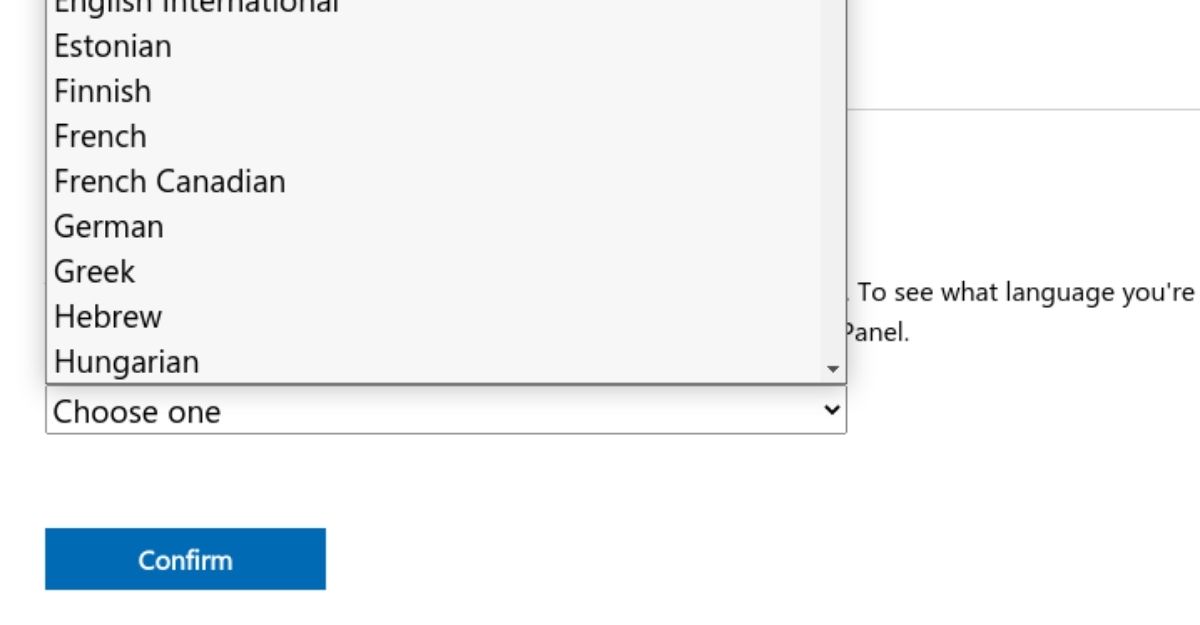
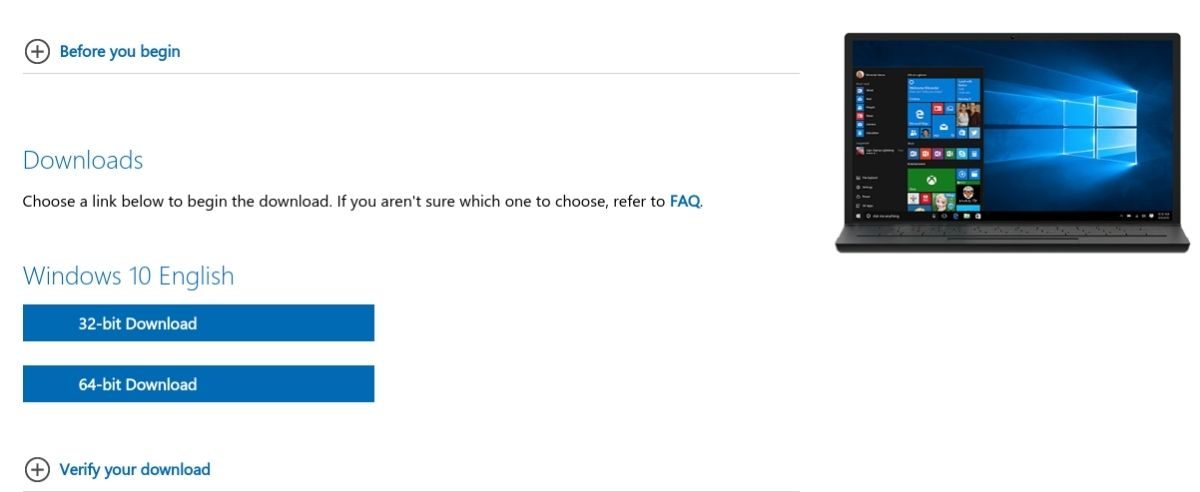
- Windows 10: Go to https://www.microsoft.com/en-us/software-download/windows10. Under the «Windows 10 2023» header, select a Windows 10 edition and click Confirm. Select a language, then click the download link for the version of Windows you want to install.
- You’ll need a blank USB drive with at least 8 GB of space to create install media. Any data on the USB drive will be erased during this process.[3]
-
2
Install UNetbootin from the Software Center. This free application lets you create a bootable USB drive in Ubuntu. To learn more about UNetbootin, see https://unetbootin.github.io. To install:
- Open a Terminal window.
- Run the command sudo add-apt-repository ppa:gezakovacs/ppa to add the repository.
- Run sudo apt-get update to update your package lists.
- Run sudo apt-get install unetbootin to install.[4]
-
3
Open UNetbootin and insert your USB drive. Opening UNetbootin displays the welcome screen where you can choose your bootable drive parameters.
-
4
Select the «DiskImage» radio button. It’s toward the bottom-left corner of the window.
-
5
Select ISO from the «DiskImage» menu. It’s to the right of the radio button.
-
6
Click the three-dot … button. This opens your file browser.
-
7
Select the file you downloaded from Microsoft and click Open. It’s the one that ends with .iso.
-
8
Select USB Drive from the «Type» menu. It’s at the bottom-left corner of the window.
-
9
Select your USB drive from the «Drive» menu. This is the device label for your USB drive.
- If you can’t select your USB drive, it likely needs to be formatted to the FAT32 or NTFS file system. You can do this in the file manager by right-clicking the USB drive and selecting Format.
-
10
Click OK. This creates a bootable Windows 10 USB drive from the downloaded ISO image. Once the drive is ready, you’ll see «Installation Complete.»
- Click Exit to close UNetbootin.


Advertisement
-
1
Restart your computer into the BIOS/UEFI. The steps to enter the BIOS/UEFI depend on your PC manufacturer and model. You’ll usually have to press a certain key (often F2, F10, F1, or Del) right after the computer starts booting.
- Insert the USB drive into a free USB port if you haven’t already.
-
2
Set the USB drive to come first in the boot order. You’ll usually do this in a menu called «Boot» or «Boot Order.» The steps to change the boot order vary by PC, but you’ll usually have to select USB Drive and mark it as 1st Boot Device. Check your PC manufacturer’s website for more specific instructions about your BIOS/UEFI.
-
3
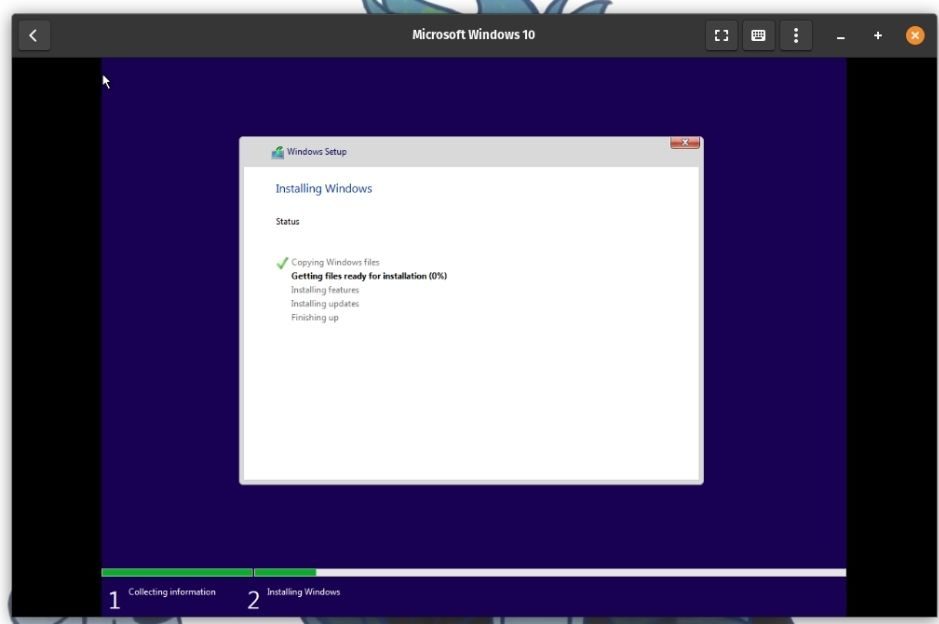
Save your changes and exit the BIOS/UEFI. Most BIOS/UEFI make the «Save» and «Exit» keys very clear somewhere on the screen. Once you exit the BIOS/UEFI, your computer will boot from your USB drive and display the «Windows Setup» window.
-
4
Click Custom: Install Windows only (advanced). It’s the second option on the window. A list of partitions will appear.
-
5
Select your Windows partition and click Next. This is the partition you just created. Windows will now install on the selected partition.
-
6
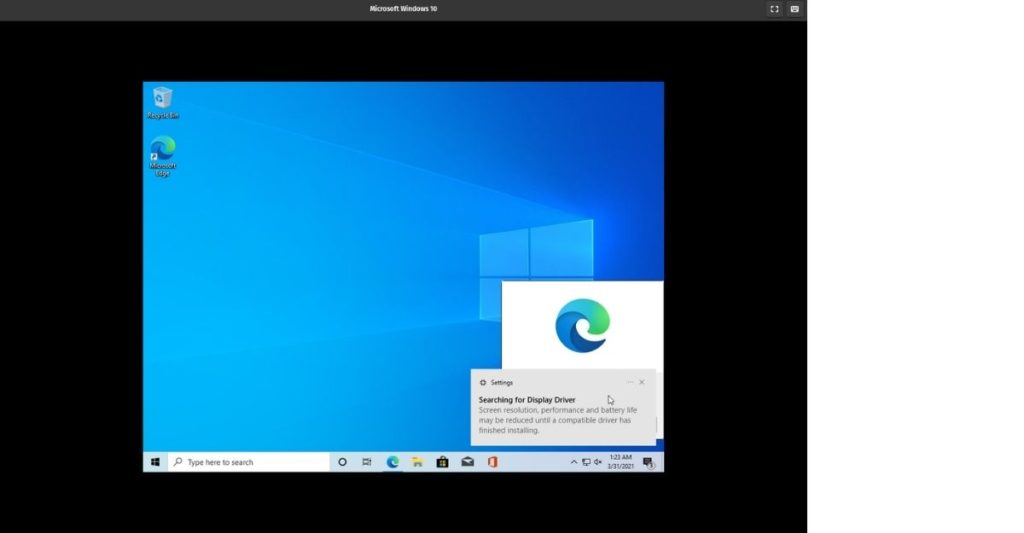
Follow the on-screen instructions to install Windows. Once you finish the setup, you’ll boot to the Windows desktop.
-
7


Advertisement
-
1
Download EasyBCD from Windows. EasyBCD is a free tool that lets you set up dual-boot from within Windows. To download.
- Open the Microsoft Edge web browser. You’ll find it in the Windows menu at the bottom-left corner of the screen.
- Navigate to https://neosmart.net/EasyBCD.
- Scroll down and click Register under «Non-commercial.» This brings you to a sign-up page.
- Enter your name and email address and click Download. This should start the download immediately, but you might have to click Save or Download to confirm.
-
2
Click the file you just downloaded. The file starts with EasyBCD. You should see it near the bottom of the browser. If you don’t, press Ctrl+J to open the Downloads list and click it there.
- If prompted, click Yes to allow the installer to run.
-
3
Follow the on-screen instructions to install EasyBCD. Once the app is installed, it will be added to the Start menu.
-
4
Open EasyBCD. It’s on the Start menu, which you can get to by clicking the Windows button at the screen’s bottom-left corner.
-
5
Click the Linux/BSD tab. It’s near the top of the app.
-
6
Select Grub 2 from the «Type» menu. It’s near the top of the tab.
-
7
Type Ubuntu into the «Name» field. It’s right below the «Type» menu. This is how Ubuntu will appear in the boot menu.
-
8
Select Automatically locate and load from the «Drive» menu.
-
9
Click the Add Entry button. It’s right below the «Drive» menu. This adds an option for Ubuntu to the standard Windows boot menu.[5]
-
10
Remove the USB drive and restart the PC. You can restart the PC by clicking the Start menu, selecting the Power button (it looks like a knob), and choosing Restart. When the PC comes back up, it will boot to a screen that allows you to select either Windows or Ubuntu. Selecting one or the other will boot into that operating system.


Advertisement
Ask a Question
200 characters left
Include your email address to get a message when this question is answered.
Submit
Advertisement
-
You must have a license to install Windows. If you don’t already have a Windows license, you won’t be able to activate Windows once installed.
Thanks for submitting a tip for review!
Advertisement
About This Article
Article SummaryX
1. Create a primary NTFS partition in Ubuntu.
2. Download the Windows 10 ISO from Microsoft.
3. Install UNetbootin from the Software Center.
4. Use UNetbootin to create a bootable USB Windows 10 drive.
5. Boot from the USB drive.
6. Follow the on-screen instructions to install Windows.
7. Connect to the internet and download EasyBCD.
8. Use EasyBCD to add Ubuntu to the boot menu.
Did this summary help you?
Thanks to all authors for creating a page that has been read 345,783 times.
Is this article up to date?
Ubuntu is a powerful and versatile operating system, but there may be times when you need to run Windows 11 for certain applications or tasks. Luckily, it is possible to install Windows 11 on Ubuntu with a few simple steps. In this article, we will guide you through the process of installing Windows 11 on Ubuntu.
Step 1: Install VirtualBox
VirtualBox is a free and open-source virtualization software that allows you to run multiple operating systems on a single machine. To install VirtualBox on Ubuntu, run the following command in the terminal:
sudo apt install virtualbox
Step 2: Download Windows 11 ISO file
You will need a Windows 11 ISO file to install Windows 11 on Ubuntu. You can download the ISO file from the official Microsoft website or any other reliable source.
Step 3: Create a new virtual machine
Open VirtualBox and click on the «New» button to create a new virtual machine. Give the virtual machine a name, select «Microsoft Windows» as the type, and «Windows 10 (64-bit)» as the version.
Step 4: Configure virtual machine settings
After creating the virtual machine, click on the «Settings» button to configure the virtual machine settings. Increase the RAM and CPU as per your requirement. Select «Storage» from the left menu and click on the «Empty» CD icon under the «Controller: IDE» section. Click on the «Add» button and select the Windows 11 ISO file that you downloaded earlier.
Step 5: Install Windows 11 on virtual machine
Start the virtual machine by clicking on the «Start» button. The Windows 11 installation process should begin automatically. Follow the on-screen instructions to complete the installation process.
Step 6: Install VirtualBox Guest Additions
VirtualBox Guest Additions are a set of device drivers and system applications that improve the performance and usability of the virtual machine. To install VirtualBox Guest Additions, click on the «Devices» menu in the virtual machine window and select «Insert Guest Additions CD image». Follow the on-screen instructions to complete the installation process.
Congratulations! You have successfully installed Windows 11 on Ubuntu using VirtualBox.
More Examples:
If you encounter any issues during the installation process, you can try the following troubleshooting steps:
- Make sure that you have enough disk space on your hard drive to install Windows 11.
- Check that your computer’s BIOS settings are configured to allow virtualization.
- Try downloading the Windows 11 ISO file from a different source.
- If the installation process is taking too long, try increasing the amount of RAM allocated to the virtual machine.
In this article, we have shown you how to install Windows 11 on Ubuntu using VirtualBox. By following these simple steps, you can easily run Windows 11 on your Ubuntu machine for those times when you need it. We hope this guide has been helpful to you.
Related Searches and Questions asked:
That’s it for this post. Keep practicing and have fun. Leave your comments if any.

In this guide i will show how to install windows 10 on your Ubuntu machine.
Digitalocean 100$ Free Credit
Digital Ocean Coupon
. Vps Server
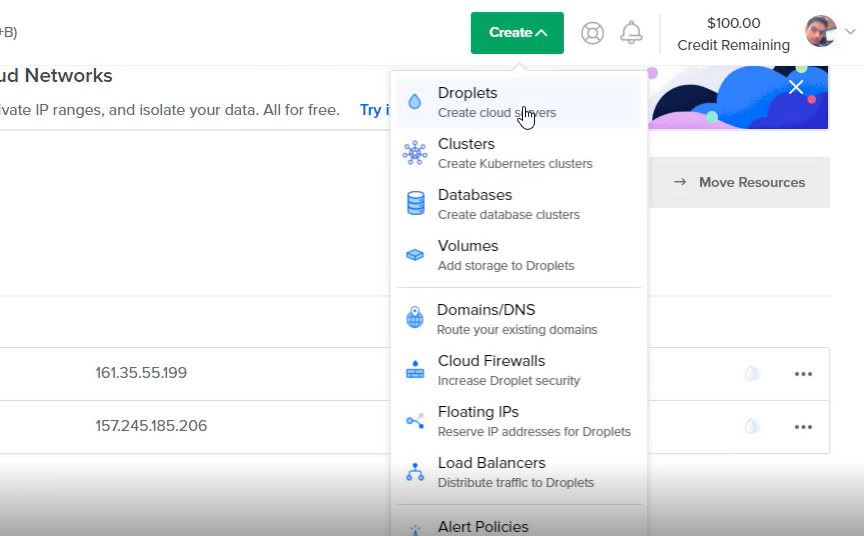
The second thing you will need is a VPS server. a public server to install & Setup SMTP.
In My Post i Am Using Digitalocean Vps Server.
Here is a list of some companies:
- Hostwind.
- Contabo.
- Interserver.
- OVH.
- Digital Ocean*
- AWS
1. Software Need
-Putty
PuTTY is a free and open-source terminal emulator, serial console and network file transfer application.
2. Install Process
:-First Create a Vps Server.
- Go to Digitalocean And Create A Droplet
2. Choose an image
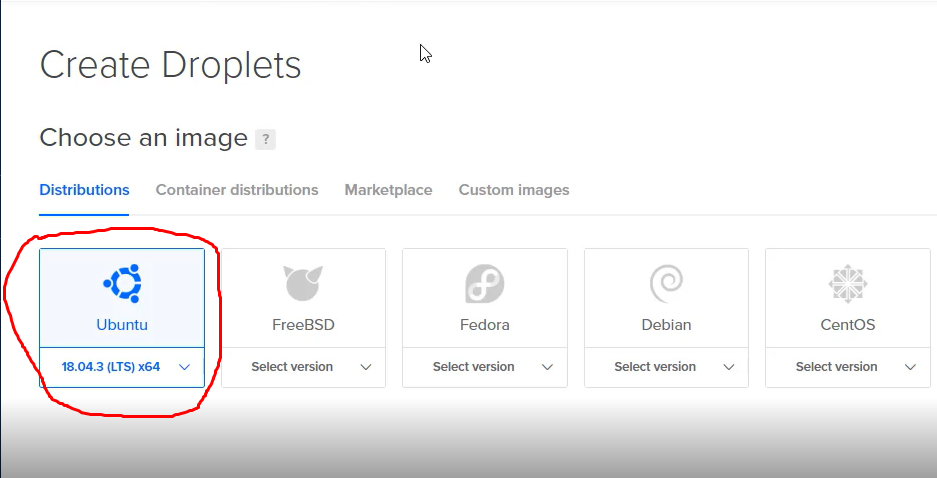
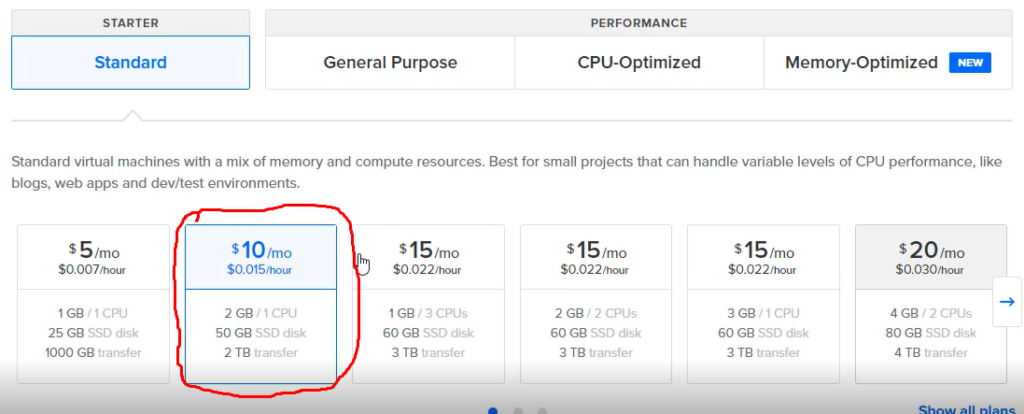
3.Choose a plan (i am using $10 machine)
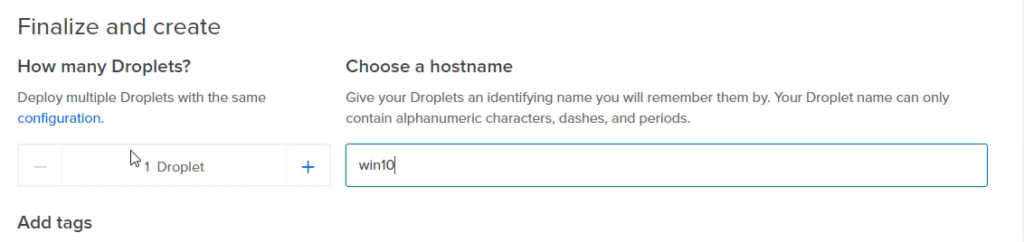
4.Choose a hostname
In Hostname Put Any Name. i am Using win10 Name
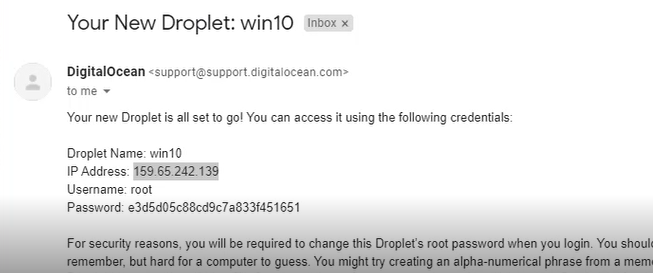
5.Now Click Create droplet. Few Minutes After You Receive a Email.
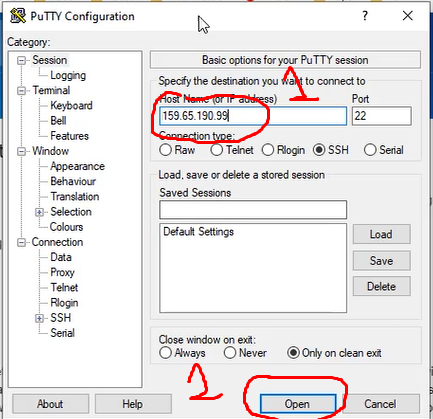
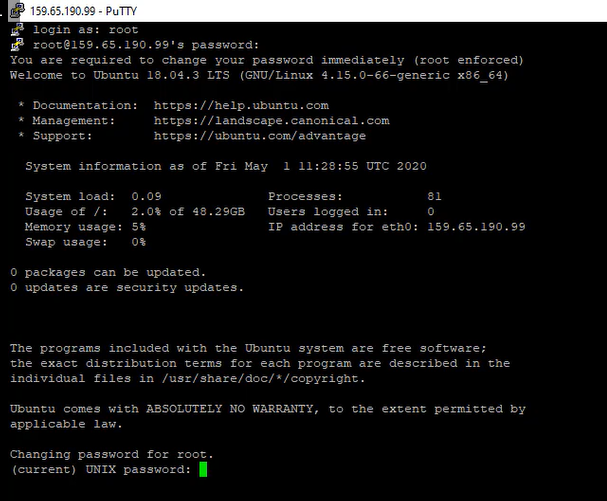
Now, Open Putty SSH Client, Connect to your machine, Enter the root password and set a new one as prompted.
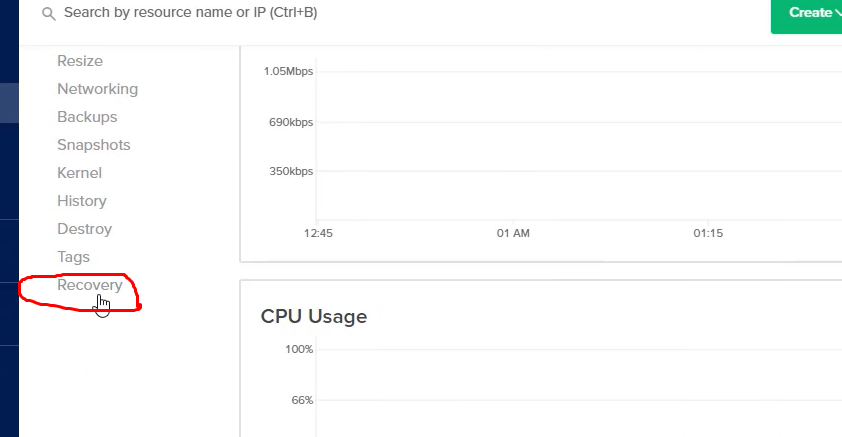
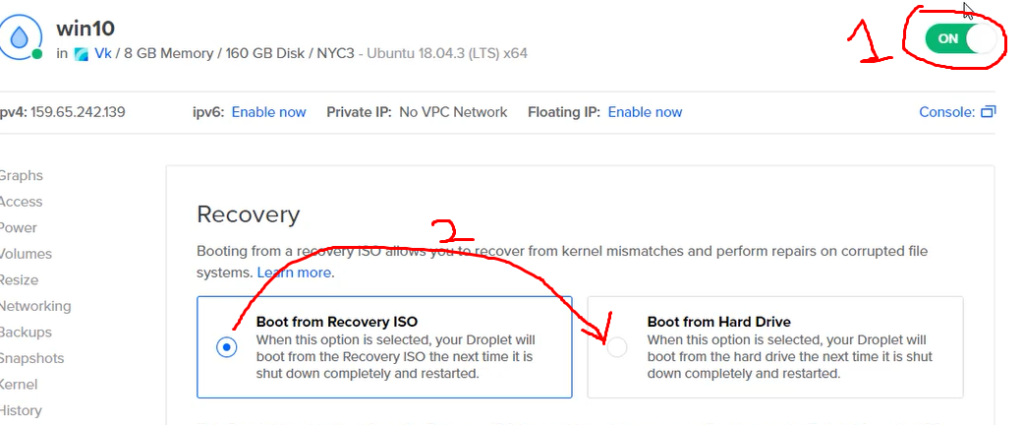
Set the Droplet to recover mode:
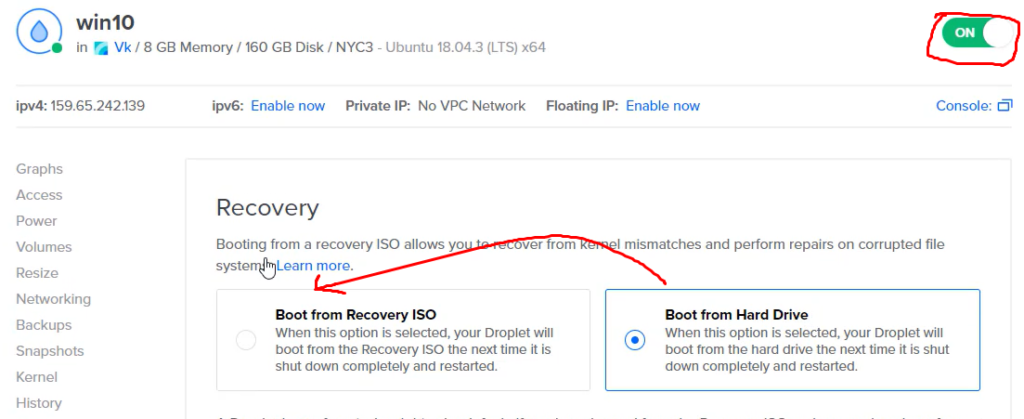
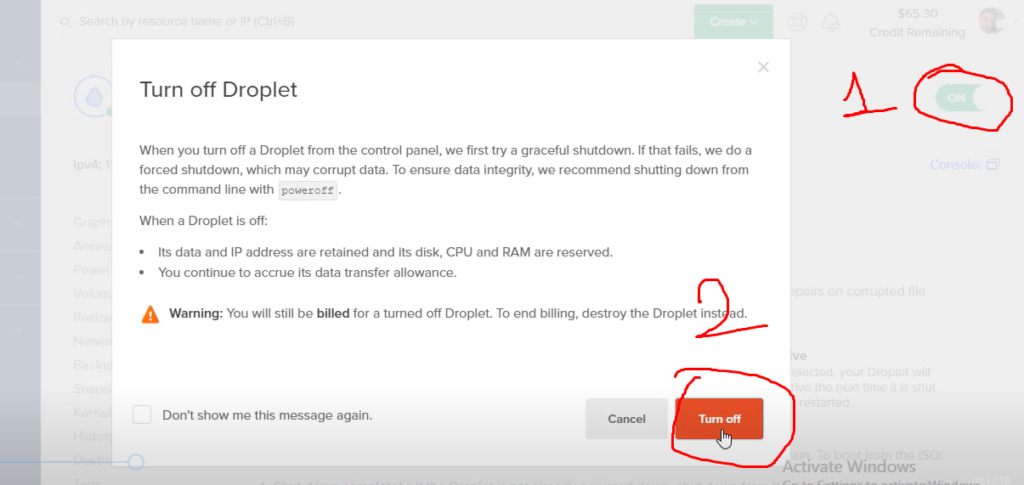
Turn off the droplet:
Then simply turn on the Droplet machine again. and
Enter (Interactive Shell):
Select number 6 to enter the interactive shell mode.

Set the root Password by simply running this command:
sudo passwd root Open Putty Software And Install Win 10
1.First Open Putty Software And Put Your Server Ip Address
2. Now Login as Root User And Create New Password. You Not Understand Then Watch My YouTube Video.
3. Now Run This Simple Command line. Go To this Link and copy command .
How to install Windows 10 and Windows Server on Digital Ocean
4. After Complete This Installation turn off the machine and set it back to boot from hard disk in the recovery section in the digital ocean droplet management dashboard as we did before.
Configure Settings:-
Now run the console window in Digital Ocean
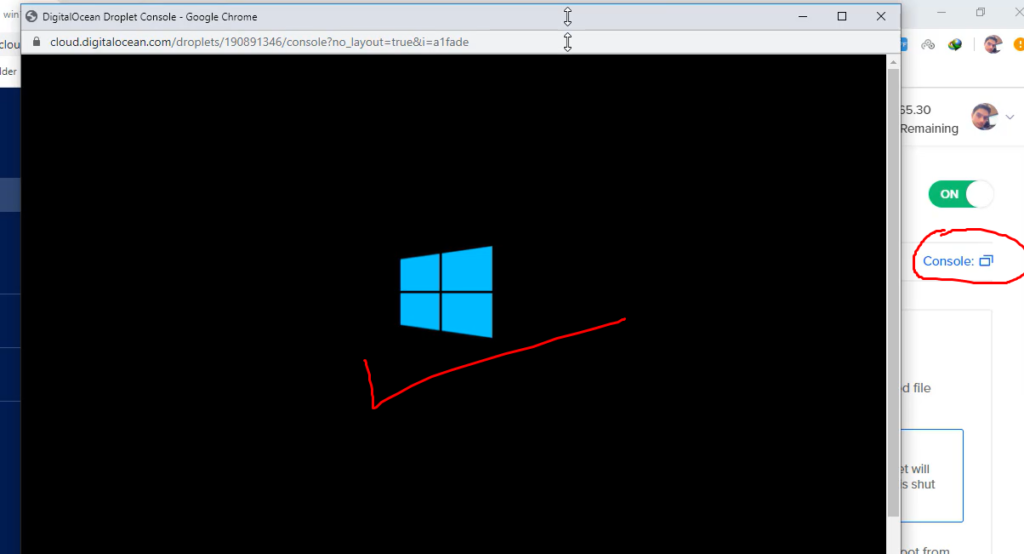
Login with the following user and password:
username: WhatUpTime.com
Password: P@ssword64
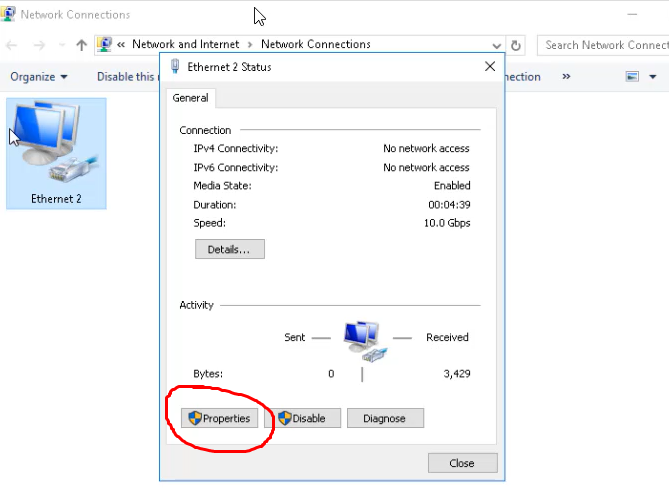
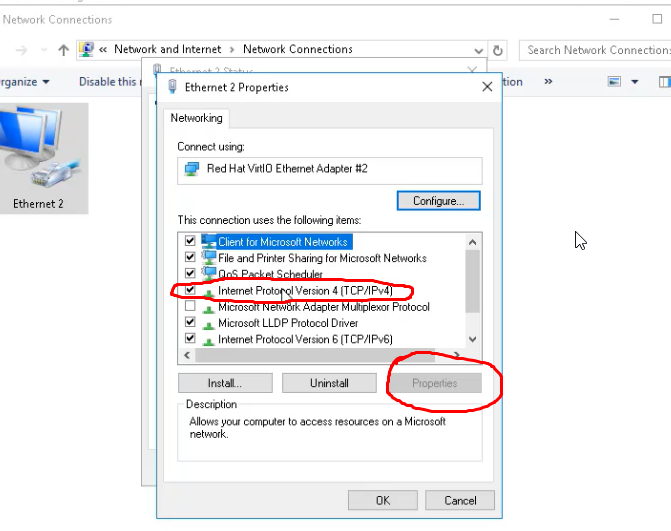
Configure Network Setting:-
1.Click the Start icon (or press the Start button on the keyboard), and then tap or click Settings.
- Click Network & Internet.
- Click Change Adapter Options.
- Right-click the connection that you want to configure and then choose Properties from the contextual menu that appears.
- Open Properties dialog box.
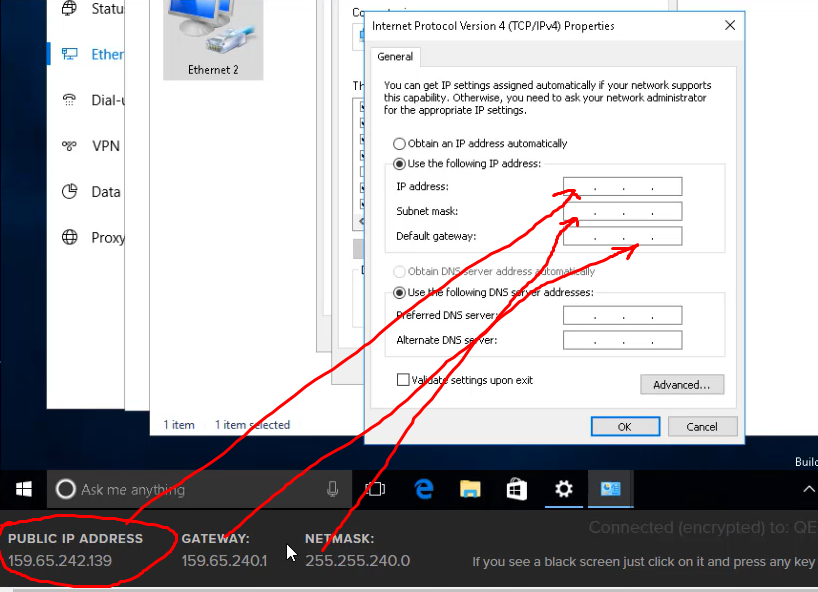
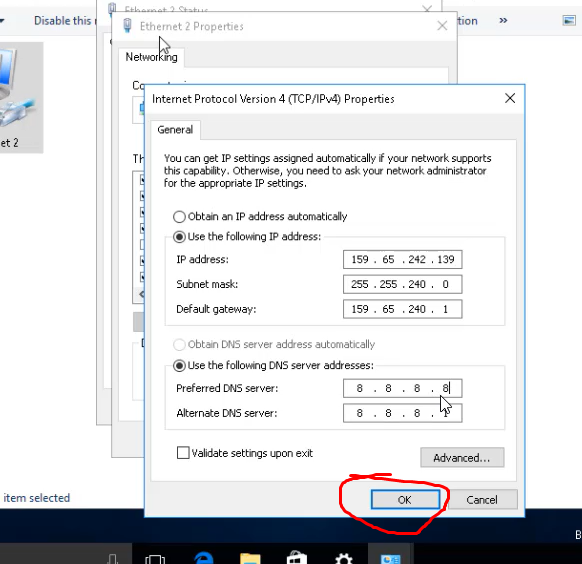
Bravo! Now you connect to your machine with RDP client and enjoy your DigitalOcean Windows VPS machine.
watch the video below to understand more:-
![]()
- Services
- Solutions
-
- For E-Commerce Business
- Warehouse Management System
- Inventory Management Software
- Manufacturing ERP Software
- SeaFood ERP
- Construction Management Software
- Telecom Contract Management
- ERP for Promotional Products
- Event Management Software
- Dispatch Management Software
- Solar ERP Software
- Odoo Integrated Shopify Store
- Odoo Walmart Integration
- Odoo Amazon Integration
-
- Odoo ERP Hosting
- Zimbra Enterprise Email Hosting
- NextCloud Hosting
-
- For Warehouse Condition Monitoring
- For SeaFood Water Quality Monitoring
- DiOx Sense – Dissolved Oxygen
- RFID IoT Gateway
-
- Case Study
-
- Odoo ERP for UAV/UAS Manufacturer
- Odoo ERP for Manufacturing Industry
- E-bike Manufacturer ERP
- ERP For Metal Fabrication Industries
- Odoo ERP for Shopify Store
- Odoo ERP for Kitchen Manufacturers
- ODOO ECOMMERCE + MANUFACTURING
- Seafood Processors ERP System
- ERP – Contract & Project
- TRADING ERP – RF INDUSTRY
-
- Odoo POS – GpsGate Integrations
- Sap Ariba Network – Odoo ERP integration
- Odoo Payroll – Canada – T4/T5 Slips
- Crypto Payment Acquirer
- Thawani Payment Acquirer
- Tap Payment Acquirer
- Odoo – Open Banking – Virtual IBAN Integrations
- Odoo Advance Email Configurator
- ODOO – DPD Shipping Provider Integration
-
- About Us
- News & Events
- Jobs Apply
- Testimonials
- Blog
- Contact Us
Steps to Install Windows 10 on existing Ubuntu 16.04
Related Posts
Page load link
Go to Top
There are many kinds of Windows and Linux users in the world, but some of the popular ones are —The ones who absolutely love Windows but everything else, others who hate Windows but use it because they think they’ve got no other options to try, and the third and most prevalent folks who love Linux to death but don’t essentially hate Windows 10. The third kind is fairly widespread.
If you think you resemble the third kind that can’t let go of Windows, you’re at the right place. In this guide, let’s look at the easiest way to install Windows 11/10 on Ubuntu or any Debian/Ubuntu-based distro for the fact.
Ways to Use Windows alongside Ubuntu
There are two ways to use Windows alongside Ubuntu:
- Dual-booting
- Installing and using a Virtual Machine in Ubuntu
Out of both, Dual-booting is harder, especially if you’re new to computers and/or Linux, but using a VM is the easiest way of using Windows in Ubuntu. If you’re curious, here’s what dual-booting can do if you have no prior knowledge of the same.
The Problem With Dual-Boot
The issue that most people face with dual-boot is, it requires you to fiddle with your computer’s memory while increasing the risk of accidentally losing your important files. If you still want to try it, check out our how to Dual-boot Linux Mint alongside Windows 10 article.
Hence, installing Windows on a Virtual machine is the fastest and the safest way. In this article, let’s look at the easiest way to install Windows 10 on Ubuntu Linux or any Ubuntu-based distro. The tool that we’ll be using is GNOME Boxes which was released in January this year.
Installing Windows 11/10 On Ubuntu Linux
With that out of the way, here’s how to install Windows 11 or Windows 10 on Ubuntu Linux. It’s fairly simple and straightforward.
Install GNOME Boxes On Ubuntu/Ubuntu-based Distros
To install GNOME Boxes, fire up the terminal and type the following command
sudo apt install gnome-boxes
If the above command doesn’t work for some reason, or if you’re using a different Linux distro, you can download and install GNOME Boxes from Pkgs.org on any distro. All you’ll need to do is download the package and double-click the .deb or .rpm package to install.
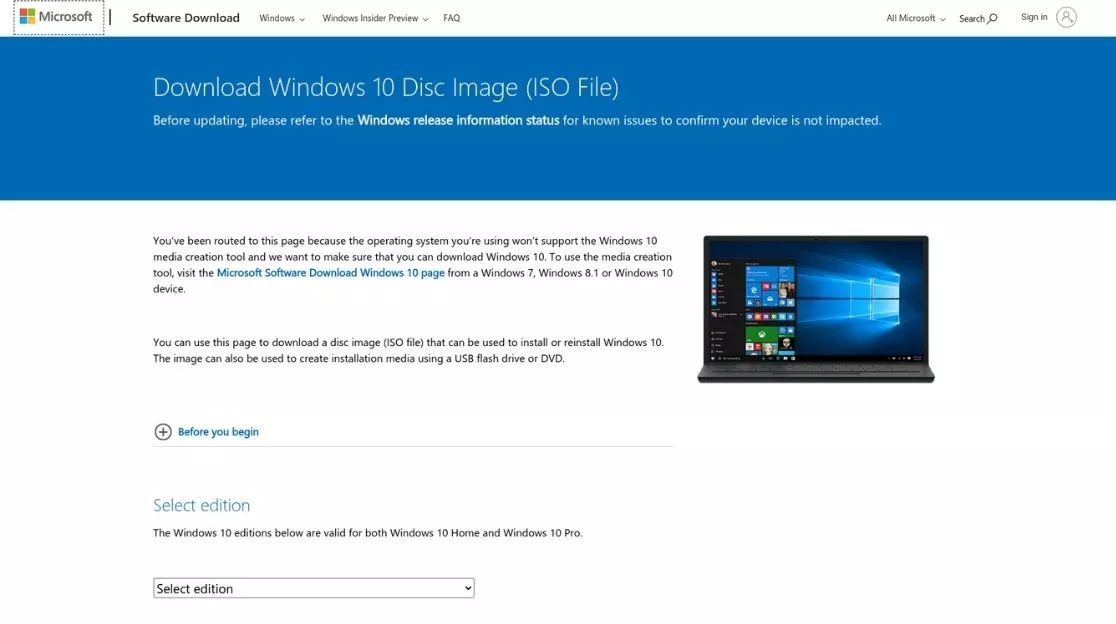
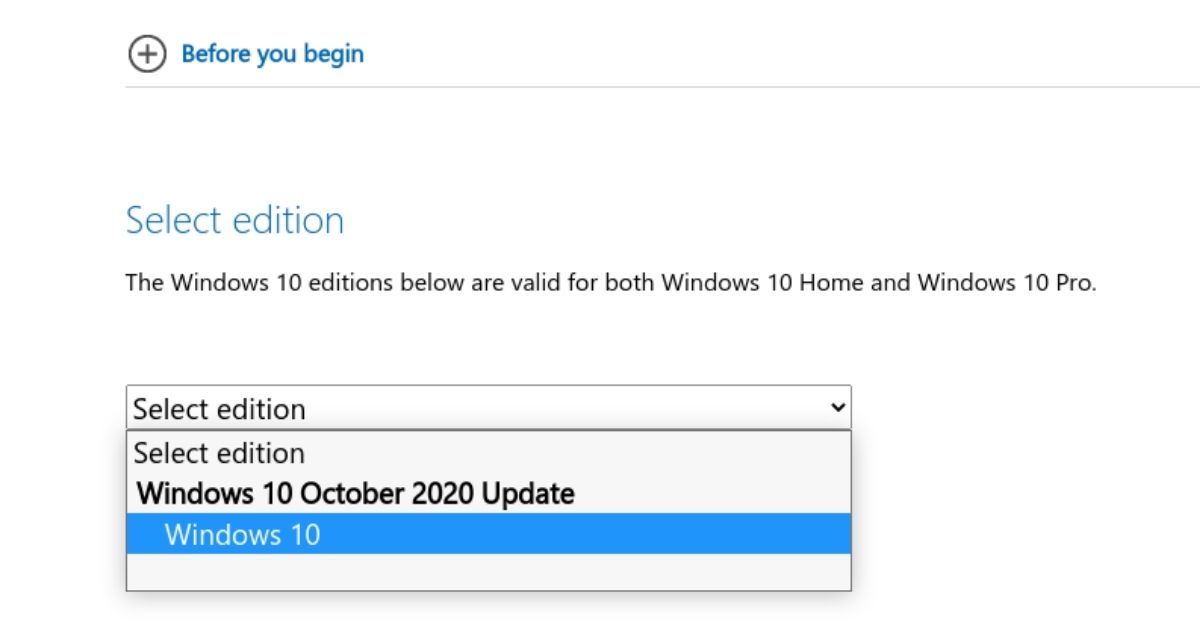
Download the Windows 11/10 ISO
Follow the steps mentioned below to download the official Windows 10 ISO.
- Head over to Microsoft’s Windows 11 download page.

- Select the edition and click on the Confirm button.

- The website will validate your request. Next, you’ll be asked to select the product language. Click on Confirm.
- You’ll be redirected to a new download page where you’ll see two links – 32-bit Download and 64-Bit Download. Click on the 64-bit Download.

- The ISO will start downloading. Have a coffee until then.
Install Windows 10/11 In Ubuntu: Create A Windows VM In Boxes
-
Open GNOME Boxes
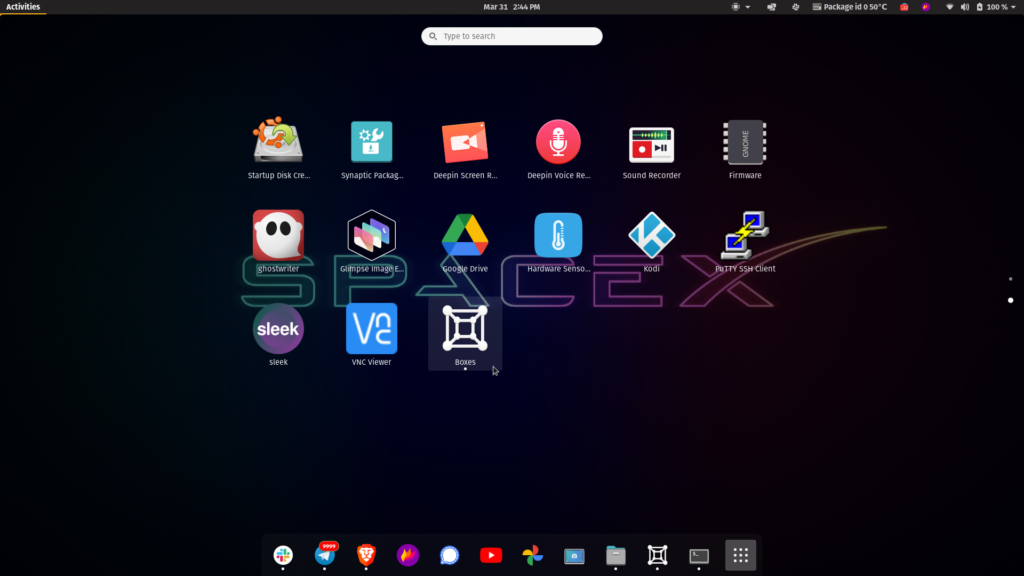
From the apps list, find and open the GNOME Boxes app.

-
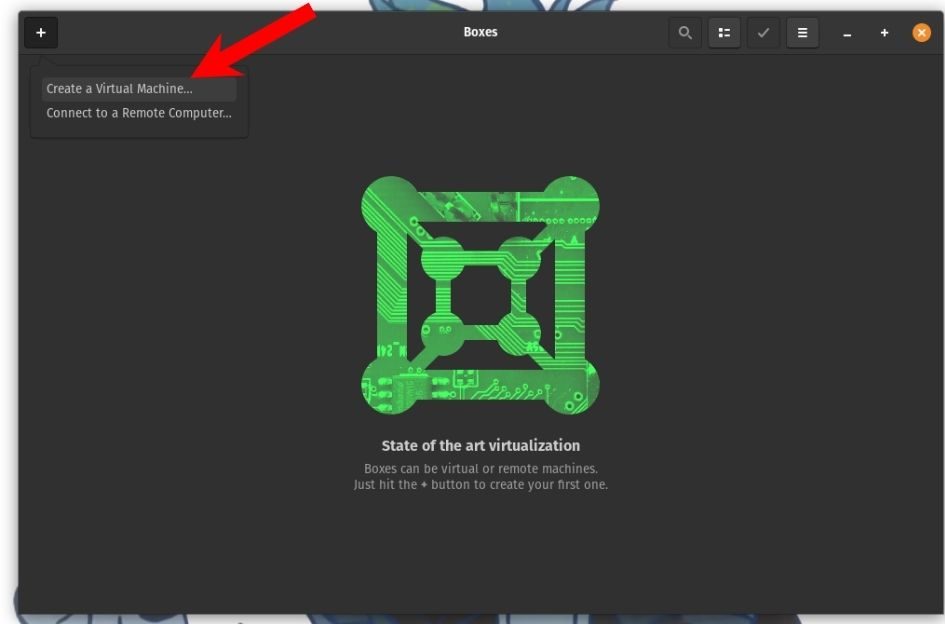
Add a Virtual Machine
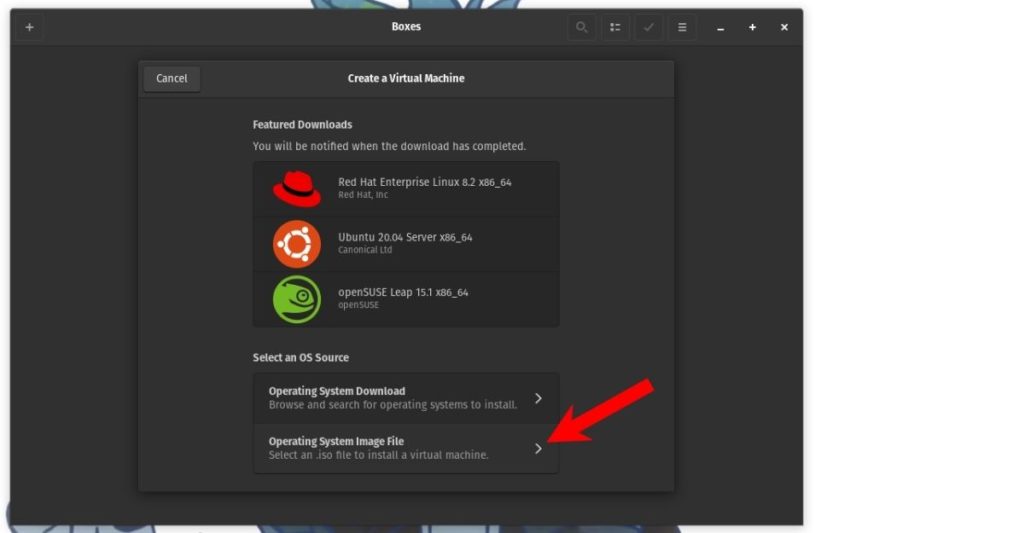
At the top-left corner of the app, find and click on the + icon and click on Create a Virtual Machine option.

-
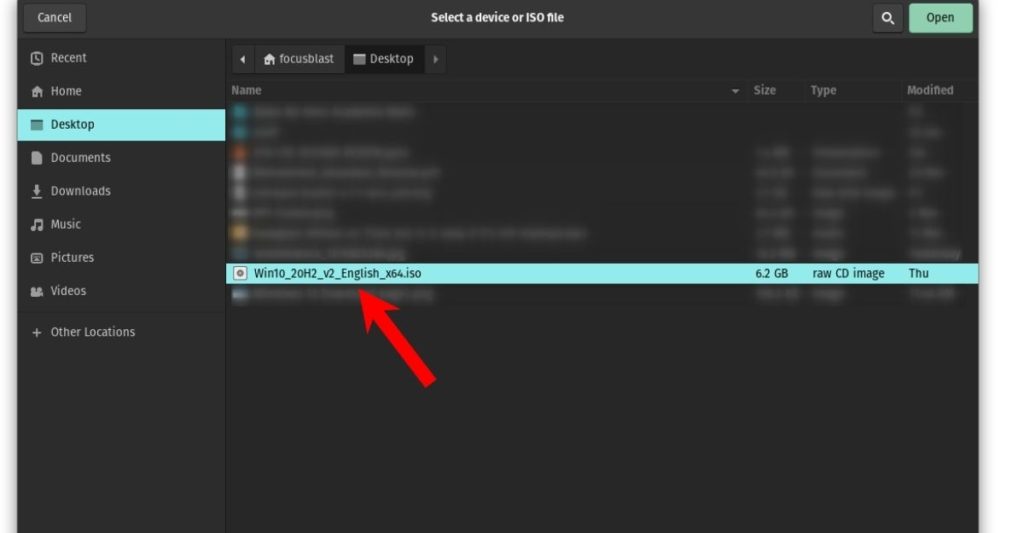
Select the Windows ISO
Scroll all way to the bottom and click on the Operating System Image File option. Now browse and select the Windows ISO that you downloaded.

-
Allocate system resources
Now, click on next and click on customize to allocate the desired amount of system resources like RAM and Storage.
-
Click on create
Finally, click on the Create button, and the Windows virtual machine will start in no time.
-
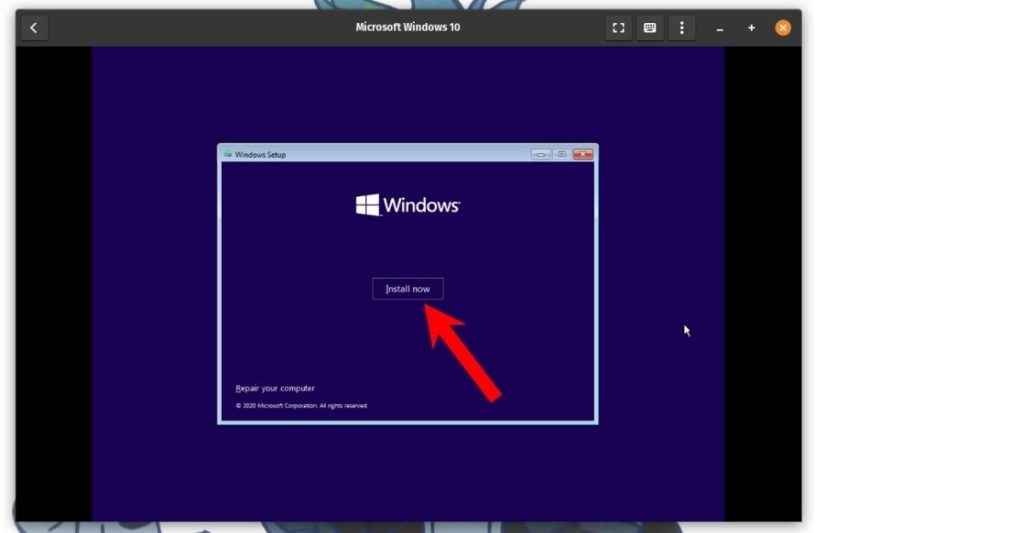
Proceed with the usual Windows installation process. And, the most important thing of all, don’t forget to mute Cortana for extra peace of mind.
-
Begin with the installation.
Select the language and click on next. On the next Window, click on the Install Now button. Next, click on I don’t have a product key, and from the list of Windows versions, select Windows Home and proceed.
Check the I accept all the license terms box and proceed by clicking on the Next button. -
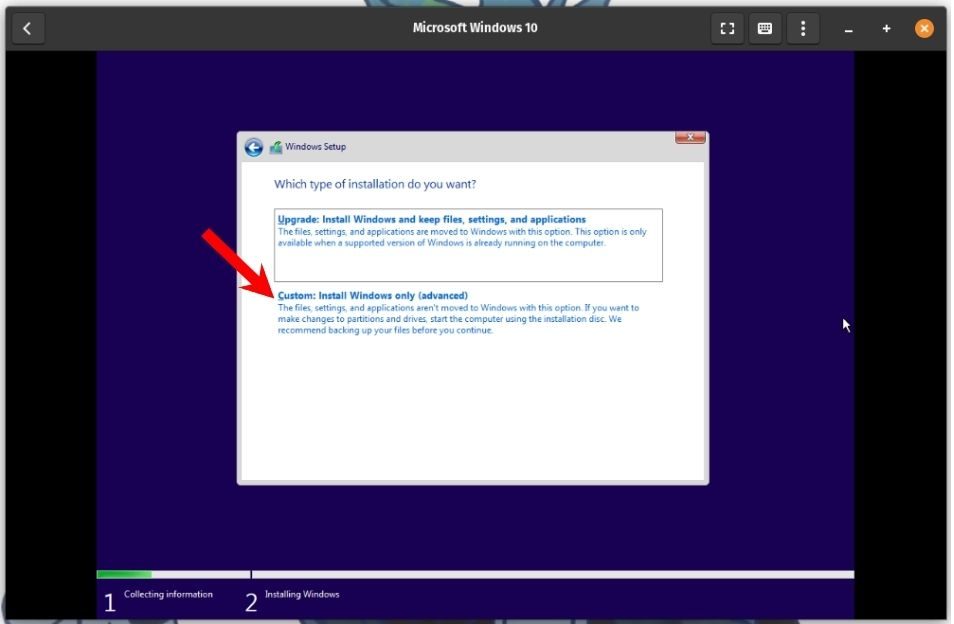
Custom installation
Click on the option that reads Custom: Install Windows only (advanced) and then click on next.

-
Windows will begin installing
Wait patiently until the Windows installation is complete.

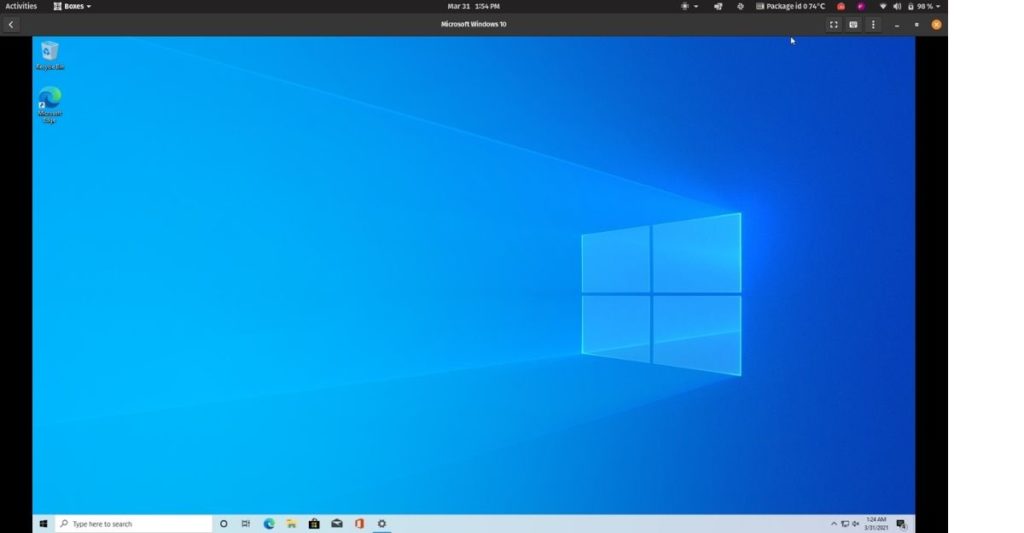
All you need to do is wait for some time until the OS is done installing. You’ll need to reboot a few times during the process. Once done, you can access Windows from Ubuntu from Linux without restarting your PC. This not only saves you from messing up your PC but also saves a lot of time.
Also, the default resolution is set to 1000×708 pixels. You can easily resize it by going to Windows settings -> Display Resolution and changing the resolution to 1920×1080 pixels for a more immersive experience.
If you first installed Ubuntu and now want to install Windows 11 alongside, the process is slightly different from your normal dual-boot installation. Let us know if you want an article on the same, and we’ll do it for you.
Do share your thoughts about this article in the comments section below. Also, let us know if you’re having trouble following this tutorial, and we’ll help you right away.
FAQs
- Should I install Windows or Ubuntu first?
The best way of setting up a dual-boot PC is by installing Windows first and then making space, and installing Ubuntu later. This saves you a lot of time compared to installing Ubuntu first and then installing Windows.
- How do I go back to Windows from Linux?
Refer to our how to create a bootable Windows 10 USB on Linux article, flash your USB flash drive, boot from the USB drive, format storage partitions, and proceed with the normal installation process.
- Can Ubuntu run Windows programs?
Yes and no. It is now possible to run Windows programs using Wine, but not all programs work very well, and some of them don’t work at all.
- How do I dual-boot Linux and Install Windows 10?
We have a separate article about how to dual-boot Linux Mint and Windows 10. This article should work for any distro.
- Can I download Linux on Windows 10?
Thanks to Microsoft finally understanding the true value of Linux, WSL (Windows Subsystem For Linux) has made installing Linux on Windows possible. Check out our article on how to install WSL on Windows.

Abubakar is a Linux and Tech Writer. Hailing from a Computer Science background, the start of his love for Tech dates back to 2011, when he was gifted a Dell Inspiron 5100. When he’s not covering Tech, you’ll find him binge-watching anime and Tech content on YouTube or hunting heads in competitive FPS games. You can also find his work on Android Police and How-To Geek.