Microsoft Defender on Android Microsoft Defender on iOS Microsoft Defender on Mac Microsoft Defender on Windows More…Less
Protect your Android, iPhone, Mac, and Windows devices from threats by installing Microsoft Defender. Download Microsoft Defender on your devices either by:
-
Scanning the following QR code

-
Searching for Microsoft Defender in your app store
-
Sharing with your devices, the following link: Copy link

We encourage you to install Microsoft Defender on at least five devices per person.
Important: This article is about the Microsoft Defender app that is included with Microsoft 365 Family or Personal subscriptions. If you’re looking for information about the Microsoft Defender Antivirus that is built into Windows, see Stay protected with Windows Security.
Ready to give it a try?

-
Open https://aka.ms/AndroidDefender (or scan the QR code below) on your Android device to go to Microsoft Defender in the Google Play Store.
Note: If your device has both a Personal Profile and a Work Profile, then you need to install the app in the Personal Profile.
-
Follow the installation steps on the Play Store page.
-
After installing, sign in with the personal Microsoft account (such as @outlook.com, @hotmail.com, or @live.com) that is associated with your Microsoft 365 subscription.

When you first sign into Microsoft Defender on Android, we’ll walk you through a few easy steps that start with setting up web protection. During this process, we’ll ask you to give Defender permission to do two things: run in the background and use the Accessibility Service.
Run in the background
A security tool that only works sometimes isn’t nearly as effective. You want Microsoft Defender to always watch your back, protecting you from the malicious sites you weren’t expecting. In order to do that, Defender needs permission to run in the background.
Accessibility service
In order to make sure the site you’re going to isn’t known to be dangerous, Defender needs to be able to see the address. To do that on Android, we use the Accessibility Service to read, almost literally, the address from your browser.
Important: Only one app at a time can have permission to use the Accessibility Service. If you give that permission to a different app, web protection in Defender will be turned off.
After setting up web protection, we’ll set up anti-malware protection. To do this we need to ask for a couple more permissions.
Access device storage
Microsoft Defender scans apps and files on your device to watch for possible threats. To do that, it needs to be able to access those files. We only use that permission to look for malicious apps, a process that happens entirely on your device. No information about your apps or files is sent to Microsoft.
Send notifications
If you want Microsoft Defender to tell you if we find a threat, you’ll need to allow us to send you notifications on your device.
Run in the background
Note: If you already allowed Microsoft Defender to run in the background for web protection, you won’t be asked for this permission again.
Protecting your device is a full-time job, but you probably want to use your device for other things, like texting, gaming, work, and entertainment. By allowing Microsoft Defender to run in the background, you allow us to help keep you safer all the time.
Let’s finish with a scan
Finally, Microsoft Defender will run an initial scan of your device to see if there are threats already on it. This scan usually only takes a minute or two.
If that initial scan finds any threats Microsoft Defender will notify you and help you remove them.
-
Open https://aka.ms/iosDefender (or scan the QR code below) on your iOS device to go to Microsoft Defender in the Apple App Store and follow the installation steps.
-
After installing, sign in with the personal Microsoft account (such as @outlook.com, @hotmail.com, or @live.com) that is associated with your Microsoft 365 subscription.

When you first sign into Microsoft Defender on iOS, we’ll walk you through a few easy steps that to set up web protection. During this process, we’ll ask you to give Defender permission to do two things: set up a local virtual private network (VPN) and allow notifications.
A local VPN?
Due to the built-in security settings in iOS, other apps aren’t able to see the address (URL) an app is trying to open, including those being opened in the web browser. To make sure the site you’re going to isn’t known to be dangerous, Defender needs to be able to see the address.
To do that, we set up a local VPN. It’s called a local VPN because it never leaves your device—it’s just a connection between your browser and Microsoft Defender running on your device.
When you click on a link, the browser sends the address you’re going to through that local VPN to Defender. Defender checks the address and then (assuming it’s good), lets the browser open that site. The whole thing happens so quickly you won’t even notice.
Allow notifications
If the site is found to be malicious that’s where notifications come in. We block access to the site, but iOS won’t let us notify you of the problem in the browser, so instead we send you a notification telling you that the site you’re trying to go to is dangerous. From that notification you can close the browser tab and stay safe. Or, if you’re completely sure that the site is safe, you can choose to continue to the site anyway.
Important: You can choose not to allow notifications and web protection will still work, but you won’t get the notification that it was Defender who blocked the site you were trying to go to.
When you install the Microsoft 365 apps on your Windows device, the Microsoft Defender app will automatically be installed for you along with the other apps. If you installed the Microsoft 365 apps before Defender was released, and you still have an active Microsoft 365 Family or Personal subscription, then the Defender app was automatically added to your Windows device as part of an update.
Important: Even if it’s installed, Microsoft Defender isn’t activated until you sign into the app.
Just launch it from the Start menu (or click the button below) and sign in with the personal Microsoft account you use for Microsoft 365.
Open Defender
If you don’t have an active Microsoft 365 subscription right now
-
Open https://aka.ms/WindowsDefender to go to Microsoft Defender in the Microsoft Store and select Install.
-
After installing, sign in with the personal Microsoft account (such as @outlook.com, @hotmail.com, or @live.com).
To uninstall Defender
Find Microsoft Defender on your Start menu, right-click it and select Uninstall.
If you uninstall the app it will not be automatically reinstalled. You can reinstall it manually by going to https://aka.ms/WindowsDefender and selecting Install.
Note:
Microsoft Defender on Mac requires macOS 10.14 or later.
-
Open https://aka.ms/MacDefender on your device to download the WDAV.PKG installation file.
-
Open the WDAV package file on your Mac and follow the installation steps.
-
After installing, sign in with the personal Microsoft account (such as @outlook.com, @hotmail.com, or @live.com) that is associated with your Microsoft 365 subscription.
When you first sign into Microsoft Defender on Mac, we’ll will walk you through a few easy steps to set up anti-malware protection on your device.
During this process, we need you to give Microsoft Defender a couple of permissions so that it can protect you.
System access
To start with, we’ll have you open the Security settings, then follow these steps:
1. Select the padlock at the bottom left so you can make changes. You’ll be prompted to enter your password or other authentication.
2. You should see a prompt that says that Some system software requires your attention before it can be used. Select the Details button.
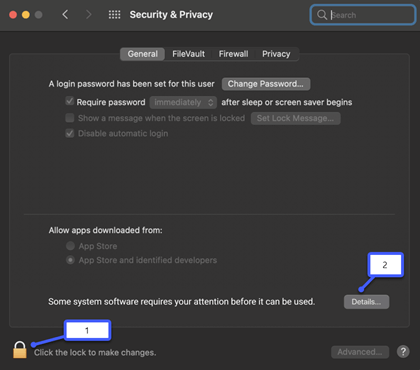
3. If you see a dialog asking you to select Microsoft Defender and Microsoft Defender Extension, select both and then OK.
Note: If you’re using macOS Catalina (10.15) you may simply see an Allow button, rather than Details.
Once that’s done, select the padlock again to prevent further changes.
Access files
Next, we’ll need permission to access your files. Microsoft Defender scans apps and files looking for threats and it can only do that if it has permission to access the files. We’ll ask you to select Open Privacy Settings, then follow these steps:
1. Select Full Disk Access.
2. Select Microsoft Defender and (if you see it) Microsoft Defender Extension.
Let’s finish with a scan
Finally, Microsoft Defender will run an initial scan of your device to see if there are any threats already on it. That scan may take a while—depending on the speed of your device and how many apps you have—but you can keep using your computer while the scan runs in the background.
If that initial scan finds any threats Microsoft Defender will notify you and help you remove them.
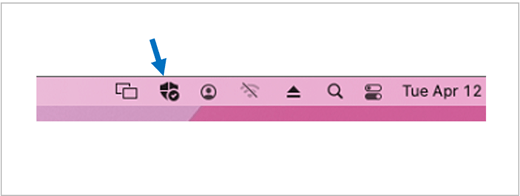
Tip: If Microsoft Defender is successfully installed and running, you’ll see its icon on the title bar near the clock at the top right.
Share your security status with family organizers
If you’re part of a Microsoft 365 Family subscription the last step is to decide if you’d like to share your security status with your family organizers. The family organizer is the person who established the Microsoft 365 Family subscription, and any other family members that person has selected to be family organizers.
By sharing your security status, you make it easier for the family organizers to help keep your devices and identity safe. This only shares security and identity threat monitoring information from Defender, not any other information about your device or any of your personal files. For more information see Protect the whole family with Microsoft Defender.
Once that process is done, we’ll take you to your Microsoft Defender dashboard and then you’re all set.
Next, see Getting started with Microsoft Defender.
Got more questions about installing Defender?
Visit the Microsoft Defender Answers community
Need more help?
Want more options?
Explore subscription benefits, browse training courses, learn how to secure your device, and more.
Communities help you ask and answer questions, give feedback, and hear from experts with rich knowledge.
Содержание
- Способ 1: Восстановление системных файлов
- Способ 2: Откат к точке восстановления
- Способ 3: Копирование исполняемого файла
- Вопросы и ответы
Важно! В этой статье будет рассказываться о том, как восстановить работу «Защитника Windows» после его полного удаления. Этот процесс подробно описывался в другой статье на нашем сайте, ссылка на которую дана ниже. Если вы ранее выполняли представленные там действия, значит, текущее руководство будет актуально.
Подробнее: Как удалить «Защитник Windows» в Windows 10
Примечание! Если штатный антивирус Windows 10 вы не удаляли, а просто отключали средствами операционной системы, для восстановления его работы обратитесь за помощью к другой статье на нашем сайте, перейдя по ссылке ниже.
Подробнее: Как включить «Защитник Windows» в Windows 10

Способ 1: Восстановление системных файлов
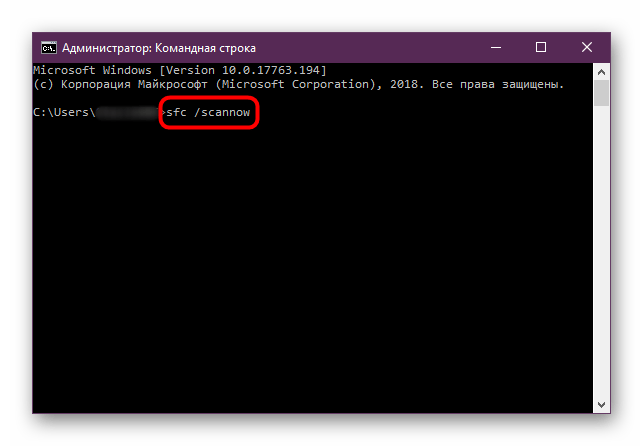
Удаленный исполняемый файл «Защитника Windows» является системным, поэтому его можно попытаться восстановить с помощью специальной предустановленной консольной утилиты SFC. Это несложная процедура, достаточно только открыть «Командную строку» и инициализировать запуск приложения путем ввода команд. Этот процесс детально описывается в другом материале на нашем сайте, при необходимости ознакомьтесь с изложенной там информацией, воспользовавшись ссылкой ниже.
Подробнее: Восстановление целостности системных файлов в Windows 10
Способ 2: Откат к точке восстановления
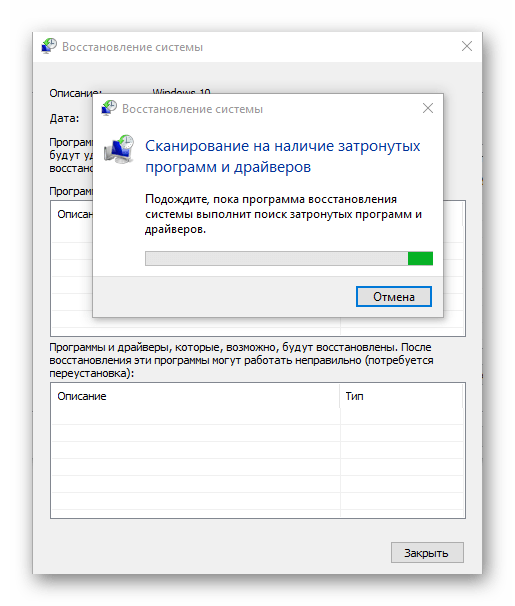
Попробовать восстановить работу «Защитника Windows» можно путем отката операционной системы до контрольной точки. Только в этом случае важно, чтобы она была сделана до удаления штатного антивируса, иначе способ окажется неэффективным. При удовлетворении этого условия произведите откат через соответствующее приложение в Windows 10. Если вы не знаете, как это сделать, воспользуйтесь руководством, представленным в другой статье на нашем сайте.
Подробнее: Как откатить Windows 10 до точки восстановления
Обратите внимание! Создавать контрольные точки в Windows 10 рекомендуется систематически. Это позволит в любой момент при появлении неисправностей совершить откат до рабочей версии, не затрачивая время на устранение проблем вручную. Ознакомьтесь со статьей на нашем сайте, в которой подробно рассказывается об этой процедуре.
Подробнее: Как создать точку восстановления в Windows 10

Способ 3: Копирование исполняемого файла
Если ни один из приведенных выше способов не помог вам, установить «Защитник Windows» придется вручную. Эта процедура отличается от стандартной инсталляции программного обеспечения в операционной системе, поэтому далее она будет рассмотрена подробнее.
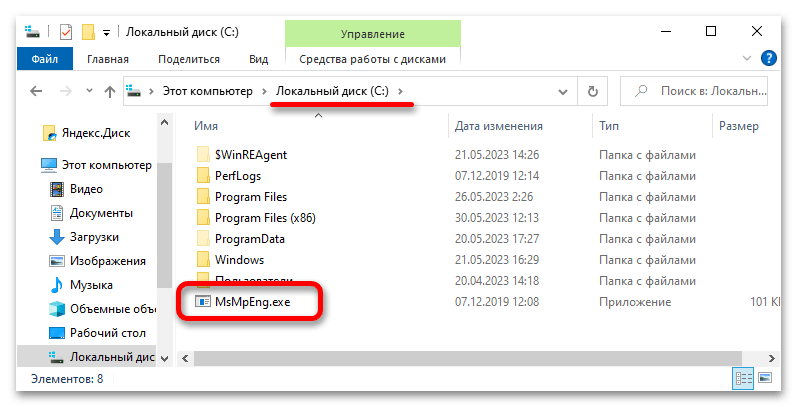
Компания Microsoft не предоставляет установочного файла «Защитника Windows», поэтому файлы антивируса придется поместить в корневую директорию на системном диске вручную. Но прежде их следует перенести на свой компьютер, предварительно скопировав с другого. Расположение исполняемого файла указано ниже:
C:\Program Files\Windows Defender\MsMpEng.exe
Примечание! Вы также можете скачать исполняемый файл «MsMpEng.exe» из интернета, но этого делать не рекомендуется, если вы не уверены в надежности источника. Есть немалая вероятность того, что вы занесете в свою операционную систему вирус.
Получив в свое распоряжение исполняемый файл «Защитника Windows», поместите его в корневой каталог диска C, чтобы к нему был быстрый доступ при выполнении действий, описанных далее в этой статье.
После этого необходимо будет запустить «Командную строку» в среде восстановления. Требуется это для того, чтобы у вас была возможность редактировать системные разделы.
- Перезапустите компьютер с зажатой клавишей Shift. Для этого откройте меню «Пуск», щелкните по кнопке выключения, зажмите указанную клавишу и кликните по пункту «Перезагрузка».
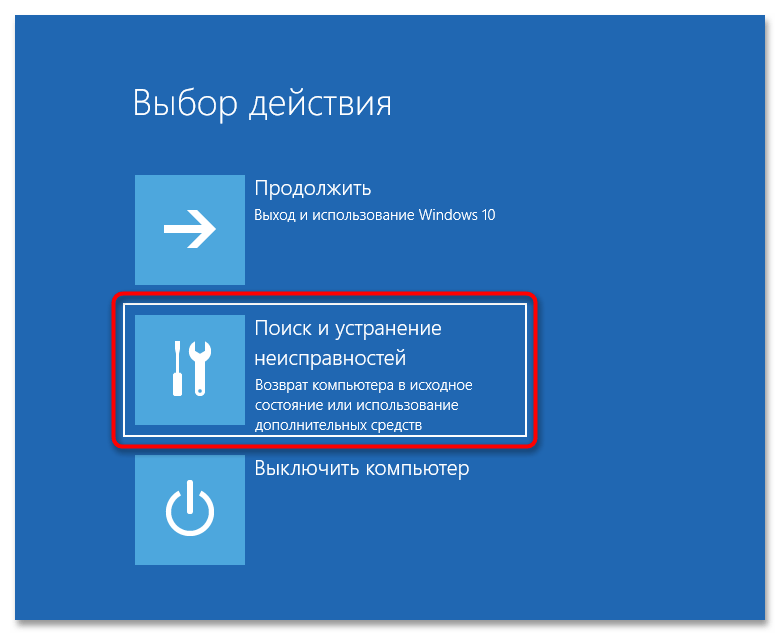
- Дождитесь, пока компьютер перезапустится и на экране появится главное меню среды восстановления. Затем перейдите в раздел «Поиск и устранение неисправностей».
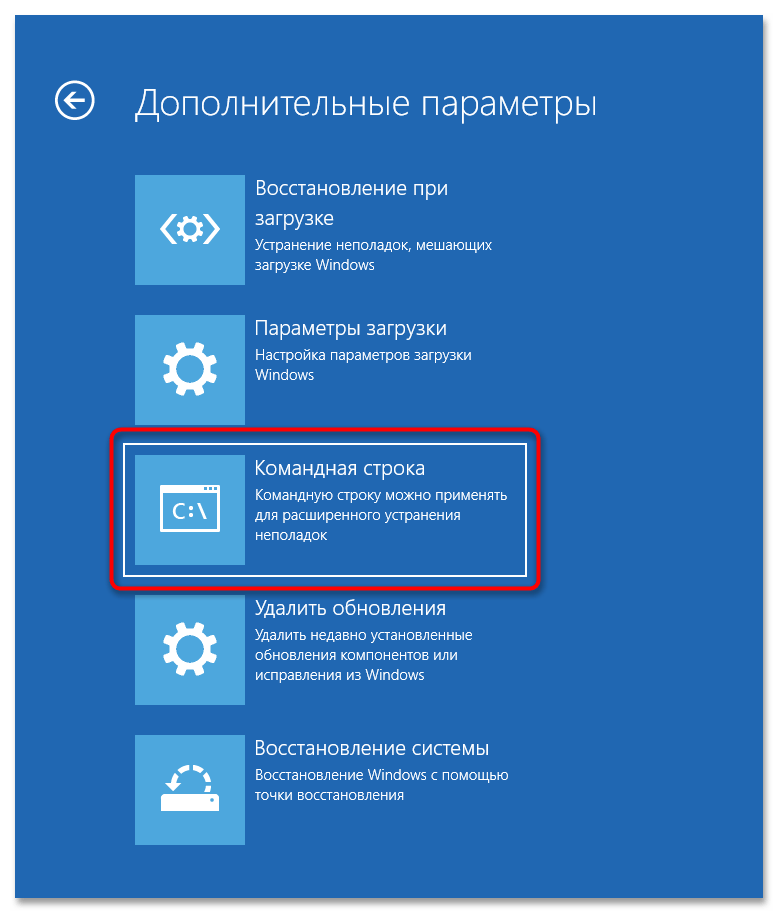
- Далее проследуйте в меню «Дополнительные параметры», щелкнув левой кнопкой мыши по одноименному элементу.
- Запустите «Командную строку», нажав по ней в списке дополнительных параметров среды восстановления.
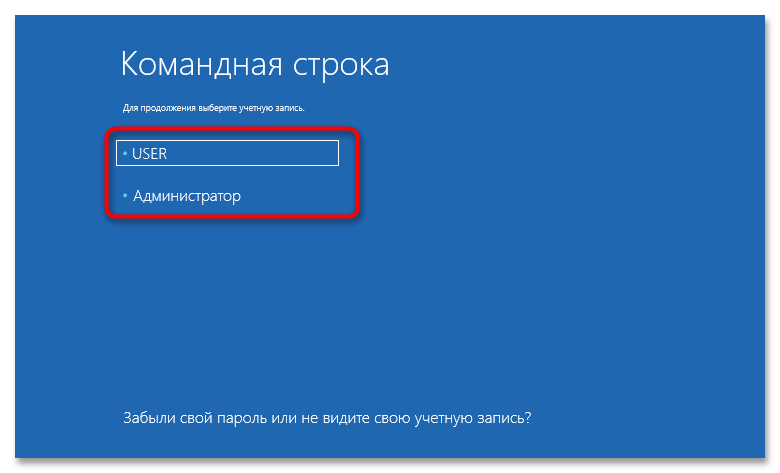
- На экране выбора учетных записей Windows 10 выберите любую, к которой у вас есть доступ. Для этого единожды кликните левой кнопкой мыши по ее названию.
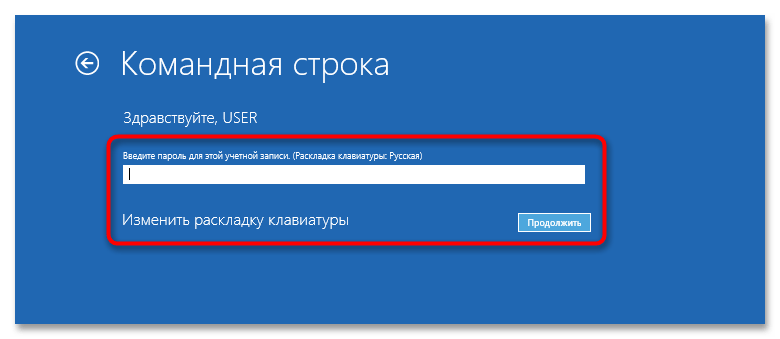
- При необходимости введите пароль и нажмите по кнопке «Продолжить». Если пароль не был задан, просто оставьте поле пустым.
- Дождитесь перезагрузки компьютера, пока на экране не отобразится «Командная строка», запущенная в среде восстановления.


Теперь необходимо путем ввода специальных команд переместить файл с системного диска в корневую директорию «Защитника Windows». Важно четко следовать дальнейшим указаниям, чтобы процедура прошла успешно, поэтому внимательно следите за тем, какие команды вводите.
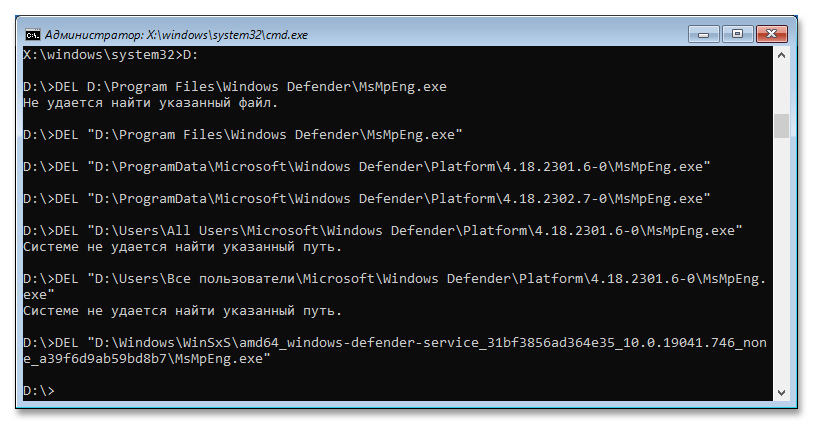
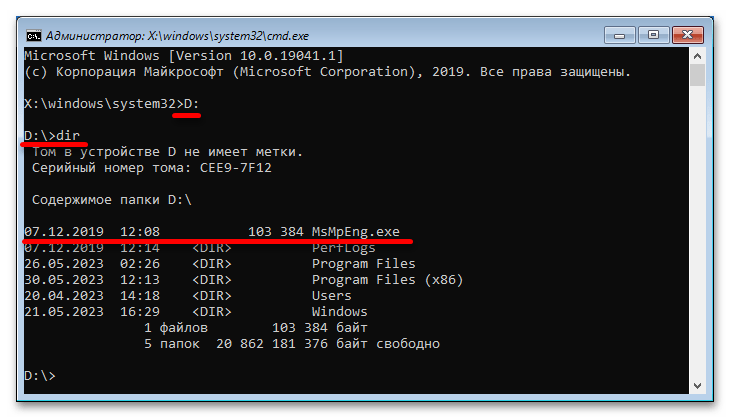
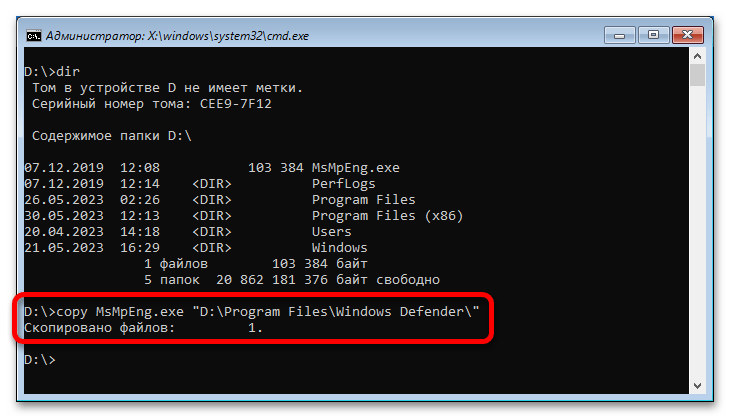
- По умолчанию «Командная строка» в среде восстановления открывается на диске X, поэтому необходимо перейти на системный раздел, обозначающийся в Windows 10 буквой C. Но здесь диски спутаны, зачастую системный раздел имеет букву D, это необходимо выяснить. Для этого перейдите на него и просмотрите содержащиеся в корневой директории папки. Чтобы это сделать, поочередно выполните приведенные ниже команды
D:
dirНа экране отобразится список всех файлов текущего каталога. Найдите ранее помещенный исполняемый файл «Защитника Windows» под названием «MsMpEng.exe». Если он здесь есть, значит, диск определен верно и вы можете продолжать следовать инструкции. Если его нет, перейдите на другой диск, введя его букву, следующую по алфавиту, и нажав Enter, например
E:,F:, илиH:. - Переместите исполняемый файл антивируса в его корневую директорию. Для этого введите специальную команду, указанную ниже:
copy MsMpEng.exe "D:\Program Files\Windows Defender\"Обратите внимание! У вас начальная буква диска может отличаться. При необходимости смените ее на ту, которую вы определили на предыдущем шаге.
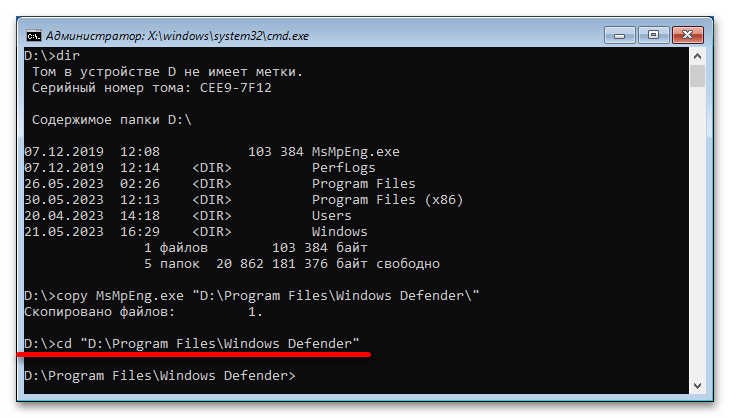
- Чтобы убедиться в успешном перемещении файла, перейдите в корневую директорию «Защитника Windows». Для этого нужно воспользоваться командой
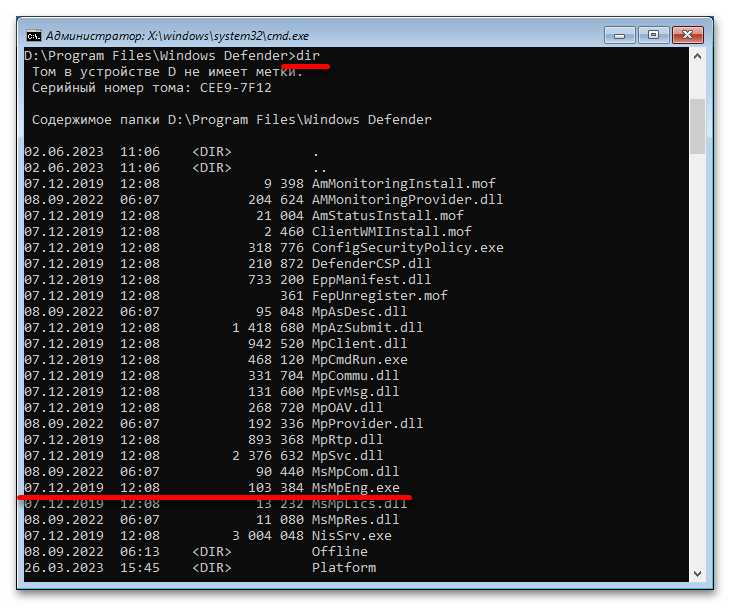
cd, указав целевой каталог.cd "D:\Program Files\Windows Defender\" - После перехода отобразите в окне консоли список всех содержащихся в этой папке файлов. Для этого воспользуйтесь уже знакомой командой
dir. Найдите в списке файл с названием «MsMpEng.exe». Если он есть, значит, все прошло успешно и можно перезагрузить компьютер, выполнив вход в операционную систему.

Если файла в директории нет, повторите выполнение этой инструкции с самого начала. Возможно, вы неверно определили букву системного диска или неправильно ее указали при выполнении команды копирования.
Важно! Если после выполнения всех действий, описанных в этом способе, работу «Защитника Windows» восстановить не получилось, попробуйте повторно воспользоваться первым методом из статьи, проведя восстановление системных файлов с помощью утилиты SFC.
Еще статьи по данной теме:
Помогла ли Вам статья?
Are you looking for an easy way to protect your computer from malicious software and viruses? Windows 10 comes with Windows Defender, a powerful anti-virus and malware program that can help keep your system safe and secure. In this article, we’ll show you how to install Windows Defender in Windows 10. We’ll walk you through the steps necessary to get Windows Defender up and running, so you can start protecting your system against viruses and malware.
Installing Windows Defender in Windows 10 is a simple process. To begin, open the Windows Settings menu by pressing Windows + I. From there, go to Update & Security. Under Windows Security, click on Open Windows Defender Security Center. In the Windows Defender Security Center, click on Virus & Threat Protection. Then, click on the shield icon to open the Windows Defender settings. Here, you can customize the protection provided by Windows Defender, including turning on or off real-time protection. Finally, click the Turn On button to enable Windows Defender.
Steps to Download and Install Windows Defender in Windows 10
Windows 10 comes with an inbuilt anti-virus and malware protection, Windows Defender. It is a great way to protect your computer from malicious threats. To make sure that your computer is secure and protected from all kinds of threats, it is important to download and install Windows Defender in Windows 10. Here, we will discuss how to do that.
The first step is to open the Windows Defender Security Center. You can do this by typing “Windows Defender” in the search bar and then selecting the Windows Defender Security Center app. Once the app is opened, click on the “Virus & Threat Protection” tab.
Check if Windows Defender is Enabled
The next step is to check if Windows Defender is already enabled or not. To do this, click on the “Virus & Threat Protection” tab and then look for the “Real-time protection” section. If you see that the “Real-time protection” is turned on, then you don’t need to do anything else. If not, then you will need to turn it on.
Turn On Windows Defender
To turn on Windows Defender, click on the “Virus & Threat Protection” tab and then look for the “Real-time protection” section. Here, you will see an option to turn on Windows Defender. Click on it and then follow the on-screen instructions to complete the process.
Download and Install Updates
After you have enabled Windows Defender, the next step is to download and install the latest updates. To do this, click on the “Virus & Threat Protection” tab and then look for the “Windows Defender Update” section. Here, you will see an option to “Download and install updates”. Click on it and then follow the on-screen instructions to complete the process.
View Scan History
Once you have enabled and updated Windows Defender, you can view the scan history. To do this, click on the “Virus & Threat Protection” tab and then look for the “Scan History” section. Here, you will be able to view the scans that have been done and any detected threats.
Schedule Scans
Finally, you can also schedule scans in Windows Defender. To do this, click on the “Virus & Threat Protection” tab and then look for the “Schedule scans” section. Here, you will be able to set up a schedule for Windows Defender to run scans on a regular basis. This will ensure that your computer is always protected from any threats.
Related Faq
Q1: What is Windows Defender?
Windows Defender is a free anti-malware program from Microsoft that helps protect your computer from viruses and other malicious software. It is pre-installed in Windows 10 and runs in the background to detect and remove threats. It can also be manually installed on earlier versions of Windows.
Q2: How do I install Windows Defender in Windows 10?
To install Windows Defender in Windows 10, open the Settings app and go to the Update & Security section. Under the Windows Security tab, click on the “Open Windows Defender Security Center” button. Once the Windows Defender Security Center window opens, click on the “Virus & threat protection” tab. In the Virus & threat protection window, click on the “Turn on real-time protection” option, and then click the “Yes” button. This will activate Windows Defender and start protecting your computer from threats.
Q3: Is Windows Defender enough to protect my computer?
Windows Defender is a good first line of defense against malicious software, but it is not enough to protect your computer from all threats. It is recommended to use a combination of security software, such as anti-virus, anti-spyware, personal firewall, and other security measures, to ensure your computer is fully protected.
Q4: How do I know if Windows Defender is running?
To check if Windows Defender is running, open the Windows Defender Security Center. In the Windows Defender Security Center window, click on the “Virus & threat protection” tab. If Windows Defender is running, it will say “Protection is on” under the Real-time protection option.
Q5: How do I update Windows Defender?
Windows Defender is designed to automatically detect and download the latest security updates. However, it is a good practice to check for updates manually on a regular basis. To manually update Windows Defender, open the Windows Defender Security Center and click on the “Virus & threat protection” tab. In the Virus & threat protection window, click on the “Check for updates” option and then click the “Check now” button.
Q6: How do I turn off Windows Defender?
To turn off Windows Defender, open the Windows Defender Security Center and click on the “Virus & threat protection” tab. In the Virus & threat protection window, click on the “Turn off real-time protection” option, and then click the “Yes” button. This will stop Windows Defender from running and your computer will no longer be protected from threats. It is not recommended to turn off Windows Defender unless you have another security program installed.
Installing Windows Defender in Windows 10 is a straightforward process that can be completed in a few easy steps. With the help of this guide, you can now easily install Windows Defender in Windows 10 and keep your computer safe from malware and viruses. If you have any questions or concerns about the installation process, you can always contact Microsoft Support for further assistance.
Whether you’re a Windows user or not, you’re probably aware of the importance of antivirus software. Windows Defender is one of the most popular antivirus programs available. It’s included with every version of Windows 10 and provides comprehensive protection against viruses, spyware, and other malicious software. Installing Windows Defender is a relatively simple process, and in this article, we’ll walk you through it step-by-step. So if you’re ready to get your Windows 10 computer fully protected, read on to learn how to install Windows Defender.
Installing Windows Defender in Windows 10 is easy. Follow these steps:
- Open the Start menu, and select the Settings icon.
- Go to Update & Security > Windows Security.
- Click the “Open Windows Defender Security Center” button.
- Click the shield icon on the left side of the window.
- Click the “Virus & threat protection” link.
- Click the “Virus & threat protection settings” link.
- Turn on the “Real-time protection” toggle switch.
- You have now installed Windows Defender on your Windows 10 PC.
What is Windows Defender?
Windows Defender is an antivirus program developed by Microsoft. It is designed to protect Windows 10 users from viruses, malware, spyware, and other malicious programs. It runs in the background on your computer and monitors for any suspicious activity. It also provides real-time protection to help keep your computer secure.
Windows Defender is included with Windows 10 and is enabled by default. This means that it is already running on your computer and you don’t need to do anything to enable it. However, if it has been disabled or if you need to reinstall it, then this article will guide you through the process.
How To Install Windows Defender In Windows 10
To install Windows Defender in Windows 10, you need to first open the Settings app. To do this, you can either press the Windows Key + I, or you can click the Start button and then click the gear icon.
Once the Settings app is open, you need to click on “Update & Security”. On the left side of the window, you should see a list of options. Click on “Windows Security”.
Check If Windows Defender Is Enabled
On the Windows Security window, you should see a list of options on the left side. Click on “Virus & threat protection”. On the right side of the window, you should see a toggle switch that says “Real-time protection”. If it is turned on, then Windows Defender is already enabled and you don’t need to do anything else.
If it is turned off, then you need to click on the toggle switch to turn it on. This will enable Windows Defender and it will start protecting your computer in real-time.
Install Windows Defender Manually
If the toggle switch is already turned on, then Windows Defender is already enabled and you don’t need to do anything else. However, if it is turned off, then you can manually install Windows Defender by downloading it from the Microsoft website.
Once you have downloaded the installer, open it and follow the on-screen instructions to install Windows Defender. Once the installation is complete, Windows Defender will be enabled and it will start protecting your computer from viruses and other malicious programs.
How To Set Up Windows Defender
Once Windows Defender is installed, you need to set it up so that it can start protecting your computer. To do this, you need to open the Settings app again. Click on “Update & Security” and then click on “Windows Security”.
Configure Real-Time Protection
On the Windows Security window, click on “Virus & threat protection”. On the right side of the window, you should see a toggle switch that says “Real-time protection”. If it is turned off, then you need to click on the toggle switch to turn it on. This will enable Windows Defender and it will start protecting your computer in real-time.
Configure Scan Options
On the Windows Security window, click on “Virus & threat protection”. On the right side of the window, you should see a list of options. Click on “Scan options”. On the next page, you can configure the type of scan that you want Windows Defender to run. You can choose from a quick scan, a full scan, or a custom scan.
Once you have configured the scan options, click on “Scan now” to start the scan. Windows Defender will then scan your computer for viruses and other malicious programs and will remove any that it finds.
Conclusion
Installing Windows Defender in Windows 10 is an easy process. All you need to do is open the Settings app, click on “Update & Security”, and then click on “Windows Security”. If Windows Defender is already enabled, then you don’t need to do anything else. However, if it is not enabled, then you can download the installer from the Microsoft website and install it manually. Once Windows Defender is installed, you can configure the scan options and then run a scan to make sure your computer is secure.
Frequently Asked Questions
What is Windows Defender?
Windows Defender is an antivirus program created by Microsoft and included with Windows 10. It provides protection from viruses, malware, spyware, and other malicious software. It also offers real-time protection from new threats and can be used to scan your computer for any existing threats.
How do I know if I have Windows Defender?
If you are using Windows 10, then you already have Windows Defender installed. You can check if Windows Defender is running by going to the Windows Start menu, selecting Settings, then Update & Security, then Windows Security. If you see Windows Defender listed in the options, then you already have Windows Defender installed.
How do I install Windows Defender in Windows 10?
Installing Windows Defender in Windows 10 is easy. First, open the Windows Start menu and search for “Windows Security”. This will open the Windows Security center. From here, select “Virus & threat protection” and then “Turn on real-time protection”. This will enable Windows Defender and begin scanning for any potential threats.
Can I customize Windows Defender settings?
Yes, you can customize Windows Defender settings to suit your needs. To do this, open the Windows Start menu, select Settings, then Update & Security, then Windows Security. Select “Virus & threat protection” and then “Manage settings”. This will open a window where you can customize settings such as real-time protection, cloud-delivered protection, and automatic sample submission.
Can I disable Windows Defender?
Yes, you can disable Windows Defender if you wish. To do this, open the Windows Start menu and search for “Windows Security”. This will open the Windows Security center. From here, select “Virus & threat protection” and then “Turn off real-time protection”. This will disable Windows Defender.
What are the benefits of using Windows Defender?
Using Windows Defender provides several benefits, such as protection from viruses, malware, spyware, and other malicious software. It also provides real-time protection from new threats and can be used to scan your computer for any existing threats. Additionally, Windows Defender can be customized to suit your needs and can be used in conjunction with other security programs for added protection.
How to download and install Microsoft Defender antivirus for windows Free
Installing Windows Defender in Windows 10 is an easy process that can be completed in a few simple steps. It is important to ensure that your system is up to date and that you have the latest version of Windows Defender installed in order to ensure maximum security and protection against viruses and other threats. With the right steps, you can ensure that your system is running at its best and that your data is safe and secure. Thank you for taking the time to read this article and we hope that it has been helpful in guiding you through the installation process.
Installing Microsoft Defender on your device is one of the best ways to keep destructive viruses at bay. And here’s how you can do it in only three simple steps!
Viruses are the last thing you want to be on your device—they can delete important programs, allow access to sensitive information, manipulate and delete files, reformat the hard drive, flood a network with traffic, and cause other annoying problems to your device.
And since prevention is better than cure, having an antivirus program on your device is crucial to keep viruses off your device. One of the best and most reliable software to do so is Microsoft Defender, which can accurately identify legitimate attack patterns and allow secure software to pass simultaneously.
Fortunately, Microsoft Defender makes it easy for anyone to enjoy its useful security features. So keep reading as we cover everything you need to know about Microsoft Defender—how to install Microsoft Defender and reinstall it on all types of devices, how to check if it’s active on your device, how to fix common problems that you may have while installing and running it, and more.
With that said, let’s get down to business!
Table of Contents
Before we get into the installation process, it makes sense to let you know more about Microsoft Defender itself…

Microsoft Defender, also known as Windows Defender, is a free anti-malware tool from Microsoft that is included in Windows 8, 10, and 11. It was first released for Windows XP as a downloadable free anti-spyware program and was shipped with Windows 7 and Windows Vista. And now, Microsoft Defender is solely an antivirus program that replaces Microsoft Security Essentials.
Windows Defender offers four scan modes: full scan, custom scan, offline scan, and quick scan. You can run Microsoft Defender on Windows 10 and 11 and turn off or on the real-time protection, change the automatic scanning settings, disable or enable firewall and network protection, and change the advanced protection settings.
One of the best things about this effective antivirus program is that it is free to use, does not require any extra installation, and is routinely updated.
Related: What is Microsoft Defender for Cloud Apps?
Before Anything Else
Before proceeding to install Microsoft Defender, there are a few things you need to do:
- Ensure that you have a stable internet connection.
- Make sure that you have enough free space on your hard drive.
- Check for updates to your operating system and install them if necessary.
- Choose the location where you want to install Microsoft Defender.
How To Install Microsoft Defender
Fortunately, Microsoft makes installing Windows Defender a breeze. Follow the three simple steps below to install it on your device:

1) Open https://aka.ms/WindowsDefender
2) Select Get in Store App. In the Microsoft Store, select Install.
3) After installing Microsoft Defender, sign in with your personal Microsoft account (such as @hotmail.com, @live.com, or @outlook.com) associated with your Microsoft 365 subscription.

Once installed, Microsoft Defender will automatically scan your computer for malware and remove any threats it finds
Tip: Microsoft encourages to install on up to five devices per person.
How To Install Microsoft Defender Definitions
You can easily install the Microsoft Defender definitions and signature updates using the control panel by following these steps:
1) Press the ‘Win key + R‘ ->
2) Type Control Panel
3) Select OK
4) Select System and Security from the control panel
5) Click on Administrative Tools
6) Choose Task Scheduler
7) Choose to Create Basic Task from the Task Scheduler.
 After opening Create Basic Task Wizard, give a name and description, then select Next.
9) Select how often you want this task to run from the options listed, then select Next.
10) Set the Start and End time of this task, then select Next.
11) Click on Start a program.
12) In the Program/script box, write “C:\Program Files\Windows Defender\MpCmdRun.exe“.
"C:\Program Files\Windows Defender\MpCmdRun.exe"13) In the Add arguments (optional) box, add the parameter -SignatureUpdate as shown in the figure below.
-SignatureUpdate
14) After entering the details and choosing all the required options, select Finish.
Related: How to Use Microsoft 365 Defender? Everything You Should Know!
Download Microsoft Defender from Google Play Store for Android
Follow the three simple steps below to install and download Microsoft Defender on any Android device:
1) Open the Play Store on your device.
2) Look for Microsoft Defender.
3) Download and install Microsoft Defender by tapping the Install button.
How To Check If Windows Defender Is Active
After installing, some users want to ensure that Microsoft Defender is active on their computers. Follow these four simple steps to do so:
1) Click on Update and Security.
2) Click on Windows Security.
3) Go to Virus & threat protection.
4) You can enable Virus & threat protection if it is not enabled.
How To Fix Windows Defender Can’t Start on Windows 10 and 11

If Windows Defender doesn’t open on your computer, there are nine different methods you can follow to fix the problem:
- Method 1: Update Windows systems.
- Method 2: Run SFC scan. Performing a system scan can help repair corrupted system files on your computer.
- Method 3: Restart your device and open Microsoft Defender again.
- Method 4: Uninstall and reinstall Windows Defender.
- Method 5: Reset the Windows Defender app.
- Method 6: Try installing third-party antivirus software.
- Method 7: Try disabling third-party antivirus software on your device that may be conflicted with the Microsoft Defender antivirus software.
- Method 8: Try starting Windows in Safe Mode.
- Method 9: If all else fails, reinstall your Windows OS. It’s highly recommended that you back up the Windows system and any important data before reinstalling your Windows OS.
Sharing Security Status with Family Organizers
The final step is to decide whether or not you want to share your security status with your family organizers if you have a Microsoft 365 Family subscription. The person who created the Microsoft 365 Family subscription is the family organizer, and every family member of that person has chosen to be a family organizer.
Letting the family organizers know about your security status makes it easier for them to keep your devices and personal information secure.
Note: This does not share any other information about your device or files; it only shares security and identity threat monitoring data from Defender.
Visit Protect the whole family with Microsoft Defender for more information about sharing security status with family organizers.
Conclusion
There you have it. This was pretty much everything you need to know to enjoy the protection of Microsoft Defender!
Microsoft Defender for Endpoint is an enterprise endpoint security platform that scales your security resources, empowers your enterprise to stop attacks quickly, and evolves your defenses by delivering endpoint security across Windows, Android, iOS, macOS, Linux, and network devices.
Bear in mind, though, that Microsoft Defender is NOT the perfect anti-malware program—it doesn’t have accountability if your device is infected by malware, it lacks an integrated dashboard for all devices, it has limited features for large-scale use, and it may slow down installation of frequently-used applications.
Nevertheless, it’s still a great, easy-to-use software that helps protect your device and important data against viruses, trojans, ransomware, and other malware.
See Also: Add Custom Recommendations in Microsoft Defender for Cloud
FAQs
Is Windows Defender already installed on Windows 10/11?
The Windows Defender app is part of Windows Security in Windows 10, version 1703, and later. The new app, which is installed by default by Windows 10, version 1703, features all settings of Windows Defender and main Windows Settings.
In fact, Windows Defender has been renamed to Windows Security in Windows 10 and 11. So if you can’t find Windows Defender on your PC, Microsoft renamed it to Windows Security. Both are the same, but Windows Security is just the suite.
Does Microsoft Defender protect against viruses?
Yes, it does. Microsoft Defender is a malware-detecting program that can help protect your computer against viruses and other malware. It also comes with Windows and receives regular updates via Windows Update.
Does Windows Defender automatically scan?
Yes, Windows Defender Antivirus automatically scans your device to provide the protection you need while you are not using your device to prevent interference with your work.
How do I enable Windows Defender again?
Enabling (bringing back) Windows Defender is easy; all you have to do is to follow these seven simple steps:
1) Click on Start.
2) Head to Settings.
3) Choose Update and Security.
4) Click on Windows Security.
5) Select Virus & threat protection.
6) Click on Manage settings.
7) Switch the Real-time protection setting to On/Off and confirm by choosing Yes.
Can I uninstall Windows Defender and reinstall it?
Microsoft Defender is not installed on computers like normal programs, meaning it cannot be installed like typical software.
Does Windows 10/11 have a built-in antivirus?
Microsoft has provided anti-malware protection for many years, but the most recent version offers strong protection against viruses. Microsoft Defender is a built-in program in Windows 10 and Windows 11 that you can trust to keep viruses and malware at bay.
How do I reset Windows Defender?
Launch PowerShell as administrator and reset the Windows Security app by running the following command if Windows Security App can’t open, or if Windows says you need a new app to open the Microsoft Defender link.
Get-AppxPackage Microsoft.SecHealthUI -AllUsers | Reset-AppxPackageDon’t forget to install all the AppX, delete third-party security software, and install the recent updates.
Close PowerShell and retry.
Can Windows Defender remove Trojan?
Naturally, the Microsoft Defender Offline scan can efficiently detect and get rid of viruses and malware. However, there are some cases where Windows Defender doesn’t live up to your expectations since it cannot handle all types of trojans, malware, viruses, and other security threats.
Why was my Windows Defender turned off?
If your Microsoft Defender is turned off, you first want to check for Malware. This is because Malware may turn off the program and keep it, even if you do everything to re-enable it.
We recommend Installing and running any other malware detector on your device and see if you can detect and remove the infection.
Is it possible to get Windows Defender for iOS?
Yes, it is possible to get Microsoft Defender for iOS.
Microsoft Intune (formerly called Microsoft Endpoint Manager, or MEM) can deploy Microsoft Defender for Endpoint on iOS, and both unsupervised and supervised devices are supported.
Does Defender for Endpoint include antivirus?
Yes, it does. Microsoft Defender for Endpoint (MDE) offers several useful features, such as Microsoft Defender Antivirus, Automated Investigation and Remediation (AIR), Attack surface reduction (ASR), and Endpoint Detection and Response (EDR).
Microsoft Defender for Endpoint is available in two plans, Defender for Endpoint Plan 1 and Plan 2 and requires a paid subscription.
How do I install Microsoft Defender for Endpoint?
You can manually deploy Microsoft Defender for Endpoint on any supported operating system.
The following steps describe how to deploy Microsoft Defender for Endpoint on macOS:

1) Go to Microsoft 365 Defender portal, head to Settings > Endpoints > Device management > Onboarding.
2) Set the Deployment method to the Local script and operating system to macOS.
3) Click on the Download installation package.
4) Save the package as “wdav.pkg” to a local directory.
5) Finally, select the Download onboarding package and save it as WindowsDefenderATPOnboardingPackage.zip to the same local directory.
How many devices can Microsoft Defender Endpoint cover?
Microsoft offers Windows Defender for Endpoint licensing per user per month. For that specific user, this licensing provides coverage for five concurrent devices.
__
Thank you for reading my blog.
If you have any questions or feedback, please leave a comment.
-Charbel Nemnom-