195
195 people found this article helpful
How to Install Windows 7 From USB (Flash Drive, Ext HD)
A tutorial on using a USB flash drive to install Windows 7
Updated on April 23, 2022
Chances are you’ll need to install Windows 7 from a USB device if you have a tablet, a small laptop, or a netbook device, few of which include optical drives as standard hardware.
Prepare for the Installation
You must migrate the Windows 7 setup files onto a flash drive (or any USB-based storage) and then boot from that flash drive to get the Windows 7 installation process started. However, simply copying the files from your Windows 7 DVD to a flash drive won’t work. You have to specially prepare the USB device and then properly copy the Windows 7 install files to it before it’ll work as you expect.
You’re in a similar, but slightly easier to solve, situation if you’ve purchased a Windows 7 ISO file directly from Microsoft and need that on a flash drive.
No matter what situation you’re in, just follow the instructions below to install Windows 7 from a USB device.
The following tutorial applies equally to whatever edition of Windows 7 you have a disc or ISO image of: Windows 7 Ultimate, Professional, Home Premium, etc.
What You’ll Need
- A Windows 7 ISO or DVD
- Access to a computer with Windows 7, 8, 10, Vista, or XP installed and working properly, as well as with a DVD drive if you have a Windows 7 DVD
- A 4 GB (or larger) flash drive
The Best USB Flash Drives of 2023
How to Install Windows 7 From USB
Correctly preparing a USB drive for use as an installation source for Windows 7 will take around 15 to 30 minutes depending on your computer speed and what edition of Windows 7 you have on DVD or in ISO format
Start with Step 1 below if you have a Windows 7 DVD or Step 2 if you have a Windows 7 ISO image.
-
Create an ISO image file from the Windows 7 DVD. If you already know how to create ISO images, fantastic: do it, and then come back here for further instructions on what to do with it.
If you’ve never created an ISO file from a disc before, check out the tutorial linked above. It’ll walk you through installing some free software and then show how to use it to make the ISO. An ISO image is a single file that perfectly represents a disc—in this case, your Windows 7 installation DVD.
Next, we’re going to work on properly getting that Windows 7 ISO you just created onto the flash drive.
-
Download Microsoft’s Windows 7 USB/DVD Download Tool. Once downloaded, execute the file and follow the installation wizard.
This free program from Microsoft, which works in Windows 10 through Windows XP, will correctly format the USB drive and then copy the contents of your Windows 7 ISO file to the drive.
Pick the en-US.exe download for the English edition of this tool.
-
Start the Windows 7 USB DVD Download Tool program, which is probably located in your Start menu or on your Start screen, as well as on your Desktop.
-
On the Step 1 of 4: Choose ISO file screen, select Browse.
-
Locate and select your Windows 7 ISO file, and then click Open.
If you downloaded Windows 7 directly from Microsoft, check for the ISO image wherever you tend to store downloaded files. If you manually created an ISO file from your Windows 7 DVD in Step 1 above then it will be wherever you saved it to.
-
Select Next once you’re back on the Step 1 of 4 screen.
-
On the Step 2 of 4: Choose media type screen, click USB device.
-
On the Step 3 of 4: Insert USB device screen, choose the flash drive or external hard drive you want to put the Windows 7 installation files on.
If you haven’t yet plugged in the flash drive or other device you’re using, you can do that now. Just click Refresh to make it show up in the list.
-
Sele4ct Begin copying.
-
Select Erase USB Device if you’re prompted to do so on a Not Enough Free Space window. Then select Yes to the confirmation in the next window.
If you don’t see this it just means that the flash drive or external hard disk you’ve selected is already empty.
Any data you have on this USB drive will be erased as part of this process.
-
On Step 4 of 4: Creating bootable USB device, wait for the program to format the USB drive and then copy the Windows 7 installation files to it from the ISO image you provided.
You’ll see a Status of Formatting for several seconds, followed by Copying files. This part might take as long as 30 minutes, maybe even longer, depending on which edition of Windows 7 the ISO file you have is from, as well as on how fast your computer, USB drive, and USB connection is.
The percentage complete indicator may sit on one or more percentages for a long time. This apparent pause doesn’t mean anything is wrong.
-
The next screen you see should say Bootable USB device created successfully, with a Status of Backup completed.
You can now close the Windows 7 USB DVD Download Tool program. The USB drive can now be used to install Windows 7.
-
Boot from the USB device to start the Windows 7 setup process.
If you still can’t get the flash drive to boot, and you also have a UEFI based computer, see the information at the bottom of this page.
-
You should have now installed Windows 7 by USB.
Tips & More Information
When the Windows 7 USB DVD Download Tool formats the flash drive during the process above, it does so using NTFS, a file system that some UEFI systems won’t boot from if present on a USB stick.
To get the USB drive to boot on these computers, you should copy the data from the flash drive onto a folder on your computer, then reformat the flash drive using the older FAT32 file system, and then copy that same data back onto the drive.
An alternative method for loading a Windows 7 ISO image onto a USB drive is to burn the ISO file to a USB drive.
FAQ
-
How do you know if a USB is bootable?
Open the Windows Disk Management tool, right-click the USB drive, and select Properties. Then, go to the Hardware tab, choose a partition, and select Properties. Then, select Populate and look next to Partition style. If the drive is bootable, it will say Master Boot Record or GUID Partition Table.
-
How many computers can you install Windows 7 on with one key?
You can only have one active Windows 7 installation at a time per installation key. So, if you want to install Windows 7 on a new computer, you must uninstall it from the old computer.
-
How do you install fonts on Windows 7?
To install fonts on Windows 7, download and unzip the font file. Then, double-click the file and select Install.
-
How do you install Windows drivers from a USB?
When installing Window drivers, instead of automatically searching for drivers, choose to manually search for the drivers and select them from your USB drive.
Thanks for letting us know!
Get the Latest Tech News Delivered Every Day
Subscribe
Можно использовать установочный носитель (USB-накопитель или DVD-диск), чтобы установить новую копию Windows, выполнить чистую установку или переустановить Windows.
Чтобы создать установочный носитель, перейдите на веб-сайт скачивания ПО, где вы найдете пошаговые инструкции. На этом веб-сайте вы можете выбрать версию Windows и создать собственный установочный носитель с помощью USB-устройства флэш-памяти или DVD-диска. Чтобы перейти непосредственно к одной из версий, выберите одну из следующих ссылок:
-
Windows 7
-
Windows 8.1
-
Windows 10 (Затем выберите Скачать средство сейчас.)
-
Windows 11 (затем выберите Скачать средство сейчас.)
Важно: Создайте резервную копию файлов перед установкой и переустановкой Windows на компьютере. Узнайте, как это сделать.
Чтобы создать установочный носитель, необходимо следующее:
-
Компьютер с надежным подключением к Интернету. Время скачивания зависит от скорости подключения к Интернету.
-
USB-устройство флэш-памяти, внешний жесткий диск или DVD-диск. Пустое USB-устройство флэш-памяти или внешний жесткий диск объемом не менее 8 ГБ либо пустой DVD-диск (и устройство для записи на DVD-диски). Рекомендуем использовать чистый носитель, поскольку все его содержимое будет удалено. Если при записи DVD-диска из ISO-файла отображается сообщение о том, что файл образа диска слишком большой, необходимо использовать DVD-носитель с двумя слоями (DL).
-
Ключ продукта. 25-значный ключ продукта (не требуется для цифровых лицензий). Если вам требуется помощь, см. раздел Как найти ключ продукта Windows.
После создания установочного носителя вы можете сбросить или переустановить Windows. Дополнительные сведения см. в статье Параметры восстановления в Windows.
Нужна дополнительная помощь?
Нужны дополнительные параметры?
Изучите преимущества подписки, просмотрите учебные курсы, узнайте, как защитить свое устройство и т. д.
В сообществах можно задавать вопросы и отвечать на них, отправлять отзывы и консультироваться с экспертами разных профилей.
Найдите решения распространенных проблем или получите помощь от агента поддержки.
You have plenty of choices to make when installing a new version of Windows on your device.
If your computer doesn’t have a CD or DVD drive, you may want to learn how to run the installation from a “bootable USB” to set up your operating system quickly.
Most modern computers and laptops have completely abandoned the CD or DVD drive, making installation disks obsolete. While this isn’t an issue in many areas, such as video games and movies, it does oppose a roadblock for some software installations. You may want to learn how to install Windows 10, Windows 8.1, and Windows 7 using a bootable USB.
This article will go in-depth regarding what a bootable USB is and how to use one to create installation media for various Windows Operating Systems to install Windows 10, 8.1, or even 7. If you’ve already got your bootable USB ready — simply jump to the “How to Install Windows using Bootable USB” section and set your new copy of Windows up in a matter of minutes.
Jump To:
- How to create a Windows bootable USB with the Media Creation Tool.
- How to boot from USB? Change your computer’s boot order
- How to install Windows 10 using bootable USB
- How to install Windows 8.1 using bootable USB
- How to install Windows 7 using Bootable USB
Benefits of installing Windows with a bootable USB
There are many instances where you might need to reinstall your operating system or get a new one entirely. For example, you’d need to reinstall Windows if you encountered a serious error, your hard drive became damaged or corrupted, or you’re upgrading/downgrading your system.
When planning to reinstall or install a Windows operating system on your PC, you need to have the necessary installation files beforehand. This will allow you to boot and install the system.
Tip: Try creating an installation media using your device before installing a new system. If it’s not possible, use a different device near you, or ask someone you know to help you out.
Because CD and DVDs are becoming less practical, many computers and laptops no longer come with a drive to read and write physical disks. This makes it impossible for you to create or use an installation media unless it’s on a bootable USB drive. While this may sound impractical initially, USB sticks have a huge advantage over disks.
USBs are incredibly accessible, given the fact that almost every computer has a USB port that you can use to connect external devices. It’s the easiest and most streamlined method of installing an operating system. Nowadays, you can create a bootable USB to install various versions of Windows.
How to create a Windows bootable USB with the Media Creation Tool
Before installing Windows using a USB, you need to create the installation media itself. Your computer will read this once the USB flash drive is connected, allowing it to boot from USB. Below are the steps to create this bootable USB flash drive using the Media Creation Tool issued by Microsoft.
- Download the appropriate installation media from Microsoft:
- Download Windows 10
- Download Windows 8.1 Disc Image (ISO File)
- Download Windows 7 Disc Images (ISO Files)
- Follow the steps to download the Windows version you want. Some versions may require you to provide your Windows product key to verify your eligibility to download disc images.

- Save the Media Creation Tool to your computer. Launch the file and click Accept when prompted to agree to the software license terms when the download is finished.

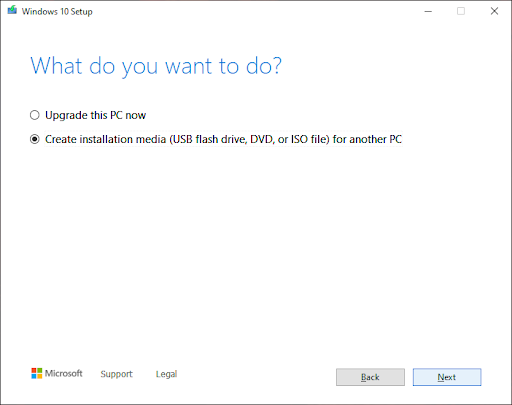
- Select Create installation media (USB flash drive, DVD, or ISO file) for another PC and click the Next button.
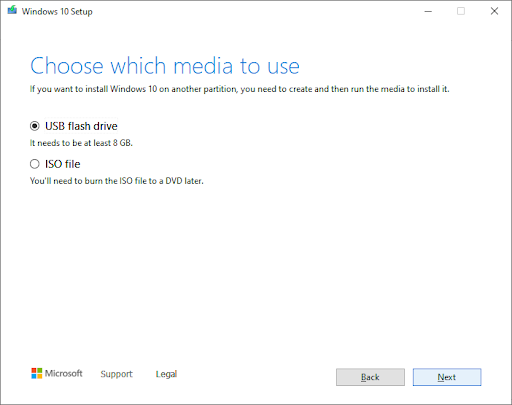
- Follow any on-screen instructions to set your preferred language, Windows edition, and System Architecture. If unsure, check the Use the recommended options for this PC option and proceed.
- Choose the USB flash drive and select your USB from the list. The Windows installation files will start to download to your USB drive.
- Note that the download may take a long time, depending on your internet connection. Ensure not to disrupt the process until the bootable USB drive is created.


Here’s a summary to boot from a USB.
You first need to create the USB itself, which will be read by your computer and used to boot up. You can find the guidelines on creating a bootable USB using the Media Creation Tool issued by Microsoft.
- Open the Microsoft Download Windows page in your web browser and click on the Download tool now button.
- Save the tool to your computer. Launch the media creation tool when the download is finished and click Accept when prompted to agree to the launch.
- Select Create installation media (USB flash drive, DVD, or ISO file) for another PC and click the Next button.
- Set your preferred Language, Windows 10 Edition, and System Architecture.
- If you can’t change the settings, place a checkmark next to the Use the recommended options for this PC option and proceed.
- Choose the USB flash drive, then hit the Next button and select your USB drive from the list. The Windows installation files will start to download to your USB drive.
- The download may take a long time, depending on your internet speed. Ensure not to disrupt the process until the creation tool has been created.
How to boot from USB? Change your computer’s boot order
After creating an installation media, you must know how to boot from USB. This is needed to install Windows from the bootable USB.
The trick is: you need to change your computer’s boot order. Doing so will place the USB flash drive at the top of the boot order priority list, meaning that your computer will read the files on it first. This will prompt your computer to load the installation media instead of the already installed system.
You need to change the boot order in your computer’s BIOS to boot from USB. After completing this step, during the next startup sequence, your system will immediately boot from USB and use the installation media you created, starting the Windows installation process.
How to Install Windows using Bootable USB
With your computer’s boot order successfully changed to load up from a USB device first, you can now crack on with installing Windows using your USB’s installation file.
Note: Make sure you’ve backed up all your files before installing to ensure you don’t lose any valuable data.
How to install Windows 10 using bootable USB
- Plug your USB device into your computer’s USB port, and start up the computer. You may be asked to press a key to boot from the USB.
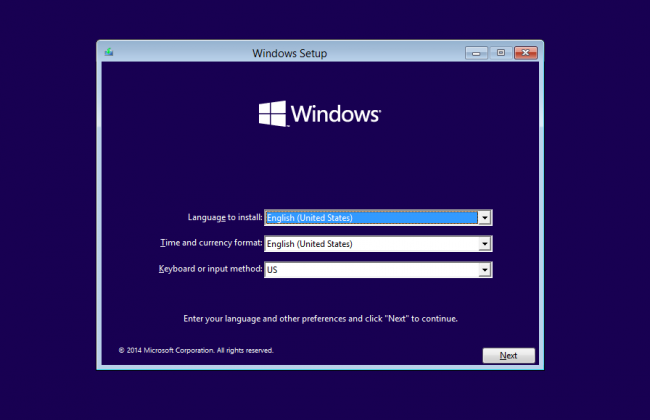
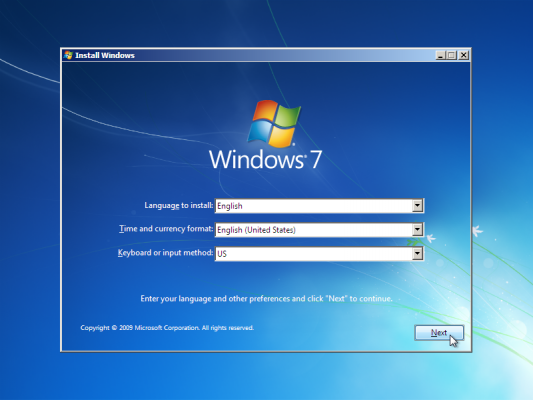
- Choose your preferred language, timezone, currency, and keyboard settings. Once you’re happy with customizing these settings, click Next. (Note that these settings can be changed in the future after the Windows 10 installation is complete.).

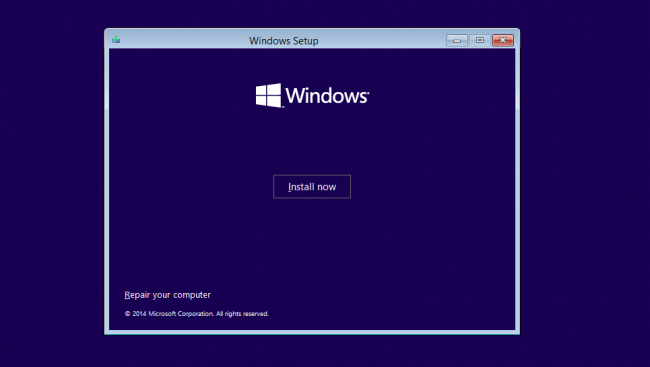
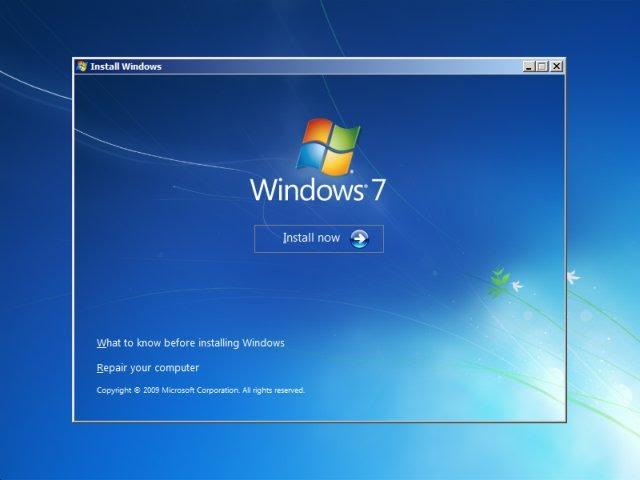
- Click Install Now and select the Windows 10 edition you’ve purchased. Now click Next to start the installation process.
- Choose your installation type. You can either choose Upgrade, which will allow keeping your current files, settings, and apps; or do a fresh clean installation by picking Custom. In this example, we’ll be choosing custom to do a fresh Windows installation.

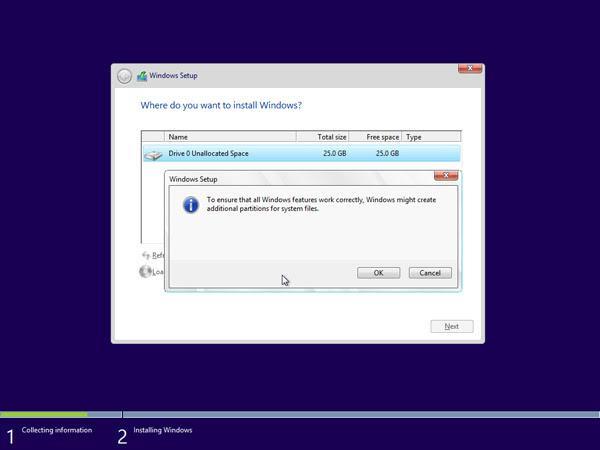
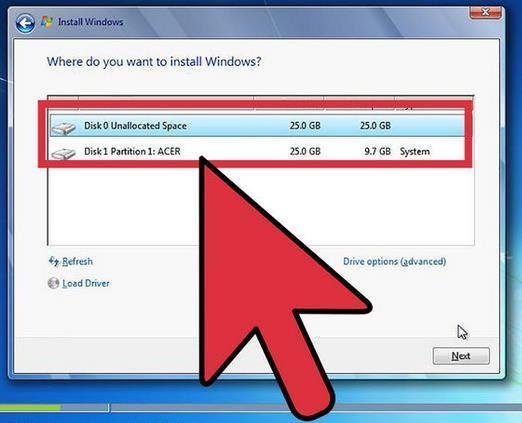
- To install Windows, you need a partition on your hard drive for storing system files; this will become the main C: drive. You can either pick an existing partition and format it or delete everything and create new partitions.
- If you’ve deleted all the existing partitions, your harddrive’s space will be unallocated, and you’ll need to create new partitions. If you just formatted an existing partition, then skip to Step 7 now. To create new partitions:
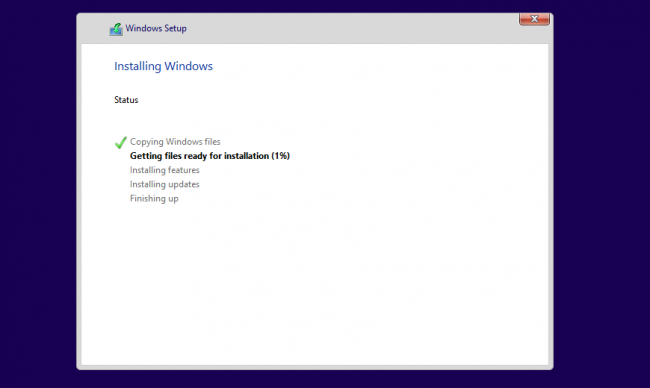
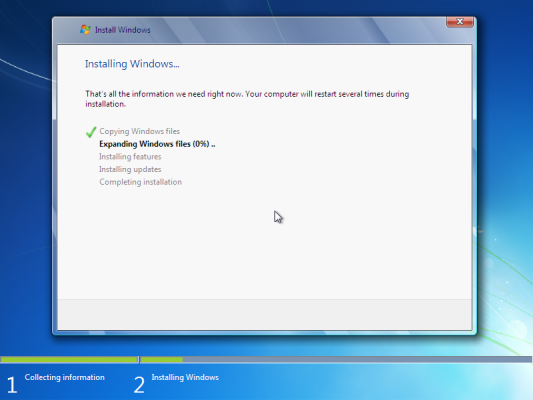
- Now select the partition where you want to install Windows and click Next. The Windows 10 installation will begin. Your computer may reboot a few times during the process. This is normal.

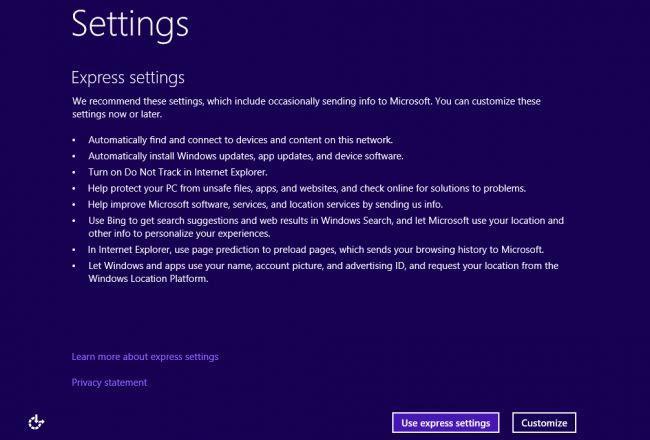
- After the installation is complete, your computer will automatically restart one last time. When it starts up again for the first time, you’ll be able to choose more of your settings or use express settings recommended by Microsoft.

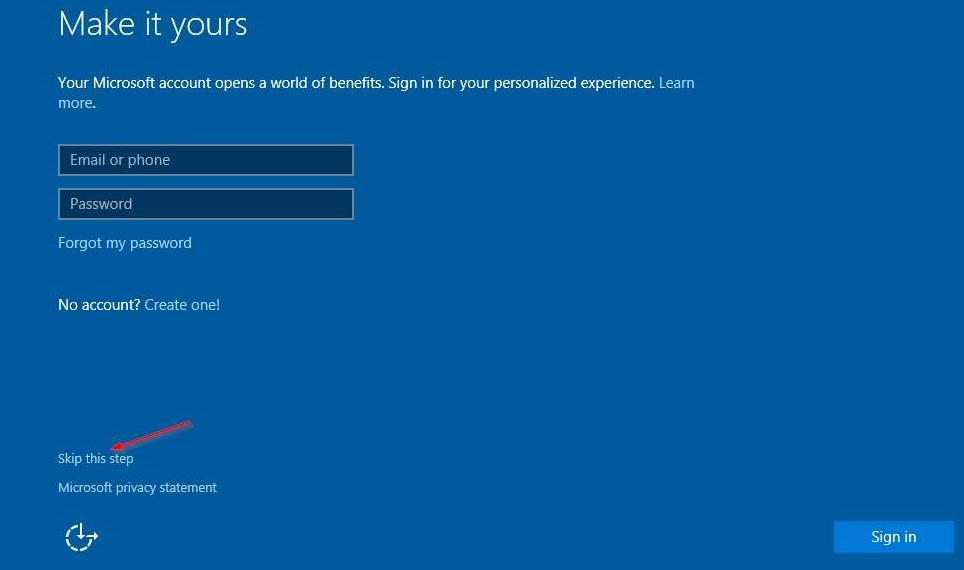
- Finally, sign in to your Microsoft account to use some of the new features with Windows 10, such as password recovery, and to access One Drive. If you don’t want to sign in with your Microsoft account, click Skip this step and follow the instructions to create a local user account instead.


How to install Windows 8.1 using bootable USB
- Plug your USB device into your computer’s USB port, and start up the computer. You may be asked to press a key to boot from the USB.
- Choose your preferred language, timezone, currency, and keyboard settings. Once you’re happy with customizing these settings, click Next. Don’t worry if you’ve made a mistake, you can change any of these in the future.

- Click Install Now and select the Windows 8.1 edition you’ve purchased. Now click Next to start the installation process.
- Enter the product key that came with your Windows purchase to activate it. When done, click Next.
- Note: You might not be prompted to enter a product key until later in the Windows 8.1 installation. This varies from version to version.
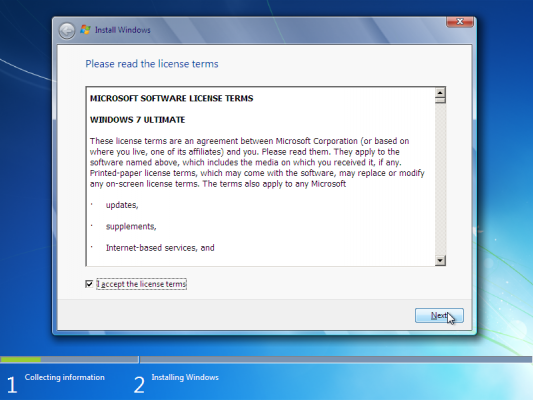
- Accept the license terms and then click Next.
- Choose your preferred installation type. You can either choose Upgrade, which will allow keeping your current files, settings, and apps; or choose Custom to do a fresh clean installation of Windows 8.1. In this example, we’ll be choosing custom to do a fresh Windows installation.
- To do a completely fresh installation with new partitions, you have to delete all the existing partitions first. Select each partition one by one and click Delete, then OK.
- Note: If you haven’t yet backed up your hard drive, you may want to stop now, back everything up, and start again. Once you’ve deleted the partitions you won’t be able to recover the data stored on these drives.
- Your computer hard drive’s space will now be unallocated. Following this, you need to create some new partitions. Select Drive options (advanced). Click New and choose the size for your new partition, then click Next.
- Windows will now create a new partition for storing system files. Click OK to accept. Repeat this step if you wish to create additional partitions.
- Select one of the new partitions and click Format. This will allow you to format your new partition. Press OK when prompted, and repeat the process for any other partitions, except the one for storing system files.

- Select the partition where you want to install Windows, and click Next.
- The Windows 8.1 installation will now begin. Your computer may reboot a few times during the process. This is normal. Follow the instructions when instructed to personalize your computer settings.


How to install Windows 7 using Bootable USB
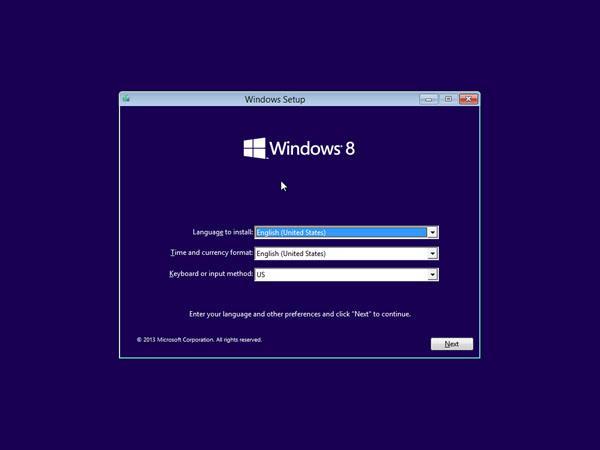
- Plug your USB device into your computer’s USB port, and start up the computer. You may be asked to press a key to boot from the USB.
- Choose your preferred language, timezone, currency, and keyboard settings. Once you’re happy with customizing these settings, click Next. Don’t worry if you’ve made a mistake, you can change any of these in the future.

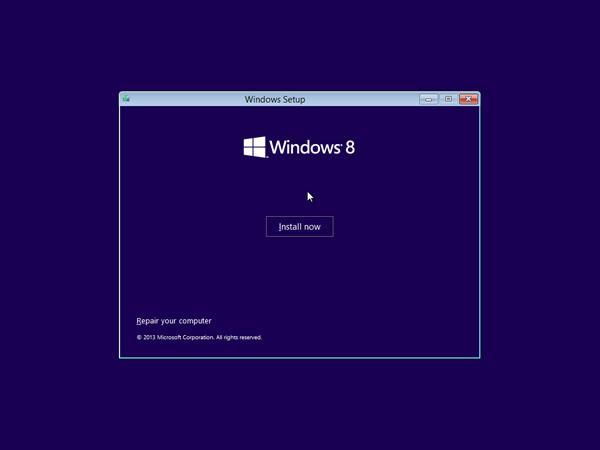
- Click Install Now to start the installation process.

- Accept the license terms and then click Next.
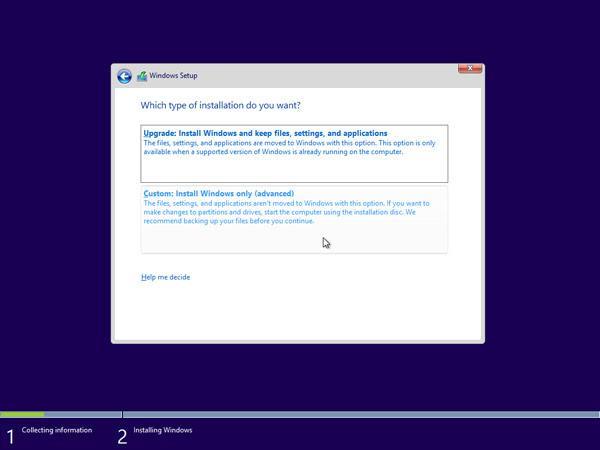
- Choose your preferred installation type. You can either choose Upgrade, which will allow keeping your current files, settings, and apps; or choose Custom to do a fresh clean installation of Windows 7. In this example, we’ll be choosing custom to do a fresh Windows installation.
- To do a completely fresh installation with new partitions, you have to delete all the existing partitions first. Select each partition one by one and click Delete, then OK.
- Note: If you haven’t yet backed up your hard drive, you may want to stop now, back everything up, and start again. Once you’ve deleted the partitions you won’t be able to recover the data stored on these drives.

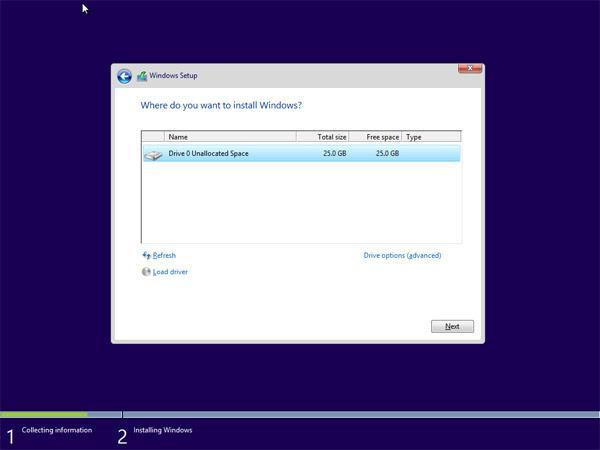
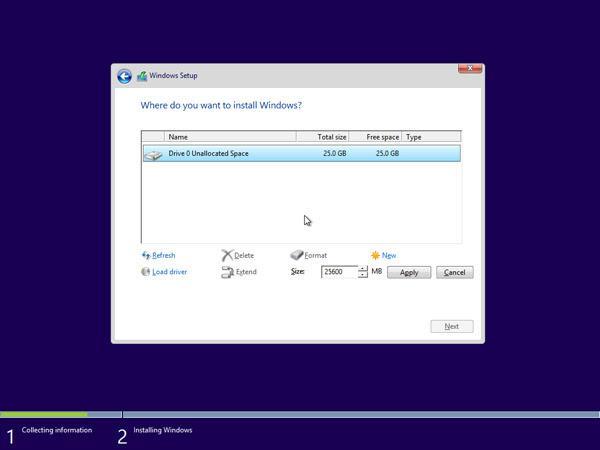
- Your computer hard drive’s space will now be unallocated. Following this, you need to create some new partitions. Select Drive options (advanced). Click New and choose the size for your new partition, then click Next.
- Windows will now create a new partition for storing system files. Click OK to accept. Repeat this step if you wish to create additional partitions.
- Select one of the new partitions and click Format. This will allow you to format your new partition. Press OK when prompted, and repeat the process for any other partitions, except the one for storing system files.
- Select the partition where you want to install Windows, and click Next.
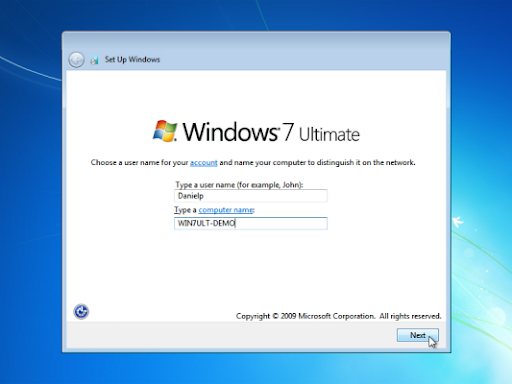
- Once the installation is complete, you’ll receive a prompt to set the user and computer names.
- Note: The built-in Administrator account is disabled on Windows 7, so the username you create will be the only one available on the system at first.
- Enter your username. The computer’s default name will be username-PC, where username is the username you’ve entered, but you can also change this. Once you’re done, click Next.

- Finally, enter the new user’s password, or just leave it blank and then click Next.
- Note: If you choose to create a password for your Windows 7 account, make sure to keep this safe. This will be the only user account on the system. If you lose it, you won’t be able to log in to your Windows system later.

That’s it! You’ve now installed a fresh copy of Windows from a bootable USB on your computer.
You may want to run a Windows update next time you start up your computer and install the latest firmware/drivers available from your manufacturer, otherwise, you’re ready to go with your new Windows machine.
Next Read:
> How to Create a Bootable USB Using Rufus
Frequently Asked Questions
Q: How to boot from a USB flash drive?
To boot your computer from USB, you need to plug the USB stick in your computer and power it on. If the install media doesn’t automatically start, you need to first change the boot order. This can be done from the BIOS settings.
Q: What format should a bootable USB be for Windows 10?
Your USB flash drive should have the FAT32 format to run the Windows 10 installer media.
Q: What size USB drive is required for the Windows Media Creation Tool?
You need a USB drive with a minimum of 4GB of free space. It should also be empty before you run the tool.
Q: How do I use the Rufus USB tool?
You can find all the information you need about the Rufus USB tool in our How to Create a Bootable USB Using Rufus article.
Q: Can I use a USB drive I created to install Windows on someone else’s computer?
No. The Windows ISO file on the USB drive is intended to be used to install Windows on the licensed user’s computers. If you’re a business owner, you may be required to show any digital licenses when auditing.
You May Also Like
» How to Create a Bootable USB Using Rufus
» How to Install Microsoft Office Updates
» How to Install Office on a Windows PC Using My Online Microsoft Account
You are here:
Home » Windows 7 Guides » How To Create Bootable Windows 7 USB To Install Windows 7 From USB Flash Drive
Computer users who have ever installed a version of Windows operating system from a USB flash drive will never go back to the traditional DVD installation method. As you probably know, installing Windows from the USB is the fastest method available to install Windows operating system.
Creating a bootable USB media to install Windows 7 from USB drive is fairly simple if you follow the step-by-step instructions provided in our how to install Windows 7 from USB guide. Users who aren’t comfortable with the Command Prompt can take the help of a third-party tool. There are quite a few free tools out there to help you install Windows 7 from USB flash drive (see eight free tools to prepare bootable Windows USB).
Now the good is that, Microsoft has just released a free tool called Windows 7 USB/DVD Download Tool to help users create bootable Windows 7 USB flash drives and install Windows 7 from USB drive.

Although you can go through our how to install Windows 7 from USB guide to do the same, this tool simplifies the job. Here are the five simple steps that you need to follow to create a bootable USB flash drive to install Windows 7 from USB device:
Note: You need a USB flash drive with a minimum of 4 GB of free space. And also please backup your data from USB first.
Windows 7 bootable USB using Windows 7 USB/DVD Download Tool
Step 1: Download Windows 7 USB/DVD Tool and install it.
Step 2: Run the program, click the Browse button to browse to your Windows 7 ISO image file.

Step 3: In this step, you need to select your media type. As we are here to create a bootable USB, simply click on USB device button.

Step 4: Select your USB flash drive from the drop down box and click on Begin copying button. Be sure to select the right USB drive as this tool formats the selected USB drive before copying Windows 7 setup files onto the USB.

Step 5: The Windows 7 USB/DVD tool will take a few minutes to complete the procedure.

Step 6: You are done. Reboot you machine and start installing Windows 7 (Windows 7 installation procedure).
If you’re having issues in preparing the bootable USB using Windows 7 USB/DVD Download Tool, we recommend you follow our 100% working install Windows 7 from USB guide.
Nowadays, many computer manufacturers, build their computer models (commonly laptops) without including an optical disk drive with them in order to accomplish a smaller – in dimensions – product or for cost reasons. But this becomes a problem in some cases, e.g. when you want to re-install the operating system or you want to upgrade it to another version you purchased. For such cases you have to create a bootable USB disk to accomplish that task.
This tutorial was written for all users that their computer doesn’t include an optical disk drive (or the optical disk drive is damaged) or they want to install Windows 7 from a USB. *
* Note: This guide works for creating a Windows USB bootable disk for all Windows versions (8, 7, Vista & XP). The only thing needed is to have the corresponding Windows version stored in a ISO image file.
How to create a Windows 7 USB Bootable disk.
To install Windows 7 from USB you have to put the Windows 7 ISO file into a USB disk by following the detailed instructions below:
Step 1: Download Windows 7 ISO file.
Navigate to this page and download the Windows 7 ISO image, according the version and product key you own.
Step 2. Download RUFUS USB Bootable Creator Utility.
Navigate to this page and download the RUFUS USB Bootable Creator Utility on your computer.
Step 3. Create a bootable Windows 7 USB using RUFUS USB Bootable Creator Utility.
1. Plug an empty USB disk on your computer or a USB that you don’t want the data on it (IMPORTANT: THE DATA ON THE USB WILL BE ERASED!)
2. Double-click to open “rufus” utility you downloaded at step 2.
3. Make sure that you select the correct (empty) USB disk.

4. Click the “Click to select…” icon next to “Create a bootable disk using” option.

5. Choose the Windows 7 ISO image you downloaded at step 1 and click Open.

6. Finally click the Start button and wait until the Windows 7 USB boot disk is created.

When the operation is completed, you ‘re almost ready to install Windows 7 from USB.
Step 4: Modify BIOS settings and change the boot order to USB.
The last thing that you have to do, is to enter into CMOS setup utility (at the computer where you want to install Windows) and change the boot order to USB. To do that:
1. Plug the Windows 7 Boot USB disk on an empty USB port.
2. Power On the computer & press the corresponding key to enter CMOS setup utility. (DEL or F1 or F2 or F10) *
* Note: The way to enter into BIOS (CMOS) Setup settings depends on the computer manufacturer.
3. Inside CMOS setup, change the “Boot Order”* setting to USB.
* Note: The “Boot Order” setting, is commonly found under “Advanced features” menu.
4. Save and exit from CMOS setup settings.
The Windows 7 installation is starting….
That’s all folks! Did it work for you?
Please leave a comment in the comment section below or even better: like and share this blog post in the social networks to help spread the word about this.
If this article was useful for you, please consider supporting us by making a donation. Even $1 can a make a huge difference for us.
