Oracle VM VirtualBox is free and open-source software that allows you to install multiple operating systems on a single host. Currently, Windows 11 23H2 is in beta version, and if you want to try out the new features of the latest build of Windows 11, you can install it on Oracle VM VirtualBox without damaging your main operating system.
You can also install other versions of the Windows operating system on Oracle VM VirtualBox. In this article, we will discuss how to install Windows 11 on Oracle VM VirtualBox. So, without wasting any time, let’s dive into the steps.
How to Download Windows 11 ISO File
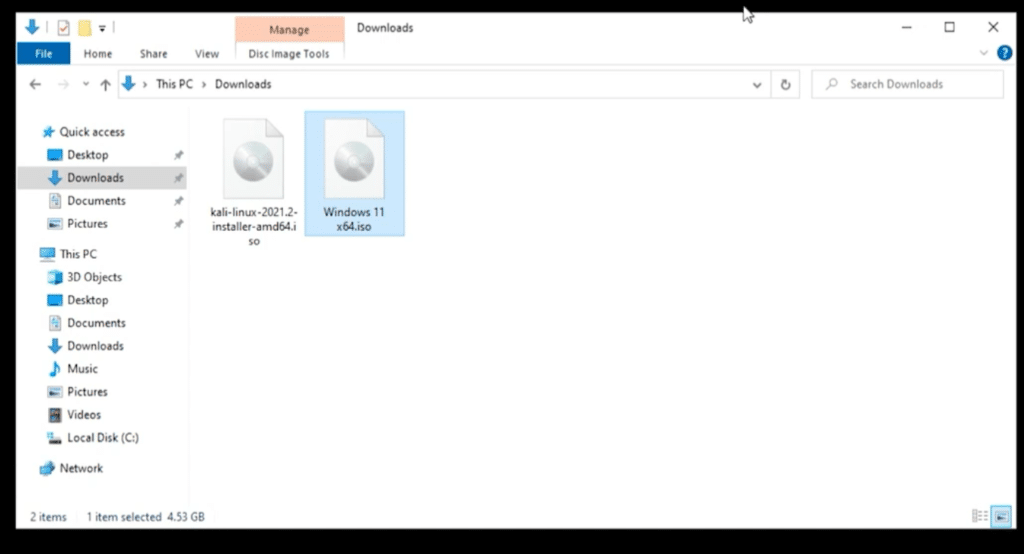
To install Windows 11 on Oracle VM VirtualBox, we need to download the Windows 11 ISO file. On the internet, you will find two types of Windows 11 ISO files: Stable build and Preview Build. The Preview Build is intended for developers and advanced users who want to try the latest features of Windows 11 before its public release. However, this build of Windows comes with some bugs and security issues, so we do not suggest installing it on your main system.
However, you can install it on VirtualBox, but for that, we need to download it. Let’s discuss how to download both the stable and preview builds of the Windows 11 ISO file.
1. Downloading Windows 11 Stable Build
First, let us discuss how to download the stable build of the Windows 11 ISO file. The current Windows 11 22H2 is the stable version of Windows 11.
Here is how you can download it:
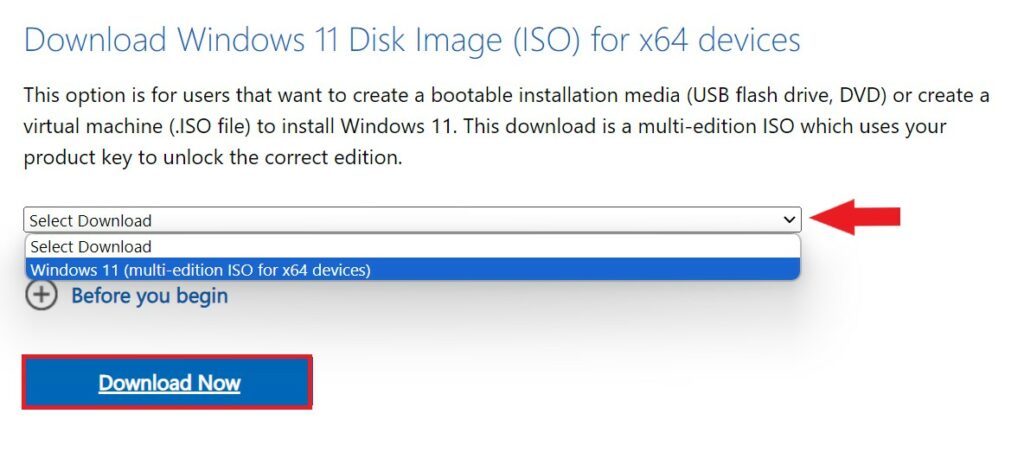
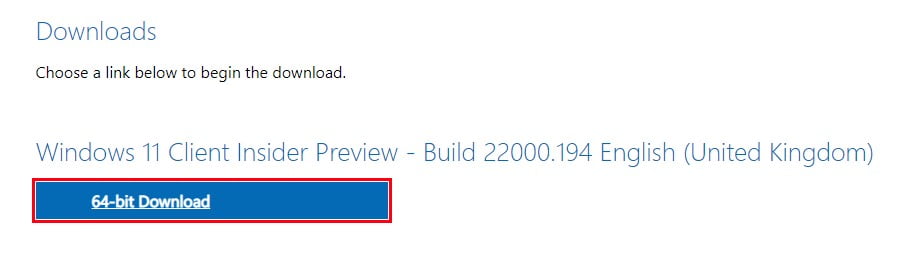
1. Visit the official Microsoft website and Locate the download link for the Windows 11 ISO file.
2. After that, choose the desired edition of Windows 11 from the drop-down menu.
3. Then click on the Download Now button.
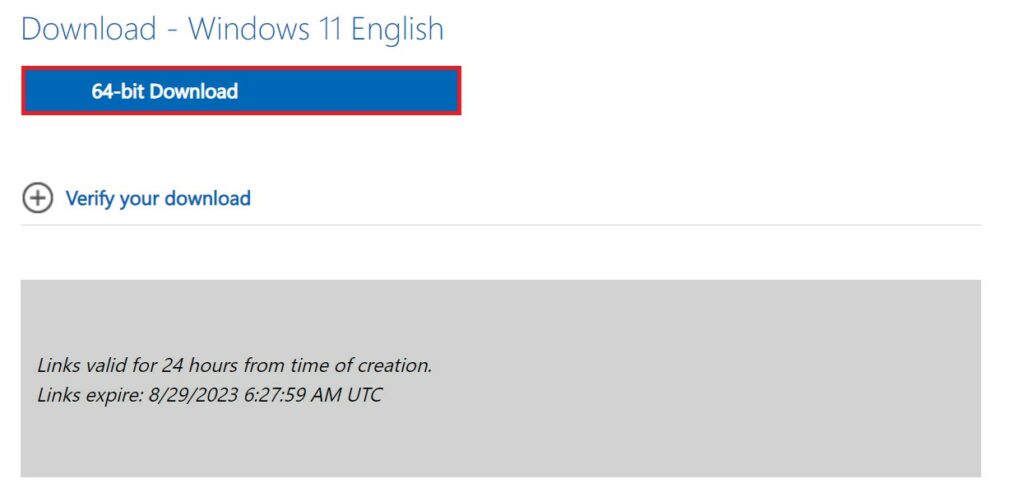
4. Select the languages from the drop-down menu and click on the Confirm button.
5. Finally, click on the 64-bit Download button to start the download process.
2. Downloading Windows 23H2 Preview Build
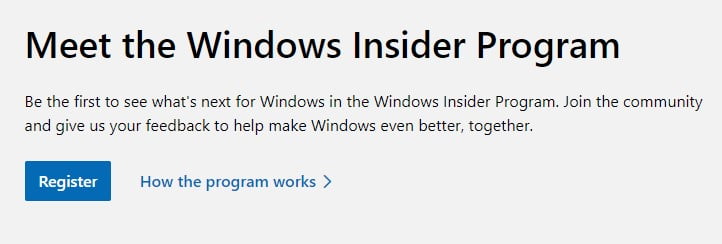
Windows 23H2 is the upcoming build of Windows 11. However, if you want to try it out, you can download the Windows 23H2 ISO file to use it on a virtual machine. However, for that, you must have a Windows Insider Program account, and the system from which you are downloading the ISO file should have an active Windows 11 license key installed. Only then can you download the official Windows 23H2 Preview Build.
Here is how you can download the Windows 23H2 ISO file:
1. Visit the Windows Insider Program site and register yourself as a beta tester.
2. Now login to your Windows Insider account and visit this link to download the Windows 11 ISO file.
3. Here scroll down and select your Windows 11 edition, product language, and click on the Confirm option.
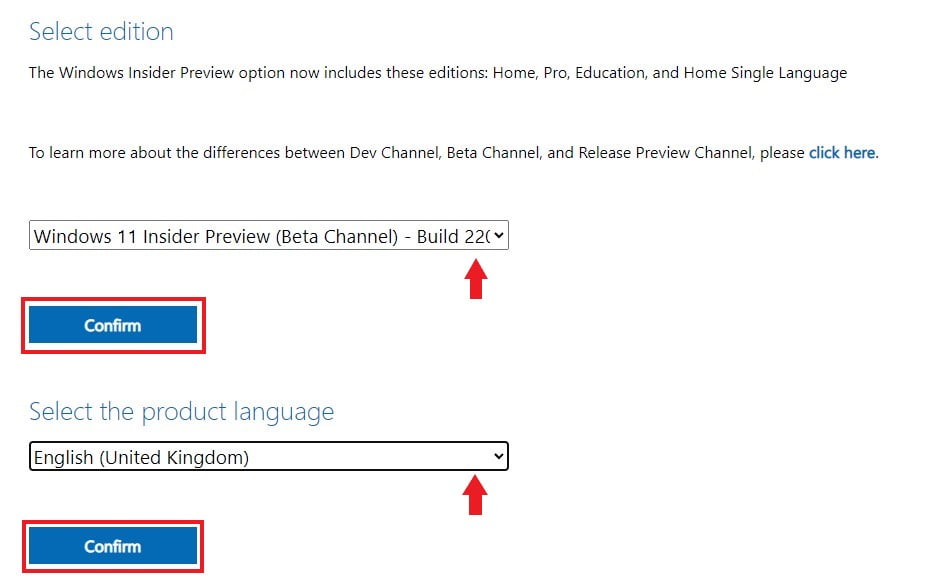
4. After you have selected the Windows Insider Preview edition and product language, you will find a download option. Here click on the 64-bit Download button to download the Windows 11 23H2 ISO file.
That’s it. This is how you can download the Windows 11 ISO file. Now, let us discuss how to install Windows 11 on Oracle VM VirtualBox.
As we are going to use Oracle VM VirtualBox to install the Windows operating system, we need to download and install Oracle VM VirtualBox. You can refer to our guide on How to Download and Install VirtualBox for detailed instructions.
If you already have VirtualBox installed on your computer, you can skip this section and proceed to the next one. If not, you need to install it first.
In this section, we will discuss how to install Windows 11 on Oracle VM VirtualBox. To do that, follow these steps:
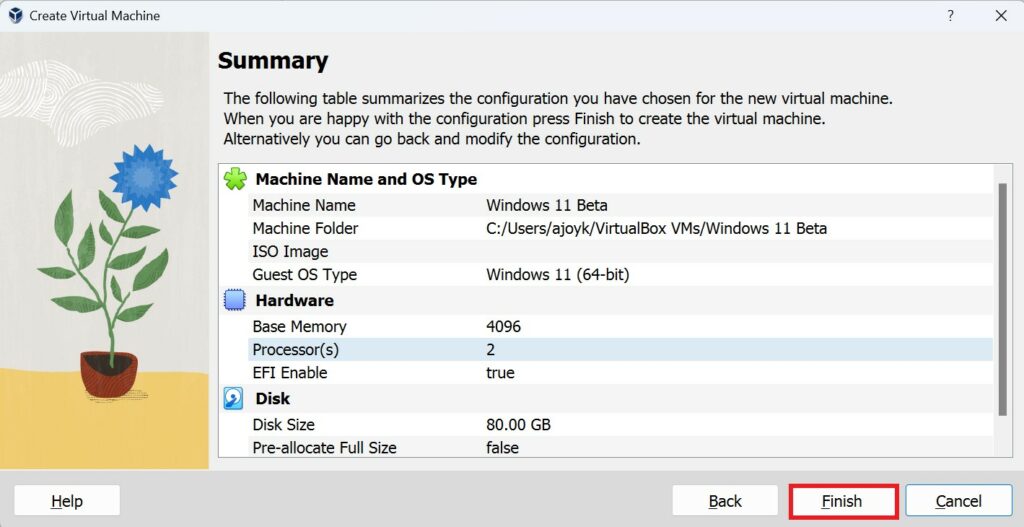
1. Create a New Virtual Machine for Windows 11
In order to install Windows Operating System on VirtualBox, you have to create a virtual machine. Windows 11, being a demanding operating system, needs around 4 GB RAM and 80 GB of storage space as the bare minimum to run on Virtual Box.
Here’s how you can create a new Virtual Machine in VirtualBox:
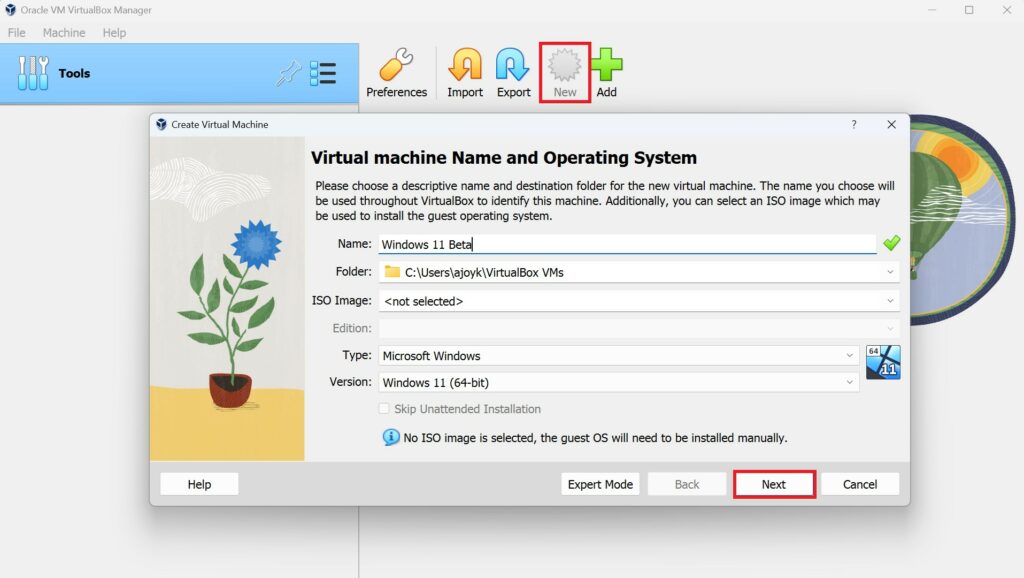
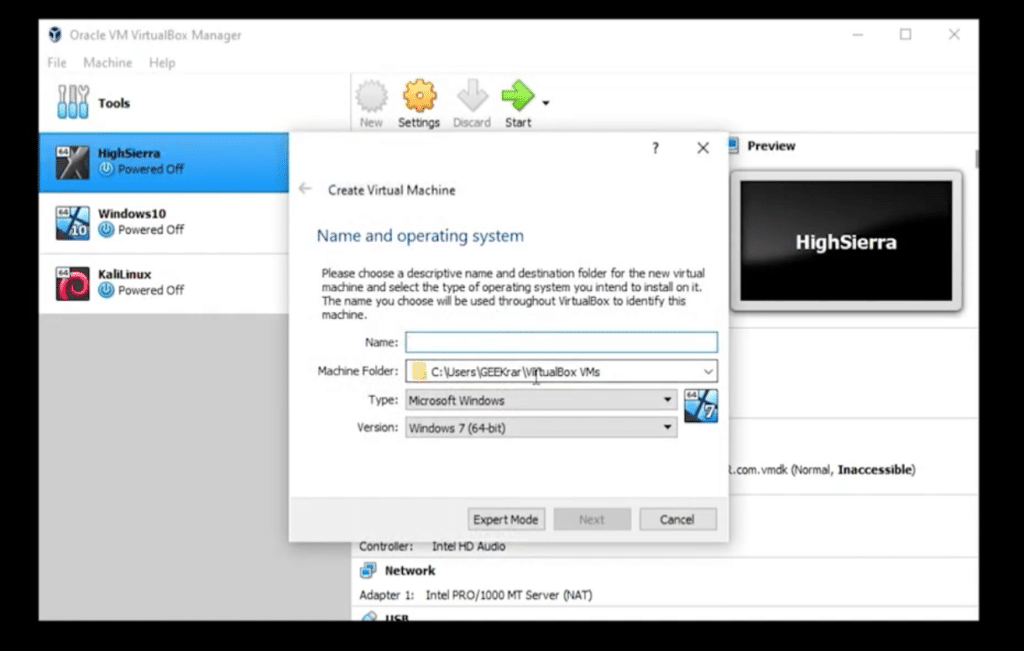
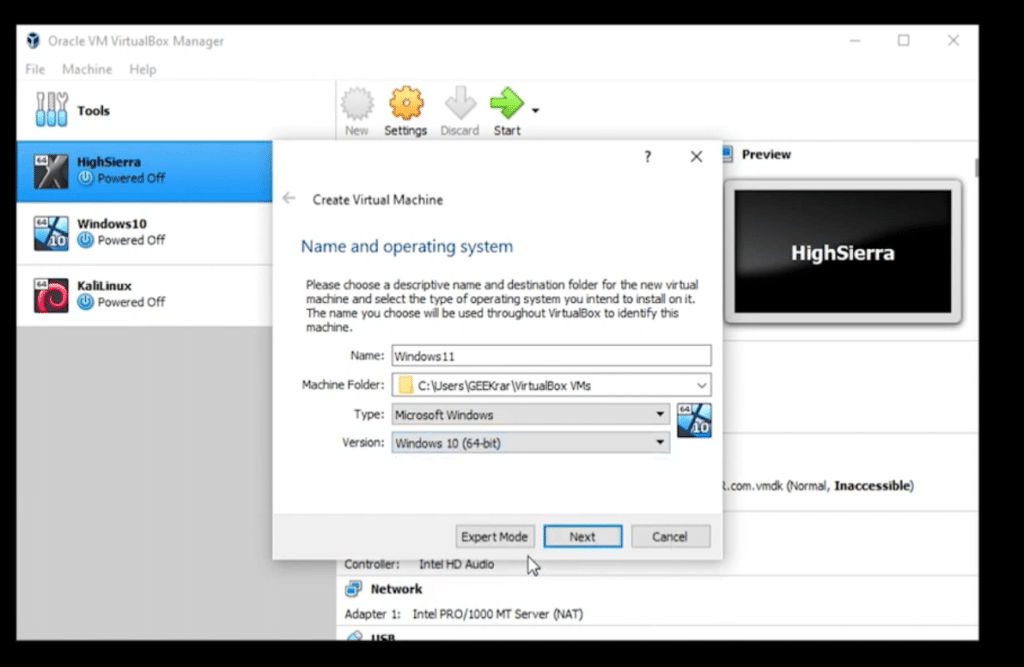
1. Open the Oracle VM VirtualBox and click New.
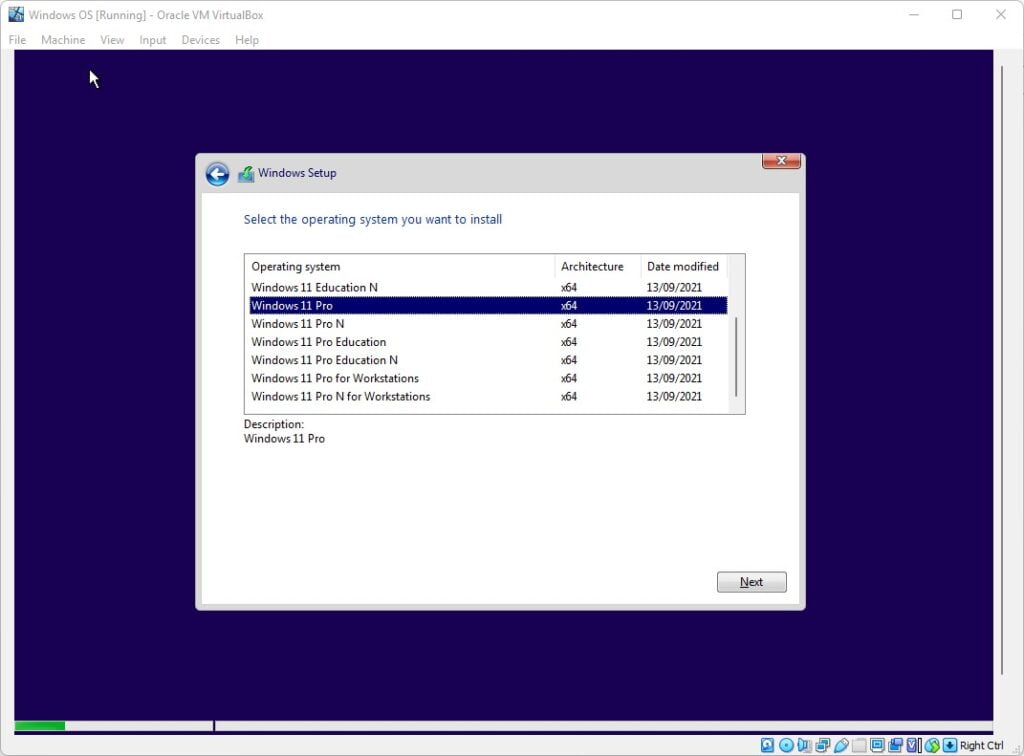
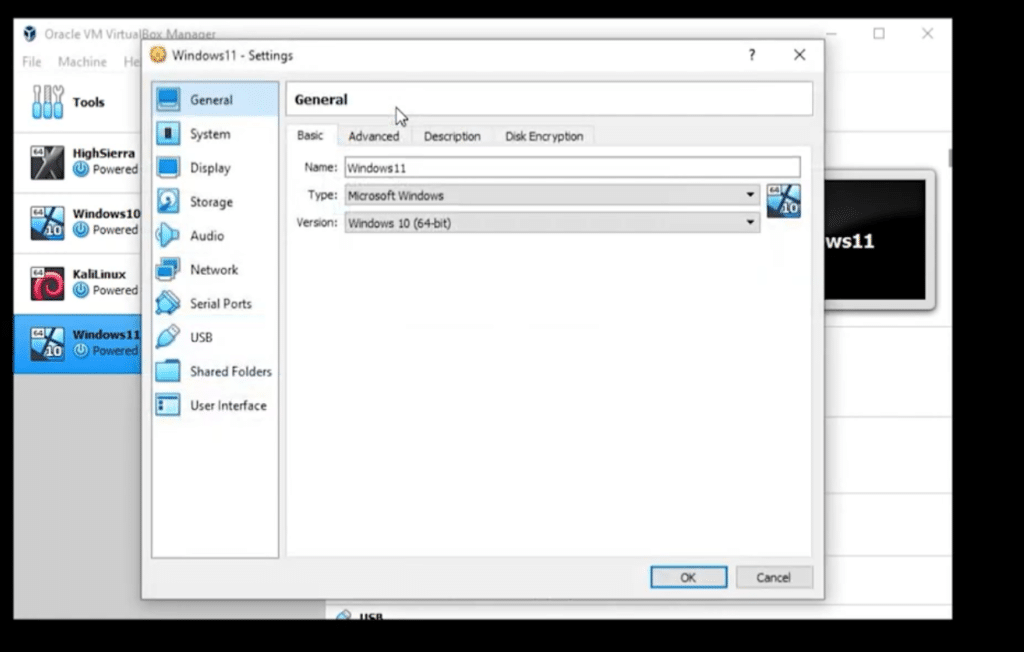
2. Now, name your virtual machine, select the operating system type as Microsoft Windows, choose the version as Windows 11 (64-bit), and click on Next.
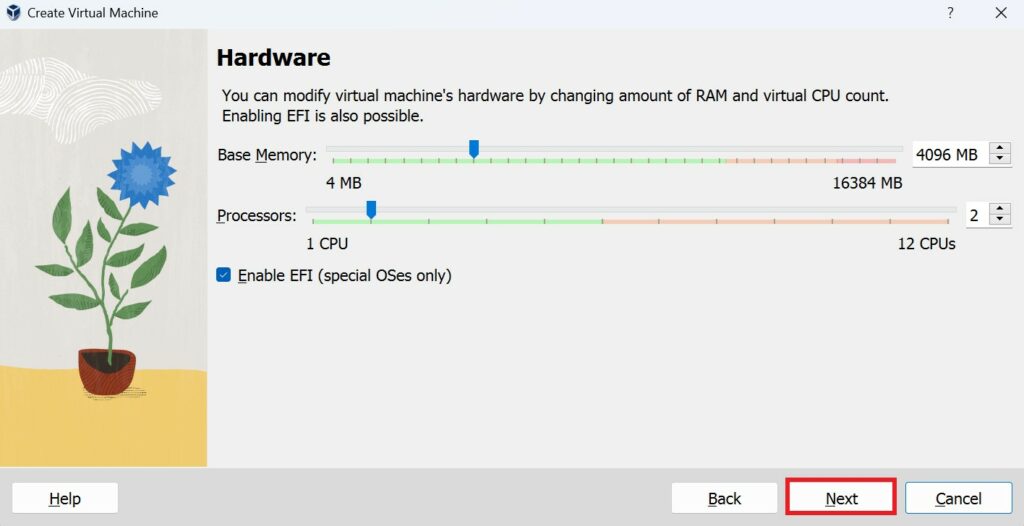
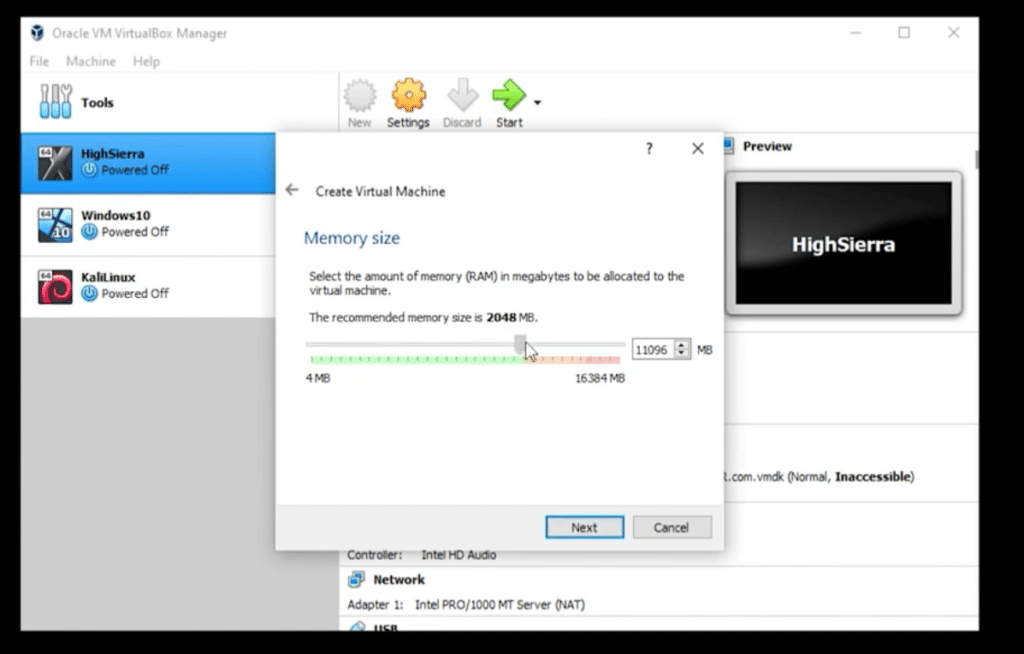
3. Select the amount of RAM you want to allocate to your VirtualBox. The recommended RAM size is 4GB, but we will suggest allocating at least 50 percent of your PC RAM to your VirtualBox for better performance.
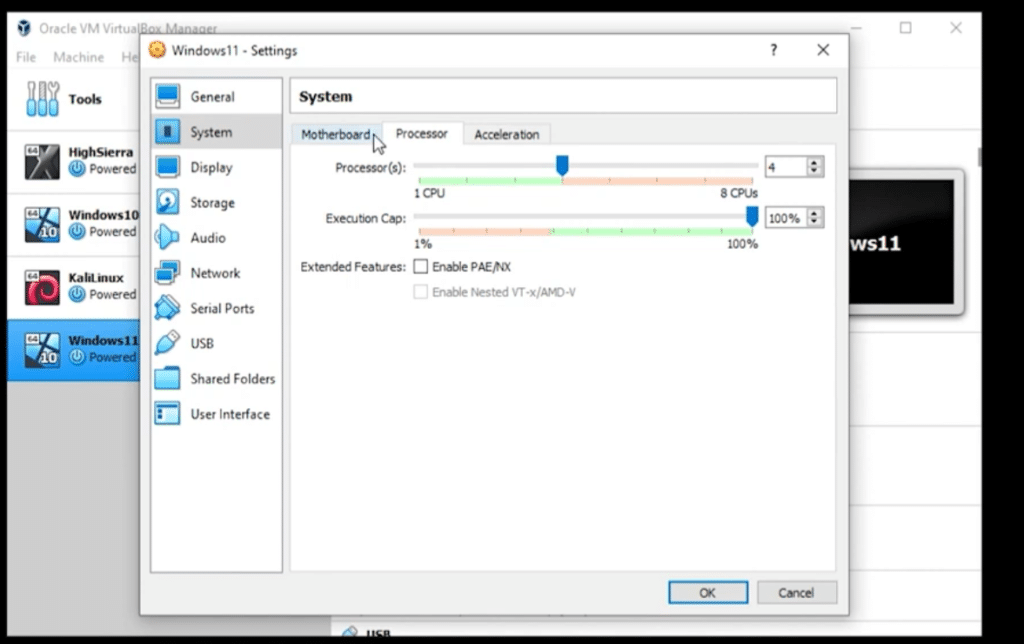
4. After that, allocate Virtual CPU Count and click on the Next button.
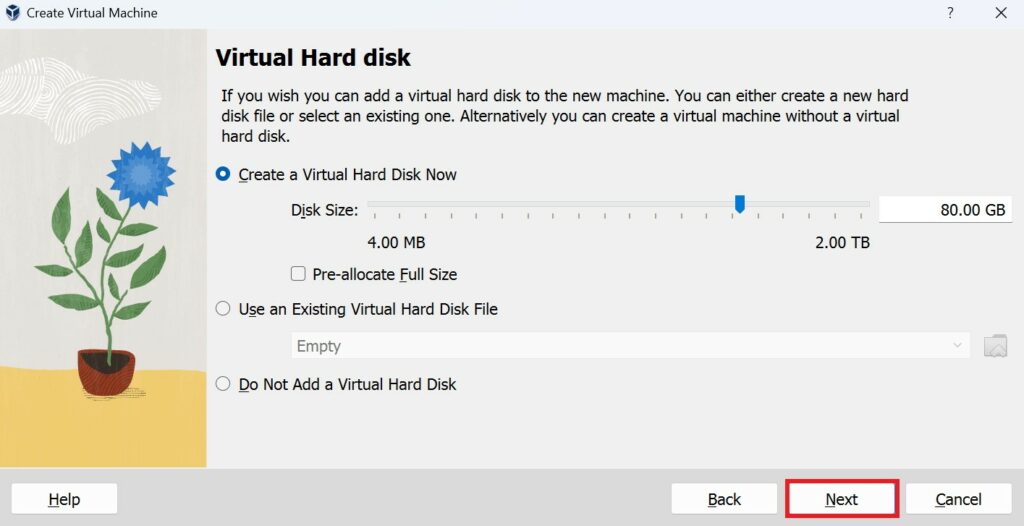
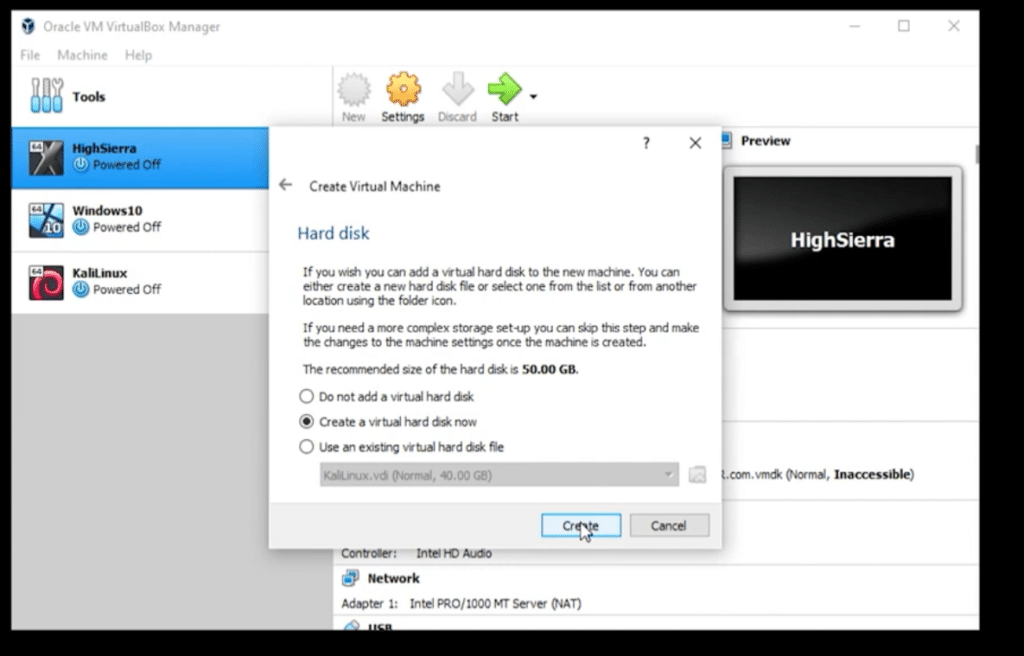
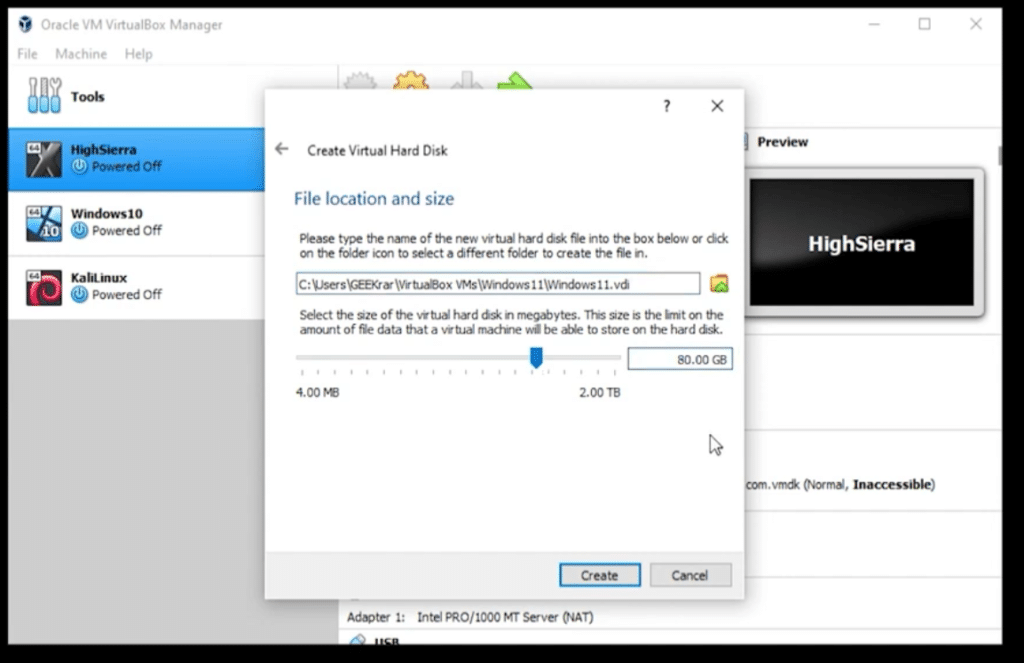
5. Now, create a virtual hard disk for your new virtual machine and click on Next. We recommend allocating at least 80GB.
6. On the next window, review the virtual machine configuration, then click on the Finish button to create it.
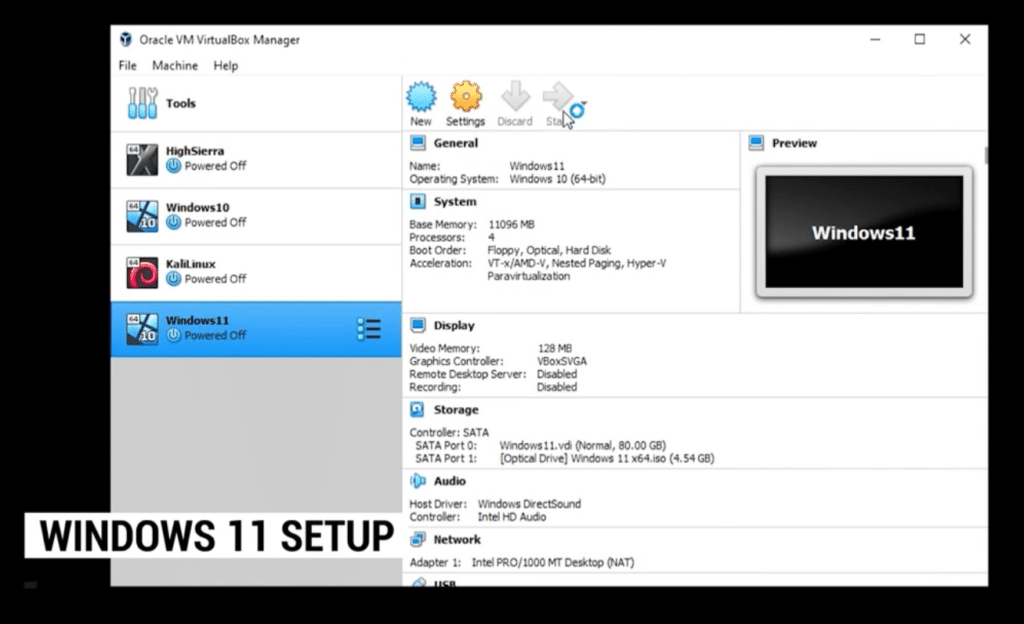
2. Install Windows 11 on Oracle VM VirtualBox
After creating a virtual machine, you are ready to install Windows 11 on Oracle VM VirtualBox. To do that, first, you have to select the Windows 11 ISO FILE.
Here’s how you can install Windows 11 on VirtualBox:
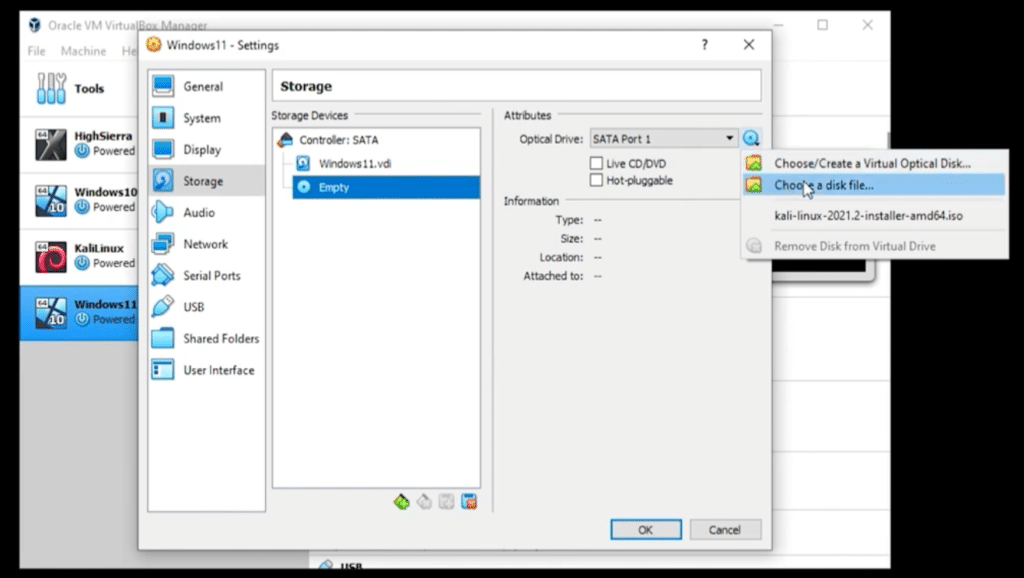
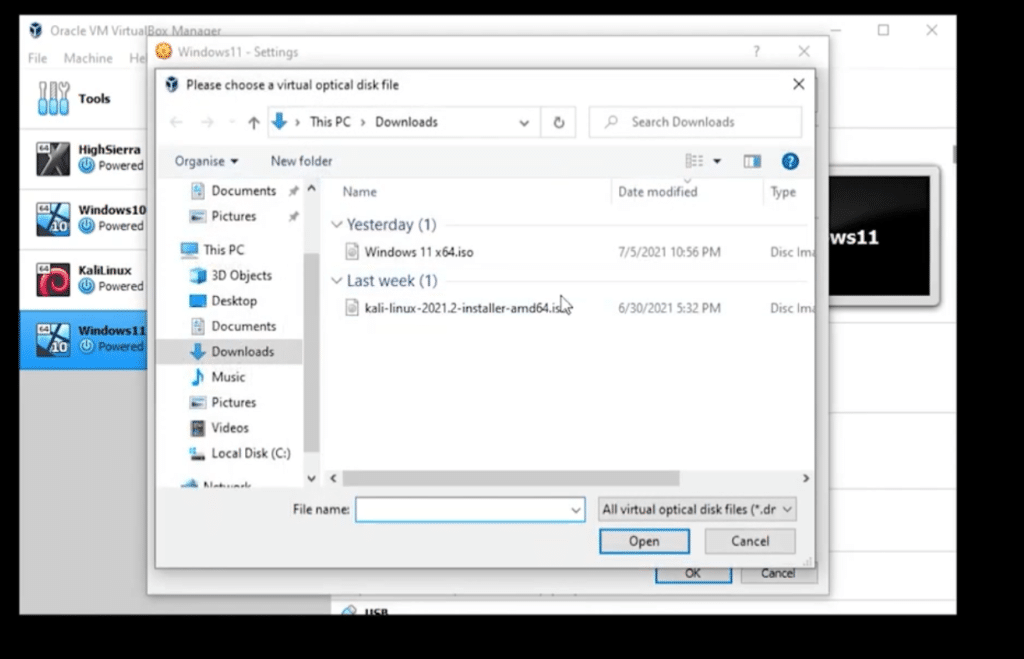
1. Select the operating system name in VirtualBox, then click Settings > Storage > Controller ID > Empty > Optical Drive.
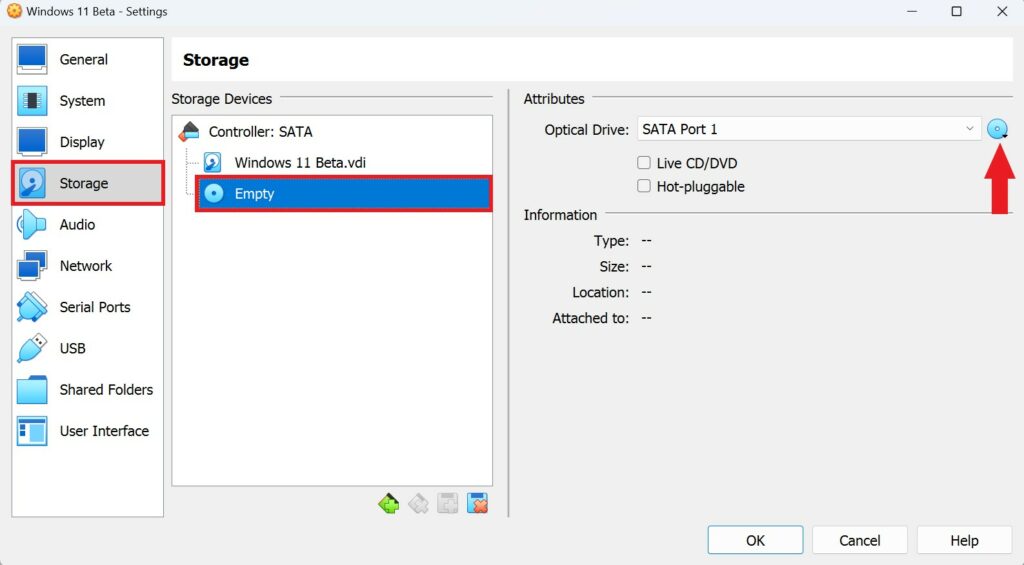
2. After that, click on the optical drive drop-down menu and select the Choose disk file option.
3. Then select the Windows 11 ISO file and click the OK button.

Note: If the OK button does not work or has an error, then you have to enable Virtualization Settings on your BIOS. Check out our guide on how to enable virtualization on Windows 11.
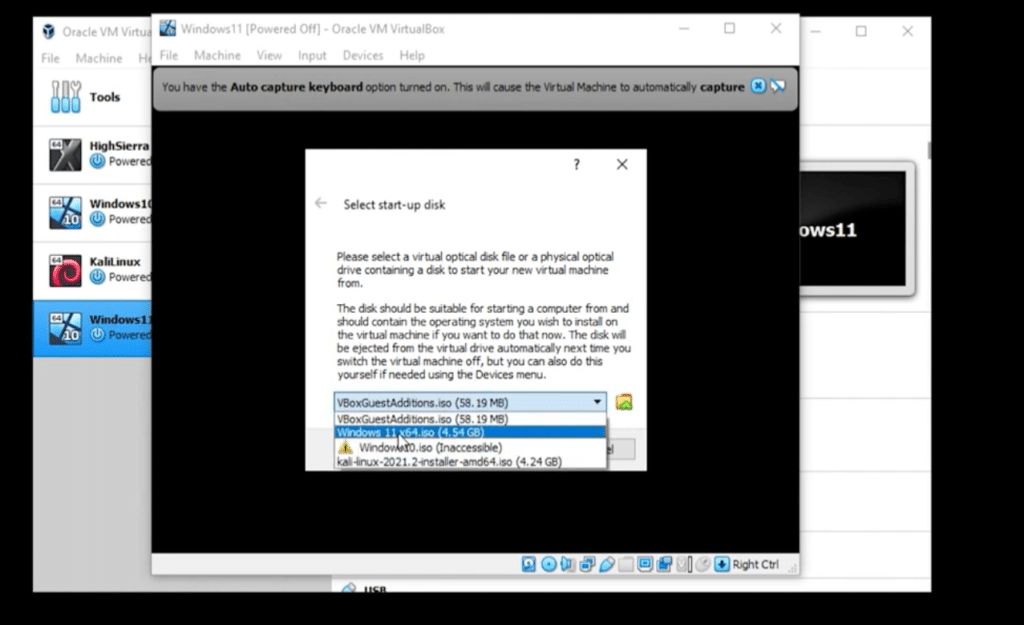
4. Now start the virtual machine by clicking on the Start button.
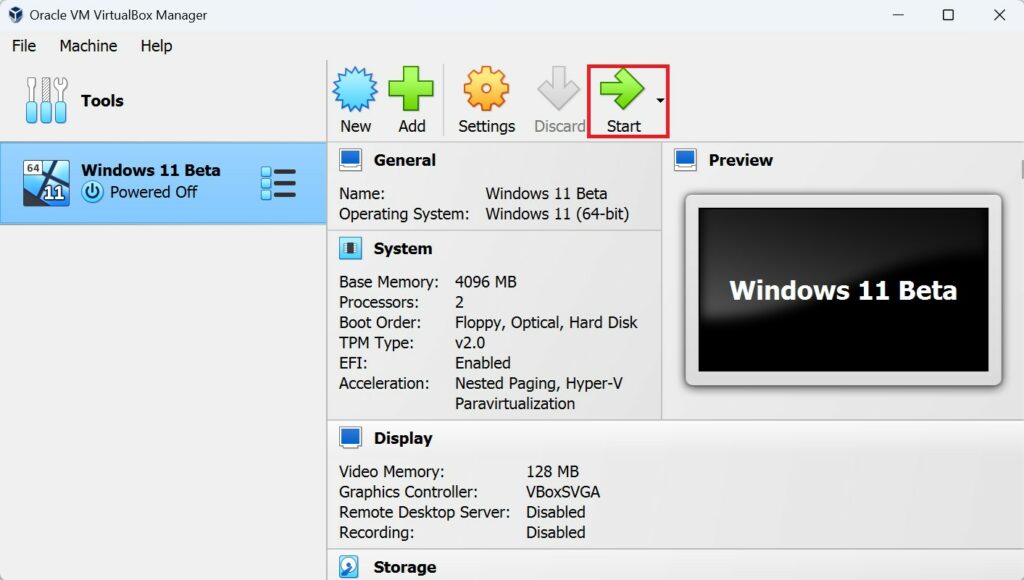
5. The Windows 11 installation wizard will appear on your screen. Now follow the Windows 11 installation setup.
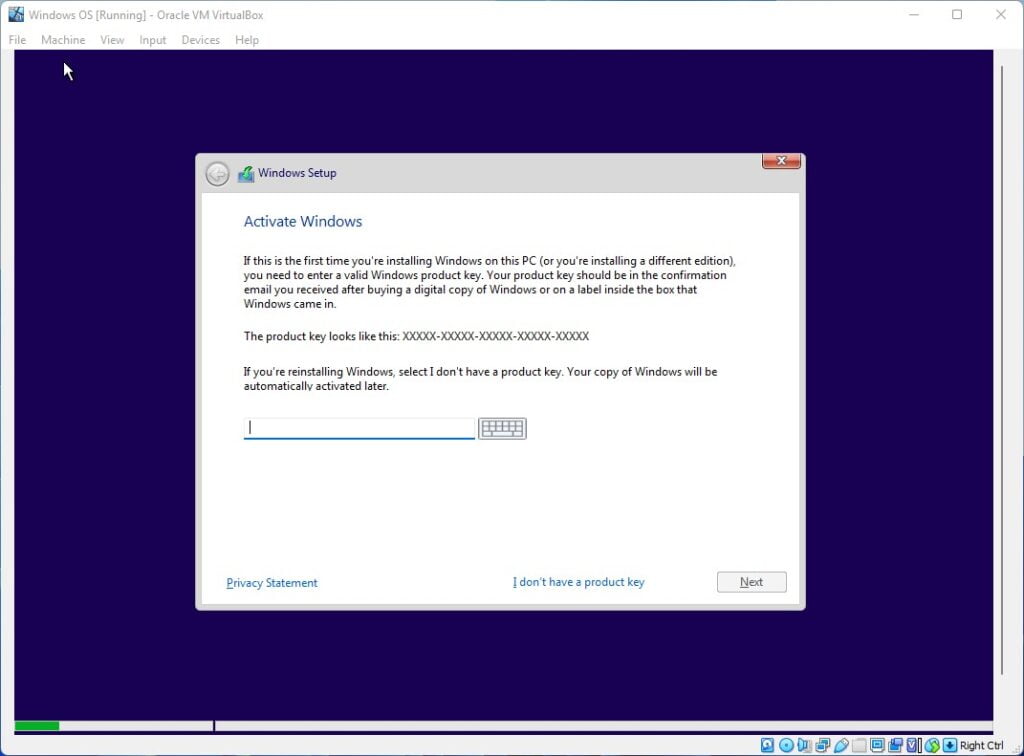
6. Here select your language and click on Next and click Install.

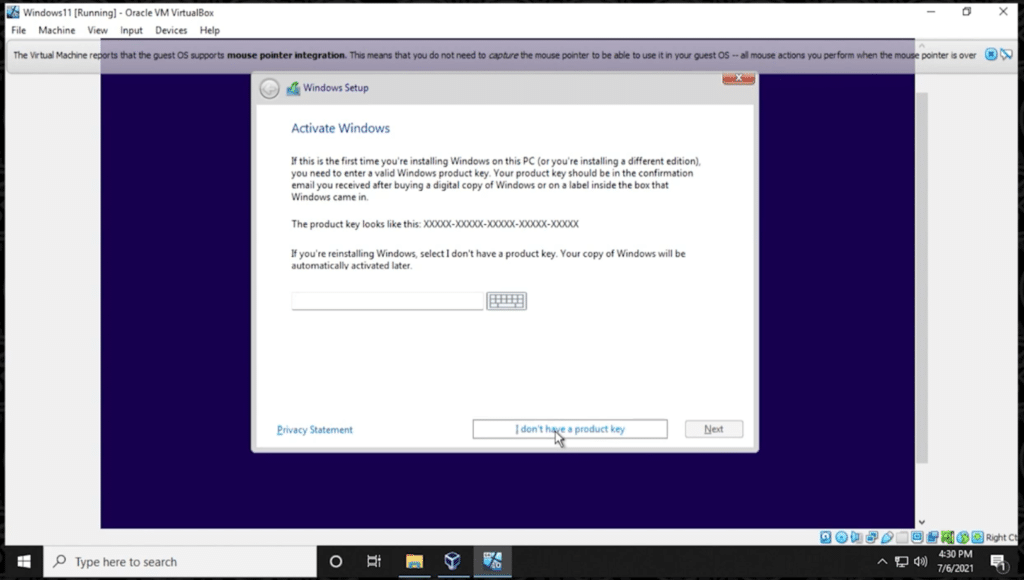
7. The following window asks for a product key to activate the Windows version. You can click the “I don’t have a product key” button for this installation.
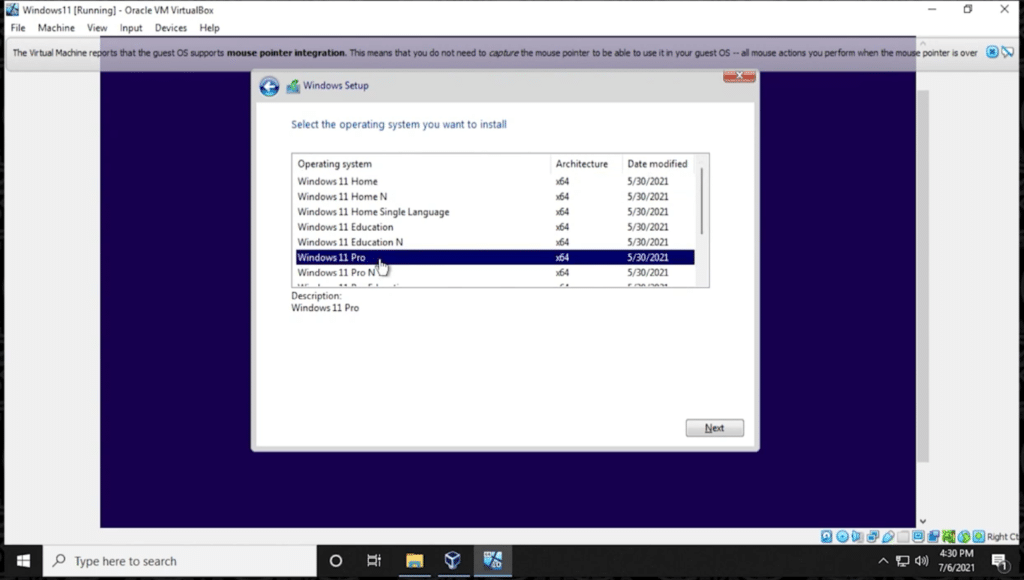
8. Now select your Windows 11 Operating system version, click on Next, and accept your license agreement.
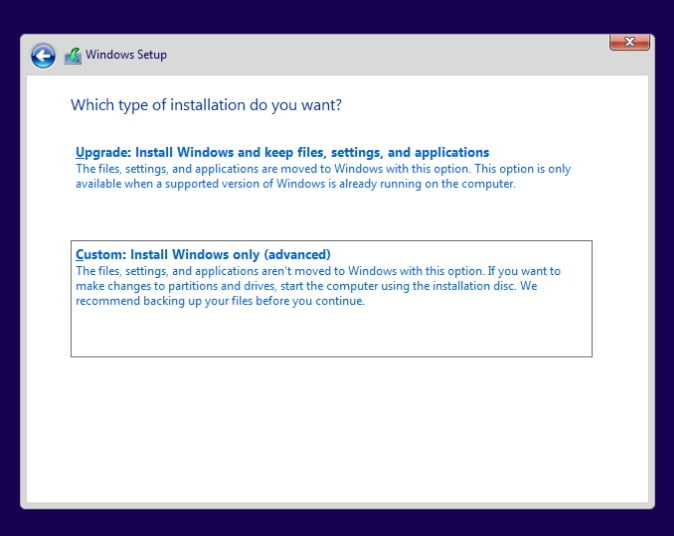
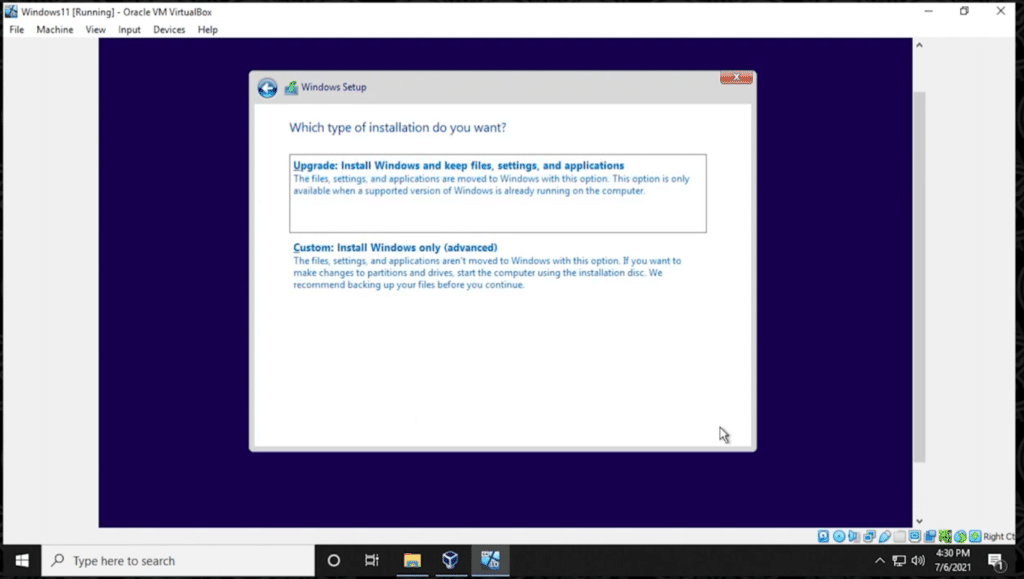
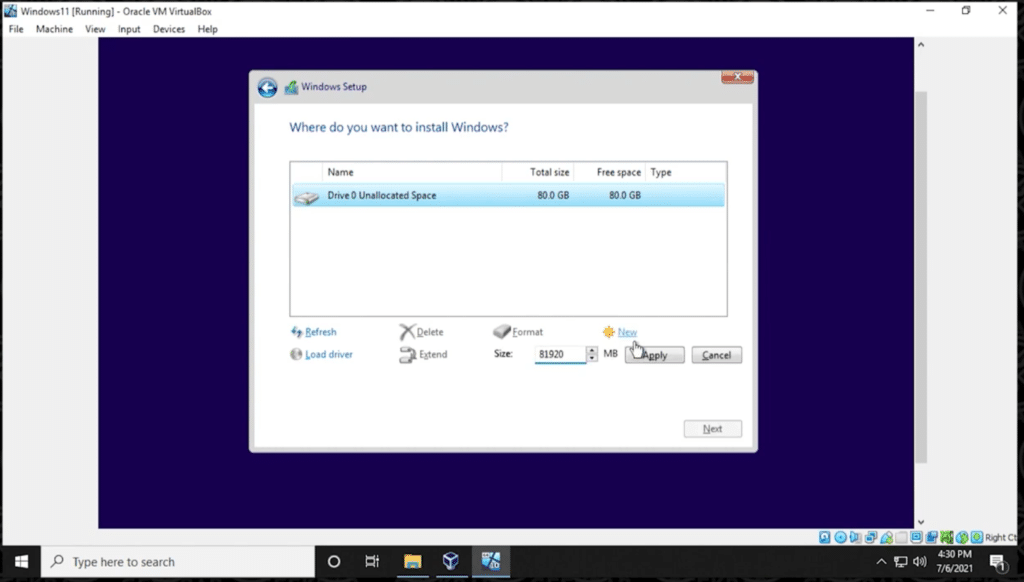
9. Now, choose the Custom Installation option allocated installation virtual hard disk and click on Next.
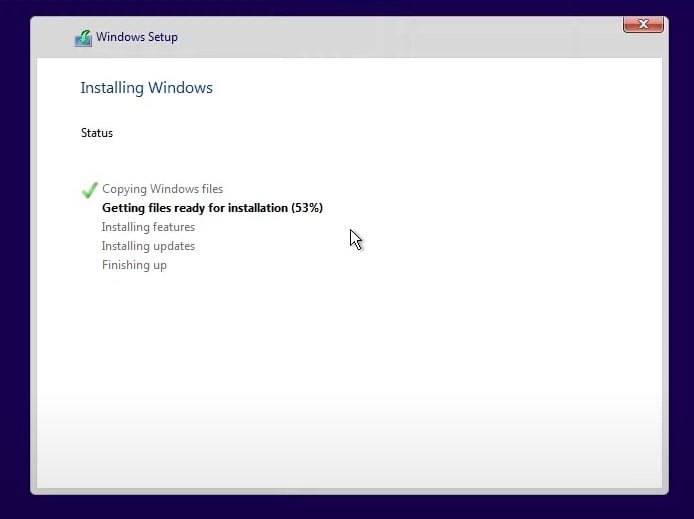
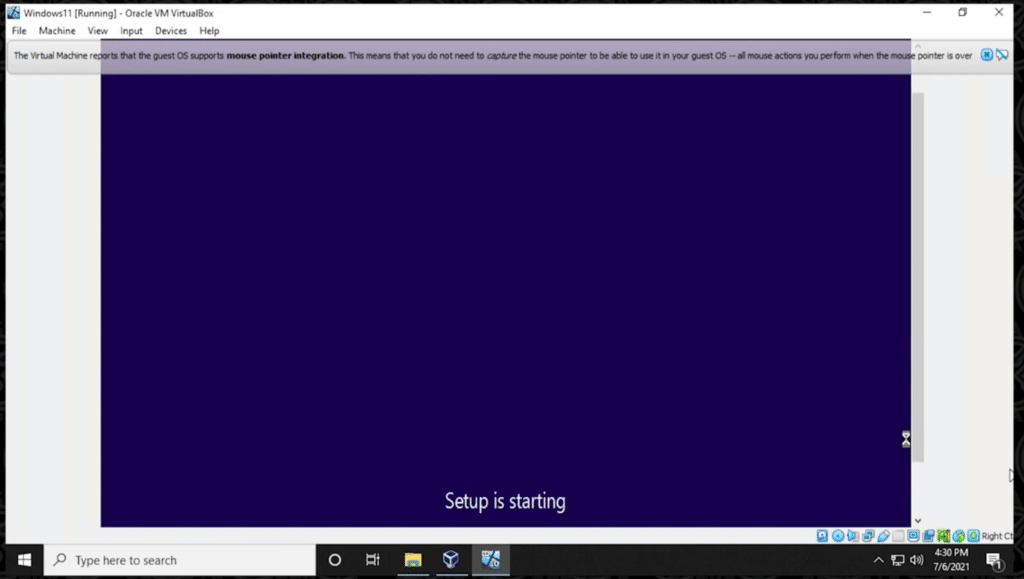
10. After that, wait until your Windows 11 installation is completed on your VirtualBox, and it will present you with a Windows 11 welcome screen. Follow the on-screen instructions to set up your Windows 11.
Conclusion
That’s it. This is how you can install Windows 11 on Oracle VM VirtualBox if you want to explore and experience the exciting new features of Windows 11. This operating system offers a sleek and modern interface along with various productivity enhancements and gaming improvements.
By running Windows 11 on a virtual machine through Oracle VM VirtualBox, you can experiment with its features without making any changes to your primary system. It’s a safe and convenient way to get a feel for the operating system and test its compatibility with your software and hardware.
Want to install windows 11 on virtualbox?
If yes then you are in the right place.
On 24th June 2021, Microsoft announced the official release of the Windows 11 Operating System in the launch event.
And according to fans, the live launch event was great that showed all the new features of Win 11 and their performance upgrades.
And after fans got really excited and started searching for Windows 11 ISO file to download & install it.
Although, the official ISO Image file is yet not released by Microsoft but you can find the leaked consumer client version of Windows 11.
And if you also want to use and experience the new 11x OS then this post is definitely for you.
So, let’s get started…
Also, check out our new post on how to upgrade Windows 10 to 11.
Table of Contents
But before we move to the actual process.
Please make sure you have all the essential things like Windows 11 ISO for VirtualBox.
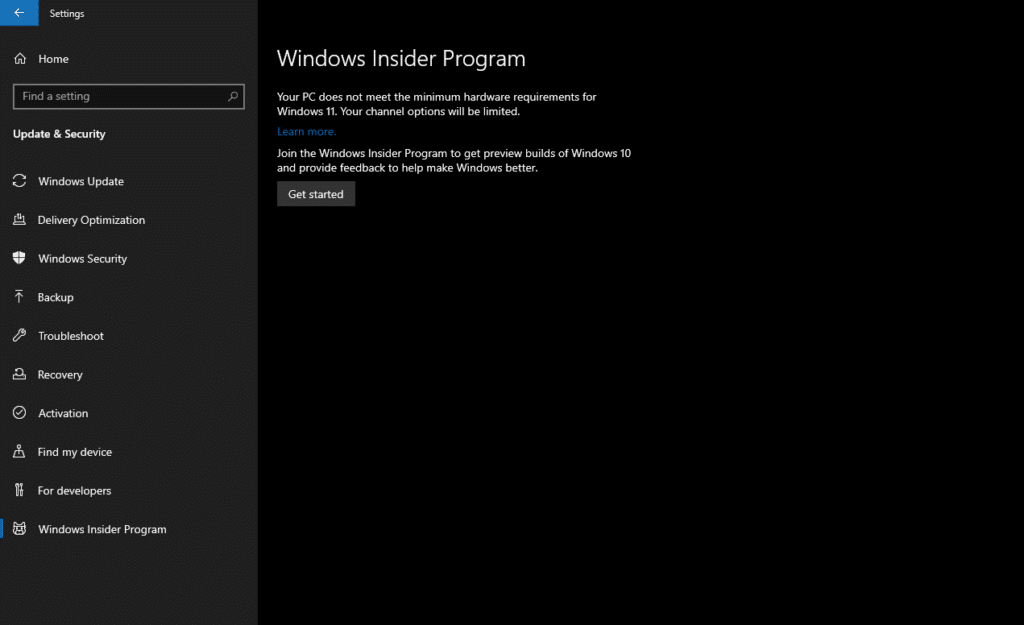
And after I would suggest you to use the PC Health Check app before installing Win 11. Because it will help you to know whether your device is compatible with the new Windows OS or not.
Although, currently there is no official Windows 11 Media Creation Tool right now and in that case, you need to download the ISO file from some external source.
But you can use these given links for downloading all files.
Oracle Virtualbox: Download Link
Virtualbox Extension Pack: Download Link
Windows 11 Virtualbox Image: Download Link
Windows 11 Insider Preview ISO Image: Download Link
Once you are ready with all the files, you can move further.
Important:- Please check your device is TPM 2.0 supported and virtualization technology like AMD-V, Hyper-V, or VT-x are enabled in BIOS settings.
So let’s get started…
1. Download and Install VirtualBox Application
First, Download and Install the Oracle VM VirtualBox application on your PC/ Computer or Laptop. And download link for Windows, Linux, macOS, Solaris, and OpenSolaris is here. Once the .exe file is downloaded, double click on it and then follow the on-screen instruction and Install it properly.

2. Install Virtualbox Extension Pack
Virtualbox Extension Pack is a great utility provided by Oracle corporation. This actually really helps in improving and adding additional features to the Virtualbox machine. By installing this plugin you can get features like Drag & Drop, Mouse Integration, Internet Connectivity, USB support, and many other awesome features like this.
And to install the extension pack file, double-click on the downloaded file and then click on Install.

3. Open Virtualbox VM Manager
Once both the files Virtualbox app and Extension pack are installed on your PC, now open the Virtualbox.exe file from the desktop.

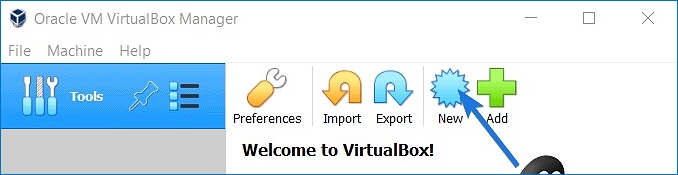
4. Create Windows 11 Virtual Machine
Now on the right hand side section, click on the New icon to create Windows 11 virtual machine in Virtualbox.

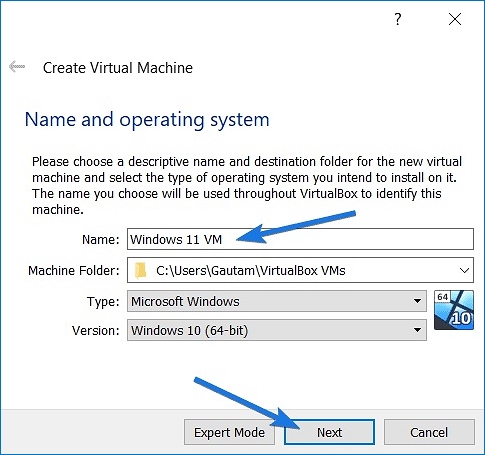
Now a dialog box of Name and operating system will open up, now enter the Name of the virtual machine and type of OS & its version. Since we want to install Windows 11 on Virtualbox virtual machine, so type Name as “Windows 11 VM“, select the Type as Microsoft Windows and version as Windows 10 (64-bit). Now click on Next.

5. Assign Virtual Machine RAM Memory
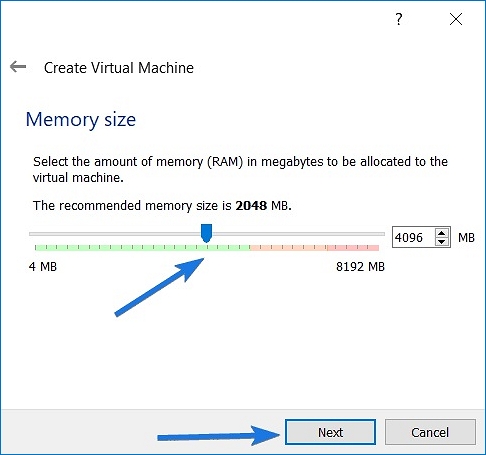
Once you have created the Win 11 virtual machine, now it’s time to allocate virtual machine RAM Memory. And for Windows 11 the recommended memory size is 4Gb or 4096 MB. So adjust the slider and then click on Next.

Important:- I would suggest you to only allocate the RAM memory till the slider is green. (Allocating RAM more than half is not recommended)
6. Create Virtual Hard Disk
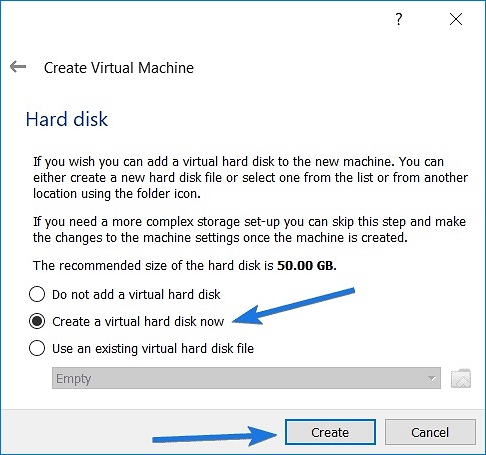
Once you have allocated the RAM memory for the virtual machine, now it’s time to create a virtual hard drive. Now under the Hard disk section, select “Create a virtual hard disk now” and then click on Create.

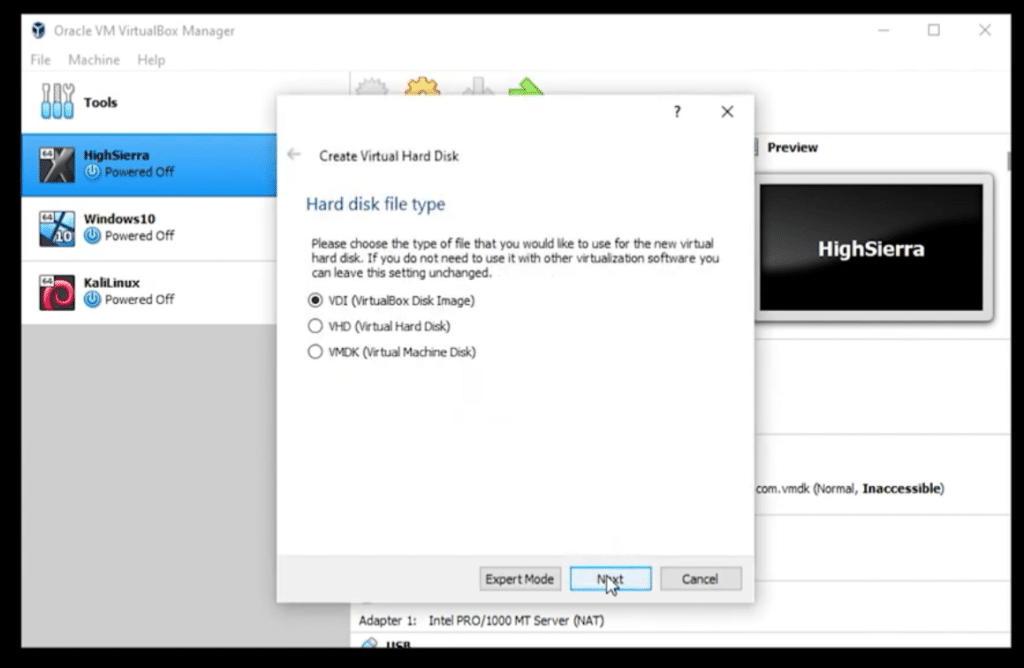
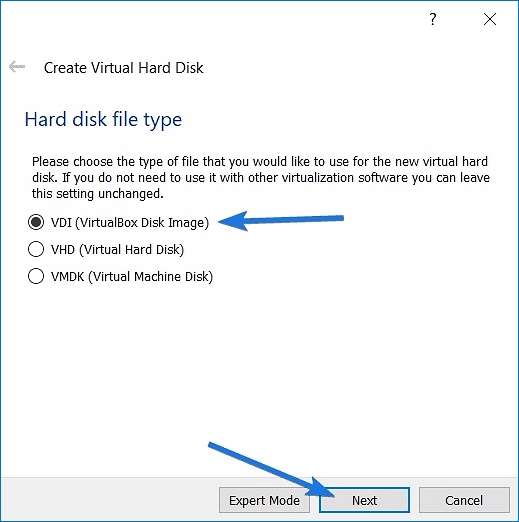
After that under the Hard disk file type section, select VDI (Virtualbox Disk Image) as file type and then click on Next.

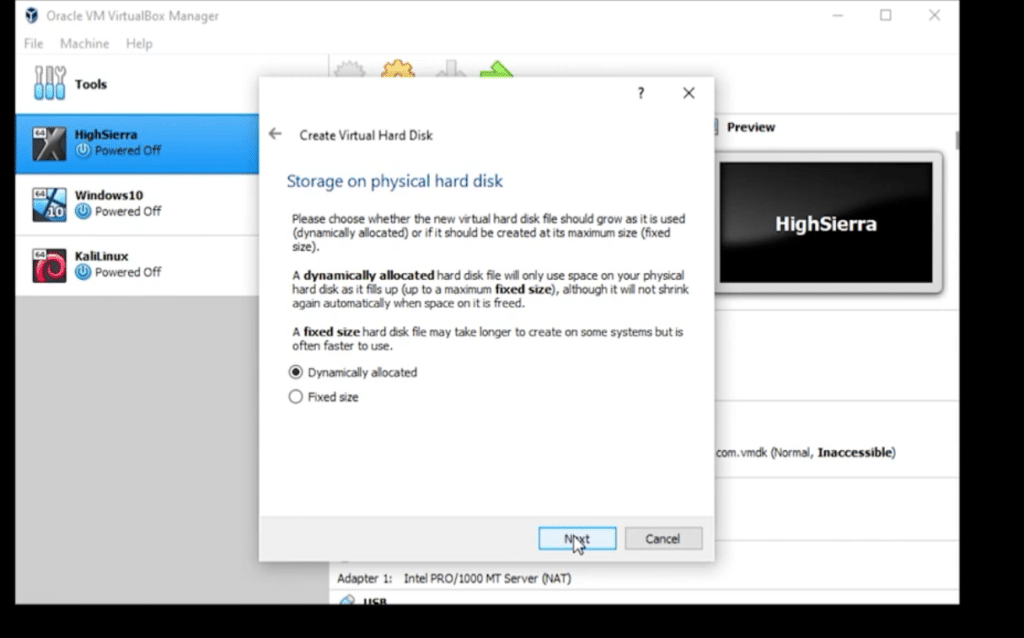
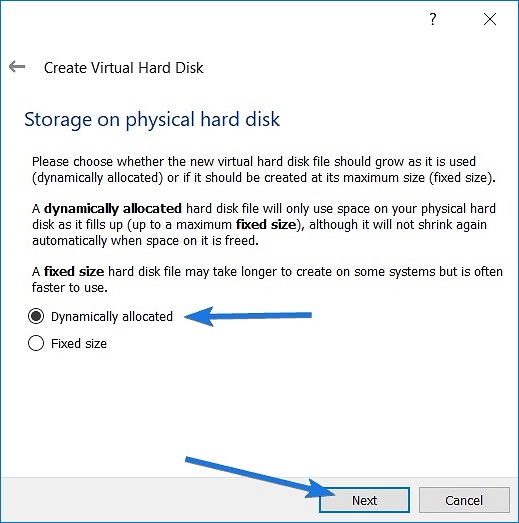
Now under the Storage on physical hard disk section, select Dynamically allocated as storage type and then click on Next.

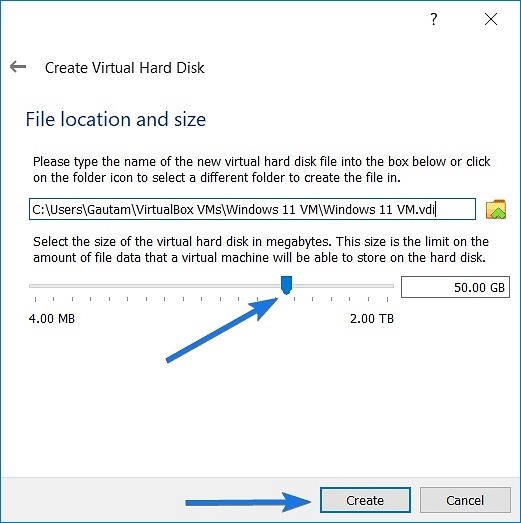
After that select the File location and size of the virtual hard drive and then click on Create. ( Please check the location of file has enough free space )

Now you have successfully created the Win 11 virtual machine and it is ready to use. But before running it we need to do some basic settings.
7. Setting up Virtual Machine
Now here we will do some basic settings like Processors, Display Memory, USB Ports, and Windows Boot Settings. So click select the Windows 11 Virtual machine and then click on the Settings icon.

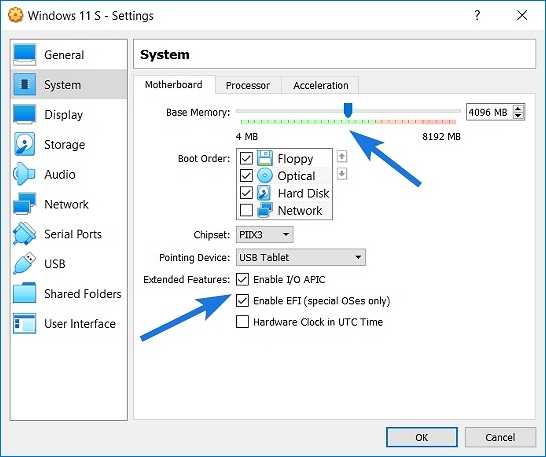
First, go to the System settings tab and then set Base Memory as 4GB ( Minimum Recommended ). And then enable extended features like Enable I/O APIC and Enable EFI (special Oses only).

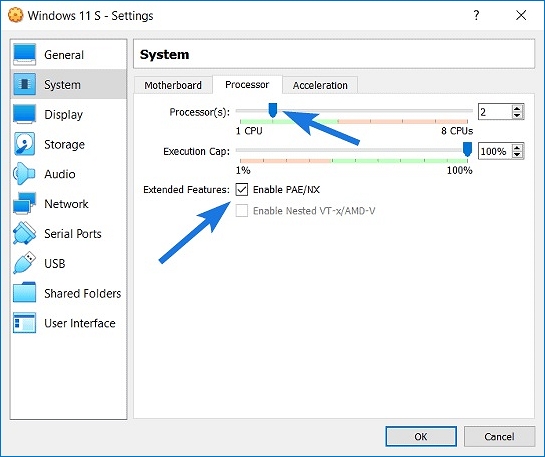
After that, go to the Processors tab & then set Processor(s) as 2, and then enable the extended features like Enable PAE/NX.

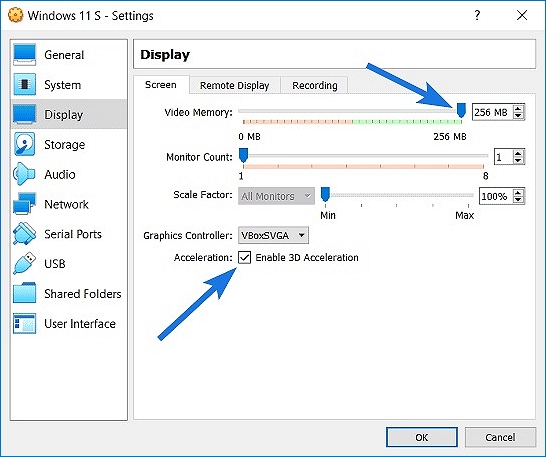
Now go to the Display settings tab and then set Video Memory as 256 MB or more. After that, set Graphics Controller as VBoxSVGA and then Enable 3D Acceleration.

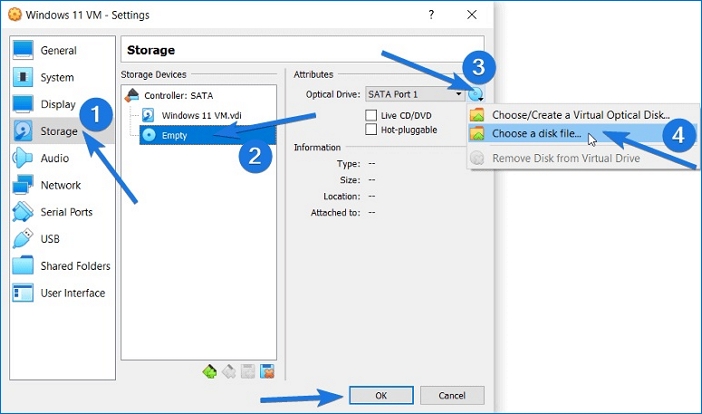
And now comes the Storage Settings part which is very important for the installation of Windows 11. Now under the Storage Devices section, click on the Empty CD icon. After that on the right-hand side section, click on the CD icon and then click on Choose a disk file… ( Basically this will help you to directly boot from ISO file instead of using USB to boot. )

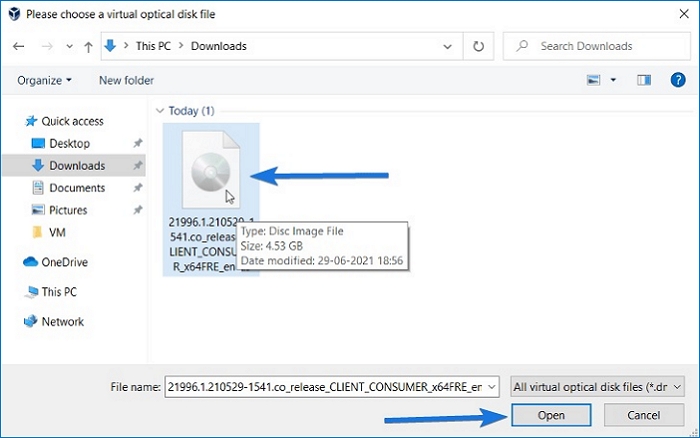
After that browse your computer directory and then navigate to the Windows 11 ISO Image File and then select & click on Open. ( Here you can also use the Insider Preview ISO Image )

And Done! All the settings part is done and your Windows 11 Virtualbox virtual machine is ready to run.
Note:- Before installing it, please checkout is your PC follows minimum requirements for Win 11.
8. Run Windows 11 VM Virtualbox
Now Open the Virtualbox Manager and then select the Windows 11 VM machine and then click on Start.

Now it will start loading the Windows OS setup files. After that follow all the on-screen instructions according to your preferences and Install it properly.

At last, you will see that Windows 11 is running on Virtualbox.

Note:- Here we have directly shown the desktop screen and if you want the full Win 11 installation then check this guide.
Important:- Getting some error like “Your PC does not meet the minimum hardware requirements for Windows 11” then check your computer/PC or laptop compatibility using the PC health check app mentioned above.
Fix ‘This PC can’t run Windows 11’ on Virtualbox
Now if you are getting an error like “This PC can’t run Windows 11” while installing it on Virtualbox then follow the below-mentioned steps to fix this issue.

And here are the steps to follow:-
1. Open Virtualbox & then again Restart the installation process. And when you are on the Windows Setup screen like shown below, press ‘Shift+F10‘ on your keyboard to open the command prompt.

Note:- If you are using a laptop then press “Shift+fn+F10” to launch CMD.
2. Now type regedit in the CMD dialog box and then hit Enter. After that, Registry Editor will open up and then navigate to the given path.
Location Path:- HKEY_LOCAL_MACHINE\SYSTEM\Setup

3. After that, right-click on the Setup key folder and then create a New > key named as LabConfig. Now in that LabConfig folder, create 2 ‘New > DWORD (32-bit)‘ values then name them as ‘BypassSecureBootCheck‘ and ‘BypassTPMCheck‘ and set there values to 00000001.

Note:- If you are still facing issues then create another DWORD (32-bit) key and name it as ‘BypassRAMCheck‘ and set its value data to 00000001.
4. At last, close the registry editor & CMD and then click on Install now button to start the installation process.

You can also follow our previous post on Bypass Windows 11 Secure Boot for the same process.
That’s it for now…
Conclusion
So that’s how you can easily download and install Windows 11 on a virtual machine using Virtualbox. And this is the best method to use new Windows OS without harming your host computer PC. Although, Microsoft has officially released the Win 11 Insider Preview build 22000 ISO and you can also use it by following the same method.
Similarly, if you are a VMware workstation user then also you can use the above file but the steps are a little different.
Check out this new post on Refresh Option in Windows 11 Missing.
Feel free to share your thoughts and also tell us if you know any better way to How to Install Windows 11 On VirtualBox Virtual Machine.
Don’t forget to share this post with your friends.
Table of Contents
In this article, we will learn how to install Windows 11 on Virtualbox and provide you with {Free Download} Windows 11 ISO File. Installing Windows 11 on Virtualbox is simple- all you need is the right files and a correct method. This complete article guide will help you to install Windows 11 on Virtualbox.
Here are some common errors that you might face while installing Windows 11 on Virtualbox- “This PC can’t run Windows 11” on Virtualbox? How to solve the problems
The first step is to check whether your system fulfills all the requirements to install Windows 11. Here are the complete set of system requirements for Windows 11, or you can read the minimum system requirements for Windows 11 below.
System Requirements for Windows 11
Processor: 1GHz or faster with a minimum of two cores on a compatible 64bit processor/chip
RAM: 4GB
Harddisk Storage: 64GB or greater
System firmware: UEFI, Secure Boot capable
TPM: Trusted Platform Module (TPM) version 2.0
Graphics card: Compatible with DirectX 12 or later, with WDDM 2.0 driver
Display: HD 720p (1280×720) or more, 8 bits per color channel
Step 1: How to download Windows 11 Image (Windows 11 ISO)
Download Windows 11 ISO: Direct Install, VirtualBox, and VMWare Images
If you use our link, download the Download Internet Download Manager (IDM) to speed up your processor. You can also connect to the Free Download Manager add-on, which increases the download speed several times.
NOTE: If you want to install Windows 11 on your PC directly, you can see the following 6 steps or skip it.
Steps to install Windows 11 from Insider Program by Microsoft
1. Go to Settings > Update & Security > Windows Insider Program. Click Get Started.
2. The next pop-up will ask you to Register for the Insider Program.
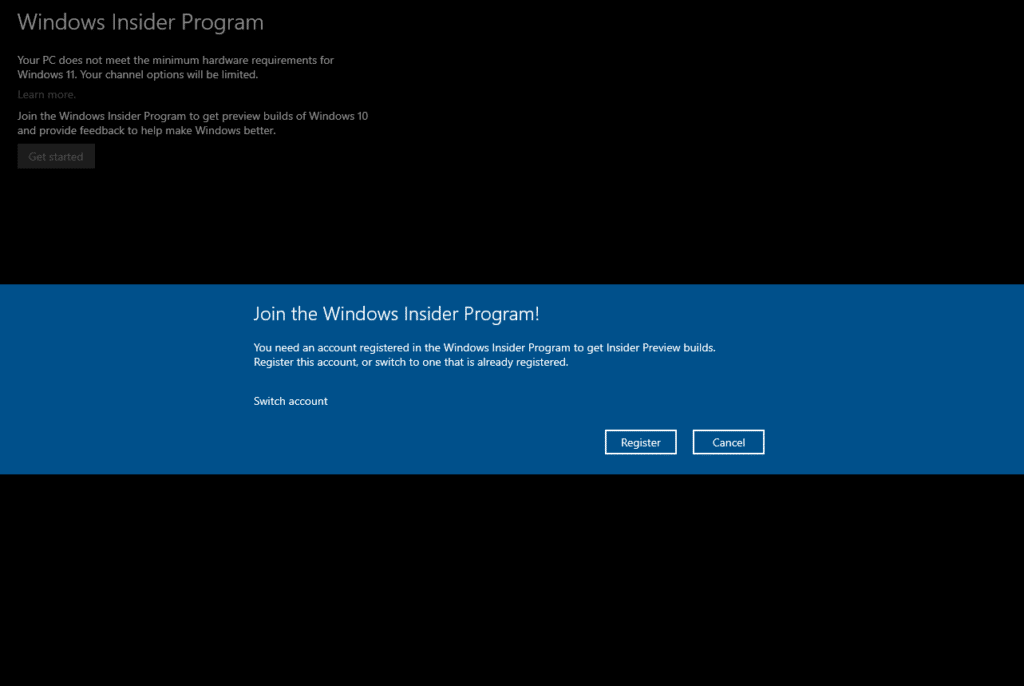
3. Follow the onscreen instructions. When choosing the experience, make sure you select the Dev channel (for developers). This channel is the only one that allows the Windows 11 download.
4. Review the terms and conditions, then click confirm. When prompted, click ‘Restart Now.’
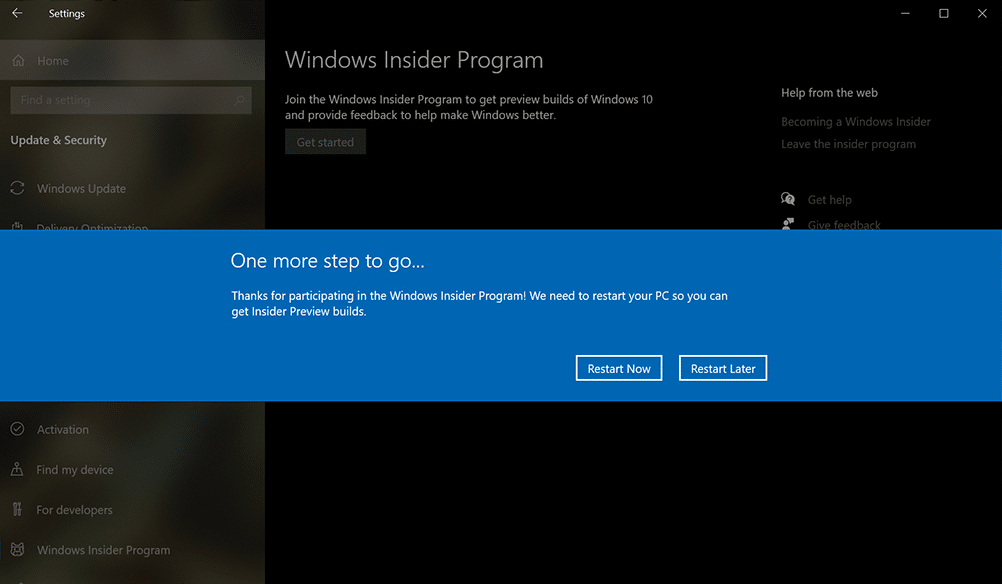
5. After restarting, go to Settings > Privacy > Diagnostics & feedback, and make sure the ‘Optional Diagnostic Data’ switches ‘On.’
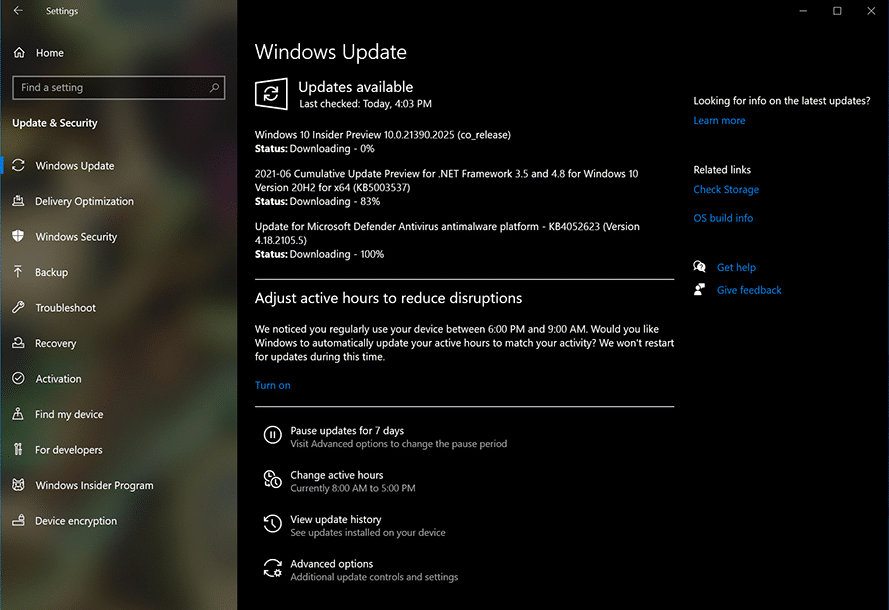
6. Last, go to Settings > Update & Security > Windows Update. Click the Check for updates button. Assuming your system qualifies for Windows 11, You should see the latest Windows 11 Insider Preview build. From here, you can select it and start installing the new operating system.
These are some straightforward steps that will help you download and install Windows 11 directly on your PC.
Step 2: Install Virtual Box
1. Download Virtualbox;
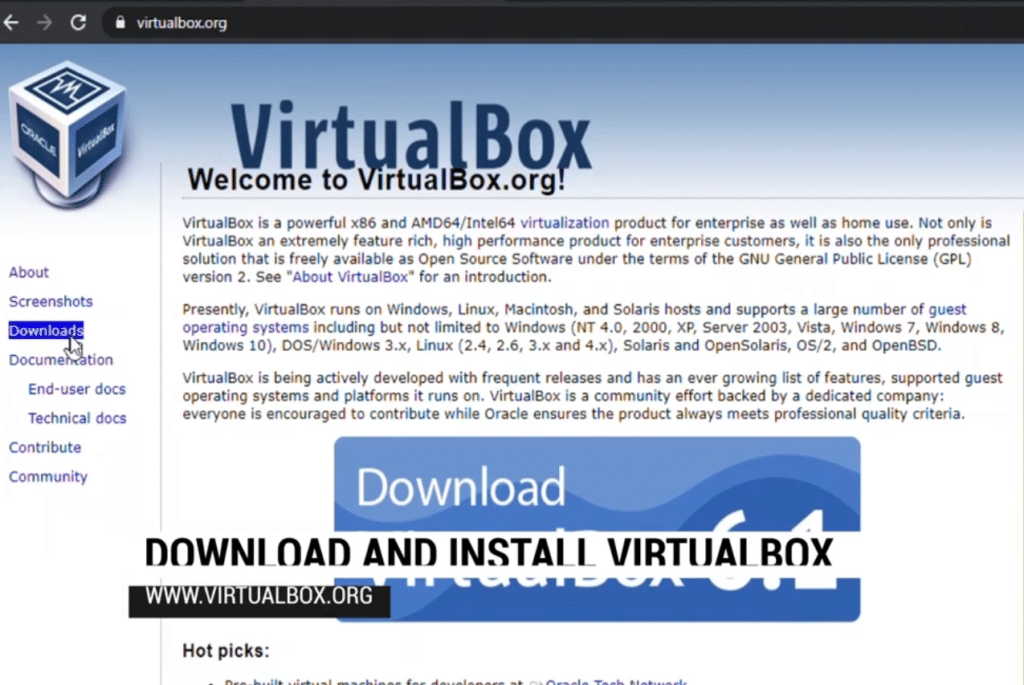
2. Click Download VirtualBox;
3. Select the “Windows hosts” option;
4. Download Virtual Box Extension Pack.
5. Wait for the application to download, then click on it;
6. Go through the installation steps.
Step 3: Setting up VirtualBox for Windows 11
1. Locate the Windows 11 ISO file that you have downloaded in Step 1.
2. Open VirtualBox that you installed in Step 2 and click New.
3. Enter any name; I have used Windows11. Select the type to- Microsoft Windows and Version to- Windows 10 (64 bit). Click Next.
4. Increase your memory size to the maximum green limit.
5. Click- Create a Virtual Disk Now.
6. Select VDI.
7. Select Dynamically allocated and click Next.
8. Set Disk Size to 80GB. Click Create.
9. Click Settings.
10. Go to System > Processors. Select 4 processors.
11. Go to Storage > Click Empty. Click the Blue Disk icon on the top right.
12. Now select the Windows 11 ISO file that you downloaded in Step 1. Click Open.
13. Leave all the other settings as defaults.
14. Click Start.
15. Select the Windows 11 ISO file. Click Start.
It will take up few minutes, and the Windows 11 Installation process will automatically proceed.
Step 4: Completing Setting up Windows 11
1. Click- I don’t have a Product Key.
2. Select any version of Windows. I am using Windows 11 Pro. Click Next.
3. Accept all the Terms and Conditions. Click Next.
4. Select Custom: Install Windows only (advance).
5. Set up your hard drives as per your needs. Select the Drive you want to install Windows 11 and click Next.
6. The setup process will start and will take some time to finish.

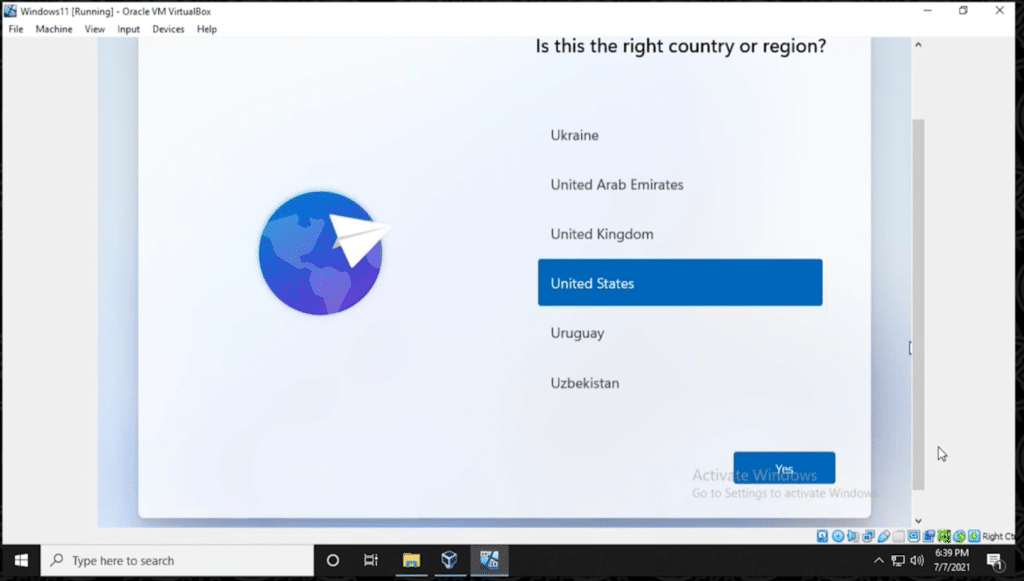
7. Once the installation is over. You will be finalizing the setup with the other formalities. Select your location.
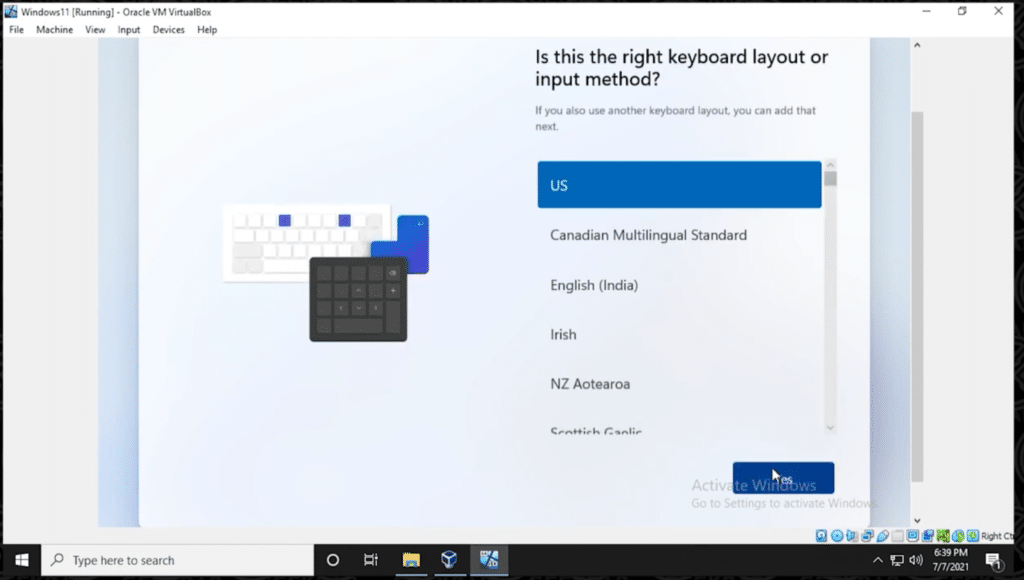
8. Select your keyboard layout. Skip the secondary layout.
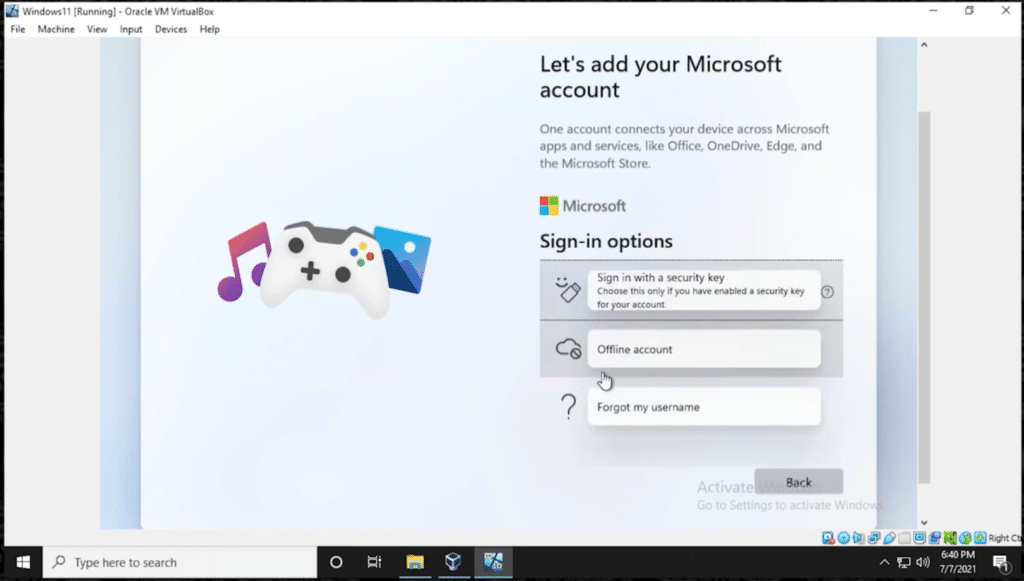
9. Skip the sign-up option by selecting Sign-in options. Select Offline Account.
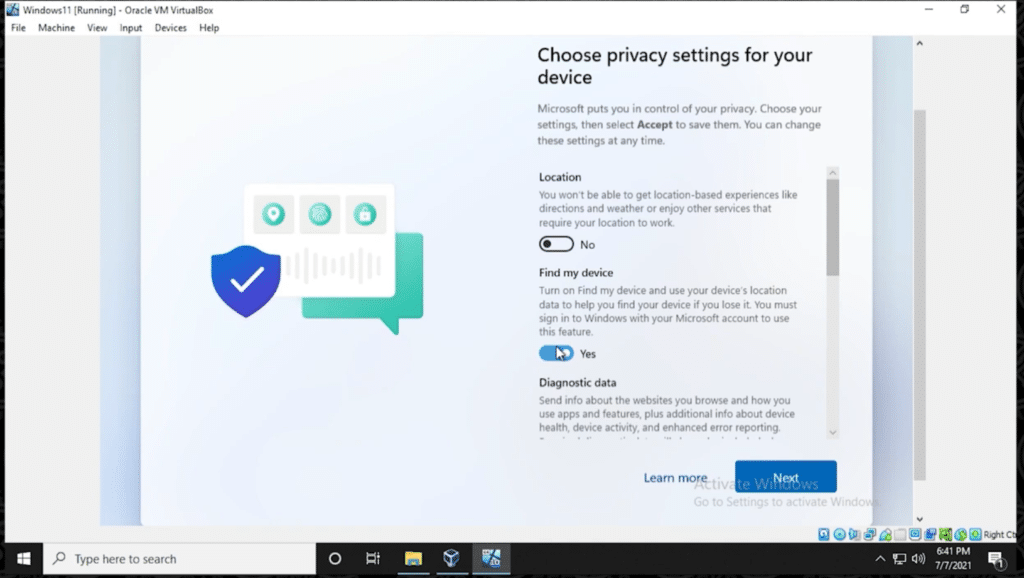
10. Enter your name and the system password that you want to set. Fill out the Security Questions. Select your Privacy Settings.
11. And finally, you have completed the step os- install Windows 11 on Virtualbox.
12. You can take the help of this guide and Activate Windows 11 for free.
You can also set up the Guest Addition. Here is a complete video that will help you through this installation process of Windows 11 on Virtualbox.
Here are some common errors that you might face while installing Windows 11 on Virtualbox- “This PC can’t run Windows 11” on Virtualbox? How to solve the problems
Conclusion: Install Windows 11 on Virtualbox
Installing Windows 11 on Virtualbox is very simple. I hope that I have covered all the steps in detail. Suppose you face any issues to install Windows 11 on Virtualbox. Would you mind sharing those in the comment section below?
Содержание
- Шаг 1: Скачивание и установка VirtualBox
- Шаг 2: Подготовка ISO-образа Windows 11
- Шаг 3: Создание и настройка виртуальной машины
- Шаг 4: Инсталляция ОС в виртуальную машину
- Вопросы и ответы

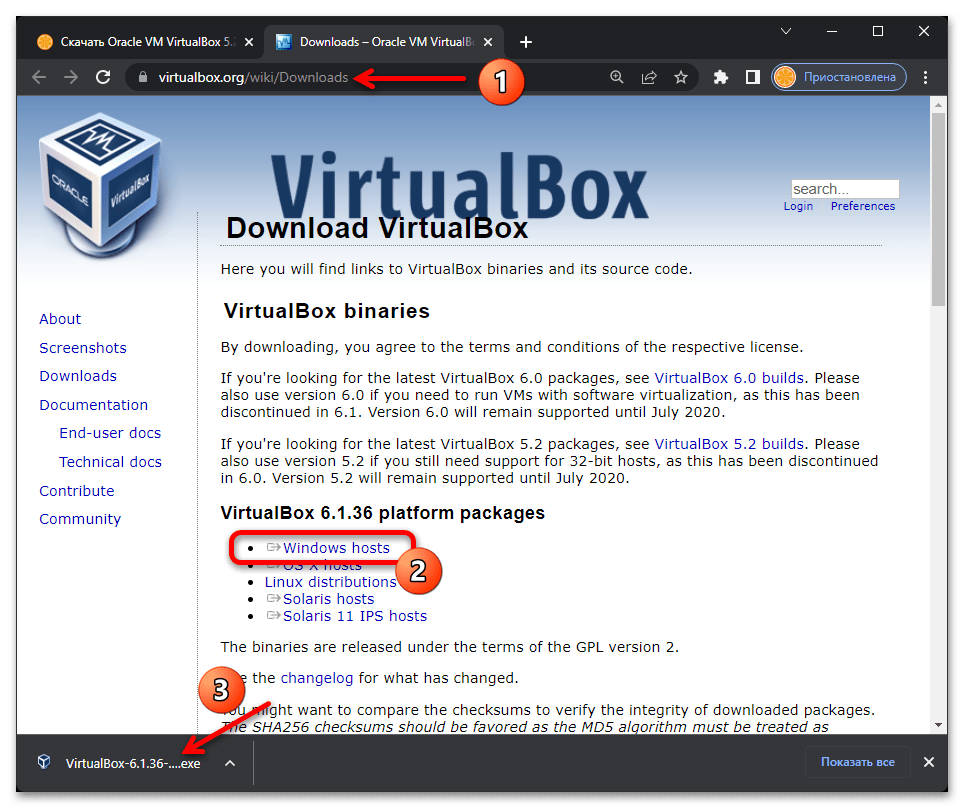
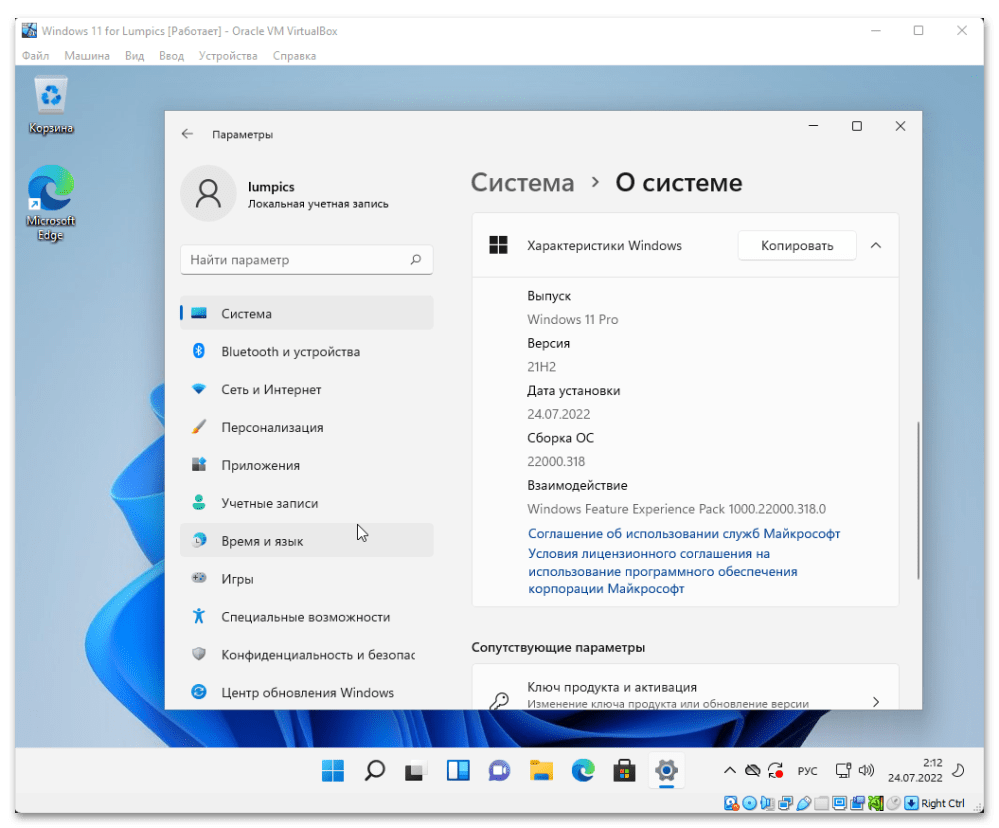
Несмотря на тот факт, что на момент написания этой статьи программа Oracle VM VirtualBox (версия 6.1.36) ещё не получила компонентов, необходимых для нативного (с соблюдением установленных Microsoft системных требований) развертывания Windows 11, получить виртуальную копию операционки с помощью программы не только возможно, но и достаточно просто. Первым делом, конечно же, нужно подготовить (скачать, установить и настроить) софт для создания виртуальных машин – с этой целью в полном объёме выполняем инструкцию по следующей ссылке:
Подробнее: Установка, запуск и настройка программы Oracle VM VirtualBox в среде Windows
Шаг 2: Подготовка ISO-образа Windows 11
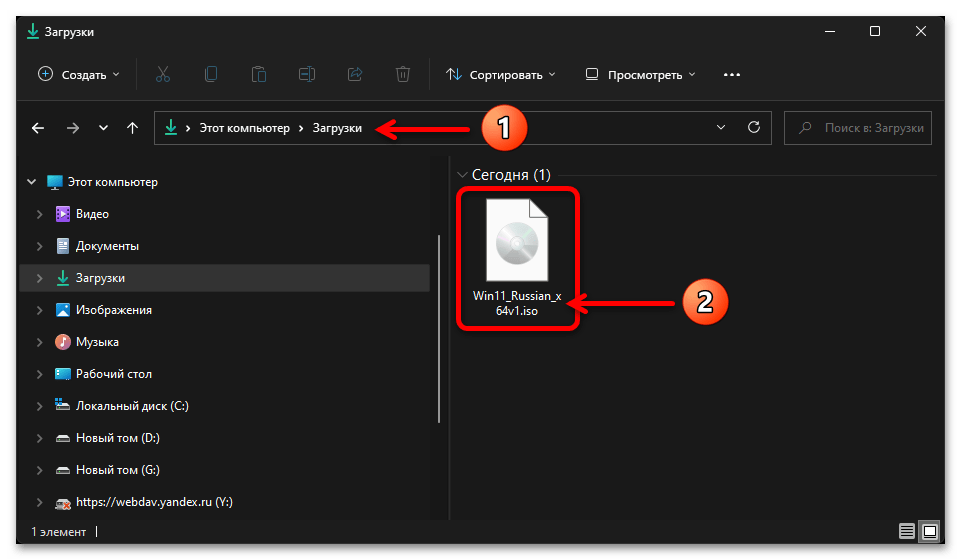
Развёртывание Windows 11 в сформированной при помощи Oracle VM VirtualBox виртуальной машине (ВМ), как и во многих других случаях, осуществляется из установочного файл-образа ОС в формате ISO. Скачать его следует заранее, а наиболее правильным подходом к решению данного вопроса будет использование услуг официального веб-ресурса Microsoft.
Скачать ISO-образ Windows 11 c официального сайта
Подробнее: Как скачать ISO-файл Windows 11 с сайта Microsoft
Шаг 3: Создание и настройка виртуальной машины
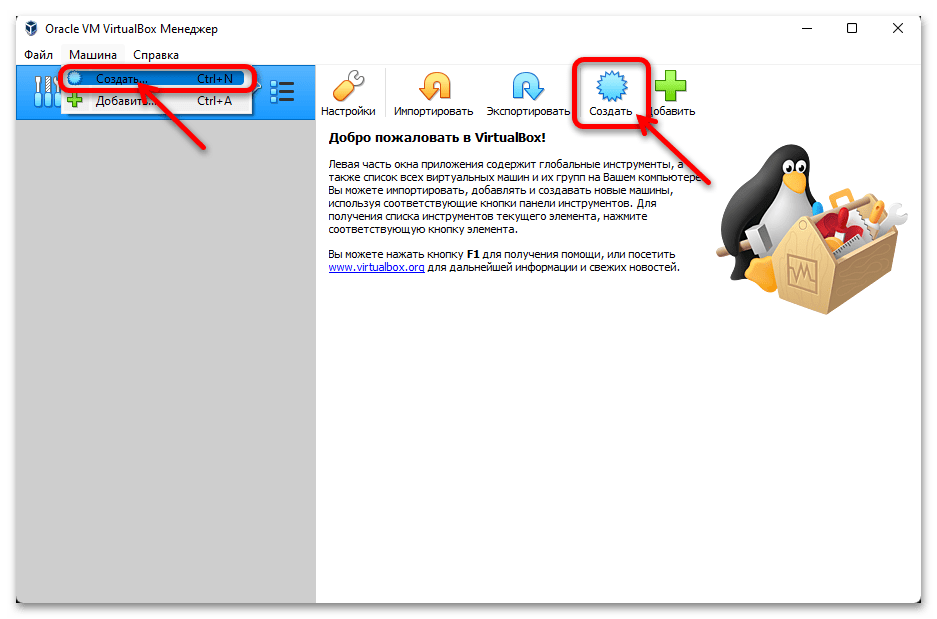
Для создания средствами VirtualBox отдельной виртуальной машины, на которую станет возможным инсталлировать Windows 11, необходимо в точности выполнить следующую инструкцию:
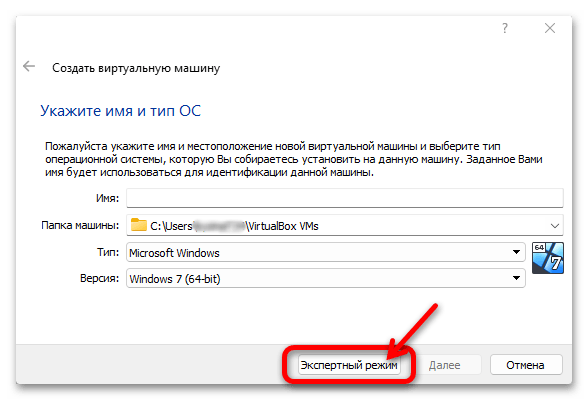
- Открываем ВиртуалБокс.
- Кликаем «Создать» в панели инструментов вверху правой части окна программы, либо вызываем одноимённую функцию из меню «Машина».
- В открывшемся окне «Создать виртуальную машину» щёлкаем «Экспертный режим».

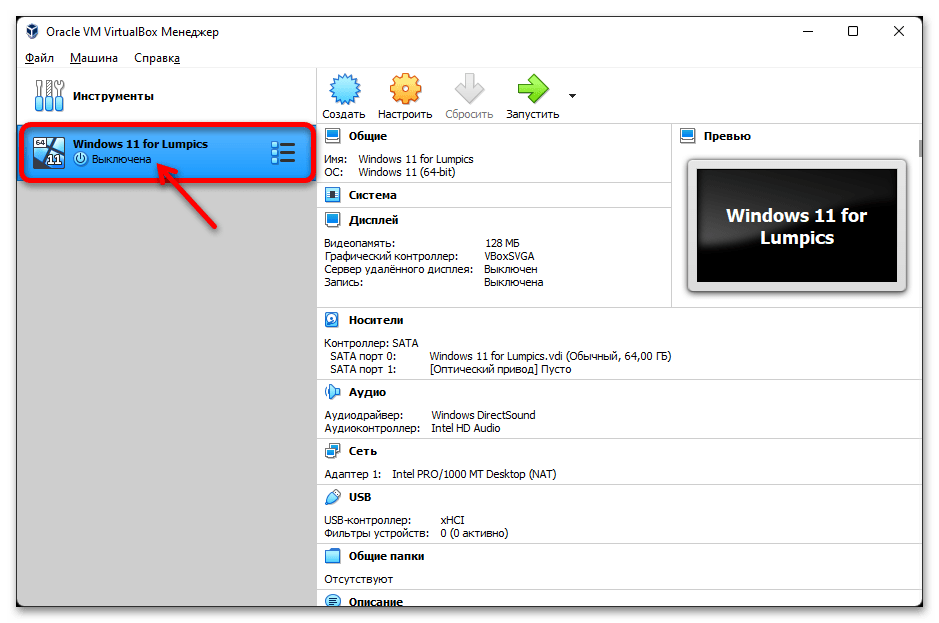
Далее: - В результате выполнения вышеперечисленного ВМ для Виндовс 11 будет сформирована и её имя отобразится в перечне слева окна Менеджера Oracle Virtual Box. Пока что машину не запускаем!
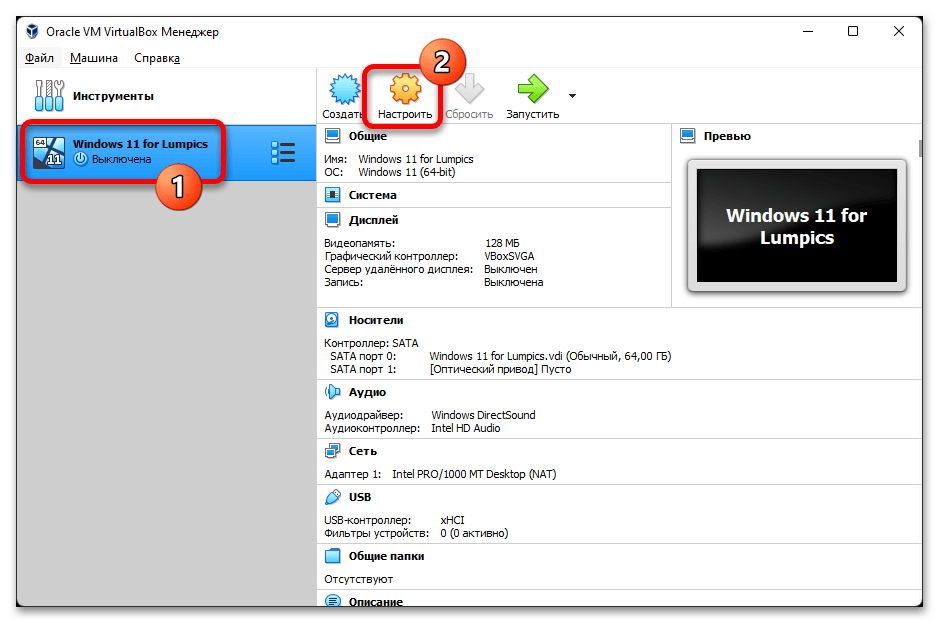
- Кликаем по имени виртуальной машины в списке доступных из Менеджера VirtualBox, затем нажимаем «Настроить».

Средствами открывшегося окна с параметрами ВМ выполняем следующее:
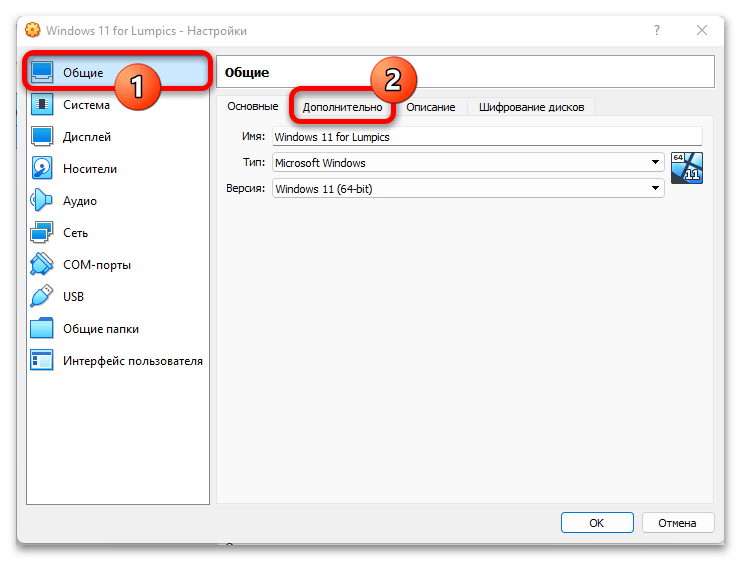
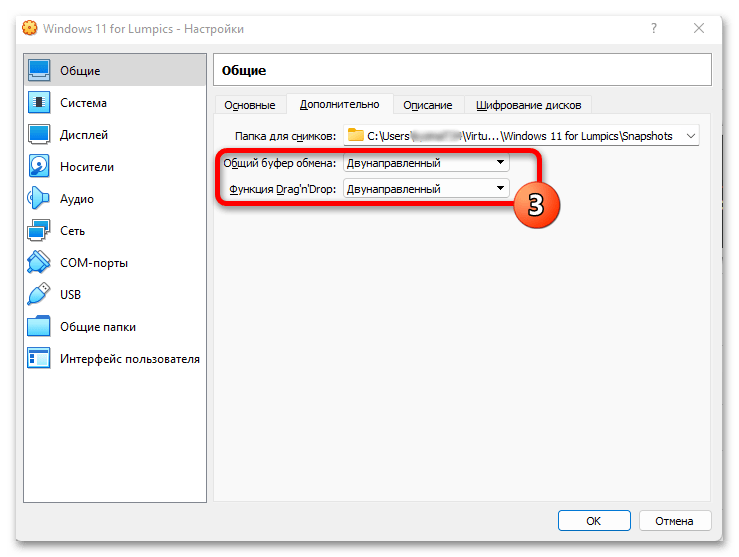
- В разделе «Общие» переходим на вкладку «Дополнительно»,

в раскрывающихся списках «Общий буфер обмена» и «Функция Drag ‘n’ Drop» выбираем «Двунаправленный».
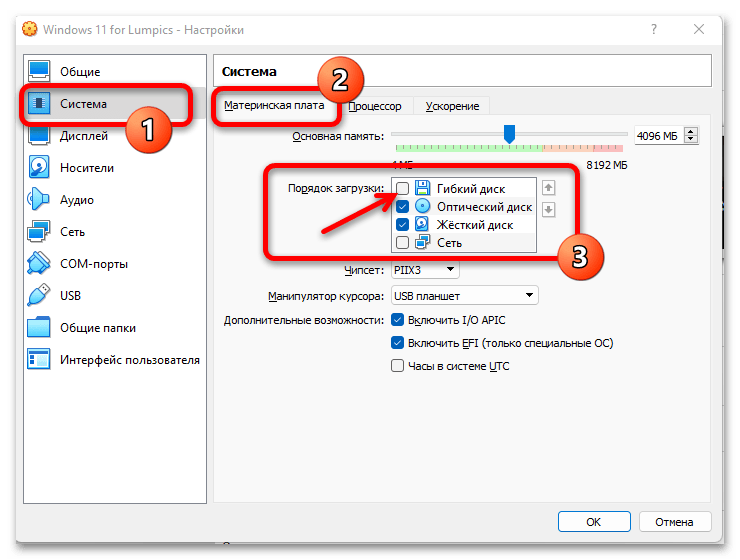
- Переходим в раздел «Система». На вкладке «Материнская плата» снимаем галочку «Гибкий диск» в списке «Порядок загрузки».

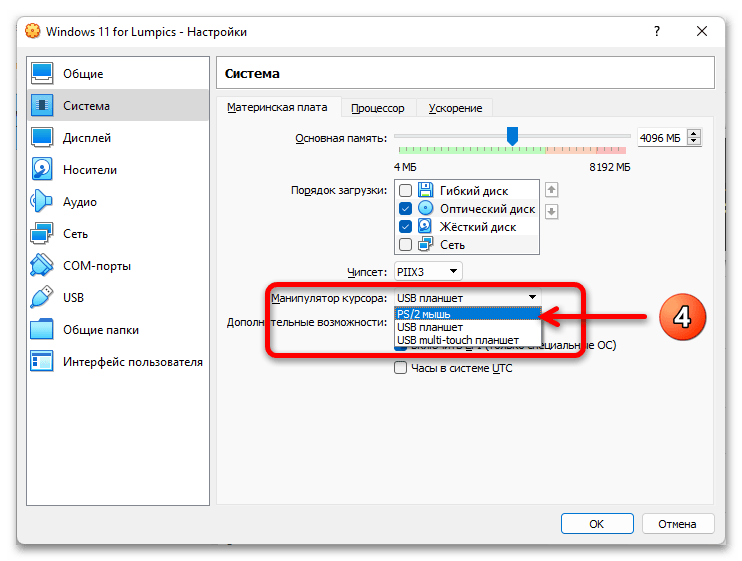
В раскрывающемся списке «Манипулятор курсора» выбираем «PS/2 мышь».

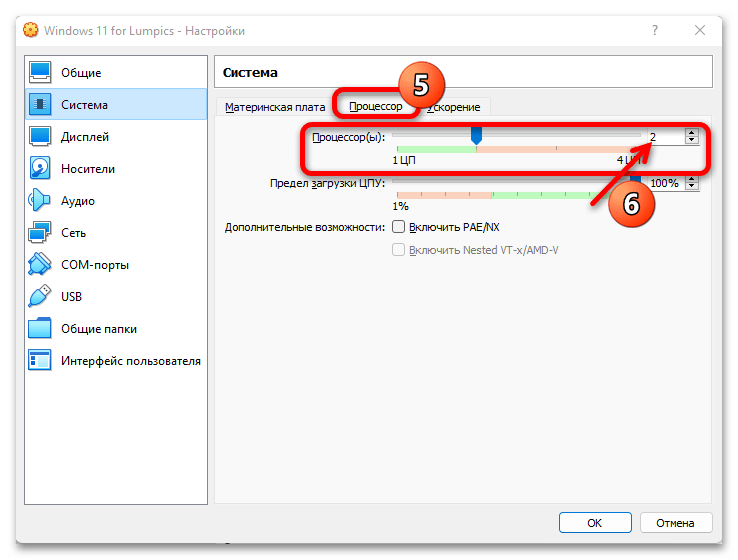
Перемещаемся на вкладку «Процессор», выставляем значение параметра «Процессор(ы)» равным не менее чем 2.
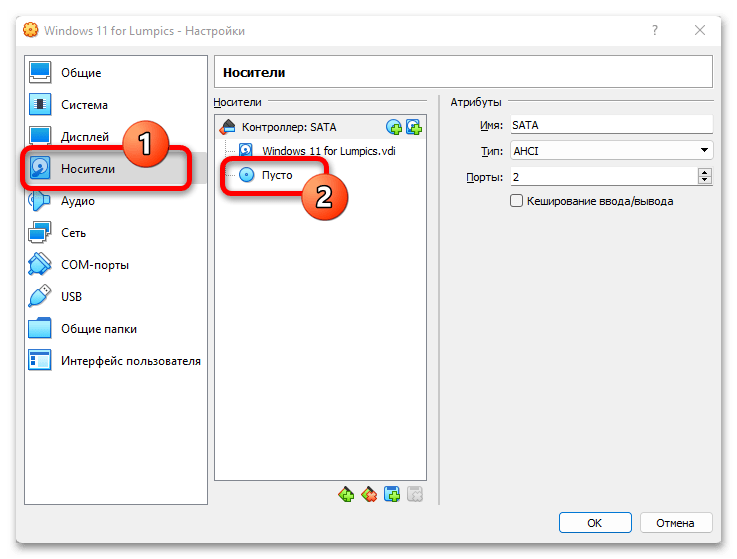
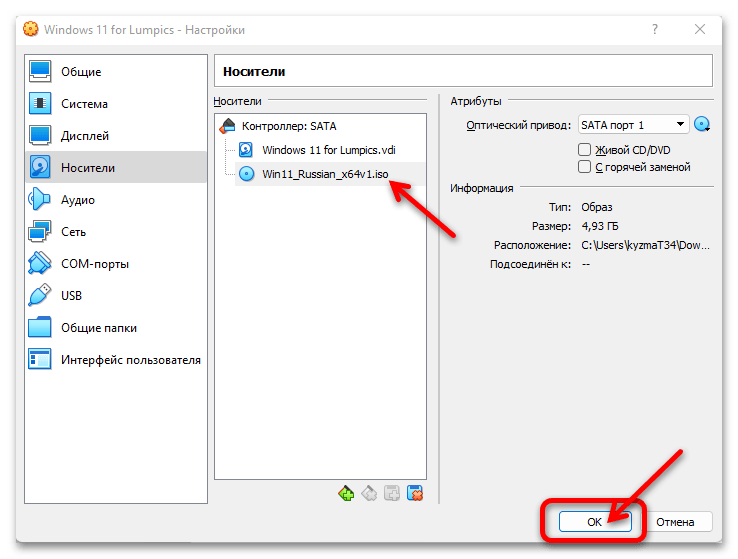
- Открываем раздел настроек ВМ «Носители», в одноимённом списке справа кликаем по обозначенному «Пусто» значку DVD-диска.

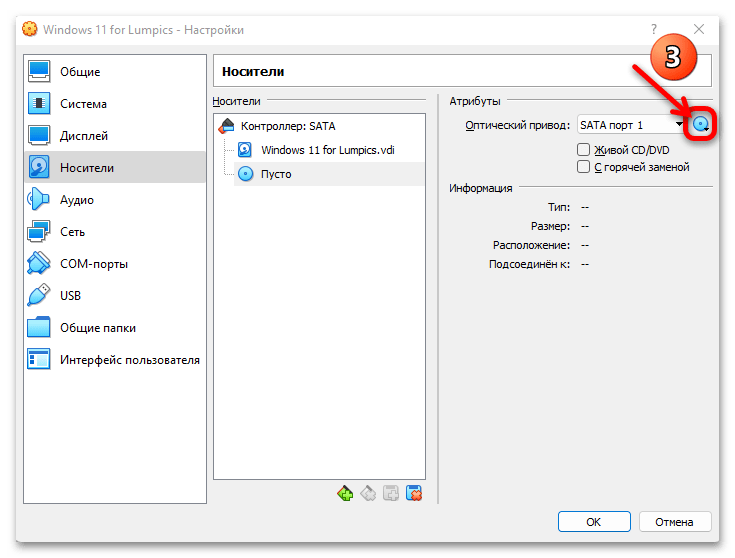
Далее, в области «Атрибуты» щёлкаем по расположенному справа от раскрывающегося списка «Оптический привод» значку «Выбрать файл образа»,

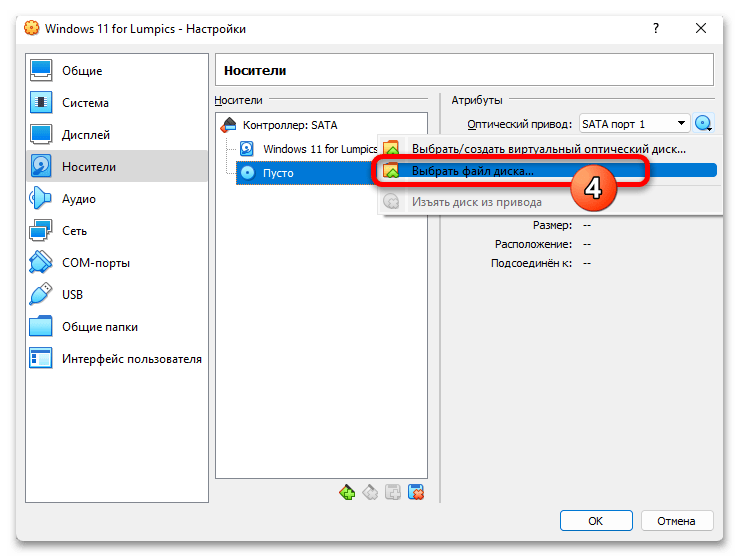
затем кликаем «Выбрать файл диска» в отобразившемся меню.

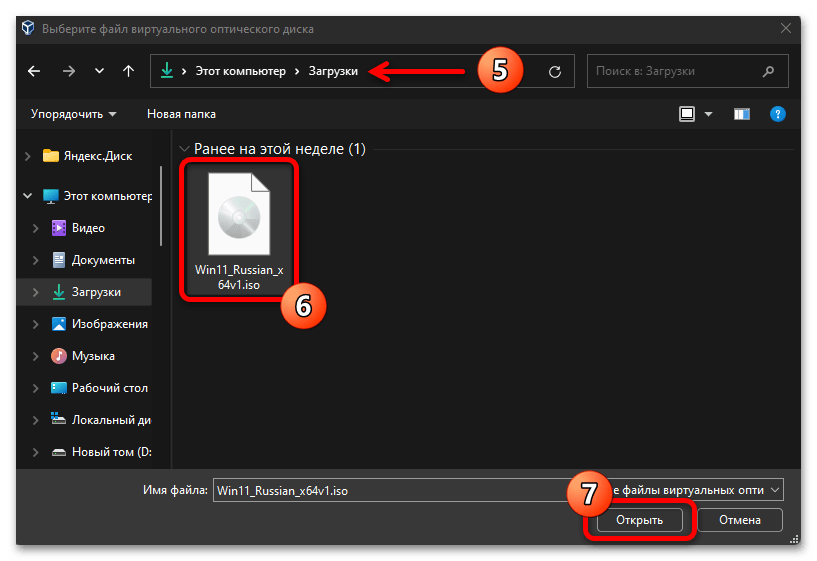
Переходим по пути расположения iso-образа Виндовс 11, выделяем файл и нажимаем «Открыть».
- Убедившись, что образ с ОС подсоединён к ВМ в программе, щёлкаем «ОК» в окне «Настройки».


- В разделе «Общие» переходим на вкладку «Дополнительно»,
Шаг 4: Инсталляция ОС в виртуальную машину
После формирования и настройки ВМ в ВиртуалБоксе вышеописанным образом можно приступать к непосредственному развёртыванию Виндовс 11 на эмулируемом программой компьютере. На данном этапе успеху мероприятия практически ничего не мешает, но всё же особенности текущей версии софта для виртуализации и системные требования устанавливаемой операционки потребуют применения некоторых «хитростей».
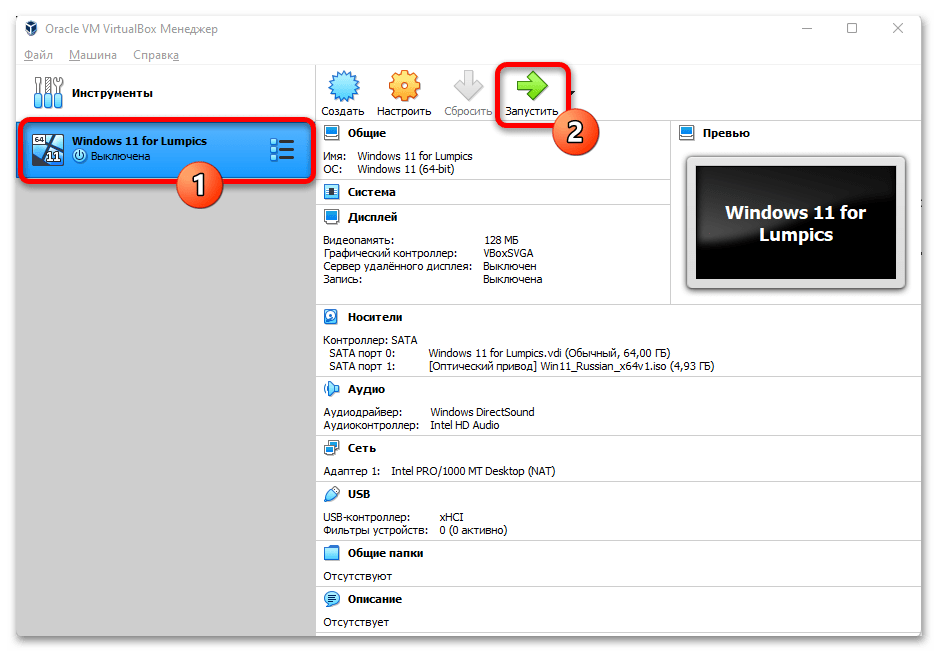
- Щелчком по имени выделяем подготовленную для Виндовс 11 виртуальную машину, кликаем «Запустить» в панели инструментов Менеджера Virtual Box.
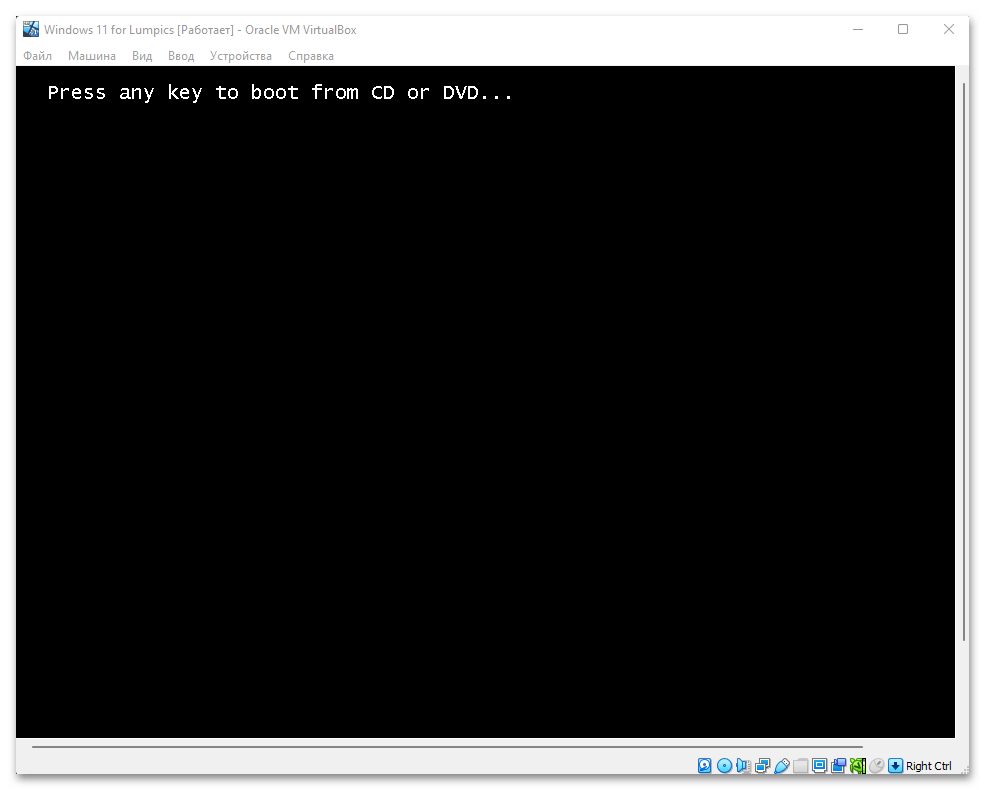
- Как только в открывшемся окне отобразится приглашение «Press any key to boot from CD or DVD…», нажимаем на любую клавишу клавиатуры ПК.

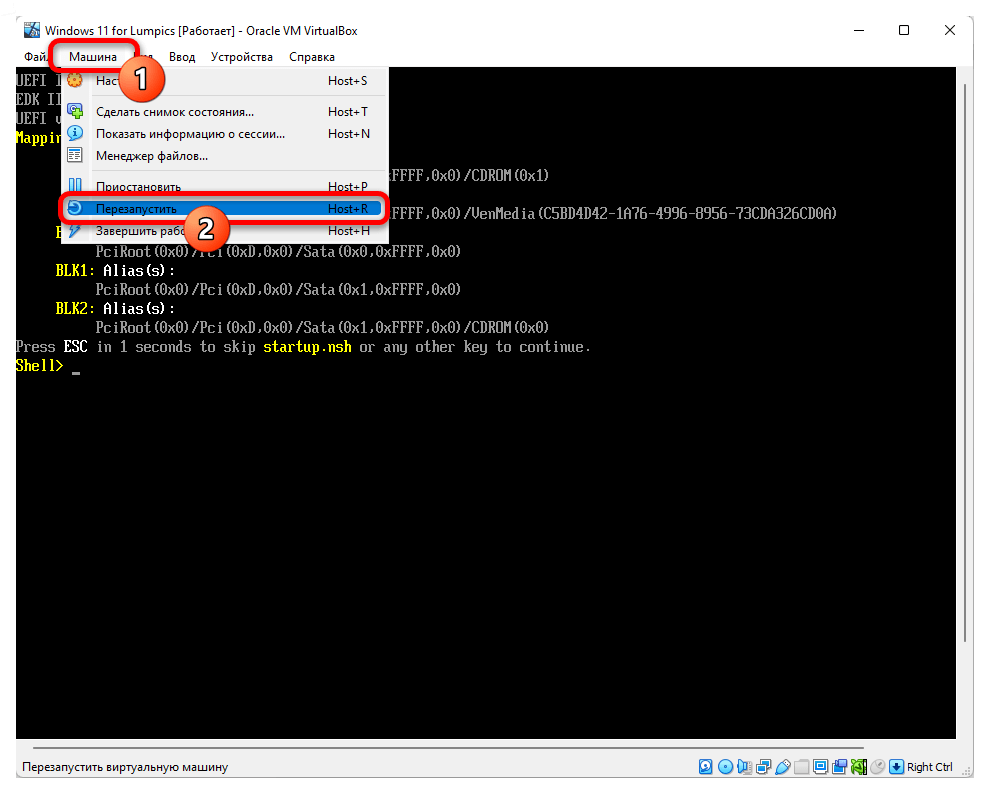
(Если не успели, и система не начала загружаться с виртуального оптического диска, открываем меню «Машина», выбираем «Перезапустить» и далее «ловим» приглашение воздействием на кнопку клавиатуры.)
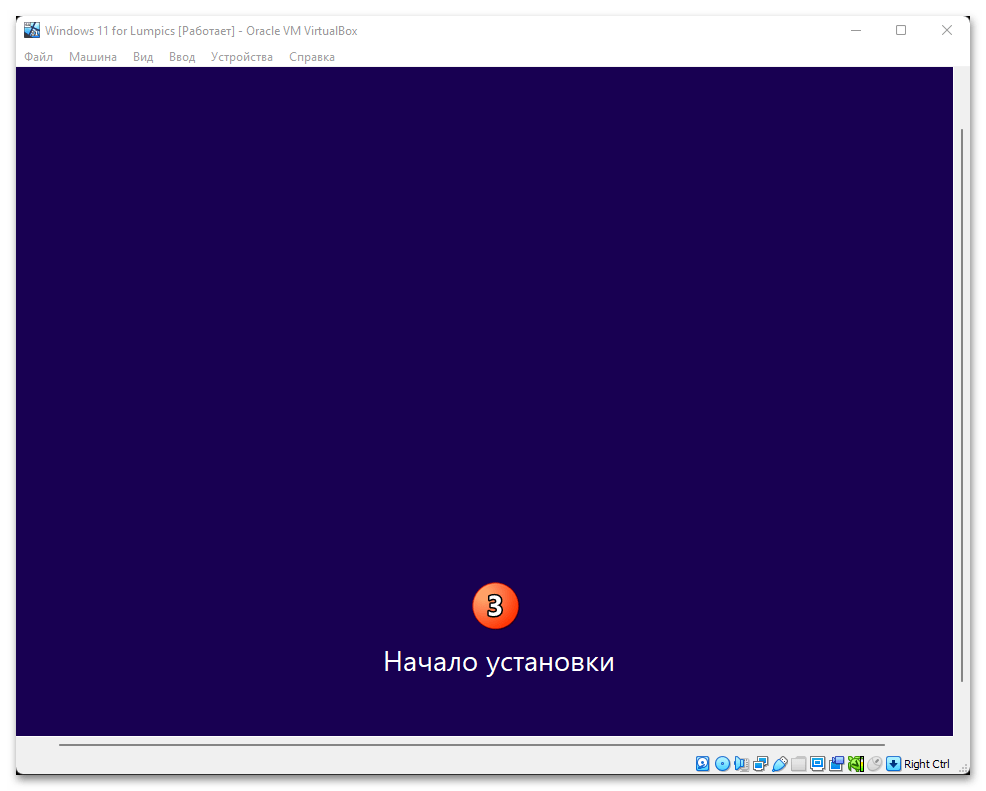
- Немного ожидаем запуска программы установки Windows в виртуальной среде.
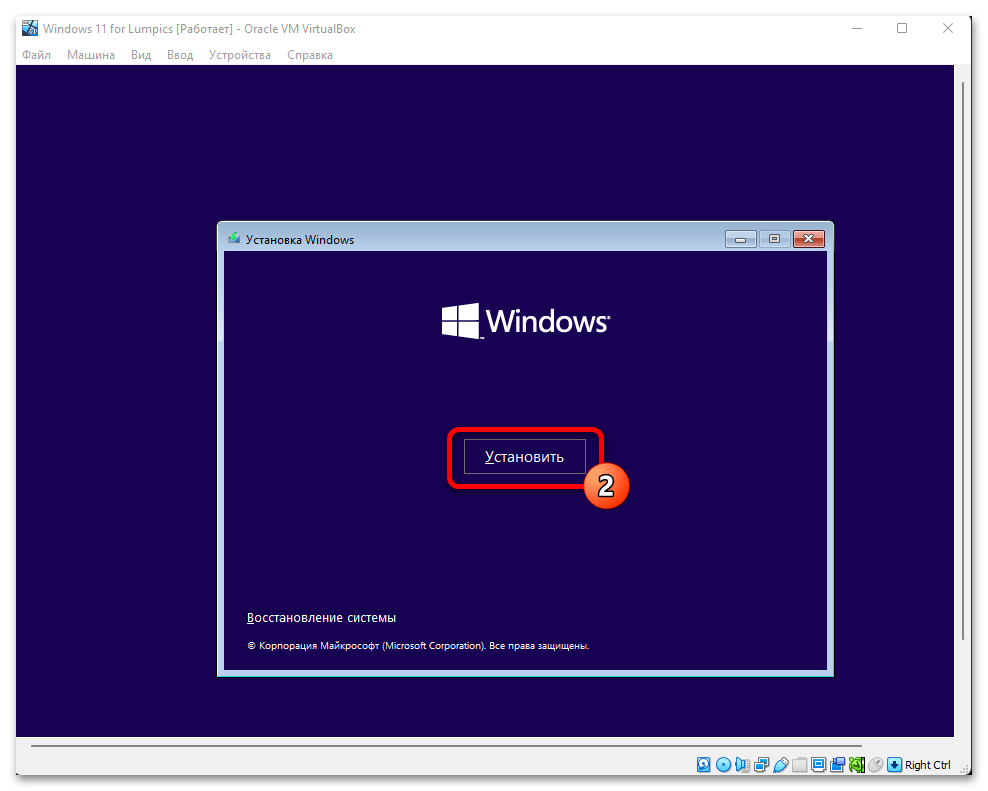
- Щёлкаем «Далее»,

затем «Установить»,

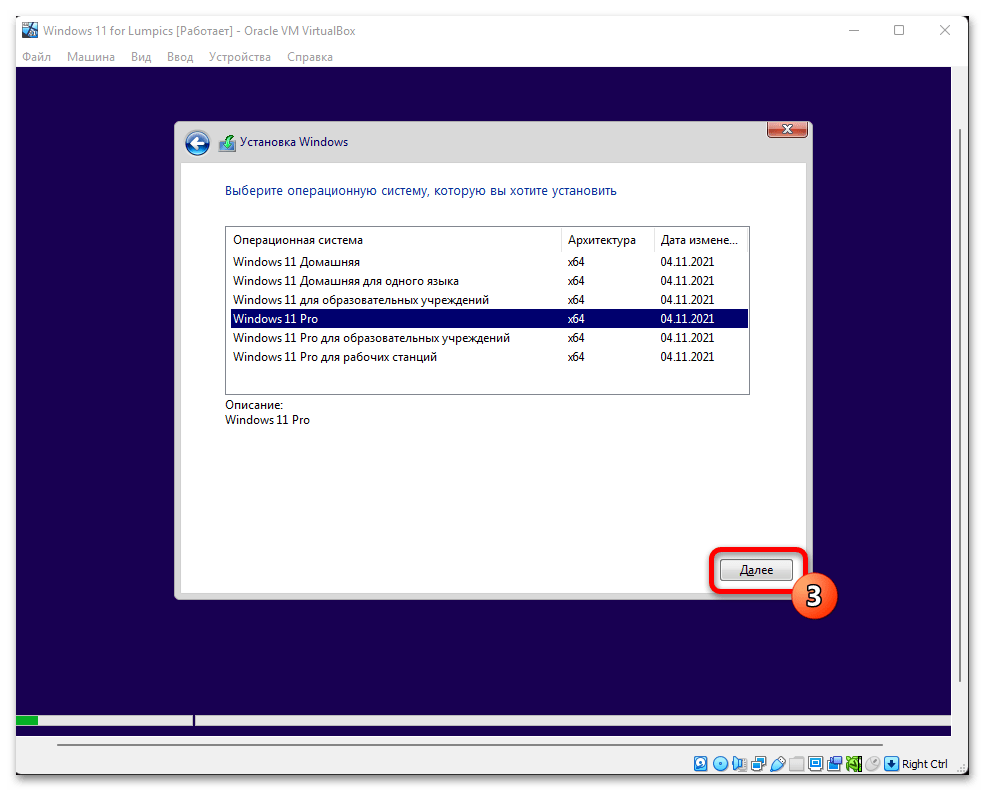
и ожидаем появления следующего окна Мастера инсталляции Windows 11.
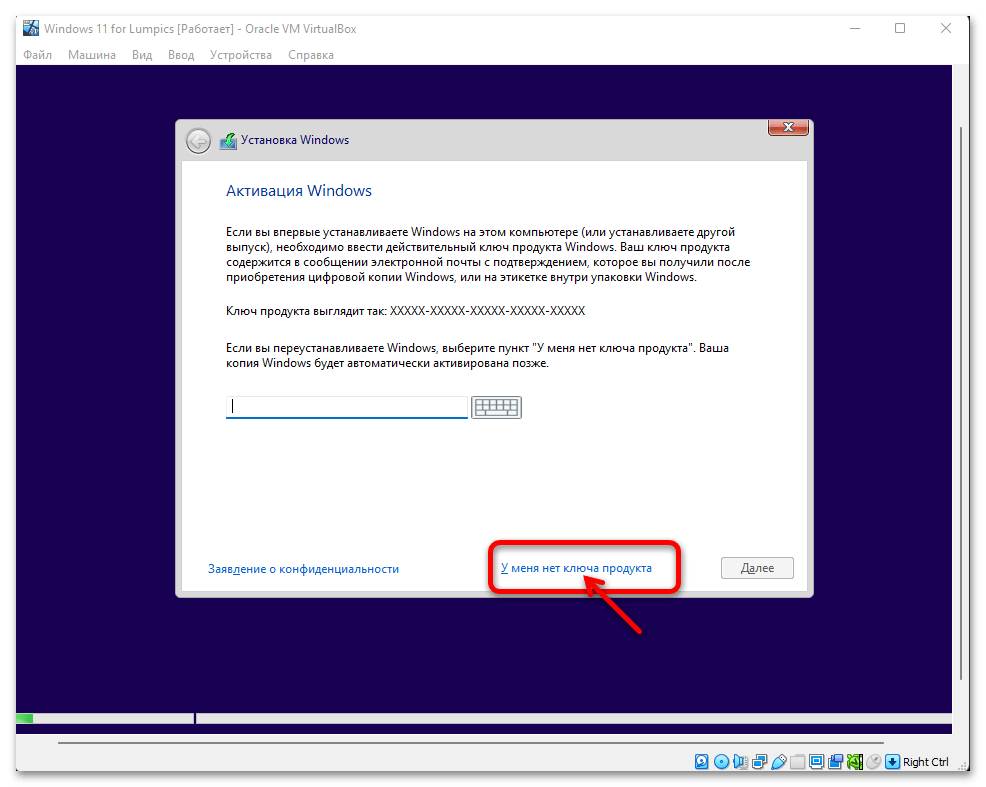
- Кликаем по ссылке «У меня нет ключа продукта».
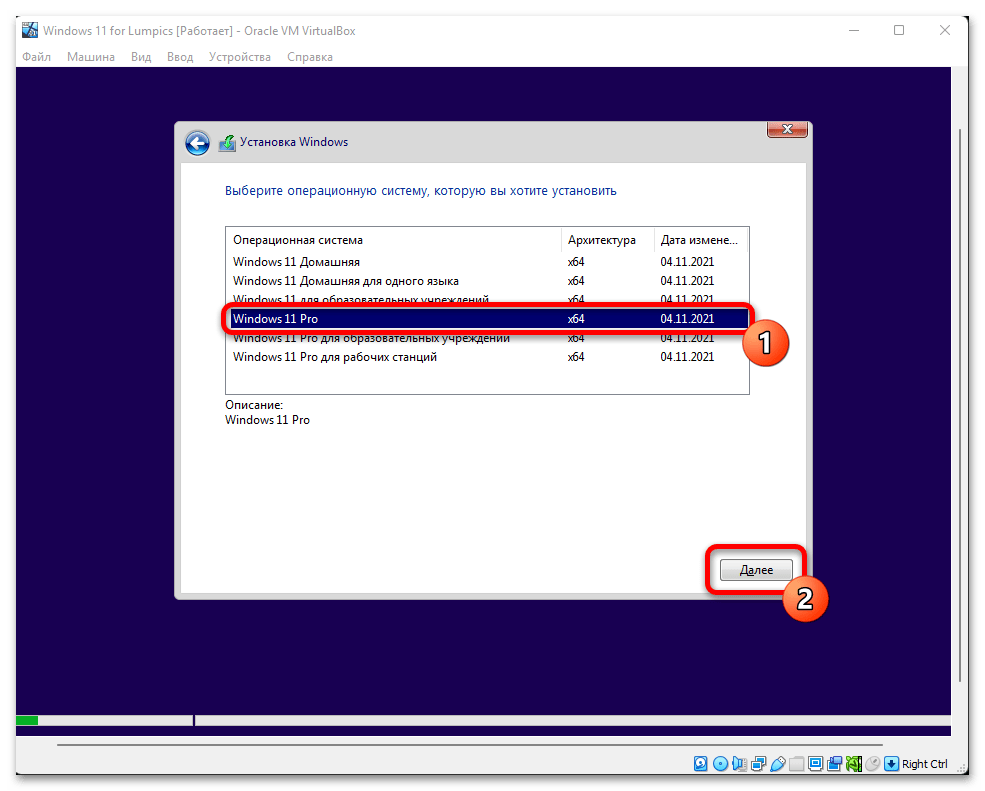
- Щелчком мышью по соответствующему наименованию выбираем требуемую к инсталляции в виртуальной машине редакцию Виндовс 11, нажимаем на кнопку «Далее».
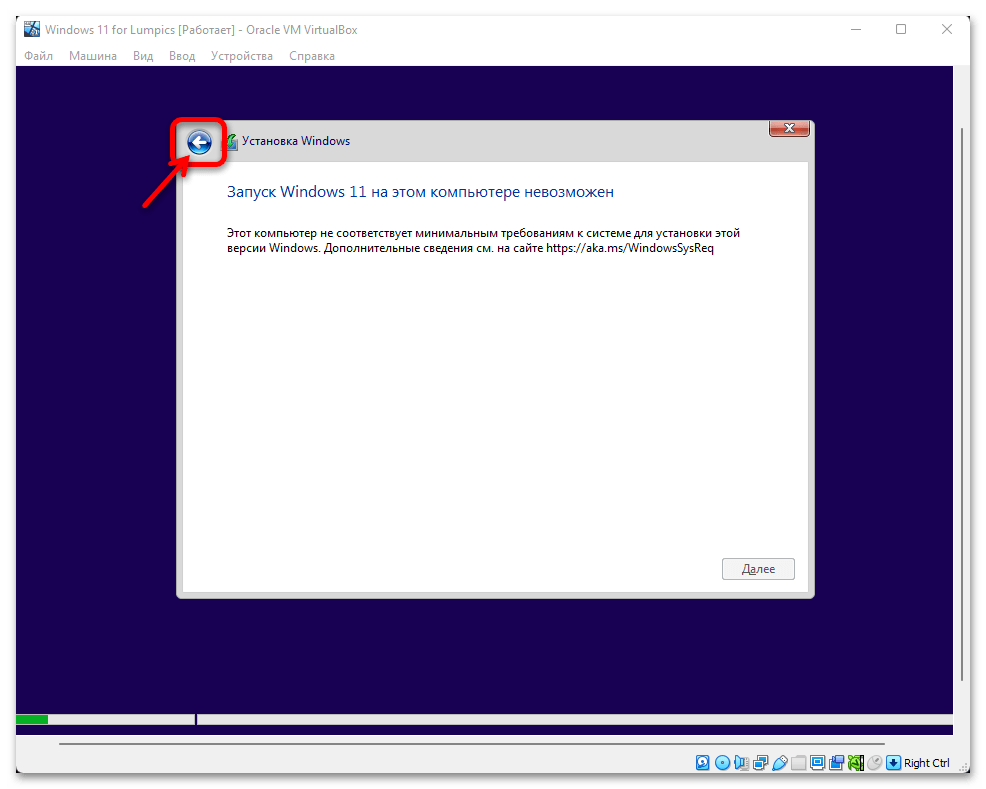
- Поскольку VirtualBox (по крайней мере последней на момент создания настоящего материала версии) не поддерживает эмуляцию требуемого установщиком операционки аппаратного модуля TPM 2.0, а также функцию UEFI «Безопасная загрузка», далее получаем сообщение о невозможности запуска Windows 11 на компьютере. Решается эта проблема следующим образом:
- Кликаем по стрелке «Назад» в окне с ошибкой.
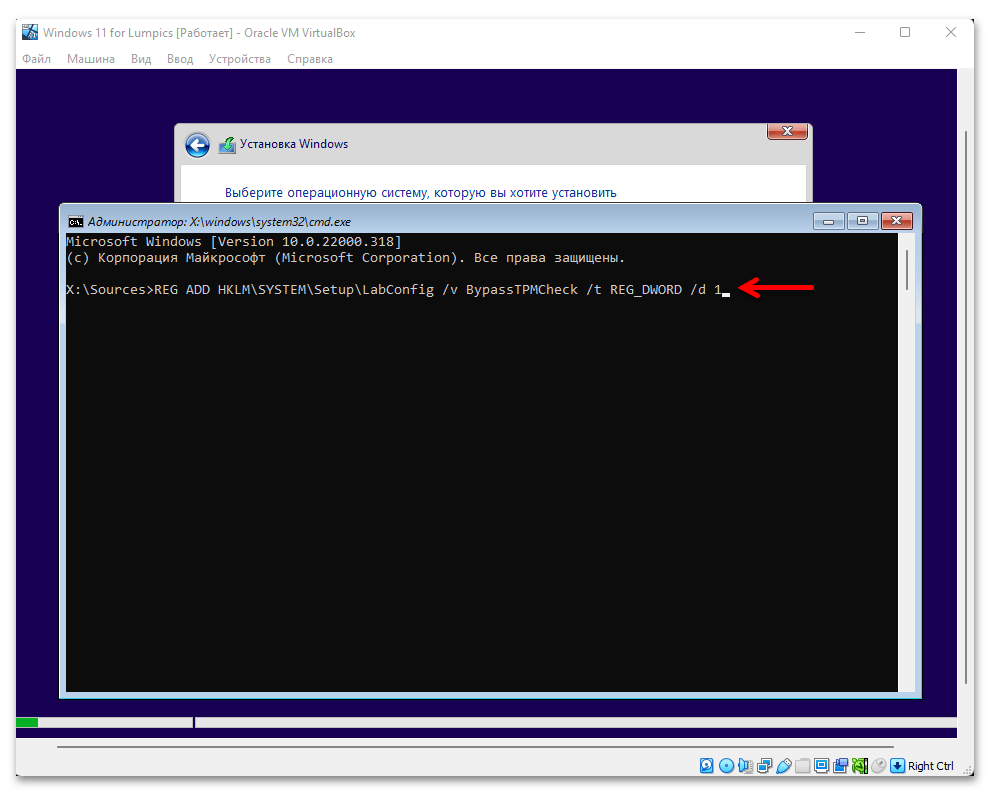
- На клавиатуре ПК нажимаем комбинацию клавиши «Shift» + «F10» (иногда, к примеру, на ноутбуках – «Shift» + «Fn» + «F10». В результате откроется окно командной строки.
- Вводим команду отключения проверки наличия модуля TPM 2.0 в реестре Windows 11, нажимаем «Ввод» на клавиатуре:
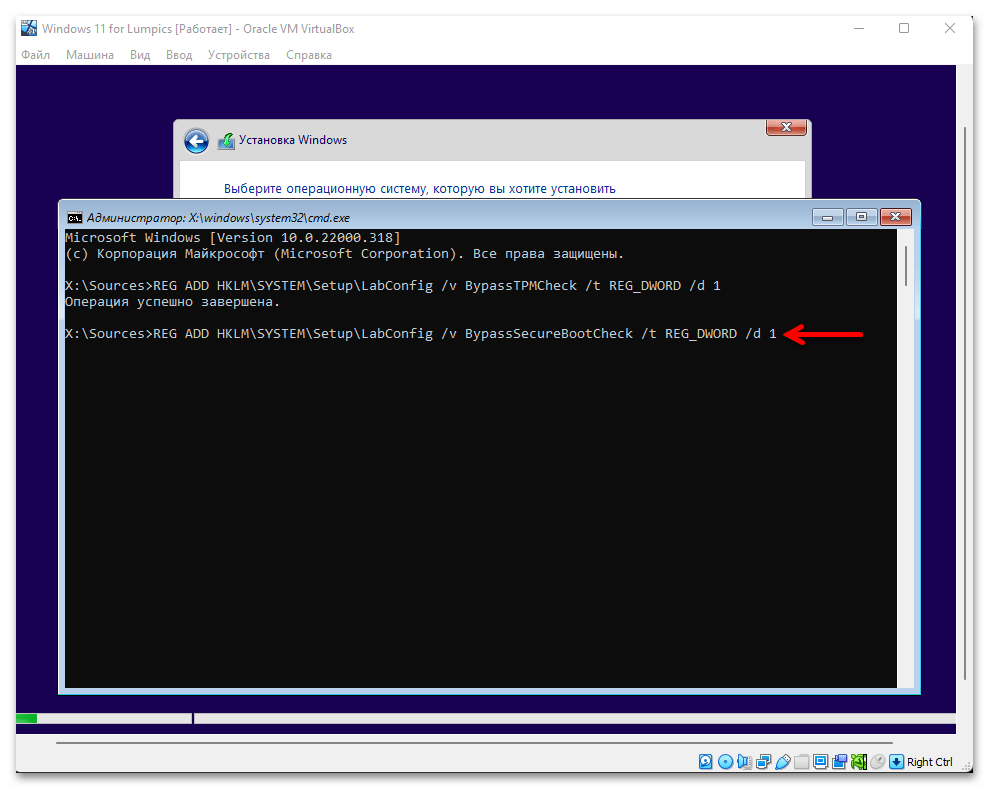
REG ADD HKLM\SYSTEM\Setup\LabConfig /v BypassTPMCheck /t REG_DWORD /d 1 - Получив уведомление «Операция успешно завершена», вводим в консоль и отправляем на выполнение команду деактивации проверки включённости «Secure Boot»:
REG ADD HKLM\SYSTEM\Setup\LabConfig /v BypassSecureBootCheck /t REG_DWORD /d 1 - Убедившись, что и вторая команда выполнена успешно, закрываем командную строку кликом по крестику в правом верхнем углу её окна,

нажимаем «Далее» в окне выбора редакции Windows 11.


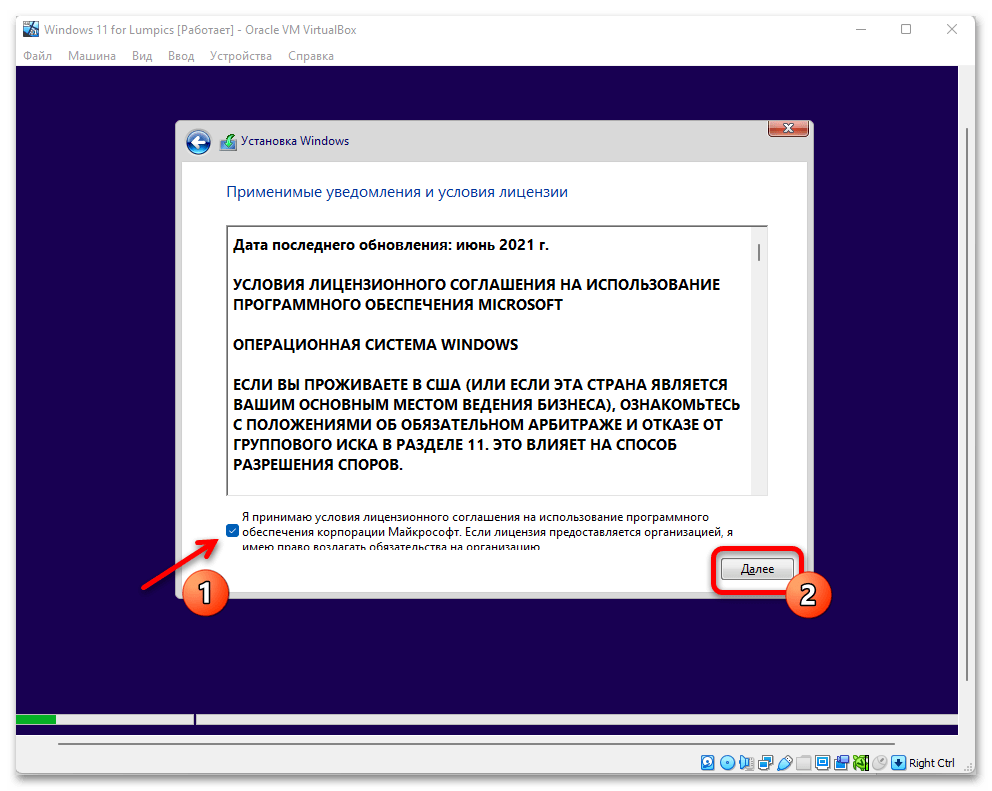
- Установив галочку возле соответствующего пункта в следующем окне Мастера установки ОС, принимаем условия лицензии Виндовс, щёлкаем «Далее».
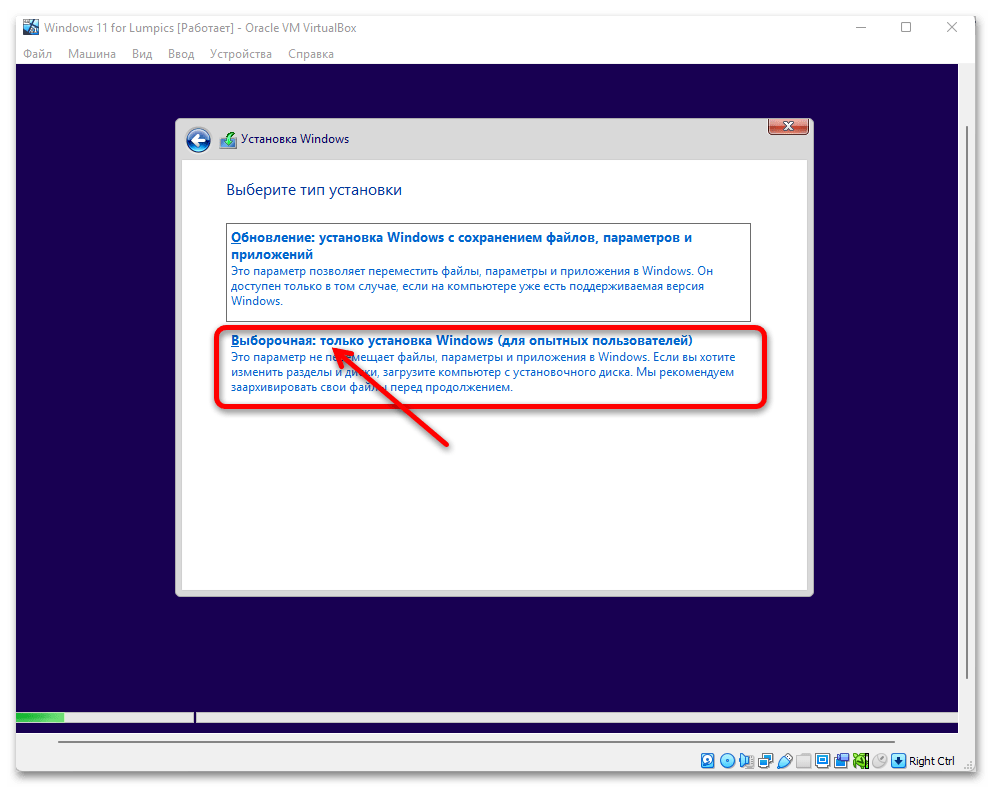
- Кликаем в области «Выборочная: только установка Windows (для опытных пользователей)».
- В следующем окне формируем разделы виртуального диска и определяем среди них целевой для установки ОС. Или же оставляем такую возможность системе, ничего не изменяя, а просто кликнув «Далее».
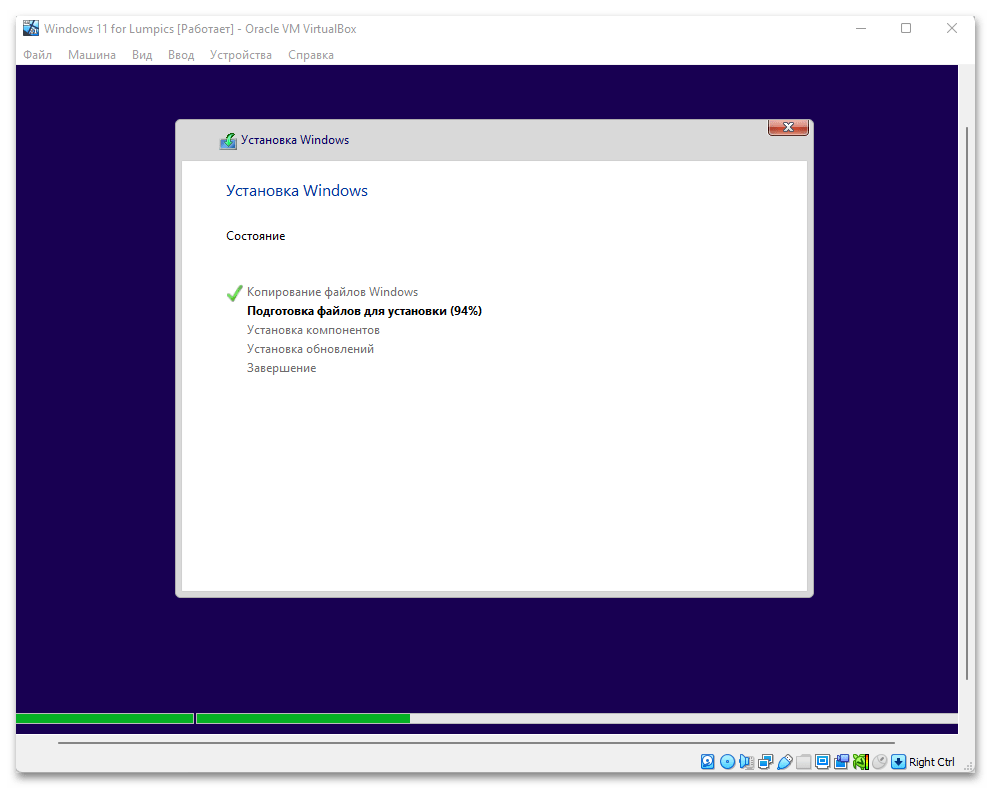
- Теперь останется подождать, пока программа инсталляции автоматически выполнит необходимые для развертывания ОС операции.
- Работа Мастера установки Windows 11 завершается
отображением приглашения осуществить её первоначальную настройку — определяем основные параметры работы ОС. Подробные пояснения по выполнению данной операции мы уже предоставляли в другой статье на нашем сайте, можно действовать полностью аналогично указанному в пункте №10 инструкции по ссылке:
Подробнее: Первоначальная настройка Windows 11 после установки ОС на виртуальную машину
- Добравшись до экрана входа в операционку,

её установку в виртуальной машине следует считать завершённой.
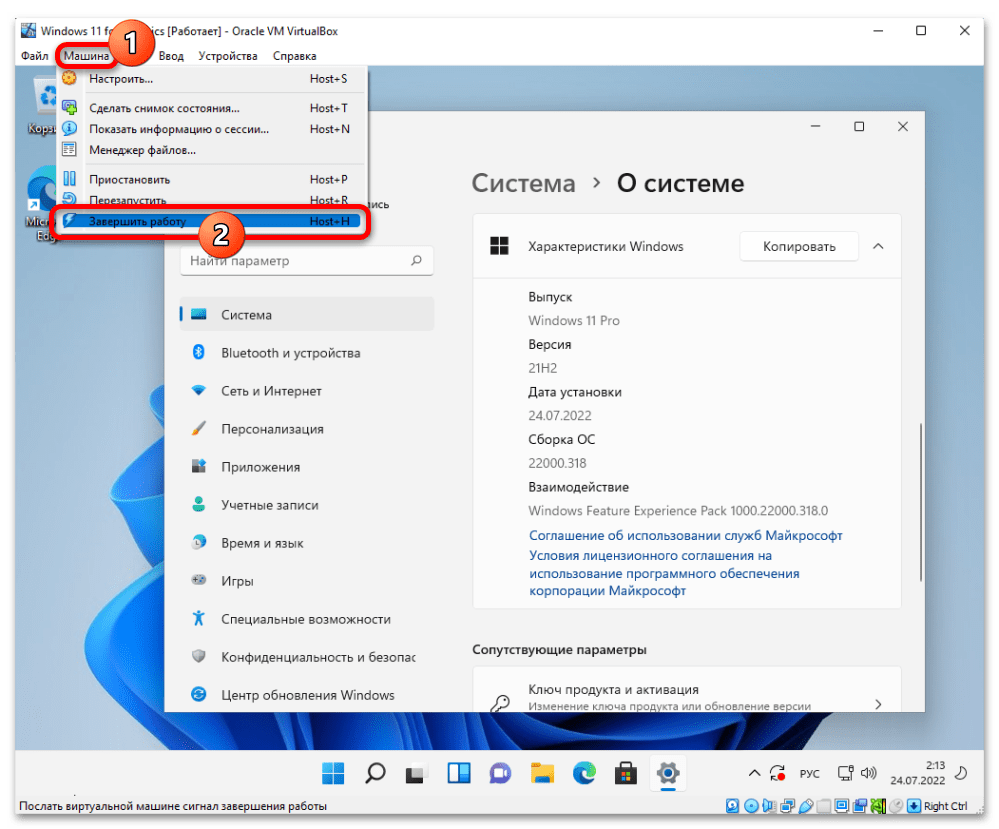
- На этом всё – приступаем к эксплуатации полученной виртуальной машины (первым делом рекомендуется обновить установленную в её рамках Виндовс 11 до последней версии) или выключаем, выбрав соответствующий пункт в меню «Машина» VirtualBox.


Еще статьи по данной теме:
Помогла ли Вам статья?
Quick Navigation:
| Workable Solutions | Step-by-step Troubleshooting |
|---|---|
| Benefits of Installing on VirtualBox | VirtualBox is a free and safe software tool …Full steps |
| Preparation: Take Backups |
Create a copy of the data on a secondary medium; protect original data loss or corruption…Full steps |
|
Steps of Installing on VirtualBox |
1. Download and install VirtualBox application 2. Open Virtualbox VM Manager 3. Build a windows 11 virtual machine 4. Assign Virtual Machine RAM Memory 5. Select the settings options…Full steps |
You can install various operating systems in a virtual computer like VirtualBox without needing to acquire new hardware.
Perhaps you’ve heard of virtual machines (VM) but have never used one. You may be concerned that you will not set it up properly or that you will not be able to locate a copy of your preferred operating system (OS). VirtualBox is the best virtual machine for home users, and you can learn how to use it with our assistance.
Benefits of Installing Windows 11 on VirtualBox
VirtualBox is a free software tool that emulates the x86 computer architecture. It works as a hypervisor, allowing the user to install another operating system on a virtual machine (VM) (operating system).
VirtualBox runs on the «host» OS. The operating system used by the virtual machine is known as the «guest» OS. The host operating system for VirtualBox might be Windows, Linux, or macOS.
When creating a virtual machine, the user can choose how many CPU cores, RAM, and disc space the virtual machine should have. While the VM is running, it can be «paused.» The system’s execution is paused at that time, and the user can resume using it later.
Oracle released VirtualBox as a piece of software. It allows you to run an operating system as though it were running on real hardware on your own PC. There are a variety of ways.to use virtual machines.
If you want to experience Linux, you can do it on a virtual computer without risking a failed installation or dual-booting. You can also experiment with potentially dangerous applications or hacks without compromising your machine. For compatibility reasons, you might need to run a virtual clone of an earlier operating system.
![]()
Windows 11 ARM Download with ISO
If you want to check out Windows on your MacBook or construct a virtual machine using HyperV, you’ll need to download a Windows 11 ARM64 ISO image…
Whatever your reason, VirtualBox is the simplest and safest way to install a «new computer» without risk on your own machine. It’s also completely free for residential users.
Getting Ready: Data and System Backups
The purpose of the backup is to create a copy of the data that can be recovered in the event that the primary data fails. Hardware or software failures, data corruption, a virus or malware, or accidental data erasure can all result in primary data failures. Backup copies allow data to be recovered from an earlier point in time, which can help an organization recover quickly in the event of a disaster.
Storing a copy of the data on a secondary medium is necessary to protect against original data loss or corruption. This additional media could be as simple as a USB drive or a disc storage system, or as complicated as a cloud storage container or tape drive. The backup medium could be retained in the same area as the primary data, or it could be kept somewhere else entirely. Weather-related events may necessitate the storage of backup copies of data in remote locations.
For best results, backup copies should be made on a consistent, regular basis, since this will limit the amount of data lost between backups. When restoring data from a backup, the longer the period between backup copies, the more likely data loss is. You have the peace of mind and flexibility of being able to travel back in time to a point when there was no data loss or harmful attacks by having several copies of your data.
Use EaseUS Todo Backup to Make a Full Backup before making a VirtualBox of windows 11
For personal use, EaseUS Todo Backup Free provides more than enough capabilities. Backups of the system, disk/partition, and files can be done manually or automatically via scheduled backups. Backups can be done in three ways: full, differential, and incremental. Start by installing the free Windows backup program and creating a full backup if you want more control over your backups.
If you want to back up your system quickly and conveniently, EaseUS Todo Backup is the way to go.
Step 1. Launch EaseUS Todo Backup and choose «Create Backup» on the home page, click «Select backup contents«.

Step 2. Among the four available categories, click «OS» to start back up.

Step 3. The system partition will be automatically selected, you only need to select the location.

Step 4. Local Drive, Cloud, and NAS are available for you to save the backup file. You can also connect an external hard drive to preserve the system backup files.

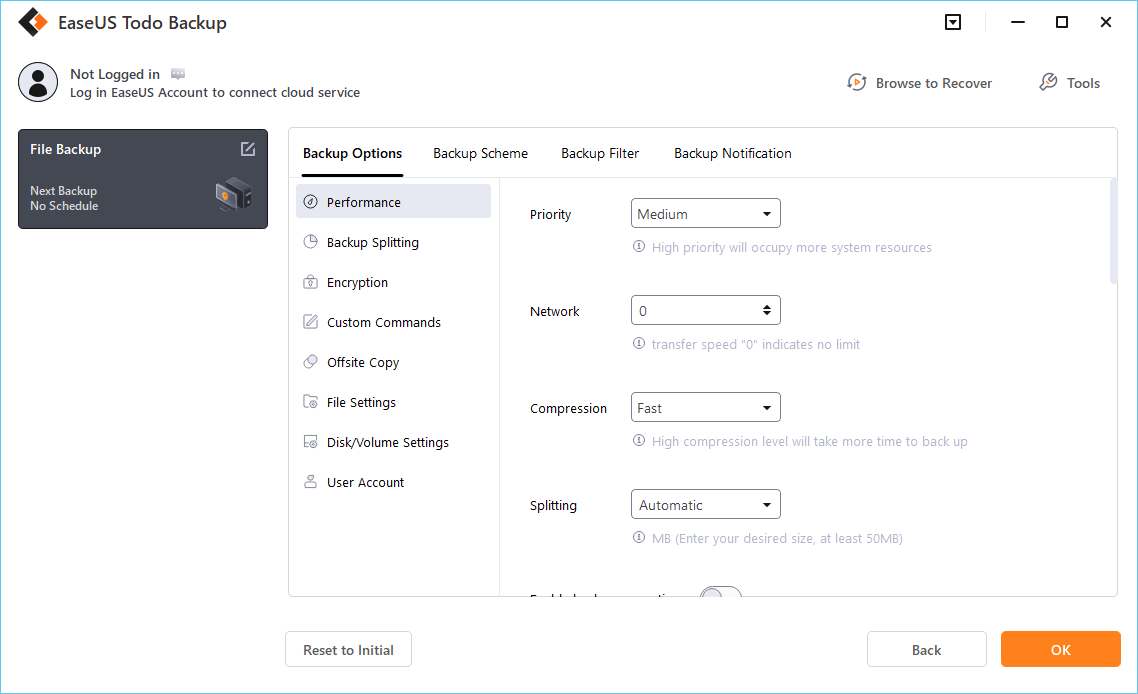
Step 5. You can customize the settings in «Options» at the left bottom. After that, click «Backup Now«, and the process will begin.
*After finishing the backup process, you can check the backup status, recover, open, or delete the backup by right-clicking the backup task on the left.
How to Install Windows 11 on VirtualBox
Step 1. Download and Install VirtualBox Application
To begin, download and install Oracle VM VirtualBox on your computer. Once the setup file has been downloaded, click on it and follow the on-screen instructions to correctly install it.

Step 2. Open Virtualbox VM Manager
After you’ve installed both the Virtualbox software and the Extension pack, open the Virtualbox.exe file from your desktop.
Step 3. Create Windows 11 Virtual Machine
In Virtualbox, click the New icon on the right-hand side area to build a Windows 11 virtual machine.
Now a dialogue box with the names of the virtual machine and the kind and version of the operating system will appear. Enter the name of the virtual machine, as well as the operating system type and version. Because we wish to install Windows 11 on a Virtualbox virtual machine, write «Windows 11 VM» in the Name field, then pick Microsoft Windows as the Type and Windows 10 as the Version (64-bit). Now press the Next button.
Step 4. Assign Virtual Machine RAM Memory
The next step is to set virtual machine RAM Memory after you’ve constructed the Win 11 virtual machine. Windows 11 recommends a memory allocation of 4GB (4096 MB). So, after moving the slider around, click Next.
Step 5. Create Virtual Hard Disk
This step includes creating a virtual hard drive after you’ve allotted RAM memory for the virtual system. Select «Create a virtual hard disc now» from the Hard disc section, then click Create.
Select VDI (Virtualbox Disk Image) as the file type under the Hard disc file type column, and then click Next.
Select Dynamically allocated as the storage type under the Storage on physical hard disc section, then click Next.
After that, choose the virtual hard drive’s file location and size, and then click Create.
The installation of the Windows 11 virtual machine is now complete, and it is ready to use. We do, however, need to set up a few things beforehand.
Step 6. Setting up Virtual Machine
Now we’ll go through some fundamental options, such as processors, display memory, USB ports, and Windows boot settings.
Select the Windows 11 Virtual Machine and then the Settings option.

To begin, go to the System settings tab and select 4GB for Base Memory. Then turn on advanced options like Enable I/O APIC and Enable EFI.
Then, under the Processors tab, set Processor(s) to 2 and activate the expanded features such as Enable PAE/NX.
Go to the Display tab and change the Video Memory to 256 MB or higher. After that, select VBoxSVGA as the Graphics Controller and enable 3D Acceleration.
The Storage Settings area is next, and it’s crucial for Windows 11 installation. Select the CD symbol option from the Storage Devices panel. Then, on the right-hand side area, click the CD symbol, followed by Choose a disc file. Instead of booting from a USB drive, you can now boot directly from an ISO file.
After that, go to your computer’s directory and find the Windows 11 ISO Image File, which you can then pick and open. (Alternatively, you can use the Insider Preview ISO Image here.)
And that’s it! Your Windows 11 Virtualbox virtual machine is ready to use once you’ve completed all of the settings.
Conclusion
So that’s how you can use Virtualbox to quickly download and install Windows 11 on a virtual computer. Using Virtual Box to install Windows 11 is a terrific method to try out the latest version of Windows without risking your main computer becoming infected with bugs or security flaws.
However, Microsoft has made the Windows 11 Insider Preview build 22000 ISO available for download, which you may use in the same way.