What does WGET Do?
Once installed, the WGET command allows you to download files over the TCP/IP protocols: FTP, HTTP and HTTPS.
If you’re a Linux or Mac user, WGET is either already included in the package you’re running or it’s a trivial case of installing from whatever repository you prefer with a single command.
Unfortunately, it’s not quite that simple in Windows (although it’s still very easy!).
To run WGET you need to download, unzip and install manually.
Install WGET in Windows 10
Download the classic 32 bit version 1.14 here or, go to this Windows binaries collection at Eternally Bored here for the later versions and the faster 64 bit builds.
Here is the downloadable zip file for version 1.2 64 bit.
If you want to be able to run WGET from any directory inside the command terminal, you’ll need to learn about path variables in Windows to work out where to copy your new executable. If you follow these steps, you’ll be able to make WGET a command you can run from any directory in Command Prompt.
Run WGET from anywhere
Firstly, we need to determine where to copy WGET.exe.
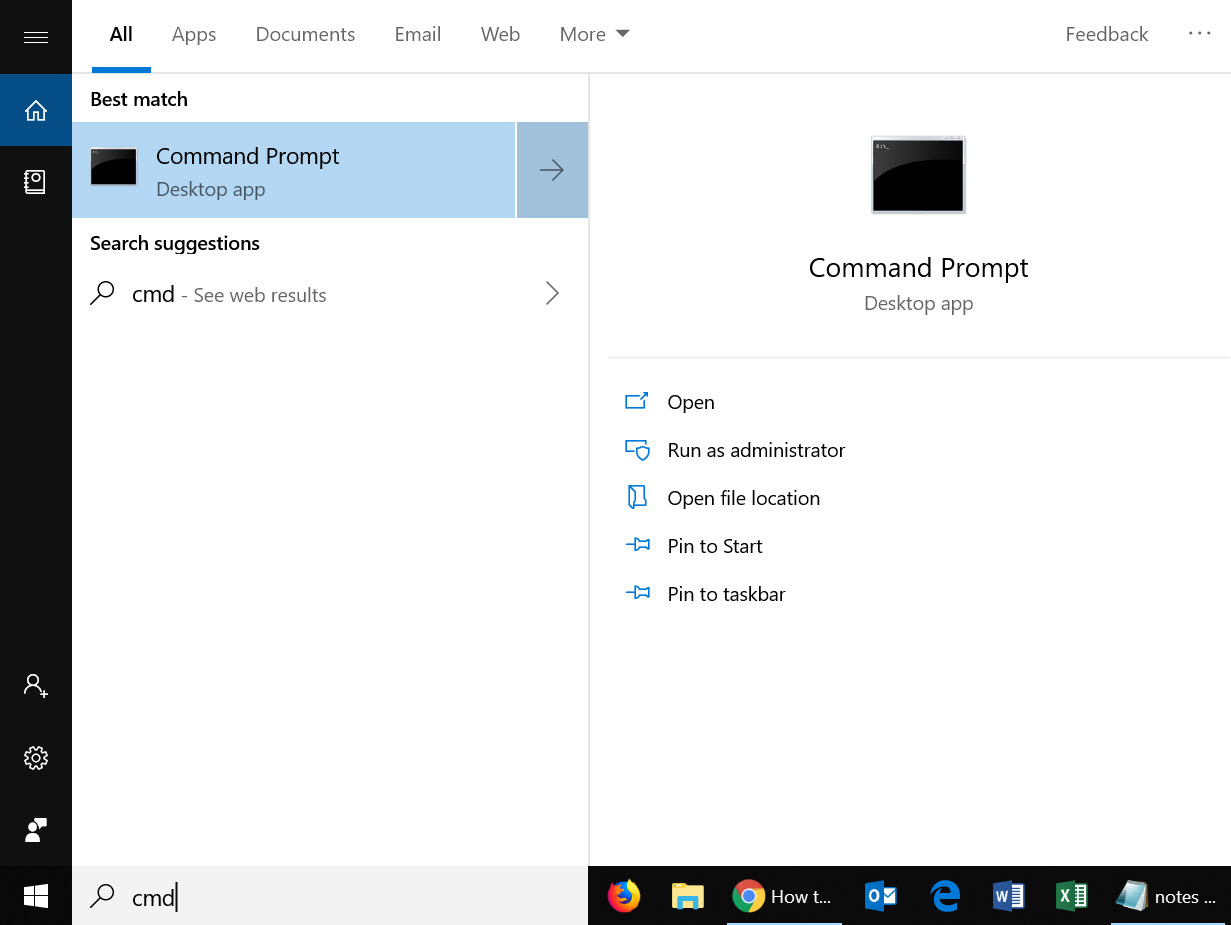
After you’d downloaded wget.exe (or unpacked the associated distribution zip files) open a command terminal by typing “cmd” in the search menu:
We’re going to move wget.exe into a Windows directory that will allow WGET to be run from anywhere.
First, we need to find out which directory that should be. Type:
path
You should see something like this:
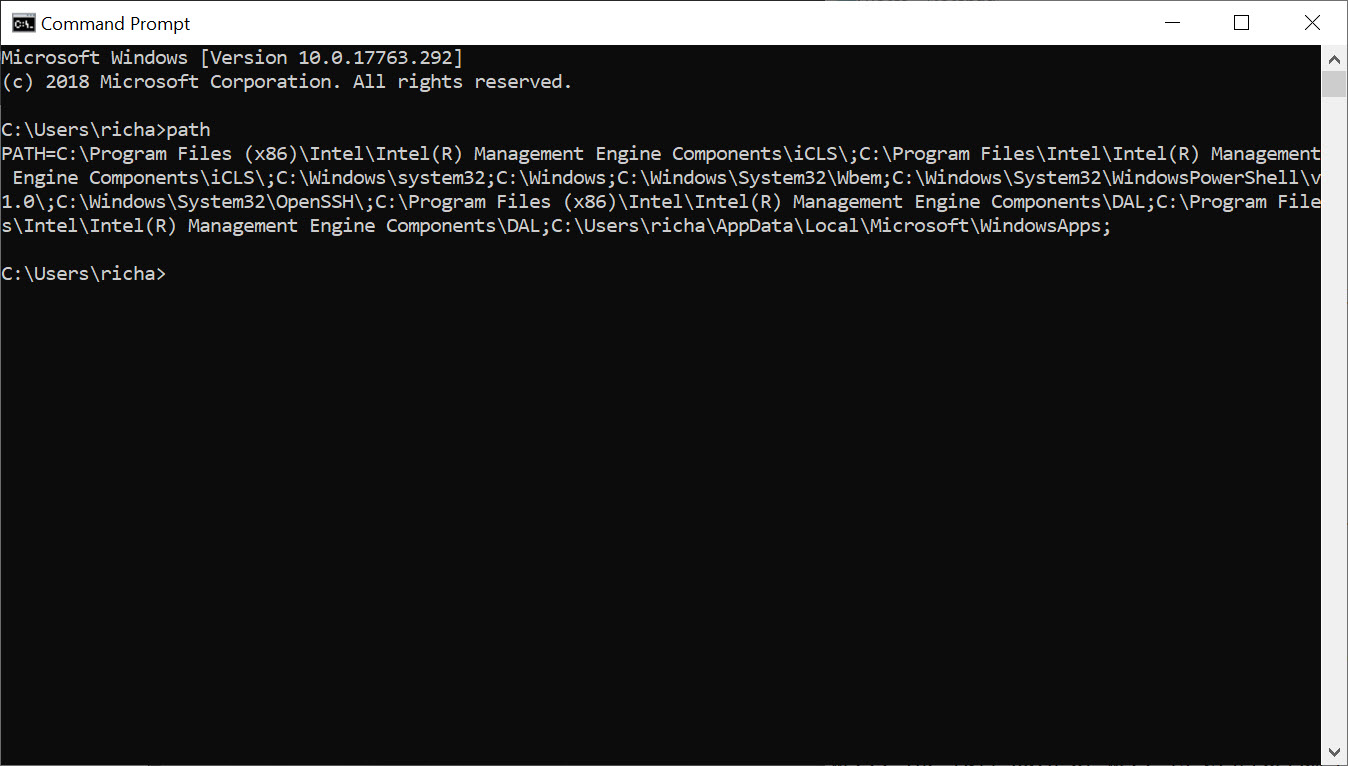
Thanks to the “Path” environment variable, we know that we need to copy wget.exe to the c:\Windows\System32 folder location.
Go ahead and copy WGET.exe to the System32 directory and restart your Command Prompt.
Restart command terminal and test WGET
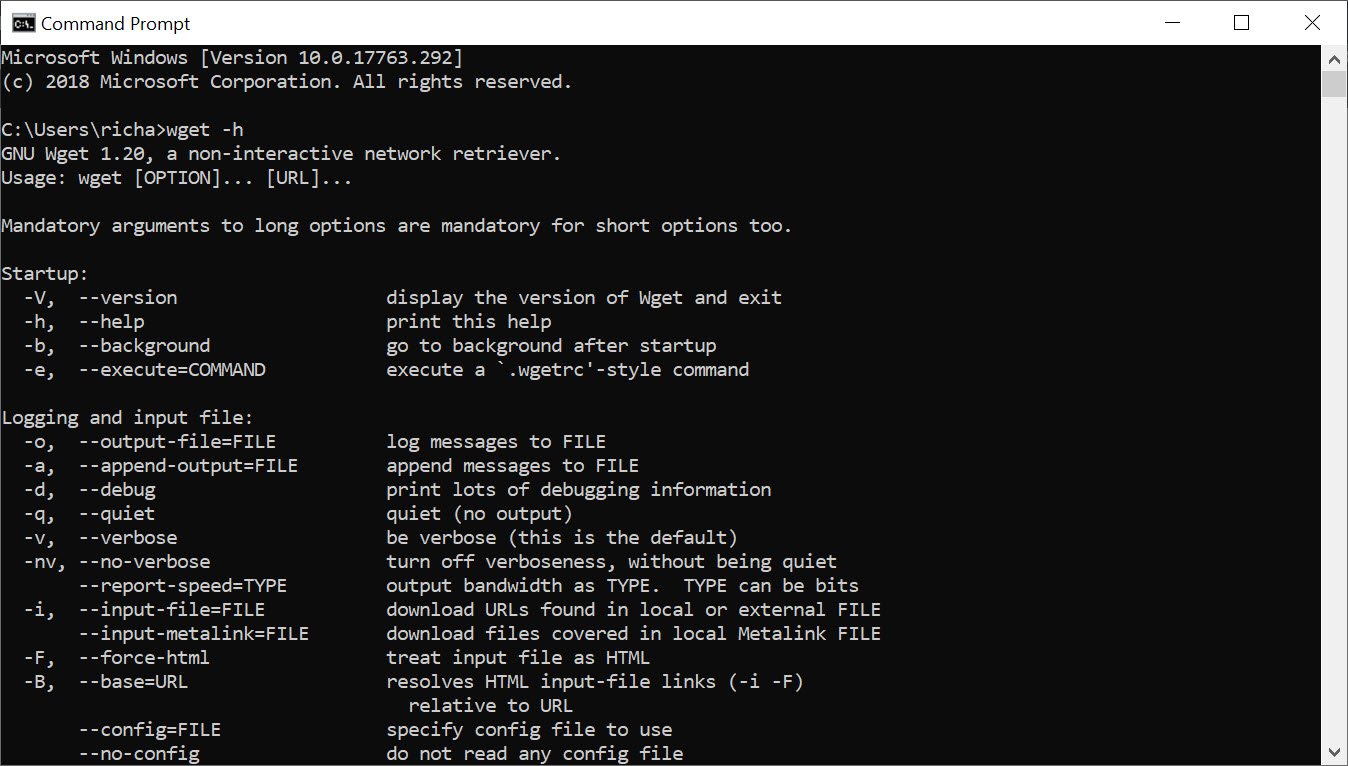
If you want to test WGET is working properly, restart your terminal and type:
wget -h
If you’ve copied the file to the right place, you’ll see a help file appear with all of the available commands.
So, you should see something like this:
Now it’s time to get started.
Get started with WGET
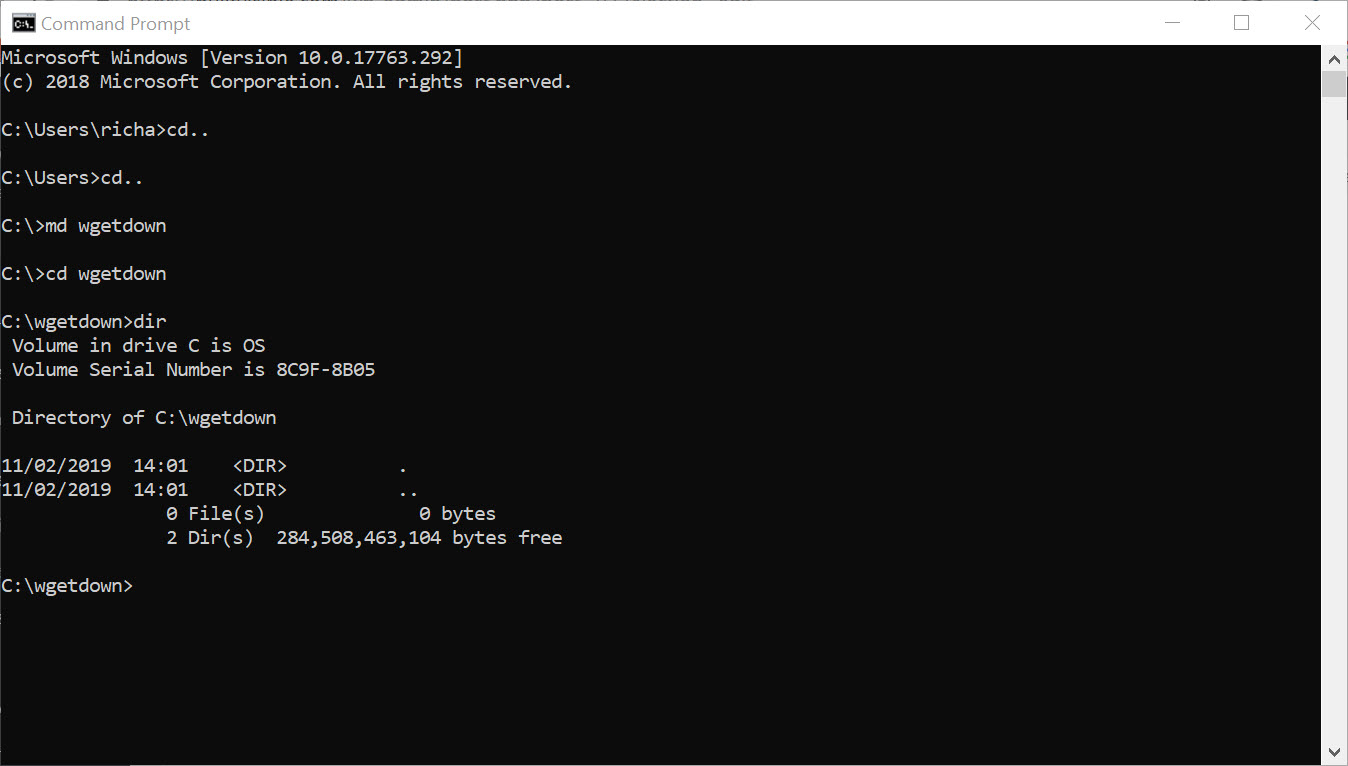
Seeing that we’ll be working in Command Prompt, let’s create a download directory just for WGET downloads.
To create a directory, we’ll use the command md (“make directory”).
Change to the c:/ prompt and type:
md wgetdown
Then, change to your new directory and type “dir” to see the (blank) contents.
Now, you’re ready to do some downloading.
Example commands
Once you’ve got WGET installed and you’ve created a new directory, all you have to do is learn some of the finer points of WGET arguments to make sure you get what you need.
The Gnu.org WGET manual is a particularly useful resource for those inclined to really learn the details.
If you want some quick commands though, read on. I’ve listed a set of instructions to WGET to recursively mirror your site, download all the images, CSS and JavaScript, localise all of the URLs (so the site works on your local machine), and save all the pages as a .html file.
To mirror your site execute this command:
wget -r https://www.yoursite.com
To mirror the site and localise all of the urls:
wget --convert-links -r https://www.yoursite.com
To make a full offline mirror of a site:
wget --mirror --convert-links --adjust-extension --page-requisites --no-parent https://www.yoursite.com
To mirror the site and save the files as .html:
wget --html-extension -r https://www.yoursite.com
To download all jpg images from a site:
wget -A "*.jpg" -r https://www.yoursite.com
For more filetype-specific operations, check out this useful thread on Stack.
Set a different user agent:
Some web servers are set up to deny WGET’s default user agent – for obvious, bandwidth saving reasons. You could try changing your user agent to get round this. For example, by pretending to be Googlebot:
wget --user-agent="Googlebot/2.1 (+https://www.googlebot.com/bot.html)" -r https://www.yoursite.com
Wget “spider” mode:
Wget can fetch pages without saving them which can be a useful feature in case you’re looking for broken links on a website. Remember to enable recursive mode, which allows wget to scan through the document and look for links to traverse.
wget --spider -r https://www.yoursite.com
You can also save this to a log file by adding this option:
wget --spider -r https://www.yoursite.com -o wget.log
Enjoy using this powerful tool, and I hope you’ve enjoyed my tutorial. Comments welcome!
Have you ever lost an essential asset at a crucial moment on your website? It is frightening to even think about it, isn’t it? Perhaps if you have used Linux, then you might have heard of WGET. Yay! WGET is also available for Windows. Thank GNU for coming up with a compatible version of WGET for Windows 10. From the starting of this article, you will understand how to download and install WGET for Windows 10. Also, you will learn how to use WGET command with examples provided for improving your understanding. Keep on reading to gain comprehensive knowledge about WGET.

Table of Contents
WGET has been available for Linux users for a long time. Learners can even refer to the different articles and guides available on the web to better their comprehension. But when it comes to the Windows version, even the scarce amount of articles cannot give you the information you need. However, do not lose hope. From this point on, you will know things about WGET on Windows that you’ve never heard or read. So why not start with answering the most asked question: What is WGET?
What is WGET?
WGET is a free tool to download files and crawl websites using the command line. Before learning to download WGET and how to use WGET command with examples, check out the points given below to know more about its features:
- WGET can retrieve contents from web pages.
- It even allows you to download from any web pages (FTP, HTTP) in any format (PDF, XML).
- It’s known to provide operational anonymity to keep users’ location or activities a secret.
- WGET works perfectly in bad network conditions too.
- Apart from these features, WGET can overwrite correct domain name in links.
- Moreover, it can perform recursive downloads, where the link present in the downloading document gets automatically downloaded further.
Also Read: What is a Command Line Interpreter?
How to Install WGET for Windows 10
Using WGET for Windows 10 will seamlessly download and extract information from any webpage by using commands. Implement the steps below to download GnuWin first to create a Windows environment and use WGET.
1. Download GnuWin WGET from here. The download process will start and finish automatically in a few seconds.
2. Click the downloaded WGET setup.exe folder to open it, as shown below.

3. Click Yes when prompted.
Note: Make sure to close already running applications before starting WGET installation.
4. To install WGET for Windows, click on Next, as depicted below.

5. Select the I accept the agreement radio button and click the Next option as highlighted below to continue the installation process.

6. Click on Browse to select the Destination Location. Choose a folder where you want to set up WGET and click on Next as shown.
Note: It is recommended to use default path: C:\Program Files (x86)\GnuWin32\bin

7. Select the components you want to install among Binaries and Documentation. Click Next to proceed further.

8. Here, click on Browse and select a Destination Folder to create the program shortcut in the start menu. Then, click on Next.
Note: If you don’t want to create a shortcut, select the checkbox Don’t create a Start Menu folder.

9. Select the Additional icons you need and click Next as illustrated below:
- Create document shortcuts in Start Menu folder
- Download Sources
![]()
10. Scroll down the review tab and check if all the desired options are present. Click Install to begin installing WGET on your system.
Note: You can select Back to change any setting you need to modify.

11. Wait for the WGET installation process to complete in your Windows 10 desktop/laptop and click Finish to exit the setup.

Also Read: Fix error 1500 Another Installation is in Progress
How to Use WGET for Windows 10
There are two ways to use WGET on your system.
- First, it is accessed directly via Command Prompt using a single path.
- Second, you need to manually go to the directory page where the app is present, and then proceed to the command prompt procedure.
You can implement any of these methods to use WGET on your system at your convenience. So, now you will see both methods in action below:
Method 1: Add CD to WGET Path
Once you install WGET for Windows 10, ensure that the wget.exe folder exists in the path given in this method.
Note: If not, copy and paste the respective folder in the location shown in the below File Explorer navigation, as you are about to use only this path.
1. Press Windows + E keys simultaneously to open File Explorer.
2. Navigate to C:\Program Files (x86)\GnuWin32\bin and copy the location.

3. Type Command Prompt in the Windows search bar and click Open to launch it, as shown below.

4. Type cd C:\Program Files (x86)\GnuWin32\bin and press Enter.
5. Then type wget and hit Enter. If the command is executed, it shows that WGET is running properly.

6A. Type the required WGET for Windows 10 command to download any file in the given format:
wget [OPTION] … [URL]…
6B. Or, view help from WGET by typing ‘wget –help’
Also Read: Fix File Explorer Not Responding in Windows 10
Method 2: Add Environment Variable
Once you download WGET for Windows 10, you must change the environmental variable set in the system settings. This is a long process. Follow the steps below carefully to set up WGET for Windows 10:
1. Press the Windows key from the keyboard and type Control Panel. Click the Open option to launch it.

2. Choose View by: Large icons from the top right corner. Click on the System option.
![]()
3. Scroll down and click on the Advanced system settings as illustrated below.

4. In the Advanced tab, click the Environment Variables button as shown.

5. Environmental Variables pop-up window will appear. Select the Path under the User variables for GREEN category and click on Edit as depicted below.

6. In the Edit environmental variable window, select the Browse option.

7. Select C:\Program Files (x86)\GnuWin32\bin path and click OK as shown.

8. Then, click OK as shown.

9. Again, click OK in the System Properties window.

10. Now, open Command Prompt as explained in Method 1.
11. Type wget and press Enter on the keyboard. Once the Environment Variable is set, you will be able to run WGET regardless of any folder you are currently in.

Also Read: How to Fix Git Merge Error
How to Check the Functioning of WGET App and Commands
To check if you can access WGET for Windows 10 regardless of any folder or directory that is present, follow the steps given below:
1. Type Command Prompt on the start menu search bar and click Open to launch it.

2. Type wget and press Enter to check whether the application runs.
Note: If you receive unrecognized command error, you have downloaded the WGET Setup from the wrong source. So, ensure to use only the link given above for the download process and try again.

3A. If the test worked, then it’s great. You have done a good job!
3B. If it is not working, do not worry. Check if you have followed the steps in an orderly manner, from downloading GnuWin, installing WGET Setup, then adding WGET environment variable. Try once again and restart the command line.
Also Read: Fix ERR_EMPTY_RESPONSE in Google Chrome
How to Use WGET Command with Examples
There are thousands of WGET commands to perform specific tasks. Run WGET for Windows 10 using any of the methods given above and type any of the commands listed below in Command Prompt.
Note: You need to enter the command correctly to obtain desired results.
1. To get list of commands, use the command wget -h.

2. To download a single file, use the command wget [URL]. For instance, enter the command wget https://wordpress.org/latest.zip. Here, WordPress is chosen as an example.
3. To download to a specific folder, use the command wget ‐P [wanted directory] [URL]. For instance, wget -P /temp https://github.com/git/git/archive/master.zip.
4. To resume an interrupted download, use the command wget ‐c [URL]. For instance, wget -c https://wordpress.org/latest.zip.
5. To set the download speed, use the command wget ‐‐limit-rate [wanted speed] [URL]. For instance, wget –limit-rate 1m https://wordpress.org/latest.zip.
6. To mirror a single webpage, use the command wget -m [URL]. For instance, wget -m https://cereal.guru/.
7. To know the version of installed WGET, then use the command wget -V.

8. To download and save under a specific name, use the command wget -o [file name] [URL]. For instance, wget -o file.docx https://cereal.guru/.
9. To download a web page in the background, use the command wget -b [URL]. For instance, wget -b https://cereal.guru/.
10. To download multiple URLs, use the command wget -i [File name]. For instance, wget -i URL.txt. Before executing this command, place all the URLs in one file and include that file name in the command.
11. To download via FTP, use the command wget –ftp-user=[ftp_username] –ftp-password=[ftp_password] ftp://… For instance, wget –ftp-user=sofiftp –ftp-password=TopSecretPassword ftp://123.456.7890.
12. To change the number of retry attempts, use the command wget –tries=[number_of_tries] [URL]. For instance, wget –tries=inf https://cereal.guru/. In this example, inf denotes infinity. The default number of retries is 20.
This is how to use WGET command with examples. Click here to know about more commands and their uses.
Recommended:
- Fix Windows 10 Update Error 0x80070103
- How to Enable Telnet in Windows 10
- Complete List of Windows 11 Run Commands
- Discord Commands List
We hope that this guide was helpful and you could learn how to download, install & use WGET for Windows 10. If you have any queries or suggestions, feel free to drop them in the comments section below.
Skip to content
Wget is a command line tool for downloading files from the internet. It supports downloading using well known protocols such as FTP, HTTP and HTTPS. It employs the powerful OpenSSL library to establish encrypted connections to HTTPS servers. It supports recursive downloads from both HTTP and FTP sites. It can continue unfinished downloads from the last position. If the remote server is password protected, then it also supports logging in to the remote server using a username and a password.
It is easy to install Wget on a Windows PC through Chocolatey. Here is how:
- First of all you have to install Chocolatey on your PC. Basically this requires running a PowerShell command as explained on https://chocolatey.org/install.
- Once Chocolatey has been installed, you can open an elevated PowerShell or cmd.exe Command Prompt and give the following command : choco install wget -y
- Chocolatey will download and finish installation in seconds. Then you can start using Wget from anywhere on your PC.


Using Wget is the easiest thing in the world. If you download a file from the internet, you can open a command prompt or PowerShell and give the command wget [URL]. For example, if you want to download 7-Zip for Windows 64-bit, then you can give the command wget https://www.7-zip.org/a/7z2106-x64.exe. It will download the file and place in the current directory.
If you want to save the file with a different name, then you have to use the -O parameter followed by the file name. For example, wget -O 7-zip-x64.exe https://www.7-zip.org/a/7z2106-x64.exe. This will save the 7-Zip installer for Windows as the local file 7-zip-x64.exe.

Wget can also be used to download multiple files in just one command. For this, you have to create an input plain text file and copy all the links in that file. Ideally, there should be one link per line. Then you can give the command wget -i input-file.txt and it will batch download all the files.
If you do not want to use Chocolatey for installing Wget on your Windows PC, then you can download an older Wget binary from http://gnuwin32.sourceforge.net/packages/wget.htm. But this is very old version and does not download files using today’s HTTPS and FTPS protocols.
We use cookies on our website to give you the most relevant experience by remembering your preferences and repeat visits. By clicking “Accept”, you consent to the use of ALL the cookies.
What is wget?
Wget is a free GNU command-line utility tool used to download files from the internet. It retrieves files using HTTP, HTTPS, and FTP protocols.
It serves as a tool to sustain unstable and slow network connections. If a network problem occurs during a download, this helpful software can resume retrieving the files without starting from scratch.
Another important aspect is its capability of recursive downloads, with which it mirrors websites. It transfers parts of a website by following links and directory structure, thus creating local versions of webpages.
The wget command is also highly flexible and can be used in terminals, scripts, and cron jobs. During the download, the user does not have to be active nor logged in. As wget is non-interactive, it can independently run in the background.
Read this article to learn how to use some of the most common wget commands.
How to Check if wget is Installed?
Most likely, the wget package is already on your system as it now comes pre-installed on most Linux distributions.
To check, open the terminal window and type in:
wgetIf you have the wget software, the output tells you that the wget command is missing a URL, as shown in the image below:

wget Command Not Found
If the output displays wget command not found you need to download and install the tool manually. Below you will find the installation instructions for Ubuntu/Debian, CentOS, and Windows.
How to Install wget on Ubuntu/Debian?
To install wget on Ubuntu or Debian releases, use the command:
sudo apt-get install wgetHow to Install wget on CentOS/Fedora?
To install wget on CentOS or Fedora, type the following command:
sudo yum install wgetHow to Install wget on Windows?
To install and configure wget for Windows:
- Download wget for Windows and install the package.
- Add the wget bin path to environment variables (optional). Configuring this removes the need for full paths, and makes it a lot easier to run wget from the command prompt:
- Open the Start menu and search for “environment.”
- Select Edit the system environment variables.
- Select the Advanced tab and click the Environment Variables button.
- Select the Path variable under System Variables.
- Click Edit.
- In the Variable value field add the path to the wget bin directory preceded by a semicolon (;). If installed in the default path, add
C:Program Files (x86)GnuWin32bin.
- Open the command prompt (cmd.exe) and start running
wgetcommands.
Introduction to wget Syntax
The wget syntax has the following pattern:
wget [option][URL]Each [option] has its long and short form which are conveniently interchangeable. This attribute specifies what to do with the URL that follows.
[URL] is the address of the file or directory you wish to download.
Download File from Web
To download a file from the web use:
wget [URL]For example, to install Tomcat 9, first you need to download the package with wget using the command:
wget http://apache.cs.utah.edu/tomcat/tomcat-9/v9.0.20/bin/apache-tomcat-9.0.20.tar.gzDownload File and Save Under Specific Name
To download a file and save it under a specified name run:
wget -O [file_name] [URL]The wget command allows you to rename files prior to downloading them on your computer.
For instance, you may want to install Terraform. To download the package and rename it terraform.zip use the following command:
wget -O terraform.zip https://releases.hashicorp.com/terraform/0.12.2/terraform_0.12.2_linux_amd64.zipDownload File to Specific Directory
By default wget downloads a file in the directory the user is in. To save the file in a different location, add the -P option:
wget -P [wanted_directory] [URL]For example, while installing Git on Ubuntu, you can download the package in the /temp directory with the command:
wget -P /temp https://github.com/git/git/archive/master.zipSet Download Speed
You can set the download speed when downloading a big file, so it does not use the full available bandwidth. The download speed is defined in kilobytes (k) and megabytes (m). Use the command:
wget --limit-rate [wanted_speed] [URL]For example, if you are installing NVIDIA TESLA drivers on Linux and want to limit the download speed to 1 megabyte, would use the command:
wget --limit-rate 1m http://us.download.nvidia.com/tesla/396.37/nvidia-diag-driver-local-repo-ubuntu1710-396.37_1.0-1_amd64.deb Continue Download After Interruption
Instead of having to start from scratch, wget can resume downloading where it stopped before the interruption. This is a useful feature if there is a lost of connection while downloading a file.
wget -c [URL]For instance, you may want to install a Mumble Server on Linux and suddenly lose internet connection while downloading the installation file. To continue downloading, type in the command:
wget -c https://github.com/mumble-voip/mumble/releases/download/1.2.19/murmur-static_x86-1.2.19.tar.bz2Download Multiple Files
wget allows downloading multiple files at the same time using the command:
wget -i [file_name]To do so, follow the steps outlined below:
1. First, create and open a file under the name MultipleDownloads.txt (or a name of your choice), using a text editor. In this case, we used Nano:
nano MultipleDownloads.txt2. Once in the editor, add the URLs of the packages you want to download, one per line.

3. Save and exit the file.
4. Run the following wget command in the terminal window:
wget -i MultipleDownloads.txtThis prompts wget to download from each URL in the text file.
Download Web page (Mirror Web page)
With wget you can download an entire website from the internet, using the -m option. It prompts wget to create a mirror of the specified webpage. The basic command for doing so is:
wget -m [URL]For example:
wget -m <a href="https://phoenixnap.com/" target="_blank" rel="noreferrer noopener">https://phoenixnap.com</a>Download via FTP
To download via FTP, type in the username and password of the FTP server, followed by the ftp address:
wget --ftp-user=[ftp_username] --ftp-password=[ftp_password] ftp://...For instance:
wget --ftp-user=sofiftp --ftp-password=TopSecretPassword ftp://123.456.7890Download in Background
You can download in the background, a practical feature when dealing with a large file:
wget -b [URL]You can check the status of the download with the command:
tail -f wget -logTo download the RPM package manager in the background, type:
wget -b http://some_website/sample_file.rpmIncrease Retry Attempts
You can set how many times wget attempts to download a file after being interrupted by a bad network with:
wget --tries=[number_of_tries] [URL]By default, the number of retry attempts is set to 20.
You can also set the number to infinity with the values 0 or inf, as in the following example:
wget --tries=inf http://download.virtualbox.org/virtualbox/rpm/rhel/virtualbox.repoSkip Certificate Check
By default, wget checks whether the server has a valid SSL/TLS certificate. If it does not identify an authentic certificate, it refuses to download.
The --no-check-certificate option is used to avoid certificate authorities checking for a server certificate. However, utilize it only if you are sure of the website’s credibility or are not worried about security issues it may cause.
wget --no-check-certificate [URL]If http://enteratonerisk.com has an untrusted certificate, but will not harm the system, you can download it with:
wget --no-check-certificate http://enteratonerisk.comChange User Agent
When downloading a webpage, wget essentially emulates a browser. In some cases, the output might say you don’t have permission to access the server, or that the connection is forbidden. This may be due to a website blocking client browsers that have a specific “User-Agent.”
“User-Agent” is a header field that the browser sends to the server it wants to access. Therefore, to download from a server that is refusing to connect, try to modify the user agent.
Find a database of all user agents online, search for the one you need and run the command:
wget --user-agent="User Agent Here" "[URL]"or
wget -U "User Agent Here" "[URL]"For example, to emulate Chrome (version 74), you would change the user agent with the command:
wget --user-agent=" Mozilla/5.0 (Windows NT 10.0; Win64; x64) AppleWebKit/537.36 (KHTML, like Gecko) Chrome/74.0.3729.169 Safari/537.36" "https://phoenixnap.com"Note: Make sure you always download from a trusted source because wget can instruct a download of a script from a malicious source. We outline this and many other dangerous commands in our article 14 Dangerous Linux Terminal Commands.
Conclusion
This article sums up why wget is such a powerful tool for downloading files over the internet. It also serves as a good reference for beginners with its list of 12 essential wget commands and examples.
— Advertisement —
Hello, how are you? This time we’re going to talk about Wget. It is a tool created by the GNU Project. Its main purpose is to get content and files from different web servers. Besides, it supports downloads via FTP, SFTP, HTTP, and HTTPS. Its features include recursive download, conversion of links for offline viewing of local HTML, and support for proxies. It is a widely known program in Linux environments, since its appearance in 1996. However, it can also be ported to Windows, where its use is not well known. For that reason, we will see how to install and use Wget in Windows 10.
Installing Wget in Windows 10
Wget is a free tool and relatively simple to install in a Linux environment. Just type the appropriate commands to each distribution, and you’re done. However, when it comes to Windows, the situation changes. There are many installers and options that end up with installation errors. However, we’ve got this version that works properly. Go to this link and download version 1.11.4-1

Next, we proceed to run the installer. Just double click and the wizard will start, press next to continue:

Then accept the license terms, and click Next to continue the installation.

Select the folder where the program will be installed. Click next to continue the installation.

Next, select the components to install. To ensure proper operation, check both boxes and press Next to continue the installation.

Next, you can create direct access to the application and its respective location

You can install additional icons. Click Next to continue

Verify the installation options and press Install to finish the process.

Once the installation is finished, we will see the following screen.

Using Wget in Windows 10
Please note that Wget does not have a graphical interface, so you will have to use it through command in the CMD. To check that the program is actually installed, please go to the installation directory. Depending on the installation options selected, it should be as follows:
C:\Program Files (x86)\GnuWin32\bin
What we need to do is open a command prompt. With this intention, press the Win+R combination and type CMD

Once there, use the CD command to navigate to the file location mentioned above. Then type Wget to use the program.

Add environment variable
We have correctly installed Wget. However, to be able to use it we always have to navigate to the installation folder of the program. This is cumbersome, so if we want to use Wget from any directory, we need to add an environment variable. With this in mind, please follow this path: Control Panel>System and Security>System>Advanced system settings

On the next screen, choose Environment Variables

Next, we are going to create a new environment variable. With that intention, please select Path and press Edit.

On the next screen first select New, then Browse. You must select the address where the program is installed.

Press ok in each of the open windows, and we can run Wget every time we open a Command Prompt. It doesn’t matter which directory we’re in. Let’s test the Wget command, downloading its executable for windows 10. With this intention, we enter this command in the CMD
wget https://sourceforge.net/projects/gnuwin32/files/wget/1.11.4-1/wget-1.11.4-1-setup.exe/download

Using Wget in Windows Subsystem for Linux
We have already seen how to use bash in windows 10. Through WSL we can also use Wget natively. To do this, we’ll open ubuntu and run the following command:
sudo apt-get install wget
Enter your password, and wait while the program is installed. Now we are ready to use wget in Windows 10.

Finally, we have seen how to install Wget in Windows 10. We can do it natively or using the Windows Subsystem for Linux. Both methods are valid for using this powerful download tool. Not only will we have access to files, but also to complete pages so that they can run offline. All right, that’s it for now, if you have any questions, don’t hesitate to ask. We are here to serve! until next time!