VirtualBox — это средство, позволяющее создавать на ПК виртуальную машину со своей собственной операционной системой.
Виртуальные машины используются для тестирования ПО на разных платформах: Microsoft Windows, Linux, macOS. Без виртуализации разработчикам пришлось бы держать под рукой отдельную ЭВМ под каждую ОС.
Всем виртуальным машинам выделяется пространство на физическом диске. Их операционные системы называются гостевыми, а ОС физического ПК — хостовой.
VirtualBox распространяется бесплатно и устанавливается на компьютеры под управлением операционных систем Windows, macOS и Linux.
Создадим виртуальную машину, работающую на Debian — ОС на базе Linux, которая используется для работы на ПК и серверах.
Из этой статьи вы узнаете:
- Как установить VirtualBox
- Как создать виртуальную машину
- Как её настроить
- Как правильно её запустить
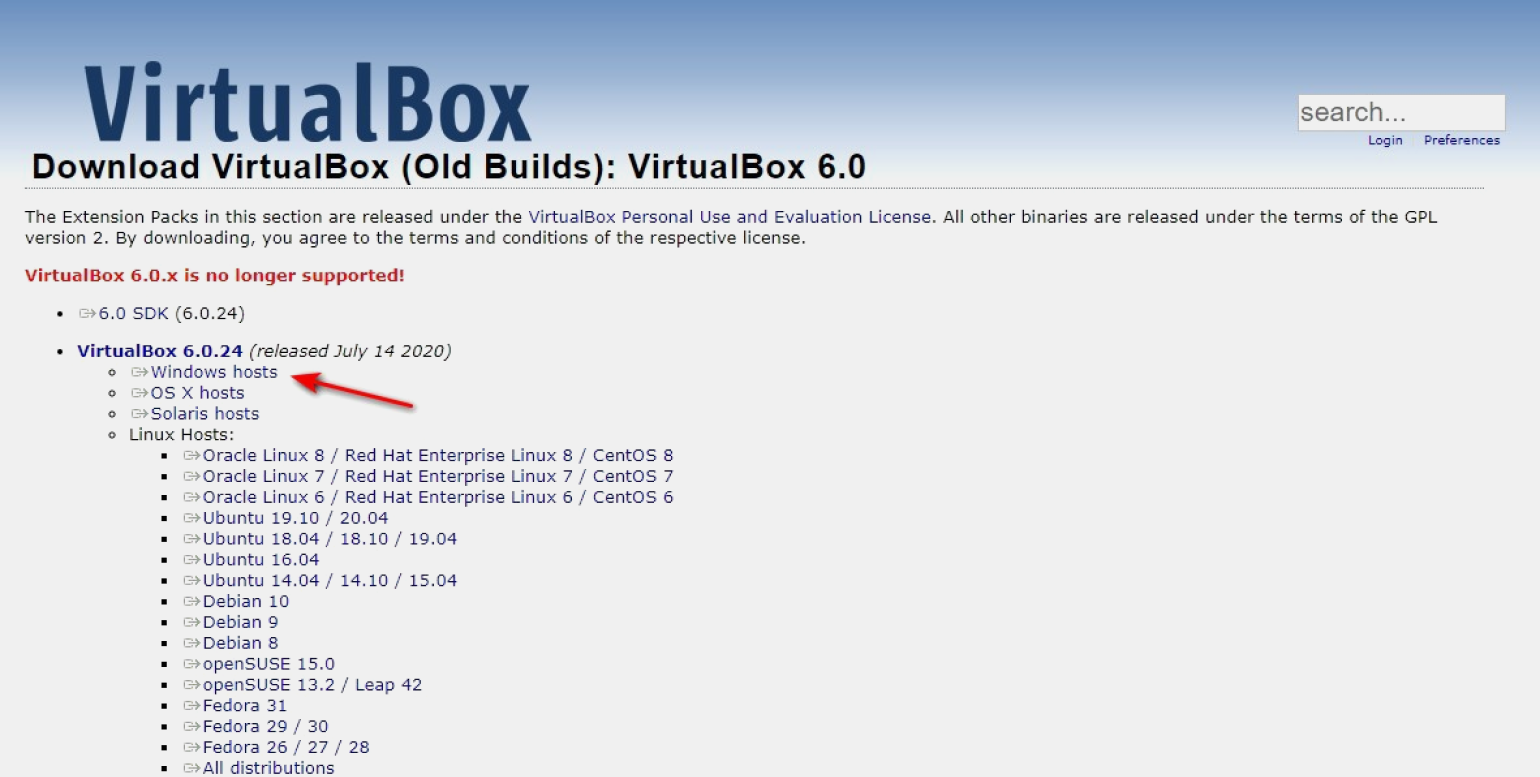
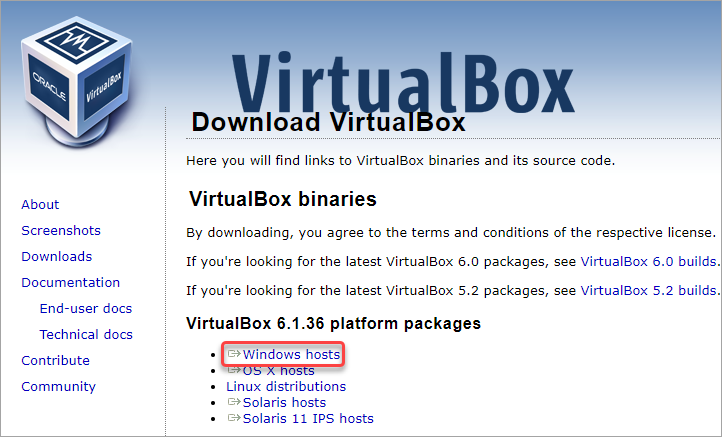
Запуск и настройка программы проста и не требует специальных знаний. Для скачивания переходим по ссылке. Это не самая последняя версия VirtualBox, но для удобства мы будем работать с ней.
На странице находится список дистрибутивов для загрузки на ПК под управлением разных ОС. Мы будем устанавливать программу на ПК под управлением Windows — следовательно, выбираем версию Windows hosts. Она первая в списке.
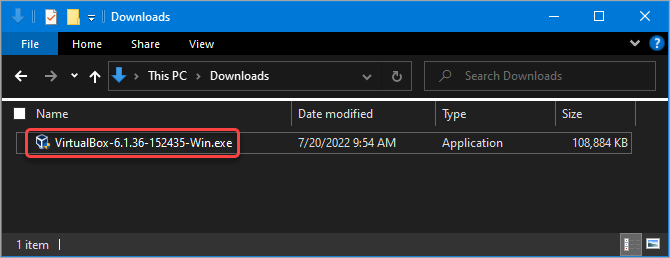
Скачиваем её на свой ПК. По завершении процесса появляется приветствие:
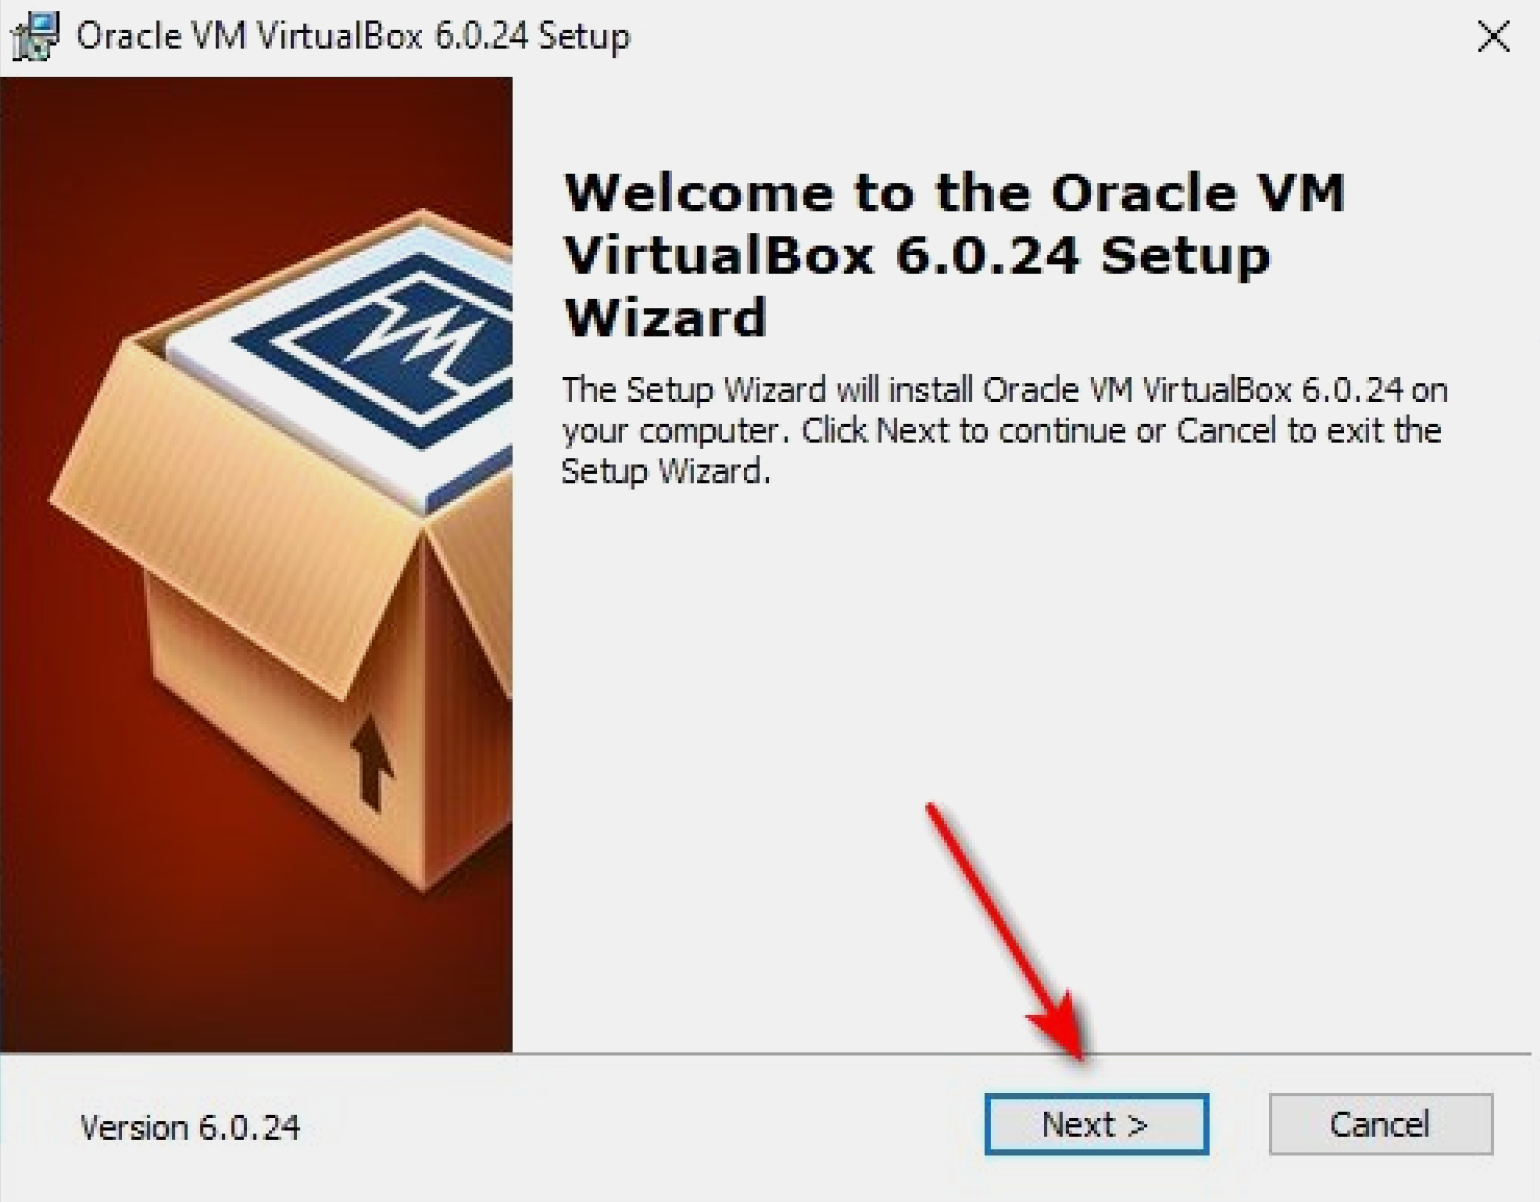
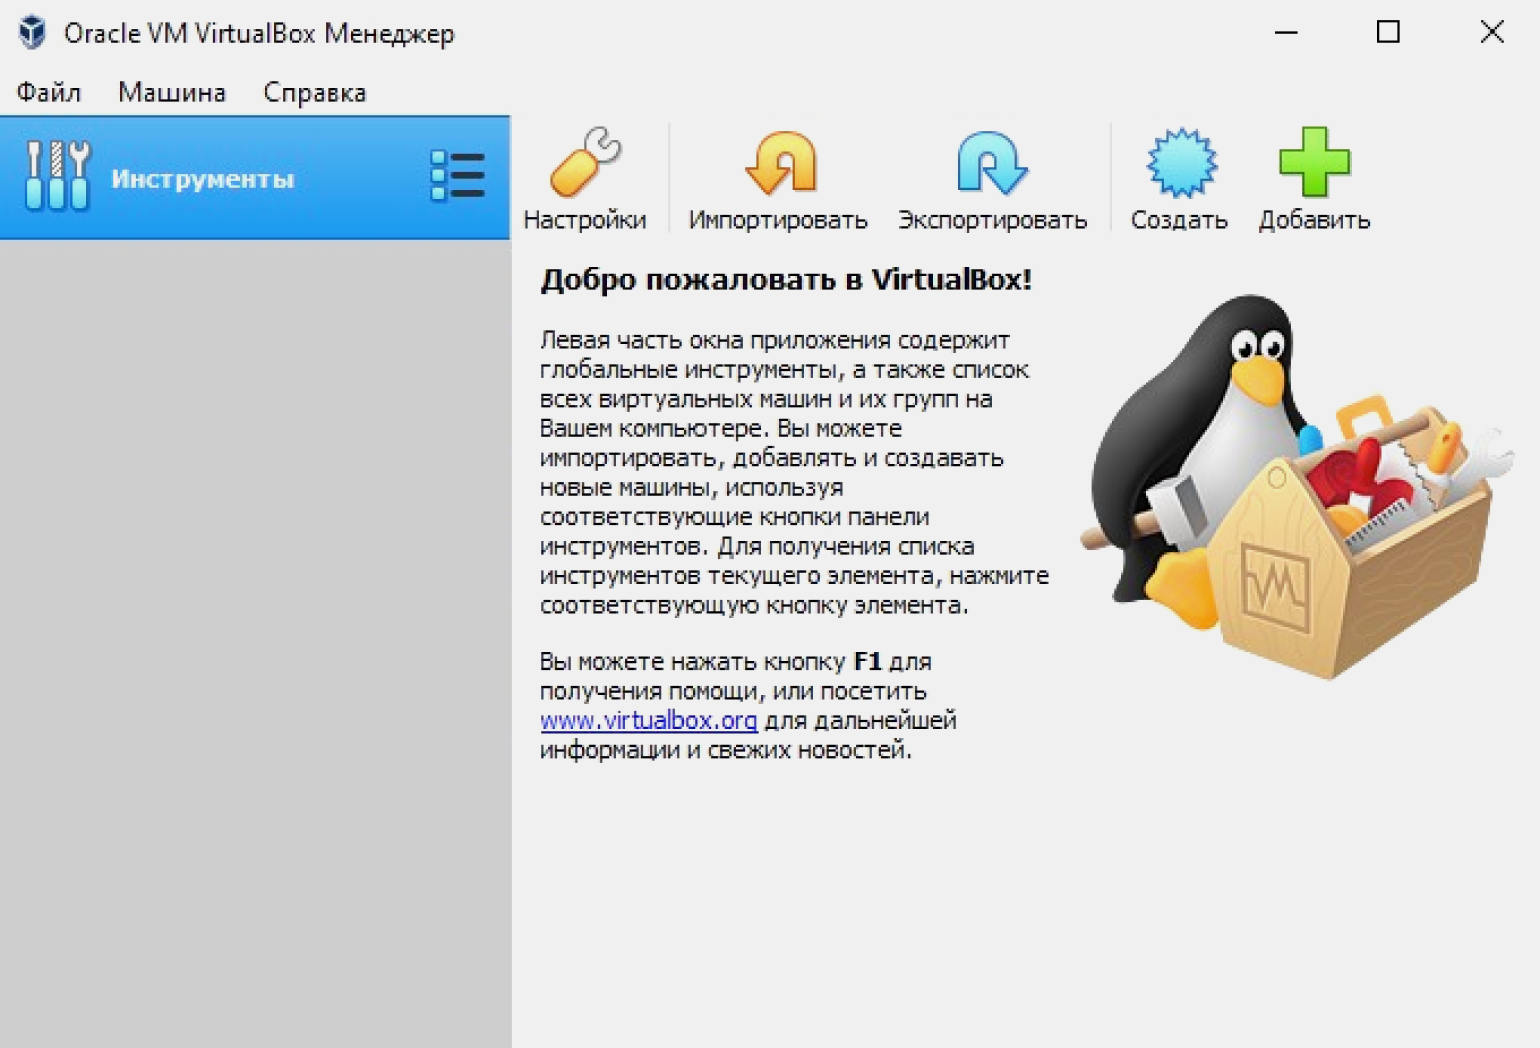
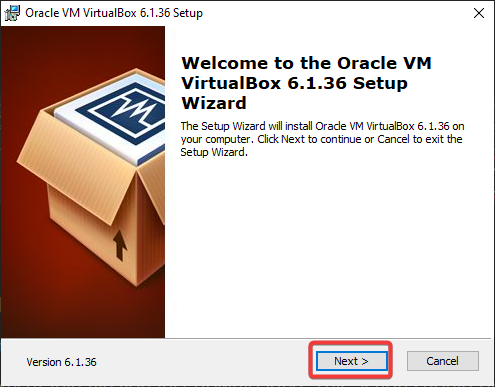
Приступаем к установке VirtualBox. В процессе могут выплывать разные предупреждения. Игнорируем их и нажимаем Next. В финале нам откроется главный экран программы с приветствием на русском языке:
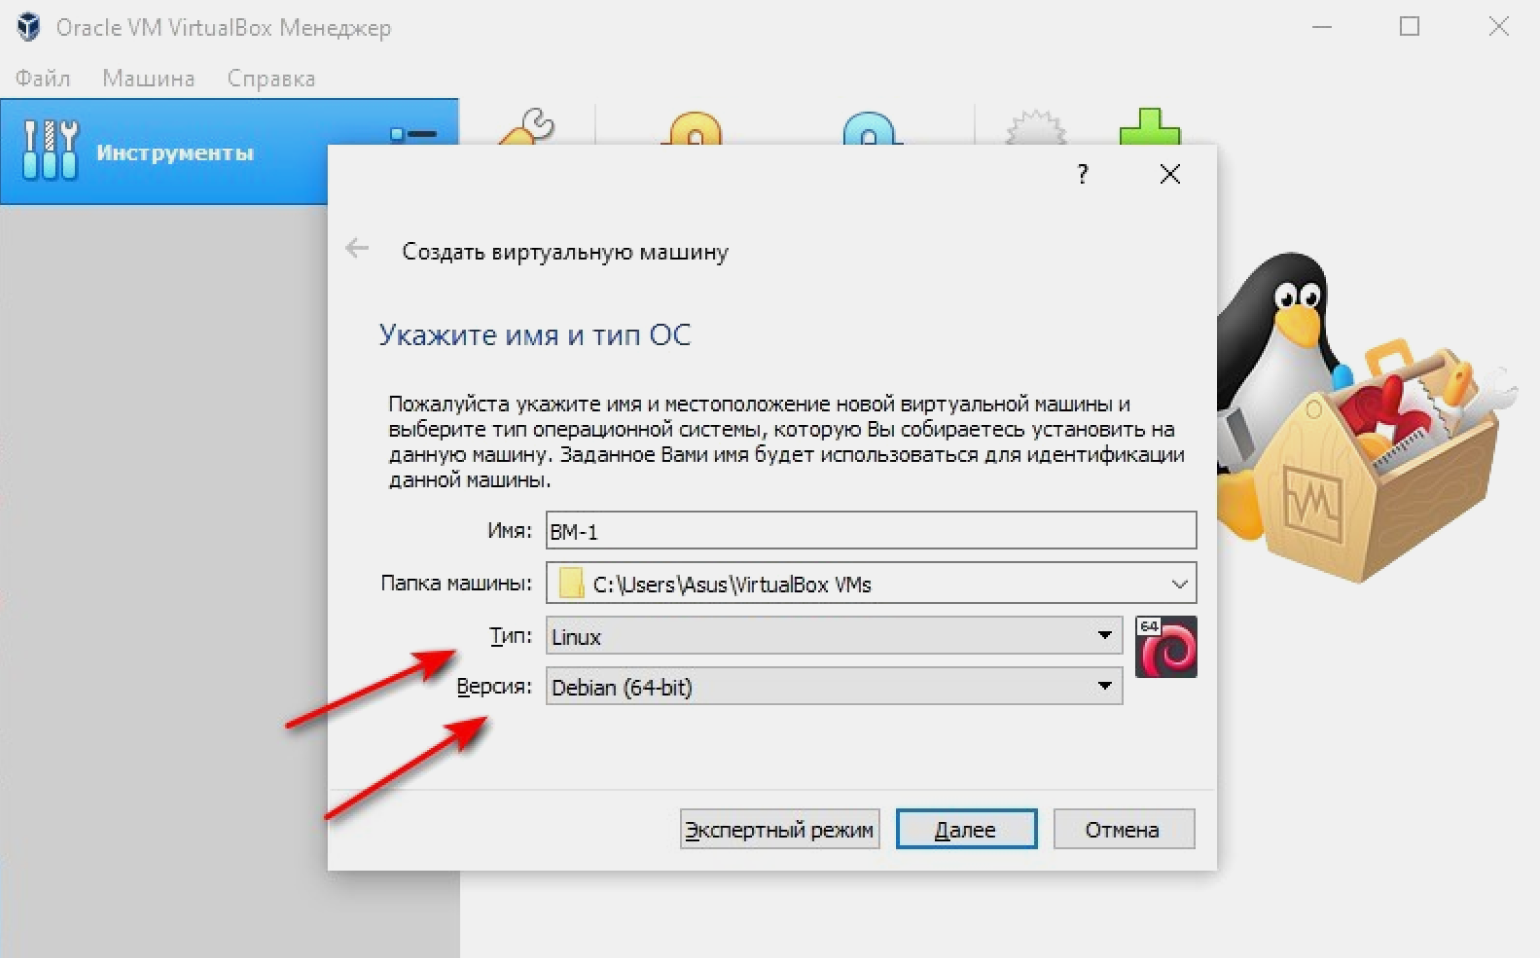
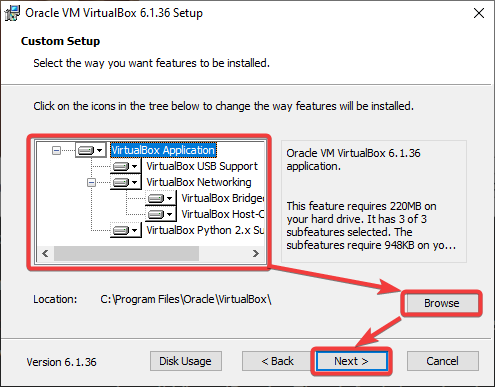
Вверху страницы нажимаем кнопку «Создать». В появившемся окне программа предлагает дать машине имя и выбрать ОС. По умолчанию задан VirtualBox под управлением Windows.
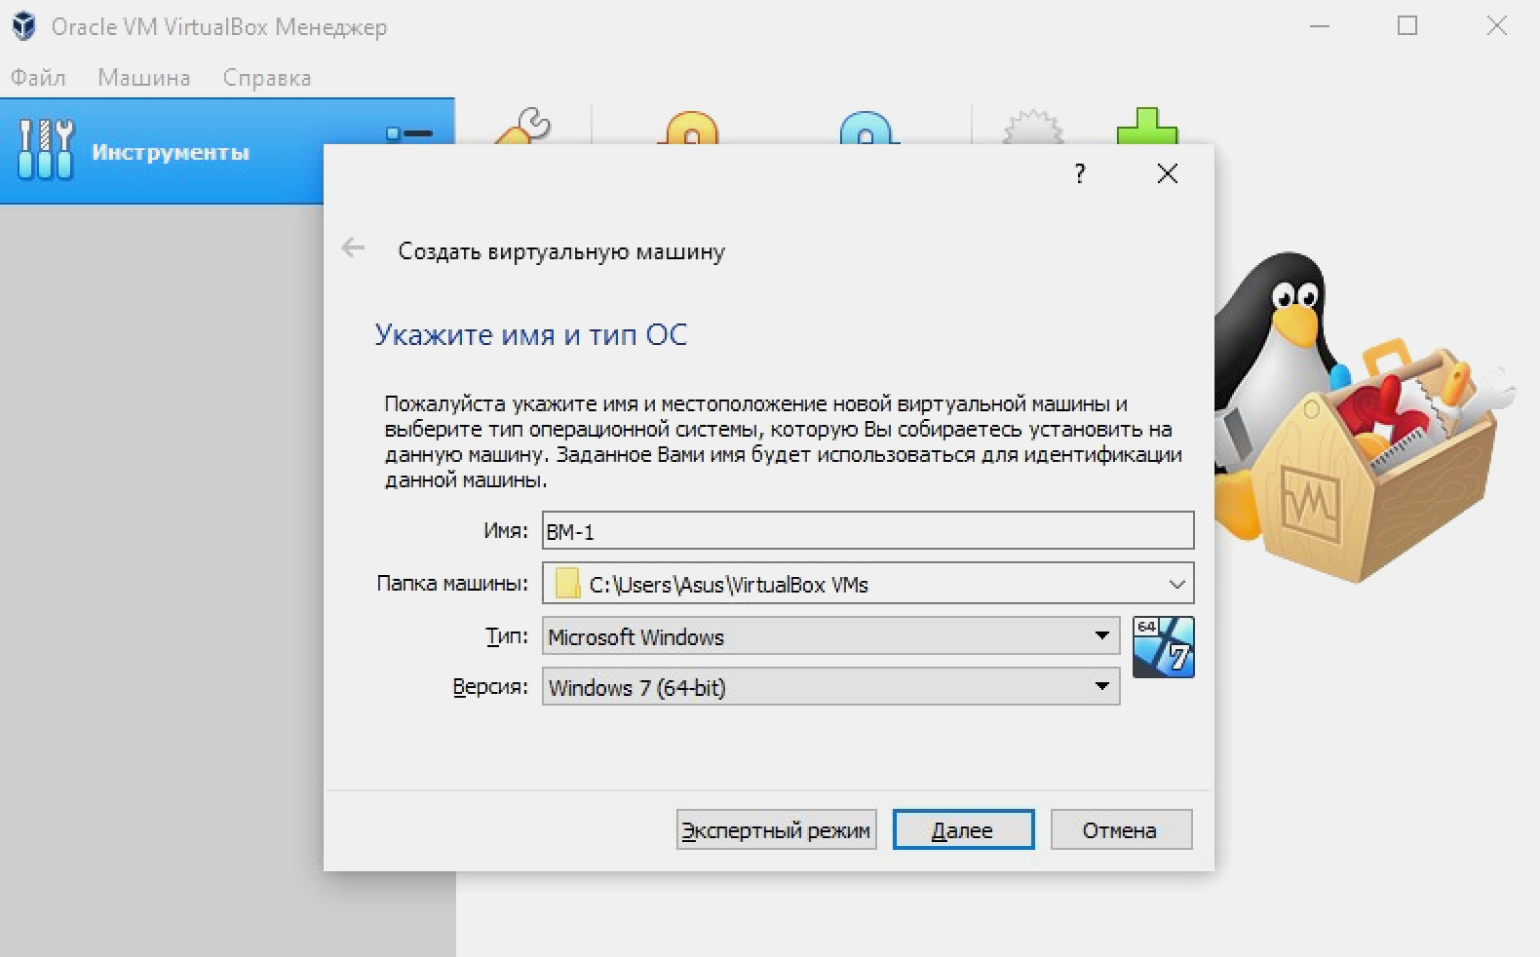
Назовём нашу виртуальную машину ВМ-1. Так как она будет управляться ОС на базе Linux, в выпадающем окне «Тип» выбираем Linux. Затем, в окне «Версия», — Debian (x64-bit).
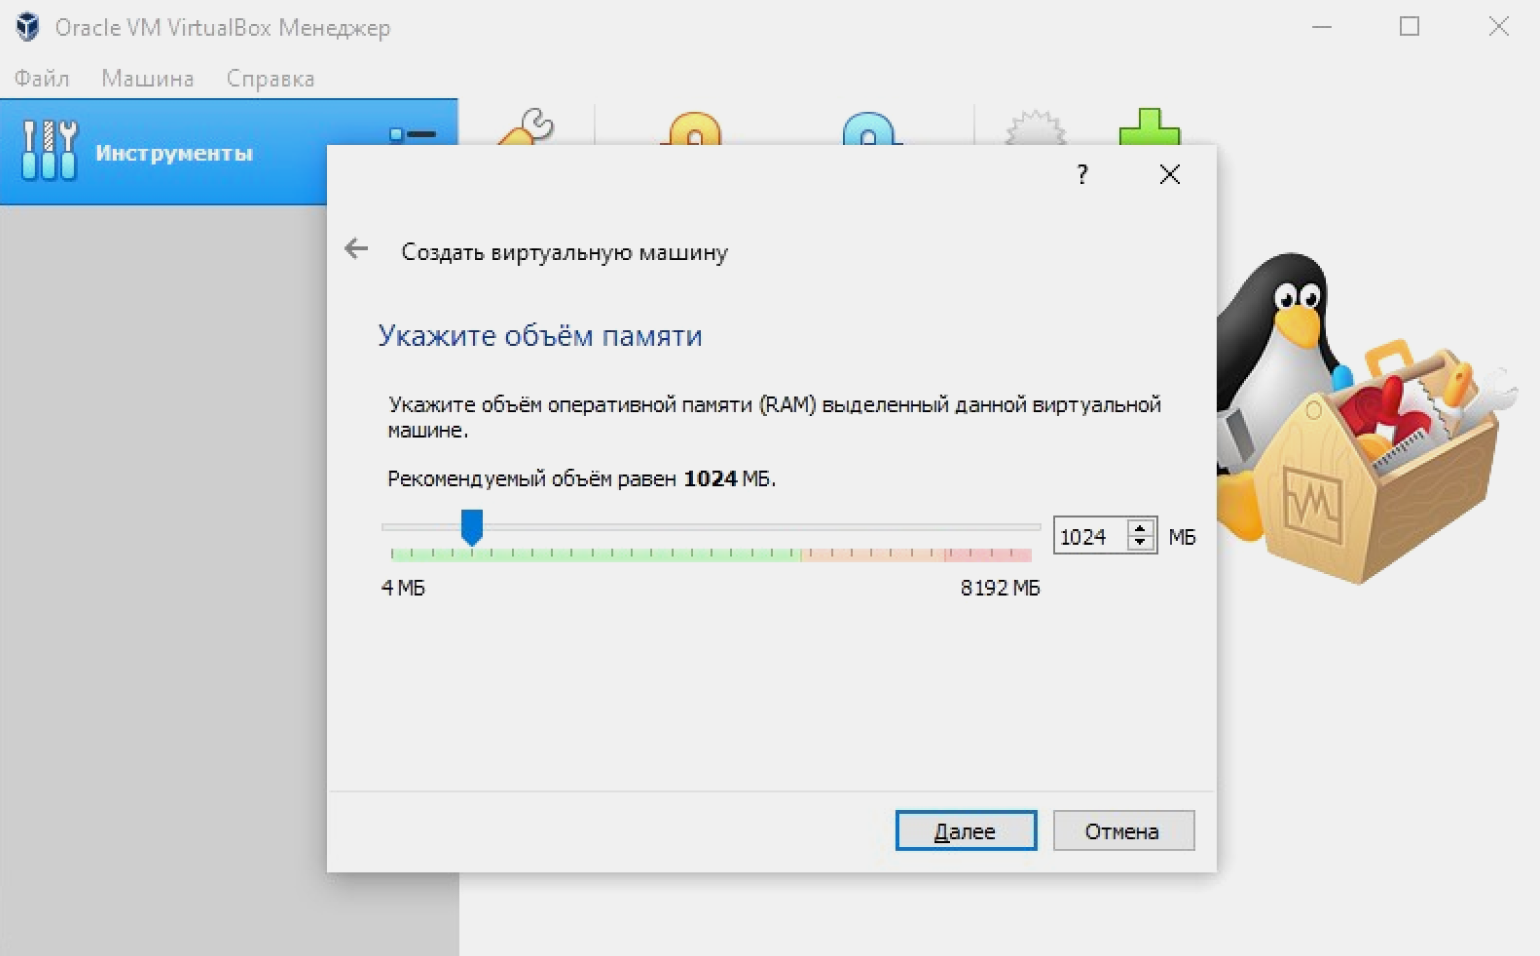
Указываем объём памяти, который мы выделим нашей ВМ-1: оставляем заданный по умолчанию или вводим своё значение.
Объём памяти напрямую влияет на работу виртуальной машины. Лучше всего придерживаться простого правила: выделять не более половины RAM физического ПК. Также можно отталкиваться от рекомендации VirtualBox, которая отмечает зелёным фоном рекомендуемый объём памяти.
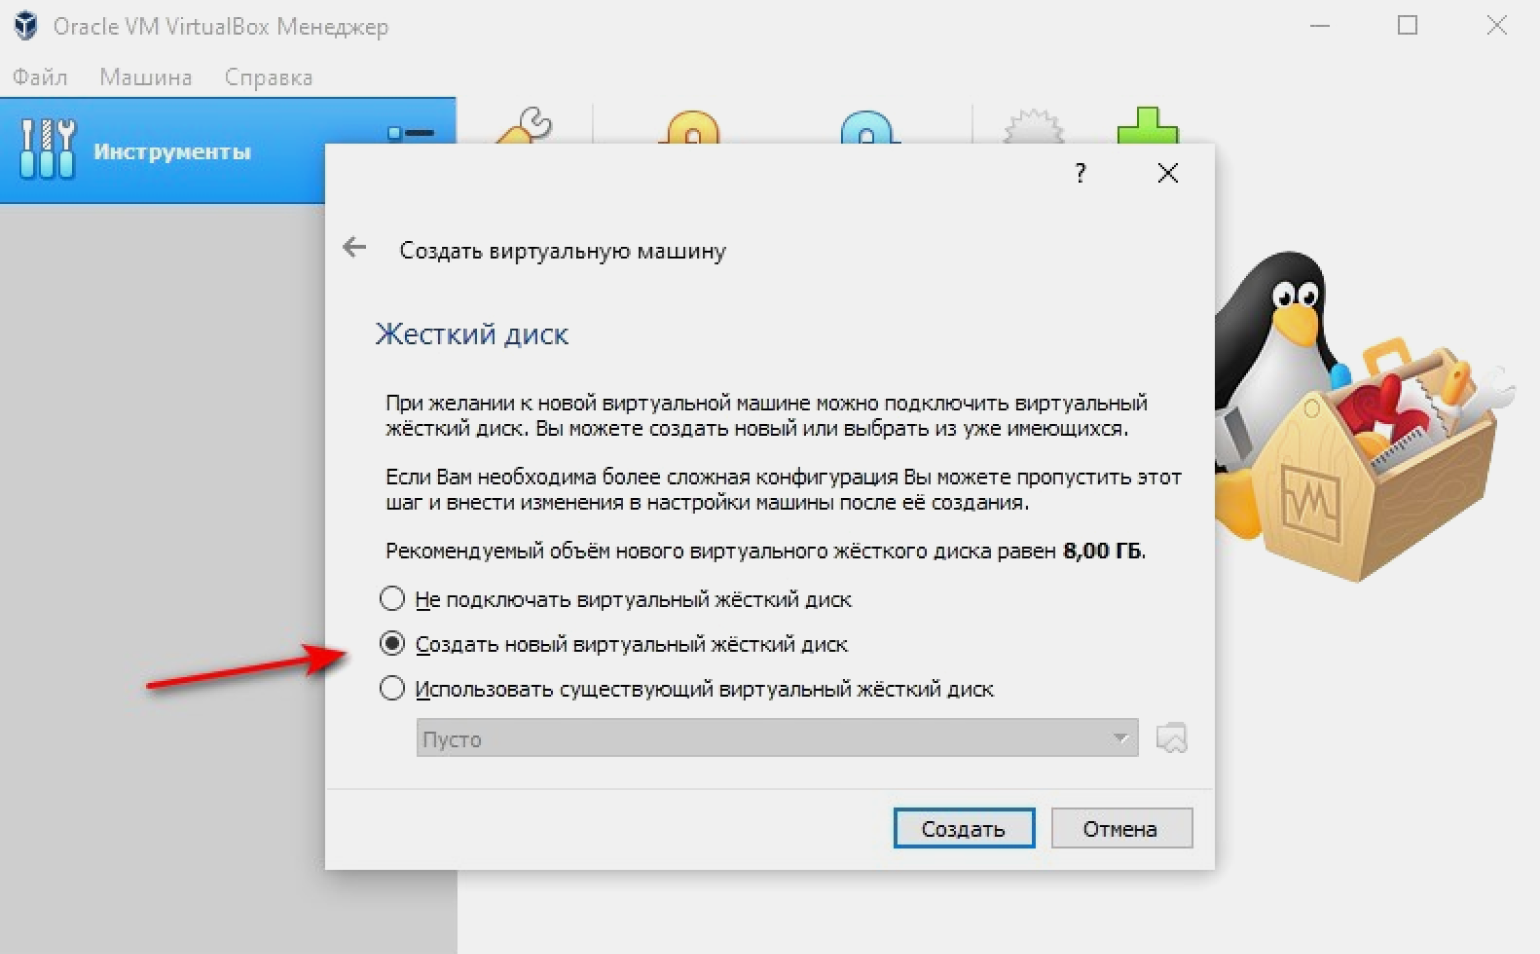
Создаём виртуальный жёсткий диск. По умолчанию программа предлагает новый диск с рекомендуемым объёмом. Принимаем параметры или задаём свои.
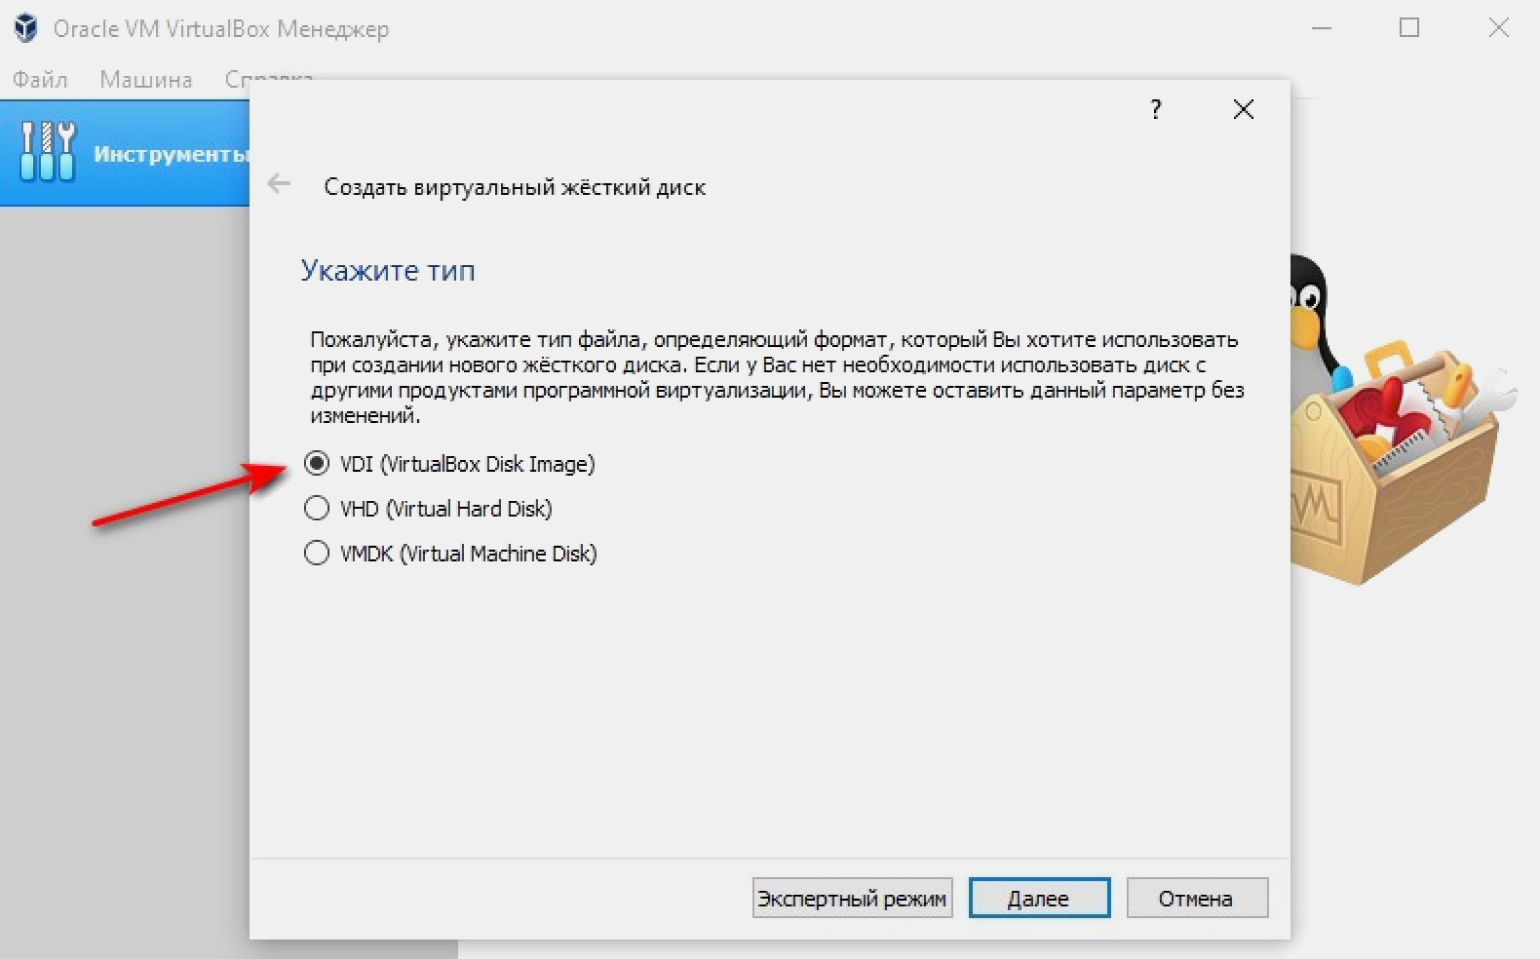
Выбираем тип файла жёсткого диска. По умолчанию VirtualBox предлагает VDI. Ок, соглашаемся. VHD и VMDK — это форматы, предназначенные для виртуальных машин на базе аналогов VirtualBox: VMWare и Virtual PC. Использование VHD и VMDK приведёт к снижению производительности нашей виртуальной машины.
Указываем формат хранения: динамический или фиксированный. Для большинства задач подходит динамический: его размер будет увеличиваться или уменьшаться в зависимости от содержимого. Для задач, где нужна максимальная производительность (например, обработка видео) подходит фиксированный формат.
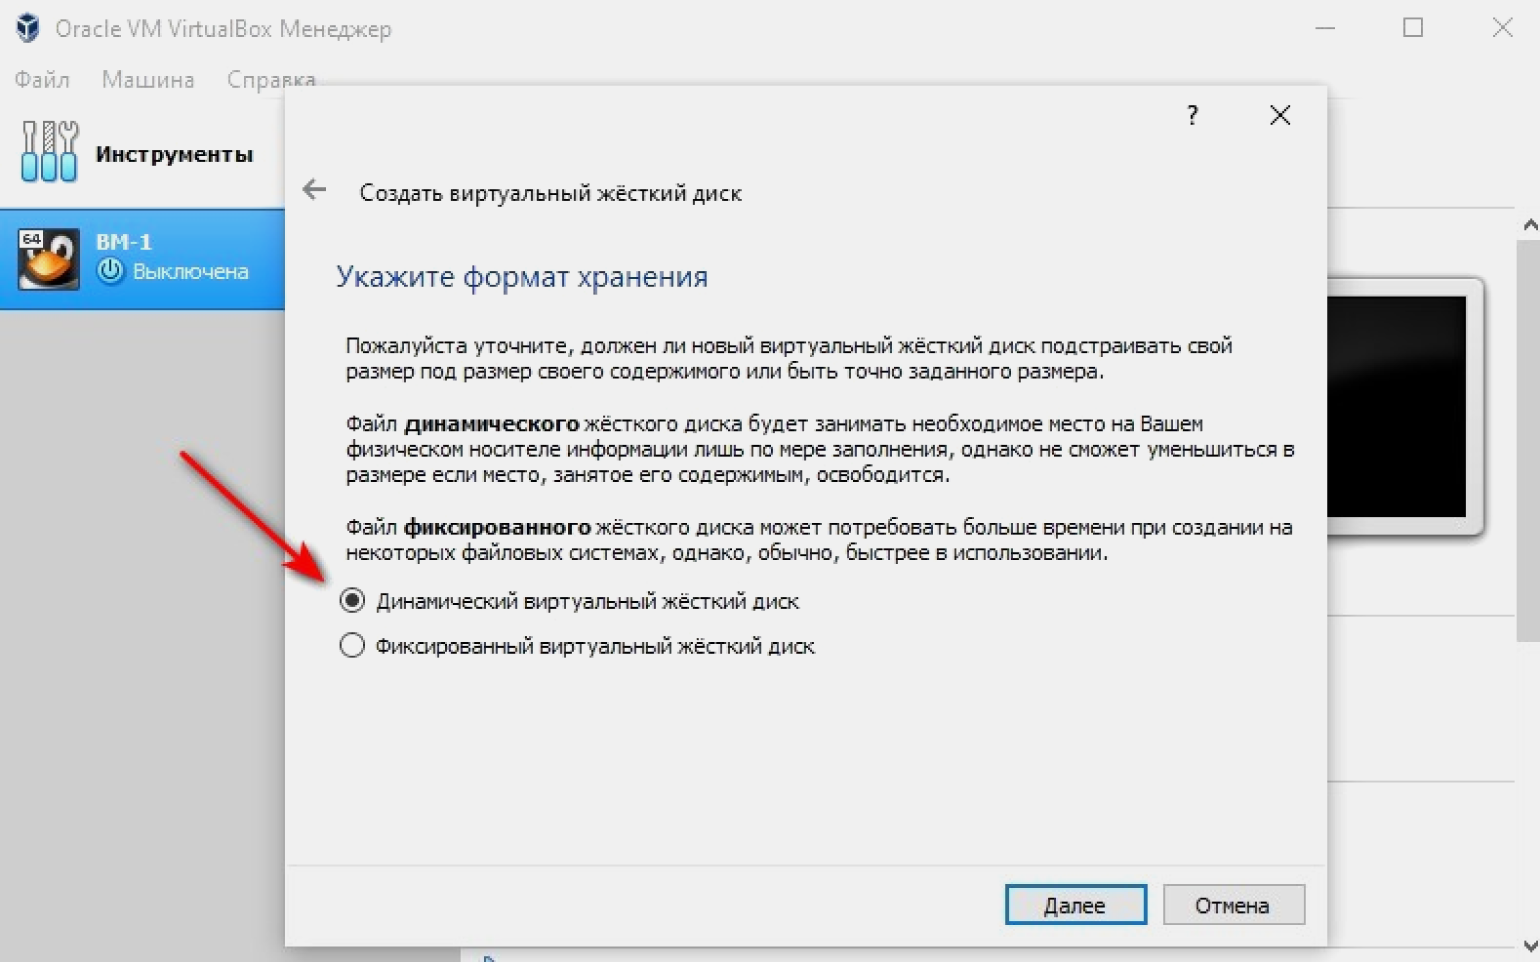
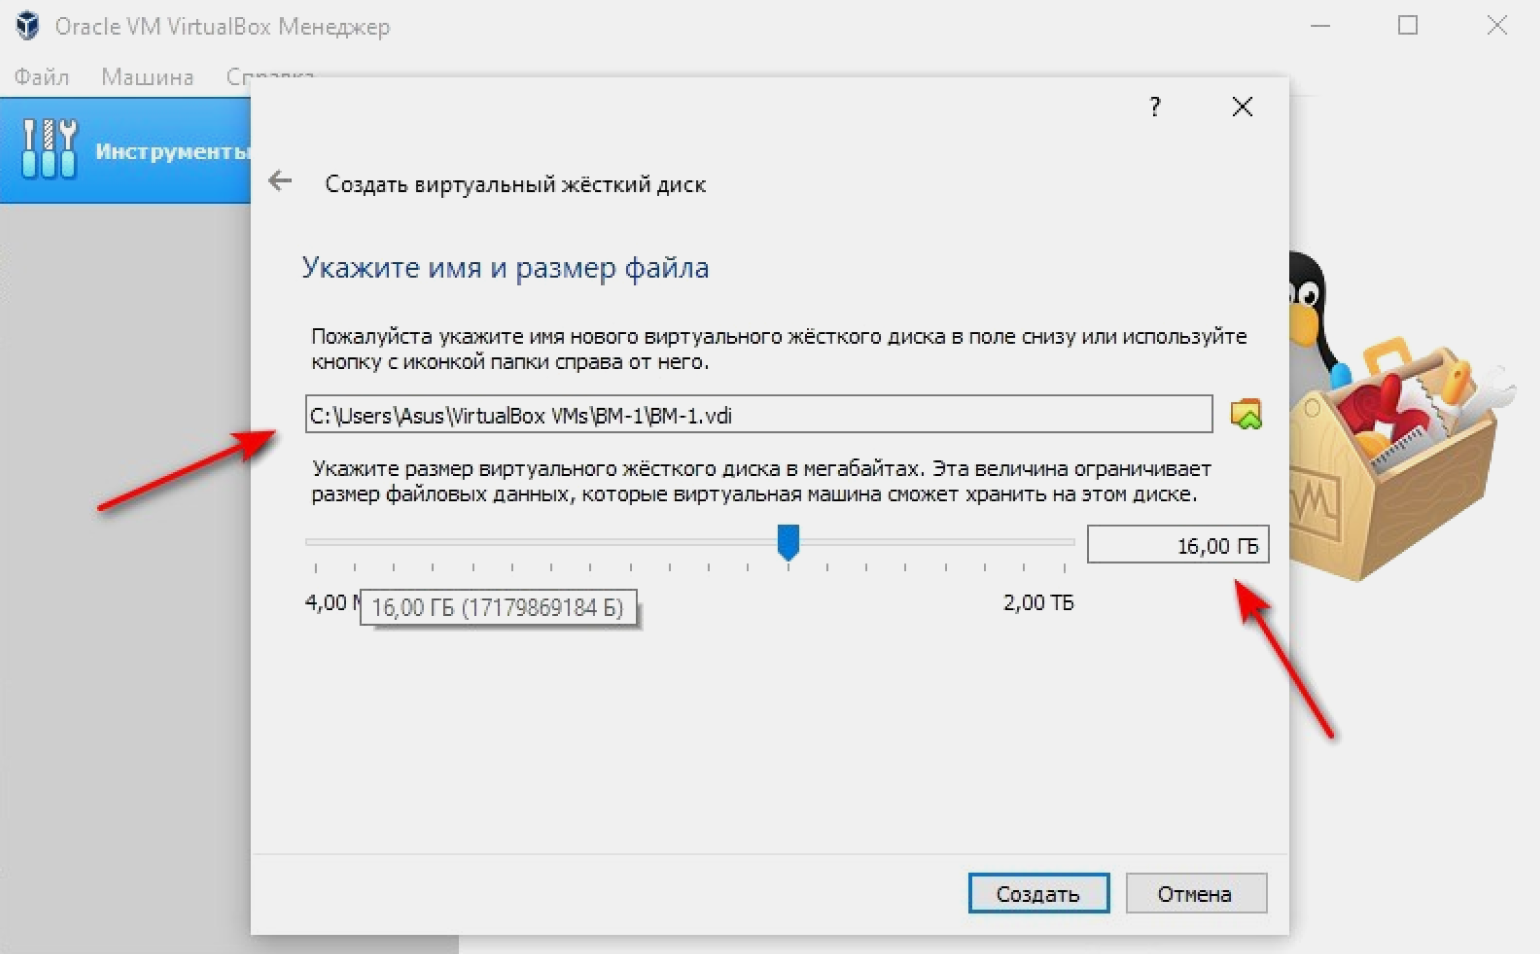
Выбираем размер диска. В нашем случае это 16 ГБ. При желании в VirtualBox можно задать больший объём. Именуем новый диск так, как предлагает программа.
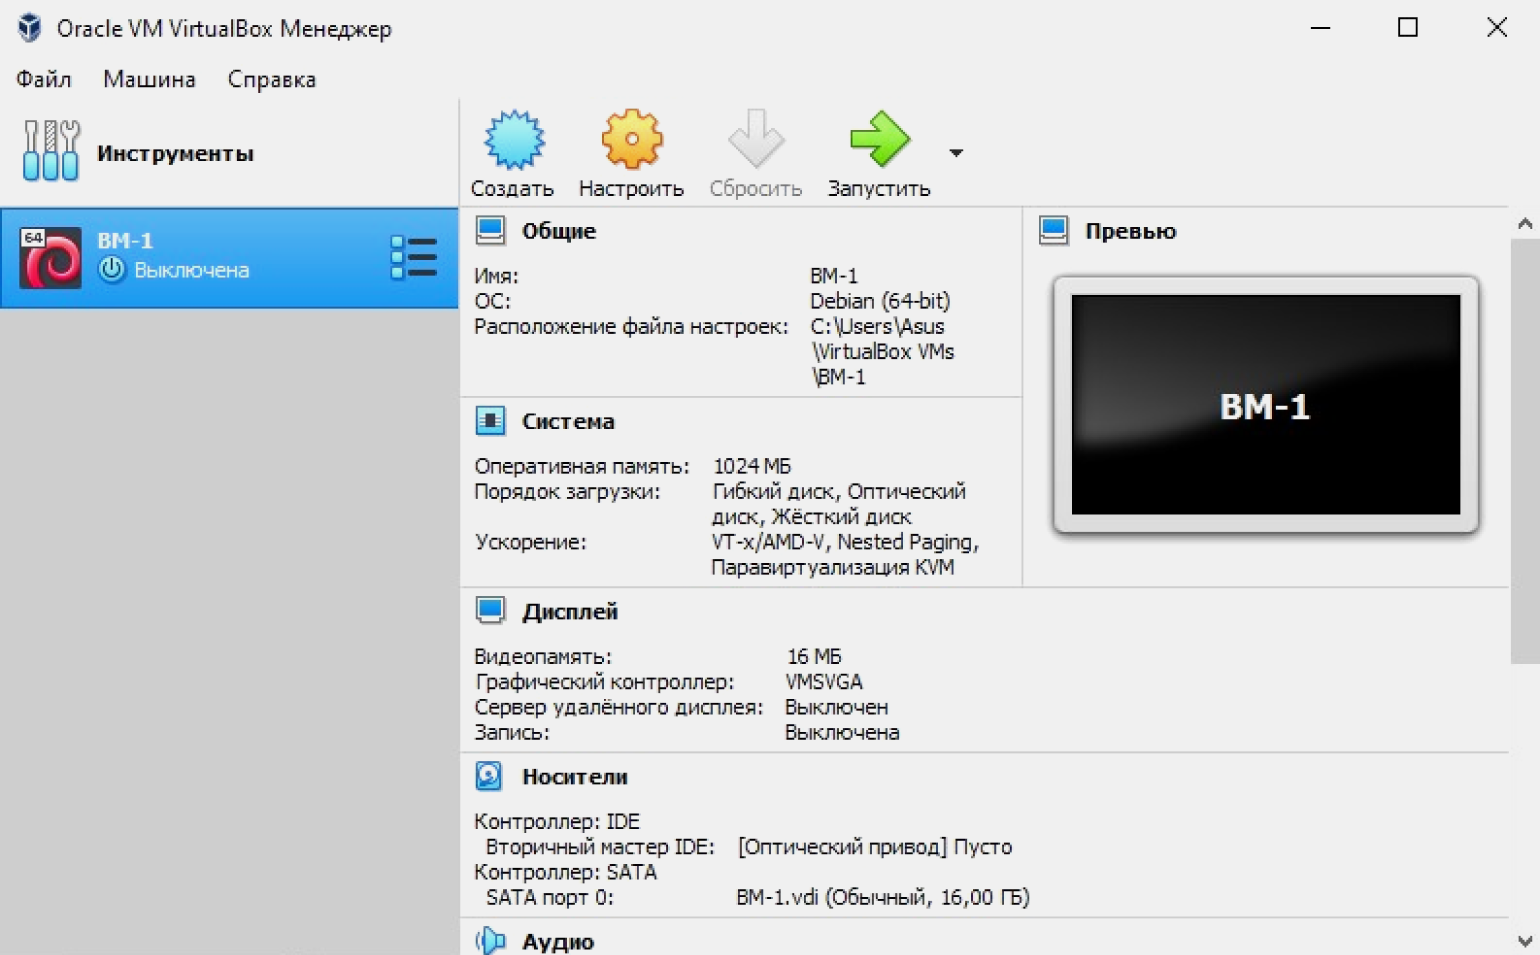
Мы создали виртуальную машину. На экране указаны её параметры: название, операционная система, оперативная и видеопамять.
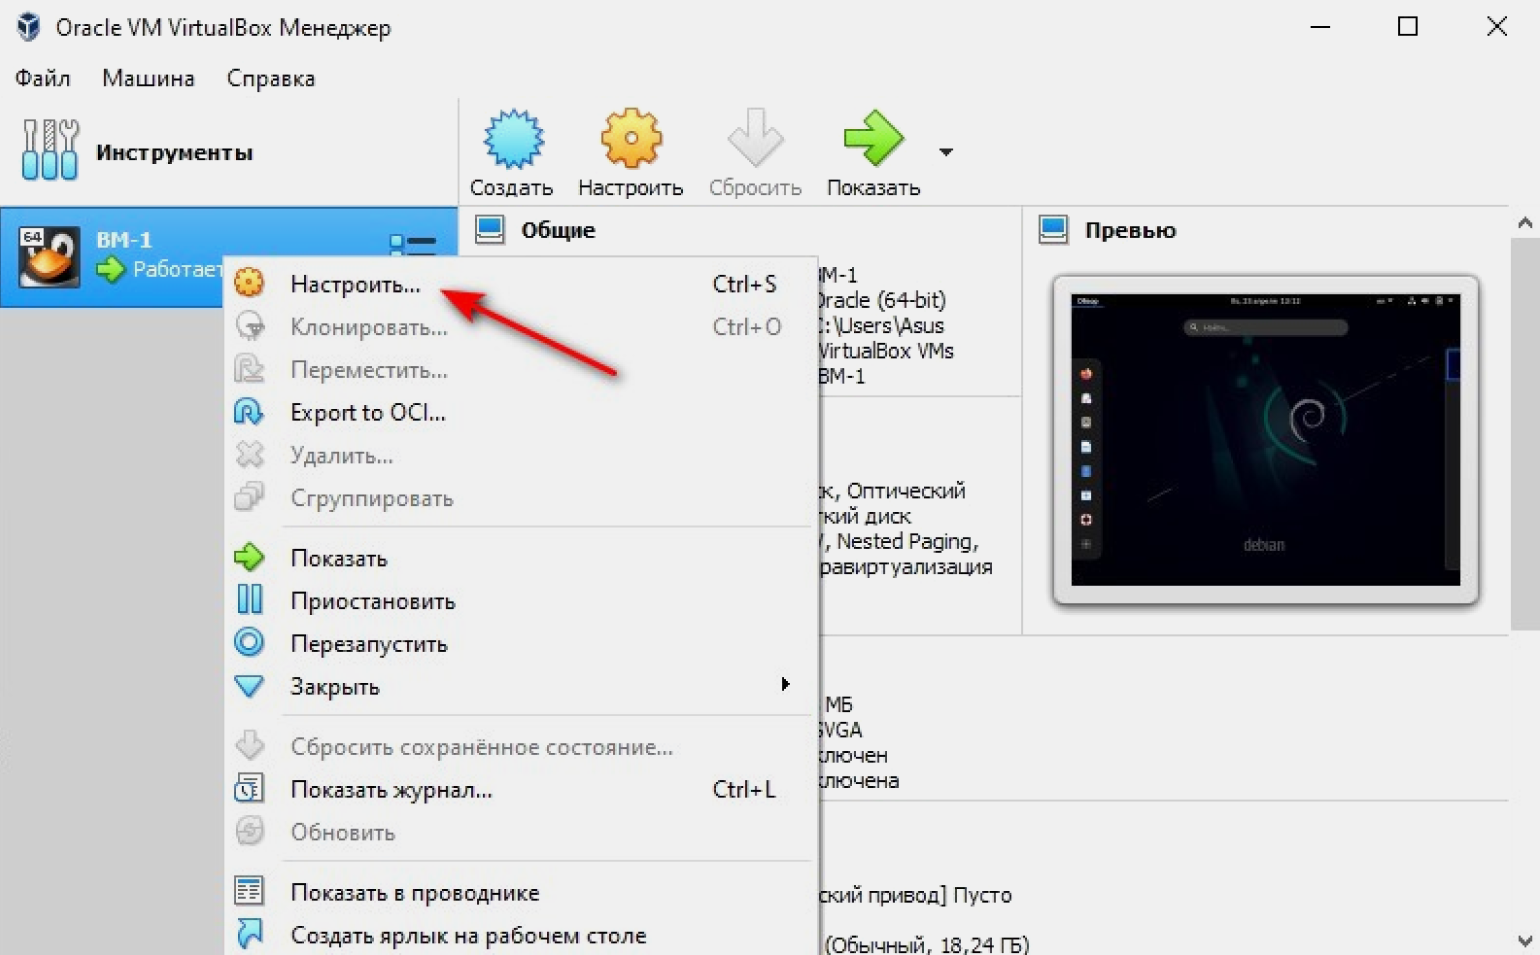
Сейчас у нашей машины параметры, заданные по умолчанию. Если мы хотим их изменить, наводим мышку на виртуальную машину ВМ-1 слева на экране, кликаем по ней правой кнопкой и в выпадающем меню выбираем «Настроить».
Выбираем вкладку «Система», затем — «Процессор». Сразу в VirtualBox значения заданы по умолчанию, при желании меняем их на другие. Например, увеличиваем количество задействованных процессоров. Помните, что не стоит устанавливать значения за пределами рекомендуемой зелёной зоны. Как видно на скриншоте, это два ядра из имеющихся четырёх. Если установить больше, это негативно скажется на работе нашего ПК.
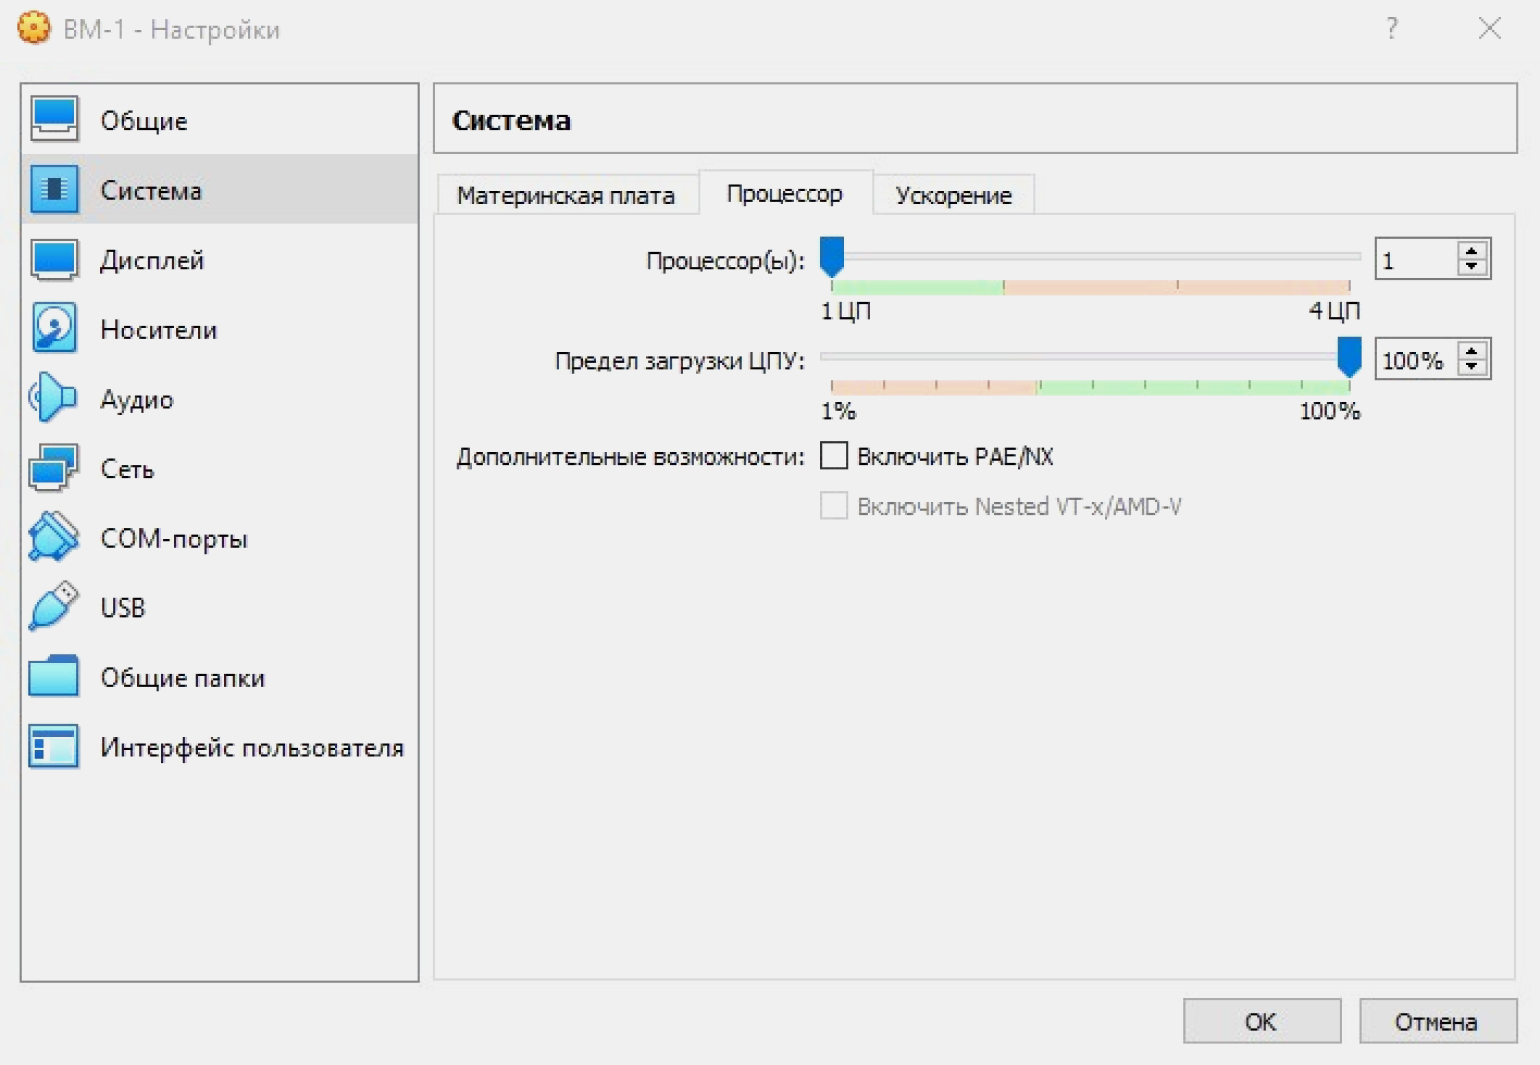
Во вкладке «Ускорение» настраиваем режим виртуализации и дополнительные параметры для ускорения работы. Они подбираются автоматически и зависят от выбранной гостевой ОС. Ничего не меняем, оставляем параметры по умолчанию.
Вариант «Минимальный» выбирают для гостевых систем macOS. «Hyper-V» — для Windows, а «KVM» — для Linux. Вариант «Отсутствует» выбираем, когда мы хотим скрыть от гостевой ОС, что она работает на виртуальной машине, а не на физическом ПК. «Совместимый» создан для поддержки виртуальных машин, созданных на устаревших версиях VirtualBox.
Функция «Включить PAE/NX» предназначена для поддержки 4 и более ГБ ОЗУ в 32-битных системах. Мы работаем в 64-битной системе, поэтому для нас это неактуально.
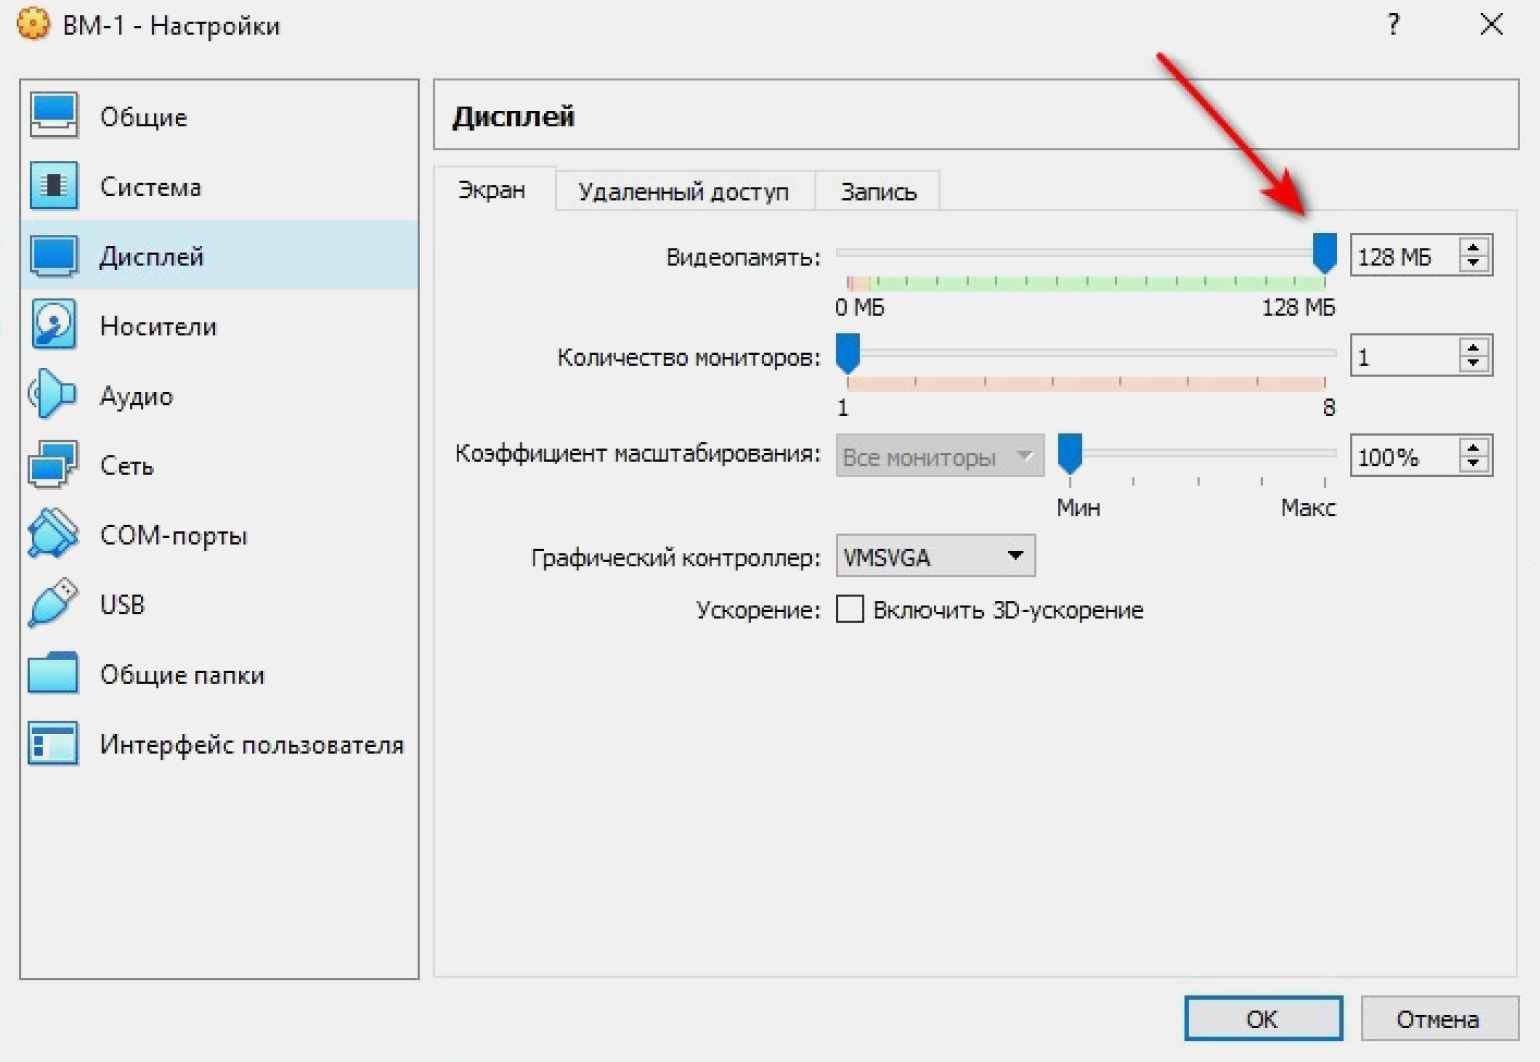
Из вкладки «Система» переходим во вкладку «Дисплей», чтобы установить параметры видеопамяти. Она определяет объём ресурсов, выделенный для виртуального графического адаптера гостевой ОС. Адаптер, в свою очередь, отвечает за обработку графических операций и вывод изображения на экран. Если выделенный объём ресурсов недостаточен, производительность может снизиться. У нашей виртуальной машины значение видеопамяти по умолчанию задано 16 МБ. Это немного, поэтому лучше сразу указать его максимальное рекомендуемое значение. В нашем случае это 128 МБ.
Для подключения к интернету VirtualBox по умолчанию использует сеть NAT. Этот вариант хорошо работает в большинстве ситуаций. Машине присваивается один и тот же IP-адрес, и она полагает, что находится в своей изолированной сети. Важно, что это будет работать, даже если ПК перемещается из одной сети в другую. Например, ноутбук меняет местоположение и подключения вместе со своим владельцем.
Если мы захотим создать связь между ВМ и ПК, выбираем и настраиваем тип подключения «Сетевой мост».
Когда нужна сеть из нескольких виртуальных машин, выбираем и настраиваем «Виртуальный адаптер хоста». Доступа к интернету не будет, но зато машины смогут взаимодействовать между собой. Подробно типы подключений рассматривать не будем — это тема отдельной статьи.
Ко всем настройкам всегда можно вернуться и изменить их согласно изменившимся задачам.
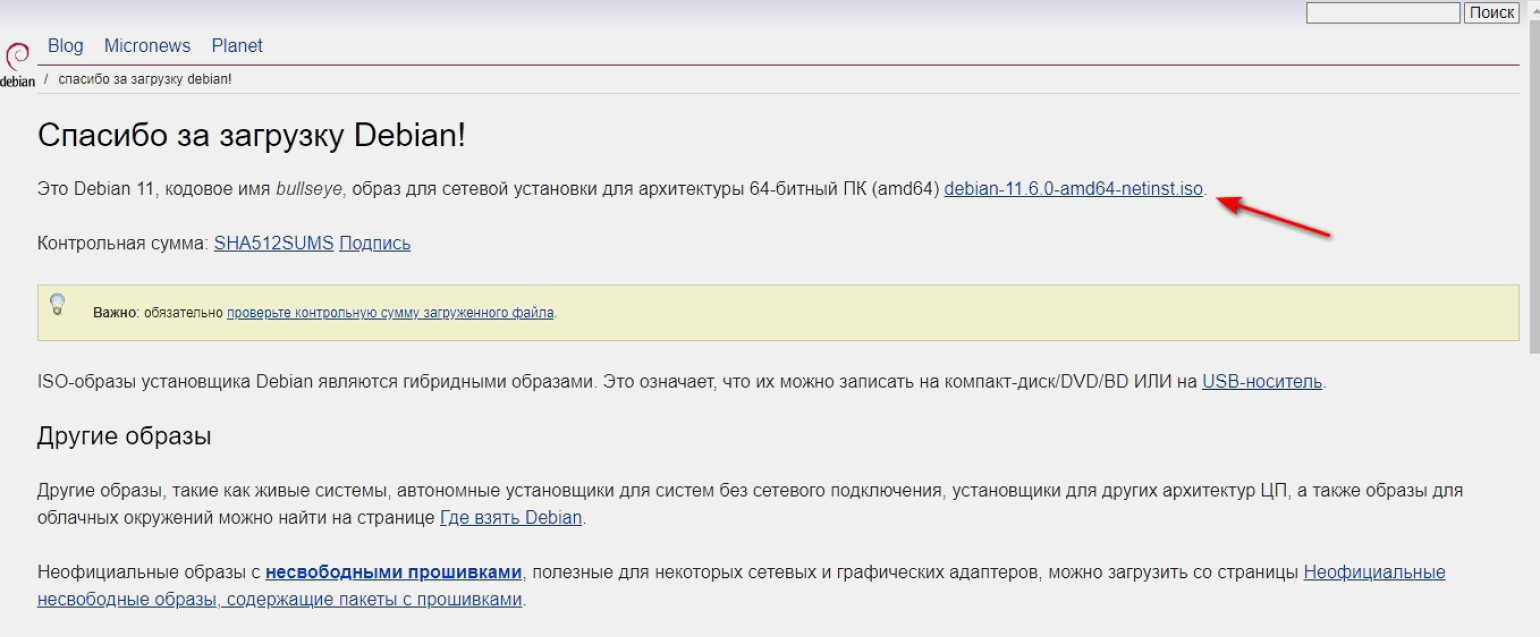
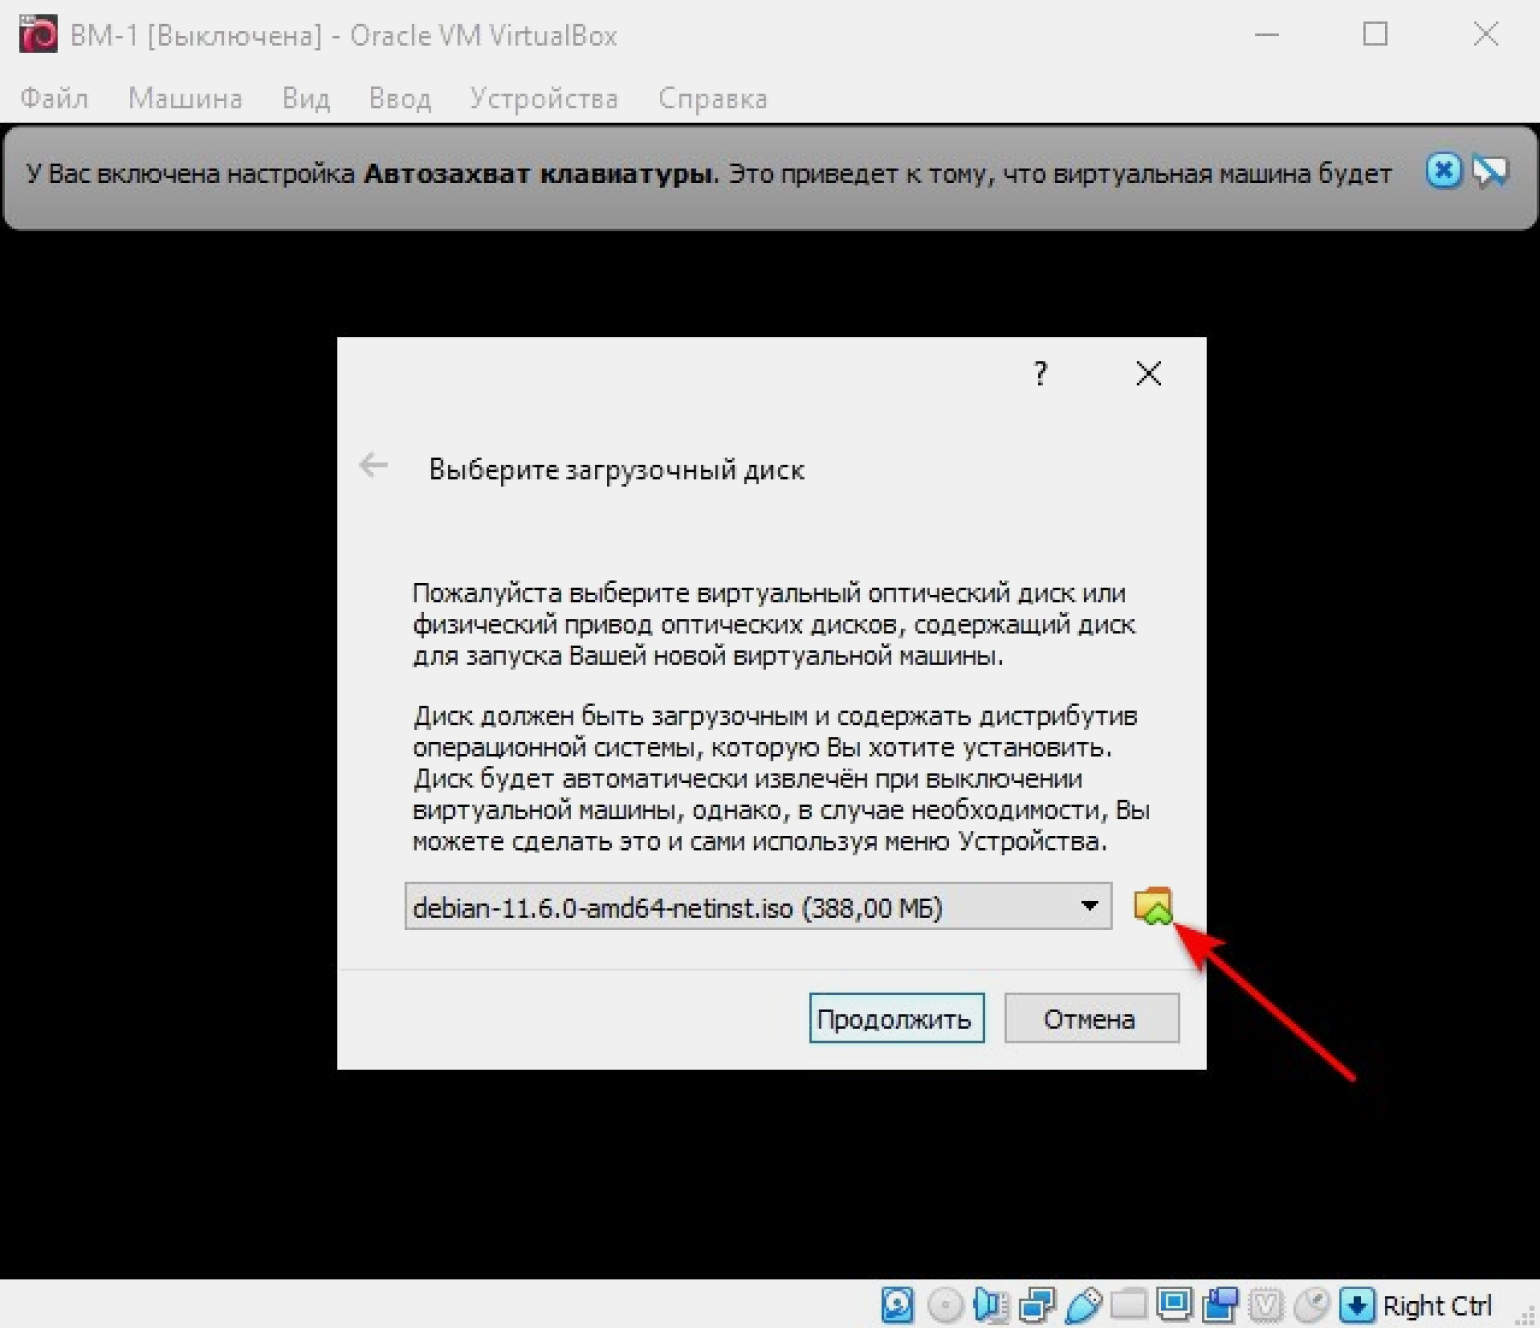
Пора установить в VirtualBox ОС. Скачиваем образ Debian 11.6 на флешку или прямо на ПК с официального сайта. Несмотря на предупреждение, контрольную сумму можно не проверять.
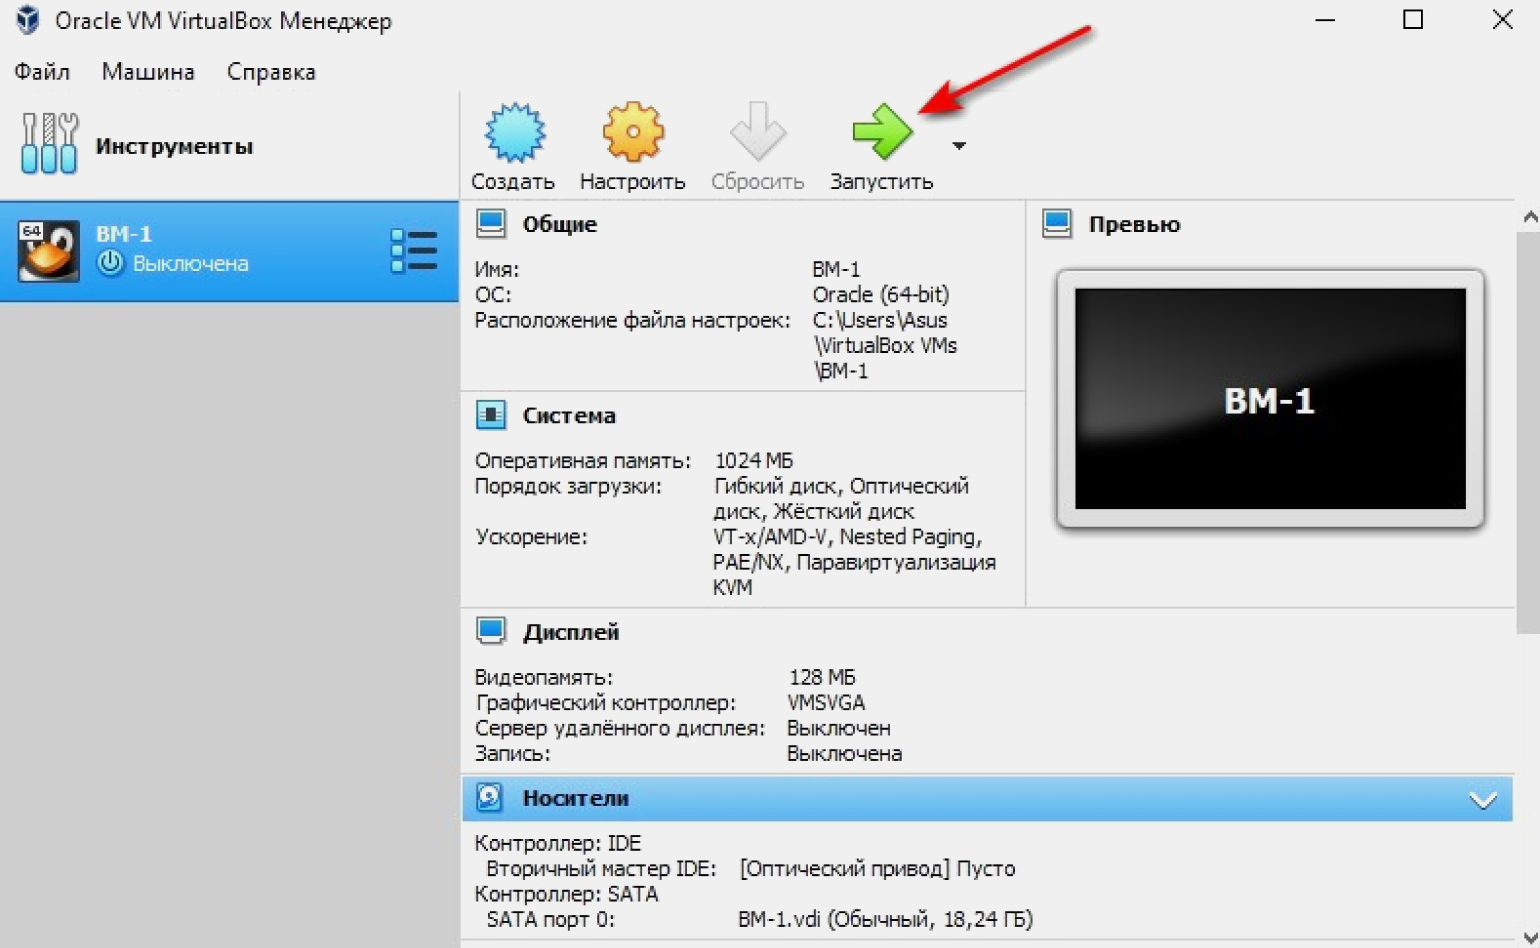
Нажимаем кнопку «Запустить» в интерфейсе VirtualBox.
Нажимаем на значок папки либо в выпадающем окне находим и выбираем папку с образом Debian и продолжаем.
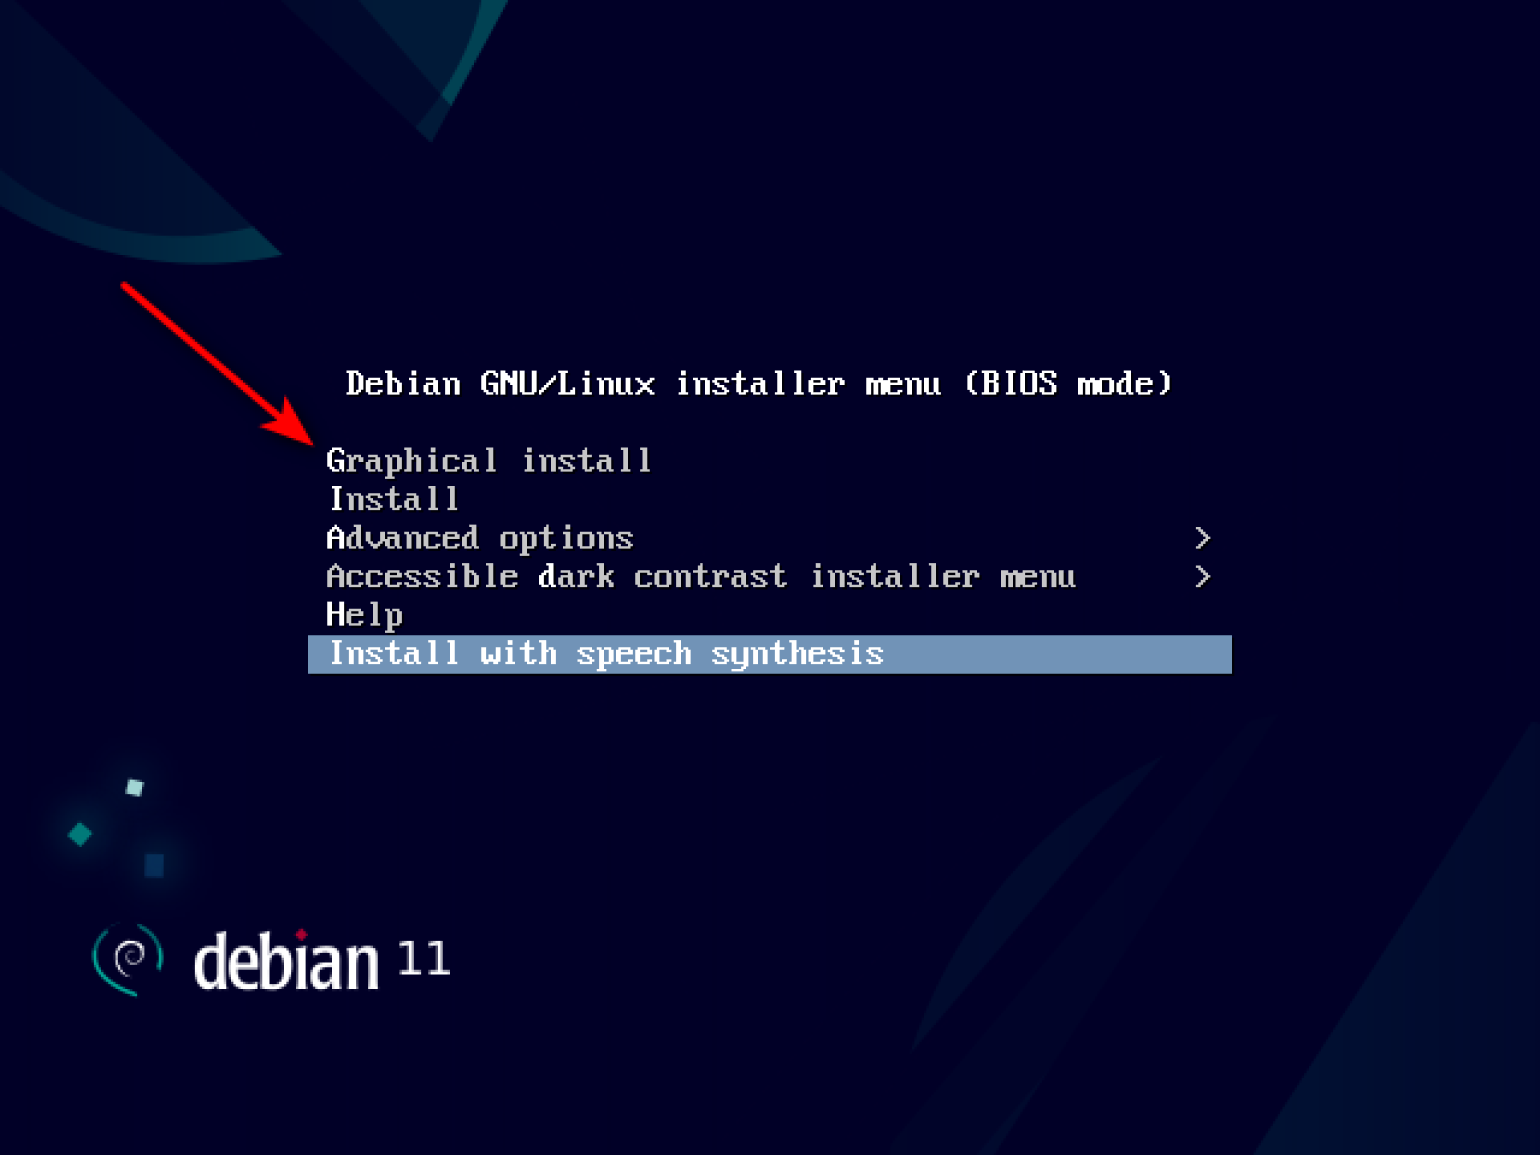
Выбираем «Сетевой интерфейс» и ждём, пока произойдёт настройка сети. В процессе время от времени будут появляться всплывающие окна. Не вникая в их содержание, просто нажимаем «Далее» или «Продолжить».
После завершения настройки VirtualBox на экране появится меню со списком способов инсталляции. Выбираем первый — Graphical Install.
После инсталляции программа предлагает выбрать язык. Выбираем русский или оставляем предложенный английский.
Затем система предлагает выбрать местонахождение. Выбираем РФ или другую страну, в которой находимся.

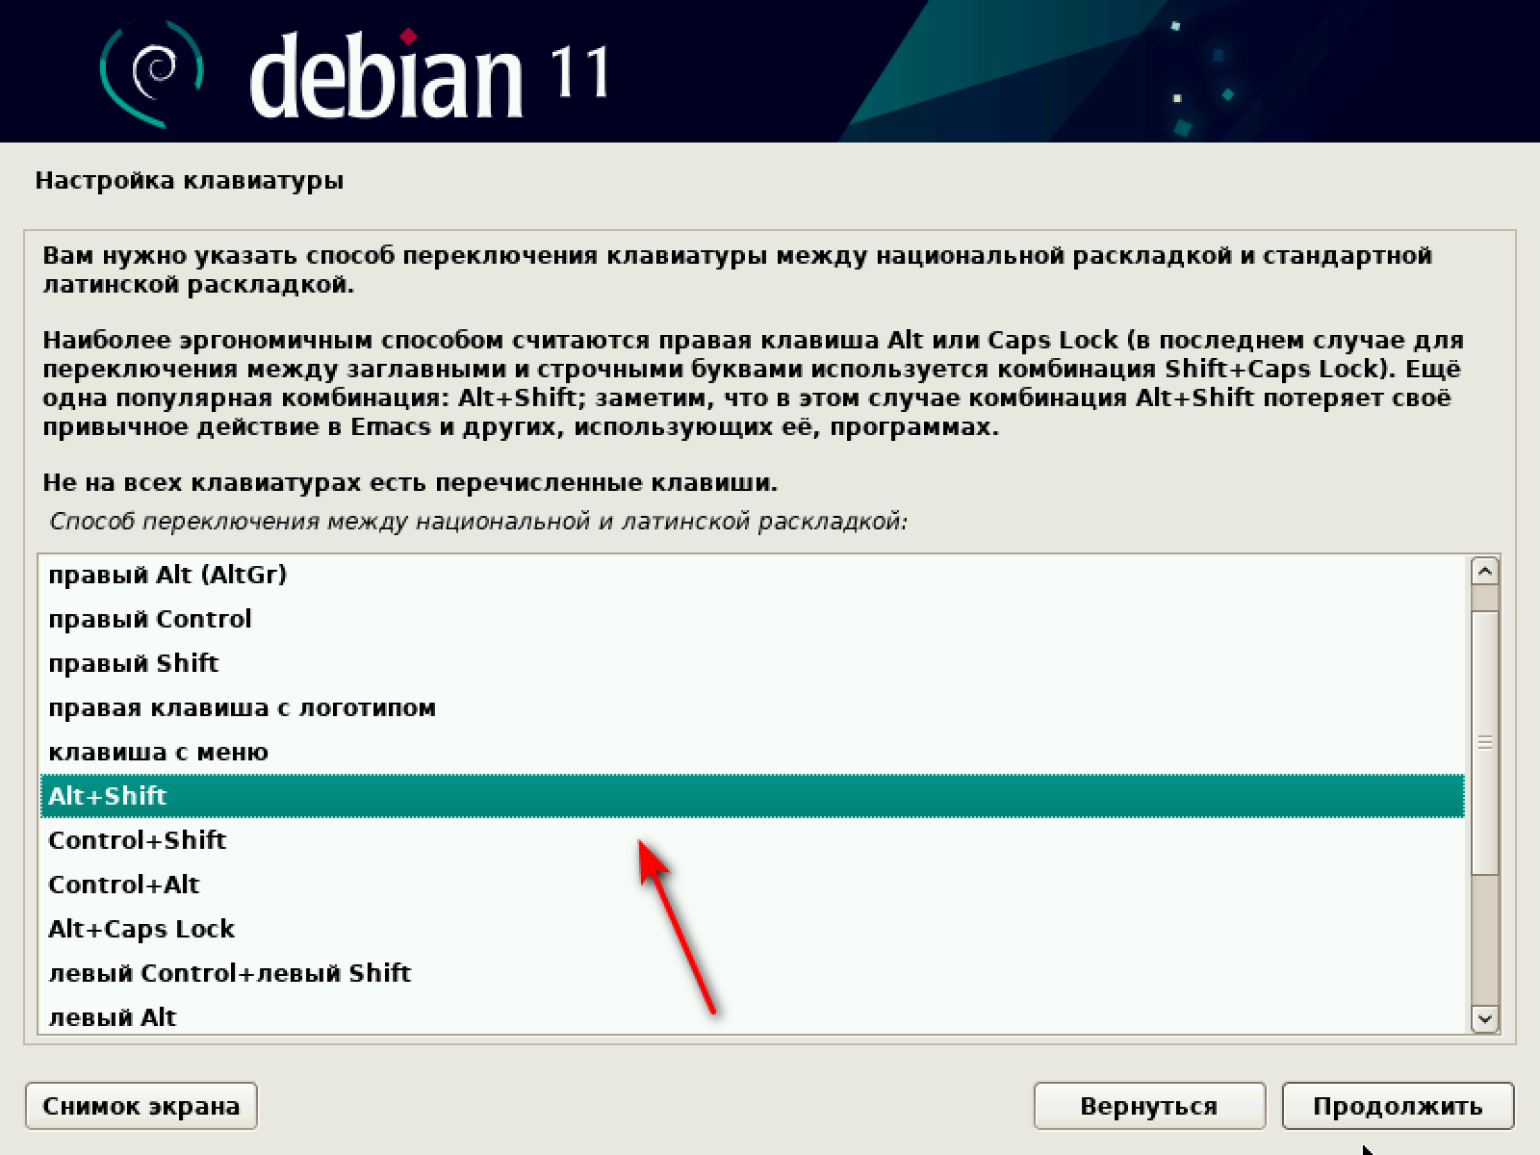
Переходим к настройке клавиатуры. Первым делом устанавливаем язык клавиатуры — русский или другой на выбор из списка.

Затем выбираем способ переключения языков с русского на английский и обратно. По умолчанию стоит Alt + Shift.
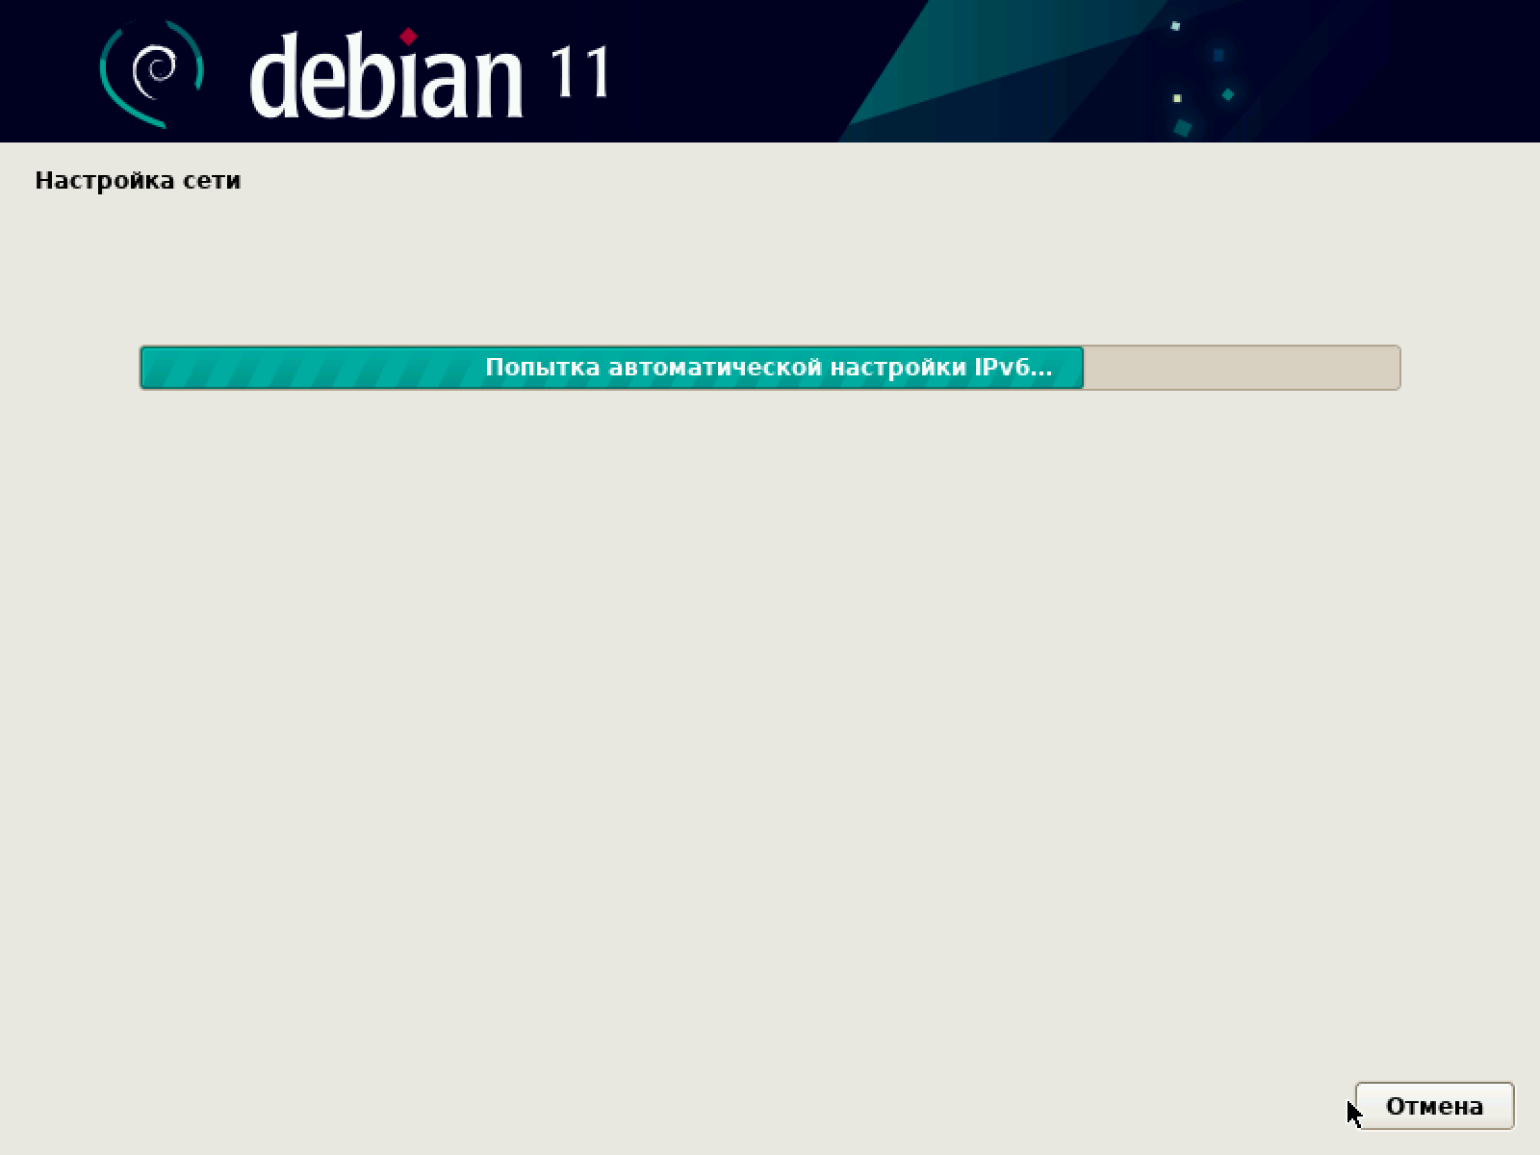
После этого система самостоятельно загружает компоненты с установочного носителя и настраивает сеть.
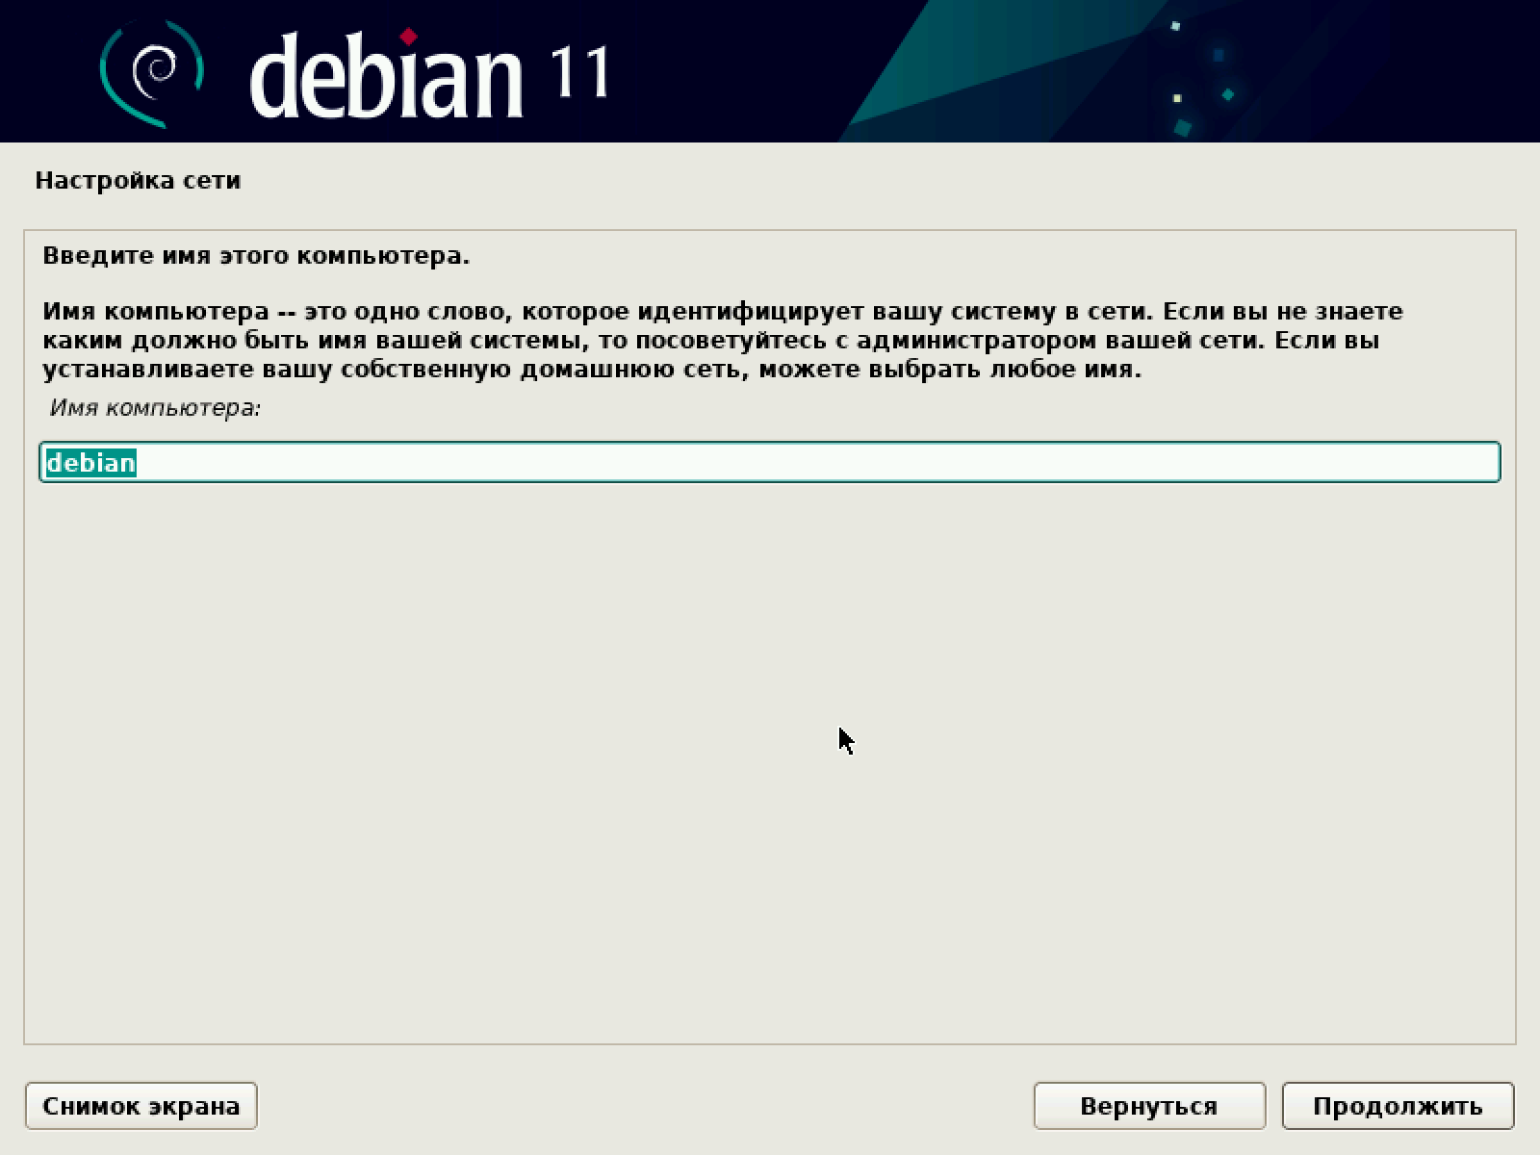
Пора дать нашей машине имя, под которым она будет известна в сети. По умолчанию предлагается назвать её debian. Сохраняем имя или вводим свой вариант.
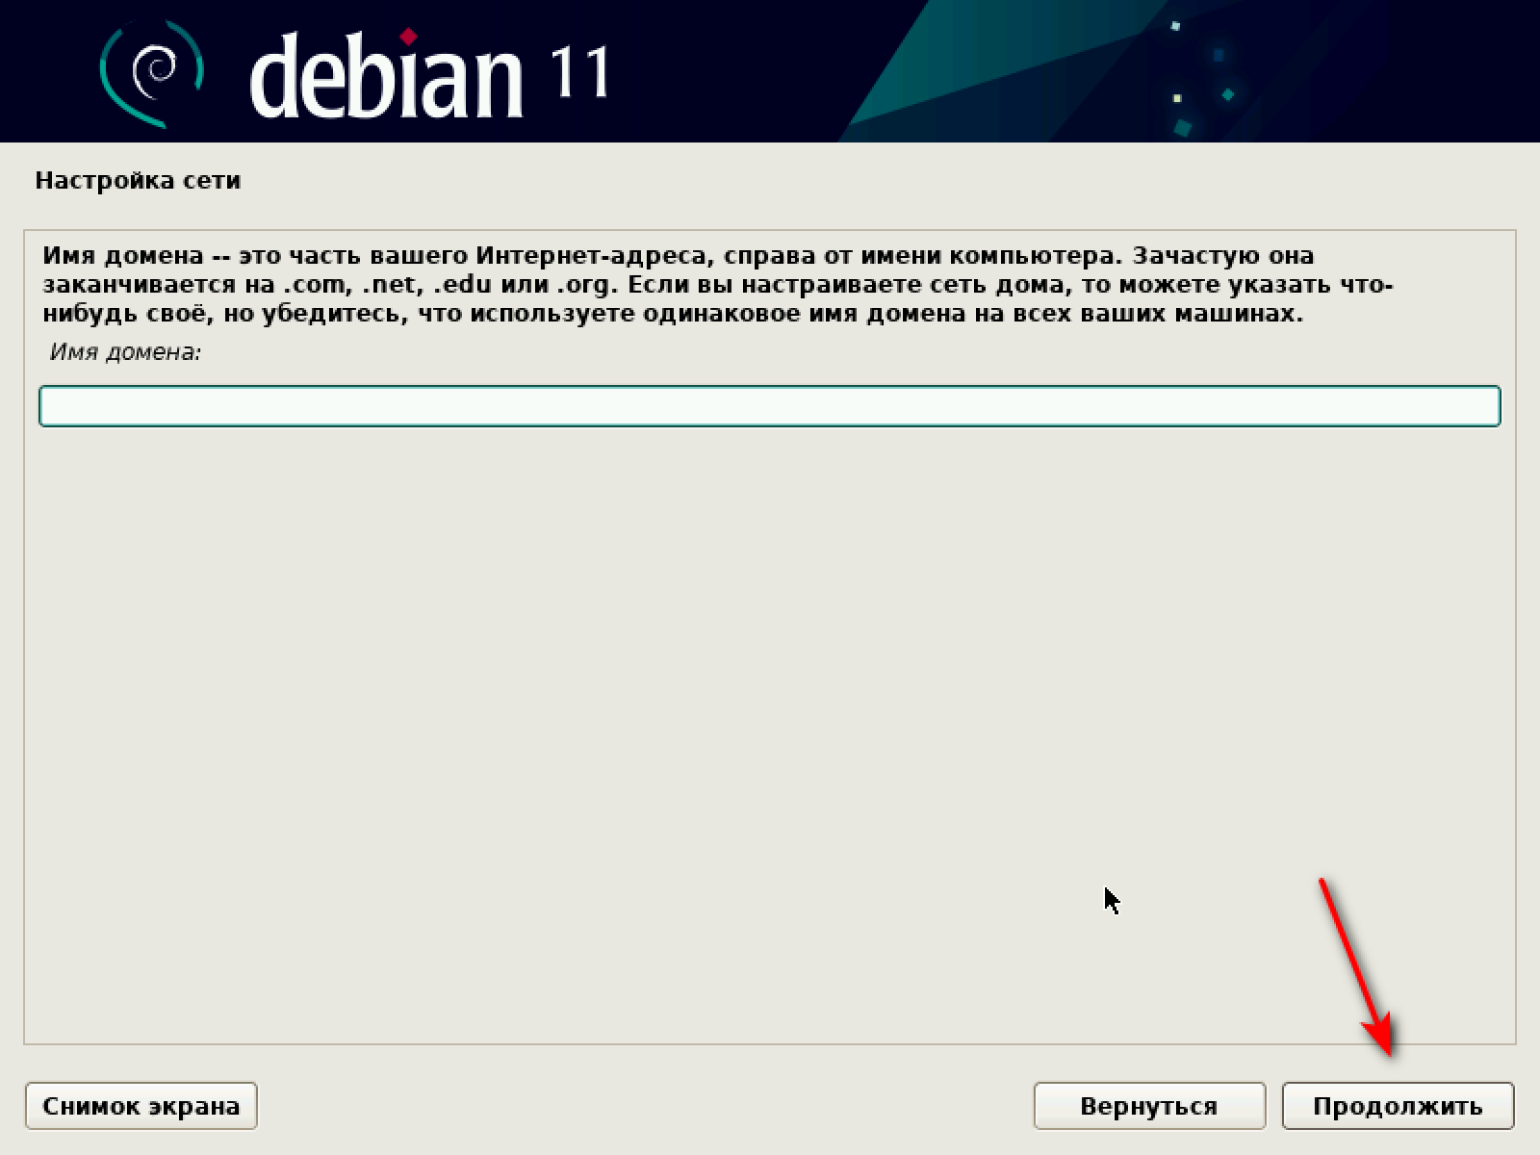
Затем система предлагает задать имя домена. Делать это необязательно, ведь мы устанавливаем ОС на виртуальную машину и домена у нас нет. Оставляем поле пустым.
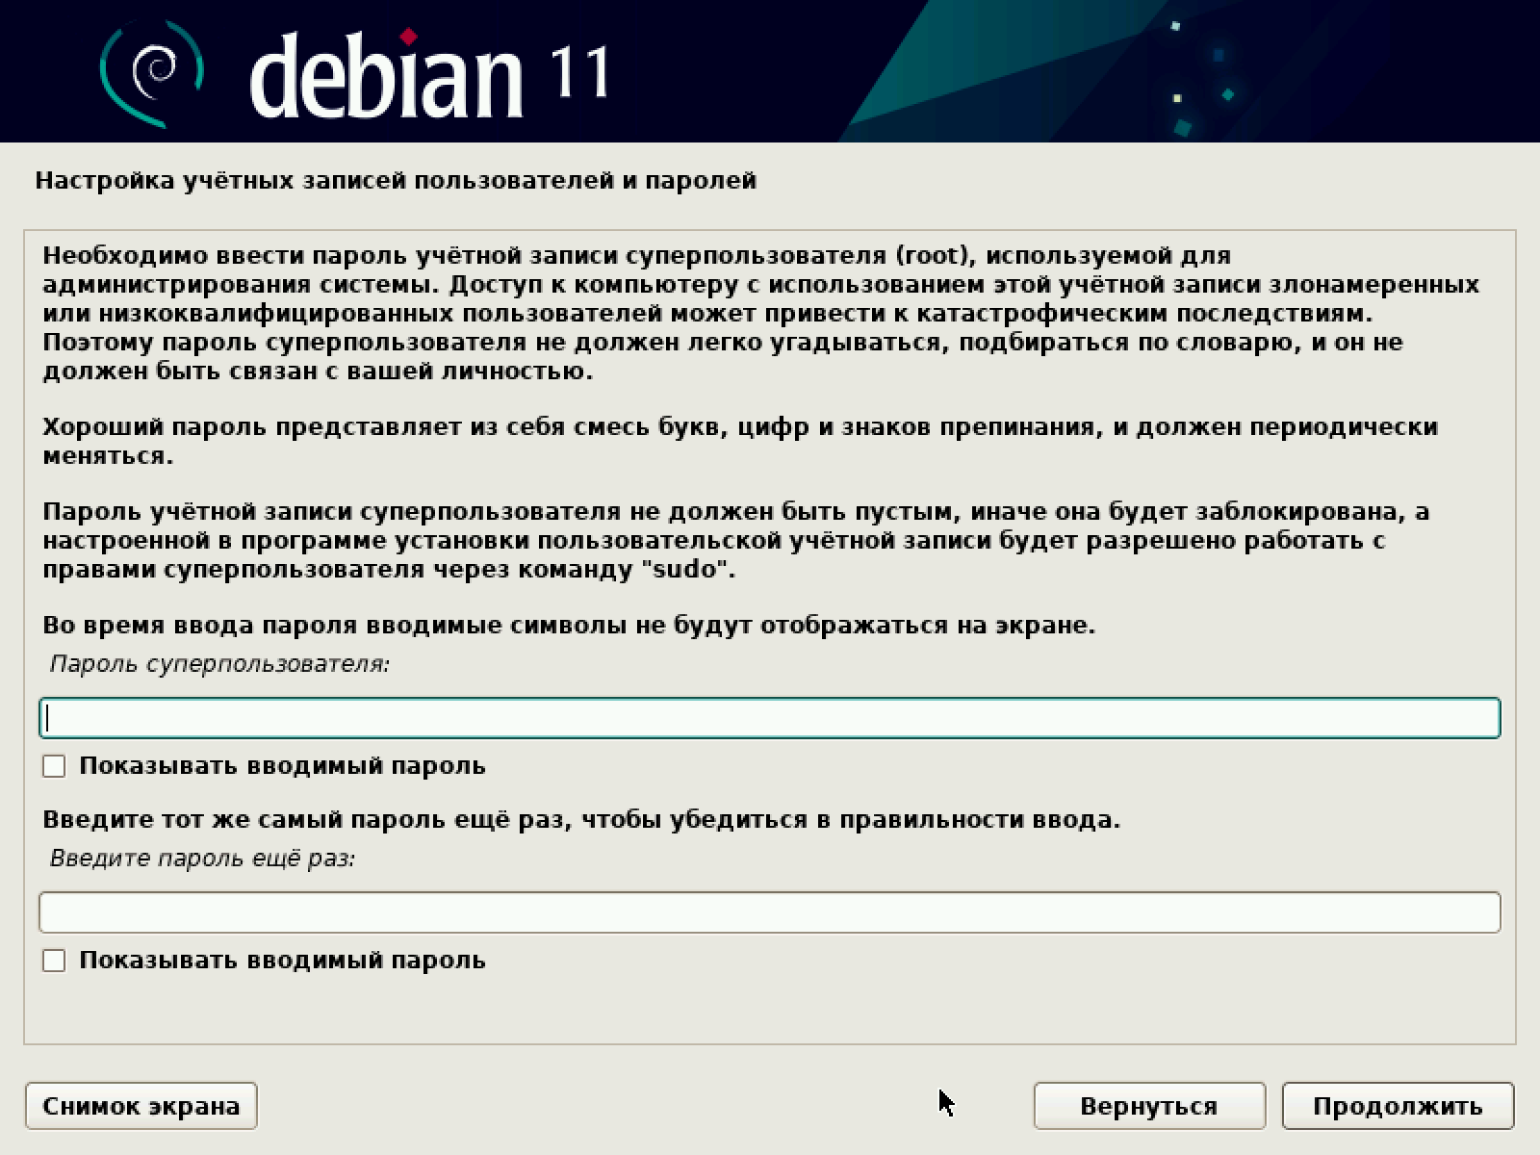
Переходим к установке паролей. В Debian есть два типа пользователей:
- Суперпользователь с правами администратора.
- Пользователь.
Для нас разница между пользователями не важна, так как VirtualBox находится на нашем частном компьютере. Однако доступ лучше всё же разграничить, чтобы случайно ничего не сломать.
Задаём пароль суперпользователя.
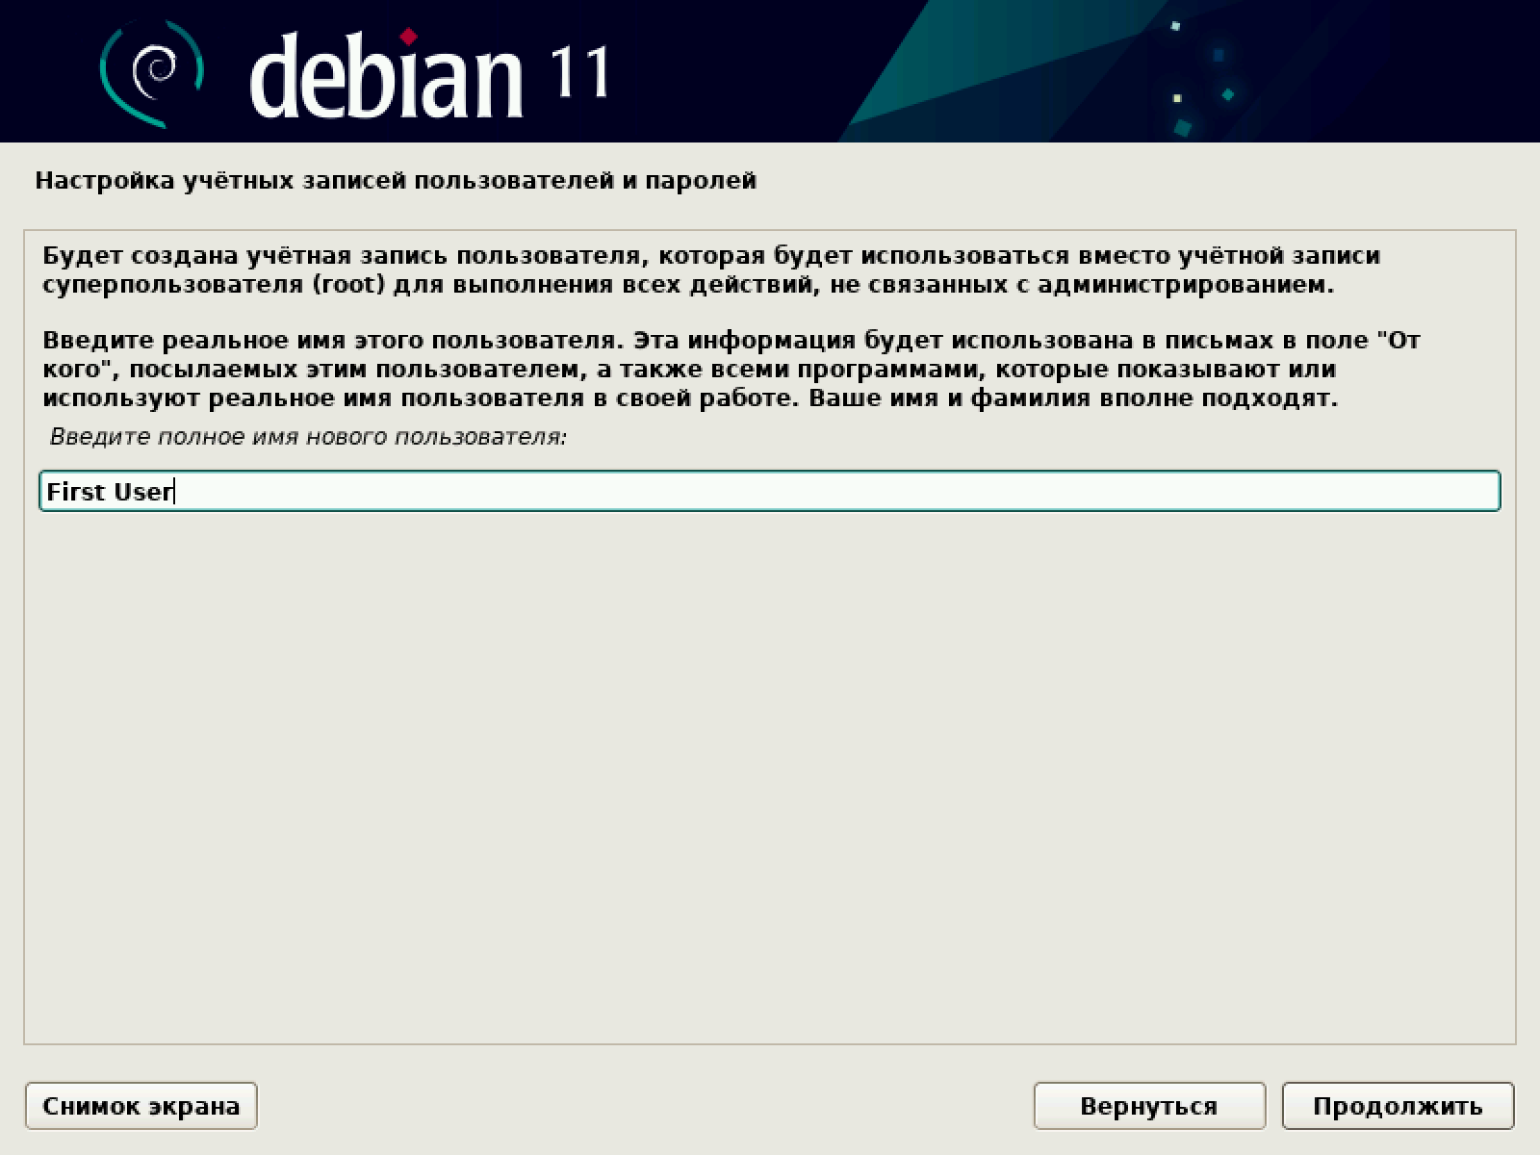
Переходим к настройке учётных записей обычного пользователя. Сначала даём ему имя. У нас это First User, но можно придумать свой вариант.
Теперь придумываем имя пользователя, под которым он будет известен в системе, например user, а затем задаём для него пароль.
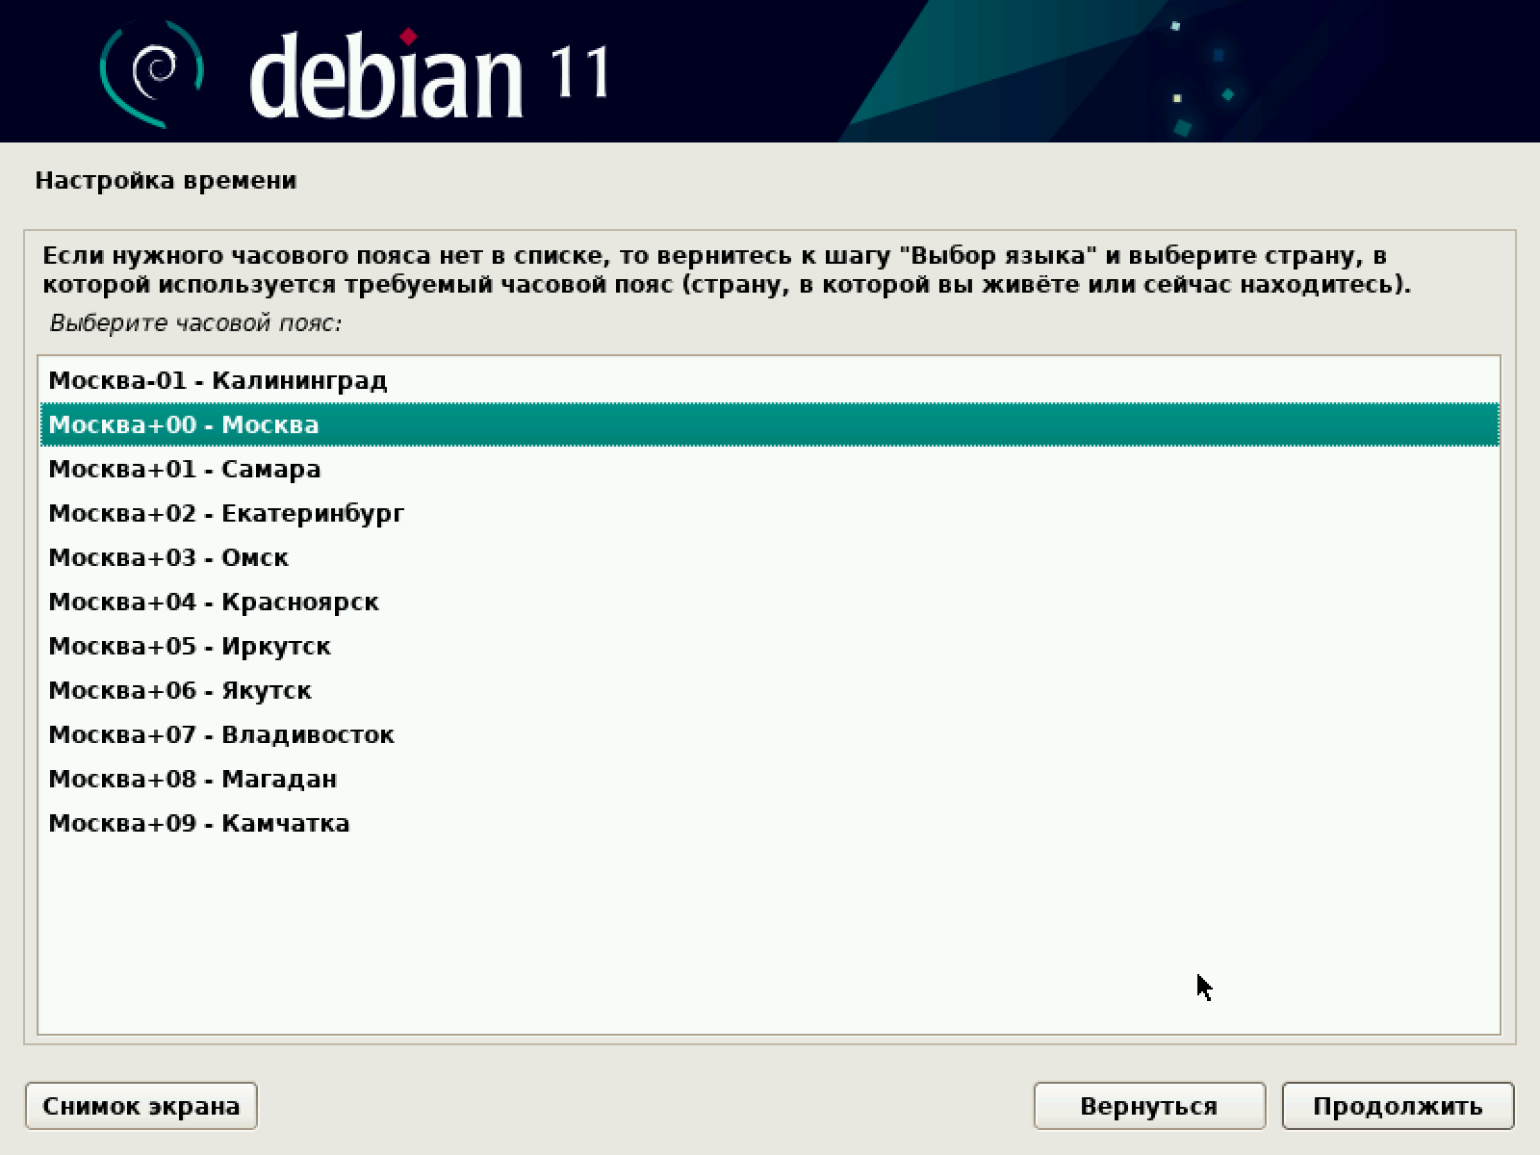
После установки паролей нам нужно выбрать время, которое будет отображаться при работе нашей машины. Устанавливаем свой часовой пояс.
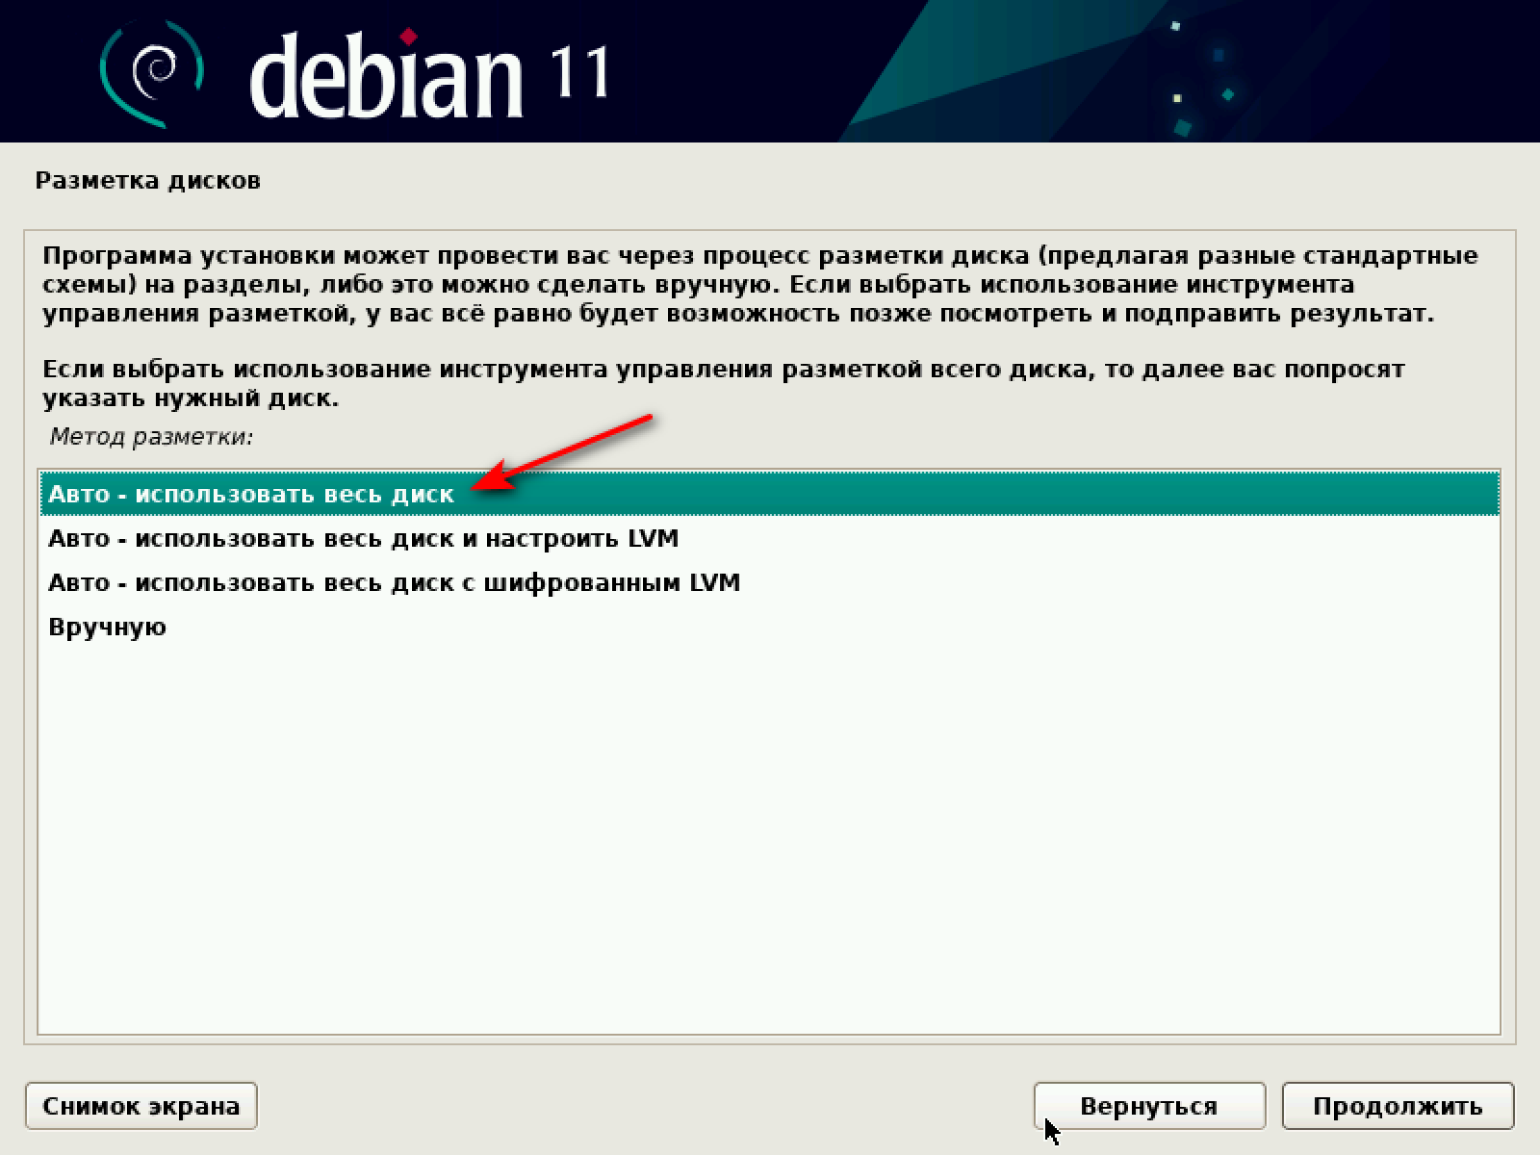
Переходим к разметке дисков. Система предлагает несколько опций на выбор. Наша цель — потестировать виртуальную машину, поэтому выбираем первый вариант: «Авто — использовать весь диск».
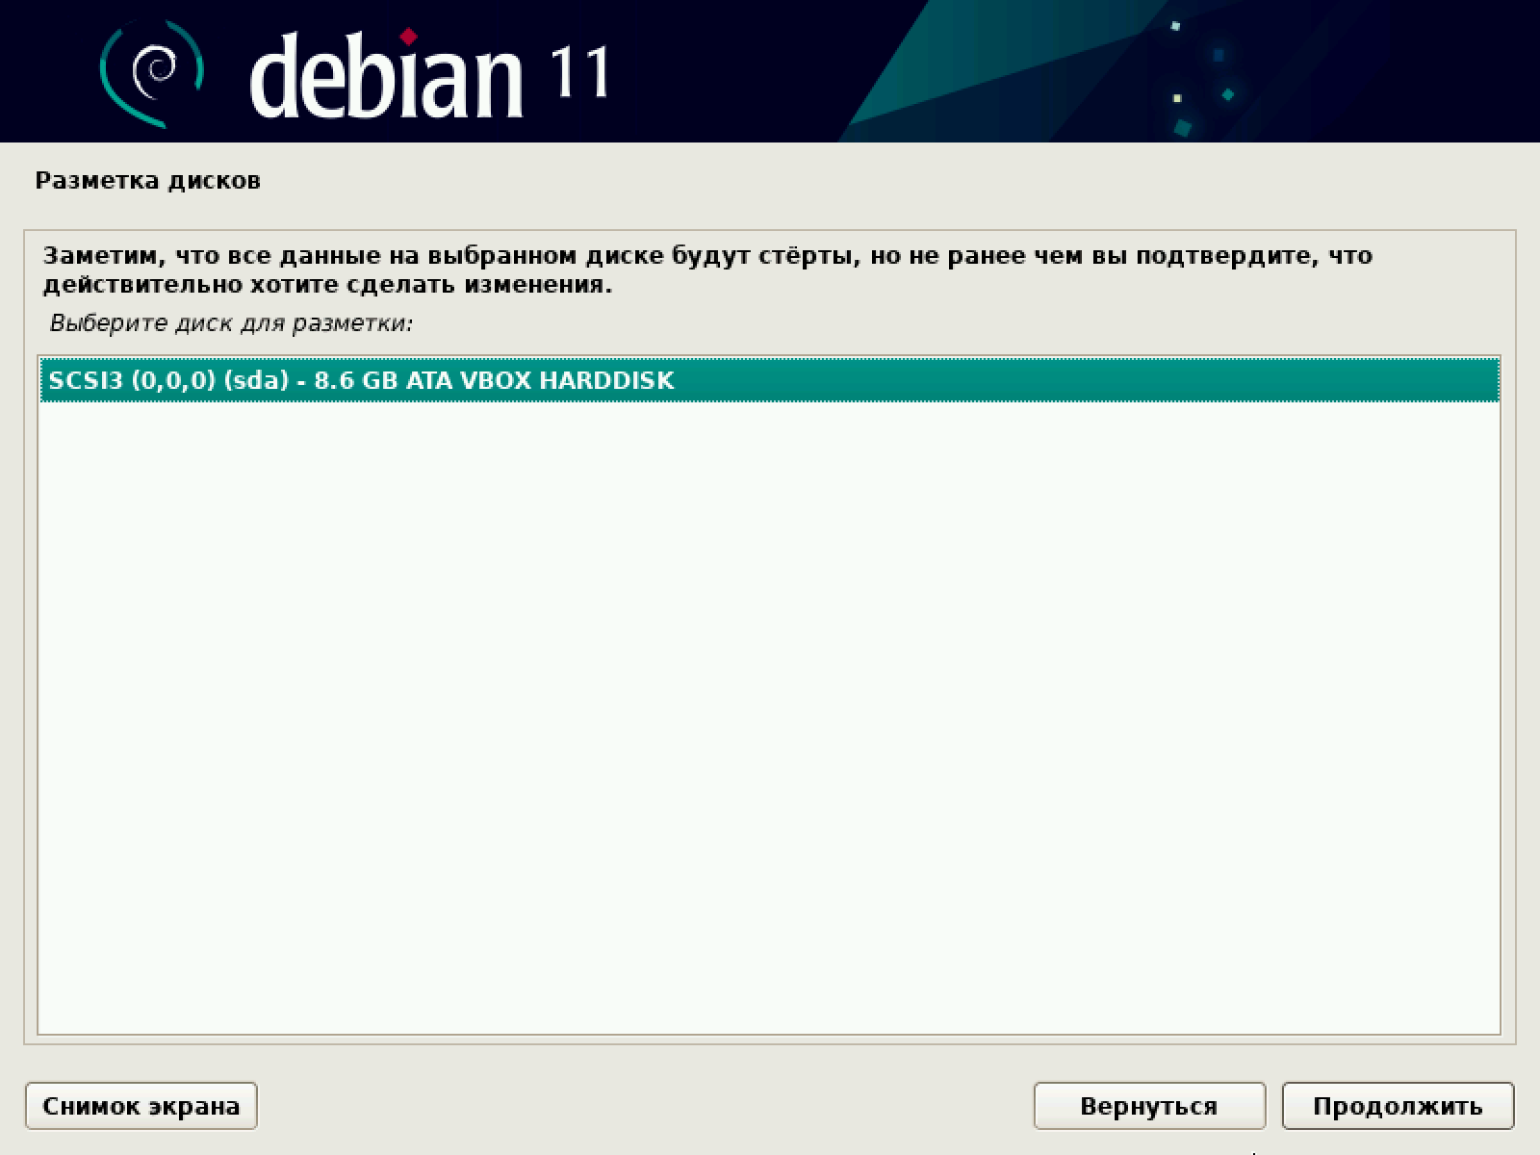
Появляется предупреждение о стирании всех данных на диске. Подтверждаем.
Выбираем схему разметки. По умолчанию система рекомендует первый вариант — «Все файлы в одном разделе (рекомендуется новичкам)». Соглашаемся и продолжаем.

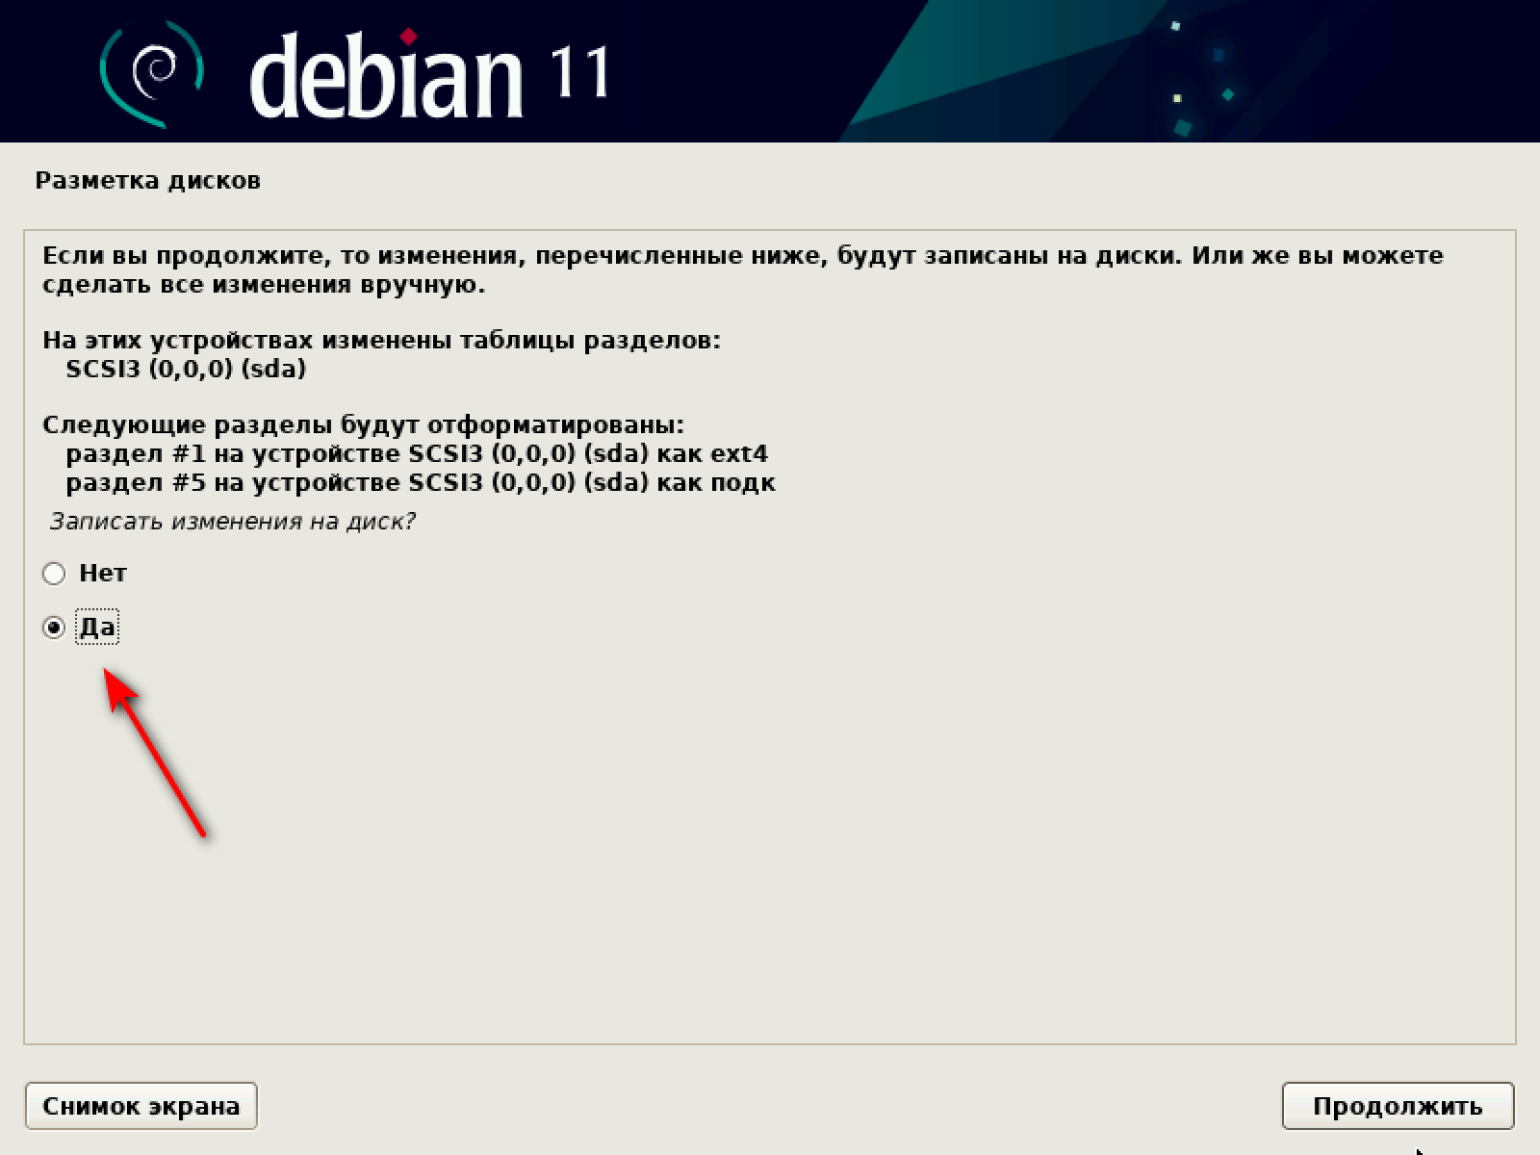
В появившемся окне ничего не меняем, только подтверждаем завершение разметки и запись изменений на диск.
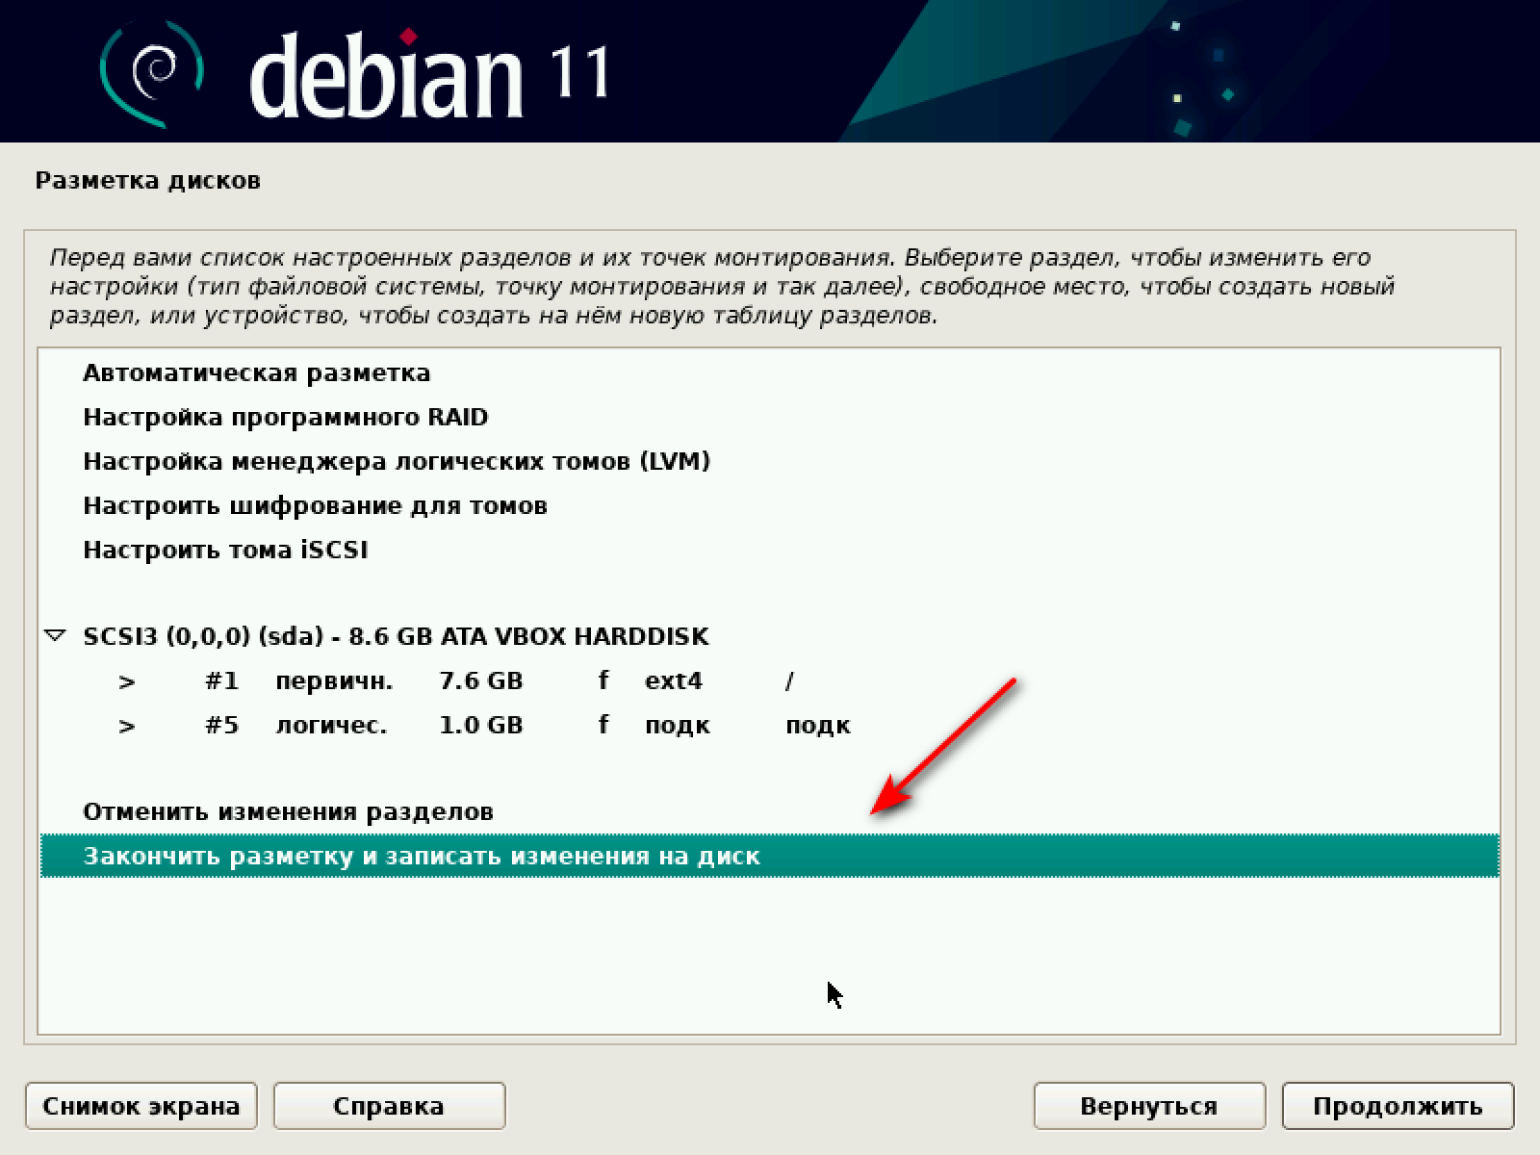
В конце процедуры разметки в отдельном окне подтверждаем сохранение изменений на диске. Ставим «Да» и нажимаем «Продолжить».
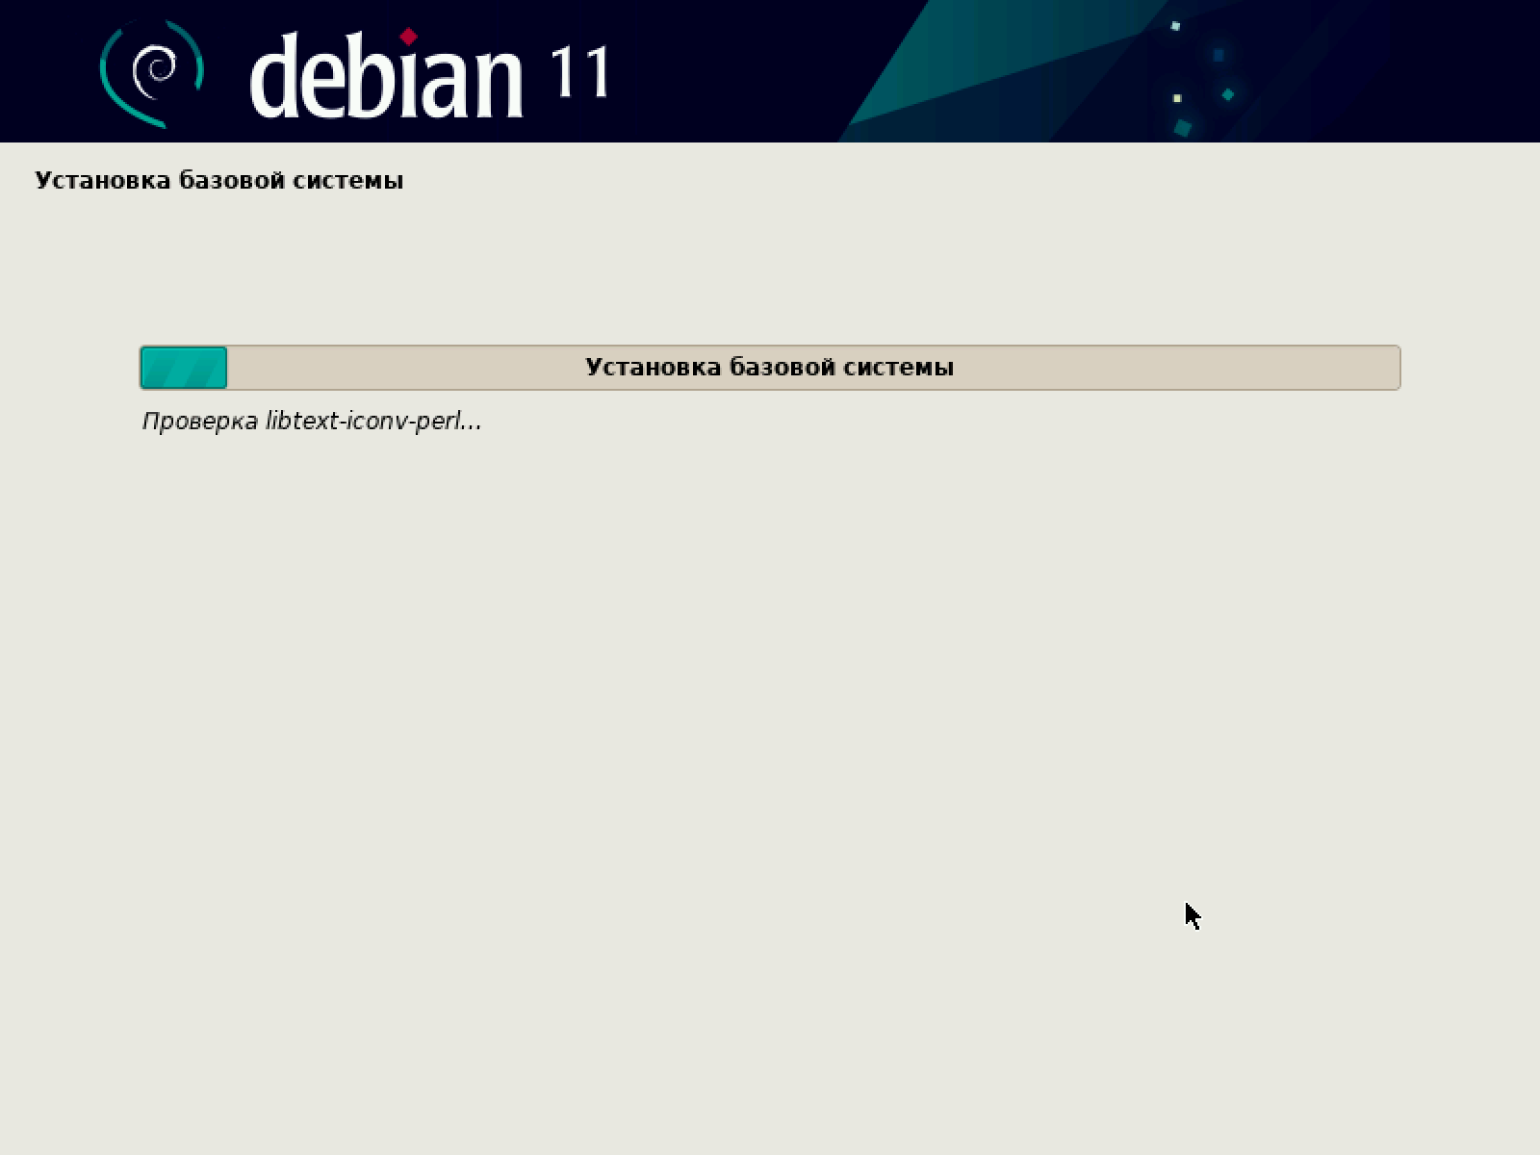
Начинается установка базовой системы.
В процессе установки система может сообщить о найденной метке и предложить просканировать другой диск. Этого делать не надо — оставляем «Нет» и нажимаем «Продолжить».

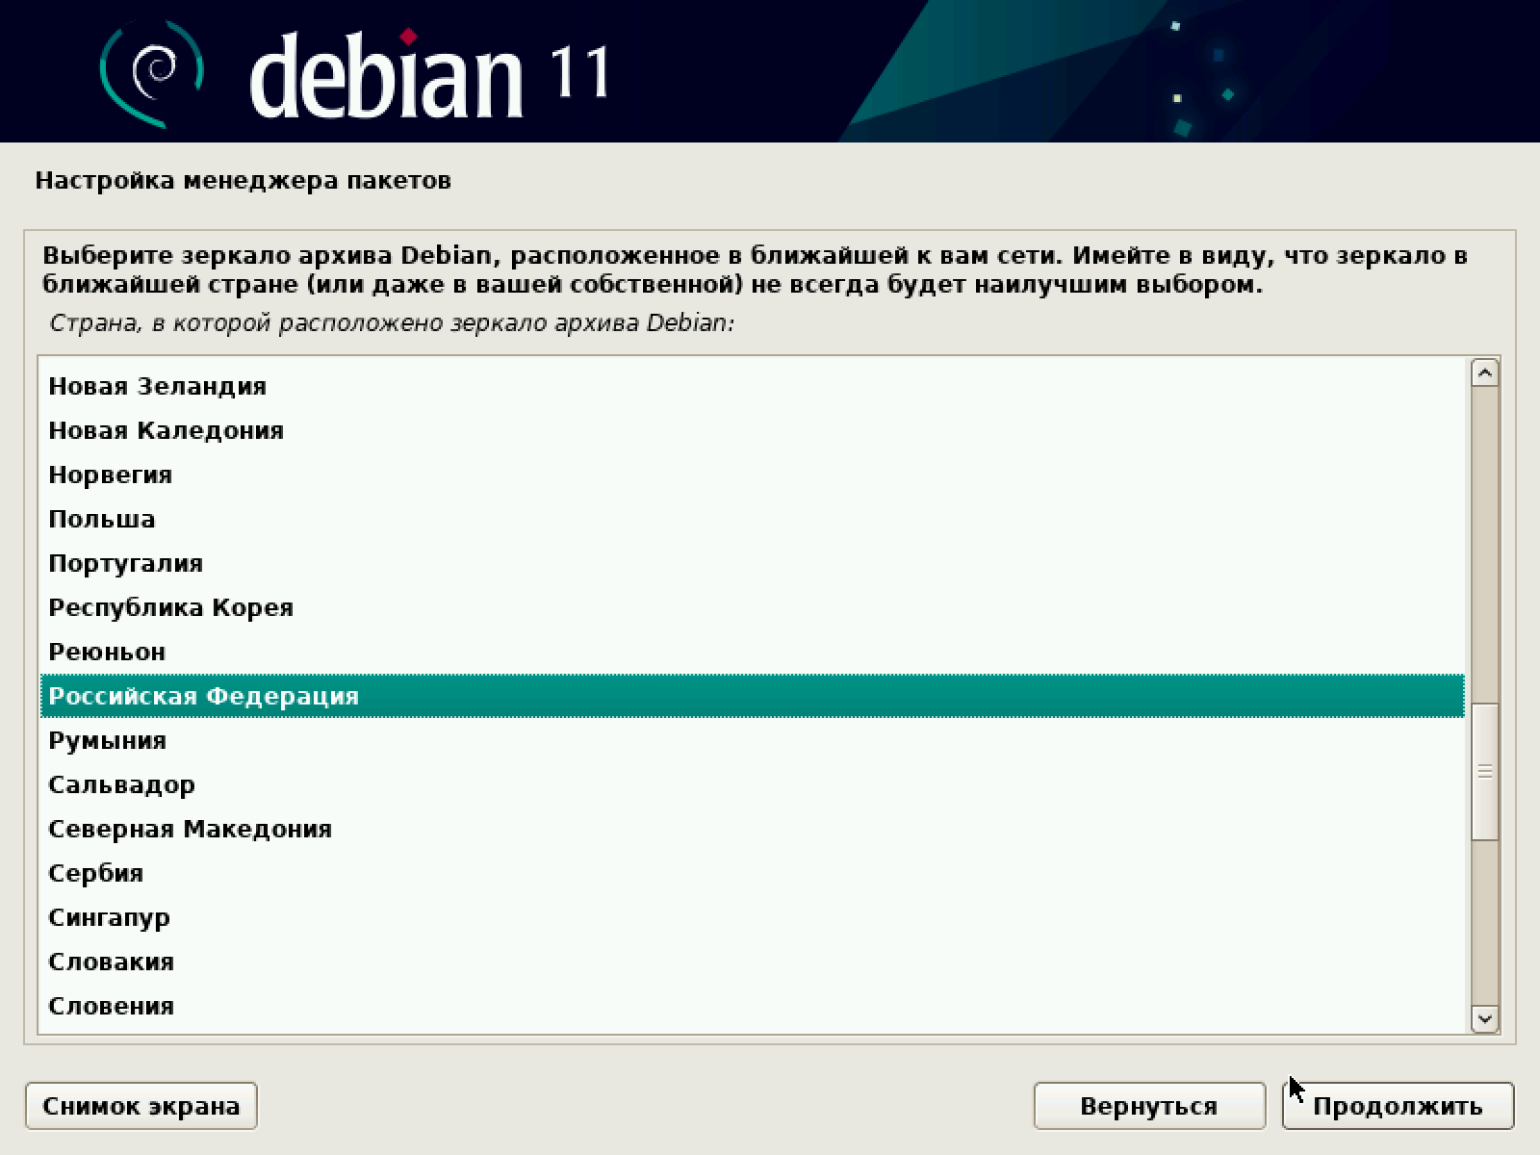
По окончании установки система предлагает выбрать зеркало архива. Страну выбираем на своё усмотрение.
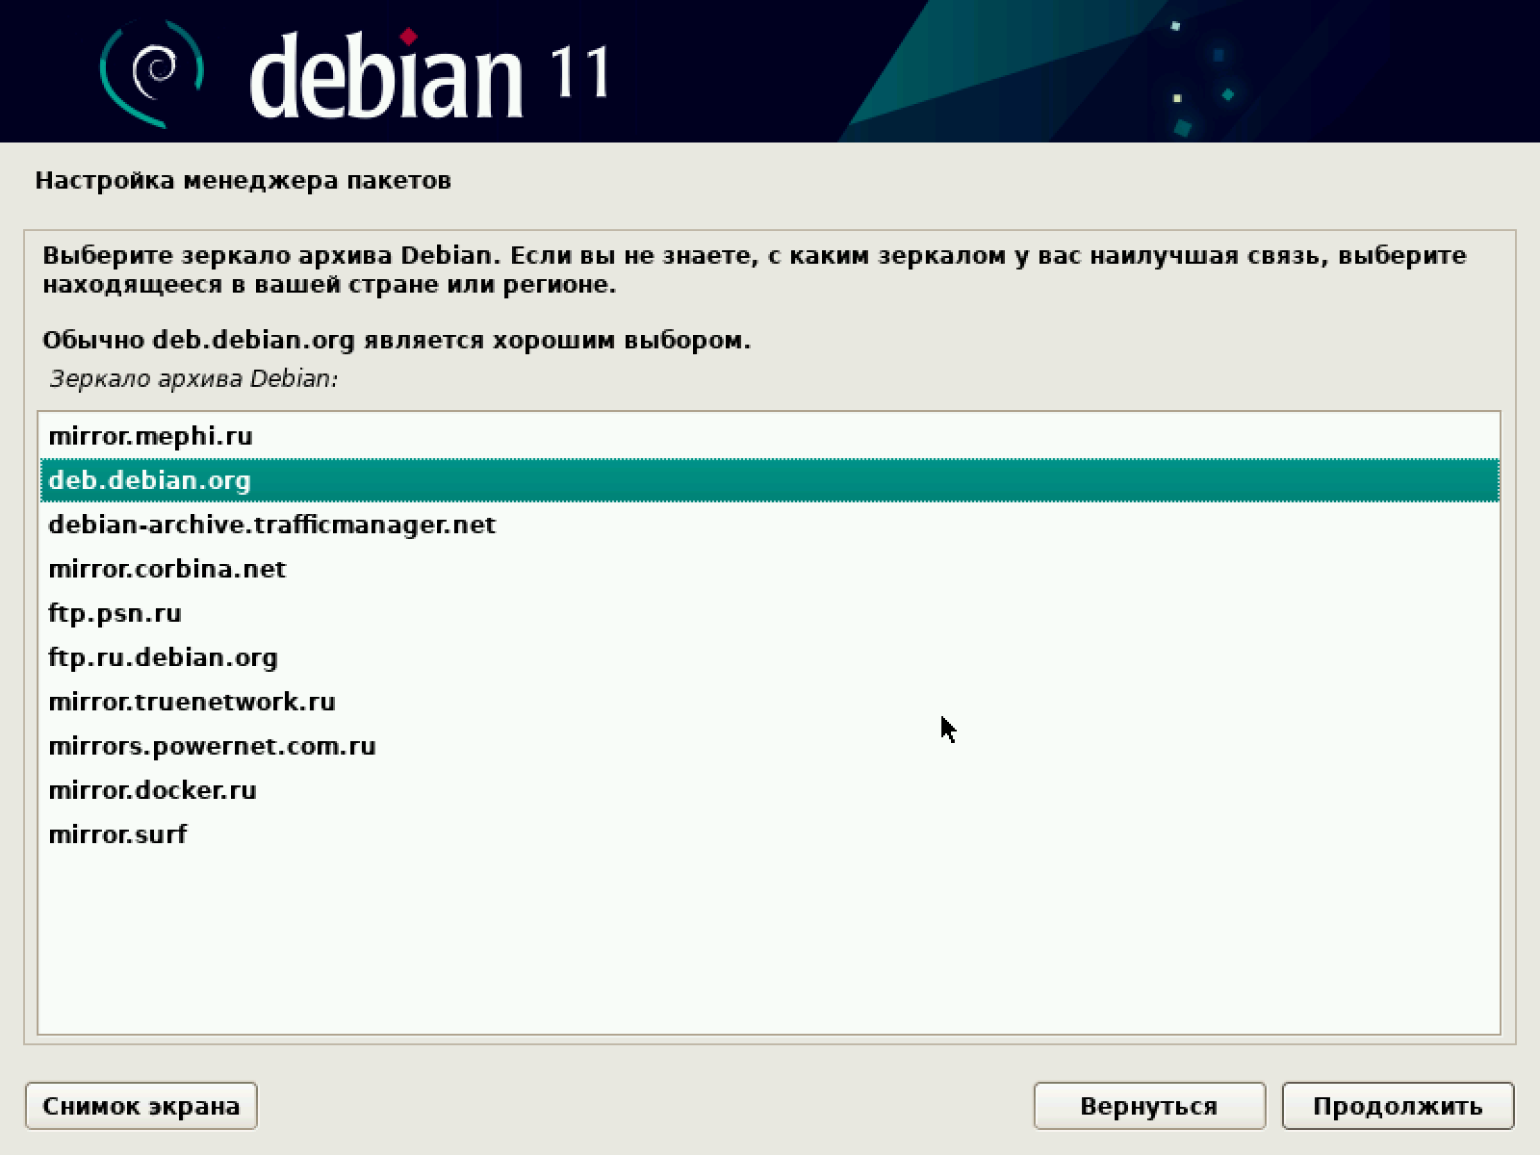
В списке зеркал архива оставляем предложенный по умолчанию deb.debian.org.
Если отказаться от выбора зеркала, будет загружена система с минимальными настройками. Она содержит только базовые компоненты и не имеет предустановленного графического интерфейса пользователя. Работа с такой системой требует хороших навыков администрирования и не подходит для новичков.
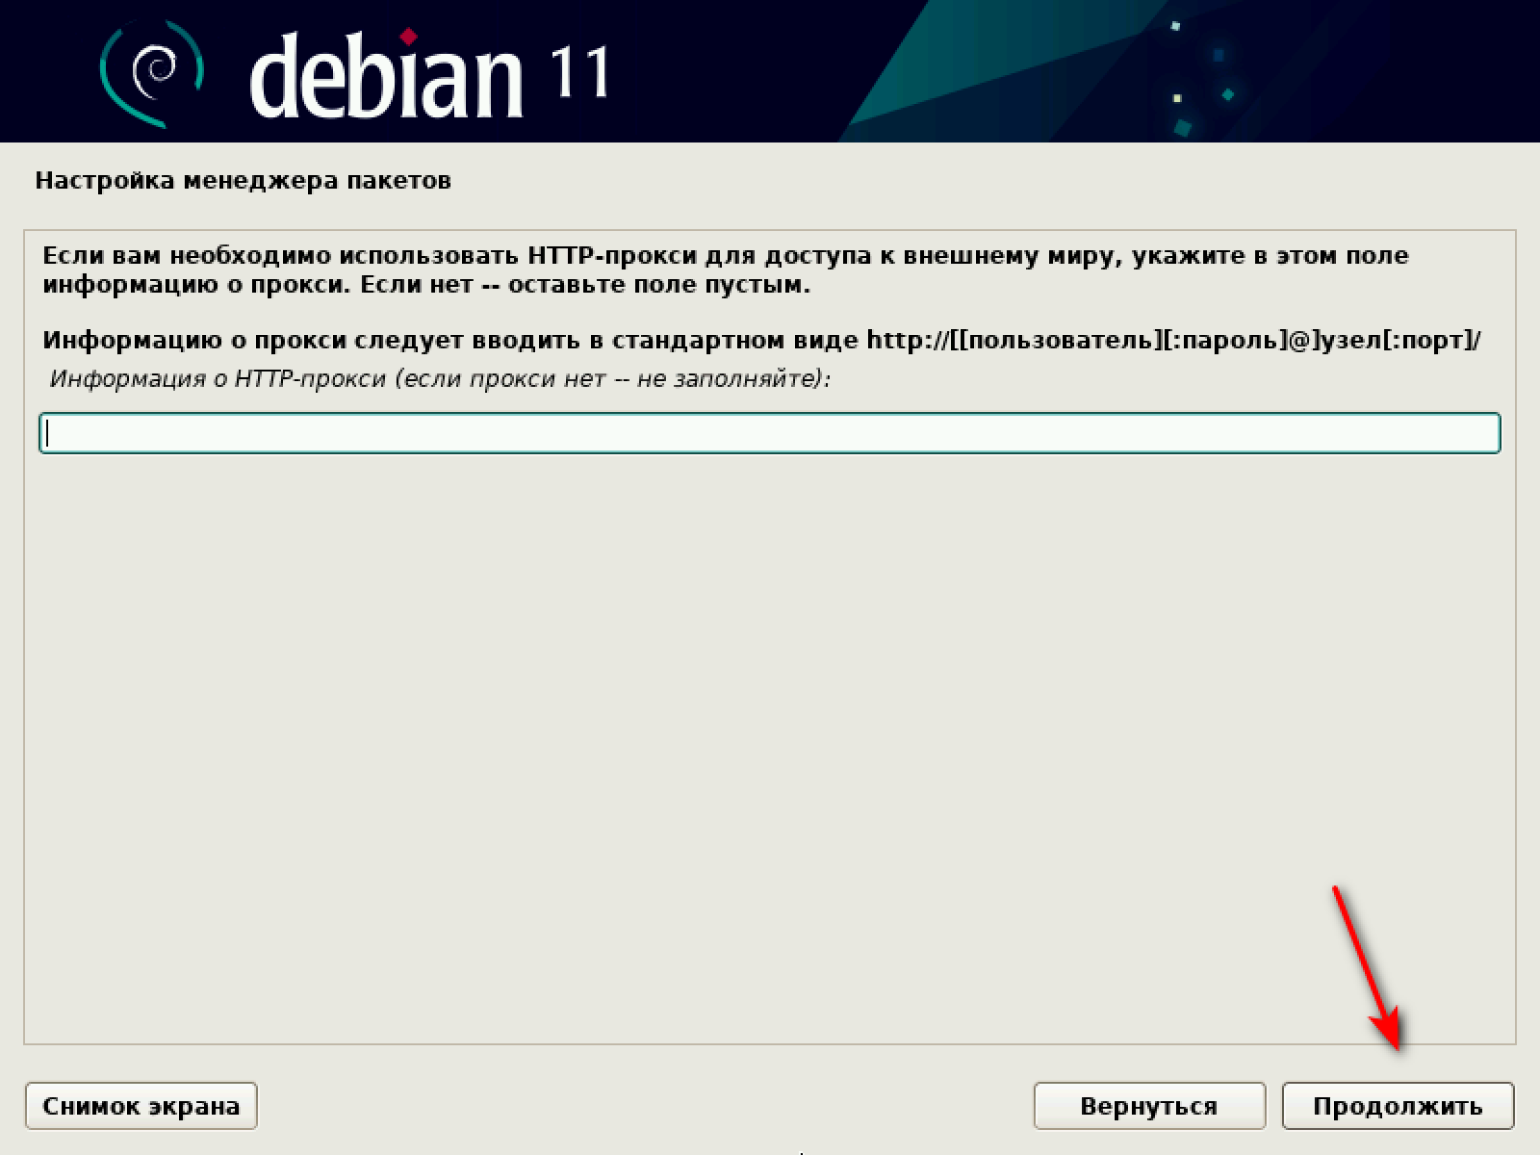
Система предлагает ввести информацию об HTTP-прокси. Оставляем поле пустым и продолжаем.
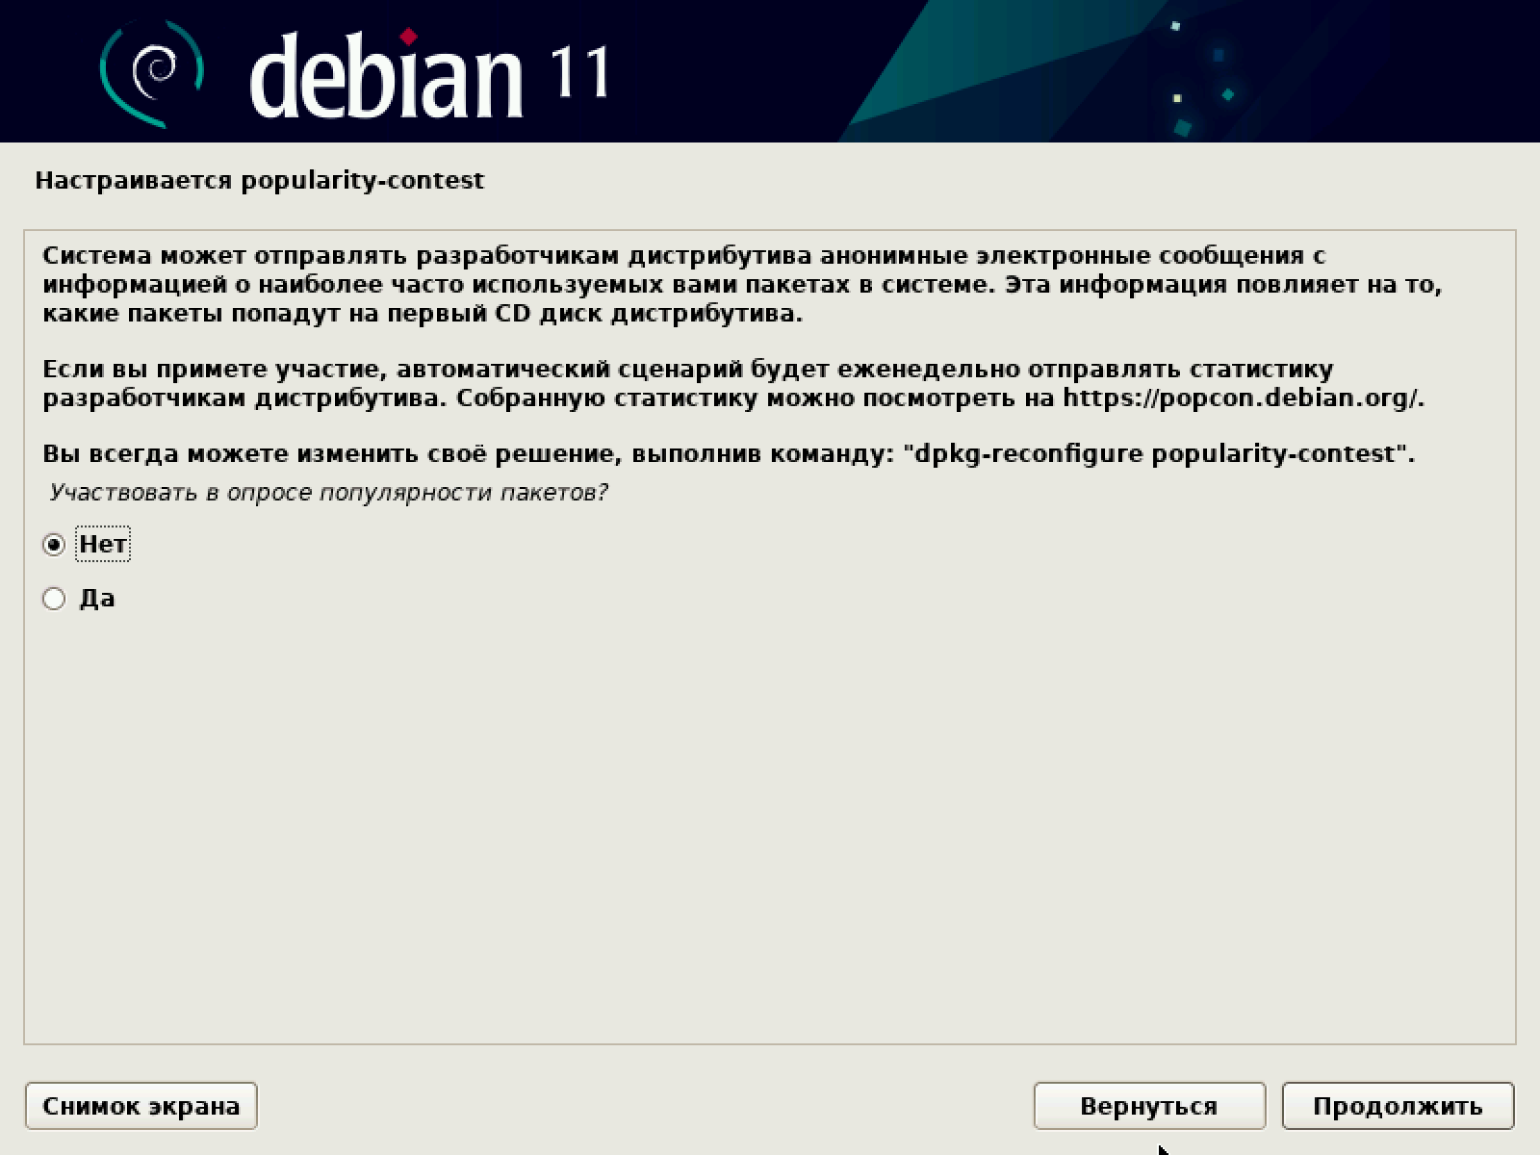
Система предлагает настроить менеджер пакетов. Нам это не нужно, поэтому просто идём дальше к установке базового пакета. По завершении установки система предложит отправлять разработчикам дистрибутива анонимные сообщения со статистикой используемых пакетов. Это ни на что не влияет, поэтому соглашаемся или отказываемся.
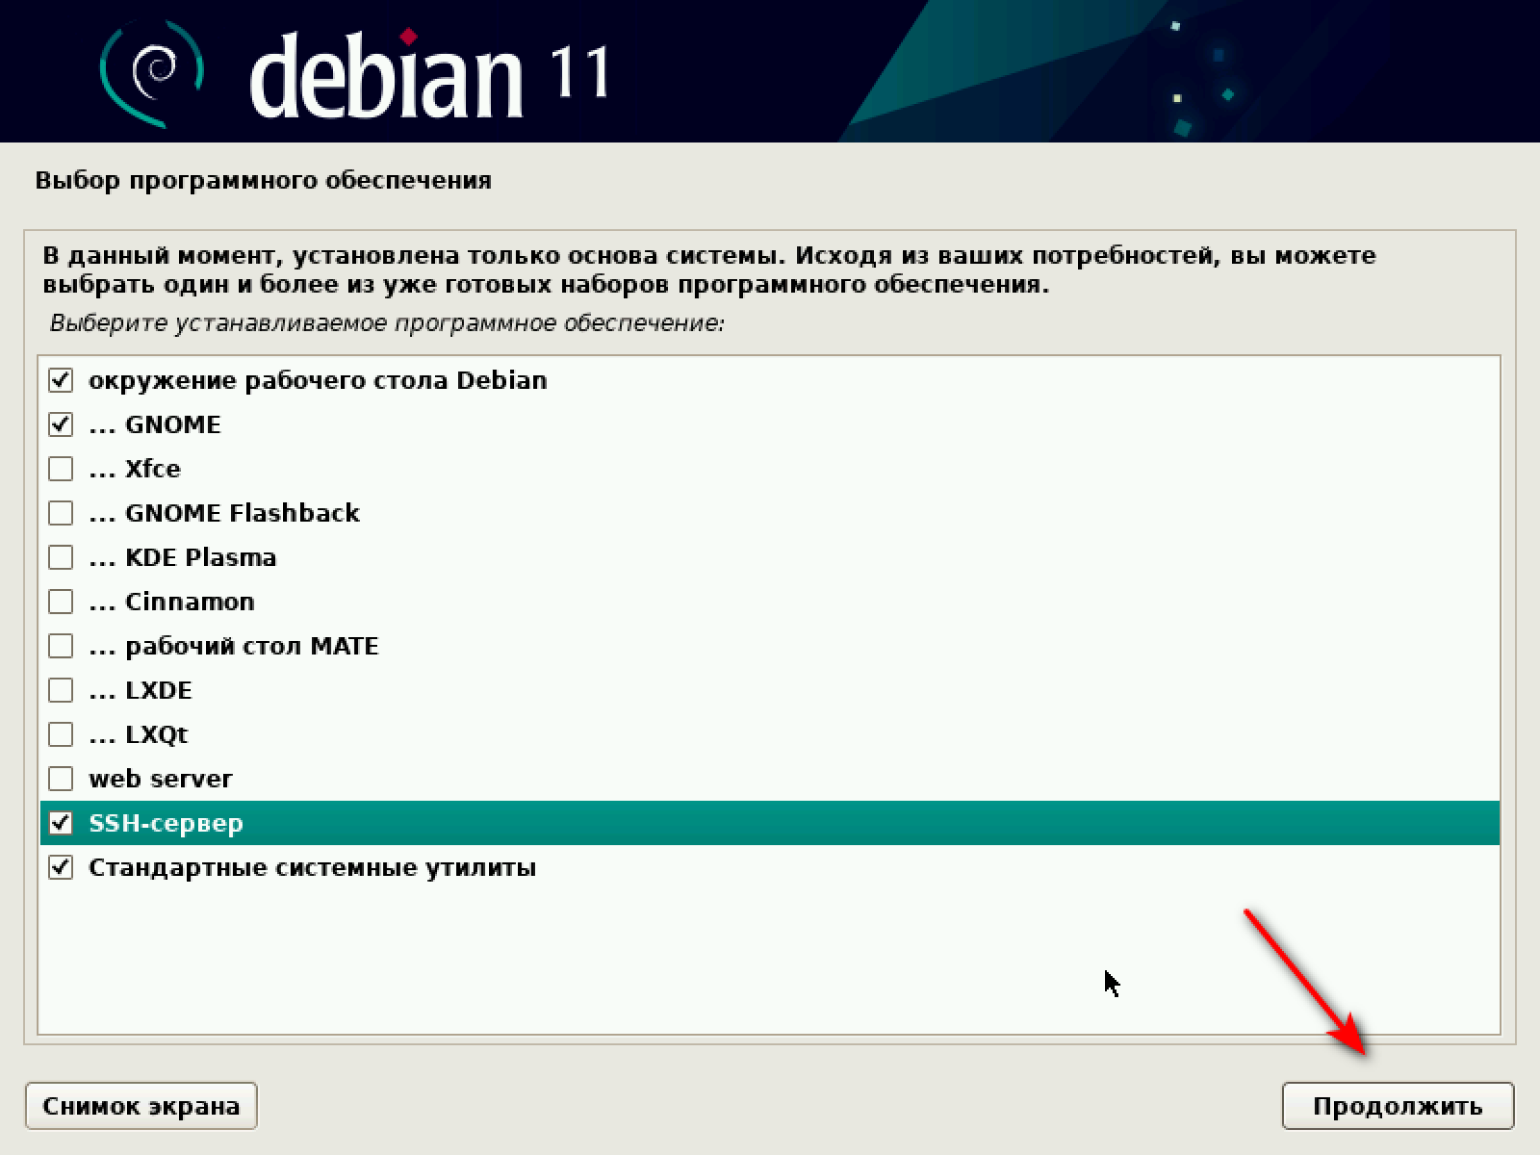
Переходим к выбору ПО. Система предлагает установить один из вариантов окружения рабочего стола. Мы установим GNOME. Он и KDE Plasma — два наиболее популярных варианта рабочего стола. У него минималистичный дизайн с фокусом на удобство использования. Интерфейс напоминает macOS.
KDE Plasma имеет более насыщенный интерфейс с различными панелями инструментов и меню. Интерфейс напоминает Windows.
Если есть желание разобраться, то можно установить на разные машины GNOME и KDE Plasma, сравнить и выбрать рабочий стол на свой вкус.
Мы установим GNOME, поэтому выбираем комбинацию, как на скриншоте, и продолжаем.
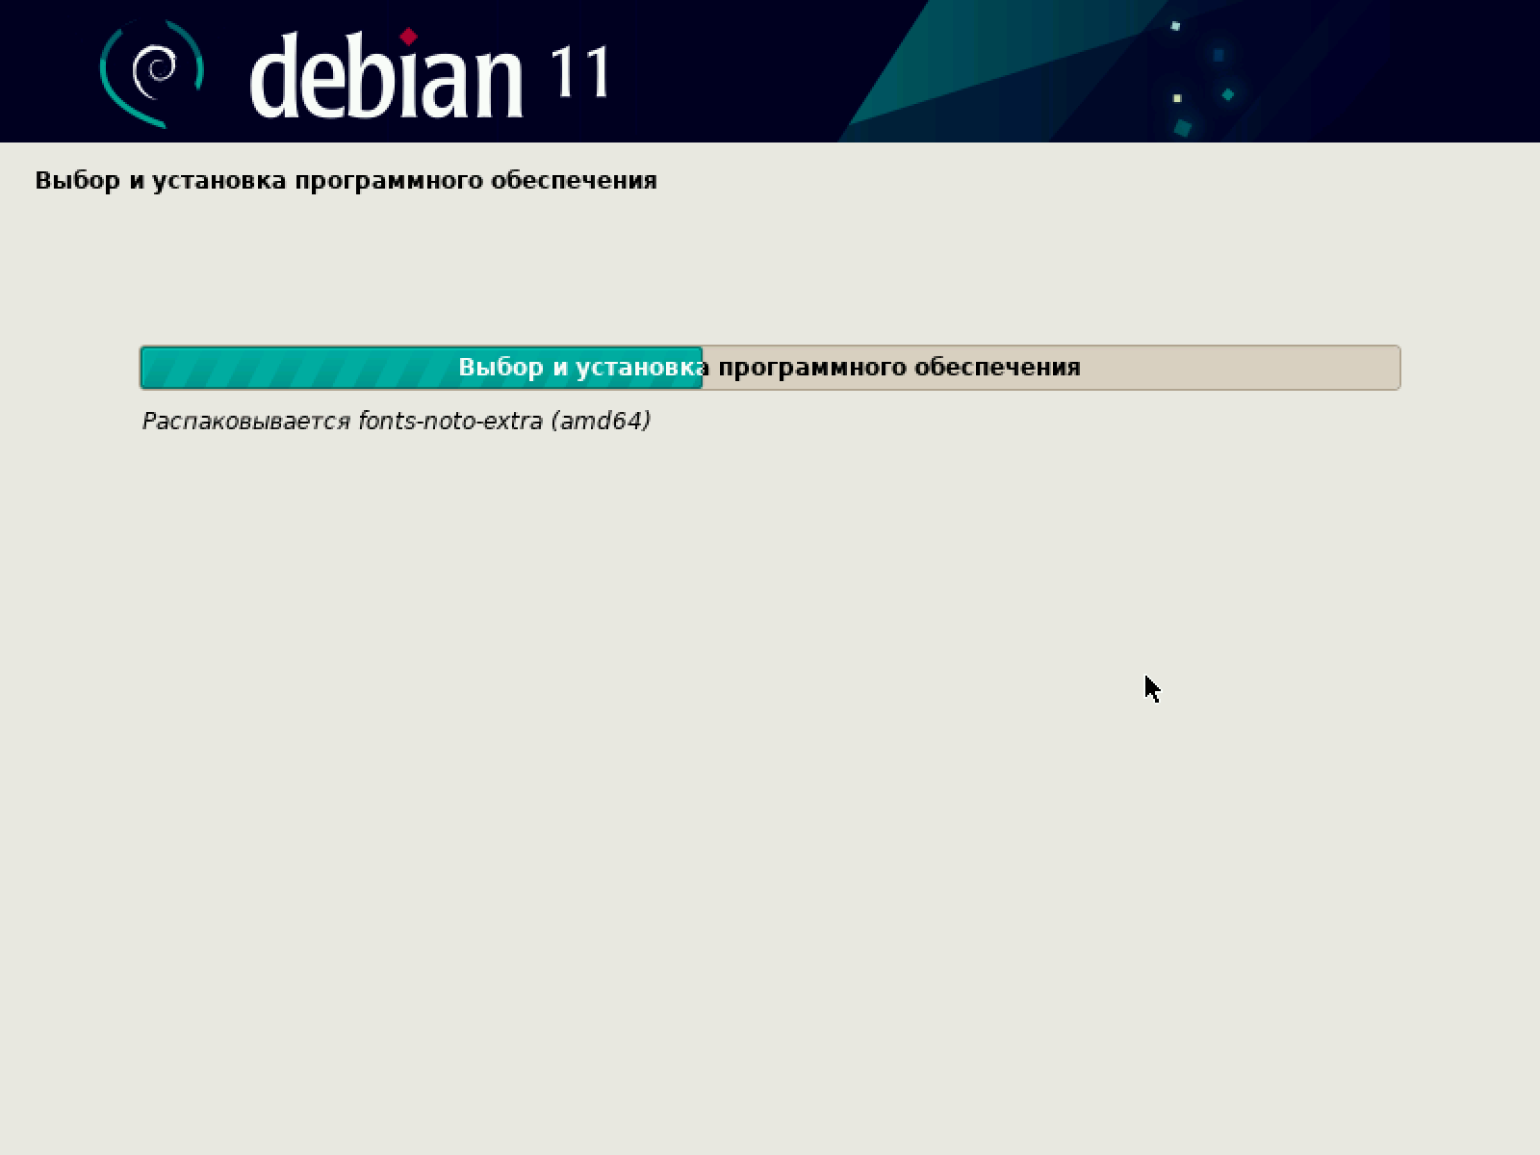
Установка в среднем занимает 10–15 минут.
По завершении установки ПО система предлагает установить загрузчик GRUB.
Выбираем «Да» и продолжаем.

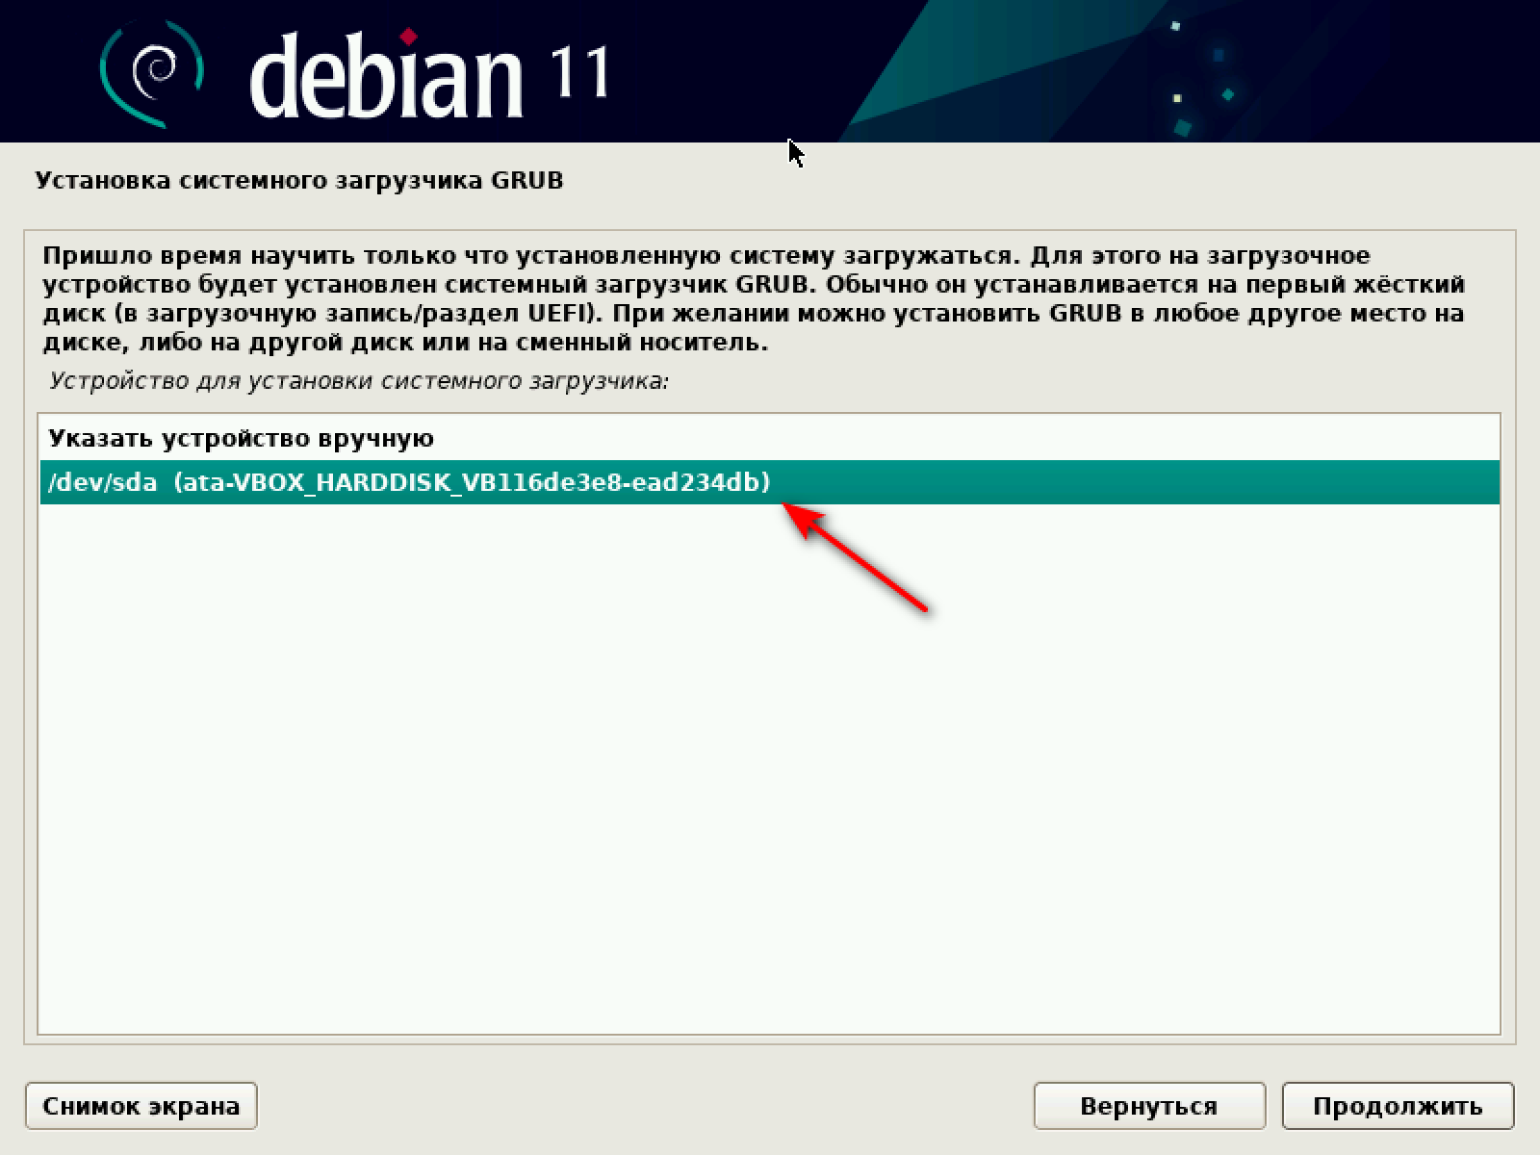
Теперь нам надо выбирать устройство, куда мы установим наш загрузчик. Под устройством система подразумевает виртуальный диск с образом ОС Debian. У нас есть диск по умолчанию, его и выбираем.
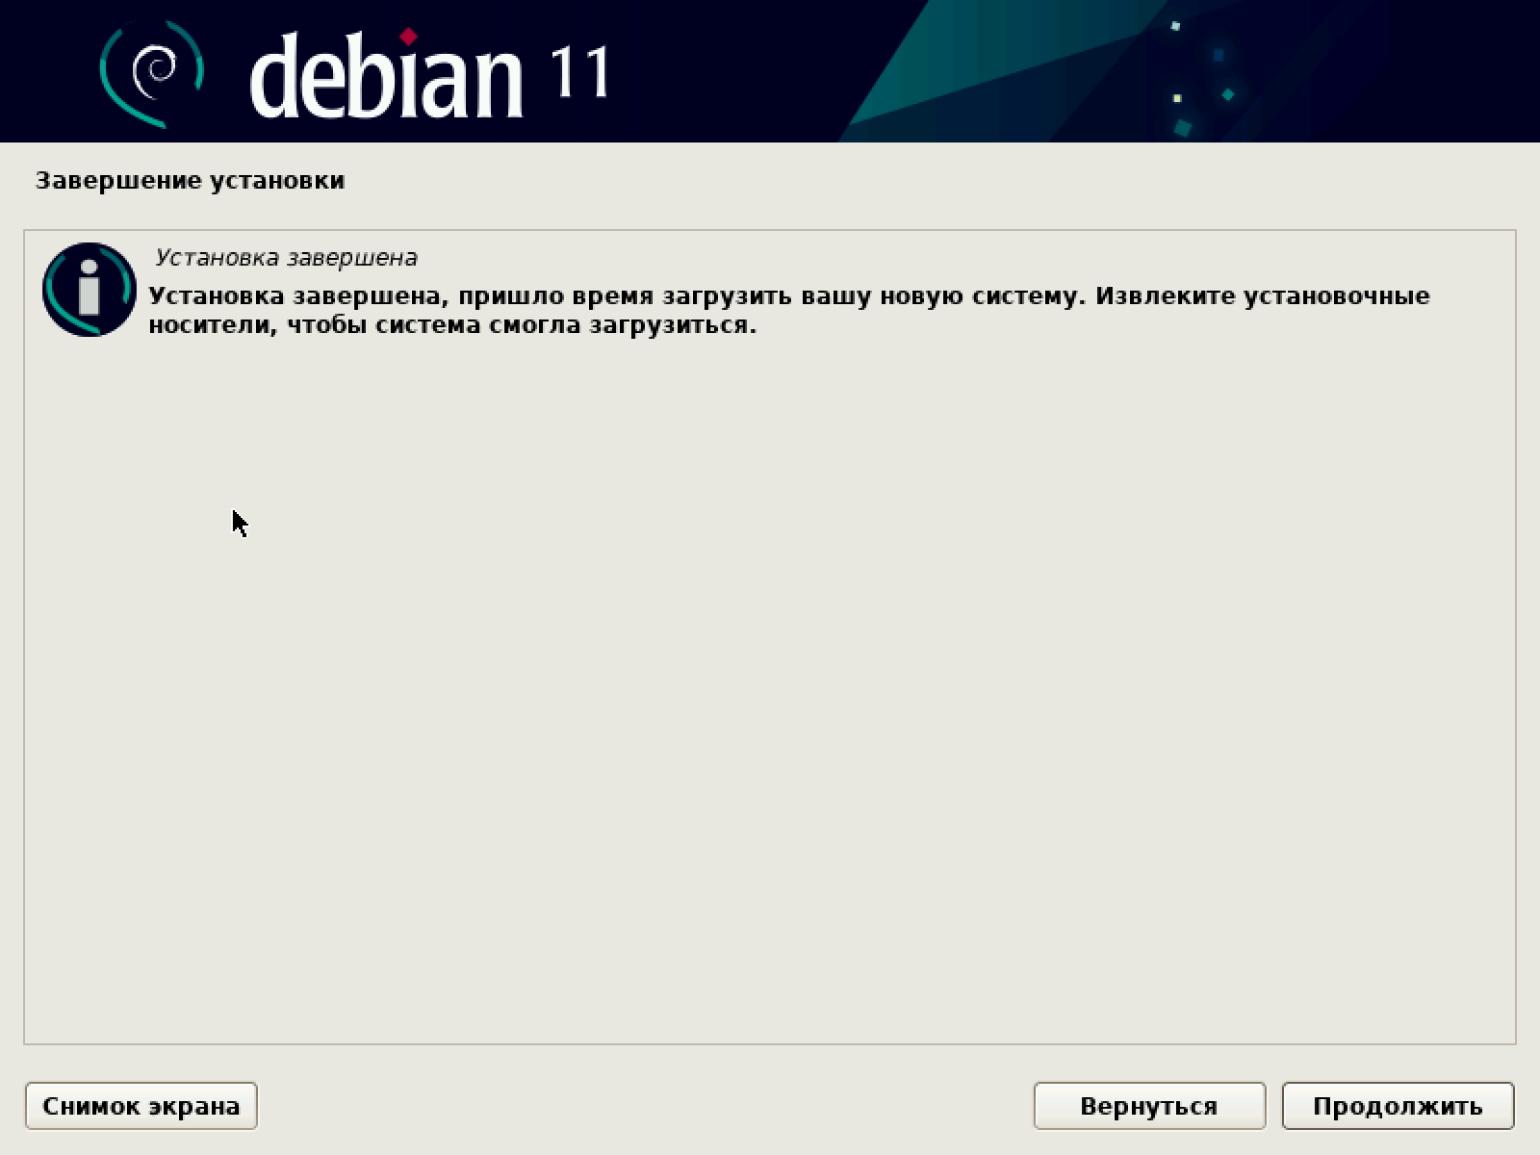
По завершении установки загрузчика появляется экран с предложением извлечь установочные носители, чтобы загрузить систему. Нажимаем «Продолжить».
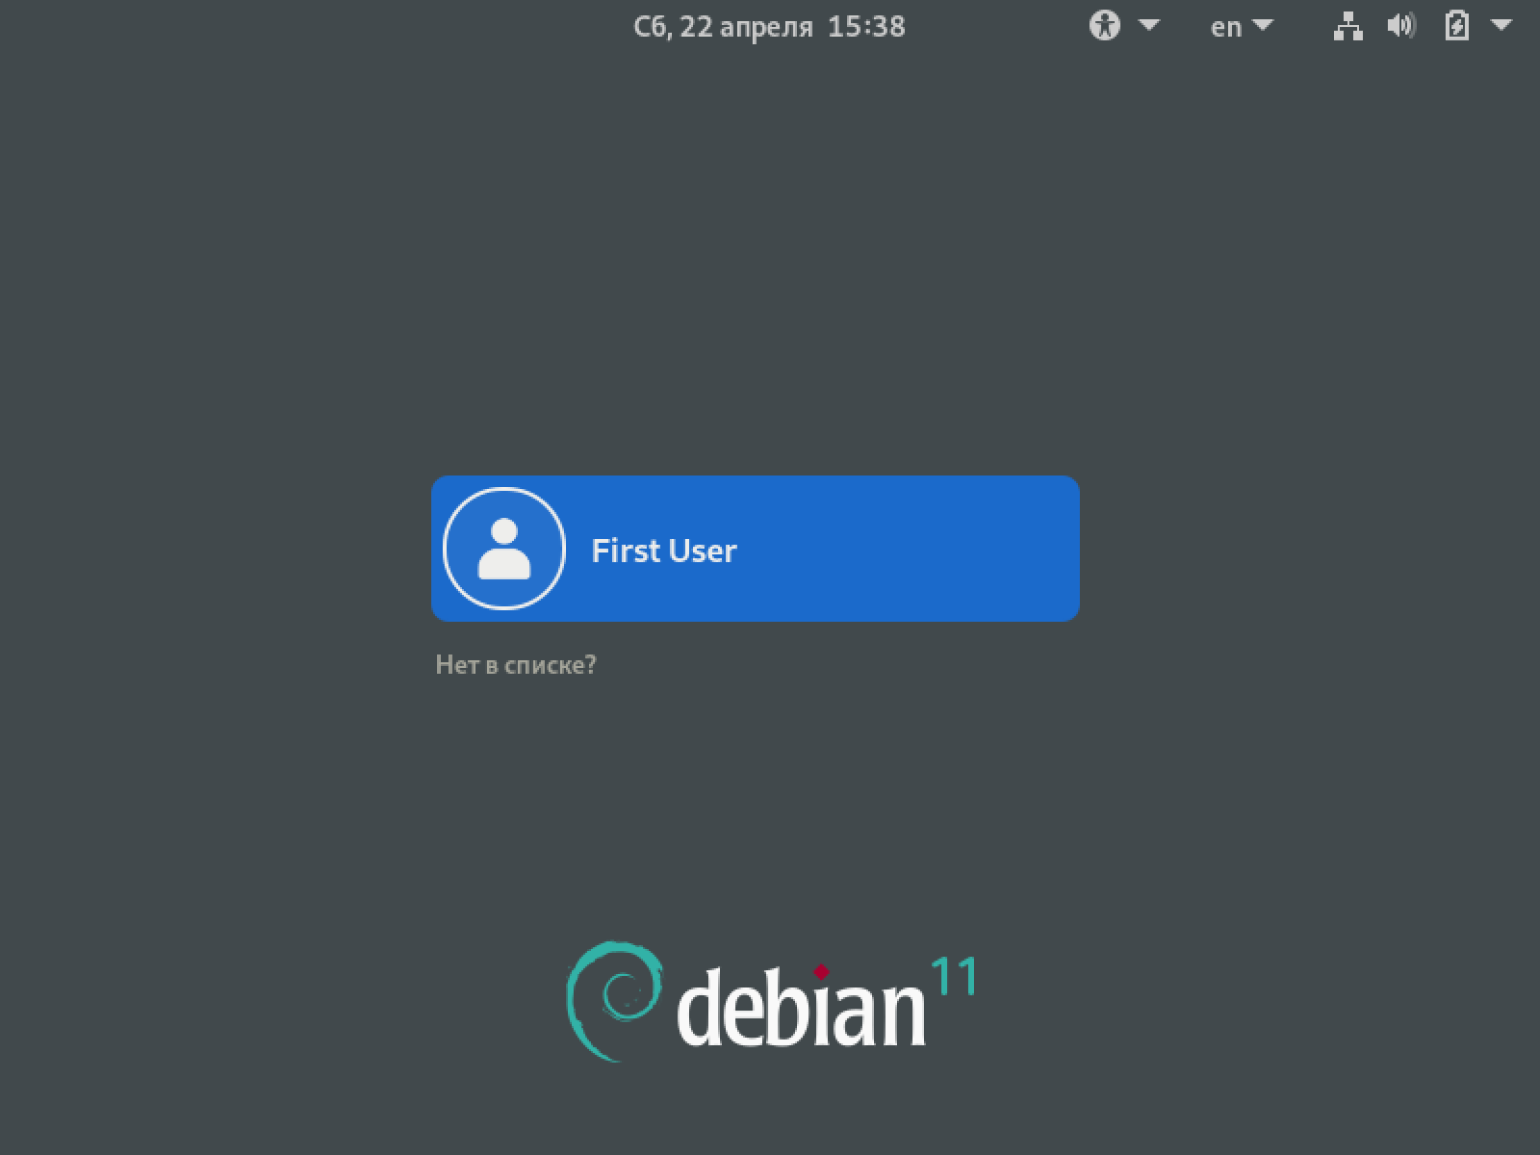
Установка завершена, и появляется экран с предложением запустить систему. Нажимаем «Продолжить».
Загрузка занимает 1–2 минуты, по её окончании появляется экран с именем нашего пользователя — First User. Наша виртуальная машина готова к работе.
Для входа используем пароль и логин, которые мы до этого установили.
Так выглядит интерфейс нашей виртуальной машины.
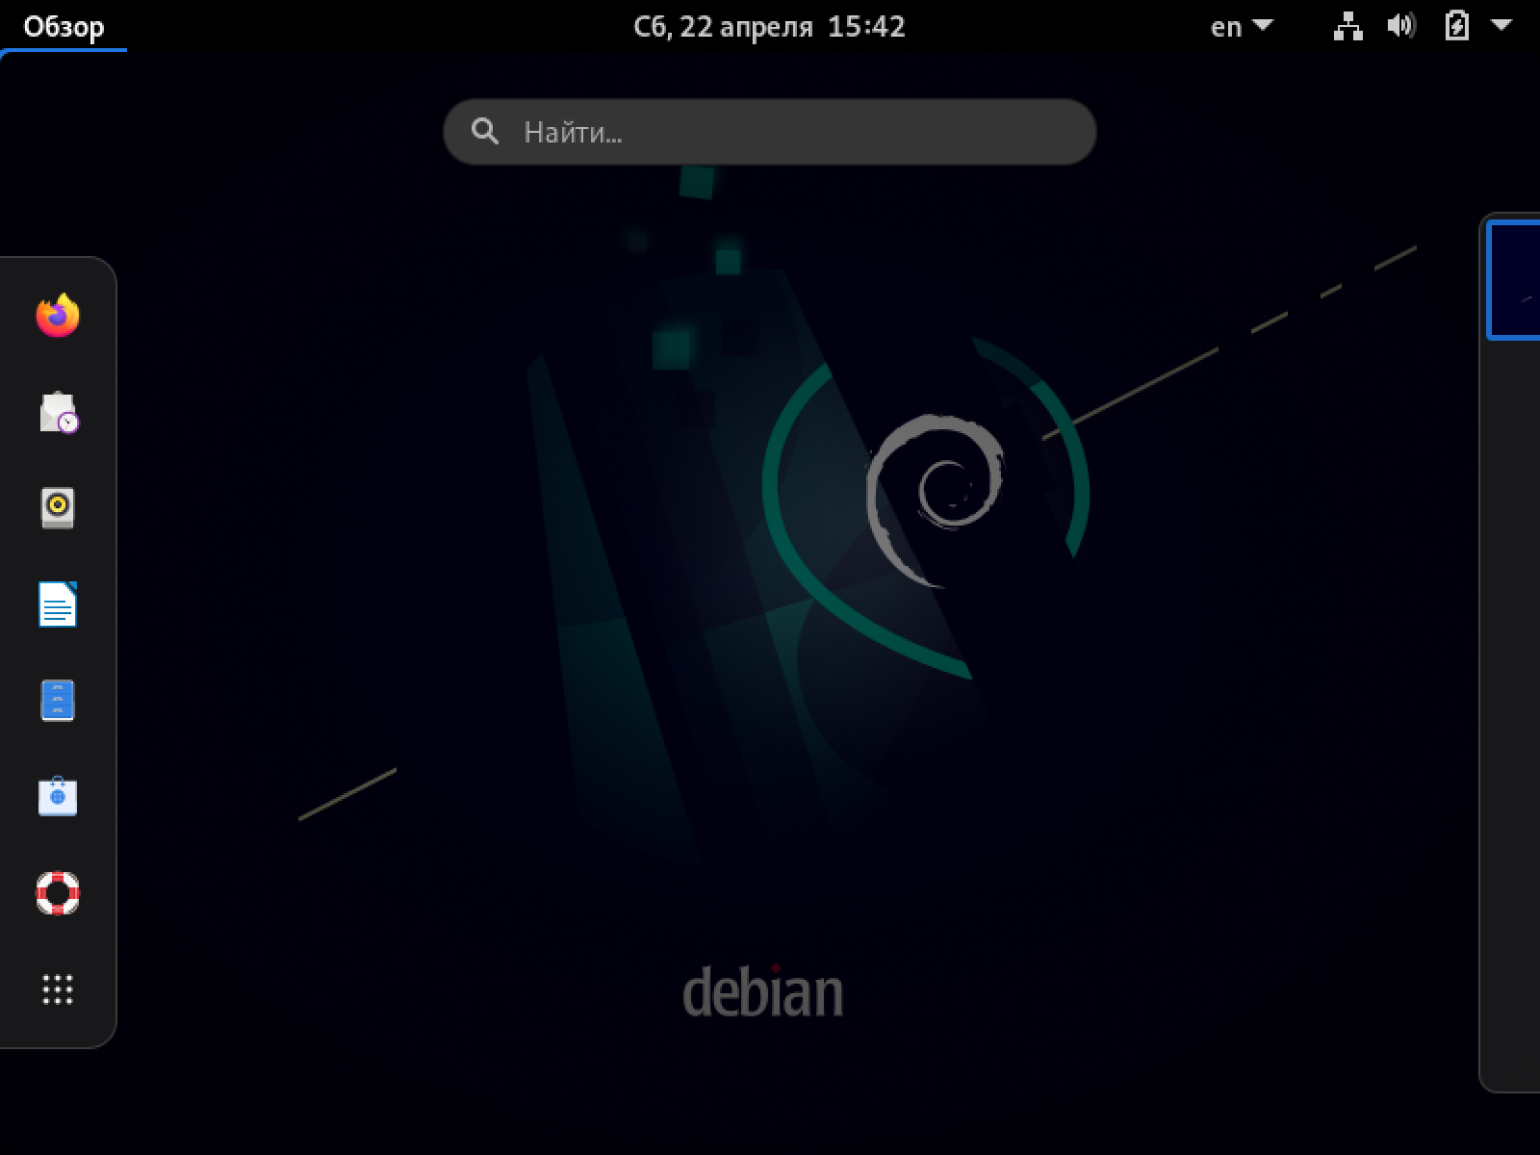
Поздравляем: мы установили виртуальную машину с операционной системой Debian.
Linux и его дистрибутивы: Debian, Ubuntu, Fedora и другие — поддерживают различные языки программирования, что делает их идеальной средой для использования в самых разных областях IT. Самый наглядный пример — операционная система Android, работающая на ядре Linux. Знание Linux необходимо в работе системных администраторов, сетевых инженеров и разработчиков.
Do you want to try a different operating system but don’t want to risk installing it on your main computer? Perhaps you need to test software on various platforms but don’t want to set up different computers? Don’t fret. You can install VirtualBox on Windows 10 and create guest VMs instead.
VirtualBox is a free virtualization program that makes it extremely convenient to set up virtual machines on different operating systems. This tutorial will teach you how to install VirtualBox on Windows 10 and the basics to get you started.
Prerequisites
This tutorial will be a hands-on demonstration. If you’d like to follow along, be sure you have the following.
- A Windows 10 computer. This guide uses Windows 10 21H2 64bit, but VirtualBox should work fine on any recent version of Windows 10 or 11.
- An ISO file for the operating system you want to install. This ISO could be of any VirtualBox-supported guest OSes.
- Free storage space. How much you need will depend on the size of the ISO you’re using, but in general, there should be at least 20 GB of free disk space.
- RAM. How much you need will depend on the operating system you want to install and how you plan on using it.
Installing VirtualBox on Windows 10
To install VirtualBox on Windows 10, you must first download the appropriate installation file for your host. From there, the installation process uses a Wizard interface, which should not be too complicated, even for a beginner.
1. Open a browser and open the VirtualBox downloads page and click the Windows hosts link. The latest VirtualBox version as of this writing is 6.1.36. Save the installer somewhere you can quickly locate it, like your Downloads folder.
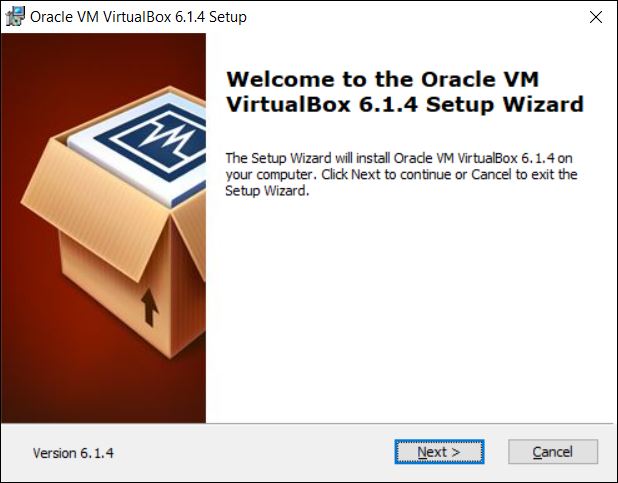
2. Locate the VirtualBox installer file using your File Explorer. Double-click the file to launch the VirtualBox Setup wizard.
3. Click Next on the first screen. This action tells the Wizard that you want to install VirtualBox.
4. Do the following actions on the Custom Setup screen.
- You’ll see a list of the features the Wizard will install. In this example, leave the default selection.
- Browse and select the location you want to install VirtualBox in. The default location is fine, but feel free to change it if you prefer.
- Click Next when you’re ready to continue.
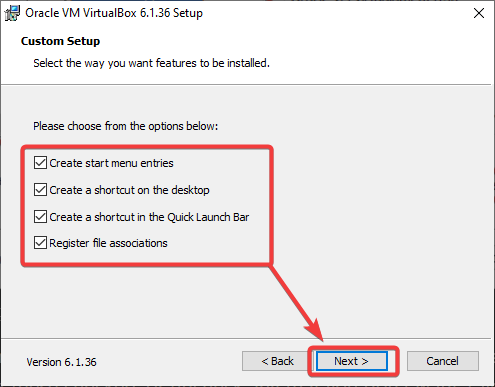
5. On the next screen, you’ll see a list of the shortcuts and file associations the installation will create. Check or uncheck the items you wish to include or exclude and click Next. This example leaves all options checked.
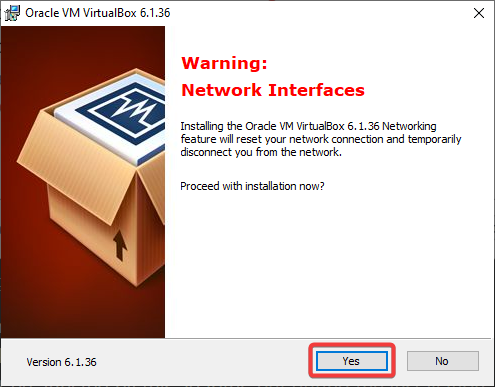
6. On the next screen, you’ll see a warning about networking. The setup process will install a virtual network adapter, which may cause your network connection to disconnect momentarily. Click Yes to continue.
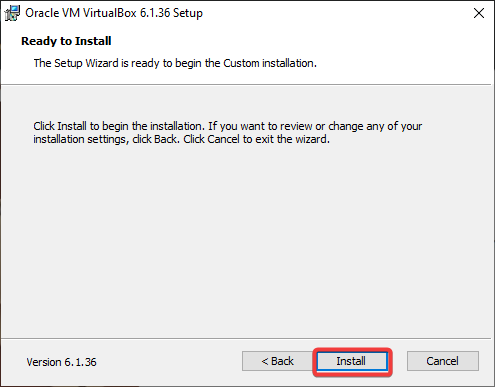
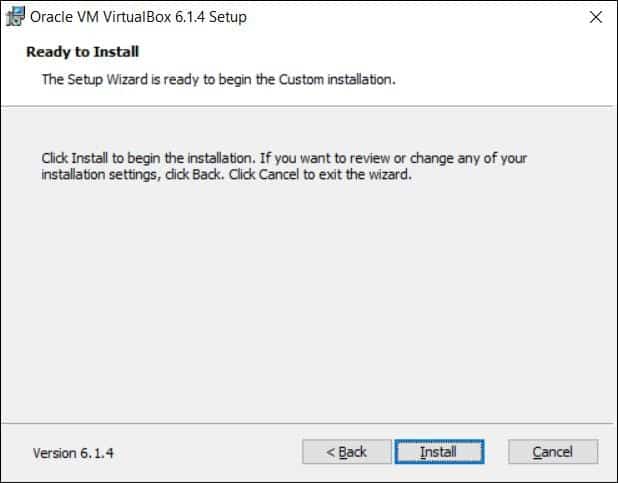
7. Finally, you’ll see a screen asking you to confirm the installation. Click Install to install VirtualBox on Windows 10.
8. The installation process takes several minutes, depending on your system speed. Click Finish to close the Wizard after the installation and start using VirtualBox.

Creating Your First Virtual Machine
After you install VirtualBox on Windows 10, your can create your first virtual machine.
Windows 11 had compatibility issues with VirtualBox, such as VMs cannot start, crashing, and having corrupted displays. But Microsoft confirmed that such issues no longer exist in VirtualBox 6.1.28 and later versions, so you can also apply all the steps below on Windows 11.
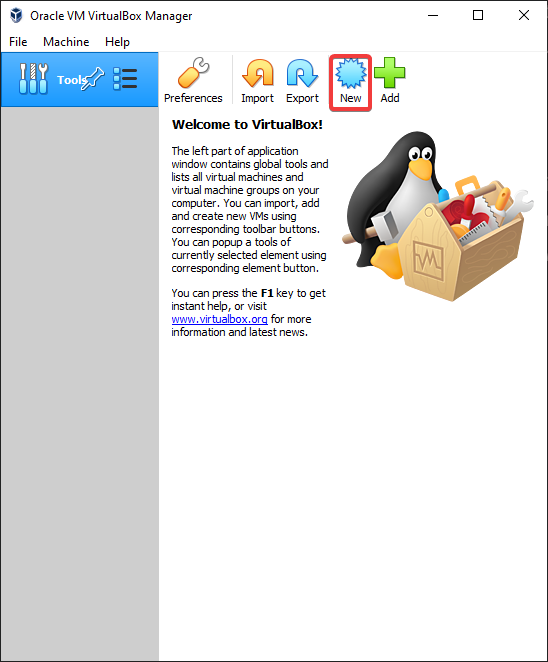
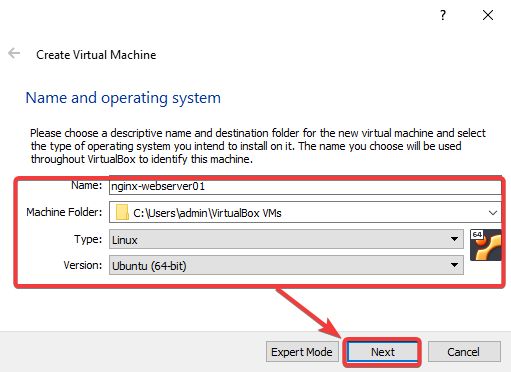
1. First, click the New button in the top-right corner of the VirtualBox window. This action brings up the Create Virtual Machine wizard. This Wizard lets you configure your new VM with the settings you want.
2. Configure the following on the Name and operating system page.
- Name: Give your VM a name. This name can be anything you want.
TIP: Name the VM based on its intended purposes, such as nginx-web-server or windows10-development, so you can better identify the VM later.
- Machine Folder: Specify the location to store your virtual machine files. You can leave the default location or click the Browse button to select a different one.
TIP: Ensure there’s enough space on your drive for your VM. A Linux VM can be as small as 4GB, but a Windows VM will need at least 20GB.
- Type: VirtualBox offers many different types of OSes. Select the operating system you want to install from the drop-down menu. This tutorial selects Linux for the type.
TIP: If the OS you want does not appear in the list, you can select Other at the bottom. This option tells VirtualBox to try to autodetect the features of your OS in the best possible way.
- Version: Select the version of the operating system you want to install from the drop-down menu. This tutorial goes with Ubuntu 20.04 LTS 64bit, so its version is Ubuntu (64-bit).
- Click Next to continue.
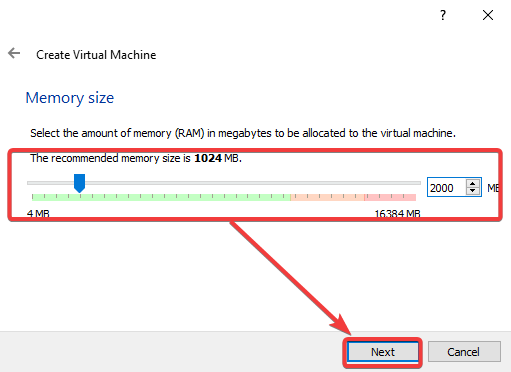
3. On the Memory size page, set how much memory (RAM) your VM will have. You can choose between 4MB (this value is too low for any OS) to 16384MB. The default is 1024MB, but you can increase it.
Generally, 2000MB is a good starting point for a Linux VM, while 4096MB for a Windows VM.
Be careful not to allocate too much memory to your VM. If you do, your host computer may start to lag or become non-responsive. On the other hand, if you set too little memory for the VM, your guest OS and apps may not have enough resources to run correctly. Choose the memory size wisely.
Click Next to continue.
4. On the Hard disk screen, decide whether to create a new hard disk for your guest VM or use an existing one. This example chooses to create a new hard disk since.
This virtual hard disk will be your guest VM’s primary hard disk that holds all the data, such as the guest OS, apps, and other files.
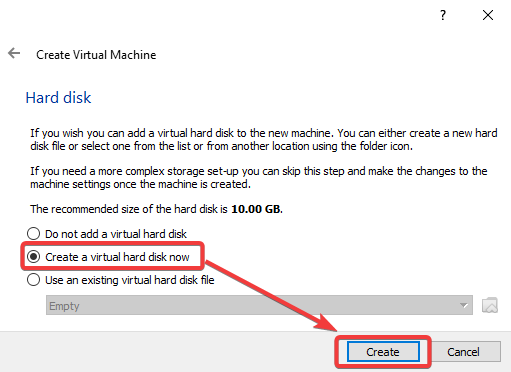
You can select Use an existing hard disk if you have an ISO image or VDI file that already contains a guest operating system.
5. On the Hard disk file type page, select VDI (VirtualBox Disk Image) and click Next to continue. This file type is the default for VirtualBox.
You may choose the corresponding option if you plan to use the virtual hard disk with other virtualization solutions, like VMware or Hyper-V.

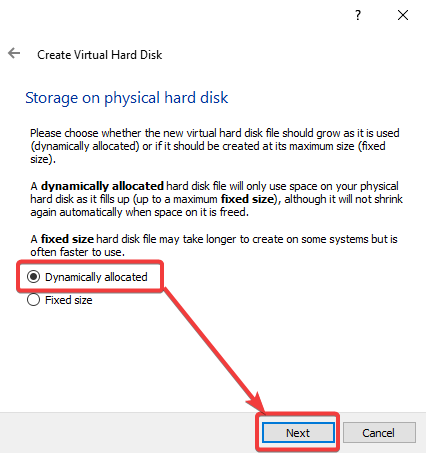
6. On the Storage on physical hard disk, select Dynamically allocated or Fixed size, depending on how you want to provision the virtual disk file size allocation. This example chooses the Dynamically allocated option. Click Next to continue.
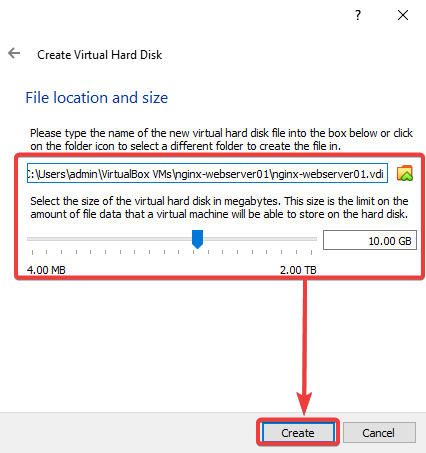
7. On the File location and size screen, specify the location and maximum size of the new virtual disk, and click Create.
A good rule of thumb is to allocate at least 10GB for a Linux VM and 40GB for a Windows VM.
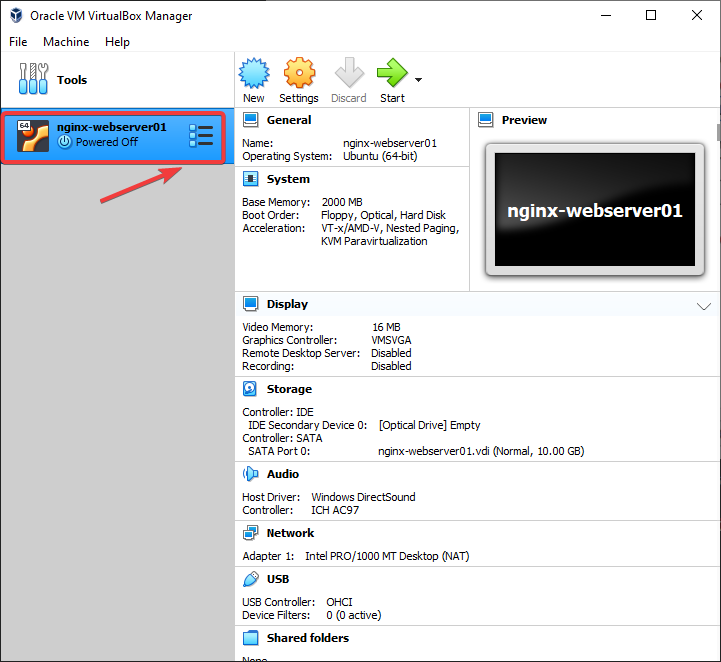
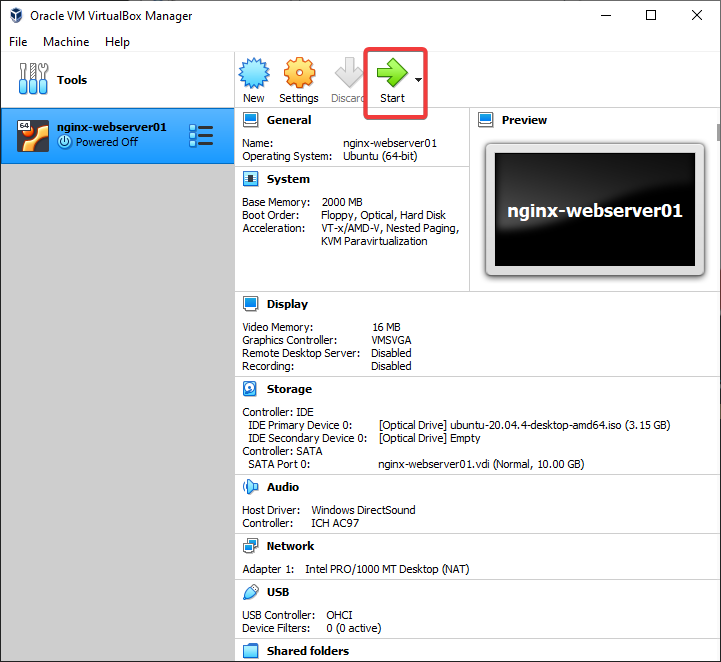
You have a new virtual VM, as shown in the VirtualBox Manager window below.
Installing the Guest Operating System
You’ve created a new virtual machine, but it’s useless without an operating system. In this section, you’ll learn how to install a guest operating system on your new VM.
You need an ISO file with the OS installation files to install the guest OS. You can download ISO files for many popular operating systems from the internet. For example, you can get a Ubuntu 20.04 ISO file from the Ubuntu official website.
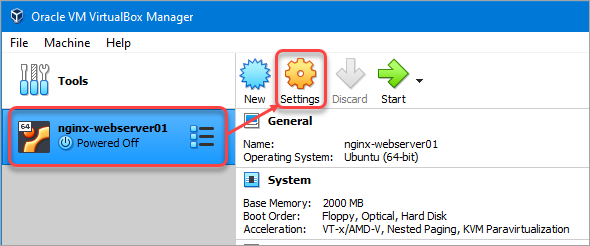
1. Click your VM on the list and click Settings.
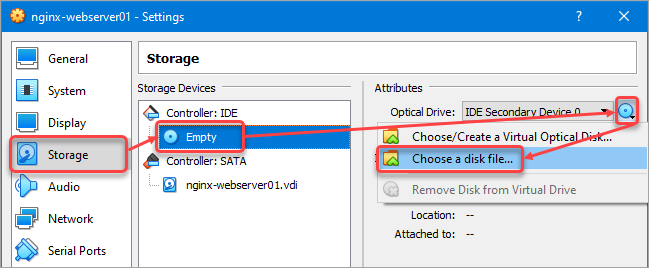
2. On the Settings window, click Storage → Empty disk → the Optical Drive icon → Choose a disk file.
3. Locate the ISO file and click Open. This example chooses the ubuntu-20.04.4-desktop-amd64.iso file.
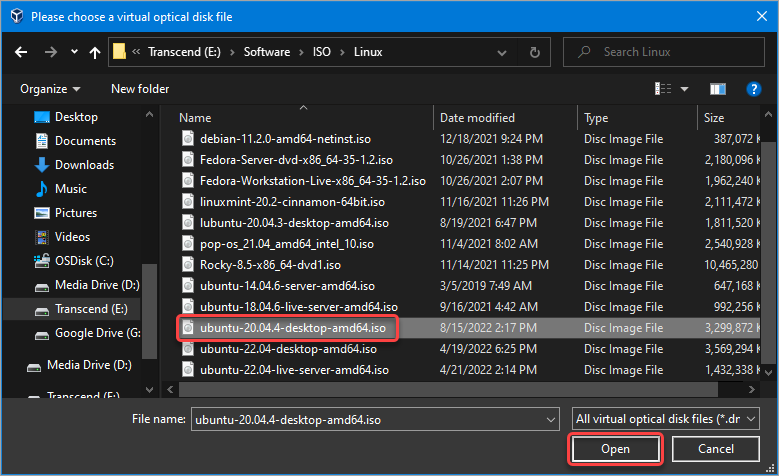
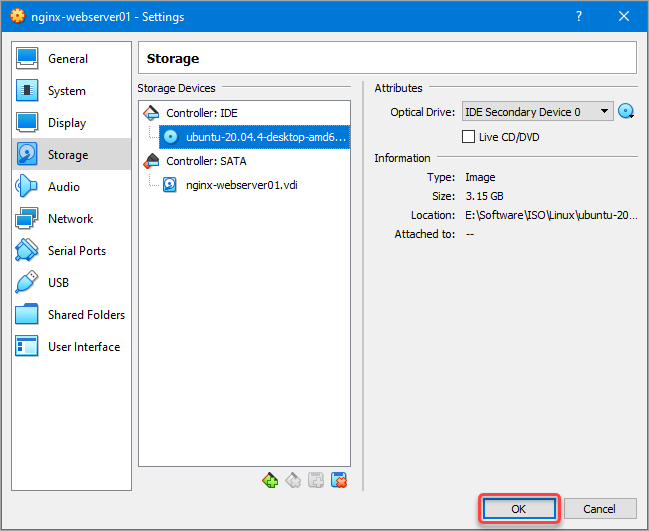
4. After loading the ISO file, click OK.
5. Start your VM by clicking the Start button in the VirtualBox Manager window. The VM will boot from the ISO file. Install the operating system as you would on a physical machine.
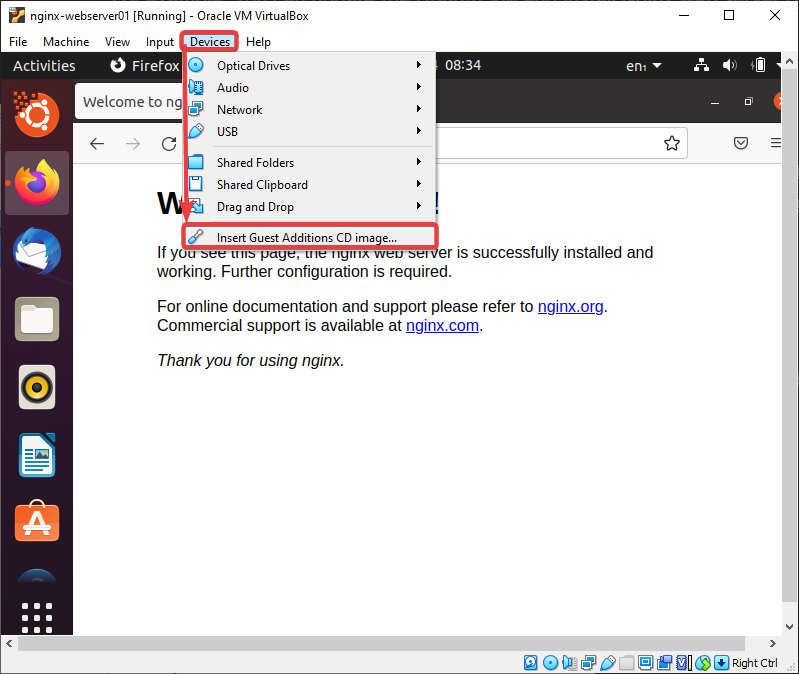
6. Once the installation is complete, one more task related to your new VM is to install the Virtual Box Guest Additions. The Guest Additions enable features like the shared clipboard, shared folders, mouse integration, display resize options, etc.
To install the Guest Additions, click the Devices menu and Insert Guest Additions CD Image. Doing so mounts the VBoxGuestAdditions.iso to your guest VM.
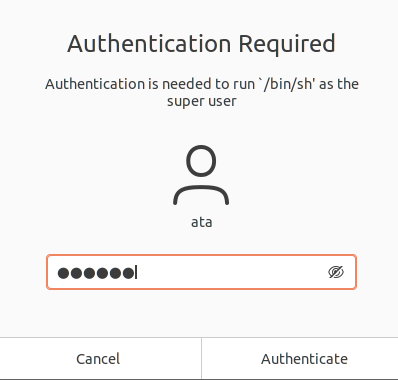
7. Provide your user password at the prompt and click Authenticate.
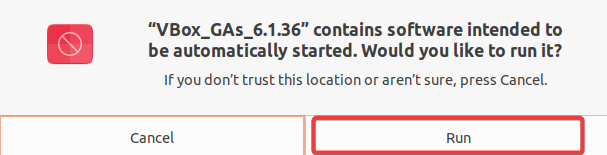
8. Next, click Run to allow the Guest Additions installation.
9. Follow the on-screen instructions to finish the installation. Once the installation is complete, reboot your VM for the changes to take effect.
Conclusion
This article taught you how to install VirtualBox on Windows 10 and create your first virtual machine. You also learned how to install the guest operating system on the VM and how to install the Guest Additions.
Now that you have a basic understanding of VirtualBox, you can experiment with different OSes and learn more about virtualization. With this new skill, why not create a WireGuard VPN connection inside a VM and access the internet safely from a public Wi-Fi network?
![]()
Download Article
![]()
Download Article
- Windows
- Mac
- Linux
- Creating a Virtual Machine
- Q&A
- Tips
- Warnings
|
|
|
|
|
|
This wikiHow teaches you how to install and use the VirtualBox application on your Windows, Mac, or Linux computer. VirtualBox is a program which emulates a second computer, allowing you to install and use operating systems (e.g., Windows 7) on VirtualBox without having to change your computer’s actual operating system.
-

1
Open the VirtualBox website. Go to https://www.virtualbox.org/ in your computer’s Internet browser. This is the website from which you’ll download the VirtualBox setup file.
-
2
Click Download VirtualBox. It’s a blue button in the middle of the page. Doing so will open the downloads page.
Advertisement
-
3
Click Windows hosts. You’ll see this link below the «VirtualBox 6.1.14 platform packages» heading. The VirtualBox EXE file will begin downloading onto your computer.
-
4
Open the VirtualBox EXE file. Go to the location to which the EXE file downloaded and double-click the file. Doing so will open the VirtualBox installation window.
-
5
Navigate through the installation prompts. Do the following:
- Click Next on the first three pages.
- Click Yes when prompted.
- Click Install
- Click Yes when prompted.
-
6
Click Install when prompted. Doing so will allow VirtualBox to begin installing on your computer.
-
7
Click Finish when prompted. It’s in the lower-right side of the window. Doing so will close the installation window and open VirtualBox. Now that you’ve installed and opened VirtualBox, you can create a virtual machine in order to run any operating system on your PC.
- Make sure that you don’t uncheck the «Start» box before doing this.


Advertisement
-
1
Open the VirtualBox website. Go to https://www.virtualbox.org/ in your Mac’s Internet browser. This is the website from which you’ll download the VirtualBox DMG file.
-
2
Click Download VirtualBox. It’s a blue button in the middle of the page. Doing so will open the downloads page.
-
3
Click the OS X hosts link. You’ll find this option in the middle of the downloads page. The VirtualBox DMG file will begin downloading onto your Mac.
-
4
Open the «VirtualBox» DMG file. Once the VirtualBox DMG finishes downloading, double-click the file to open it.
-
5
Double-click the «VirtualBox.pkg» icon. It’s a brown box-shaped icon in the upper-left corner of the window. Doing so will prompt VirtualBox’s installation window to open.
-
6
Navigate through the installation prompts. Click Continue when prompted, then do the following:[1]
- Click Continue in the bottom-right corner of the window.
- Click Install in the bottom-right corner of the window.
- Enter your Mac user password when prompted.
- Click Install Software
-
7
Wait for the installation to complete. Once you’re prompted to click Close in the bottom-right corner of the window, you’ve successfully installed VirtualBox on your Mac.
-
8
Open VirtualBox. Click Spotlight
, type in virtualbox, and double-click VirtualBox in the resulting drop-down menu. Now that you’ve installed and opened VirtualBox, you can create a virtual machine in order to run any operating system on your Mac.


Advertisement
-
1
Open Terminal. This step will vary depending on your version of Linux, but you can usually open Terminal by selecting
Terminal from the Menu. The Terminal window will pop up.
- You can also press Alt+Ctrl+T to open Terminal.
-
2
Enter the installation command. Type in sudo apt-get install virtualbox-qt and press ↵ Enter.
-
3
Enter your password when prompted. Type in the password that you use to log into your computer, then press ↵ Enter.
-
4
Confirm the installation. Type y when prompted, then press ↵ Enter.
-
5
Wait for VirtualBox to finish installing. This will take a few minutes. When you see your computer account’s username appear to the left of the command line, Terminal has successfully installed VirtualBox and is awaiting further commands.
-
6
Open VirtualBox. Type in virtualbox and press ↵ Enter to do so. This will prompt the VirtualBox main window to open. Now that you’ve installed and opened VirtualBox, you can proceed with creating a virtual machine in order to run any operating system on your computer.


Advertisement
-
1
Gather your installation disc(s) or files. When creating a virtual machine, you will need to install the operating system just like you would on a regular computer. This means that you will need the installation disc(s) for the operating system you want to install on the virtual machine.
- You can also install an operating system by using its ISO file.
-
2
Click New. This will open the wizard that will guide you through the process to create your first virtual machine.
-
3
Identify the operating system. On the first screen of the wizard, you will be asked to give the new virtual machine a name as well as choose what operating system you will be installing. Choose the type of operating system from the «Type» menu, and then choose which version you are installing from the «Version» menu.
- For example, if you are installing Windows 7, choose «Microsoft Windows» from the Type menu, and then «Windows 7» from the Version menu.
- If you are installing the 64-bit version of the operating system, make sure to choose the 64-bit version from the Version menu.
-
4
Click Next. It’s at the bottom of the window.
-
5
Set the amount of RAM. You will need to designate how much of your computer’s RAM will be allocated to your virtual machine. VirtualBox will automatically choose the recommended minimum amount for the operating system you selected, but you can increase or decrease this if you’d like.
- You can only go as high as the amount of RAM physically installed in your system.
- It is not recommended that you set it to the max amount, as there won’t be any left for your regular operating system to use when the virtual machine is running.
-
6
Click Next.
-
7
Create a virtual hard drive. Select a virtual hard drive option and click Create, then click through the prompts and click Create again. Your virtual machine will need a virtual hard drive in order to install the operating system and any programs.
- Make sure that the virtual hard drive has at least enough space to install the operating system. Check the specifications for your operating system to see how much space you should allocate at minimum.
- Remember that any programs you install will also take up space on your virtual hard drive, so plan accordingly.
- The most common format for virtual hard drives is VDI (VirtualBox Disk Image).
-
8
Start the operating system installation. Once the virtual machine has been configured, the wizard will close and you will be taken back to the VirtualBox main window. Double-click your new machine in the left menu, then do one of the following:
- If you are installing from a disc, insert it into your computer, click the «Host drive» drop-down box and click the correct drive letter from the drop-down menu.
- If you are installing from an image file, click the folder-shaped icon to browse through your computer for the installation image file.
-
9
Click Start. It’s at the bottom of the window. This will prompt VirtualBox to begin reading your disk or file.
-
10
Install the operating system. After selecting the installation media, the operating system installation will begin. Installation proceeds the same way it would as if you were installing the operating system on a regular computer. See the following guides for instructions on installing the operating system of your choice:
- Windows 8
- Windows 7
- Windows Vista
- Windows XP
- Install OS X
- Linux Mint
- Ubuntu Linux
-
11
Boot up your virtual machine. Once the operating system is installed, your virtual machine is ready to go. Simply double-click the name of your virtual machine in the left menu of the VirtualBox main page to start it up. The virtual computer will boot and load into the operating system that you installed.
- Your virtual machine will run in a window. Whenever the virtual machine window has focus, any keystrokes or mouse clicks will affect the virtual machine and not your physical computer.
-
12
Shut down your virtual machine. You have a couple of different options when closing your virtual machine, and each will affect the machine slightly differently. When you click the «X» in the upper-right corner of the window, you will be presented with several options:
- Save the machine state — This will save the virtual machine in exactly the state that it’s in when you close it. Any programs you are running will be saved in their current state, and everything will be restored when you start the machine again.
- Send the shutdown signal — This will send a power-down signal to the virtual machine, and it will shut down as if the power button was pressed on a physical computer.
- Power off the machine — This will power down the machine as if power was cut to the computer. Nothing will be saved.
-
13
Take snapshots of your virtual machine. VirtualBox allows you to copy your virtual machine’s exact state, allowing you to return to that state at any time. This is incredibly useful for testing software or other configurations.[2]
- You can take a snapshot by clicking the Machine menu and selecting Take snapshot. The snapshot will be added to the list of your virtual machines on the left side of the VirtualBox menu.
- You can restore a snapshot by right-clicking the snapshot and selecting Restore. Any changes to your virtual hard drive since the time the snapshot was created will be lost when the snapshot is restored.


Advertisement
Add New Question
-
Question
How do I remove if I installed Linux?

First: If you are still in the virtual machine with Linux installed, click the X and choose «Power off the machine». Close Virtual Box. Boot up Virtual Box. Right click the computer that has Linux installed. Choose «Remove» from the menu. Select «Delete all existing files».
-
Question
How much RAM can be used with a VirtualBox?
As much as your PC has. For example, if your real PC has 4 GB of RAM, your VM has access to 4 GB of RAM, although that will not leave any RAM for the main PC functions, like the operating system.
-
Question
Does installing VirtualBox make the computer forget the network it’s currently connected to?
It does not! Installing VirtualBox will be like installing any other computer program. Your real computer will remain connected to your real WiFi and will not disconnect or forget your network. The same goes for creating a Virtual Machine. Your real computer will never be disconnected from the WiFi.

See more answers
Ask a Question
200 characters left
Include your email address to get a message when this question is answered.
Submit
Advertisement
-
VirtualBox can be used to test software that won’t work on your computer’s built-in operating system. For example, if you have a Mac and you want to test a Windows program, VirtualBox provides a solution.
Thanks for submitting a tip for review!
Advertisement
-
Any operating system used in VirtualBox will run somewhat sluggishly due to the sheer processing power needed to run two operating systems at once on one computer.
Advertisement
About This Article
Article SummaryX
1. Go to https://www.virtualbox.org.
2. Click Download VirtualBox.
3. Click Windows hosts.
4. Open the downloaded EXE file.
5. Click Next.
6. Follow the on-screen instructions.
Did this summary help you?
Thanks to all authors for creating a page that has been read 543,253 times.
Is this article up to date?
In this article, we will learn How to Install Virtualbox on Windows. We will also share the links to download the latest version of Virtualbox.
VirtualBox is a free and open-source virtualization software that allows you to run multiple operating systems simultaneously on your Windows computer. It is a powerful tool that developers, system administrators, and IT professionals use to test software, experiment with new operating systems, or create virtual environments for their projects.
Installing VirtualBox on Windows is a straightforward process that can be completed in simple steps. In this guide, we will walk you through the process of downloading and then install VirtualBox on Windows computer so that you can start running virtual machines in no time. Whether you’re a seasoned developer or a beginner, this guide will help you start with VirtualBox on your Windows machine.
What is a Virtual Machine?
A virtual machine (VM) is a software emulation of a computer system that can run programs and applications just like a physical computer. It allows you to create multiple operating systems on a single computer, each with its own set of resources such as CPU, memory, and storage.
A virtual machine runs in a sandboxed environment, which means that it is isolated from the host operating system and other virtual machines on the same computer. This isolation provides a high level of security and allows you to test and experiment with different operating systems and software without affecting your host system.
Virtual machines are widely used in software development, testing, and deployment, as well as in cloud computing and data centers. They can be created, modified, and deleted quickly and easily, making them a flexible and cost-effective solution for running multiple operating systems on a single computer or server.
In this guide, we will focus on how to install and use VirtualBox, one of the most popular virtualization software for creating and managing virtual machines on Windows.
Step 1: Enable Virtualization
Virtualization allows users to have many operating systems run through one server or computer. With virtualization, you can have different experiments and operating systems on only one server. VMware provides cloud computing and platform virtualization software and services. To install Virtualbox on Windows, you must ensure that virtualization is enabled on your system. Here is a guide you can use:
Step 2: Download VirtualBox For Windows & Mac
VirtualBox is a popular open-source virtualization software that allows you to run multiple operating systems on your Windows computer. Whether you’re a software developer, system administrator, or just a curious user, VirtualBox can help you create virtual environments for testing, experimenting, or running software that may not be compatible with your host system.
To get started with VirtualBox on your Windows computer, you’ll need to download the software from the official website. The download process is simple and straightforward, and you can choose the version that best suits your needs, whether you’re running a 32-bit or 64-bit version of Windows.
In this guide, we’ll walk you through the steps of downloading and installing VirtualBox on your Windows computer. We’ll cover everything from downloading the software to configuring your virtual machine settings, so you can start running virtual environments on your Windows computer in no time. Whether you’re new to virtualization or a seasoned pro, this guide will help you start with VirtualBox on your Windows machine.
Download VirtualBox For Windows
Head over to the installation process when the VirtualBox installer file is there.
Step 3: Install VirtualBox on Windows & Mac
Installing VirtualBox on Windows is easy and can be done on different operating systems. Just like we’ve provided VMware Workstation/Player and installed it, we’ll also show how to install VirtualBox on Windows & Mac. The procedure for installing VirtualBox on Windows, Mac, and even Linux is pretty much the same. Let us go through the process and install Virtualbox on Windows.
1. First, Open the VirtualBox installer file and hit Next.
2. Click, install.
3. Download and install Virtualbox Extension: Link
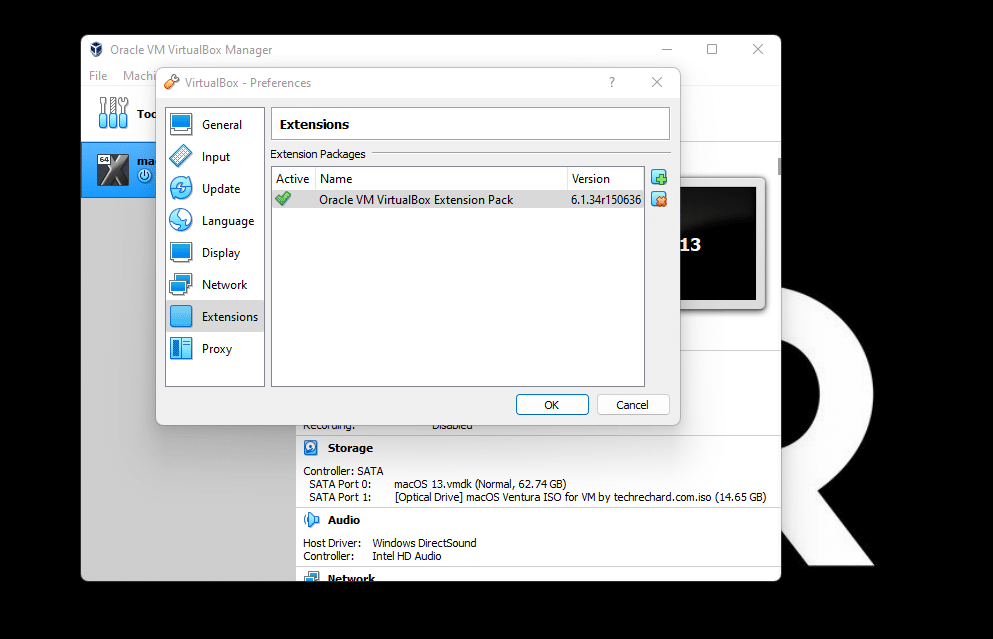
4. Open VirtualBox. Click File -> Preferences -> Extension. Click on the + Sign and upload the file here.
Well done! You can manage to successfully install VirtualBox on Windows.
We’ve done it! Now you can install any operating system on VirtualBox.
Here is a video tutorial you can use:
Here are some guides you can use:
- How To Install macOS 13 Ventura on VirtualBox
- Install macOS Monterey on VirtualBox
- How to Install macOS Big Sur on VirtualBox
- Install macOS Catalina on VirtualBox on Windows PC
- Install macOS Mojave on VirtualBox
- How To Install MacOS High Sierra On VirtualBox
- How To Install MacOS Sierra On VirtualBox
- How to Install Mac OS X EL Capitan on VirtualBox
- How to install SteamOS on Virtualbox
- How to install Chrome OS on Virtualbox
- How to Install Android on VirtualBox
Incoming Links:
Install Virtualbox on Windows, Virtualbox for Windows, How to install VirtualBox on Windows PC
Oracle’s VirtualBox is a free, open-source platform for virtualization that lets users run multiple virtual computers on a single physical computer. Virtual machines can be used to try out different operating systems and apps without altering the settings or data on the host computer. This article will help you learn how to install VirtualBox on Windows 11 and 10.
Why VirtualBox? Well, there are many reasons for it. Firstly, it is free, open-source, highly customizable, and easy to set up and configure. Most importantly, it is cross-platform, meaning it can be installed and used on various host operating systems, including Windows, macOS, and Linux. Now, let’s understand the prerequisites for installing VirtualBox.
Prerequisites for Installing VirtualBox on Windows
Before setting up a virtual machine on Windows 11 or 10, there are some prerequisites you should know, such as the requirements, free space, and drivers.
1. Requirements
To run VirtualBox on a Windows PC, your system must meet the following minimum requirements:
- CPU: x86-compatible hardware (most modern Intel and AMD CPUs are supported)
- RAM: The minimum requirement of the host operating system (Windows 11: 4GB) plus the minimum requirement of the operating system you wish to virtualize.
- Disk space: The minimum space requirement of the virtualized operating system plus up to 50MB for the VirtualBox installation
- Supported operating systems for your virtual machine: Windows 11, Windows 10, Windows 7, Windows 8 and 8.1, Windows Vista, Windows XP, Windows 2000, Windows Server 2003, 2008, and 2012 (including R2), Windows NT, Ubuntu Desktop, and macOS X.
Check out a complete list of VirtualBox-supported OS if yours is not listed above.
2. Free Space
Having enough free space on your hard drive is essential for installing and running VirtualBox and virtual machines on your computer. If you plan on running multiple virtual machines simultaneously, you will need to have enough free space to accommodate the combined size of all the virtual machines.
Moreover, you may want to create a ‘Virtual hard disk’ for each virtual machine, allowing you to store files and data on the virtual machine. This will require additional hard drive space. Most importantly, the more free space you have on your hard disk, the better the performance of your virtual machine will be.
3. Drivers
VirtualBox comes bundled with generic drivers that allow the virtual machine to access and use hardware components on your PC, such as the network adapter and graphics card.
But if you have a device or piece of software that needs a specific driver, you will have to install it manually.
Installing VirtualBox on Windows is pretty straightforward. Follow the below steps.
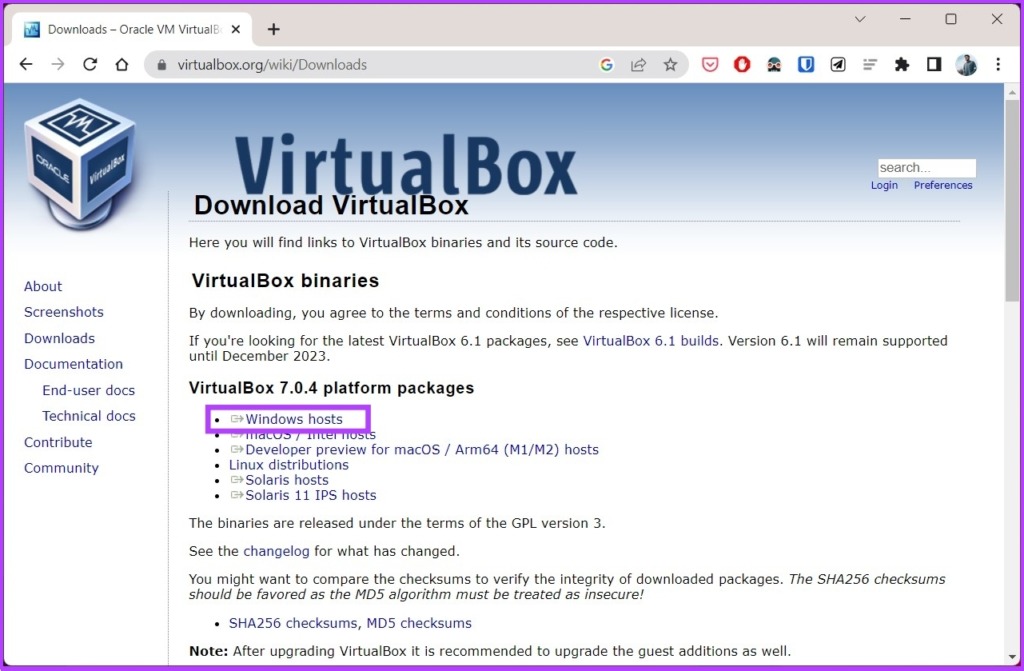
Step 1: Go to the Oracle VirtualBox download page using the below link.
Download VirtualBox

Step 2: Click on the Windows hosts link. Save the installer file anywhere you prefer.
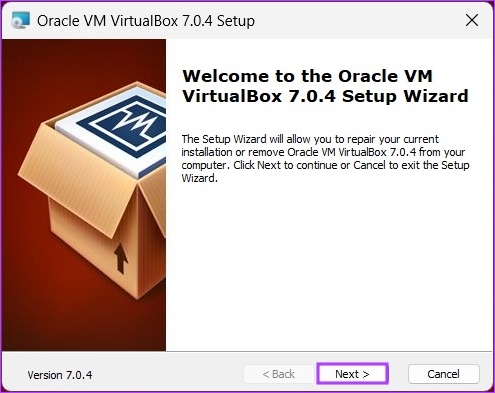
Step 3: Navigate to the installer file and double-click on it.

Step 4: An installation wizard will pop up; click Next.
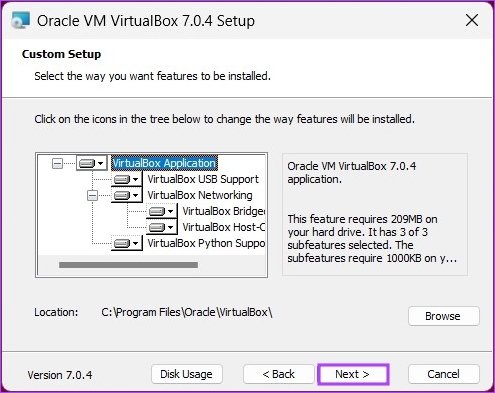
Step 5: On the next screen, customize the things you want to install. You can change the installation location too. For this article, we will go with the default installation without changing any settings. Click Next.
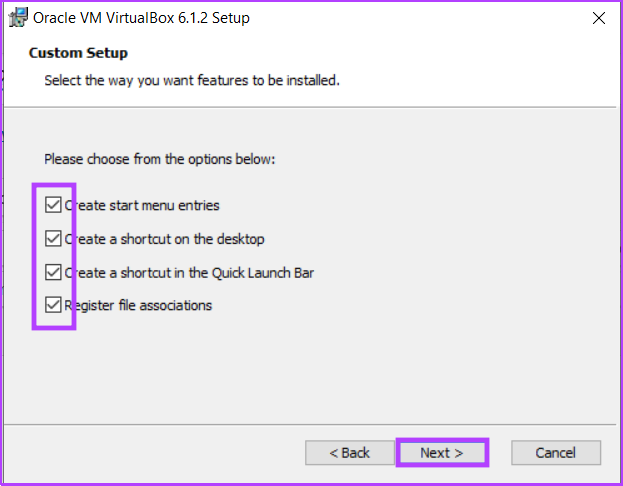
Step 6: In the next screen, you will see a list of shortcuts and file associations the installation will create. Check or uncheck the options you want to include, and click Next.
Step 7: The next screen will show a warning about Network Interfaces. The setup process will install a virtual network adapter. Click Yes.
Note: After clicking Yes, you may encounter a temporary network disconnection.

Step 8: If there are any missing dependencies, VirtualBox will install them. Click Yes.

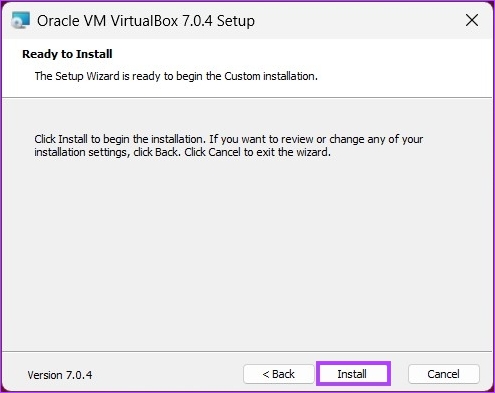
Step 9: Finally, click Install in the ‘Ready to Install’ screen.
The installation will take some time depending on your system speed.
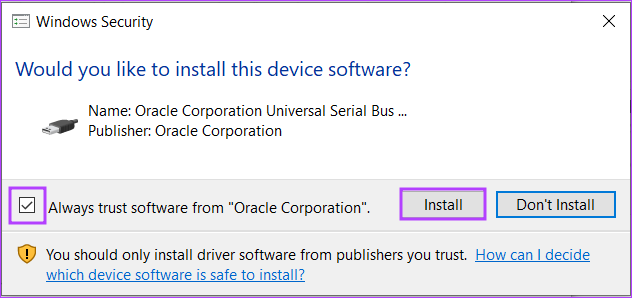
Step 10: During installation, you may get a Windows Security prompt. Click Install.
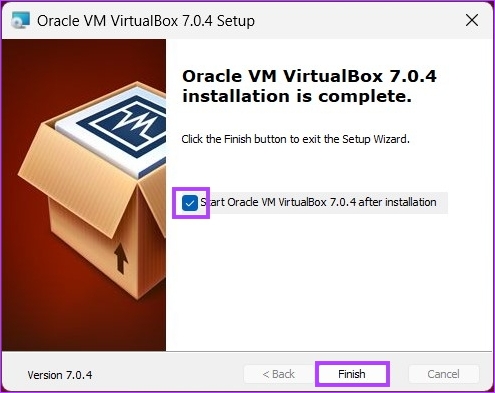
Step 11: Once the installation is complete, click Finish to close the wizard after the installation.
Note: Check the box that says ‘Start Oracle VM VirtualBox after Installation,’ if you want to try VirtualBox right away.
There you go. You have successfully installed VirtualBox on your PC.
If you are a power user and want more out of VirtualBox, you must go for the VirtualBox’s extension pack. However, before we proceed, let’s first understand Oracle VM VirtualBox Extension Pack. Keep reading.
How to Install Virtualbox Extension Pack on Windows 11 and 10
Oracle’s VirtualBox comes in two packages: the basic version and the extension pack. The basic package includes all open-source components, while the extension pack enhances VirtualBox’s capabilities with features such as VRDP support, host webcam passthrough, AES-encrypted disk image support, cloud integration, etc.
Here’s how to install the VirtualBox Extension Pack on Windows 10 and 11.
Step 1: Visit the Oracle VirtualBox download page using the below link.
Download VirtualBox
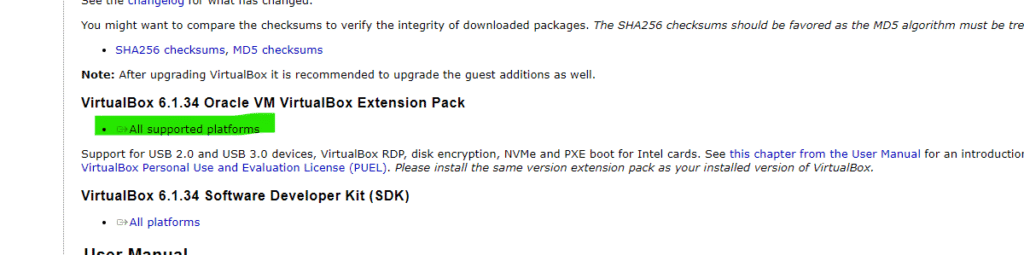
Step 2: Under the ‘VirtualBox Extension Pack’ section, click the ‘All supported platforms’ link to download the latest pack. Save the installer file anywhere you prefer.

Step 3: Navigate to the installer file and double-click on it.
Step 4: Click Next in the pop-up.
Step 5: On the next screen, customize the things you want to install. We will go with the default installation settings. Click Next.
Step 6: Now, you will see a list of shortcuts and file associations the installation will create. Check or uncheck the options you wish and click Next.
Step 7: The next screen will show a warning about Network Interfaces. The setup process will install a virtual network adapter. Click Yes.
Note: After clicking Yes, you may encounter a temporary network disconnection.
Step 8: If there are any missing dependencies, VirtualBox will install them. Click Yes.
Step 9: Click Install.
Step 10: During installation, you may get a Windows Security prompt, click Install.
Tip: Check the box for ‘Always trust software from Oracle Corporation’ to avoid this pop-up.
Step 11: Once done, click Finish.
Tip: To start VirtualBox after installation, check the box for ‘Start Oracle VM VirtualBox 7.0.4 after installation.’
As you can see, the installation process for the basic and extension packs is similar. If you have any more questions, check out the FAQ section below.
FAQs on Installing VirtualBox on Windows
1. Does VirtualBox affect your computer?
VirtualBox is safe and should not have any negative effects on your computer. However, when you run a virtual machine on your computer using VirtualBox, it can chew up a significant amount of resources such as CPU, memory, and disk space.
2. Can you install VirtualBox without admin rights?
It is necessary to have administrator rights on your computer to install VirtualBox. However, you do not need administrator rights to access your virtual machine.
3. Does VirtualBox need a license?
VirtualBox is free and open-source software, so it does not require a license. You can download and use it without having to pay for a license. However, if you want to use certain features that are part of the Oracle VM VirtualBox Extension Pack, you will need to purchase a license from Oracle.
4. Does VirtualBox use UEFI or BIOS?
Depending on how the host computer and virtual machine are set up, VirtualBox can use either UEFI or BIOS to start a virtual machine. By default, VirtualBox will try to boot the virtual machine using EFI. If EFI is not available, it will fall back to BIOS.
5. Do I need an ISO file for VirtualBox?
Yes, you will need an ISO file if you wish to install an operating system on a virtual machine.
Run Parallel Operating Systems
Now that you know how to install any operating system you want on your host computer hassle-free, check out how to install Windows 11 on VirtualBox easily and efficiently. We hope this article helps.