1. Overview
Windows Subsystem for Linux (WSL) allows you to install a complete Ubuntu terminal environment in minutes on your Windows machine, allowing you to develop cross-platform applications without leaving windows.
What you will learn:
- How to enable and install WSL on Windows 10 and Windows 11
- How to install and run a simple graphical application that uses WSLg
- How to install and run a much more advanced application that uses WSLg
Note: As of November 2022, WSL is now available as a Windows Store app for both Windows 10 and Windows 11. This means previous tutorials related to installing WSL as a Windows feature are no longer required.
What you will need:
- A Windows 10 or Windows 11 physical or virtual machine with all the updates installed
2. Install WSL
WSL can be installed from the command line. Open a powershell prompt as an Administrator (we recommend using Windows Terminal) and run:
wsl --install
This command will enable the features necessary to run WSL and also install the default Ubuntu distribution of Linux available in the Microsoft Store. It is recommended to reboot your machine after this initial installation to complete the setup.
You can also install WSL from the Microsoft Store.
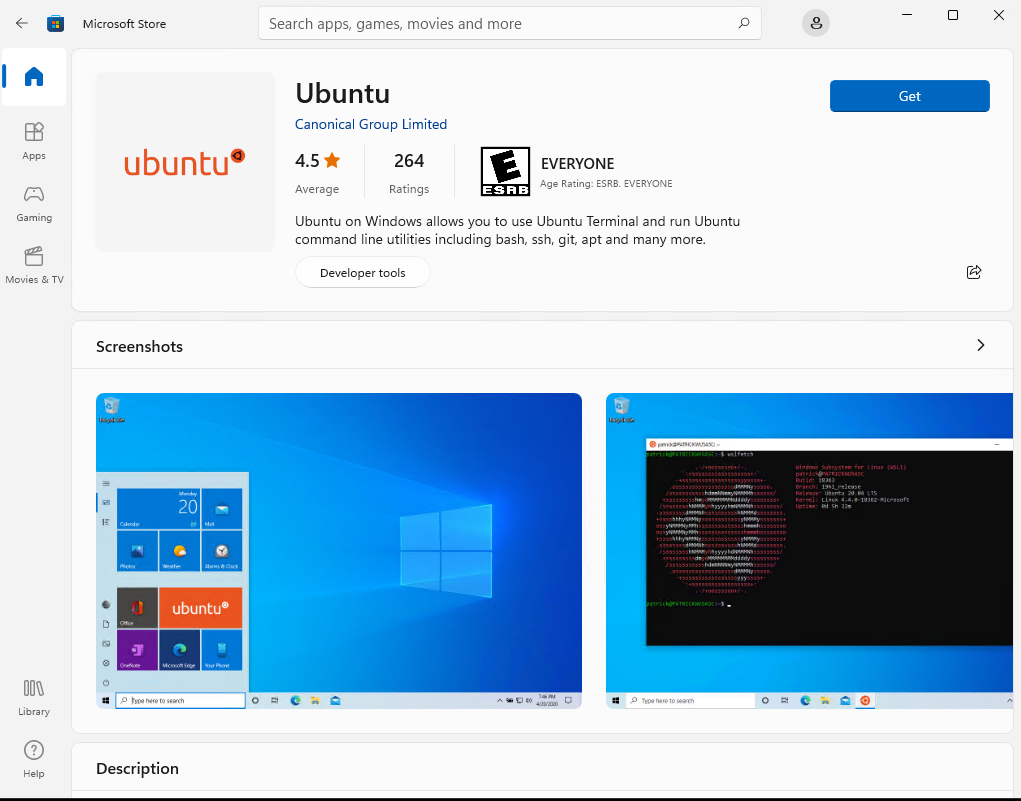
Installation of WSL from the Microsoft Store
Duration: 3:00
The WSL app is availble to install directly from the Microsoft Store like other Windows applications.
To install the WSL application from the Microsoft Store, open it and search for Windows subsystem.
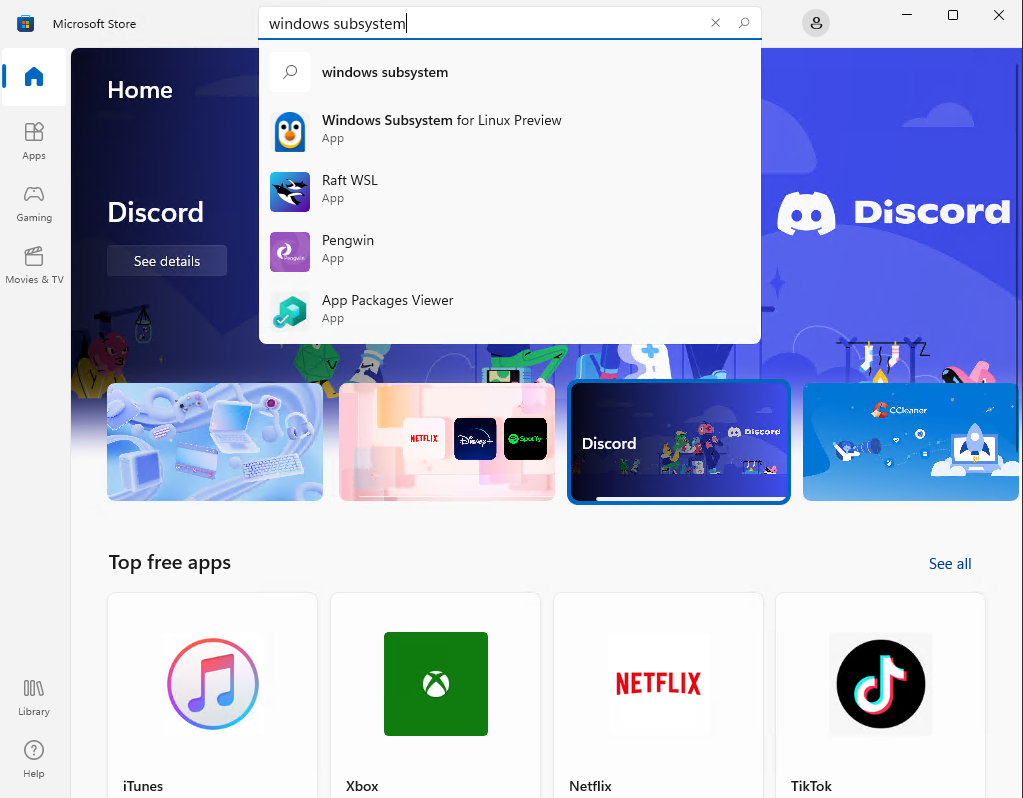
Click on the item Windows Subsystem for Linux to open the corresponding application page.
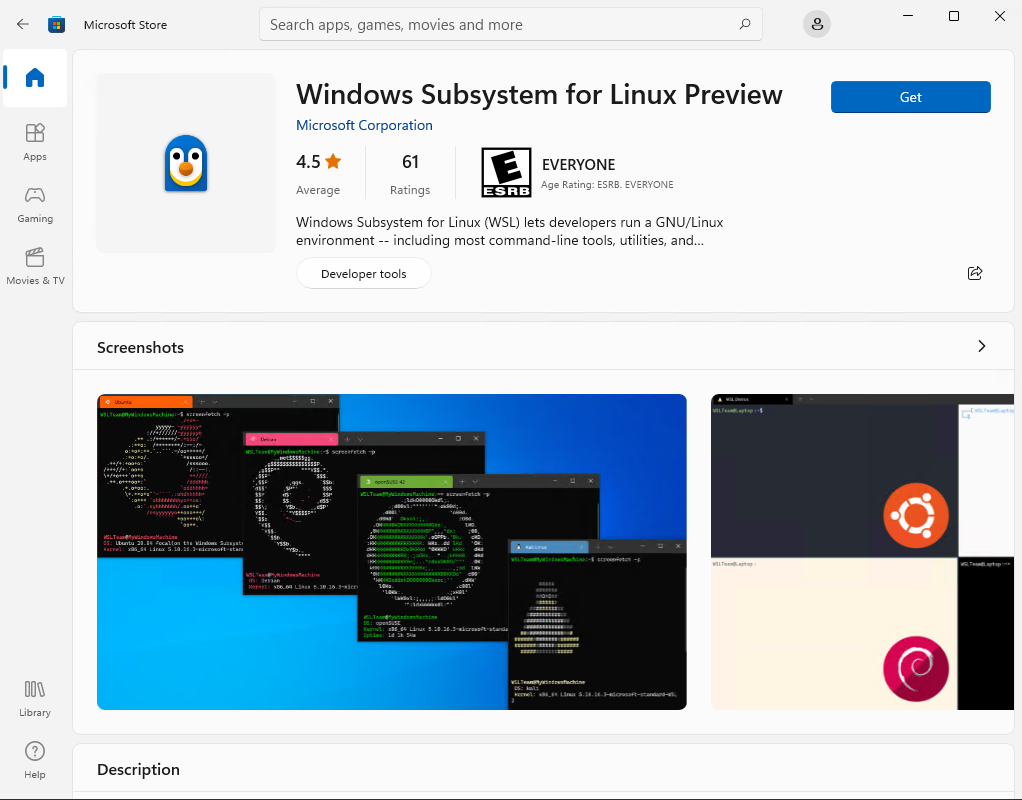
Click on Get to download and install the application.
Upon installation, you can click on Open, but it will not do much since there is no Linux distribution installed.
However, if you really want to open the WSL application without installing a distribution, you’ll see a nice and short help message that you must follow in order to make something useful with WSL:
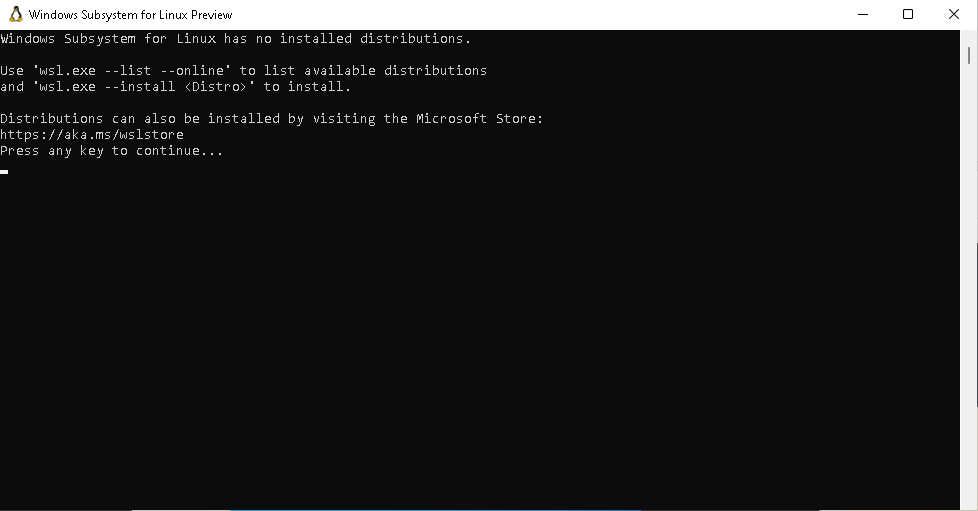
You can now proceed with the installation of Ubuntu.
3. Download Ubuntu
WSL supports a variety of Linux distributions including the latest Ubuntu release, Ubuntu 20.04 LTS and Ubuntu 18.04 LTS. You can find them by opening the Microsoft Store app and searching for Ubuntu.
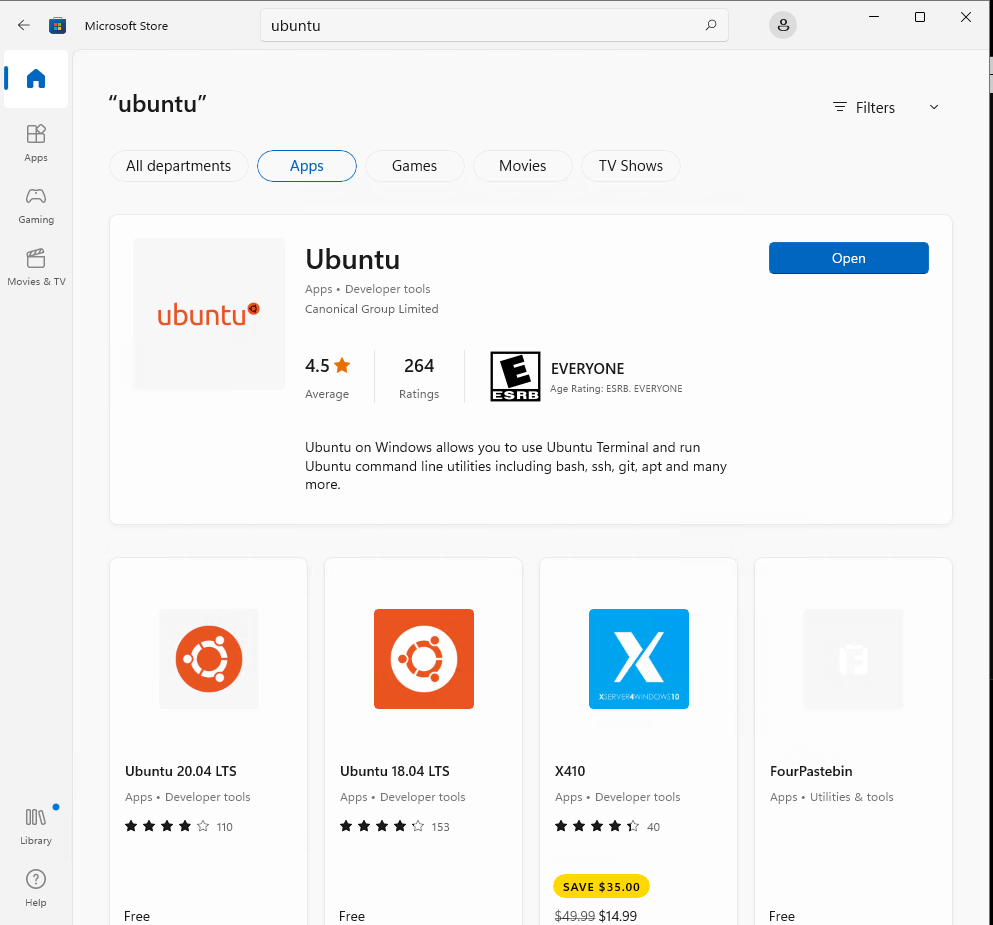
Choose the distribution you prefer and then select Get.
Which version should I choose?
There are three types of Ubuntu releases published to the Microsoft Store:
- Ubuntu with a version number e.g. Ubuntu 20.04.x. This will always be 20.04 and upgrades won’t be proposed.
- Ubuntu without a version number. This is the latest LTS version of Ubuntu after the first point release. At the time of writing, it is Ubuntu 22.04. It will remain Ubuntu 22.04 until the first point release of the next LTS release of Ubuntu, for example 24.04.1 in 2024.
- Ubuntu Preview is a daily build of the latest development version of Ubuntu. You should install it if you want to live on the edge but not for production workload as it doesn’t receive the same amount of QA as stable releases and may break at any time.
Ubuntu will then install on your machine.
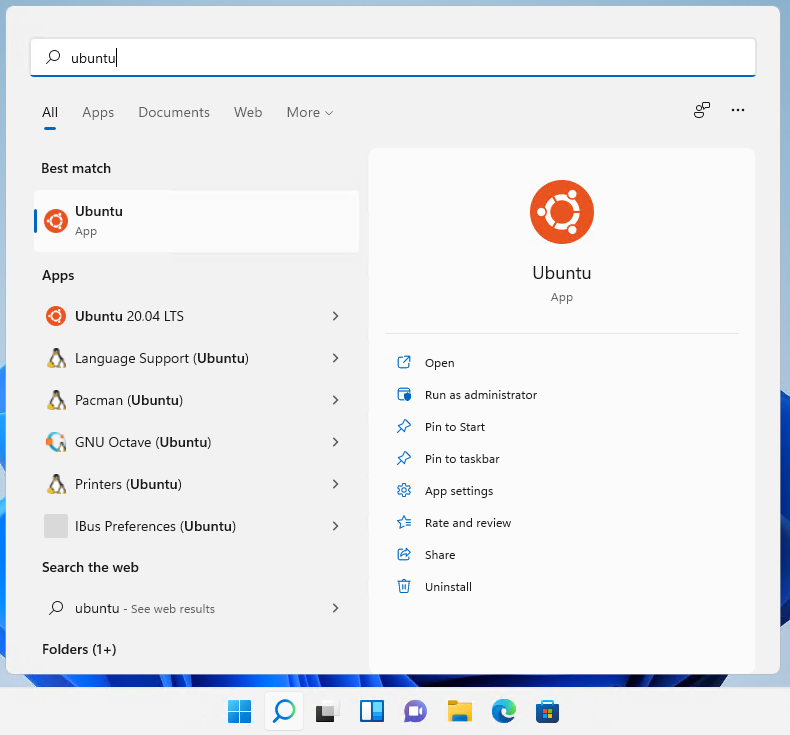
Once installed, you can either launch the application directly from the store or search for Ubuntu in your Windows search bar.
Install Ubuntu from the command line
It is possible to install the same Ubuntu applications available on the Windows Store directly from the command line.
In a Powershell terminal you can run:
wsl --list --online to see all available distros.

You can install a distro using the NAME by running:
wsl --install -d Ubuntu-20.04

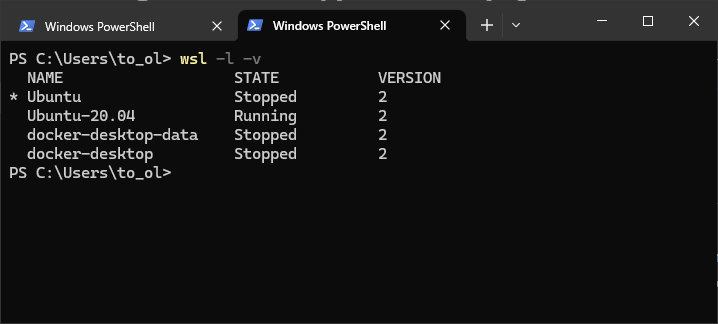
Use wsl -l -v to see all your currently installed distros and which version of WSL they are using:
4. Configure Ubuntu
Congratulations, you now have an Ubuntu terminal running on your Windows machine!
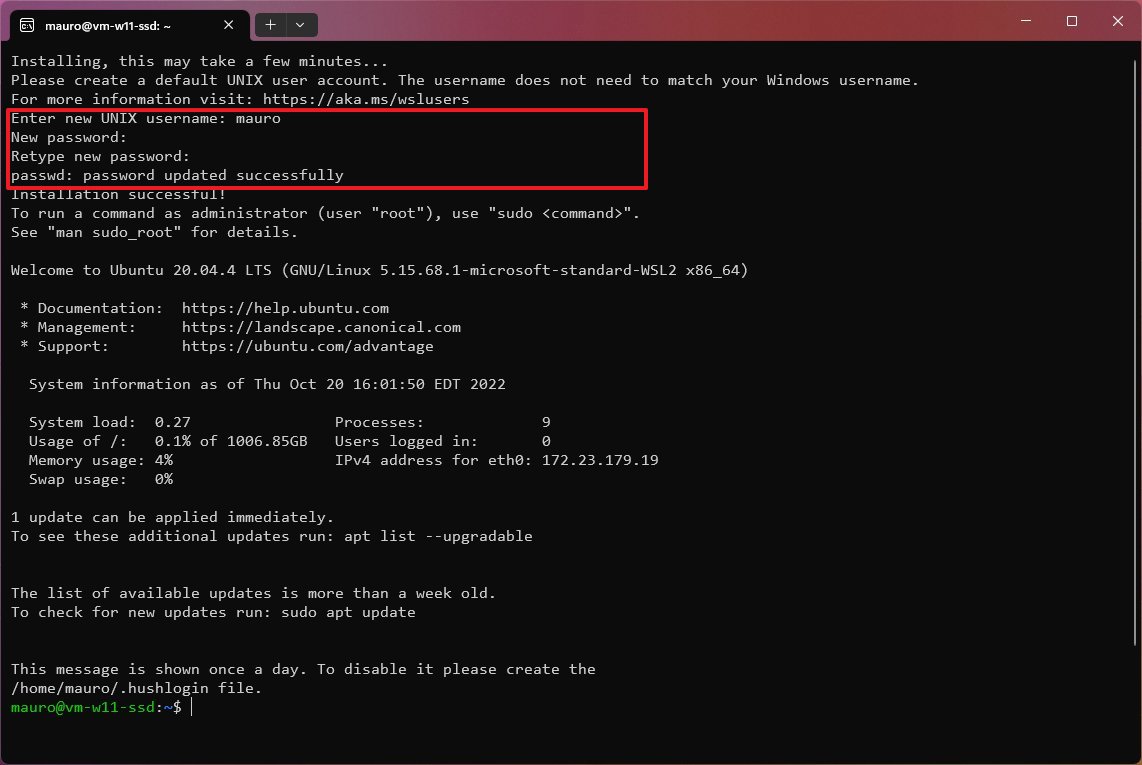
Once it has finished its initial setup, you will need to create a username and password (this does not need to match your Windows user credentials).

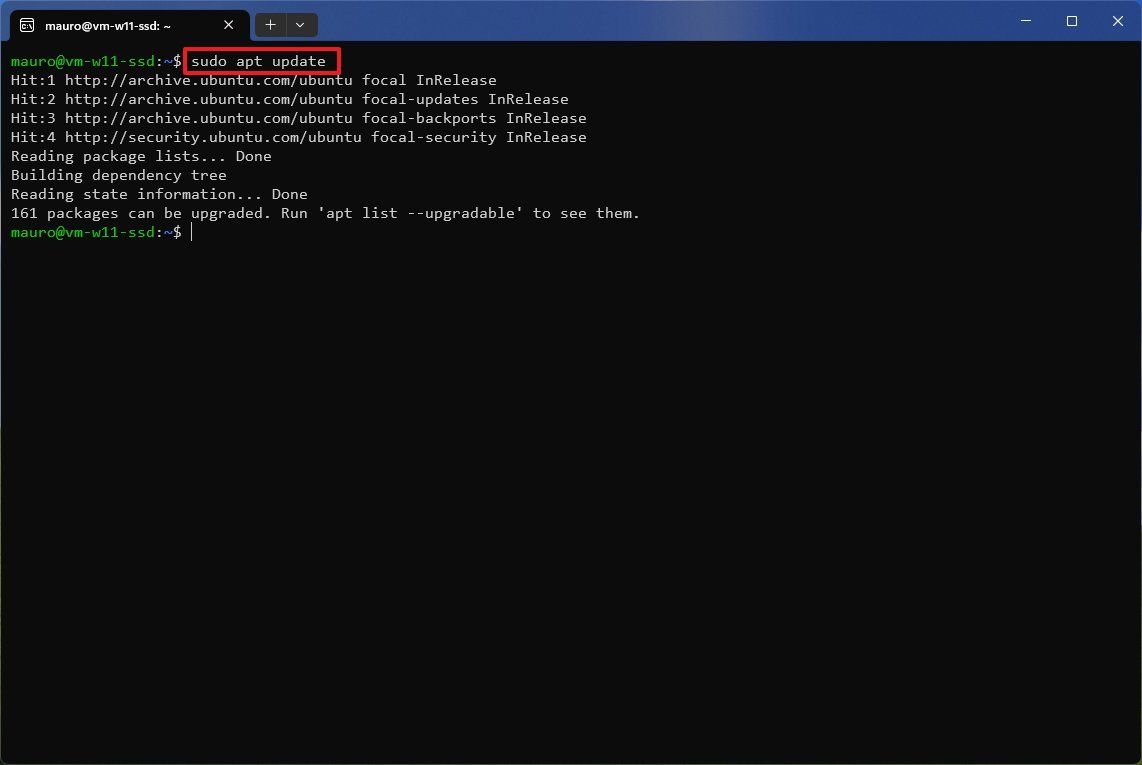
Finally, it’s always good practice to install the latest updates with the following commands, entering your password when prompted.
sudo apt update
Then
sudo apt full-upgrade
Press Y when prompted.
(Optional) Enable systemd
In September 2022, Microsoft announced support for systemd in WSL. This long-awaited upgrade to WSL unlocks a huge number of quality of life features for managing processes and services. This includes snapd support, which enables users to take advantage of all of the tools and apps available on snapcraft.io.
To enable systemd you will need make a small modification to /etc/wsl.conf in your Ubuntu distribution.
Run `sudo nano /etc/wsl.conf’ to open the file and insert the following lines:
[boot]
systemd=true
Then restart your distro by running wsl --shutdown in powershell and relaunching.
5. Install and use a GUI package
WSL2 comes with WSLg enabled by default. WSLg allows you to run graphical linux applications.
To check that you have the latest package lists, type:
sudo apt update
Then, start with some basic X11 applications:
sudo apt install x11-apps
To run the xeyes, a “follow the mouse” application, type:
xeyes &
The & at the end of the line will execute the command asynchronously. In other words, the shell will run the command in the background and return to the command prompt immediately.
The first launch of a GUI application takes a few seconds while WSL is initializing the graphics stack. Next executions of GUI applications are much faster.
Leave xeyes opened and run the calculator xcalc with:
xcalc
When you move the cursor over the calculator, xeyes follows the cursor. This shows that several GUI applications can interact together.
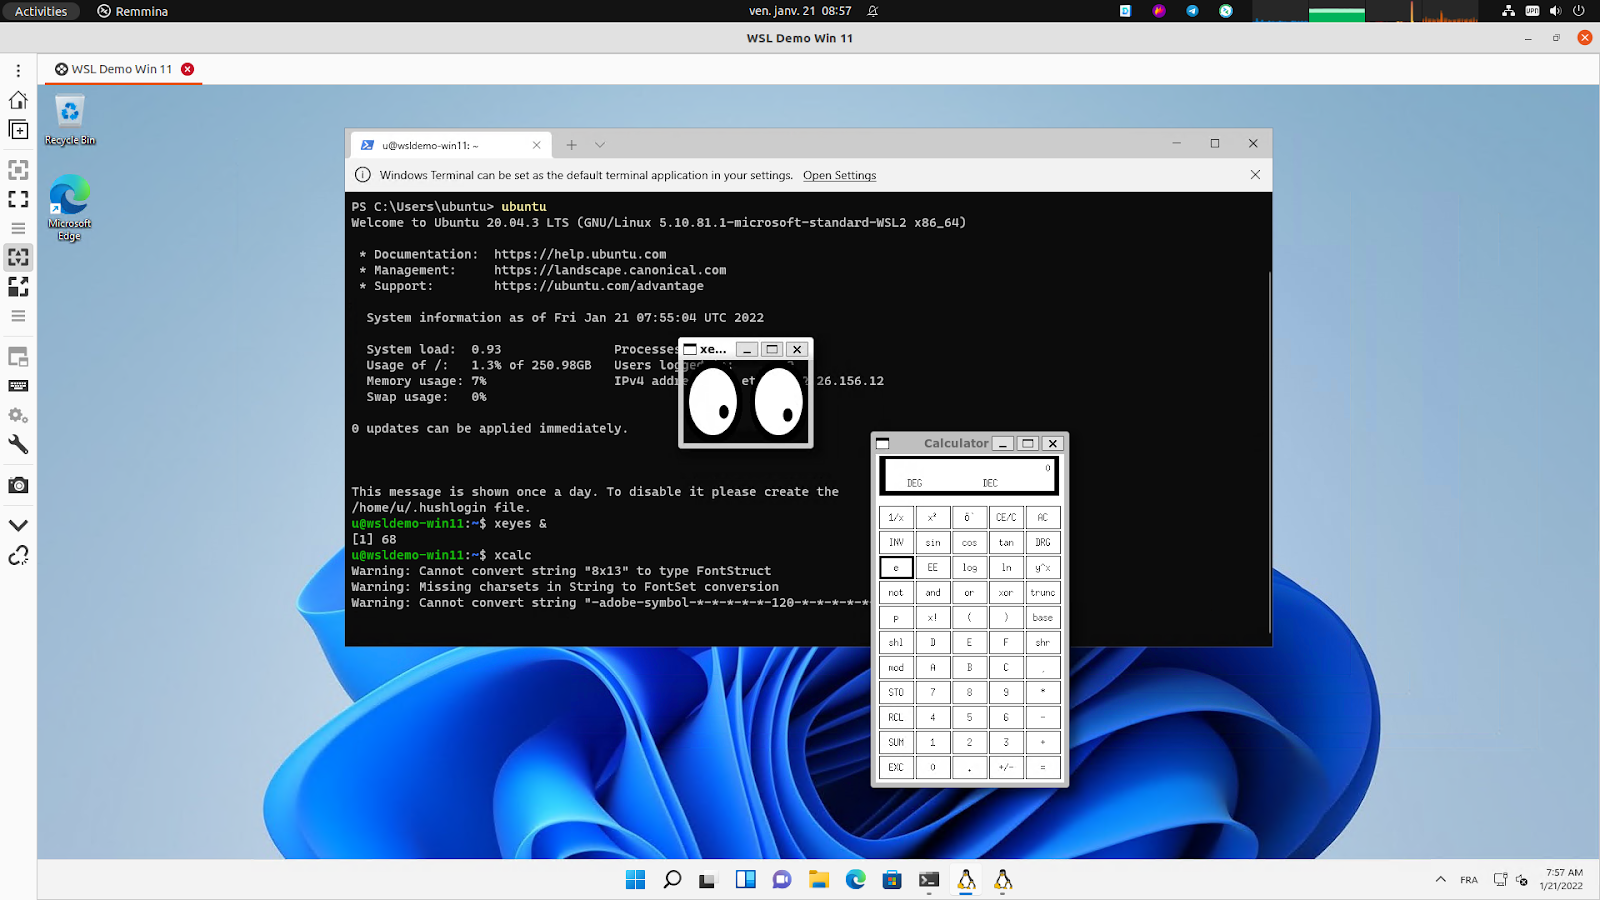
Note that applications running under WSLg display a little penguin at the bottom right corner of their icons in the Windows taskbar. That’s one way you can distinguish applications running on Windows or Ubuntu (besides the window decoration and styling).
![]()
Close xeyes and xcalc by pressing the cross icon on the top right corner of each X application window.
Xcalc and xeyes are very basic X Windows applications but there are plenty of choices in the Linux ecosystem corresponding to your needs and available out of the box on Ubuntu.
In the following example, we will use GNU Octave to perform numerical computation.
We will use it to calculate and draw a beautiful Julia fractal. The goal here is to use Octave to demonstrate how WSLg works, not to go through the theory of fractals.
First thing is to install the software like we did for x11-apps, from the terminal prompt run:
sudo apt install octave
Then start the application:
octave --gui &
Do not forget the ampersand & at the end of the line, so the application is started in the background and we can continue using the same terminal window.
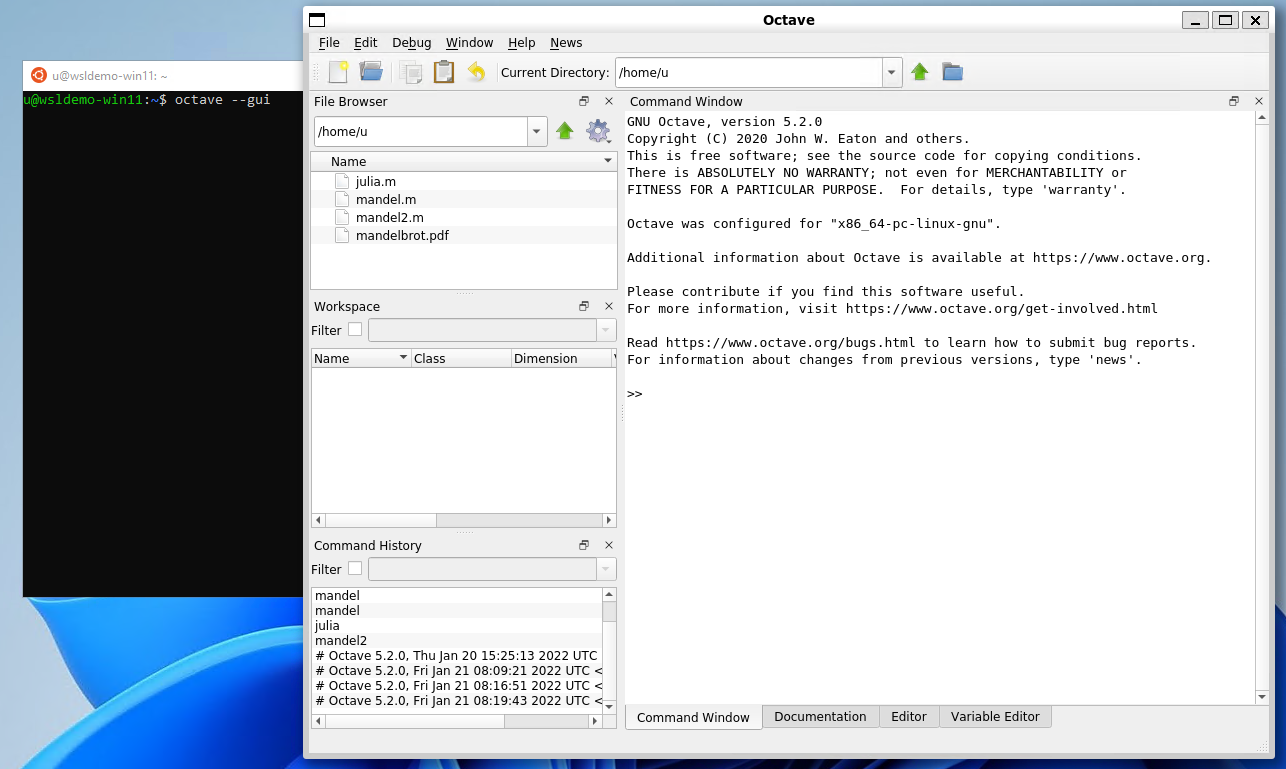
In Octave, click on the New script icon to open a new editor window and copy/paste the following code:
#{

Inspired by the work of Bruno Girin ([Geek Thoughts: Fractals with Octave: Classic Mandelbrot and Julia](http://brunogirin.blogspot.com/2008/12/fractals-with-octave-classic-mandelbrot.html))

Calculate a Julia set

zmin: Minimum value of c

zmax: Maximum value of c

hpx: Number of horizontal pixels

niter: Number of iterations

c: A complex number

#}

function M = julia(zmin, zmax, hpx, niter, c)

%% Number of vertical pixels

vpx=round(hpx*abs(imag(zmax-zmin)/real(zmax-zmin)));

%% Prepare the complex plane

[zRe,zIm]=meshgrid(linspace(real(zmin),real(zmax),hpx),

linspace(imag(zmin),imag(zmax),vpx));

z=zRe+i*zIm;

M=zeros(vpx,hpx);

%% Generate Julia

for s=1:niter

mask=abs(z)<2;

M(mask)=M(mask)+1;

z(mask)=z(mask).^2+c;

end

M(mask)=0;

end
This code is the function that will calculate the Julia set.
Save it to a file named julia.m. Since it is a function definition, the name of the file must match the name of the function.
Open a second editor window with the New Script button and copy and paste the following code:
Jc1=julia(-1.6+1.2i, 1.6-1.2i, 640, 128, -0.75+0.2i);

imagesc(Jc1)

axis off

colormap('default');
This code calls the function defined in julia.m. You can later change the parameters if you want to explore the Julia fractal.
Save it to a file named juliatest.m.
And finally, press the button Save File and Run.

After a few seconds, depending on your hardware and the parameters, a Julia fractal is displayed.

Like Octave, this window is displayed using WSLg completely transparently to the user.
Enjoy!
6. Enjoy Ubuntu on WSL!
That’s it! In this tutorial, we’ve shown you how to install WSL and Ubuntu on Windows 11, set up your profile, install a few packages, and run a graphical application.
We hope you enjoy working with Ubuntu inside WSL. Don’t forget to check out our blog for the latest news on all things Ubuntu.
Further Reading
- Enabling GPU acceleration on Ubuntu on WSL2 with the NVIDIA CUDA Platform
- Setting up WSL for Data Science
- Working with Visual Studio Code on Ubuntu on WSL2
- Microsoft WSL Documentation
- Whitepaper: Ubuntu WSL for Data Scientists
- WSL on Ubuntu Wiki
- Ask Ubuntu
Was this tutorial useful?
Thank you for your feedback.
Ubuntu is one of the most popular Linux distributions and is widely used for various purposes like web development, data analysis, and machine learning. If you are a Windows 11 user and want to install Ubuntu, you can easily do so using the Windows Subsystem for Linux (WSL). In this article, we will guide you through the step-by-step process of installing Ubuntu on Windows 11.
Prerequisites
Before we begin, make sure that your system meets the following requirements:
- A 64-bit version of Windows 11
- An active internet connection
- At least 4GB of RAM
- 15GB of free storage
Enable Windows Subsystem for Linux
The first step is to enable the Windows Subsystem for Linux feature on your Windows 11 system. To do this, follow these steps:
-
Open the Start menu and search for «Windows features».
-
Select «Turn Windows features on or off» from the search results.
-
Scroll down and locate «Windows Subsystem for Linux».
-
Check the box next to it and click «OK».
-
Restart your computer when prompted.
Install Ubuntu on Windows 11
Once you have enabled the Windows Subsystem for Linux feature, you can install Ubuntu on your Windows 11 system by following these steps:
-
Open the Microsoft Store and search for «Ubuntu».
-
Select «Ubuntu» from the search results and click «Get».
-
Once the installation is complete, launch Ubuntu from the Start menu.
-
The first time you launch Ubuntu, it will take some time to set up. Wait for the installation to complete.
-
After the installation is complete, you will be prompted to create a new user account and password. Follow the on-screen instructions to complete the setup.
Congratulations! You have successfully installed Ubuntu on your Windows 11 system.
Using Ubuntu on Windows 11
Now that you have installed Ubuntu on your Windows 11 system, you can use it to run Linux commands and applications. To launch Ubuntu, simply open the Start menu and select «Ubuntu».
You can also use the Windows Terminal to launch Ubuntu. To do this, follow these steps:
-
Open the Start menu and search for «Windows Terminal».
-
Select «Windows Terminal» from the search results.
-
In the Windows Terminal, click on the down arrow next to the «+» sign and select «Ubuntu».
-
Ubuntu will launch in a new tab in the Windows Terminal.
In this article, we have shown you how to install Ubuntu on Windows 11 using the Windows Subsystem for Linux. With Ubuntu installed, you can run Linux commands and applications on your Windows 11 system. We hope this guide was helpful to you. If you have any questions or comments, please feel free to leave them below.
Related Searches and Questions asked:
That’s it for this post. Keep practicing and have fun. Leave your comments if any.

(Image credit: Future)
On Windows 11 version 22H2 or 21H2, if you are a developer, network administrator, or advanced user who needs to use Linux tools, you don’t need a second computer since the system offers different solutions to run Linux alongside Windows, including the Windows Subsystem for Linux and Hyper-V.
The Windows Subsystem for Linux is a collection of components and integrations that allows you to install various distributions of Linux (such as Ubuntu, Kali, Debian, etc.) without the desktop experience and the overhead of a virtual machine. Using this platform, you can run command-line and GUI tools as well as interact with Windows components from the Linux shell.
If you prefer to have access to the desktop experience that Linux has to offer or want a more traditional experience, you can create and install any distribution on a virtual machine using the Microsoft Hyper-V technology. This solution provides the ability to create a virtual machine with custom settings to install and run Linux alongside Windows 11.
This guide will walk you through two approaches to setting up and running Linux distributions alongside Windows 11.
How to run Linux with WSL on Windows 11
To install a Linux distro (such as Ubuntu) on Windows 11, use these steps:
- Open Start.
- Search for Command Prompt, right-click the top result, and select the Run as administrator option.
- Type the following command to install WSL and Ubuntu Linux on Windows 11 and press Enter: wsl —install

- (Optional) Type the following command to install WSL with a specific distro and press Enter: wsl —install -d DISTRO-NAME
- Quick tip: You can use the wsl —list —online command to view the available distros.
- Restart the computer.
- Create an account and password for the Linux installation prompt after the computer reboots.
Once you complete the steps, you can start the Linux terminal to run commands, scripts, and different tools.
Install GUI apps
The Windows Subsystem for Linux install command also adds the components to run graphical apps, which means you can install your favorite GUI apps.
To install graphical apps in the WSL version of Linux, use these steps:
- Open Start.
- Search for Ubuntu (or the distro you installed) and click the top result to spin the distro.
- Type the following command to download the package information and press Enter: sudo apt update
- Type the following command to install an app and press Enter: sudo apt install APP-NAME
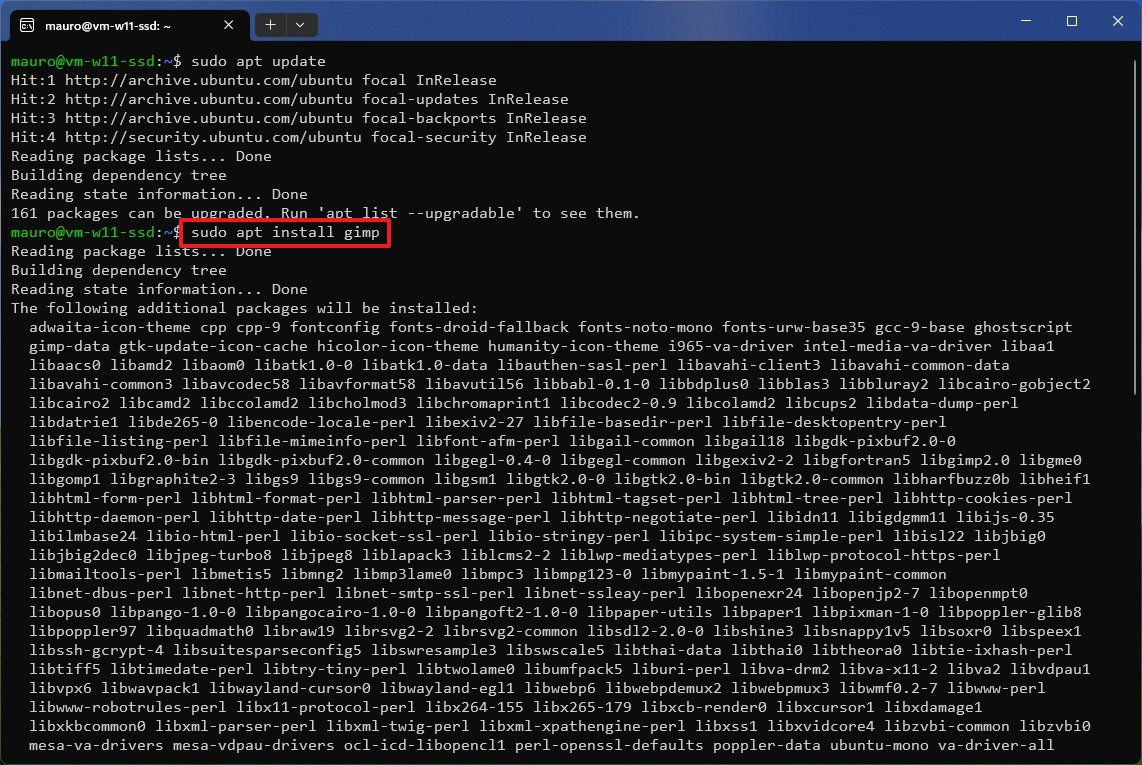
In the command, change the APP-NAME for the name of the app you want to install. For example, this command installs the GIMP app: sudo apt install gimp
After you complete the steps, the application will register in the system, making it available through the Start menu and the «Installed apps» page to uninstall.
How to run Linux with VM on Windows 11
If you prefer to use a more traditional virtual machine experience with access to the Linux desktop interface, you will need to enable the Hyper-V Manager app, create a virtual machine, and install the distro you want.
Enable Hyper-V on Windows 11
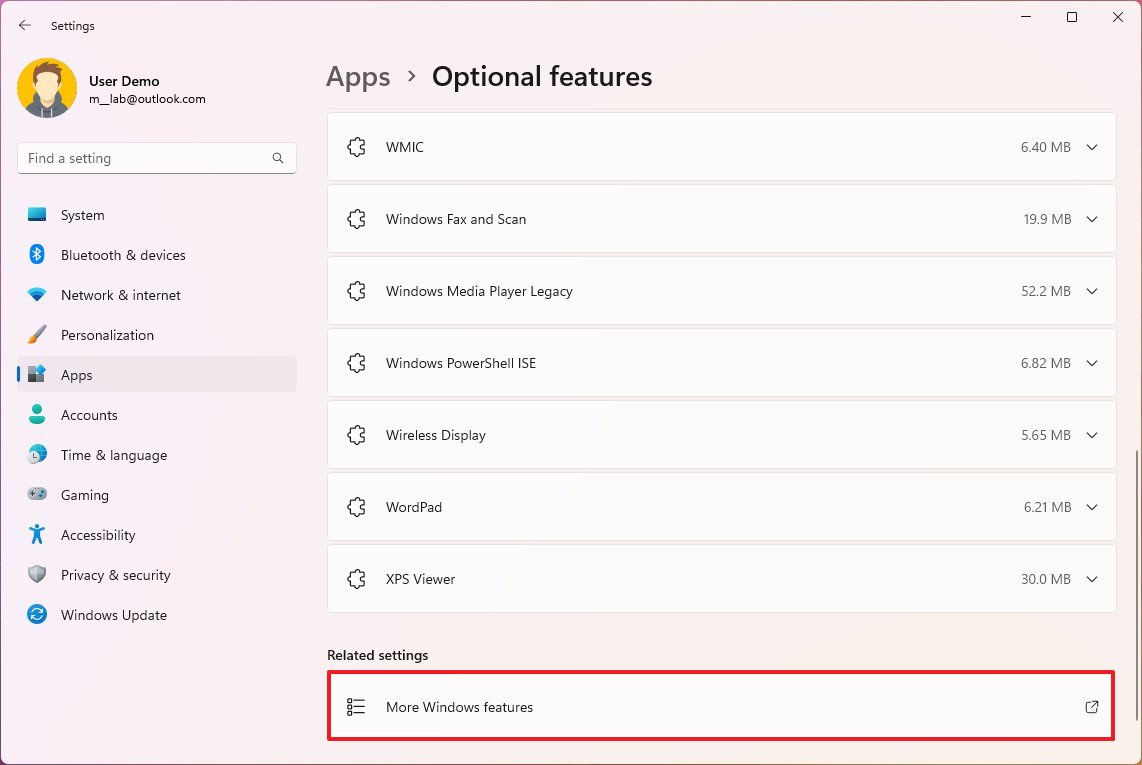
To enable Hyper-V on Windows 11, use these steps:
- Open Settings.
- Click on Apps.
- Click the Optional features page on the right side.
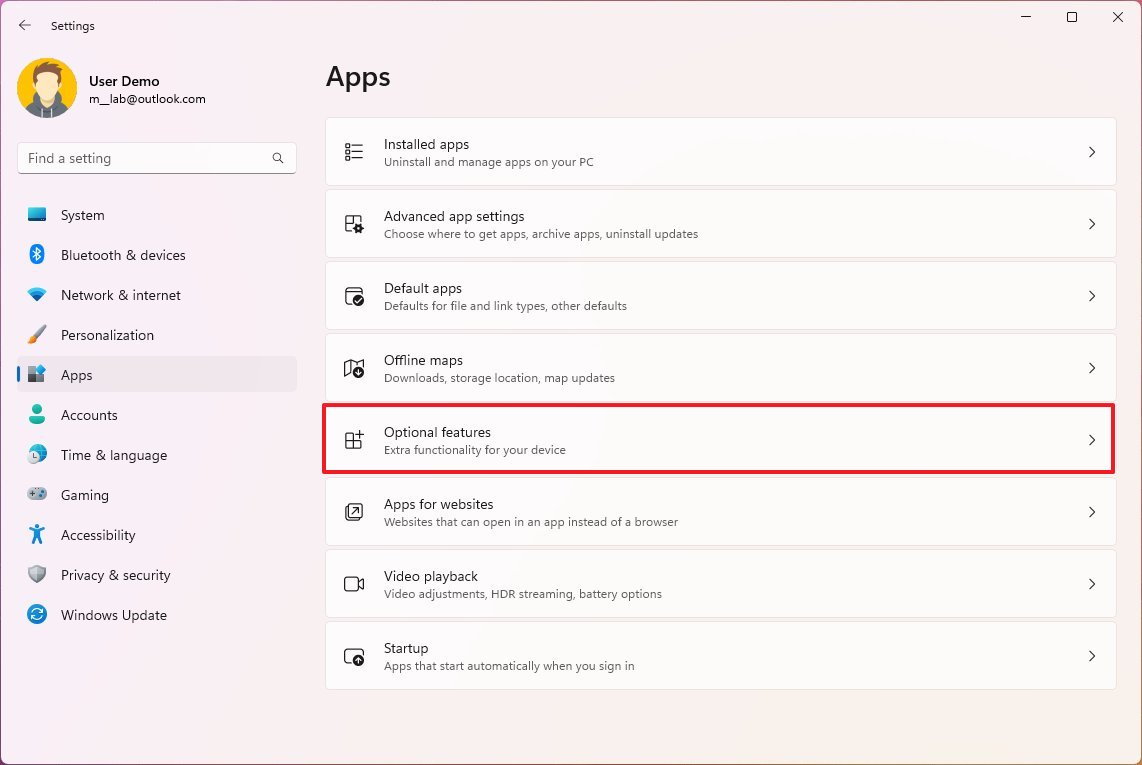
- Under the «Related settings» section, click the «More Windows features» setting.
- Check the Hyper-V option.
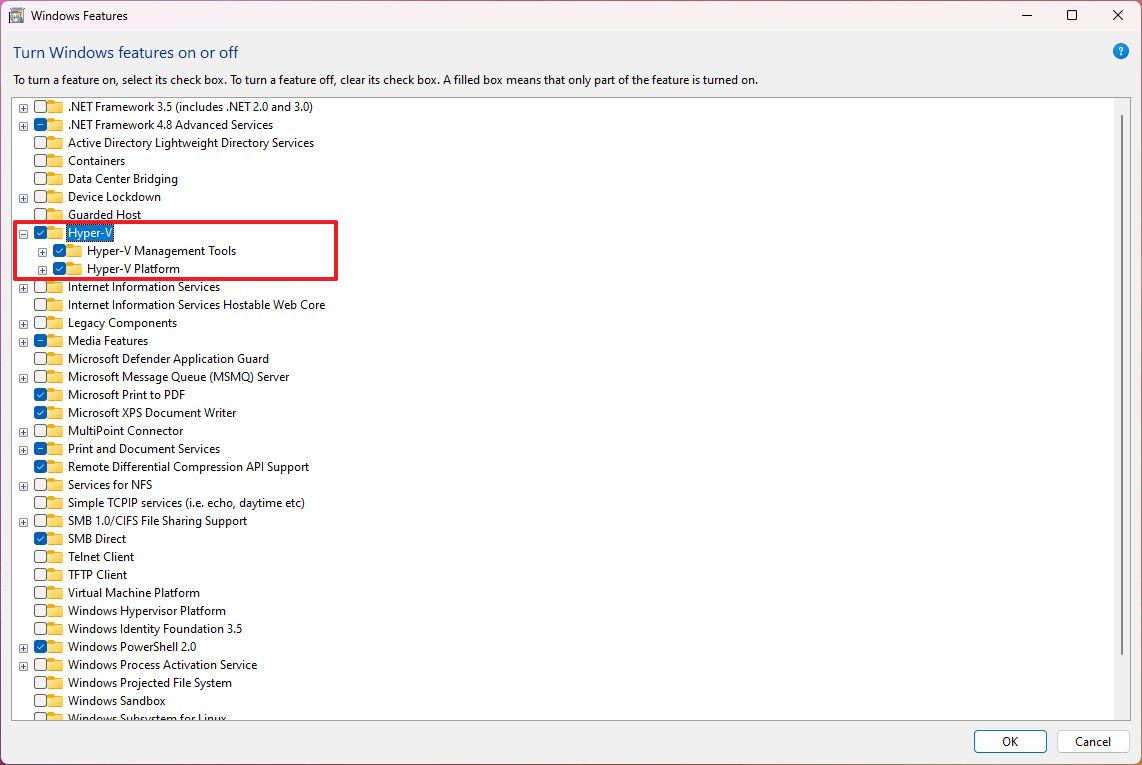
- Click the OK button.
- Click the Restart now button.
Once you complete the steps, you can proceed to create a virtual machine.
Create Linux virtual machine (quickly)
On Windows 11, you have two ways to create a virtual machine. You can use the quick method that downloads one of the available versions of Ubuntu and sets up the virtual machine automatically. Or you can create a VM manually that allows you to install any Linux distribution.
To use the «Quick Create» feature on Hyper-V to set up a Linux virtual machine, use these steps:
- Open Start.
- Search for Hyper-V and select the top result to open the app.
- Click on Actions from the top navigation and select the Quick Create option.
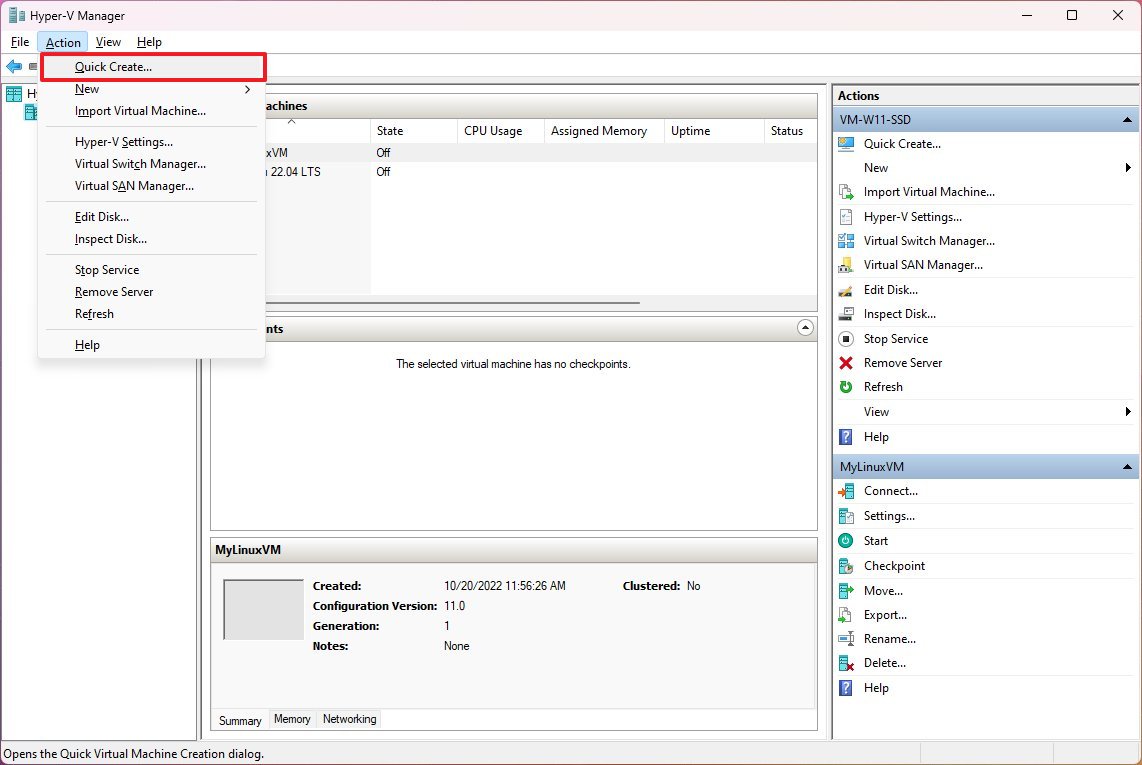
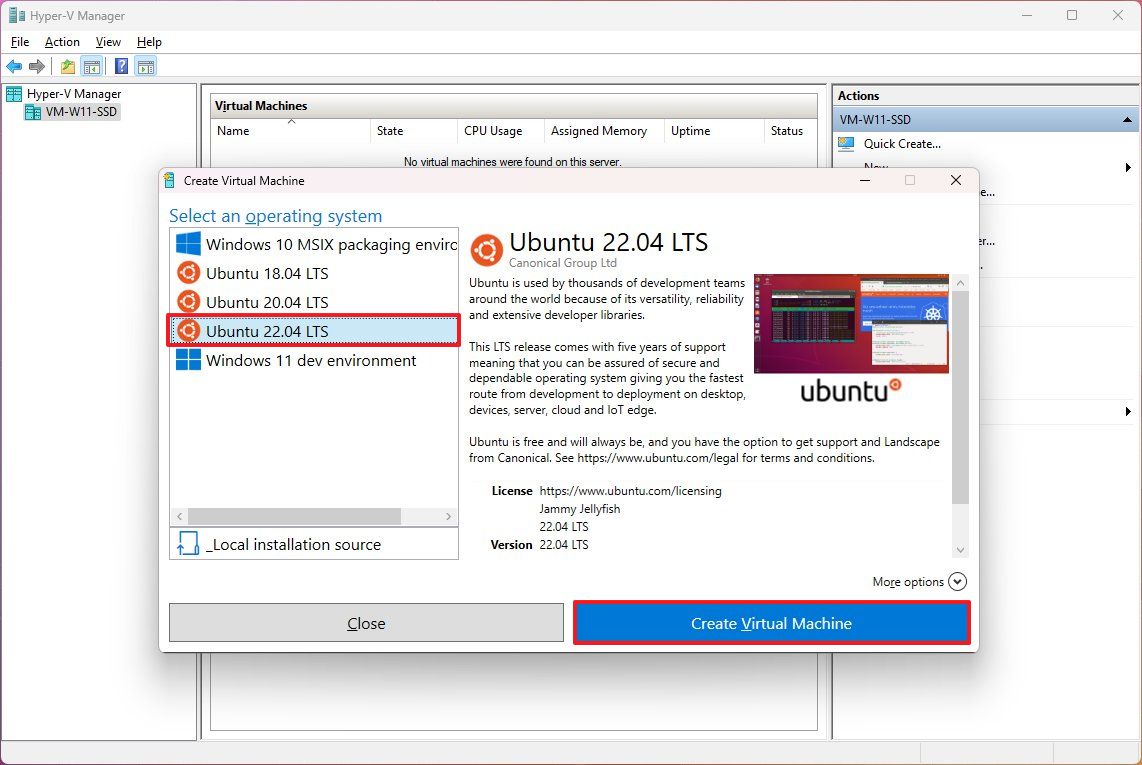
- Select the version of Ubuntu to install on Windows 11.
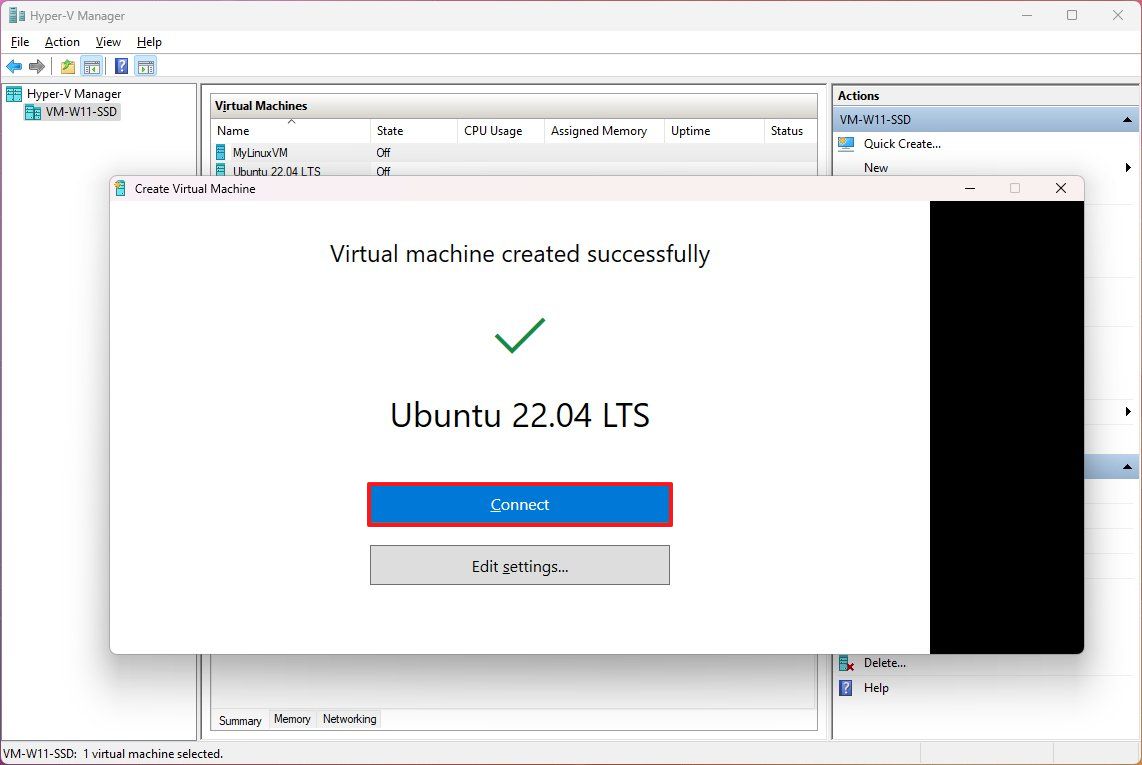
- Click the «Create Virtual Machine» button.
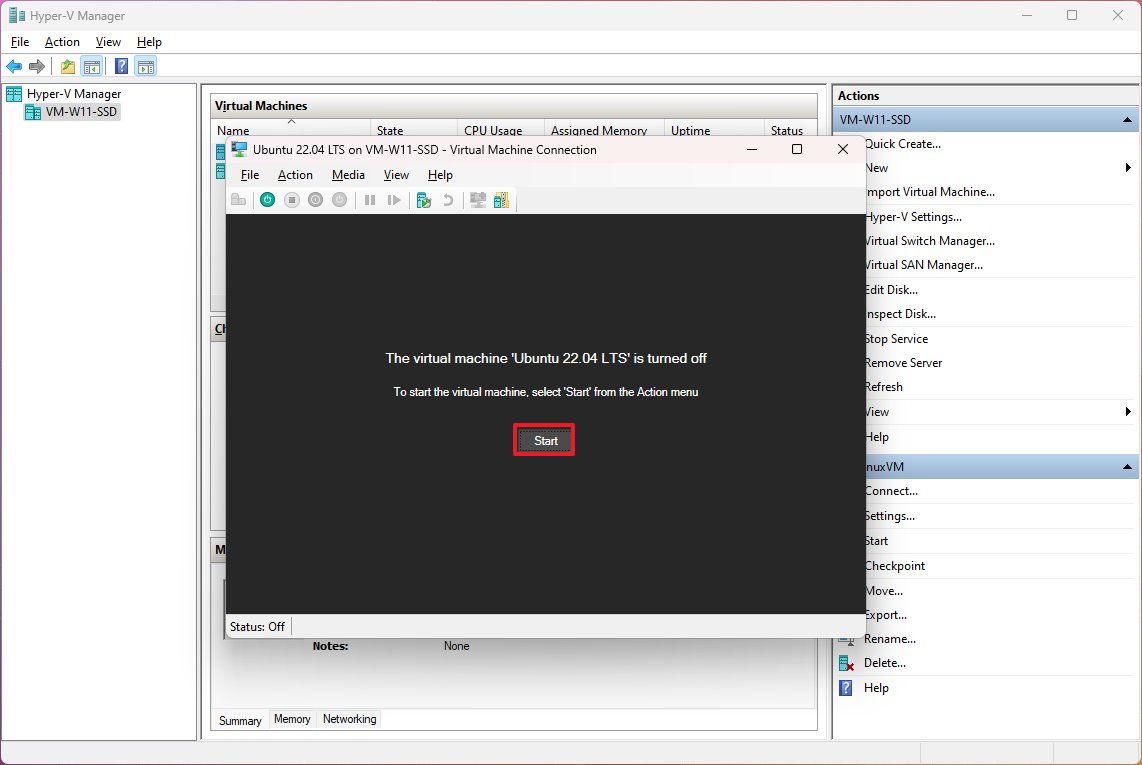
- Click the Connect button.
- Click the Start button.
- Select your language.
- Click the Continue button.
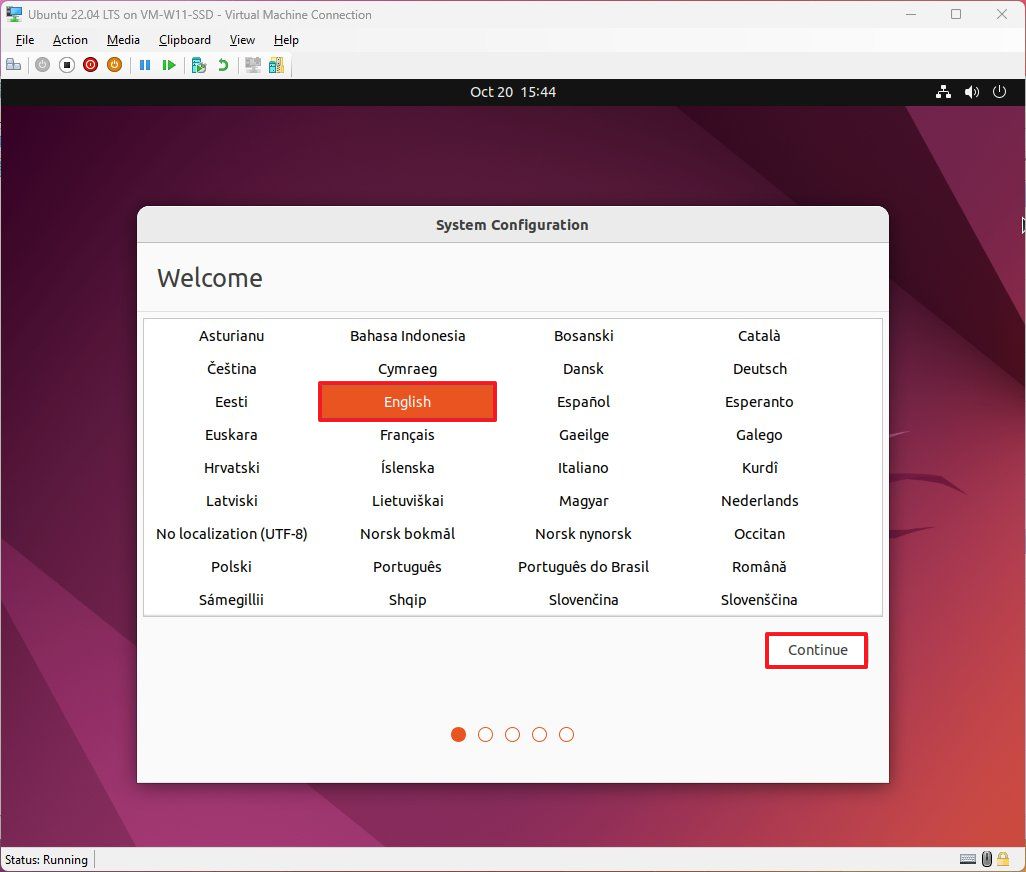
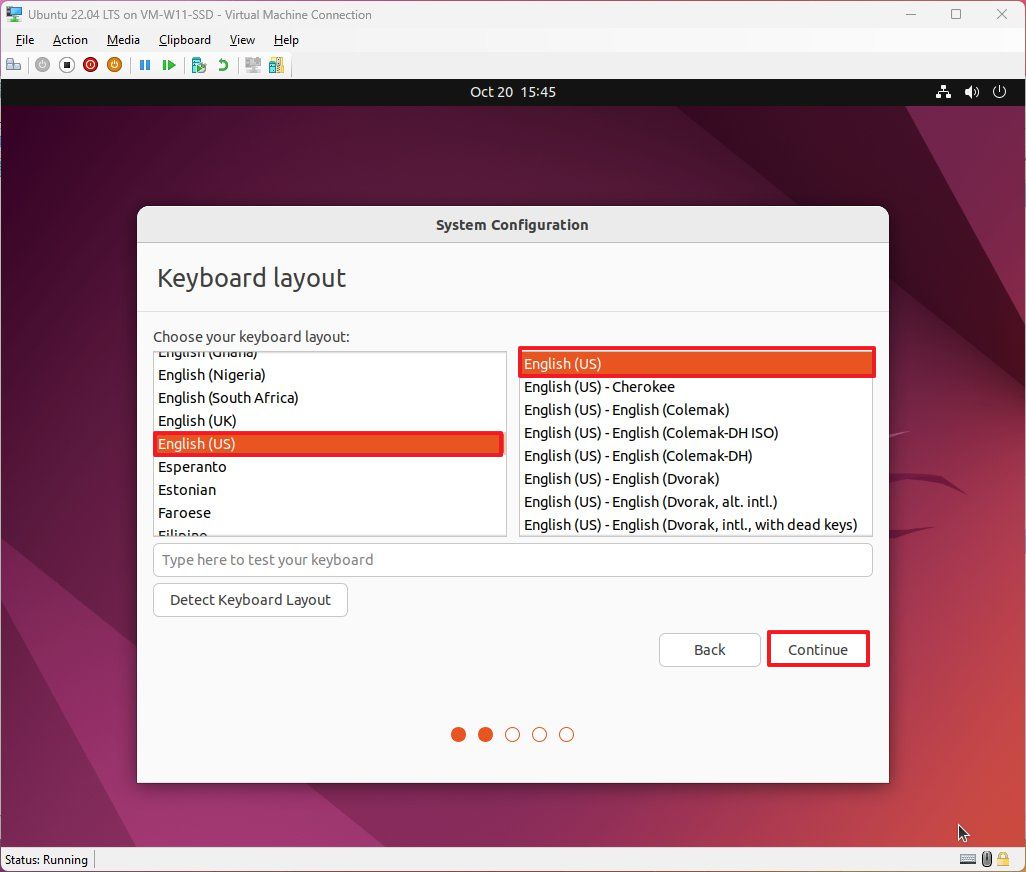
- Select the keyboard layout.
- Click the Continue button.
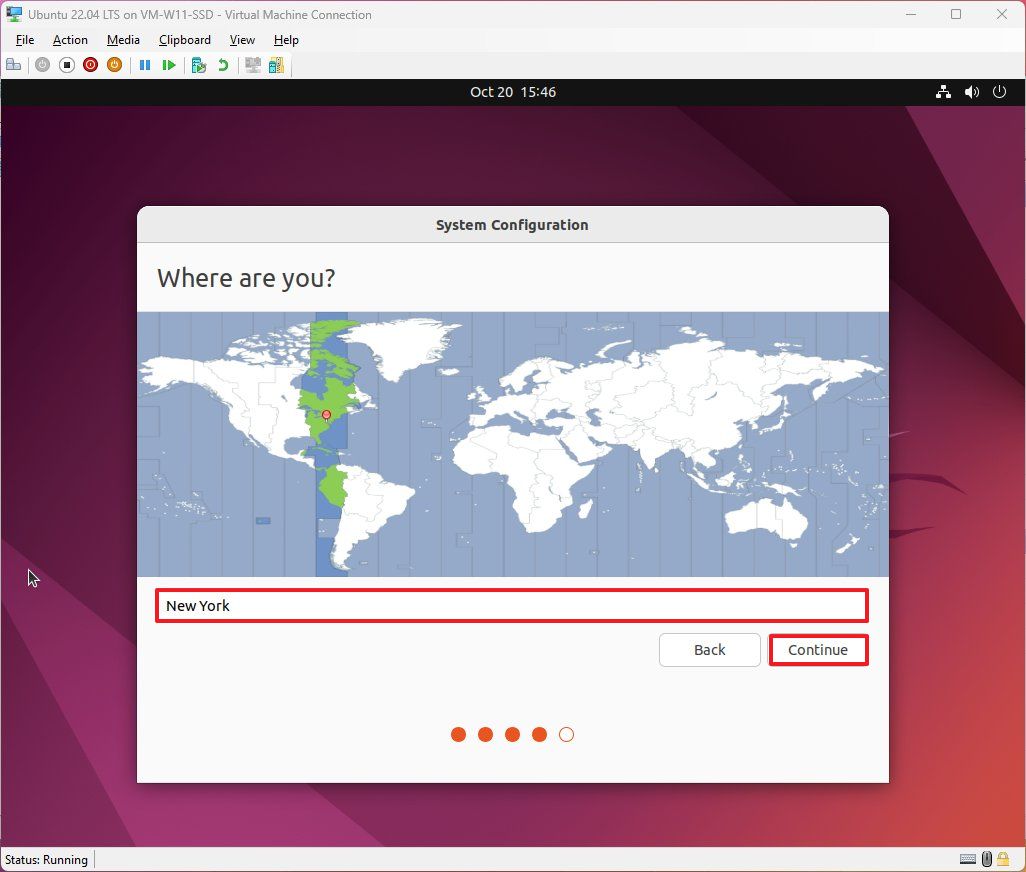
- Select your location.
- Click the Continue button.
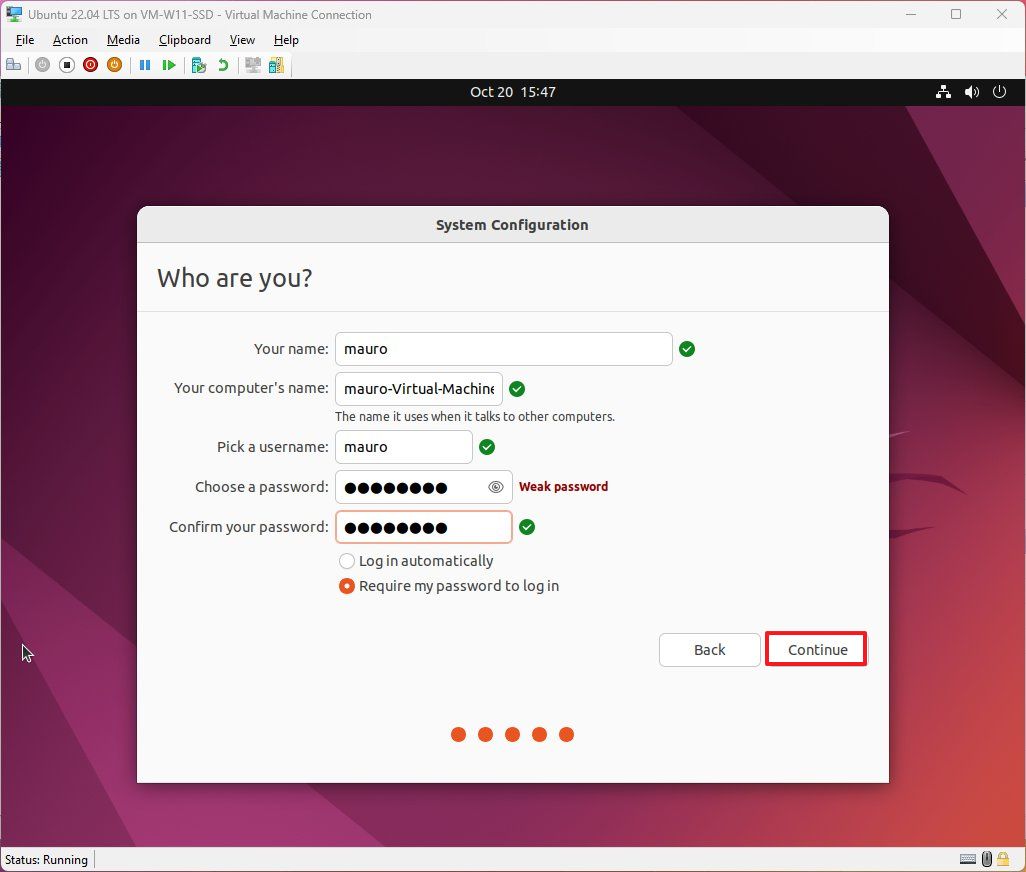
- Create a user account and password.
- Click the Continue button.
After you complete the steps, you can start using Ubuntu Linux alongside Windows 11 with a graphical desktop experience.
Create Linux virtual machine (manually)
Alternatively, you can create a virtual machine manually using the ISO file of your favorite Linux distribution.
To create a Linux Hyper-V VM on Windows 11, use these steps:
- Open Start.
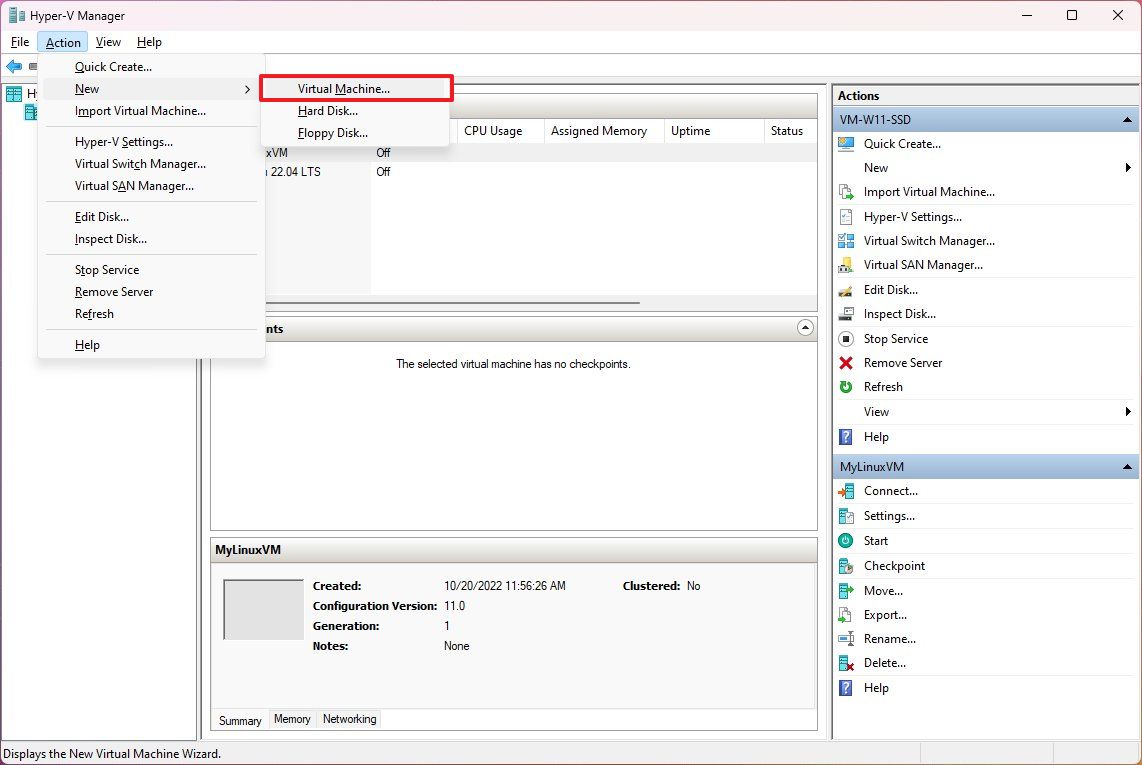
- Search for Hyper-V and select the top result to open the app.
- Click on Actions from the top navigation, select New and choose the Virtual Machine option.
- Confirm a name for the machine.
- (Optional) Check the «Store the virtual machine in a different location» option and specify the location to store the Linux machine.
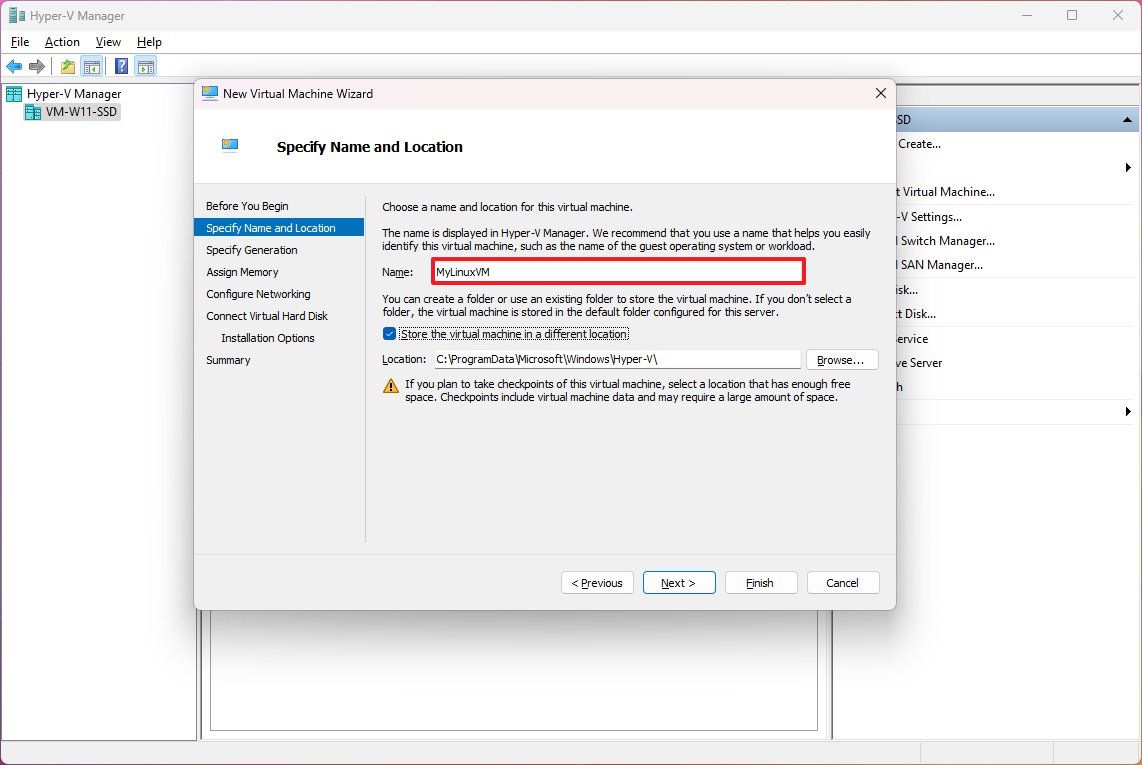
- Click the Next button.
- Select the Generation 1 option.
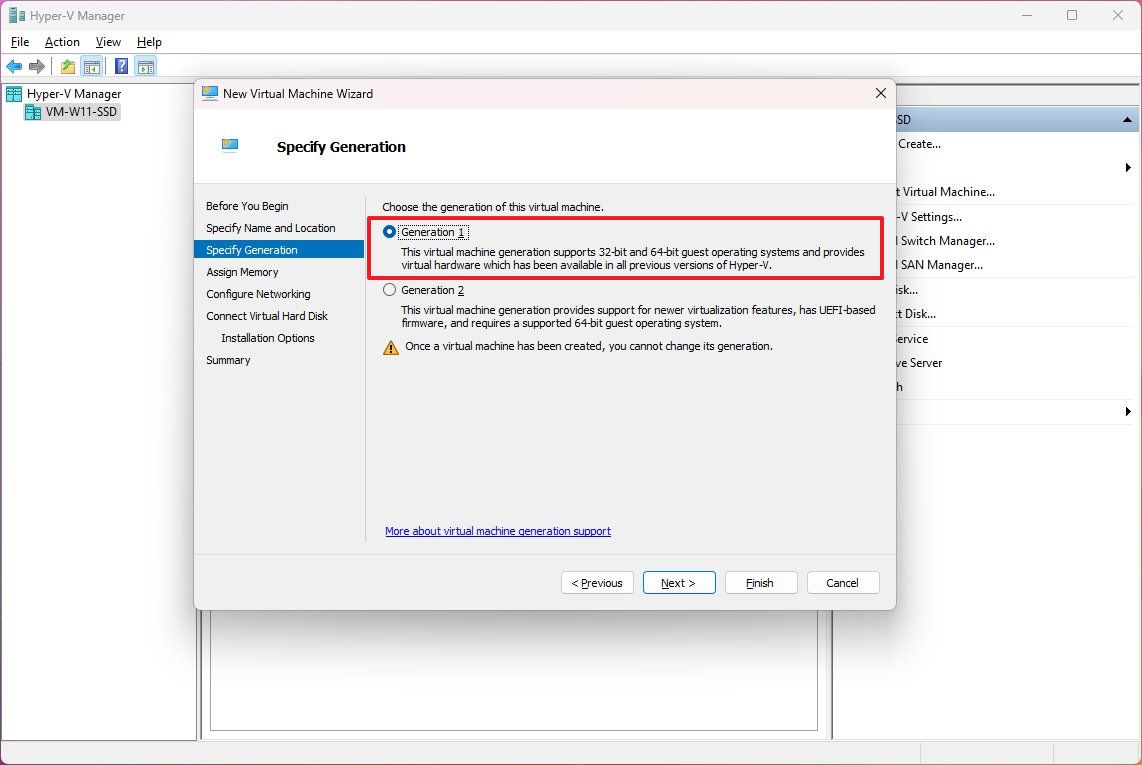
- Quick note: This option will depend on the operating system you want to install. You can check this Microsoft documentation website to help you make a choice. Usually, the «Generation 1» option would be your best option when using Linux.
- Click the Next button.
- Specify the amount of memory to reserve for the virtual machine.
- Check the «Use Dynamic Memory for this virtual machine» option.
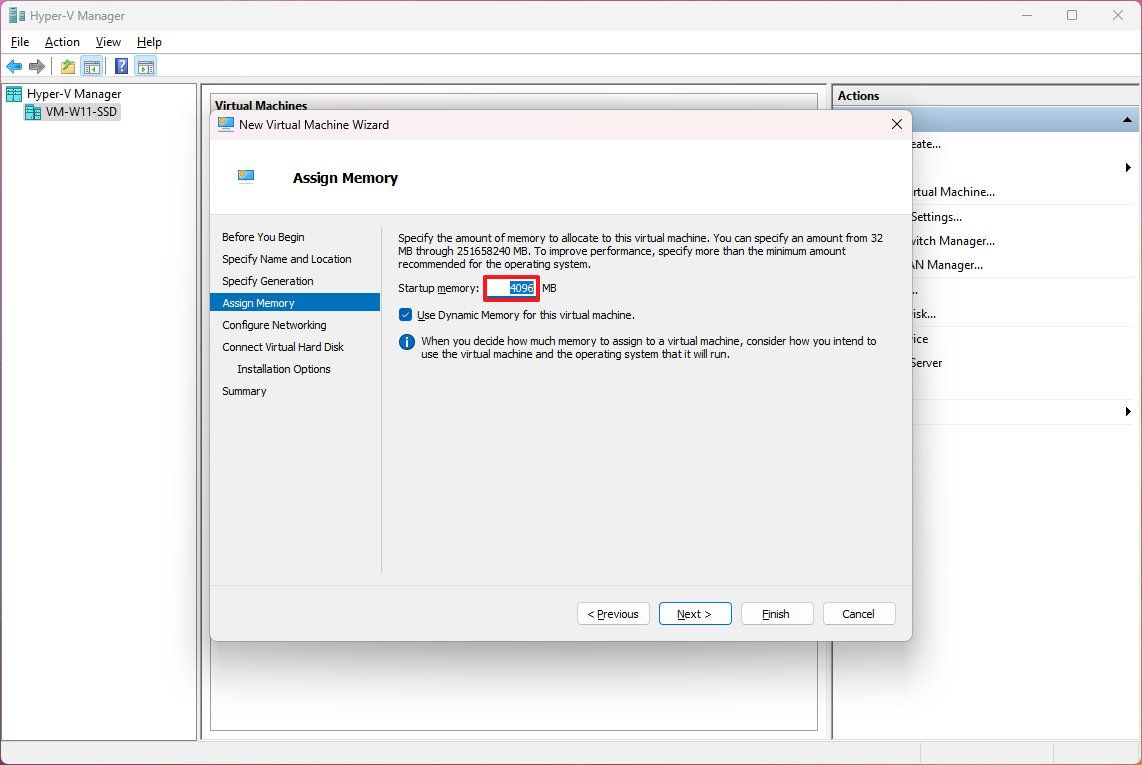
- Click the Next button.
- Select the Default Switch for the «Connection» setting.
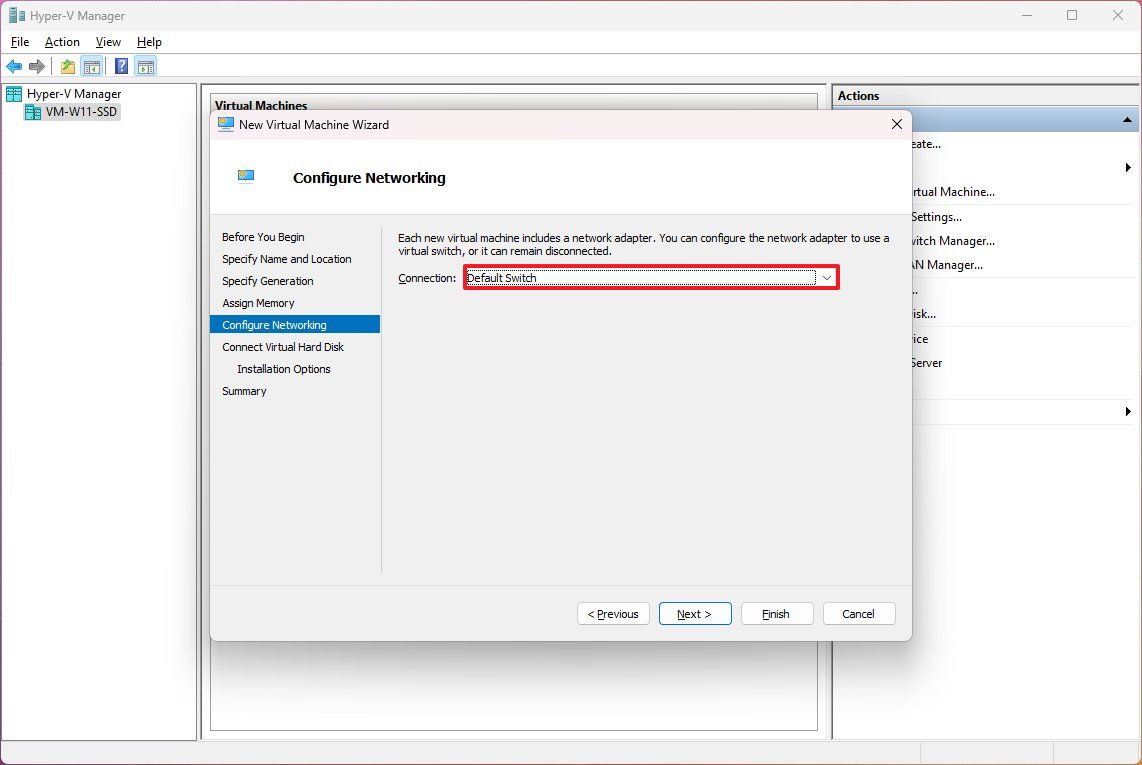
- Click the Next button.
- Select the «Create a virtual hard disk» option.
- Specify a name for the virtual drive.
- Specify the size of the virtual drive to install the Linux distro.
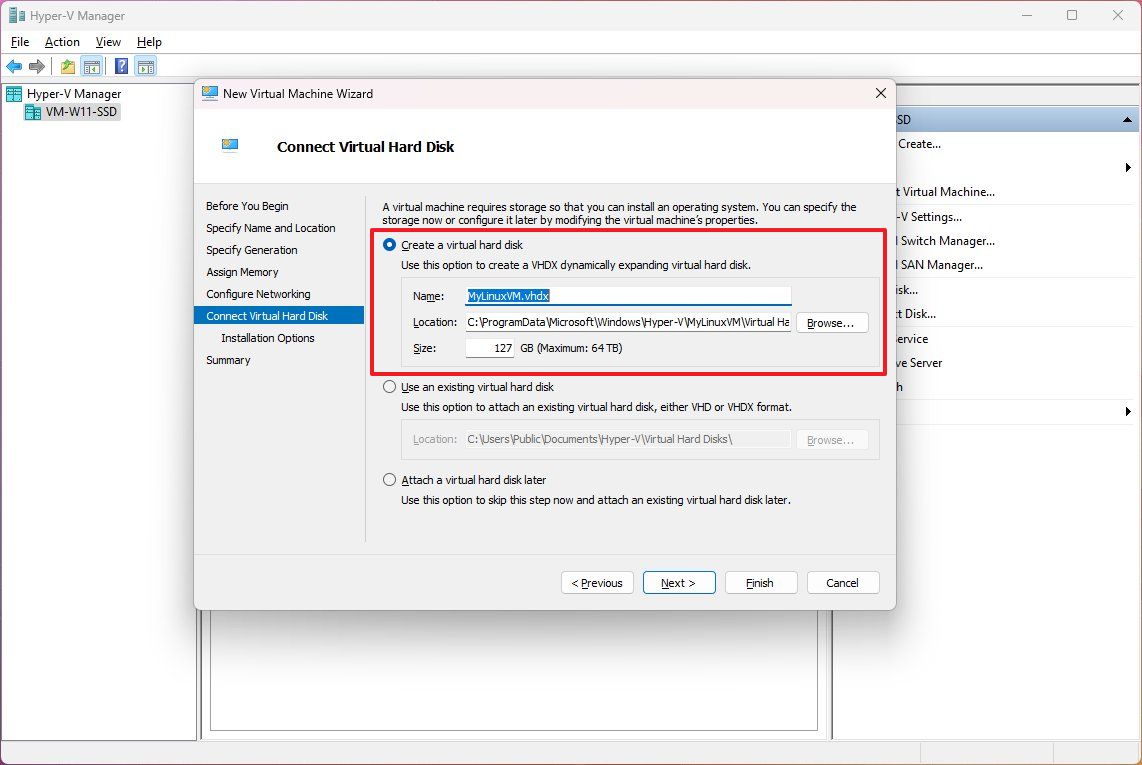
- Click the Next button.
- Select the «Install an operating system from a bootable image file» option.
- Click the Browse button.
- Select the Linux distro ISO file.
- Click the Open button.
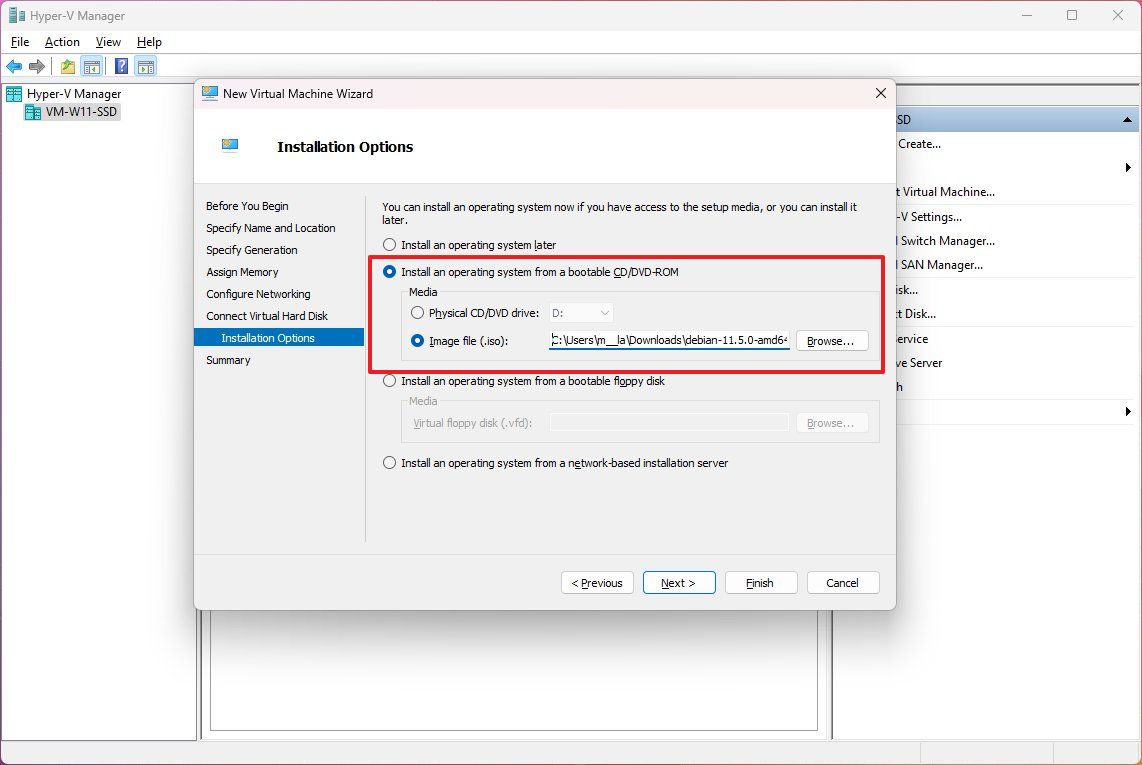
- Click the Next button.
- Click the Finish button.
- Select the virtual machine from Hyper-V Manager and click the Start button.
- Click the Connect button.
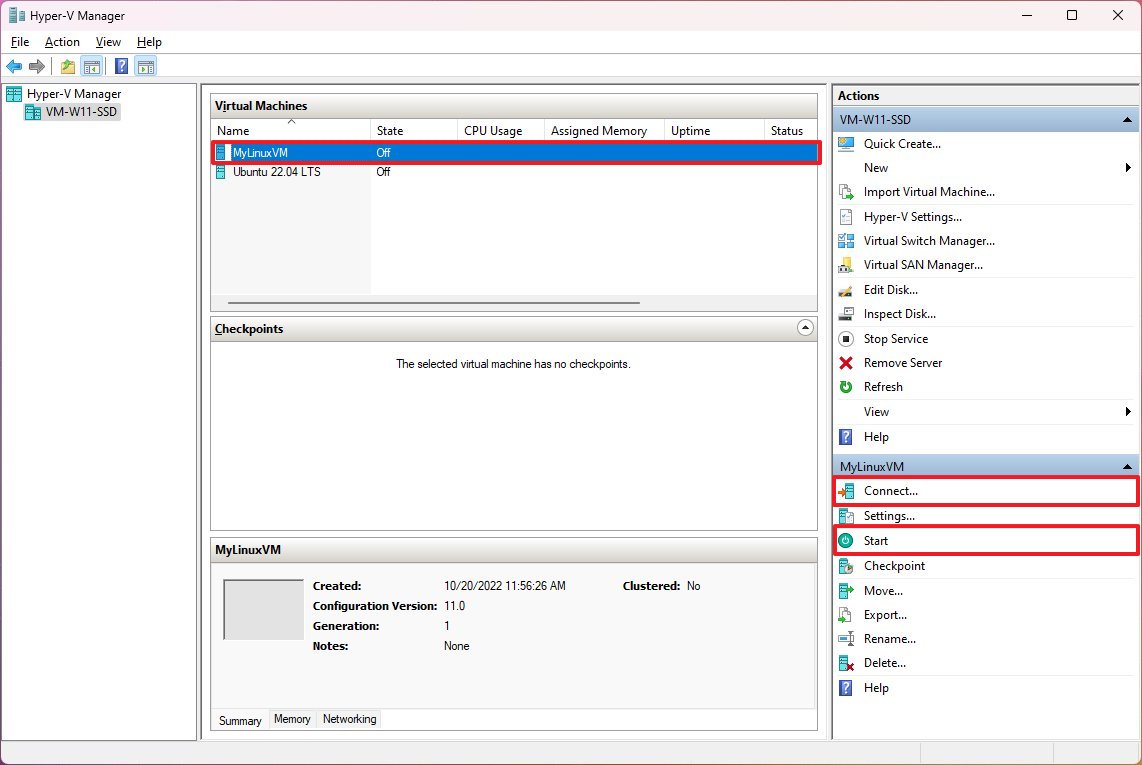
- Continue with the on-screen directions to install the Linux distro.
Once you complete the steps, the distribution of Linux will install on the virtual machine with a graphical or command experience, depending on the distro you installed.
Whether you choose to use the Windows Subsystem for Linux or Microsoft Hyper-V virtual machine, you can install and run as many distros as the hardware on your computer allows.
More resources
For more helpful articles, coverage, and answers to common questions about Windows 10 and Windows 11, visit the following resources:
- Windows 11 on Windows Central — All you need to know
- Windows 10 on Windows Central — All you need to know
All the latest news, reviews, and guides for Windows and Xbox diehards.
Mauro Huculak is technical writer for WindowsCentral.com. His primary focus is to write comprehensive how-tos to help users get the most out of Windows 10 and its many related technologies. He has an IT background with professional certifications from Microsoft, Cisco, and CompTIA, and he’s a recognized member of the Microsoft MVP community.
Tutorial To Install Ubuntu 22.04 Alongside With Windows 11 In Dual Boot
This post helps you to install Ubuntu 22.04 LTS in dual boot with Windows 11. Windows 11 is the latest Windows operating system from Microsoft. Ubuntu 22.04 is going to be made available in 2022. Ubuntu 22.04 LTS ‘Jammy Jellyfish’, will be made available on April 21, 2022. Ubuntu 22.04 LTS is the Long Term Support.
Ubuntu 22.04 Release Timeline
- Oct 2021: Development Started
- February 24, 2022: Feature freeze
- March 31, 2022: Beta release
- April 14, 2022: Final freeze and release of candidate version
- April 21, 2022: Final release
- April 2027: End of Life
How To Install Ubuntu 22.04 LTS Along With Windows 11
First, you need to download Ubuntu 22.04 LTS ISO from the official website of Ubuntu.
Download Ubuntu 22.04 LTS ISO
Now Create a Live USB With Ubuntu 20.04 LTS
After downloading Ubuntu 22.04 LTS ISO, use your favorite tool to create a bootable USB drive with Ubuntu 22.04 LTS.
Prepare the Windows Operating System For Dual-Boot
In this step, you need to create unallocated space for Ubuntu installation. You should have enough space for the Ubuntu as you also need to have space for your files to get stored except on the Windows partition. If you don’t have any unallocated space in your system. You can delete one of your available partitions and create enough available space for Ubuntu. We suggest you have 100 GB of unallocated space for the Ubuntu installation. Meanwhile, Ubuntu 22.04 requires 25GB of disk space for installation.
Now, you need to boot your system from Ubuntu 22.04 LTS bootable USB drive.
Boot from USB Drive.
You might need to access your BIOS setting to change the boot sequence on BIOS/UEFI to boot a system from DVD/USB. If you are booting in the UEFI system then select Ubuntu from the GRUB menu and then press Enter.
After a while, you will see a welcome screen where you will get the option of installing Ubuntu or trying it. Click on the Install Ubuntu button and you will see the next windows where you can select the keyboard setting. Choose the Keyboard and then click Continue to proceed further.
Now, you will see the screen from where you can choose the type of installation. You can go either with Minimal Installation or Normal installation. You can have also the option of installing system updates and third-party software during OS installation.
Now you will see the most important part of the Ubuntu installation alongside Windows 11 and this one is Disk selection or disk partitioning. If you are in UEFI System you will see the following three options:
- Install Ubuntu alongside Windows Boot Manager
- Erase the disk and install Ubuntu
- Something else
If you are in the Legacy system, then you will see something like this:
- Install Ubuntu Alongside Windows 10
- Erase the disk and install Ubuntu
- Something else
In either case, go with the something else option. Here you can create partitions manually with the size you want. We will create the following partition in the unallocated space:
- /boot – 10GB (Optional for legacy bios system )
- /home – 30GB
- swap – 8GB
- / – Remaining space in your unallocated partition.
When finished, hit the Install Now button in order to apply changes to the disk and start the installation process of Ubuntu 20.04 LTS alongside Windows 11.
On the next screen select your physical location from the map and then click Continue to move ahead.
Now, On the next screen, you need to configure your username and password for your administrative sudo account and Continue to finalize the complete installation of the Ubuntu 22.04 LTS alongside Windows 11. It might take up to 30 minutes to complete. Once Ubuntu 22.04 LTS installation is complete, click Restart Now to reboot the machine. After rebooting your system, you will see the Grub menu, where you will see both Ubuntu 22.04 LTS and Microsoft Windows 11. From here, you can select the operating system of your choice and use it.
Installing WSL Ubuntu 22.04 on Windows 11
1. Enable Windows Subsystem for Linux and Virtual Machine platform
Go to Control Panel -> Programs -> Programs and Features -> Turn Windows features on or off

2. Switch to WSL 2
Open Powershell and type in the below command.
wsl —set-default-version 2
3. Install Ubuntu
Open Microsoft Store and search for Ubuntu. Select the version you intend to install. I’d use the latest LTS version Ubuntu 22.04. Click on the Get button.

It will take a couple of minutes to download and install.
4. Open up the installed Ubuntu version that was installed.

If you get an error like the below image, make sure to install the WSL2 Kernel update.

If it’s an older Ubuntu version the error message would be something like the image below.

Error: WSL 2 requires an update to its kernel component.
Installing the WSL2 kernel update should fix this issue. Then close the Ubuntu window and open it up again.
It will ask for the Language, username, and password like below.


In the mount settings, you can leave the defaults.

It will take a minute or two to apply the changes.

Hit enter to reboot Ubuntu WSL.

Now, we have installed the WSL 2.
Popular posts from this blog
This is to install Docker within Ubuntu WSL without using the Windows Docker application. Follow the below steps. Install Ubuntu 22.04 WSL 1. Enable Windows Subsystem for Linux and Virtual Machine platform Go to Control Panel -> Programs -> Programs and Features -> Turn Windows features on or off 2. Switch to WSL 2 Open Powershell and type in the below command. wsl —set-default-version 2 If you don’t have WSL 2, download the latest WSL 2 package and install it. 3. Install Ubuntu Open Microsoft Store and search for Ubuntu. Select the version you intend to install. I’d use the latest LTS version Ubuntu 22.04. Click on the Get button. It will take a couple of minutes to download and install. 4. Open up the installed Ubuntu version that was installed. If you get an error like the below image, make sure to install the WSL2 Kernel update . If it’s an older Ubuntu version the error message would be something like the image below. Error: WSL 2 requires an update to its
In older Ubuntu versions, you could have just right-clicked on the Ubuntu Terminal window’s title bar and set any title you would like. But unfortunately after Ubuntu 18.04 LTS this feature is gone. I used to love this feature because I’m multiple tabs in the single terminal window kind of a guy. I usually like to work in multiple named terminal tabs like below. By default, in newer Ubuntu version, it is showing just the current directory. Let’s see how we can do this. Ubuntu prompt In ubuntu’s Bash, there’s an environment variable $PS1 which is responsible for the details that the command line prompts. You’ll be able to echo this and see what’s inside it. If I echo it it will print something like this. echo $PS1 \[\e]0;\u@\h: \w\a\]${debian_chroot:+($debian_chroot)}\[\033[01;32m\]\u@\h\[\033[00m\]:\[\033[01;34m\]\w\[\033[00m\]\$ If you really want to understand what this means, you can refer this page . Updating the termina
Sometimes we need to check the console or the network transactions of a link that opens up in a new tab. By default, the Chrome developer tools are not opening in a new tab. So, by the time when we hit F12 and open the dev tools, part of the information we needed could be already gone. There’s a setting in dev tools where you can keep the dev tools open automatically in a new tab. To enable that, hit F12 and open up the dev tools. Click on the settings icon in the top right corner. In the Preferences section, scroll down to the bottom. You’ll be able to find the option to Auto-open DevTools for popups. Select the checkbox and we’re good to go!