The latest Windows versions include a built-in SSH server and client that are based on OpenSSH. This means now you can remotely connect to Windows 10/11 or Windows Server 2022/2019 computer using any SSH client, similar to Linux distros. In this article, we’ll show you how to configure OpenSSH on Windows 10 and Windows 11, and connect to it using Putty or any other SSH client.
OpenSSH is an open-source, cross-platform version of Secure Shell (SSH) that is used by Linux users for a long time. This project is currently ported to Windows and can be used as an SSH server on almost any version of Windows.
How to Install SSH Server on Windows 10 or 11
Starting with Windows 10 build 1809, OpenSSH Server is included in all Windows operating system images.
You can enable the OpenSSH server in Windows 10 or 11 through the graphical Settings panel:
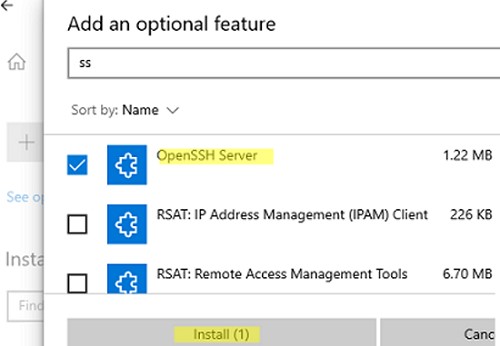
- Go to Settings > Apps > Apps and features > Optional features (or run the command ms-settings:appsfeatures);

- Click Add a feature, select OpenSSH Server (OpenSSH-based secure shell (SSH) server, for secure key management and access from remote machines), and click Install.

- Wait for the OpenSSH server installation to complete.


You can also install the sshd server using PowerShell:
Add-WindowsCapability -Online -Name OpenSSH.Server*

Or using DISM:
dism /Online /Add-Capability /CapabilityName:OpenSSH.Server~~~~0.0.1.0
If you want to make sure the OpenSSH server is installed, run the following PS command:
Get-WindowsCapability -Online | ? Name -like 'OpenSSH.Server*'
Name : OpenSSH.Server~~~~0.0.1.0
State : Installed

OpenSSH Server on Windows delivered as a Feature on Demand (FoD). This means that Windows does not store the binaries for OpenSSH installation locally. During installation of optional features, Windows downloads feature files from Microsoft Update servers. If your computer is located on an offline environment (not connected to the Internet), you can install OpenSSH Server from an offline FoD ISO image:
- You can download the FoD ISO image for your version of Windows from the Volume Licensing Service Centre (VLSC) or from My Visual Studio.
- Mount the FoD ISO media to a virtual DVD drive in Windows;
- Install the OpenSSH.Server with the command:
Add-WindowsCapability -online -name OpenSSH.Server~~~~0.0.1.0 -source -Source "E:\" -LimitAccess
Use the following PowerShell command to uninstall the SSH server:
Remove-WindowsCapability -Online -Name OpenSSH.Server~~~~0.0.1.0
Note. On earlier versions of Windows (prior to Windows 10 1809), you can manually install the Win32-OpenSSH port for Windows from the GitHub repository.
The OpenSSH binary files are located in the C:\Windows\System32\OpenSSH\ folder.

This path is also added to the Path environment variable in Windows:
$Env:Path

How to Enable and Configure SSH Server on Windows
Check the status of ssh-agent and sshd services using the PowerShell Get-Service command:
Get-Service -Name *ssh*

By default, both services are stopped and not added to the automatic startup. Run the following commands to start OpenSSH services and configure autostart for them:
Start-Service sshd

Set-Service -Name sshd -StartupType 'Automatic'

Start-Service ssh-agent

Set-Service -Name ssh-agent -StartupType 'Automatic'

Check if sshd service is running and listening on port TCP/22:
netstat -nao | find /i '":22"'

A rule allowing remote connections to the SSH server is added to the Windows Defender firewall when OpenSSH Server is installed (with the description Inbound rule for OpenSSH SSH Server (sshd)). Use the PowerShell command to check that the rule for the OpenSSH server is enabled:
Get-NetFirewallRule -Name *OpenSSH-Server* |select Name, DisplayName, Description, Enabled

If the rule is disabled, you must enable it:
Get-NetFirewallRule -Name *OpenSSH-Server*|Enable-NetFirewallRule
You can configure a number of settings for the OpenSSH server in Windows by using the %programdata%\ssh\sshd_config configuration file.

Note. Read our guide on how to use Amazon SES as SMTP Relay.
For example, you can disable SSH password authentication and leave only key-based auth by enabling the following directives in the sshd_config file:
PubkeyAuthentication yes

PasswordAuthentication no
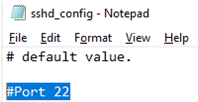
Here you can also specify a new TCP port (instead of the default TCP 22 port) on which the SSHD will accept connections. For example:
Port 2222
Using the directives AllowGroups, AllowUsers, DenyGroups, DenyUsers, you can specify users and groups who are allowed or denied to connect to Windows via SSH:
- DenyUsers theitbros\jbrown@192.168.1.15 — denies connections to username jbrown from 192.168.1.15 host;
- DenyUsers theitbros\* — prevent all users from theitbros domain to connect host via SSH;
- AllowGroups theitbros\ssh_allow — only allow users from theitbros\ssh_allow to connect host.
The allow and deny rules of sshd are processed in the following order: DenyUsers, AllowUsers, DenyGroups, and AllowGroups.
For example, to allow an SSH connection under the mylocaluser1 account from host 192.168.31.100, add the following directive
AllowUsers mylocaluser1@192.168.31.100
After making changes to the sshd_config file, you need to restart the sshd service:
Get-Service sshd| Restart-Service –force

Connect to Windows via SSH
Now you can connect to Windows computer using any SSH client. To connect from Linux, use the command:
ssh -p 22 admin@192.168.1.90
- admin is a local Windows user that you want to connect as. This account must be a member of the built-in Administrators group.
- 192.168.1.90 is an IP address or FQDN of the remote Windows host.

After that, a Windows command prompt window will open in the SSH session.
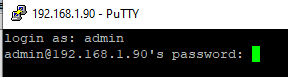
You can use the popular Putty client to connect to a Windows computer via SSH:
- Download and run putty.exe;
- Enter the hostname or IP address of the remote Windows host you want to connect over SSH;
- Select the Connection type: SSH and make sure port 22 is specified;

- Click Open;
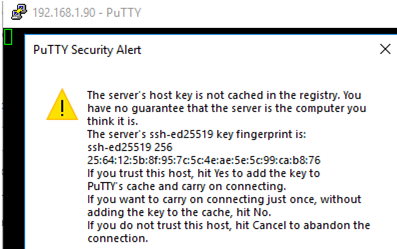
- The first time you connect to a Windows host via SSH, a Security Alert will appear asking you to confirm that you want to add the ssh-ed25519 key fingerprint of the remote machine to your local cache. If you trust this host, click the Accept button. This will add that server to the list of known SSH hosts;
 Note. OpenSSH server fingerprint stored in a file C:\ProgramData\ssh\ssh_host_ecdsa_key.pub. You can view the current ECDSA key fingerprint on a Windows host with the command:
ssh-keygen -lf C:\ProgramData\ssh\ssh_host_ed25519_key.pub

- A Putty window will appear. Here you need to specify the Windows username and password that you want to use to connect;

- Once you have logged in, the command prompt of the remote Windows host will be opened;
- You can now interactively run commands on the remote host.


 Note. OpenSSH server fingerprint stored in a file C:\ProgramData\ssh\ssh_host_ecdsa_key.pub. You can view the current ECDSA key fingerprint on a Windows host with the command:


You can also use the built-in Windows SSH client to connect to another Windows host. Install the ssh.exe client on Windows using the command:
Add-WindowsCapability -Online -Name OpenSSH.Client*
Now you can connect to a remote SSH host directly from the Windows command prompt. Use the following command:
ssh root@192.168.13.202
The first time you connect, you will also need to add the fingerprint of the SSH server’s ECDSA key to the list of known hosts. To do this, type “yes” > “enter”.

Enter the user’s password. The command line C:\Windows\system32\conhost.exe should appear: 
You can now use the OpenSSH.Client tools (scp.exe, sftp.exe) to copy a file between hosts using the SSH protocol. The following command will copy the local test1.log file to a remote Windows SSH host:
scp.exe D:\PS\test1.log root@192.168.13.202:c:\temp
![]()
If you prefer to use Windows Terminal, you can add the required SSH host profiles to it for quick connection:
- Run Windows Terminal and go to its Settings;
- Click the Add a new profile button in the Profiles section;

- Specify that you want to create a duplicate of Windows PowerShell profile;

- Specify a profile name (“SSH Windows 10 DEVPC” in this example);
- In the Command line parameter, specify the connection string to your SSH host. For example: %SystemRoot%\System32\WindowsPowerShell\v1.0\powershell.exe ssh root@192.168.13.202

- Save the profile;
- Now in the Windows Terminal menu you will have a separate option for a quick SSH connection to a Windows host.


Hint. You can change the default SSH shell on Windows from cmd.exe to PowerShell CLI. To do this, run the following on the host running the OpenSSH server:
New-ItemProperty -Path "HKLM:\SOFTWARE\OpenSSH" -Name DefaultShell -Value "C:\Windows\System32\WindowsPowerShell\v1.0\powershell.exe" -PropertyType String -Force
From here, when connecting to Windows via SSH, you will immediately see PowerShell prompt instead of cmd.exe.

If you want to use key-based ssh authentication instead of password authentication, you need to generate a key using ssh-keygen on your client. In such a case, the contents of the id_rsa.pub file must be copied to the c:\users\admin\.ssh\authorized_keys file in Windows 10.
After that, you can connect from your Linux client to Windows 10 without a password. Use the command:
ssh -l admin@192.168.1.90
In previous versions of OpenSSH on Windows, all of the sshd service logs were written to the text file C:\ProgramData\ssh\logs\sshd.log by default.
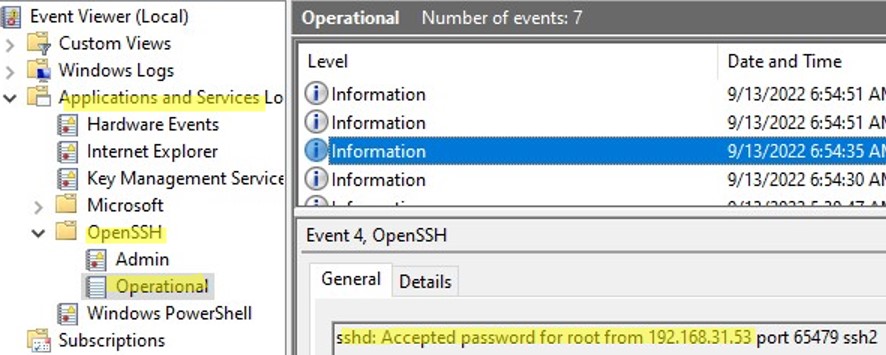
On Windows 11, SSH logs can be viewed using the Event Viewer console (eventvwr.msc). All SSH events are available in a separate section Application and Services Logs > OpenSSH > Operational.
For example, the screenshot shows an example of an event with a successful connection to the computer via SSH. You can see the ssh client’s IP address (hostname) and the username used to connect.
Sshd: Accepted password for jbrown from 192.168.14.14. port 49833 ssh2


Cyril Kardashevsky
I enjoy technology and developing websites. Since 2012 I’m running a few of my own websites, and share useful content on gadgets, PC administration and website promotion.
Until recently, if you wanted to use SSH on Windows, you’d need to rely on third-party clients like PuTTY or install SSH server packages from similar sources.
However, the April 2018 update (version 1803) introduced OpenSSH as a built-in feature. As long as you’re running supported Windows versions, you can install the OpenSSH client and server components as optional features.
As such, we’ll cover the prerequisites, full steps to install OpenSSH using various methods, and how to get started with it in this article.
Table of Contents
Before you begin, you’ll want to ensure the following requirements are met:
- Windows Server 2019 or later / Windows 10 build 1809 or later
- PowerShell 5.1 or later
- Your account is a member of the Administrators group
Optional Features (GUI)
The easiest way to install OpenSSH on Windows is from the Optional Features page in Windows Settings.
- Press Win + I and go to Apps > Optional Features.
- Click on View features in the Add an optional feature section.

- Select OpenSSH Client and OpenSSH Server from the list and press Next > Install.

- After the components are installed, press Win + R, type
services.msc, and press Enter. - Locate the OpenSSH SSH Server and OpenSSH Authentication Agent services here.

- Double-click them and start these services. If you want, you can also change the startup type to Automatic. Save the changes afterward.
- Next, press Win + R, type
wf.msc, and press Enter. - In the Inbound Rules section, ensure the OpenSSH SSH Server (sshd) rule is enabled.

- The basic setup is complete. Check the Get Started with OpenSSH section for further steps. You can also follow the same steps to uninstall OpenSSH if required.


PowerShell
If you want to be more efficient, you can also perform the same steps as above in an elevated PowerShell window.
- Press Win + R, type
powershell, and press CTRL + Shift + Enter. - First, ensure that the OpenSSH components are available:
Get-WindowsCapability -Online | Where-Object Name -like 'OpenSSH*'
- Next, install the OpenSSH client and server components:
Add-WindowsCapability -Online -Name OpenSSH.Client~~~~0.0.1.0Add-WindowsCapability -Online -Name OpenSSH.Server~~~~0.0.1.0
- Start the sshd and ssh-agent services and change their startup type to Automatic as such:
Set-Service -Name sshd -StartupType 'Automatic' -Status RunningSet-Service -Name ssh-agent -StartupType 'Automatic' -Status Running


- Next, configure the necessary Windows firewall rule for SSH traffic:
New-NetFirewallRule -Name 'OpenSSH-Server-In-TCP' -DisplayName 'OpenSSH Server (sshd)' -Enabled True -Direction Inbound -Protocol TCP -Action Allow -LocalPort 22
- Now that the setup is complete, you can start using SSH. Refer to the get started with OpenSSH section if you need help with this.
- Also, if you want to uninstall the OpenSSH components, here are the necessary commands:
Remove-WindowsCapability -Online -Name OpenSSH.Client~~~~0.0.1.0Remove-WindowsCapability -Online -Name OpenSSH.Server~~~~0.0.1.0


GitHub (MSI)
If you downloaded the OpenSSH package from GitHub, you can install the components using the MSI Installer with msiexec /i <path to openssh.msi>.
- For instance, if the file is in your current directory, use
msiexec /i openssh.msi - If the file is in, let’s say, your downloads folder, use
msiexec /i C:\users\anup\downloads\openssh.msi - To uninstall OpenSSH, use
msiexec /x <path to openssh.msi> - Let’s say the installer is in the current directory, and you want to install or remove certain components only. You can use the following commands as required:
msiexec /i openssh.msi ADDLOCAL=Clientmsiexec /i openssh.msi ADDLOCAL=Servermsiexec /i openssh.msi REMOVE=Clientmsiexec /i openssh.msi REMOVE=Server
After installing the components, follow these steps to update the system PATH variable:
- Press Win + R, type
systempropertiesadvanced, and press Enter. - Click on Environment Variables. In the System variables section, select Path and click on Edit.
- Check for
%systemroot%\System32\opensshhere. If it isn’t present, click on New and add it to the list. Do note that this is the default installation path. If you installed OpenSSH on a different path, change the value accordingly for this step. - Press Ok > Ok to save the changes.


Now, you can run Get-Service -Name ssh* in PowerShell to verify that the components were installed properly. If you also need to start the required services or open ports, please refer to either of the earlier sections for the steps.
Finally, if you want to use other methods like Winget or Chocolatey, we recommend checking out the OpenSSH wiki on GitHub. In addition to install instructions, it also has various usage examples and manuals that you might find useful.
OpenSSH Server Configuration
By default, the OpenSSH server (sshd) in Windows reads the configuration data from %programdata%\ssh\sshd_config. Numerous configuration options are listed in this file, but as the Windows implementation of OpenSSH is still fairly new, only certain configurations are supported at present.
We’ve listed some commonly made configuration changes below for reference. We recommend checking the OpenSSH server configuration guide from Microsoft or the one on GitHub for the full list of options. Also, don’t forget to restart the sshd service to apply any changes made.
- Uncomment the Port line and change the value if you want to change the SSH port. You’ll also need to add a firewall rule to allow inbound traffic on said port.
- Change the ListenAddress from 0.0.0.0 to something else if you only want to listen to a specific IP address. Add multiple ListenAddress lines in the same manner if you want to listen to multiple IP Addresses.
- Change GSSAPIAuthentication to yes if you want to use Kerberos authentication.
- Add the AllowGroups, AllowUsers, DenyGroups, and DenyUsers directives to control which groups and users can access the SSH server.
- If working with domain users and groups, check the following examples for format reference:
DenyUsers tnt\admin@192.168.10.17DenyUsers tnt\*AllowGroups tnt\sshclients tnt\serveradmins - If dealing with workgroup users and groups, check these examples instead:
AllowUsers anup@192.168.10.17AllowGroups sshclients
- If working with domain users and groups, check the following examples for format reference:
- Finally, you can use the following command in PowerShell to set the default OpenSSH shell to PowerShell instead of command prompt:
New-ItemProperty -Path "HKLM:\SOFTWARE\OpenSSH" -Name DefaultShell -Value "C:\Windows\System32\WindowsPowerShell\v1.0\powershell.exe" -PropertyType String -Force


Get Started With OpenSSH
You can use any of the methods listed above to set up another Windows system as an OpenSSH client, server, or both. And if you’re new to SSH, here are some basic steps to get started:
- First, press Win + R, type
sysdm.cpl, and press Enter. - Check if you’re a Workgroup or Domain user here.
- Press Win + R, type
powershell, and press Enter. - If you’re a workgroup user, enter the following command and skip to Step 6:
ssh user@host - If you’re a domain user, enter any of the following commands:
ssh -l user@domain hostssh domain\user@hostssh user@domain@hostssh user@host


- On the first login, you’ll have to confirm that the host is trusted. If you enter Yes, the host will be added to the list of known hosts.

- Now, input the host account’s password and press Enter.

Password-based authentication is generally fine, but ideally, you should use even more secure authentication methods like Kerberos and SSH keys. For Kerberos, follow the steps listed below:
- On the domain-joined server, navigate to
%programdata%\ssh\. - Open the sshd_config file with a text editor.
- Uncomment the GSSAPIAuthentication line, set it to yes, and save the changes.
- In Powershell, use the following commands to restart the sshd service and apply the changes from above:
net stop sshdnet start sshd
- Now, on the Windows client that’s logged in as a Domain user, enter
ssh -K hostname.


Authenticate With SSH Key
When connecting across domains, password-based authentication isn’t recommended as its vulnerable to brute forcing. Instead, you should use public key authentication. This uses cryptographic algorithms to generate one public and one private key file.
A user’s public key is stored on the SSH server, and it’s compared with the client-side private key for authentication. As long as the private key is protected properly, this authentication method is much more secure.
You’ll need to generate the key pair on the client system, create an authorized keys file on the server, and store the client’s public key in this file. To do this, start with the following steps on the server system:
- Press Win + R, type
powershell, and press CTRL + Shift + Enter. - Create the administrators_authorized_keys file.
- For users in the Administrators group:
New-Item -Type File -Path C:\ProgramData\ssh\administrators_authorized_keys - For standard users:
New-Item -Type File -Path C:\Users\username\.ssh\administrators_authorized_keys
- For users in the Administrators group:
- In our case, we created the file using an Administrator account. If you’re using a standard account, change the file path accordingly in the rest of the commands.
- Set the access permissions for the keys file with:
get-acl C:\ProgramData\ssh\ssh_host_dsa_key | set-acl C:\ProgramData\ssh\administrators_authorized_keys
Now, launch an Elevated PowerShell window on the client system and follow these steps:
- Use
cd ~/.sshto get to the .ssh directory and generate the key pair withssh-keygen. - When prompted for the file location, press Enter to use the default value :
C:\Users\username\.ssh\ - Add a passphrase for your private key if you want to further improve its security.

- Now, change the user and host values and run the commands shown below. It will append the client’s public key to the authorized keys file on the server.
$public_key = Get-Content ~/.ssh/id_rsa.pubssh user@host "'$($public_key)' | Out-File C:\ProgramData\ssh\administrators_authorized_keys -Encoding UTF8 -Append"
- Enter your password to approve the operation. Now, you’ll be able to connect using public key authentication.


Troubleshooting Common Errors
SSH Errors like Port 22 Connection Refused, or Connection Timed Out are pretty common. If you followed the steps from this article, basic steps like ensuring the SSH services are running, restarting them, allowing SSH traffic through the firewall, adding SSH to system PATH, etc., will already be covered.
In addition to these, here are some more troubleshooting steps worth trying:
- First, make sure the steps mentioned above are done on the remote system as well.
- Retry and make sure you entered the correct credentials.
- Use the host’s IP address instead of the hostname. If this works, resolve DNS problems by flushing the cache or using a different server.
- Ping the host to ensure there’s no packet loss.
- Check the SSH port and ListenAddress in the server’s sshd_config file.
- Use verbose flags (
ssh -vorssh -vvv) to get more details on what’s going wrong.
SSH-server based on the OpenSSH package is part of the operating system in all modern versions of Windows. In this article, we’ll show you how to install and configure the OpenSSH server on Windows 10/11 and Windows Server 2022/2019 and connect to it remotely via a secure SSH connection (just like in Linux 🙂).
Contents:
- How to Install OpenSSH Server on Windows?
- Configuring SSH Server on Windows
- Sshd_config: OpenSSH Server Configuration File
- How to Connect to a Remote Windows Computer via SSH?
- Checking SSH Connection Logs in Windows
How to Install OpenSSH Server on Windows?
The OpenSSH Server package is a part of all modern versions of Windows 10 (starting with 1803), Windows 11, and Windows Server 2022/2019 as a Feature on Demand (FoD). To install the OpenSSH server, open the elevated PowerShell prompt and run the command:
Get-WindowsCapability -Online | Where-Object Name -like ‘OpenSSH.Server*’ | Add-WindowsCapability –Online
Or using DISM:
dism /Online /Add-Capability /CapabilityName:OpenSSH.Server~~~~0.0.1.0
If your computer is directly connected to the Internet, the OpenSSH.Server package will be downloaded and installed on Windows.
You can also install OpenSSH on Windows 10/11 through the modern Settings panel (Settings -> Apps and features -> Optional features -> Add a feature). Find Open SSH Server in the list and click Install.
On computers in disconnected (offline) environments, you can install the OpenSSH Server from the Feature on Demand ISO image (available in your account on the Microsoft websites: MSDN or my.visualstudio.com). Download the ISO and extract its contents to the E:\FOD folder (you can only extract the file OpenSSH-Server-Package~31bf3856ad364e35~amd64~~.cab) and install the Windows feature from the local repository:
Add-WindowsCapability -Name OpenSSH.Server~~~~0.0.1.0 -Online -Source E:\FOD
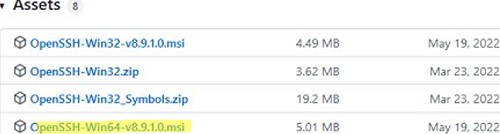
An MSI installer for OpenSSH for Windows is also available in the official Microsoft repository on GitHub (https://github.com/PowerShell/Win32-OpenSSH/releases/). For example, for Windows 10 x64, you need to download and install the OpenSSH-Win64-v8.9.1.0.msi package. The following PowerShell command will download the MSI file and install the OpenSSH client and server on your computer:
Invoke-WebRequest https://github.com/PowerShell/Win32-OpenSSH/releases/download/v8.9.1.0p1-Beta/OpenSSH-Win64-v8.9.1.0.msi -OutFile $HOME\Downloads\OpenSSH-Win64-v8.9.1.0.msi -UseBasicParsing
 msiexec /i $HOME\Downloads\OpenSSH-Win64-v8.9.1.0.msi
You can install an OpenSSH server in previous Windows versions as well (Windows 8.1, Windows Server 2016/2012R2/2012). Check the example on how to install and configure Win32-OpenSSH in the article “How to Configure SFTP Server (SSH FTP) on Windows?”.
To make sure the OpenSSH server has been installed, run the command:
Get-WindowsCapability -Online | ? Name -like 'OpenSSH.Ser*'
State : Installed

Configuring SSH Server on Windows
After installing the OpenSSH server on Windows, two services are added:
- ssh-agent (OpenSSH Authentication Agent) – can be used to manage private keys if you have configured SSH key authentication;
- sshd (OpenSSH SSH Server).
You need to change the startup type of the sshd service to automatic and start the service using PowerShell:
Set-Service -Name sshd -StartupType 'Automatic'
 Start-Service sshd

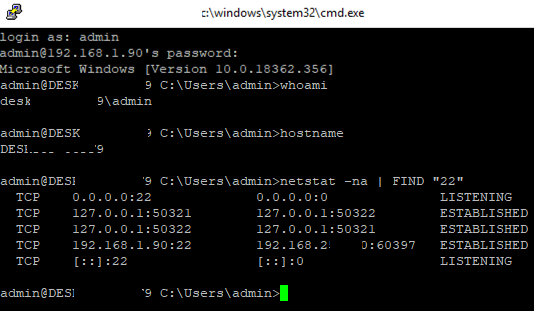
Use the netstat command to make sure that the SSH server is running and waiting for the connections on TCP port 22:
netstat -na| find ":22"

Make sure that Windows Defender Firewall allows inbound connections to Windows through TCP port 22:
Get-NetFirewallRule -Name *OpenSSH-Server* |select Name, DisplayName, Description, Enabled
Name DisplayName Description Enabled
---- ----------- ----------- -------
OpenSSH-Server-In-TCP OpenSSH SSH Server (sshd) Inbound rule for OpenSSH SSH Server (sshd) True

If the rule is disabled (Enabled=False) or missing, you can create a new inbound rule using the New-NetFirewallRule cmdlet:
New-NetFirewallRule -Name sshd -DisplayName 'OpenSSH Server (sshd)' -Enabled True -Direction Inbound -Protocol TCP -Action Allow -LocalPort 22
By default, key OpenSSH components are located in these folders:
- OpenSSH Server executables:
C:\Windows\System32\OpenSSH\(sshd.exe, ssh.exe, ssh-keygen.exe, sftp.exe, etc.) - The sshd_config file (created after the first service start of the service):
C:\ProgramData\ssh - The authorized_keys file and keys can be stored in the user profile folder:
%USERPROFILE%\.ssh\
Sshd_config: OpenSSH Server Configuration File
You can change your OpenSSH server settings in the config file: %programdata%\ssh\sshd_config. This is a plain text file with a set of directives. You can use any text editor for editing:
start-process notepad C:\Programdata\ssh\sshd_config
For example, to deny SSH connection for a specific domain user account (or all users in the specified domain), add these directives to the end of the file:
DenyUsers woshub\[email protected]
DenyUsers corp\*
To allow SSH connection to the specific domain security group only:
AllowGroups woshub\sshadmins
You can allow access to a local user group:
AllowGroups sshadmins
By default, all Windows users can connect to OpenSSH. Directives in the sshd_config files are processed in the following order: DenyUsers, AllowUsers, DenyGroups, AllowGroups.
You can deny SSH login for the accounts with administrator privileges. In this case, if you need to perform any privileged actions in your SSH session, you will have to use runas.
DenyGroups Administrators
The following directives allow you to access Windows using SSH private keys or a password.
PubkeyAuthentication yes
PasswordAuthentication yes
You can change the default TCP/22 port on which OpenSSH Server connections are accepted in the sshd_config configuration file using the Port directive.
After making any changes to the sshd_config file, you need to restart the sshd service
restart-service sshd
How to Connect to a Remote Windows Computer via SSH?
Now you can try to connect to your Windows 10 computer using the SSH client (I’m using putty in this example).
You can use the built-in Windows SSH client to connect to a remote host. To do this, open the command prompt and run the following command:
ssh [email protected]
In this example, max is the username on the remote Windows computer, and 192.168.13.12 is the IP address or DNS name of the computer.
Note that you can use the following username formats when connecting to Windows via SSH:
max@server1– local Windows user[email protected]@server1– Active Directory user or Microsoft/Azure account (use the UserPrincipalName format)woshub\max@server1– NetBIOS name format
In an Active Directory domain, you can use Kerberos authentication in SSH. To do this, you need to enable the following directive in sshd_config:
GSSAPIAuthentication yes
You can now transparently connect to an SSH server from a domain-joined Windows machine with a domain user session. In this case, the user’s password will not be requested, and SSO authentication via Kerberos will be performed:
ssh -K server1
The first time you connect, you will be prompted to add the host to the list of known SSH hosts (C:\Users\your_user\.ssh\known_hosts).
Click Yes, and login under your Windows user account.
If the SSH connection is successful, you will see the cmd.exe shell prompt.
admin@win10pc C:\Users\admin>

You can run different commands, scripts, and apps in the SSH command prompt.
I prefer working in the PowerShell console. To start it, run:
powershell.exe

In order to change the default cmd.exe shell in OpenSSH to PowerShell, make changes to the registry using the following PowerShell command:
New-ItemProperty -Path "HKLM:\SOFTWARE\OpenSSH" -Name DefaultShell -Value "C:\Windows\System32\WindowsPowerShell\v1.0\powershell.exe" -PropertyType String –Force

Restart your SSH connection and make sure that PowerShell is now used as a default SSH shell (this is indicated by the prompt PS C:\Users\admin>).

The PowerShell prompt has been started in my SSH session, where the usual functions work: tab autocomplete, PSReadLine syntax highlighting, command history, etc. If the current user is a member of the local administrators’ group, all session commands are executed elevated even if UAC is enabled.
OpenSSH server on Windows can be used in various SSH tunneling scenarios.
Checking SSH Connection Logs in Windows
By default in Windows SSH server connection logs are written not to text files, but to a separate event log via Event Tracing for Windows (ETW). Open the Event Viewer console (eventvwr.msc ) and navigate to Application and services logs -> OpenSSH -> Operational.
If you successfully connect to the SSH server using a password, an event will appear in the log:
EventID: 4
sshd: Accepted password for root from 192.168.1.53 port 65749 ssh2
If SSH key authentication was performed, you will see the following event:
sshd: Accepted publickey for locadm from 192.168.1.53 port 61426
ssh2: ED25519 SHA256:FEHDEC/G42FS23209C2KMb4335923pigN31s3qMK322lGibD
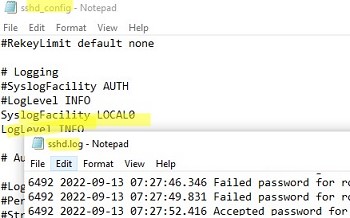
If you want the SSH connection logs to be written to a local text file, you need to enable the following parameters in the sshd_config file:
SyslogFacility LOCAL0
LogLevel INFO
Restart the sshd service and make sure that the SSH server logs are now written to a plain text file C:\ProgramData\ssh\logs\sshd.log
Linux offers SSH directly via the Bash interface, and now you can do the same for Windows 10! Why do this? Putty makes it hard to initiate new server connections via the CLI and thus limits automation capability. Having SSH installed on Windows makes this task super straightforward. This post will show you how to install and use the Windows 10 SSH feature.
How to install the Windows 10 SSH feature
You can install the SSH feature using the Optional Features in Windows Settings or Windows PowerShell. However, either of these options will require elevated Administrator permissions.
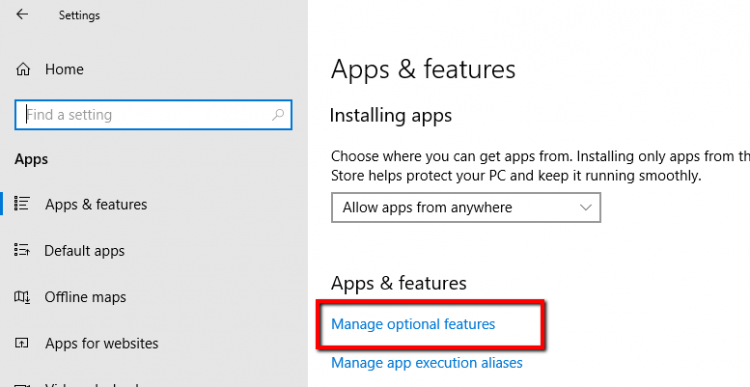
To install SSH: click on Start -> Settings Apps -> Apps and Features -> Manage Optional Features. Next, find “OpenSSH Client” and then click “Install“.
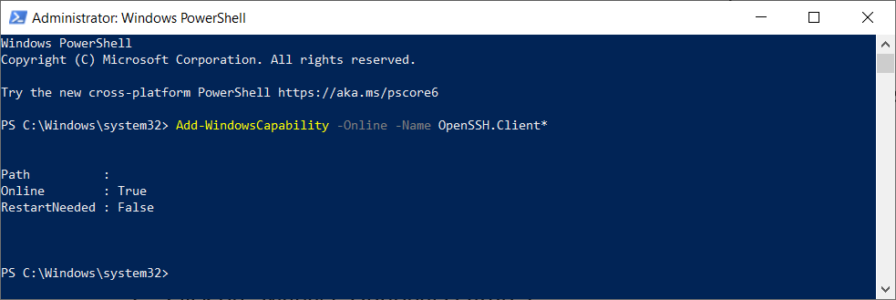
Alternatively, you can run the following command via PowerShell to install SSH:
Add-WindowsCapability -Online -Name OpenSSH.Client*See the following example screenshot:
How to use the Windows 10 SSH feature
Run the ssh command to see all the parameters that you can run.
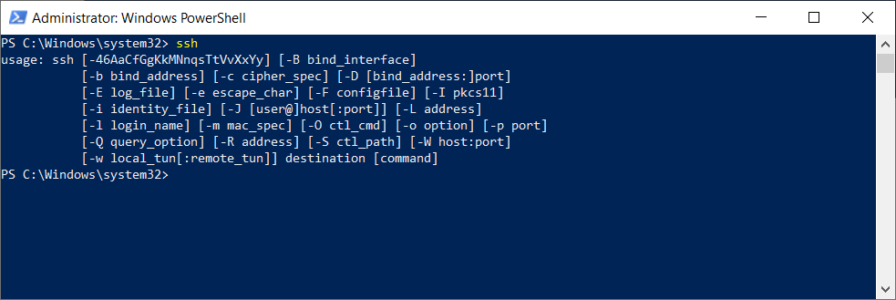
Additionally, you should now be able to run a basic SSH command such as:
The first connection to a server will result in a message like the following:
The authenticity of host 'server name (<the server ip>)' can't be established.
ECDSA key fingerprint is SHA256:(<a large string>).
Are you sure you want to continue connecting (yes/no)?
Answer “yes” so that SSH will add the server to the local system’s list of known SSH hosts.
Of course, most of you may be using private key files instead of passwords. The easiest way to do this is by storing your private key file in the .ssh folder of your user profile.
You can then connect to your server using the following example command:
Remember to run PowerShell as your local Windows user for the example mentioned above.
Consequently, you will also have access to the following SSH commands from your Windows command prompt or PowerShell: ssh.exe, scp.exe, sftp.exe, ssh-add.exe, ssh-agent.exe, ssh-keygen.exe, and ssh-keyscan.exe.
Wrapping up
Now you know how to install and use the Windows 10 SSH feature! Tell Anto Online if you prefer using Putty or how it stacks up with Linux’s SSH client. You may also be interested to see “How to setup Windows Subsystem for Linux“.
Sources
You may also want to visit the following excellent sources for more in-depth information:
- Installation of OpenSSH For Windows Server 2019 and Windows 10 – microsoft.com
- Install OpenSSH on Windows 10 using PowerShell – jcutrer.com
- Install SSH on Windows 10 as Optional Feature – www.thomasmaurer.ch
- PowerShell remoting with SSH public key authentication – 4sysops.com
- Secure Shell – wikipedia.org
You may also be interested in
About the Authors
Anto’s editorial team loves the cloud as much as you! Each member of Anto’s editorial team is a Cloud expert in their own right. Anto Online takes great pride in helping fellow Cloud enthusiasts. Let us know if you have an excellent idea for the next topic! Contact Anto Online if you want to contribute.
Support the Cause
Support Anto Online and buy us a coffee. Anything is possible with coffee and code.
Buy me a coffee
In previous article i describe How to install Open SSH in Windows 10 as Optional Feature and use it. Today i will continue with OpenSSH and i will describe step by step how can install OpenSSH Server in Windows 10 and configure it.
OpenSSH Server and client included in Windows 10 v.1809 and later and in Windows Server 2019
So let’s start!!
How to Identify if Windows 10 Open SSH Server installed from GUI
Before start with the installation its better to identify if already OpenSSH Server installed.
- Click Start and Gear Icon
- Click in Apps

- From the right side select Manage Optional Features.
- if you see Open SSH Server then it means that already installed.
- If you can’t see this means that you must install the Feature.

How to Identify if OpenSSH Server installed from Powershell
If you like Powershell you can use the following command to identify if OpenSSH Server already installed
Get-WindowsCapability -Online | ? name -like "openssh*"
Check the State status to identify if is installed or not
- State:Installed means it’s already installed
- State:Not Present means it’s not installed

How to Install in Windows 10 the OpenSSH Server from GUI
After identify that OpenSSH Server it’s not installed we can proceed to install the OpenSSH Server
- Click Start and Gear Icon
- Click in Apps
- From the right side select Manage Optional Features
- Click Add Feature
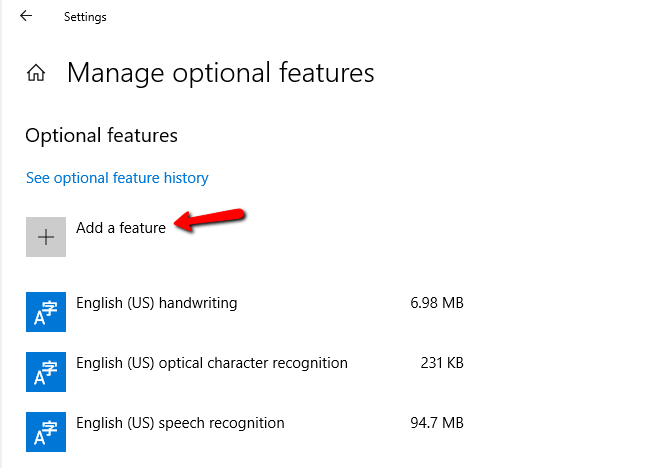
- Find and click Open SSH Server
- Click Install

How to Install in Windows 10 the OpenSSH Server from Powershell
If you would like to proceed the installation of OpenSSH Server from Powershell you can do it with one command.
Type the following command and wait to finish the installation
Add-WindowsCapability -Online -Name OpenSSH.Server~~~~0.0.1.0

How to start and Configure in Windows 10 the OpenSSH Server
Now it’s time to Configure OpenSSH Server to start use it.
- Open Powershell command as Administrator
- Type the following command to start the Service of the OpenSSH Server
Start-service sshd - Type the following command to add Automatic Startup in Service
Set-Service -Name sshd -StartupType 'Automatic'- Type the following command to find the Rule for OpenSSH Server in Windows Firewall and verify that is Allow
Get-NetFirewallRule -Name *ssh*

How to connect with ssh from Linux to Windows 10 OpenSSHServer
The reality with ssh is that most of them use it with Public key authentication instead of password authentication because it prevent attacks.
But by default after the installation the OpenSSH Server use password authentication.
We will keep the password authentication to be able to connect through the configuration that must be done to use the Public key authentication
So for the best practices and better security let’s explain how can generate ssh keys and use it to connect in OpenSSH Server
- Login in Windows 10 OpenSSH Server and create the users that you want to connect.
- If you have Domain users and have already decide which should be connect then avoid the previous step
- Login in the Linux that you will use it to connect in OpenSSH Server
- Type the following command to start generate the keys
- ssh keygen
- It will ask how you would like to save the file name but you can leave it as the default and click Enter
- Also it will ask to create a passphrase.
- Just write down a passphrase and keep it in a safe place because it will ask when you will connect in OpenSSH Server.

- Now if you type ls to see the files and folder of the ssh directory you will see 2 files. These are the private key and the public key with the extension .pub
- id_rsa
- id_rsa.pub

- To be able create the authentication must be copy the public key in the Openssh Server in the following path of the user which will connect from Linux. Note that we must have create the user before proceed with this step.
- The name of the public key file must be authorized_keys in the .ssh folder
- C:\Users\<username>\.ssh
- So let’s type the following command from the Linux which create the ssh keys and replace the user1@192.168.50.151 with your username and ip address of the opensshserver
- scp ~/.ssh/id_rsa.pub user1@192.168.50.151:»c:\users\user1\.ssh\authorized_keys»

- Login in the Openssh server and verify that the authorized_keys created in the .ssh of the user folder.
- Now we must configure the permission of the authorized_keys because if you try to connect as it you will get an error Permission denied (publickey,keyboard-interactive)
- If we check the permissions of the authorized_keys file we will see that has access the user which will connect in my scenario is the user1 and the Domain Administrator.
- But these users must be removed.

- If you search in Google you will find most of the Blogs and forums to say that you can download the Powershell module OpenSSHUtil but this module has been deprecated and if you try you will fail to downloaded
- Before try to remove the access from users in the authorized_keys file must be disable the inheritance. If you don’t do it and try to remove the users with icacls command then you will get the info that succesfull proceed with the file but if you will check the permission will be the same without remove the users.
- Right click in authorized_keys file — Properties.
- Click Advanced button.
- Click Disable inheritance.
- Click Convert inherited permissions into explicit permissions on this object.

- Login again in Linux which will use it to connect and type the following command to connect with ssh and password authentication for now
- ssh user1@192.168.50.151
- After connect type the following commands to remove the user access from the authorized_keys
- Icacls «authorized_keys» /remove user1
- Icacls «authorized_keys» /remove administrator

- Now type the following command to check the permissions in the file.
- Only these users must has access in this file
- icacls authorized_keys

- The last step is to disable the password authentication and enable the Pubkey authentication from the ssh_config file to be able authorized only with the ssh keys and not with password
How to disable password authentication in OpensshServer
After the basic configuration of OpensshServer to set Automatic the Service and verify the Rule in Windows Firewall you can proceed in more advance configuration.
Let’s explain how can change configuration of Openssh server.
- Open Powershell as Administrator
- Type the command notepad.exe $env:PROGRAMDATA\ssh\sshd_config to open the ssh_config file

- Change the following lines with these values.
-
- PubkeyAuthentication yes
- PasswordAuthentication no
PermitEmptyPasswords no

- Then type the following commands to restart the Openssh Server service
- Stop-Service sshd
- Start-Service sshd

- Let’s connect in Linux and type the command to connect trough ssh.
- If all works without issues you will see that ask the passphrase before connect

- Type it and the connection will be established.

If you failed to connect with Public key authentication then the better solution is to use Logs of SSH to identify the cause of the issue.
This has been change from previous versions and now the SSH Logs located in Windows Event Logs in stead of the C:\ProgramData\ssh\logs\sshd.log and you can find it in Application and Services Logs — OpenSSH Logs

I hope my article to help you or explore something new or resolve a problem.
Have a nice weekend !!
I invite you to follow me on Twitter or Facebook. If you have any questions, send me an email at info@askme4tech.com