PyCharm is a cross-platform IDE that provides consistent experience on the Windows, macOS, and Linux operating systems.
PyCharm is available in two editions: Professional, and Community. The Community edition is an open-source project, and it’s free, but it has fewer features. The Professional edition is commercial, and provides an outstanding set of tools and features. For more information, refer to the editions comparison matrix.
System requirements
|
Requirement |
Minimum |
Recommended |
|---|---|---|
|
RAM |
4 GB of free RAM |
8 GB of total system RAM |
|
CPU |
Any modern CPU |
Multi-core CPU. PyCharm supports multithreading for different operations and processes making it faster the more CPU cores it can use. |
|
Disk space |
3.5 GB |
SSD drive with at least 5 GB of free space |
|
Monitor resolution |
1024×768 |
1920×1080 |
|
Operating system |
Officially released 64-bit versions of the following:
Pre-release versions are not supported. |
Latest 64-bit version of Windows, macOS, or Linux (for example, Debian, Ubuntu, or RHEL) |
You do not need to install Java to run PyCharm because JetBrains Runtime is bundled with the IDE (based on JRE 17).
PyCharm supports the following versions of Python:
-
Python 2: version 2.7
-
Python 3: from the version 3.6 up to the version 3.12
The JetBrains Toolbox App is the recommended tool to install JetBrains products. Use it to install and manage different products or several versions of the same product, including Early Access Program (EAP) and Nightly releases, update and roll back when necessary, and easily remove any tool. The Toolbox App maintains a list of all your projects to quickly open any project in the right IDE and version.
Install the Toolbox App
-
Download the installer .exe from the Toolbox App web page.
-
Run the installer and follow the wizard steps.
-
After you run the Toolbox App, click its icon
 in the notification area and select which product you want to install.
To install a specific version, click
and select Available versions.
 in the notification area and select which product you want to install.
 and select
Log in to your JetBrains Account from the Toolbox App, and it will automatically activate the available licenses for any IDE that you install.
Install the Toolbox App
-
Download the disk image .dmg from the Toolbox App web page.
-
Mount the image and drag the JetBrains Toolbox app to the Applications folder.
-
After you run the Toolbox App, click its icon in the main menu and select which product you want to install.
To install a specific version, click
and select Available versions.

Log in to your JetBrains Account from the Toolbox App, and it will automatically activate the available licenses for any IDE that you install.
Install the Toolbox App
-
Download the tarball .tar.gz from the Toolbox App web page.
-
Extract the tarball to a directory that supports file execution.
For example, if the downloaded version is 1.17.7391, you can extract it to the recommended /opt directory using the following command:
sudo tar -xzf jetbrains-toolbox-1.17.7391.tar.gz -C /opt
-
Execute the jetbrains-toolbox binary from the extracted directory to run the Toolbox App.
After you run the Toolbox App for the first time, it will automatically add the Toolbox App icon
to the main menu. -
Select the product that you want to install.
To install a specific version, click
and select Available versions.
Log in to your JetBrains Account from the Toolbox App, and it will automatically activate the available licenses for any IDE that you install.
Standalone installation
Install PyCharm manually to manage the location of every instance and all the configuration files. For example, if you have a policy that requires specific install locations.
-
Download the installer .exe.
To verify the integrity of the installer, use the SHA checksum linked from the Download page.
-
Run the installer and follow the wizard steps.
Mind the following options in the installation wizard
-
64-bit launcher: Adds a launching icon to the Desktop.
-
Open Folder as Project: Adds an option to the folder context menu that will allow opening the selected directory as a PyCharm project.
-
.py: Establishes an association with Python files to open them in PyCharm.
-
Add launchers dir to the PATH: Allows running this PyCharm instance from the Console without specifying the path to it.
-
To run PyCharm, find it in the Windows Start menu or use the desktop shortcut. You can also run the launcher batch script or executable in the installation directory under bin.
-
Download the disk image .
To verify the integrity of the downloaded disk image, use the SHA checksum linked from the Download page.
-
Mount the image and drag the PyCharm app to the Applications folder.
Run the PyCharm app from the Applications directory, Launchpad, or Spotlight.
Install using tar archives
-
Download the tarball
-
Unpack the pycharm-*.tar.gz file to a different folder, if your current Download folder doesn’t support file execution:
tar xzf pycharm-*.tar.gz -C <new_archive_folder>
The recommended installation location according to the filesystem hierarchy standard (FHS) is /opt. To install PyCharm into this directory, enter the following command:
sudo tar xzf pycharm-*.tar.gz -C /opt/
To verify integrity of the downloaded archive, use the SHA checksum linked from the Download page.
-
Switch to the bin subdirectory:
cd <new archive folder>/pycharm-*/bin
For example,
cd /opt/pycharm-2022.2.4/bin
-
Run pycharm.sh from the bin subdirectory.
sh pycharm.sh
To create a desktop entry, do one of the following:
-
On the Welcome screen, click Configure | Create Desktop Entry
-
From the main menu, click Tools | Create Desktop Entry
When you run PyCharm for the first time, you can take several steps to complete the installation, customize your instance, and start working with the IDE.
For more information, refer to Run PyCharm for the first time.
For more information about the location of the default IDE directories with user-specific files, refer to Directories used by the IDE.
Silent installation on Windows
Silent installation is performed without any user interface. It can be used by network administrators to install PyCharm on a number of machines and avoid interrupting other users.
To perform silent install, run the installer with the following switches:
-
/S: Enable silent install -
/CONFIG: Specify the path to the silent configuration file -
/D: Specify the path to the installation directoryThis parameter must be the last in the command line, and it should not contain any quotes even if the path contains blank spaces.
For example:
pycharm-professional.exe /S /CONFIG=d:\temp\silent.config /D=d:\IDE\PyCharm
To check for issues during the installation process, add the /LOG switch with the log file path and name between the /S and /D parameters. The installer will generate the specified log file. For example:
pycharm-professional.exe /S /CONFIG=d:\temp\silent.config /LOG=d:\JetBrains\PyCharm\install.log /D=d:\IDE\PyCharm
Silent configuration file
You can download the silent configuration files for PyCharm at https://download.jetbrains.com/python/silent.config.
The silent configuration file defines the options for installing PyCharm. With the default options, silent installation is performed only for the current user: mode=user. If you want to install PyCharm for all users, change the value of the installation mode option to mode=admin and run the installer as an administrator.
The default silent configuration file is unique for each JetBrains product. You can modify it to enable or disable various installation options as necessary.
See more details on installing PyCharm in the video tutorial:
Install as a snap package on Linux
You can install PyCharm as a self-contained snap package. Since snaps update automatically, your PyCharm installation will always be up-to-date.
PyCharm is distributed via two channels:
-
The stable channel includes only stable versions. To install the latest stable release of PyCharm, run the following command:
sudo snap install pycharm-professional —classic
sudo snap install pycharm-community —classic
The
--classicoption is required because the PyCharm snap requires full access to the system, like a traditionally packaged application. -
The edge channel includes EAP builds. To install the latest EAP build of PyCharm, run the following command:
sudo snap install pycharm-professional —classic —edge
sudo snap install pycharm-community —classic —edge
When the snap is installed, you can launch it by running the pycharm-professional or pycharm-community command.
To list all installed snaps, you can run sudo snap list. For more information about other snap commands, refer to the Snapcraft documentation.
Last modified: 27 September 2023
В прошлом уроке мы установили Python, однако, этого недостаточно для того, чтобы писать программы. Нам также потребуется редактор кода, а точнее IDE — интегрированная среда разработки.
Такие среды помимо редактора кода, содержат и другие инструменты, которые упрощают написание программ.
В этом курсе мы будем использовать PyCharm Community от компании JetBrains. PyCharm — это одна из самых популярных IDE, и на данный момент есть две версии: бесплатная Community и платная Professional.
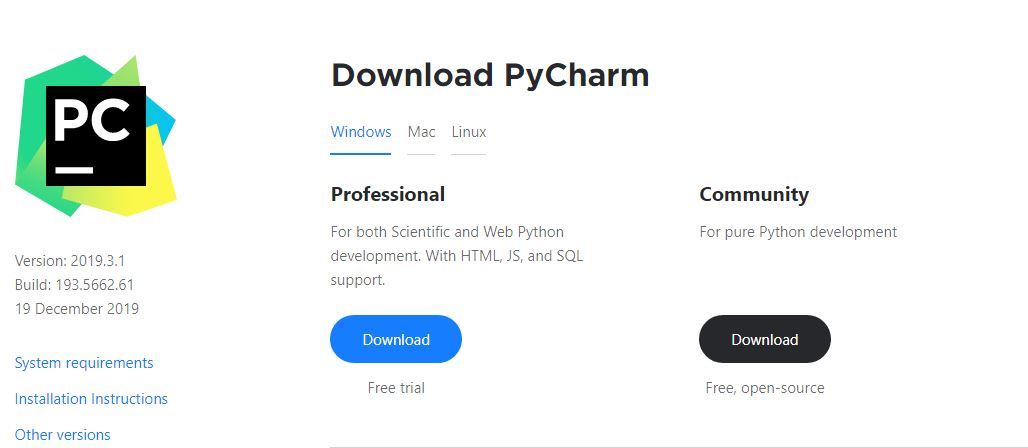
Вам нужно скачать PyCharm Community. Для этого на странице загрузки нужно кликнуть по кнопке Download
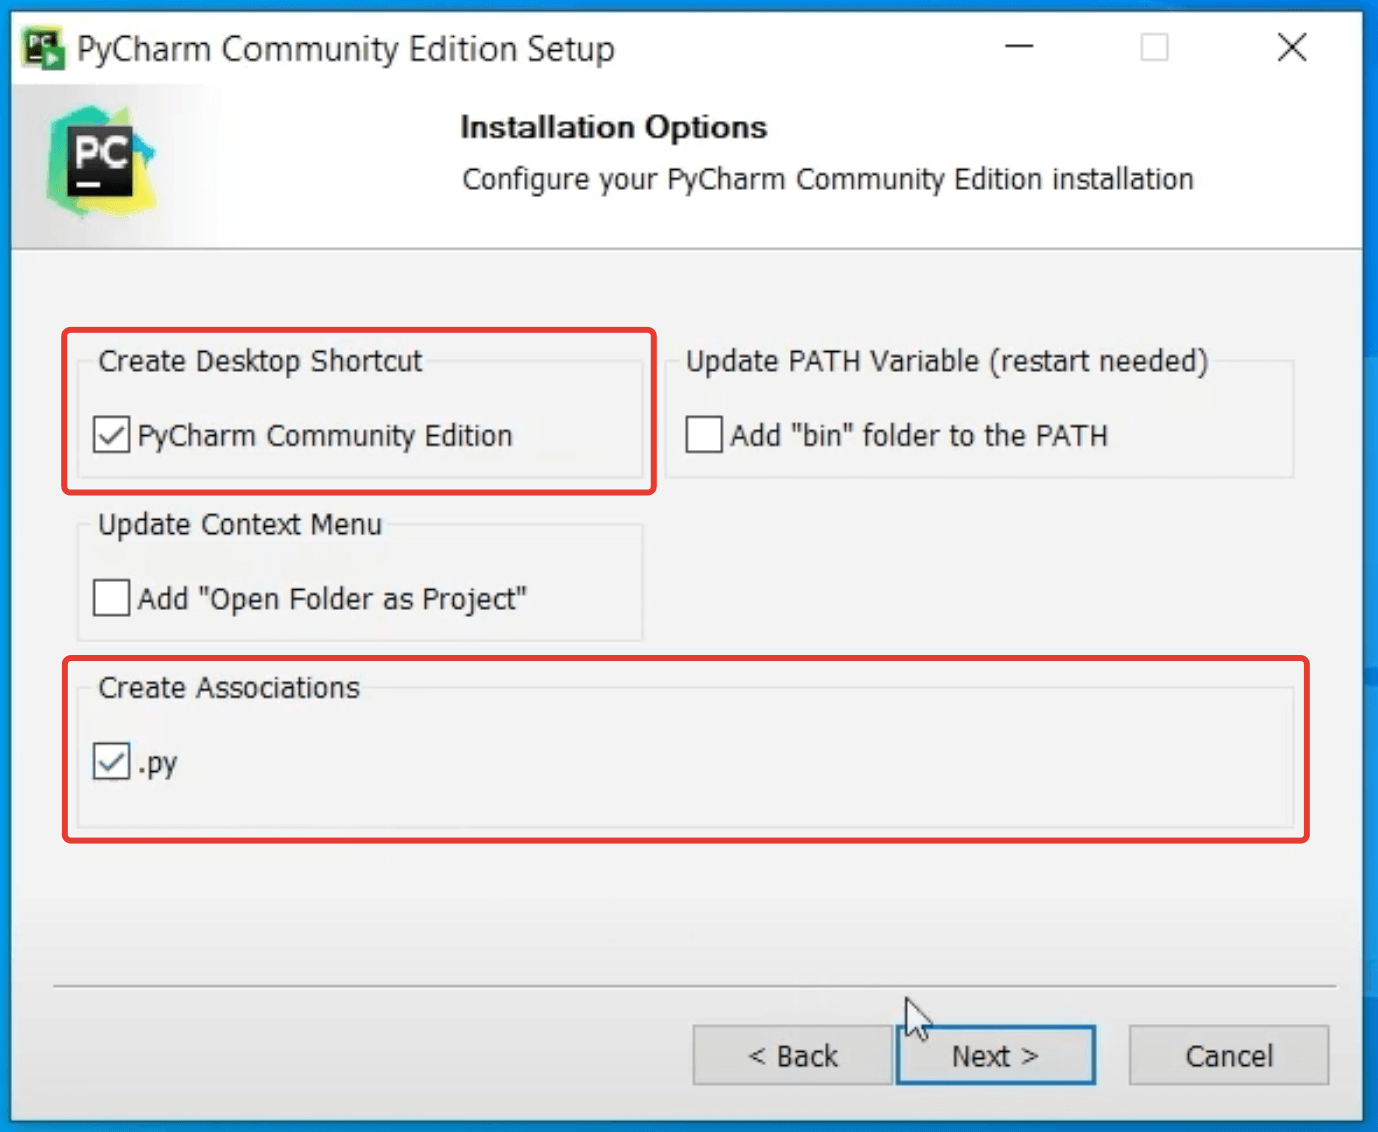
После загруки установщика, его нужно запустить и выдать необходимые Windows-разрешения. Далее надо несколько раз нажать Next и отметить галочки для создания ярлыка на рабочем столи и связи PyCharm с .py-файлами:
Далее снова нажимем Next и Install, чтобы запустить процесс установки.
После завершения нажимаем Finish и теперь можно запускать PyCharm кликнув по ярлыку на рабочем столе. На этом этапе у вас может всплыть окно с лицензионным соглашением, которое надо принять.
Также вам может быть предложено импортировать настройки из ранее установленного PyCharm. Можно смеало выбрать Don’t import settings и нажать OK.
Если всё прошло успешно, то произойдет первый запуск IDE и на этом этапе Брандмауэр Windows может попросить разрешения доступа. Надо разрешить.
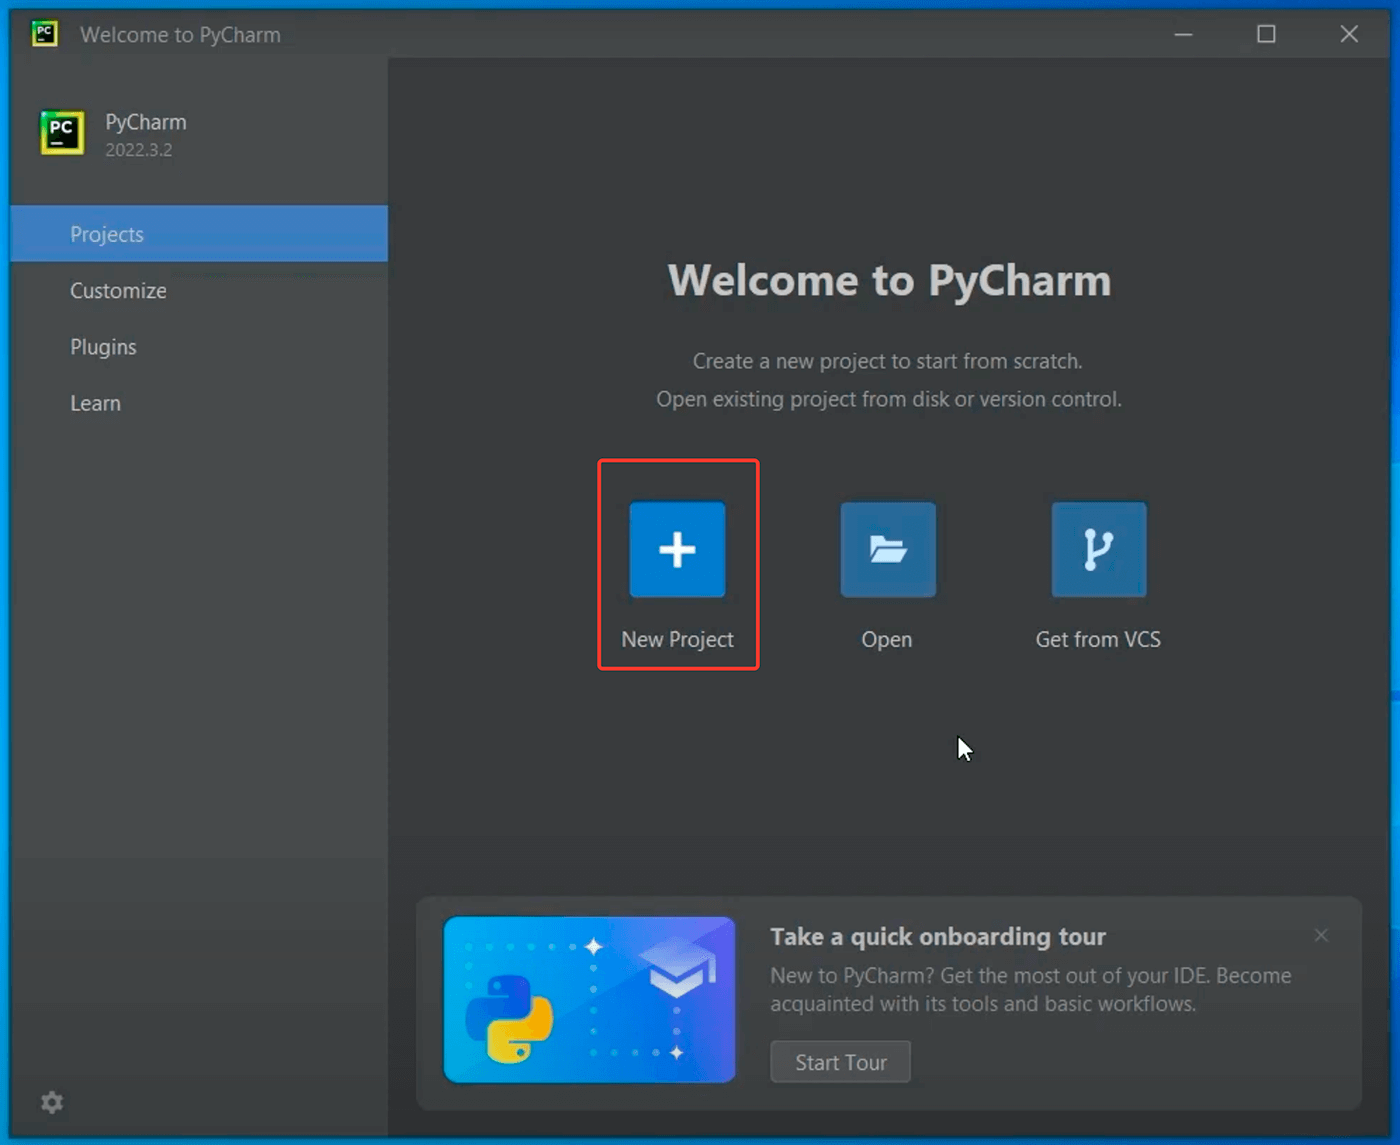
После откроется Welcome окно, в котором необходимо создать наш первый проект, нажав на New Project:
В верхней строке нам предлагают выбрать каталог, в котором мы будем хранить наш проект. Сам PyCharm рекомендует создать внутри домашней папки пользователя каталог PycharmProjects для хранения всех проектов и pythonProject для хранения нашего текущего:
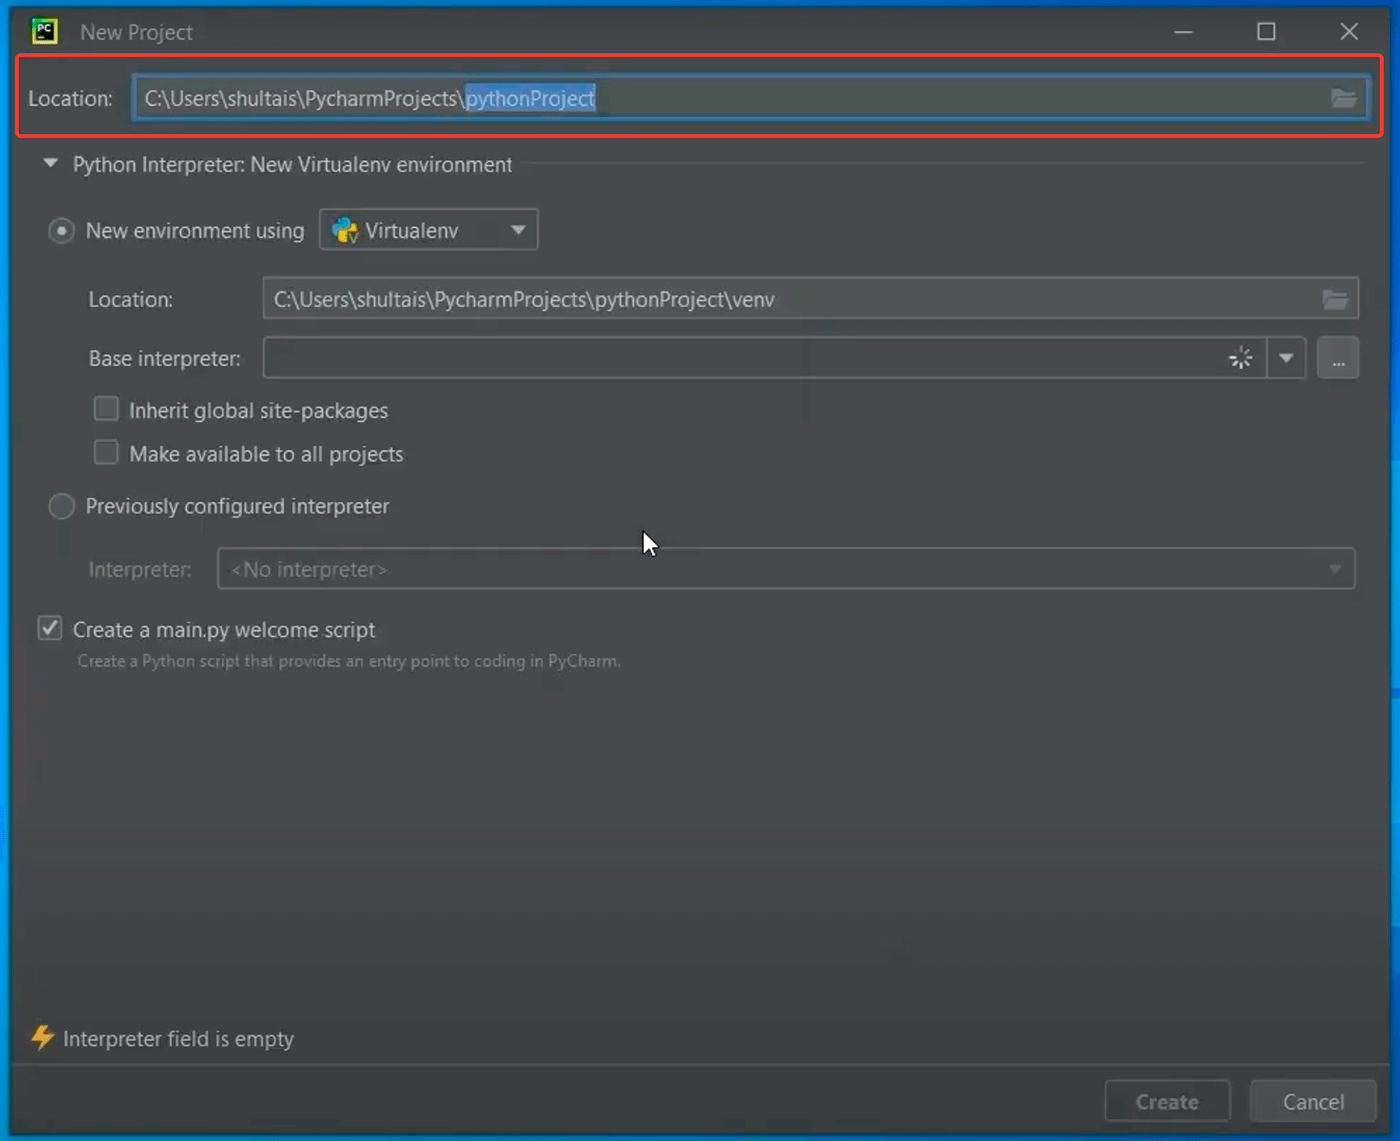
Давайте PycharmProjects оставим как есть, а вот создаваемый проект переименуем во что-то другое. Вы можете дать ему любое имя, которое вам нравится, но постарайтесь выполнить два условия:
1. Используйте только латиницу.
2 Не используйте пробелы.
Я вместо pythonProject напишу SEPython.
Далее нам надо выбрать версию Питона, которую мы будем использовать в нашем проекте. Причем PyCharm нам сразу предлагает использовать виртуальные окружения. Виртуальные окружения мы будем изучать ближе к концу курса. Нас же пока интересует строка с базовым интерпретатором. Если на неё внимательно посмотреть, то мы увидим Python 3.11 это тот самый Python, который мы установили в прошлом уроке:

В итоге мы создаем проект SEPython, и это проект будет использовать питон, который мы установили в прошлом уроке.
Отлично, нажмем Create и немного подождем пока всё установится и настроится. В процессе PyCharm создаст виртуальное окружение, обновит пути и так далее.
После создания проекта, PyCharm сразу же добавим в него файл main.py с элементарным кодом. Давайте запустим его.
Для этого в правом верхнем углу напротив main.py надо нажать на зеленую стрелочку. Эта стрелочка запускает программу:
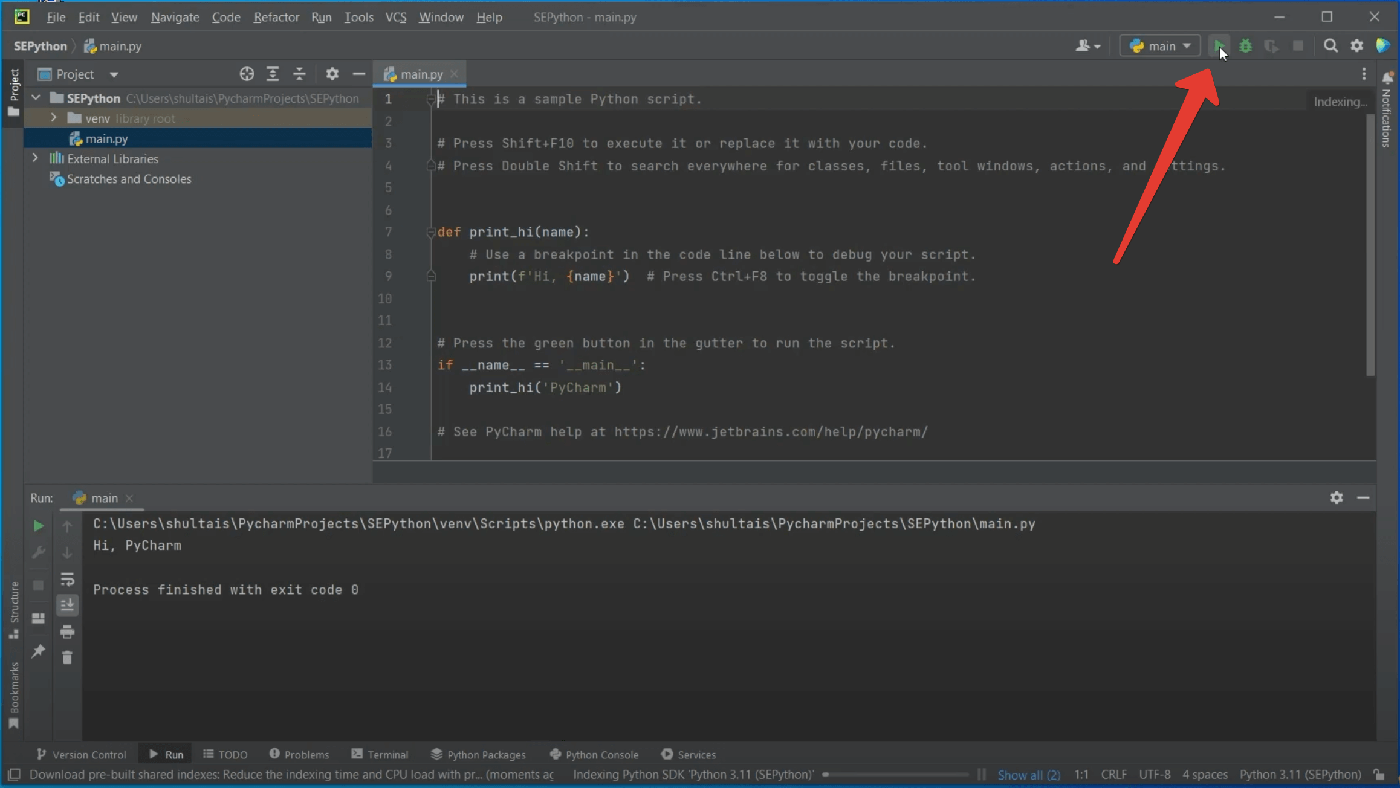
После запуска внизу вы должны увидеть результат её работы — фразу «Hi, PyCharm». Поздравляю, ваша первая программа на Python запущена. Но её создали в JetBrains. Нас же интересует написание собственных программ и про это мы поговорим в следующем уроке.
Следующий урок
Урок 5. Первая программа в Windows
В этом уроке вы напишите свою первую программу на языке Python.
Посмотреть
Полный курс с практикой
- 146 уроков
- 298 заданий
- Сертификат
- Поддержка преподавателя
- Доступ к курсу навсегда
4700 ₽
- Можно в рассрочку
Регистрация
Prerequisite: Python Language Introduction
Python is a widely-used general-purpose, high-level programming language. It was initially designed by Guido van Rossum in 1991 and developed by Python Software Foundation. It was mainly developed for emphasis on code readability, and its syntax allows programmers to express concepts in fewer lines of code.
Python is a programming language that lets you work quickly and integrate systems more efficiently.
We need to have an interpreter to interpret and run our programs. There are certain online interpreters like GFG-IDE, IDEONE or CodePad, etc. Running Python codes on an offline interpreter is much more compatible than using an online IDE.
PyCharm is one of the most popular Python-IDE developed by JetBrains used for performing scripting in Python language. PyCharm provides some very useful features like Code completion and inspection, Debugging process, support for various programming frameworks such as Flask and Django, Package Management, etc. PyCharm provides various tools for productive development in Python.
Installing Python:
Before, starting with the process of installing PyCharm in Windows, one must ensure that Python is installed on their system. To check if the system is equipped with Python, go to the Command line(search for cmd in the Run dialog(
+ R).
Now run the following command:
python --version
If Python is already installed, it will generate a message with the Python version available.

If Python is not present, go through How to install Python on Windows? and follow the instructions provided.
Downloading and Installing PyCharm:
Before beginning with the installation process, PyCharm needs to be downloaded. For that, PyCharm is available on jetbrains.com.
Download the PyCharm and follow the further instructions for its installation.
Beginning with the installation:
Getting Started with PyCharm:
Once the Installation is over, PyCharm can be searched and started from the Start Menu. Follow the steps given below to do the same:
Last Updated :
28 Jan, 2020
Like Article
Save Article
Learn how to easily set up PyCharm Community Edition in 2023 with our step-by-step guide.
Introduction
PyCharm is a powerful Integrated Development Environment (IDE) used for programming in Python. PyCharm provides valuable tools such as code analysis, a graphical debugger, and an integrated unit tester, making it an ideal choice for both data science and machine learning applications. In addition, it supports web development with various Python frameworks, including Django, Flask, Pyramid, and web2py. This tutorial is specifically tailored to the PyCharm Community Edition, which is free and open source.
Whether you’re a Dataquest learner or a seasoned developer looking to switch IDEs, this guide will walk you through the process of installing and setting up PyCharm Community Edition for optimal Python development.
In this tutorial, we’ll cover:
- How to install PyCharm Community Edition
- Creating and running a Python file
- Using the Python console
- Formatting Python code
- Refactoring Python code
- Setting up virtual environments
By the end of this guide, you’ll have a fully configured PyCharm environment ready to handle your Python projects. Let’s get started!
![]()
Installing PyCharm Community Edition IDE
Getting PyCharm Community Edition set up on your computer is a task that requires a few simple steps. These steps vary based on the operating system you’re using.
Step 1: Download PyCharm Community Edition
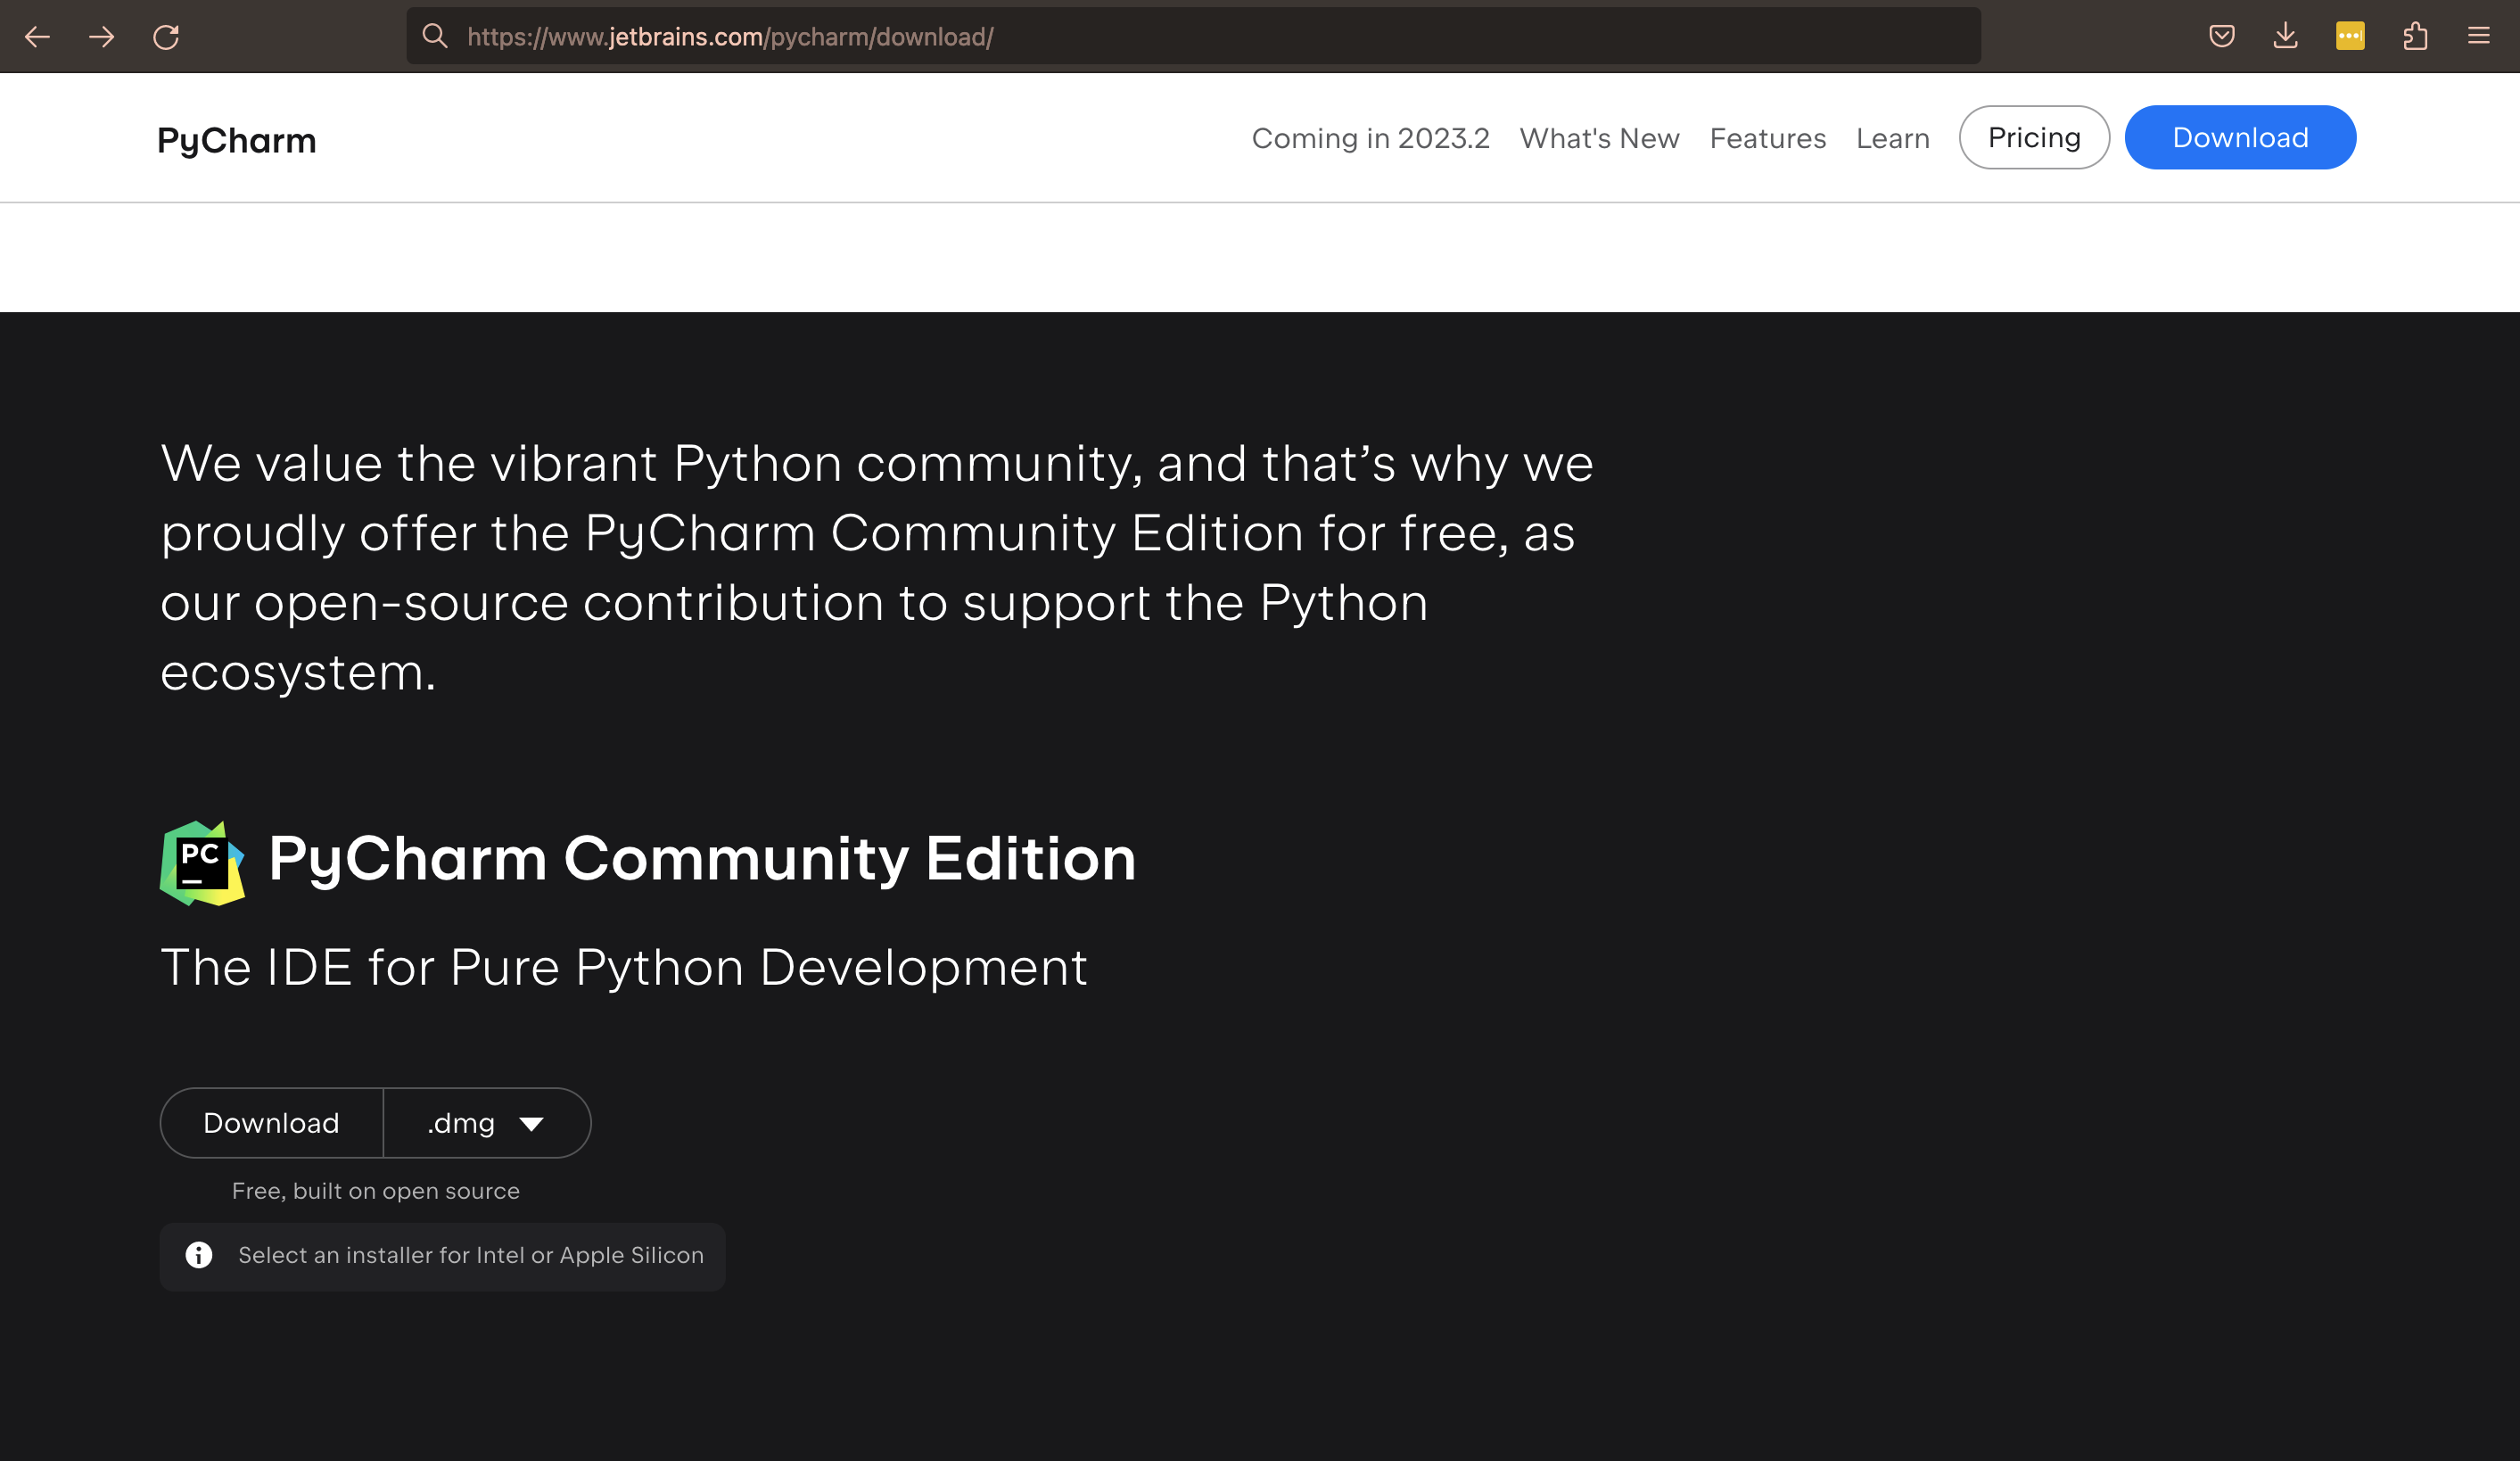
Begin by heading over to the official JetBrains website. Here you’ll find the PyCharm Community Edition. The site automatically determines your operating system and suggests the appropriate version for download. For macOS users, please note that there are separate disk images for Intel and Apple Silicon processors. Click on the «Download» button in the PyCharm Community Edition segment of the webpage.
Step 2: Install PyCharm Community Edition
Once the download is finished, find the downloaded file (usually in your «Downloads» folder). Double-click on the downloaded file to initiate the installation process.
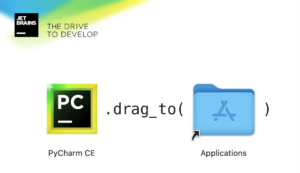
For macOS users, download the disk image. Drag the PyCharm icon into the Applications folder when prompted. Run the PyCharm app from the Applications directory, Launchpad, or Spotlight.
If you’re a Windows user, start by downloading the .exe installer. Please note, if you’re using an ARM64 processor, there’s a dedicated installer available. Once downloaded, run the installer and adhere to the guidelines provided by the setup wizard.
During the setup process, be aware of a few key options: «64-bit launcher», «Open Folder as Project», «.py», and «Add launchers dir to the PATH». Ensuring these are correctly set up will help optimize your coding environment.
After completing the installation, you’ll be able to access PyCharm either via the Windows Start menu or by utilizing the desktop shortcut if you chose to create one.
For Linux users, start by downloading the tar.gz file from the JetBrains website. There’s a separate tarball for ARM64 processors.
You can unpack the tar.gz file to a folder of your choosing using the command below if your current Download folder doesn’t support file execution:
tar -xzf pycharm-*.tar.gz -C <new_archive_folder>The recommended installation location according to the filesystem hierarchy standard (FHS) is /opt. If you want to extract the tar.gz file to this folder, use the following command:
sudo tar -xzf pycharm-*.tar.gz -C /opt/Remember, when using sudo, you’ll be prompted for your password. Also, keep in mind that with great power comes great responsibility: use sudo judiciously, as it allows you to make significant changes to your system. Always double-check a command before running it with sudo.
Verify the integrity of the downloaded archive by using the SHA checksum linked from the Download page. Then, switch to the bin subdirectory of your installation folder:
cd /opt/pycharm-*/binFinally, run pycharm.sh from the bin subdirectory.
./pycharm.shCreate a desktop entry from the Welcome screen by clicking Configure | Create Desktop Entry, or by clicking Tools | Create Desktop Entry from the main menu.
Step 3: Launch PyCharm Community Edition
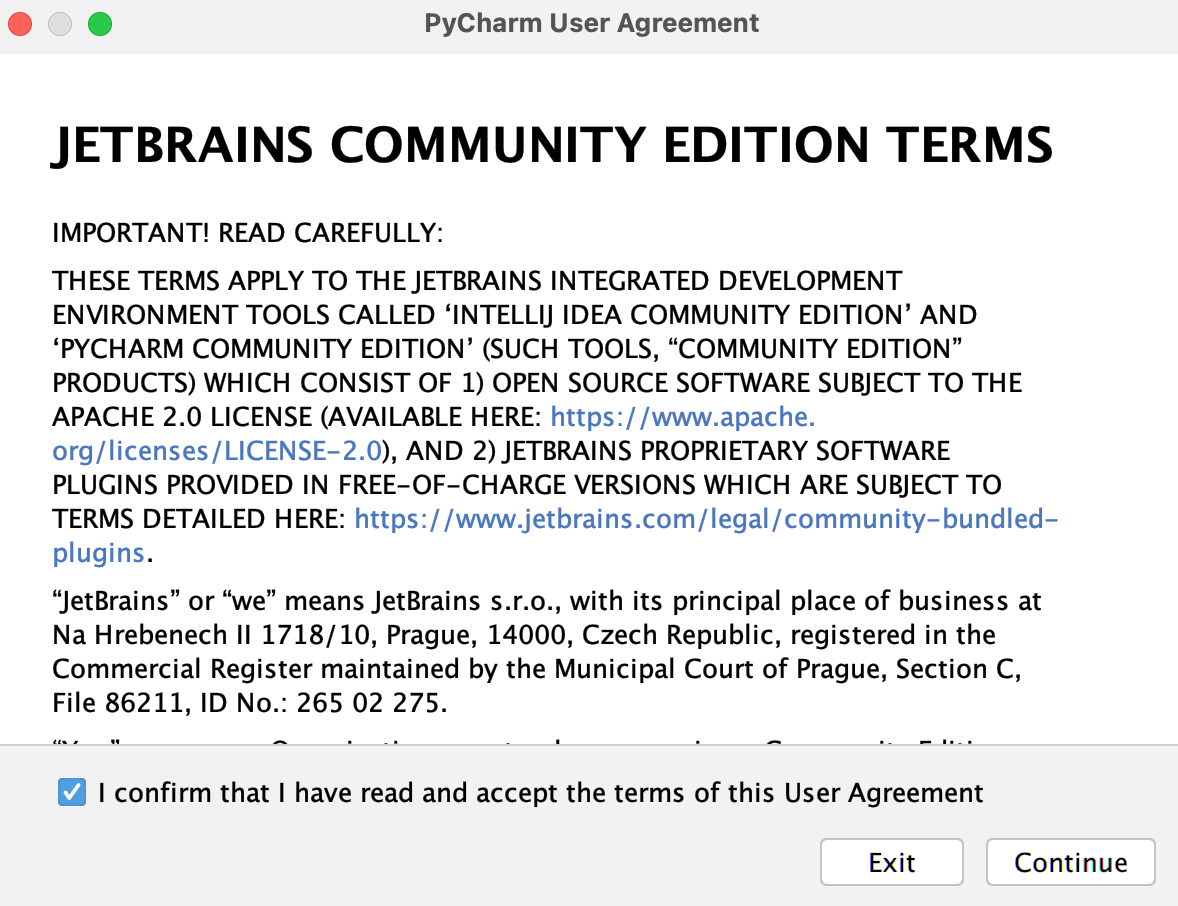
After the installation is complete, PyCharm can be found in your Applications folder (macOS) or in your list of installed programs (Windows). Open PyCharm to initiate the IDE and accept the security warning confirming your willingness to open the application. Follow the instructions and accept the PyCharm User Agreement terms.
For Windows users, you can open PyCharm through the Start menu or by typing «PyCharm» in the search bar.
For Linux users, you can open PyCharm through the applications menu or by typing pycharm in the terminal, depending on your specific installation process.
Creating and Running a Python File in PyCharm
One of the main reasons to use an IDE like PyCharm is the ease with which you can write and run Python code. Let’s set up PyCharm Community Edition to run a Python file. Just a quick note: the steps to create and run a Python file in PyCharm might differ slightly based on whether you’re on Windows, macOS, or Linux, so it’s always a good idea to check out the OS-specific PyCharm documentation if you run into any hiccups!
Step 1: Create a New Project
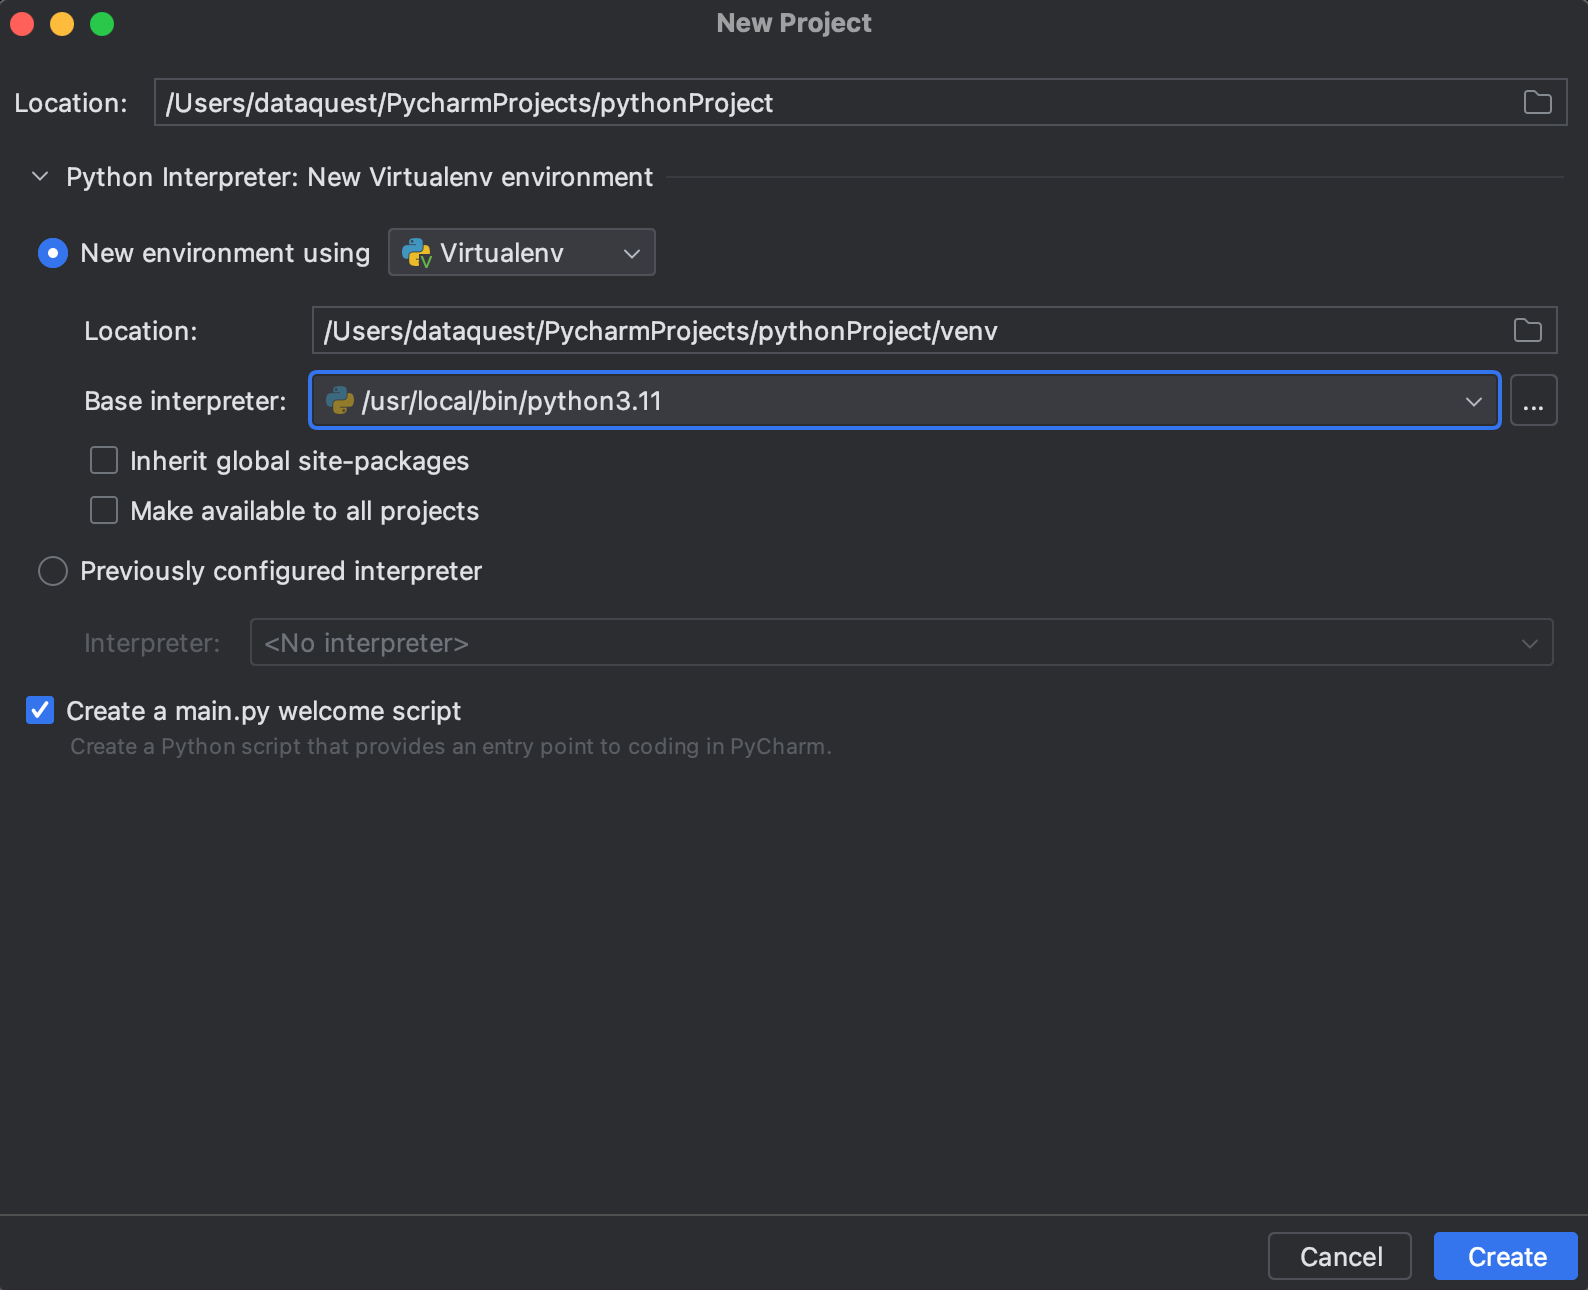
On the Welcome screen, select New Project.
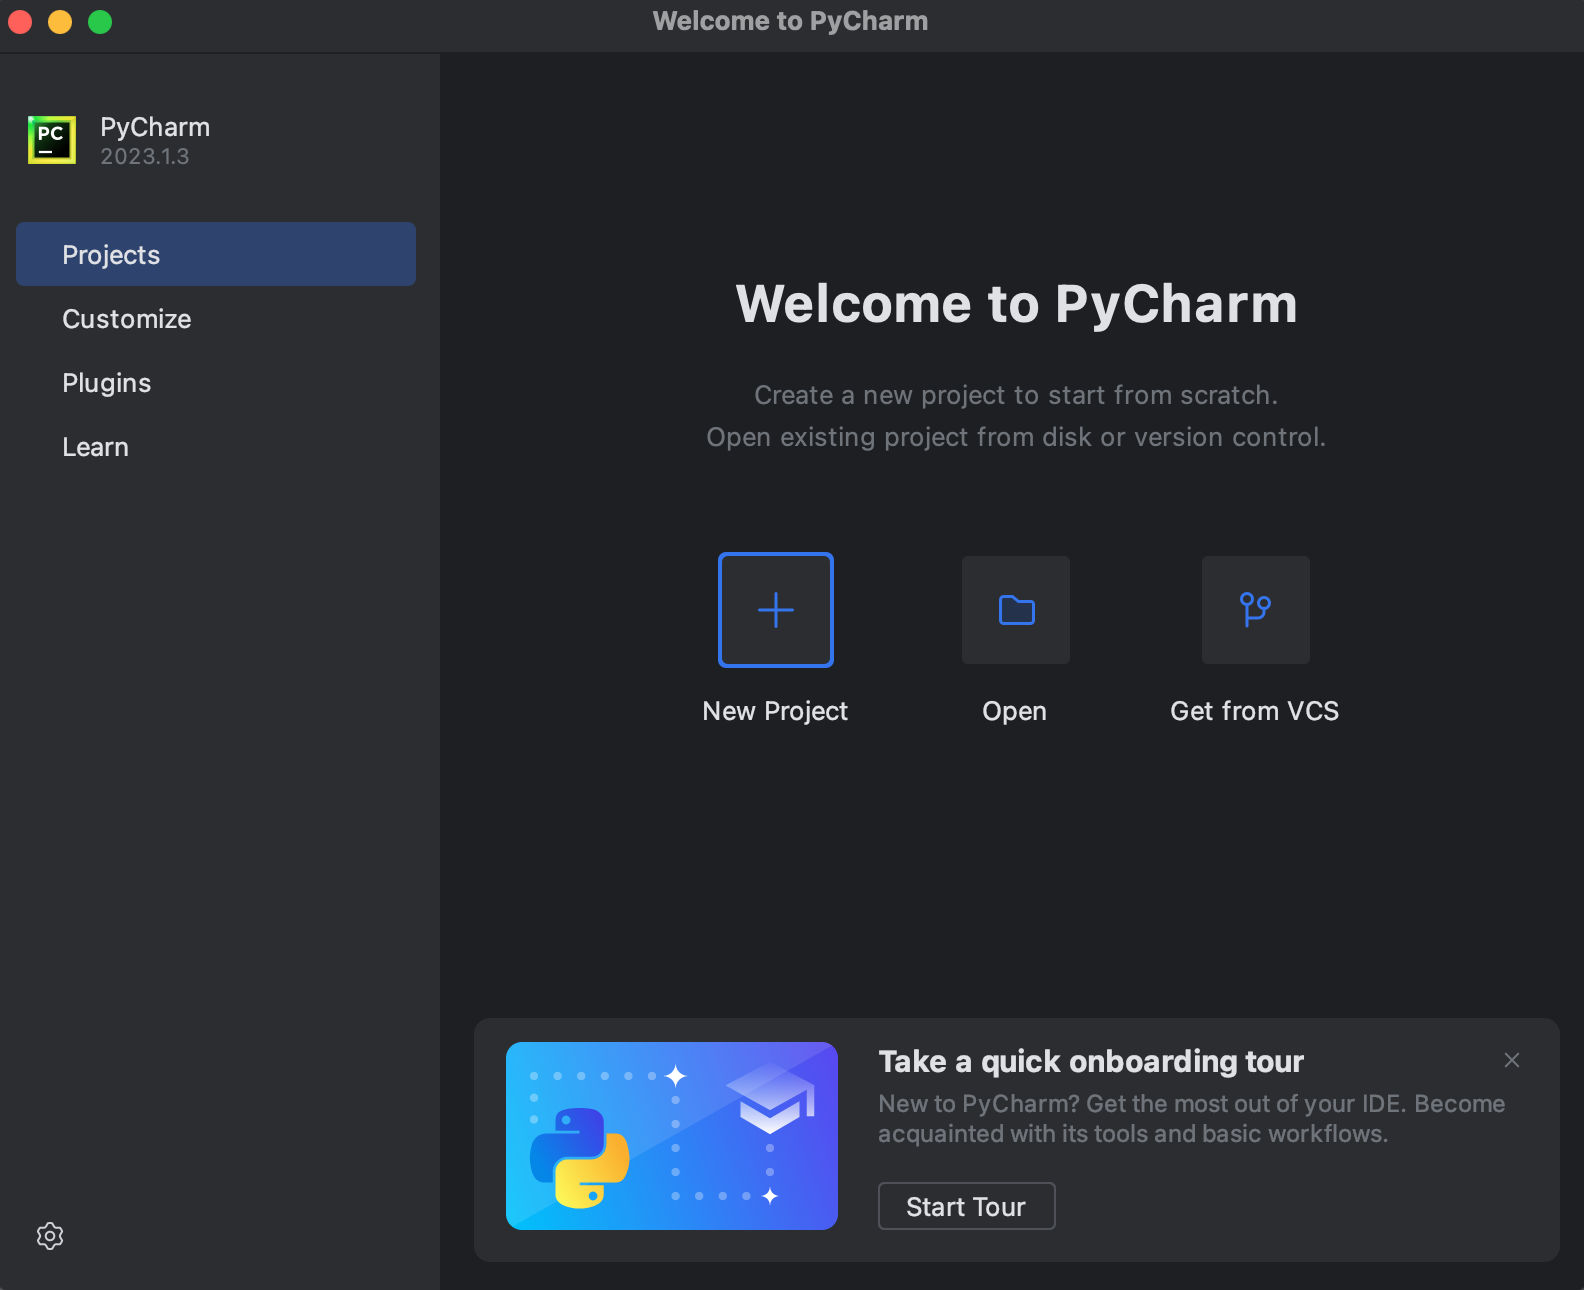
Then specify the project location, environment, and Python interpreter. Select the most recent version of Python that you have installed.

If you do not see the option to select a Python base interpreter, you may need to install Python on your computer. If you’re a Mac user check out this Dataquest blog post to learn how to install Python. If you’re a Windows user, check out this blog post.
Leave the box checked that says «Create a main.py welcome script». This will create and open a Python script when the project is created.
Step 2: Create a New Python Script
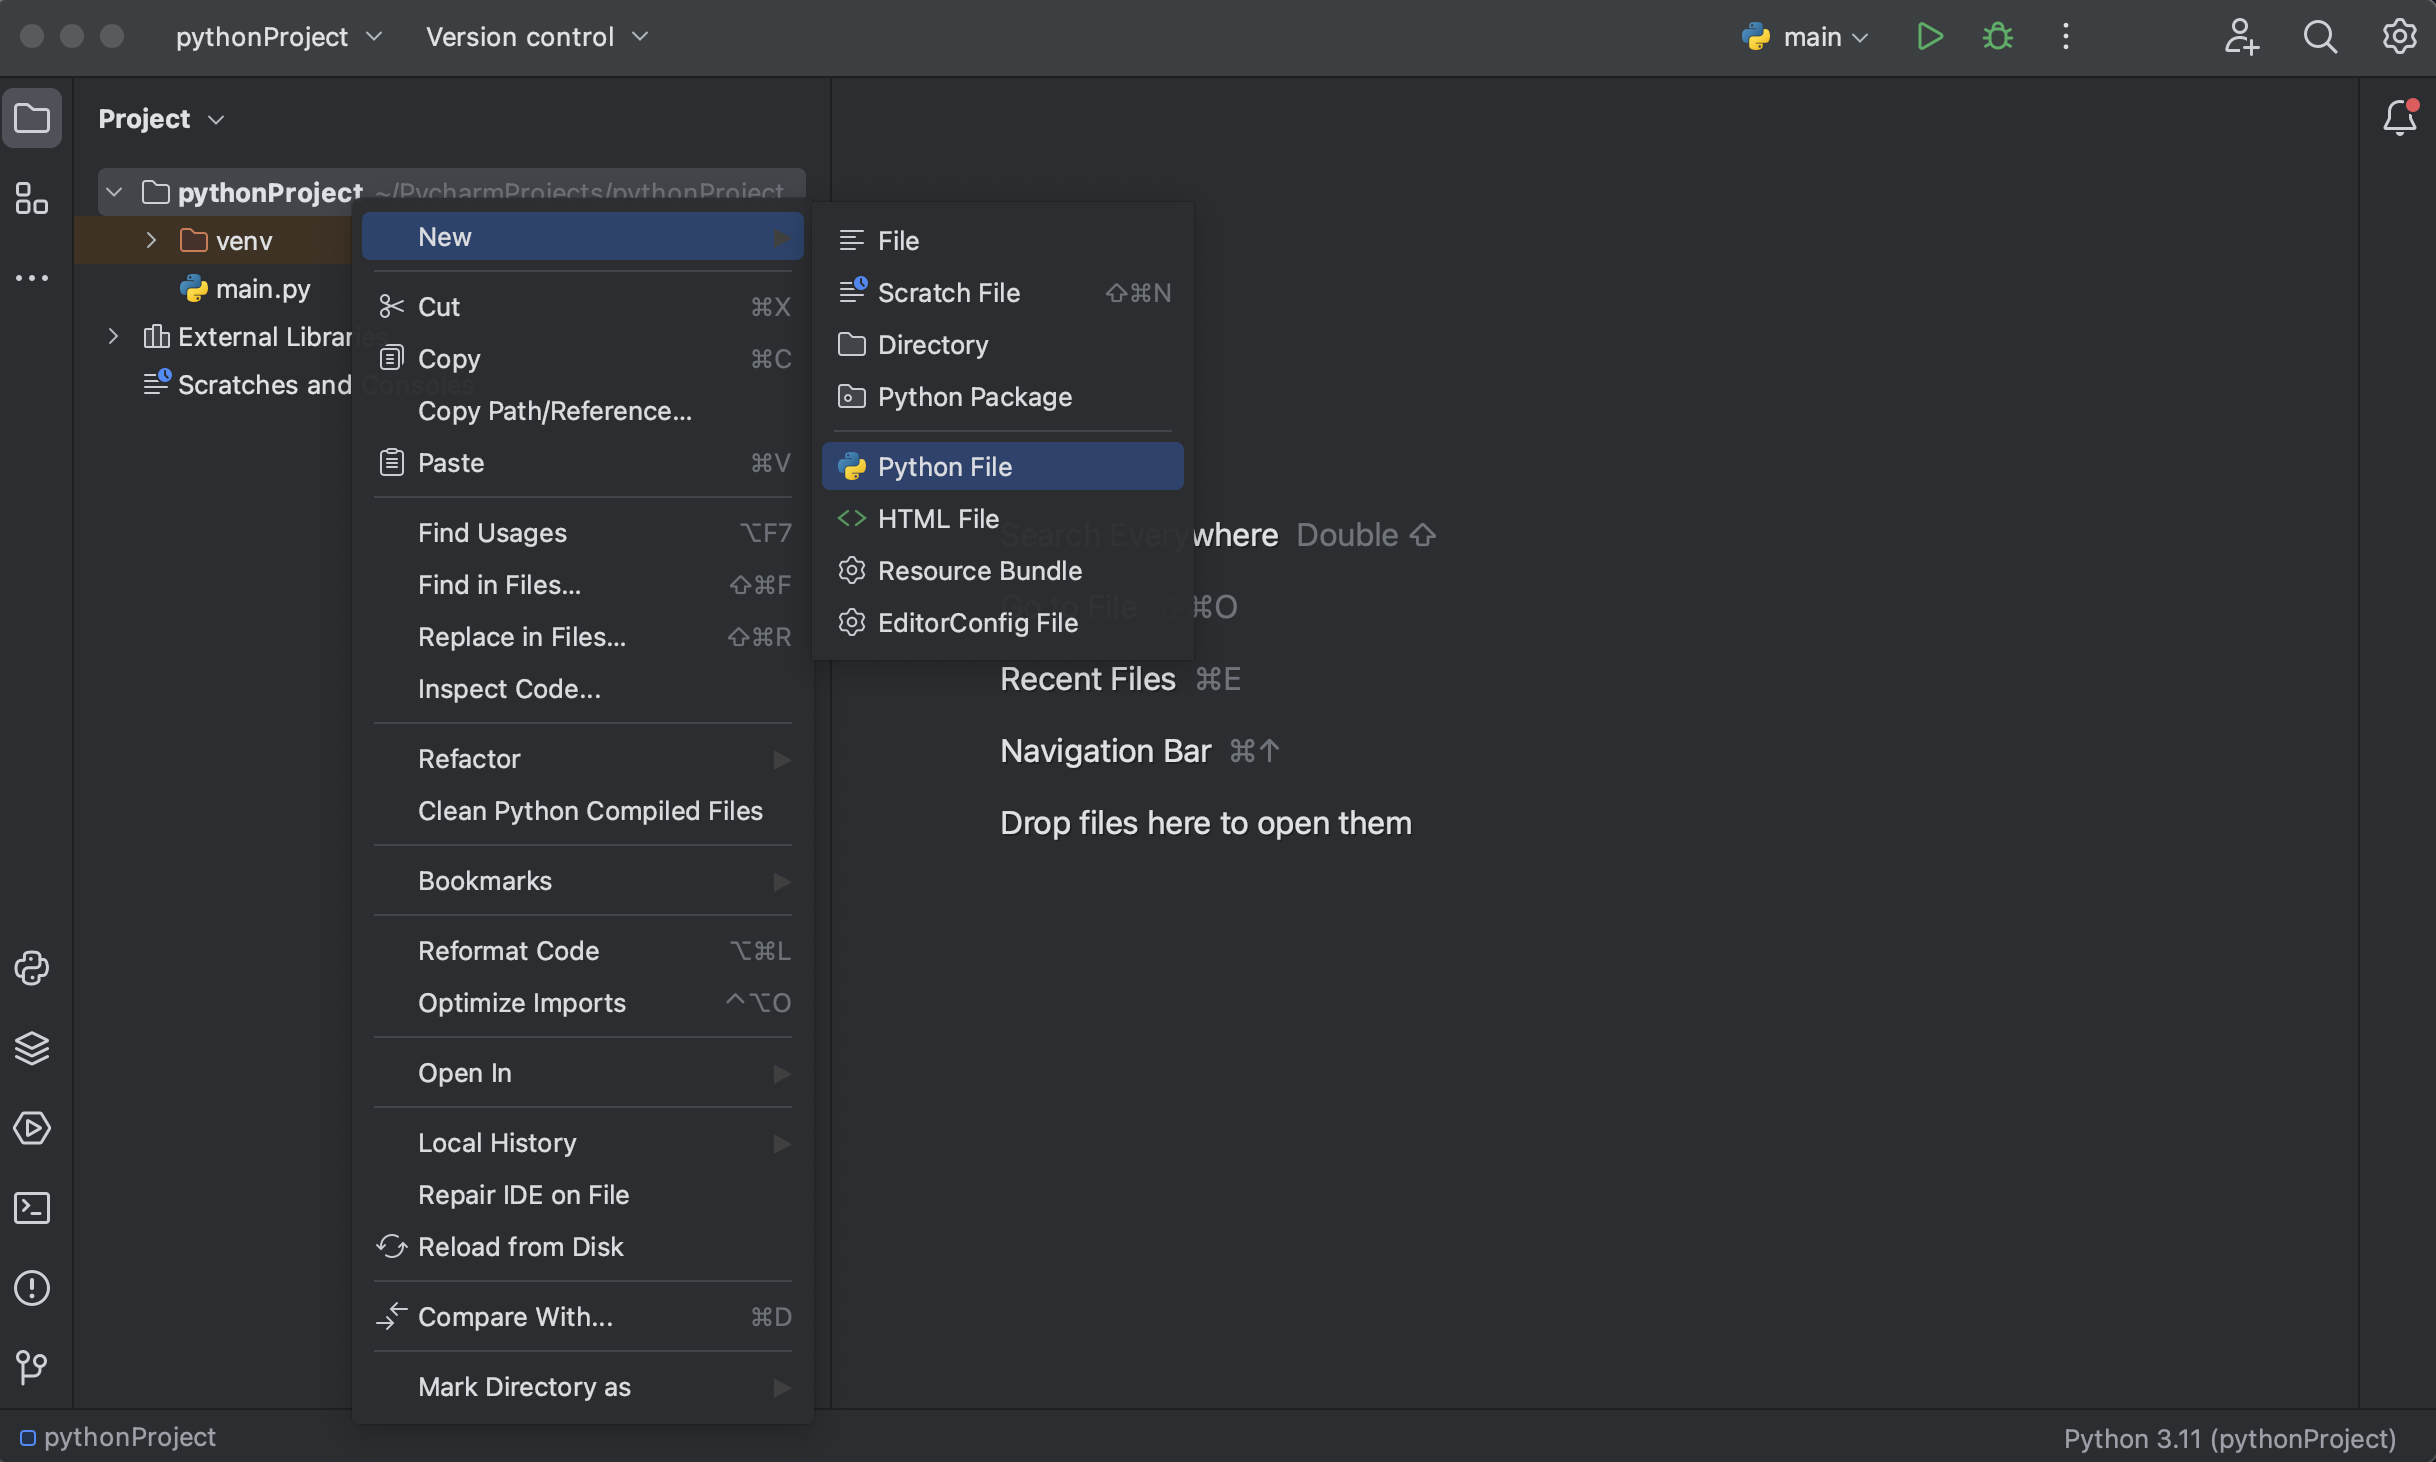
If you’re greeted by the main.py file when the project opens, you’re ready to start coding in Python. If you need to create a new Python file, right-click on your project in the «Project» pane, then select «New» > «Python File». You’ll be prompted to enter a name for your file.
Step 3: Write Some Python Code
Once you’ve created your Python file, you can start writing code. For this tutorial, let’s write a simple function that checks if a word is a palindrome (a word that reads the same backward as forward). Here’s an example:
def is_palindrome(word):
    return word == word[::-1]

print(is_palindrome('radar'))  # This will print: True
print(is_palindrome('python'))  # This will print: False
Step 4: Run Your Python Code
To run your Python code, right-click anywhere in your code editor and select «Run [filename]», or click the green triangle above the code editor.

You’ll see the output of your code in the «Run» pane at the bottom of the PyCharm window.
In the next section, we’ll discuss how to use the Python console in PyCharm Community Edition.
Using the Python Console
The Python console is a built-in tool in PyCharm that allows you to execute Python commands interactively. It’s a great place to experiment with code and test your functions.
Step 1: Open the Python Console
To open the Python console, go to «View» > «Tool Windows» > «Python Console» in the PyCharm menu.
Step 2: Use the Python Console
Once the Python console is open, you can start typing Python commands. The console will execute these commands immediately and show the results. For example, you can use the Python console to call the is_palindrome function we defined earlier. Right-click inside the code editor, then select «Run File in Python Console». We’ll see the results from our Python script and then can continue to use the function:
True
False
>>> is_palindrome('noon')
True
In the next section, we’ll discuss how to format Python code in PyCharm Community Edition.
Formatting Python Code
Writing clean, readable code is an important part of software development. PyCharm Community Edition comes with built-in tools to help you format your Python code according to the PEP 8 style guide.
To enable PEP 8 compliance checking, go to «PyCharm» > «Settings» > «Editor» > «Inspections». Under «Python», check «PEP 8 coding style violation», if it’s not checked already. PyCharm will now highlight any parts of your code that violate the PEP 8 style guide.
Refactoring Python Code
Refactoring is the process of restructuring existing code without changing its external behavior. It’s a way to improve the design, structure, and implementation of your code, while preserving its functionality.
One might ask, «Why bother with refactoring?» The reason is that refactoring can significantly enhance the readability and maintainability of your code. It makes your code more structured, efficient, and easier to understand. Furthermore, clean and well-structured code is simpler to extend or modify later on.
In PyCharm Community Edition, you can perform refactoring in a few clicks. But it’s crucial to remember that after each refactoring step, you should run your tests to make sure the code still works as expected. This practice helps maintain the integrity of your code during the refactoring process.
Example 1: Renaming a Symbol
One of the most common refactoring tasks is renaming a symbol (a variable, function, class, method, etc.). To rename a symbol in PyCharm, right-click the symbol and select «Refactor» > «Rename». You’ll be prompted to enter a new name for the symbol.
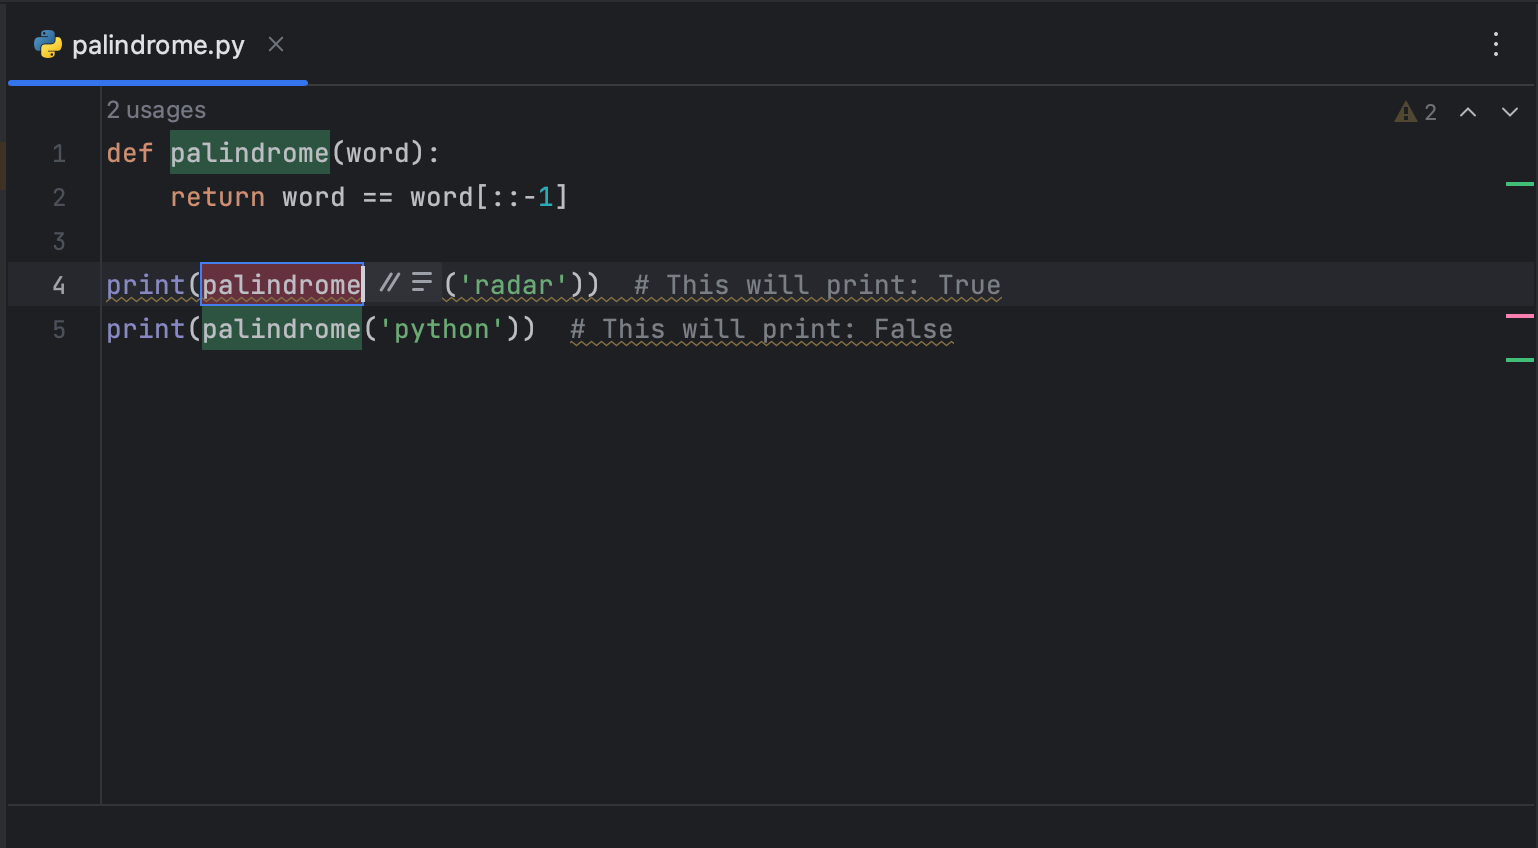
Now, all instances of is_palindrome have been changed to palindrome.
Example 2: Extracting a Variable, Constant, or Method
Another common refactoring task is extracting a piece of code into a variable, constant, or method. This can make your code more readable and reusable. To extract a piece of code in PyCharm, select the code, then right-click, select «Refactor» and choose an option.
Let’s see an example of the extract method feature. We’ll start by creating a new Python file and pasting the following piece of code into it.
def user_profile():
user = "Alice"
age = 25
profile = "User: " + user + ", Age: " + str(age)
print(profile)
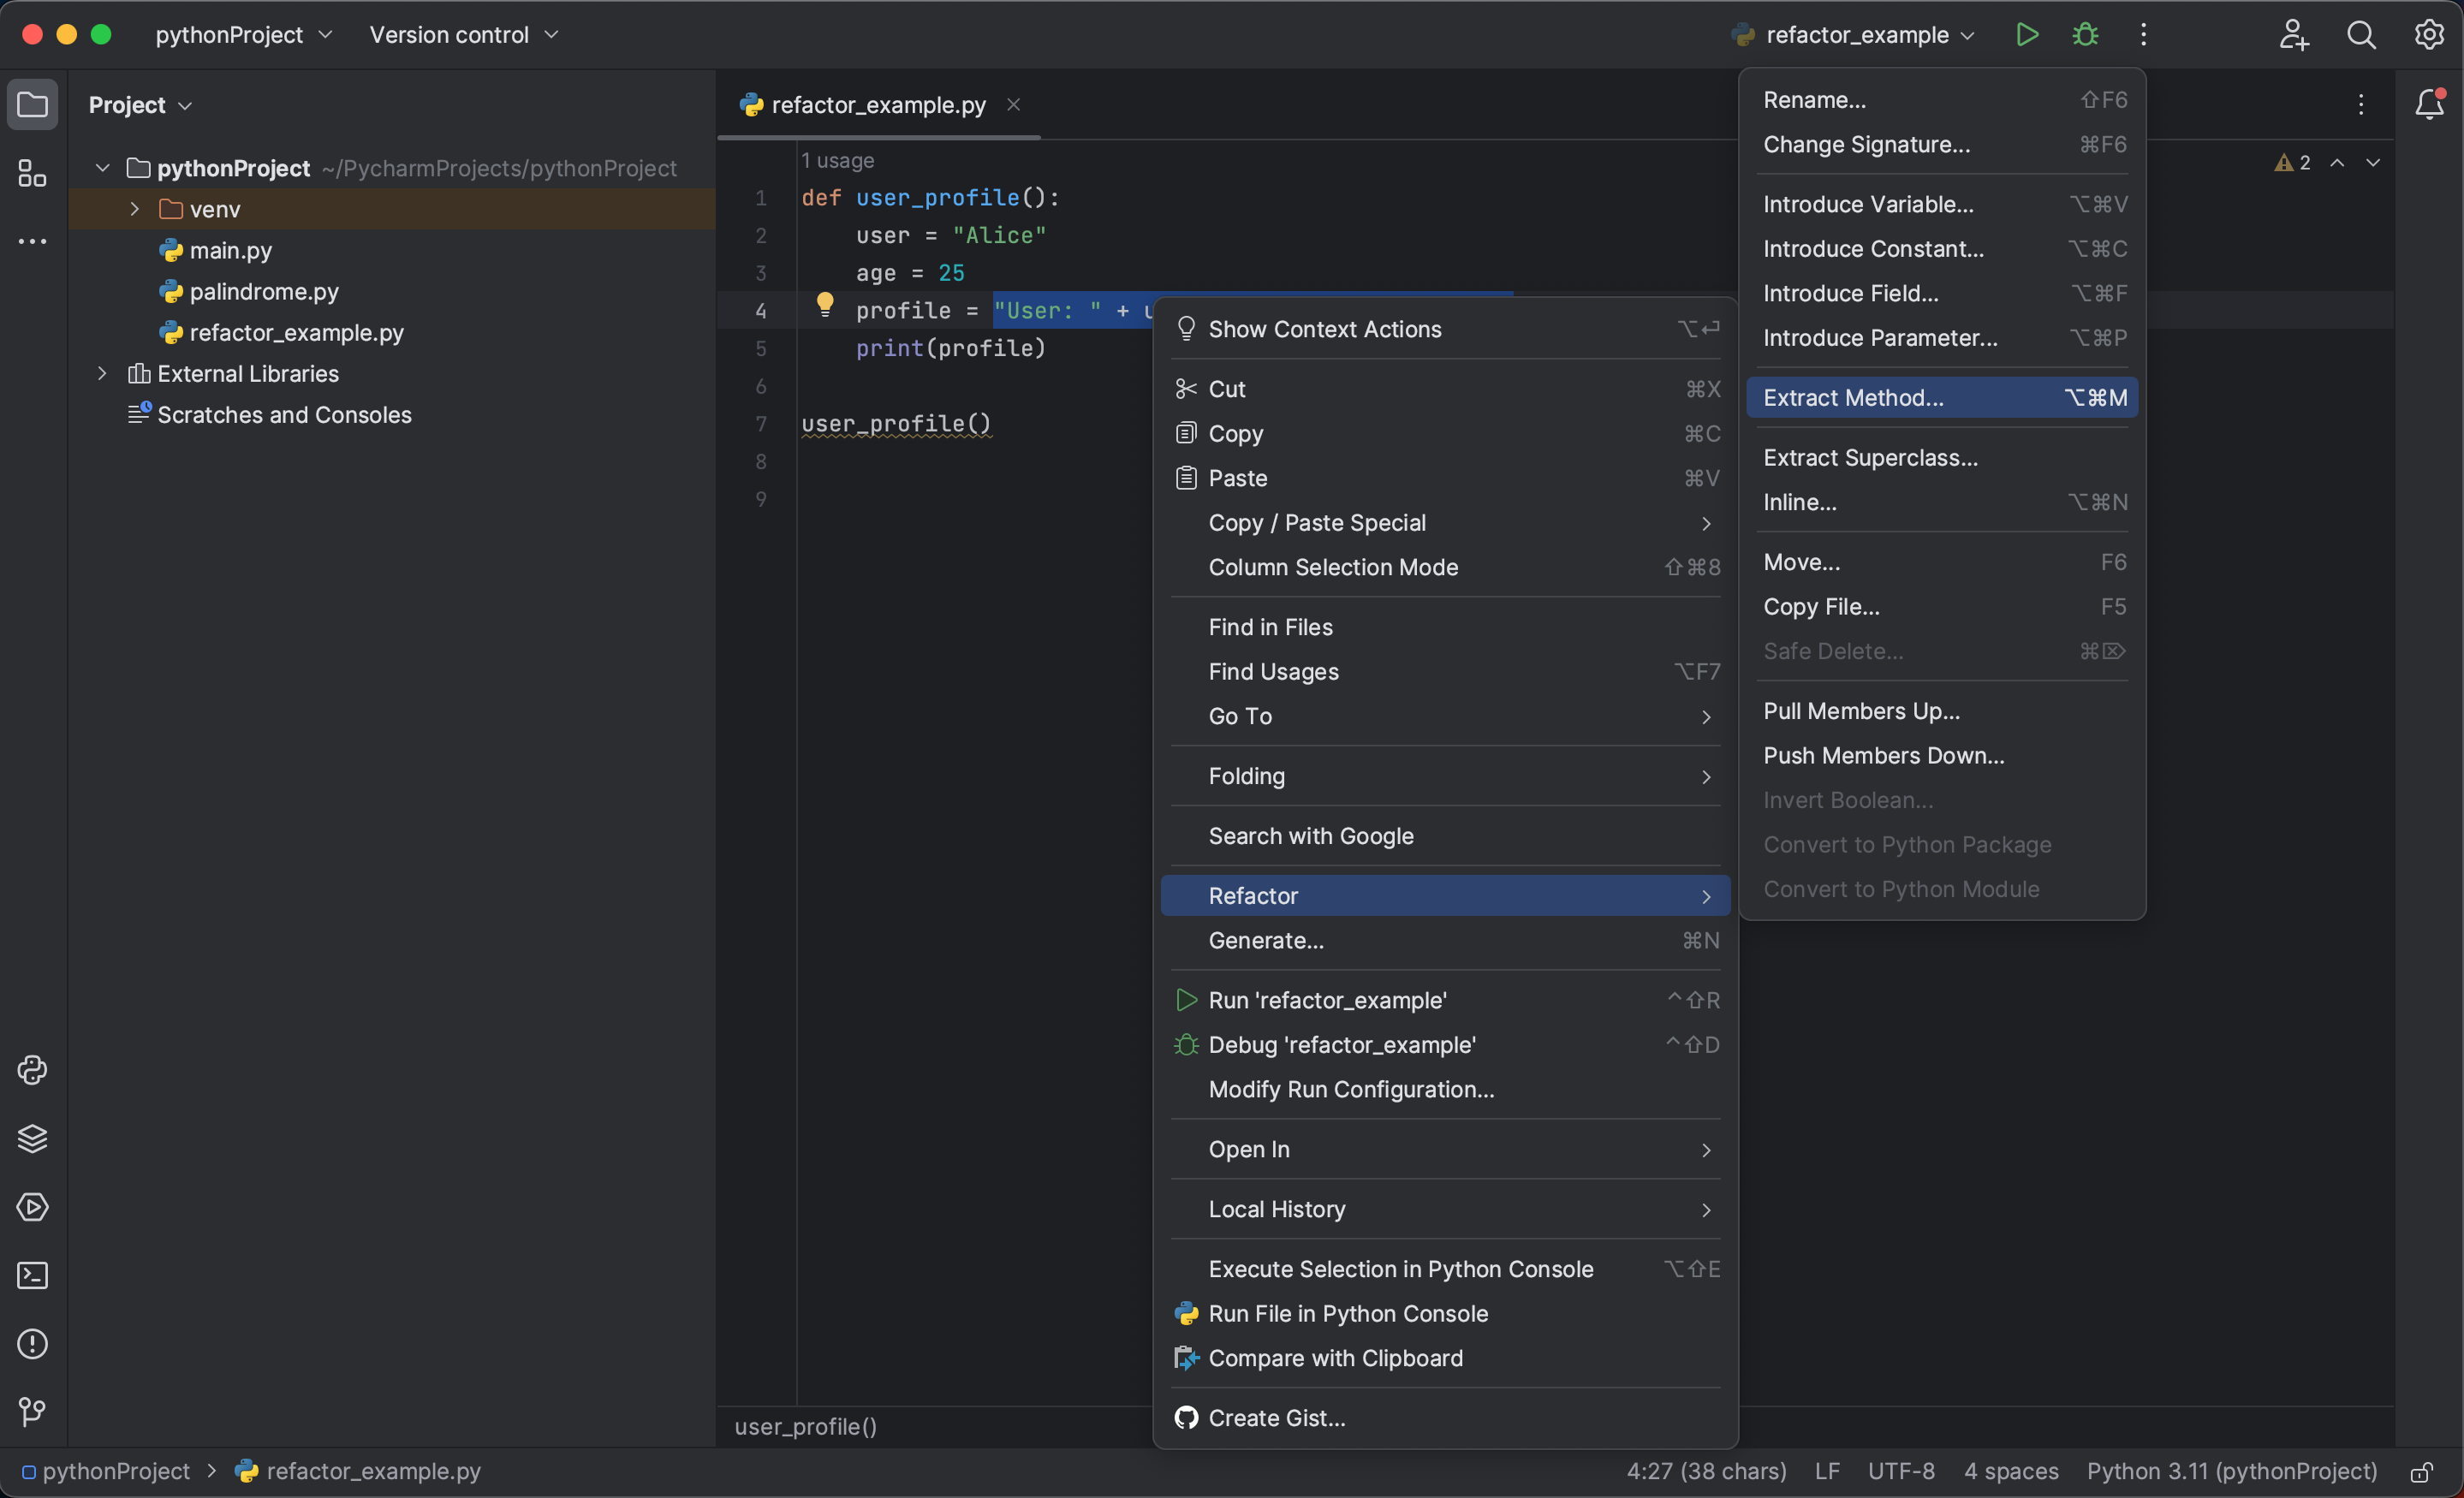
user_profile()In this case, we can refactor the construction of the profile string into a separate method. To do this, we select the part of the code we want to extract, in this case, "User: " + user + ", Age: " + str(age). Then, right click and select «Refactor» > «Extract Method».
In the popup window, name the new method something like construct_profile. Then, toggle the order of the parameters so that user appears first and age appears second, similar to the structure we see in the profile. Logical parameter ordering makes your code easier to understand and use correctly.
Now, double check your work in the «Signature preview» then hit «OK».
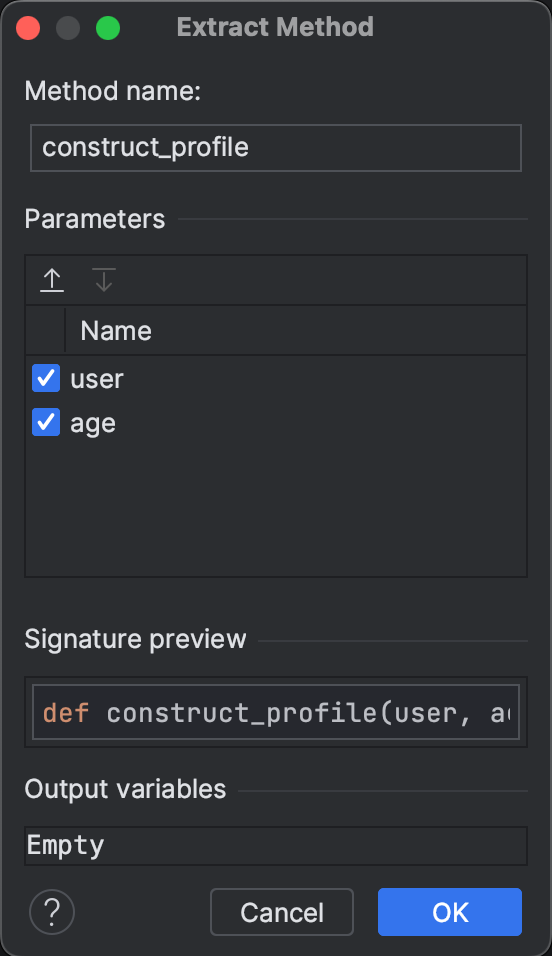
Now our Python script looks like this:
def user_profile():
    user = "Alice"
    age = 25
    profile = construct_profile(user, age)
    print(profile)

def construct_profile(user, age):
    return "User: " + user + ", Age: " + str(age)

user_profile()
By using these refactoring tools, you can improve the quality of your Python code without changing its behavior.
Setting Up Virtual Environments
Virtual environments in Python are simply indispensable. Consider them as individual playgrounds for your projects, where each project gets its own set of dependencies. This becomes pivotal when you’re working with multiple projects that require different versions of the same package. Not using these environments can lead to package conflicts which can disrupt your projects.
Luckily, we can create these individual playgrounds for our projects with the help of virtual environments. Each project gets its own custom environment, minimizing the risk of conflicts. This not only helps in maintaining the project’s integrity but also makes the management of packages and dependencies far simpler.
If you’re wondering how to go about setting up these environments, remember when we were setting up our first project? PyCharm made it super easy for us. But, just to make sure that we’re all on the same page, let’s delve into this critical concept a bit further.
Step 1: Create a New Project
To create a new project in PyCharm Community Edition, click «New Project» on the Welcome screen, or select «File» in the menu, then «New Project». You’ll be prompted to enter a name for your project and choose a location where the project files will be stored.
Step 2: Set Up a Virtual Environment
In the «New Project» dialog, you’ll also see an option to create a new virtual environment for your project. PyCharm Community Edition uses Virtualenv, or venv, to create virtual environments by default. Enter a name for your virtual environment, or leave it as the default venv.
Step 3: Start Using Your Virtual Environment
Once you’ve created your project, PyCharm Community Edition will automatically activate the virtual environment for you. Any packages you install using the PyCharm package manager or the terminal will be installed in this virtual environment, isolated from your other projects.
The process of setting up virtual environments is generally the same across different operating systems, but there might be slight differences in how to access the terminal or command line in PyCharm.
Conclusion
Congratulations! You’ve now set up your PyCharm Community Edition IDE for optimal Python development. We’ve covered a lot of ground in this tutorial, including:
- How to install PyCharm Community Edition
- Creating and running a Python file
- Using the Python console
- Formatting Python code
- Refactoring Python code
- Setting up virtual environments
By following these steps, you’ve created a powerful and flexible development environment that will support you in your Python projects. Whether you’re a student on the Dataquest Backend Developer career path or a seasoned developer, PyCharm Community Edition has a lot to offer.
Remember, this is just the beginning of what you can do with PyCharm Community Edition. There are many more features and tools to explore. For more information, check out the official PyCharm documentation.
Happy coding!
Skip to content
HOME
This tutorial will explain the step-by-step process to download and install PyCharm on Windows.
Prerequisite:
Python is already installed on the machine.
You can refer to this tutorial to install Python on Windows 11.
Installation Steps
Step 1 – To download PyCharm visit the website https://www.jetbrains.com/pycharm/download/, and it will give you two options: Professional or Community. The professional edition of PyCharm requires a subscription, while the community edition is free. Click the “DOWNLOAD” button under the Community Section.

Step 2 – Once the download is complete, run the exe to install PyCharm. The setup wizard should have started. Click the “Next” button.

Step 3 – On the next screen, Change the installation path if required. Click the “Next” button.

Step 4 – On the next screen, you can create a desktop shortcut if you want, Add Open Folder as Project, Create Associations, Update PATH variable (restart needed), and click on the “Next” button.

Step 5 – Choose the start menu folder. Keep selecting JetBrains and click on the “Install” button.

Step 6 – Wait for the installation to finish.

Step 7 – Once the installation is finished, you should receive a message screen that PyCharm is installed. You can select either of the options – Reboot now or I want to manually reboot later and click the “Finish” button.

Step 8 – After you click on the “Finish” button, the following screen will appear. I already have created a new project, so you can see the RobotFramework project here.
