Introduction
Node.js is a backend Javascript runtime environment that is light and highly scalable. It is used to build real-time applications such as video streaming applications. To make development easier, Node js developers created a node package manager (npm). This package manager acts as the Node.js command line. It is used for installing modules and initializing projects.
In this tutorial, you will learn how to install npm on Windows and how to use it.
Follow the steps below to download and install the Node.js .msi file. The Node.js .msi file includes the node package manager. You don’t have to download them separately like before.
-
Go to the Nodej.s website and download the Long Term Support (LTS) version of Node.js. The LTS version has features that have abundant documentation and it is stable in terms of security and performance when compared to the Node.js current version.
-
Navigate to the Download folder in the file manager and click the
.msipackage to start the installation procedure. -
Accept the terms in the License Agreement.

-
Add a different directory if you want but you can just leave the default location set by Node.js.
-
Select the Node.js features you want to install or remove by clicking on the drop-down list. You can leave everything on default if you don’t have any changes to make.
-
Check the box to install essential tools required by Node.js and npm.
-
Finish the installation process by clicking on the install button to install Node.js.


Confirming that npm and Node.js have been installed successfully
Use the npm -v command to check the version of the node package manager you just installed. You will get the version number if it has been successfully installed.
npm -v

8.1.0
Use node -v command to check if Node.js has been installed successfully. This command will also show the version number if Node.js has been successfully installed.
node -v

8.1.0
How to initialize a project using npm
The npm init command is used to create a Node.js project. The npm init command will create a package where the project files will be stored. All the modules you download will be stored in the package.
npm init
The npm init command will also create the package.json file, and prompt you to add the following project information when creating a project:
-
Project name
-
Project initial version
-
Project description
-
The project’s entry point
-
The project’s entry point
-
The project’s test command
-
The project’s git repository
-
The project’s license
The information will be stored in the package.json file. The package.json file contains the important details and metadata of your project such as package versions.
Here is an example of a package.json file:
{

  "name": "hometech",

  "version": "1.0.0",

  "description": "How to install node package manager",

  "main": "index.js",

  "scripts": {

    "test": "echo \"Error: no test specified\" && exit 1",

    "start": "node server.js"

  },

  "author": "Boemo Mmopelwa",

  "license": "MIT",

  "dependencies": {

    "@apollo/client": "^3.3.7",

    "Express": "^3.0.1",

    "apollo-angular": "^2.2.0",

    "express": "^4.17.1",

    "express-graphql": "^0.12.0",

    "graphql": "^15.4.0"

  },

  "devDependencies": {},

  "keywords": [

    "vultr"

  ]

}
The package.json file is stored in your current prescribed directory but you can also move it to your desired destination.
If you want to skip the questions asked when creating a project, use this command:
npm init --yes
The above command will initialize the project and skip all the required details required by the package.json file. You can set these configuration details later when you’re ready to add them. But these are important details that should never be forgotten to be added.
You can use the following commands to install additional information:
-
npx license: use this command to download your preferred license package such as MIT.
-
npx gitignore: This command downloads the gitignore file from GitHub’s repo of your choice using the gitignore package.
-
npx covgen: This command uses the covgen package to generate the Contributor Covenant. This command will also generate a code of conduct that all contributors must abide by.
Setting config options for the init command
The node package manager allows you to set default config options for the npm init command.
Here are some of the commands you can use to set default config options:
Setting the author’s email address
The following command sets your default email address.
> npm set init.author.email "enter your email address here"
Setting the author’s name
The following command sets your default author name.
> npm set init.author.name "enter your author name here"
Setting the project license
The following command sets your project’s license.
> npm set init.license "MIT"
How to add dependencies in the package.json file manually
Use the dependencies attribute to manually add dependencies to the package.json file by referencing the name and version of the dependency using any text editor such as Microsoft Visual studio:
{

 "name": "hometech",

 "version": "1.0.0",

 "dependencies": {

 "my_dep": "^1.0.0",

 }

}
Use the devDependencies attribute to manually add devDependencies name and version to the package.json file:
"name": "hometech",

"version": "1.0.0",

"dependencies": {

"my_dep": "^1.0.0",

},

"devDependencies" : {

"my_test_framework": "^3.1.0".

"another_dev_dep": "1.0.0 - 1.2.0"

}
How to list packages in dependencies
You can check and keep track of all installed using the npm list command. The npm list command will generate a list of all installed packages.
npm list
The command will output all installed packages:
demo@1.0.0 C:\Users\Demo

+-- @apollo/client@3.3.7

+-- apollo-angular@2.2.0

+-- array-flatten@1.1.1 extraneous

+-- body-parser@1.19.0 extraneous

+-- content-disposition@0.5.3 extraneous

+-- cookie-signature@1.0.6 extraneous

+-- cookie@0.4.0 extraneous

+-- debug@2.6.9 extraneous

+-- destroy@1.0.4 extraneous

+-- ee-first@1.1.1 extraneous

+-- encodeurl@1.0.2 extraneous

+-- escape-html@1.0.3 extraneous

+-- etag@1.8.1 extraneous

+-- express-graphql@0.12.0

+-- Express@3.0.1 invalid: "^4.17.1" from the root project

+-- finalhandler@1.1.2 extraneous

+-- forwarded@0.1.2 extraneous

+-- fresh@0.5.2 extraneous

+-- graphql@15.4.0

+-- http-errors@1.7.2 extraneous

+-- type-is@1.6.18 extraneous

+-- utils-merge@1.0.1 extraneous
How to Install Modules using npm
The npm install command is used to install modules such as Express. To use this command just add the name of your module after the install keyword.
npm install <enter the module name here>
If you don’t want to install a specific module you can go ahead and install modules and project dependencies listed in the package.json file using the following command.
npm install
If you are installing a module that hasn’t been listed in the package.json file. You can use the following command to install and add the module to the package.json file as a project dependency.
npm install <module> --save
You can also use the --save-dev flag which adds the module as a devDependencies. Development dependencies (devDependencies) are used for development purposes only, they are not required during runtime.
npm install <module> --save-dev
How to Install Modules Globally on your System
If you want all of your applications to use a specified module, install the module globally by using the--global flag so that all Node.js applications in your system can access the module:
npm install <enter the module you want to install globally here> --global
Inspecting and auditing installed packages
Security vulnerabilities found in packages often cause service outages and data loss. Inspecting and auditing your Node.js package dependencies using the npm audit command could help you identify security vulnerabilities and fix them before they cause data loss.
The npm audit command is only supported in npm version 6.0.0 and later versions only.
The npm audit command sends details about the package’s dependencies and devDependencies for inspection to your default registry. A report will be sent back which contains results of your package dependencies, devDependencies, bundledDependencies, and optionalDependencies security state.
Follow the following steps to audit your package dependencies:
-
Launch the command line and navigate to your package directory.
-
Make sure that your package includes the package.json and package-lock.json files.
-
Insert the
npm auditcommand and press enter to start the security auditing process. -
After the report has been generated using the previous command you can now analyze the audit report and implement security measures to eliminate security vulnerabilities detected in your package dependencies.
Node Package Manager Command Cheat Sheet
Here is a list of essential commands that you will use after you install Node.js and the node package manager.
-
npm uninstall <package>: This command is used to uninstall a package.
-
npm list -g —depth=0: List globally installed packages.
-
npm -g uninstall <name>: This command is used to uninstall a global package.
-
npm-windows-upgrade: Upgrade npm on Windows.
-
npm run: list available scripts to run.
-
npm-windows-upgrade: This command is used to update npm.

In this article, you’ll learn how to work with JavaScript in the backend using Node on Windows.
When you start working with JavaScript and discover that you can not only work with it in the frontend but also in the backend, a new world of possibilities seems to open up before you.
To begin with, you realize that you don’t need to learn another language to have the backend of your applications up and running. Second, Node.js is simple to install and works in all development platforms we are used to: Mac, Linux, and Windows.
In this article, I’ll show you how to install Node on Windows with a step-by-step guide so you’re ready to use it.
You will also be happy to know that package management is made even easier, as npm (the Node Package Manager) comes with the installation of Node.
With it, you will be able to have access to an almost unending number of community-made dependencies. You can simply install these in your app so you don’t have to reinvent the wheel time and again.
So let’s install Node on Windows and start playing with it a bit.
The first thing to do is to access Node’s official site.
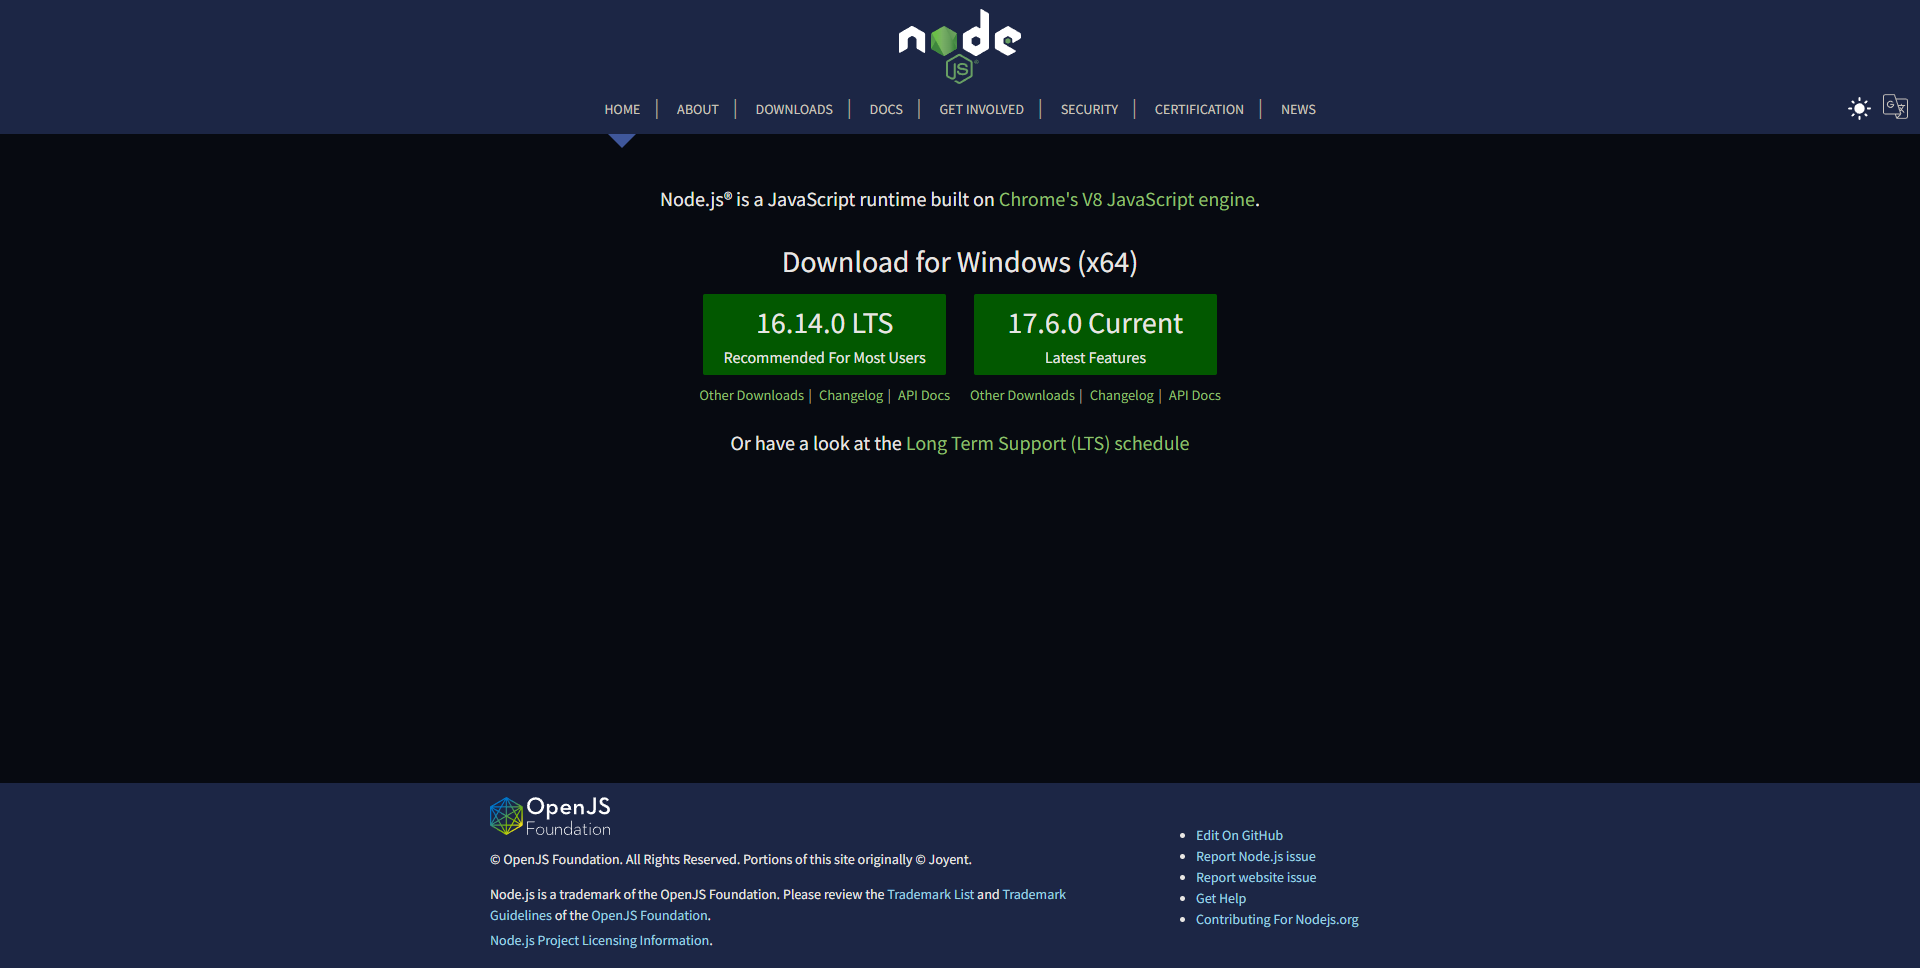
The website is intelligent enough to detect the system you are using, so if you are on Windows, you will most likely get a page like the one above. Right in the middle of it, two buttons show you the most common possibilities of download – also the latest ones.
If you are curious about all the most recent features Node has to offer, go with the button on the right. For most people, however, the site itself recommends using the Long-Term Support version, which leads you to the button on the left.
At the moment of writing this article, the LTS version is version 16.14.0.
When you click on any of them, an .msi file gets downloaded to your computer. The next step is to click on it and the installation will begin. The wizard opens and the following window appears:
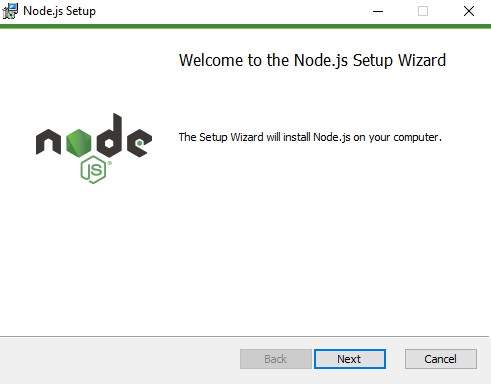
Click Next. On the following window, you’ll read (you do read it, right?) Node’s EULA, accept its terms, and click Next again. The next window is the one where you select the destination folder for Node.
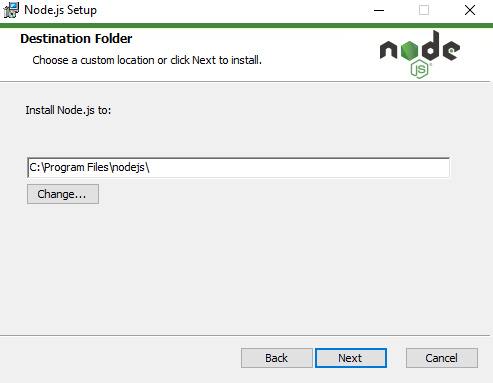
Windows normally recommends that the programs be installed in the Program Files folder, in a folder of their own (in our case, we are installing Node.js, so the nodejs folder is our go-to place).
For the sake of simplicity, let’s follow the wizard’s suggestions and use C:\Program Files\nodejs\ as the destination folder.
The following window is the one where you can customize your installation. Unless you have disk space problems or have a clear idea as to what you are doing, I recommend keeping the options as they are and just pressing Next again.
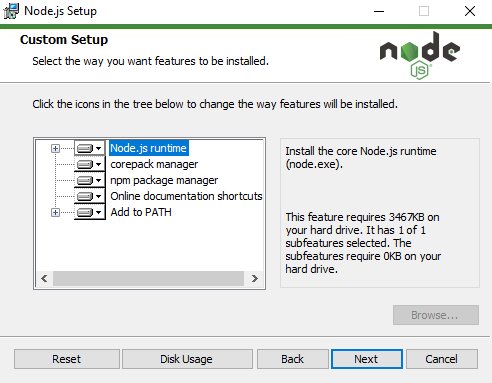
One thing I would like to point out on this window is the third option you see. That’s the option that allows you to have npm installed along with Node on your computer. This way, if you still intend to change the setup in this page somehow, keep that option as is and npm will be installed for you at the end of the process.
The next window deals with the automatic installation of “Tools for Native Modules”. Again, unless you are sure you need them, I recommend keeping this checkbox unmarked and just pressing Next once more.
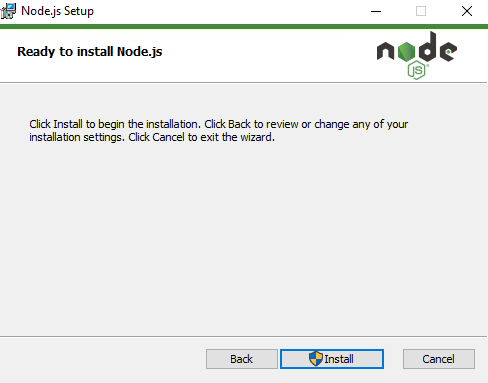
We’ve reached the final pre-install window. As it says, from here, you just have to click Install to begin the installation, so let’s do it.
Notice the shield beside the word Install? That means Windows will ask you to confirm if you really want to go through the installation process as soon as you click that button. Assuming this is the reason why you are reading this article, just click Yes and let the installer do its thing.
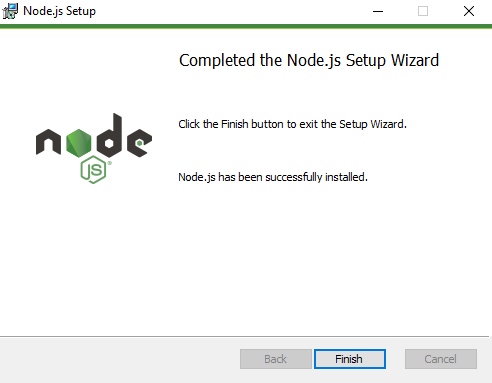
We finally got to the window we were hoping for, telling us that Node has successfully been installed on our Windows computer. Click Finish and let’s check if everything is ok.
How to Check Your Node Installation
In order to check if Node (and npm) were properly installed on your computer, you can choose to open either Windows Powershell or the Command Prompt.
We’ll go with the first. Click on the search bar beside the Start Menu button and type powershell. Click Enter and Windows Powershell will open up in a window for you.
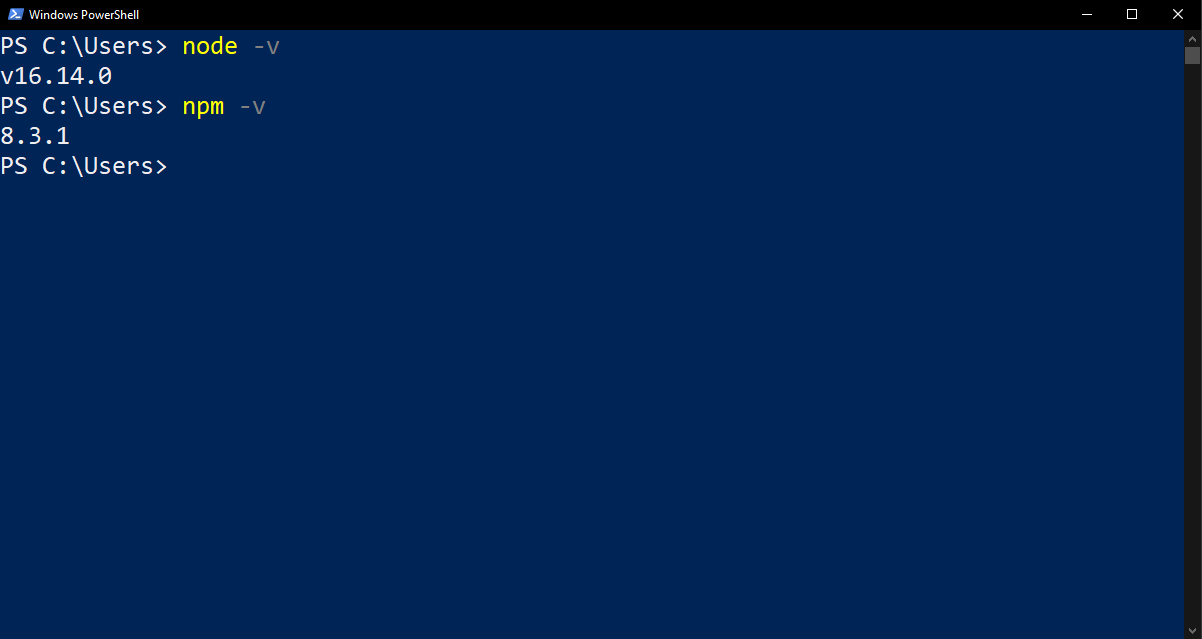
In any folder (like C:\Users, for instance), you can type node -v to check for the version of Node you are using. As I mentioned above, the latest version as I write this article is version 16.14.0 and that’s exactly what we see on Powershell above.
As a side note, you may be asking yourself why we can check this in any folder. One of the options in the custom setup (that we left as is) was to add Node to PATH. By doing so, we are able to access it from anywhere while navigating through the folders.
It is also possible to check for the npm version. To do so, type npm -v and press Enter. In our case, latest version is version 8.3.1, so we can pretty much say we are up to date.
How to Use npm
Ok, but you did not go all this way reading just to finish here after installing Node and npm, right? You want to see both in action. Let’s do it, then.
To learn how to start a project with Node and install packages with npm, we’ll use Visual Studio Code.
We’ll create a folder named Node_Test, where we’ll put both Node and npm to work a little.
Let’s start simple. Inside the Node_Test folder, right click inside the folder and click Open with Visual Studio Code. This will make VS Code open in this empty folder automatically.
Inside VS Code, if you haven’t yet, open a new terminal by pressing Ctrl+Shift+' (single quote).
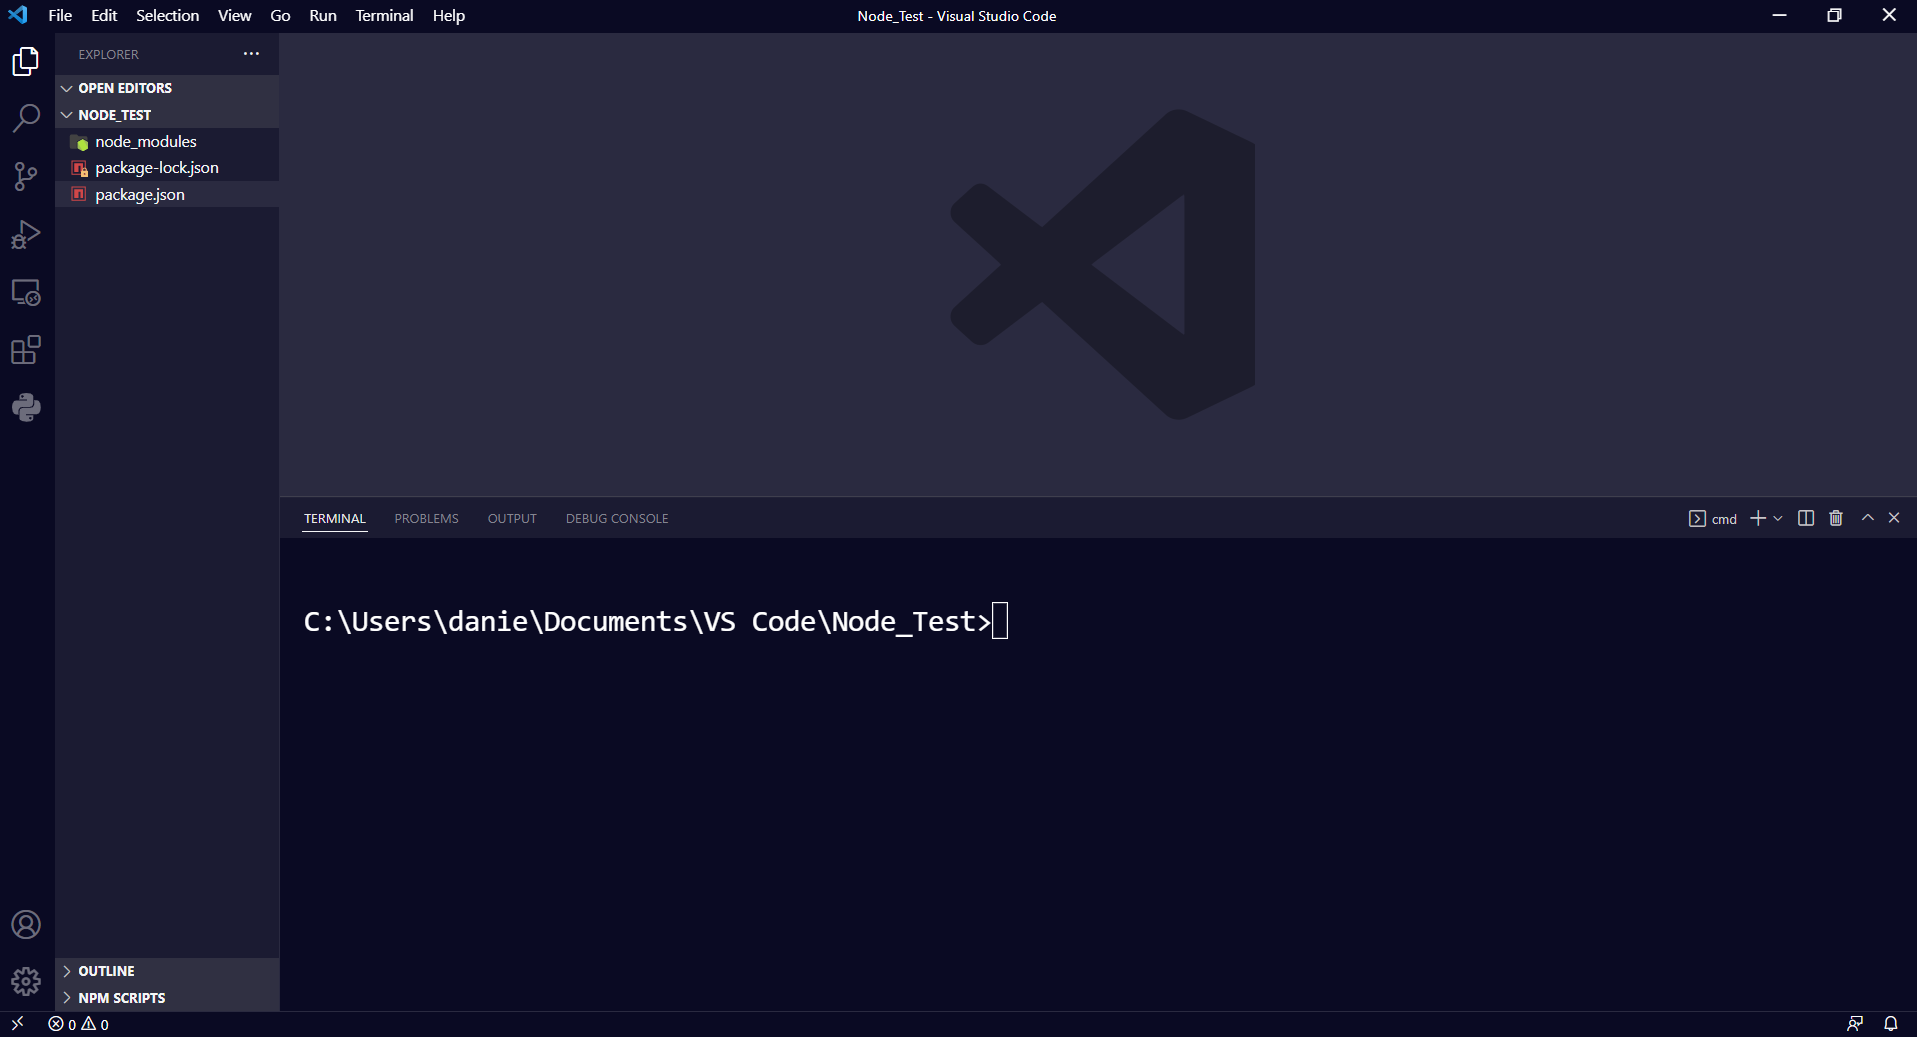
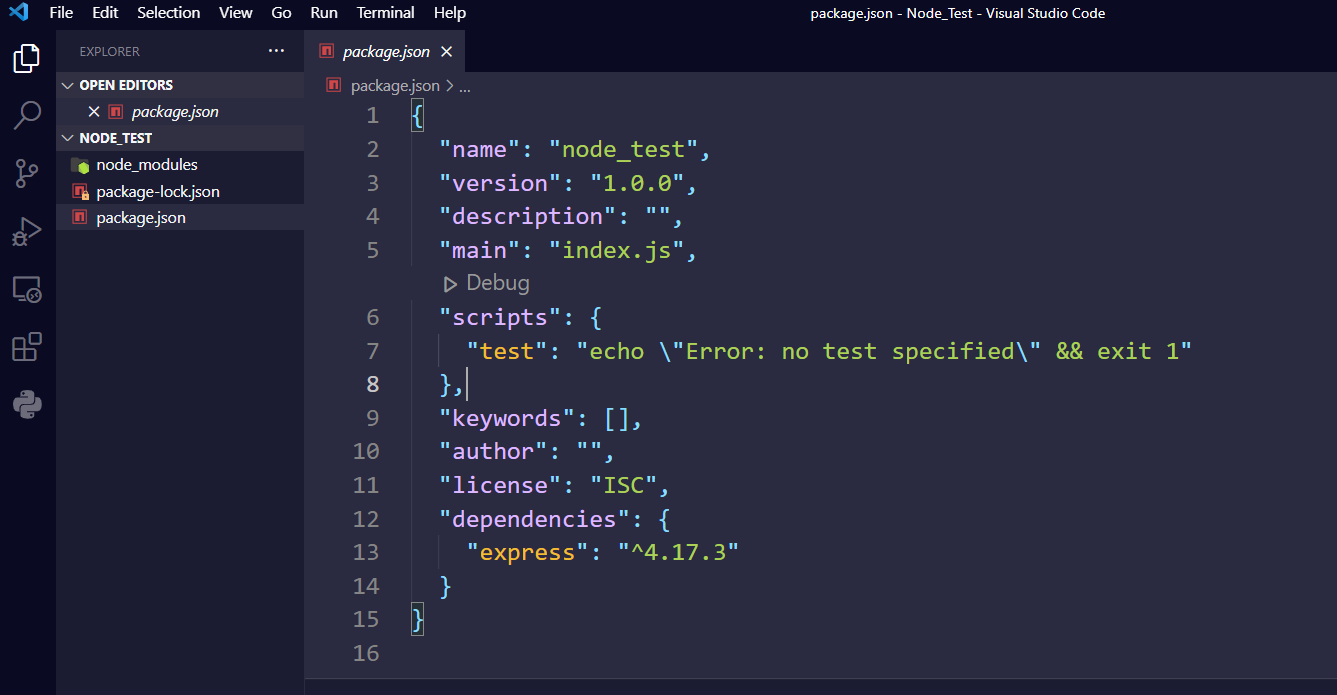
Click on the terminal and, on the command line, type npm init -y. This will start a Node project automatically for us without us needing to worry about the initial configuration (the -y flag will do that on its own). This creates a package.json file within the Node_Test folder.
Next, let’s install Express as a dependency. You can find it and a list of other possible dependencies of npm on https://www.npmjs.com/.
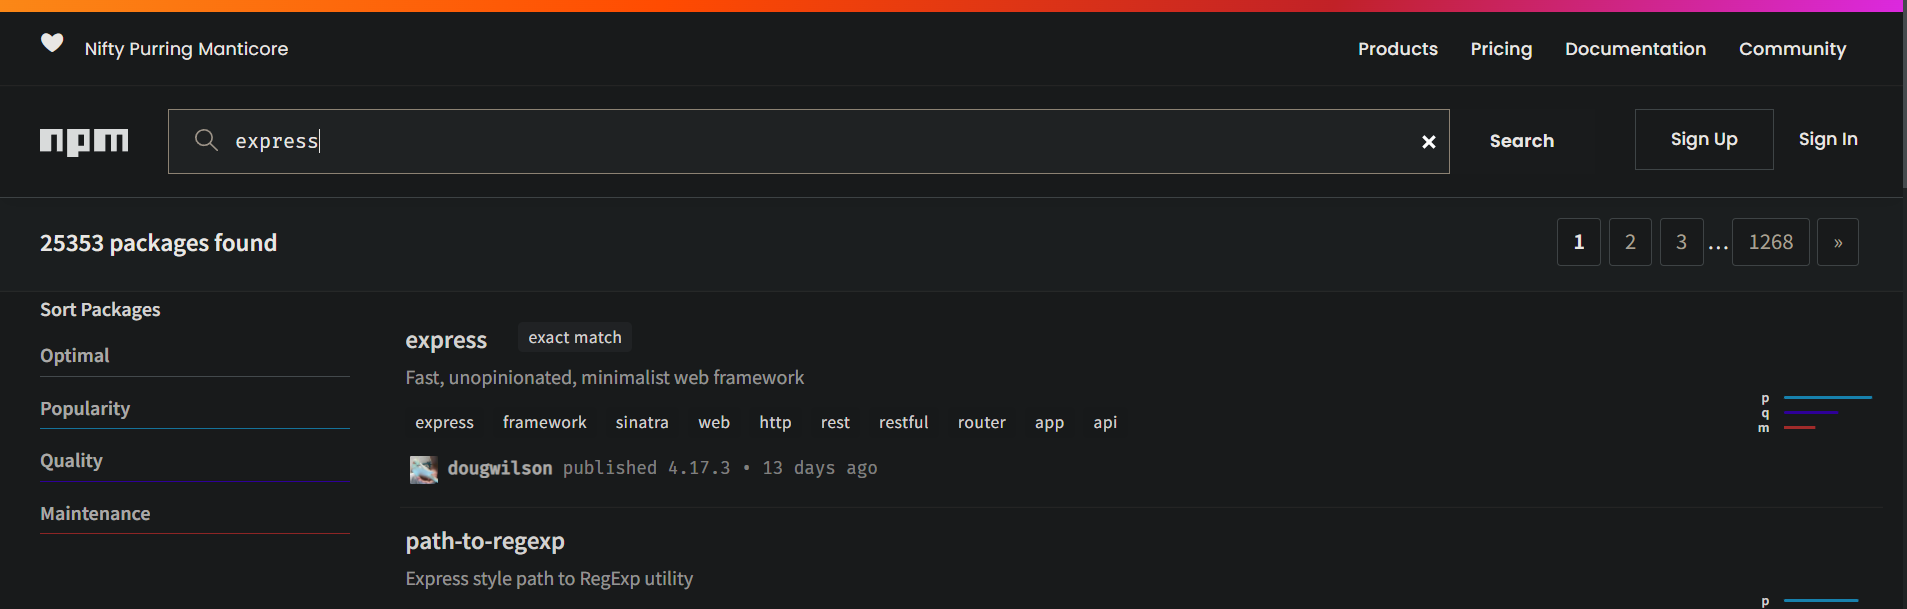
Another side note: every time you open npm’s web site, on the top left, you will see what appears to be a meaningless combination of three words. If you look at the initials, though, you will see that it is a brand-new sequence with the acronym npm.
Right, now let’s install Express with this Nifty Purring Manticore. Back on VS Code and the terminal, type npm i express and press Enter. Express will be installed. You can do the same with any other dependency you can think about.
To make sure that Express is installed, open package.json. Scroll up to the list of dependencies and you will see Express there.
Wrapping Up
That’s pretty much it. In this article, you saw how to install Node and npm on Windows.
I hope this has been useful to you. For more tutorials like this, check out freecodecamp.org/news and browse for the topic you would like to learn about.
Happy coding! 😊
Learn to code for free. freeCodeCamp’s open source curriculum has helped more than 40,000 people get jobs as developers. Get started
Quick Summary:
The node.js environment needs to be installed on your desktop or laptop before you can begin developing your Node.js applications, whether you’re a developer or a student. Using Node.js with NPM is important for your next project. This blog will help you in installing Nodejs and NPM on your system using two different methods.
JavaScript programmers worldwide who struggle to elevate their code into a robust development environment now have Node.js to thank for their relief. You can now create two-way web applications using Node.js, allowing the server and client sides to interact fully and exchange data in real-time.
Using custom modules, Node.js can incorporate extra or enhanced functionality. You must install these modules individually. NPM and node.js installation on Windows is made simple by this blog. Nevertheless, let’s first look at what Node.js and NPM are before we get into the step-by-step installation.
What are Node.js and NPM?
You can build web servers and networked applications using Node.js, a JavaScript-based environment. Moreover, it may be used to concatenate, minify, and compile SaaS files into CSS, among other beneficial computer activities.
A “package Manager” called NPM makes installing node “packages” quick and simple. Simply put, a package is a code library that enhances Node by including valuable features. Well-known businesses, including Netflix, PayPal, NASA, and Walmart, utilize Node.js. It has several benefits that, in some situations, make it a far better option than that other server-side platforms like PHP or Java.
Nodejs is the most popular web development technology, according to the Stack Overflow Developer Survey 2022. Nodejs manages numerous concurrent clients simultaneously using a “single-threaded event loop” design. The JavaScript event-based architecture and call-back mechanism are the foundation for the node.js processing model.
Prerequisites of installing Nodejs and NPM
Before we start, here are a few system requirements to download, install, and set up.
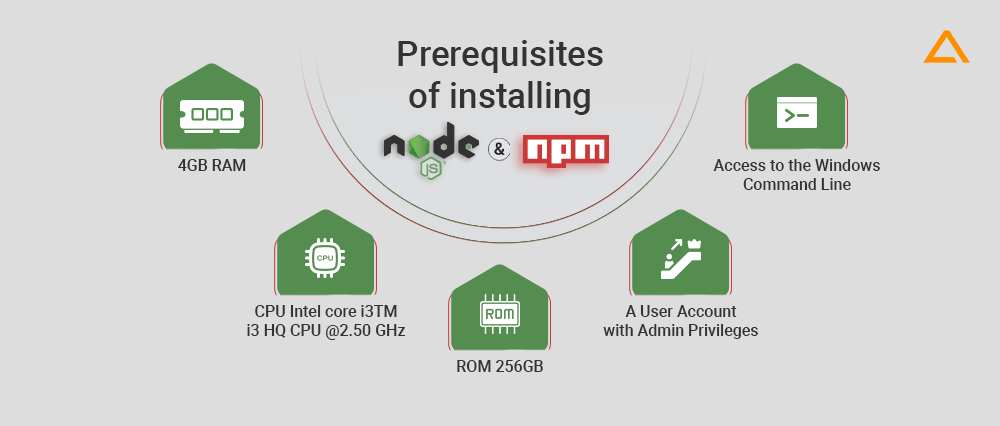
Requirements
- 4GB RAM
- CPU Intel core i3TM i3 HQ CPU @2.50 GHz
- ROM 256GB
- A user account with admin privileges
- Access to the windows command line
Now that we have covered the prerequisite let’s understand which version of Node.js you want to go for.
LTS Version vs. Current Version: Which One to go With?
There are two different versions of Node.js that you can work with: the LTS Version and the Current Version.
Let’s begin with the LTS!
The first is Long-Term Support (LTS), a version available for a while and with all necessary support. As a result, a tonne of resources and a community are available for help with this edition.
This LTS version is frequently suggested to users due to its sustainability and 18-month support cycle. Because it is a stable version and will help you obtain a reliable outcome, you can develop backends using it.
Let’s move forward to the current version.
The most recent Node version available is listed in the Current version field, along with any new or changed features. But this version might have flaws, and only roughly eight months of support are needed. Experts advise just using this version for front-end development as a result.
If you’re a frequent user who appreciates a hassle-free lifestyle, consider all these factors and select the LTS version. Installing the most recent version is an option if you’re an experienced user who appreciates the challenge of exploring cutting-edge technology.
In search to Hire Node JS Developers?
Hire dedicated Full-Stack Node.JS developers Team from Aglowid to build high-performance & scalable web & mobile app solution.
Each operating system has different methods through which you can install Node.js. The core setup differs for each OS; however, you can find these different file types on the official website. In the next section of this article, we will look at the step-by-step guide for installing NPM and Node.js on Windows.
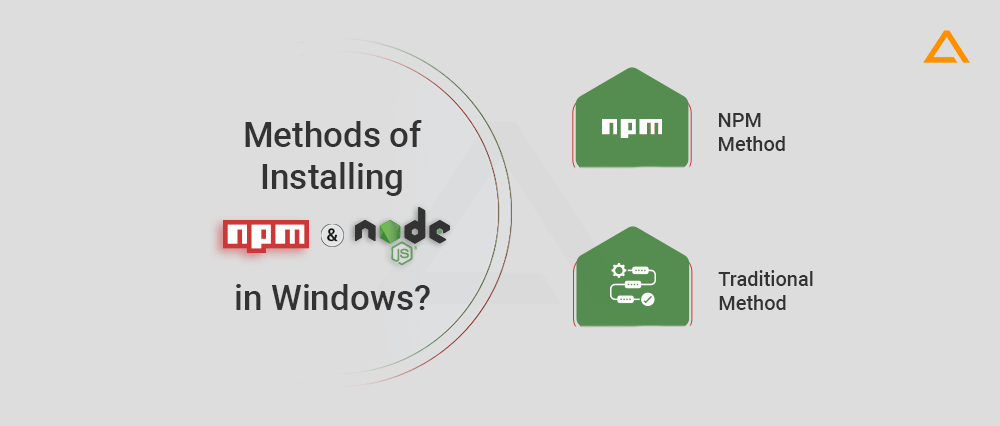
Traditional Method
Since you have decided to create an application using Node.js first, you must install Node.js on your system. Here we are going to explain the installation process using a step-by-step guide. So, let’s begin with the first step.
Step 1: Download the installer
First, you need to download the windows installer (.msi) file or opt for Windows binary (.zip) from the official node.js website. While writing this blog, the latest LTS version of Node.js is 18.14.2.
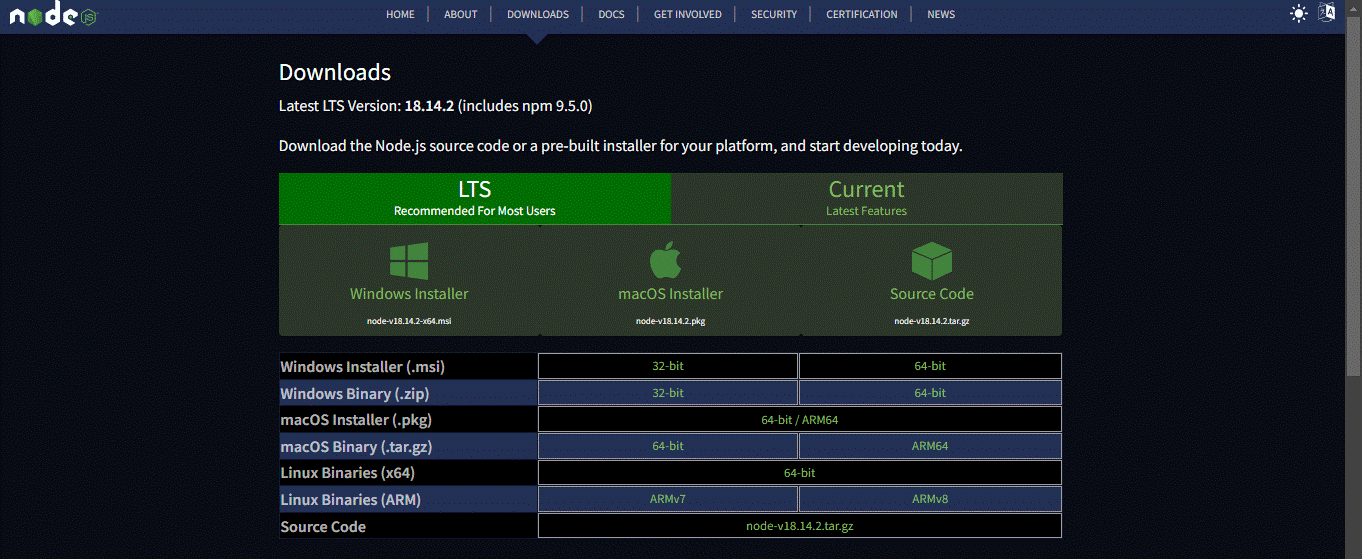
Note: If you have older systems, don’t worry, this setup is available in various formats, including a 32-bit version. To select the current version, you can navigate to the right side of the screen to the “current latest features.” It is important to note that if you’re new to node.js or don’t have a specific version requirement, you can go for the LTS version.
Step 2: Install Node.js and NPM from Browser
Once the installer is downloaded, launch it and follow the instructions. You need to press “next” for few times, select the path you want node.js to install, and finish the setup process. Restart your computer once you’ve installed node.js.
Step 3: Test & verify the installation
Ensure you have the downloaded node.js working properly using the simple commands mentioned below. You can use a command prompt or PowerShell to run these commands.
Test Node.js and NPM Version
Type the command’ node -v’ and ‘npm -v’ to check the version of node.js and NPM you have installed. Run these commands, and you’ll get some numbers on the screen, such as 8.8.0, which shows the version of the software installed.
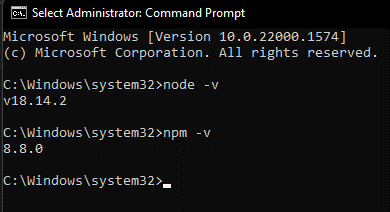
Here you can see that the version of the Node installed is v18.14.2, and npm is 8.8.0. Now let’s create a file with simple code and test it.
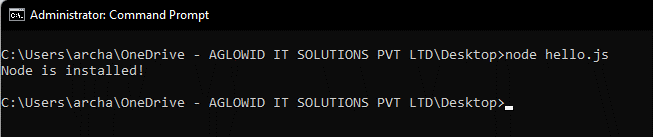
Create the simple Javascript file, name it hello.js, and add the code console. log('Node is installed!');. To run this code, open your command prompt, browse to the location where you saved the file, and type node hello.js. This will start the Node and will run the code in the program. You will see the output of ‘Node is installed!’.
Also Read: Node js vs React: Checkout the Difference
NPM Method
Node.js and NPM can be downloaded and installed on Windows in various ways. You can set up NPM and node.js on your computer using the software package manager Chocolatey. Let’s look at the step-by-step process for installing NPM and node.js on Windows using Chocolatey. In addition, we’ll look at how to remove Chocolatey from the same.
Before diving into the installation of chocolatey, let’s first understand what it is chocolately.
Chocolately was developed to offer the universal package manager for windows. Created by Rob Reynolds in 2011, it is an open-source project that helps developers and admins manage windows software. In Summary, it is a decentralized framework for quickly installing your needed applications and tools.
Now that you have an overview of chocolately, let’s see the step-by-step installation guide.
Requirements
- Windows 7+ / Windows Server 2003+
- PowerShell v2+ (minimum is v3 for installation from this website due to TLS 1.2 requirement)
- .NET Framework 4+ (the installation will attempt to install .NET 4.0 if you do not have it installed)(minimum is 4.5 for installation from this website due to TLS 1.2 requirement)
Install Chocolately
Unlike the traditional method, you can choose which version of chocolately you want to download. There are six types of downloads available. The following are the versions available.
- Generic
- Individual
- Ansible
- CHEF
- PSDSC
- Puppet
Note:Please look at here before running any of the scripts mentioned here. We know it’s safe, but you must verify the security and contents of any script from the internet. You must take security seriously, as all these scripts download and execute the PowerShell script.
The first step is to ensure you are using an administrative shell. Apart from that, you can also install a non-admin version.
The second step is that you must confirm that Get-ExecutionPolicy is not restricted. We suggest using Bypass to bypass the policy to get things installed or AllSigned for quite a bit more security.
Run Get-ExecutionPolicy. If it returns Restricted, run Set-ExecutionPolicy AllSigned or Set-ExecutionPolicy Bypass -Scope Process.
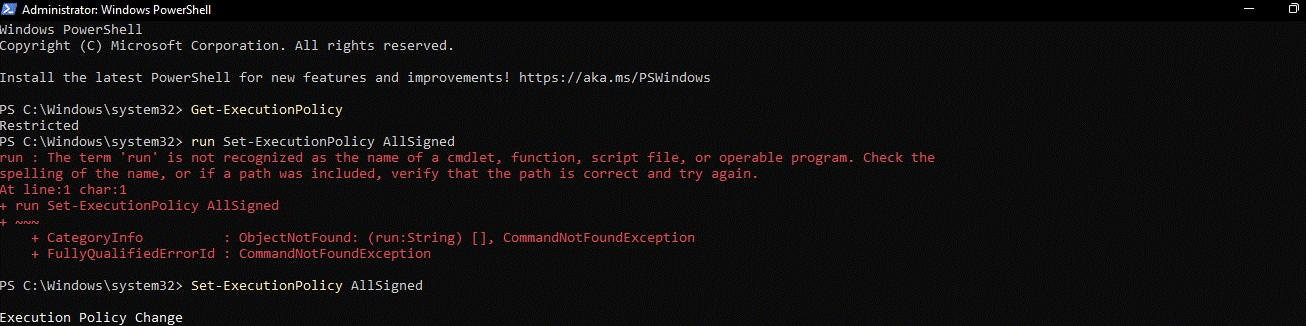
Now run the following command:
Set-ExecutionPolicy Bypass -Scope Process -Force;
[System.Net.ServicePointManager]::SecurityProtocol =
[System.Net.ServicePointManager]::SecurityProtocol -bor 3072; iex ((New-Object
System.Net.WebClient).DownloadString('https://community.chocolatey.org/install.ps1'))
This command will help you bypass the execution policy set in place. When done correctly, you’ll get the screens as below.
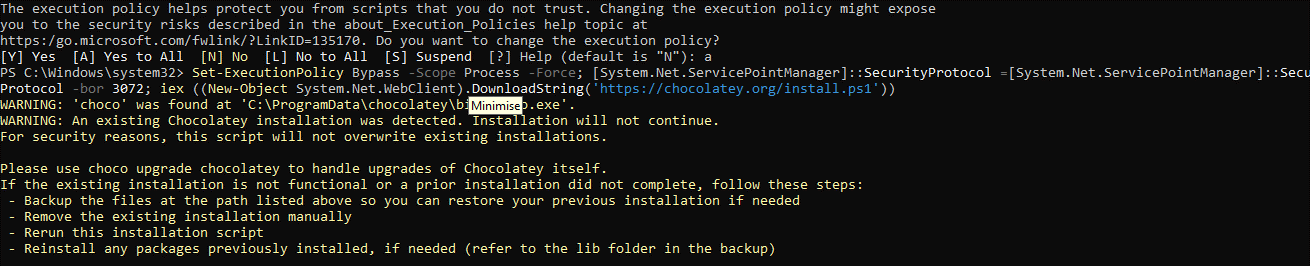
Lastly, paste your copied text into the shell and press enter. Wait a few minutes, and if you don’t see any error pop-ups, congratulations! You have successfully installed chocolately.
You can check the installation by checking the version of chocolately using the following commands:
Choco -v
![]()
This brings us to the end of the installation of node.js using chocolately.
Why should we use NodeJS?
Before the inception of Node.js, developers were working on the stateless request-response pattern, but after Node.js, developers can use web applications with real-time connections, where both the included parties can initiate the communication.

This might not look like a big thing, but it starkly contrasts the web response paradigm where the client had to initiate the communication. Apart from this, node.js provides various advantages, which makes it the better choice. Some of the advantages that node.js provide are Speed, Ubiquity, DataQuries, Real-time applications, Single-codebase, and Increased Productivity. Now that it is clear why we should use node.js let’s look at the use cases in which you can use Node.js and NPM together.
When to use Node.js and NPM?
Node.js is a well-liked runtime environment for creating server-side applications, and NPM (Node Package Manager) is a potent package manager that enables programmers to manage and share reusable code modules quickly.
There are various use cases where you can use Node.js and NPM. Here we have curated the list of use cases where both are used.
- Developing Micro APIs.
- Hosting SPAs. (Single-page applications)
- Developing Streaming Web applications
- Building Real-Time Chatbots
- Creating collaboration tools
- Creating Big-data & Analytics solutions
- Crafting Microservices Architectures
- Creating a Real-Time Tracking Dashboard
When NOT to use Node.js and NPM?
Like a story has two sides, in technology, there are pros and cons of every tech stack, and node.js is no different. While there are many criteria where Node.js shines, there are few where it may not be the best choice for your project. Following are some of the scenarios:
- Where heavy server-side computing is required
- Server-side application working with relational database
- Applications with CRUD
have a unique app Idea?
Hire Certified Developers To Build Robust Feature, Rich App And Websites.
Wrapping Up!
In conclusion, installing Node.js with NPM is a rather easy and simple process. The right procedures can be followed to swiftly set up an environment and use Node.js to create strong, effective apps. Node.js is a preferred option for developers because of its advantages, including speed and scalability. Moreover, NPM offers access to a sizable selection of libraries and packages that help to speed up the development process. Node.js with NPM is a great framework for creating quick and scalable online apps, regardless of your level of experience as a developer.
If you’re looking to take your JavaScript coding to another level, Treehouse offers unlimited courses in JavaScript (and many other subjects) starting at $25/month. Try our program out with a free seven-day trial today.
JavaScript is quickly becoming the go-to language for web developers. Front-end web developers use JavaScript to add user interface enhancements, add interactivity, and talk to back-end web services using AJAX. Web developers who work on the server-side are also flocking to JavaScript because of the efficiencies and speed offered by JavaScript’s event-driven, non-blocking nature.
In fact, concentrating on JavaScript as your language of choice offers the opportunity to master a single language while still being able to develop “full-stack” web applications.
In a previous article, I wrote about how to install Node.js® and, it’s companion, NPM on a Mac. Fortunately, for Windows users, the Node.js® installation process is a lot easier than how I recommend installing Node.js® on a Mac.
What is the Difference Between Node & NPM?
The key to this server-side JavaScript revolution is Node.js® — a version of Chrome’s V8 JavaScript runtime engine — which makes it possible to run JavaScript on the server-side.
Node.js is also used for developing desktop applications and for deploying tools that make developing web sites simpler. For example, by installing Node.js® on your desktop machine, you can quickly convert CoffeeScript to JavaScript, SASS to CSS, and shrink the size of your HTML, JavaScript and graphic files. Using NPM — a tool that makes installing and managing Node modules — it’s quite easy to add many useful tools to your web development toolkit.
When to use Node
Node isn’t a program that you simply launch like Word or Photoshop: you won’t find it pinned to the taskbar or in your list of Apps. To use Node you must type command-line instructions, so you need to be comfortable with (or at least know how to start) a command-line tool like the Windows Command Prompt, PowerShell, Cygwin, or the Git shell (which is installed along with Github for Windows).
Are you ready to start learning?
Learning with Treehouse for only 30 minutes a day can teach you the skills needed to land the job that you’ve been dreaming about.
Start a Free Trial

Installation Steps
Installing Node and NPM is pretty straightforward using the installer package available from the Node.js® web site.
- Download the Windows installer from the Nodes.js® web site.
- Run the installer (the .msi file you downloaded in the previous step.)
- Follow the prompts in the installer (Accept the license agreement, click the NEXT button a bunch of times and accept the default installation settings).

- Restart your computer. You won’t be able to run Node.js® until you restart your computer.
Checking if Node & NPM are Installed
Make sure you have Node and NPM installed by running simple commands to see what version of each is installed and to run a simple test program:
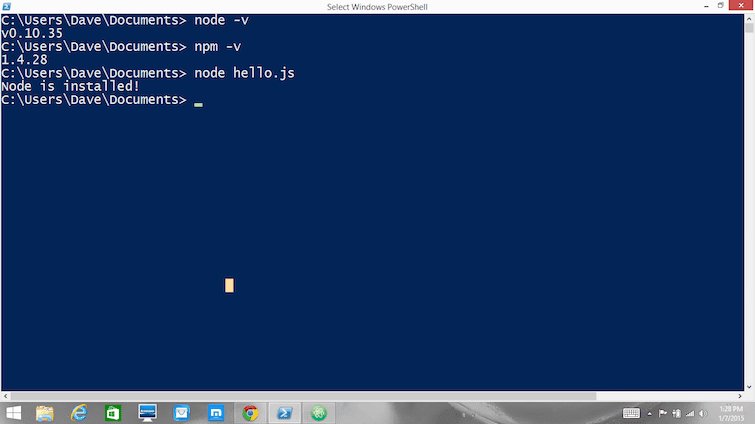
- Test Node. To see if Node is installed, open the Windows Command Prompt, Powershell or a similar command line tool, and type
node -v. This should print a version number, so you’ll see something like thisv0.10.35. - Test NPM. To see if NPM is installed, type
npm -vin Terminal. This should print NPM’s version number so you’ll see something like this1.4.28 - Create a test file and run it. A simple way to test that node.js works is to create a JavaScript file: name it
hello.js, and just add the codeconsole.log('Node is installed!');. To run the code simply open your command line program, navigate to the folder where you save the file and typenode hello.js. This will start Node and run the code in thehello.jsfile. You should see the outputNode is installed!.
Check and Update Your Node and NPM Versions
New versions of Node and NPM come out frequently. To install the updates, just download the installer from the Nodejs.org site and run it again. The new version of Node and NPM will replace the older versions.
How to Uninstall Node and NPM
You uninstall Node.js and NPM the same as you would most Windows software:
- Open the Windows Control Panel
- Choose the “Programs and Features” option
- Click the “Uninstall a program” option
- Select Node.js, and click the Uninstall link.
With Node.js and NPM installed you’ll soon be able to take advantage of the huge world of NPM modules that can help with a wide variety of tasks both on the web server and on your desktop (or laptop) machine. The NPM site lists all of the official Node packages making it easy to make the choice. Have fun!
Learn with Treehouse
Learning with Treehouse starts at only $25 per month. If you think you’re ready to start exploring if tech is right for you, sign up for your free seven day trial.
What sets Treehouse apart is their dedication to helping you find your perfect job or develop your own business. – SwitchUp.org
Follow us on Twitter, Instagram, and Facebook for our favorite tips, and to share how your learning is going. We’ll see you there!
If you liked reading this article, you should also look at these two:
- 7 Awesome Things You Can Build With Node.js
- The Best Places to Look for Your First Tech Job
- 5 Treehouse Students Who Found Tech Jobs in Less than a Year
Introduction
Node.js is a run-time environment which includes everything you need to execute a program written in JavaScript. It’s used for running scripts on the server to render content before it is delivered to a web browser.
NPM stands for Node Package Manager, which is an application and repository for developing and sharing JavaScript code.
This guide will help you install and update Node.js and NPM on a Windows system and other useful Node.js commands.
Prerequisites
- A user account with administrator privileges (or the ability to download and install software)
- Access to the Windows command line (search > cmd > right-click > run as administrator) OR Windows PowerShell (Search > Powershell > right-click > run as administrator)
Step 1: Download Node.js Installer
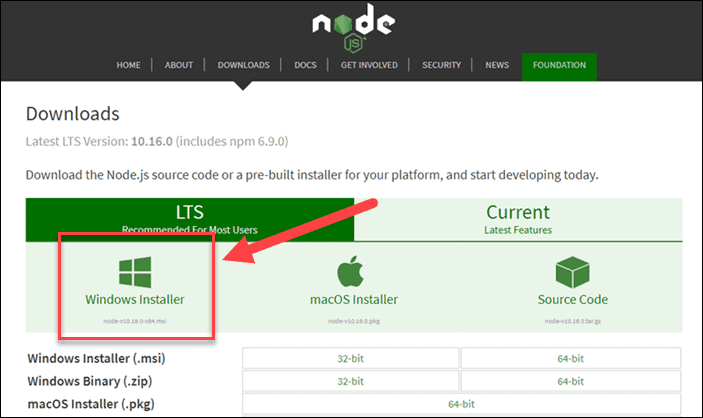
In a web browser, navigate to https://nodejs.org/en/download/. Click the Windows Installer button to download the latest default version. At the time this article was written, version 10.16.0-x64 was the latest version. The Node.js installer includes the NPM package manager.
Note: There are other versions available. If you have an older system, you may need the 32-bit version. You can also use the top link to switch from the stable LTS version to the current version. If you are new to Node.js or don’t need a specific version, choose LTS.
Step 2: Install Node.js and NPM from Browser
1. Once the installer finishes downloading, launch it. Open the downloads link in your browser and click the file. Or, browse to the location where you have saved the file and double-click it to launch.
2. The system will ask if you want to run the software – click Run.
3. You will be welcomed to the Node.js Setup Wizard – click Next.
4. On the next screen, review the license agreement. Click Next if you agree to the terms and install the software.
5. The installer will prompt you for the installation location. Leave the default location, unless you have a specific need to install it somewhere else – then click Next.
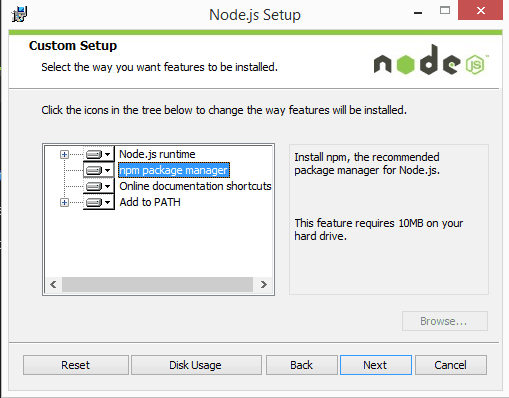
6. The wizard will let you select components to include or remove from the installation. Again, unless you have a specific need, accept the defaults by clicking Next.
7. Finally, click the Install button to run the installer. When it finishes, click Finish.
Step 3: Verify Installation
Open a command prompt (or PowerShell), and enter the following:
node -vThe system should display the Node.js version installed on your system. You can do the same for NPM:
npm -v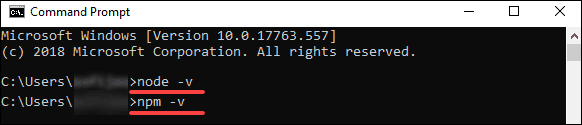
If npm is not recognized or properly installed, command prompt will display the following error message: npm: command not found.
How to Update Node.js and NPM on Windows
The easiest way to update Node.js and NPM is to download the latest version of the software. On the Node.js download page, right below the Windows Installer link, it will display the latest version. You can compare this to the version you have installed.
To upgrade, download the installer and run it. The setup wizard will overwrite the old version, and replace it with the new version.
How to Uninstall Node.js and NPM on Windows
You can uninstall Node.js from the Control Panel in Windows.
To do so:
- Click the Start button > Settings (gear icon) > Apps.
- Scroll down to find Node.js and click to highlight.
- Select Uninstall. This launches a wizard to uninstall the software.
Basic Node.js Usage
Node.js is a framework, which means that it doesn’t work as a normal application. Instead, it interprets commands that you write. To test your new Node.js installation, create a Hello World script.
1. Start by launching a text editor of your choice.
2. Next, copy and paste the following into the text editor you’ve just opened:
var http = require('http');
 http.createServer(function (req, res) {
   res.writeHead(200, {'Content-Type': 'text/html'});
   res.end('Hello World!');
 }).listen(8080);
3. Save the file, then exit. Open the PowerShell, and enter the following:
node \users\<your_username>\myprogram.jsIt will look like nothing has happened. In reality, your script is running in the background. You may see a Windows Defender notice about allowing traffic – for now, click Allow.
4. Next, open a web browser, and enter the following into the address bar:
http://localhost:8080In the very upper-left corner, you should see the text Hello World!
Right now, your computer is acting like a server. Any other computer that tries to access your system on port 8080 will see the Hello World notice.
To turn off the program, switch back to PowerShell and press Ctrl+C. The system will switch back to a command prompt. You can close this window whenever you are ready.
Conclusion
You should now be able to install both the Node.js framework, and the NPM package manager. You’ve also written your first node.js JavaScript program!
The NPM framework gives access to many different JavaScript solutions, which can be found at npmjs.com.