-
Главная
-
Инструкции
-
Node.js
-
Как установить Node.js на Windows: пошаговая инструкция
На JavaScript выполняется большая часть интерактивных элементов на сайтах и в мобильных приложениях. JavaScript отлично работает с HTML/CSS и интегрирован основные браузеры на рынке. Чистый JavaScript используется в вебе, а для общего применения JavaScript разработчики используют различные среды выполнения, например, Node.js.
Node.js — это среда выполнения кода JavaScript. Она позволяет использовать JavaScript как язык программирования общего назначения: создавать на нем серверную часть и писать полноценные десктопные приложения.
Основа Node.js — движок V8. Этот движок был разработан Google и используется в браузере Google Chrome. Он компилирует код JavaScript в машинный код, который понимает процессор. Однако, чтобы сделать из JavaScript язык общего назначения, одного движка недостаточно. Так, например, для создания серверной части нужно, чтобы язык умел работать с файлами, сетью и т.п. Для решения этой проблемы разработчики добавили к V8 дополнительные возможности, с помощью своего кода и сторонних библиотек. В итоге у них получился инструмент, который превращает JavaScript в язык общего назначения.
Node.js стала популярна среди разработчиков благодаря возможности создавать серверную и клиентскую часть на одном языке, скорости работы и NPM. В этом материале мы расскажем, как правильно установить Node.js на Windows 10.
Удаление старых версий
Перед установкой необходимо удалить старые версии среды выполнения, если они были ранее установлены. Наличие предыдущих версий может привести к возникновению конфликтов.
Проверим систему на наличие версий Node.js. Для этого в cmd (чтобы ее запустить, нажмите Win+R, введите cmd и нажмите Enter) выполняем команду nvm list:
C:\Users\Timeweb>nvm list
    18.9.0
    18.8.0
    16.17.0
Как видим, у нас установлено несколько версий. Удалим их:
- Выполняем команду
npm cache clean --force. - В «Установка и удаление программ» удаляем Node.js.
- Перезагружаем компьютер.
- Удаляем следующие каталоги. Некоторые из них могут существовать, а некоторые, наоборот, отсутствовать:
- C:\Program Files (x86)\Nodejs
- C:\Program Files\Nodejs
- C:\Users\{User}\AppData\Roaming\npm
- C:\Users\{User}\AppData\Roaming\npm-cache
- C:\Users\{User}\.npmrc
- C:\Users\{User}\AppData\Local\Temp\npm-*
- Возвращаемся в командную строку и выполняем
nvm uninstallк каждой версии, полученной с помощьюnvm list:
C:\Users\Timeweb>nvm uninstall 18.9.0
Uninstalling node v18.9.0... doneC:\Users\Timeweb>nvm uninstall 18.8.0
Uninstalling node v18.9.0... done
C:\Users\Timeweb>nvm uninstall 16.17.0
Uninstalling node v18.9.0... done
Дополнительно проверим, что версии удалены:
C:\Users\Timeweb>nvm list
No installations recognized.C:\Users\Timeweb>where node
ИНФОРМАЦИЯ: не удается найти файлы по заданным шаблонам.
C:\Users\Timeweb>where npm
ИНФОРМАЦИЯ: не удается найти файлы по заданным шаблонам.
С помощью nvm-windows
Node Version Manager или сокращенно NVM — это диспетчер версий Node.js. Возможно, во время работы вам придется использовать различные версии Node и переключаться между ними. Версии часто меняются, поэтому при работе рекомендуется использовать диспетчер версий.
NVM — самый распространенный диспетчер версий, но, к сожалению, в Windows он не доступен, и вместо него используется адаптированный вариант nvm-windows.
- Зайдите в репозиторий nvm-windows на github.
- Загрузите установщик
nvm-setup.exeпоследней версии диспетчера. - После загрузки осуществите установку.
- По окончании работы установщика откройте PowerShell от имени администратора и проверьте работоспособность NVM:
PS C:\Windows\system32 > nvm list
No installations recognized.
Теперь нужно выбрать версию Node.js, которую вы будете устанавливать на свой компьютер. Команда nvm list available покажет частичный список доступных для загрузки версий:

Если для вашего проекта не требуется определенная версия, то рекомендуется выбрать последний LTS-выпуск. Риск возникновения проблем при работе с такой версией минимален. Если же вы хотите протестировать нововведения и улучшенные возможности, то вы можете загрузить последнюю версию. При этом не стоит забывать, что риск возникновения проблем с новейшей версией выше.
Установим последний LTS. Возьмем номер версии из результата nvm list available и установим его с помощью nvm install:
PS C:\Windows\system32> nvm install 16.17.0
Downloading node.js version 16.17.0 (64-bit)...
Extracting...
Complete
Creating C:\Users\Timeweb\AppData\Roaming\nvm\tempDownloading npm version 8.15.0… Complete
Installing npm v8.15.0…
Installation complete. If you want to use this version, type
nvm use 16.17.0
Установка завершена. В ряде случаев при установке nvm-windows может возникнуть проблема: nvm не загрузит диспетчер пакетов NPM. В этом случае рекомендуем воспользоваться следующим способом установки.
Как установить node.js с помощью официального установщика
- Зайдите на официальный сайт nodejs.org в раздел «Загрузка».
- Выберите и загрузите нужную версию.
- По завершению загрузки откройте файл, после чего начнется установка.
- Следуйте инструкциям установщика.
Установка node.js в WSL2
Если вы хотите использовать Node.js вместе с Docker, планируете работать с командной строке Bash или просто любите Linux, то имеет смысл задуматься об установке среды выполнения в WSL2.
WSL (Windows Subsystem for Linux) — это программная прослойка для запуска приложений, созданных под Linux-системы, на ОС Windows. Возможно, вам уже приходилось работать в WSL с приложениями, у которых нет Windows-версий. Ранее мы уже рассматривали установку Node.js на Ubuntu 20.04. Поэтому в этом разделе будет размещена инструкция по установке WSL 2 — об установке Node.js на Ubuntu читайте в статье «Как установить Node.js в Ubuntu 20.04».
Алгоритм установки WSL2 в Windows 10 зависит от версии операционной системы. Чтобы её узнать, нажмите Win+R и введите winver. После этого откроется такое окно:
Алгоритм для версий старше 2004
В PowerShell от имени администратора выполняем следующие команды:
wsl --install
wsl --set-version Ubuntu 2
Для проверки результата воспользуемся командой wsl.exe -l -v:
PS C:\WINDOWS\system32> wsl.exe -l -v
  NAME      STATE           VERSION
* Ubuntu    Stopped         2
Алгоритм для версий младше 2004 (как минимум потребуется ОС версии 1903)
В PowerShell (от имени администратора) активируем подсистему Windows для Linux.
dism.exe /online /enable-feature /featurename:Microsoft-Windows-Subsystem-Linux /all /norestartЗатем активируем функцию виртуальной машины:
dism.exe /online /enable-feature /featurename: VirtualMachinePlatform /all /norestart После выполнения этих действий нужно перезагрузить компьютер.
Когда компьютера запустится, скачиваем и устанавливаем пакет обновлений ядра Linux. Загрузить его можно по здесь.
В PowerShell выберем 2 версию WSL в качестве основной:
wsl --set-default-version 2Теперь скачаем какую-нибудь операционную систему на Linux. Сделать это можно прямо магазине приложений Microsoft Store:
По окончании установки вы сможете зайти в консоль установленной системы через меню поиска:
Заключение
Node.js — это популярная среда разработки, которая используется множеством крупных компаний: PayPal, Yahoo, Ebay, General Electric, Microsoft и Uber. В рамках этого материала мы рассмотрели способы как установить Node.js на Windows 10.
Note: The packages on this page are maintained and supported by their respective packagers, not the Node.js core team. Please report any issues you encounter to the package maintainer. If it turns out your issue is a bug in Node.js itself, the maintainer will report the issue upstream.
- Alpine Linux
- Android
- Arch Linux
- CentOS, Fedora and Red Hat Enterprise Linux
- Debian and Ubuntu based Linux distributions
- fnm
- FreeBSD
- Gentoo
- IBM i
- macOS
- n
- NetBSD
- Nodenv
- nvm
- nvs
- OpenBSD
- openSUSE and SLE
- SmartOS and illumos
- Snap
- Solus
- Void Linux
- Windows
- z/OS
Alpine Linux
Node.js LTS and npm packages are available in the Main Repository.
Node.js Current can be installed from the Community Repository.
Android
Android support is still experimental in Node.js, so precompiled binaries are not yet provided by Node.js developers.
However, there are some third-party solutions. For example, Termux community provides terminal emulator and Linux environment for Android, as well as own package manager and extensive collection of many precompiled applications. This command in Termux app will install the last available Node.js version:
Currently, Termux Node.js binaries are linked against system-icu (depending on libicu package).
Arch Linux
Node.js and npm packages are available in the Community Repository.
CentOS, Fedora and Red Hat Enterprise Linux
Node.js is available as a module called nodejs in CentOS/RHEL 8 and Fedora.
dnf module install nodejs:<stream>where <stream> corresponds to the major version of Node.js.
To see a list of available streams:
For example, to install Node.js 18:
dnf module install nodejs:18/commonAlternatives
These resources provide packages compatible with CentOS, Fedora, and RHEL.
- Node.js snaps maintained and supported at https://github.com/nodejs/snap
- Node.js binary distributions maintained and supported by NodeSource
Debian and Ubuntu based Linux distributions
Node.js binary distributions are available from NodeSource.
Alternatives
Packages compatible with Debian and Ubuntu based Linux distributions are available via Node.js snaps.
fnm
Fast and simple Node.js version manager built in Rust used to manage multiple released Node.js versions. It allows you to perform operations like install, uninstall, switch Node versions automatically based on the current directory, etc.
To install fnm, use this install script.
fnm has cross-platform support (macOS, Windows, Linux) & all popular shells (Bash, Zsh, Fish, PowerShell, Windows Command Line Prompt).
fnm is built with speed in mind and compatibility support for .node-version and .nvmrc files.
FreeBSD
The most recent release of Node.js is available via the www/node port.
Install a binary package via pkg:
Or compile it on your own using ports:
cd /usr/ports/www/node && make installGentoo
Node.js is available in the portage tree.
IBM i
LTS versions of Node.js are available from IBM, and are available via the ‘yum’ package manager. The package name is nodejs followed by the major version number (for instance, nodejs12, nodejs14 etc)
To install Node.js 14.x from the command line, run the following as a user with *ALLOBJ special authority:
Node.js can also be installed with the IBM i Access Client Solutions product. See this support document for more details
macOS
Download the macOS Installer directly from the nodejs.org web site.
If you want to download the package with bash:
curl "https://nodejs.org/dist/latest/node-${VERSION:-$(wget -qO- https://nodejs.org/dist/latest/ | sed -nE 's|.*>node-(.*)\.pkg</a>.*|\1|p')}.pkg" > "$HOME/Downloads/node-latest.pkg" && sudo installer -store -pkg "$HOME/Downloads/node-latest.pkg" -target "/"Alternatives
Using Homebrew:
Using MacPorts:
port install nodejs<major version>

# Example
port install nodejs7
Using pkgsrc:
Install the binary package:
Or build manually from pkgsrc:
cd pkgsrc/lang/nodejs && bmake installn
n is a simple to use Node.js version manager for Mac and Linux. Specify the target version to install using a rich syntax,
or select from a menu of previously downloaded versions. The versions are installed system-wide or user-wide, and for more
targeted use you can run a version directly from the cached downloads.
See the homepage for install methods (bootstrap, npm, Homebrew, third-party), and all the usage details.
If you already have npm then installing n and then the newest LTS node version is as simple as:
NetBSD
Node.js is available in the pkgsrc tree:
cd /usr/pkgsrc/lang/nodejs && make installOr install a binary package (if available for your platform) using pkgin:
Nodenv
nodenv is a lightweight node version manager, similar to nvm. It’s simple and predictable. A rich plugin ecosystem lets you tailor it to suit your needs. Use nodenv to pick a Node version for your application and guarantee that your development environment matches production.
Nodenv installation instructions are maintained on its Github page. Please visit that page to ensure you’re following the latest version of the installation steps.
nvm
Node Version Manager is a bash script used to manage multiple released Node.js versions. It allows
you to perform operations like install, uninstall, switch version, etc.
To install nvm, use this install script.
On Unix / OS X systems Node.js built from source can be installed using
nvm by installing into the location that nvm expects:
env VERSION=`python tools/getnodeversion.py` make install DESTDIR=`nvm_version_path v$VERSION` PREFIX=""After this you can use nvm to switch between released versions and versions
built from source.
For example, if the version of Node.js is v8.0.0-pre:
Once the official release is out you will want to uninstall the version built
from source:
nvs
Windows
The nvs version manager is cross-platform and can be used on Windows, macOS, and Unix-like systems
To install nvs on Windows go to the release page here and download the MSI installer file of the latest release.
You can also use chocolatey to install it:
macOS,UnixLike
You can find the documentation regarding the installation steps of nvs in macOS/Unix-like systems here
Usage
After this you can use nvs to switch between different versions of node.
To add the latest version of node:
Or to add the latest LTS version of node:
Then run the nvs use command to add a version of node to your PATH for the current shell:
$ nvs use lts
PATH -= %LOCALAPPDATA%\nvs\default
PATH += %LOCALAPPDATA%\nvs\node\14.17.0\x64
To add it to PATH permanently, use nvs link:
OpenBSD
Node.js is available through the ports system.
Using pkg_add on OpenBSD:
openSUSE and SLE
Node.js is available in the main repositories under the following packages:
- openSUSE Leap 15.2:
nodejs10,nodejs12,nodejs14 - openSUSE Tumbleweed:
nodejs16 - SUSE Linux Enterprise Server (SLES) 12:
nodejs10,nodejs12, andnodejs14
(The «Web and Scripting Module» must be enabled.) - SUSE Linux Enterprise Server (SLES) 15 SP2:
nodejs10,nodejs12, andnodejs14
(The «Web and Scripting Module» must be enabled.)
For example, to install Node.js 14.x on openSUSE Leap 15.2, run the following as root:
Different major versions of Node can be installed and used concurrently.
SmartOS and illumos
SmartOS images come with pkgsrc pre-installed. On other illumos distributions, first install pkgsrc, then you may install the binary package as normal:
Or build manually from pkgsrc:
cd pkgsrc/lang/nodejs && bmake installSnap
Node.js snaps are available as node on the Snap store.
Solus
Solus provides Node.js in its main repository.
sudo eopkg install nodejsVoid Linux
Void Linux ships Node.js stable in the main repository.
Windows
Download the Windows Installer directly from the nodejs.org web site.
Alternatives
Using Winget:
winget install OpenJS.NodeJS
# or for LTS
winget install OpenJS.NodeJS.LTS
After running one of the two commands above, it may be necessary to restart the
terminal emulator before the node CLI command becomes available.
Using Chocolatey:
cinst nodejs
# or for full install with npm
cinst nodejs.install
Using Scoop:
scoop install nodejs
# or for LTS
scoop install nodejs-lts
z/OS
IBM® SDK for Node.js — z/OS® is available in two installation formats,
SMP/E and PAX. Select the installation format that applies to you:
- Installing and configuring SMP/E edition of Node.js on z/OS
- Installing and configuring PAX edition of Node.js on z/OS
In this article , We are going to perform Download Node.js for Windows, How to Install Node.js on Windows 10, update the node.js and npm on windows, creating node.js app on windows, uninstalling node.js from windows 10.
Table of Contents
What is Node.js ?
Node.js is free and an open-source cross-platform JavaScript run-time environment that allows server-side execution of JavaScript code. It is used in developing web and networking applications
What is NPM (Node Package Manager) ?
NPM (Node Package Manager) is command line tool for Node.js packages that installs, updates and uninstall packages in your projects.We don’t have install npm separately it is includes with Node.js installation.
Prerequisite
- Windows 10 with Administrator Access
Step #1: Download Node.js package for Windows
First download the latest node.js package from node.js official site and click on Windows installer, it will download .msi file.
Click on 32 bit or 64 bit version of node.js for windows.
![How to Install Node.js on Windows 10 [4 Steps] 1](https://www.fosstechnix.com/wp-content/uploads/2020/09/Download-latest-node.js-for-windows--1024x542.png)
once you clicked, it will ask for to save dowloaded node.js msi setup, click on Save File.
![How to Install Node.js on Windows 10 [4 Steps] 2](https://www.fosstechnix.com/wp-content/uploads/2020/09/save-node.js-msi-file-in-windows-1024x442.png)
once downloaded, double click on node.js Windows Installed .msi file.
you will see Node.js Setup Wizard , click on Next as shown below.
![How to Install Node.js on Windows 10 [4 Steps] 3](https://www.fosstechnix.com/wp-content/uploads/2020/09/node.js-setup-wizard-click-on-Next-1024x529.png)
click on Node.js License agreement and click on Next.
![How to Install Node.js on Windows 10 [4 Steps] 4](https://www.fosstechnix.com/wp-content/uploads/2020/09/accept-node.js-agreement-and-click-on-next-1024x515.png)
Select Destination folder where you want to Install Node.js and click on Next.
![How to Install Node.js on Windows 10 [4 Steps] 5](https://www.fosstechnix.com/wp-content/uploads/2020/09/change-the-node.js-installation-path-and-click-on-Next-1024x528.png)
Select on to install npm modules like python and Visual Studio Build Tools if not installed and click on Next
![How to Install Node.js on Windows 10 [4 Steps] 6](https://www.fosstechnix.com/wp-content/uploads/2020/09/click-on-install-node.js-necessory-tool-and-click-on-next-1024x518.png)
custom setup for Node.js and click on Next.
![How to Install Node.js on Windows 10 [4 Steps] 7](https://www.fosstechnix.com/wp-content/uploads/2020/09/click-on-next-button-1024x551.png)
Now Install Node.js on Windows 10, click on Install.
![How to Install Node.js on Windows 10 [4 Steps] 8](https://www.fosstechnix.com/wp-content/uploads/2020/09/click-on-node.js-install--1024x519.png)
wait to finish to Install Node.js on Windows.
![How to Install Node.js on Windows 10 [4 Steps] 9](https://www.fosstechnix.com/wp-content/uploads/2020/09/wait-till-install-node.js-on-windows-1024x520.png)
once installing of Node.js finished, click on Finish.
![How to Install Node.js on Windows 10 [4 Steps] 10](https://www.fosstechnix.com/wp-content/uploads/2020/09/click-on-finish-button-1024x517.png)
It will open commands prompt to Install Addition Tools for Node.js for Windows, click Enter.
![How to Install Node.js on Windows 10 [4 Steps] 11](https://www.fosstechnix.com/wp-content/uploads/2020/09/install-additional-tool-for-node.js-commands-prompt-1024x621.png)
once you entered, it will open Windows Powers shell and wait till to Install additional Tools for Node.js.
once all finished, open a commands prompt .
Check Node.js and npm version on Windows.
![How to Install Node.js on Windows 10 [4 Steps] 12](https://www.fosstechnix.com/wp-content/uploads/2020/09/check-node.js-and-npm-version-on-windows.png)
Note: when you install node.js using msi installed, you don’t need to setup system variables for node.js.
Step #3: How to Update Node.js and NPM on Windows
To update node.js and npm on windows , you can download the node.js version from the node.js official site , install and replace it with existing version.
OR
open a commands prompt and run below commands to update the node.js and npm on windows
npm install npm –global
Output:
C:\Users\fosstechnix\AppData\Roaming\npm\npm -> C:\Users\fosstechnix\AppData\Roaming\npm\node_modules\npm\bin\npm-cli.js
C:\Users\fosstechnix\AppData\Roaming\npm\npx -> C:\Users\fosstechnix\AppData\Roaming\npm\node_modules\npm\bin\npx-cli.js
+ [email protected]
added 434 packages from 885 contributors in 8.878s
Step #4: Create a Node.js Application on Windows
Create a javascript file with name nodeapp.js in C:\Users\your name\ location, add below code which prints ” Hello World”.
sudo nano nodeapp.js
Paste the below lines into it.
const http = require('http');

const hostname = '127.0.0.1';
const port = 3000;

const server = http.createServer((req, res) => {
  res.statusCode = 200;
  res.setHeader('Content-Type', 'text/plain');
  res.end('Hello World\n');
});

  server.listen(port, hostname, () => {
  console.log(`Server running at http://${hostname}:${port}/`);
});
Run your Node.js server with the below command,
node nodeapp.js
Output:
 node nodeapp.js

Server running at http://127.0.0.1:3000/
Now open your browser and type server name or IP followed by port 3000, you will see Hello World message.
http://localhost:3000/
you will see “Hello World” Message on your browser.
How to Uninstall/Remove Node.js and NPM from Windows
To Uninstall or completely Remove Node.js and NPM from Windows 10.
1. Open the Control Panel
2. click on Programs and Features
3. Select Node.js
4. click on Uninstall Button
It will ask to confirm uninstall node.js from Windows.
Conclusion:
In this article, We have performed, Download Node.js for Windows, How to Install Node.js on Windows 10, update the node.js and npm on windows, creating node.js app on windows, running and testing node.js app, uninstalling node.js from windows 10.
Related Articles
How to Install Node.js and NPM on Ubuntu 20.04 LTS
How to Install Latest Node.js and NPM on Ubuntu 19.04,18.04/16.04 LTS
How to Install Angular CLI on Ubuntu 18.04/16.04 LTS
How to Install node.js on Mac OS
Node.js is a cross-platform environment that runs and executes JavaScript codes outside the browser. Since its first release, Node.js has gained massive popularity among developers. As it uses JavaScript, it is fast and easy to pick up and avails excellent scalability, making it a favourite among web developers. The Node.js framework is available for all the major operating systems like Windows, Ubuntu, and Mac. To know more, check out KnoweldgeHut Full Stack Developer review.
s-logo.jpg
Are you ready to start working with node.js? Before anything else, let us understand how to install node.js on windows 10.
In this tutorial, you will learn-
- How to Download & Install Node.js on Windows 10
- How to uninstall Node.js on windows
- How to Install NPM on Windows 10
- Running your first «Hello World» application in Node.js
Prerequisites
Below we get started, here are a few system requirements to download, install, and set up React-Native on Windows 10.
Hardware requirements
- RAM 4GB
- CPU Intel Core i3TM i3 HQ CPU @2.50 GHz
- ROM 256 GB
Software requirement
- Chocolatey
Attention: You will also need a stable internet connection because we will be downloading most of this software.
Installation procedure
-
Step-by-step procedure to Install node.js on Windows 10
Undoubtedly, the first step to getting started on working with node.js is installing the software package in your system. Once done, follow the step-by-step tutorial on how to proceed to get the node.js framework successfully installed in your system. We will also look at how you can uninstall the program from your computer completely.
Step-1: Download node.js installer into your system
Visit the official node.js site https://nodejs.org/en/download/ and click on Windows installer to download the necessary software in your system. The installer contains the NPM package. Based on the system you want to install, choose 32-bit installer or 64-installer and proceed.

Note: When you click on download, you will be asked to choose the file location you want to store the instal.msi binary files. Choose a secure file location of your choice.

Step-2: Run the installation
Once you choose the path, the next step is to double-click the instal.msi binary files to initiate the installation process. Furthermore, you will be asked for permission to run the application.
Warning: On the open file security warning, there is a cancel option as well. Don’t click on the cancel option, or else you may perhaps need to restart the installation. You can use the back button to check your previous installation step.
On running the application, you will proceed to an interface with a welcome message. Click the «Next» button and proceed with the installation as shown in the image.

Step-3: Accept the terms of usage

After clicking the next option, you will get an end-user license agreement. Read the terms of using the software, and then click on next.
N.B. You will find a square box asking you to agree with the terms, and only when you have read the terms, you will be allowed to proceed further.
Step-4: Specify the path
Once you have accepted the terms and conditions, the next step is to specify the path where you want to install node.js. Your file location is the path where you must install the node.js in your system. Before we proceed further, you can enroll in Web Design Training to accelerate your career.

Once you have specified the path, click on the Next button to proceed with the installation.
Step-5: Select the default options
On proceeding with the Next option, the custom page setup will open up on the screen. Here you will get four icons as stated below:
- node.js runtime
- NPM package manager
- Online documentation shortcuts
- Add to PATH

Select all the options as default and then proceed with the Next option.
Step-6 Initiate the installation
After all these steps, you will see an install button to process the installation of node.js on Windows. Click on the install button to initiate the installation of node.js on your Windows. Based on your system performance it may take a couple of minutes to install node.js on your system. Once the installation is complete, you will get a message on your screen as — Node.js has been successfully installed.

Step-7: Complete the installation
On clicking the Finish button, the process of installation of node.js is successfully completed. Congratulations! You have successfully installed node.js on your Windows 10.

Verifying the install
To verify that the node.js has been successfully installed in your system, go to the command prompt and run it as administrator. Now use the following command to check the node.js version installed in your system.
node -v
The message v14.16.1 verifies that node.js has been successfully installed on your windows, and you are ready to use it.

Alternative Method
Do you know there is also an alternative way to download & install Node.js and NPM on Windows 10? Using a software package manager called Chocolatey, you can install node.js and NPM on your machine. Let us understand how to install node.js and NPM on windows using Chocolatey step by step. We will also look at how to uninstall the same with Chocolatey.
Installing Chocolatey.
The first process that you need to do is to install Chocolatey in your system. Take a note that the installation of Chocolatey requires administrator access to the computer’s command prompt to run.
- Choose the option – get started as shown below:

- Once you go to the official Chocolatey website, select the individual as shown in the picture.

- Open Windows PowerShell and run as administrator. Now run the command and then press enter.
Get-ExecutionPolicy
- On running this command, you will get a message as Restricted. Once you get the message as Restricted, continue and then run another command and press enter.
Set-Execution Policy All Signed

- You will get a screen with execution policy changes. Select the A (Yes to all) option and then press Enter.

- Copy and paste the command mentioned below:
Set-ExecutionPolicy Bypass -Scope Process -Force; [System.Net.ServicePointManager]::SecurityProtocol =[System.Net.ServicePointManager]::SecurityProtocol -bor 3072; iex ((New-Object System.Net.WebClient).DownloadString('https://chocolatey.org/install.ps1'))

To check whether you have installed it well, open the command prompt below:
choco -version
If you have installed it well, you will see the display of the Chocolatey version you have installed on the screen as below:

Boom! Chocolatey is now successfully installed in your system.
Install Node.js
Using Chocolatey that you have just installed, now we can install Node.js in the system. Open the command prompt as the administrator and put in the Chocolatey command prompt as mentioned below:
Choco install -y nodejs.install
To confirm if it has installed correctly on the computer, you need to execute the command below on the computer command prompt, as an administrator:
node --version

If you have followed the steps correctly, the installation would have been successful and the message below will display on your screen after the installation has been completed.
After installing the Node.js, the Node Package Manager NPM automatically gets installed in the system. Run the command below to check the installation of NPM. The displayed message below verifies that the installation of NPM is successful.

Writing your first program on node.js
Now that you have successfully downloaded and installed node.js in your system, let’s learn how to write a program using node.js
Follow the steps to write your first program.
- Step-1: Create a folder and name it. (Here we have created a folder named Node Programs.
- Step-2: Open any code editor of your choice (here we are using Visual Studio Code).

- Step-3: Click on the file menu and open the folder you just created.

- Step-4: Once you open the folder, create a file and name it. (Here we have created a file named as welcome.js)

- Step-5: Write your program and save it using (Ctrl + S).
- Step-6: Start debugging using the shortcut f5.
.png&w=3840&q=75)
And that’s it! You have successfully created your first project using node.js.
(Goodbye-COVID-19 was the message we wanted to print and it is running successfully).
Uninstalling Node.js
Uninstalling node.js needs a manual process. Here is a step-by-step guide on how to uninstall node.js from your system.
- Step-1: Go to the file location where you have stored node.js

- Step-2: Select the node.js row and right-click on it. Out of the three options available, click on uninstall.

- Step-3: After clicking on the uninstall option, the uninstalling starts.

Once done, you will successfully uninstall node.js from your system.
Are you ready to unlock the power of coding? Discover the endless possibilities with Python programming. Join us and learn Python programming in a unique and engaging way. Start your coding journey today!
Summary
- In this article we have covered how to install Node.js with the help of the MSI installation module from the Node.js website. Besides, we have also learned to install the necessary modules needed to run a Node.js application.
- Node.js can also be installed with the help of a package manager Chocolatey. With the use of simple commands in the command prompt or in the Windows PowerShell as mentioned above, we have seen how to download node.js using the Chocolatey package manager that automatically downloads the necessary files and then installs them on the client machine.
- Lastly, we have learned about the uninstallation of node.js completely from your system.
In a nutshell, we have seen how to install node.js using different methods. That’s all you need to get started with node.js. You are free to choose any terminal of your preference.
Keep in mind: Node.js was never made to tackle the process scaling issue but made to address the I/O scaling issue.
Red Flags: While installing node.js, make the right choice between a 32-bit installer and a 64-bit installer matching your system. For instance, if you have a 64-bit operating system you will be unable to install the 32-version of node.js. Likewise, if you have a 32-bit operating system, you will be unable to install the 62-version of node.js. Therefore, the key here is to know your system and proceed with the next steps.
This tutorial will discuss the command line way to install Node.js and NPM quickly on Windows 10 or 11 using the PowerShell or Command prompt.
Node.js and its NPM which stands for ‘Node package manager’ are widely used by developers around the world for developers’ modern applications. Both are open-source and cross-platform, hence the operating system is not a limitation at all. Nodejs which offers a back-end JavaScript runtime environment allows developers to build scalable network applications. Whereas, to install dependencies and other supported packages to build an app, NPM, a Node Package Manager is there.
Although Node.js is cross-platform, its process of installation is different as per the operating system you are using. When it comes to Windows, most of the time users manually visit the website of Nodejs to download its executable file to perform the installation. However, you don’t need to do that because Windows 10 and 11 come with an inbuilt package manager like Linux known as Winget.
And in this article, we will provide a step-by-step guide to installing Node.js and NPM on Windows 10 or 11 using the command terminal.
Those who are not interested in the CLI way can still go for the traditional GUI way for downloading and installing Node.js and NPM on Windows 10 or 11.
Use CMD or Powershell to install Node.js & NPM on Windows 10 or 11
Prerequisites – Before installing Node.js and NPM on Windows, it is important to ensure that the following prerequisites are met:
- You are using Windows 10 or 11
- Access the Administrator user account
- Active Internet connection
1. Open PowerShell as Admin
Here we are using Powershell, however, you can use the Command prompt as well; the given steps in this article will be the same for both.
Right-click on the Windows 10 or 11 start menu and select Terminal (Admin) in Windows 11. Whereas Windows 10 users would have Powershell (Admin) option.
2. Check Winget is Available
Winget is a package manager developed by Microsoft for its Windows operating system to easily install an application using the command line. So, first, let’s check whether it is available on our system or not. Well, by default it will be there. if not, then you can install it manually from GitHub.
wingetYou will get something like the below in the given screenshot which confirms, the package manager is working fine.

3. Command to Install Node.js LTS or Current version
Node.js comes with NPM, so installing it will also configure the package manager. Som on your command prompt or terminal, type the given command to check the availability of Nodejs packages:
winget search node.jsYou will see all the available versions of Node to install on Windows using the Winget package manager such as LTS, Current, and Nighlly.

Let’s see how to download them using the command given below, choose only one as per the version you want on your system.
For Node.js & NPM LTS version, the command will be:
winget install OpenJS.NodeJS.LTSFor Node.js and NPM Current version
winget install OpenJS.NodeJSTo get the Nightly version (testing)
winget install OpenJS.NodeJS.Nightly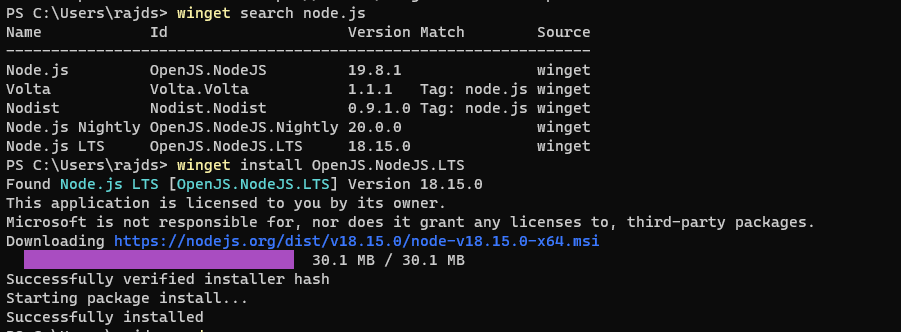
4. Testing the Installation by checking the version
Once you are done with the installation, let’s confirm the required version of Node.js and NPM are on Windows by running a simple command in the command prompt or Powershell. However, before running them close and reopen the command prompt.
Check the version of Node.js by typing
node -v Check the version of NPM by using
npm -v
Conclusion
Using the command line to install Node.js and NPM on Windows is quite easy as compared to the graphical way in which we manually have to download the installer by using a browser and visiting the software website. By following the steps given in this article, developers can ensure that they have the latest version of Node.js and NPM installed on their Windows computers for creating scalable network applications using JavaScript.
Other Articles:
- How to change the NPM version in Linux, Windows, or macOS?
- How to update NodeJS and NPM to their latest versions?
- How to directly install the npm package from the GitHub repository
- What is npm ci and how it is different from the ‘npm install’ command?