MinGW also called as Minimalistic GNU for Windows is a popular compiler for C and C++ and used for the development of native MS-Windows applications. It does not depend on any 3rd party tools or libraries but relies on the several DLLs provided by Microsoft as components of the operating system. Out of these DLLs, MSVCRT.DLL i.e. Microsoft C runtime library is the primary one. Apart from the system components, the threaded applications must use freely distributable thread support DLL, provided as part of MinGW itself. You may consider using Cygwin for POSIX application deployment.
Below listed are the features and components provided by MinGW. You may also refer MinGW for more details.
- A port of the GNU Compiler Collection (GCC), including C, C++, ADA and Fortran compilers;
- GNU Binutils for Windows (assembler, linker, archive manager)
- A command-line installer, with optional GUI front-end, (mingw-get) for MinGW and MSYS deployment on MS-Windows
- A GUI first-time setup tool (mingw-get-setup), to get you up and running with mingw-get.
In this tutorial, we will install MinGW on windows and write, compile, and execute our Hello World program in C++.
Step 1 — Download MinGW
Go to the Download Page to start downloading mingw-w64. It will show various download options as shown in Fig 1.

Fig 1
Download MinGW-W64-builds as highlighted in Fig 1.
You may also download and install MinGW Installation Manager in case you are planning only for the 32-bit compiler. The MinGW-W64 provides both 32-bit and 64-bit compilers.

Fig 2
Download MinGW Installation Manager as highlighted in Fig 2.
Step 2 — Install MinGW-W64
Now execute the MinGW-W64-builds executable downloaded by us in the previous step. It will show the welcome screen as shown in Fig 3.

Fig 3
Click on the Next Button to continue with the installation. It will show the settings screen as shown in Fig 4.

Fig 4
Note that I have selected x86_64 architecture in order to support 64-bit instructions. You may continue with i686 for 32-bit instructions. Also, I have selected the posix option of Threads settings for programs involving multithreading. You may select the win32 option based on your needs. Now click on the Next Button to continue with the installation. The next screen asks for the installation path as shown in Fig 5.

Fig 5
Make sure that you provide an installation path without any spaces. Now click on the Next Button to finish the installation.
It might show you error specific to fail to download. I tried a few times and got success in 3rd attempt. You may also continue with manual installation in case it failed multiple times. You can simply download the archive of MinGW-W64 and extract it to the desired location.
It will show the download progress and status as shown in Fig 6, Fig 7, and Fig 8.

Fig 6

Fig 7

Fig 8
Now click on the Next Button after download completes. It will show the success message as shown in Fig 9.

Fig 9
Click on the Finish Button to close the installer. Now add the bind directory of MinGW-W64 to the system path as shown in Fig 10.

Fig 10
Step 3 — Install MinGW
In this step, we will install the MinGW distributed by the official website as shown in Fig 2. Execute the installer downloaded in previous steps. It will show the welcome screen as shown in Fig 11.

Fig 11
Click on the Install Button to start the installation. It will ask for the installation directory as shown in Fig 12.

Fig 12
Click on the Continue Button to start the installation. It will show the progress as shown in Fig 13 and Fig 14.

Fig 13

Fig 14
Click on the Continue Button to launch the installation manger as shown in Fig 15.

Fig 15
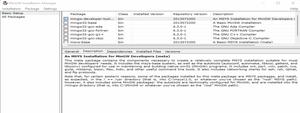
Choose the package GCC as shown in Fig 16.

Fig 16
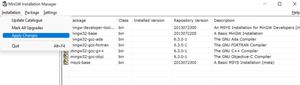
Click on the Apply Button to apply the changes as shown in Fig 17.

Fig 17
Click on the Apply Changes Button. It will show the confirmation message as shown in Fig 18.

Fig 18
Click on the Apply Button to install GCC. It will show the Package progress as shown in Fig 19 and Fig 20.

Fig 19

Fig 20
Click on the Close Icon and also close the installation manager to complete the installation of the compiler required to compile the programs.
You may add the MinGW path to bin directory which is C:\cpp\mingw\bin in my case to system path as we did for MinGW-W64. Make sure that you keep only one compiler path at a time among MinGW and MinGW-W64.
Step 4 — Getting started with C — Hello World
Write your first C program as shown below and save in a file hello.c.
#include<stdio.h>int main() {	printf( "Hello World" );
}
Compile and execute the program using the command as shown below.
# Compile and make executable
gcc hello.c -o hello.exe
It will compile the program and generate the executable i.e. hello.exe. We can simply type hello to execute the program. It will print Hello World on the console as shown in Fig 21.

Fig 21
Step 5 — Getting started with C++ — Hello World
We can repeat the previous step to write the Hello World program in C++. Write your first C++ program as shown below and save it to hello.cpp.
#include<iostream>using namespace std;
int main() {
cout << "Hello World";
return 0;
}
Compile and execute the program using the command as shown below.
# Compile and make executable
g++ hello.cpp -o hello.exe
It will compile the program and generate the executable i.e. hello.exe. We can simply type hello to execute the program. It will print Hello World on the console as shown in Fig 22.

Fig 22
This is how we can install MinGW and MinGW-W64 and configure the system path to access the executables from the command line. We also wrote our first C and CPP programs, compiled and executed them to print Hello World on the console.
MinGW is a native C/C++ compiler(GCC) which have free distributable import libraries and header files for building native Windows applications. In this tutorial, we are going to install MinGW for C/C++. These are a few steps that we have to perform to successfully install MinGW on our device.
How to Install the MinGW Tools for C/C++?
Step 1: Go to the MinGW website and click on Download. It will start downloading in 5 seconds.

Step 2: Double click and open the exe MinGW file and click install. It will automatically start downloading all the setups for the MinGW.
Step 3: After all of the setup click Continue. Now the MinGW installation manager will pop up.
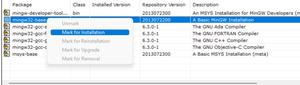
Step 4: In the installation manager right click on every option and then click Mark for Installation.
Step 5: In the Installation, option-click Apply changes. And then select Apply. It will start downloading all the files. It will take 5-6 minutes. After finishing click on Close.
How to Change Environment Variables for MinGW
After successful installation of MinGW, next step is to change the environment location for MinGW.
Step 1: Go to the C drive on your device and search for the MinGW folder. And in the MinGW folder go to the bin folder and copy its path.
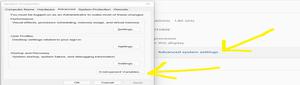
Step 2: Go to the control panel then go to System then Advanced system settings and then Environment variables.
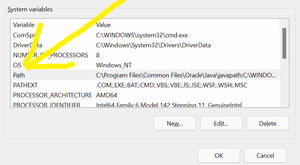
Step 3: In the system variables search for path and then select Edit. Now add a new path to it by clicking New. Now paste the path and click ok.
This marks the complete installation of MinGW in the system.
Another method to change Environment Variable for MinGw.
Step 1: Go to the C drive on your device and search for the MinGW folder. And in the MinGW folder go to the bin folder and copy its path.

Step 2: Now go to this pc and right click there and click on show more properties and click on properties pointed by the arrow.

Step 3: Now click on Advanced system setting.

Step 4: Now click on environmental variables.

Step 5: Now in system variables click on path and click on edit button.

Step 6: Now click on new button and paste the copied path there as shown in photo.

Now click on “ok” button of step 6, 5 and 4. and then close all the windows and restart your pc.
This marks the complete installation of MinGW in the system.
Last Updated :
06 Feb, 2023
Like Article
Save Article
MinGW (Minimalist GNU for Windows) is a development environment for Windows that includes a port of the GCC (GNU Compiler Collection) compiler. MinGW is commonly used to build open-source software for Windows. To install MinGW on Windows 10, follow the steps below:
Method 1: Download and Install MinGW
MinGW is a native Windows port of the GNU Compiler Collection (GCC), with freely distributable import libraries and header files for building native Windows applications.
Step 1: Download the MinGW Installer
Go to the MinGW website (https://sourceforge.net/projects/mingw-w64/files/mingw-w64/) and click on the «Download» button for the latest version of the MinGW installer.
Step 2: Run the MinGW Installer
After downloading the MinGW installer, run the executable file and follow the installation wizard.
Step 3: Select the Installation Options
During the installation process, you will be prompted to select the installation options. Select the following options:
- Architecture: x86_64
- Threads: posix
- Exception: seh
- Build revision: latest
Step 4: Set the Installation Directory
Set the installation directory to a location of your choice.
Step 5: Add MinGW to the System Path
After the installation is complete, add the MinGW bin directory to the system path by following these steps:
- Open the Start menu and search for «Environment Variables»
- Click on «Edit the system environment variables»
- Click on the «Environment Variables» button
- Under «System Variables», find the «Path» variable and click «Edit»
- Click «New» and add the path to the MinGW bin directory (e.g. «C:\MinGW\bin»)
- Click «OK» to save the changes
Step 6: Verify the Installation
To verify that MinGW is installed correctly, open a command prompt and type the following command:
This should display the version of the GCC compiler that is installed.
Method 2: Add MinGW to the System Path
Step 1: Download MinGW 64
Go to the MinGW-w64 website and download the latest version of MinGW 64 for your system.
Step 2: Install MinGW 64
Run the downloaded installer and follow the instructions. By default, MinGW 64 will be installed in C:\Program Files\mingw-w64\x86_64-8.1.0-posix-seh-rt_v6-rev0. You can change this location if you want.
Step 3: Add MinGW to the System Path
- Open the Start menu and search for «Environment Variables».
- Click on «Edit the system environment variables».
- Click on the «Environment Variables» button.
- Under «System Variables», scroll down and find the «Path» variable. Click on «Edit».
- Click on «New» and add the path to the MinGW 64 bin directory. By default, this is
C:\Program Files\mingw-w64\x86_64-8.1.0-posix-seh-rt_v6-rev0\mingw64\bin. - Click «OK» on all the windows to close them.
Step 4: Verify the Installation
Open a command prompt and type gcc --version. If MinGW 64 is installed correctly, you should see the version information for GCC.
$ gcc --version
gcc (MinGW.org GCC Build-2) 9.2.0
Step 5: Use MinGW 64
You can now use MinGW 64 to compile and run C and C++ programs. Here is an example:
#include <stdio.h>

int main() {
    printf("Hello, world!\n");
    return 0;
}
Save this code to a file named hello.c. Open a command prompt and navigate to the directory where hello.c is saved. Compile the code with the following command:
This will create an executable file named hello.exe. Run the program with the following command:
You should see the following output:
Method 3: Verify the Installation
Step 1: Download and Install MinGW 64
- Download the MinGW 64 installer from the official website: http://mingw-w64.org/doku.php/download
- Run the installer and select the following options:
- Architecture: x86_64
- Threads: posix
- Exception: seh
- Build revision: latest
- Destination folder: choose a directory of your choice
- Click on «Next» and follow the on-screen instructions to complete the installation.
Step 2: Verify the Installation
-
Open the Command Prompt by pressing the Windows key + R and typing «cmd» in the Run dialog box.
-
Type the following command to check if MinGW is installed correctly:
If MinGW is installed correctly, you should see the version number of the GCC compiler.
-
Type the following command to check if the MinGW bin directory is added to the system path:
If the MinGW bin directory is added to the system path, you should see the directory path in the output.
-
Type the following command to compile a simple C program:
This will compile the «hello.c» file and create an executable file named «hello.exe».
-
Type the following command to run the executable file:
If the program runs successfully and prints «Hello, World!» to the console, then MinGW is installed correctly and ready to use.

-
First, let’s access the official MinGW website:
mingw.org -
Now let’s go to the downloads tab, which is in the upper left corner:

- On the download page choose option
MingW-W64-builds:

- Now click the direct link to github:

- On the github page, choose the following option:
x86_64-12.2.0-release-posix-seh-rt_v10-rev0.7z

Now you will download the file and unzip it using winrar (or any other file extraction tool).
After unzipping the file, go to the location where you unzipped it
and copy the path of the bin folder:

That done, to windows settings -> system -> about -> advanced system settings.
Click environment variables -> system variables -> path -> edit -> new -> paste the bin folder path you copied earlier.
Okay, now open your terminal (win + r) and type cmd and type the following command g++ --version, if everything went well, the g++ version will appear.
MinGW is a popular Windows programming environment for Minimalist GNU for Windows. It combines the acclaimed GNU Compiler Collection (GCC) with Windows-specific libraries to provide a comprehensive toolkit for programming in C, C++, and Fortran. Installing it on your Windows 11 PC enables you to use its capabilities and construct sturdy and efficient Windows programs.
In this guide, we’ll walk you through installing MinGW on a Windows 11 PC to ensure all necessary components and configurations are present before beginning the development of Windows applications.

Setting up MinGW on Windows 11

It is an excellent choice for a user-friendly development platform that works perfectly on Windows. Combining capabilities from GCC with Windows-specific libraries, MinGW makes programming in C, C++, and Fortran simple. It takes advantage of open-source benefits while developing native Windows applications.
Before installing it on Windows 11, you must confirm that your system fulfills the minimum requirements. Windows 11 is entirely compatible, allowing for a smooth development experience. Check that your hardware and software satisfy the requirements, such as enough disc space and administrator rights.
Downloading MinGW
To begin using it, first, download its files from various sources, official distributions, and third-party sites offering official or unofficial distributions, or visit its official website or a trusted repository to acquire Windows 11 compatible versions. Based on your system configuration and requirements, select the suitable installation package.
Installation Process

After downloading, do as follows to install it:
1) Launch the downloaded executable file to initiate installation.
2) The installer will guide the installation. Select which components to install, such as the GCC compiler, libraries, and headers.
3) Navigate to the desired installation location. Generally, its default location will be suggested; however, you can change it if needed.
4) Finish the installation by following the instructions and agreeing to the license terms if requested.
Configuring Environment Variables
It is critical to configure the environment variables to guarantee that it is accessible from everywhere on your system. Add MinGW routes to the system’s environment variables as follows:
1) Launch the Settings by pressing Windows + I, scroll to «About,» and choose «Advanced System Settings» under «Device Specifications.»
2) In the «System Properties» menu, navigate to the Advanced section and «Environment Variables.»
3) In there, search for the «Path» variable under «System Variable» and double-click on it to edit
4) In the «Edit environmental variable,» select «New» and paste the MinGW bin path.
5) Click «OK» to preserve your changes and exit the Environment Variables dialogue.
Verifying the Installation:
You can run a short verification to ensure that MinGW is correctly installed on your Windows 11 PC. Follow these steps to verify the application is functioning correctly:
1. Press and type «cmd» to access the Command Prompt application.
2. type «gcc —version» into the Command Prompt window before hitting enter.
The GCC compiler version information should be displayed on the screen if correctly installed.
MinGW integration with IDEs:
Combining it with popular integrated development environments (IDEs) such as Visual Studio Code, Code::Blocks, or Dev-C++ would be best to improve your programming experience. Each IDE has its configuration requirements, but in general, you must specify its installation path and compiler options within the IDE’s settings.
Troubleshooting Common Problems:
Some frequent complications may arise throughout the installation process. These are a few potential problems and their solutions:
1. Installation issues: If you experience installation difficulties, ensure you possess all of the required administrator credentials, have downloaded the correct version for your system configuration, and provide that all installation files are not corrupted.
2. Configuration Issues: If it misbehaves as expected, verify that all environment variables and paths have been correctly specified and valid paths established. Also, add its installation directory to your system’s «Path» variable for proper configuration.
Conclusion
You can easily install and set up MinGW on your Windows 11 system by following the procedures given in this article. It is a robust development environment combining open-source tool flexibility and Windows compatibility. By embracing it, developers can unleash their full potential and begin on an exciting path of Windows application development.
Edited by Arkaprovo Roy
Thank You!
GIF
❯