Introduction
Apache Maven is a build-automation tool designed to provide a comprehensive and easy-to-use way of developing Java applications. It uses a POM (Project Object Model) approach to create a standardized development environment for multiple teams.
In this tutorial, we will show you how to install Apache Maven on a system running Windows.
Prerequisites
- A system running Windows.
- A working Internet connection.
- Access to an account with administrator privileges.
- Access to the command prompt.
- A copy of Java installed and ready to use, with the JAVA_HOME environment variable set up (learn how to set up the JAVA_HOME environment variable in our guide to installing Java on Windows).
Follow the steps outlined below to install Apache Maven on Windows.
Step 1: Download Maven Zip File and Extract
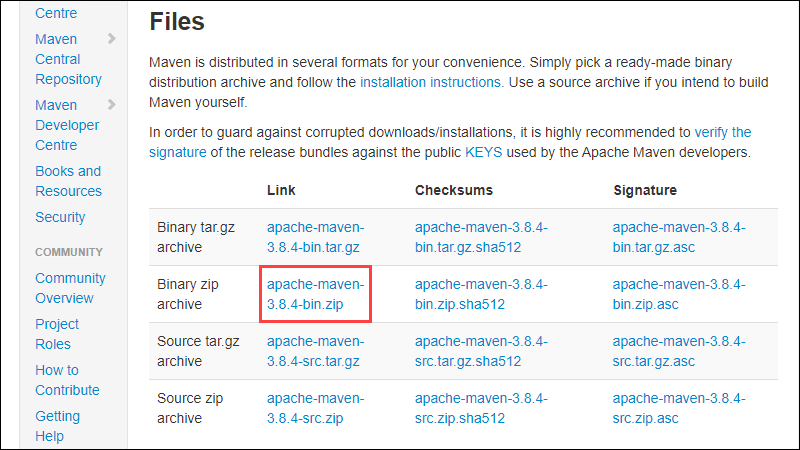
1. Visit the Maven download page and download the version of Maven you want to install. The Files section contains the archives of the latest version. Access earlier versions using the archives link in the Previous Releases section.
2. Click on the appropriate link to download the binary zip archive of the latest version of Maven. As of the time of writing this tutorial, that is version 3.8.4.
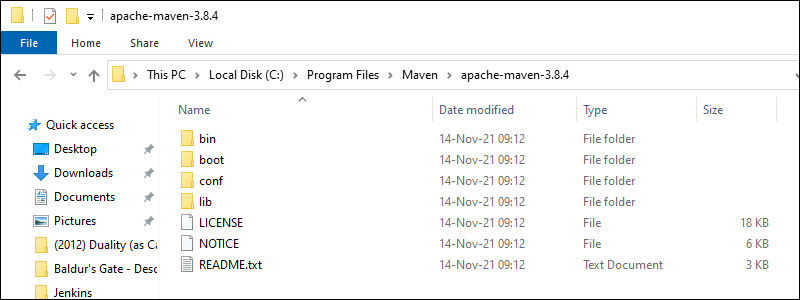
3. Since there is no installation process, extract the Maven archive to a directory of your choice once the download is complete. For this tutorial, we are using C:\Program Files\Maven\apache-maven-3.8.4.
Step 2: Add MAVEN_HOME System Variable
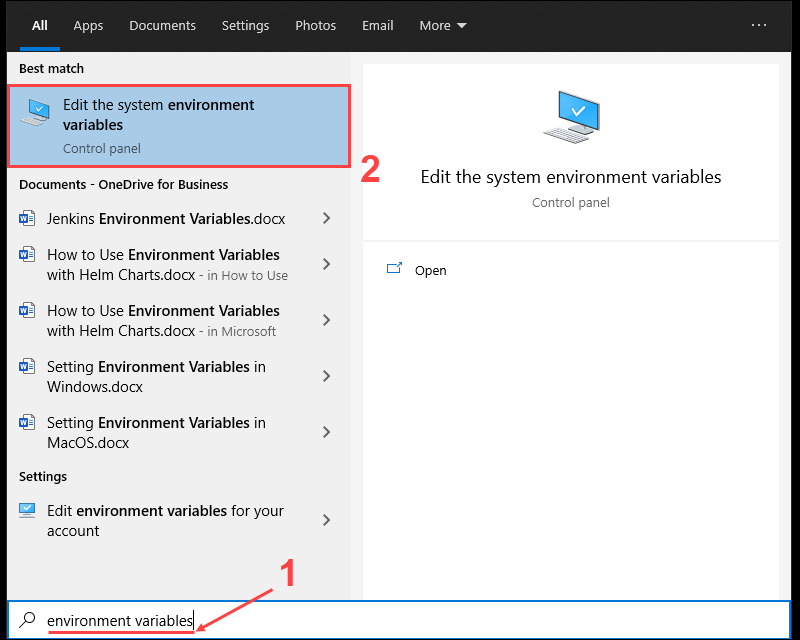
1. Open the Start menu and search for environment variables.
2. Click the Edit the system environment variables result.
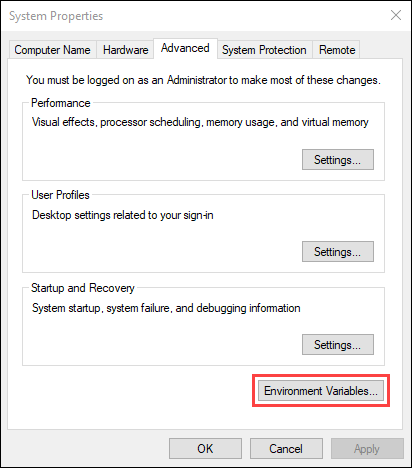
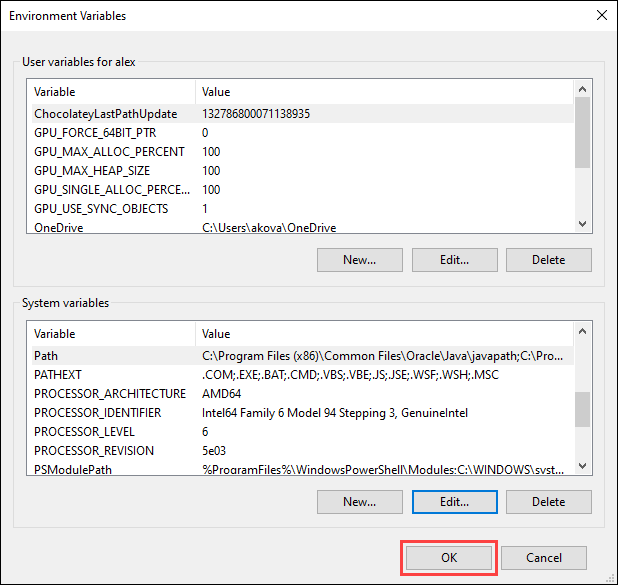
3. Under the Advanced tab in the System Properties window, click Environment Variables.
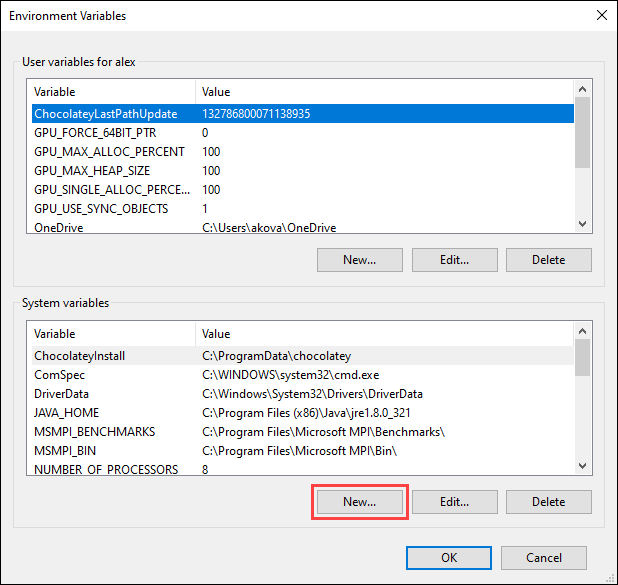
4. Click the New button under the System variables section to add a new system environment variable.
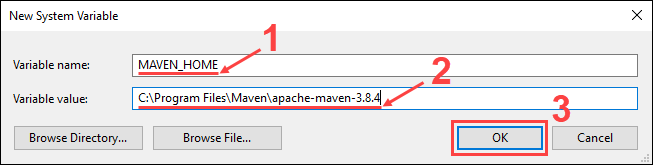
5. Enter MAVEN_HOME as the variable name and the path to the Maven directory as the variable value. Click OK to save the new system variable.
Step 3: Add MAVEN_HOME Directory in PATH Variable
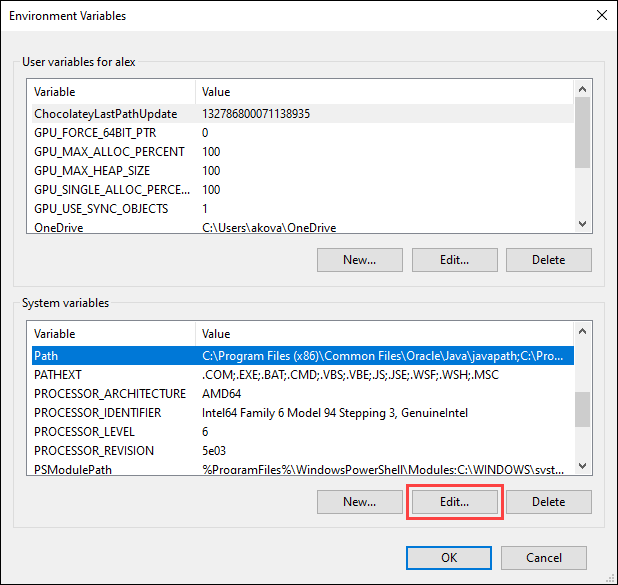
1. Select the Path variable under the System variables section in the Environment Variables window. Click the Edit button to edit the variable.
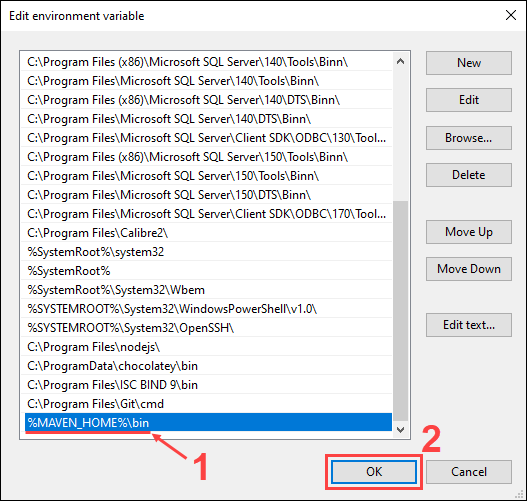
2. Click the New button in the Edit environment variable window.
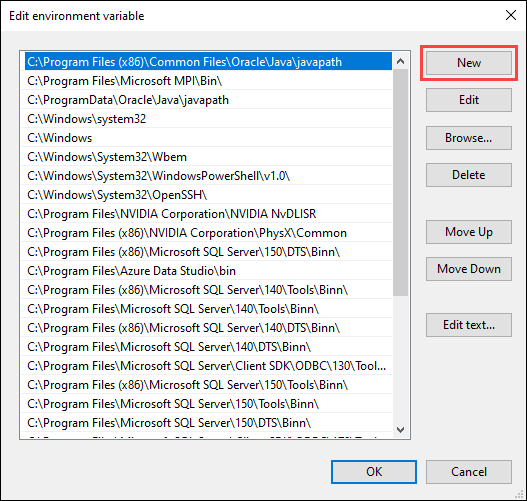
3. Enter %MAVEN_HOME%\bin in the new field. Click OK to save changes to the Path variable.
Note: Not adding the path to the Maven home directory to the Path variable causes the 'mvn' is not recognized as an internal or external command, operable program or batch file error when using the mvn command.
4. Click OK in the Environment Variables window to save the changes to the system variables.
Step 4: Verify Maven Installation
In the command prompt, use the following command to verify the installation by checking the current version of Maven:
mvn -version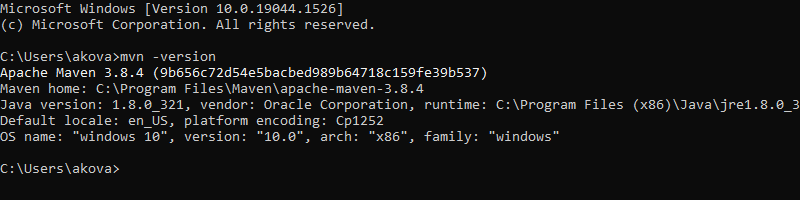
Conclusion
After reading this tutorial, you should have a copy of Maven installed and ready to use on your Windows system.
В данной статье вы найдёте инструкцию по установке Maven из архива,
настройке переменных окружения для возможности запуска команд Maven
в командной строке операционной системы Windows.
Требования
#
Предварительно у вас должен быть установлен JDK версии не ниже 8 и настроена
переменная окружения $JAVA_HOME. Проверьте в PowerShell
командами java --version и echo $env:JAVA_HOME. На скриншоте пример вывода,
который удовлетворяет дальнейшим действиям.

Если у вас ошибки и команда java не найдена, а JAVA_HOME ничего не выводит, скачайте
и установите JDK.
На странице необходимо выбрать операционную систему,
скачать файл MSI и запустить.
Это обычный установщик, в котором достаточно будет нажать «Далее».
После установки закройте все окна PowerShell и откройте заново,
попробуйте выполнить команды. Перезагрузку тоже можете попробовать 🙂
⏬ Скачивание архива
#
Перейдите на официальный сайт проекта Maven и скачайте архив
Downloading Apache Maven
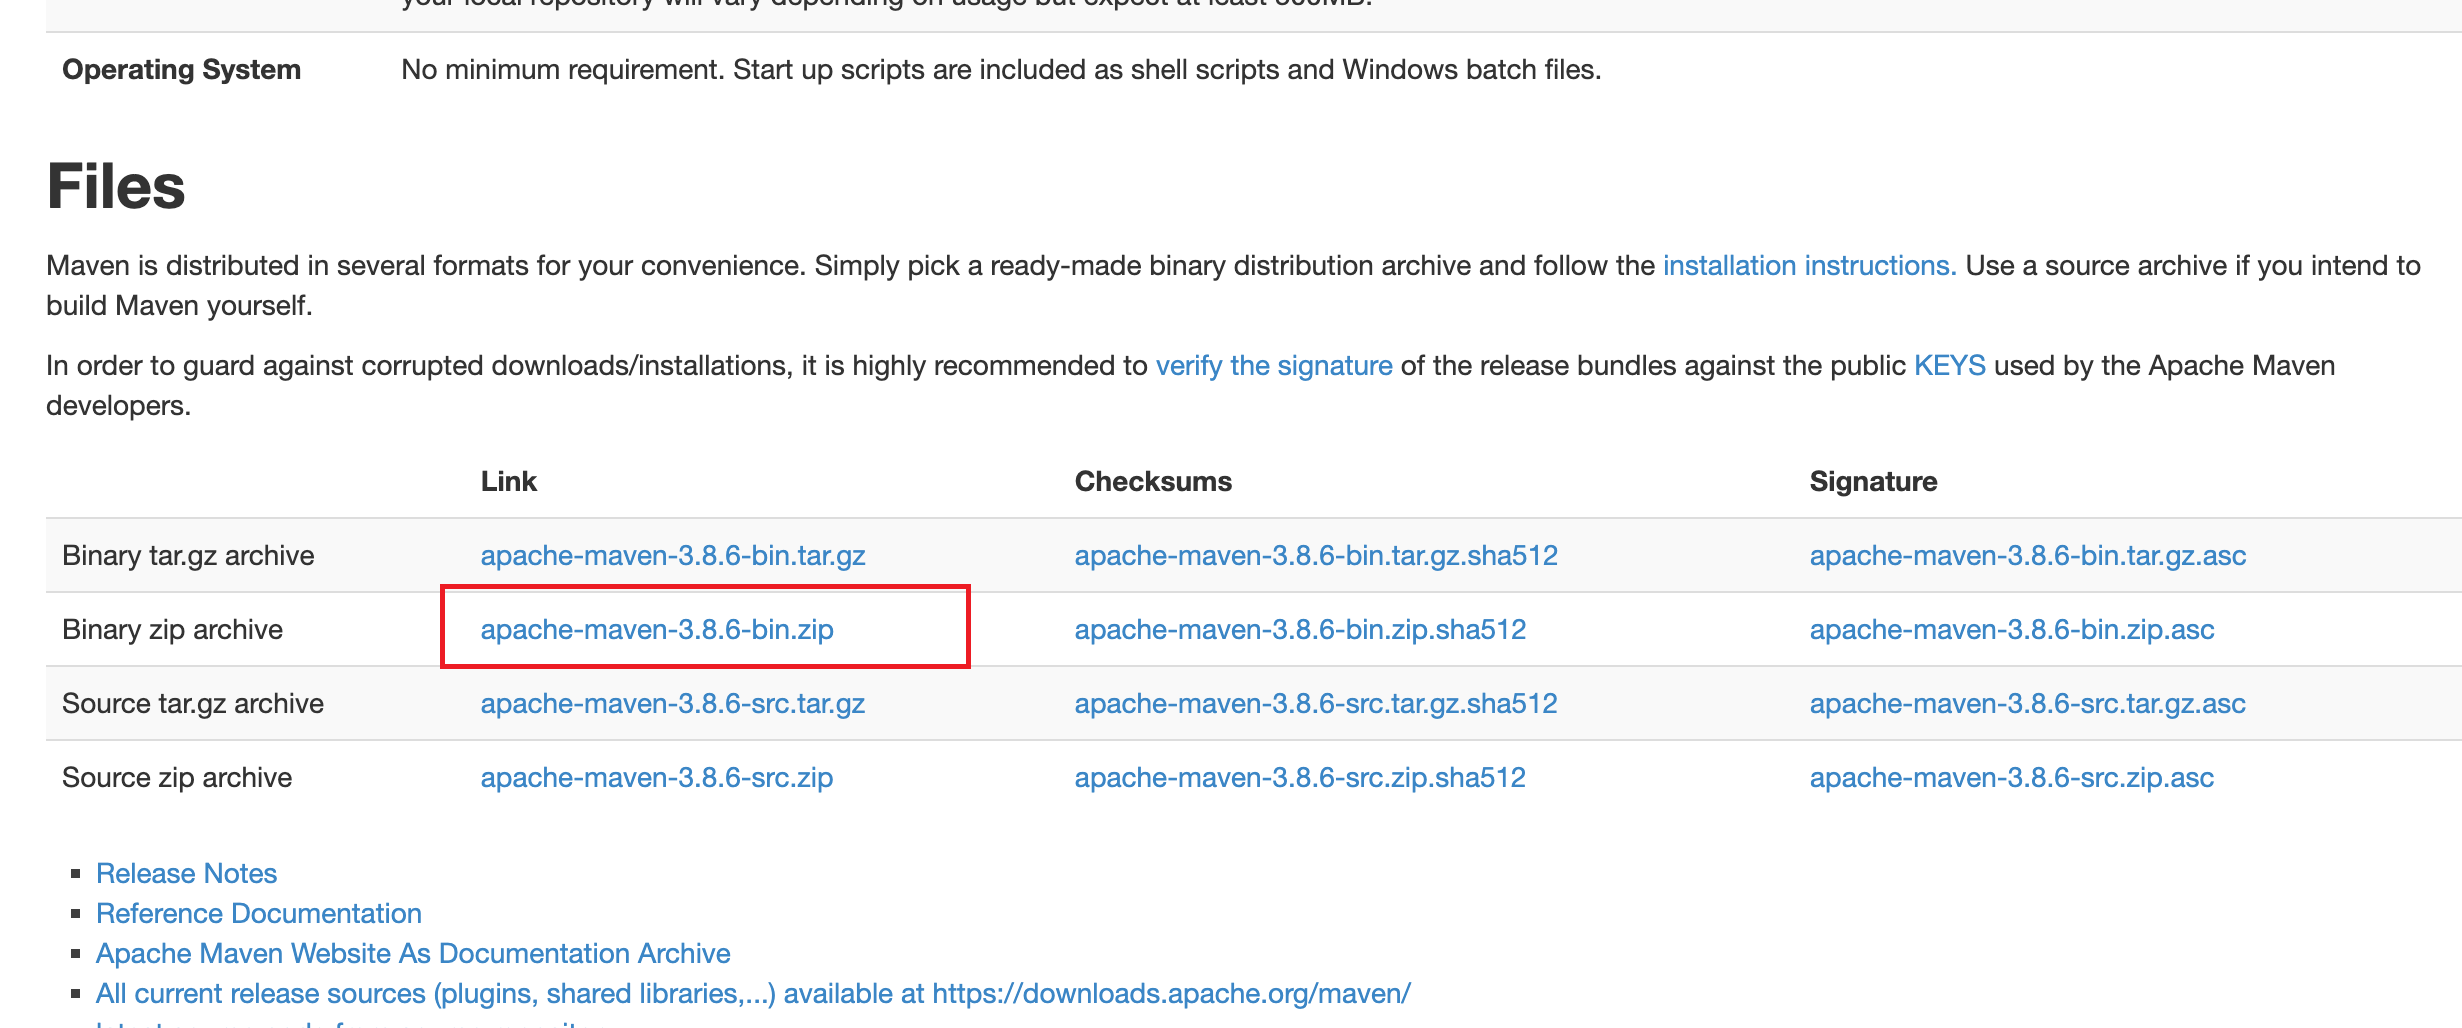
На странице найдите секцию Files и скачайте Binary Zip Archive.
📤 Распаковка архива
#
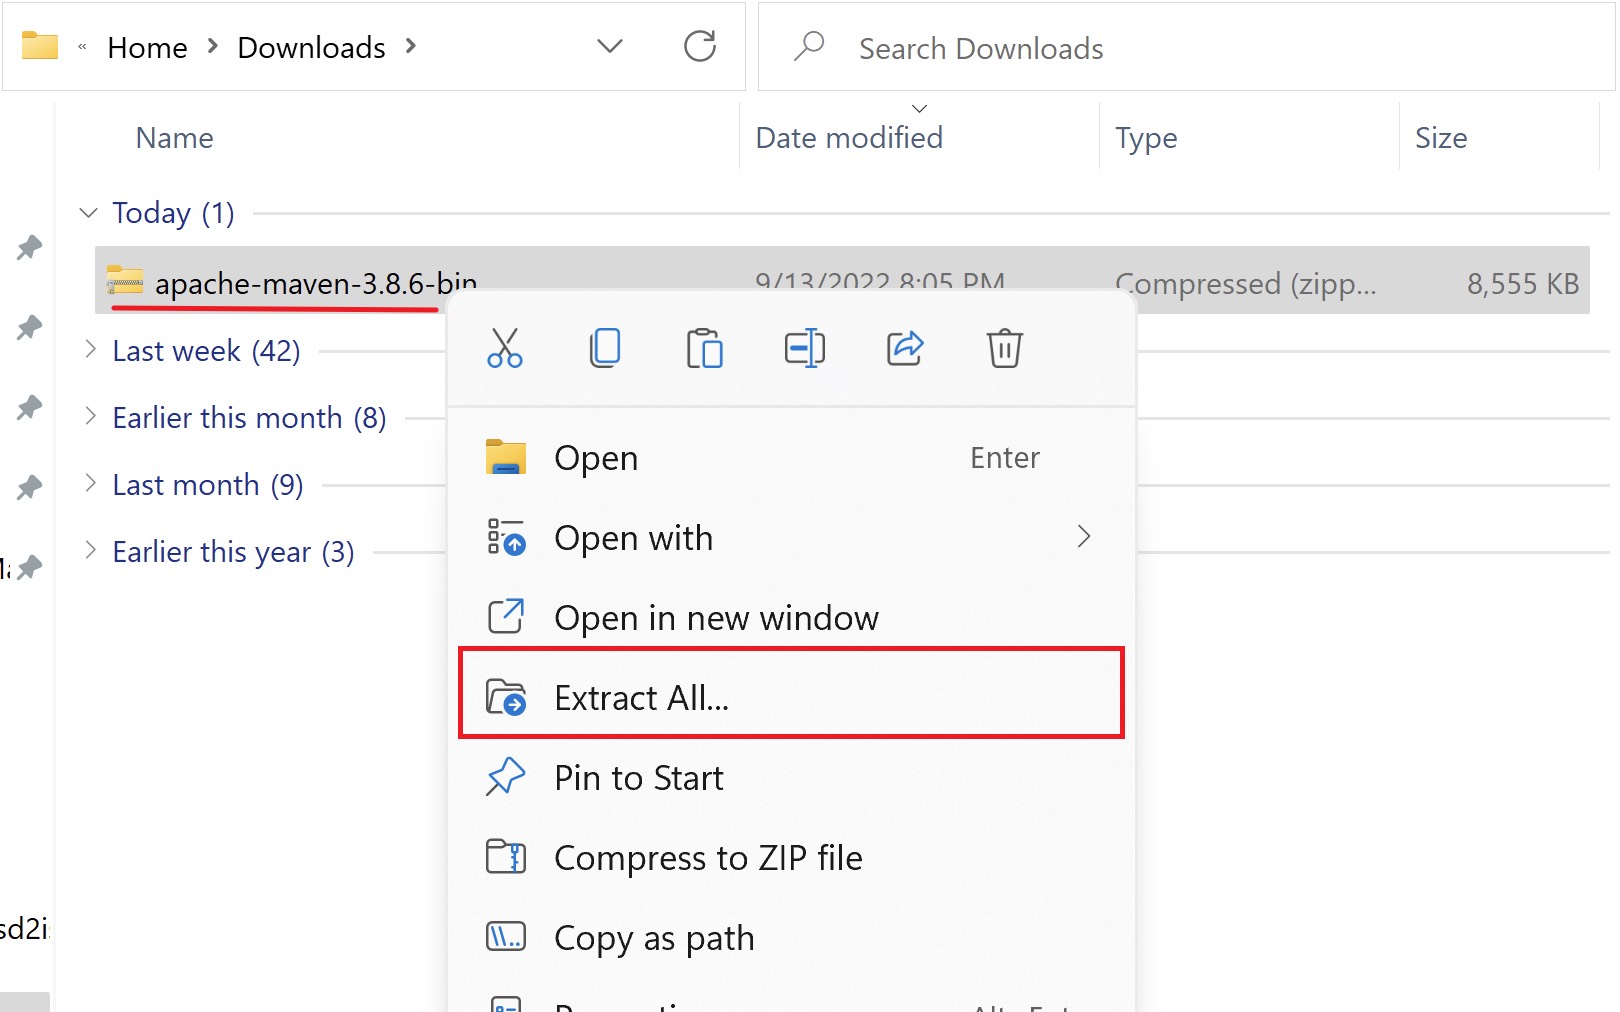
Найдите файл со скачанным архивом. Нажмите на него правой клавишей мыши
и выберите «Извлечь всё…» (Extract All…).
В предложенном окне установите путь, куда будет распакован архив. Вы можете распаковать в удобное для вас место. При этом в пути не должно быть пробелов, кириллицы или специальных символов.
В примере будем устанавливать в корень диска C:\, можете вписать или
выбрать через кнопку «Обзор…» (Browse…).
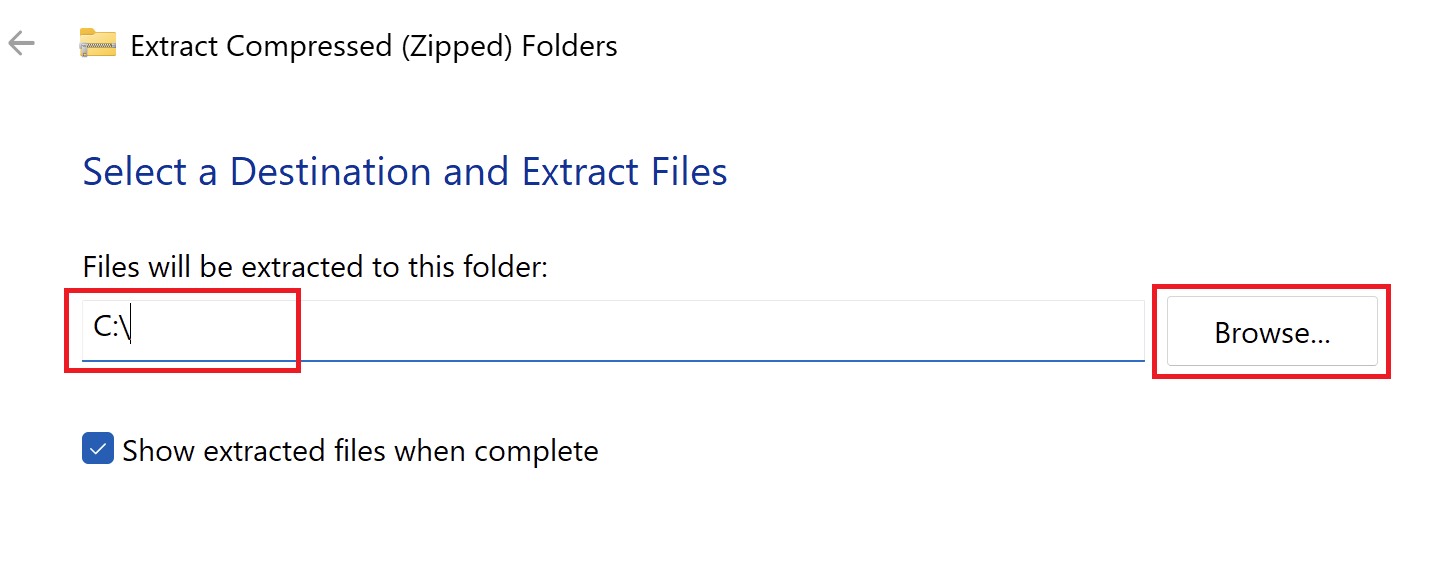
Нажмите кнопку «Распаковать» (Extract).
☑️ Проверка запуска
#
Содержимое архива представляет собой набор библиотек и исполняемых файлов.
Мы можем попробовать его запустить. Для этого откройте командную строку
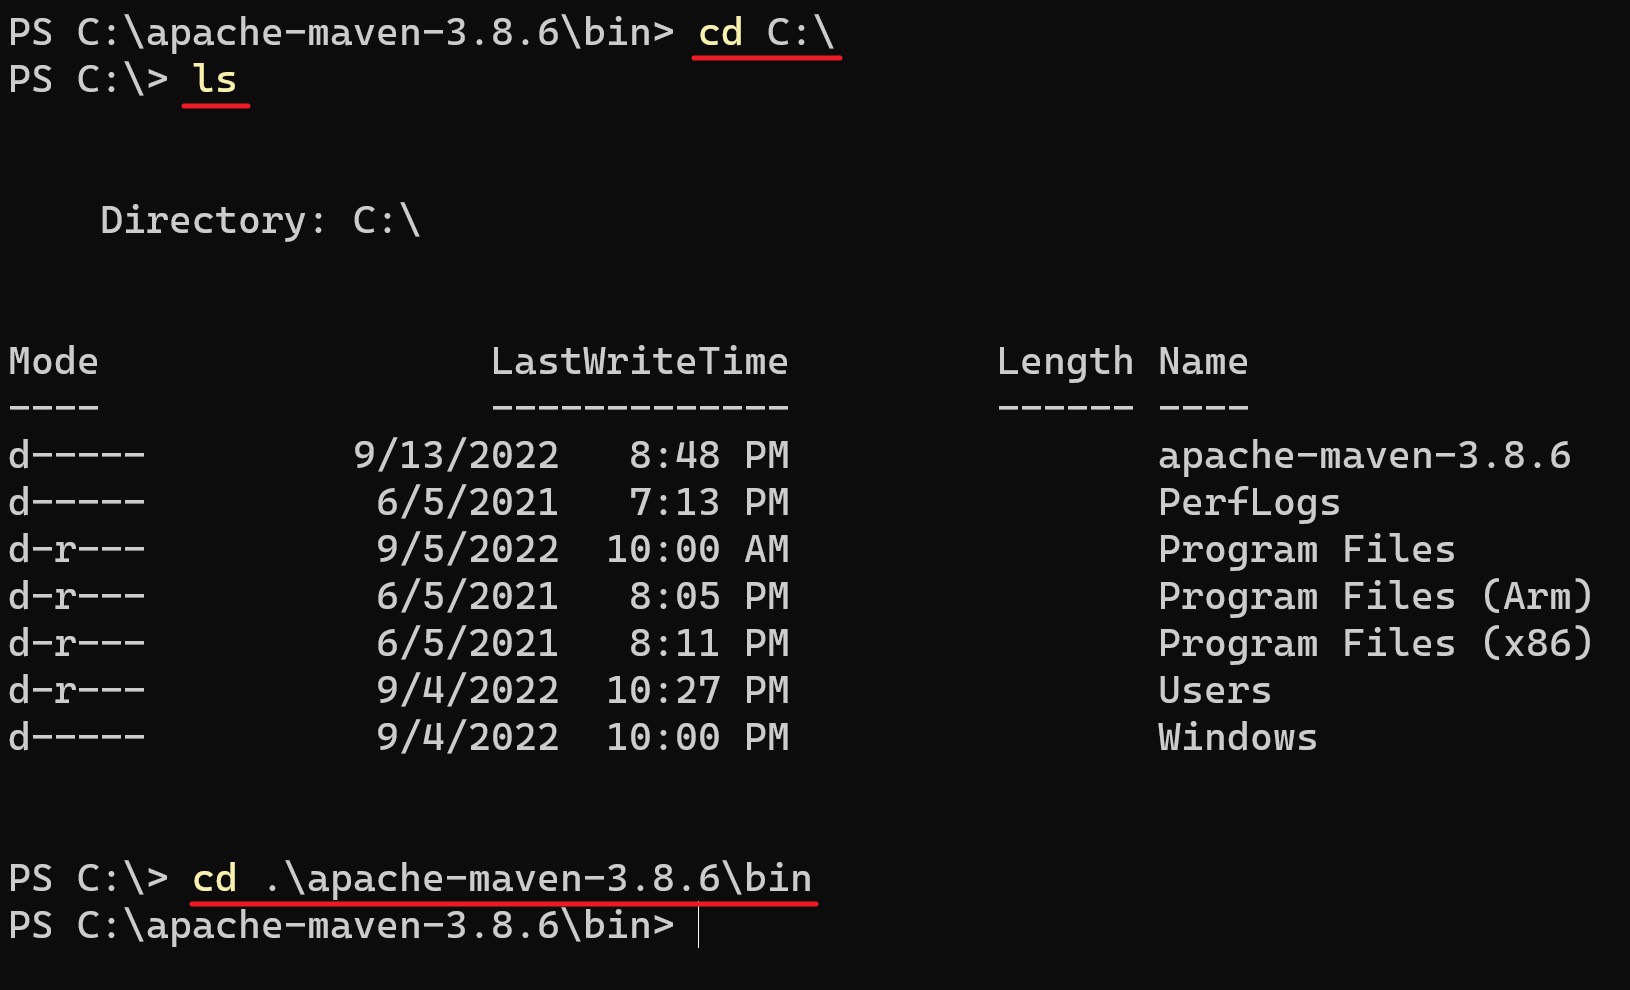
(Windows PowerShell) и перейдите в директорию, в которую распаковали архив.
Если распаковали в C:, то команда будет cd C:\
Далее посмотрите список файлов и найдите директорию apache-maven-3.x.x.
У вас версия может отличаться, так как Maven активно обновляется.
В примере это директория apache-maven-3.8.6.
Перейдите в директорию apache-maven-3.8.6 и далее в директорию bin. Это можно сделать одной командой:
cd C:\apache-maven-3.8.6\bin
Выполните команду ./mvn -version. Если переменная окружения JAVA_HOME ведёт на JDK, то вы увидите версию Maven:

Если у вас выводится версия, значит, Maven готов к работе. Если нет, то убедитесь, что находитесь в директории bin, там есть файл mvn и выполнены требования перед установкой.
🏗️ Настройка PATH
#
Конечно, на данном этапе уже можно пользоваться Maven,
но придётся постоянно писать полный путь до файла mvn, и это неудобно.
Для того чтобы команда работала в любой директории,
необходимо добавить папку C:\apache-maven-3.8.6\bin
в системную переменную PATH. Это важная переменная, в ней перечислены
директории, в которых Windows ищет исполняемые файлы,
когда мы набираем в консоли имя файла.
Чтобы посмотреть её содержание, выполните команду в PowerShell:
echo $env:PATH

В результате будет выведена строка с директориями, разделёнными точкой с запятой.
Как это работает?
Например, если мы в терминале наберём команду calc, откроется приложение
«Калькулятор». Так как операционная система прошлась по очереди по всем папкам
и нашла в одной из них приложение calc.exe, его и запустила.
Операционная система всегда запускает первый попавшийся подходящий
исполняемый файл, даже если их несколько в разных директориях.
Таким же образом директории проходятся по очереди записи в строке PATH.
Это значит, что нам надо добавить в этот список и папку с исполняемым файлом mvn.
Сделайте это из консоли. Только на всякий случай сохраните в текстовый файл
все директории, которые получили командой echo $env:PATH.
Если вы ошибётесь в команде и удалите данные, то сможете восстановить их
из файла. Чтобы сохранить сразу в файл, используйте команду
$env:PATH >> path.txt. Значение сохранится в папке, в которой вы находитесь.
Команда для добавления директории bin:
setx PATH "$env:PATH;C:\apache-maven-3.8.6\bin"
❗ Не ставьте в конце пути \ (обратный слеш), так как это будет экранировать кавычку, и кавычка станет частью строки.
Эта команда записывает в PATH cамо значение PATH и добавляет нашу строку. Важно на забыть поставить разделитель ; в начале нашего пути до bin.
По сути, мы склеиваем текущее значение с нашей директорией и записываем в эту же переменную.

После выполнения команды закройте все терминалы и откройте заново.
Проверьте, что сохранилось в PATH echo $env:PATH.
Если путь до Maven есть в списке — время проверить работу команды mvn.

Теперь вы можете запускать mvn в любой директории,
для этого вам не будет требоваться среда разработки.
🎉 Поздравляю с успешной установкой!
Apache Maven is a popular open-source build automation tool used primarily for Java projects. It provides a standardized way to build and manage projects and dependencies, making it easier for developers to understand the state of a project, its structure, and its dependencies.
Check Prerequisites
The first step is to ensure that you have the Java JDK installed on your machine. This is because Maven requires JDK to be installed on your system.
To check whether you have JDK installed, open Command Prompt and type the following command:
java -version
The command above should return the installed JDK version. If the command returns no output or an error, you need to install the Java JDK on your machine.
You can check the resource below for that.
How to Install Java 11 on Windows: Step by Step
In this tutorial, we will see a detailed step by step guide on how to setup the Java JDK 11 on Windows using the Amazon Corretto JDK.
![]() Captain Salem
Captain Salem

Download and Install Maven
The next step is to download and install Maven on the system.
Go to the Apache Maven official website’s download page:
Maven – Download Apache Maven
 Brett Porter

Download the binary zip archive.
Once the download is complete, extract the zip file to a directory (for example, C:\Program Files\Apache\Maven). This path will be referred to as <MAVEN_HOME>.
Set Environment Variables
- Go to Control Panel -> System and Security -> System -> Advanced System Settings -> Environment Variables.
- Click on «New» under System Variables. Then enter
JAVA_HOMEas Variable name and the path to your JDK installation as Variable value (for example,C:\Program Files\Java\jdk-11.0.2). Then click OK. - Repeat the previous step to add a new System Variable named
MAVEN_HOMEwith the path to your Maven installation (for example,C:\Program Files\Apache\Maven). - Find the System Variable named
Pathand click on Edit. In the Variable value field, add;%JAVA_HOME%\bin;%MAVEN_HOME%\binat the end. Then click OK.
Once complete, open a new command prompt window and run the command:
mvn --version
f Maven is installed correctly, you will see information about the installed Maven version, the JVM version, and other details.
Install Maven Using Scoop
You can also install Maven using the Scoop package manager on your machine. You can run the command as shown:
scoop install maven
Output:
Installing 'maven' (3.9.2) [64bit] from main bucket
apache-maven-3.9.2-bin.zip (8.9 MB) [============================================================================] 100%
Checking hash of apache-maven-3.9.2-bin.zip ... ok.
Extracting apache-maven-3.9.2-bin.zip ... done.
Linking ~\scoop\apps\maven\current => ~\scoop\apps\maven\3.9.2
Persisting conf
Persisting lib\ext
'maven' (3.9.2) was installed successfully!
'maven' suggests installing 'java/openjdk'.
If you do not have Scoop installed, you can check the tutorial below:
How to Install Scoop on Windows
In this post, we will quickly go over how you can quickly install and configure Scoop package manager on Windows in easy steps.
![]() GeekBitsCaptain Salem
GeekBitsCaptain Salem

Conclusion
That’s it! You’ve successfully installed Maven on your Windows machine.
Published by

A highly-skilled software engineer with a passion for teaching and sharing knowledge. From development to hardware, get articles with
high technical accuracy, clarity, and an engaging writing style.
How to Install Maven on Windows 11
In this guide, we install Apache Maven on a Windows 11 machine.
Learn Maven: https://www.javaguides.net/p/maven.html
YouTube Video
Here are the steps to install Apache Maven on a Windows operating system:
1. Download the Apache Maven Binary Zip Archive
1. Download the Apache Maven binary zip archive from the official website: https://maven.apache.org/download.cgi
Refer the below screenshot:

2. Extract the Zip
Extract the contents of the downloaded archive to a suitable location on your computer.
Refer the below screenshot:

3. Set up the Environment Variable
Add the bin directory of the extracted Maven archive to your system’s PATH environment variable.
Refer the below screenshot:

4. Verify the Installation
Verify the installation by opening a new command prompt window and running the following command:
mvn —version
Refer the below screenshot:

Once you install Maven successfully, you can use the command prompt to run, package, and deploy Maven projects.
That’s it! You have successfully installed Apache Maven on your Windows 11 machine.
Apache Maven
Software Installation
Windows 11
Install Maven on Windows: In our previous post of the Maven tutorial series, we are learning the basics of Maven and the Life Cycle of Maven. But in this post, we are going to learn a little bit more and also try to do hands-on Maven things.
Before Maven, the process of building and managing a Java-based project was complicated and time-consuming. Maven is a powerful project management tool that uses the Project Object Model (POM) to help you download dependencies automatically. With Maven, you can easily manage your Java-based projects with less effort and time investment.
Maven is the perfect tool for building Java applications. It’s written in Java, so it’s perfect for programs that run on the JVM. Just make sure you have Java installed first, then you can install and use Maven without any problems.
Prerequisites to Install Maven
Before going with the learning process let’s try to find out what is the minimum system requirement to deal with Maven. You can get all the system requirement details below:
- A system running Windows.
- A working Internet connection.
- Access to an account with administrator privileges.
- Access to the command prompt.
We have already published a blog post regarding how to install java on windows. You can check that by clicking on the link.
In order to install Maven on your Windows machine, you will first need to have the Java Development Kit (JDK) installed. The latest version of Maven requires JDK 1.7 or above in order to run properly.
Why JDK is Required?
As you know Maven is a Java-based tool, so to execute the commands of Maven we have to install Java in our local system first. When we are mentioning Java, that means we are talking about JDK (Java Development Kit), not about JRE (Java Runtime Environment). If you have any questions what’s the difference between JDK & JRE? then you can read one of our previous posts where we mentioned that in detail.
Install JDK For Windows
Installing Oracle JDK is a paid process, but we can save money by using OpenJDK instead. It’s free to use and there’s no need to worry about licenses or support from Oracle.
You can check this tutorial where we have already shared a detailed blog post on OpenJDK windows installation steps.
After successfully installed and configured you can validate that by running the below command:
C:\>java -version

Install Maven on Windows
After configuring the Java on your windows machine now we need to install Maven on our machine. To Install Maven on your machine follow the below steps.
There are different versions of Apache maven available on the official website. But before using those you have to remember that different apache maven version requires a minimum JDK version to be installed on that machine.
1. Maven 3.3+ requires JDK 1.7+
2. Maven 3.2 requires JDK 1.6+
3. Maven 3.0/3.1 requires JDK 1.5+
Maven Download
1 . Visit the Maven download page to find the version of Maven you want to install. The Files section contains all the latest versions, while Previous Releases give access to older ones.
2 . Click on the respective link which you want to download the binary zip archive of Maven 3.8.6, which is the latest version at the time of writing this tutorial! For this tutorial, we have downloaded the
Binary zip archive.

3 . Once you’ve got the Maven archive downloaded, go ahead and extract it to a directory of your choice. No installation process is required! For this tutorial, we have extracted the files into: C:\Users\XX\Downloads\DL_Files\apache-maven-3.8.6

Setting up Maven Environment Variables
After Maven Download, the next thing is we have to configure the system variable. So follow the below steps to configure the M2_HOME, MAVEN_HOME, and Path.
- Click on the Search bar and Try to Find out the environment variables.
- Click on the Edit the system environment variables result.

After clicking on Edit the system environment variables, you will get a window System properties.

Click on the Environment Variables, After that you will get another environment variables window. Click the New button under the System variables section to add a new system environment variable.

In order to set up Maven, you’ll need to add its home directory to your system variables. To do this, simply enter MAVEN_HOME as the variable name and the path to the Maven folder as the variable value. This will help ensure things run smoothly and click OK to save the new system variable.

The next thing is to click on the “Path” variable under the “System variables” section in the Environment Variables window. Clicking on the “Edit” button will allow you to edit the variable.

Click the New button in the Edit environment variable window. Enter %MAVEN_HOME%\bin into the new field. Click OK to save changes to your Path variable.

Note: If you see the error ‘mvn’ is not recognized as an internal or external command, operable program, or batch file, it may be because you have not added the path to the Maven home directory to your Path variable.
Again Click the “OK” button in the “Environment Variables” window to save your changes.
Maven Verify Command
Great job! Your Maven installation is complete. Now let’s test it out from the Windows Command Prompt. To do this, go to the run (Windows+R) and type ‘cmd’ in the box. At the prompt, type: mvn -version
If the above command gives you the maven version, it means that your environment variable is set correctly and the Maven installation is successful.

Conclusion:
We have discussed in detail how to install Maven on your windows machine. But after following this still, if you have any concerns then you can ask in the comment section.
Ads Custom Widget After Entry
Before Comments
Reader Interactions