Настройка рабочей среды
Установка библиотеки GTest в Ubuntu Linux
Для установки GTest в Ubuntu достаточно выполнить команду
sudo apt install libgtest-dev
Установка библиотеки GTest в Windows 10
Для установки библиотеки GTest в Windows 10 скачаем ее исходный код, скомпилируем с помощью CMake и подключим собранную библиотеку и заголовочные файлы к MinGW.
Убедитесь в том, что в системе установлены MinGW и CMake.
Скачайте zip архив со страницы релиза (версия 1.11.0 на момент написания текста). Ссылка находится в самом низу страницы.

Распакуйте архив и перейдите в директорию, содержащую файл CMakeLists.txt. Выполняем сборку с помощью следующих команд (используйте интерфейс PowerShell):
> mkdir build;                   # создаем директорию для сборки
> cd build;                      # переходим в директорию build
> cmake -G "MinGW Makefiles" ..  # генерируем файлы для сборки
> cmake --build .                # запускаем сборку
Подключаем библиотеку к MinGW:
- Скопируйте директорию
googletest/include/gtest, в директорию MinGW, которая у автора этого текста выглядит такmingw32/lib/gcc/i686-w64-mingw32/8.1.0/include/. - Скопируйте содержимое директории
build/lib(четыре файла с расширением.a) в директорию MinGWmingw32/lib/.
Готово. Теперь Вы можете подключать библиотеку GTest к своим проектам.
install googletest on Linux and Windows
This file contains bidirectional Unicode text that may be interpreted or compiled differently than what appears below. To review, open the file in an editor that reveals hidden Unicode characters.
Learn more about bidirectional Unicode characters
| #!/bin/sh | |
| # c.f.: https://qiita.com/y-vectorfield/items/6238cfd2d9c34aefe364 | |
| # Modified library files installation directory | |
| # move to working directory | |
| cd ~/ | |
| # download | |
| git clone https://github.com/google/googletest.git | |
| # build | |
| cd googletest | |
| mkdir build | |
| cd build | |
| cmake .. | |
| make | |
| # install | |
| sudo cp -r ~/googletest/googlemock/include/gmock /usr/local/include/gmock | |
| sudo cp -r ~/googletest/googletest/include/gtest /usr/local/include/gtest | |
| sudo mkdir /usr/local/lib/gtest; sudo cp -r ~/googletest/build/lib/libgtest*.a /usr/local/lib/gtest/ | |
| sudo mkdir /usr/local/lib/gmock; sudo cp -r ~/googletest/build/lib/libgmock*.a /usr/local/lib/gmock/ |
Setup GoogleTest on Windows
1. Setup build tools
You can skip some of the following steps if you have already installed them.
- Install Mingw-w64
- Install Python3
- Install GNU Make (Make for Windows GnuWin32 is sufficient)
- Install CMake
2. Build GoogleTest
-
Download GoogleTest release package, extract it, and go to folder:
googletest-release-x.x.x -
Run following commands
cmake -G "MinGW Makefiles"
make
3. Copy header and library files to your environment
You may have to change Mingw-w64 path in the following instructions, according to your environment.
- Copy 2 folders
googletest-release-x.x.x/googletest/include/gtestandgoogletest-release-x.x.x/googletest/include/gmocktoC:/Program Files/mingw-w64/x86_64-8.1.0-posix-seh-rt_v6-rev0/mingw64/include/ - Copy gtest library files
copy googletest-release-x.x.x/lib/libgtest*.atoC:/Program Files/mingw-w64/x86_64-8.1.0-posix-seh-rt_v6-rev0/mingw64/lib/gtest/ - Copy gmock library files
googletest-release-x.x.x/lib/libgmock*.atoC:/Program Files/mingw-w64/x86_64-8.1.0-posix-seh-rt_v6-rev0/mingw64/lib/gmock/
4. Usage
MathLib will help you know how to use GoogleTest.
Table of contents
- A: convenient and fast installation GoogleTest
- B: Configure the LIB path and generate command line
- C:Google Test
- D: The problem that may be encountered
-
- Nuget manager cannot find Google Test
- Google Test file failure
- Application error-cannot start normally, click «OK» to close the application
A: convenient and fast installation GoogleTest
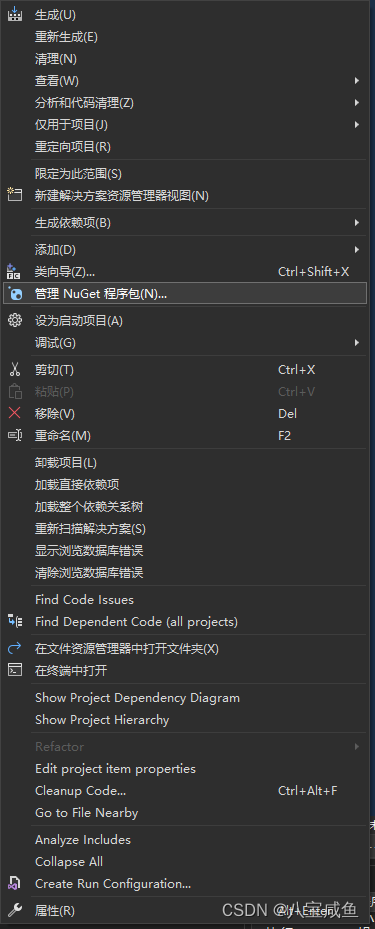
1. Open items that you need to test, right -click the project
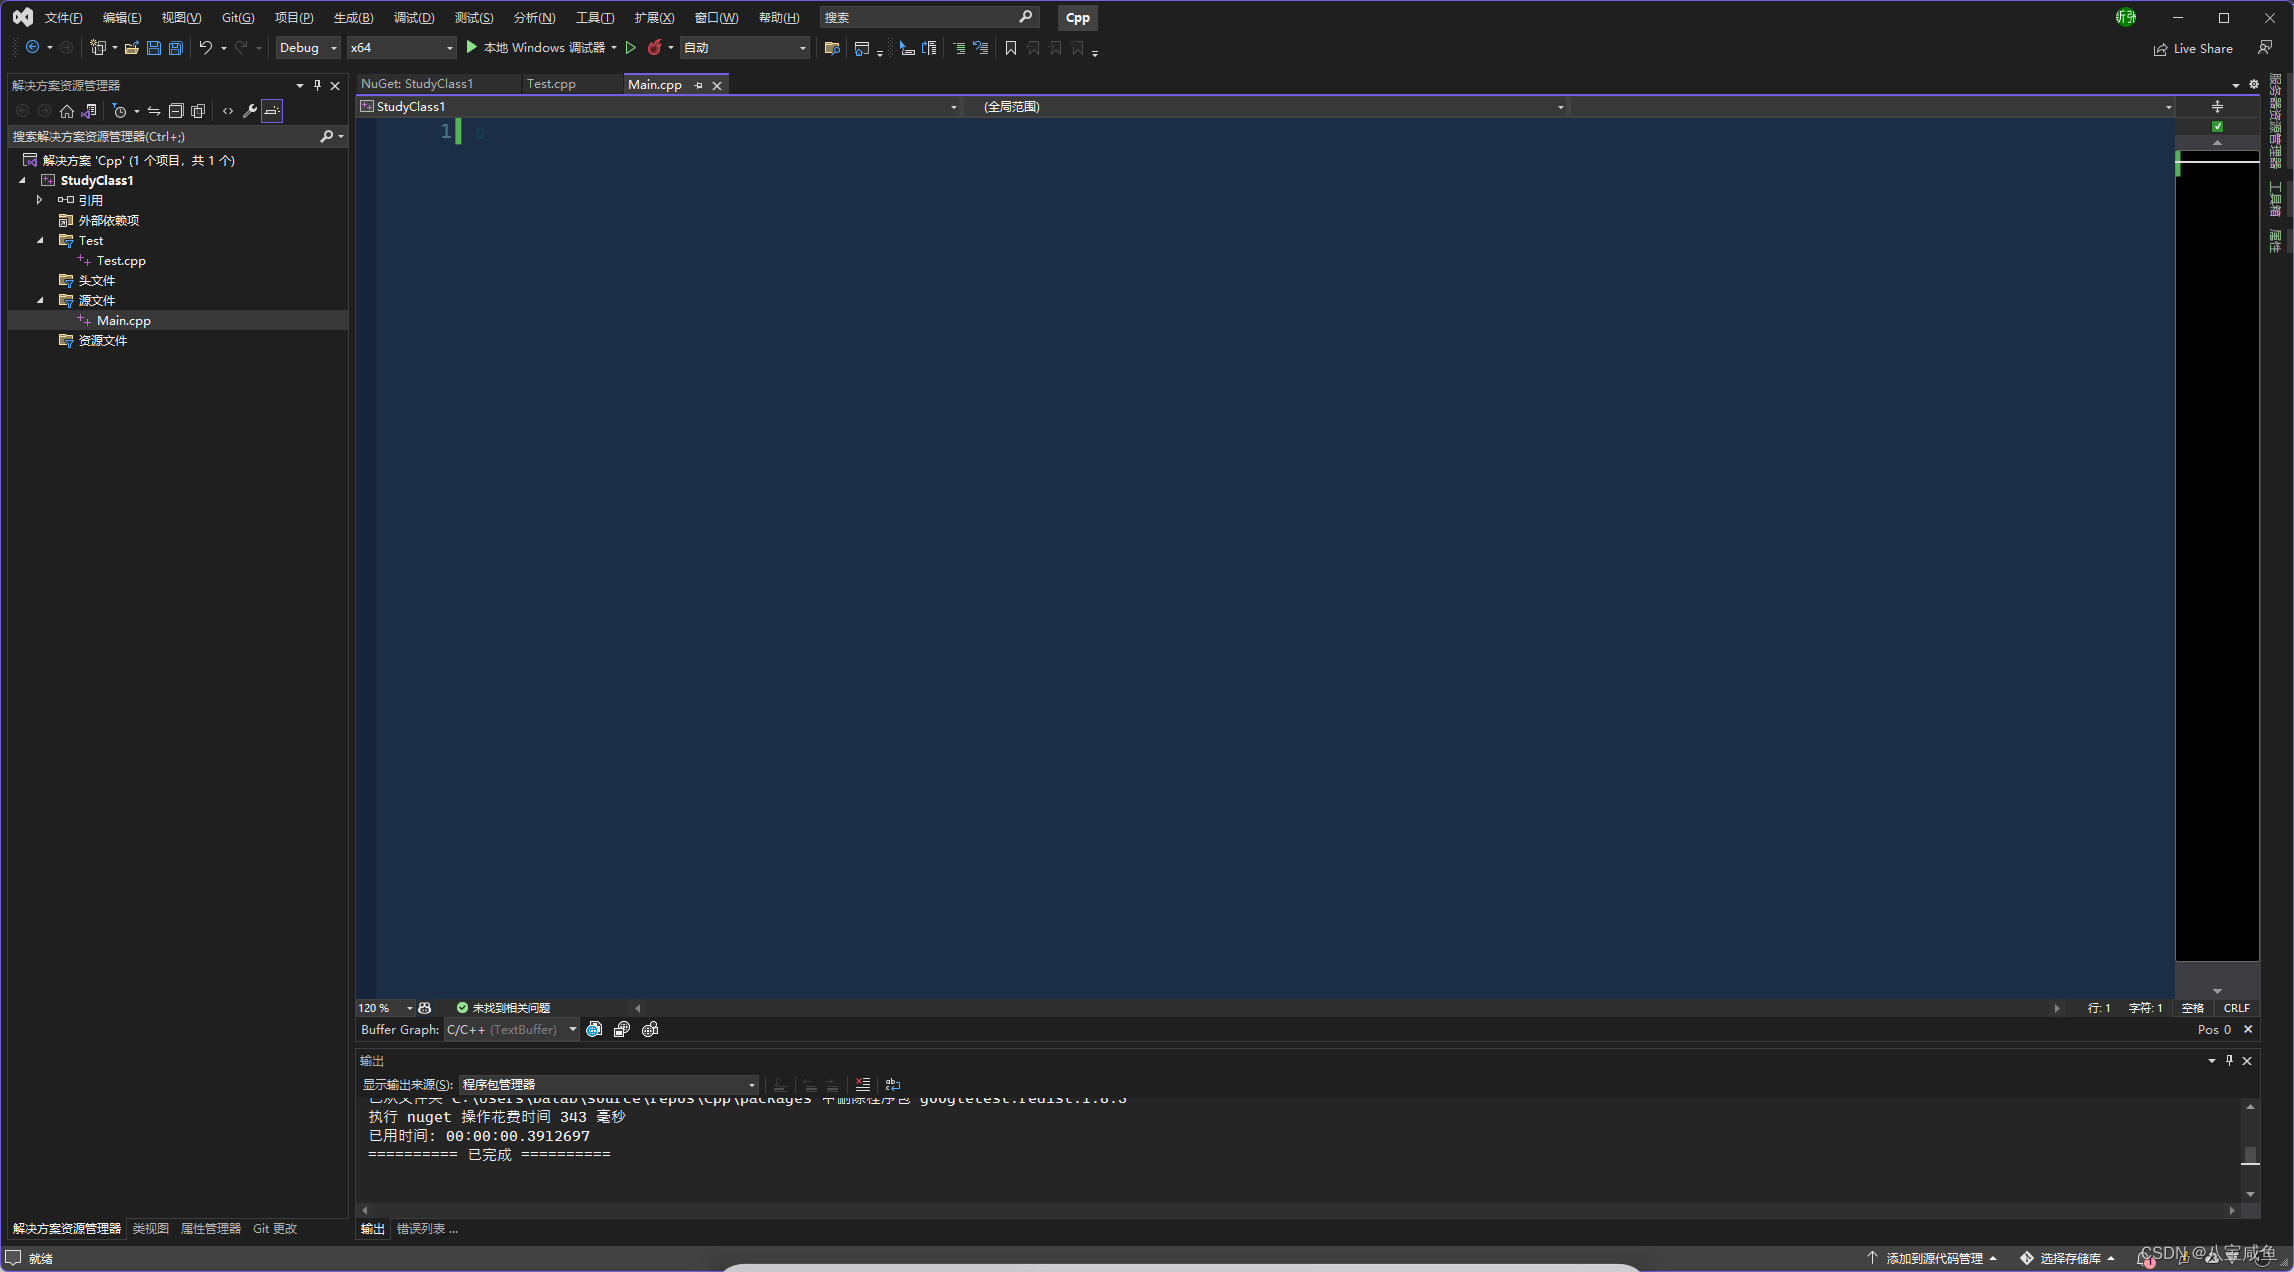
2. Select Manage Nuget Packages
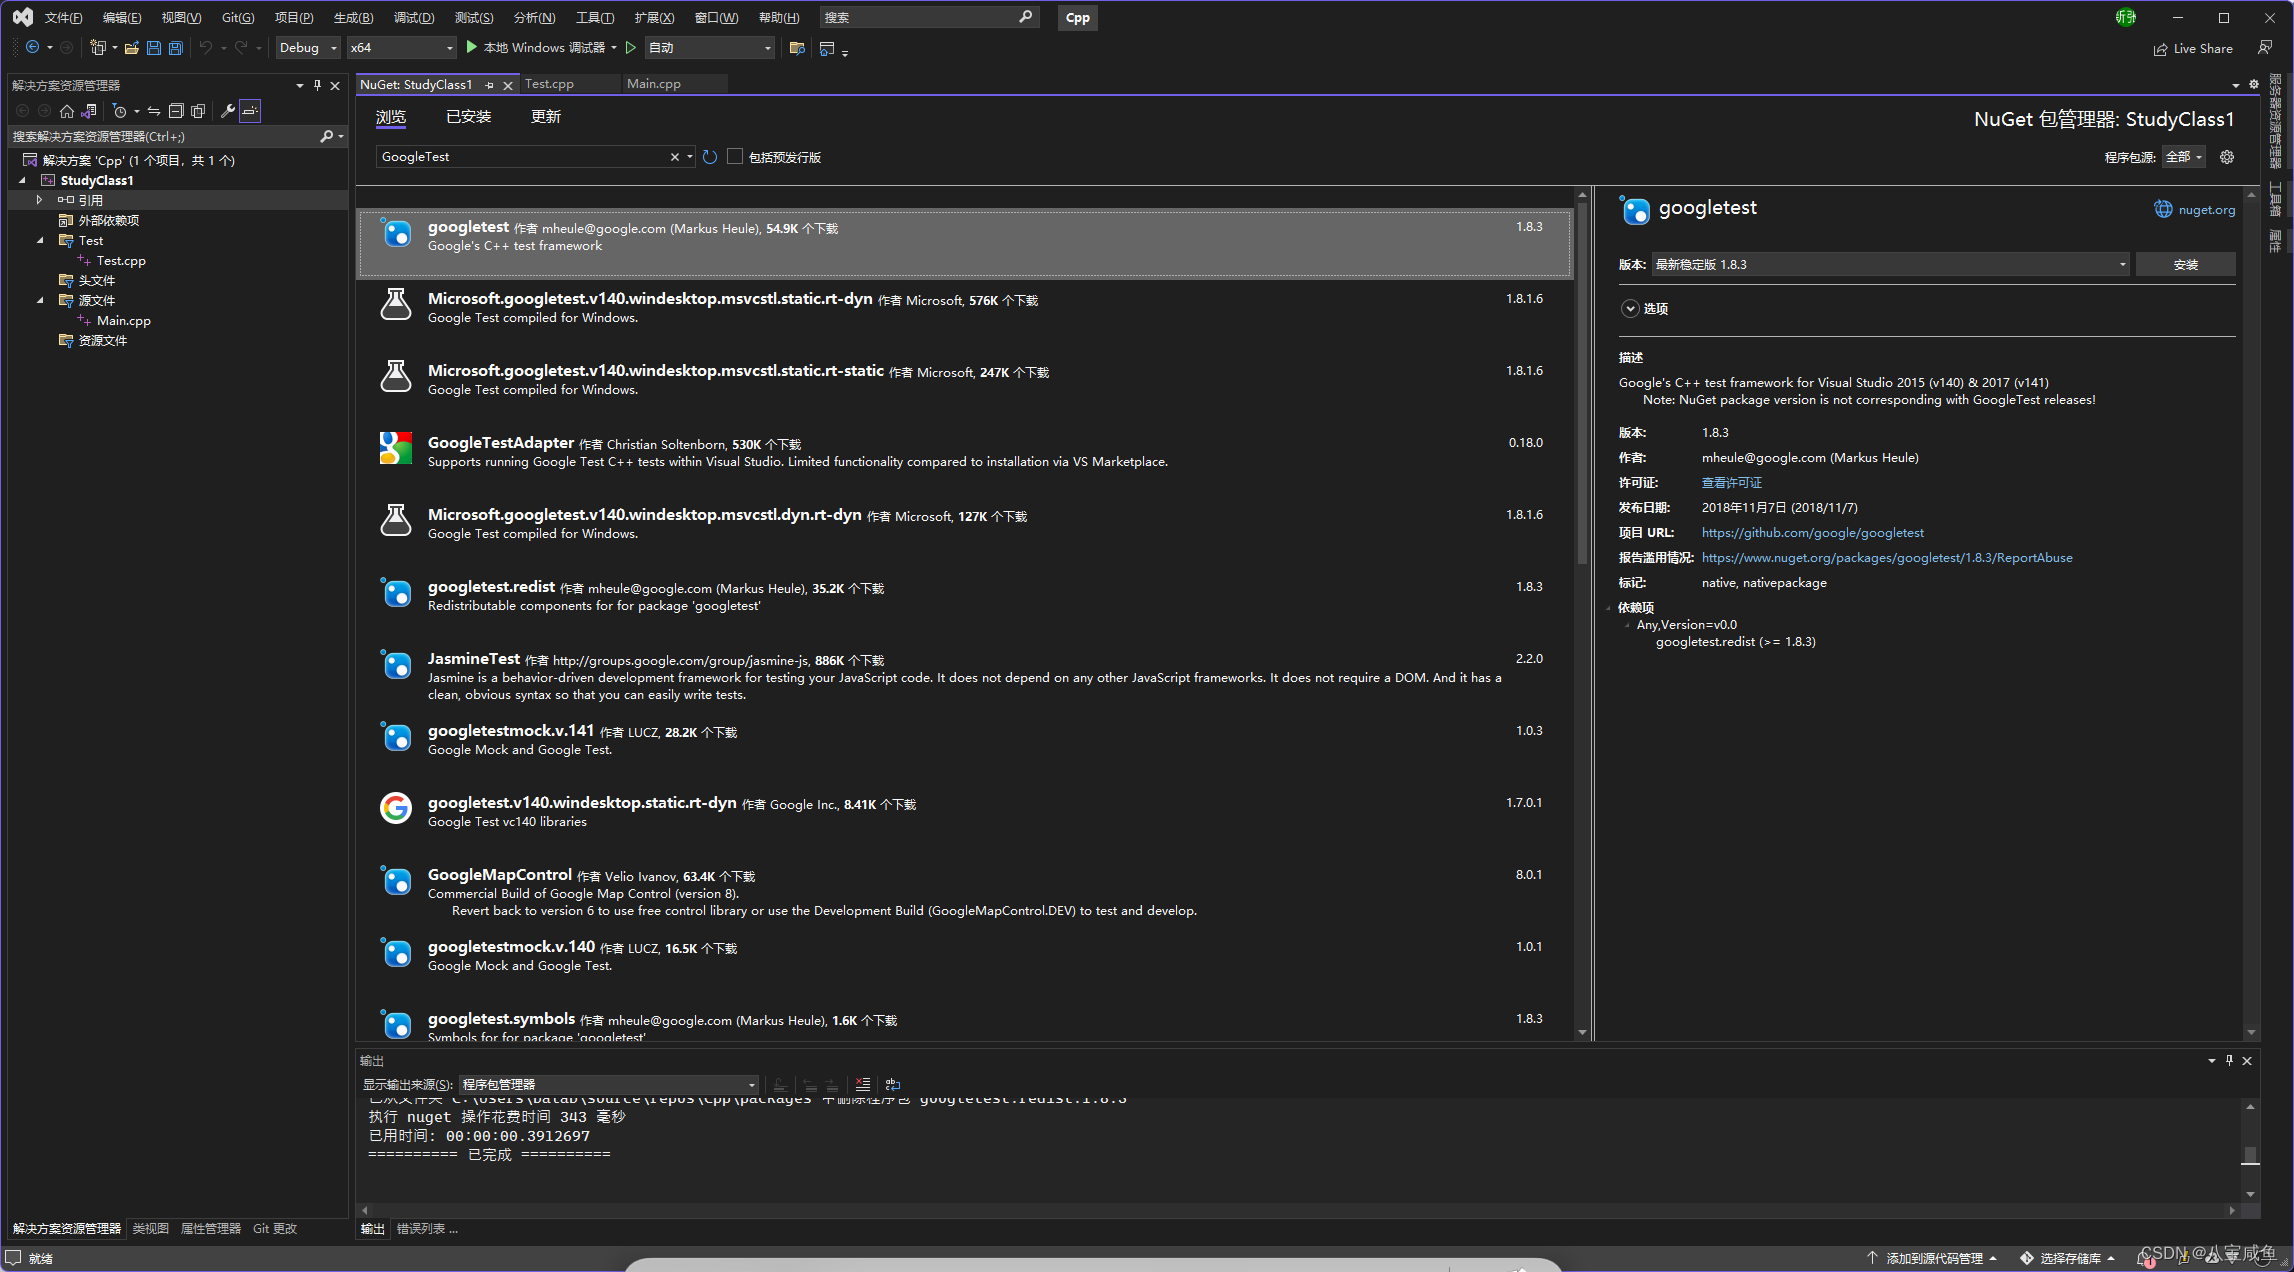
3. In the manager interface, select Browse to search for Google Test, and click Install after finding it
B: Configure the LIB path and generate command line
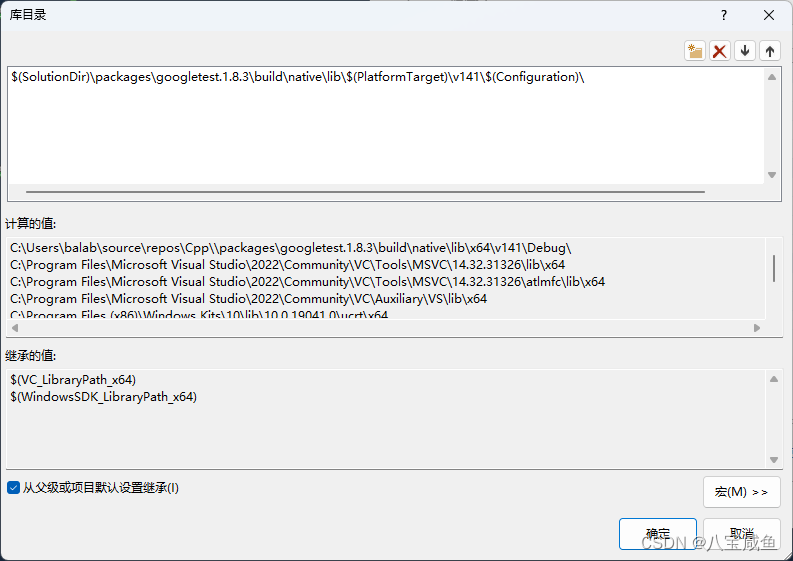
LIB path:$(SolutionDir)\packages\googletest.1.8.3\build\native\lib\$(PlatformTarget)\v141\$(Configuration)\
There is a macro inside, theoretically, everyone will be universal, and you can modify it according to your current situation
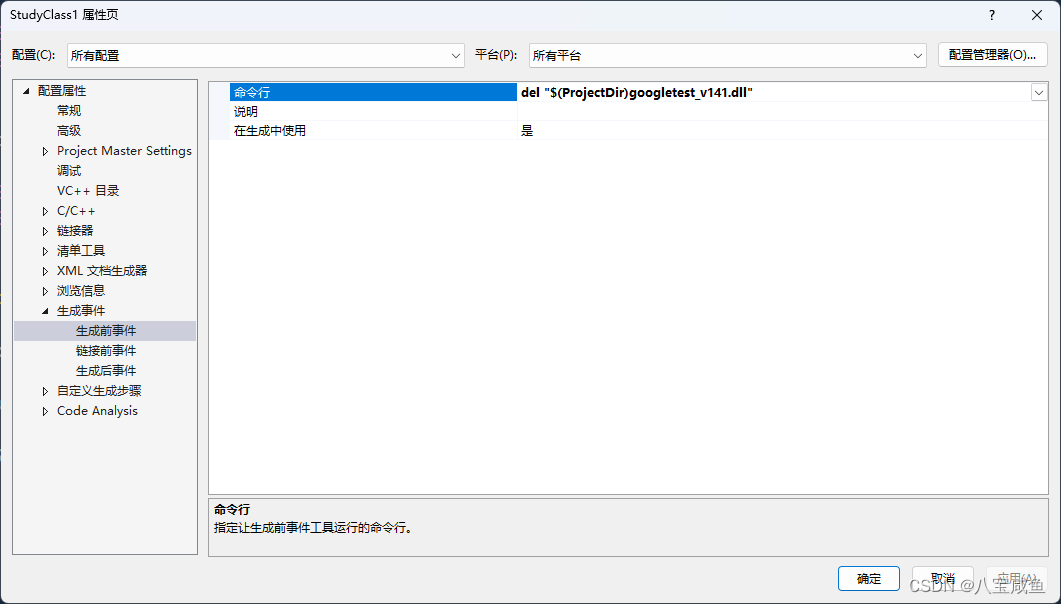
B: Use the command line, copy different directory, the corresponding version of the DLL to the working directory, and delete the DLL of the previous version difference
Working directory is default$(ProjectDir)
Generate an event
del "$(ProjectDir)googletest_v141.dll"
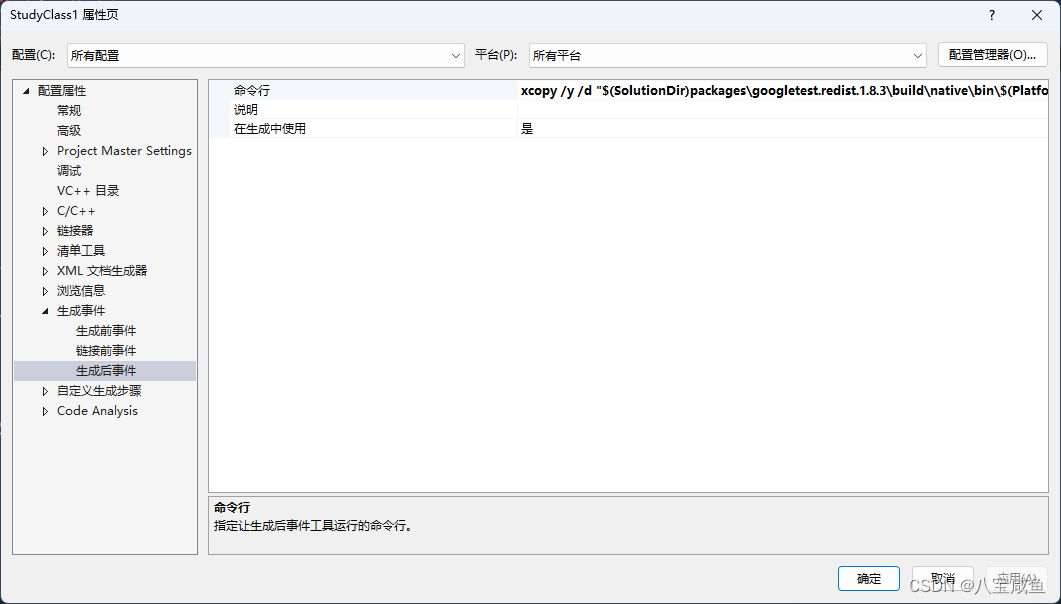
Post -generated event
xcopy /y /d "$(SolutionDir)packages\googletest.redist.1.8.3\build\native\bin\$(PlatformTarget)\v141\$(Configuration)\googletest_v141.dll" "$(ProjectDir)"
There is a macro inside, theoretically, everyone will be universal, and you can modify it according to your current situation
GTest Doc: https://google.github.io/googletest/
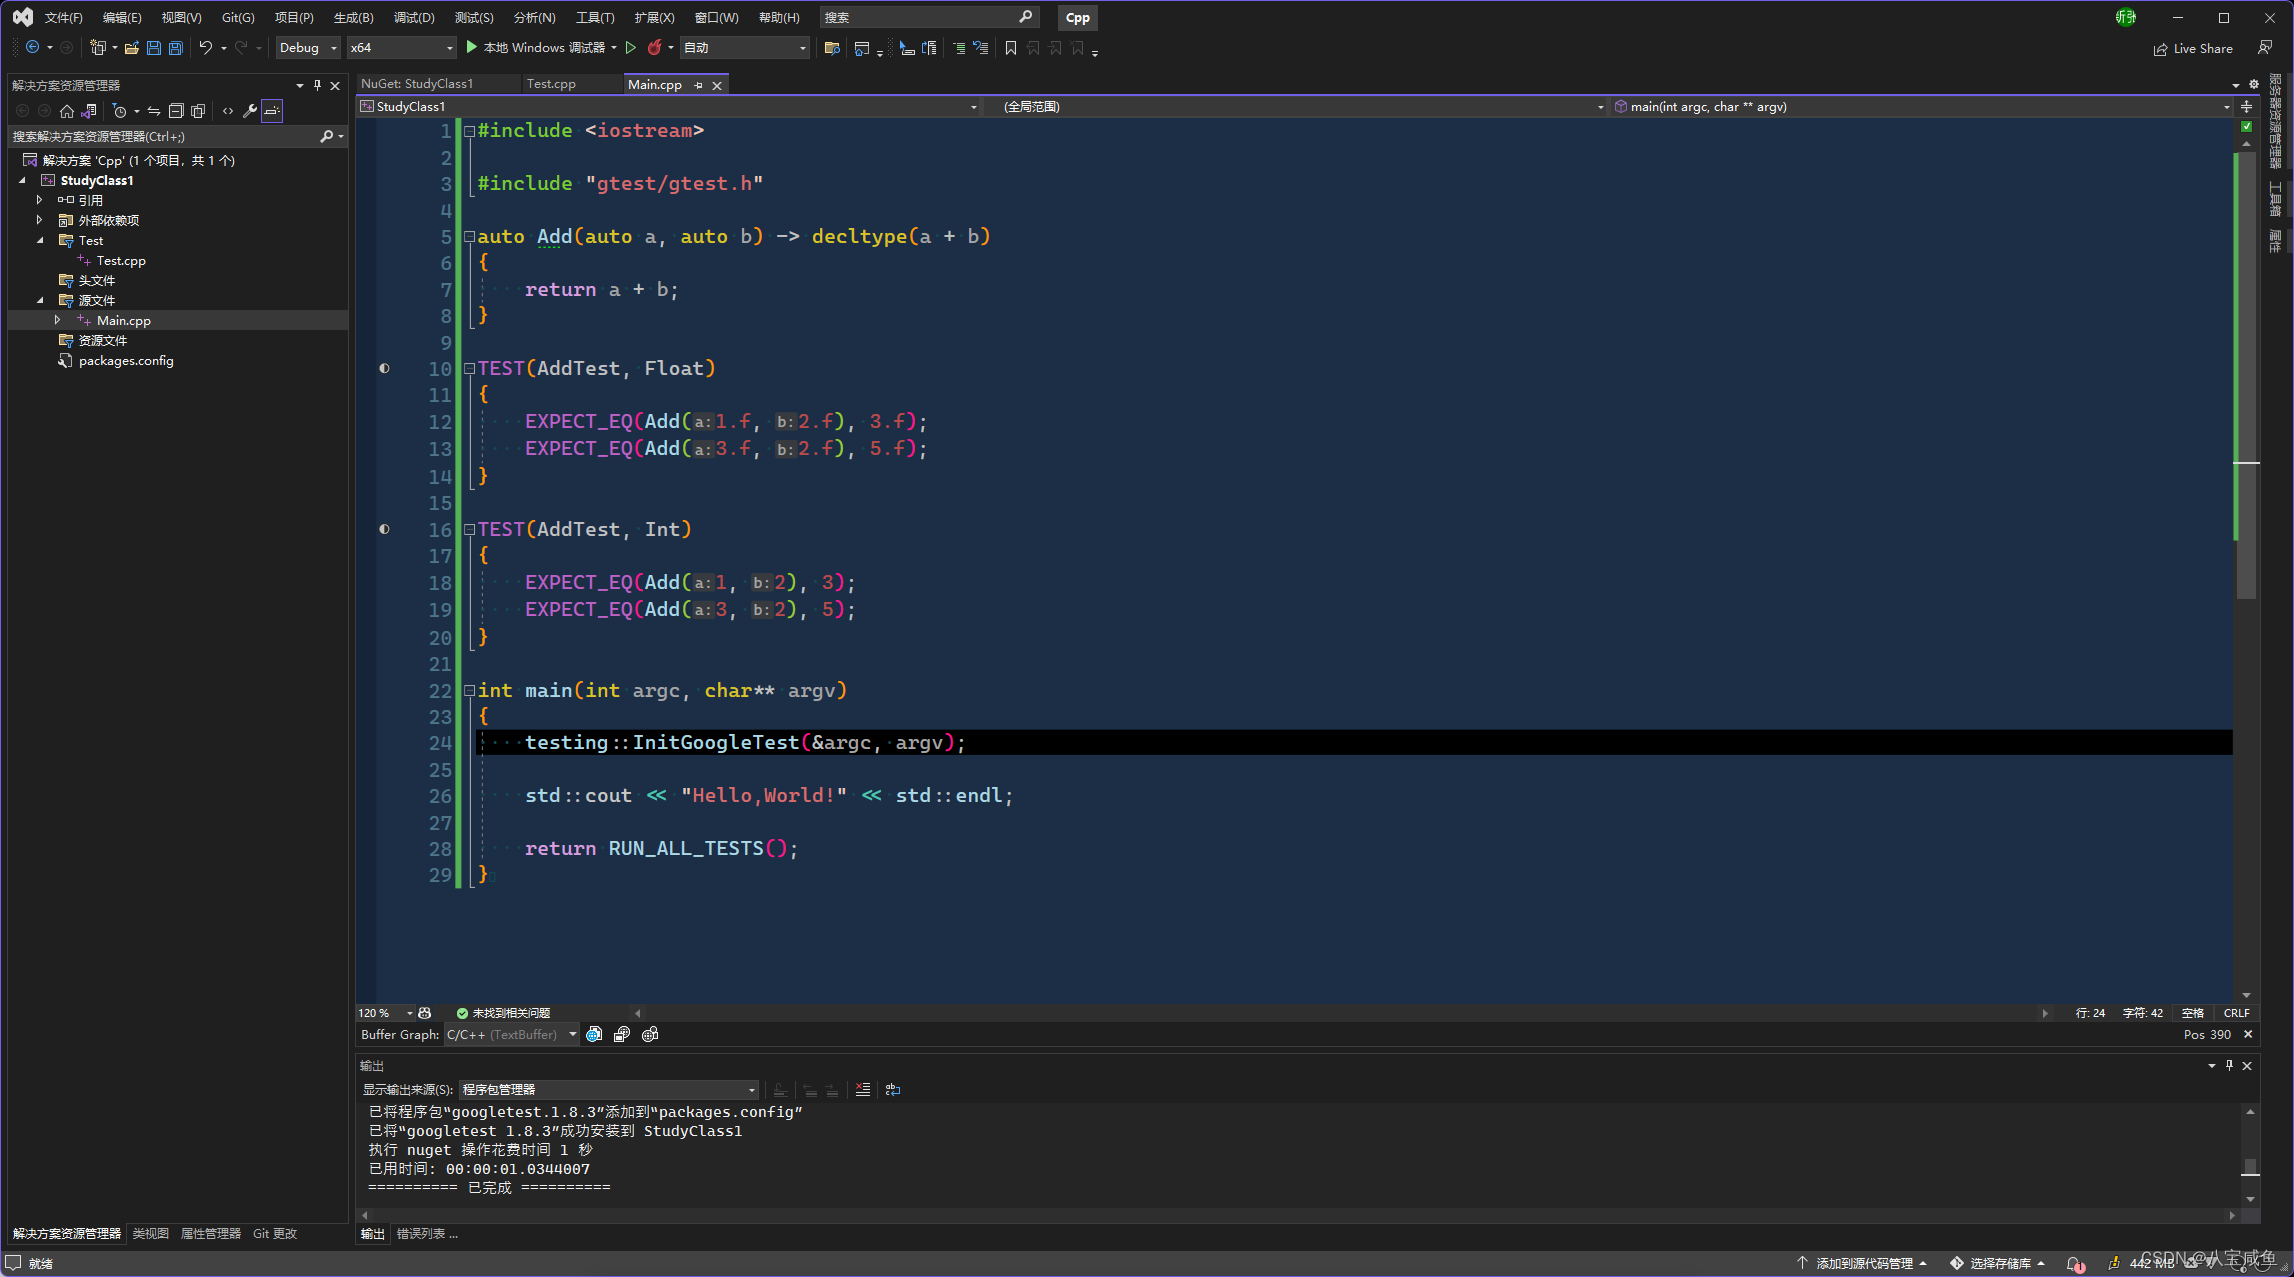
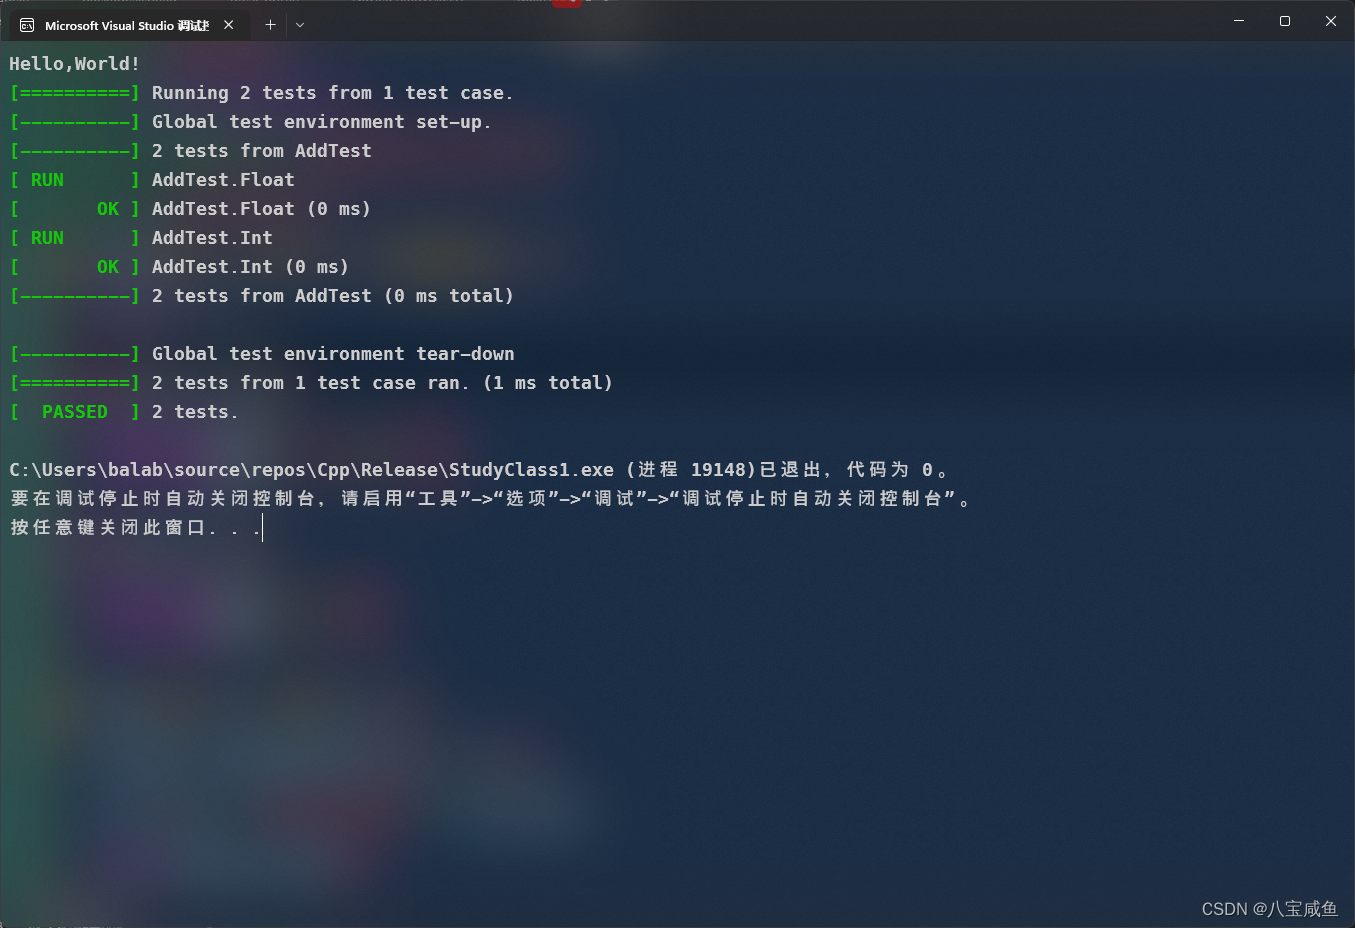
Example // Configure according to the above, this code can run directly (C ++ 20)
#include <iostream>
#define GTEST_LANG_CXX11 1
#pragma comment(lib, "googletest_v141.lib")
#include "gtest/gtest.h"
auto Add(auto a, auto b) -> decltype(a + b)
{
return a + b;
}
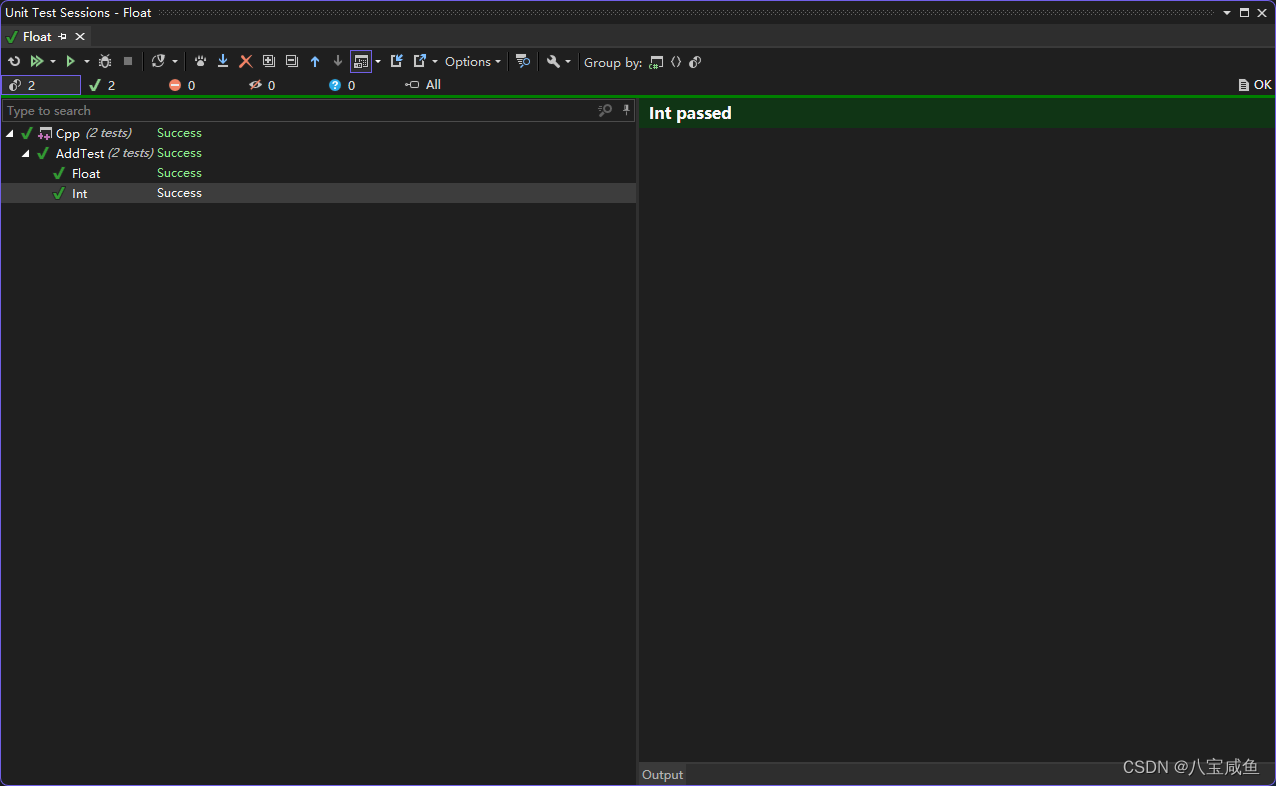
TEST(AddTest, Float)
{
EXPECT_EQ(Add(1.f, 2.f), 3.f);
EXPECT_EQ(Add(3.f, 2.f), 5.f);
}
TEST(AddTest, Int)
{
EXPECT_EQ(Add(1, 2), 3);
EXPECT_EQ(Add(3, 2), 5);
}
int main(int argc, char** argv)
{
testing::InitGoogleTest(&argc, argv);
std::cout << "Hello,World!" << std::endl;
return RUN_ALL_TESTS();
}
D: The problem that may be encountered
Nuget manager cannot find Google Test
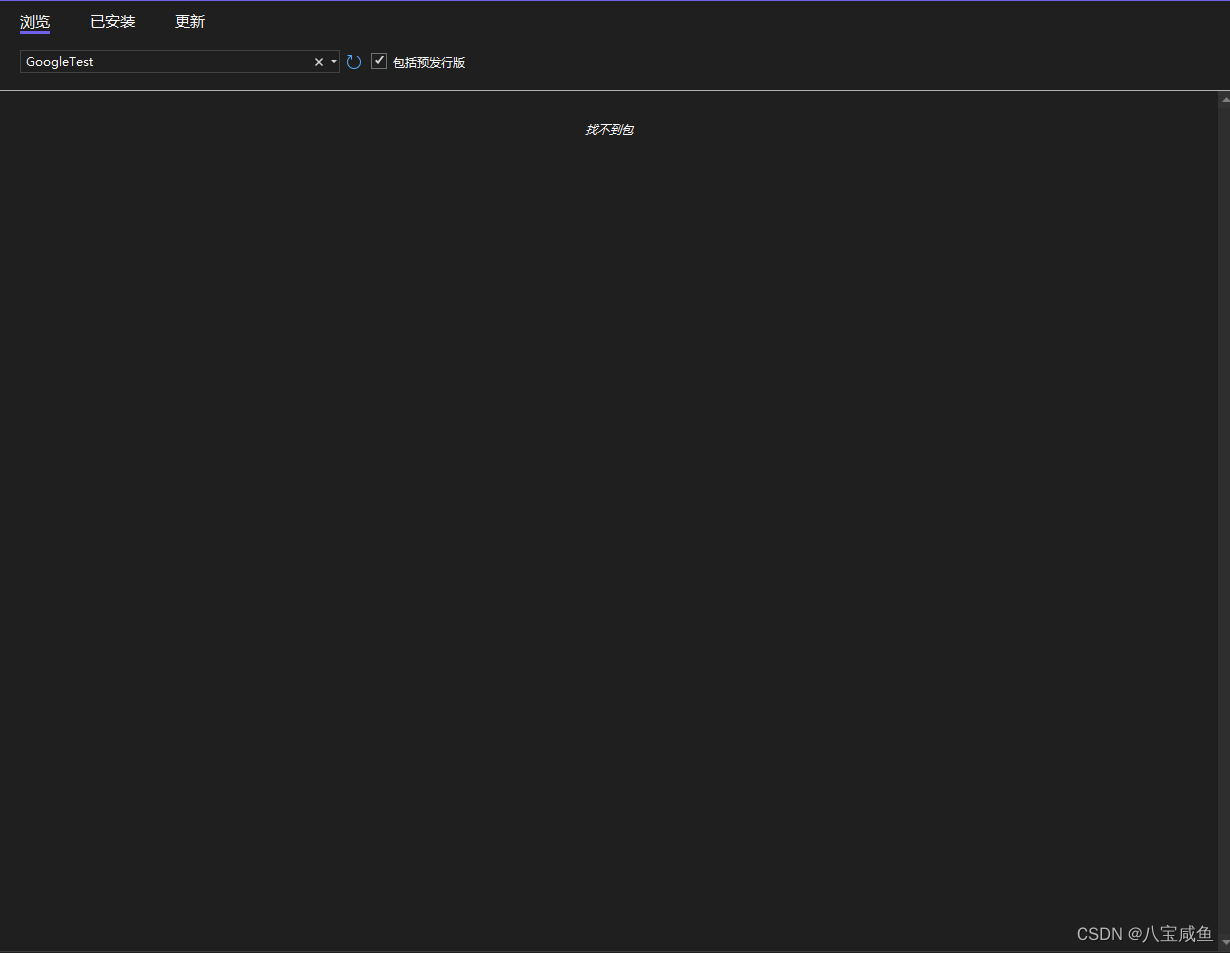
Reason: NUGET Bag Source has only local directory
Solution: Options-> Nuget bag manager-> Baoyuan-> Add->https://api.nuget.org/v3/index.jsonorhttps://nuget.cdn.azure.cn/v3/index.json
It can be added at the same time
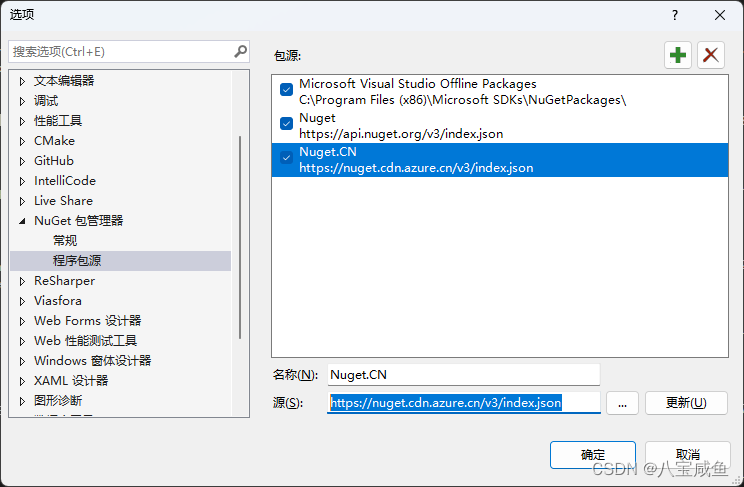
After the settings are completed, reopen the Nuget Manager and adjust the source
Google Test file failure

Reason: Google Test only supports abstract detection for the C ++ standard of the compiler, and there is a chance to determine whether the current compiler supports C ++ 11
Solution: #include «GTEST.H» before adding#define GTEST_LANG_CXX11 1
Application error-cannot start normally, click «OK» to close the application
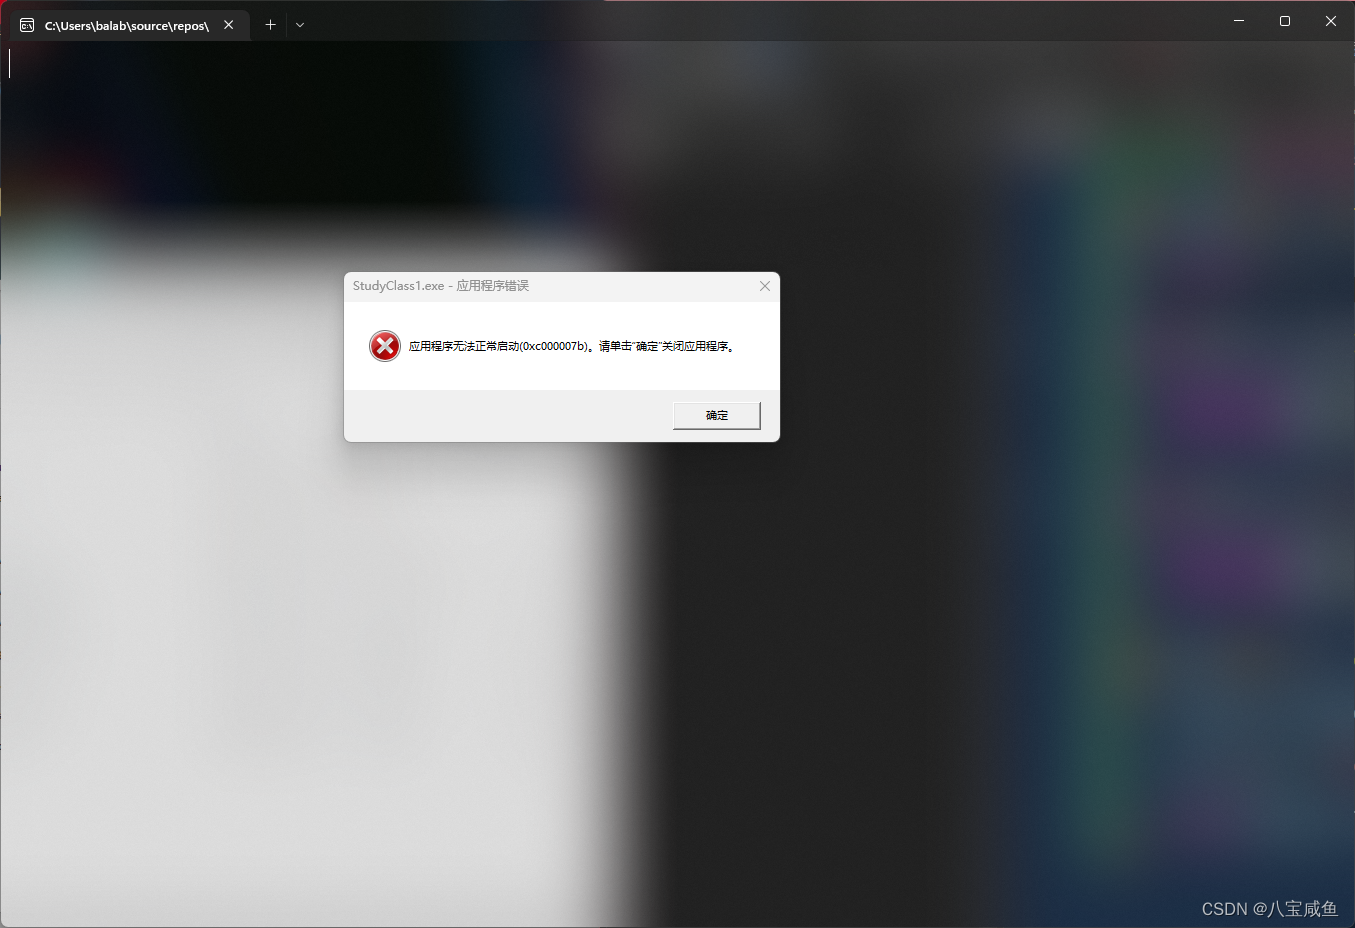
Reason: Unsuccessful cleaning, copy the corresponding version DLL
Solution: Re -generate or manually delete GoogleTest_v141.dll

Contents
- 1 Google Test Installation Guide For C In Windows For Visual Studio Code By Anusree S The
- 2 Install Google Test On Windows
- 2.1 Conclusion
- 2.1.1 Related image with google test installation guide for c in windows for visual studio code by anusree s the
- 2.1.2 Related image with google test installation guide for c in windows for visual studio code by anusree s the
- 2.1 Conclusion
Immerse yourself in the captivating realm of arts and culture, where creativity knows no boundaries. Celebrate the transformative power of artistic expression as we explore diverse art forms, spotlight talented artists, and ignite your passion for the cultural tapestry that shapes our world in our Google Test Installation Guide For C In Windows For Visual Studio Code By Anusree S The section. Sample framework unit is testing library c a google test google installation framework program is is what 1- testing c steps google google 1- testing test what why for- 2- 4- 3-
Google Test Installation Guide For C In Windows For Visual Studio Code By Anusree S The
Google Test Installation Guide For C In Windows For Visual Studio Code By Anusree S The
When i try to run or debug the project, the terminal end with code 1 and showing the error fatal error c1083: cannot open include file: ‘gtest gtest.h’: no such file or directory, which is weird, since even intellisense can detect gtest. 1. what is google c testing framework? 2. why google test? 3. installation steps 4. sample program 1. what is google c testing framework? google test is a unit testing library for.

Google Test Installation Guide For C In Windows For Visual Studio Code By Anusree S The
Google Test Installation Guide For C In Windows For Visual Studio Code By Anusree S The
Select install. set up your c environment c is a compiled language meaning your program’s source code must be translated (compiled) before it can be run on your computer. the c c extension doesn’t include a c compiler or debugger, since vs code as an editor relies on command line tools for the development workflow. In this tutorial, you configure visual studio code to use the gcc c compiler (g ) and gdb debugger from mingw w64 to create programs that run on windows. after configuring vs code, you will compile, run, and debug a simple hello world program. this tutorial does not teach you about gcc, gdb, mingw w64, or the c language. Welcome to googletest! googletest is google’s c testing and mocking framework. this user’s guide has the following contents: googletest primer teaches you how to write simple tests using googletest. read this first if you are new to googletest. From the main menu, choose tools > options > test adapter for google test to set additional options. for more information about these settings, see the google test documentation. add include directives in your test .cpp file, add any needed #include directives to make your program’s types and functions visible to the test code.
Install Google Test On Windows
Install Google Test On Windows
video from udemy course solid c udemy course solid cpp materials of the course are at in this video you will learn how to set up visual studio code for creating and executing c and c programs. visual studio if you’re a c programmer and want to write unit test for the c code, it’s highly likely that you’ll end up using google test. a viewer on one of my recent twitch streams made an excellent suggestion request for a video showing how to get started with in this video, we set up unit testing for our c code using gtest, generate coverage data with gcov and lcov, and finally generate a how to write c & c programs in visual studio code ide please like and subscribe this channel tags #teachmecomputer how do you install gtest or google test framework on linux. there are two ways you can install gtest on linux 1. using sudo apt this is a demo of setting up google test in visual studio 2010 notes can be downloaded from: boqian.weebly . watch me learn how to add googletest unit tests to your c project. clone the example at
Conclusion
Having examined the subject matter thoroughly, it is clear that the article offers useful knowledge concerning Google Test Installation Guide For C In Windows For Visual Studio Code By Anusree S The. Throughout the article, the writer illustrates a deep understanding on the topic. Notably, the section on Y stands out as a highlight. Thank you for this article. If you have any questions, please do not hesitate to reach out through the comments. I look forward to your feedback. Moreover, below are a few relevant content that you may find interesting:
Compiling googletest on Windows can be a challenging task, especially when using MinGW with MSYS. However, with the right steps and tools, it is possible to compile and use googletest on this platform.
Method 1: Installing MSYS2 and MinGW-w64
To compile googletest on Windows using MinGW with MSYS, you can follow these steps:
-
Install MSYS2 and MinGW-w64 by downloading and running the installer from the official website.
-
Open MSYS2 shell by running
mingw64.exein the installation directory. -
Update the package database and upgrade the installed packages by running the following command:
-
Install the required packages for building googletest by running the following command:
pacman -S mingw-w64-x86_64-gtest -
Clone the googletest repository from GitHub by running the following command:
git clone https://github.com/google/googletest.git -
Change directory to the cloned repository by running the following command:
-
Create a build directory and change directory to it by running the following commands:
-
Configure the build by running the following command:
cmake -G "MSYS Makefiles" .. -
Build the library by running the following command:
-
Install the library by running the following command:
-
Verify that the library is installed by running the following command:
ls /mingw64/lib/libgtest.aIf the library is installed correctly, you should see the output
/mingw64/lib/libgtest.a.
That’s it! You have successfully compiled googletest on Windows using MinGW with MSYS. Now you can use the library in your C++ projects.
Method 2: Downloading and Compiling googletest
Step 1: Download googletest
You can download the latest version of googletest from the official GitHub repository.
$ git clone https://github.com/google/googletest.gitStep 2: Build googletest
- Open MSYS terminal and navigate to the googletest directory.
- Create a build directory and navigate to it.
$ mkdir build && cd build- Generate the makefile using CMake.
$ cmake .. -G "MinGW Makefiles"- Build the project using make.
Step 3: Link googletest to your project
- Copy the compiled libraries to your project directory.
$ cp lib/*.a /path/to/your/project/lib- Copy the include directory to your project directory.
$ cp -r ../googletest/include/gtest /path/to/your/project/include- Link the googletest library to your project.
// In your project's C++ code
#include "gtest/gtest.h"

int main(int argc, char **argv) {
  testing::InitGoogleTest(&argc, argv);
  return RUN_ALL_TESTS();
}- Compile your project with the googletest library.
$ g++ -o my_test my_test.cpp -L/path/to/your/project/lib -lgtestCongratulations! You have successfully compiled googletest on Windows using MinGW with MSYS.
Method 3: Integrating googletest with Your Project
Step 1: Download and Install MinGW with MSYS
First, you need to download and install MinGW with MSYS. You can download it from the MinGW website.
Step 2: Download and Build googletest
- Download the latest release of googletest from the googletest GitHub repository.
- Extract the downloaded file to a directory of your choice.
- Open MSYS and navigate to the directory where you extracted googletest.
- Run the following commands to build googletest:
cd googletest-master
mkdir build
cd build
cmake ..
make
Step 3: Integrate googletest with Your Project
- Add the
includedirectory from the googletest source directory to your project’s include directories. - Add the
libdirectory from the googletest build directory to your project’s library directories. - Link your project with the
gtestandgtest_mainlibraries.
Here is an example CMakeLists.txt file:
cmake_minimum_required(VERSION 3.0)

project(MyProject)

include_directories(${CMAKE_SOURCE_DIR}/googletest-master/googletest/include)

link_directories(${CMAKE_SOURCE_DIR}/googletest-master/build/lib)

add_executable(MyProject main.cpp)

target_link_libraries(MyProject gtest gtest_main)
Here is an example test file:
#include

TEST(MyTest, Test1)
{
    EXPECT_EQ(1, 1);
}

int main(int argc, char **argv)
{
    ::testing::InitGoogleTest(&argc, argv);
    return RUN_ALL_TESTS();
}
In this example, we have a test case named MyTest with a single test named Test1. The test expects 1 to be equal to 1. The main function initializes googletest and runs all the tests.