Before you start using Git, you have to make it available on your computer.
Even if it’s already installed, it’s probably a good idea to update to the latest version.
You can either install it as a package or via another installer, or download the source code and compile it yourself.
Installing on Linux
If you want to install the basic Git tools on Linux via a binary installer, you can generally do so through the package management tool that comes with your distribution.
If you’re on Fedora (or any closely-related RPM-based distribution, such as RHEL or CentOS), you can use dnf:
$ sudo dnf install git-allIf you’re on a Debian-based distribution, such as Ubuntu, try apt:
$ sudo apt install git-allFor more options, there are instructions for installing on several different Unix distributions on the Git website, at https://git-scm.com/download/linux.
Installing on macOS
There are several ways to install Git on macOS.
The easiest is probably to install the Xcode Command Line Tools.
On Mavericks (10.9) or above you can do this simply by trying to run git from the Terminal the very first time.
If you don’t have it installed already, it will prompt you to install it.
If you want a more up to date version, you can also install it via a binary installer.
A macOS Git installer is maintained and available for download at the Git website, at https://git-scm.com/download/mac.
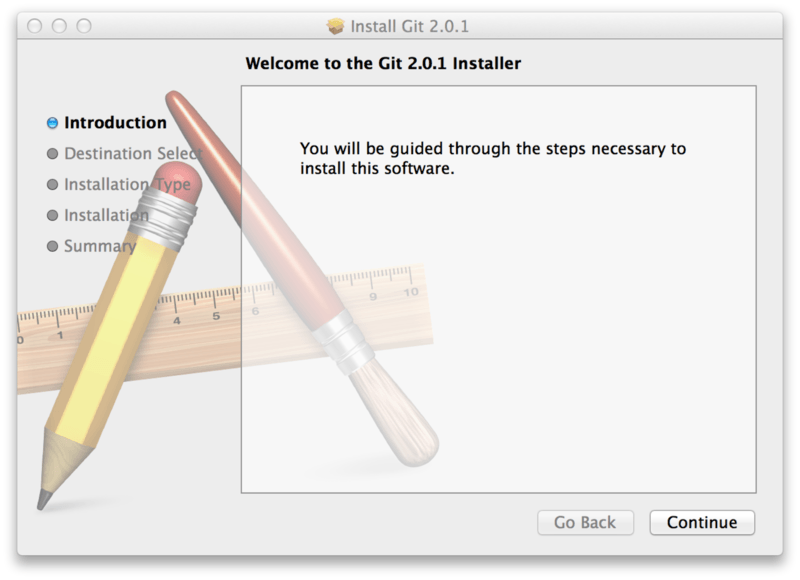
Figure 7. Git macOS installer
Installing on Windows
There are also a few ways to install Git on Windows.
The most official build is available for download on the Git website.
Just go to https://git-scm.com/download/win and the download will start automatically.
Note that this is a project called Git for Windows, which is separate from Git itself; for more information on it, go to https://gitforwindows.org.
To get an automated installation you can use the Git Chocolatey package.
Note that the Chocolatey package is community maintained.
Installing from Source
Some people may instead find it useful to install Git from source, because you’ll get the most recent version.
The binary installers tend to be a bit behind, though as Git has matured in recent years, this has made less of a difference.
If you do want to install Git from source, you need to have the following libraries that Git depends on: autotools, curl, zlib, openssl, expat, and libiconv.
For example, if you’re on a system that has dnf (such as Fedora) or apt-get (such as a Debian-based system), you can use one of these commands to install the minimal dependencies for compiling and installing the Git binaries:
$ sudo dnf install dh-autoreconf curl-devel expat-devel gettext-devel \
  openssl-devel perl-devel zlib-devel
$ sudo apt-get install dh-autoreconf libcurl4-gnutls-dev libexpat1-dev \
  gettext libz-dev libssl-dev
In order to be able to add the documentation in various formats (doc, html, info), these additional dependencies are required:
$ sudo dnf install asciidoc xmlto docbook2X
$ sudo apt-get install asciidoc xmlto docbook2x|
Note |
Users of RHEL and RHEL-derivatives like CentOS and Scientific Linux will have to enable the EPEL repository to download the |
If you’re using a Debian-based distribution (Debian/Ubuntu/Ubuntu-derivatives), you also need the install-info package:
$ sudo apt-get install install-infoIf you’re using a RPM-based distribution (Fedora/RHEL/RHEL-derivatives), you also need the getopt package (which is already installed on a Debian-based distro):
$ sudo dnf install getoptAdditionally, if you’re using Fedora/RHEL/RHEL-derivatives, you need to do this:
$ sudo ln -s /usr/bin/db2x_docbook2texi /usr/bin/docbook2x-texidue to binary name differences.
When you have all the necessary dependencies, you can go ahead and grab the latest tagged release tarball from several places.
You can get it via the kernel.org site, at https://www.kernel.org/pub/software/scm/git, or the mirror on the GitHub website, at https://github.com/git/git/tags.
It’s generally a little clearer what the latest version is on the GitHub page, but the kernel.org page also has release signatures if you want to verify your download.
Then, compile and install:
$ tar -zxf git-2.8.0.tar.gz
$ cd git-2.8.0
$ make configure
$ ./configure --prefix=/usr
$ make all doc info
$ sudo make install install-doc install-html install-info
After this is done, you can also get Git via Git itself for updates:
$ git clone https://git.kernel.org/pub/scm/git/git.git
How to install Git on any OS
Git can be installed on the most common operating systems like Windows, Mac, and Linux. In fact, Git comes installed by default on most Mac and Linux machines!
Checking for Git
To see if you already have Git installed, open up your terminal application.
- If you’re on a Mac, look for a command prompt application called «Terminal».
- If you’re on a Windows machine, open the windows command prompt or «Git Bash».
Once you’ve opened your terminal application, type git version. The output will either tell you which version of Git is installed, or it will alert you that git is an unknown command. If it’s an unknown command, read further and find out how to install Git.
Install Git Using GitHub Desktop
Installing GitHub Desktop will also install the latest version of Git if you don’t already have it. With GitHub Desktop, you get a command line version of Git with a robust GUI. Regardless of if you have Git installed or not, GitHub Desktop offers a simple collaboration tool for Git. You can learn more here.
Install Git on Windows
- Navigate to the latest Git for Windows installer and download the latest version.
- Once the installer has started, follow the instructions as provided in the Git Setup wizard screen until the installation is complete.
- Open the windows command prompt (or Git Bash if you selected not to use the standard Git Windows Command Prompt during the Git installation).
- Type
git versionto verify Git was installed.
Note: git-scm is a popular and recommended resource for downloading Git for Windows. The advantage of downloading Git from git-scm is that your download automatically starts with the latest version of Git included with the recommended command prompt, Git Bash . The download source is the same Git for Windows installer as referenced in the steps above.
Install Git on Mac
Most versions of MacOS will already have Git installed, and you can activate it through the terminal with git version. However, if you don’t have Git installed for whatever reason, you can install the latest version of Git using one of several popular methods as listed below:
Install Git From an Installer
- Navigate to the latest macOS Git Installer and download the latest version.
- Once the installer has started, follow the instructions as provided until the installation is complete.
- Open the command prompt «terminal» and type
git versionto verify Git was installed.
Note: git-scm is a popular and recommended resource for downloading Git on a Mac. The advantage of downloading Git from git-scm is that your download automatically starts with the latest version of Git. The download source is the same macOS Git Installer as referenced in the steps above.
Install Git from Homebrew
Homebrew is a popular package manager for macOS. If you already have Homwbrew installed, you can follow the below steps to install Git:
- Open up a terminal window and install Git using the following command:
brew install git. - Once the command output has completed, you can verify the installation by typing:
git version.
Install Git on Linux
Fun fact: Git was originally developed to version the Linux operating system! So, it only makes sense that it is easy to configure to run on Linux.
You can install Git on Linux through the package management tool that comes with your distribution.
Debian/Ubuntu
- Git packages are available using
apt. - It’s a good idea to make sure you’re running the latest version. To do so, Navigate to your command prompt shell and run the following command to make sure everything is up-to-date:
sudo apt-get update. - To install Git, run the following command:
sudo apt-get install git-all. - Once the command output has completed, you can verify the installation by typing:
git version.
Fedora
- Git packages are available using
dnf. - To install Git, navigate to your command prompt shell and run the following command:
sudo dnf install git-all. - Once the command output has completed, you can verify the installation by typing:
git version.
Note: You can download the proper Git versions and read more about how to install on specific Linux systems, like installing Git on Ubuntu or Fedora, in git-scm’s documentation.
Other Methods of Installing Git
Looking to install Git via the source code? Learn more here.
Contribute to this article on GitHub.
Get started with git and GitHub
Review code, manage projects, and build software alongside 40 million developers.
Sign up for GitHub
Sign in
Введение
В этой инструкции покажем, как установить Git на Windows, и поможем выбрать правильные параметры при установке. Затем создадим репозиторий и зафиксируем в нем изменения. Все это поможет вам сделать первые шаги в освоении Git.
Что такое Git и зачем он нужен
Git — это одна из самых популярных систем контроля версий (VCS). Такие системы помогают разработчикам хранить и версионировать исходный код приложений, настройки систем и другие текстовые файлы. И хотя ничего не мешает использовать VCS в других областях, чаще всего они применяются именно в IT.
Каждое состояние файлов в Git можно зафиксировать (сделать коммит), причем это навсегда останется в истории репозитория. Поэтому можно в любой момент посмотреть историю изменений файлов, сравнить различные версии и отменить отдельные изменения.
Также Git упрощает ведение параллельной разработки несколькими членами команды. Для этого используется ветвление. Условно можно сказать, что в Git-репозитории есть одна основная ветка, в которой хранится текущая стабильная версия исходного кода. Когда разработчик хочет изменить этот код, он «откалывает» себе отдельную ветку от основной и работает в ней. Когда работа закончена, он «вливает» изменения в основную ветку, чтобы его доработками смогли воспользоваться другие члены команды.
На самом деле все это описание довольно грубое, и по работе с Git можно написать не одну статью. На официальном сайте Git есть бесплатная электронная книга, в том числе она переведена на русский язык. А в этой статье мы сосредоточимся на установке Git в Windows и его первоначальной настройке.
Установка Git в Windows
Переходим на официальный сайт Git, в раздел загрузок. Мы увидим несколько вариантов установки: разные разрядности, портативная версия и даже установка из исходников. Мы выберем Standalone-версию, для этого проще всего нажать ссылку Click here to download, она всегда ведет на самую актуальную версию. Запускаем скачанный файл.
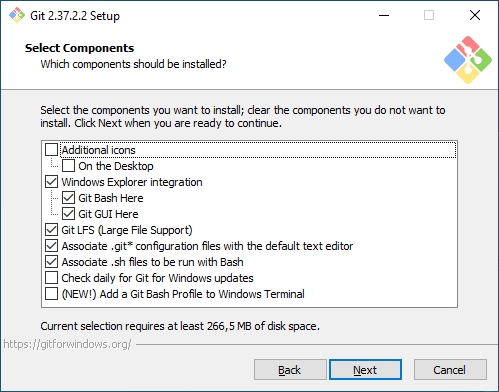
Выбор компонентов. Первый экран — выбор компонентов для установки. Если вам нужны дополнительные иконки на рабочем столе, или если вы хотите, чтобы Git ежедневно проверял наличие новой версии, — отметьте соответствующие опции. Остальные параметры лучше оставить по умолчанию.
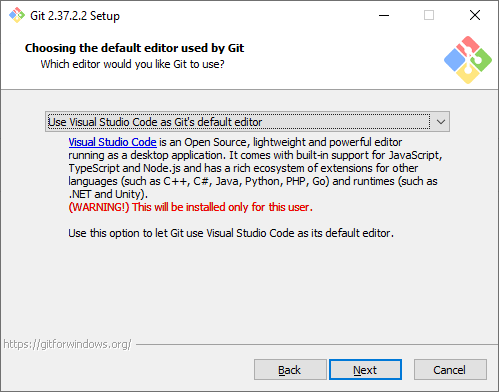
Текстовый редактор по умолчанию. Необходимо выбрать редактор, который будет использовать Git — например, когда вы будете писать сообщение для коммита. Это не обязательно должен быть редактор, в котором вы планируете писать исходный код.
По умолчанию в установщике выбран Vim — консольный текстовый редактор, который для многих может показаться сложным в освоении. Если вы не знакомы с Vim и при этом хотите именно консольный редактор — выберите nano. Если у вас уже установлен какой-нибудь текстовый редактор — выбирайте его. Мы для примера будем использовать VSCode.
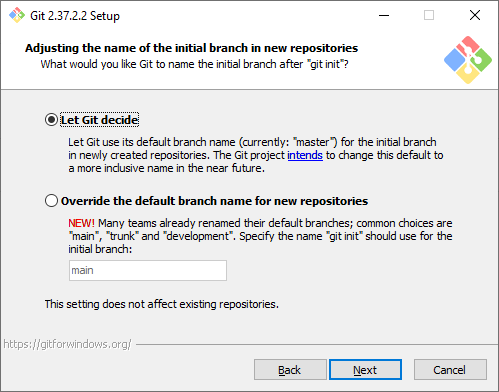
Название первой ветки. Тут нужно выбрать, как Git будет называть первую ветку в каждом репозитории. Раньше такая ветка всегда называлась master, но со временем это стало напоминать о временах рабства, и многие проекты и компании стали переименовывать ветки в своих репозиториях. Поэтому разработчики Git добавили эту опцию, чтобы название первой ветки можно было изменить. Мы будем придерживаться старого поведения и оставим название master.
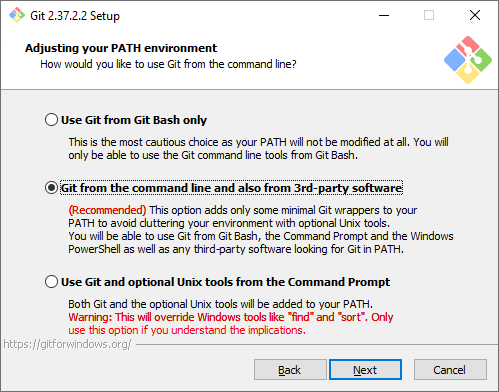
Способ использования Git. Первая опция сделает Git доступным только из командной строки Git Bash. Это не очень удобно, потому что не позволит пользоваться Git-ом из других оболочек или интегрировать его с редактором кода. Вторая опция самая оптимальная (ее мы и выберем) — она позволяет работать с Git-ом из разных оболочек и интегрировать его с другими приложениями. Третья опция кроме установки Git также «перезапишет» некоторые системные команды Windows аналогами из Unix, и эту опцию нужно выбирать только если вы точно понимаете, что делаете.
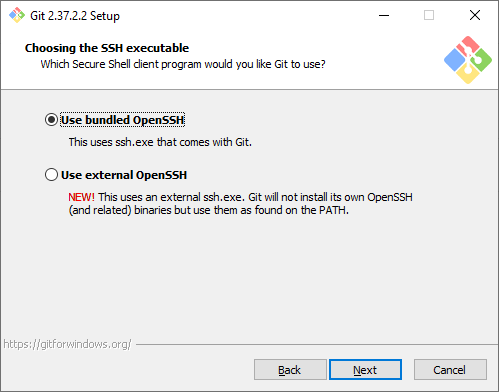
Выбор SSH-клиента. Изначально Git поставлялся со встроенным SSH-клиентом, но недавно появилась опция, где можно использовать внешний клиент. Если у вас уже что-то установлено на компьютере — можете выбрать вторую опцию. Мы же остановимся на первой, так как предварительно ничего не устанавливали.
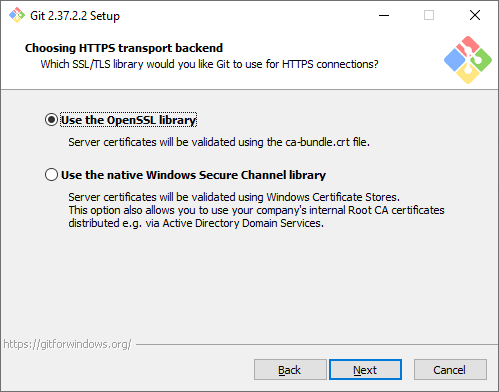
Выбор SSL/TLS библиотеки. По умолчанию Git будет использовать свою OpenSSL библиотеку с заранее определенным списком корневых сертификатов. Обычно этого достаточно, но если вам нужно работать со внутренними репозиториям внутри компании, которые используют самоподписанные сертификаты, выберите вторую опцию. Тогда Git будет использовать библиотеку и сертификаты из вашей операционной системы.
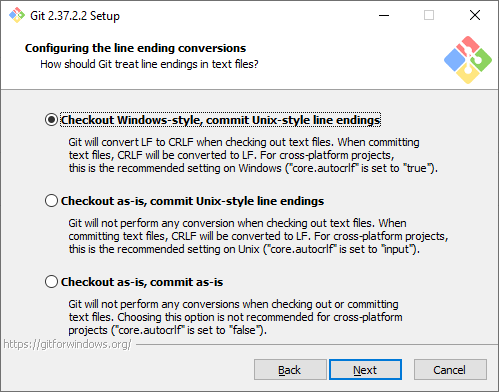
Символы перевода строки. Существует два основных способа формирования конца строки в файлах — CRLF и LF. Первый используется в Windows, второй — в Unix-like системах. Первая опция позволяет извлекать файлы из репозитория в Windows-стиле, при этом отправлять файлы в репозиторий в Unix-стиле. Мы рекомендуем использовать этот вариант, потому что он лучше всего подходит для кросс-платформенной команды, когда над одним кодом могут работать разработчики на разных ОС.
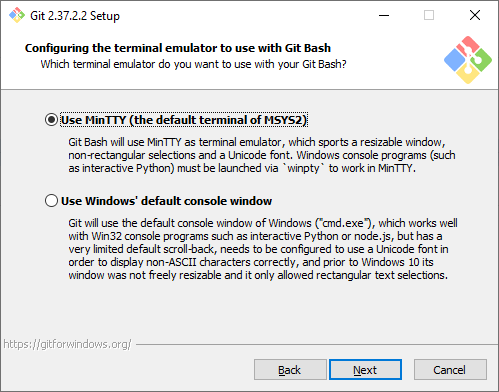
Эмулятор терминала. Эмулятор, который будет использоваться в командной строке Git Bash. MinTTY — удобный вариант, поэтому он выбран по умолчанию. Встроенный эмулятор CMD не очень удобен, у него есть некоторые ограничения, поэтому выбирайте его, только если делаете это осознанно.
Стратегия git pull. Первая опция будет пытаться обновить историю коммитов без создания коммитов слияния. Это самый оптимальный и часто используемый вариант, оставим его.

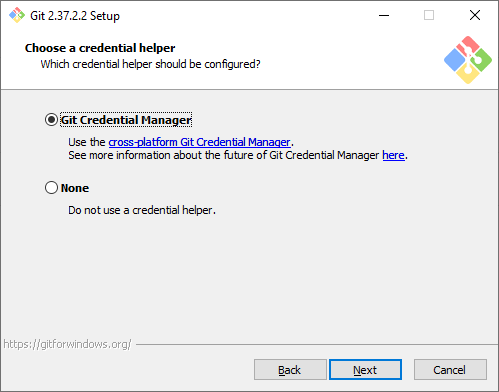
Credential Manager. Установка этого параметра позволит Git запоминать логины и пароли для подключения к удаленным репозиториям (например, GitHub, GitLab или корпоративное хранилище) и не вводить их постоянно.
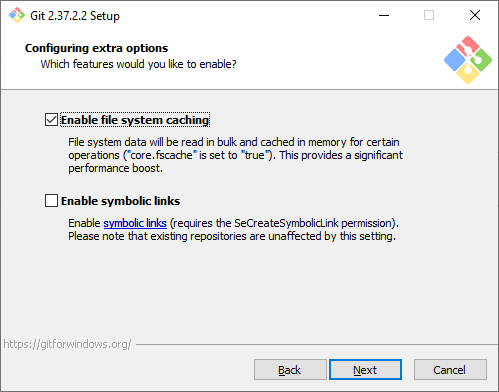
Дополнительные настройки. Кэширование позволит ускорить работу Git, эту опцию рекомендуем оставить. А вот символические ссылки нам не нужны.
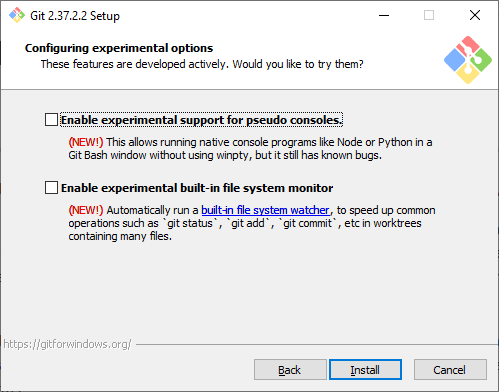
Экспериментальные настройки. Эти опции еще не переведены в стабильную стадию, поэтому их использование рекомендуется, только если вы точно понимаете, что делаете. Мы не будем ничего отмечать.
Git установлен и готов к работе.
Установка в различные дистрибутивы Linux
Также коротко покажем, как можно установить Git в различные дистрибутивы Linux. Как правило, самостоятельно скачивать ничего не нужно, достаточно воспользоваться встроенным в дистрибутив пакетным менеджером.
Debian
pt-get install gitUbuntu
add-apt-repository ppa:git-core/ppa # apt update; apt install gitFedora 21
yum install gitFedora 22+
dnf install gitGentoo
emerge --ask --verbose dev-vcs/gitArch Linux
man -S gitOpenSUSE
ypper install gitMageia
rpmi gitFreeBSD
pkg install gitOpenBSD
g_add gitRHEL, CentOS, Oracle Linux и др.
Как правило, пакетный установит довольно старую версию Git, поэтому рекомендуется собирать Git из исходных кодов, или воспользоваться сторонним репозиторием IUS Community.
Первоначальная настройка и создание репозитория
Перед началом работы с Git нужно указать свое имя и email, которые в дальнейшем будут записываться в историю изменений при каждом коммите. В будущем это позволит понять, кто именно внес те или иные изменения.
Откроем любое из приложений — Git Bash или Git CMD. Первое — это командная строка в стиле Linux, второе — командная строка в стиле Windows. Выбирайте то, что вам ближе. Мы выберем Git Bash и выполним две команды:
git config --global user.email "git-user@selectel.ru"
git config --global user.name "Selectel Git User"
Теперь Git полностью готов к работе. Давайте создадим репозиторий и зафиксируем в нем первое изменение (сделаем коммит). Для начала создадим каталог для будущего репозитория и сразу перейдем в него:
mkdir first-repo && cd first-repoСоздаем новый репозиторий в этом каталоге:
git initУвидим ответ:
Initialized empty Git repository in C:/Users/git_user/first-repo/.git/.Это означает, что в директории создан новый репозиторий. Далее создадим текстовый файл, назовем его README.md, и напишем в нем любой текст. Но сам по себе этот файл не попадет в следующий коммит. Мы должны проиндексировать изменения, то есть явно сказать Git-у, что этот файл нужно учитывать в следующем коммите:
git add README.mdДалее введем команду:
git commitОткроется текстовый редактор, который мы выбирали на этапе установки Git. Тут нам нужно ввести комментарий для коммита, то есть кратко описать изменение, которое мы сделали. Мы напишем такой комментарий:
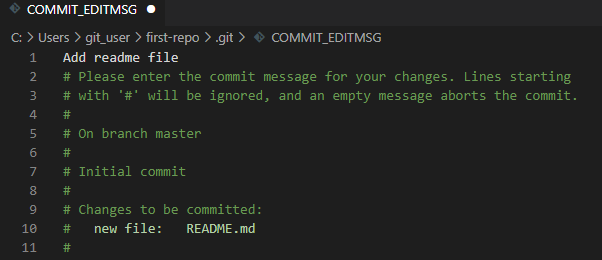
Обратите внимание, что Git автоматически добавил небольшую подсказку в это окно. При этом она не войдет в коммит, потому что в начале строки стоит символ решетки, и Git проигнорирует ее. Но она может быть полезна для дополнительной проверки: мы видим название текущей ветки и список файлов, которые войдут в коммит.
Сохраним файл и закроем редактор. Увидим примерно следующее сообщение:
[master (root-commit) 2b8f7a5] Add readme file
 1 file changed, 3 insertions(+)
 create mode 100644 README.md
Мы успешно сделали первый коммит.
Работа с Git в визуальном интерфейсе
Сам по себе Git — это утилита командной строки. Но не всем может быть удобно запоминать и писать команды в терминале, поэтому часто разработчики пользуются графическим интерфейсом. Есть несколько вариантов:
- Встроенный GUI. В базовой установке Git есть две простые утилиты: gitk и git gui. Но у них довольно старый интерфейс и пользоваться ими не всегда удобно.
- Отдельные графические утилиты. Они могут быть понятны и красивы, но неудобны тем, что код нужно писать в одной программе, а для работы с Git нужно переключаться в другую. Примеры таких программ: GitKraken, Sourcetree, GitAtomic. Большой список таких клиентов есть на официальном сайте Git.
- Встроенные в IDE или текстовый редактор. В большинстве популярных редакторов кода или IDE уже есть поддержка Git. Как правило, ничего дополнительно настраивать не нужно. Мы рассмотрим именно такой вариант на примере редактора VSCode.
Откроем директорию с репозиторием в редакторе VSCode. Внесите любое изменение в файл README.md и сохраните изменения. Обратите внимание, что в левой части редактора кое-что изменилось:
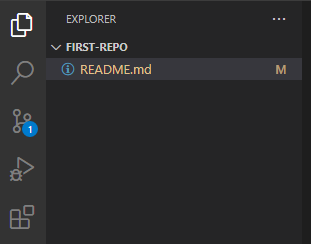
- Файл README.md подсветился желтым цветом, а рядом с ним появилась буква M (означает Modified — изменен).
- На панели Source Code появилась цифра 1, означающая, что есть одно изменение, которое можно зафиксировать.
Перейдем на панель Source Code. Слева находится список файлов, которые были изменены. Если кликнем на файл, то увидим какие именно изменения мы внесли: в этом случае добавили новую строчку This is the second commit.

Теперь давайте зафиксируем наши изменения. Рядом с названием файла нажмем на «плюс», чтобы проиндексировать его. Это аналогично команде git add, которую мы выполняли ранее. Затем в поле Message внесем комментарий и нажмем кнопку Commit. Это аналогично команде git commit.
Поздравляем, вы сделали уже два коммита в свой репозиторий!
Заключение
Итак, мы рассмотрели процесс установки Git под Windows, рассказали об основных параметрах установки и последующей настройки. Увидели, как репозиторий и внести в него первый коммит. Познакомились с работой в командной строке и с помощью графического интерфейса.
Learn the step-by-step guide Git tool installation on windows, Linux, and MacOS examples..
This tutorial explains about how to install Git on Windows, MacOS, and Linux.
Following are steps to install the git tool on windows.
-
Go to here
-
Select the standard installer and select one from below
- 32-bit Git for Windows Setup.
- 64-bit Git for Windows Setup.
-
It downloads Git-2.39.2-64-bit.exe to a local folder
-
Next, Click on the executable file and follow the GUI steps to install it.
MacOS provides different ways to install
With the homebrew package manager, Run the below command
brew install git
with MacPorts, run the below command
sudo port install git
Git install on Linux
for yum users
yum install git
For apt-get users
apt-get install git
To check the git installation, Open the terminal and run the below command
B:\>git version
git version 2.29.2.windows.3
Working with Git starts with installing or updating, if you already have it on your computer. On this page, you will find how to install Git on Windows, Linux and Mac.

There are three ways to install Git on Mac OS X: Git for Mac installer, Homebrew and MacPorts.
Mac Installer
This is the simplest way of installing Git on Mac. Here are the steps to follow:
- Download the latest Git for Mac installer.
- Follow the given instructions to finish installing.
- Open the terminal and type git --version to verify that the installation was successful.
git --version git version 2.9.2 - Input your Git username and email as given in the example below:
git config --global user.name "BobSmith001"
git config --global user.email "[email protected]"
Homebrew
Install Homebrew on Mac and then follow the steps below to install Git with it:
- Open your terminal and install Git with Homebrew.
- Type git --version to verify that the installation was successful.
git --version git version 2.9.2 - You need to input your Git username and email as given in the example below:
git config --global user.name "BobSmith001"
git config --global user.email "[email protected]"
MacPorts
Follow these instructions to install Git with MacPorts:
- Update MacPorts:
- Now you need to search the most recent Git ports and variants:
port search git port variants git - The installation of Git should be with bash completion, the OS X keychain helper, and the docs:
sudo port install git +bash_completion+credential_osxkeychain+doc - You need to configure your Git username and email as given in the example below:
git config --global user.name "BobSmith001"
git config --global user.email "[email protected]"
How to Install Git on Windows
Find the instructions below to install Git on Windows:
- Download the most recent Git for Windows installer.
- Then, the Git Setup wizard screen will show up and you need to follow the prompts to complete the installation.
- Open a Command Prompt or Git Bash if you’ve selected not to use Git from Windows Command Prompt.
- Configure your Git username and email as given in the example below:
git config --global user.name "BobSmith001"
git config --global user.email "[email protected]"
Debian / Ubuntu ( apt-get )
You can find Git packages via APT. Here are the steps to follow:
- Install Git from your shell with apt-get:
sudo apt-get update sudo apt-get install git - Type git --version to verify that the installation has succeeded:
git --version git version 2.9.2 - Input your Git username and email as given in the example below:
git config --global user.name "BobSmith001"
git config --global user.email "[email protected]"
Fedora (dnf/yum)
Git packages are available via yum and dnf.
- Install Git using dnf or use yum if you’re using older versions of Fedora.
- Type git --version to verify that the installation was successful.
git --version git version 2.9.2 - Configure your Git username and email as given in the example below:
git config --global user.name "BobSmith001"
git config --global user.email "[email protected]"
Installing Git from source is more preferable, as you can always get the latest and updated version.
You need the following libraries to install Git from source: curl, zlib, openssl, expat and libiconv.
For those, who use a system that has dnf or apt-get, the two commands below can be useful for installing all of the dependencies:Note that you will need the following additional dependencies to be able to add documentation in different formats (doc, HTML, info):
yum install curl-devel expat-devel gettext-devel \ openssl-devel zlib-devel perl-devel asciidoc xmltoapt-get install libcurl4-gnutls-dev libexpat1-dev gettext \ libz-dev libssl-devsudo dnf install asciidoc xmlto docbook2X sudo apt-get install asciidoc xmlto docbook2xCompile and install:
tar -zxf git-1.7.2.2.tar.gz
cd git-1.7.2.2
make prefix=/usr/local all
sudo make prefix=/usr/local install
Git can also be installed via Git itself for updates:
git clone git://git.kernel.org/pub/scm/git/git.git