One way you can change the style of a document is by adding a new text font. To add a font to Word, download and install the font in Windows, where it will become available to all Microsoft 365 applications.
Fonts come as files, and there are many sites on the Internet where you can download free fonts, such as DaFont. You can also import font files from a CD, a DVD, or your organization’s network. TrueType (file extension .ttf) and OpenType (.otf) fonts both work fine.
Note: Before you download a font, make sure that you trust the source.
Add a font
-
Download the font files. These often come compressed in .zip folders. In one .zip folder, you might find several variations on the same font, such as “light” and “heavy.” A .zip folder usually looks like this:

-
If the font files are zipped, unzip them by right-clicking the .zip folder and then clicking Extract. Now you’ll see the available TrueType and OpenType font files:
-
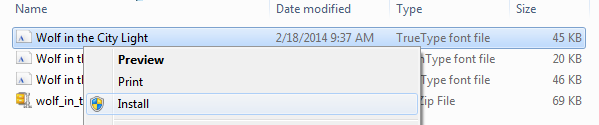
Right-click the fonts you want, and click Install.
-
If you’re prompted to allow the program to make changes to your computer, and if you trust the source of the font, click Yes.
Your new fonts will appear in the fonts list in Word.


Here are two other ways to install and manage fonts:
-
All fonts are stored in the C:\Windows\Fonts folder. You can also add fonts by simply dragging font files from the extracted files folder into this folder. Windows will automatically install them. If you want to see what a font looks like, open the Fonts folder, right-click the font file, and then click Preview.
-
Another way to see your installed fonts is through Control Panel. In Windows 7 and Windows 10, go to Control Panel > Fonts. In Windows 8.1, go to Control Panel > Appearance and Personalization > Fonts.
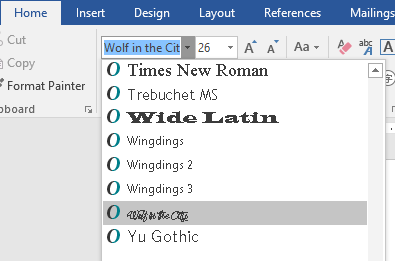
The next time you start Word, you’ll see the fonts you added in the Font list.
Need more help?
Want more options?
Explore subscription benefits, browse training courses, learn how to secure your device, and more.
Communities help you ask and answer questions, give feedback, and hear from experts with rich knowledge.
Find and download your favorite fonts to the OS
Updated on December 15, 2021
What to Know
- Right-click the font file and choose Install.
- Drag the file into Settings > Personalization > Fonts.
- Search Fonts in Microsoft Store, choose Get on font page.
This article explains how to install fonts in Windows 11. You can get the font file yourself from the web or use Microsoft Store to locate and easily install new fonts. We’ll also cover how to delete fonts you don’t want anymore.
How Installing Fonts Works in Windows 11
Font files are like regular files, where they can be downloaded from websites and shared between computers via flash drives, CDs, etc.
There are lots of places to get fonts online, including free sources like Google Fonts, DaFont, and FontSpace. We’ll see below Windows 11 has its own, built-in method for getting fonts, too.
If you’ve got a font file, like one in the OTF or TTF file extension, you can’t just put it anywhere on your computer and expect it to be usable. A font isn’t recognized by Windows 11, and by extension programs like Word, until it’s been properly installed.
Installed fonts are stored in a specific folder, as covered below. As long as the program you want to use the font in is looking for font files in the standard Windows Fonts folder, following the steps below will allow the file to be used by that software.
How to Install Fonts From the Web
Here’s what to do with the file you’ve downloaded so you can start using the font in your programs:
-
Locate the font file. You need the actual file, so if the font was downloaded in an archive (it probably was), extract it first: Select it once and then go to Compressed Folder Tools > Extract all > Extract. The font will appear in a folder by the same name as the archive.
If your font downloads within an archive file, it’s most likely a ZIP file. However, if it’s something else like 7Z or RAR, you’ll need a third-party file extractor tool to open it. Once you get the true font out of the archive, the rest of these steps apply just as they do with ZIP fonts.
-
There are several ways to install a font in Windows 11. The easiest is to double-click it, or right-click it, and select Show more options > Install.
You can also go to Settings > Personalization > Fonts, and drag the font file into the area at the top. This works with multiple fonts as well.
Font installations can also take place directly from the Windows Fonts folder at C:\Windows\Fonts. Copy and paste, or drag and drop, one or more fonts there to install them in bulk.
If none of these methods work, verify you’ve dealing with the actual font and not the archive it came in. If Windows 11 doesn’t recognize the font you have, try to convert it to a supported format.
How to Install Fonts Through Microsoft Store
Another way to get fonts is through Microsoft Store. Instead of searching for a trustworthy website to get fonts from, and then having to download the file yourself, Windows 11 has a built-in method which streamlines the whole process.
-
Go to Settings > Personalization > Fonts > Get more fonts in Microsoft Store.
One way to access Settings is by right-clicking the Start button and selecting it from the list.
-
Pick the font you want to install, and then choose Get.
How to Delete Fonts in Windows 11
It’s easy to go overboard installing custom fonts. There’s nothing wrong with it unless you’ve collected so many your programs are now running slowly trying to load them all, or it’s becoming difficult to sift through all the options.
Let’s first look at the easier way to uninstall fonts:
-
Right-click the Start button and go to Settings > Personalization > Fonts.
-
Select the font from the Available fonts area. You can find it by searching for its name or scrolling through the list.
-
Select Uninstall, and then confirm it in the pop-up.
The other way to delete fonts is a better technique if you want to remove multiple fonts at once. Visit this path in File Explorer to select the font(s) you want to remove, and then choose Delete from the menu at the top:
C:\Windows\Fonts
If you right-click a font, or use the Organize menu option, you can copy it elsewhere for backup or sharing purposes.
FAQ
-
How do I add fonts to Microsoft Word?
To add fonts to Microsoft Word and other Windows 11 programs, install the font on your system by following the instructions above. You may have to close and reopen the program for the font to appear.
-
What font is used in Windows 11?
Segoe UI Variable is the default font for Windows 11. Microsoft has used the Segoe font family for its user interfaces and marketing materials for many years.
-
Where do I find fonts on Windows 11?
Open Windows 11 File Explorer and go to the C:\Windows\Fonts folder to see all of the fonts installed on your system.
Thanks for letting us know!
Get the Latest Tech News Delivered Every Day
Subscribe
Home » How to Install Custom Fonts in Windows PC
Installing the fonts in PC is no longer a challenging task as it requires a few easy steps to get your work done. Have you ever tried to install desktop fonts but failed? In today’s guide, I am going to share one of the easiest ways to install the fonts in Windows PC.
However, you should make sure that the fonts you have selected for installation are desktop fonts, not web fonts. Furthermore, the zipped folder should be unzipped. Let’s discuss the steps in detail.
Installing Fonts in Window 10
- Search the window fonts from the search menu bar and unzip all the fonts before installing.
- Remember that you can’t install the zipped fonts. Once they are unzipped, click the install button and here you go with your fonts.
Apart from this
- You can also drag or copy-paste the unzipped fonts in the font manager.
- In order to open the font manager, you have to press the Fonts control panel.
It is how you can install the fonts in your Window 10 PC.
Installing Fonts in Window 8
- Find out window fonts from the search bar and unzip all the required fonts before installation.
- Once they are unzipped, press the Install button, and they will be installed in your Windows.
Another way of installing the fonts in Window 8 is:
- Search the required fonts from the search bar, once you found, click the font folder.
- In the opened font folder, drag and copy paste all the unzipped fonts for installation.
Here you go with the successful installation in Window 8 with simple steps.
Installing Fonts in Window 7
- Search your required font from the search bar and unzip those fonts before installation.
- Once they are unzipped, click the install button.
Apart from this method, you can also get your hands from another way that includes:
- From search menu, look for fonts and unzip them.
- To open the font folder, click on the font folder.
- Later drag and copy-paste the unzipped fonts in the font folder.
Installing Font in Window Vista
- To install the fonts, first, you have to unzip them because the zipped fonts can not be installed.
- Click the Start Menu and go to the Control Panel.
- You will see various options among which chose Appearance and Personalization.
- Later click on ‘Font’ option.
- From font files, click on ‘Install new font’ option.
- Go to that font folder where all your required fonts are available.
- Select them and click the install button.
- Here you go with your required fonts. It will take a few time for installation.
Installing Font in Window XP
- Unzip the fonts before starting the installation process.
- Go to Start menu from where go to the Control Panel.
- Various options will appear from which choose Appearance and Themes.
- On the left side of your screen, choose the font option and select ‘Install new fonts.’
- Visit that folder where your required fonts are available.
- Once you found out, click the install button and here you go with all your required fonts.
Windows 10 comes preloaded with a number of different font types (based on which language package you’re using), but you can also find a ton of different types of fonts (both free and paid) online. Installing these fonts on your Windows 10 PC is pretty simple. Here’s how.
[Further reading: How to work with Microsoft Word’s cursive, script or handwriting fonts]
Install fonts using the source file
Click the Extract All options from the context menu. Marshall Gunnell/IDG
You can quickly install a font using the font file’s context menu. When you download a font from the web, more often than not the files come in compressed ZIP folders. In this case, unzip the compressed files by right-clicking the folder and then selecting Extract All from the context menu.
Next, decide where you want to unzip the files. Click Browse in the window that appears to open File Explorer.
Once File Explorer is open, choose the location you want to unzip the files. Once ready, click Extract.
Click the Extract button.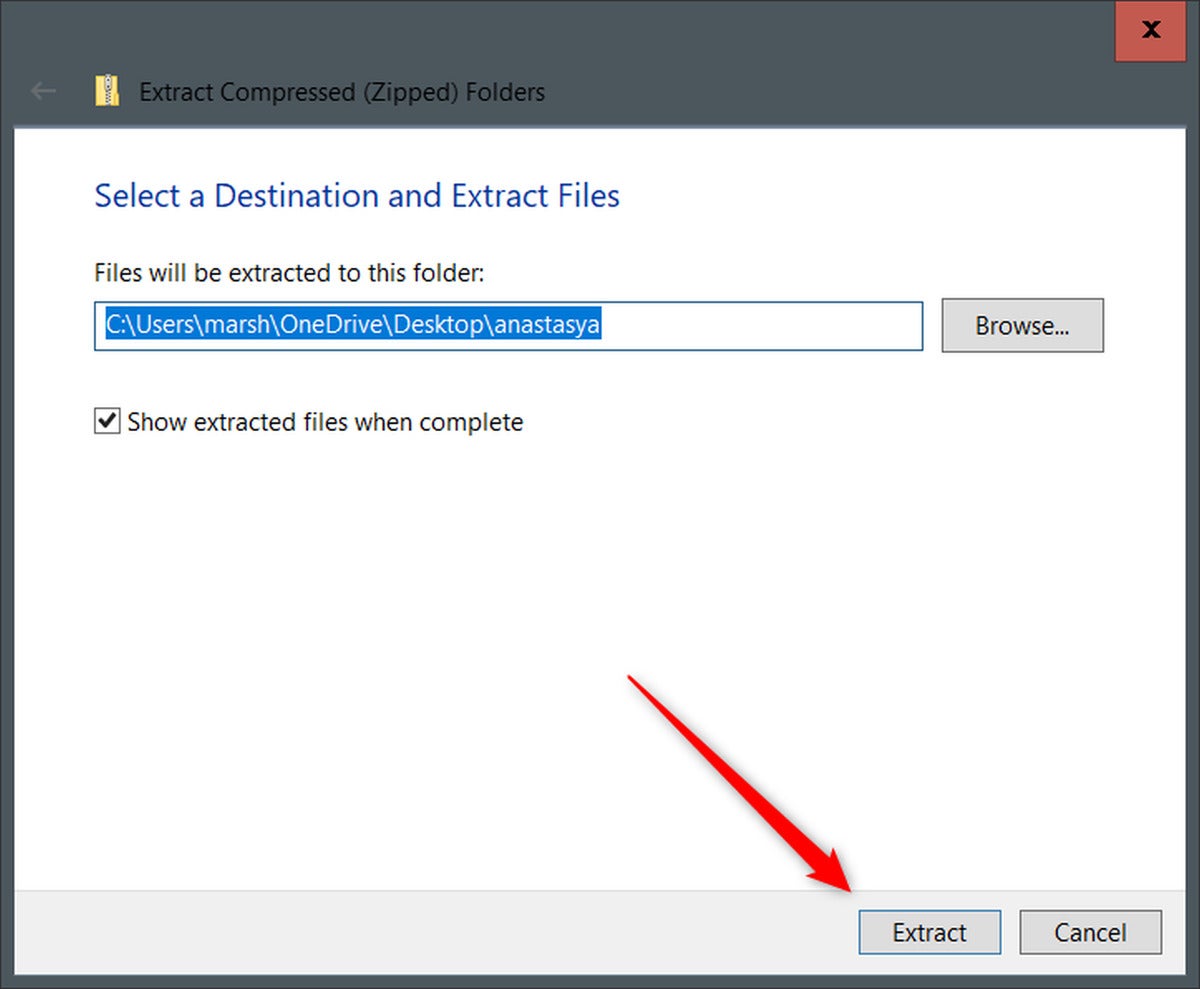 Marshall Gunnell/IDG
Open the folder that contains the unzipped files and right-click the font that you want to install. Click Install from the context menu to install the font on your user account, or Install for all users to install the font on all user accounts.
Install the font for your user profile or for all users.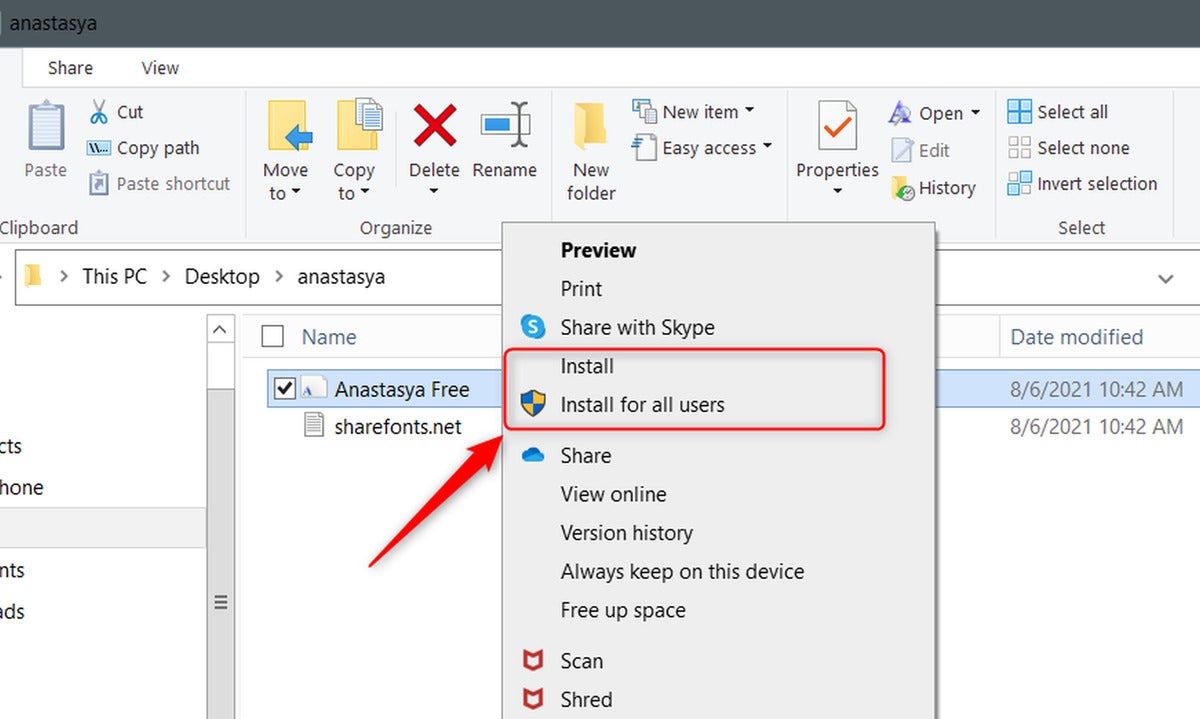 Marshall Gunnell/IDG
The font will begin installing. The installation process will only take a few seconds.
Install fonts from Control Panel
Search for the Control Panel app.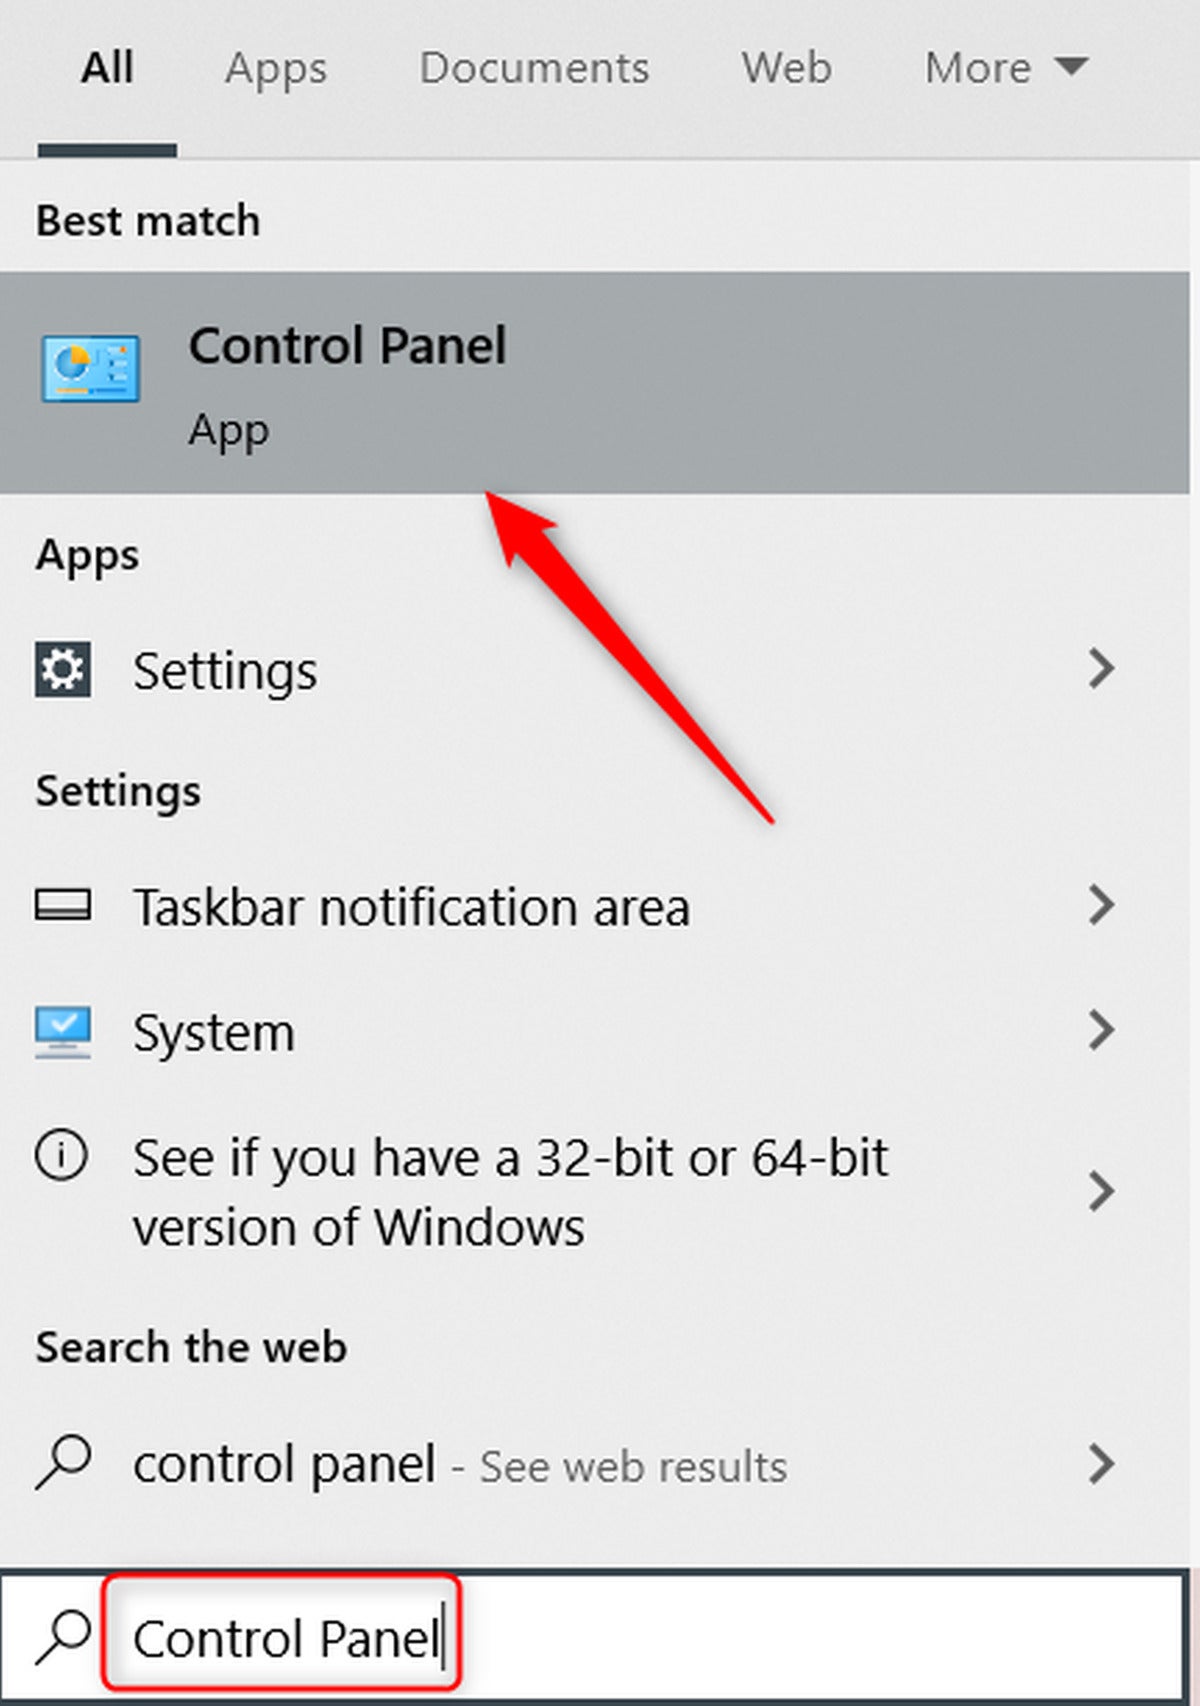 Marshall Gunnell/IDG
Another popular way of installing fonts on your Windows 10 PC is by using Control Panel.
Open Control Panel by typing control panel in the Windows Search bar and then clicking the Control Panel app from the search results.
In Control Panel, click Appearance and Personalization. Next, click Fonts.
You’ll now see a large library of fonts currently installed on your computer.
To install a new font, drag and drop the font file in the font window.
After a few seconds, the font will appear in the library. Once it appears, the font is successfully installed.
Click Fonts to see your font library.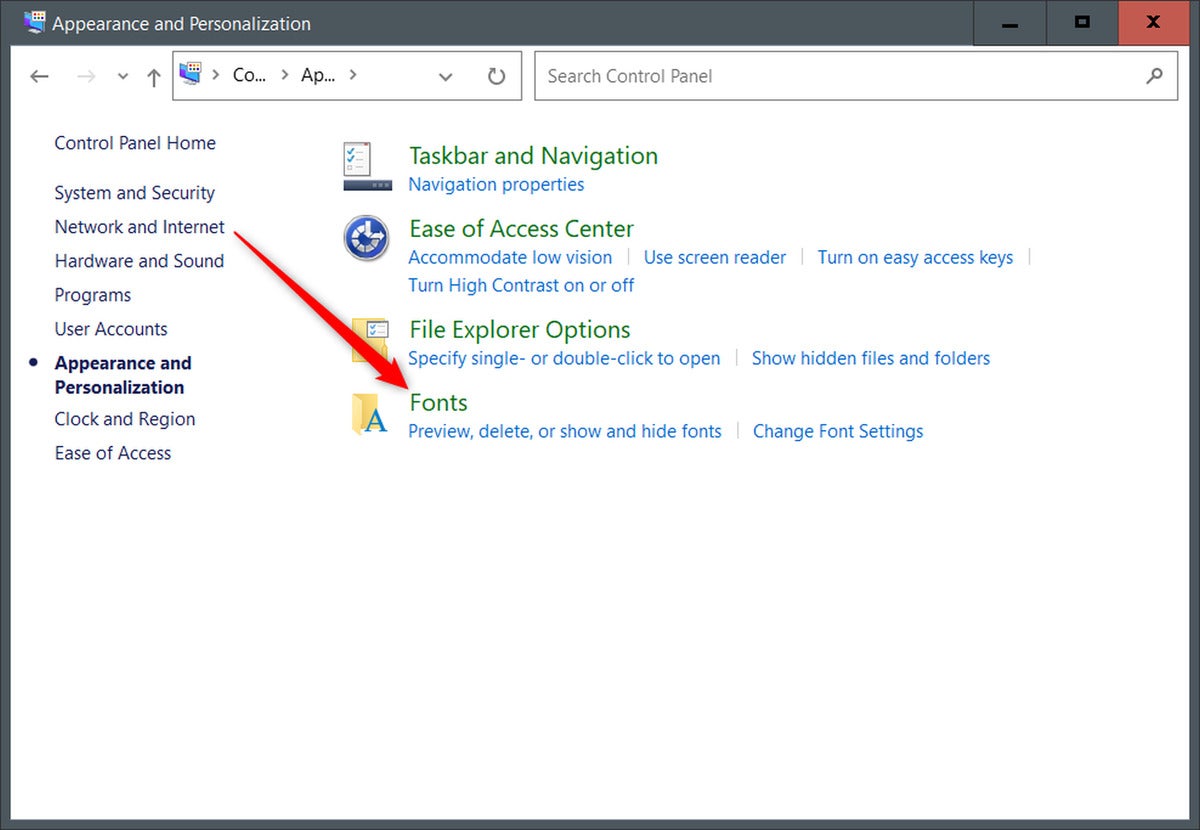 Marshall Gunnell/IDG
Install fonts from the Settings app
Microsoft provided the ability to install from the Settings app in its Windows 10’s April 2018 update. Instead of digging through multiple levels in the Settings app to search for the Font options, just type font in the Windows Search bar and then click Font settings from the search results.
Search for Font settings in Windows Search.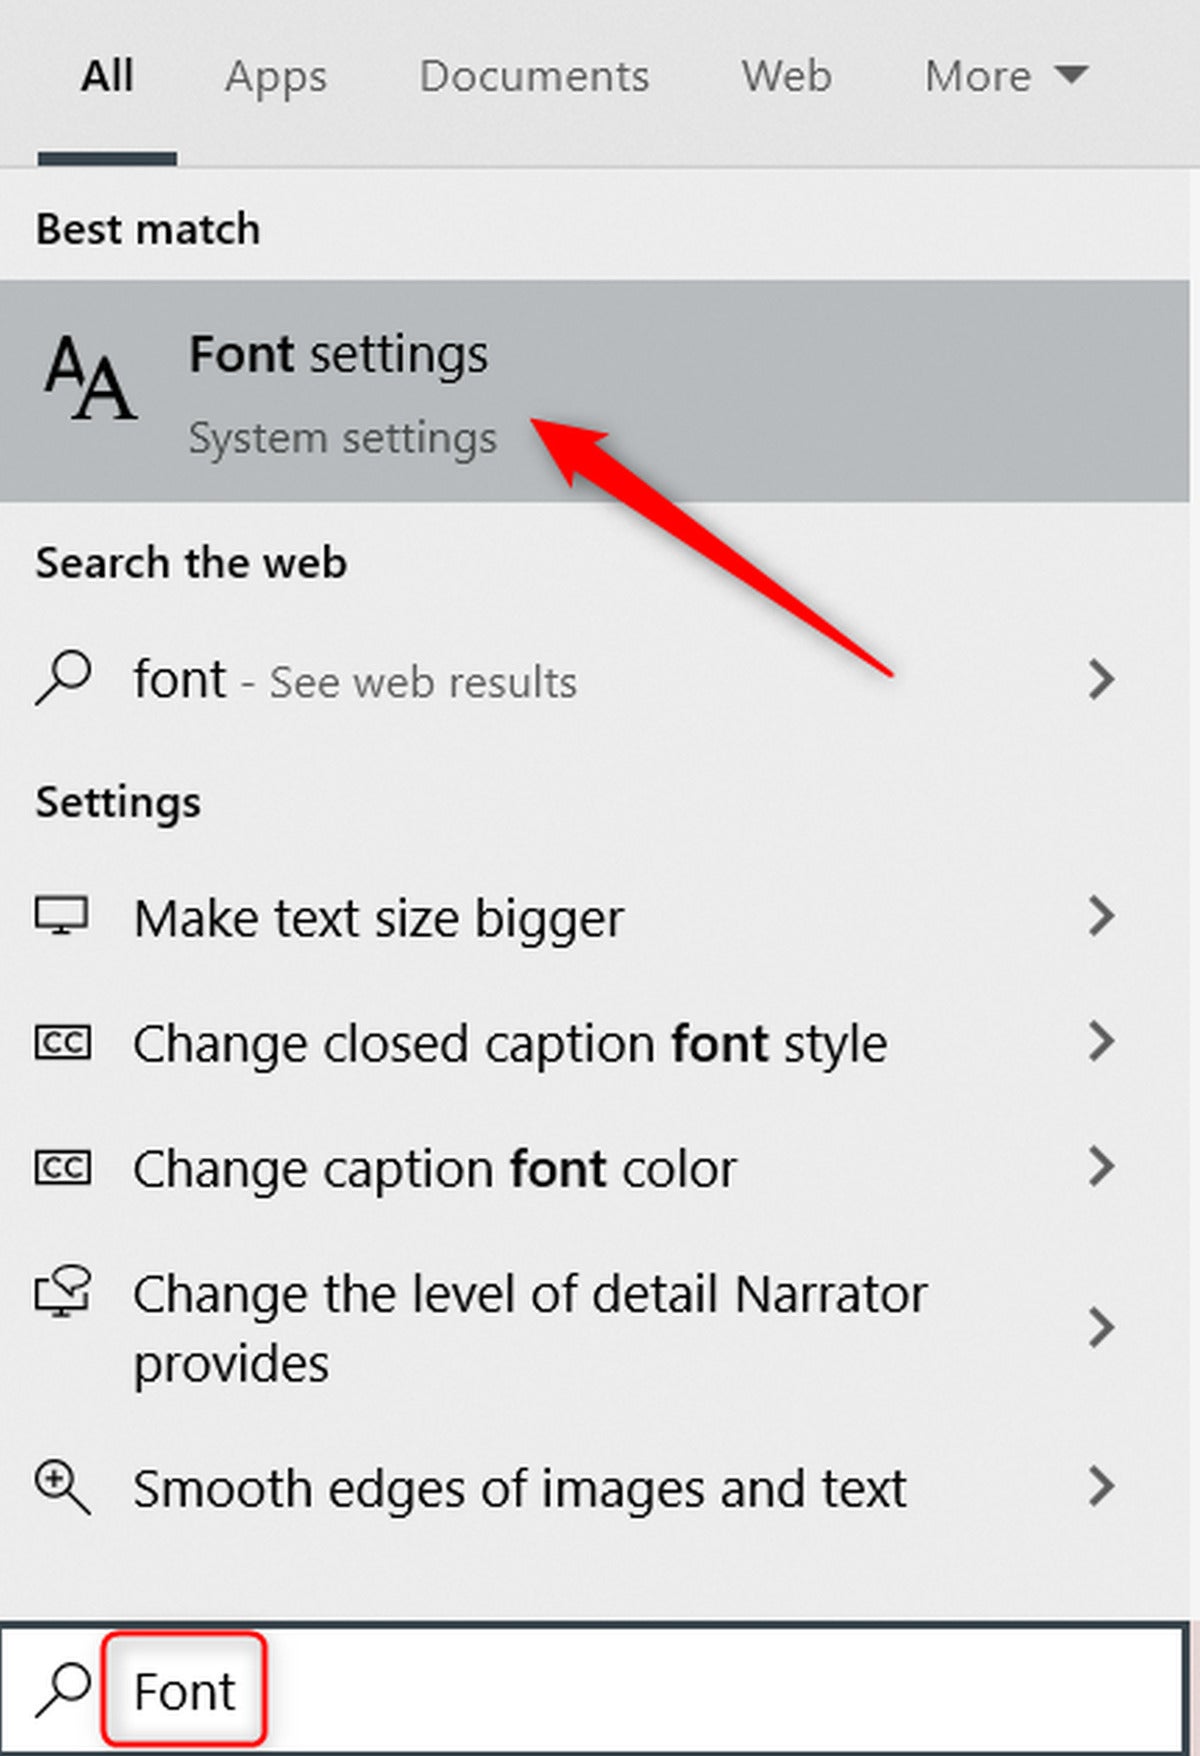 Marshall Gunnell/IDG
The Fonts options will open in the Settings app. Drag and drop the font file that you want to install into the Add Fonts section. The font will begin installing. The installation process takes only a few seconds.
As you can see, the process for installing fonts is relatively straightforward, and there are a few different ways to do it. If you want to take your font game to the next level, you can even make your own using Microsoft Font Maker. Give it a shot!
Windows is a Microsoft operating system that cares about the end-user experience and ease of use. As a result, Windows itself already has a wide range of fonts pre-installed by default. It turns out that we always need to improve an art or a presentation to be more flashy and stylish, in which case, learn how to install fonts on Windows and how easy it is.
In this regard, we really have to take our hat off because Microsoft makes it as easy as possible to install or remove fonts in Windows.
How to install new fonts in MS Word or MS PowerPoint?
Having a stylish font in MS Word is a simple task. You don’t actually install a font in MS Word or another program like PowerPoint. You install it on Windows Operating System and then you can use this font in all programs with compatible text editors.
")
In summary, if you want to add a font to Word, for example, download and install the font on Windows, where it will become available for all Office applications.
Fonts are files with a .TTF (TrueType Font) or .OTF (OpenTrue Font) extension.
Note: Before downloading and installing a font, it is very important to make sure that you trust the site of origin.
Where to download new fonts to install on Windows?
MaisFontes is a very practical and simple site to download fonts. The fonts on MaisFontes are free for you to install on Windows. We curate the fonts to ensure there is no Malware or malicious software.
To download a new font, simply navigate to maisfontes.com, pick and choose the font that best suits your project. Click the Download button and wait for the download.
")
Usually the file is compressed in .ZIP format to ensure the security of the file.
How to install fonts on Windows?
There are two basic ways to install fonts on Windows, regardless of your version. You just can’t forget to use only font files with a .TTF or .OTF extension. There are several other formats that need more attention before running a font on Windows.
The third path is exclusive from Windows 10 onwards, as it uses the Microsoft Store.
")
First of all, you have to close the program you want to use the font (if it is still open) — in our example: MS Word or PowerPoint.
If the font file is compressed, open the .ZIP package (or .RAR depending on the site downloaded) and extract the file (.TTF or .OTF).
Method 1: Direct installation
- Open Windows Explorer;
- Go to the folder where you saved the font file (usually in the Downloads folder);
- Right-click on the font file (.TTF or .OTF) and then click on “Install” (on your account only), or “Install for all users” (for everyone who accesses your PC);
- Windows will run the font installation.
Method 2: Drag to install
- Open File Explorer;
- Go to the “C:\Windows\Fonts” folder;
- You can also access it by using the Windows «Run» command and then typing “%windir%\fonts” (without quotes). Press ENTER to execute;
- Drag the file with the new font into the open folder and Windows will install automatically.
Method 3: Via Microsoft Store
The third method is a new option only for Windows 10 or higher, as it uses fonts from the Microsoft Store.
")
- Click on Start and then on “Settings” (the gear symbol);
- Click on “Personalization” and then on “Fonts”;
- Click on “Download more fonts from Microsoft Store”;
- Click on the font you want to install, and then on “Get” (there are free and paid fonts to choose from);
- Windows 10 will install the font automatically.
And ready.
Too many fonts slows Windows down
This is a factor that weighs in installing many fonts on Windows. Too many fonts slows Windows down. There is no set number, it will depend on your PC configuration, however, if you are finding it slower than usual and you have just been adding new fonts, then BEWARE. It’s time to remove some fonts and test.
We already noticed that by adding 30 more fonts, the PC actually slower, more «loaded» to perform some basic tasks. Just remove some fonts not used anymore and «voilà«, your Windows will be fast again.
Conclusion
See how easy it is to install fonts on Windows? Generally speaking, Windows does not complicate the installation of fonts on the system. Once installed, they will be included in the system and made available to all programs capable of editing texts installed on the same computer.
Summary of this article
Does Too Many Fonts Slow Windows?
Depending on the configuration of the PC, we have already noticed that above 30 different fonts installed on Windows can slow it down.
Just remove some fonts not used anymore and «voilà», your Windows will be fast again.
How to add a font in MS PowerPoint?
It is not possible to install a font directly into MS PowerPoint. First of all, you need to install the font in Windows and then you will be able to use the install font in all other compatible programs.
How to add a font in MS Word?
You don’t actually install a font in MS Word or other Windows program. You install it on Windows Operating System and then you can use this font in all programs with compatible text editors.
How to add a font in Windows?
Regardless of Windows version, there are two basic ways to install fonts. We recommend .TTF or .OTF font files.
Method 1: Direct installation with double click and Install Source.
Method 2: Drag and drop it to the “C:\Windows\Fonts” folder.
Method 3: Via Microsoft Store: “Settings” > “Personalization” > “Fonts” > “Download more fonts from Microsoft Store”.
What is the best font format for Windows — TTF or OTF?
If its use is traditional, it doesn’t matter TTF (TrueType) or OTF (OpenType). OTF fonts contain sophisticated features and wider character range, as well as additional fonts known as Alternate.