Introduction
FFmpeg is a command-line audio and video converter available for Linux, macOS, and Windows. This open-source tool helps users manipulate multimedia content and offers free access to several audio and video libraries.
Even though FFmpeg doesn’t have a clickable GUI, the installation process is straightforward.
In this guide, you will learn how to install FFmpeg on Windows in four simple steps.
Prerequisites
- A system running Windows (This tutorial uses Windows 10).
- A file archiver (This guide uses 7-Zip).
- Command Prompt or Windows PowerShell access.
- Administrator privileges.
How To Install FFmpeg on Windows
Installing FFmpeg on Windows requires adding the utility to the Windows PATH. Additionally, users can manually navigate to the folder containing the executable and run the program. However, the process is time-consuming and impractical.
A straightforward way to work with FFmpeg is to add it to PATH by editing Windows environment variables. Therefore, Windows knows where to look for the executable. Users can run FFmpeg directly from the command line without typing in the full path to the app’s folder.
Step 1: Download FFmpeg for Windows
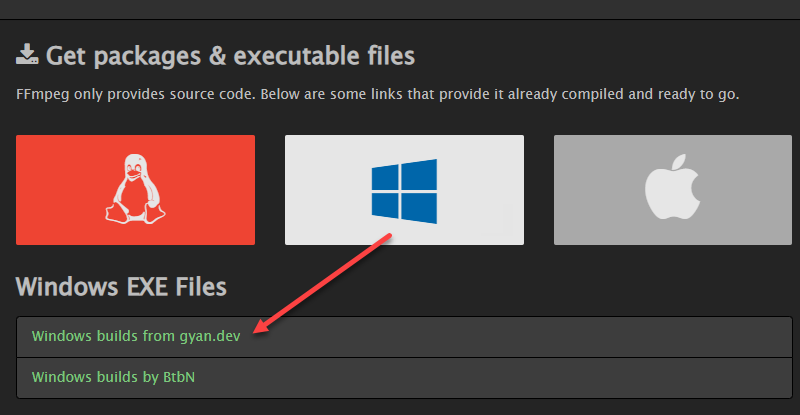
Visit the FFmpeg download page. The More downloading options section has FFmpeg packages and executable files for Linux, Windows, and Mac. To get the Windows version:
1. Hover over the Windows logo and click the Windows builds from gyan.dev link. A new page opens.
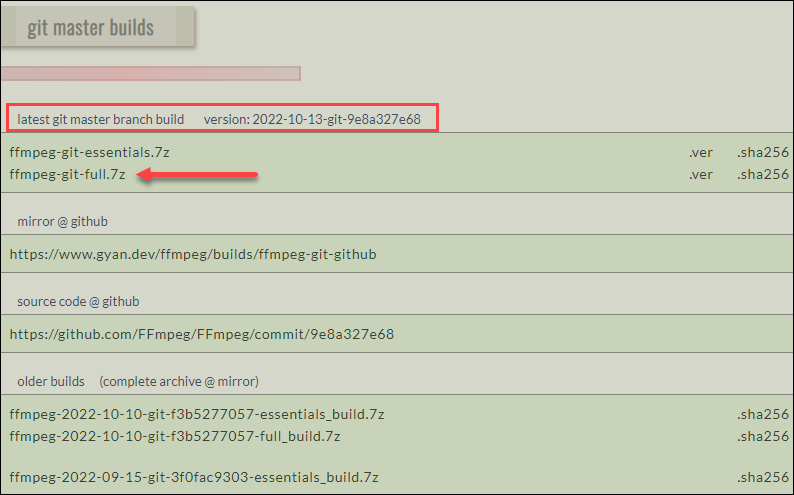
2. In the git master builds section, look for the latest version of the FFmpeg build. Click the ffmpeg-git-full-7z link to download the full build since that version has the most up-to-date libraries.
3. Choose the download location and save the file if the download does not start automatically.
Note: This guide uses the Windows build from gyan.dev. Other builds are available for download, like the one by BtbN. No official documentation confirms any significant differences between different builds.
Step 2: Extract the Downloaded Files
Once downloaded, extract the contents:
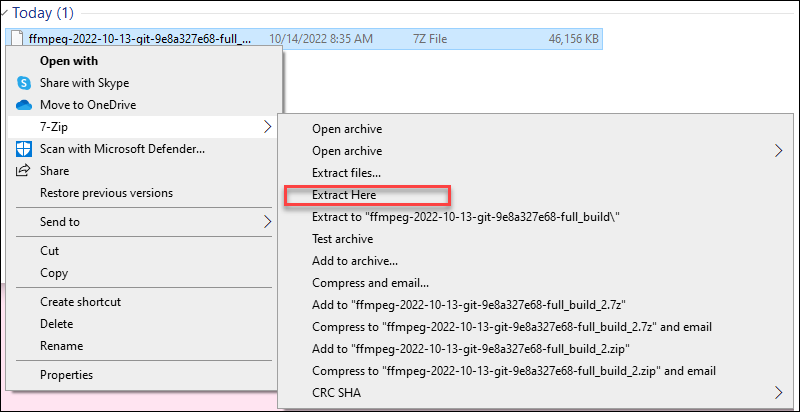
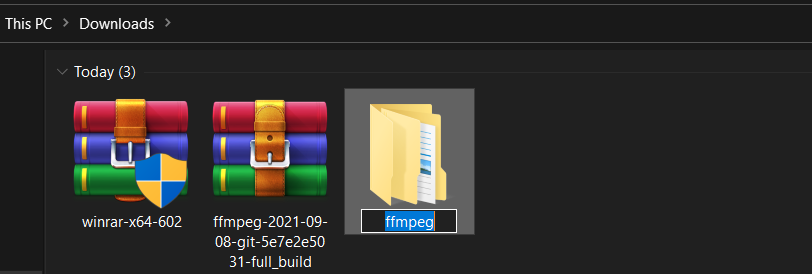
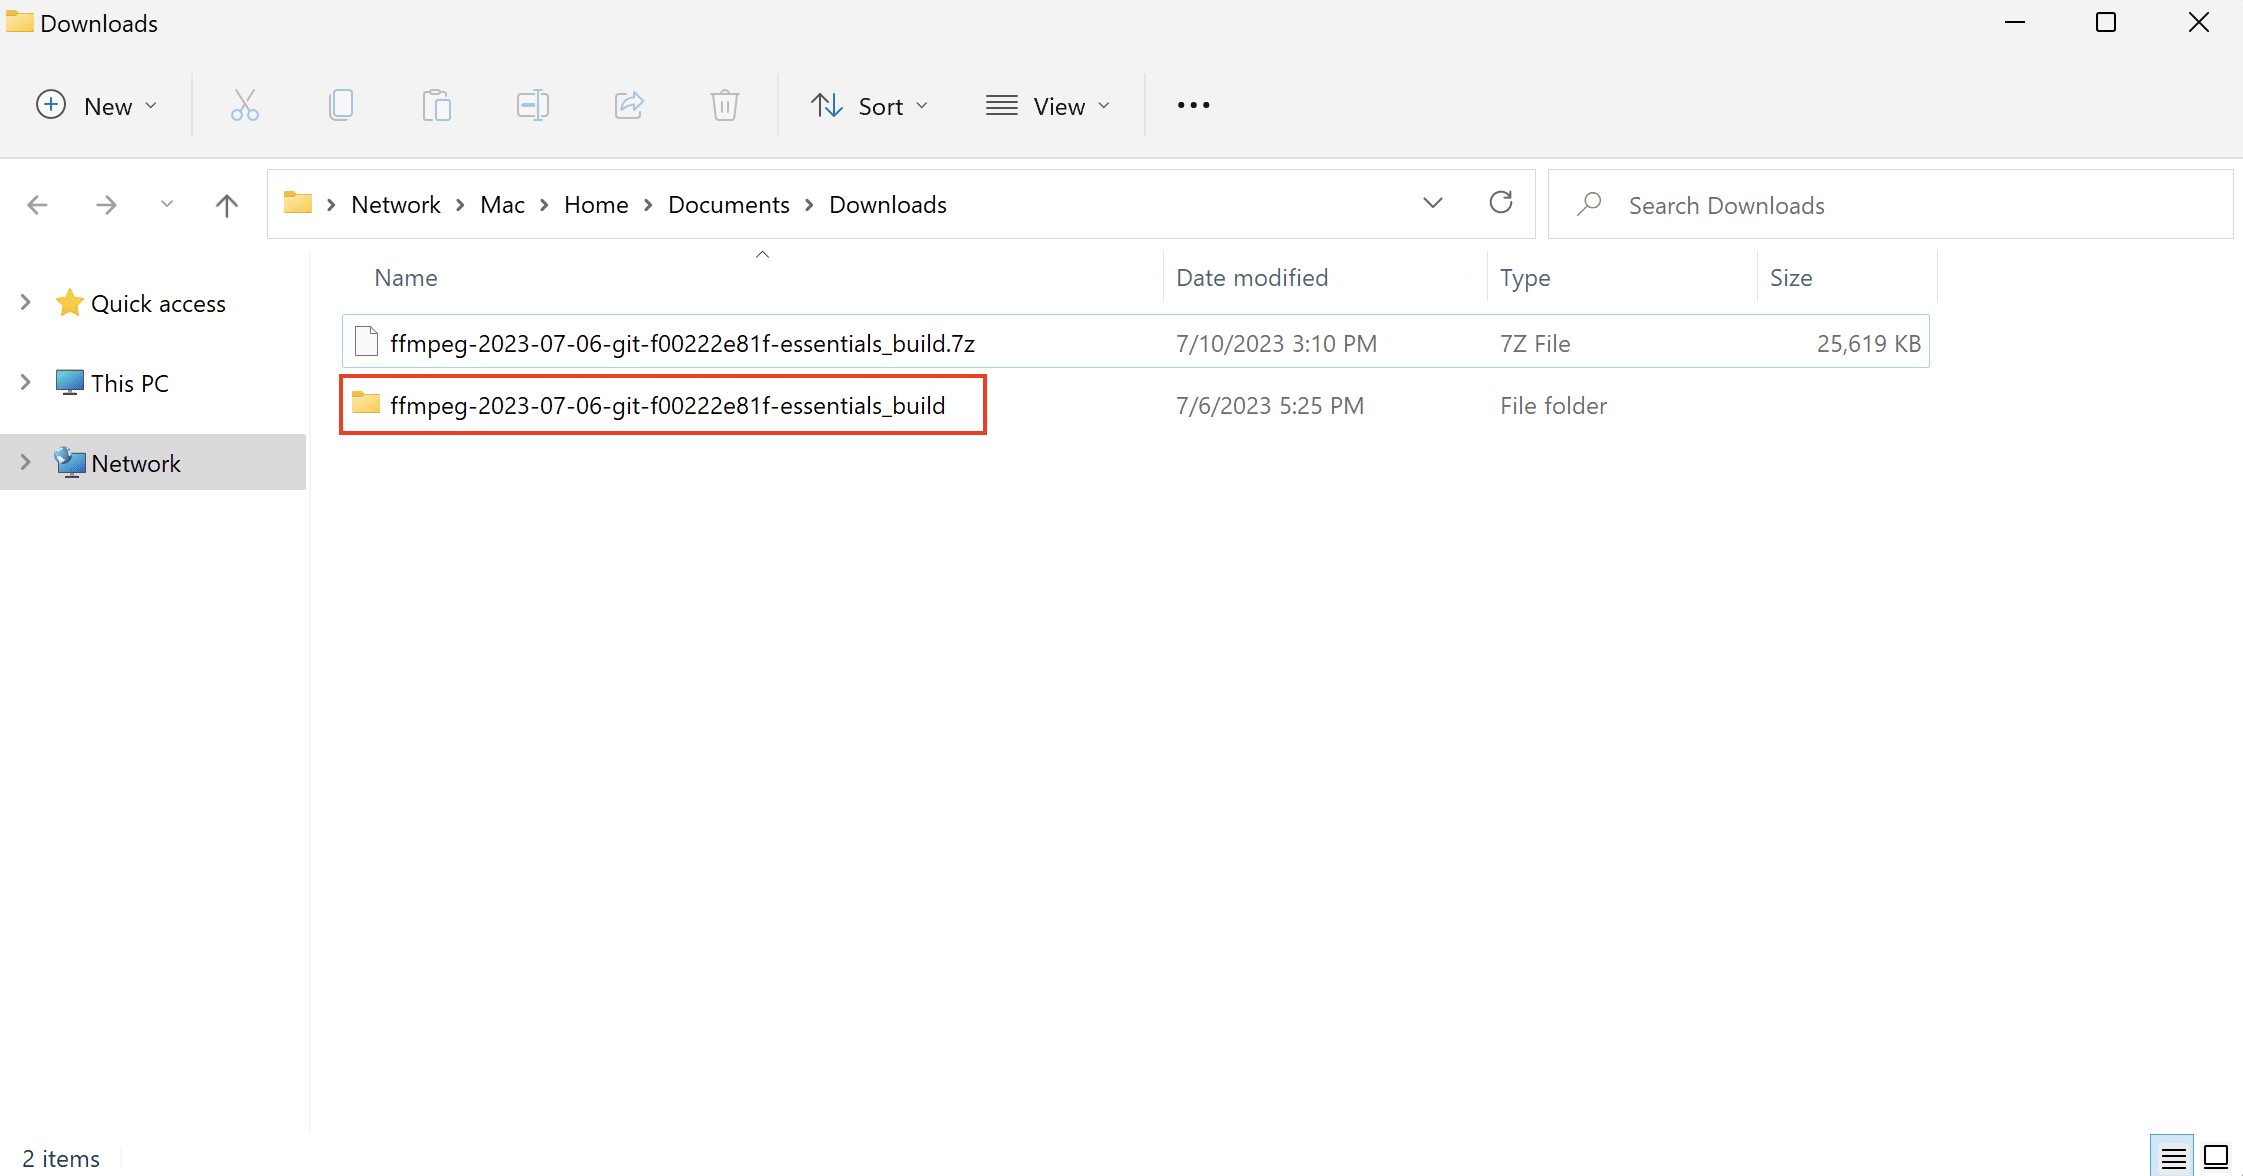
1. Locate the downloaded file. The default location is the Downloads folder.
2. Right-click the file and hover over 7-Zip (or another file archiver of choice).
3. From the archiver submenu, choose Extract here. Wait for a few seconds for the extracting process to complete.
5. Rename the extracted folder to ffmpeg.

6. Move the folder to the root of the C drive or the folder of your choice.

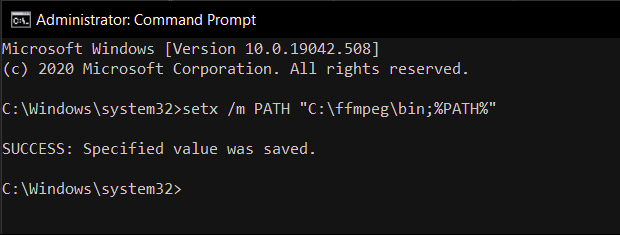
Step 3: Add FFmpeg to PATH
Set Windows environment variables to add FFmpeg to the PATH. Follow these steps:
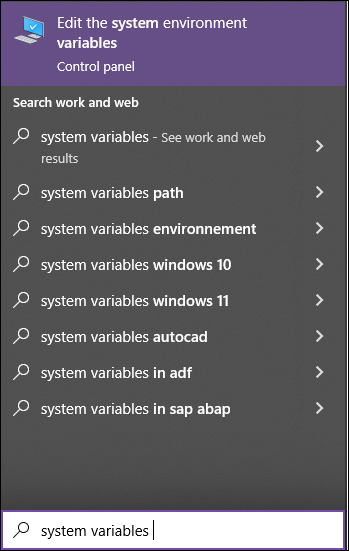
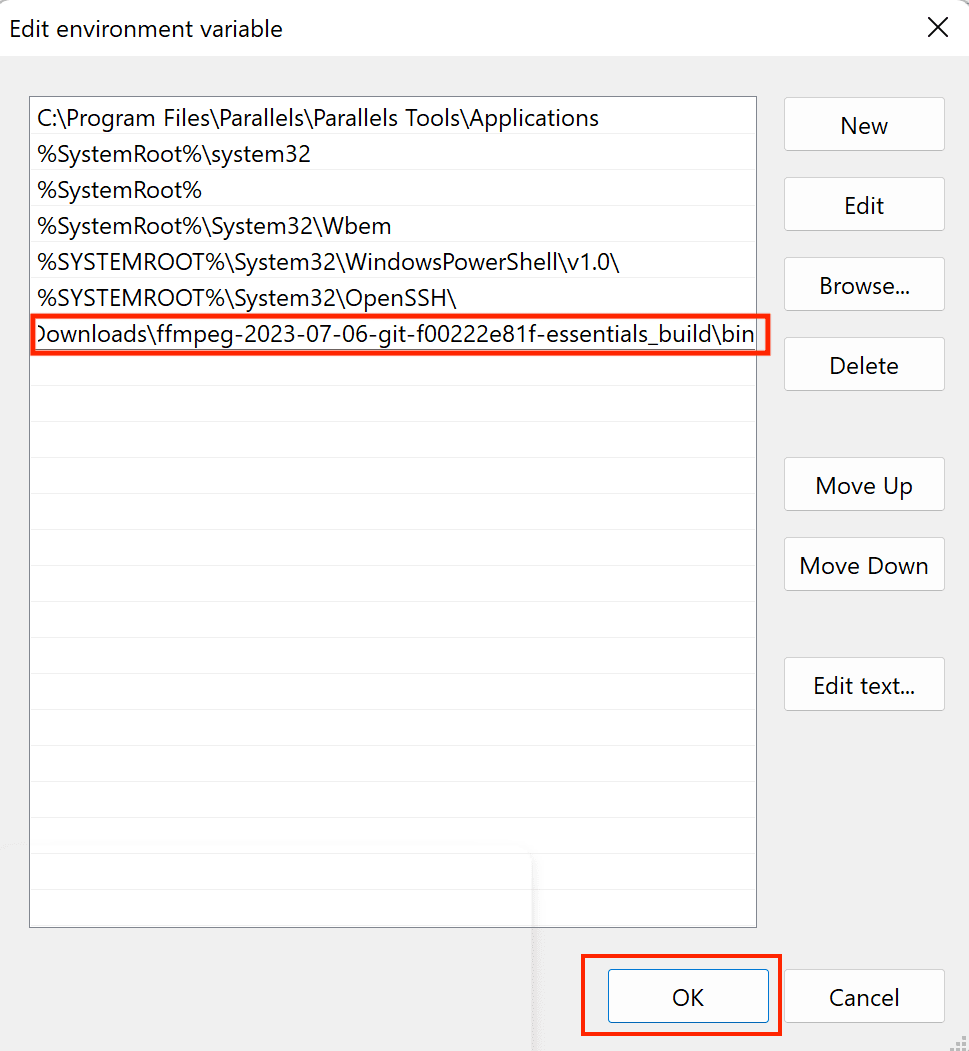
1. Type system variables into the search bar and click the Edit the system environment variables option.
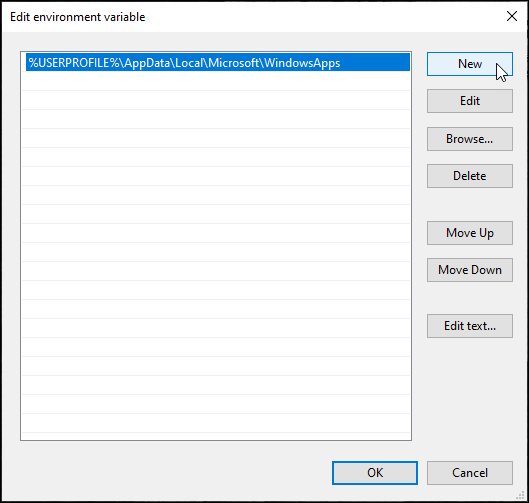
2. Under the User variables section, select Path and click the Edit button.

3. Choose New from the side menu.
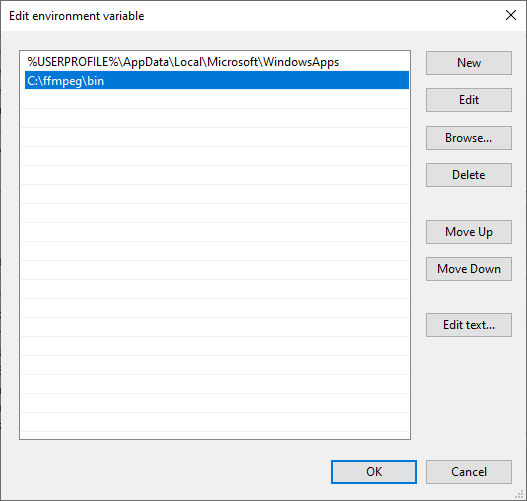
4. Add C:\ffmpeg\bin to the empty field and confirm changes with OK.
The change in the Path variable line confirms the FFmpeg is added to PATH.
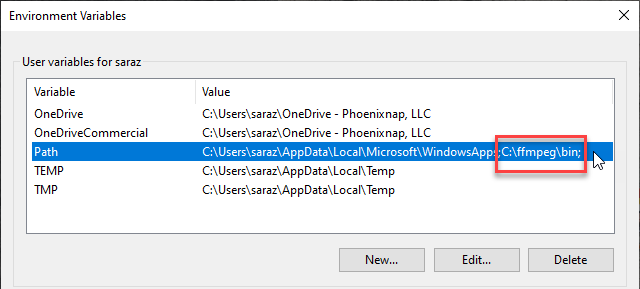
Note: If you stored FFmpeg in a folder other than the C drive, use that path accordingly.
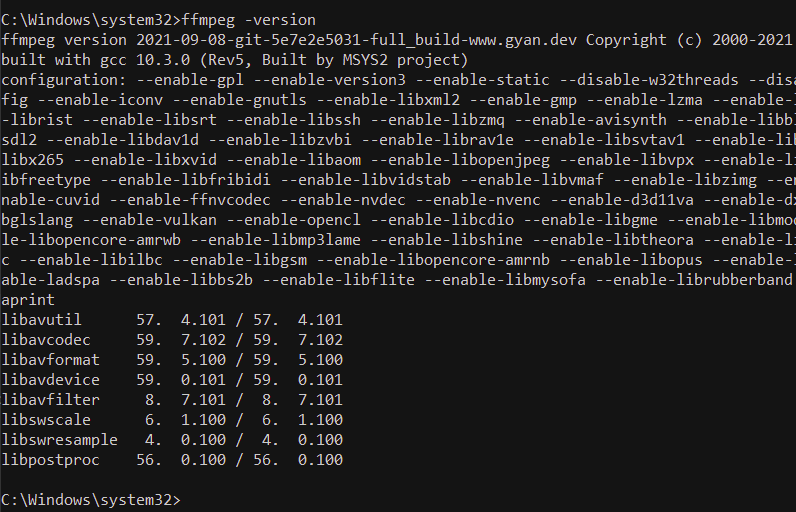
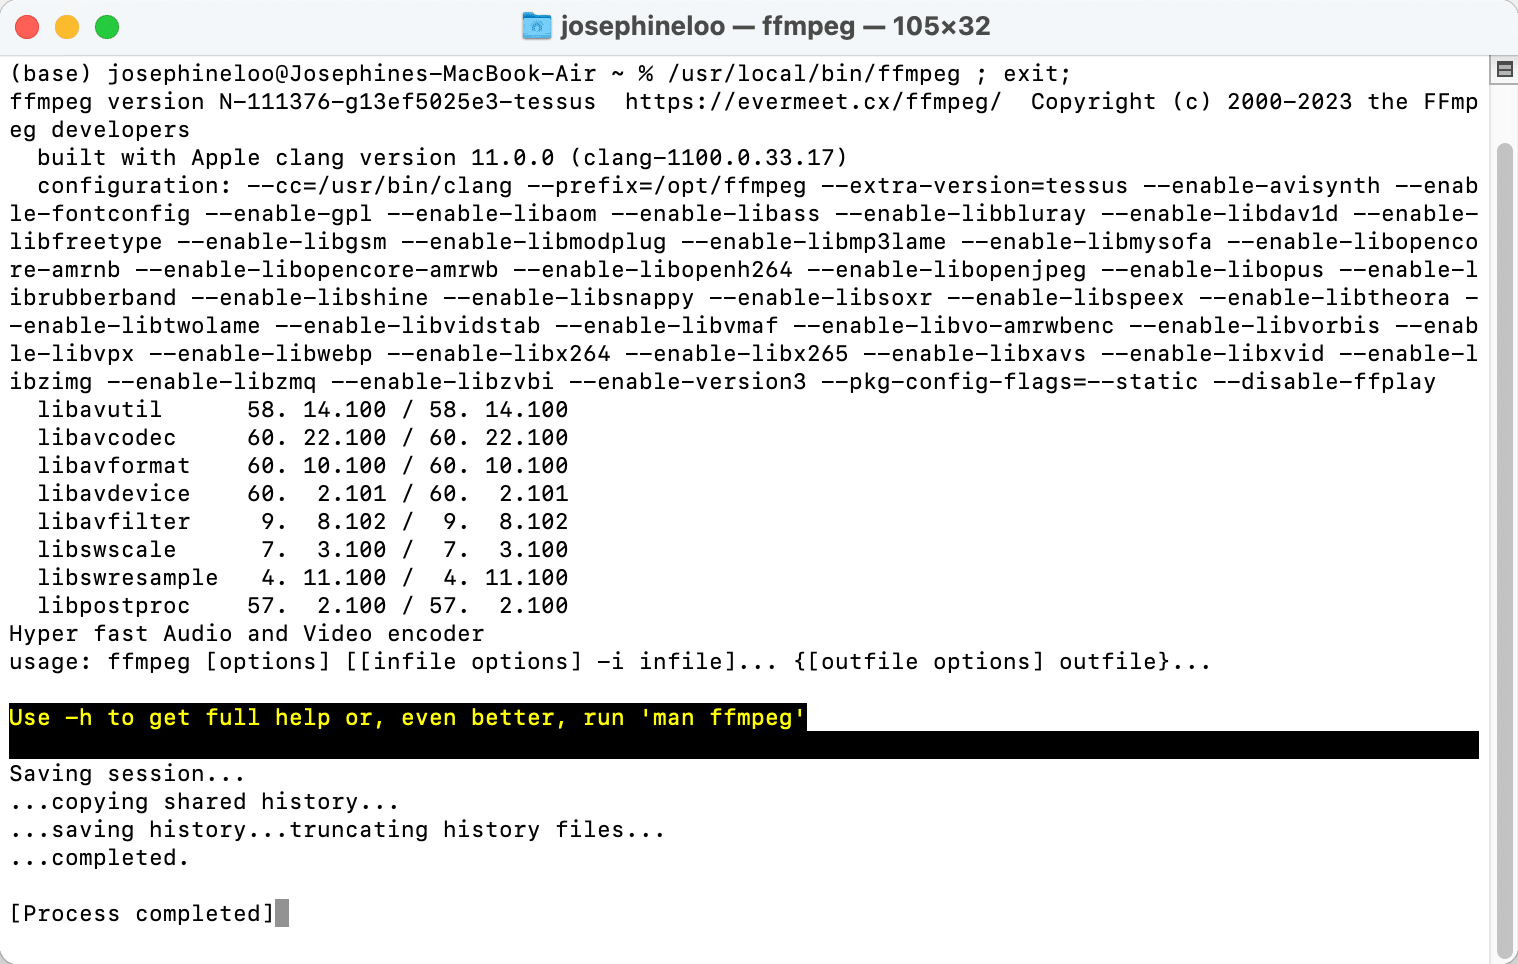
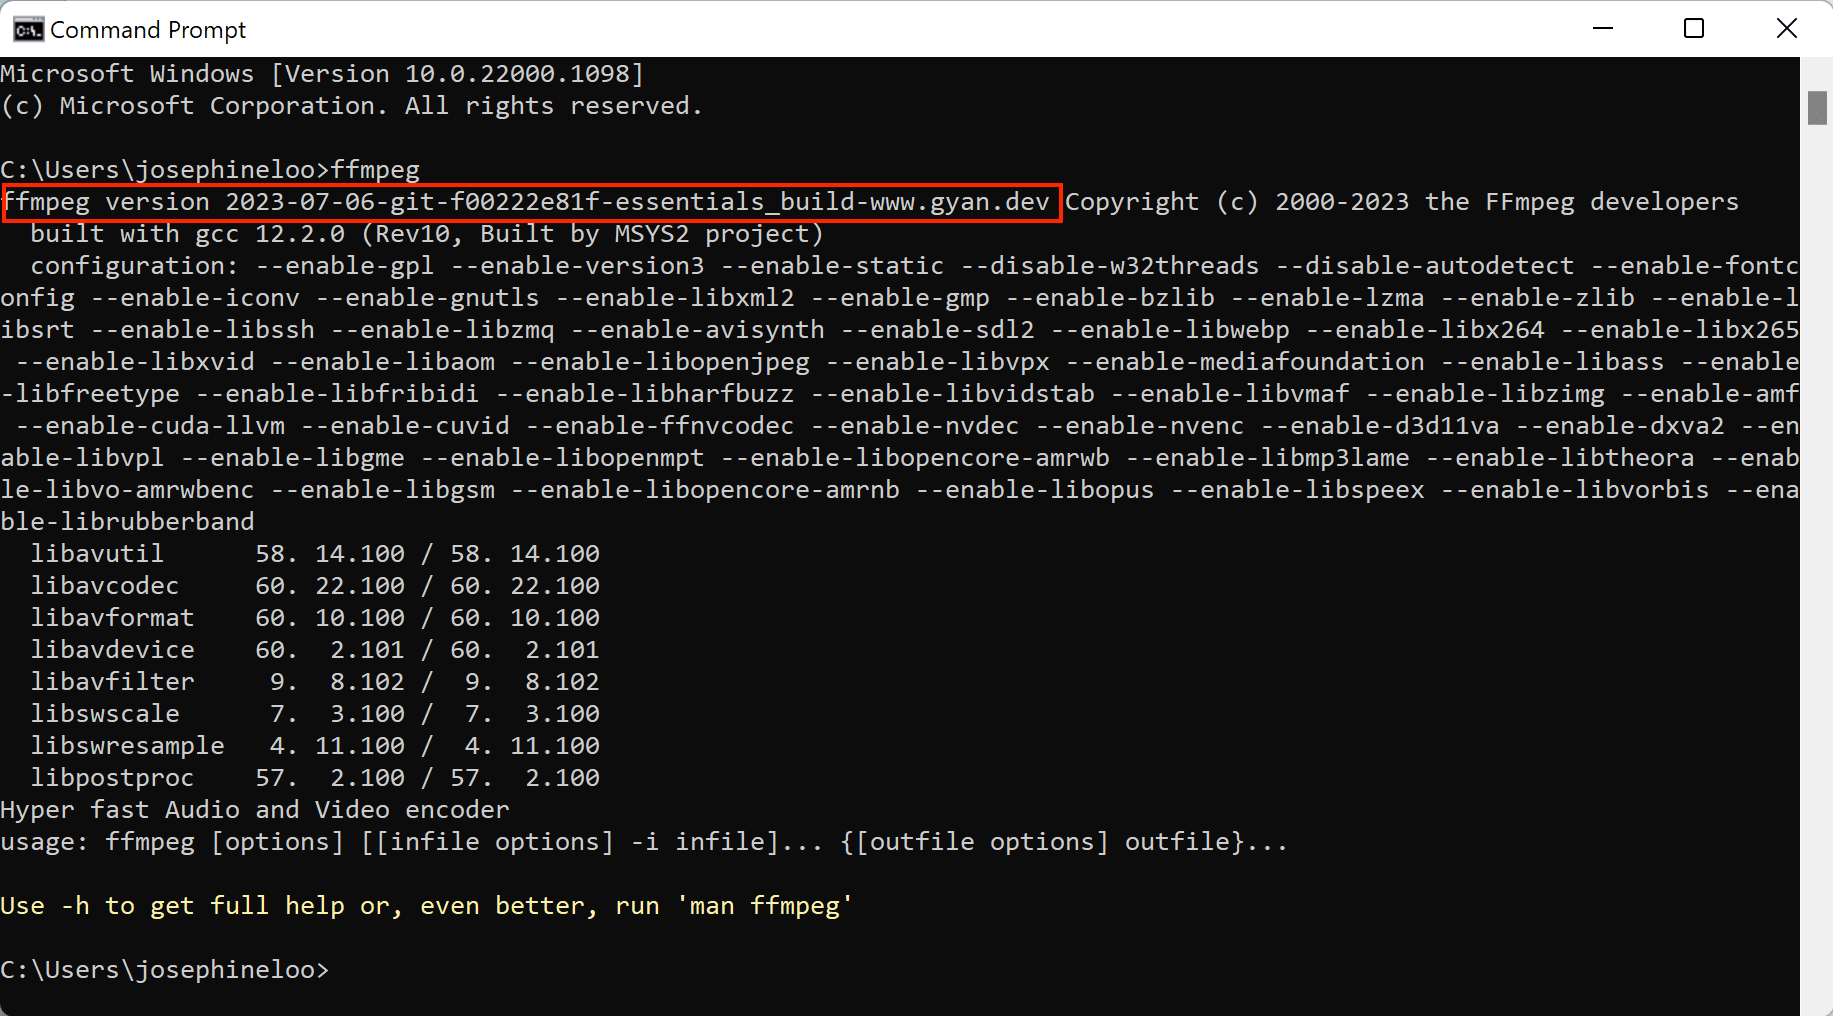
Step 4: Verify FFmpeg PATH
To verify the FFmpeg is correctly added to the Windows PATH, open the Command Prompt or PowerShell and run:
ffmpegThe output confirms the installation:

Conclusion
This article provided an easy step-by-step guide on installing FFmpeg on Windows.
For more tutorials refer to our article and learn how to install FFmpeg on MacOS.
Next, learn how to change or reset the administrator password on the Windows server.
![]()
Download Article
Get the FFmpeg audio and video conversion tool running on your PC
![]()
Download Article
FFmpeg is an open-source media tool you can use to convert any video format into the one you need. The tool is command-line only, so it doesn’t have a graphical, clickable interface. If you’re used to regular graphical Windows programs, installing FFmpeg may seem complicated at first—but don’t worry, it’s pretty easy! This wikiHow guide teaches you the simplest way to install FFmpeg on your Windows PC.
Things You Should Know
- Install 7-Zip first so you can extract the FFmpeg files.
- Download the latest full release build from https://www.gyan.dev/ffmpeg/builds.
- Extract the FFmpeg folder, move it to the root of your main drive, and add it to your system path.
-

1
Install 7-Zip. If you don’t have 7-Zip already installed, you’ll need it to be able to extract the FFmpeg files. This tool is free, and you can download it from https://www.7-zip.org.
- Once you’ve downloaded the installer, double-click the downloaded file, then follow the on-screen instructions to install.
-
2
Advertisement
-
3
Click the release builds link. You’ll see this in the left panel.
-
4
-
5
Extract the downloaded file. Here’s how:
- Right-click the Windows/Start button and select File Explorer.
- Click the Downloads folder in the left panel (you may have to click This PC first to find it).
- Right-click the file that begins with «ffmpeg» and ends with «.7z.»
- (Windows 11 only) Click Show more options.
- Select the 7-Zip menu and click Extract Here. This creates a new folder with the same name as the .7z file.
-
6
Rename the extracted folder FFmpeg. To do this:
- Right-click the folder.
- If you’re using Windows 10, click Rename. If you have Windows 11, click the icon of an «A» followed by a cursor at the bottom of the menu.
- Type FFmpeg and press Enter.
-
7
Click the FFmpeg folder once and press Control+X. This «cuts» the folder from the Downloads folder so you can paste it into the root of your hard drive.
-
8
Click This PC in File Explorer. It’s the computer icon in the left panel.
-
9
Click your hard drive. It’s usually called «Windows (C:)» or «OS (C:),» but the name and drive letter may vary.
-
10
Right-click a blank area of the right panel and select Paste. This moves the folder to the root of your hard drive.
-
11
Open Command Prompt as an administrator. To do this, just type cmd into the Windows search bar, right-click Command Prompt, select Run as administrator, and then click Yes.
-
12
Add FFmpeg to your system path. To do this from the command line, type or paste setx /m PATH "C:\ffmpeg\bin;%PATH%" and press Enter.[2]
When you’re finished, close the Command Prompt window.- You’ve now installed FFmpeg and set the proper environment variables. To confirm that FFmpeg is working, open a new command prompt window, type ffmpeg -version, and then press Enter.


Advertisement
Add New Question
-
Question
Isn’t the folder path case-sensitive? If you rename it to «FFmpeg» but the path has «C:\…\ffmpeg\bin», won’t that cause an error?

Nicole Levine is a Technology Writer and Editor for wikiHow. She has more than 20 years of experience creating technical documentation and leading support teams at major web hosting and software companies. Nicole also holds an MFA in Creative Writing from Portland State University and teaches composition, fiction-writing, and zine-making at various institutions.
wikiHow Technology Writer
Expert Answer
Windows directory names are not case-sensitive. Don’t worry, it’ll definitely work!
-
Question
How can I get WSL (Ubuntu) to recognize this if I’ve installed it? Works with Powershell. (Using Windows Terminal)
Nicole Levine is a Technology Writer and Editor for wikiHow. She has more than 20 years of experience creating technical documentation and leading support teams at major web hosting and software companies. Nicole also holds an MFA in Creative Writing from Portland State University and teaches composition, fiction-writing, and zine-making at various institutions.
wikiHow Technology Writer
Expert Answer
If you’re using Ubuntu via WSL, you have a couple of options. If you want to run the FFmpeg binary, you can cd into /mnt/c/FFmpeg/bin (replace «c» if you put the FFmpeg folder on a different drive letter) and run the command ./ffmpeg.exe (add whichever flags you need), or skip the Windows stuff and just install the FFmpeg package in an Ubuntu terminal with «sudo apt install ffmpeg.»
-
Question
I clicked the following buttons, ffmpeg.exe, ffplay.exe and ffprobe.exe, they turned up for a glance then disappeared. What’s happened? Thank you.
Nicole Levine is a Technology Writer and Editor for wikiHow. She has more than 20 years of experience creating technical documentation and leading support teams at major web hosting and software companies. Nicole also holds an MFA in Creative Writing from Portland State University and teaches composition, fiction-writing, and zine-making at various institutions.
wikiHow Technology Writer
Expert Answer
These applications can only be run from the command line. If you try to double-click them in File Explorer, you’ll experience the behavior you’ve witnessed. Instead, open Command Prompt, then run the «ffmpeg» command to view all possible command line options.

See more answers
Ask a Question
200 characters left
Include your email address to get a message when this question is answered.
Submit
Advertisement
-
FFmpeg is a command line-only program, meaning you can only use it in Command Prompt. This may prove difficult for users who aren’t familiar with Command Prompt.
-
You must have an administrator account to install FFmpeg.
Thanks for submitting a tip for review!
Advertisement
About This Article
Article SummaryX
1. Download FFmpeg from https://www.gyan.dev/ffmpeg/builds/ffmpeg-git-full.7z.
2. Extract the file.
3. Rename the extracted folder to «FFmpeg.»
4. Move the «FFmpeg» folder to the root of your hard drive.
5. Right-click the Start menu and select Command prompt (Admin).
6. Run this command: setx /m PATH «C:\FFmpeg\bin;%PATH%»
Did this summary help you?
Thanks to all authors for creating a page that has been read 1,603,798 times.
Is this article up to date?
The ffmpeg is a cross-platform & open-source software utility to record, convert and stream video/audio files. It can be used to:
- Change the format of a video/audio file
- Extract audio from video file
- Merge audio and video streams
- Change the bitrate of a video/audio file
- Create GIF from a video file
- Extract still images from a video file
- To embed subtitles into a video file
- To compress or resize a video/audio file
- Record a live stream
In this article, we will show you how to install ffmpeg in Windows.
Installing FFmpeg on windows:
Follow the below steps to install FFmpeg on windows:
Step 1: Click here to download the zip file of the latest version. (As of September 2021, version 4.4 is the latest)

Step 2: Unzip this file by using any file archiver such as Winrar or 7z.
Step 3: Rename the extracted folder to ffmpeg and move it into the root of C: drive.
Step 4: Now, run cmd as an administrator and set the environment path variable for ffmpeg by running the following command:
setx /m PATH "C:\ffmpeg\bin;%PATH%"
Step 5: Restart your computer and verify the installation by running:
ffmpeg -version
Last Updated :
20 Jun, 2023
Like Article
Save Article
FFmpeg is a free and open-source command-line tool for transcoding multimedia files. It supports a wide variety of codecs and file formats, including AVI, MP4, FLV, MKV, WMV, and more.
With it you can convert video and audio files, edit them in various ways such as cutting or cropping videos, as well as encode and decode them. You can also use it to record your screen or webcam, or to create time-lapse videos, and much more.
It’s used by a lot of popular applications, such as VLC media player, HandBrake, and Adobe Premiere Pro, and many others.
Table of Contents
- Installing FFmpeg on Windows
- Download FFmpeg
- Extract & Move FFmpeg
- Add FFmpeg to PATH
- Check if FFmpeg is Installed on Windows
- Conclusion
Installing FFmpeg on Windows
To install FFmpeg on Windows is very easy, it’s just different than the usual install process.
All we have to do is download the FFmpeg software which is bundled in an archive, place it somewhere we’d keep software/utilities, such as in the C: drive, and add its location to the PATH environment variable.
The PATH environment variable is a list of directories that Windows will look in for executable files (EXE, DLL, BAT). This allows you to run programs from any directory without having to type the full path to the program. We want this so we can easily use ffmpeg from the command-line.
Download FFmpeg
To download FFmpeg:
- Go to https://ffmpeg.org/download.html
- Hover over the Windows logo in the bottom left of the screen.
- Underneath it you’ll see two links appear. Click on Windows builds from gyan.dev
- On that page click on ffmpeg-git-full.7z. It’s a link that will download the archive in 7zip format. If you can’t extract it make sure to download and install 7zip on your system.
Now extract the archive and rename it to something simple, like ffmpeg.
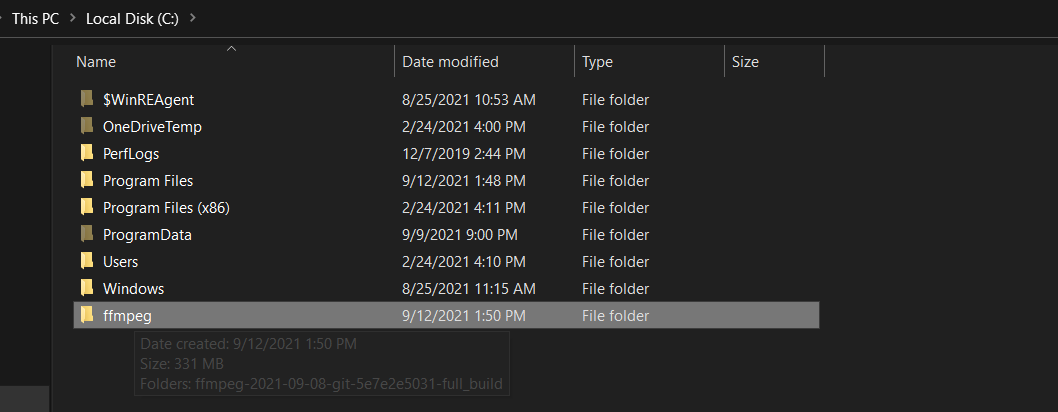
Next we’ll move the archive somewhere in the C: drive. I’ll move it right in C:. So the path will be C:\ffmpeg in my case.
This is my C: drive with ffmpeg in it:

Next we want to add the path to the directory containing ffmpeg.exe (and a few other executables) to our PATH environment variable. That directory is ffmpeg\bin.
You can see for yourself if you go inside ffmpeg\bin:

Add FFmpeg to PATH
Like we said before the PATH is the system variable that your operating system uses to locate needed executables from the command-line.
You can do this in multiple ways, such as by using the command-line or using the Windows graphical interface.
The command-line method is faster and we’ll do it this way.
Add FFmpeg to PATH Using the Command-Line
To do this just open a command promp (cmd) as an Administrator and run:
setx /m PATH "C:\ffmpeg\bin;%PATH%"
You can change C:\ffmpeg\bin with something else, if you have placed ffmpeg elsewhere.
Here’s how it looks like when you run the command in the Command Prompt:

That’s it. If everything went well, we should be able to use ffmpeg from the command-line.
Check if FFmpeg is Installed on Windows
To check if ffmpeg is installed on Windows just run ffmpeg in the command line and it should output some information about our version of ffmpeg, such as available codecs, ffmpeg version, and some other things.

Well done. FFmpeg should now be installed on your Windows system and you can start using it to convert or encode your video and audio files.
Conclusion
In this tutorial we covered how to install FFmpeg on Windows. Hopefully it worked for you. If it didn’t feel free to leave us a comment and we’ll get back to you as soon as we can.
FFmpeg is a complete, cross-platform solution to record, convert and stream audio and video. You can use it to decode, encode, transcode, mux, demux, stream, filter, and play media files in any format. As it runs in a wide variety of build environments and machine architectures including Mac, Windows, and Linux, it is highly portable.
Whether you’re looking to convert, play and analyze media files or add these functionalities to your application, you can use FFmpeg to do both. It contains multiple tools and libraries that serve these purposes, such as libavcodec, libavutil, libavformat, libavfilter, libavdevice, libswscale, and libswresample. When you download the FFmpeg packages/executable files to your machine, these libraries will be downloaded automatically too.
In this article, we’ll show you how to download and install FFmpeg on your machine, whether it’s running on macOS, Windows, or Ubuntu/Linux.
Installing FFmpeg on Mac
Option 1: Use a Package Manager (Homebrew)
The easiest way to install FFmpeg on your Mac is by using a package manager like Homebrew. Homebrew is a free and open-source package manager that simplifies the installation of software on macOS and Linux. Using Homebrew, FFmpeg can be installed on your Mac with just a single command.
Install Homebrew on your Mac and then run the command below in the terminal to install the latest version of FFmpeg:
You can also download a specific version of FFmpeg. To do so, specify the FFmpeg version in the command, following ffmpeg@. For example, the command below will install version 5 of FFmpeg instead of the latest one:
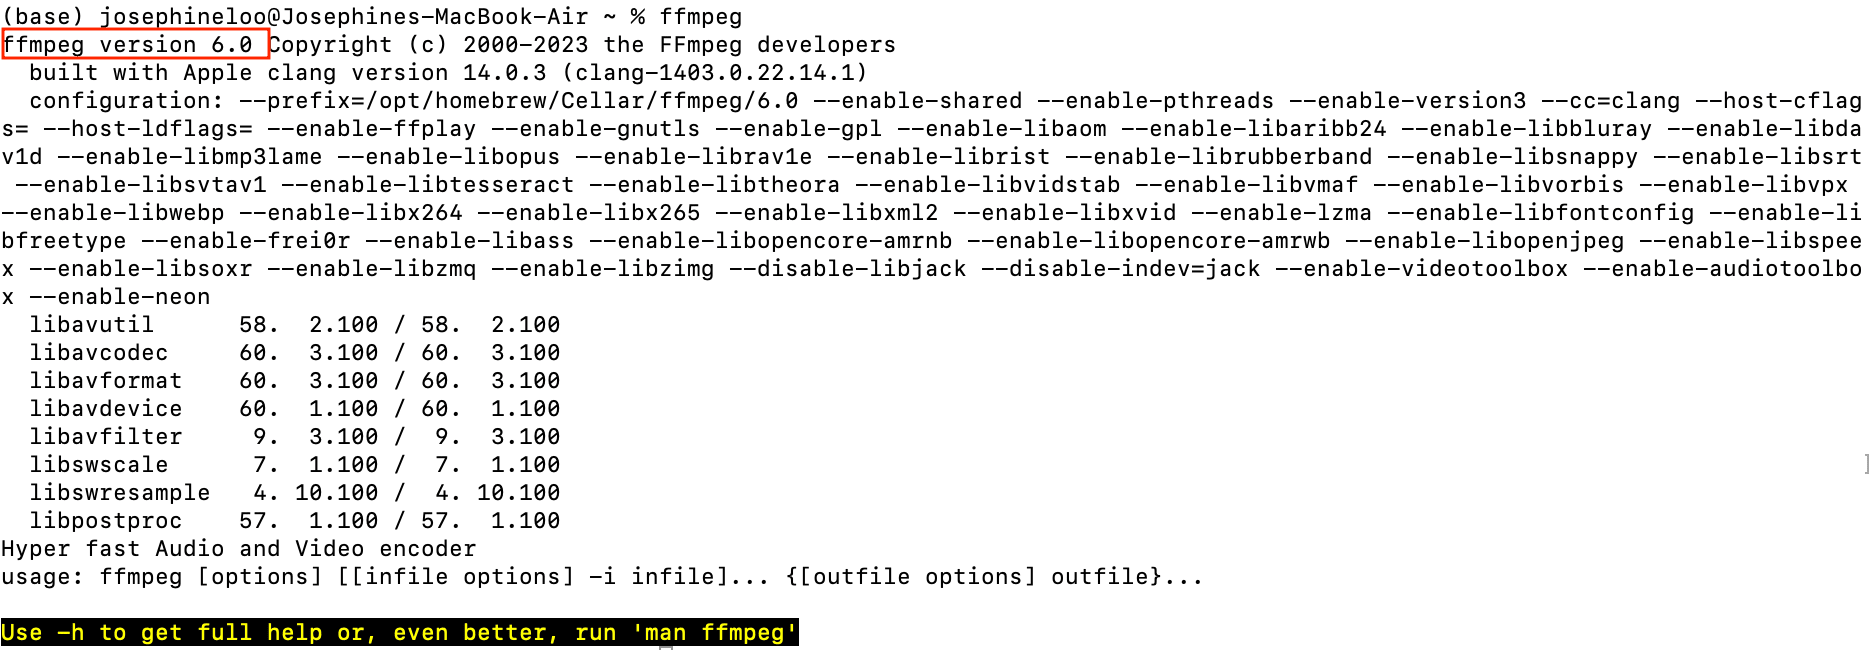
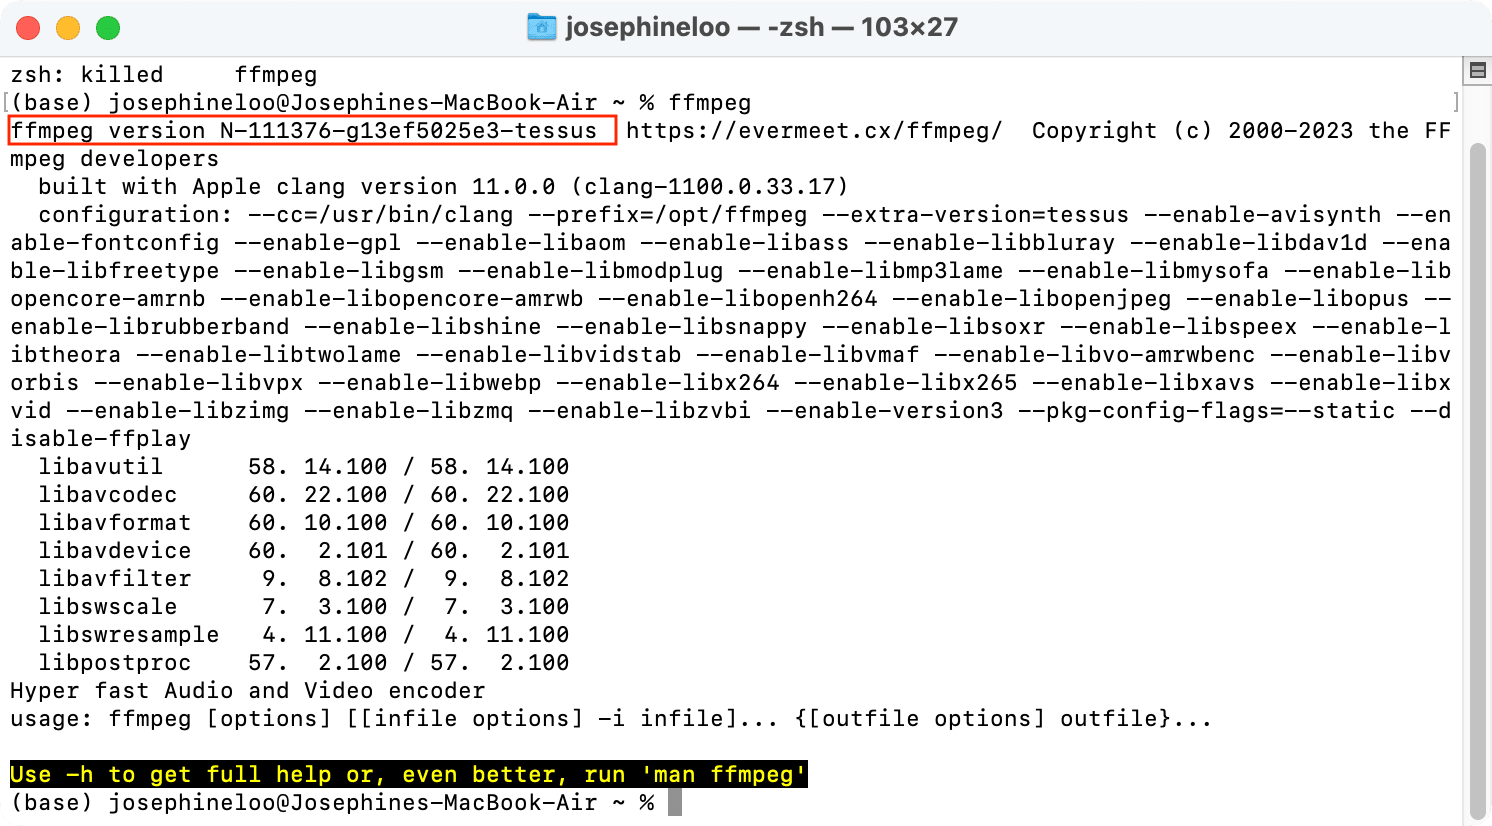
After the installation has been completed, verify it by running ffmpeg in the terminal:
If the output shows you information about the FFmpeg installed including its version, FFmpeg has been installed successfully on your Mac and your can start using it to manipulate media files!
Option 2: Download from the Official Website
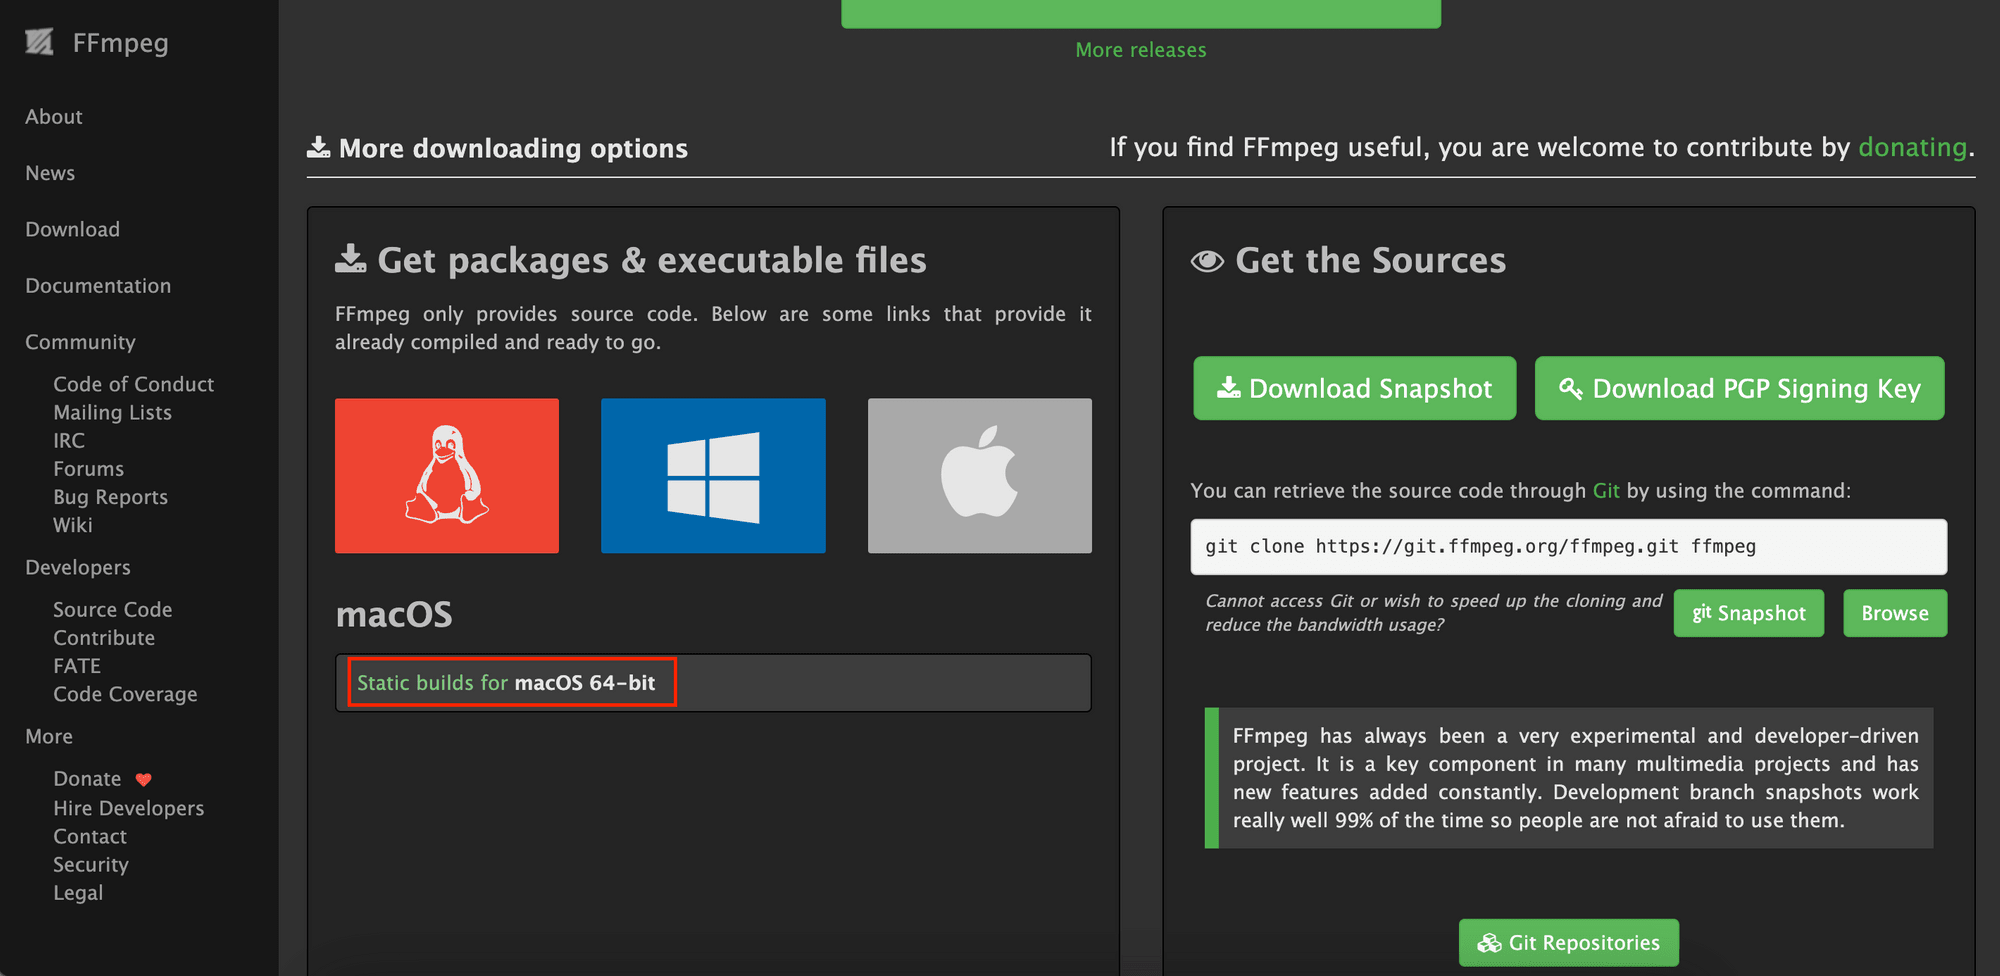
In general, using a package manager like Homebrew is recommended for most users, as it provides a convenient and hassle-free way to install and manage FFmpeg. However, if you have specific needs or prefer more control over the installation process, downloading from the official website may be a better option. The FFmpeg packages and executable files are available for download on the official website and you can select the specific version that you want.
Go to the FFmpeg website’s Download page and click on “Static builds for macOS 64-bit”.
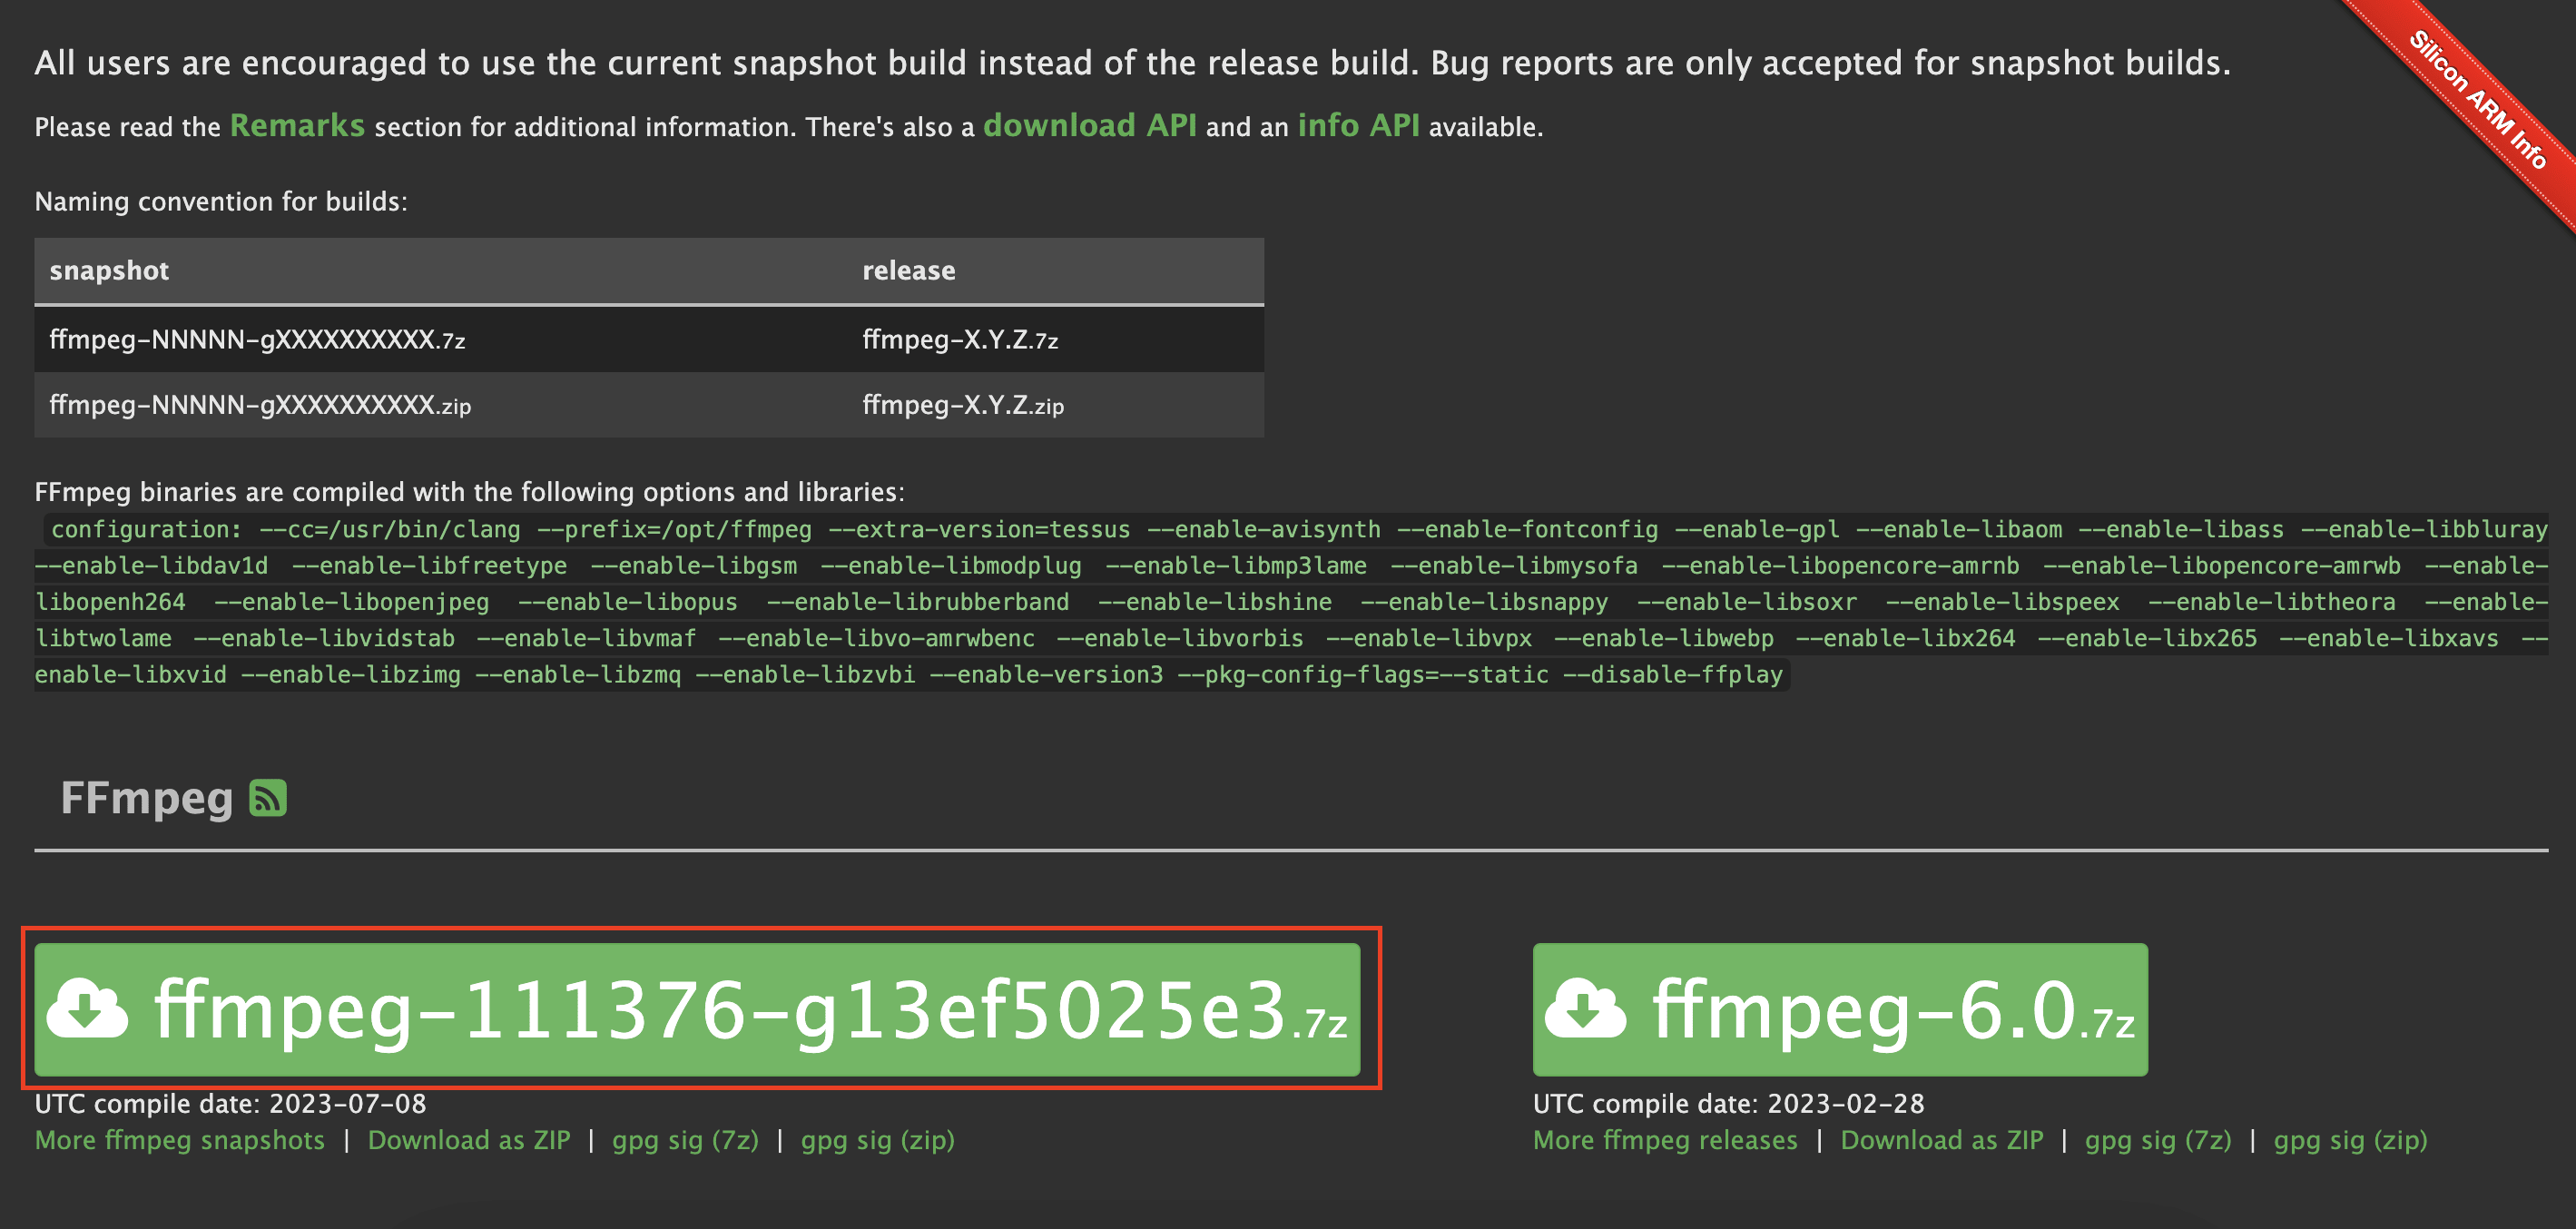
You’ll see the current snapshot and release builds. From the official remark, it’s encouraged to use the current snapshot build as they will only accept bug reports for snapshot builds. Click on the current snapshot build on the left. The build file in .7z format will be downloaded.
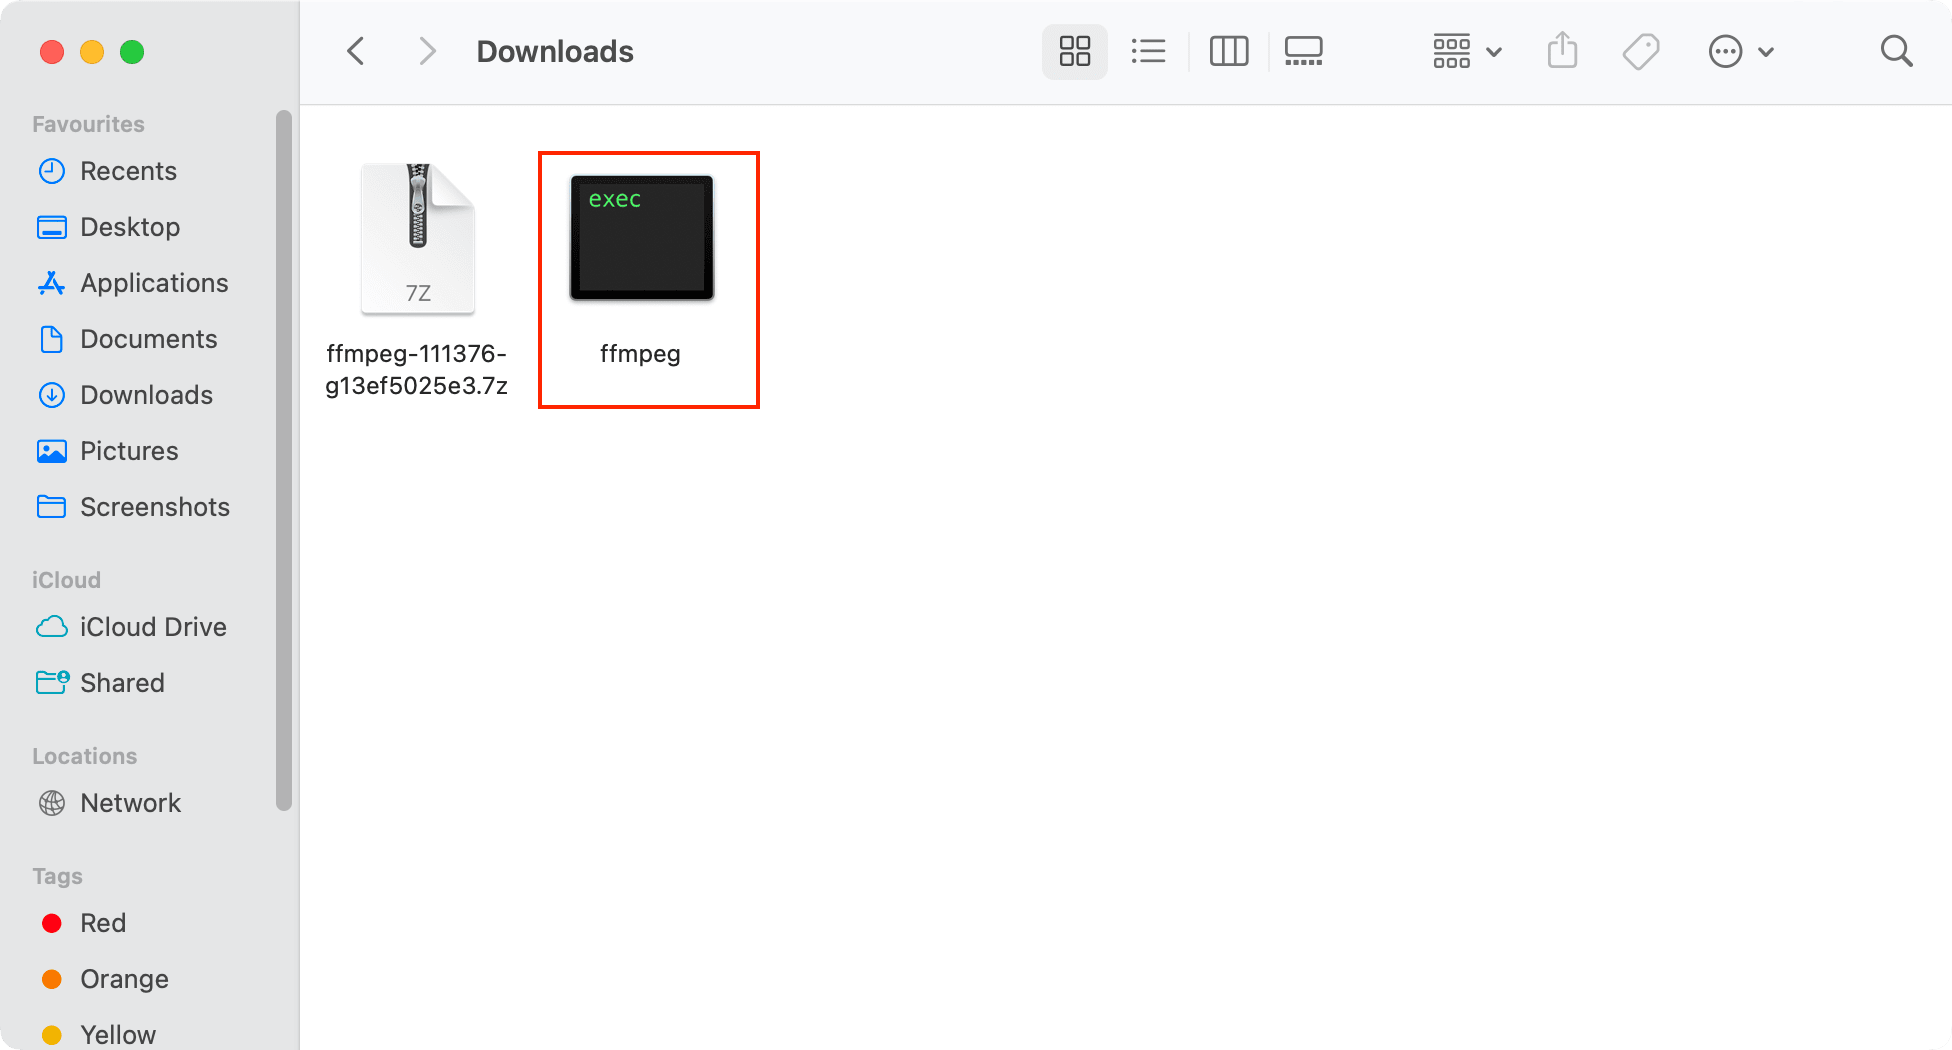
Once the download has been completed, open the .7z file and extract the executable file from it. You can also move the executable file to a location of your choice (eg. /usr/local/bin ).
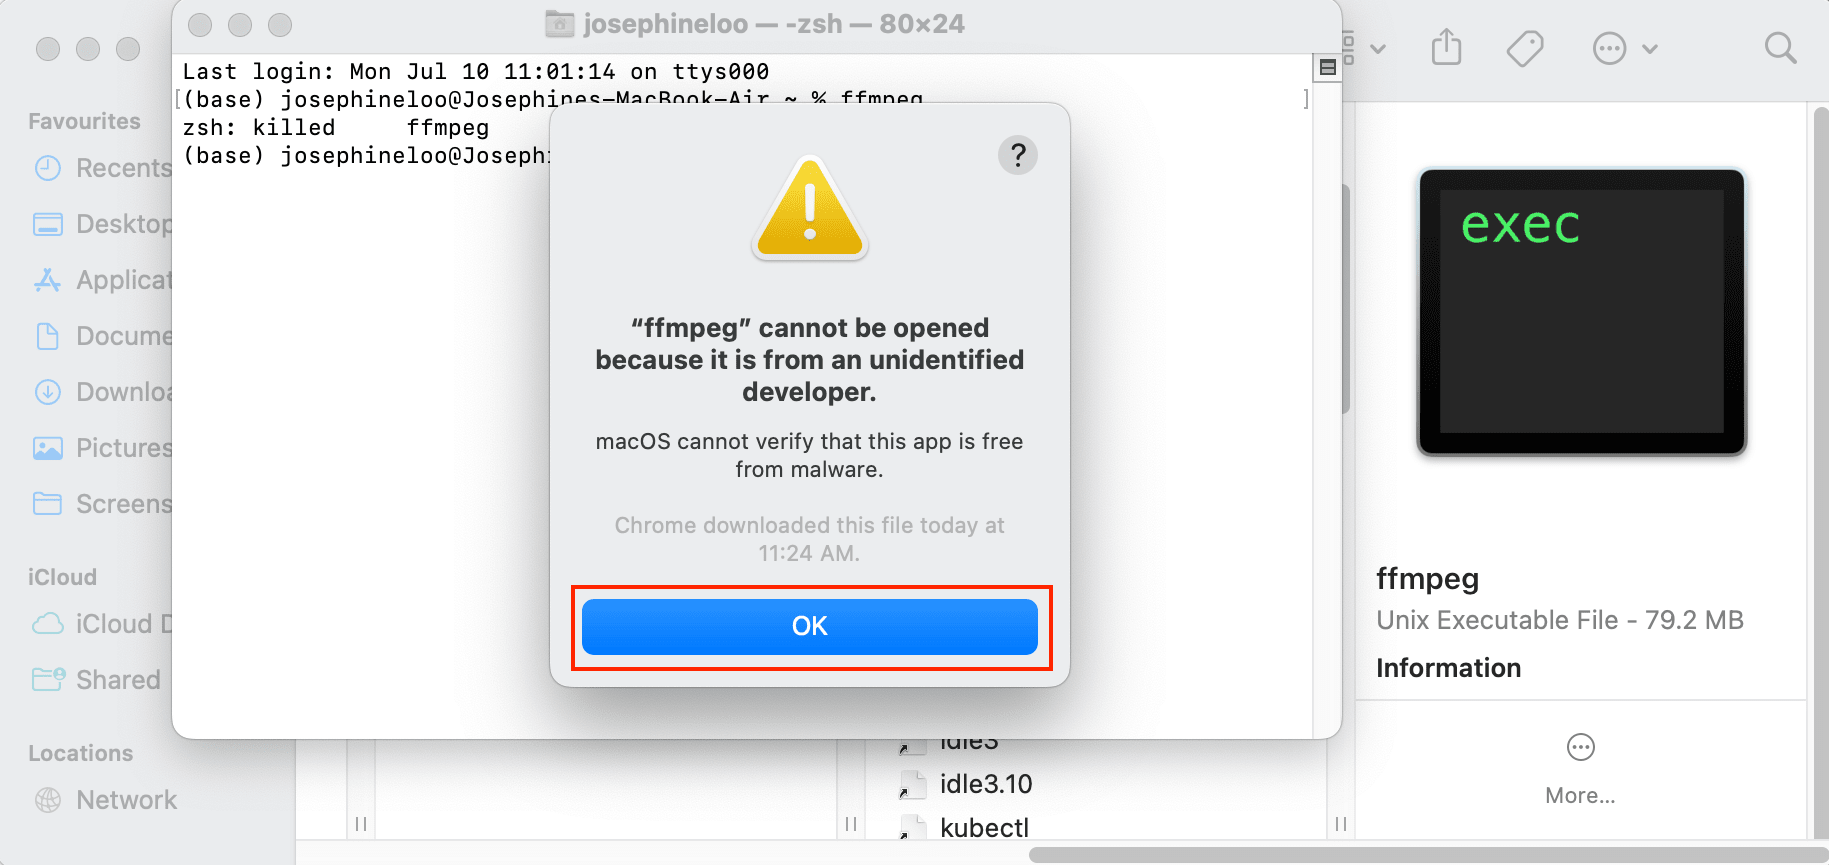
Double-click the executable file to start the installation. You might get a pop-up that warns you that the file cannot be opened because it is from an unidentified developer. If that happens, click “OK” to continue.
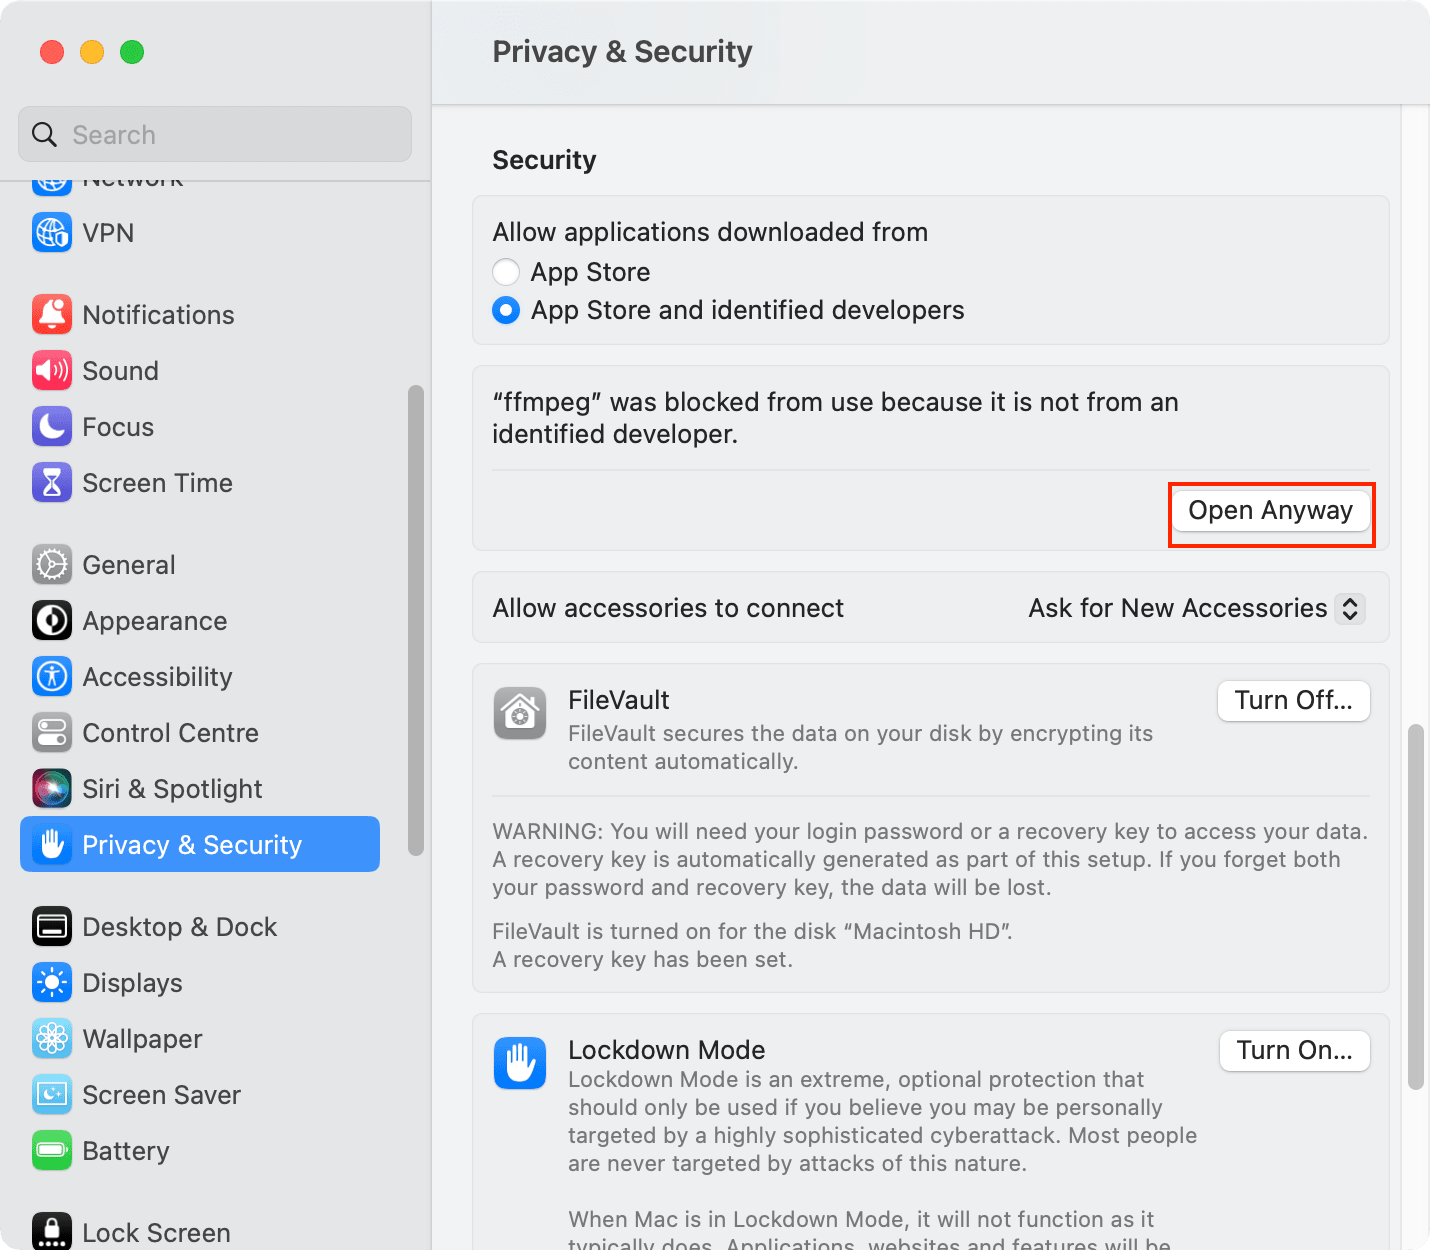
To continue with the installation, we need to modify the security setting. Go to “Privacy & Security” in your System Settings and click “Open Anyway” to allow the installation.
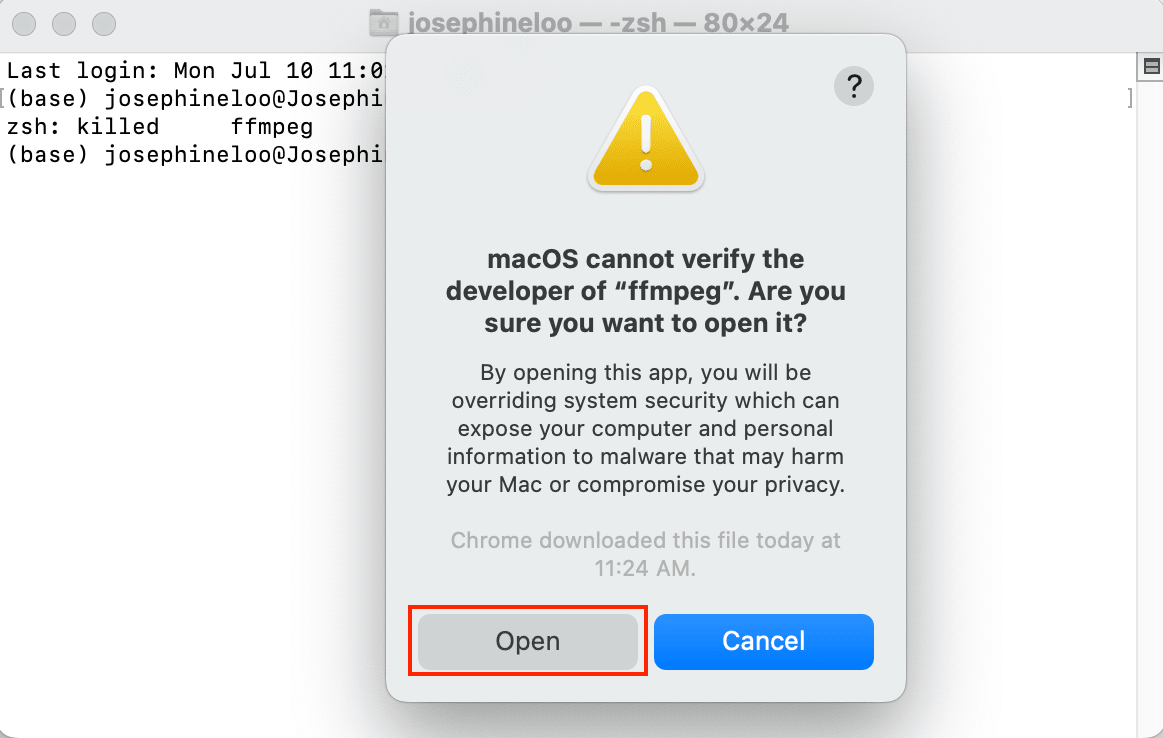
If another pop-up warns you about the action, click “Open” to continue.
Double-click on the executable file again. Now, it should open up a new terminal and start the installation.
Once the process has been completed, you can verify the installation by running ffmpeg in the terminal and see its information including the version installed in the output:
Installing FFmpeg on Windows
Go to the FFmpeg website’s Download page and click on “Windows builds from gyan.dev”.
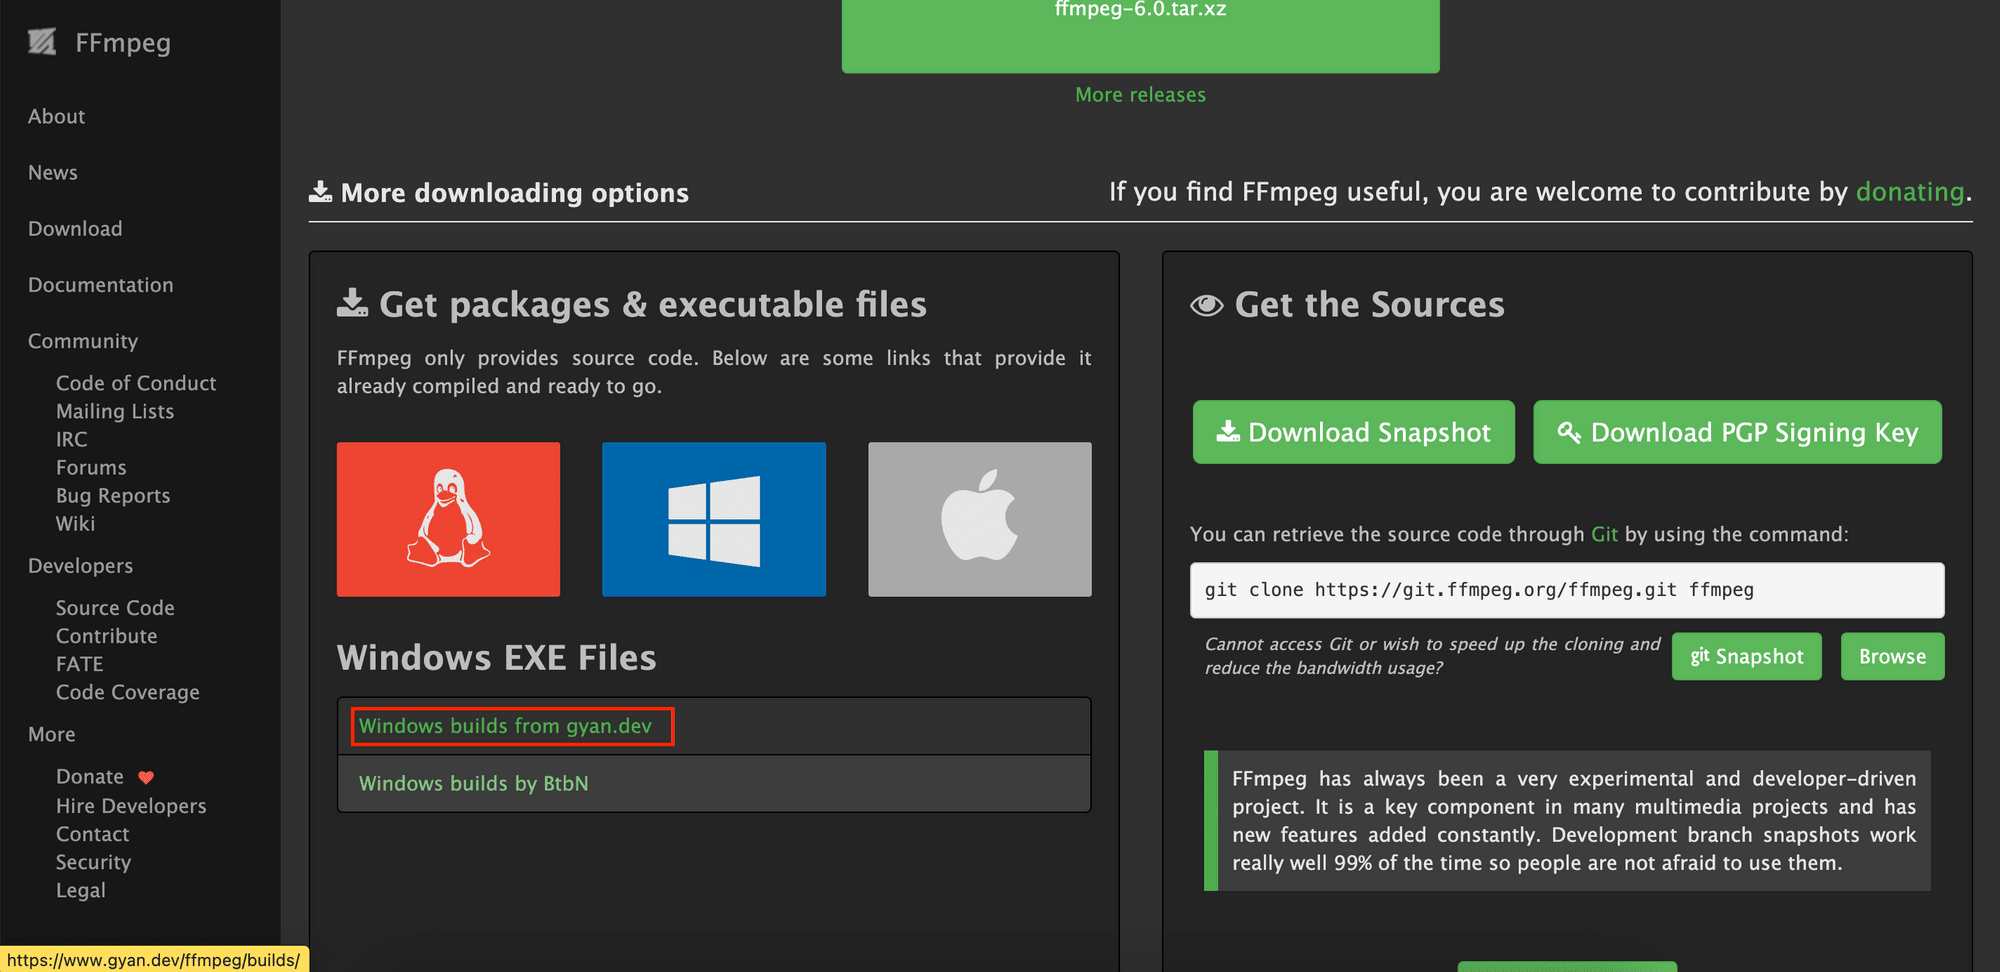
You’ll see a list of available builds on the new page. Choose the desired version and click on one of the .7z files to download it.
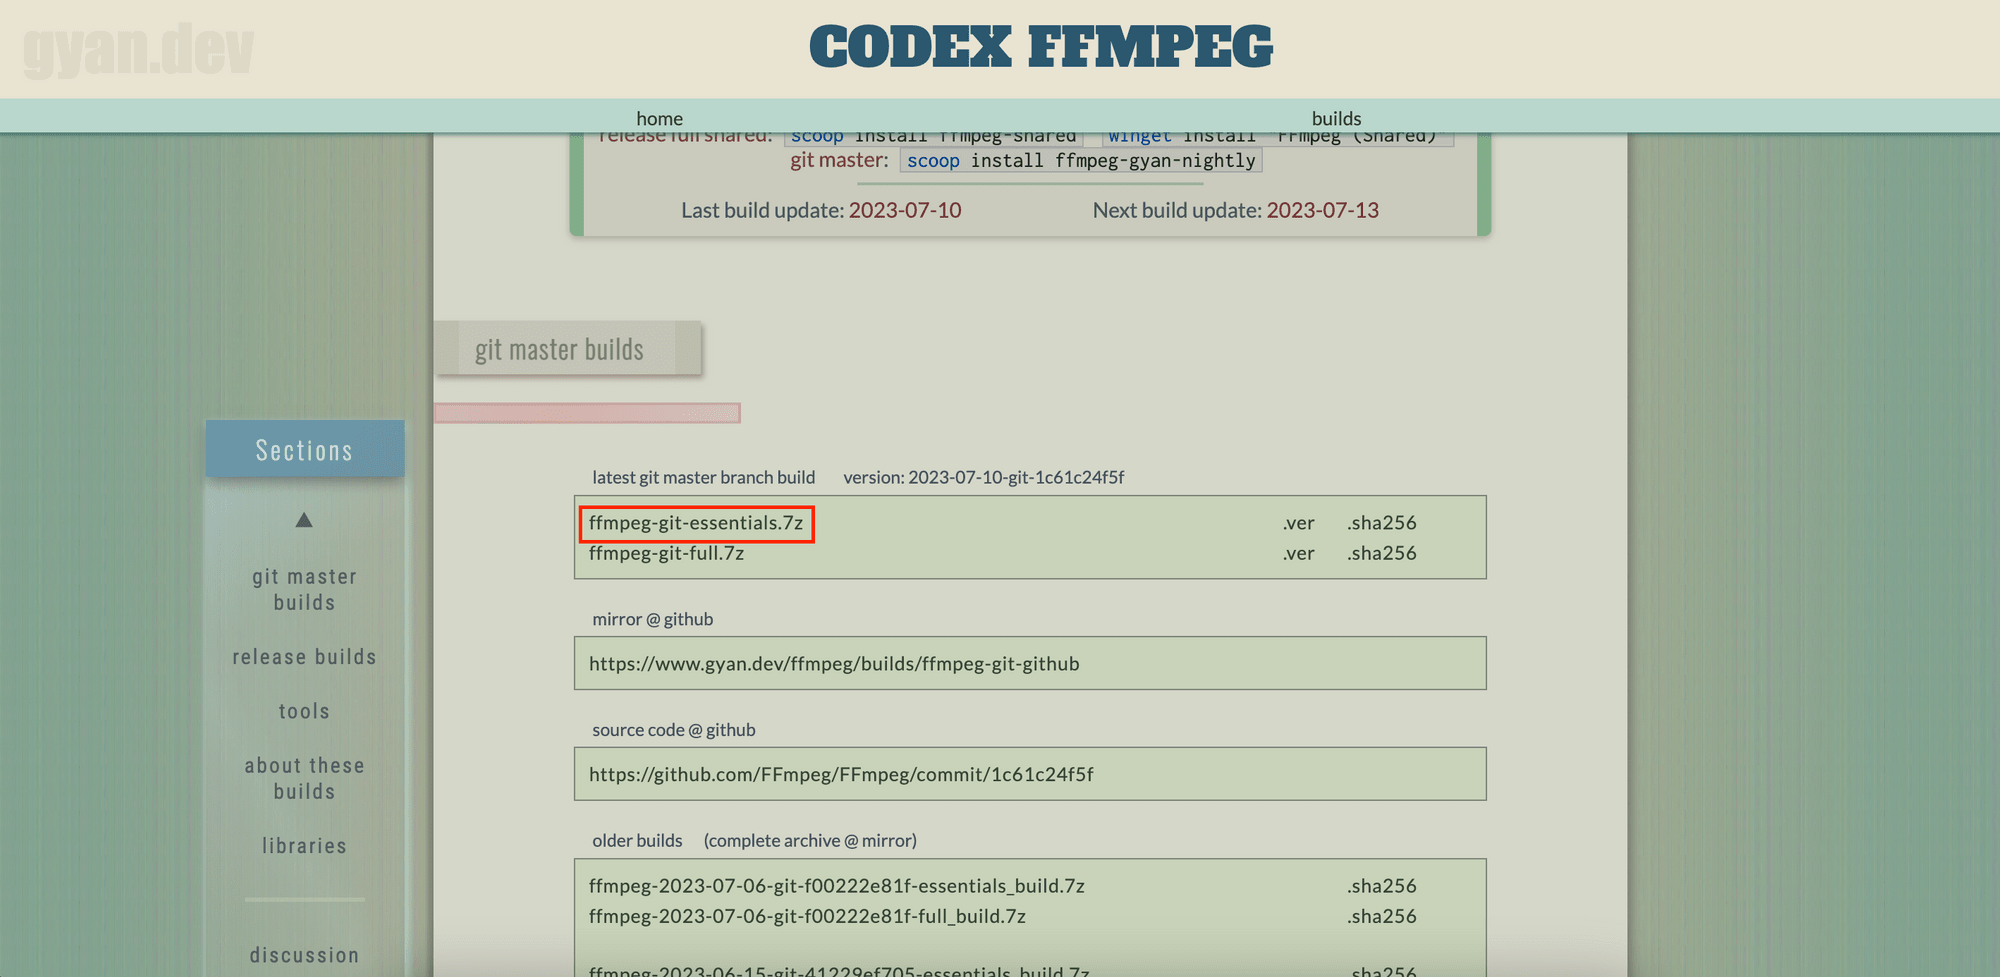
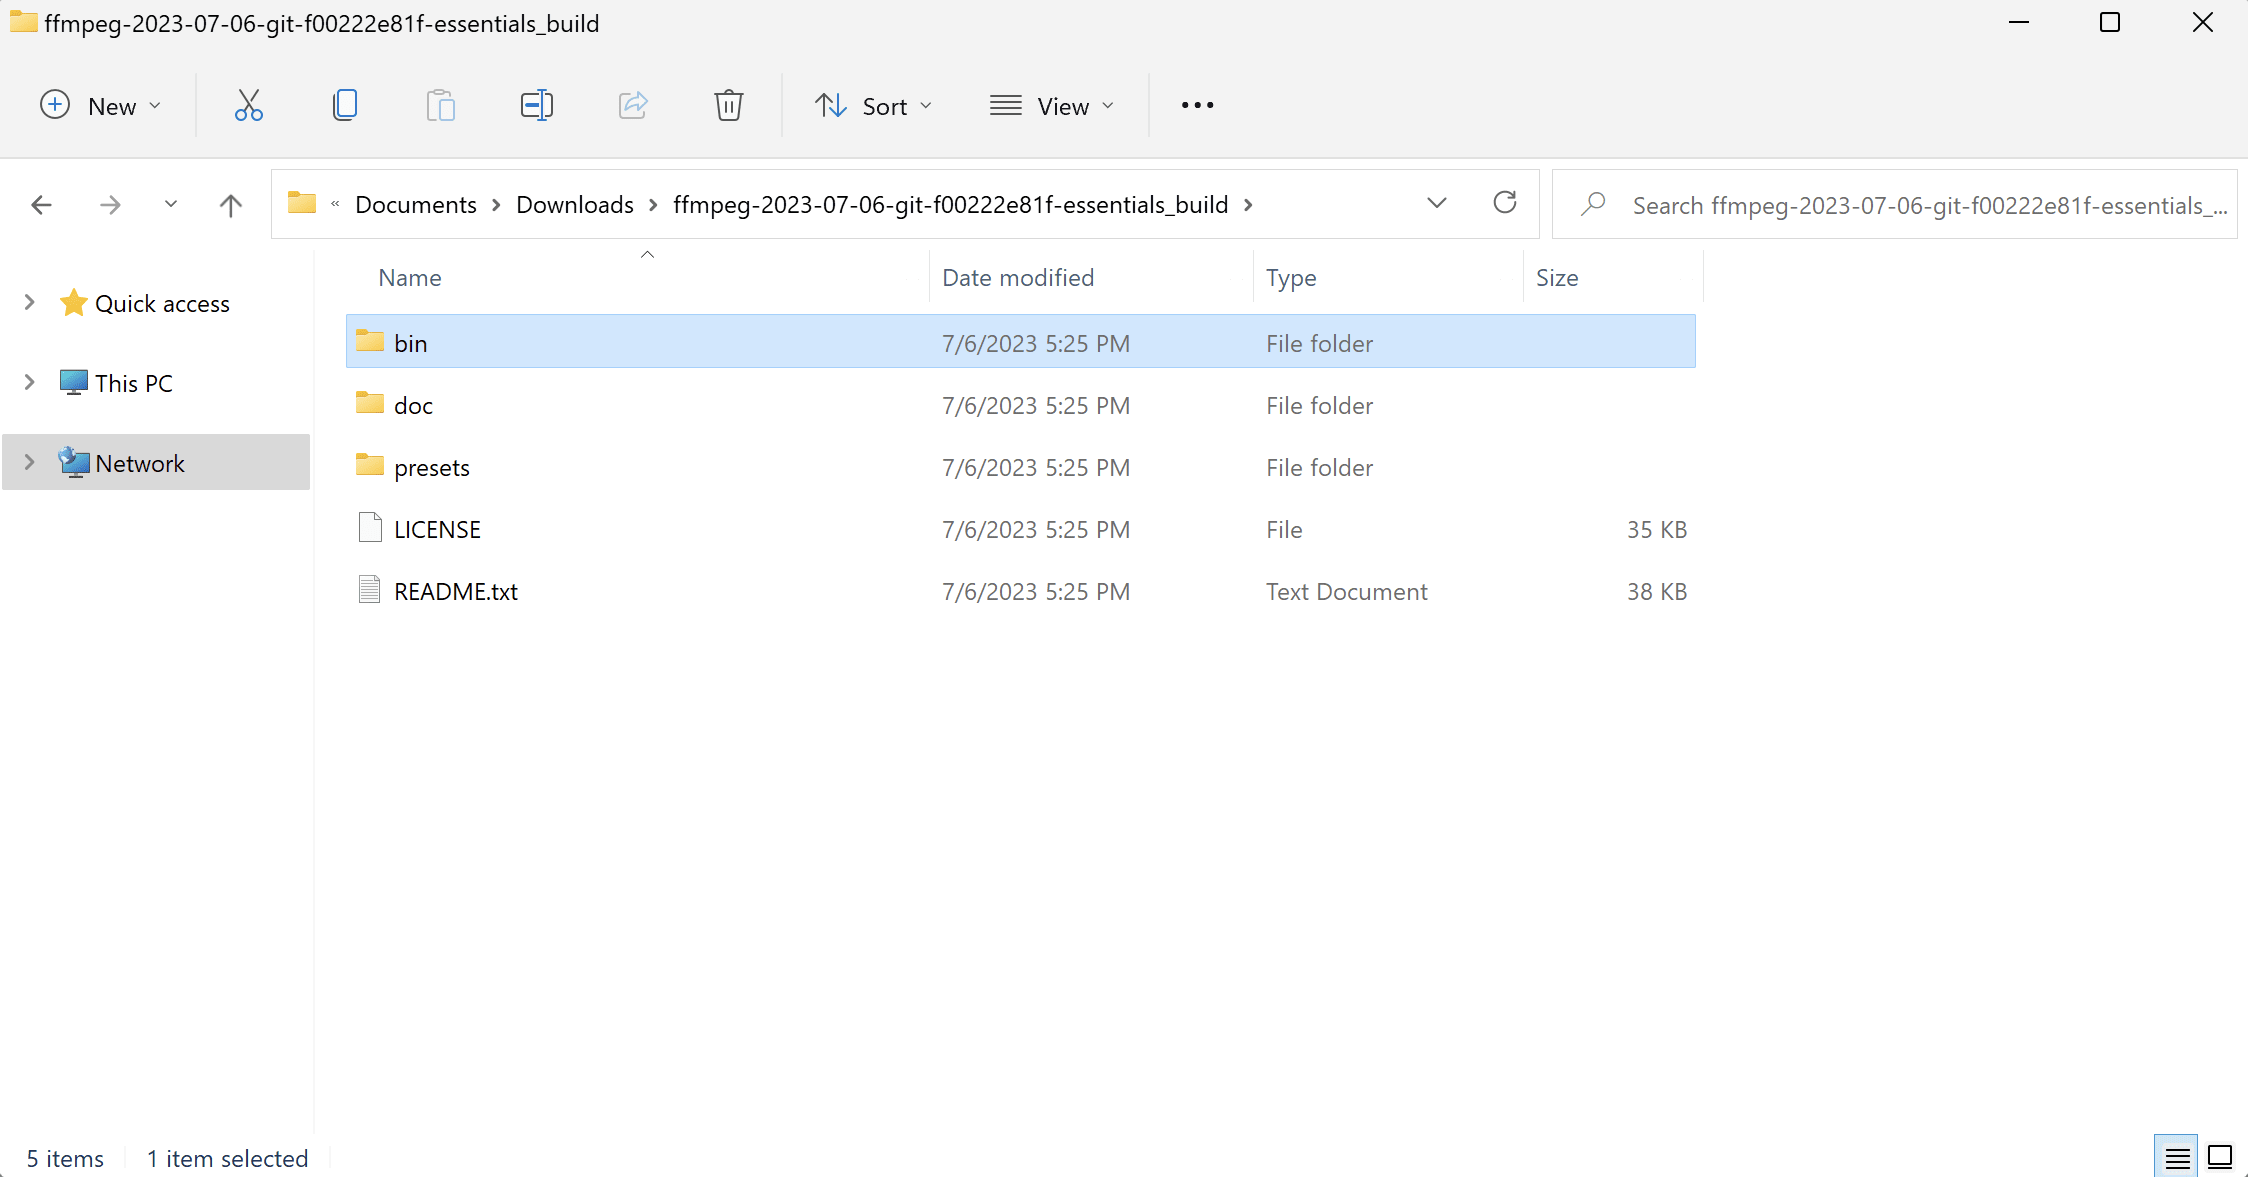
Once the download has been completed, extract the content from the .7z file. It should be a folder with the same name.
In the extracted folder, locate the bin folder and copy its directory. The executable files are stored in this folder and we need to add its directory to the PATH environment variable to install and use FFmpeg.
Open up “System Properties” and under the “Advanced” tab, click on the “Environment Variables” button.
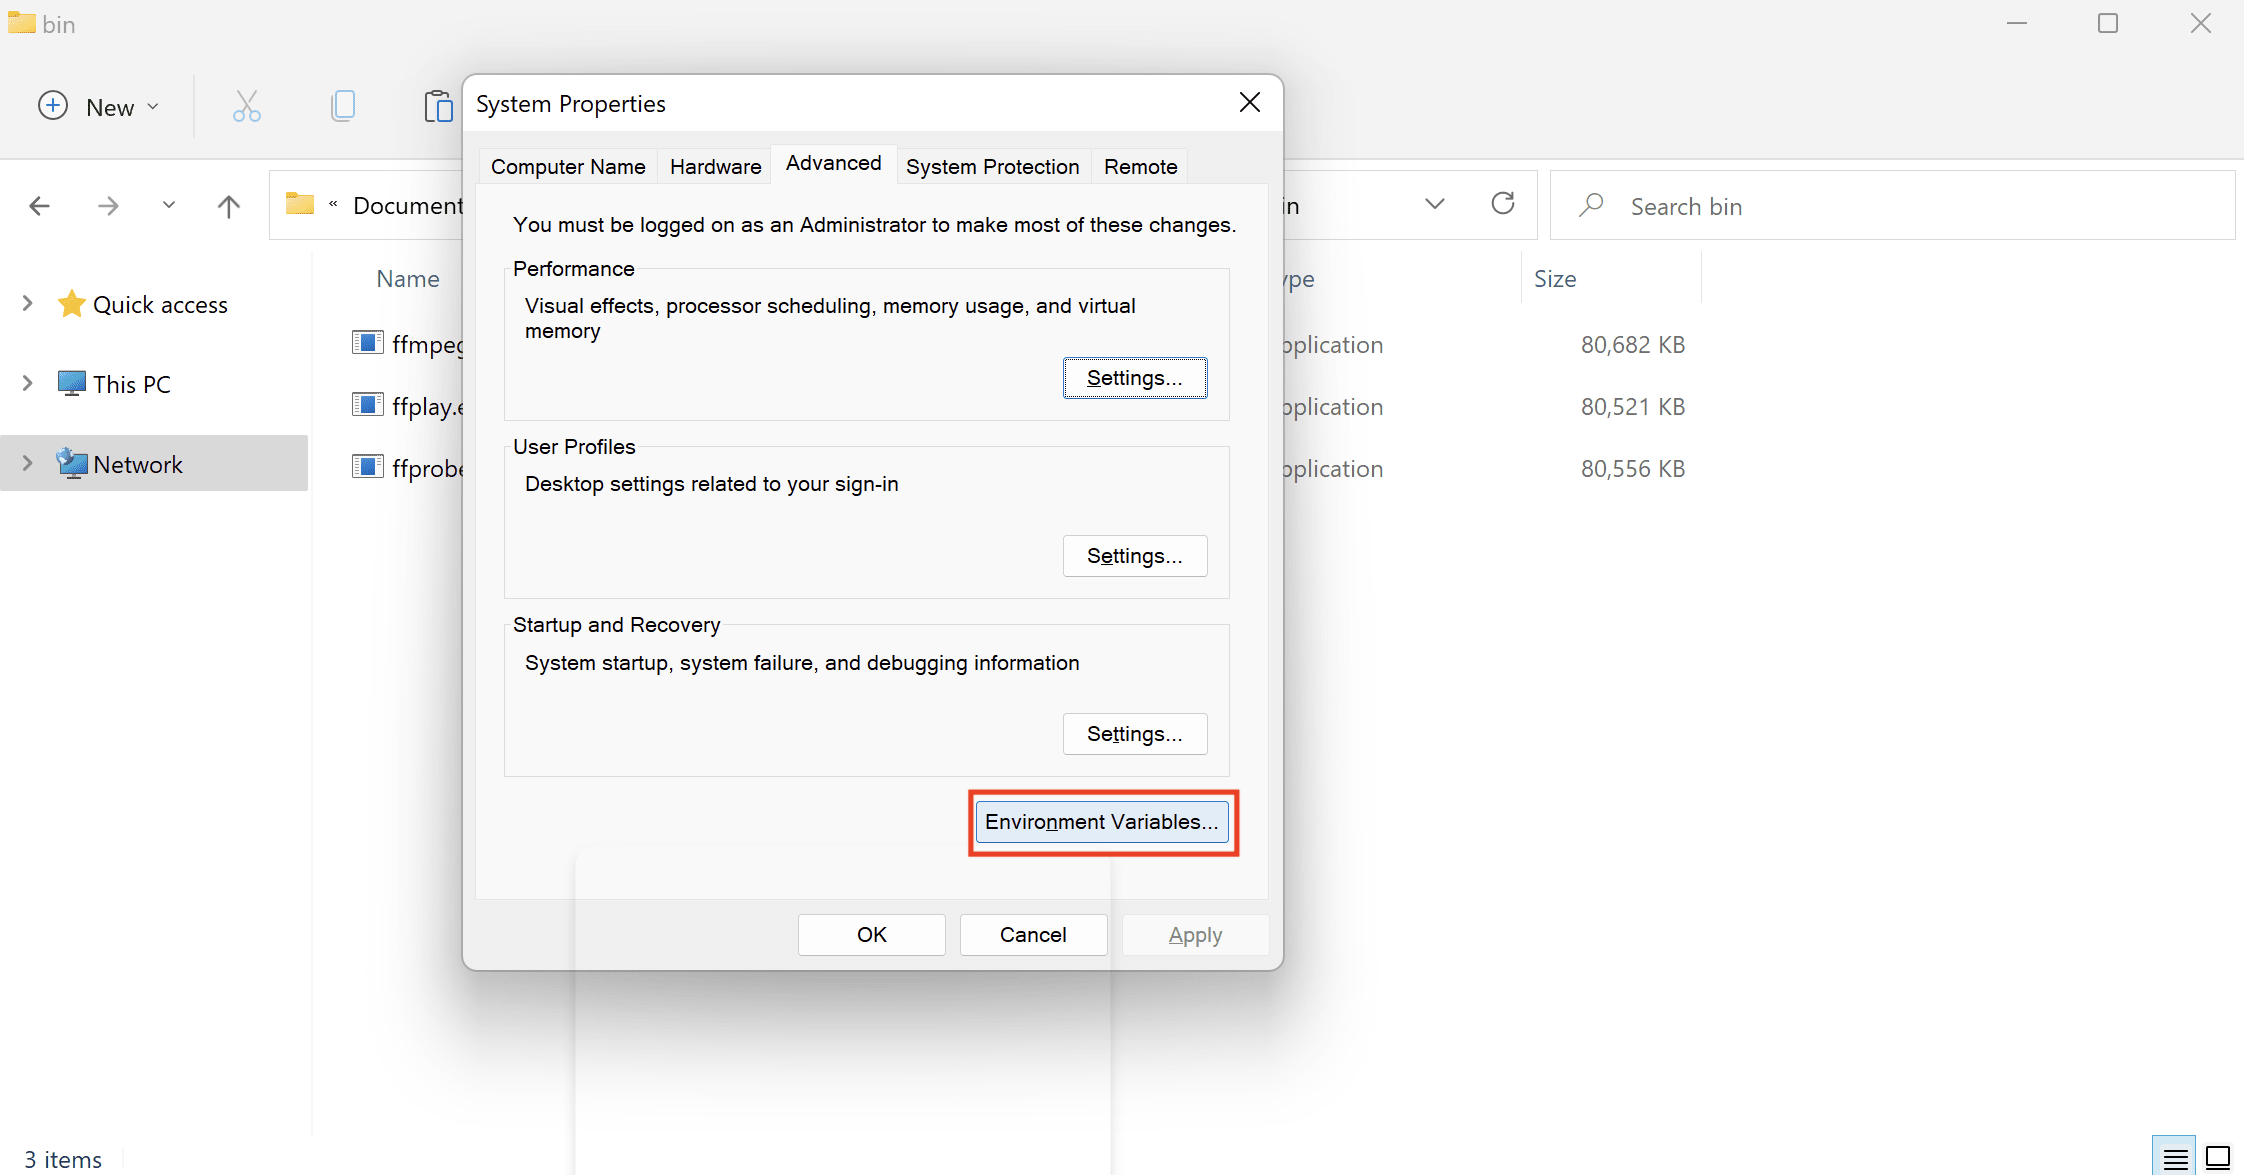
In the “Environment Variables” window, find the “Path” variable in the “System variables” section. Select it and click on the “Edit” button.
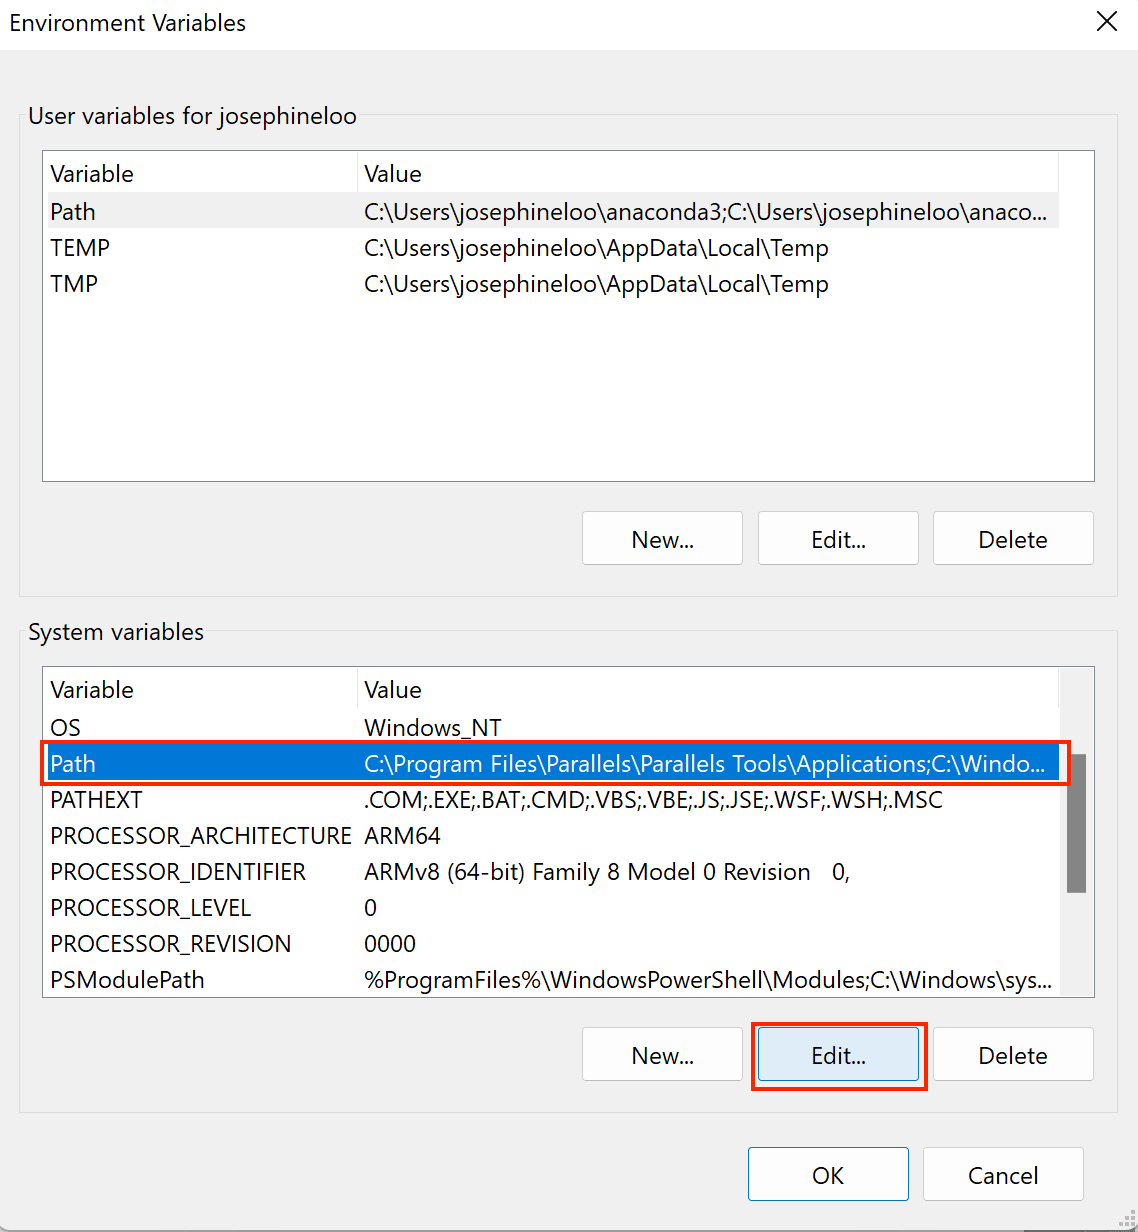
In the “Edit Environment Variable” window, click the “New” button and paste the path to the bin directory. Then, click “OK” to save the changes.
FFmpeg is now installed on your Windows system. You can verify it by opening a Command Prompt window and running ffmpeg. You should see its version and other information:
Installing FFmpeg on Ubuntu/Linux
Installing FFmpeg on Ubuntu is really easy as you can use the default Advanced Package Tool (apt) to install it from the official repository.
Open a terminal on your Ubuntu system and update the package manager’s repository by running the command below:
After the update has been completed, run the command below to install FFmpeg:
The latest of FFmpeg will be installed on your Ubuntu system. You can verify the installation by running ffmpeg in the terminal to check:

What’s Next
After installing FFmpeg successfully on your machine, you can start using it to manipulate media files—make GIFs from images, add watermarks to videos, add subtitles to videos, and more.
However, this is a general guide that shows you how to install FFmpeg on your machine and you could still run into errors that are specific to your system. If that’s the case and you would like to explore other options that don’t require installation, try using a cloud-hosted tool like Bannerbear. It helps you generate custom images, videos, and more using API and these articles should give you an idea of how it works:
- How to Make a T-Shirt/Merchandise Mockup Generator Using Bannerbear in Node.js
- How to Start Generating Images Dynamically in PHP with Bannerbear
- How to Build a Video Thumbnail Generator Tool Using React and Bannerbear
- How to Add Auto-Generated Custom Open Graph Images to WordPress Using Bannerbear