Table of Contents
Краткая выдержка команд для установки Docker.
Необходимые условия
У вас должен быть установлен wsl, командой
проверьте существование WSL. На скриншоте с wsl все ок.

Если у вас нет WSL,
следуйте инструкции по ссылке
и возвращайтесь.
Скачивание и установка Docker
Все действия выполнялись на Windows 11 (сборка 22000.376) и Docker 4.3.2
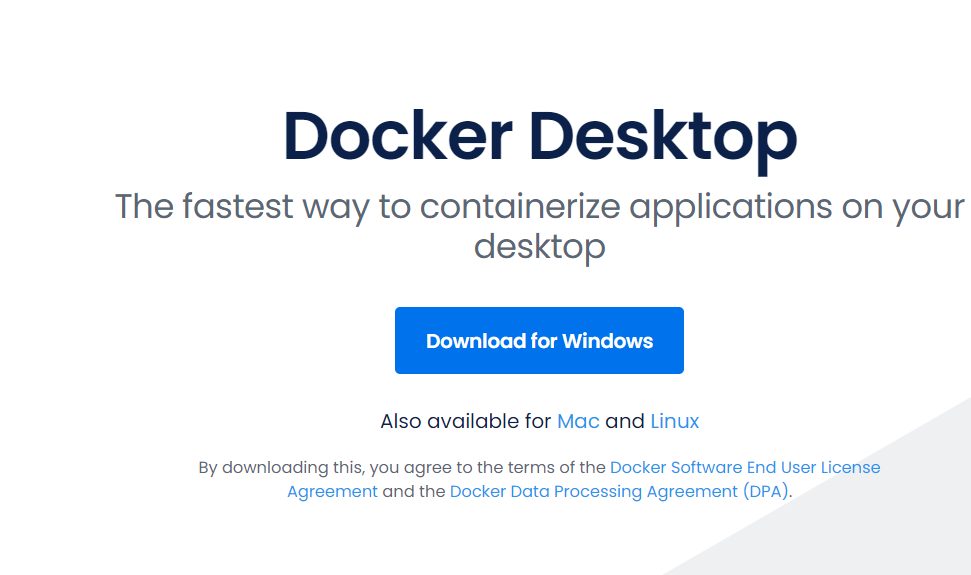
- Скачайте Windows установку с официального сайта.
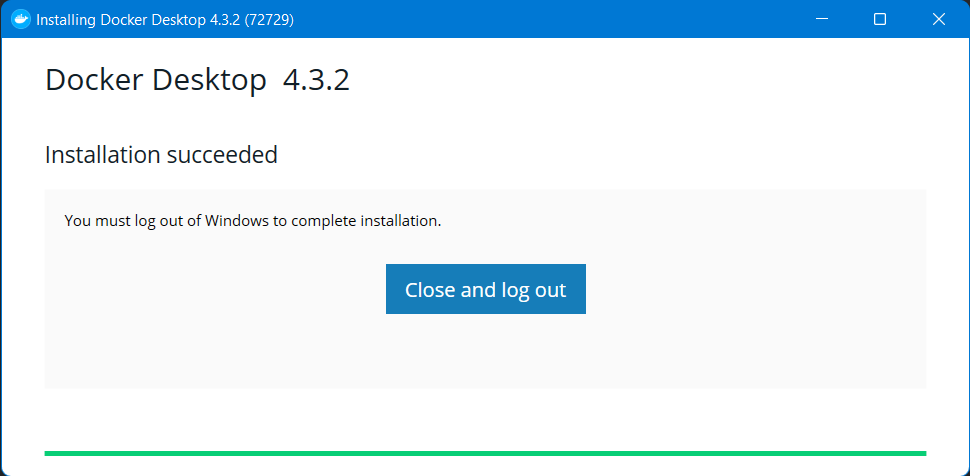
- Запустите установку и просто прожимайте Далее. По окончанию, перезагрузитесь или выполните Выход (Log out).
- Сразу при входе или первом запуске Docker, вам предложат принять соглашение.
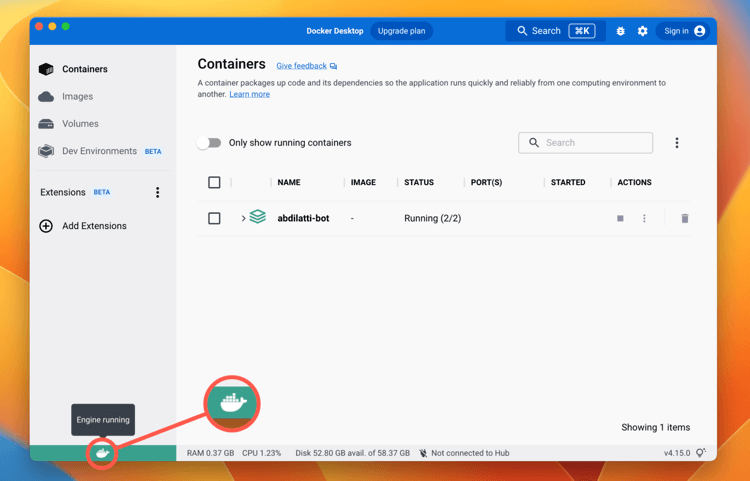
- Далее будет запуск необходимых служб. Открывайте Docker Dashboard, ярлык на рабочем столе или в трее иконка.
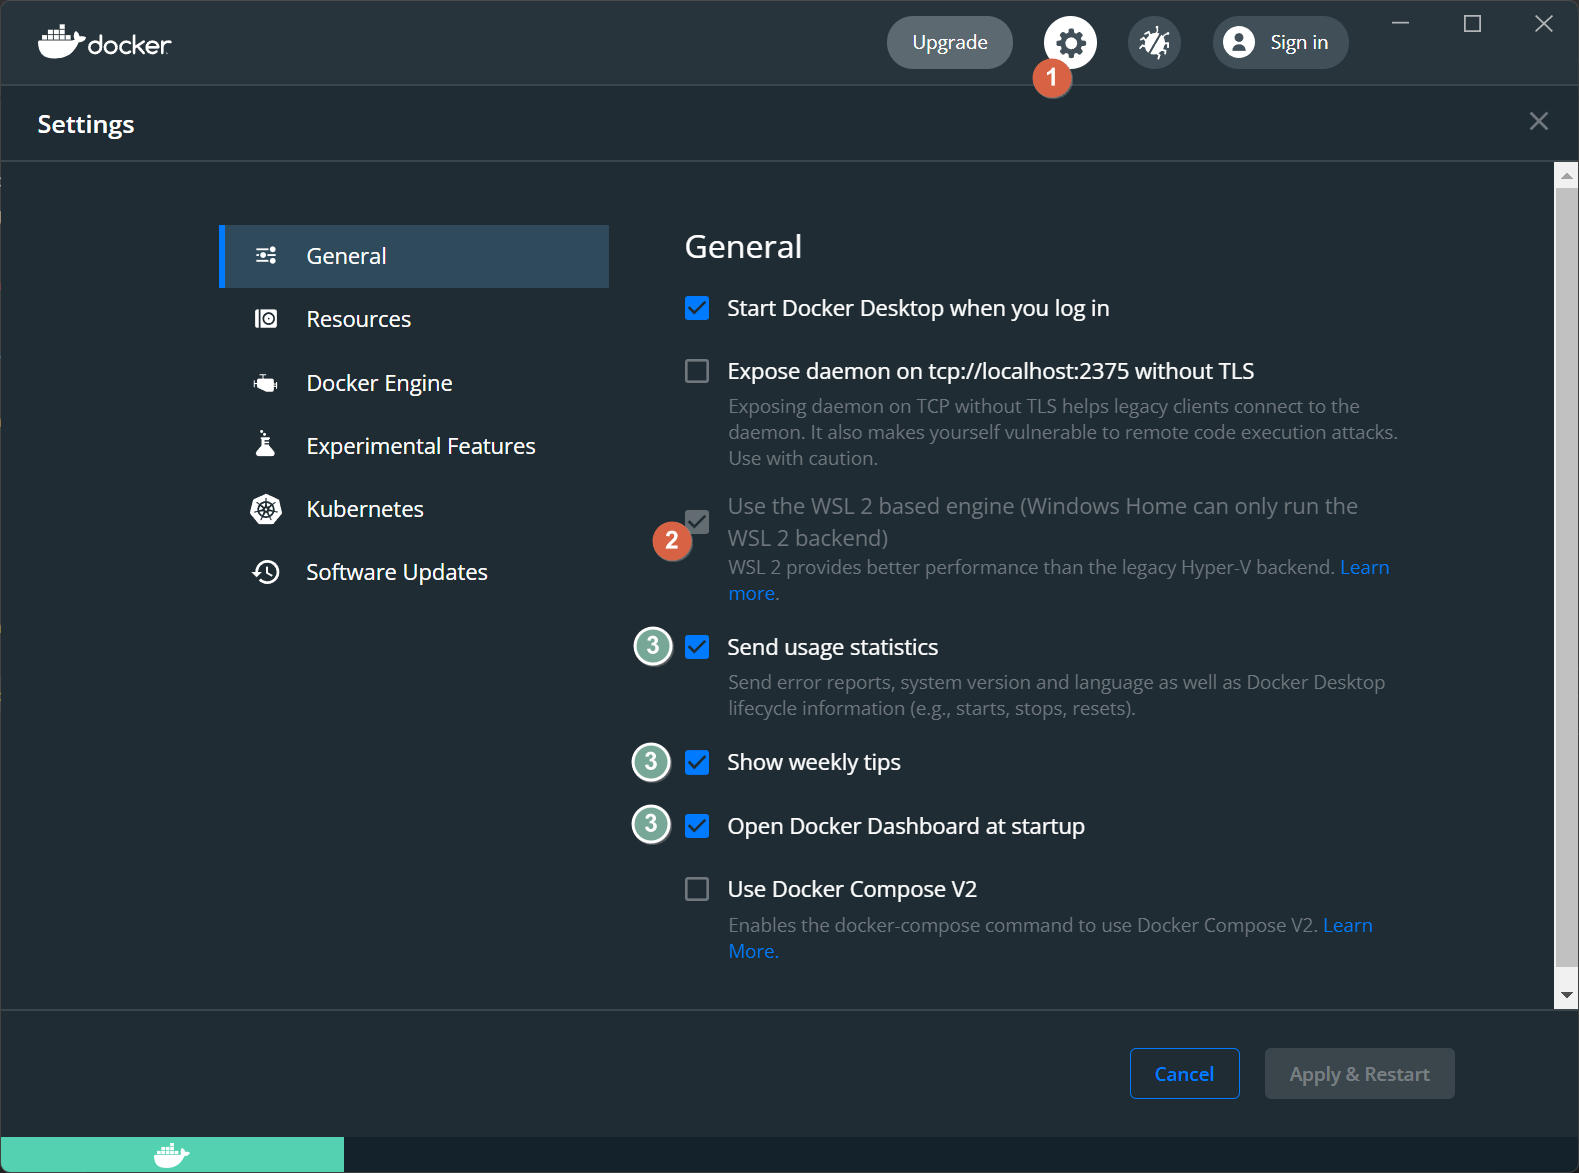
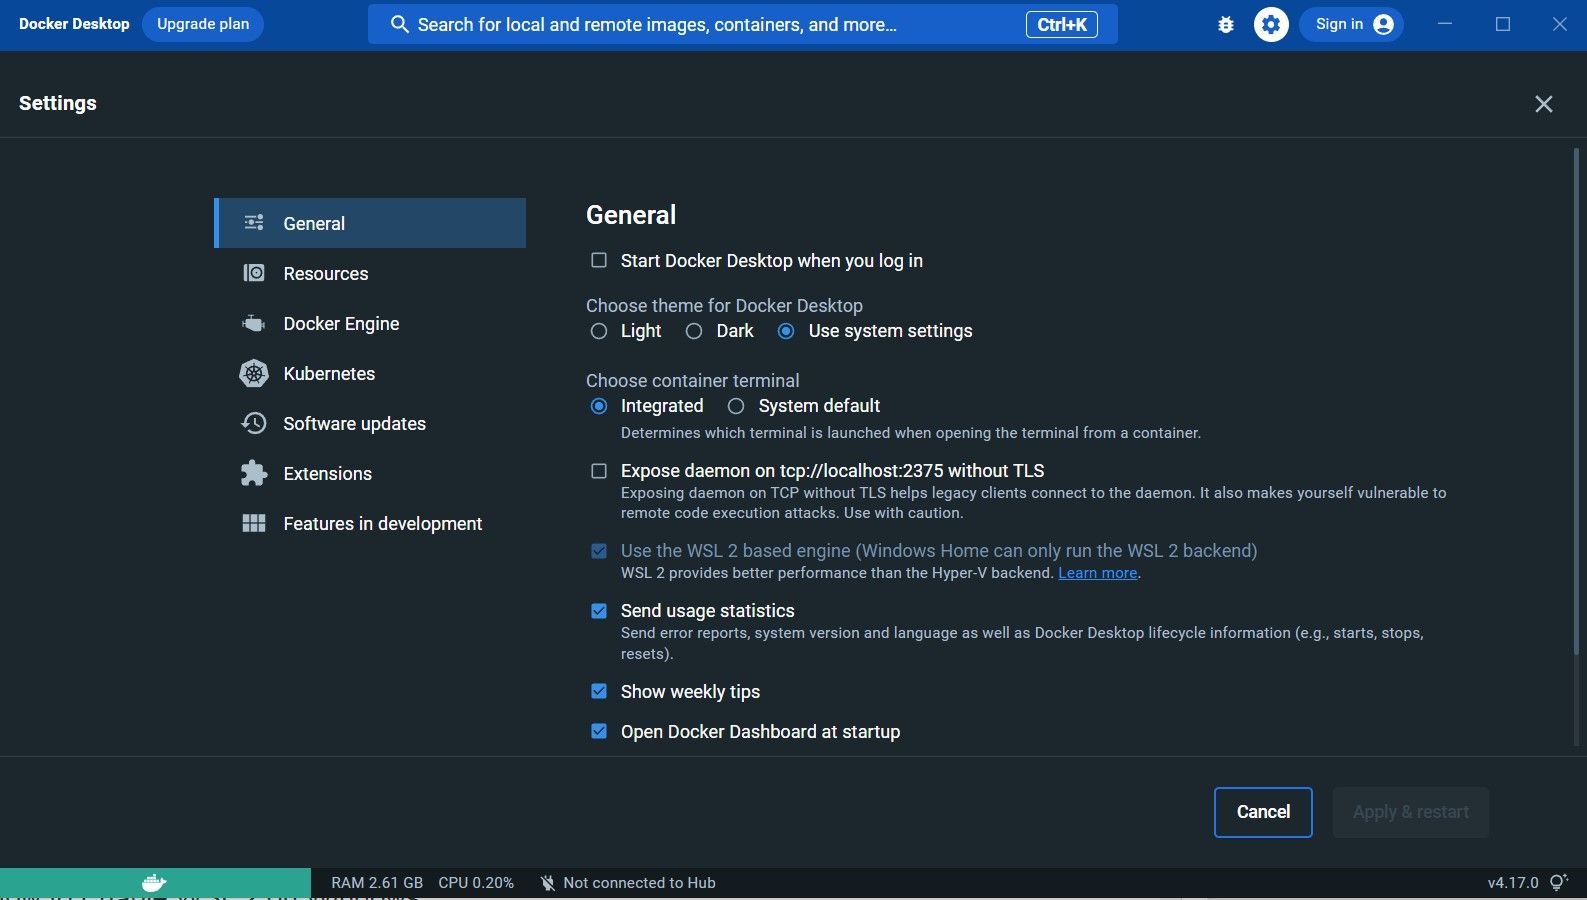
- Зайдите в настройки (1) и убедитесь (2) — что выбран WSL2.
- Если хотите чтобы Docker вас лишнего не тревожил отключите пункты (3).
Установка завершена!
Запуск первого контейнера
Попробуйте запустить контейнер через консоль wsl.
Например, поднимем текстовый рассказ фильма Star Wars в контейнере.
- Запустите WSL консоль.
- Введите команду:
docker run -it --rm mikesplain/telnet towel.blinkenlights.nl
Кратко по параметрам:
runзапуск нового контейнера.-itконтейнер будет запущен в интерактивном (i) режиме, и в используется tty взаимодействие, позволяет использовать консоль внутри контейнера (t).--rmконтейнер будет удален после завершения своей работы.mikesplain/telnetназвание образа, он будет загружен из dockerhub.towel.blinkenlights.nlпараметр, который будет использовать контейнер. В данном случае программа telnet.
В итоге увидите титры и начало истории, а значит все работает отлично
и можно полноценно пользоваться Docker.
🚀 Не залипните на звездные войны 
🎁 Полезные ссылки
- The Docker Handbook – 2021 Edition
Изучаем Docker на Habr
- Часть 1: основы
- Часть 2: термины и концепции
- Часть 3: файлы Dockerfile
- Docker команды
For many developers, Docker is the platform for creating and deploying applications in self-sufficient containers. It is an OS-level virtualization platform that helps users build and manage applications without worrying about dependencies and underlying OS.
In this guide, we will see how to install Docker desktop on Windows 10 or Windows 11. We’ll also mention the benefits of Docker on Windows and how you can uninstall it from the Windows environment.
Let’s start with the benefits of Docker on Windows.
Table Of Content
- What are the Benefits of Working with Docker on Windows?
- Install Docker on Windows 10 & 11
- Prerequisites
- Install Docker Desktop on Windows 11
- Start Docker Desktop Tool
- How To Install Docker on Windows 10?
- How to Install Docker From the Command Prompt
- Uninstall the Docker Desktop Tool
- Conclusion
What are the Benefits of Working with Docker on Windows?
Docker on Windows brings a range of benefits to the development process and application deployment, including:
- The simple user interface allows you to view and monitor all Docker containers from one location.
- Docker takes care of allocating the required resources and memory space for the containers.
- Supports HTTP proxy settings
- Docker allows developers to create containerized applications that can run in a Windows environment. This makes it easy to build and test applications on Windows and then deploy them to other platforms without compatibility issues.
- Docker images can be easily moved between development, testing, and production environments, which makes it easier to maintain consistency and reduce the risk of errors or bugs caused by differences between environments
Like all environments, you need the following elements to run Docker containers in a Windows environment:
- Docker Engine: This runs on the host machine to build and run containers.
- Docker Client: This receives the commands from the users, translates them into REST API, and delivers them to the Docker Daemon.
- Docker Daemon: This manages Docker containers
- Docker Compose: This runs multiple container applications.
Now that you know what you need, we’ll explain the installation process of Docker on the Windows operating system.
Before we discuss the installation process, we should go into the details of prerequisites and related information so that you have a solid foundation on installing Docker on Windows 10 & 11, especially if using it with a dedicated server.
Prerequisites
- Windows 10 64-bit or Windows 11 64-bit (version 2004 or higher for Pro edition; version 1909 or higher for Enterprise and Education editions)
- The target machine should have a 64-bit processor with support for Second Level Address Translation (SLAT).
Minimum 4 GB RAM. - BIOS settings and hardware virtualization support must be enabled.
- Support for Windows Hyper-V enabled.
- Support for Older Windows versions
Install Docker Desktop on Windows 11
Let’s start with the process of installing Docker Desktop on Windows 11. The process involves several steps that are detailed below.
- Visit the Docker Desktop For Windows download page and download the Docker Desktop installation file.
Note: The target machine should have a 64-bit processor and 4GB system RAM to run Docker successfully on Windows 10.
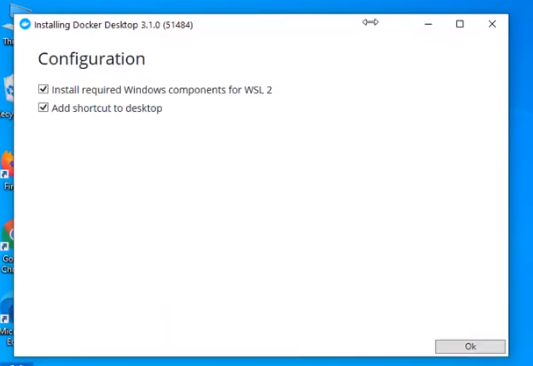
- Run the installer and remember to enable the Hyper-V Windows feature on the Configuration page.
- Complete the installation process and restart the computer once the process finishes.
Start Docker Desktop Tool
After completing the installation, you’ll need to start the Docker tool manually. For this, locate or search for “Docker Desktop” in the desktop search bar.
Before you can get started with Docker, you’ll need to go through the onboarding tutorial. This will help you learn how to build a Docker image and run a container.
Once you’ve completed the tutorial, you’ll be up and running with Docker Desktop on Windows. To verify if everything is working correctly, go to the Docker CLI and run the “docker version” command. This will tell you the Docker version installed on your system.
At this point, Docker has been installed on your Windows 11 machine and is ready for running containers and Docker images.
How To Install Docker on Windows 10?
The process of installing Docker on Windows 10 is similar to installing Docker on Windows 11. Let’s see the major steps of the process.
Start by downloading the installer from the official Docker for Windows page.
Once the download finishes, locate the downloaded file and run it.
On the setup page, you must choose the options, such as the Hyper-V and WSL 2 features. Then, click “OK” and follow the instructions of the wizard. Close the wizard when it finishes.
When using Docker, it’s important to know that the administrator account and Docker user accounts are often the same. If you don’t have a Docker user group, you will need to create one and add your user account to it.
Initially, run the admin panel as computer management.
You can add new users to the Docker group by going to the Local Users and Groups and, from there, find Docker user groups.
After you’ve completed all these steps, restart your computer to update and start Docker Desktop on Windows 10.
Once the system comes back online, start Docker Desktop.
It will prompt you to review and accept the Subscription Services Agreement for Docker Desktop. Once you accept and agree to the terms and conditions, the Docker Desktop window will appear, and you’re ready to work!
Remember to go through the Quick Start guide included with Docker Desktop for a better experience.
Resolving the WSL Kernel Version Error
Some Windows 10 systems can show the following error about Docker Desktop requiring a newer version of the WSL kernel.
To resolve this error, launch the Command Prompt and run the following command:
wsl --update
How to Install Docker From the Command Prompt
If you wish, you can install Docker Desktop from the Command Prompt. This is a simple process where you enter a simple command to initiate the installation process. But first, you need to download the Docker Desktop installer from the official site.
Here are the commands you’ll need to run:
If you’re in a terminal window, run the following command:
"Docker Desktop Installer.exe" install
If you’re in the PowerShell, run the following command:
Start-Process '.\win\build\Docker Desktop Installer.exe' -Wait install
Finally, if you’re at the Command Prompt, run the following command:
start /w "" "Docker Desktop Installer.exe" install
When the process finishes, don’t forget to add your user account to the Docker user group, especially if your admin account and user account are not the same. To do that, run this command:
net localgroup docker-users <users>/add
How do I Know if Docker is Installed on my Windows 10/ Windows 11 Machine?
After the installation finishes, it is always a good idea to verify if everything is working as intended. For this, you can try the following ideas:
- If you’re using a Windows terminal, you can use the following command line to launch Docker:
docker-run
- From Powershell, you can verify the Docker version and installation by entering the following command:
docker --version
- You can also check the latest version of the Docker desktop from the Docker option.
- Alternatively, you can check for a web server by running the Docker desktop.
Uninstall the Docker Desktop Tool
There are times when you might want to remove Docker from the Windows machine. Like the installation process, the uninstallation process is straightforward.
1. Go to the Windows Start menu.
2. Choose Settings > Apps > Apps & features.
3. Docker Desktop should be present in the Apps & features list.
4. Click Uninstall.
Conclusion
Docker on Windows is a quick and easy way to run applications in containers on Windows operating systems. Developers can build, package, and deploy applications more efficiently and consistently across different environments using containers. This improved productivity and reduced complexity help organizations save time and money.
Docker on Windows is the perfect way to utilize the features of both Windows and Linux-based containers. However, it is important to note that Docker on Windows does have some limitations and requirements, such as minimum hardware specifications and the use of Windows 10 Professional or Enterprise editions with the Hyper-V feature enabled.
Containerization is faster and more efficient than running a virtual machine. Here’s how you can do it on Windows 10 and Windows 11.
Windows is mighty, but it isn’t suited to application development and deployment. Container platforms such as Docker make it easy to develop and scale cross-platform applications. Read on to learn how you can get started with Docker on Windows 10 and 11.
What Is Docker?
Docker is an open-source platform that allows developers to efficiently build, deploy and run their applications within a container. All dependencies are bundled up so your project can easily be deployed in any environment.
Docker is popular among many containerization platforms because it is reliable, functional, and highly scalable. It runs on the Docker engine, an essential DevOps tool that provides a clean and lightweight environment for testing and deployment. Docker is not a virtual machine; it’s a container—it only virtualizes the operating system and not the underlying hardware.

Nevertheless, these are some of the best Docker alternatives if you want to try something else.
On Windows 10 and 11, you can access Docker via Docker Desktop and the Windows Subsystem for Linux (WSL). Docker Desktop is available on Windows, macOS, and Linux, and it’s known to accelerate productivity by simplifying the process of configuring complex application environments.
But if you prefer to containerize your applications through the command line interface (CLI) instead, you can use WSL 2 on Windows 10 and 11 or the Linux terminal.
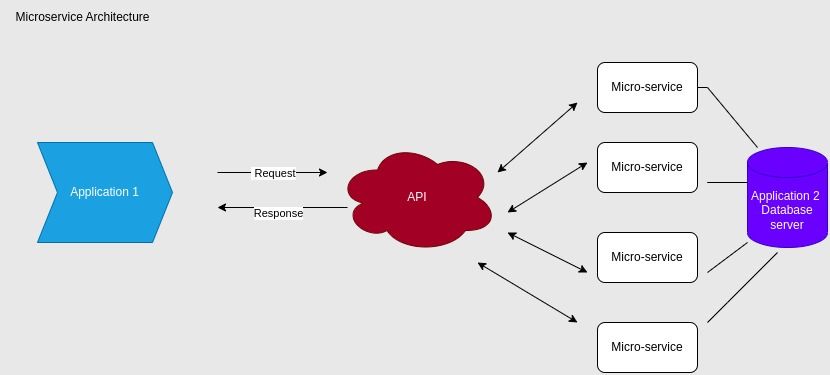
A simple example to comprehensively understand Docker is to imagine a web application with a front-end user interface, a back-end server, and a database.
Through Docker, you can isolate the three modules into different containers along with their dependencies; your application can be developed and deployed on any platform. If you want to increase a single module’s capacity (the backend server, for example), you can directly scale it without impacting the other modules.
Why Should You Use Docker?

Many developers rely on Docker because they can pack application configurations and dependencies into a single container. This can then be executed using a single Docker image. You can also use Docker Hub to download the Docker image of thousands of publicly hosted applications, including Apache, Tomahawk, Ubuntu, and more.
Since Docker containers are robust, you can also configure them to host your server; nginx docker containers are commonly used as web servers. Additionally, as mentioned earlier, Docker makes scaling and deploying your applications incredibly convenient.
This is a significant advantage over traditional virtual machines in the DevOps framework. Container orchestration services such as Kubernetes (K8s) can also help you efficiently manage multiple Docker containers. To sum up, you can use Docker in several ways:
- Run Linux distros easily
- Set up a web server for learning or testing purposes
- Portable deploy applications
- Bundle the application into a single image file
- Simplified CI/CD pipeline
If you want to try one of these features—specifically running Linux distros easily—you can check out our guide on running Ubuntu as a Docker container.
What Is the Windows Subsystem for Linux (WSL)?
The Windows Subsystem for Linux lets Windows users run Linux distributions such as Ubuntu and Kali on Windows without having to dual-boot or configure a dedicated virtual machine. Windows users can directly access the Linux command-line tools, applications, and utilities without additional installation overhead.
Initially launched with Windows 10, the latest version—WSL 2—offers much more stability and power. As a developer, you can benefit from WSL by developing cross-platform applications without worrying about dedicated hardware or leaving the Windows ecosystem.
How to Install Docker with Docker Desktop on Windows
You can use Docker Desktop as a standalone application or integrate it with Windows Subsystem for Linux for better performance and efficient resource consumption. We’ll cover both methods in the upcoming sections.
To install Docker Desktop on Windows 10 and 11:
- Download Docker Desktop for Windows.
- Open the downloaded setup; the file is usually in your PC’s Downloads folder.
- Grant administrator privileges, if required.
- Follow the setup wizard to complete the installation of Docker Desktop.
- Restart your PC for the changes to take effect.
You can now download a sample image from Docker Hub to test out a container.
How to Enable WSL 2 on Windows
Before you install Docker through WSL 2, you’ll have first to install WSL 2.
The Windows Subsystem for Linux 2 is available to users running Windows 10 (Build 19041 and higher) and Windows 11. If you’re running an older version of Windows 10, you’ll have to install it manually.
Fortunately, Microsoft makes it easy to install and set up a Linux distro with this tool. Here’s how to install WSL 2 with the default Ubuntu image:
- Launch the Start menu, search for Command Prompt, right-click the Best match, and select Run as administrator.
- Enter the following command and press Enter:
wsl -- install
The installation process will take some time, so you might need to wait around. If you want to install a different Linux distribution, you can do so via the following command:
wsl -- install -d <Distribution>
You can view the list of Linux distributions through:
wsl.exe -l -o
Once you’ve safely configured WSL 2 on Windows 10 or 11, you can install Docker.
How to Install Docker with WSL 2 Backend on Windows
You can leverage better performance from your containers if you integrate Docker Desktop to use WSL 2 as its backend. WSL 2 provides efficient boot-up and enhances resource consumption using dynamic memory allocation; these features allow you to start Docker containers considerably faster.
For optimum performance on Windows, we recommend installing Docker by integrating Docker Desktop with WSL 2. You can do that in just a few steps:
- Download Docker Desktop for Windows.
- Enable WSL 2.
- Restart your system for the changes to take effect.
- Launch Docker Desktop from the Start menu, and navigate to Settings > General.

- Ensure the Use WSL 2 based engine check box is enabled.
- Select Apply & Restart.
- Once your system is ready, launch WSL 2 and enter the following command to ensure Docker is prepared to run:
docker -- v
Learn Docker to Set Yourself Apart
Docker has made development and deployment very easy. If you want to be a formidable software engineer, we highly recommend getting hands-on experience with Docker and container orchestration services such as Kubernetes.
Pre-requisites: Windows OS, Docker
Before understanding the concept of Docker, let’s first discuss the concept of Hypervisors. So in an IT Company, or any cooperate, there is a development team, a testing team, and an operation team for developing the application, testing it, and deploying it. Now suppose the developers are working on a different OS, for example, let’s say macOS, and they used some dependencies or libraries as per the language they are using, so they just won’t hand the software to the testing team, but also the libraries, but now, the application didn’t run o the tester’s machine, but it worked on the developer’s machine, maybe because the tester’s machine has different OS features than the developer’s one, so now, devs have to send the OS, but that is not practically possible, as one can’t just copy the C drive and hand it over, that’s where the concept of Hypervisors comes into the picture, think of this as a virtual machine or Wim-ware, so you have the physical hardware, you host an OS on it, and the OS can now host another OS also called Guest OS, and this guest OS can be packed and send to the testing team.
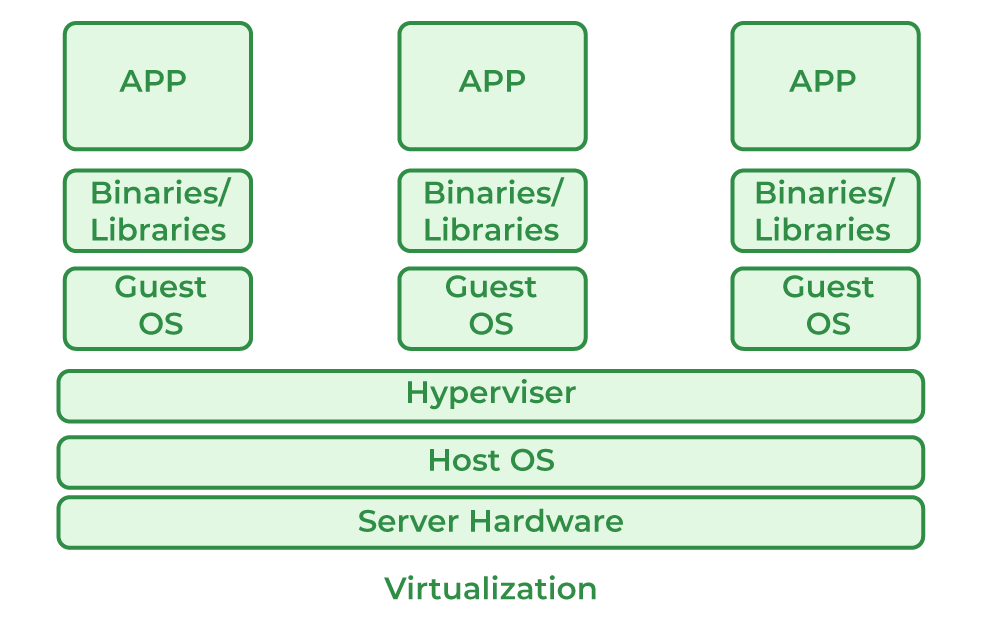
But the problem here is, for every application, one needs a different OS, this will result in a waste of resources as multiple OSs will be running. So for this problem, we have the concept of Containers, the difference between Hypervisors and containers is that we don’t need multiple OS for every application, multiple applications can share the same OS kernel, great isn’t it? So instead of installing HYPERVISOR, we will be installing Docker.

What is Docker?
Docker is an open-source platform where we run our applications in the form of containers. Docker containers are very light in weight and contain all the dependencies and configurations so we can run them across different computing environments. Developers can package all the dependencies of the application in the form of images it can be portable easily or shared easily with other developers without worrying about the underlying OS.
Requirements
- Windows 11 64-bit: Home or Pro version 21H2 or higher, or Enterprise or Education version 21H2.
- Windows 10 64-bit: Home or Pro version 21H2 or higher, or Enterprise or Education version 21H2.
- 4GB RAM or Higher.
- Hyper V feature must be enabled in Windows.
Specifications
- RAM: The minimal amount of Memory needed to run containers smoothly is 4GB, however, if a program has more complicated functions, it will need more than 6 GB RAM.
- Storage: For running the containers and installation of docker the minimum space required is 25GB. If you want to store the container images and data then we need at least more than 35 GB to 40 GB.
- Network: To download, push and pull the images we need active internet then only we can maintain the container images with the help of docker.
- CPU: At least a 64-bit processor is required for docker.
Docker can be run on a laptop with 4 GB of Memory, a 64-bit processor, and 25 GB of storage. It might change based on our use cases.
Step-By-Step Docker Installation On Windows
Follow the below steps to install and configure Docker on Windows:
Step 1: For installation of Docker, go to your favorite browser(chrome will be used here, but it can be done by using any browser). In the search bar, type Docker download. And click on the first link that appears.

Step 2: After clicking the link, choose your OS, be it Windows, MAC, or Linux for installation.
Step 3: The download will start, and based on your internet speed, it will take some time to do so. To know more about docker desktop installation visit Docker Desktop.
Start Docker Desktop Tool
Step 1: After installation, it will look something like this in Windows:
- Open the Docker Desktop.
- Accept the Docker Subscription Service Agreement window. and click On continue. Docker Desktop will start after we accept the terms and conditions.
Step 2: After clicking Ok the installation will start.
Step 3: After installation, it will show something like the below:
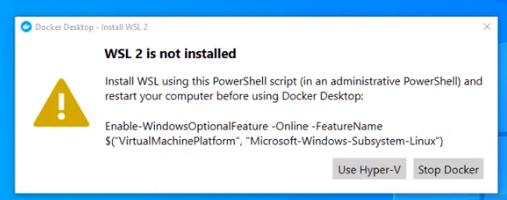
Step 3: After installation, we need to restart our PC and install WSL 2, which stands for Windows Setup for LINUX. It is a compatibility layer for running Linux binary executables natively on Windows 10. Please follow the next few instructions carefully. After restarting, the following dialog box will appear, then click on the Stop Docker button there.
Step 4: After clicking, we need to enable the Hyper-V, for that we will restart the PC and go to BIOS setup, Settings>Update and Security>Recovery>Advanced Setup>Device Configuration. After that, if the option Enable Turbo Boost on DC. is unmarked, mark it, after it, save, and exit.

Step 5: Afterward, in the last step, go to Control Panel> Turn Windows Features on and off. Then for activating Hyper-V, mark the Hyper-V and Windows Hypervisor Platform.
At this point, you have successfully installed and configured Docker on your Windows machine.
How To Install From The Command Line?
To install the Docker desktop, follow the procedures listed below.
Step 1: Run the following command in the Command prompt.
start /w "" "Docker Desktop Installer.exe" install
Step 2: Add user account into docker user groups.
net localgroup docker-users <users>/add
Verification
Verify the docker installation and versions,
1. Run the following command in the command prompt to check the docker version.
docker --version
2. After that we will receive a Beta invitation email When you start docker for the first time.
How To Install Docker On Windows 10?
You must perform the following steps in order to install Docker on Windows 10:
Step 1: In this step, we must assure that our Windows can support Docker the minimum requirement is Docker requires 64-bit Windows 10 Pro.
Step 2: You can download the docker by using this link “https://www.docker.com/products/docker-desktop”.
Step 3: Once the installation is finished go to the start menu and open Docker Desktop. Enable Hyper-V and Windows Subsystem for Linux features after enabling Docker Desktop will automatically restart. After restarting you can open the Docker Desktop and start using it.
Step 4: To test whether the Docker Desktop is installed or not open the command prompt or PowerShell window and run try to pull the sample image for example Nginx if the image is pulled then the Docker installation in Windows was completed successfully completed.
How To Install Docker On Windows 11?
First, make sure that your Windows matches Docker’s requirement Docker requires 64-bit Windows 11 Pro, and the rest all the steps are the same as Windows 10.
How To Update The Docker In Windows?
By following the steps mentioned below we can update our Docker:
Step 1: Open the Docker Desktop from the start menu.
Step 2: Click on the settings and click on the “resource” tab there we can find an option called “Check for Updates.”Docker Desktop will check for any available updates.
Step 3: If any update is available Docker will show us like “Download and Install” Directly click on it Docker Desktop will automatically download it after completion of installation you can the Docker version by using the following command in the command prompt or PowerShell window.
docker version
Advantages of Docker In Windows
- Docker for Windows allows developers to their applications easily on any Windows.
- Docker can be installed very easily on Windows.
- Docker containers can be moved in between Windows and Linux without changing the Source code.
- The application is isolated from the underlying OS which makes it more secure.
Uninstall Docker Desktop Tool
To uninstall the Docker Desktop follow the steps mentioned below.
- Find “Add or Remove Programs” in the start menu and choose it.
- Click Docker Desktop when you see Docker in the list of installed programs.
- When you click on uninstall in Docker Desktop, be sure to follow the steps that appear.
- After the uninstallation is complete, restart the computer.
How To Install And Enable WSL 2 On Windows
Before installing docker by using WSL 2 make sure your Windows is supported for that and then install and enable WSL2 on your laptop.
Step 1:Enter the following command as an administrator to enable the Windows Subsystem for Linux feature.
dism.exe /online /enable-feature /featurename
:Microsoft-Windows-Subsystem-Linux /all /norestart
Step 2: In this step, you need to enable the virtual machine platform feature to enable it to run the following command in Powershell as an administrator
dism.exe /online /enable-feature /featurename
:VirtualMachinePlatform /all /norestart
Step 3: After running the above command you need to restart your computer by this the virtual machine platform feature will be enabled.
Step 4: Know download and install WSL 2 Linux kernel updated package from the official website of Microsoft
Step 5: Make WSL 2 the standard version. Run the following command when logged in as an administrator in Windows PowerShell.Install a Linux distribution by using the Microsoft Store. You can pick from a variety of Linux distributions, including Kali Linux, Debian, and Ubuntu.
wsl --set-default-version 2
After completing the above steps we can use execute Linux commands on your windows using WSL 2.
How To Install Docker With WSL 2 Backend On Windows?
Utilizing dynamic memory allocation will help the WSL 2 backend consume resources more efficiently. which enables us to launch Docker very quickly and improve Docker’s speed. To make this happen please follow the steps mentioned below.
Step 1: Install and enable WSL 2 on Windows by following the steps outlined in the previous answers. And install Docker Desktop as mentioned above for Windows.
Step 2: Once the Docker Desktop installation is completed open the setting in Docker Desktop click on the resources tab and click on WSL 2 integration. Click “Apply & Restart” to apply the changes.
Step 3: Open a terminal in your WSL 2 distribution and use the following command to confirm that Docker is operational after Docker Desktop has restarted.
docker pull ubuntu
If the image is successfully retrieved, WSL 2 has likely been deployed as a backend for Docker. The WSL 2 backend now allows you to use Docker to construct and manage containers on your Windows computer.
Note: The Docker CLI interacts with the Docker daemon running in the Windows Docker Desktop application when you issue Docker commands in your WSL 2 terminal.
Conclusion
In this article, we covered a step-by-step procedure to install docker in Windows 11 and Windows 10. We also covered how to install docker in Windows 10 and 11 with the help of the Command line. Refer to Install in Mac and Ubuntu to know more about installation in different OSs.
Docker has seen a rapid rise in popularity over the years. It has revolutionized traditional software development. Docker containers enable developers to scale up at an incredible rate and are easy to use. Docker allows you to reduce the size and footprint of your operating system by using containers. Containers make it easier for teams from different units such as development, QA, and operations to collaborate seamlessly across applications. Docker containers can be deployed anywhere on any machine, virtual or physical, and even in the cloud.
This article will show you step-by-step how to install docker under Windows 11.
Prerequisites for Installing Docker on Windows
- Windows 11 64-bit Home or Pro version 21H2 or Higher, Enterprise or Education version 21H2 or Higher
- You must enable Hyper-V and Containers Windows features.
- To run WSL 2 under Windows 11, you need 4 GB of RAM
In order to enable hardware virtualization support at the BIOS level, you must activate it in your BIOS settings. Make sure that Hyper-V or Containers are enabled in Windows.
Docker Desktop Before that, let me talk about Docker Desktop briefly.
Install Docker on Windows 11 installation steps
Open your favourite browser to install Docker. Chrome can be used, but you can use any browser. In the search bar, type Docker download. Click the first link you see. This should automatically take you to Docker’s official website. Once you have selected the link, choose Windows operating system to install it.
Alternatively, download the docker file from the website https://docs.docker.com/docker-for-windows/install/
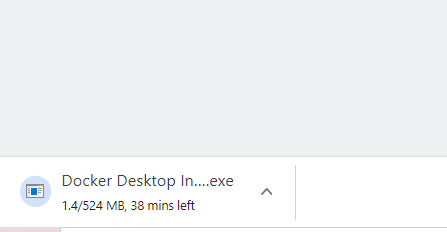
Docker Desktop Installer.exe file will get downloaded and it may take some time, depending on your internet speed. Then, to execute the installation, double-click on Docker Desktop Installer.exe. Docker Desktop will start downloading the necessary packages.

When prompted, ensure the Use WSL 2 instead of Hyper-V option on the Configuration page is selected or not depending on your choice of backend.

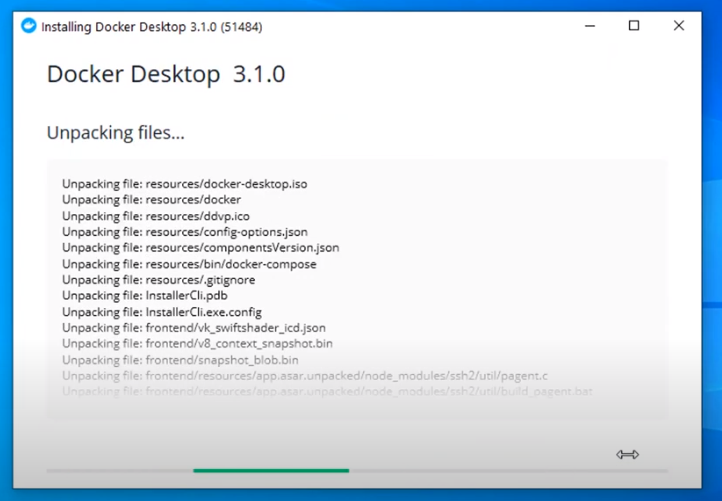
Wait for the files to be unpackaged.

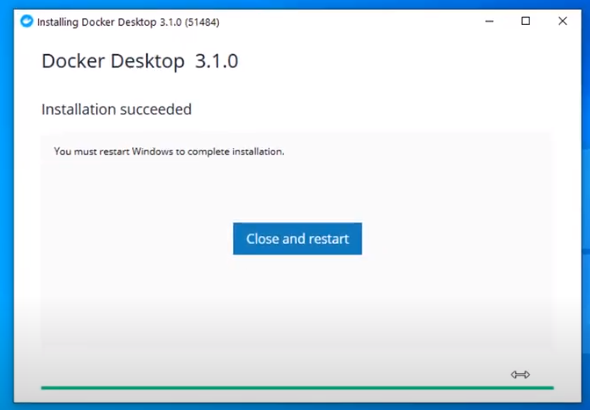
Once you get the “Installation Succeeded” message, click on close and restart for the changes to take effect.

When the system restarts, Go to Programs > Docker Desktop
You will be prompted to accept the terms.

Once you accept the terms, Docker Desktop will start.

Click on Sign In, to login to Docker to continue to Docker Desktop.

In a couple of minutes, Docker Desktop will be up and running.
Open command prompt and run “docker -v” command. If you get the docker version, that means docker installation on Windows was successful.

Run docker hello-world command to run a simple docker container on Windows.

You can also run docker from the Docker Desktop interface.
For the first time when Docker Desktop starts, you will get the below screen. Click on Start to run a few docker command on Docker Desktop.

Click on the >> sign to move the command to the right side inside the Windows powershell and run it. This command will clone a github repository.


Once the cloning finishes, run the next command in the Docker Desktop tutorial to build the image.

Then, run your first docker container on Docker Desktop.

Finally, tag and push the docker image so that others also can download and use it.

Once you click on Done, it will show you the message “You ran your first container image”

Click on the Dashboard link and go to Containers, where you can see which all containers are running or exited on Docker Desktop.

Final Thoughts
So that was all about how to install docker on windows. Docker Desktop is an amazing tool to use Docker on the Windows operating system. Go ahead, and setup Docker Desktop and get started with Docker on Windows 11.