Everything You Need to
Successfully Use CMake
Since CMake is the most downloaded software build platform, there is an overwhelming number of resources out there. We wanted to pull together some of the best resources so you can easily find what you need no matter where you are in your CMake journey.
Getting Started
All the resources you need to begin your CMake journey, from learning materials to accessing the CMake community.
Getting Started
Documentation and Community
Whether you are still learning how to use CMake, contributing, or just enjoy being part of the conversation, there is is something here for everyone.
Documentation and Community
News & Updates
Stay up to date with the latest CMake blog articles and software releases.
News & Updates
CMake is a SCons for automating compilation tasks.
CMake is a system to automate compilation tasks of code files created in C and C++.
On Unix type systems we can say that it is a “Makefile” generator. He is classified as a SCons.
We already made a brief introduction here on the blog about CMake, but it is also possible to generate Makefiles in Windows, although CMake also generates files for Visual Studio.
Today we will see how to install CMake on Windows.
Dependencies
As in this example we will use GCC, it is important that you have it installed on your Windows via MinGW, see here how to do it.
Now let’s go step by step!
Installation
01. Download CMake by clicking the button below:
Download CMake for Windows 64-bit
After downloading, double-click on the downloaded file: cmake-3.26.0-rc6-windows-x86_64.msi and give administrator permissions to start the installation setup.
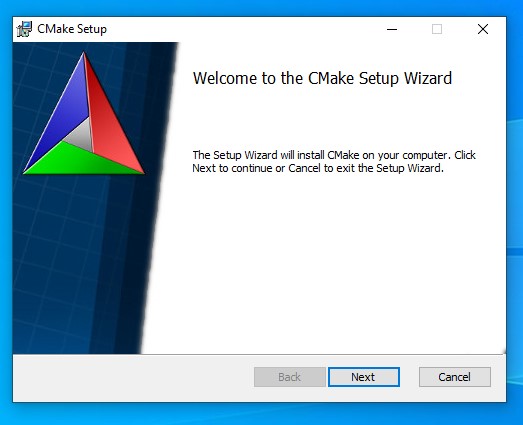
02. Setup presentation
Just click on
Next.
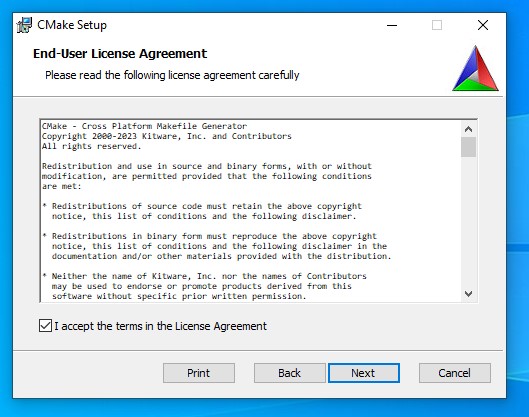
03. Accept the license terms
And then click
Next.
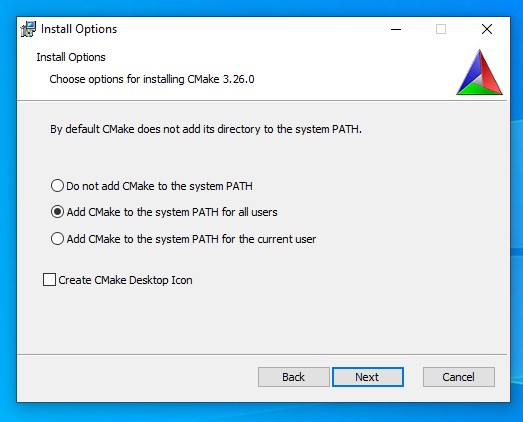
04. Add CMake to your PATH
Check the Add CMake to the system PATH for all users option for the command to be available to all system users. And then click on Next.
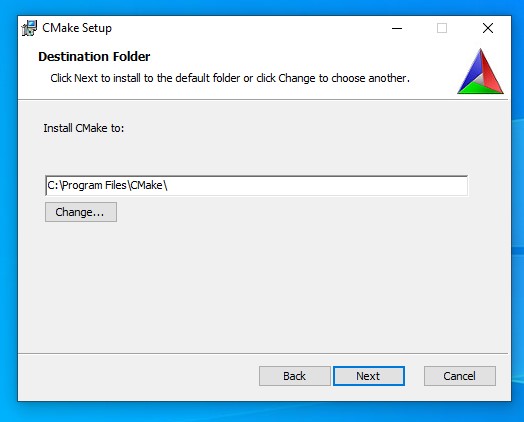
05. Select installation path
Hint: Keep what already appears and click
Next.
06. Start the installation
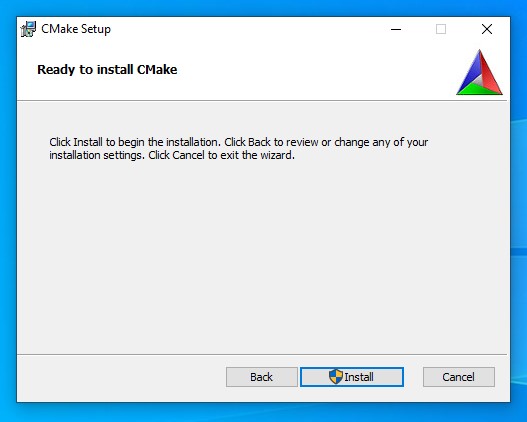
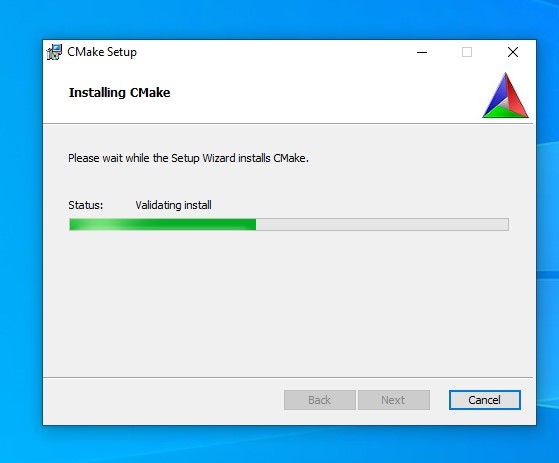
Click on Install and wait for the installation to finish.
Installing:
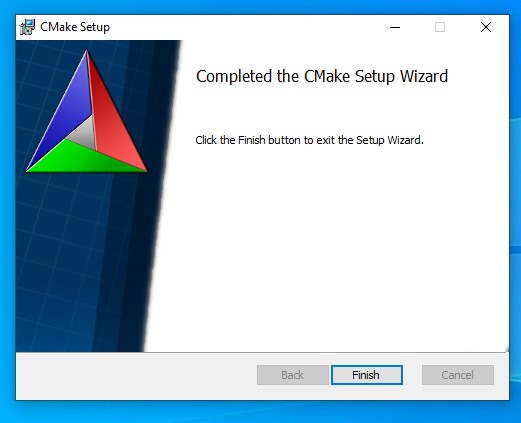
Once finished, click on
Finish:
Testing CMake
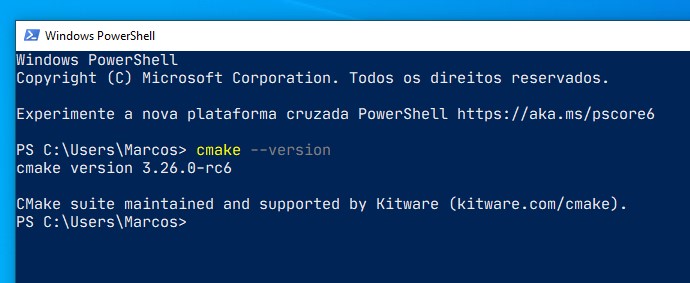
Open PowerShell or CMD and type the command:
cmake --versionIf the output is similar to the image below, everything is right and installed perfectly:
Compiling with CMake
-
Create a folder, for example
MyProject, enter it (by CMD or PowerShell,cd MyProject) and inside it do: -
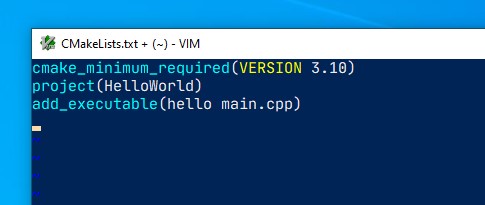
Create a file named
CMakeLists.txtwith your Preferred Code Editor or IDE and fill it with the code below:
cmake_minimum_required(VERSION 3.10)
project(HelloWorld)
add_executable(hello main.cpp)- Also create a
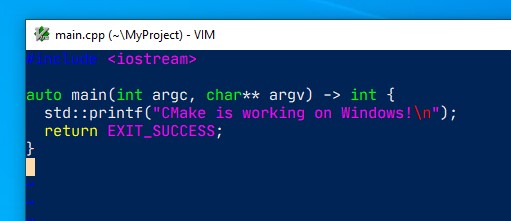
main.cppfile with a basic code, example:
#include <iostream>

auto main(int argc, char** argv) -> int {
   std::printf("CMake is working on Windows!\n");
   return EXIT_SUCCESS;
}
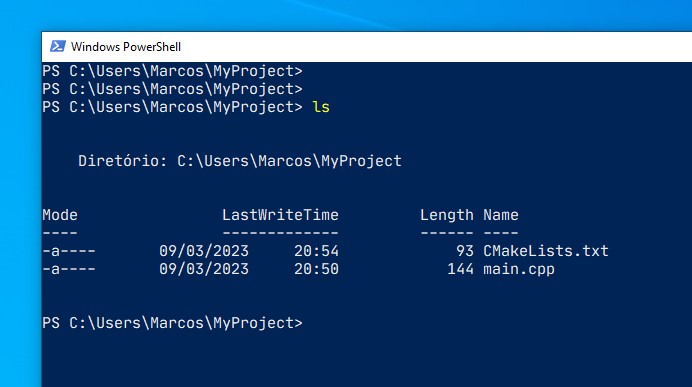
At the end your MyProject folder will have 2 files: CMakeLists.txt and main.cpp as shown in the image below:
- Now run the command:
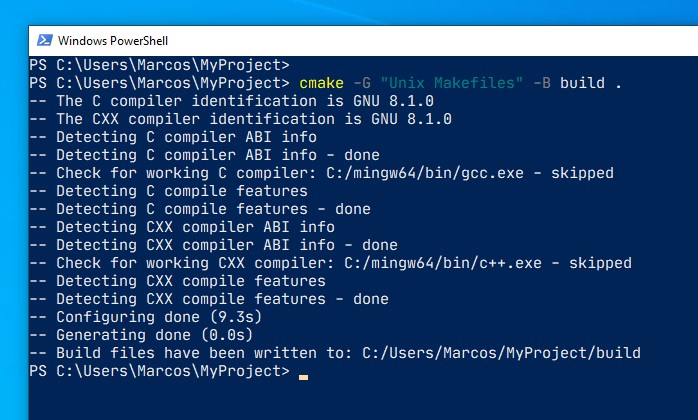
cmake -G "Unix Makefiles" -B buildIt will create a folder called
buildinside your project. If you don’t say-G "Unix Makefiles"it will prepare files for Visual Studio, in which case we want a Unix-like Makefile.
The output will be similar to the image below:
- Once finished, enter the build folder (
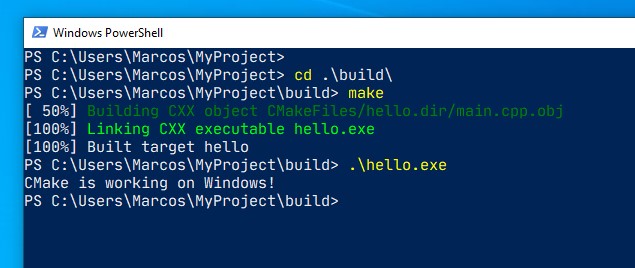
cd build) and run themakecommand (if this command does not exist, it is because you did not rename the MinGW file to that name as mentioned in the article about MinGW cited above, then most likely the command will bemingw32-make). And then run the final binary:hello:
That’s it, now you can compile your C and C++ code with CMake!
Useful links
- https://cmake.org/
- https://cmake.org/download/
- https://github.com/Kitware/CMake/
cmake
windows
We’re Earthly. We make building software simpler and faster with containerization. If you’re into CMake and automation, Earthly could be just the tool you need. Check it out.
CMake is an open source multiplatform tool that you can use to help with build automation, testing, packaging, and the installation of software. One of the main advantages of CMake is that it supports generating build scripts for a wide variety of platforms including Windows, macOS, and Linux. This gives developers the flexibility they need when building a new project and hopefully helps speed up the build.
In this article, you’ll learn more about CMake and if it’s the right solution for you. You’ll also walk through the process of installing it on Windows.
Pros and Cons of CMake

There are a number of benefits to using CMake to help build your solutions, including the fact that CMake can run on all major platforms, including Windows, Linux, and macOS. This means that a team of developers who are using different operating systems can still have common development tools.
Using CMake for projects, instead of something like Visual Studio projects, helps you avoid being locked into one integrated development environment (IDE). A team can create a project using CMake, and then each developer can use their preferred IDE to work on it. CMake integration is supported by a variety of IDE tools, including CLion, Atom, and Visual Studio.
It may be useful for some developers and software architects to understand what dependencies are within their projects and the nature of the dependency. CMake can create a visualization of any dependencies within the project, that you can use to create documentation.
While many would assume that CMake’s active development is an advantage (which it is!), it also has its downsides: Not everyone within a developer team will be running the same version of CMake. However, to help reduce this issue, CMake has introduced policies that define how certain CMake features should behave. This means your team can set a common policy regardless of what version people are using.
Another disadvantage of CMake is the lack of information available for some versions. It can be hard to find accurate information to resolve an issue or answer a question.
When to Use CMake
As you can see, CMake can be a useful build system. Developers using CMake can quickly check performance on different build backends and easily move between them.
CMake can also help to keep your source code folder clean. It can separate the build system, intermediaries, and output files from the source code, keeping your code clean for the future.
Install CMake on Windows
There are several ways to install CMake on Windows. The first option is to use pre-compiled binaries as either the Windows Installer file (MSI) or the compressed version (ZIP) files. You just have to download the files and then walk through the interactive installation wizard.
The second option is to download and build CMake from the source, and CMake even includes a source release download option.
The third option is to use a package manager tool, such as Windows Package Manager or Chocolatey. This can be especially convenient if you already have either installed on your machine. We will use the package manager method you’ll use for your installation here.
If you’re using Windows Package Manager, run the following command to install CMake:
winget install kitware.cmakeIf you’re using Chocolatey, use the following command:
Install a CMake Extension with Visual Studio
Once you’ve finished installing CMake on Windows, you need to install an extension that lets you integrate the functionality of CMake into your IDE (Visual Studio is used here).
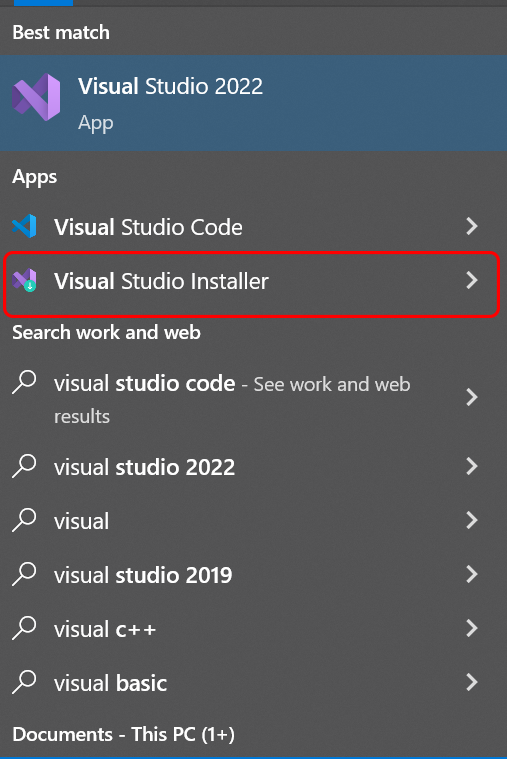
To install the CMake extension, you need to select Start and then open the Visual Studio Installer from the menu:
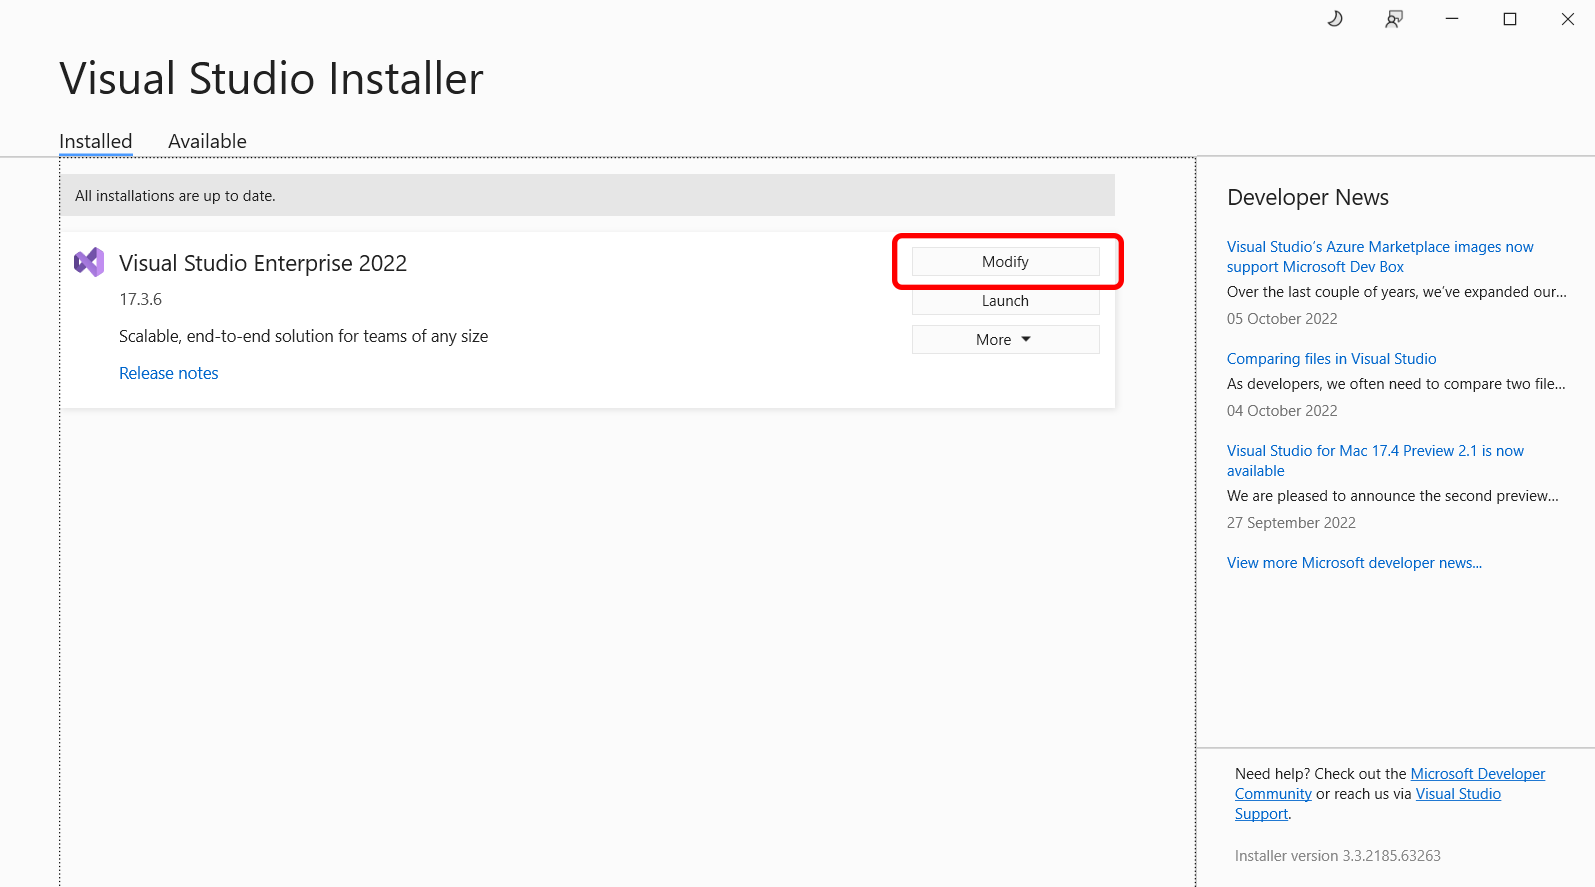
Once the Visual Studio Installer loads, select Modify:
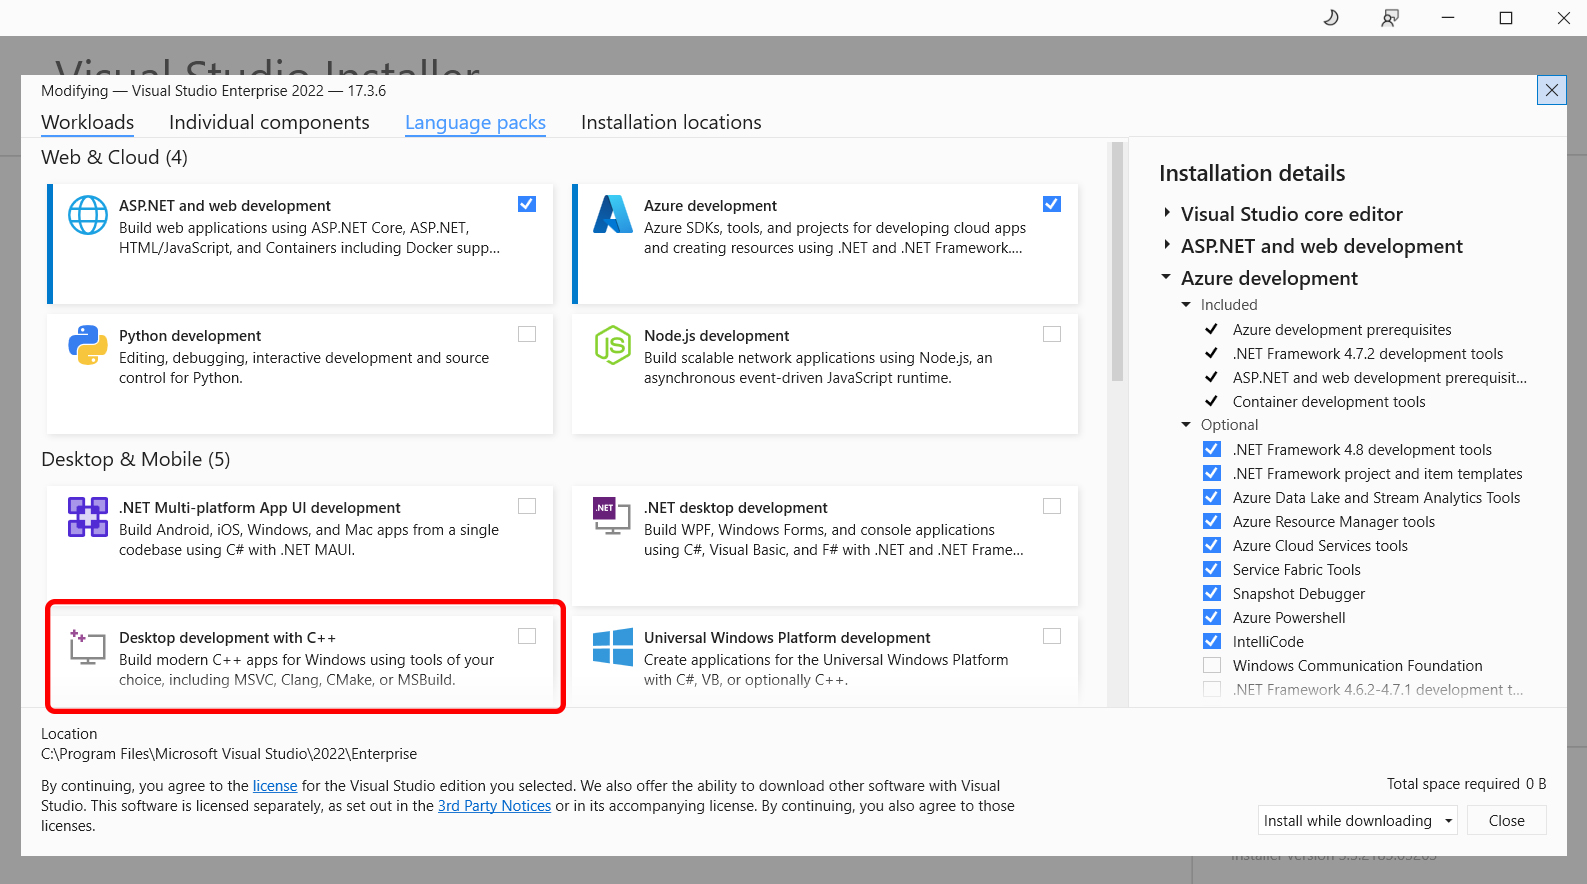
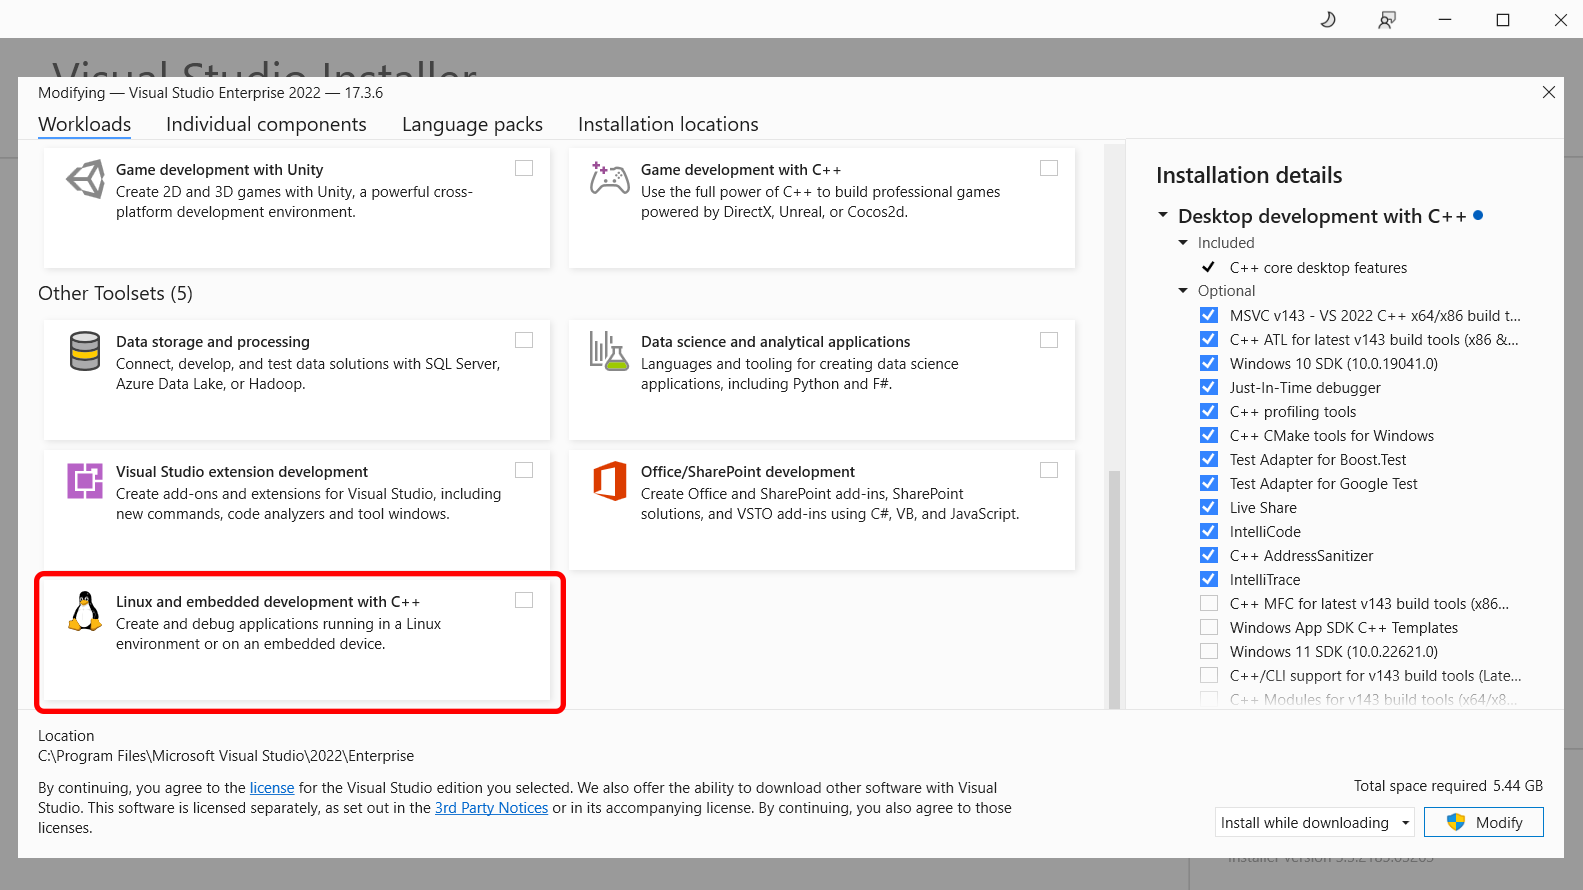
Under Workloads, locate Desktop development with C++, which can be found under Desktop & Mobile:
On this same page, you also need to find and select the Linux and embedded development with C++ component. This component ensures you have cross-platform CMake development capabilities:
Once you’ve selected both, select Modify again, and the additional tools will be installed.
Integrate an IDE
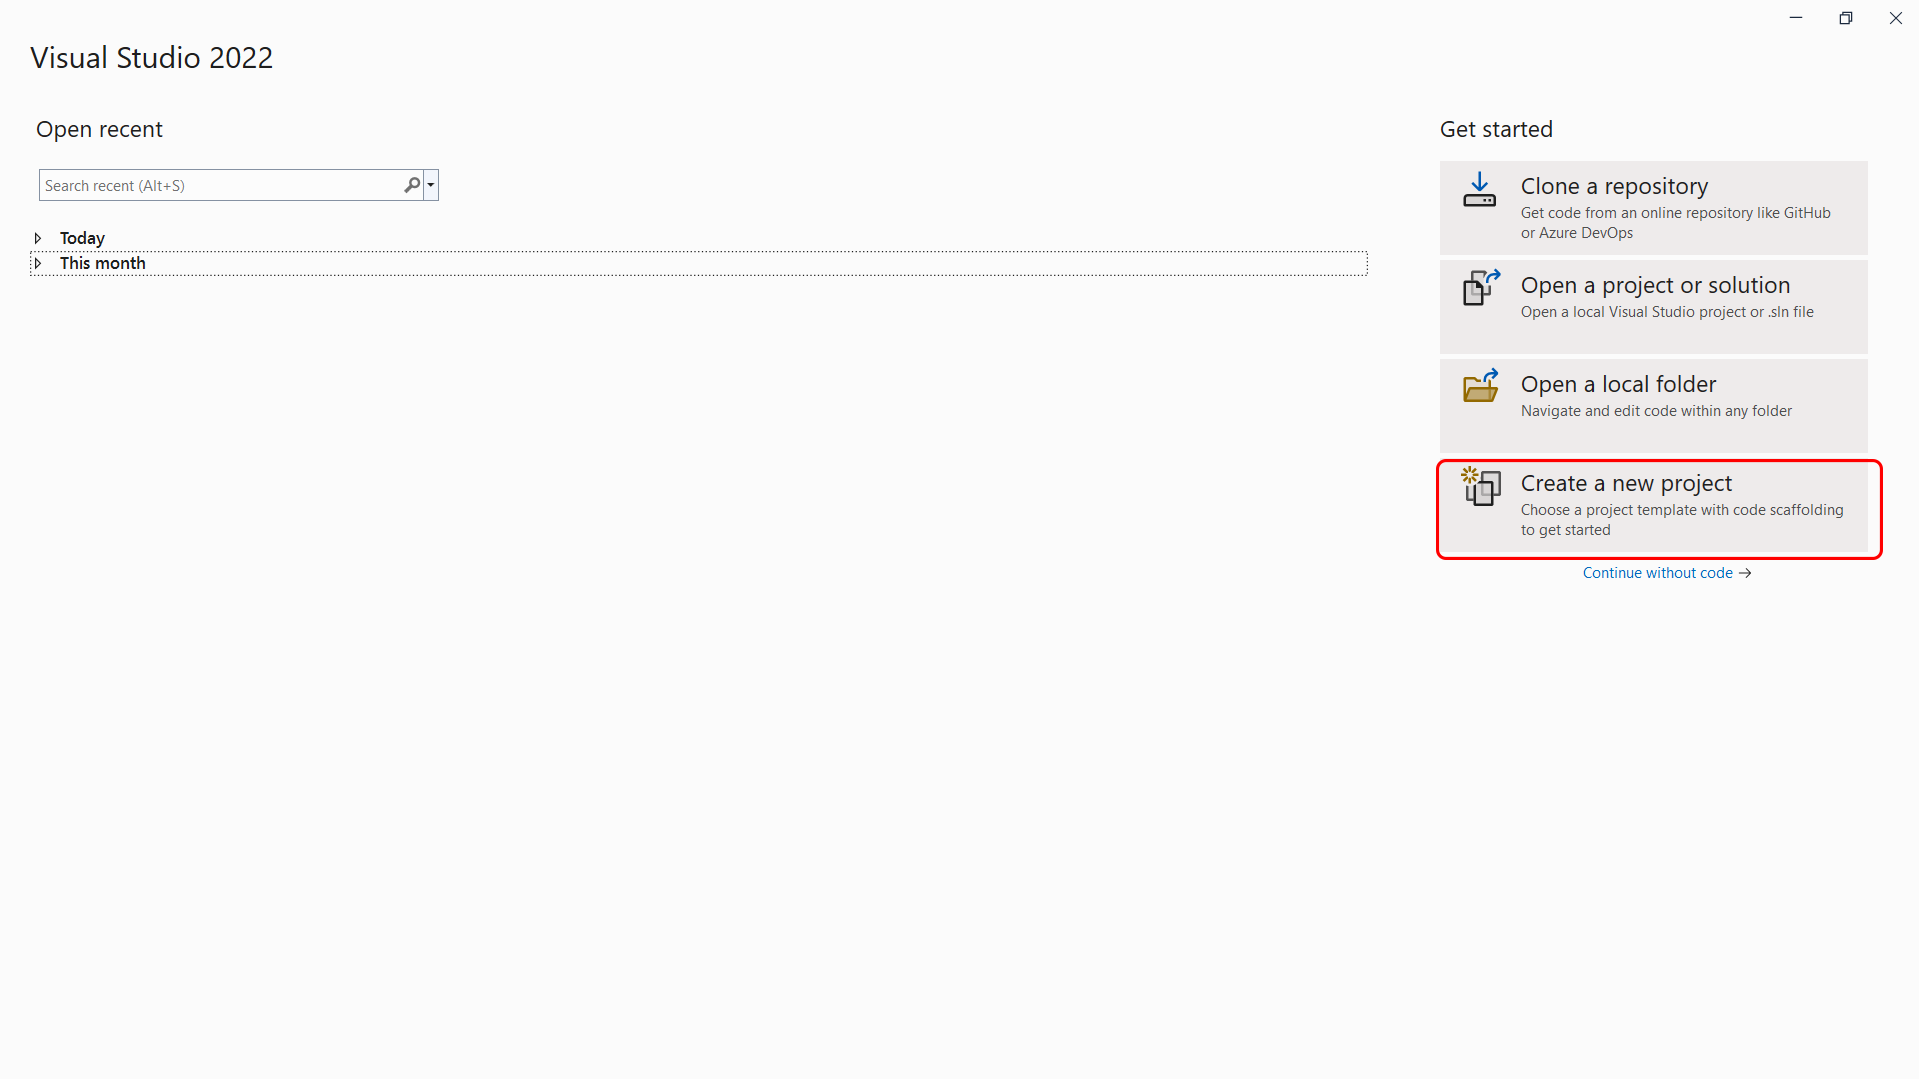
Now that you’ve installed CMake and a few components, it’s time to use them. Start a new project by opening Visual Studio and selecting Create a new project > CMake project:
After selecting CMake project, Visual Studio, and CMake will create a directory and a file called CMakeLists.txt, which is a set of instructions describing certain settings within the project, such as source files and targets.
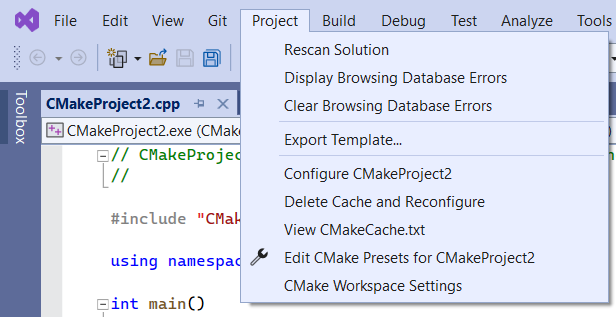
When Visual Studio detects that there is a CMakeLists.txt file within a project that’s been opened, it adds CMake items to the Project menu, which gives you access to commands for viewing and editing CMake scripts:
Configure CMake Projects
CMake supports two files that let you specify build and test options. These files are CMakePresets.json and CMakeUserPresets.json. Microsoft recommends that you use CMakePresets.json.
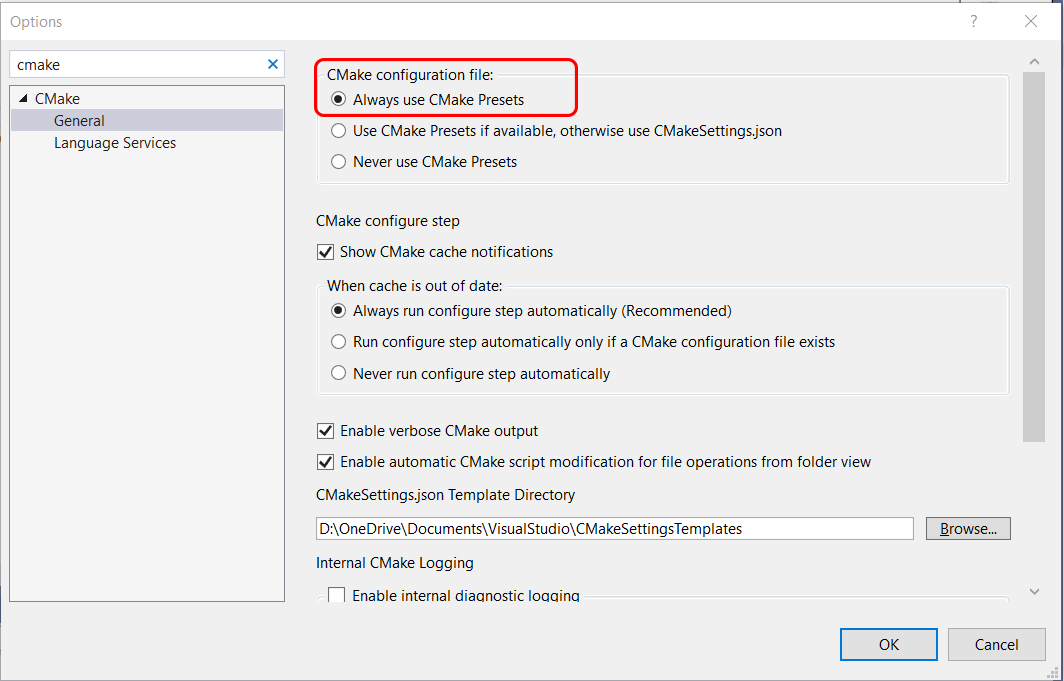
To ensure that Visual Studio uses the CMakePresets.json file, you need to enable it. You can do so via Tools > Options > CMake > General. Please ensure that the Always use CMake Presets option is selected:
If Visual Studio can’t find a CMakePresets.json file, it will fall back to using the default configure presets.
There are three key settings within your CMakePresets.json file: target systems, configure presets, and build presets. The target system is the system on which CMake is invoked to configure and build your project. You can use systems installed on your local machine, SSH connections, and all Windows Subsystem for Linux (WSL) installations.
The configure preset option is used when CMake is invoked to generate the project build system. Depending on your target system, the options for this will change. So if you are using Ubuntu as your target system, your configure preset could be Linux debug.
The build preset value is used when CMake is invoked to build the project and should align with the configure preset. If Visual Studio can’t find any build presets that are associated with the configure preset, then it will provide the default build preset.
As you can see, there are a lot of options available to configure your CMake projects to suit your needs and project. If you’re looking for even more information on how to configure your projects, check out this Visual Studio documentation.
Build CMake Projects on Visual Studio
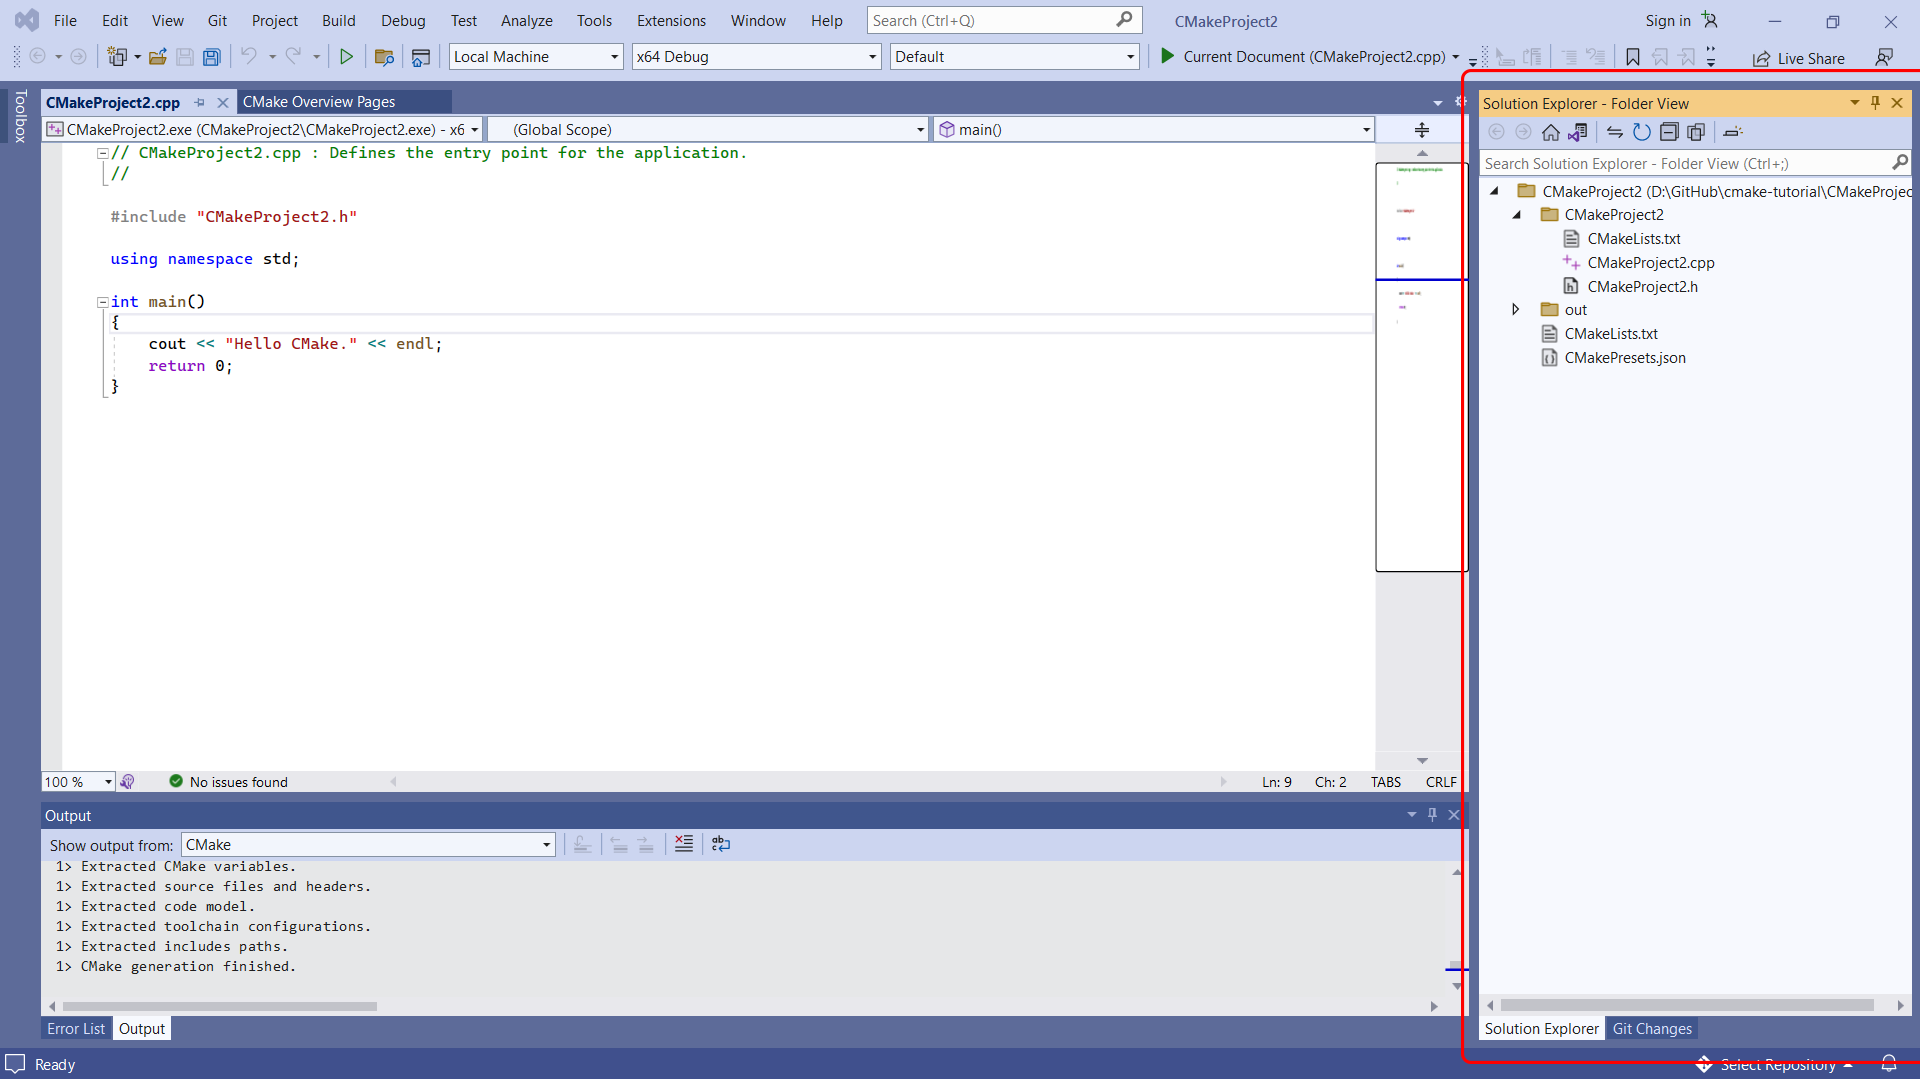
When you’re ready, Visual Studio gives you several options to build your CMake projects, including the toolbar or the Solution Explorer.
If you want to use the toolbar, you need to find the Startup Item drop-down:
Select your preferred target to build, and either press F5 or choose Run.
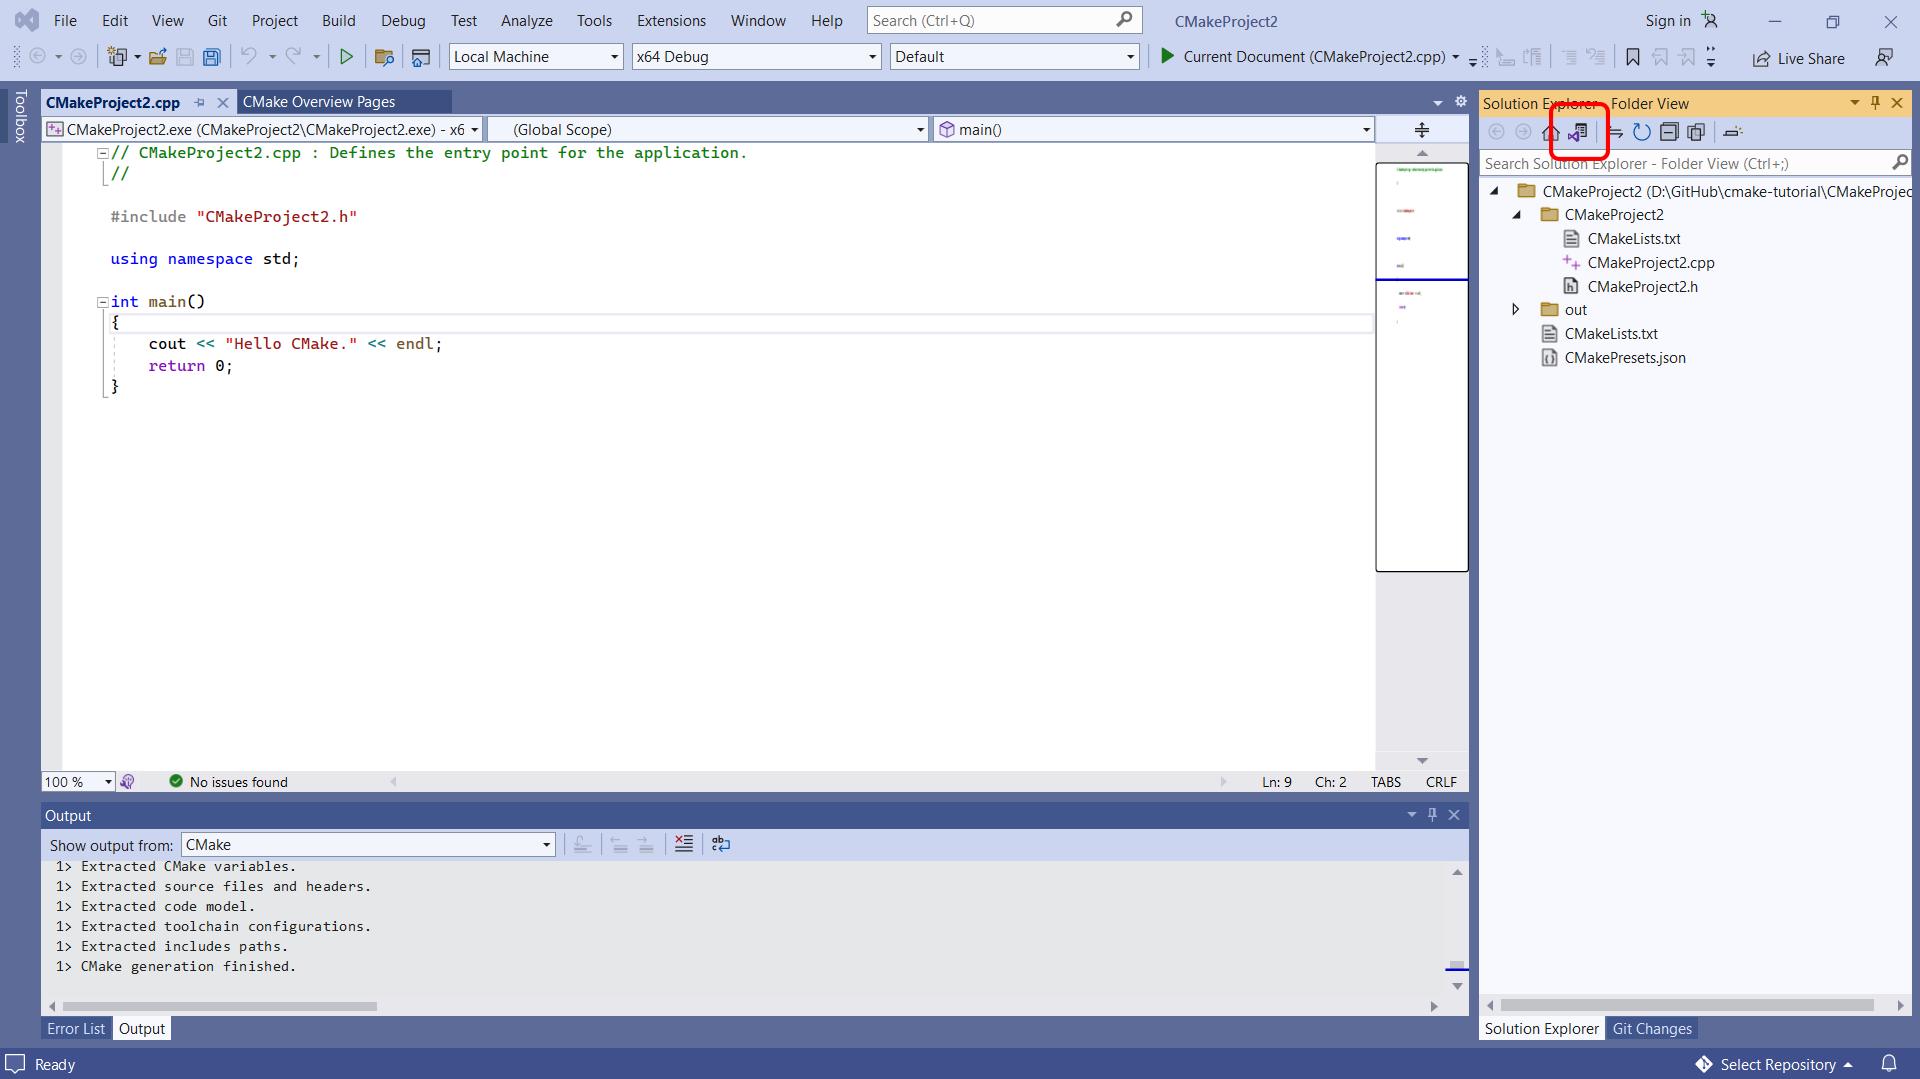
If you want to use the Solution Explorer, navigate to the Solution Explorer on the right-hand side of your screen. By default, it will be set to the Folder View:
You need to change the Folder View to the CMake Targets View. To do this, select the view icon:
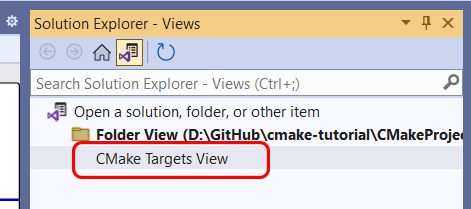
Then select CMake Targets View:
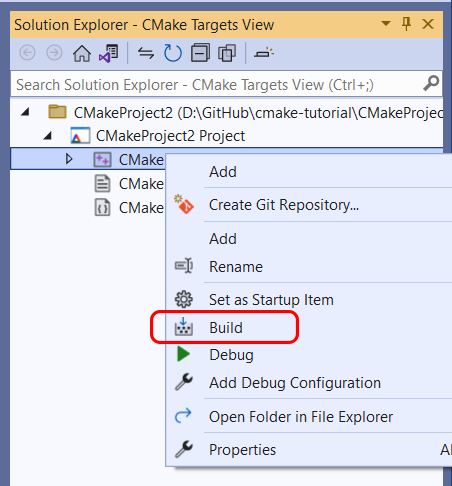
Then right-click on CMake Target and select Build from the context menu:
Lastly, you can select Build > Build All from the main menu of Visual Studio to build your CMake project:
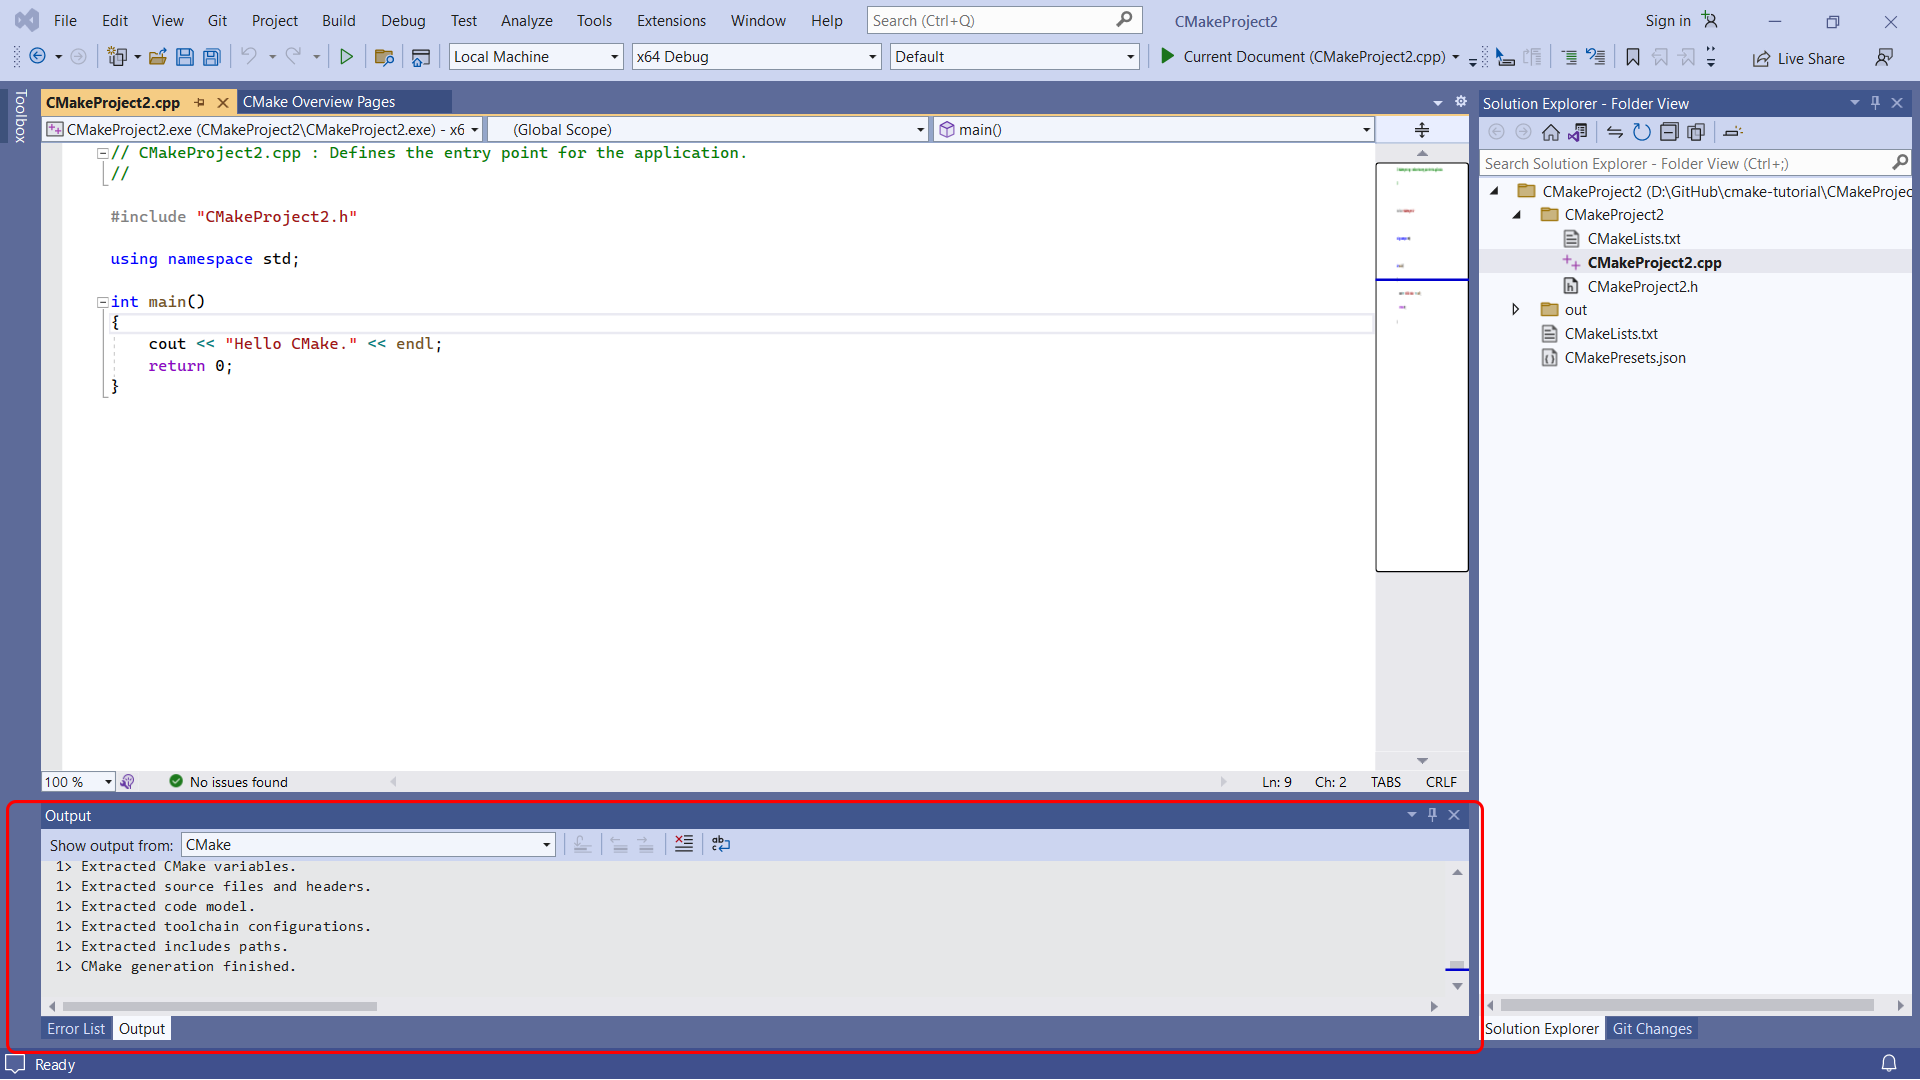
After completing either one of these options, you can find the build results within the Output window and Error List:
Debug CMake Projects
As you know, when writing code, it’s never perfect the first time, which is why you’ll need to be able to debug your code.
To debug your CMake project using Visual Studio, start by selecting one of the targets shown in the Startup Item drop-down within the toolbar:
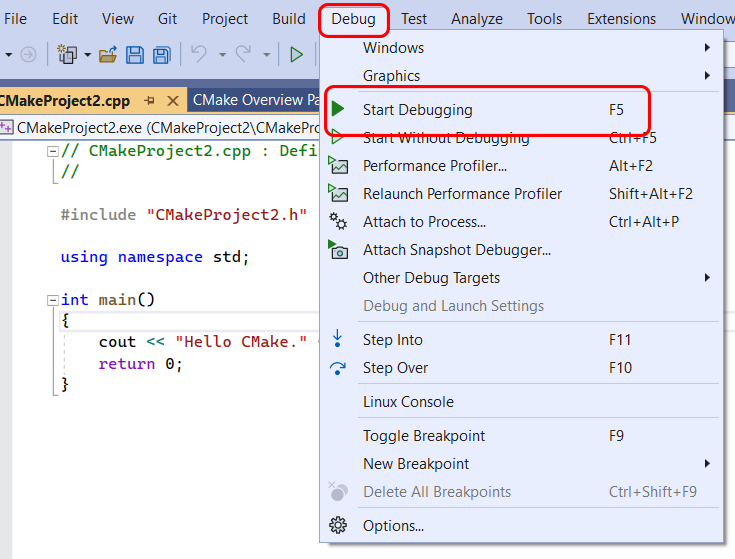
Then select Debug > Start Debugging from the main toolbar:
If any changes have been made since the last time you built the project, the debug command will build it first before the debugging can take place.
The launch.vs.json file can be used to customize your CMake debugging session. This file can be used to input any environment variables or command line arguments that you might want to pass into the program during debugging.
Conclusion
CMake is a versatile tool that aids in build automation, testing, packaging, and software installation. It integrates with many IDEs, giving developers the flexibility to stick with their preferred IDE. It ensures your application’s compatibility across any platform. While CMake isn’t for everyone, it can be a robust solution for the right developer or project.
And if you’re looking to optimize your builds further, you might want to give Earthly a shot for its efficient caching and straightforward syntax.
Earthly makes builds simple
Fast, repeatable builds with an instantly familiar syntax – like Dockerfile and Makefile had a baby.
Learn More
Your CMake version should be newer than your compiler. It should be newer than the libraries you are using (especially Boost). New versions work better for everyone.
If you have a built in copy of CMake, it isn’t special or customized for your system. You can easily install a new one instead, either on the system level or the user level. Feel free to instruct your users here if they complain about a CMake requirement being set too high. Especially if they want 3.1+ support. Maybe even if they want 3.27+ support…
Quick list (more info on each method below)
Ordered by author preference:
- All
- Pip(x) (official, often updates same-day)
- Anaconda / Conda-Forge
- Windows
- Winget
- Chocolatey
- Scoop
- MSYS2
- Download binary (official)
- MacOS
- Homebrew
- MacPorts
- Download binary (official)
- Linux
- Snapcraft (official)
- APT repository (Ubuntu/Debian only) (official)
- Download binary (official)
Official package
You can download CMake from KitWare. This is how you will probably get CMake if you are on Windows. It’s not a bad way to get it on macOS either (and a Universal2 version is supplied supporting both Intel and Apple Silicon), but using brew install cmake is much nicer if you use Homebrew (and you should; Apple even supports Homebrew such as during the Apple Silicon rollout). You can also get it on most other package managers, such as Chocolatey for Windows or MacPorts for macOS.
On Linux, there are several options. Kitware provides a Debian/Ubuntu apt repository, as well as snap packages. There are universal Linux binaries provided, but you’ll need to pick an install location. If you already use ~/.local for user-space packages, the following single line command1 will get CMake for you 2:
~ $ wget -qO- "https://cmake.org/files/v3.27/cmake-3.27.0-linux-x86_64.tar.gz" | tar --strip-components=1 -xz -C ~/.local
The names changed in 3.20; older releases had names like cmake-3.19.7-Linux-x86_64.tar.gz. If you just want a local folder with CMake only:
~ $ mkdir -p cmake-3.27 && wget -qO- "https://cmake.org/files/v3.27/cmake-3.27.0-linux-x86_64.tar.gz" | tar --strip-components=1 -xz -C cmake-3.27
~ $ export PATH=`pwd`/cmake-3.27/bin:$PATH
You’ll obviously want to append to the PATH every time you start a new terminal, or add it to your .bashrc or to an LMod system.
And, if you want a system install, install to /usr/local; this is an excellent choice in a Docker container, for example on GitLab CI. Do not try it on a non-containerized system.
docker $ wget -qO- "https://cmake.org/files/v3.27/cmake-3.27.0-linux-x86_64.tar.gz" | tar --strip-components=1 -xz -C /usr/local
If you are on a system without wget, replace wget -qO- with curl -s.
You can also build CMake on any system, it’s pretty easy, but binaries are faster.
CMake Default Versions
Here are some common build environments and the CMake version you’ll find on them. Feel free to install CMake yourself, it’s 1-2 lines and there’s nothing «special» about the built in version. It’s also very backward compatible.
Windows
Also Scoop is generally up to date. The normal installers from CMake.org are common on Windows, too.
MacOS
Homebrew is quite a bit more popular nowadays on macOS, at least according to Google Trends.
Linux
RHEL/CentOS
The default on 8 is not too bad, but you should not use the default on 7. Use the EPEL package instead.
Ubuntu
You should only use the default CMake on 18.04+; it’s an LTS release with a pretty decent minimum version!
Debian
Other
General tools
Just pip install cmake on many systems. Add --user if you have to (modern pip does this for you if needed). This does not supply Universal2 wheels yet.
CI
| Distribution | CMake version | Notes |
|---|---|---|
| TravisCI Xenial | 3.12.4 | Mid November 2018 this image became ready for widescale use. |
| TravisCI Bionic | 3.12.4 | Same as Xenial at the moment. |
| Azure DevOps | 3.27.0 | kept up to date |
| GitHub Actions 20.04 | 3.27.0 | Same runners as Azure DevOps |
If you are using GitHub Actions, also see the jwlawson/actions-setup-cmake action, which can install your selection of CMake, even in a docker action run.
Full list
Versions less than 3.10 are marked by a deeper color of red.
Also see pkgs.org/download/cmake.
Pip
This is also provided as an official package, maintained by the authors of CMake at KitWare and several PyPA members, including myself. It’s now supported on special architectures, like PowerPC on Linux and Apple Silicon on macOS, and on MUSL systems like Alpine too. If you have pip (Python’s package installer), you can do:
gitbook $ pip install cmakeAnd as long as a binary exists for your system, you’ll be up-and-running almost immediately. If a binary doesn’t exist, it will try to use KitWare’s
scikit-buildpackage to build, and will require an older copy of CMake to build. So only use this system if binaries exist, which is most of the time.This has the benefit of respecting your current virtual environment, as well. It really shines when placed in a
pyproject.tomlfile, however — it will only be installed to build your package, and will not remain afterwards! Fantastic.This also, of course, works with pipx. So you can even use
pipx run cmaketo run CMake in a disposable virtual environment, without any setup — and this works out-of-the-box on GitHub Actions, sincepipxis a supported package manager there!Personally, on Linux, I put versions of CMake in folders, like
/opt/cmake312or~/opt/cmake312, and then add them to [LMod][]. Seeenvmodule_setupfor help setting up an LMod system on macOS or Linux. It takes a bit to learn, but is a great way to manage package and compiler versions.1. I assume this is obvious, but you are downloading and running code, which exposes you to a man in the middle attack. If you are in a critical environment, you should download the file and check the checksum. (And, no, simply doing this in two steps does not make you any safer, only a checksum is safer). ↩
2. If you don’t have a
.localin your home directory, it’s easy to start. Just make the folder, then addexport PATH="$HOME/.local/bin:$PATH"to your.bashrcor.bash_profileor.profilefile in your home directory. Now you can install any packages you build to-DCMAKE_INSTALL_PREFIX=~/.localinstead of/usr/local! ↩
Step#1: download Cmake
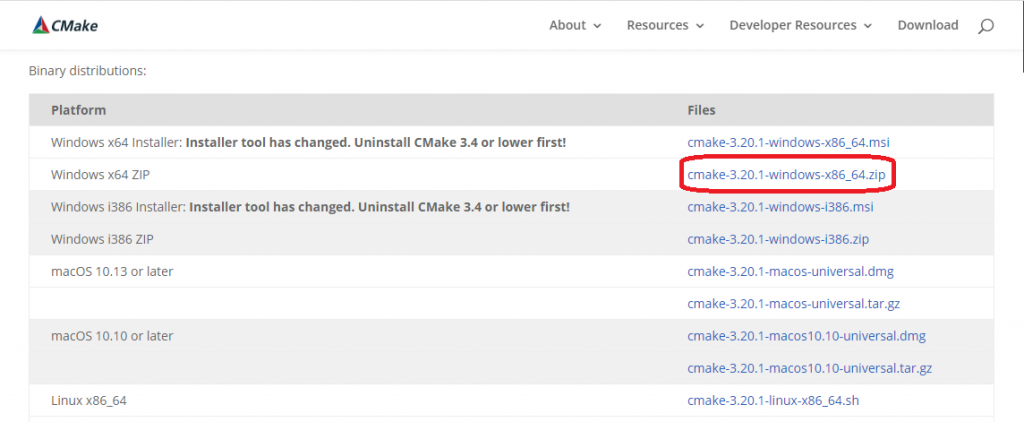
- Download the Cmake software through this link—>
- Go to the download section
- Select option as window’s x64 zip
- After complete download extract files by using WinRAR software
Step#2: set binaries
- Open the CMake folder and locate the bin folder
- Open the bin folder and copy the path
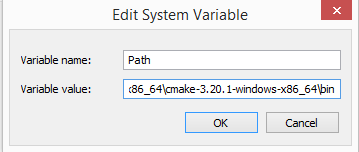
- C:\Users\Mohammed Anees\Desktop\libraries\Cmake\cmake-3.20.1-windows-x86_64\cmake-3.20.1-windows-x86_64\bin
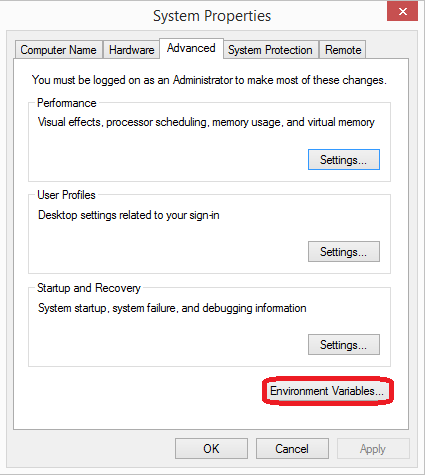
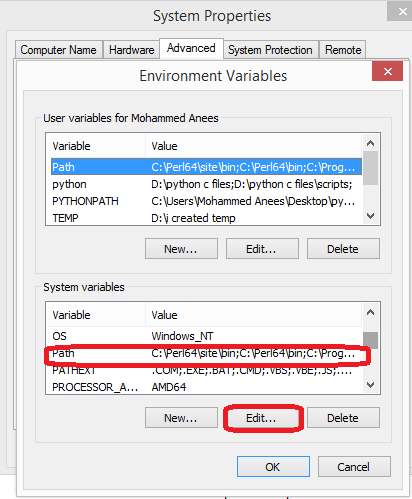
Now go to this pc—>properties—>advanced system settings—> environment variables
Select the path and edit it
Don’t delete the existing path but first, add(semicolon ; ) before the path and then paste it
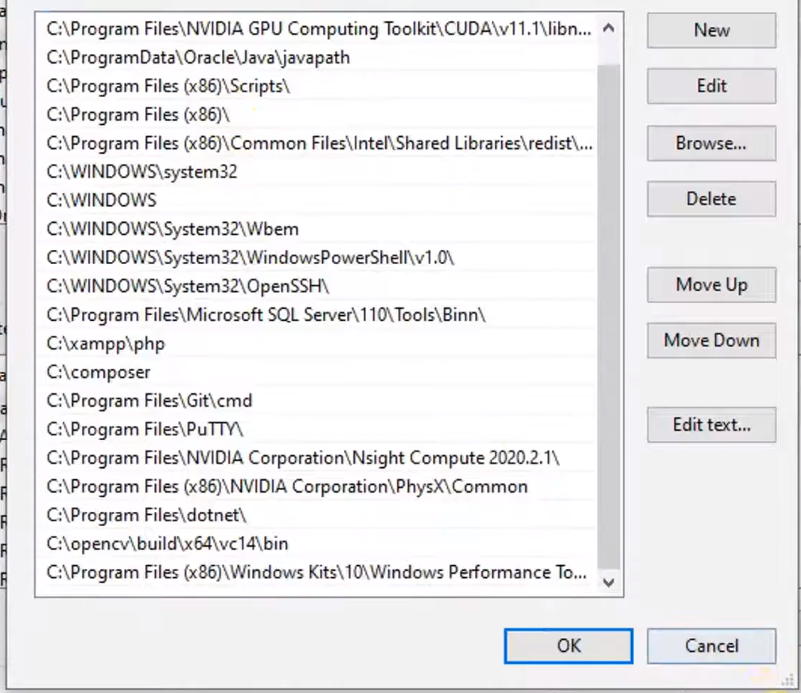
In some pc, you might get a different window like below in that case you no need to add( semicolon ; ) just click new and paste the bin path
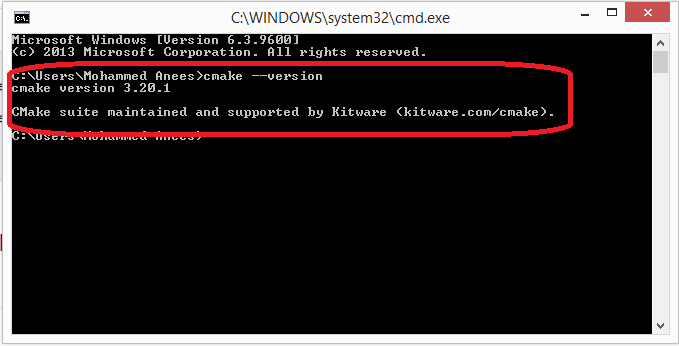
Step#3: check whether you install it right
- Win+x —>Go to Run —> type CMD—> then type the command cmake – -version
Step#3: Create CMake-GUI on desktop
- Open CMake folder—>bin—> CMake-gui—> right click—> send to desktop
Mohammed Anees
Hey there, welcome to aneescraftsmanship I am Mohammed Anees an independent developer/blogger. I like to share and discuss the craft with others plus the things which I have learned because I believe that through discussion and sharing a new world opens up
