Google Chrome is a fast web browser available at no charge. Before you download, you can check if Chrome supports your operating system and that you have all the other system requirements.
How to install Chrome
Windows
- Download the installation file.
- If prompted, click Run or Save.
- If you choose Save, to start installation, either:
- Double-click the download.
- Click Open file.
- If you choose Save, to start installation, either:
- If you’re asked, ‘Do you want to allow this app to make changes to your device’, click Yes.
- Start Chrome:
- Windows 10 and up: A Chrome window opens after everything is done. You can make Chrome your default browser.
If you’ve used a different browser, like Internet Explorer or Safari, you can import your settings into Chrome.
Install Chrome offline
If you’re having problems downloading Chrome on your Windows computer, you can try the alternative link below to download Chrome on to a different computer.
- On a computer connected to the Internet, download the alternative Chrome installer.
- Move the file to the computer where you want to install Chrome.
- Open the file, and follow the onscreen instructions to install.
If you land on the regular download page, that’s normal. Even though the installers look similar, a special tag tells us which one is best for you.
Once you download the file, you can send it to another computer.
Mac
Linux
Use the same software that installs programs on your computer to install Chrome. You’ll be asked to enter the administrator account password.
- Download the installation file.
- To open the package, click OK.
- Click Install Package.
Google Chrome will be added to your software manager so that it stays up to date.
Chromebook
System requirements to use Chrome
Windows
To use Chrome on Windows, you’ll need:
- Windows 10 and up
- An Intel Pentium 4 processor or later that’s SSE3 capable
Mac
To use Chrome on Mac, you’ll need:
- macOS Catalina 10.15 and up
Linux
To use Chrome on Linux, you’ll need:
- 64-bit Ubuntu 14.04+, Debian 8+, openSUSE 13.3+ or Fedora Linux 24+
- An Intel Pentium 4 processor or later that’s SSE3 capable
Fix problems with Chrome
- Try uninstalling Chrome and reinstalling it to fix problems with your search engine, pop-ups or Chrome updates.
- Fix problems installing Google Chrome
- Fix ‘Aw, Snap!’ page crashes and other page loading errors
Fix issues with Chrome on Wayland
Chrome on Linux now supports Wayland along with X11. When Chrome opens on Linux, one of these display server protocols is automatically chosen.
How Chrome interacts with a display server protocol
- Chrome interacts with a display server protocol to help you perform certain types of actions. If you have trouble with these types of actions in Wayland you can change back to X11:
- Drag and drop
- Copy and paste
- Keyboard, mouse or touch input
- Wayland restricts Chrome’s ability to perform certain actions, such as:
- Tab dragging uses simplified preview thumbnails.
- Windows can’t be placed at a set location on the screen.
How to override the Chrome automatic display server protocol selection
From your browser:
- Navigate to chrome://flags
- Set #ozone-platform-hint to X11 or Wayland
From the command line:
- Navigate to the command line
- Launch Chrome:
- For X11:
--ozone-platform=x11 - For Wayland:
--ozone-platform=wayland
- For X11:
Can’t install Chrome because of S mode
If you can’t install Chrome on your Windows computer, your computer might be in S mode. If you want to download and install Chrome, learn more about how to exit S mode. You can also find out how to fix problems installing Chrome.
Related resources
- Sign in and sync in Chrome
- Update Google Chrome
- Uninstall Google Chrome
Was this helpful?
How can we improve it?
Skip the traditional method of installing Chrome; use a command to quickly install the Google Chrome browser on Windows 11 and windows 10.
In 2008, Google released the browser, thanks to its fast speed, it became the most popular browser after only four years. Today, it still holds the top spot. In the Google Chrome browser, the HTML renderer Blink, which is split off from the WebKit, is used. The free Javascript engine V8 is used to execute JavaScript.
Google Chrome consists of three parts. The actual browser, which is responsible for controlling the software, the renderer implemented in the browser and running as a sub-process, and the rendering engine Blink, which runs within the renderer. The rendering processes of the individual tabs (tabbed browsing) take place in a shielded environment (sandbox). This prevents malicious code from infecting the entire computer if only one of the tabs is corrupted.
The browser is available not only for computers but also for smartphones. On most Android devices, it is even pre-installed. In addition, it is possible on the computer to supplement the browser with extensions from a store. Another browser feature is that you can use Google Translate to translate entire web pages.
Steps to install Chrome browser on Windows 11 or 10 using Winget command
1. Open Windows Terminal
To use the command line, we need to run the Terminal app. For that, right-click on the Windows Start button and select Terminal (Admin) on Windows 11 or Powershell (Admin) for Windows 10.

2. Check the Chrome version
Before installing the browser let’s first search and check what version of Google Chrome is available to install using the Windows package manager – winget.
Note: If you have not used Winget earlier, then first run the given command to check whether it is available on your system or not.
winget
If you get output related to it, then the package manager is on your system.
Let’s search Chrome:
winget search chrome
You can see there are three editions of Chrome available standard, Beta, and Dev along with their version numbers.

3. Install Chrome on Windows 11 or 10
Next, use the winget to install the edition you want; it is recommended to go for the standard one if you want the browser for regular use. Those who want to try out new features before available to the public can opt for Beta or Developer versions.
For the standard version
winget install Google.Chrome
For the Beta version
winget install Google.Chrome.Beta
For Dev version
winget install Google.Chrome.Dev
4. How to run the browser
Well, installing through the command terminal doesn’t mean we also need the same to run the browser. Just go to your Windows search box and type Chrome to run it like any other common software.

5. How to update Chrome using command
Just like we have installed the Google Chrome browser on Windows using the Winget command line, we can update it as well, if any new version is available.
winget upgrade Google.Chrome
6. Uninstall or remove
No need to go through the Control panel to uninstall Google Chrome from Windows 11 or 10. We can use Wignet for that as well. Just run the given command and you are done.
winget uninstall Google.Chrome
In the same way, you can uninstall Chrome beta and dev versions as well.
Other Articles:
⇒ Install Top 10 essential software on Windows 11 using the command
⇒ How to install XAMPP on Windows 10 using the Command prompt
⇒ Command to download and install Slack on Windows 11 or 10
⇒ How to Install PHP Composer on Windows 11
⇒ List of Common Keyboard Shortcuts for Windows 1
Google Chrome is currently leading all browsers in popularity. Chrome has been setting new standards in speed, efficiency, and security since 2008. Chrome is just as good as advertised, although it doesn’t need any advertising. Everyone knows Chrome, and every other Internet user is also a Chrome user. If you’re on Windows 10 or 11, then give Google Chrome a try, and you will enjoy its reliability and functionality.
Contents
- System Requirements for Google Chrome on Windows 10/11
- How to Download and Install Chrome on Windows 11/10
- How to Make Chrome Your Default Engine
- How to fix Google Chrome installation failed
- How to Uninstall Google Chrome on Windows 10 and 11
System Requirements for Google Chrome on Windows 10/11
Speaking of the latest version’s system requirements, they’re rather moderate:
- Windows 10 or 11.
- An Intel Pentium 4 processor or later that’s SSE3 capable.
- Free disk space – at least 573 MB.
As for RAM usage, pretty much any computer with Windows 11/10 on board is capable of running Chrome. But of course, the more RAM you have, the better.
10 open tabs consume about 1 GB, 20 tabs – 1.8 GB, 60 tabs need 3.7 GB.
You can download the latest version of Chrome for Windows 11 or Windows 10 from our website, it is fast and safe.
Hit the Download button, and click on Save File.

Then run the saved filed. By default, it should be in your Downloads folder. Double-click on it and press Run.
When prompted to allow this app to make changes to your device, click “Yes.” Google Chrome will begin the installation and open the browser automatically upon completion.
Next you can sign in to your Google account, turn on sync, get some extensions, change the browser’s appearance and so on. But the first thing you’ll probably want to do is set Chrome as your default browser.
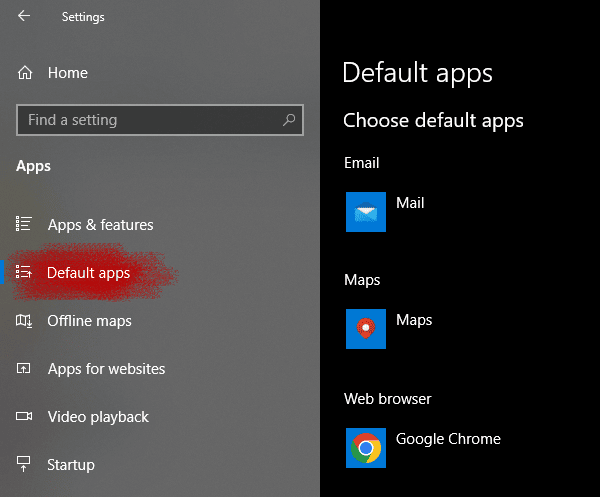
How to Make Chrome Your Default Engine
You can do this either in Windows or in Chrome settings.
In Windows go to Start – Settings – Apps – Default Apps – choose Google Chrome under Web Browser.

In Chrome go to chrome://settings/defaultBrowser and click “Make default.”
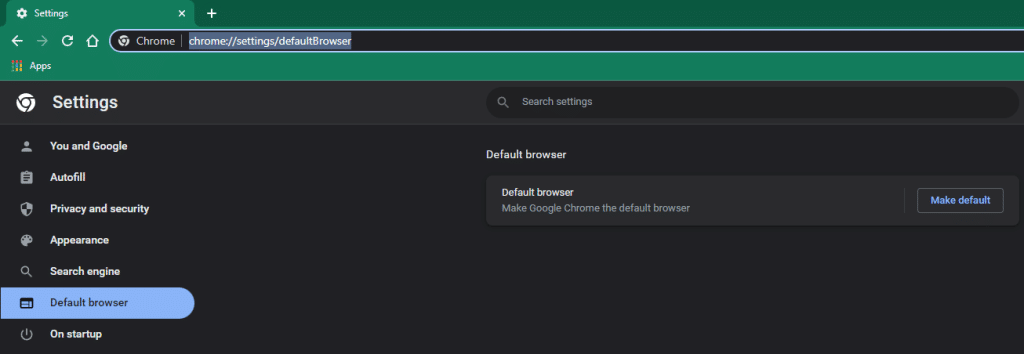
You’ll be redirected to “Default Apps”, and you know what to do there.
How to fix Google Chrome installation failed
Specific error codes mean the following:
- 1603 and 0x00000643 – run Microsoft’s Install and Uninstall Troubleshooter,
- 0x80070070 – free up enough space on your system disk,
- 4 – a newer version of Chrome is already installed on your computer,
- 31 – could not re-install Chrome,
- 7, 12, 13, 35, 57, 102, 103 – the installation failed for unknown reasons.
If you get an error message when you try to install Google Chrome, try these fixes one by one:
- run Microsoft’s Install and Uninstall Troubleshooter anyway, even when the error code is not 1603 or 0x00000643,
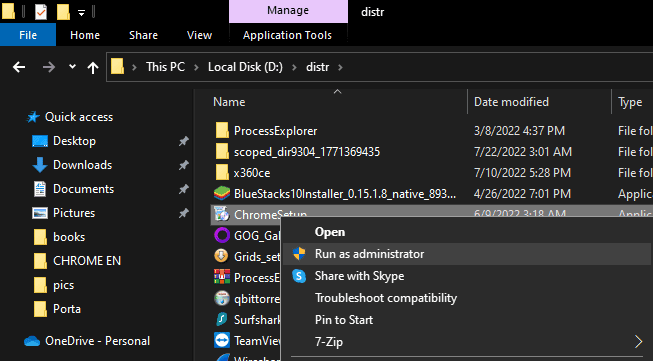
- right-click on the installation file to open the context menu, and choose “Run as administrator”,
- scan for viruses,
- temporarily disable antivirus software and firewall,
- fix Internet stability issues,
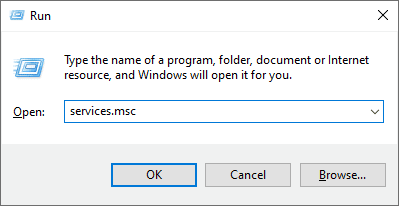
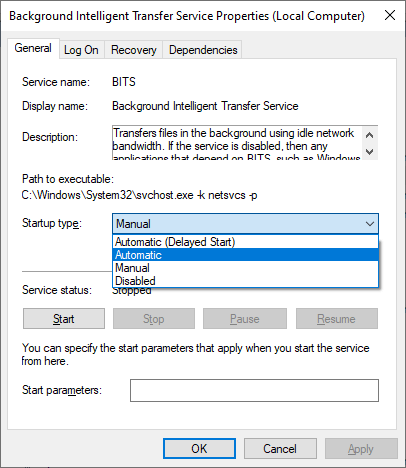
- make sure the Background Intelligent Transfer Service is running: press Win+R, type in mcs, right-click on the Background Intelligent Transfer Service, select Properties and set the Startup type to Automatic,
- download and install one of the stable versions of Chrome for Windows 10 or Windows 11.
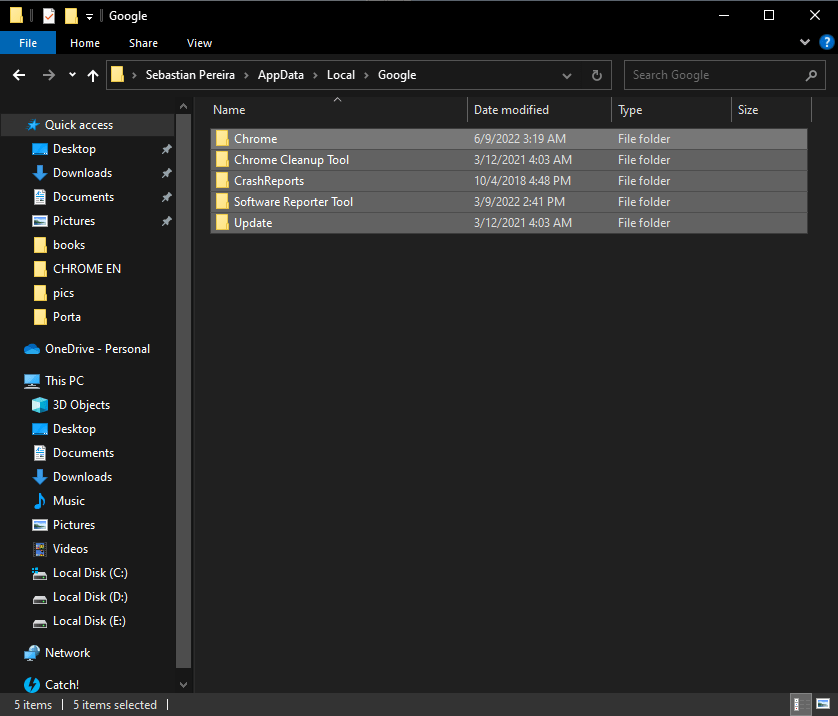
If nothing helps you can also try to delete the Google and Google Update folders:
- press Win+R, then copy/paste %localappdata%\Google\ and click OK,
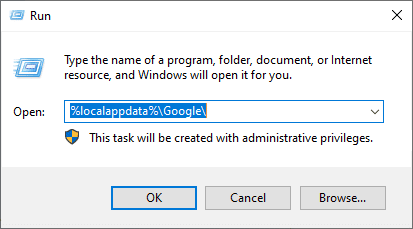
- now select the Update folder and hit “Delete” on your keyboard,

- after it’s done, see if you can install Google Chrome; if no, then go back to %localappdata%\Google\ but this time delete everything, every single folder.
The last resort (though, not actually) is to remove the Google key from your Registry:
- press Win+R, type in regedit and hit the OK button to open the Registry editor,
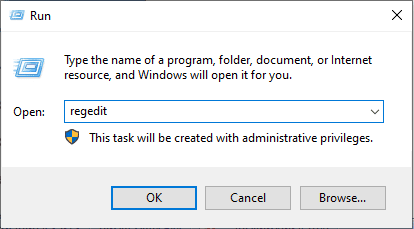
- navigate to HKEY_CURRENT_USER\Software\Google\Update\ClientState and delete {4DC8B4CA-1BDA-483e-B5FA-D3C12E15B62D}
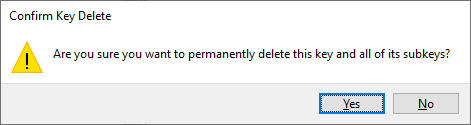
If you still can’t install Chrome after it, then delete the following 3 keys:
- HKEY_CURRENT_USER\Software\Google
- HKEY_LOCAL_MACHINE\Software\Google
- HKEY_LOCAL_MACHINE\Software\Wow6432Node\Google
Also you can always ask for help at the Google Chrome Help center.
How to Uninstall Google Chrome on Windows 10 and 11
Google Chrome is the most popular browser in the world, it’s true. But that doesn’t necessarily means it’s the best overall. You may not like it at all, or you might like some other browser better. Whatever the reason is, you can uninstall Chrome nice and easy:
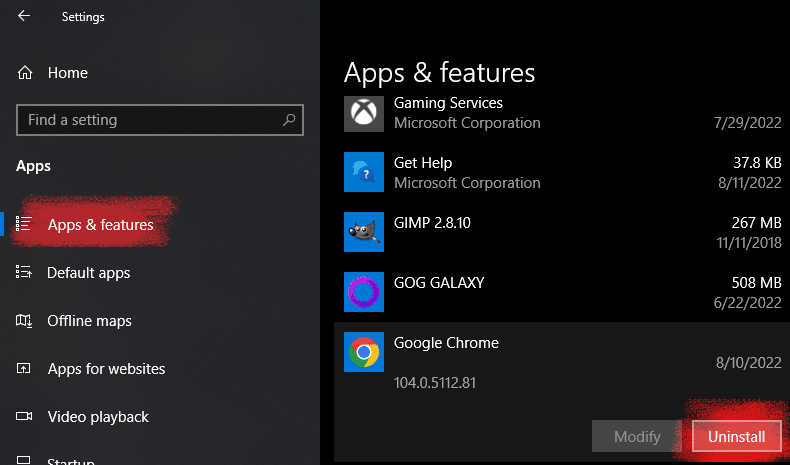
- Go to Start – Settings,
- Apps – Apps & features, scroll down to Chrome and click “Uninstall”.
( 9 assessment, average 4.22 from 5 )
In our present modern world which is governed by computers and mobile devices in almost every aspect of life- from businesses, academics and even in the field of health as well as in the workplaces that we get indulged with each day, the need of a tool that can browse through millions of websites currently registered is a must! Computers and other devices that can access the web has evolved from being a tool in the military to a worldwide phenomenon and now, we even entertain ourselves with all the games, social media and many other information and leisure stuff that it can offer. That’s the reason why each device, no matter what type of it that you own really needs a web browser. If you bought a laptop before then also acquired a mobile device like a tablet or smartphone, you’ve surely seen a built-in browser in it but the problem is most of them can’t really match the usability and speed of the popular one called Google Chrome! In this tutorial, we will be showing you the steps in how you can install Google Chrome to Windows 10 and how you can do it in other computers even without Internet connection so if you really want a browser that can do a lot of things without sacrificing speed and system resource then you need to get Chrome installed to your computer now!
Installing Google Chrome for the First Time
If you are reading this tutorial right now then we assume that your computer is currently connected to the Internet and you don’t have Google Chrome installed on it yet so in order to install Google Chrome for the first time, you will need to make sure that your machine has access to the Internet. Once it is connected, you will need to head to your favorite browser, open Google search by typing in “google.com” into your browser’s URL input box on top and once the Google search page opens, simply type in “Google Chrome download”. Once the search results appears, simply click on the first one that is displayed on the list and you will automatically be taken to the Google Chrome download webpage which looks exactly like the one shown below.
From the Google Chrome download page, you will simply need to click on the button that says “Download now” and a another Window will open which contains the “Google Chrome Terms of Service” statement. From here, you will also see 2 checkboxes at the bottom. The first one asks you to make Google Chrome your default browser while the second one asks if you want to help make Google Chrome better by sending usage statistics and crash reports. You can check both of these options or just leave them unchecked then hit the “Accept and Install” button found at the bottom as highlighted on the screenshot below.
After doing so, the Google Chrome Online Setup file will be downloaded and once the download completes, you will simply need to head towards your computer’s “Downloads” library and look for the downloaded file that says “ChromeSetup” in there. The file should look like the one shown below.
Just double-click on this file and follow the instructions in order to run it. If you used Microsoft Edge (Windows 10’s brand new built-in browser) in downloading the Google Chrome setup file then you can simply click on the “Run” button that would appear at the bottom after the file is downloaded in order to automatically run the installer or click on the “Open folder” button if you want to open the Downloads library and click the setup file from there.
After the setup file is run, a “User Account Control” Window will appear and from here, all you need to do is click on the “Yes” button. After hitting “Yes”, Google Chrome online setup will then be downloaded and all you need to do is wait for the browser to be completely downloaded and installed. Nothing else is left for you to do after running the setup file because the installer will handle everything for you.
Once Google Chrome gets installed, you will be asked to login to it using your Google account. If you don’t have one yet then you can simply sign up for a new account and use it to login to Google Chrome. Logging in will help sync your browsing history, bookmarks and many other stuff to all your device where you’ve logged in using your Google Account such as your android tablet or smartphone.
How to Download Google Chrome Offline Setup
Now, you’ve seen how Google Chrome is downloaded using the common method but the method itself requires your computer to be connected to the Internet. What if someone asks you to install Google Chrome into their computer and there is no available Internet connection? The first method that we’ve shown above just won’t work because the setup file isn’t complete that’s why you need connection to the Internet so that the setup file can download all the other required files for Google Chrome installation. However, you don’t really need to worry that much because Google Chrome also has an offline installer version which is also known as “Google Offline Installer” or “Google Standalone Setup”. To download this setup file (which is actually larger than the one we’ve downloaded above since it is already complete), you will again need to open a web browser and this time you can use the newly installed “Google Chrome” in your computer then head to the Google Search webpage once again. On the Search input box of the Google Search webpage, simply enter “Google Offline Installer” and then hit on your computer’s “Enter” key or just click on the “Search” icon at the right end of the Google Search input box. After you do this, the Search results will display and from here, simply click on the one that appears on the very top so you can access the Google Offline Installer download page as you can see on the screenshot below.
On this next page, you will then need to click on the version of Google Chrome that you want to download. If you are planning to use Google Chrome as your personal browser and won’t allow others to use it then you will need to choose “install Chrome for one account” while if you plan to let others use your Google Chrome browser then you will need to click on the “install Chrome for all accounts” link as highlighted on the screenshot above. After clicking on the link that corresponds to the Google Chrome version that you want to download an offline installer for, a new tab will be opened and finally display the “Download Chrome” button. Just click on it and again, the “Google Chrome Terms of Service” Window will open where you will simply need to click “Accept and Install”.
After hitting the “Accept and Install” button from the “Google Chrome Terms of Service” Window, the Offline Installer will be downloaded instantly and all you need to do is wait until the download completes. It will take longer because the Offline Installer is 30MB+ in size but if you have fast Internet connection then the download process should complete in a few minutes! If you wish to download both versions of Google Chrome Offline Installer (the one for single user and multiple users) then you will simply need to go back to the first step, select the other version that you want to download and follow the same steps that we’ve shown above. Once the installers are completely downloaded, just copy them to your USB flashdrive that you bring with you always and voila! You now have an offline Google Chrome installer that you can use anytime even without connection to the Internet!
Google Chrome: A Great Tool for Browsing the Modern Web!
What’s great about Google Chrome is that it is owned and developed by the Internet giant “Google”. This means that you will get the most out of your browsing sessions because of the plugins and add-ons that are found in the Google Chrome Web Store. There are thousands of free plugins that can be downloaded from there which would surely make your more productive no matter how you use Google Chrome! Have you started using Google Chrome lately? What do you like about it most? We’d like to hear your voice, please feel free to initiate a healthy discussion about this amazing browser by using our comments section below!
Google Chrome is a great browser and I have been using it for years. If you are a millennial or a boomer, then you probably remember a time where the Internet Explorer was our go-to but I am definitely glad that time is over. Chrome is not only easy to use, but it offers a ton of extensions that increase the functionality of your basic browser without being a detriment to your browsing experience. So, why not learn how to install Google Chrome today? If you want to remove it for some reason, later on, no need to worry. I will teach how to uninstall Google Chrome as well.
If you got a new computer or just installed Windows 10, you won’t have Chrome installed by default. No need to worry, because the process is very easy and definitely not a hassle. I am going to share with you both how to install the browser, and how to uninstall it as well. Just follow these instructions, and you will be good to go.
How to Install Chrome on Windows 10
Step 1 – Just open whatever browser you have available (I am using Microsoft Edge to show you the steps) and go to https://www.google.com/chrome/. This is what the page will show. Click on Download Chrome.

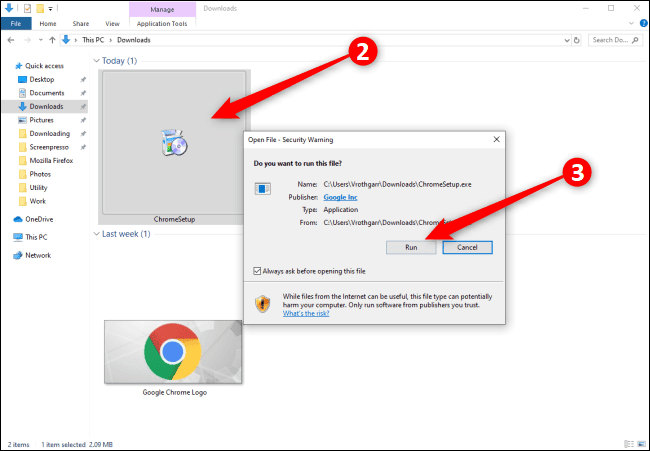
Step 2 – The ChromeSetup.exe file will be downloaded; depending on your browser it will either appear at the bottom, or at the top of the screen like mine is. Once the download is complete, click Open file to start the installation.

Step 3 – A UAC prompt will open like this and will ask you, ‘Do you want to allow this app to make changes to your device?’. Click Yes to start the installation.

Step 4 – This is what you will see, as soon as installation starts.

Step 5 – When the installation is complete, Google Chrome will automatically start, and an icon will be added to your desktop.
So, this is how you install Google Chrome. Easy, wasn’t it? Enjoy your new browser!
Uninstalling Chrome in Windows 10
Don’t like the new browser? No, worries. You can uninstall Google Chrome even more easily! Just follow these simple steps.
Step 1 – Click on the Start menu or the Windows button at the bottom of your screen and type Uninstall in the search box. Open the Add or remove programs option.

Step 2 – The following screen will appear. Under Apps & features, in the search bar, type Chrome.

Step 3 – When the Google Chrome option appears, simply click on Uninstall.

Step 4 – This will give another uninstall prompt. Click Uninstall.

Step 5 – Once again a UAC prompt will appear asking you, ‘Do you want to allow this app to make changes to your device?’. Click Yes.
Step 6 – Once more, you will be asked if you want to Uninstall Chrome and you can check the ‘Also delete your browsing data’ box if you want. This will remove your bookmarks and other information, as well. If you don’t want this to be removed permanently, I suggest not checking this option.

Step 7 – A survey will open on your default browser, asking about why you uninstalled chrome. You can choose to fill it or just ignore it.

Your Chrome has now been successfully uninstalled on your Windows 10 computer.