Learn how to get your favorites apps on Windows 11
by Loredana Harsana
Loredana is a passionate writer with a keen interest in PC software and technology. She started off writing about mobile phones back when Samsung Galaxy S II was… read more
Updated on
- Android apps are delivered to users through the Google Play Store and other app stores.
- When one has an application in APK format but no Android device to install it on, one can use a third-party app.
- Windows 11, through the Windows Subsystem for Android, now allows you to open and install such files on your PC.
Many of our readers asked how to install and run APKs on Windows 11 and this article is going to answer all the questions.
You will have to download an APK file opener for your operating system – but that’s only if you don’t already have one installed. For more advanced features and a higher probability of opening an APK file, we recommend File Viewer Plus which has more than 400 extensions available.
- Is my PC APK ready?
- What do I need to install APK files on Windows 11?
- How can I install APK files on Windows 11?
- 1. Download and install Windows Subsystem for Android
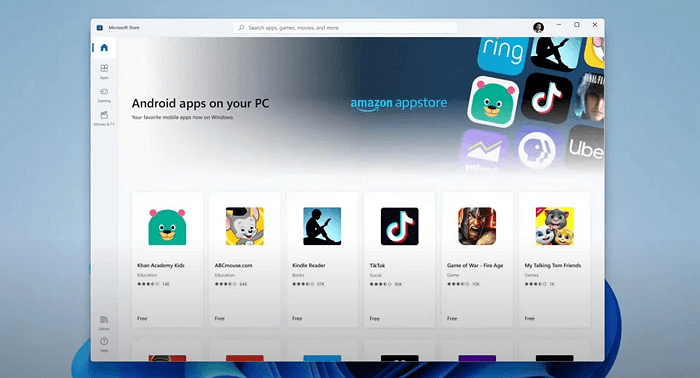
- 2. Download and install the Amazon Appstore
- 3. Sideload APKs using an APK file
- Are there implications of running APKs from third-party sites?
- Are APK files safe?
Is my PC APK ready?
There are two ways to install APK files on Windows: use an Android emulator or unpack them with a special application.
In order to install APKs on Windows 11, you need to have Hyper-V and Virtual Machine Platform enabled.
To enable the two features:
How we test, review and rate?
We have worked for the past 6 months on building a new review system on how we produce content. Using it, we have subsequently redone most of our articles to provide actual hands-on expertise on the guides we made.
For more details you can read how we test, review, and rate at WindowsReport.
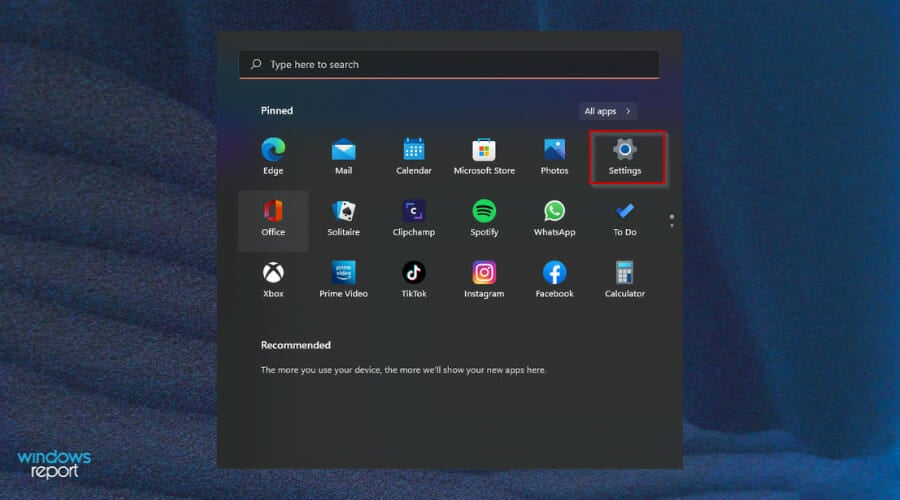
1. Hit the Windows + I keys simultaneously to open the Start Menu then select the Settings app.
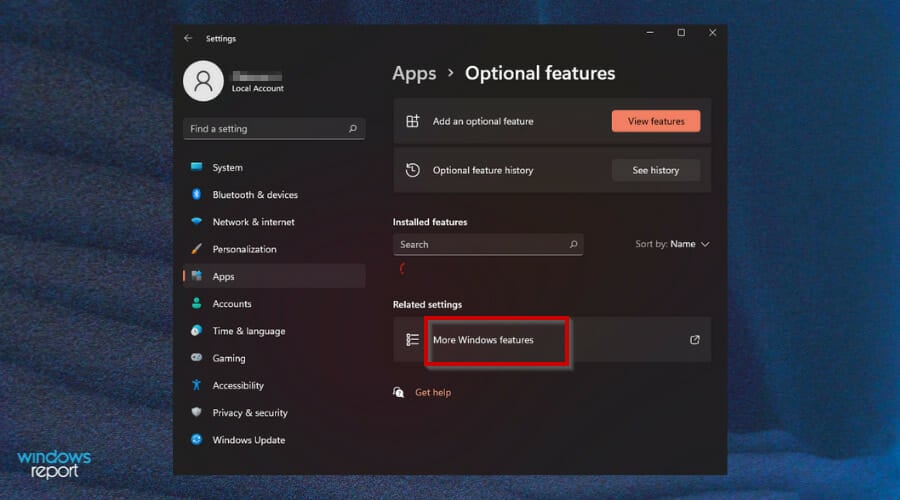
2. Navigate to Apps and select Optional features.
3. Select More Windows Features.
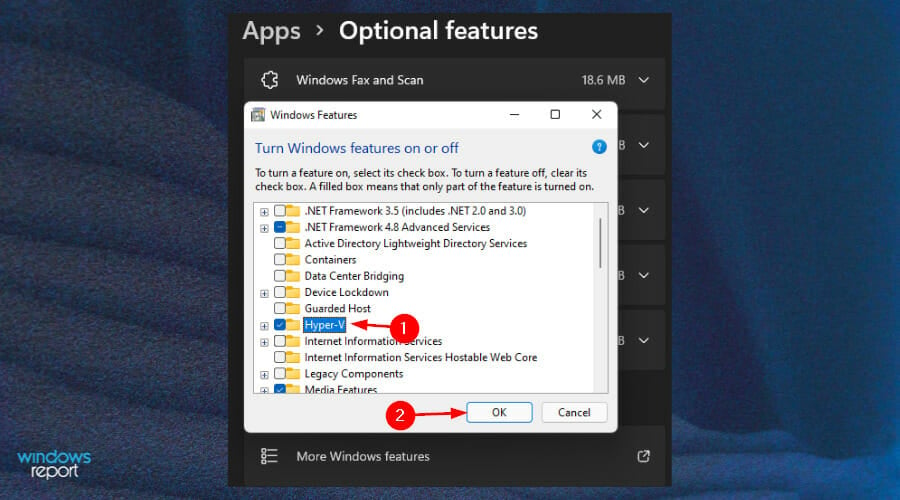
4. Locate Hyper-V and click on the checkbox then press OK.
5. Also find Virtual Machine Platform, click on the checkbox and press OK.
6. Wait for the installation to complete.
What do I need to install APK files on Windows 11?
The majority of Android apps are written for phones, and won’t run on the larger screens of PCs. There are ways to get around this, but they vary in effectiveness and riskiness.
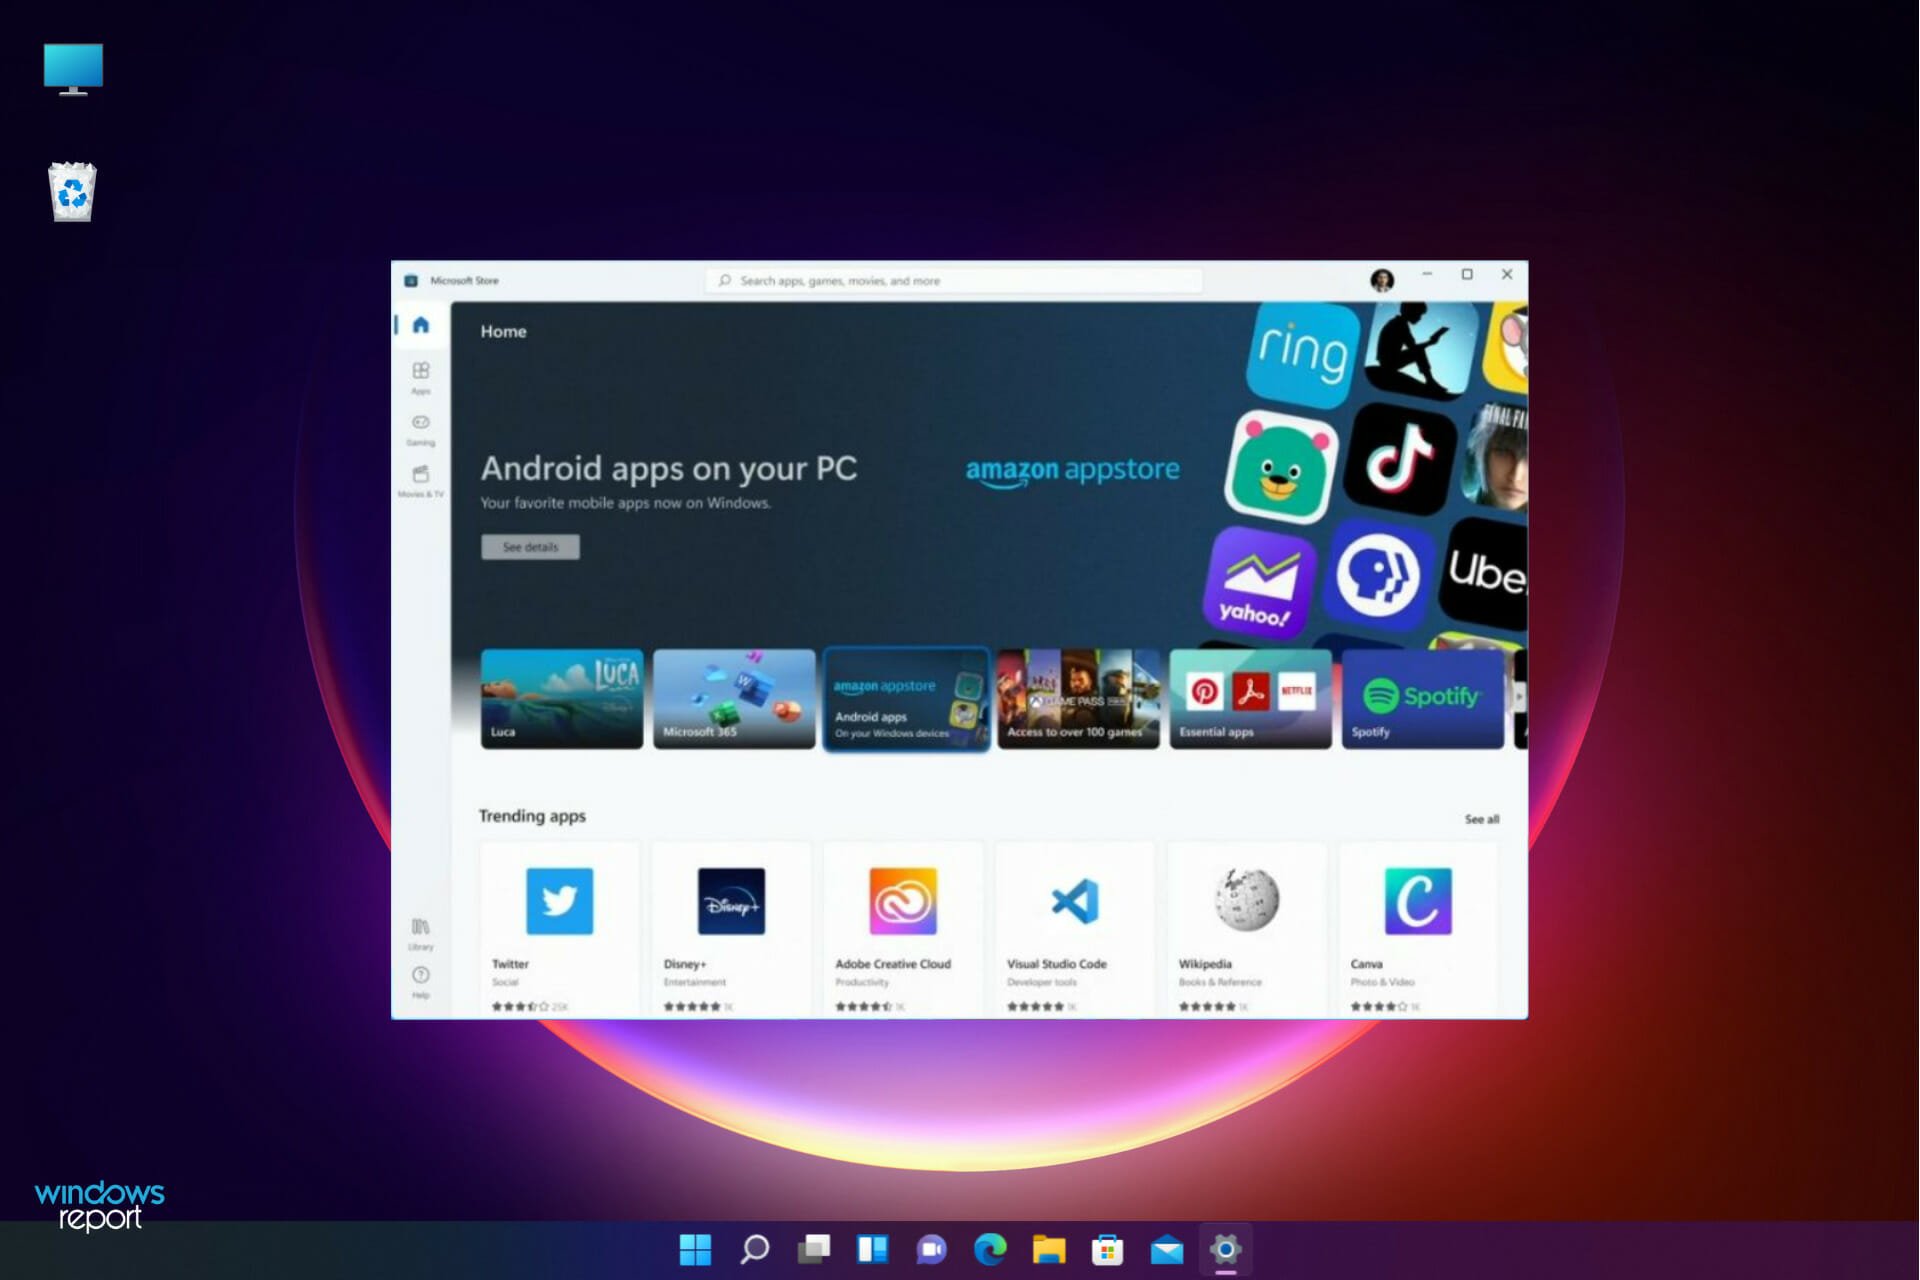
You will probably want to download a Google Play Store alternative for your Windows 11 PC. The most common app stores are the Amazon Appstore and the Microsoft Store.
The only limitation is that the stores offer a limited number of applications so if you need one that is unavailable, you will have to sideload it. In addition, your PC must meet the minimum system requirements before you can run any APKs.
Sideloading means installing apps from sources other than the official stores. There are quite a few reasons why one might want to do this: free apps, avoiding data usage when downloading games and videos, and so on.
Don’t hesitate to visit our guide on how to sideload Android apps on Windows 11 if you choose to install them from third-party sites.
For Windows 11 users, Microsoft’s Windows Subsystem for Android is a great new addition to the operating system. It allows you to run Android apps on your PC or laptop.
How can I install APK files on Windows 11?
1. Download and install Windows Subsystem for Android
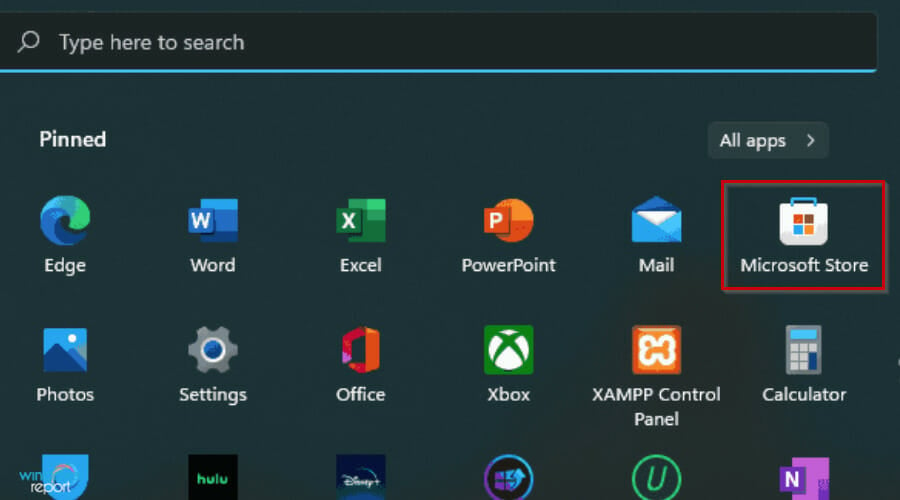
- Press the Windows + I keys to open the Start Menu.
- Select Microsoft Store to launch.
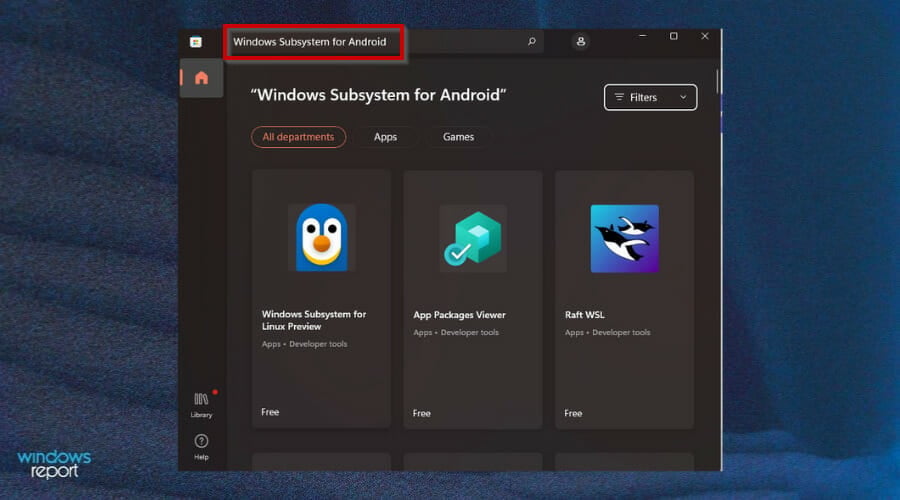
- Type Windows Subsystem for Android on the Microsoft Store search window and press Enter.
- Click Open Microsoft Store to be redirected to the Microsoft Store.
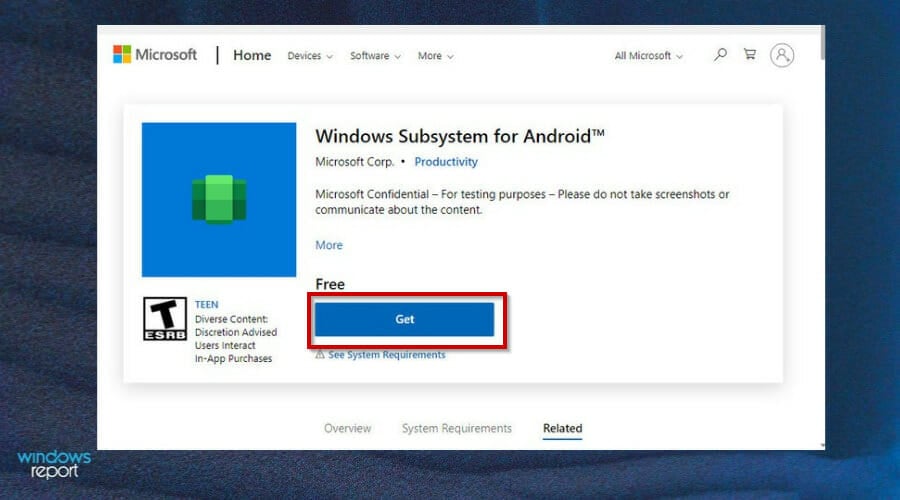
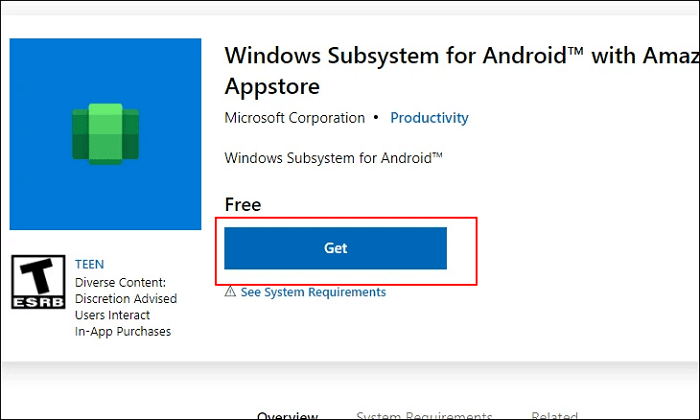
- Hit the Get button to start installation.
- Once installed, you can now download and open APKs.
2. Download and install the Amazon Appstore
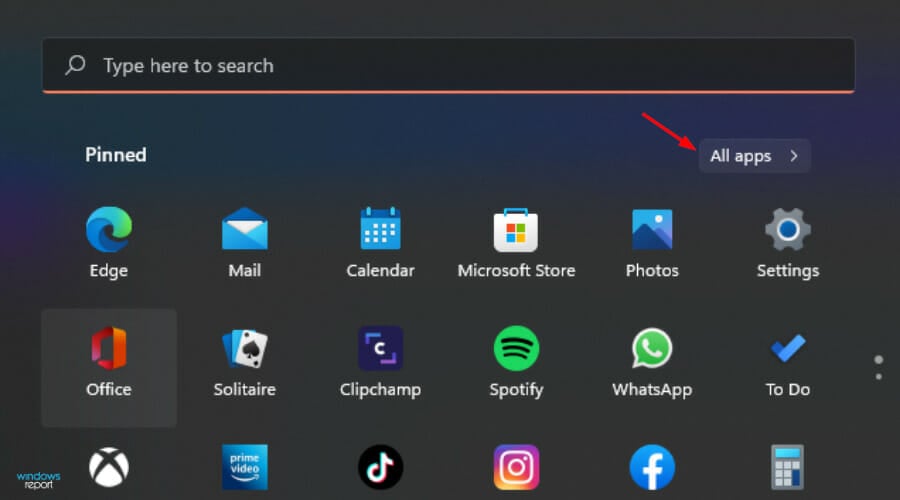
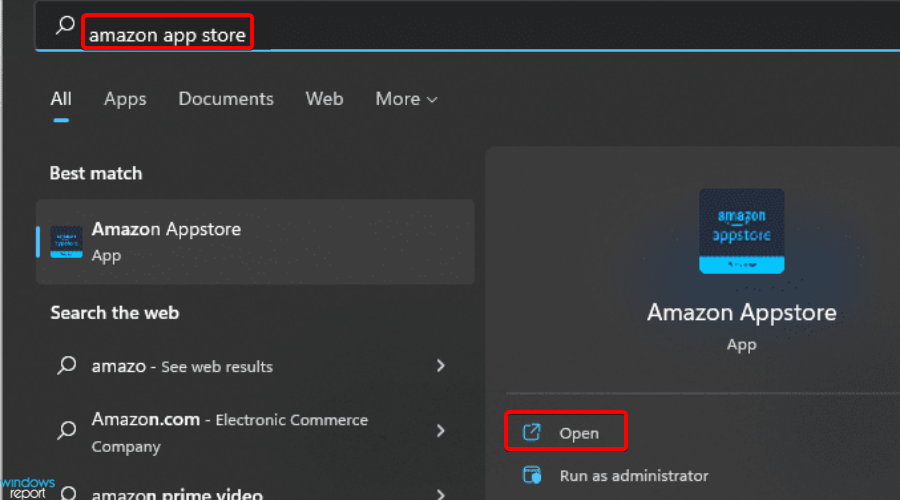
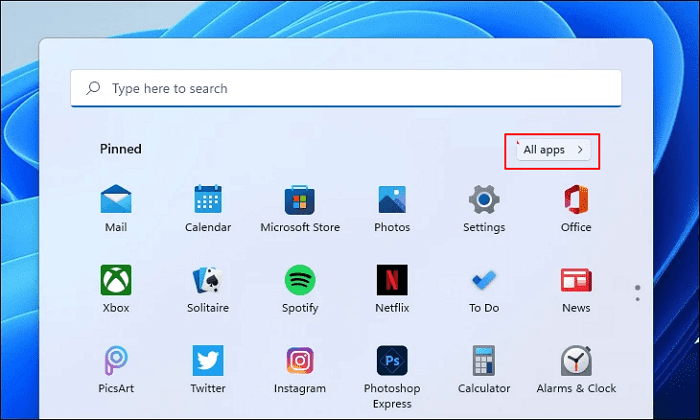
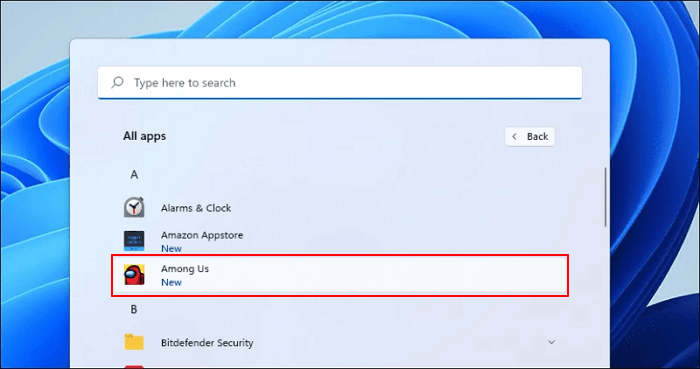
- Press the Windows + I key to open the Start Menu and click on All apps.
- Locate the Amazon Appstore and click on it to launch.
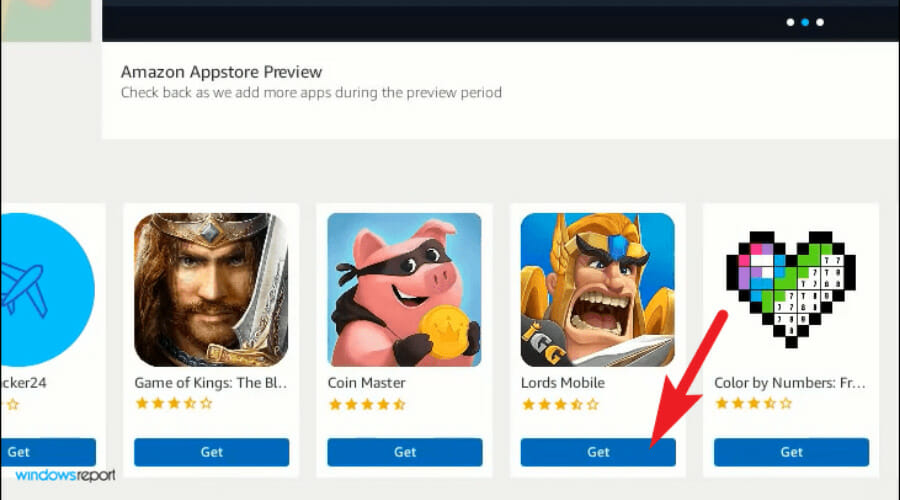
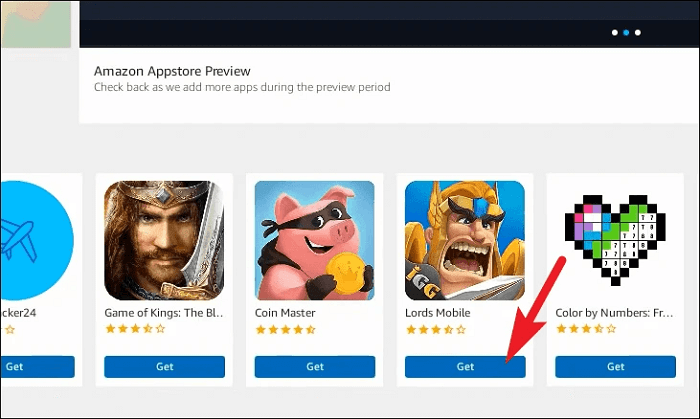
- Find the application of your choice and click on the Get button.
3. Sideload APKs using an APK file
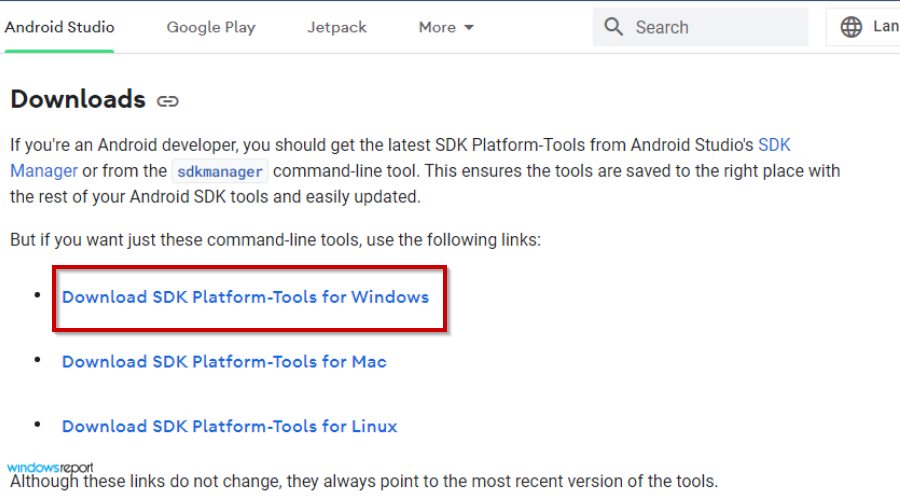
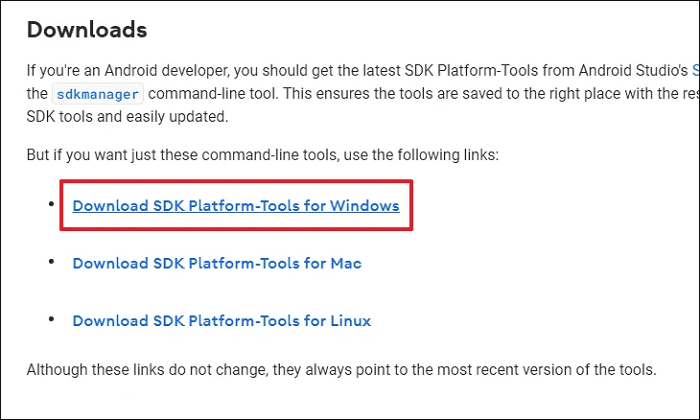
- Open your browser and click to Download SDK Platform-Tools for Windows.
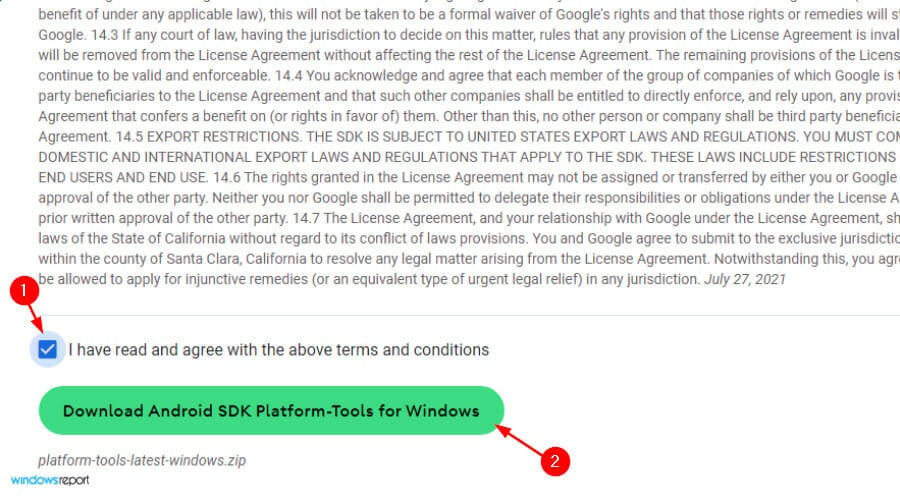
- Click the checkbox I have read and agree with the above terms and conditions to start downloading.
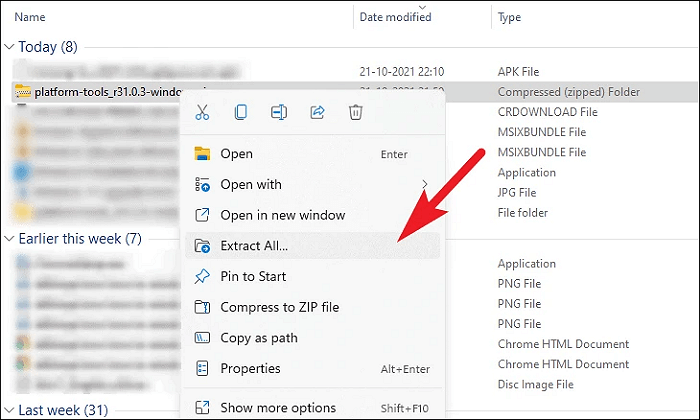
- Open the zip folder to extract all files.
- Open the Start Menu and select All apps.
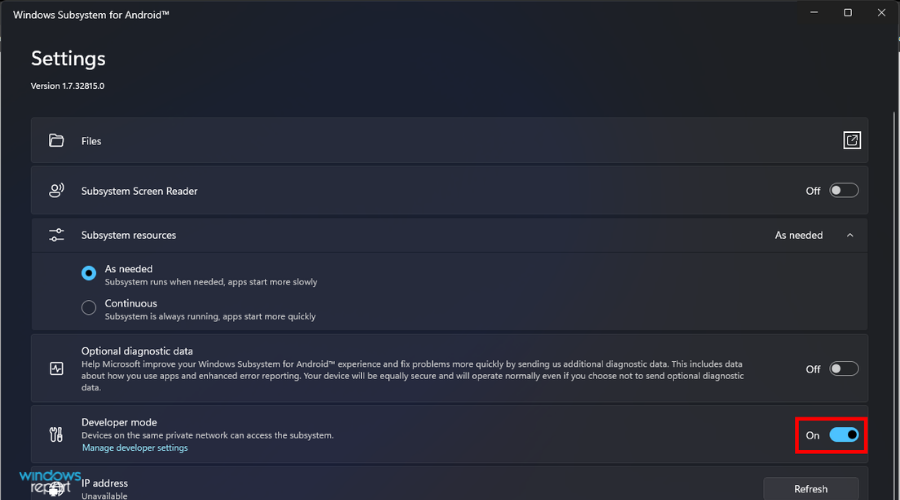
- Locate Windows Subsystem for Android and launch it.
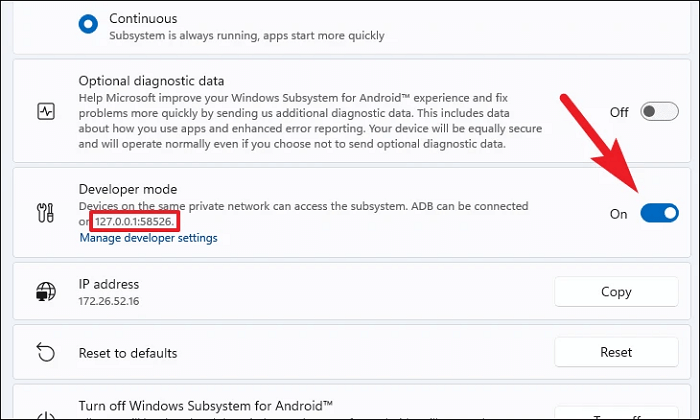
- Select Developer mode and toggle it on.
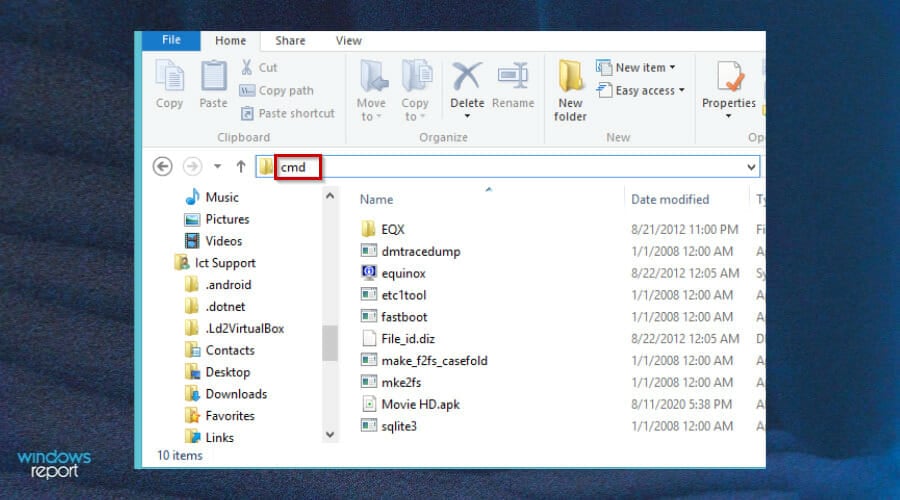
- Go back to the extract folder and type cmd on the address bar.
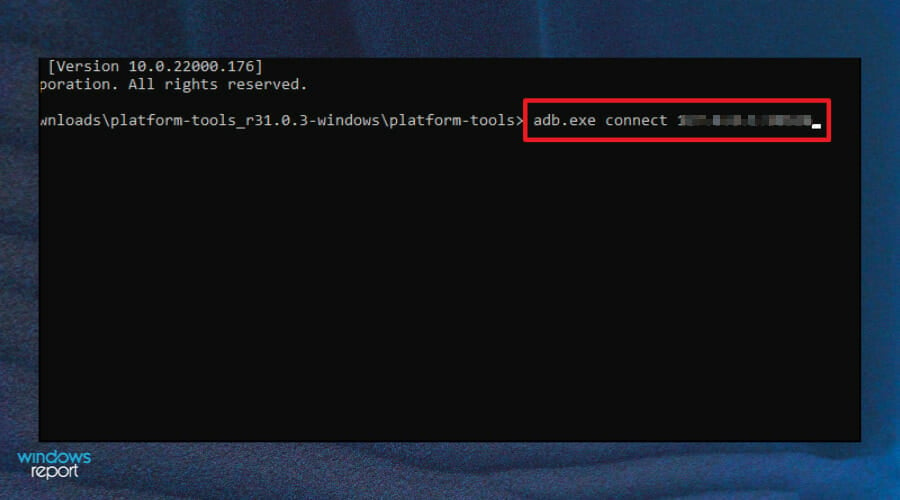
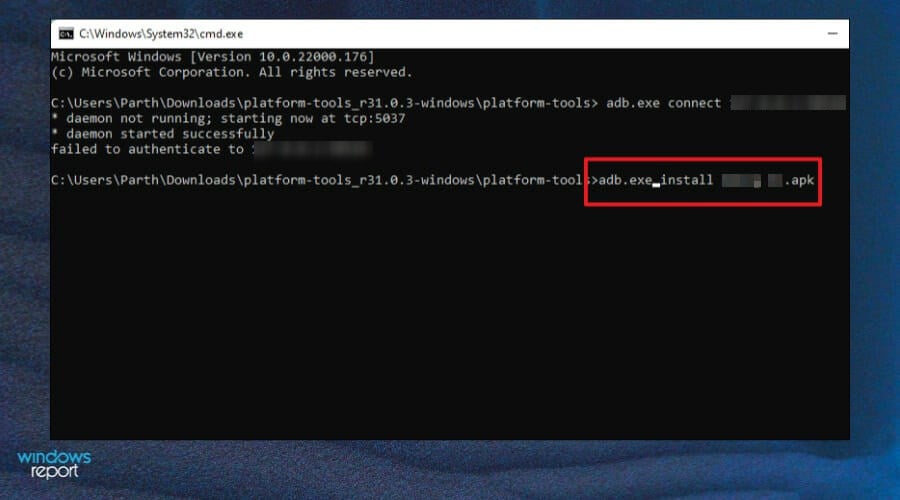
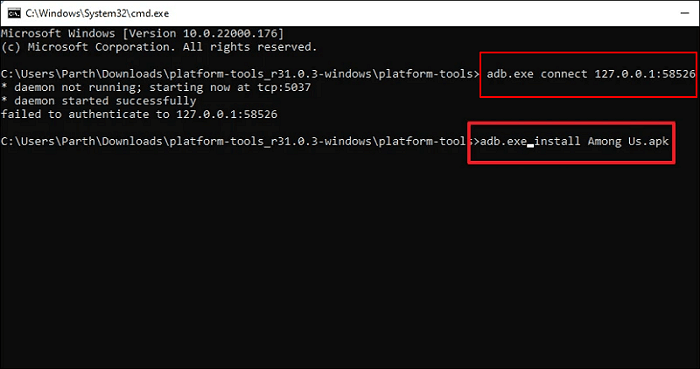
- Type in the following commands and press Enter after each one:
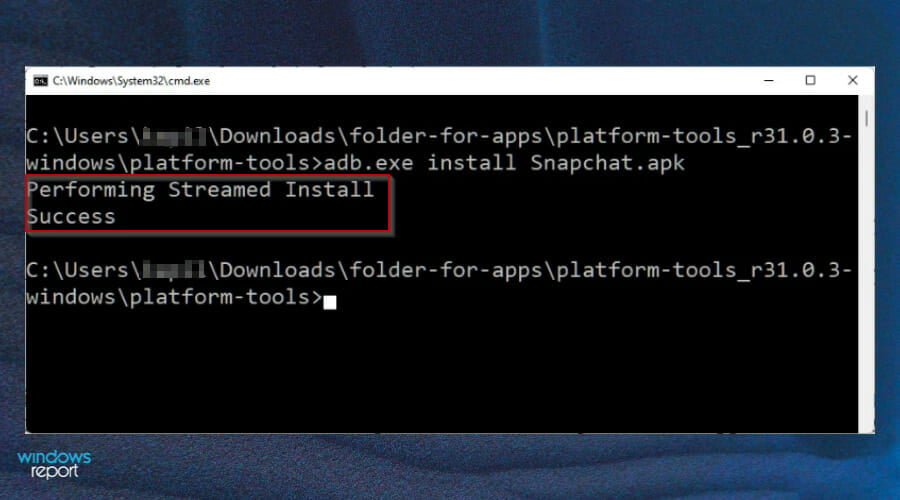
adb.exe connect <IP address>adb.exe install <file name>.apk - Once your app is installed successfully, the following message will be displayed:
- Go back to the Start Menu and launch your APK to open.
Are there implications of running APKs from third-party sites?
The safety of this approach is often questioned. Are you really installing what you think you are? Probably not from a random site you found on the Web.
But when you have a choice between an app installed from a site you know and one that is not, there are other considerations. It’s worth reviewing those to make sure your risk profile is as low as it can be.
When installing APKs from third-party sites, Windows users need to be aware of the risks. Malware attacks are a growing threat. You need to make sure that your device is completely safe and secure. We have outlined some of the top antiviruses for your PC to keep you safe while browsing.
Are APK files safe?
First, you should never download applications from untrusted websites. You can never know what malware they might contain. If you want to install an application on your PC and don’t find it in the official store, head to the official site to see if the app is available there.
The goal here is not just to avoid downloading malicious software like viruses and spyware but also software that will take control of your device for other purposes, such as sending spam emails or stealing data from your online accounts.
Another thing to watch out for when installing APKs is phishing scams. A hacker can use this method to trick you into giving away sensitive information like credit card details or even login credentials for your online accounts.
If you are not careful, clicking on a malicious link can lead you to a phishing website that will try and steal important information from you. Remember to always check the address bar in your browser before entering any sensitive information.
Also, if you choose to use other Android emulators to run APKs and encounter installation problems, refer to our guide on how to resolve the issue.
We hope you found a way to open and install APKs from one or more of the methods we listed above. If you encounter any problems while running APKs, leave us a comment down below.
- Активация «Платформы виртуальной машины» в Windows 11
- Установка Windows Subsystem for Android
- Установка WSATools
- Установка Android Debugging Bridge (ADB)
- Настройка Windows Subsystem for Android
- Настройка WSATools
- Установка APK-приложения в Windows 11
Раньше запуск Android-приложений на Windows-компьютерах мог осуществляться только при использовании программ-эмуляторов Android, например, BlueStacks или Nox App Player. Сейчас существует альтернативный способ — использование «Платформы виртуальной машины» и подсистемы «Windows Subsystem for Android» (WSA). Первая уже есть в составе Windows 11 — нужно лишь включить ее. Подсистему WSA потребуется установить отдельно через Microsoft Store.
Однако на активации виртуальной машины и инсталляции Windows Subsystem for Android дело не заканчивается. Следующая задача, с которой столкнется пользователь, это установка на компьютер APK-файла (т.е. Android-приложения). Существует, как минимум, два способа сделать это:
- Ручной. Предполагает установку инструментов Android Debugging Bridge (ADB), управление которыми осуществляется через терминал Windows при помощи специальных команд.
- Автоматический. Предполагает использование утилиты WSATools (также распространяется через Microsoft Store), которая возьмет задачу по работе с Android Debugging Bridge (т.е. инструменты эти все равно придется устанавливать) и терминалом Windows на себя.
Ручной способ рассматривать не будем (даже в автоматическом довольно много чего нужно проделать).
Активация «Платформы виртуальной машины» в Windows 11
Здесь все просто:
- Запустите системную утилиту Выполнить, используя комбинацию клавиш Win + R, впишите в нее команду OptionalFeatures и нажмите ОК:

- Откроется новое окно Компоненты Windows. Найдите в списке компонент Платформа виртуальной машины, установите галочку перед ним и нажмите ОК:
- Дождитесь окончания активации виртуальной машины, что может занять несколько минут:
- Далее нужно будет перезагрузить компьютер.
Установка Windows Subsystem for Android
Программное обеспечение Windows Subsystem for Android распространяется через Microsoft Store, однако попытки найти его непосредственно через приложение магазина могут не увенчаться успехом (почему-то в результатах поиска отображается «Windows Subsystem for Linux»). В этом случае действуем по следующей схеме:
- Запускаем любой браузер и переходим по этой ссылке (ведет на страницу загрузки Windows Subsystem for Android на сайт Microsoft Store) и нажимаем кнопку Get in Store app в правом верхнем углу:
- Теперь в приложении Microsoft Store на компьютере откроется нужная нам страница — нажимаем кнопку Установить:
- Откроется еще одно небольшое окно. Нажимаем в нем несколько раз Далее и дожидаемся окончания скачивания и установки Windows Subsystem for Android (размер приложение составляет примерно 1 ГБ, потому нужно будет подождать).
Установка WSATools
С этим приложением не должно возникнуть никаких проблем. Просто выполните поиск по запросу «WSATools» в Microsoft Store и установите программу, кликнув по кнопке Получить:
Установка Android Debugging Bridge (ADB)
Инструменты Android Debugging Bridge распространяются в виде портативных утили в ZIP-архиве. Нам нужно скачать его, распаковать в любой папке на компьютере, а затем указать в настройках WSATools место распаковки:
- Перейдите на официальную страницу ADB.
- Прокрутите страницу до раздела Downloads и кликните по ссылке Download SDK Platform-Tools Windows.
- Сохраните ZIP-архив «platform-tools» в любой папке на компьютере и распакуйте его.
Теперь перейдем к настройке всего того, что было скачано.
Настройка Windows Subsystem for Android
При установке приложений из Microsoft Store ярлыки для их запуска не появляются на рабочем столе, но их можно найти в меню Пуск или в специальной папке Приложения через Проводник. Второй вариант удобнее. Просто скопируйте в адресную строку Проводника или в системную утилиту Выполнить команду:
shell:::{AD1405D2-30CF-4877-8468-1EE1C52C759F}\Apps
Кликните пару раз по значку Параметры подсистемы Windows для Android:
В открывшемся окне перейдите во вкладку Разработчик и активируйте Режим разработчика:
Настройка WSATools
Запустите утилиту WSATools из папки Приложения по аналогии с запуском подсистемы Windows для Android. Дальнейшие действия:
- В главном окне WSATools кликните по значку с изображением шестеренки, чтобы перейти в настройки программы:
- Раскройте блок Custom ADB Location, затем кликните по кнопке Select adb.exe и укажите путь до файла «adb.exe», который хранится в папке, куда был распакован ранее архив «platform-tools»:
- Нажмите Save для сохранения настроек.
Оставьте программу запущенной. Переходим к завершающей части нашей инструкции.
Установка APK-приложения в Windows 11
После сохранения настроек WSATools кликните по кнопке Install an APK в главном окне программы. Если все правильно установлено и настроено, должно открыться окно выбора APK-файла. В качестве примера мы установим и запустим Android-версию браузера Opera:
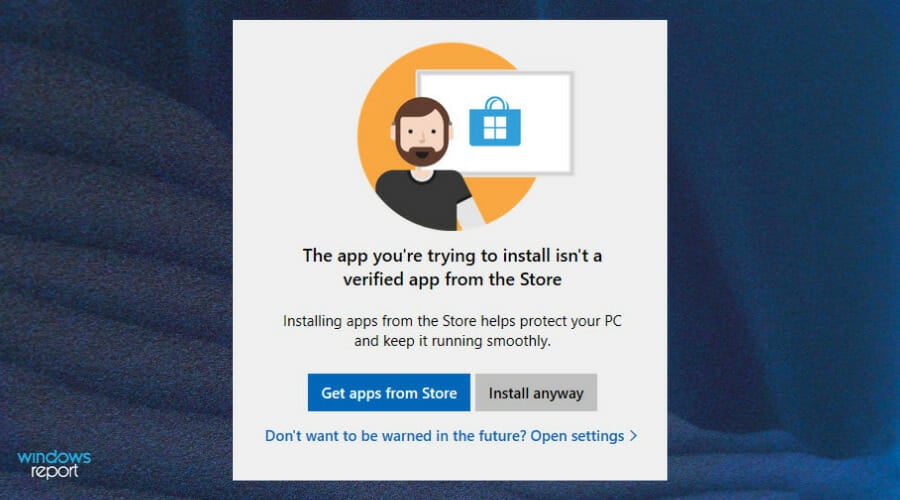
Скорее всего (зависит от того, откуда был скачан APK-файл), WSATools выведет сообщение о невозможности получения информации об устанавливаемом приложении. Нажмите Install Anyway, чтобы проигнорировать это:
Далее в левом нижнем углу кликните по кнопке Install. Это приведет к отображению нового окна Разрешить отладку ADB?. Поставьте флажок напротив Всегда разрешать с этого компьютера и нажмите кнопку Разрешить (если галочку не ставить, то это окно будет появляться при каждой установке APK):
Дождитесь окончания установки APK-приложения:
Если все прошло успешно надпись «Application installed successfully» отобразится на зеленом фоне (если он будет красным, значит, APK не был установлен). Кликните по кнопке Open App:
Последнее действие не обязательно приведет к запуску установленного APK. Не страшно. Откройте меню Пуск, перейдите в нем в раздел Все приложения и найдите имя только что установленного приложения (можно также воспользоваться поиском). В нашем случае это «Opera»:
Дождитесь запуска подсистемы Windows для Android:
Наконец, мобильный браузер Opera был запущен в Windows 11. Перейдем на сайт 2ip.ru, чтобы привести доказательства:
Как можно видеть, напротив графы Операционная система написано «Android 13».
- Complex Level: Medium
- Applies to: Install APK on Windows 11 for both Public and Preview Insider users.
Timeline for Windows 11 Supporting Android Apps:
- 1. On October 21st, 2021, Microsoft introduced Android apps on Windows 11 to Windows Insiders.
- 2. On February 15th, 2022, Windows Subsystem for Android was available for public preview.
On February 16th, 2022, Windows Subsystem for Android allows Windows 11 devices to run Android apps in Amazon Appstore. Currently, the newest Windows Subsystem for Android is only available in the United States.
At The Beginning:
This page covers everything that you need to know about Windows System for Android that enables Windows 11 devices to install APK and run Android applications available in Amazon Appstore. Both Windows 11 Public and Preview Insider users can all get a full guide here to obtain the latest Windows 11 system and sideload Android apps successfully on their computers.
If you are one of them, follow the respective guide here to install and run Android apps on your computers with respective solutions.
In this article, you’ll learn:
- #1. Check If Your Windows 11 PC Meets the System Requirements for Android Apps
- #2. Prepare Windows 11 PC Ready for Installing APK
- #3. How to Install APK on Windows 11 Insider OS
Sure! Since Microsoft announced on October 5th, 2021, it’s already a known truth that Windows 11 will support running Android apps soon with an Android Subsystem. However, since then, Windows users have continued asking when and how to install APK on Windows 11.
So for the question of «Can I run Android Apps on Windows 11», the answer is Yes! Here in the following, you’ll get everything you need to know about Windows Subsystem for Android App and how to install APK on your Windows 11 computers. So let’s get started now.
Which OS Can Install Android APK and Run Android Apps
After the release of the Windows 11 KB5010414 update on February 15th, 2022, it’s now a real thing for sideloading and running Android apps as a partnership of Amazon Appstore. Then, it’s now a reality that Windows 11 Public users in the U.S. area could get the new update and configure the computer to install APK in Windows 11.
So what about the Windows users outside the United States? The good news is that any Windows 11 Preview Insiders can also download the Windows Subsystem for Android App on their computers.
In a word, regardless you are a Windows 11 Public user in the United States or a Preview Insider around the world, you can all install Windows 11 for Android Apps now.
How to do so? Here is a full guide for you:
- #1. Check If Windows 11 On Your PC Meets The System Requirements for Android Apps
- #2. Prepare Windows 11 PC Ready for Installing APK
- #3. How to Install APK on Windows 11 Insider/Window 11 Public
If you think this article is helpful for you to install apk on Windows 11, you can click the button below to share it with someone who needs it!
#1. Check If Your Windows 11 PC Meets the System Requirements for Android Apps
Note that not all computers installed with Windows 11 can get the newest Windows Subsystem for Android App. This new system has some basic requirements on computer hardware, let’s see the details.
- RAM: 8 GB or 16 GB (recommended)
- Storage Type: Solid State Drive (SSD)
- Processor: Intel Core i3 8th or above; AMD Ryzen 3000 or above; Qualcomm Snapdragon 8c or above.
- Processor architecture: x64 or ARM64
- Virtual Machine Platform: Virtualization must be enabled on Windows 11
So how do you know if your computer reaches the system requirement specification? Here are two methods that you can pick either one to follow.
Method 1. Check If Your PC Support Windows 11 with Automated Software
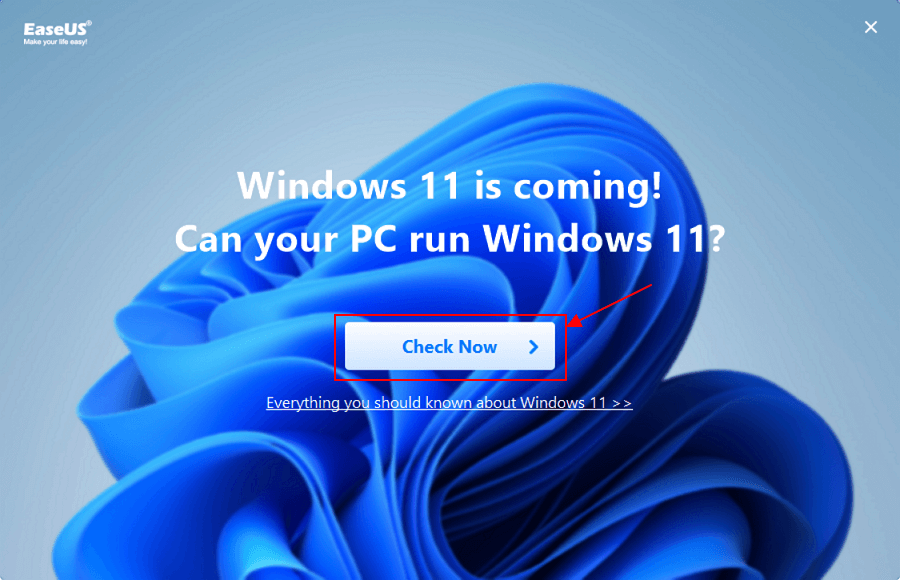
EaseUS Partition Master offers you a powerful feature called Win11 Checker that you can directly check if your PC supports Windows 11 or not here.
Step 1. Launch EaseUS Partition Master and click «Toolkit».
Step 2. Click «Win11 Checker» to open this feature. Then click the Check Now button to start.
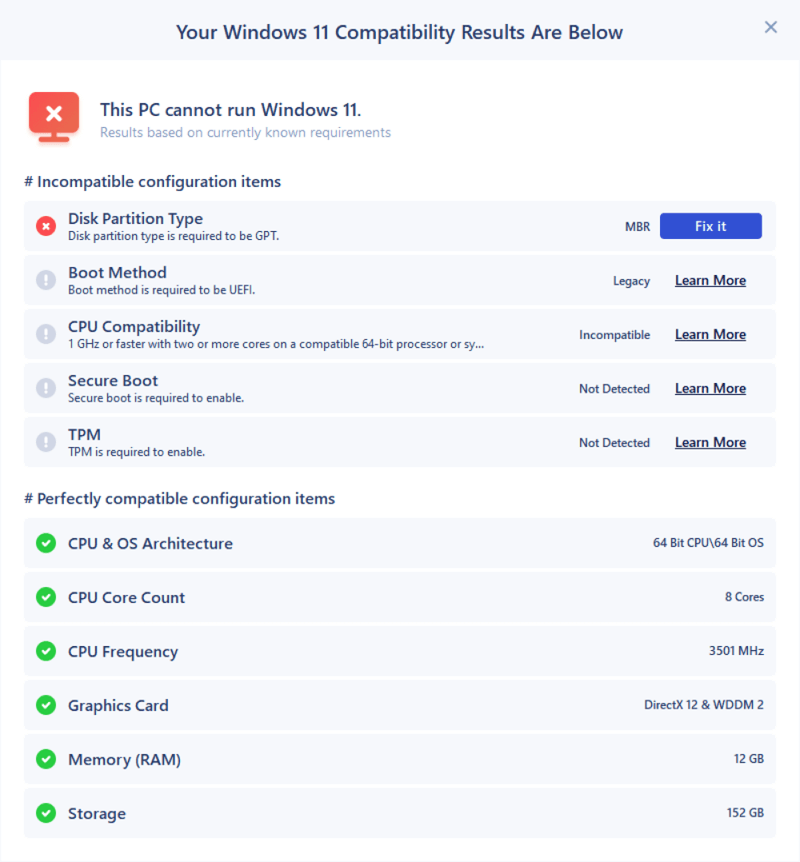
Step 3. The Windows 11 compatibility result window will soon appear. All the incompatible and compatible configuration items will be listed.
If you see Incompatible configuration items on the result screen, it means that your computer is not compatible with Windows 11. If you see no items, it means that your computer is perfectly compatible with the newest Windows 11 requirements.
Method 2. Check if your Windows 11 PC Meets the System Requirements to Install APK:
Step 1. Press Windows + I keys to open Settings.
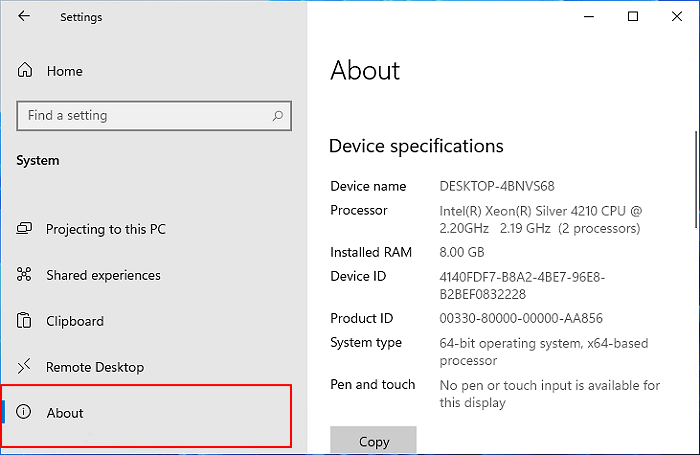
Step 2. Click on «Systems» and click «About» on the system settings window.
Step 3. Check and confirm if your computer meets the system requirements for installing APK on Windows 11:
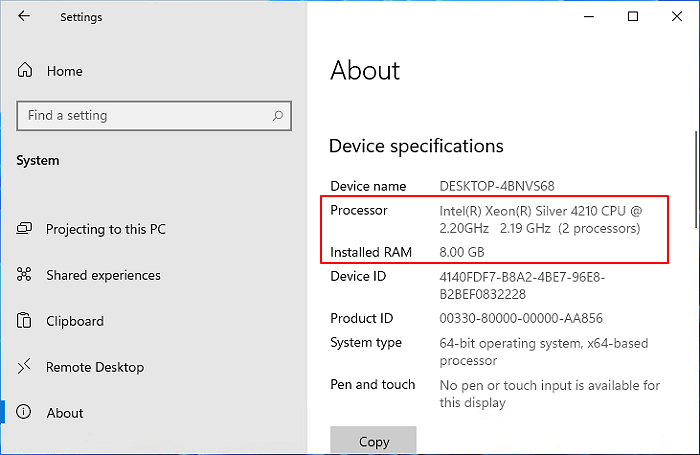
- Under the Device specifications section, confirm the RAM and CPU requirements.
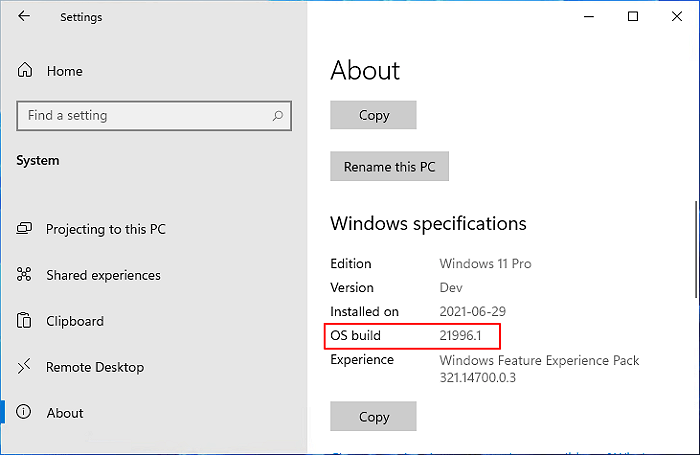
- Under the Windows specifications section, confirm if your Windows 11 is equal to or higher than 22000.257.
For example, my current OS is an older version and I’ll need to update my computer to the newest Windows 11 first.
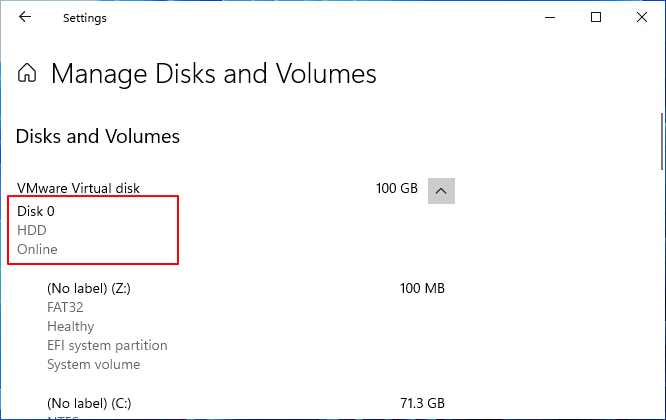
- Click «System» > «Storage», under the storage management section, click «Advanced storage settings» > «Disks & volumes» settings to see if the media type of main drive is SSD.
If it’s HDD, you can’t install APK on Windows 11.
If your computer meets all the requirements, you can directly skip the 2nd part of «Prepare Windows 11 PC Ready» and move to the 3rd or 4th part to install APK on Windows 11.
If your computer doesn’t meet all the requirements, follow the 2nd part to configure and get the computer ready for installing and running Android apps.
#2. Prepare Windows 11 PC Ready for Installing APK
Here we’ll guide you through configuring and getting Windows 11 PC ready for installing APK Android apps from the following 4 parts: RAM, Storage Type, Processor/Processor architecture, and Virtual Machine.
Let’s go.
1. Increase RAM If It’s Less Than 8GB
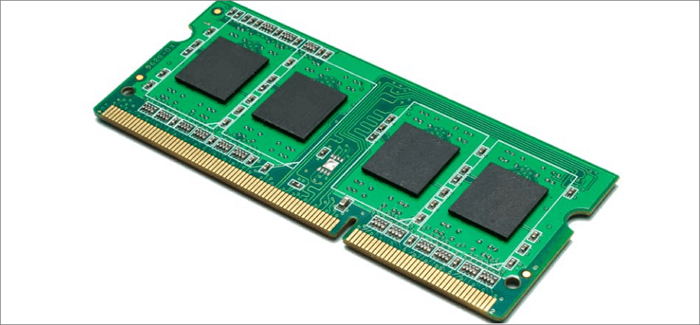
If the RAM on your computer is less than 8GB, you can purchase a new RAM card to extend it to 8GB or 6GB.
Here is how to do so:
Step 1. Check the RAM storage on your PC:
Right-click on «This PC» > Click «Properties», and next to the «Installed RAM» section, you can view the RAM storage on your PC.
Step 2. Purchase a RAM card for your PC.
Note that the RAM card needs to be the same storage capacity as the original card installed on your PC.
For example: 4GB — 4GB; 8GB — 8GB; 16GB — 16GB; 32GB — 32GB.
If you purchased a 32GB RAM card, but the original card is 16GB, the new memory card performance will be configured to run the same speed as the old card.
Step 3. Install the new RAM card to your PC:
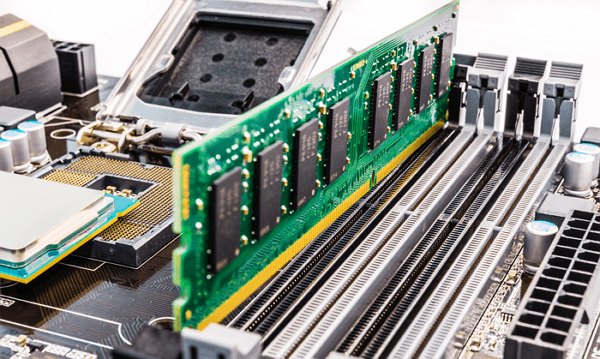
Shut down your PC and open the computer case > Find the RAM card slot, insert and fasten the new RAM card > Close the computer cause and restart the computer.
After this, you need to wait for the computer to boot up, and the system will automatically detect and display the added RAM storage.
2. Migrate Windows 11 from HDD to SSD
When your Windows 11 operating system is installed on a mechanical hard disk drive, the new Subsystem won’t install on your PC. This is because the system requires an SSD for installing APK on Windows 11.
To do so, you can transfer and migrate Windows 11 from HDD to a new SSD with the help of reliable partition manager software — EaseUS Partition Master.
Here is how to migrate Windows 11 system from HDD to SSD without reinstallation:
1st. Purchase and Install a New SSD to Windows 11
Two tips for selecting and adding a new SSD for Windows 11 OS migration:
- The new SSD must be equal to or better than the used space of the Windows 11 system partition.
- New SSD must be installed or added as an internal disk on your PC.
Here is how to do so:
Step 1. Purchase a new SSD that contains equal or bigger storage capacity than the system drive, for example, 120GB SSD = 120GB C drive, or 256GB, 512GB SSD.
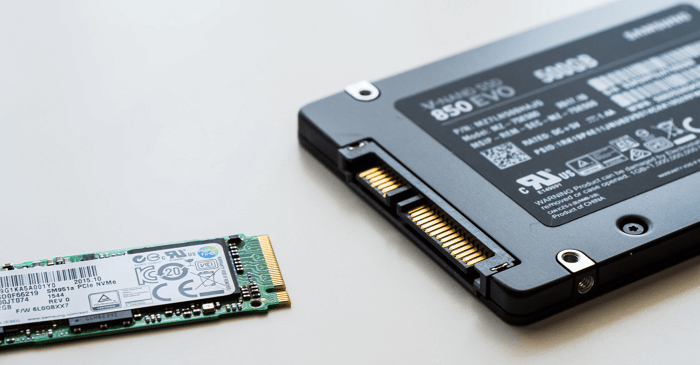
Step 2. Check the new SSD type: a SATA SSD or an M.2/NVMe SSD.
Step 3. Shutdown the computer, open the computer case, install the new SSD:
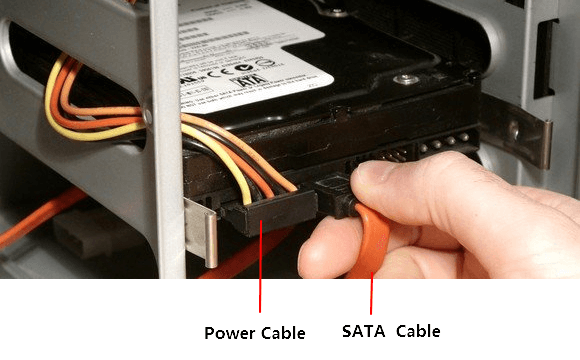
- If it’s a SATA SSD, connect the SSD to the computer via a SATA cable and a power cable.
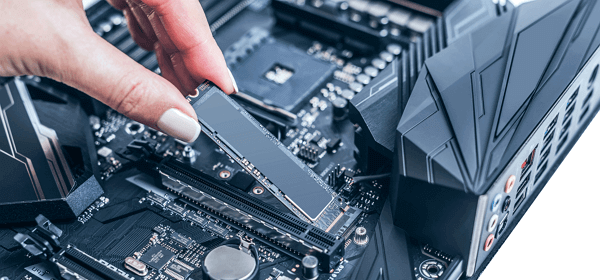
- If it’s an M.2 or NVMe SSD, find the SSD slot, slide in the SSD disk, and fasten it.
Step 3. Once done, reboot your computer.
2nd. Initialize New SSD on Windows 11
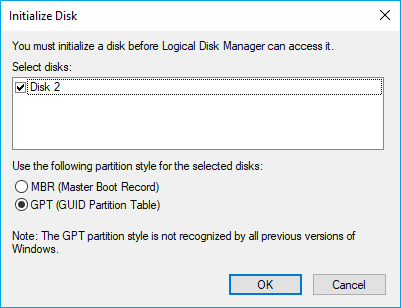
To make the new SSD readable on Windows 11, you need first to initialize this disk to share the same disk type as your current OS drive. Here is how to do so:
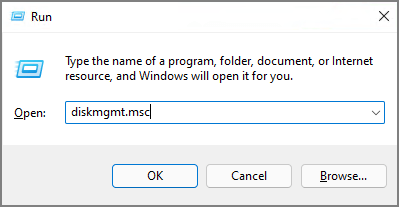
Step 1. Press Windows + R keys, type diskmgmt.msc in the opened Run dialog and click «OK» to open disk management.
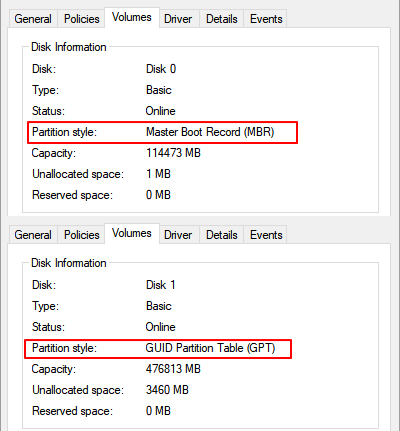
Step 2. Right-click the OS disk, select «Properties», go to the Volumes tab, and check the partition style.
Step 3. Right-click on the SSD and select «Initialize Disk», then select «GPT» as the type.
(Windows 11 requires GPT as boot disk type as it needs UEFI and Secure Boot modes.)
3rd. Migrate Windows 11 to SSD Without Reinstallation
Once you set up the SSD, you are now good to transfer Windows 11 to SSD with the help of OS migration software like EaseUS Partition Master.
Note: The operation of migrating OS to SSD or HDD will delete and remove existing partitions and data on your target disk when there is not enough unallocated space on the target disk. If you saved important data there, back up them to an external hard drive in advance.
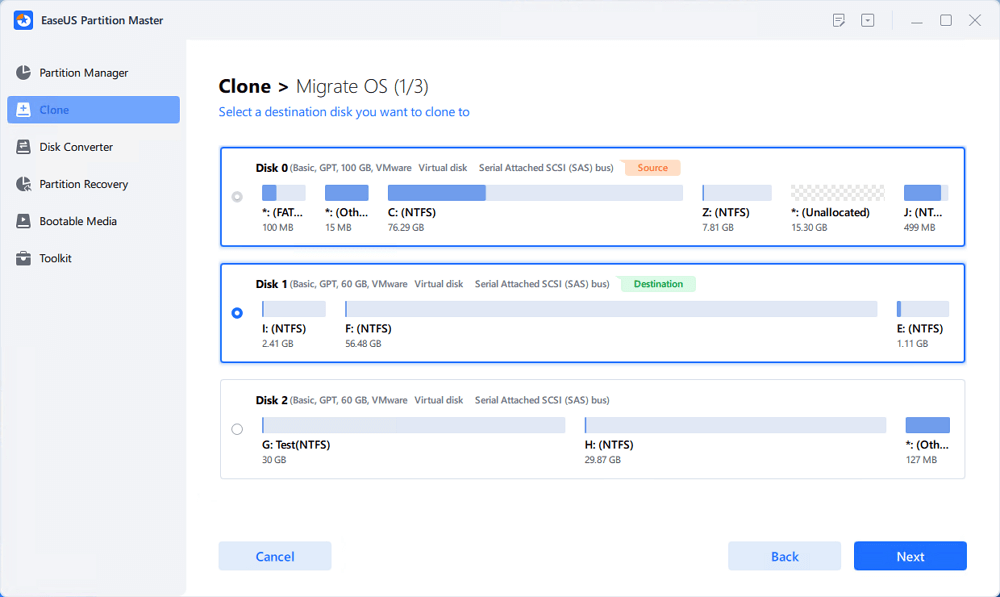
Step 1. Select «Clone» from the left menu. Select the «Migrate OS» and click «Next» to continue..
Step 2. Select the target disk you want to clone. Click «Next».
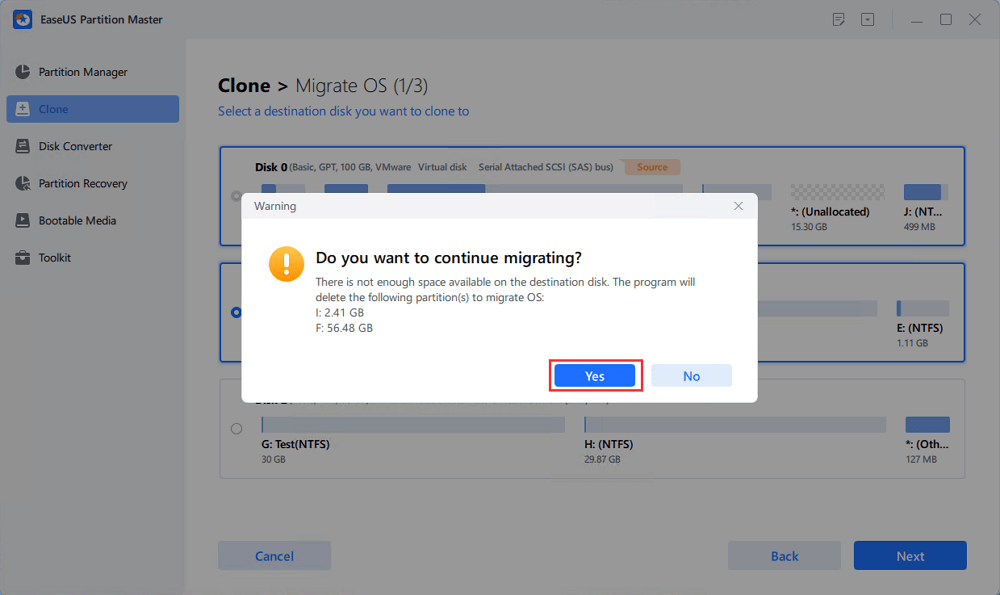
Step 3. Click «Yes» after checking the warning message. The data and partitions on the target disk will be deleted. Make sure that you’ve backed up important data in advance. If not, do it now.
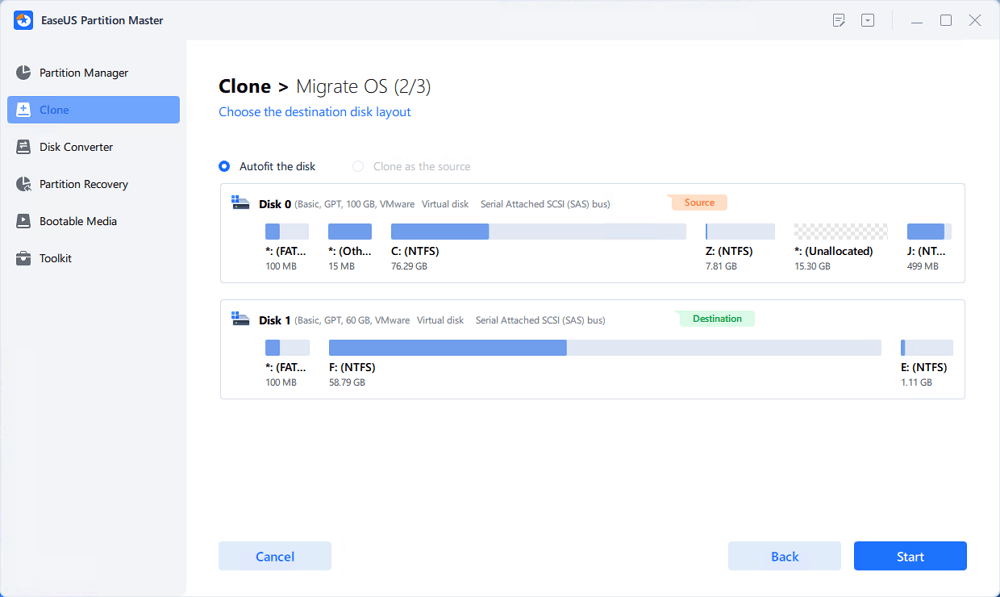
Step 4. Preview the layout of your target disk. You can also click the disk layout options to customize the layout of your target disk as you want. Then click «Start» to start migrating your OS to a new disk
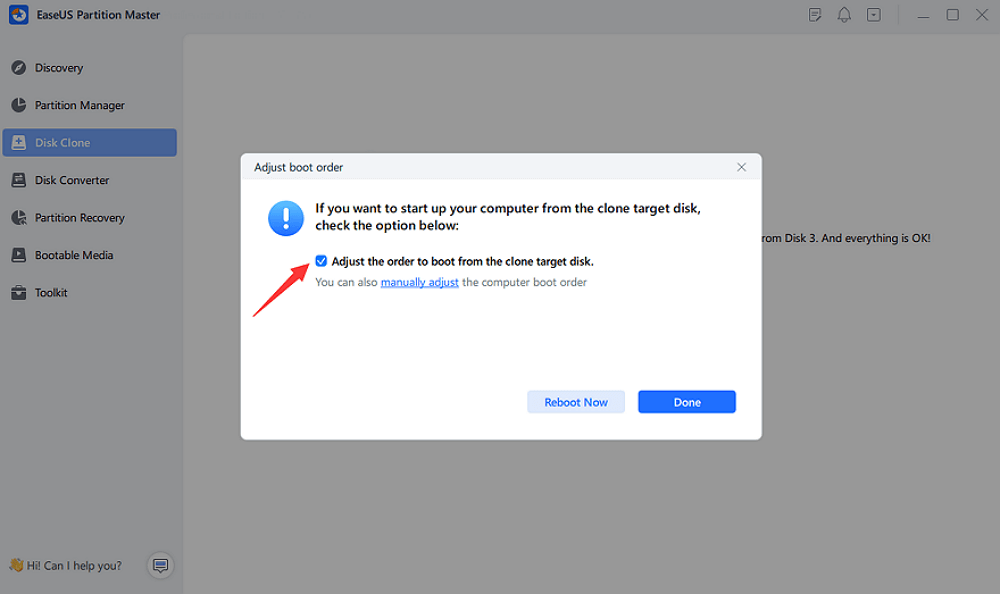
Step 5. When you see a confirming message, asking «If you want to start up computer from the clone target disk», tick «Adjust the order to boot from the clone target disk» and click the respective button through your demands.
- Reboot Now: it means to reboot the PC and boot OS from the new disk immediately.
- Done: it means to make the changes later.
3. Upgrade Processor/Processor Architecture
Note that if your computer processor or processor architecture is older Intel Core i3 8th, AMD Ryzen 3000, Qualcomm Snapdragon 8c, etc., you have two ways to go:
- Option 1. Manually replace and upgrade the CPU processor on your own.
Here is a checklist of Windows 11 supported Processors: https://docs.microsoft.com/en-us/windows-hardware/design/minimum/supported/windows-11-supported-intel-processors
See details for upgrading CPU.
- Option 2. Replace your old computer with a newer one.
For nun-geek users, we don’t recommend you try to replace the CPU processor as it’s easy to get your computer broken. However, if you have no technical skills, replacing the Old PC with a new computer is much easier.
Also, if your computer is 32bit, you’ll need to replace the computer with a 64bit for installing APK files on Windows 11.
4. Enable Virtualization on Windows 11
To emulate the Subsystem for Andriod on Windows 11, you’ll need to enable virtualization on your PC to access a larger library of apps like APK apps to use and install.
Here is how to do so:
First. Enger BIOS Settings
- Press Windows + S, type settings in the search box, and open Settings.
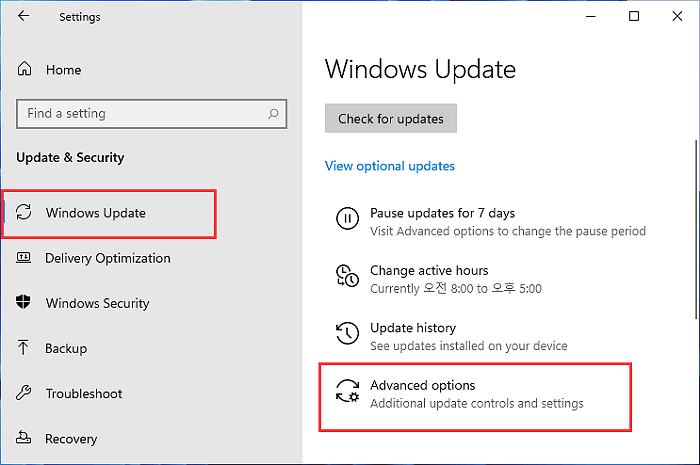
- Click «Windows Update» on the left pane, then select «Advanced options».
- Click «Recovery» > Select «Restart now» next to the Advanced startup section.
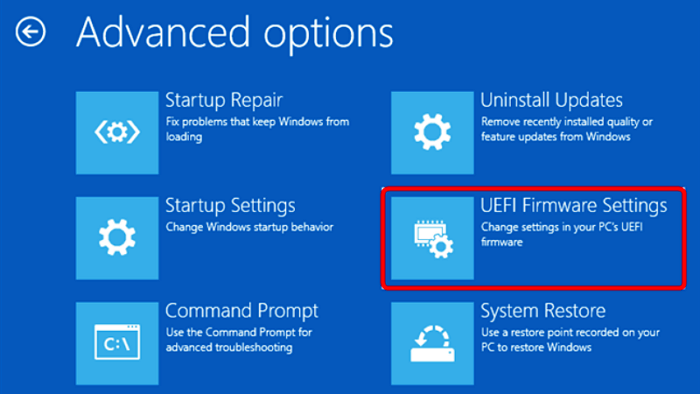
- Click «Troubleshoot» > «Advanced Options» > «UEFI Firmware Settings».
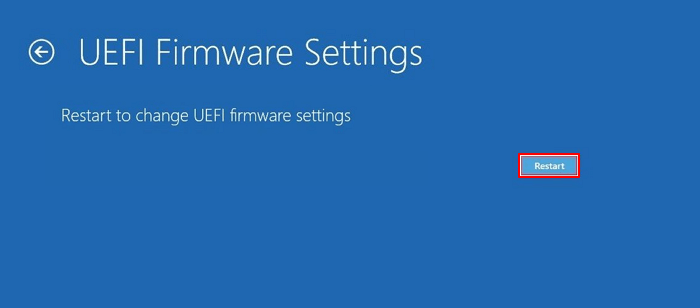
- Click «Restart» on the UEFI Fireware Settings window so to enter BIOS settings.
Second. Enable Virtualization in BIOS
Here we’ll show you how to enable Virtualization in Intel and AMD CPUs. Let’s see the details:
Enable Virtulization for Intel CPU:
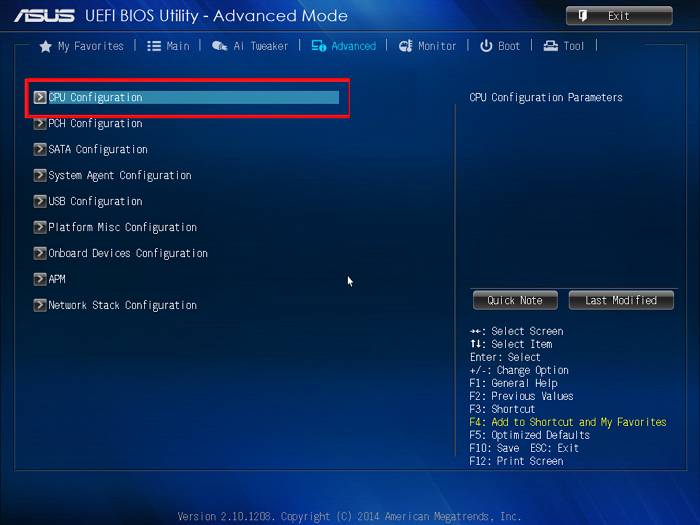
- On BIOS settings, press F7 or click «Advanced Mode».
- Click «Advanced» > Select «CPU configuration».
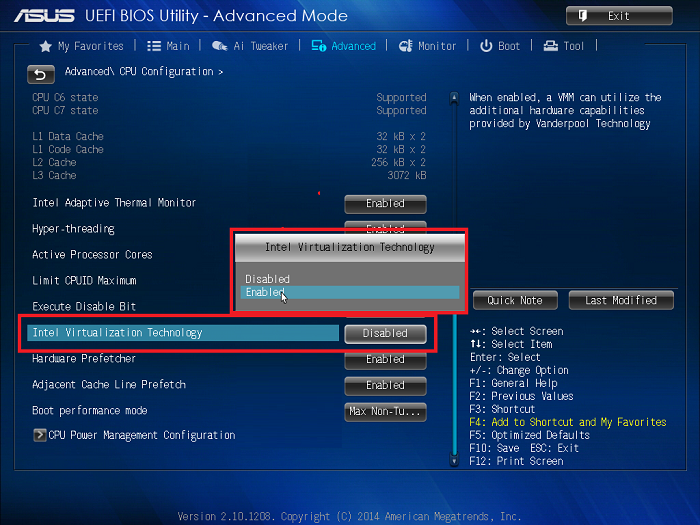
- Click «Intel Virtualization Technology», select «Enabled».
- Press F10 to save and exit, or click «Exit» and save changes.
Enable Virtualization for AMD CPU:
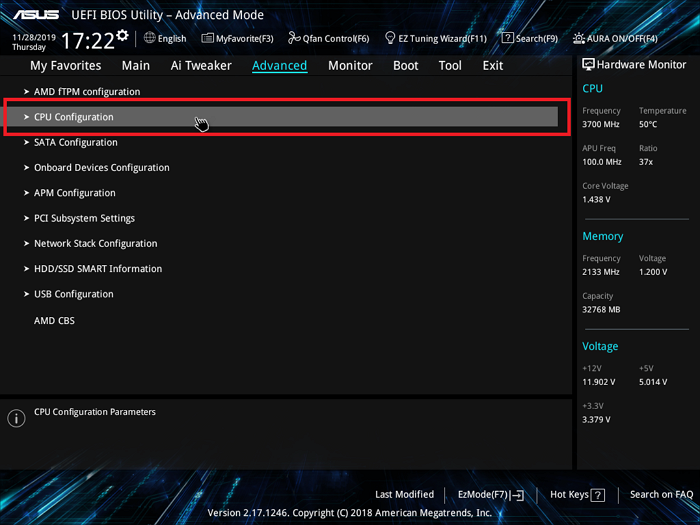
- On BIOS settings, press F7 or click «Advanced Mode».
- Click «Advanced» > «CPU Configuration».
- Select «SVM Mode» and click «Enabled».
- Click «Exit» and click «OK» to save the changes and restart the computer.
After this, you can now move to the next part to install Android APK on Windows 11. As the ways to install APK on Windows 11 are different, we suggest you first confirm your current running version of Windows 11 and then follow the right guide to get the desired APK application installed on your PC.
#3. How to Install APK on Windows 11 Insider OS
For Windows Insiders, you need first make sure that you’ve updated Windows 11 to the latest version with the following steps:
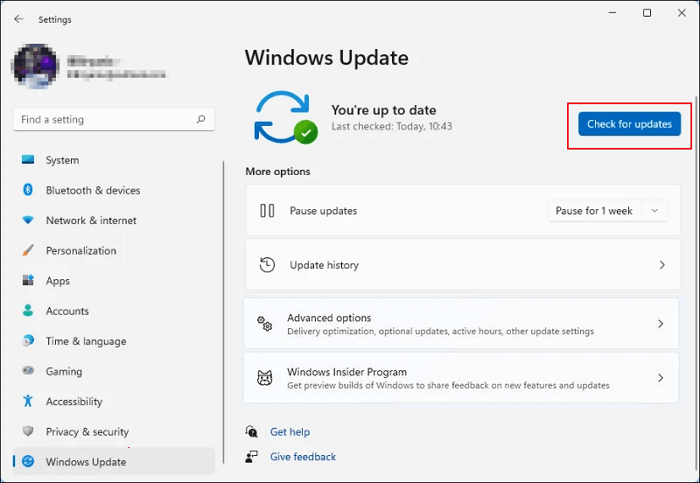
Open Settings > Click on «Windows Update» > Click on «Check for updates».
Wait for the process to complete and then restart the computer to install the new updates.
First. Check for Microsoft Store Update
It’s also important that both Insider and Public users update the Microsoft Store so as to install APK apps on Windows 11. Here is how to do so:
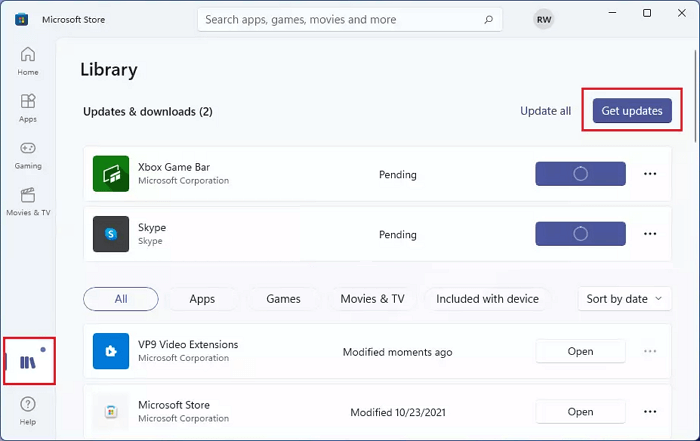
Step 1. Open Microsoft Store, click «Library,» and click «Get updates».
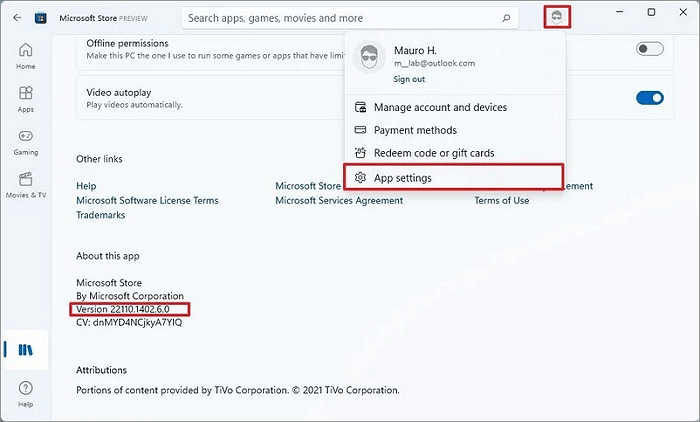
Step 2. Click the Profile menu, select «App settings», then confirm if Microsoft Store is with 22110.1402.6.0 or even higher version.
If not, upgrade the Microsoft Store app to the new version.
Second. Install Windows Subsystem for Android with Amazon App Store on Windows 11
Step 1. Open Microsoft Store app, search «Windows Subsystem for Android,» and click «Get».
Step 2. Click «Get» or «Install» on the Microsoft Store app.
Wait for the process to complete.
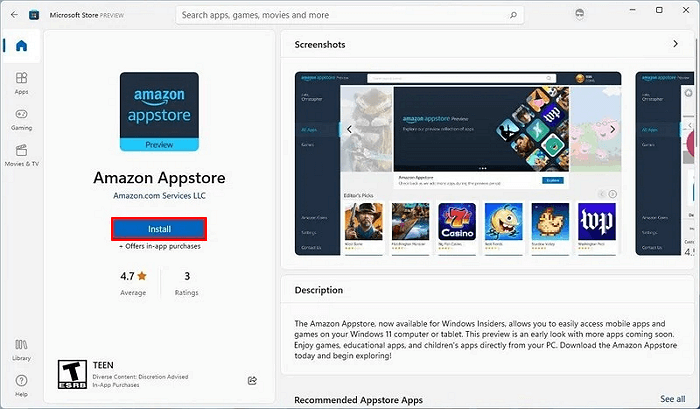
Step 3. Search to open Amazon Appstore in Microsoft Store, click «Install».
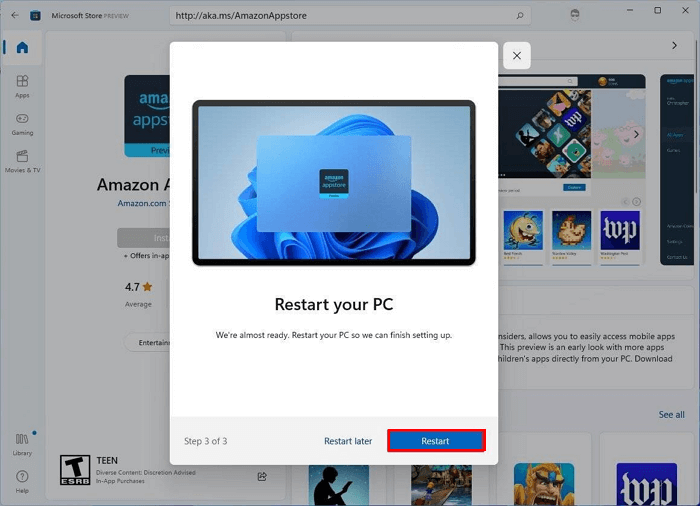
Step 4. Click «Set up» and click «Download» > «Next» > «Restart».
After this, you are now good to go and install Android APK applications on your Windows 11 computers.
Last. Install Android Apps on Windows 11 from Amazon Appstore
Step 1. Open the start menu on Windows 11, and click «All apps».
Step 2. Sign in with your Amazon account, and then you are good to select and install Android applications by clicking «Get».
Bonus Tip: How to Install APK on Windows 11 to Sideload Android Apps
Alongside Amazon Appstore, you can also sideload apps on Windows 11 via the APK files. Here is how to do so:
Step 1. Go to Android developer website: https://developer.android.com/studio/releases/platform-tools
Step 2. Go to the Downloads section and click «Download SDK Platform-Tools for Windows».
Step 3. Check «I have read and agree with the above terms and conditions», and click «Download Android ADK Platform-Tools for Windows».
Step 4. Once done, go to the download directory, right-click the zipped folder, and select «Extract All».
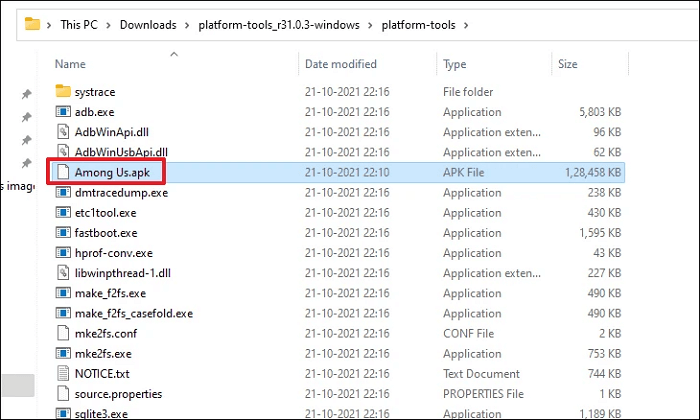
Step 5. Once the zipped folder opens, download and copy to save the APK file for a desired app to the folder.
Step 6. Open Windows Subsystem for Android on Windows 11 from the menu bar, enable the Developer mode on WSA window: switch to On size.
Step 7. Open Command Prompt, type the following command lines, and hit Enter each time:
- adb.exe connect ip address
- adb.exe install file name.apk
Wait for the process to complete. This will help to install the APK file on Windows 11.
Once done, you can now go to the App section on the start menu to view and use the sideloaded Android apps on Windows 11.
Conclusion
On this page, we introduced some key points to make sure you can install Android APK or apps on Windows 11 successfully. To make it simple, check and confirm that you follow the guidelines one by one:
- You are the latest new Windows 11 Public or Insider user of 22000.527 or higher.
- Your computer meets Windows 11 requirements for installing Android apps: 8GB or more RAM, SSD OS disk, enable virtualization, processor, and update processor architecture.
If you are unsure if your computer meets the requirements, take EaseUS Partition Master to test the compatibility.
If you don’t know how to get the latest Windows 11, relax, and you can revert to the #2 part to get Windows 11 ready for this.
For the complete process of installing Android apps on Windows 11, go to the #3 part and get a complete guide. I hope this page indeed works for you.
FAQs About How to Install APK on Windows 11
If you have more questions about installing APK on Windows 11, follow the questions here and find answers below:
1. How do I open a APK file in Windows 11?
- Install Windows Subsystem for Android (WSA) on your PC.
- Create a virtual Android machine on computer with WSA.
- Sideload APK files of your favored apps and games.
- Install and then open the Android apps.
2. How do I manually install Android apps on Windows 11?
- Go to the Migcorosft Store.
- Go to the Amazon Appstore.
- Click on ‘Install’.
- Sign in with your Microsoft Account.
- Follow the instructions and sign in with your account.
- Download the Android apps you want.
3. Can you run Android apps on Windows 11?
Yes, sure. Microsoft has officially supported users to run Android apps on Windows 11 with its Windows Subsystems for Android. If you are interested in, follow the tutorial guide on this page to download and run Android apps and games on Windows 11.
Sure, here is a guide on how to run Android apps on Windows 11:
- Check if your PC is compatible. Not all Windows 11 PCs can run Android apps. To check if your PC is compatible, open the Settings app and go to System > About. Under “Specifications,” look for “Processor,” “RAM,” and “Virtualization.” Your PC must have a 64-bit processor, 4GB of RAM, and virtualization enabled in order to run Android apps.
- Enable virtualization. If virtualization is not enabled on your PC, you will need to enable it before you can run Android apps. To enable virtualization, open the Start menu and search for “Turn Windows features on or off.” In the Turn Windows features on or off window, scroll down and look for “Virtualization.” Check the box next to “Virtualization” and click OK. Your PC will restart.
- Install the Amazon Appstore. The Amazon Appstore is the only official way to install Android apps on Windows 11. To install the Amazon Appstore, open the Microsoft Store and search for “Amazon Appstore.” Click Install and follow the instructions.
- Sign in to the Amazon Appstore. Once the Amazon Appstore is installed, you will need to sign in with your Amazon account. If you don’t have an Amazon account, you can create one for free.
- Search for and install Android apps. Once you are signed in to the Amazon Appstore, you can search for and install Android apps just like you would on an Android device. To install an app, click the Install button.
- Run Android apps. Once an Android app is installed, you can run it from the Start menu or by clicking its icon on the desktop. Android apps will appear in the Start menu alongside your Windows apps.
Windows Subsystem for Android™️
Download WSA
Read More here
Download WSATools APK Installer
Method 2
- Head to store.rg-adguard.net.To install WSA, we use the Microsoft Store Generation Project website. It retrieves packages from the Microsoft server, the same server that Microsoft Store uses to install apps on your Windows PC. Hence, it’s safe to use.
- Head to store.rg-adguard.net.
- Copy the following link and paste it into the URL box: www.microsoft.com/en-us/p/windows-subsystem-for-android/9p3395vx91nr
This Guide will show you how to install and run apk files or Android apps in any Edition of Windows 11 using Windows Subsystem for Android. WSA or Windows Subsystem for Android is a Tool that allows Windows to run Android Apps directly without using any emulator.
Install Android apps or apk files in Windows using Windows Subsystem for Android
WSA or Windows Subsystem for Android is a Tool that allows Windows to run Android Apps directly without using any emulator. The problem is Windows Subsystem for Android is currently only available through preview via the Beta Channel of the Windows Insider Program. But if you follow my guide, you don’t have to be in Windows Insider Program to try it out. The only thing you need is Windows 11 installed and some patience.
Prerequisites:
- Windows Subsystem for Android or WSA must be Installed.
