Начинающие пользователи ПК, как правило, понятия не имеют, что такое виртуальная память в системе «Виндовс». В каких целях её используют? Как её включить, поменять размер или вовсе отключить? Как организована виртуальная память в «Виндовс» 10?
Что такое виртуальная память на Windows 10 и зачем она нужна
Вашей «оперативки» может не хватать на то количество программ, которые открыты сейчас на ПК. Чтобы система не тормозила, подключается виртуальная память. Это файл подкачки определённого размера (устанавливается вручную пользователем либо самой системой) на жёстком диске, в который временно помещается память из «оперативки». Иными словами, часть жёсткого диска используется как «оперативка», если последней оказалось мало.
Обычно в файл подкачки помещаются данные об открытых приложениях, которые в данный момент не используются процессором (окна этих приложений свёрнуты). При необходимости данные перемещаются обратно в «оперативку».
Файл подкачки, кстати, называется pagefile.sys.
Где находится виртуальная память Windows 10 и как её включить
Виртуальная память в виде файла подкачки находится в корневой папке локального системного диска. По умолчанию эта память включена в «Виндовс». Но даже если она отключена, вы можете её сами включить в настройках системы — об этом в следующем разделе.
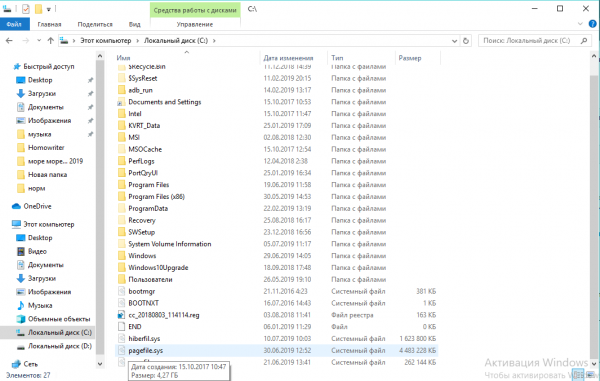
Файл pagefile.sys по умолчанию находится прямо на системном диске
Как настроить виртуальную память: увеличить или уменьшить размер, отключить её
Ручная настройка файла подкачки поможет оптимизировать работу компьютера. Можно увеличить размер памяти, если ваша «оперативка» не справляется с задачей. Если вам не хватает места на системном диске, вы можете перебросить этот файл на пользовательский диск либо вовсе отключить функцию — файл исчезнет, места станет больше. Выключать файл подкачки стоит только в том случае, если вы уверены, что голой «оперативки» вам хватит на все нужды ПК.
Параметры pagefile.sys
В «десятке» можно очень быстро перейти в настройки виртуальной памяти:
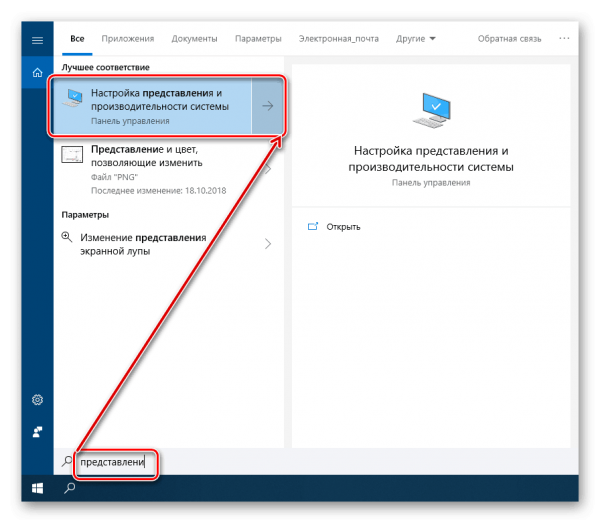
- Кликаем по лупе справа от «Пуска». В поле для поиска набираем слово «представление». По мере ввода должна сразу появиться выдача «Настройка представления и производительности системы». Щёлкаем по этому результату.

Вбейте запрос в «Поиске Виндовс»
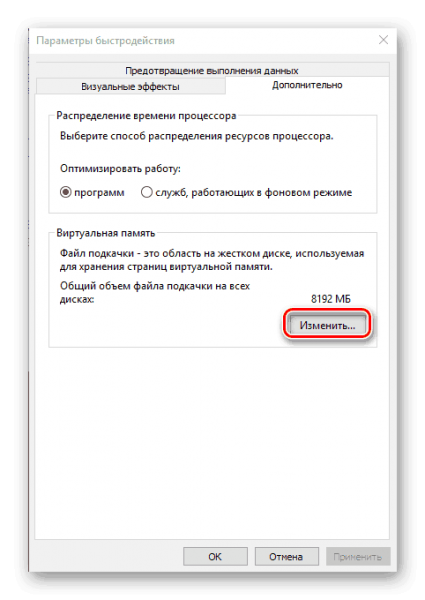
- В новом окошке переходим в раздел «Дополнительно» и в блоке для виртуальной памяти кликаем по «Изменить».

Перейдите к изменению параметров виртуальной памяти
- В открытом окне можно активировать, отключить и настроить сам размер файла подкачки — ничего сложного. Выбираем в белом окошке диск, на котором должен располагаться файл подкачки.

Задайте определённый размер для вашего файла подкачки
- Ниже указываем вручную размер либо ставим второе значение, чтобы система сама выбрала подходящий размер. Чтоб вовсе отключить файл, поставьте третье значение «Без файла». Насчёт размера: в нижней части окна ОС вам подсказывает, какой размер лучше поставить. Обычно это 4983 МБ.
- Если нужно, перемещаем файл подкачки с системного диска на пользовательский. Для этого удаляем файл на диске С (обычно он и есть системный) и добавляем файл на пользовательский.
- Щёлкаем по «Задать», а затем по ОК.

Настройка дополнительного файла подкачки swapfile.sys
В «Виндовс» 10 есть ещё один файл подкачки — дополнительный swapfile.sys. Он также находится на системном диске. Он предназначен для хранения информации о приложениях из магазина «Виндовс Стор». Причём в файле хранятся не отдельные разбросанные данные, а вся информация о работе программы целиком. Благодаря этому файлу программы из магазина могут уходить в гибернацию (режим по типу сна), как это делает вся система «Виндовс».
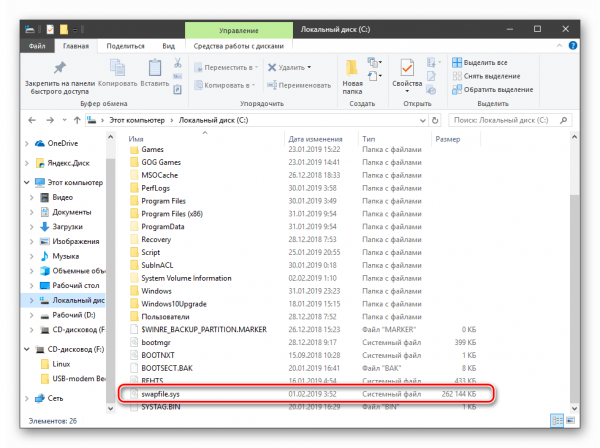
Файл swapfile.sys отвечает за сохранение информации работающих приложений из магазина
Настроить как-либо этот документ нельзя. Вы можете его удалить, но система его вновь создаст, если вы будете пользоваться приложениями из фирменного магазина Windows. Переживать по поводу размеров swapfile.sys не стоит — он весит довольно мало.
Как очистить виртуальную память
Виртуальную память нужно периодически очищать. Можно сразу настроить её очистку вместе с отключением компьютера:
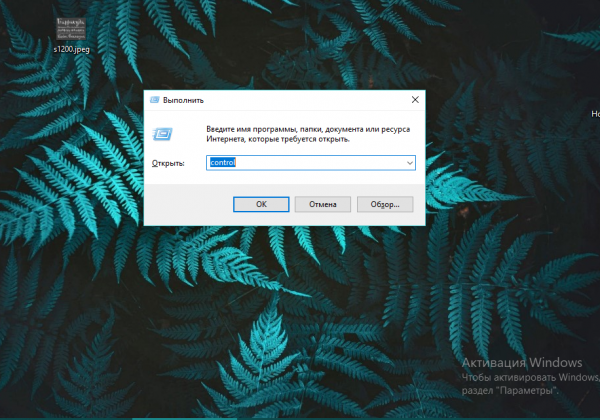
- Запустите «Панель управления» через меню «Пуск» либо с помощью панели «Выполнить». В последнем случае зажмите «Виндовс» и R. Напишите control и щёлкните по ОК.

Выполните команду control
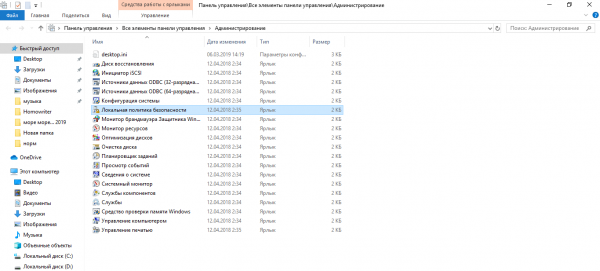
- Зайдите в блок для администрирования.

Перейдите в «Администрирование»
- Откройте утилиту для настройки политики безопасности.

Дважды кликните по ярлыку «Локальная политика безопасности»
- Запустите блок с параметрами безопасности. Отыщите в правой части окна параметр «Завершение работы: очистка файла подкачки». Щёлкните по нему дважды и в новом окошке поставьте значение «Включить». Сохраните изменения.
- Перезапустите компьютер два раза, чтобы виртуальная память полностью очистилась.

Виртуальная память на «Виндовс» может компенсировать нехватку «оперативки», когда система перегружена открытыми окнами. Вы вправе сами указать размер файла подкачки (виртуальной памяти) либо вовсе отключить его, чтобы сэкономить место на системном диске. Желательно сразу настроить очистку виртуальной памяти вместе с отключением «компа».
- Распечатать
Оцените статью:
- 5
- 4
- 3
- 2
- 1
(14 голосов, среднее: 3.6 из 5)
Поделитесь с друзьями!
![]()
When it comes to Windows computer and its storage system, many of us would alter its original SSD (Solid State Drive) or RAM with a larger one. This certainly results in increasing memory on your system. But ever thought of looking for an easy hack? Instead of taking paining of changing existing RAM or SSD, if you can do it easily then?
Well, you can increase virtual memory in your Windows system (that actually is easy way to increase space on disk). But, before we tour you through the guide, let us give a brief on Virtual Memory.
What is Virtual Memory?
Your system has two types of memory: one is its SSD or hard drive that is best used to save all sort of files and documents. While the other one is RAM, which is used to save specific data of various programs on your system. RAM is also responsible for proper working of your system. However, it is used much faster than SSD that results in system slow down and lagging.
With that been said, Microsoft has attempted well to resolve the issue with virtual memory. Virtual memory is that addition memory on your system which is used only when your RAM has been all used. For example, if your system has 1 GB RAM and it has been consumed, then your system will start using its virtual memory in order to work effortlessly for you.
But still, virtual memory is just another memory on your system and is certain to get piled up sooner or later. Apparently this must be the reason for Microsoft to be kind enough and have provided access to users to increase it manually. Sigh! With a few manual steps, you can increase your system’s virtual memory and experience a smooth and clutter free performance of your system.
Follow these Simple Steps to Increase Virtual Memory in Windows 10
- Go to Start Menu and click on Settings.
- Now type performance on search bar and select Adjust the appearance and performance of Windows.

- A new Window will open before you. Go to Advanced tab in it.
- You’ll see a Virtual memory section in it. Click on Change

- If the current setting is considerably less than the recommended, unselect the Automatically manage paging file size for all drives box on this window and click on Custom size.
- Now enter the recommended value in the Initial Size box, and a larger figure in the Maximum size
- Click on OK to save the changes.
So, these were the steps to increase virtual memory in windows 10. Increasing virtual memory will help optimize your system’s memory and thereby its performance. We’d also recommend you to disk clean your system occasionally, so that you are never short of storage space.
In Windows computers, Virtual memory is used in place of the physical RAM when it runs out of usable space. Virtual memory combines your computer’s RAM with temporary space on your hard disk called the Swap file, Paging file or Pagefile. Whenever RAM is not enough to complete the task windows moves data to the paging file and frees up RAM so that your computer can complete its task. And prevent issues like slow down of the machine, Blue Screen of Death (BSOD), Low Memory problems, App Crashes Etc.
Virtual memory can be considered as being an extension of the computer’s physical memory.
Your computer has two types of memory: The hard drive or solid-state drive, used for your operating system, photos, music and documents, and RAM (Random Access Memory) used for storing program-specific data. The hard drive is perfect for long-term storage, while RAM is much faster and more volatile, acting as a working area for the programs and files you have open.
Every time you open more applications than the RAM on your PC can accommodate, the programs already present in the RAM are automatically transferred to the Pagefile. This process is technically called Paging. Because the Pagefile works as a secondary RAM, many times it is also referred to as virtual memory in windows 10.
Increasing Virtual Memory in Windows 10
Windows 10 and windows 11 manage Virtual memory itself only, But at times you might be required to alter the memory allocated. It is always said to customize the virtual memory into a size that is within the permissible limit. Here is Fallow To manually Adjust Virtual memory for windows computers.
- First press the combination of Win + R keys together to open the Run dialog box.
- Here type sysdm.cpl on it and then click on the OK button.
- This will open “System Properties” of your computer.
- Go to the Advanced tab and click on the Settings option. Which is available under the “Performance” section.
- Now On the “Performance Options” window, go to the Advanced tab and click on the Change button located under the “Virtual Memory” section.

- You will see the Virtual Memory window on your computer screen.
- Here you have to uncheck the “Automatically manage paging file size for all drive” option at the top of the same window.
- Select any of the Drive letters where you allow to create the paging file and then click on Custom size.
- Then enter custom fields in the “Initial size (MB)” and “Maximum size (MB)” fields.

How To Calculate pagefile size
To Calculate the pagefile size always recommended amount (Refer above image) of total system memory. The maximum size is three (1.5) x the initial size. So let’s say you have 4 GB (1 GB = 1,024 MB x 4 = 4,096 MB) of memory. The and maximum size would be 1.5 x 4,096 = 6144 MB.
After Set the Initial size (MB)” and “Maximum size (MB)” Value and click on set, Now Click on the OK button and then on the Apply button to save changes. This will prompt to Restart the window ” you must restart your computer to apply these changes. ”
This is the Best and simple way to Increase Virtual Memory in Windows 10.
Also Read
- Fix Memory-Related problems Using Memory Diagnostic Tool.
- Google Chrome not working/responding after the windows 10 update
- How to Fix Your Computer Is Low On Memory Warning In Windows 10
- 5 Tweaks to fix Slow Boot Times in Windows 10 (Updated)
- Solved: Windows 10 Critical Structure Corruption BSOD Error (5 Working solutions)
- Fix System Restore did not complete successfully error 0x80070005 on Windows 10
(Image credit: Windows Central)
On Windows 10, virtual memory (or paging file) is an essential component (hidden file) designed to remove and temporarily store less frequently use modified pages allocated in RAM (random-access memory) to the hard drive. Using this approach allows the system to prioritize faster physical memory for more frequent processes and applications, improving the overall performance and preventing the device from locking up in the event it runs out of system memory.
In addition, the paging file is important to support crash dumps during a system crash (Blue Screen of Death), as without a large enough page file, a dump with all the contents of the system memory won’t be created.
Although the system does a pretty good job managing the paging file size according to various factors automatically, sometimes, you may still need to increase the default virtual memory values manually. For instance, when you see the «Your system is low on virtual memory» message. You’re noticing slow performance over time, or a particular application requires specific parameters to work as intended.
If you’re experiencing issues with virtual memory, the device doesn’t have enough memory, or you’re trying to improve the system performance, Windows 10 allows you to increase the size of the virtual memory in at least two ways using the Settings app and Command Prompt.
In this Windows 10 guide, we’ll walk you through the steps to increase the size of the virtual memory to improve the system responsiveness.
- How to increase virtual memory using Settings
- How to increase virtual memory using Command Prompt
How to increase virtual memory using Settings
To adjust the virtual memory size on Windows 10, use these steps:
Warning: Although anyone can change the paging file size, it’s only recommended to use these instructions if you have a valid reason, and you know what you’re doing.
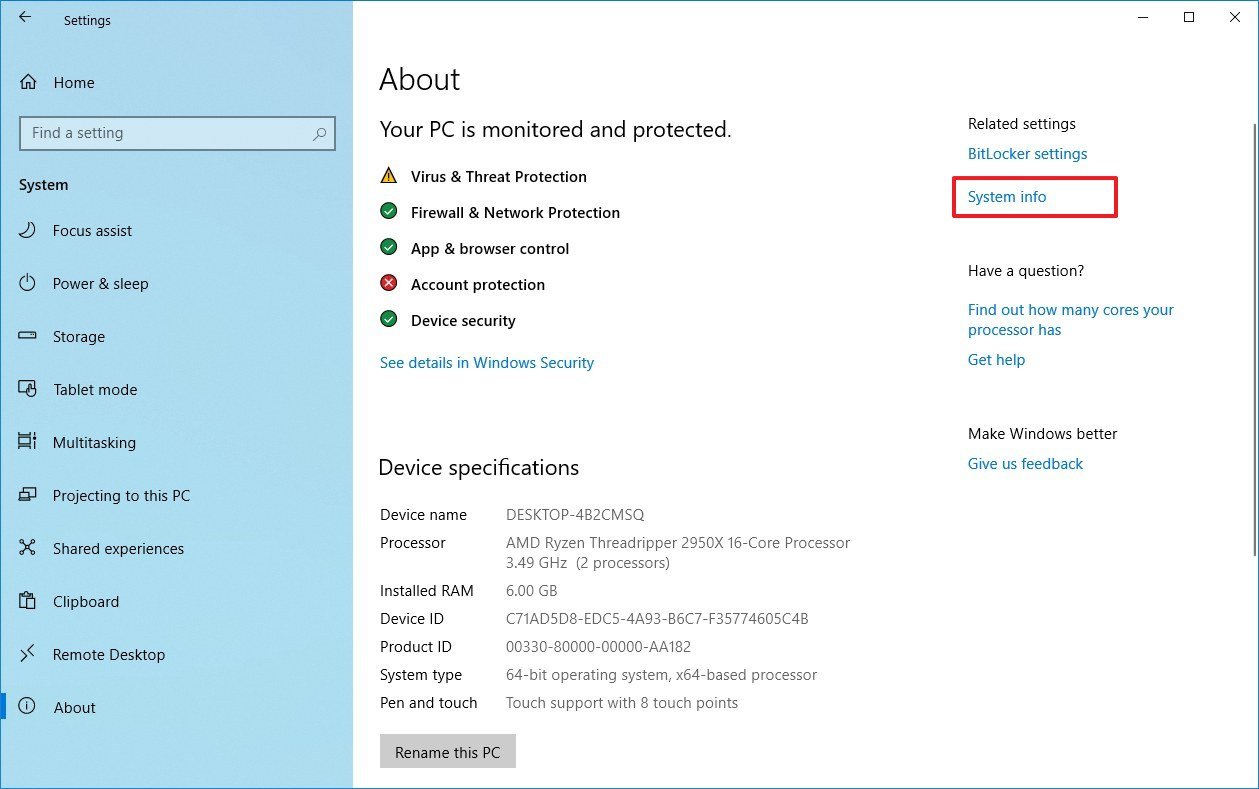
- Open Settings.
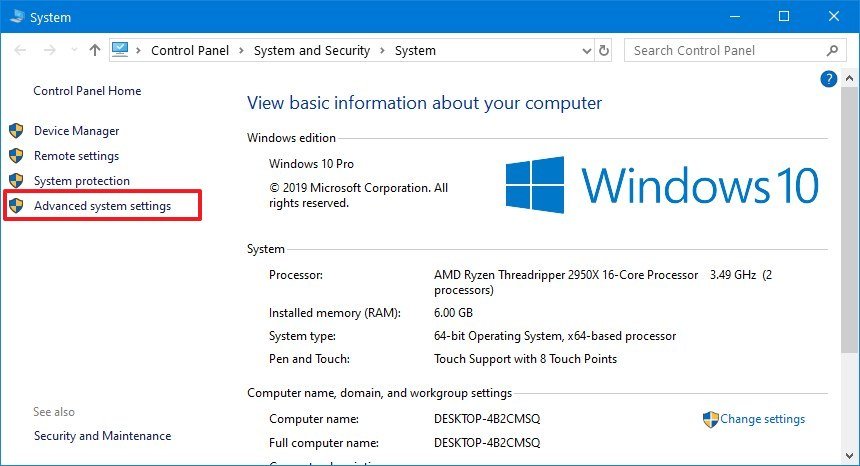
- Click on System.
- Click on About.
- Under the «Related settings» section, click the System info option.
- Click the «Advanced system settings» option from the left pane.
- Click the Advanced tab.
- Under the «Performance» section, click the Settings button.
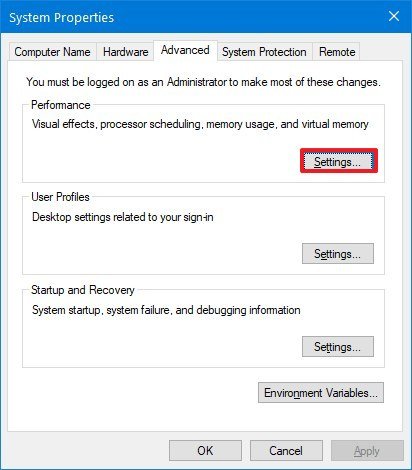
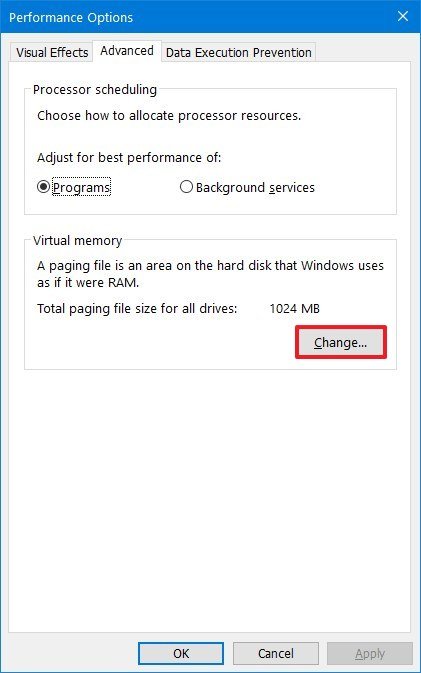
- Click the Advanced tab.
- Under the «Virtual memory» section, click the Change button.
- Clear the Automatically manage paging files size for all drives option.
- Select the Custom size option.
- Specify the initial and maximum size for the paging file in megabytes.Quick tip: The size of the virtual memory is unique to each device, and it can’t be generalized. However, usually, it’s recommended to use a number that’s one and a half times the total available memory for the «Initial size» and three times of available memory for the «Maximum size» when possible.
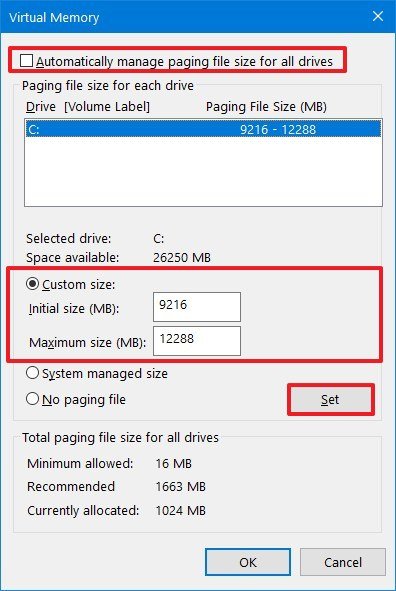
- Click the Set button.
- Click the OK button.
- Click the OK button again.
- Restart your device.
Once you complete the steps, you should notice an increase in performance when navigating Windows 10 as well as when running multiple apps at the same time.
If you need to revert the changes, you can use the same instructions, but on step No. 10, make sure to check the Automatically manage paging size for all drives option, and restart your device.
How to increase virtual memory using Command Prompt
To modify the paging file size with Command Prompt, use these steps:
- Open Start.
- Search for Command Prompt, right-click the top result, and select the Run as administrator option.
- Type the following command to understand the current status of the paging file and press Enter:
wmic pagefile list /format:list

- Type the following command to switch form manage to custom virtual memory and press Enter:
wmic computersystem where name="%computername%" set AutomaticManagedPagefile=false
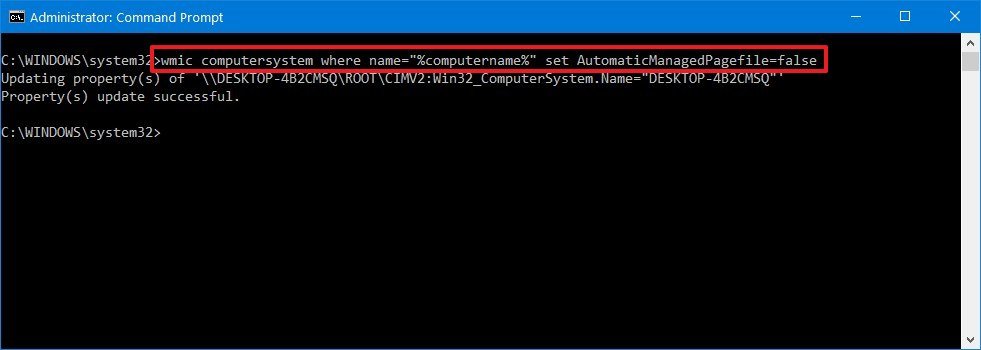
- Type the following command to set the initial and maximum size of the virtual memory and press Enter:
wmic pagefileset where name="C:\\pagefile.sys" set InitialSize=YOUR-INIT-SIZE,MaximumSize=YOUR-MAX-SIZEThis example sets the paging file to «9216» and «12288» megabytes for the initial and maxium size:wmic pagefileset where name="C:\\pagefile.sys" set InitialSize=9216,MaximumSize=12288

- Type the following command to restart your computer and press Enter:
shutdown -r -t 00
After you complete the steps, the device will start using the new values for virtual memory, which, if done correctly, should help to improve system performance.
If you no longer need to use the custom size for virtual memory, you can always revert the changes and allow Windows 10 to manage this feature using this command:
wmic computersystem where name="%computername%" set AutomaticManagedPagefile=trueand restarting your device.
While it’s recommended to use one and a half times the available memory for the initial and three times the memory for the maximum size, make sure to test the changes and adjust the values if you’re experiencing freezes, crashes, and other problems.
Although it’s possible to disable virtual memory on Windows 10, even when you have a large amount of system memory, it’s not recommended to disable this feature. Usually, if you disable paging file, some applications may stop working, some system features may not work efficiently, and you may end up with some weird behaviors.
All the latest news, reviews, and guides for Windows and Xbox diehards.
Mauro Huculak is technical writer for WindowsCentral.com. His primary focus is to write comprehensive how-tos to help users get the most out of Windows 10 and its many related technologies. He has an IT background with professional certifications from Microsoft, Cisco, and CompTIA, and he’s a recognized member of the Microsoft MVP community.
Contents:
Virtual Memory Overview
What is Virtual Memory?
How to Increase Virtual Memory on Windows 10?
Virtual Memory Overview
Windows 10 RAM (Random Access Memory) goes low while you are running too many applications at the same time, like Google Chrome, Battlegrounds, Microsoft word, YouTube videos, etc. At this moment, the virtual memory is invoked to function on your PC.
But unfortunately, the error that your system is low on virtual memory also appears on Windows 10.
In such a case, you find Windows 10 is slow or freezes as it fails to process with enough virtual memory.
It is said that virtual memory size or to say Windows paging file can be adjusted in accordance with your system basics. So here you might as well increase virtual memory on Windows 10 improve PC’s performance.
What is Virtual Memory?
Simply put it, Windows virtual memory comes to play when there is not enough physical memory (RAM) on your PC. In essence, virtual memory is a tremendous file named PageFile.Sys stored on hard drive, which is why users are prone to call it Page file or Paging file or Swap file.
In this way, to set Windows 10 virtual memory, you are actually adjusting the Page file size.
How to Increase Virtual Memory on Windows 10?
You need to know that no matter you are watching a video or open a webpage in browsers, there will be a program file places in RAM. On this occasion, Windows 10 will use a large amount of RAM, thus easily getting stuck due to slow RAM. Therefore, increasing the virtual memory is quite necessary or sometimes unavoidable.
Nevertheless, since virtual memory on Windows 10 should be managed in line with the RAM, so before you start changing page file size, you would better check the actual physical memory on Windows 10. Then increase virtual RAM on the basis of your RAM.
Step 1: Check Windows 10 RAM
To get to know how much RAM you have on Windows 10, navigate to This PC > Properties > Installed memory.
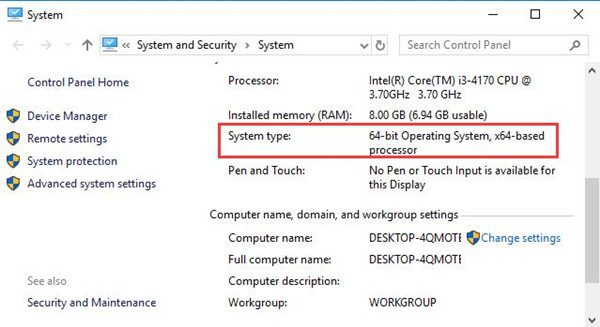
Here it is 8GB. Like what you notice, there are only 6.94 GB left for use. That lies in that some RAM is used by your video card or something else on the system.
Notes:
But here you should pay attention that if it is Windows 10 32-bit, it means the physical memory is no more than 4GB and even if the RAM shows 8GB or more on a PC of Windows 10 32-bit, only 4GB works. So you can only increase the virtual memory from 4096MB to 6144MB.
Upon getting the RAM size and Windows system type, you now are able to set virtual memory on Windows 7, 8, and 10.
Step 2: Increase Virtual Memory on Windows 10
As you know, by default, Windows 10 tend to automatically manage paging file size for all drives. That is to say, virtual memory has already been customized the time you installed the system. But if you have known how much physical memory you have on Windows 10, it is feasible to change Windows 10 virtual memory.
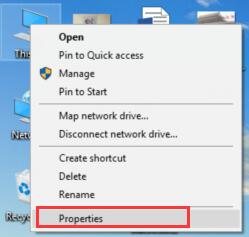
1. Right click This PC to open its Properties.
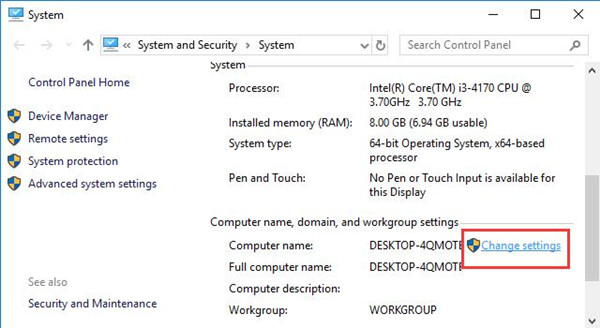
2. In System window, hit Change settings.
3. In System Properties, under the Advanced tab, locate Performance and then choose to change its Settings.
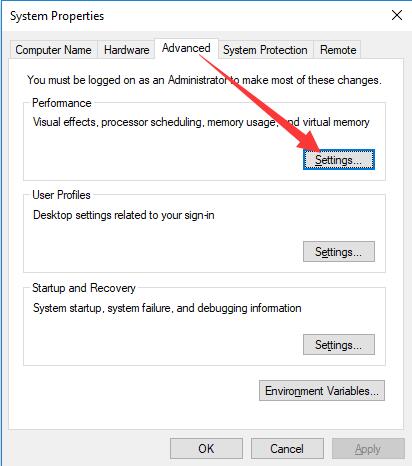
Here you are capable of adjusting the performance of Virtual effect, processor scheduling, memory usage, and virtual memory.
4. In Performance Options, under Advanced, find out Virtual memory and then Change it.
As you have noticed, it shows you that a paging file is an area on the hard disk that Windows uses as if it were RAM. And on this PC, the total paging file size for all drives is 1325 MB.
5. In Virtual Memory, uncheck the option – Automatically manage paging file size for all drives, and then Custom size will be available, begin to set both the Initial size and Maximum size.
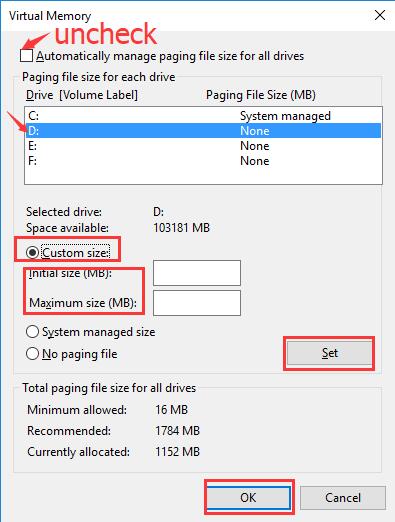
After that, according to the optimal settings, Windows 10 virtual memory should be 1.5-3 times that of the RAM.
If your physical memory is 1GB, you can set your virtual memory as 1536MB, 2048MB or 3072MB.
If your physical memory is 2GB, you can set your virtual memory as 3072MB, 4096MB or 6144MB.
If your physical memory is 4GB, you can set your virtual memory as 4096MB or 6144MB.
If your physical memory is 8GB, you can set your virtual memory as 8192MB.
Here if you are to increase Windows virtual memory, both the initial size and the maximum one should be larger than the Recommended size 1784 MB, which is what Windows 10 automatically sets for you.
6. Click Set and OK to save changes.
Now you will have increased Windows 10 virtual memory and PC screen flickers will disappear as the programs would turn to virtual memory if using too high RAM.
All in all, when you are encountering computer bad performance issue, for instance, Windows 10 monitor flashing or high memory usage by ntoskrnl.exe, there is no need to worry about it as you can increase Windows 10 virtual memory to relieve the burden.
Related Articles:
What is OpenAL and Should I Remove it?
Download Windows Photo Gallery Windows 10
There Is No Email Program Associated to Perform The Requested Action

Brian Peng
Brian Peng is a PC technician and network engineer with over 13 years of IT experience. He has worked in the IT industry for a long time, providing IT support and network service support for various companies. Currently, he has written over 1000 articles about computers, games, and mobile.